Laboratory Manual VMC 321 - Veterinary...
46
Laboratory Manual VMC 321 Systematic Veterinary Virology
Transcript of Laboratory Manual VMC 321 - Veterinary...
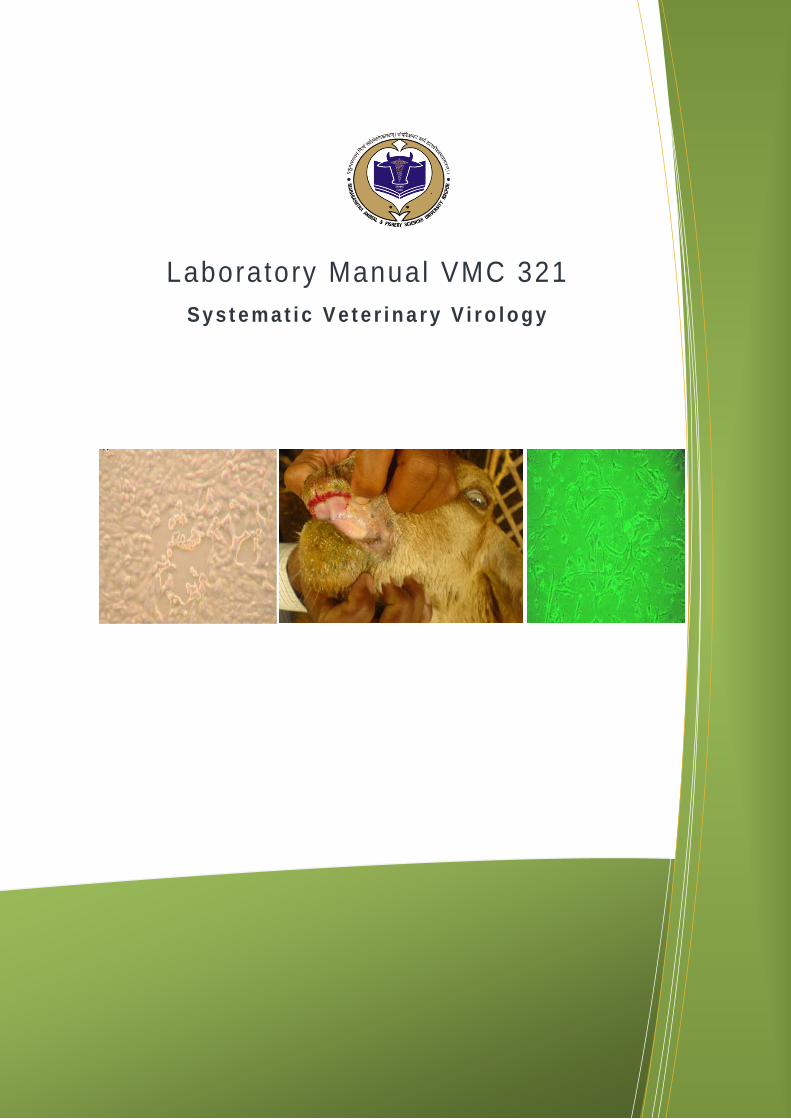
Laboratory Manual VMC 321 Sys t em at i c V e t e r i n a ry V i ro l o g y
LABORATORY MANUAL FOR
VETERINARY MICROBIOLOGY
SYSTEMATIC VETERINARY VIROLOGY
VMC-321 (New Syllabus)
Compiled by
Dr. Ashok V. Bhonsle Assistant Professor
& Dr.A.G.Karpe
Associate Professor, COVAS, Parbhani
DEPARTMENT OF MICROBIOLOGY COLLEGE OF VETERINARY AND ANIMAL SCIENCES
MAHARASHTRA ANIMAL & FISHERY SCIENCES UNIVERSITY
UDGIR – 413517

LABORATORY MANUAL FOR
VETERINARY MICROBIOLOGY
CERTIFICATE
Certified that this is a bonafide record of practical work done in the laboratory for the course of Systematic Veterinary Virology course No. VMC-321 during the year .
Name of the student: _
Registration No.: _
Exam seat No.:
Course Teacher
SEMESTER END EXAMINATION
Evaluated The Practical Record Submitted For The SEMESTER END Practical Examination Held On _.
Course Teacher Sectional Head
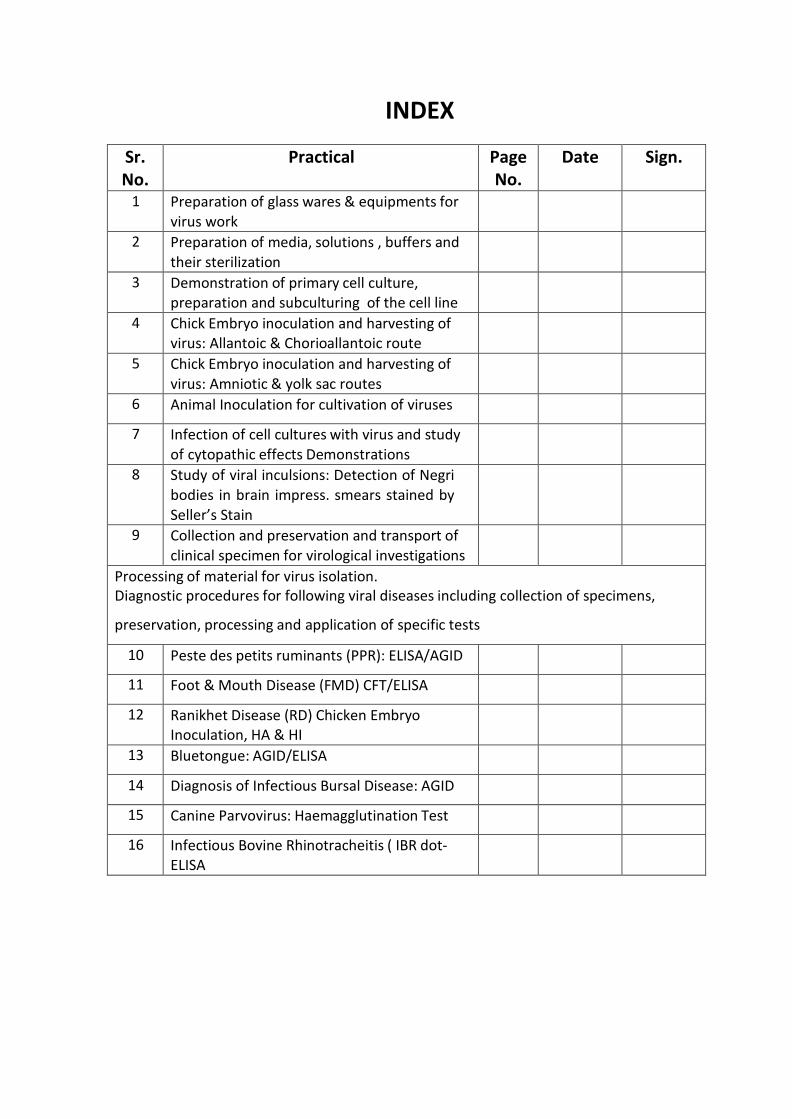
INDEX
Sr. No.
Practical Page No.
Date Sign.
1 Preparation of glass wares & equipments for virus work
2 Preparation of media, solutions , buffers and their sterilization
3 Demonstration of primary cell culture, preparation and subculturing of the cell line
4 Chick Embryo inoculation and harvesting of virus: Allantoic & Chorioallantoic route
5 Chick Embryo inoculation and harvesting of virus: Amniotic & yolk sac routes
6 Animal Inoculation for cultivation of viruses
7 Infection of cell cultures with virus and study of cytopathic effects Demonstrations
8 Study of viral inculsions: Detection of Negri bodies in brain impress. smears stained by Seller’s Stain
9 Collection and preservation and transport of clinical specimen for virological investigations
Processing of material for virus isolation. Diagnostic procedures for following viral diseases including collection of specimens,
preservation, processing and application of specific tests
10 Peste des petits ruminants (PPR): ELISA/AGID
11 Foot & Mouth Disease (FMD) CFT/ELISA
12 Ranikhet Disease (RD) Chicken Embryo Inoculation, HA & HI
13 Bluetongue: AGID/ELISA
14 Diagnosis of Infectious Bursal Disease: AGID
15 Canine Parvovirus: Haemagglutination Test
16 Infectious Bovine Rhinotracheitis ( IBR dot- ELISA
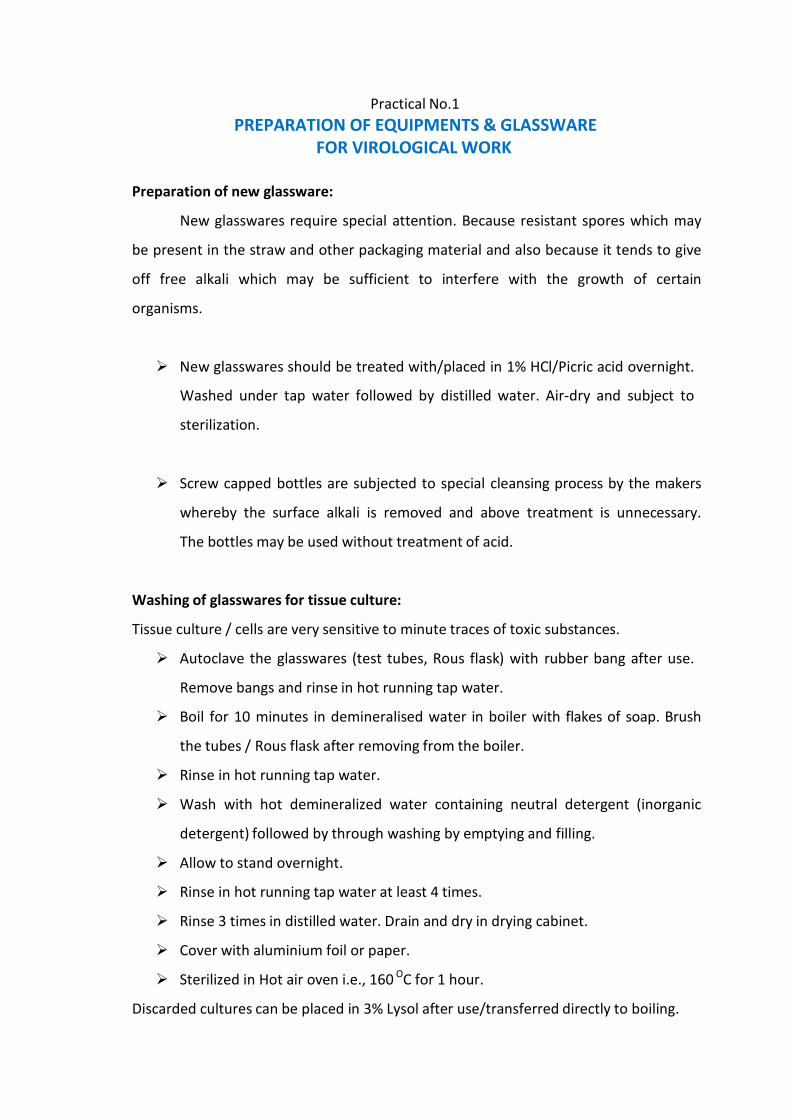
Practical No.1 PREPARATION OF EQUIPMENTS & GLASSWARE
FOR VIROLOGICAL WORK
Preparation of new glassware:
New glasswares require special attention. Because resistant spores which may
be present in the straw and other packaging material and also because it tends to give
off free alkali which may be sufficient to interfere with the growth of certain
organisms.
New glasswares should be treated with/placed in 1% HCl/Picric acid overnight.
Washed under tap water followed by distilled water. Air-dry and subject to
sterilization.
Screw capped bottles are subjected to special cleansing process by the makers
whereby the surface alkali is removed and above treatment is unnecessary.
The bottles may be used without treatment of acid.
Washing of glasswares for tissue culture:
Tissue culture / cells are very sensitive to minute traces of toxic substances.
Autoclave the glasswares (test tubes, Rous flask) with rubber bang after use.
Remove bangs and rinse in hot running tap water.
Boil for 10 minutes in demineralised water in boiler with flakes of soap. Brush
the tubes / Rous flask after removing from the boiler.
Rinse in hot running tap water.
Wash with hot demineralized water containing neutral detergent (inorganic
detergent) followed by through washing by emptying and filling.
Allow to stand overnight.
Rinse in hot running tap water at least 4 times.
Rinse 3 times in distilled water. Drain and dry in drying cabinet.
Cover with aluminium foil or paper.
Sterilized in Hot air oven i.e., 160 OC for 1 hour.
Discarded cultures can be placed in 3% Lysol after use/transferred directly to boiling.
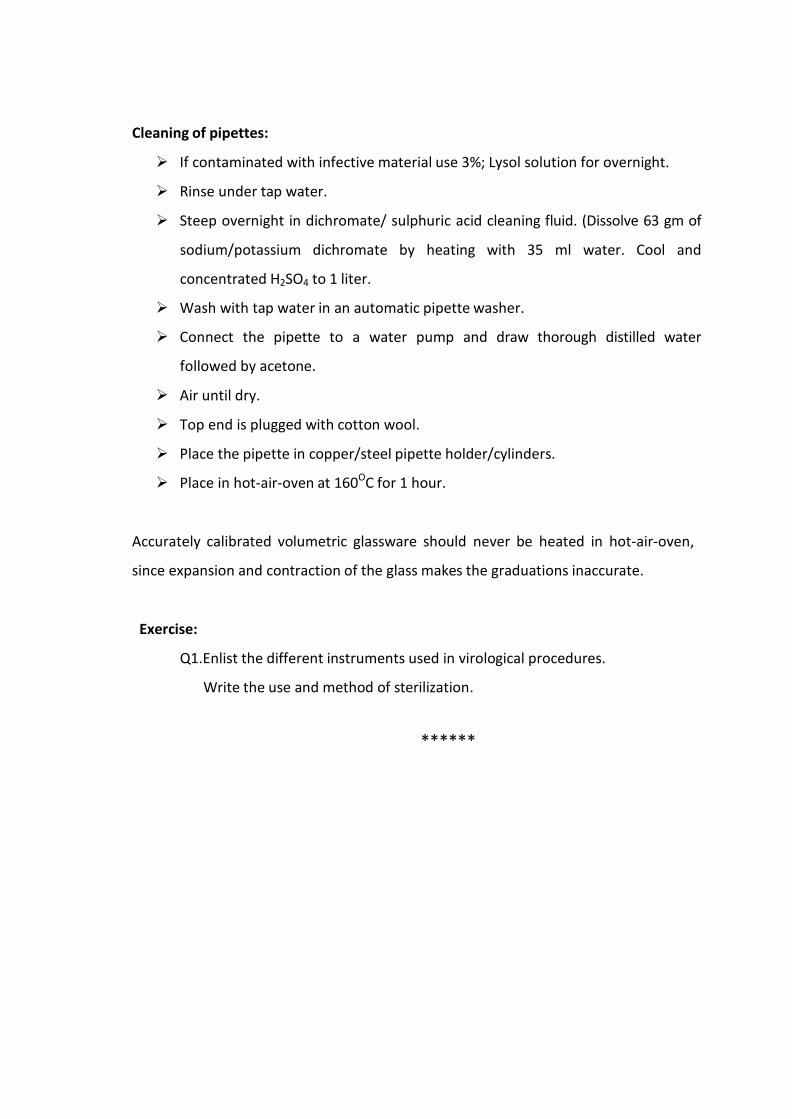
Cleaning of pipettes:
If contaminated with infective material use 3%; Lysol solution for overnight.
Rinse under tap water.
Steep overnight in dichromate/ sulphuric acid cleaning fluid. (Dissolve 63 gm of
sodium/potassium dichromate by heating with 35 ml water. Cool and
concentrated H2SO4 to 1 liter.
Wash with tap water in an automatic pipette washer.
Connect the pipette to a water pump and draw thorough distilled water
followed by acetone.
Air until dry.
Top end is plugged with cotton wool.
Place the pipette in copper/steel pipette holder/cylinders.
Place in hot-air-oven at 160OC for 1 hour.
Accurately calibrated volumetric glassware should never be heated in hot-air-oven,
since expansion and contraction of the glass makes the graduations inaccurate.
Exercise:
Q1.Enlist the different instruments used in virological procedures.
Write the use and method of sterilization.
******
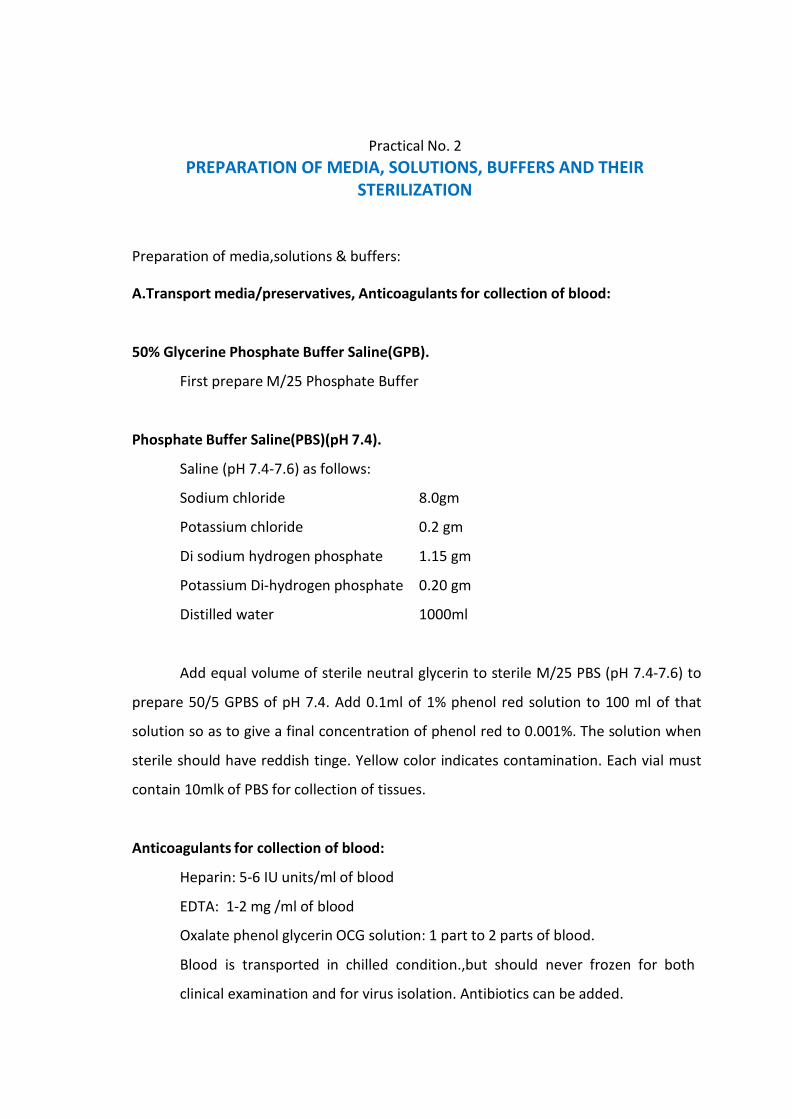
Practical No. 2 PREPARATION OF MEDIA, SOLUTIONS, BUFFERS AND THEIR
STERILIZATION
Preparation of media,solutions & buffers:
A.Transport media/preservatives, Anticoagulants for collection of blood:
50% Glycerine Phosphate Buffer Saline(GPB).
First prepare M/25 Phosphate Buffer
Phosphate Buffer Saline(PBS)(pH 7.4).
Saline (pH 7.4-7.6) as follows:
Sodium chloride 8.0gm
Potassium chloride 0.2 gm
Di sodium hydrogen phosphate 1.15 gm
Potassium Di-hydrogen phosphate 0.20 gm
Distilled water 1000ml
Add equal volume of sterile neutral glycerin to sterile M/25 PBS (pH 7.4-7.6) to
prepare 50/5 GPBS of pH 7.4. Add 0.1ml of 1% phenol red solution to 100 ml of that
solution so as to give a final concentration of phenol red to 0.001%. The solution when
sterile should have reddish tinge. Yellow color indicates contamination. Each vial must
contain 10mlk of PBS for collection of tissues.
Anticoagulants for collection of blood:
Heparin: 5-6 IU units/ml of blood
EDTA: 1-2 mg /ml of blood
Oxalate phenol glycerin OCG solution: 1 part to 2 parts of blood.
Blood is transported in chilled condition.,but should never frozen for both
clinical examination and for virus isolation. Antibiotics can be added.

Sterilization of of tissue culture media / thermolabile liquids :
The various types of filters used for clarifying or to remove the bacteria, fungi from
the thermolabile liquids,media,solutions & buffers are as follows:
1. Earthenware Candles e.g., Berkfeld, Chamberland filters.
2. Asbestos Paper Disks e.g., Seitz Filter.
3. Sintered Glass Filters.
4. Membrane Filters.
1.Earthenware Candles
Berkfeld Filters:
Made from kieselguhr, a fossil diatomaceous earth found in deposits in
Germany.
Filters are of coarse type owing to the size of the granules forming the
substance the substance of filter.
Made in three grades of porosity:
V: Veil (the coarsest) do not allow the Serratia
marscens, the test bacteria to pass through).
W: Wenig (the finest).
N: Normal (the intermediate)
Filters can be sterilized by steaming/autoclaving. Filters should be brushed with
a stiff nailbrush and than boiled in distilled water. When clogged with organic
matter heated to redness in a muffle furnace and allowed to cool slowly.
Chamberland Filters:
Made up of unglazed porcelain and are produced in various grades of porosity,
the finest grade allows only small viruses such as FMD virus, Circovirus.
Most porous grades L1a, L2, and L3 are comparable with V, N, and W candles
respectively.
2. Asbestos Paper Disk Filters.
Seitz Filters:
Disk of Asbestos is inserted into a metal holder (14 cm in diameter-Large size).
Various sizes are available.
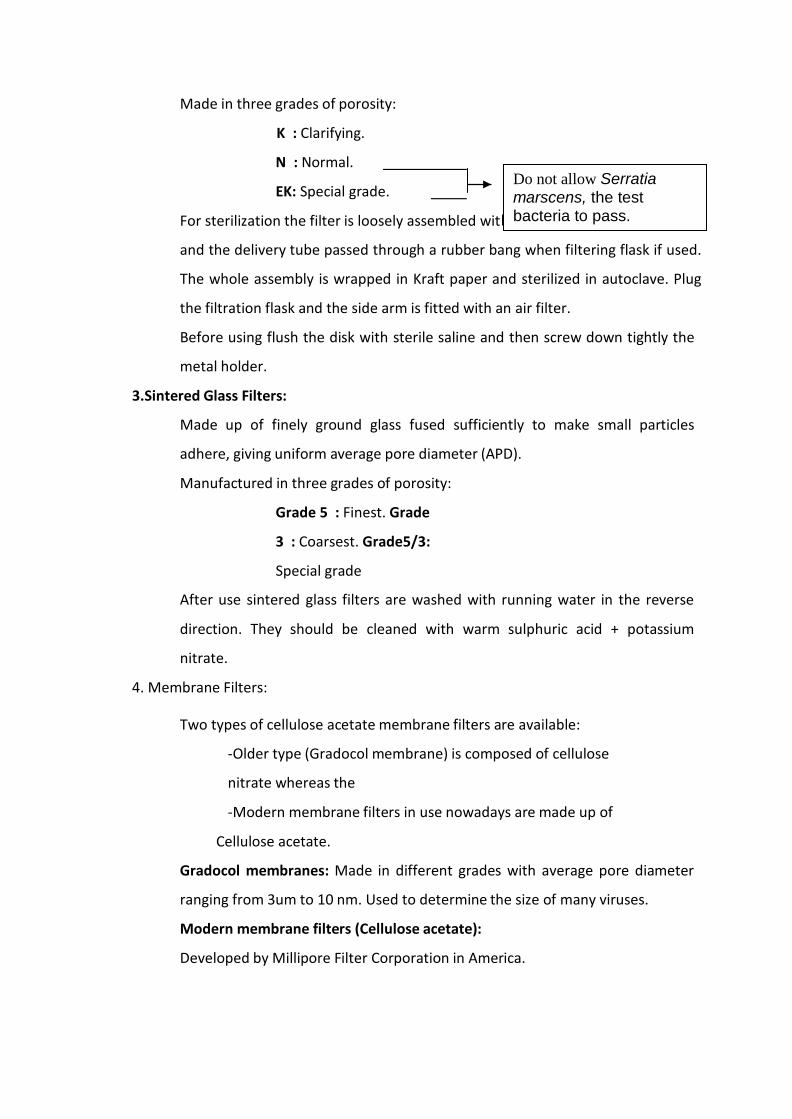
h the asbestos disk in position
Made in three grades of porosity:
K : Clarifying.
N : Normal.
EK: Special grade.
For sterilization the filter is loosely assembled wit
Do not allow Serratia marscens, the test bacteria to pass.
and the delivery tube passed through a rubber bang when filtering flask if used.
The whole assembly is wrapped in Kraft paper and sterilized in autoclave. Plug
the filtration flask and the side arm is fitted with an air filter.
Before using flush the disk with sterile saline and then screw down tightly the
metal holder.
3.Sintered Glass Filters:
Made up of finely ground glass fused sufficiently to make small particles
adhere, giving uniform average pore diameter (APD).
Manufactured in three grades of porosity:
Grade 5 : Finest. Grade
3 : Coarsest. Grade5/3:
Special grade
After use sintered glass filters are washed with running water in the reverse
direction. They should be cleaned with warm sulphuric acid + potassium
nitrate.
4. Membrane Filters:
Two types of cellulose acetate membrane filters are available:
-Older type (Gradocol membrane) is composed of cellulose
nitrate whereas the
-Modern membrane filters in use nowadays are made up of
Cellulose acetate.
Gradocol membranes: Made in different grades with average pore diameter
ranging from 3um to 10 nm. Used to determine the size of many viruses.
Modern membrane filters (Cellulose acetate):
Developed by Millipore Filter Corporation in America.

Made in variety of sizes from 1.7cm to 14 cm and can be fitted into metal or
glass holder/syringe filter holder.
Cellulose acetate filters are composed of two layers, a basal layer with pores of
3-5um and an upper layer with pores of 0.5-1.0 um in diameter.
Sterilized by autoclaving at 121OC for 35-40 mins.
Cellulose acetate membranes are less absorptive when compared with Seitz
filter and the rate of filtration is high. Also do not alter the pH of media passed
through.
Exercise:
Q1. Write the composition of MEM & HBSS in detail.
Q2. Draw well labeled diagram showing the process of filtration using
negative pressure.
Q3. How to prepare the growth medium for animal cell culture.
******
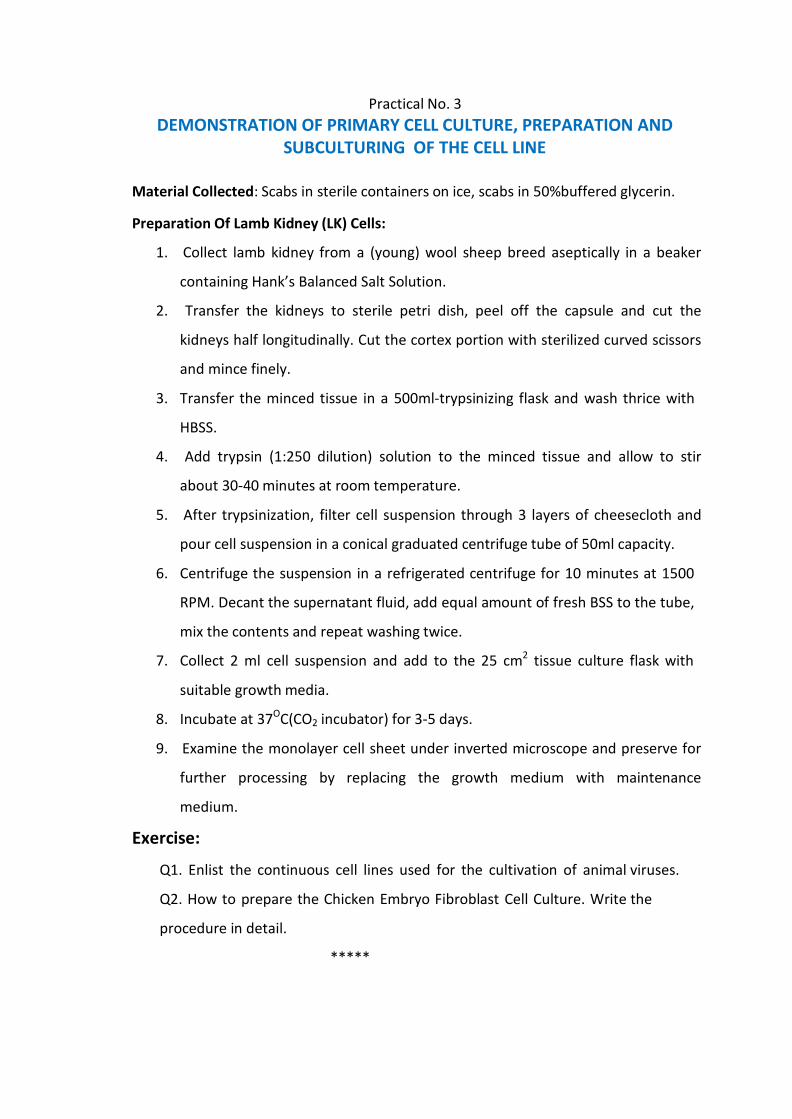
Practical No. 3 DEMONSTRATION OF PRIMARY CELL CULTURE, PREPARATION AND
SUBCULTURING OF THE CELL LINE
Material Collected: Scabs in sterile containers on ice, scabs in 50%buffered glycerin.
Preparation Of Lamb Kidney (LK) Cells:
1. Collect lamb kidney from a (young) wool sheep breed aseptically in a beaker
containing Hank’s Balanced Salt Solution.
2. Transfer the kidneys to sterile petri dish, peel off the capsule and cut the
kidneys half longitudinally. Cut the cortex portion with sterilized curved scissors
and mince finely.
3. Transfer the minced tissue in a 500ml-trypsinizing flask and wash thrice with
HBSS.
4. Add trypsin (1:250 dilution) solution to the minced tissue and allow to stir
about 30-40 minutes at room temperature.
5. After trypsinization, filter cell suspension through 3 layers of cheesecloth and
pour cell suspension in a conical graduated centrifuge tube of 50ml capacity.
6. Centrifuge the suspension in a refrigerated centrifuge for 10 minutes at 1500
RPM. Decant the supernatant fluid, add equal amount of fresh BSS to the tube,
mix the contents and repeat washing twice.
7. Collect 2 ml cell suspension and add to the 25 cm2 tissue culture flask with
suitable growth media.
8. Incubate at 37OC(CO2 incubator) for 3-5 days.
9. Examine the monolayer cell sheet under inverted microscope and preserve for
further processing by replacing the growth medium with maintenance
medium.
Exercise:
Q1. Enlist the continuous cell lines used for the cultivation of animal viruses.
Q2. How to prepare the Chicken Embryo Fibroblast Cell Culture. Write the
procedure in detail.
*****
Practical No. 4 CHICK EMBRYO INOCULATION AND HARVESTING OF VIRUS:
ALLANTOIC & CHORIO- ALLANTOIC ROUTE
CULTIVATION OF RD VIRUS BY ALLANTOIC ROUTE OF INOCULATION
Material required: Spleen, lung, kidney tissue from RD suspected bird, 10-11 day old
embryonated chicken eggs 5 nos. , drill machine, egg candler, egg incubator, syringes,
needles, forceps, scissors, petridish, tincture of iodine, melted paraffin, phosphate
buffer saline, penicillin & streptomycin.
Procedure:
1. Candle the egg and mark an area of CAM away from the from the embryo and
amniotic cavity .The area should be free from large blood vessels and about 3
mm below the base of the air-cell. Make a pencil mark in the area at the point
of inoculation.
2. Make another mark on the upper end of the air sac of the eggs.
3. Drill a small hole through the shell at each mark but do not pierce the shell
membrane.
4. Apply tincture of iodine to the holes and allow drying.
5. .With sterile precautions, make a small puncture in the shell membrane in the
hole over the air sac. The hole over the air-cell is necessary for air vent to allow
the equalization of pressure produced by the inoculum within the egg and to
prevent the inoculum and embryo fluid from escaping through the hole on the
side of the egg.
6. Inoculate 0.2 ml inoculum through the hole in the side of the egg to a depth of
about ¼ inch. Use 1ml tuberculin syringe with 27-gauge ½ inch needle.
7. Seal the two holes with melted paraffin or suitable liquid adhesive.
8. Incubate the eggs for 4-5 days.
9. For collection of allantoic fluid(harvesting), apply disinfectant to the shell over
air sac. Break the shell over air sac with forceps and remove the shell to a
distance of about 8-10 mm from the top of the air sac.
10. With the help of a 10 ml syringe and 22-gauge 1-inch needle, collect about 5ml
of allantoic fluid from the cavity through the air sac opening and expel the
fluid in the container.
CULTIVATION OF FOWL POX VIRUS BY CHORIO ALLANTOIC MEMBRANE ROUTE
OF INOCULATION
Fowl poxvirus can be isolated by the inoculation of suspected material into
embryonated chicken eggs. Approximately 0.1 ml of tissue suspension of skin or
diphtheritic lesions, with the appropriate concentration of antibiotics, is inoculated on
to the chorioallantoic membranes (CAMs) of 9–12 days old developing chicken
embryos. These are incubated at 37°C for 5–7 days, and then examined for focal white
pock lesions or generalized thickening of the CAMs.
Material required: drill machine, egg candler, egg incubator, syringes, needles,
forceps, scissors, petridish, tincture of iodine, melted paraffin, phosphate buffer saline,
penicillin & streptomycin.
Procedure:
1. Candle the eggs and mark the position of the embryo.
2. Keep the long axis of the egg in horizontal position with embryo uppermost;
mark an equilateral triangle with each side about 1 cm, equidistant between
the ends of the egg.
3. With the help of small carborundum disc, cut the eggshell at the marks but do
not pierce the shell membrane.
4. With needle, pierce the shell membrane over the air sac.
5. Apply tincture iodine to the grooves cut by the carborundum disc and allow
drying.
******
6. Gently remove the triangle of shell to expose shell membrane without
rupturing the chorioallantoic membrane (CAM).
7. Using a teasing needle, pierce the exposed shell membrane on the side of the
egg but do not pierce the CAM.
8. Place 0.1 ml of inoculum (0.1 ml of tissue suspension of skin or diphtheritic
lesions) over the pierced point on the side of the egg and create a slight
vacuum with a small rubber at the hole over the air sac by sucking the air
through the air bulb. Inoculum over the shell membrane will pass through the
opening in the shell membrane on the side of the side of the egg allowing the
CAM to drop from the shell membrane underneath the triangular area and the
inoculum will be taken in due to negative pressure created at the opening i.e.,
triangular area on the side of the egg.
9. Close the triangular opening in the shell on the side as well as over the air sac
with the help of cut shell flap removed and melted paraffin wax or suitable
adhesive tape.
10. Incubate the egg for 5-7 days at 37O C maintaing the humidity.
11. Candle the eggs daily & discard the mortality of embryo within 24 hours of
inoculation.
12. After 5-7 days remove all the eggs from the incubator, kill the embryos by
chilling and collect CAM. Wash the CAM in a petridish with normal saline and
examine.
Exercise: Q1.Explain the selection of eggs for isolation of virus.
Q2.Explain-SPF eggs. Write the source for SPF eggs in India.
Q3.Write the findings on Chorioallantoic membrane (CAM) with
poxvirus isolation.
Practical No. 5 CHICK EMBRYO INOCULATION AND HARVESTING OF VIRUS: YOLK
SAC ROUTES
CULTIVATION OF AVIAN ENCEPHALITIS VIRUS IN EMBRYONATED CHICKEN EGGS BY
YOLK SAC ROUTE
Material required:
Brain tissue from the birds infected with AE virus- processed inoculum
(10% emulsion in PBS-Practical No.3), incubated 7-8 day old embryonated chicken
eggs, egg candler, egg incubator, syringes, needles, forceps, scissors, petridish, tincture
of iodine, melted paraffin, phosphate buffer saline, penicillin, streptomycin &
centrifuge machine.
Procedure:
1. Candle the egg with long axis in the horizontal plane and locate the yolk sac.
Make a mark on the shell over the yolk sac about half way from the small end
of the egg to the apex of the curvature of the shell.
2. Drill a small hole through the shell at the mark avoiding piercing of the shell
membrane.
3. Using a 1 ml tuberculin syringe fitted with a 27 gauge needle, 1.25 needle
insert the full length needle ion the long axis through the hole and inject the
inoculum (0.2 ml of 10% emulsion of brain in PBS from suspected bird).
4. Seal the hole with melted paraffin/ suitable adhesive tape.
5. Incubate the egg for 5-7 days at 37O C maintaing the humidity.
6. Candle the eggs daily & discard the mortality of embryo within 24 hours of
inoculation.
7. Remove the dead embryos, if any and all the remaining embryos after 3 days of
incubation, chill them and collect yolk, yolk sac and brain of the embryos.
8. Preserve the material in sterilized screw capped tubes in the deep freeze till
further use.
Exercise:
Q1. Enlist the inoculation routes for isolation of various virus.
*****
******
Practical No. 6 ANIMAL INOCULATION FOR CULTIVATION OF VIRUSES
GUINEA PIG FOOT PAD INOCULATION METHOD FOR ISOLATION OF FMD VIRUS
Material Required /Clinical specimen:
1 ml of lymph from an unruptured or recently ruptured cattle tongue vesicle /
epithelium samples.Oesophageal-pharyngeal fluid collected by means of a probang
cup.
Two month old Guinea pig 2 Nos., 25 gauge needle, syringe etc.
Preparation of inoculum:
Take out the frozen specimen from deep freeze and thaw at room
temperature.Transfer the specimen (ruptured mucosal /tongue epithelium/tissue
collected) to the mortar.Cut into small pieces .Add small quantity of sterile sand & PBS
( to make it 10-20% specimen ) and grind into a fine paste.Centrifuge and collect
supernatent.Add the antibiotics to avoid contamination i.e.,Penicillin @ 10,000 units
and streptomycin @ 10 mg per ml and incubate for 30 minutes.
Inoculation Procedure :
1. Prepare one hind foot pad of each guinea pig.Clean the foot pad with 70%
alcohol and dry.
2. Mark one longitudinal line on the sterilized foot pad of each guinea pig.
3. Intradermally inoculate 0.2 ml of above prepared inoculum with 25 gauge
needle at five equyidistant spots on the marked line on foot pads.
4. The Guinea pigs are maintained on good bedding and observed daily for the
the lesions on the foot pad and clinical signs.
5. Lesions in positive cases will be evident on 4th or 5th day of inoculation.
The skin from fully developed lesions is removed and stored in deep freezer till
further processing.
Exercise:
Q1. Describe the clinical signs and lesions of FMD in cattle.
Practical No. 7 INFECTION OF CELL CULTURES WITH VIRUS AND STUDY OF
CYTOPATHIC EFFECTS DEMONSTRATIONS
Preparation of inoculum:
Take out the frozen specimen from deep freeze and thaw at room
temperature.Transfer the specimen (tissue collected) to the mortar.Cut into small
pieces .Add small quantity of sterile sand & PBS ( to make it 10-20% specimen ) and
grind into a fine paste.Centrifuge and collect supernatent.Add the antibiotics to avoid
contamination i.e.,Penicillin @ 10,000 units and streptomycin @ 10 mg per ml and
incubate for 30 minutes.Use for inoculation.
Preparation of blood for isolation of virus:
Blood collected using suitable anticoagulant is stored at 4OC till further
processing.(some viruses loose the infectivity when stored at 4 OC). At the time of
inoculation take out the blood from refrigerator bring it to the room temperature,
either centrifuge it to collect the buffy coat used in many virus isolation procedures or
subject it to Ultra–sonicator, centrifuge , collect the supernatant . Add the antibiotics
to avoid contamination i.e.,Penicillin @ 10,000 units and streptomycin @ 10 mg per ml
and incubate for 30 minutes.Use for inoculation.
Pass on the inoculum through Sintered glass filter,cellulose acetate membrane filters
with average pore diameter of 1.2u,0.8u and 0.2 u to remove the debris,bacterial cell
etc, to prevent the contamination i.e., bacterial and fungal.
Inoculation:
1. One ml of clarified biopsy preparation supernatant is inoculated on to a 25 cm2
tissue culture flask of 90% confluent LT or LK cells.
2. Allow to absorb for 1 hour at 37°C.
3. The culture is then washed with warm PBS and covered with 10 ml of a suitable
medium, such as GMEM, containing antibiotics and 2% fetal calf serum.
4. The flasks should be examined daily for 14 days for evidence of cytopathic
effect (CPE), and the medium is replaced if it appears to be cloudy. Infected
cells develop a characteristic CPE consisting of retraction of the cell membrane
from surrounding cells, and eventually rounding of cells and margination of
the nuclear chromatin, characterized by grape-like clusters of rounded cells
gathered around a hole in the monolayer; sometimes giant cells with several
nuclei may be observed. Experience is needed to recognize this characteristic
appearance.
5. If no CPE is apparent by day 14,blind passage must be made. The culture
should be freeze/thawed three times, and clarified supernatant inoculated on
to fresh LT or LK culture.
6. The cell cultures are observed daily for CPE, which usually appears within
3 days after inoculation.
7. After third passage, if there is no CPE, declare the sample negative for
presumptive isolation of virus using cell culture.
Exercise: Q1. Enlist the Cytopathic Effect (CPE) for various animal viruses.
******
Practical No. 8 STUDY OF VIRAL INCULSIONS: DETECTION OF NEGRI BODIES IN
BRAIN IMPRESSION SMEARS STAINED BY SELLER’S STAIN
For demonstration of Negri bodies accurately in paraffin sections as well as in
impression smears Seller’s stain is the simplest and preferred method. Best results are
obtained when brain tissue is fresh as decomposition makes demonstration of Negri
bodies difficult.
Seller’s stain:
Stock solutions:
a. Methylene blue 1.0 G
Methanol 100 ml
b. Basic Fuchsin 1.0 G
Methanol 100 ml
Working solutions:
Methylene blue 6.0 ml
Basic Fuchsin 20.0 ml
Methanol 50 ml
Staining Method:
1. For Impression smears:
i. Prepare the impression smear.
ii. Immerse the moist smear in the working solution for about 5 seconds.
iii. Rinse in tap water. & Dry at room temperature without using blotting
paper.
iv. Mount the slide and read.
2. For Paraffin sections:
i. Free the paraffin by serially dipping in 100% to 50% alcohol.
ii. Rinse in distilled water.
iii. Immerse the slide in the working solution for 2 to 10 minutes.
iii. Wash in running tap water & Mount the slide and read.
Exercise:
Q1. Perform the test and write the findings.
******
Practical No. 9 COLLECTION , PRESERVATION AND TRANSPORT OF
CLINICALSPECIMEN FOR VIROLOGICAL INVESTIGATIONS
1.PPR: Eye (ocular swab), mouth and rectal swabs in PBS on ice, about 10ml or more
blood at the height of body temperature in anticoagulant, Prescapular lymph nodes,
spleen, tonsil etc. in HBSS and on ice. Tissue materials from 5 to 6 or more animals be
collected and dispatched for better picture of disease / outbreak. Cotton buds can be
used as swabs.
2.Foot And Mouth Disease: Vesicular fluid from unruptured oral vesicles and curetted
epithelium from fresh lesions oeso-pharyngeal fluid in 50% PBS preferably on ice.
About 10 ml blood at the height of body temperature in EDTA/heparin.
3.Bovine Spongiform Encepahalopathy: Tissues from brain stem involving medulla
oblongata at the level of obex, posterior cerebellar peduncle, rostral quadrigemina
body and spinal cord in 10% formal saline for histopathological examination and for
prion detection very thin pieces of above sites of brain in frozen state.
4.Bovine Virus Diarrhea / Mucosal Disease: Blood in EDTA, paired serum samples,
semen, intestinal swabs, lymph nodes and spleen on ice.
5.Bovine Malignant catarrhal Fever (BMCF) : Blood in EDTA, Paired serum samples, all
internal organs including cornea, skin, muzzle on ice.
6.Rabies: Half portion of brain, salivary gland in 50% phosphate buffered glycerin in
leak proof hard box and the rest half portion in 10% neutral formol saline solution.
Alternative and preferable small pieces from hippocampus and brain (cerebellum,
medulla, cerebrum spinal cord) in 50% buffered glycerin and on ice separately duly
sealed and packed in thick polybags and hard box labeled “SUSPECTED FOR RABIES”. If
available, fresh smears from brain may be stained with Seller’s stain.
7.Pox Disease: Scabs in sterile containers on ice, scabs in 50%buffered glycerin. 8.Bovine Herpes Virus1,2, 3,/IBR/IPV/Bovine Mammilitis / Parainfluenza
3/Adenovirus :
Paired serum sample on ice, swabs from vagina and nasal lesions and pieces of
trachea, liver, turbinate bone, lung on ice. From bulls semen and preputial washing in
transport medium and paired serum on ice.
9.Enzootic bovine leucosis: Blood in EDTA, tumor tissues, lymph nodes, abomasum,
right auricle of heart, spleen, intestine, liver, kidney, lung and uterus.
10.African Swine Fever: Blood in heparin or EDTA, spleen, tonsil, kidney lymph nodes,
and bones on ice for virus isolation, paired serum samples.
11.Classical swine fever: Heparinized 20 ml blood at the height of temperature in
sterile vials or test tube on ice from live animal. Heart blood, pieces of spleen, lymph
nodes, pancreas (10 to 15 g each) in 250% GPB.. Tissue materials from 5 to 6 or more
animals may be collected in order to give confirmatory diagnosis/true picture of
disease. Materials for isolation and serological tests may be collected in sterile vials on
ice without adding glycerin.
12.Transmissible gastroenteritis (TGE): Faeces, small intestine, lung, udder on ice for
virus isolation and serological tests
13.Porcine reproductive and respiratory (PRRS):
Lung, liver, lymph nodes, tonsils, spleen, heart, brain, ascitic fluid and paired sera on
ice
14.Aujeszky’s disease (Pseudorabies): One half of brain, skin and subcutaneous tissue
in sterile container on wet ice or in buffer glycerin for virus isolation. Paired serum
sample.
15.Bluetongue disease: Blood at the height of body temperature in heparin (6-10
units/ml), paired sera in sterile containers on ice. Spleen, Lymph nodes on ice for virus
isolation.
16.Rift valley fever: Blood, liver, spleen, brain, aborted fetus on ice for virus isolation.
17.Caprine arthritis encephalitis/ Maedi/Visna disease: Paired serum, joint capsule,
lung, brain etc. on ice.
18.Canine Distemper: Pieces of lung, brain etc. on ice. Impression smears from liver,
pieces of liver and spleen on ice.
19.Infectious canine hepatitis: Impression smears from liver fixed in methanol. Spleen
and liver in sterile containers on ice.
20.Canine parvovirus infection: Rectal swabs and faeces in PBS, pieces of intestine,
heart on ice.
21.Equine influenza: Nasal swabs in PBS or Hank’s solution on ice paired serum.
22.Equine Infectious anemia: Paired serum sample,spleen on ice/blood on ice.
23.African horse sickness: 20 ml unclotted whole blood in EDTA, paired serum
samples, spleen, brain, lung in 50% buffered glycerin.
24.Equine rhinopneumonitis: Nasal swabs, liver, lung, spleen, thymus from aborted
fetus, paired serum samples, blood from acute clinical cases.
25.Ranikhet disease: Freshly dead / moribund bird on ice, portion of liver, spleen,
trachea, bronchi, lung in 50% buffered glycerin saline on ice.
26.Marek’s disease: Live birds in acute stage of disease, feather follicles from chest
and neck region in transport medium, paired serum samples .
27.Avian influenza: Intestinal contents, faeces, cloacal swabs, oro-nasal swabs,
samples from trachea, lungs, liver, air sacs, intestine, spleen, kidney, brain, heart,
separately as a pool , paired serum samples.
28.Infectious bursal disease (Gumboro disease): Live affected chick/bird, bursa of
Fabricious in transport medium, paired serum sample .
29.Infectious bronchitis: Swab from exudates, lung, paired serum sample.
30.Infectious stunted chick syndrome: Liver, duodenal portion of intestine with
pancrease, spleen on ice.
31.Leechi heart disease (Hydro pericardium syndrome):
Liver, spleen, thymus, bursa, kidney, heart on ice.
Exercise: Q1. Explain the importance of ‘cold chain’.
Q2.Write the preservatives used for collection of material for the
isolation of virus.
******
Practical No. 10 DIAGNOSIS OF Peste des petits ruminants (PPR): ELISA
Collection of samples Samples for virus isolation must be kept chilled in transit to the laboratory. In live animals, swabs are made of the conjunctival discharges and from the nasal and buccal mucosae. During the very early stage of the disease, whole blood is also collected in anticoagulant for virus isolation, polymerase chain reaction (PCR) and haematology (either ethylene diamine tetra-acetic acid or heparin can be used as anticoagulant, though the former is preferred for samples that will be tested using PCR). At necropsy, samples from two to three animals should be collected aseptically from lymph nodes, especially the mesenteric and bronchial nodes, lungs, spleen and intestinal mucosae, chilled on ice and transported under efrigeration. Samples of organs collected for histopathology are placed in 10% neutral buffered formalin. It is good practice to collect blood for serological diagnosis at all stages, but particularly later in the outbreak.
Immunocapture enzyme-linked immunosorbent assay Advice on the use and applicability of the immunocapture enzyme-linked immunosorbent assay (icELISA) method is available from the OIE Reference Laboratories for PPR. The method described is available as a commercial kit.
The icELISA (Libeau et al., 1994) using two monoclonal antibodies (MAb) raised to the N protein allows a rapid identification of PPRV. The instructions provided by kit supplier should be followed, but the following shows a typical procedure for the test.
i) Microtitre ELISA plates are coated with 100 µl of a capture MAb solution (diluted according to the instructions of the kit supplier). Coating may be overnight at 4°C or for 1 hour at 37°C. ii) After washing, 50 µl of the sample suspension is added to each of two wells, and two block (control) wells are filled with buffer. iii) Immediately add 25 µl of a detection biotinylated MAb for PPR and 25 µl of streptavidin/peroxidase to two wells. iv) The plates are incubated at 37°C for 1 hour with constant agitation. v) After three vigorous washes, 100 µl of ortho-phenylenediamine (OPD) in 0.03% (v/v) hydrogen peroxide is added, and the plates are incubated for 10 minutes at room temperature. vi) The reaction is stopped by the addition of 100 µl of 1 N sulphuric acid, and the absorbance is measured at 492 nm on a spectrophotometer/ELISA reader.
The cut-off above which samples are considered to be positive is calculated from the blank control as three times the mean absorbance values of the control wells.
The test is very specific and sensitive (it can detect 100.6 TCID50/well of PPRV). The results are obtained in 2 hours.

A sandwich form of the immunocapture ELISA is widely used in India (Singh et al., 2004): the sample is first allowed to react with the detection MAb and the immunocomplex is then captured by the MAb or polyclonal antibody adsorbed on to the ELISA plate.
The assay shows high correlation to the cell infectivity assay (TCID50) with a minimum detection limit of 103 TCID50/ml.
(www.oie.int.org Prescribed protocol)
*****
Practical No. 11 DIAGNOSIS OF FOOT AND MOUTH DISEASE :
COMPLEMENT FIXATION TEST Foot and mouth disease is endemic in India and a large number of outbreaks
occur every year. The presence of FMD virus in the field samples is routinely confirmed
by typing of suspected material/isolated virus. Any control strategy to curtain the
disease requires knowledge of prevalence of various serotypes in a particular
geographic area. For this various serological tests have been used. Viz. CFT, SNT, ELISA,
PCR, etc.
for typing of virus.
The complement fixation test is considered to be cumbersome and time
consuming even then it is used for the detection of foot and mouth disease virus
antigen in vesicular fluid for diagnosis and typing of the virus. (Nowadays replaced by
Double Antibody Sandwich ELISA)
Principle: Complement system gets activated following antigen antibody
reaction .The FMD virus when treated with type specific antisera in the presence of
complement, bring about the lysis of immune complex. The lysis will not be visible to
the naked eyes. Therefore in order to make this reaction visible an indicator system
consisting of sheep RBC and hemolysin is employed in the complement fixation test.
The complement fixation test employs two systems of antigen – antibody
reaction.:
1. Test system: Type specific Antisera and Virus antigen (vesicular fluid).
2. Indicator system: Hemolysin (antibody against sheep RBC) and
Sheep RBC.
The complement is the system of factors that can fix in any one of the above
antigen-antibody systems and subsequently results into either lysis of RBC
(hemolysis) or no lysis of RBC (no hemolysis).
If the clinical material contains the virus homologus to type specific antisera,
there will be antigen-antibody reaction, leads to activation and complement
fixation in the test system.
If the clinical material does not contain the virus homologus to type specific
antisera, there will be no antigen-antibody reaction in the test system & there
will be no activation and complement fixation in the test system. The
complement would remain free and subsequently react in the indicator system
resulting into lysis of RBC.The negative complement fixation test thus will be
observed as hemolysis.
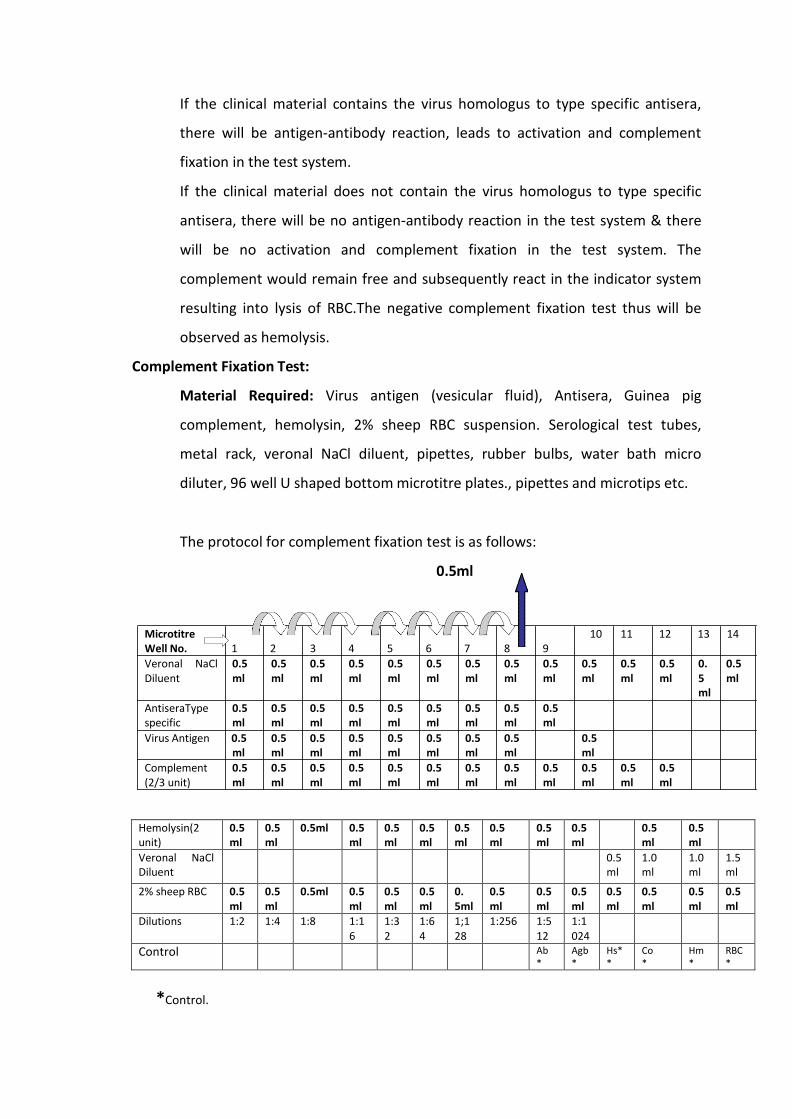
Complement Fixation Test:
Material Required: Virus antigen (vesicular fluid), Antisera, Guinea pig
complement, hemolysin, 2% sheep RBC suspension. Serological test tubes,
metal rack, veronal NaCl diluent, pipettes, rubber bulbs, water bath micro
diluter, 96 well U shaped bottom microtitre plates., pipettes and microtips etc.
The protocol for complement fixation test is as follows:
0.5ml
Microtitre Well No. 1 2 3 4 5 6 7 8 9
10 11 12 13 14
Veronal NaCl Diluent
AntiseraType specific
0.5 ml 0.5 ml
0.5 ml 0.5 ml
0.5 ml 0.5 ml
0.5 ml 0.5 ml
0.5 ml 0.5 ml
0.5 ml 0.5 ml
0.5 ml 0.5 ml
0.5 ml 0.5 ml
0.5 ml 0.5 ml
0.5 ml
0.5 ml
0.5 ml
0. 0.5 5 ml ml
Virus Antigen 0.5 ml
0.5 ml
0.5 ml
0.5 ml
0.5 ml
0.5 ml
0.5 ml
0.5 ml
0.5 ml
Complement (2/3 unit)
0.5 ml
0.5 ml
0.5 ml
0.5 ml
0.5 ml
0.5 ml
0.5 ml
0.5 ml
0.5 ml
0.5 ml
0.5 ml
0.5 ml
Hemolysin(2 unit)
0.5 ml
0.5 ml
0.5ml 0.5 ml
0.5 ml
0.5 ml
0.5 ml
0.5 ml
0.5 ml
0.5 ml
0.5 ml
0.5 ml
Veronal NaCl Diluent
0.5 ml
1.0 ml
1.0 ml
1.5 ml
2% sheep RBC 0.5 ml
0.5 ml
0.5ml 0.5 ml
0.5 ml
0.5 ml
0. 5ml
0.5 ml
0.5 ml
0.5 ml
0.5 ml
0.5 ml
0.5 ml
0.5 ml
Dilutions 1:2 1:4 1:8 1:1 6
1:3 2
1:6 4
1;1 28
1:256 1:5 12
1:1 024
Control Ab *
Agb *
Hs* *
Co *
Hm *
RBC *
*Control.
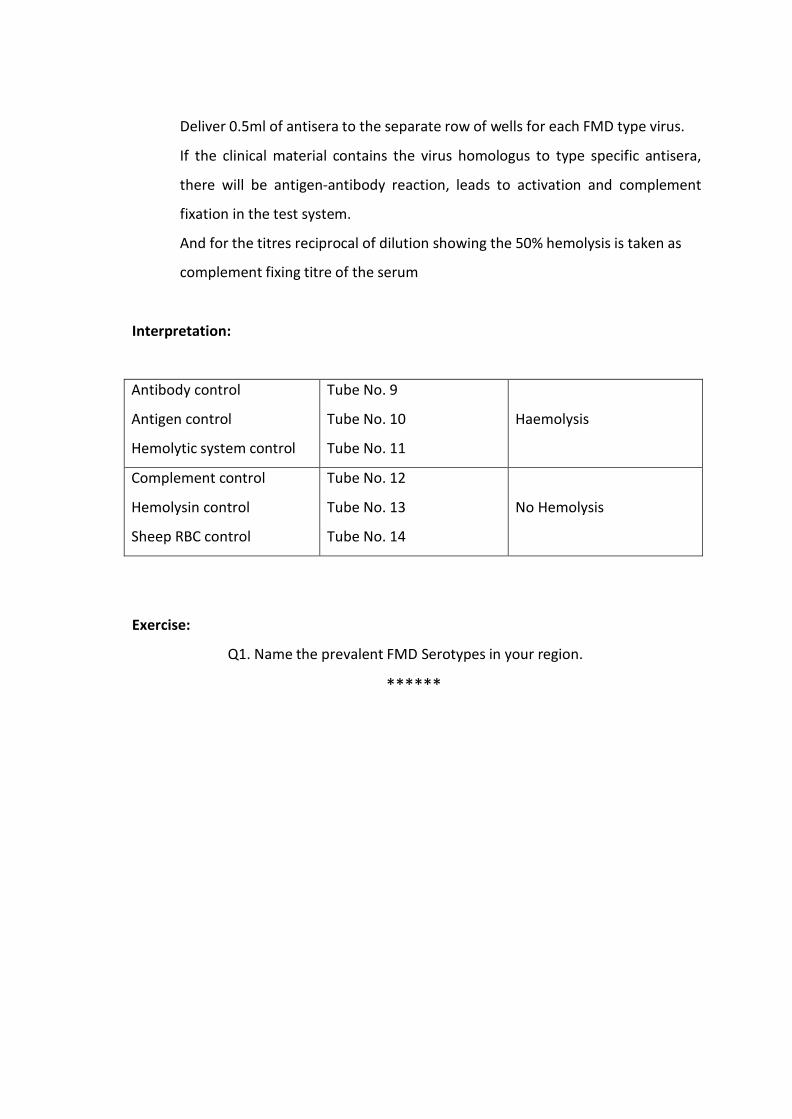
Deliver 0.5ml of antisera to the separate row of wells for each FMD type virus.
If the clinical material contains the virus homologus to type specific antisera,
there will be antigen-antibody reaction, leads to activation and complement
fixation in the test system.
And for the titres reciprocal of dilution showing the 50% hemolysis is taken as
complement fixing titre of the serum
Interpretation:
Antibody control
Antigen control
Hemolytic system control
Tube No. 9
Tube No. 10
Tube No. 11
Haemolysis
Complement control
Hemolysin control
Sheep RBC control
Tube No. 12
Tube No. 13
Tube No. 14
No Hemolysis
Exercise: Q1. Name the prevalent FMD Serotypes in your region.
******
Practical No. 12 DIAGNOSIS OF RANIKHET DISEASE:
HAEMAGGLUTINATION TEST & HAEMAGGLUTINATION INHIBITION TEST
Some of the viruses belonging to Paramyxovirus, Orthomyxovirus, Reovirus,
Enterovirus & Pox viruses agglutinate suspensions of washed RBC’s of various species
of animals. This haemagglutination property (ability to agglutinate erythrocytes) has
been successfully used for identifying the viruses.
Principle of Haemagglutination Test:
Some of the viruses contain in their outer coat virus coded glycoproteins
(Haemagglutinin) capable of binding to the mucoprotein receptors (Sialic acid) over
the surface of the erythrocytes. Such viruses bridge the gap between the erythrocytes
leads to the formation of lattice. This reaction is seen in micro plates/Perspex plates in
the form of mat formation.
Material Required: Perspex plate1ml pipettes, rubber bulb, beaker, conical flask,
Pasteur pipette, centrifuge, measuring cylinder.
Reagents: 1% Chicken RBCs, Phosphate buffer saline (pH7.2), Allantoic fluid (collected
from ECE on inoculation of suspected material for RD virus isolation)
Procedure:
1. Add 0.5 ml each of PBS in all the wells in a row of Perspex plate with the help of
1ml pipette and rubber bulb.
2. Add 0.5 ml of undiluted allantoic fluid in the first well (only).
3. With the help of pipette mix PBS and allantoic fluid (containing RD virus) from
the first well properly and transfer 0.5ml from 1st well to 2nd well (Two fold
dilution). Again in 2nd well mix the contents with the help of pipette and
transfer 0.5ml from 2nd well to 3rd well. Repeat till 9th well and discard 0.5ml
(diluted allantoic fluid containing RD virus) from 9th well.
4. Add 0.5 ml of 1% chicken RBC suspension to all the wells including 10th well
(RBC control).
5. Shake the plate well to mix the contents and incubate the plate at room
temperature.
6. Read the test at intervals of 15,30,45 and 60 minutes.
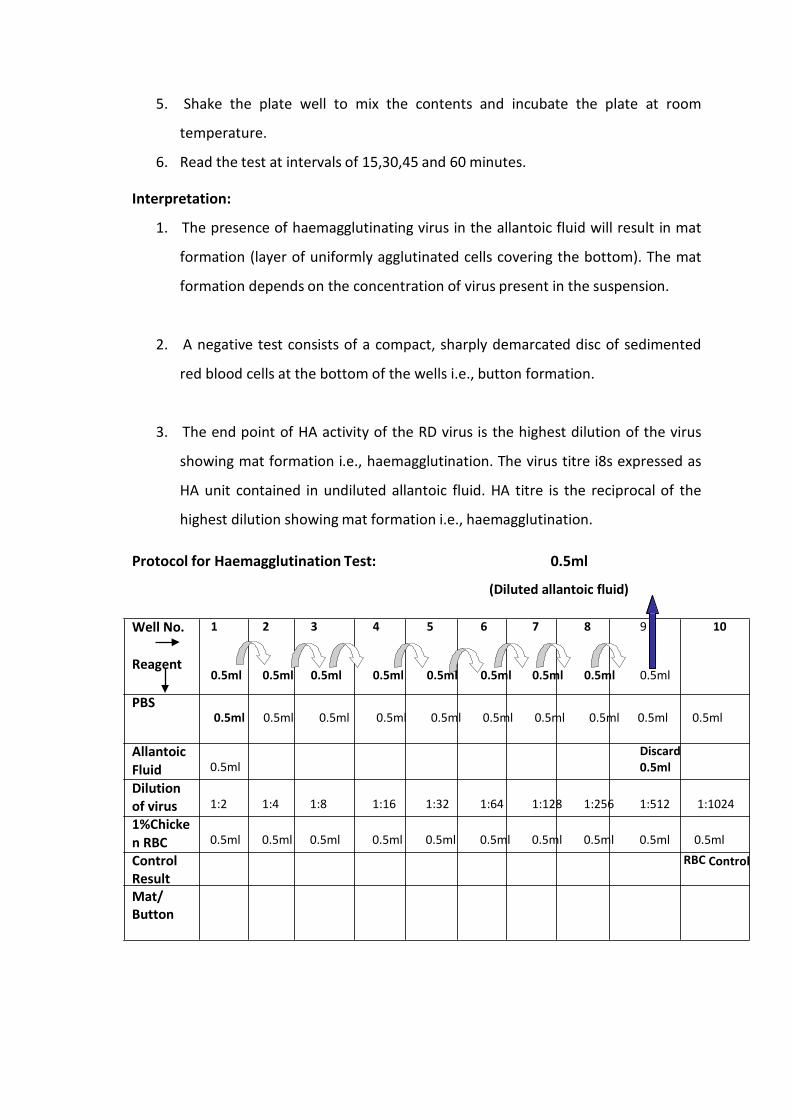
Interpretation:
1. The presence of haemagglutinating virus in the allantoic fluid will result in mat
formation (layer of uniformly agglutinated cells covering the bottom). The mat
formation depends on the concentration of virus present in the suspension.
2. A negative test consists of a compact, sharply demarcated disc of sedimented
red blood cells at the bottom of the wells i.e., button formation.
3. The end point of HA activity of the RD virus is the highest dilution of the virus
showing mat formation i.e., haemagglutination. The virus titre i8s expressed as
HA unit contained in undiluted allantoic fluid. HA titre is the reciprocal of the
highest dilution showing mat formation i.e., haemagglutination.
Protocol for Haemagglutination Test: 0.5ml
(Diluted allantoic fluid)
Well No.
Reagent
PBS
1 0.5ml
2 0.5ml
3 0.5ml
4 0.5ml
5 0.5ml
6 0.5ml
7 0.5ml
8 0.5ml
9 10 0.5ml
0.5ml 0.5ml 0.5ml 0.5ml 0.5ml 0.5ml 0.5ml 0.5ml 0.5ml 0.5ml
Allantoic Fluid 0.5ml Dilution
Discard 0.5ml
of virus 1:2 1:4 1:8 1:16 1:32 1:64 1:128 1:256 1:512 1:1024 1%Chicke n RBC 0.5ml 0.5ml 0.5ml 0.5ml 0.5ml 0.5ml 0.5ml 0.5ml 0.5ml 0.5ml Control RBC Control Result Mat/ Button
HAEMAGGLUTINATION INHIBITION TEST
The haemagglutination inhibition test is used for assess the titres of
haemagglutinating-inhibiting antibodies against RD virus in the serum of
suspected/healthy bird used for diagnosis and monitoring the vaccine titres.
Principle of Haemagglutination Inhibition Test:
HI-Test is based on the haemagglutination property of RD virus. Haemagglutinin binds
to the mucoprotein receptors (Sialic acid) over the surface of the erythrocytes&
bridges the gap between the erythrocytes leads to the formation of lattice. This
reaction is seen in microtitre / Perspex plates in the form of mat formation. But In the
presence of antibodies (in the serum), abs interacts with the virus and thus makes the
virus unavailable for agglutination of red blood cells. Red blood cells settles at the
bottom of the wells thereby giving i.e., button formation in the presence of
haemagglutinating-inhibiting antibodies against RD virus.
Material Required: Perspex plate, 1ml pipettes, rubber bulb, beaker, conical flask,
Pasteur pipette, centrifuge, measuring cylinder.
Reagents: 1% Chicken RBCs, Phosphate buffer saline (pH7.2), 4HA Unit RD virus, and
Test serum)
Procedure:
1. Add 0.5 ml each of PBS in all the wells in a row of Perspex plate with the help of
1ml pipette and rubber bulb.
2. Add 0.5 ml of undiluted Test serum in the first well (only) .
3. With the help of pipette mix PBS and Test serum in the first well properly and
transfer 0.5ml from 1st well to 2nd well (Two fold dilution). Again in 2nd well mix
the contents with the help of pipette and transfer 0.5ml from 2nd well to 3rd
well. Repeat till 8th well and discard 0.5ml (diluted test serum) from 8th well.
4. Add 0.5ml each of 4 HA unit virus upto 9th well (Virus control).
5. Allow it to stand for 10 minutes at room temperature.
6. Add 0.5 ml each of 1% chicken RBC suspension to all the wells including 10th
well (RBC control).
7. Shake the plate well to mix the contents and incubate the plate at room
temperature.
8. Read the test at intervals of 15,30,45 and 60 minutes.
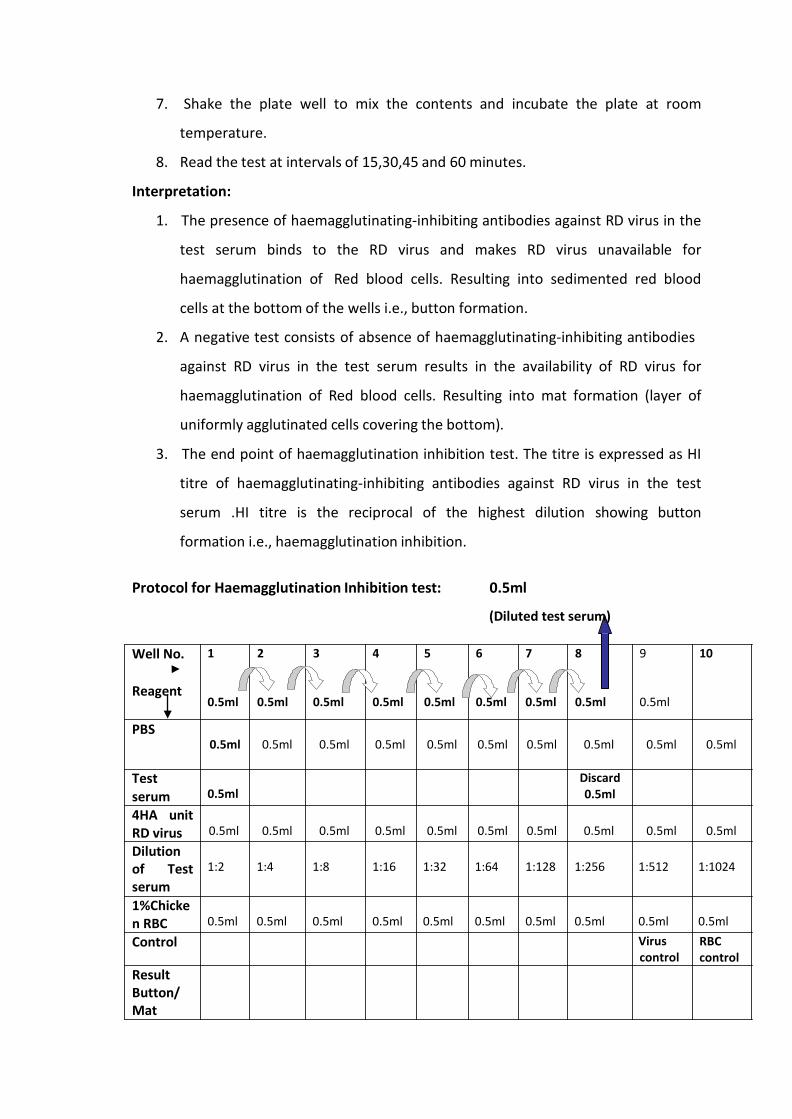
Interpretation:
1. The presence of haemagglutinating-inhibiting antibodies against RD virus in the
test serum binds to the RD virus and makes RD virus unavailable for
haemagglutination of Red blood cells. Resulting into sedimented red blood
cells at the bottom of the wells i.e., button formation.
2. A negative test consists of absence of haemagglutinating-inhibiting antibodies
against RD virus in the test serum results in the availability of RD virus for
haemagglutination of Red blood cells. Resulting into mat formation (layer of
uniformly agglutinated cells covering the bottom).
3. The end point of haemagglutination inhibition test. The titre is expressed as HI
titre of haemagglutinating-inhibiting antibodies against RD virus in the test
serum .HI titre is the reciprocal of the highest dilution showing button
formation i.e., haemagglutination inhibition.
Protocol for Haemagglutination Inhibition test: 0.5ml
(Diluted test serum)
Well No.
Reagent
PBS
1 0.5ml
2 0.5ml
3 0.5ml
4 0.5ml
5 0.5ml
6 0.5ml
7 0.5ml
8 0.5ml
9 10 0.5ml
0.5ml 0.5ml 0.5ml 0.5ml 0.5ml 0.5ml 0.5ml 0.5ml 0.5ml 0.5ml
Test serum 0.5ml 4HA unit
Discard 0.5ml
RD virus 0.5ml 0.5ml 0.5ml 0.5ml 0.5ml 0.5ml 0.5ml 0.5ml 0.5ml 0.5ml Dilution of Test serum 1%Chicke
1:2 1:4 1:8 1:16 1:32 1:64 1:128 1:256 1:512 1:1024
n RBC 0.5ml 0.5ml 0.5ml 0.5ml 0.5ml 0.5ml 0.5ml 0.5ml 0.5ml 0.5ml Control Virus
control RBC control
Result Button/ Mat

Exercise: Q1. Write the use and composition of Alserver’s solution. Q2. Calculate 4HA unit of RD Virus.
Q3. Calculate the HI titres of given sera samples and interprete the Results based on the history of vaccination in broilers.
******
Practical No. 13 DIAGNOSIS OF BLUE TONGUE DISEASE: AGID
Anti-BTV antibody generated in infected animals can be detected by using Agar
gel immune-diffusion (a prescribed test for international trade).
The AGID test to detect anti-BTV antibodies is simple to perform However, one of the
disadvantages of the AGID used for BT is its lack of specificity in that it can detect
antibodies to other orbiviruses particularly those in the EHD serogroup. The preferred
protocol, is as follows:
Test procedure:
1. A 2.8 mm thick layer of 0.9% agarose in 0.85% NaCl is prepared and circular
wells 5.0 mm in diameter and 3.0 mm apart are cut out with six wells arranged
around a central well.
2. Place BTV readymade soluble antigens (procured from the reference
laboratories) in the central well.
3. Three positive and three test sera are placed in alternate peripheral wells
surrounding the antigen in the central well and the plates are incubated at 20-
25°C in a humid environment for 24 hours.
4. A series of precipitin lines form between the antigen and known positive sera
and lines generated by strong positive test sera will join up with those of the
positive controls. With weak positive samples, the control lines bend toward
the antigen and away from the test sample well, but may not form a
continuous line between the control test wells. With negative samples, the
precipitin lines will continue into the sample wells without bending toward the
antigen.
5. All weak positive samples and other samples that produce questionable results
should be repeated using wells that are 5.3 mm in diameter placed 2.4 mm
apart or retested using the competitive ELISA.
Exercise:
Q1. Prepare the protocol for the above test.
Q2. Write the interpretation of the test.
******
Practical No. 14
DIAGNOSIS OF INFECTIOUS BURSAL DISEASE : AGID
Agar gel immunodiffusion test
The AGID test is the most useful of the serological tests for the detection of specific
antibodies in serum, or for detecting viral antigen or antibodies in bursal tissue.
For detection of antigen in the bursa of Fabricius, the bursae should be removed
aseptically from about ten chickens at the acute stage of infection.
The bursae are minced using two scalpels in scissor movement, then small pieces are
placed in the wells of the AGID plate against known positive serum.
Preparation of agar
Dissolve sodium chloride (80 g) and phenol (5 g) in distilled water (1 litre). Add agar
(12.5 g) and steam until the agar has dissolved. While the mixture is still very hot, filter
it through a pad of cellulose wadding covered with a few layers of muslin. Dispense
the medium in 20 ml volumes into glass bottles and store at 4°C until required for use.
The linear pattern of wells is preferred although a hexagonal pattern may be used.
Each test serum or bursa should be placed adjacent to a positive control antibody (AB)
or antigen (AG), respectively.
Wells, 3 mm deep, 6 mm in diameter, and 3 mm apart, are used.
Test procedure
1. Prepare plates from 24 hours to 7 days before use. Dissolve the agar by placing in
a steamer or boiling water bath. Take care to prevent water entering the bottles.
2. Pour the contents of one bottle into each of the required number of 9 cm plastic
Petri dishes laid on a level surface.
3. Cover the plates and allow the agar to set.
4. Cut three vertical rows of wells 5 mm in diameter and 3 mm apart, using a
protocol and tubular cutter
5. Remove the agar from the wells using a pen and nib, taking care not to damage
the walls of the wells.
6. Using a pipette, dispense 50 µl of the test sera into the wells .
7. Dispense small pieces of finely minced test bursa suspension by means of curved
fine pointed forceps/pipette into the wells, to just fill the wells.
8. Dispense 50 µl of the positive and negative control reagents into the relevant
wells.
9. Incubate the plates at between 22°C and 37°C for up to 48 hours in a humid
chamber to avoid drying the agar.
10. Examine the plates against a dark background with an oblique light source after 24
and 48 hours.
Exercise: Q1. Explain: Preparation of antigen from infected bursa of Fabricius.
******
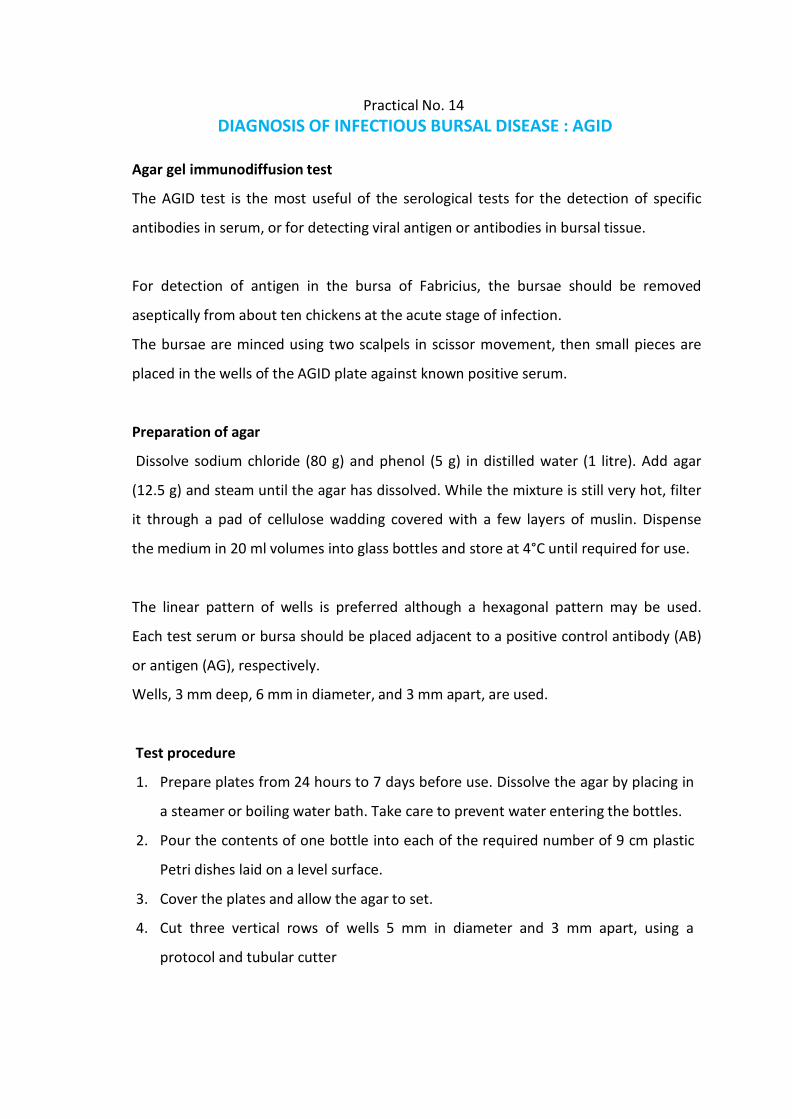
Infected Vero (monkey kidney cell-line)-Note the CPE
Haemagglutination Inhibition Test: Note The Button & Mat Formation
BHK-21 Cell line
Goatpox- Note the scab lesions
Characteristic Pock Lesion on CAM - Pox virus Negri body :neuron cell in trigeminal
ganglion
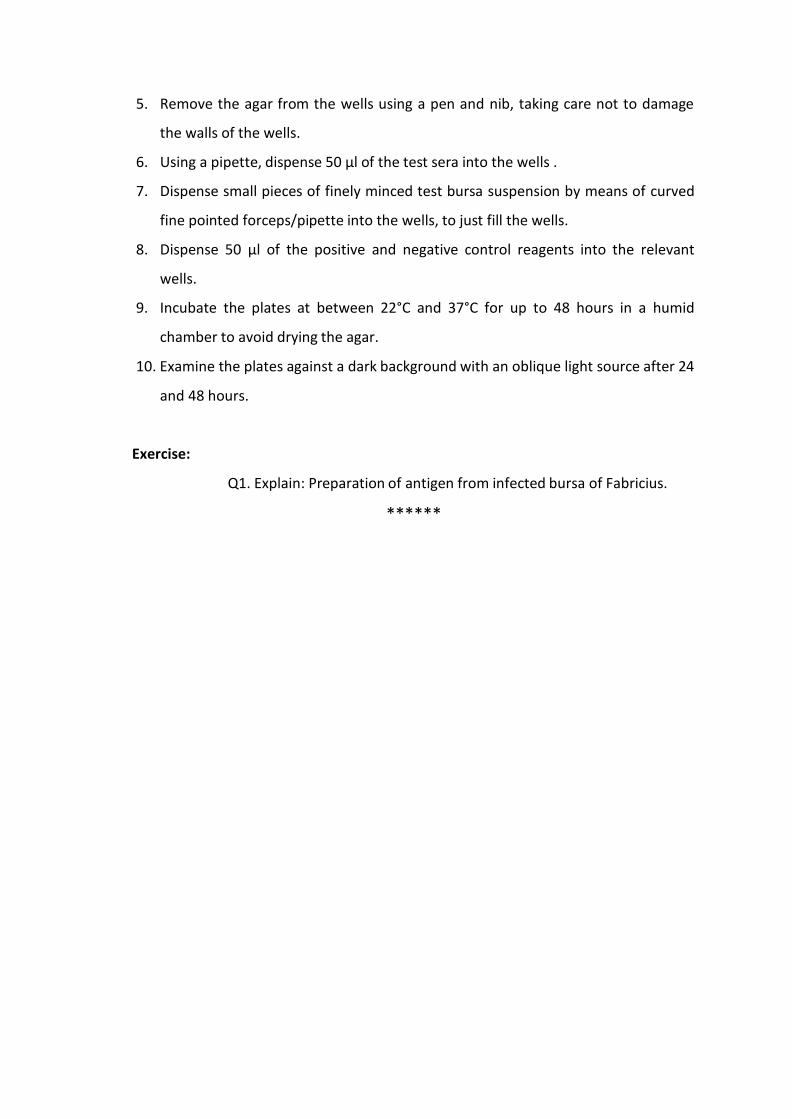
R-Reference positive sera
Central well- antigen; A,B & C -Test samples Fluorescent Antibody Technique
: Diagnosis of Rabies
Note the Hippocampus region of brain Guinea pig: Footpad inoculation-FMD virus
Syringe Filter Fusion & Syncitia Formation
(http://www.tau.ac.il/lifesci/departments/ biotech/members/rozenblatt/fig10)
Practical No. 15
CANINE PARVOVIRUS: HAEMAGGLUTINATION TEST
Clinical samples. Fecal samples and intestinal tissue samples from CPV suspect dogs should be
prepared as 10% (wt/vol) suspensions in phosphate-buffered saline (PBS) (pH 7.2)
Haemagglutination Test: (As described by Carmichael et al.) 1. The samples were serially diluted twofold in PBS (0.2 M) in V-bottom plates.
First, 50 microliters of PBS was added to each well of the plate. 2. In the first column, 50 μl of sample (fecal suspension or cell culture
supernatant) was added. The sample was mixed five times, and 50 μl was transferred to the next well.
3. Each sample was diluted from 1:2 through 1:4,096. Then, 50 μl of PBS was added to each well.
4. The HA test was performed using porcine erythrocytes (0.5%). 5. The corners of the plate were tapped four or five times to mix the erythrocytes. 6. The plates were covered with lids and incubated at 4 to 7°C for 2 to 4 h. 7. Positive agglutination was indicated by mat formation, and the button
indicated lack of agglutination. 8. The titer was calculated as the reciprocal of the last well with agglutination.
After overnight incubation, some positive samples can elute.
Exercise: Q1. Perform the test and write results..
*****
Practical No. 16
INFECTIOUS BOVINE RHINOTRACHEITIS ( IBR dot-ELISA)
(Prescribed Test Protocol by OIE.int.org)
Collection and processing of samples Nasal swabs are collected from several (from five to ten) affected cattle in the early phase of the infection. These cattle still have serous rather than mucopurulent nasal discharge. In cases of vulvovaginitis or balanoposthitis, swabs are taken from the genitals. The swabs should be vigorously rubbed against the mucosal surfaces. The prepuce can also be washed with saline; the washing fluid is then collected. The specimens are suspended in transport medium (cell culture medium containing antibiotics and 2–10% BoHV-1-free fetal bovine serum to protect the virus from inactivation), cooled at 4°C, and rapidly submitted to the laboratory.
During necropsy, mucous membranes of the respiratory tract, and samples of the tonsil, lung and bronchial lymph nodes are collected for virus detection. In cases of abortion, the fetal liver, lung, spleen, kidney and placental cotyledons are examined. Samples should be kept on ice and sent to the laboratory as quickly as possible.
After arrival at the laboratory, swabs are agitated at room temperature for 30 minutes in the transport medium to elute virus. Following removal of the swabs, the transport medium is clarified by centrifugation at 1500 g for 10 minutes. Tissues are homogenised to a 10–20% (w/v) suspension in cell culture medium before centrifugation at 1500 g for 10 minutes
Diagnostic Method: The ImmunoComb® test is based on solid phase “dot”-ELISA technology. Antigen is applied to test ‘spots’ on the solid phase, which is a comb- shaped plastic card (the Comb).
The serum specimen to be tested is diluted in a buffer in the first well of a multi- chamber developing plate. The test spots on the Comb are then incubated with the sera in the developing plate. Specific IgG antibodies from the specimen, if present, bind to the antigen at the test spot.
The Comb is then transferred to a well, where unbound antibodies are washed from the antigen spots. In the next step, the Comb is allowed to react with an anti-cow IgG Alkaline Phosphates conjugate, which will bind to antigen-antibody complexes at the test spots. After 2 more washes, the Comb is moved to the last well, where a color result develops via an enzymatic reaction. The intensity of the color result of test spots corresponds directly to the antibody level in the test specimen.
IBR dot-ELISA: Specificity 86.2% Sensitivity 94.6%
Preferred Method of Diagnosis: Serology is used to evaluate antibody responses to infection by the viruses associated with BRD. Serologic techniques are also helpful in evaluating the effectiveness of vaccination programs.
Interpretation: The level of antibodies (i.e., antibody titer) is determined according to the intensity of the test color result.
Positive and negative control serum samples are included in the ImmunoComb® Bovine IBR-PI3-BRSV Antibody Test Kit.
The negative control consists of non-immune sera and should be read as zero. Specimens with colorless (white) or faint color result (i.e., less than S1) are considered negative.
The positive control spot on the Comb should develop a distinct grey color that is scored S3. The positive control has been calibrated to correspond approximately to 200 ELISA units (0.2 Optical Density). Specimens with identical or darker grey color results (S3 – S5) are considered positive.
Proper evaluation of the humoral immune response to infection is performed by comparing test results in paired serum samples, which are obtained at the acute and convalescent stages of illness. Negative serology would be expected to be found in unvaccinated and unexposed herds. Any seroconversion (S1 or greater) would indicate infection, while S3 or greater is considered significant in previously vaccinated animals.
Applications: 1. To determine IBR infection in cattle by measuring IgG antibody titer. 2. To evaluate passive (maternal) antibody levels in calves to IBR Virus. 3. To evaluate humoral immunity status of herds for assistance in designing vaccination programs forIBR.
References: Peters, A., R. (1987). Vaccines for respiratory disease in cattle. Vaccine,5(3), 164.
Tittle, D. (2000). A quantitative measure of the concentration of immunoglobulin G1,
and antibodies to Infectious Bovine Rhinotracheitid, Parainfluenza 3 and Bovine Respiratory Syncytial Viruses in bovine colostrum and post-suck calf sera. Farm Animal Elective Project: Royal Veterinary College, University of London, England.
*****

VACCINATION SCHEDULE FOR PREVENTION OF VIRAL DISEASES IN LIVESTOCK AND POULTRY
The vaccination is the most effective way of preventing the viral diseases. The
vaccination schedule is not fixed one .One schedule may not work at different places
(region/country). The optimal design of veterinary vaccination programme depends on
the incidence of disease in the area (epidemiology of virus) and the characteristics of
the vaccine.
As a guideline the following vaccination schedule can be used for the
prevention of viral diseases . Taking into the consideration the incidence of disease
and other properties, the optimal vaccination schedule can be designed coupled with
the field experience.
Some of the principles underlying decisions on vaccination schedules are
outlined and tables of schedules for the vaccination of various domestic animals are
provided.
Schedule for vaccination against viral diseases of cattle
Vaccine Age of vaccination Booster Dose Attenuated virus vaccines
Bovine viral diarrhea virus 4-9 months of age (single dose) Annual Infectious Bovine Rhinotracheitis virus 3-4 months of age (single dose) Annual Rinderpest virus 6-8 months off age (single dose) None
4-6 months of age (two doses with a 4 week Parainfluenza virus 3
Foot & Mouth disease
interval) Annual Inactivated Virus Vaccines
viruses 4 weeks of age (single dose) 4-12 months 3-4 months of age (two doses at a 4 week
Infectious Bovine Rhinotracheitis virus
interval) single dose) 6-12 months
Rota virus 6-8 weeks and 2 weeks before end of gestation Each pregnancy Corona virus 6-8 weeks and 2 weeks before end of gestation Each pregnancy Parainfluenza virus 3 6 weeks, 3 months, 7 months of age Annual
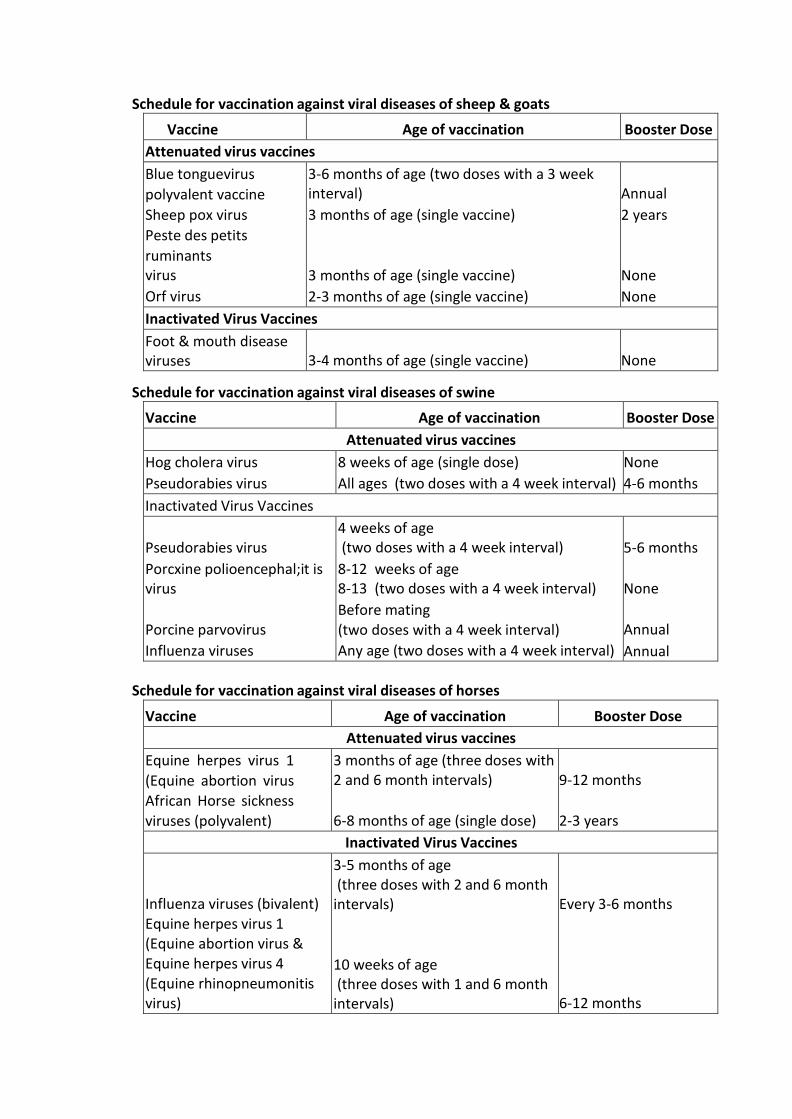
Schedule for vaccination against viral diseases of sheep & goats
Vaccine Age of vaccination Booster Dose Attenuated virus vaccines Blue tonguevirus polyvalent vaccine Sheep pox virus Peste des petits ruminants virus Orf virus
3-6 months of age (two doses with a 3 week interval) 3 months of age (single vaccine) 3 months of age (single vaccine) 2-3 months of age (single vaccine)
Annual 2 years None None
Inactivated Virus Vaccines Foot & mouth disease viruses
3-4 months of age (single vaccine)
None
Schedule for vaccination against viral diseases of swine
Vaccine Age of vaccination Booster Dose Attenuated virus vaccines
Hog cholera virus Pseudorabies virus
8 weeks of age (single dose) All ages (two doses with a 4 week interval)
None 4-6 months
Inactivated Virus Vaccines
Pseudorabies virus Porcxine polioencephal;it is virus Porcine parvovirus Influenza viruses
4 weeks of age (two doses with a 4 week interval)
8-12 weeks of age 8-13 (two doses with a 4 week interval) Before mating (two doses with a 4 week interval) Any age (two doses with a 4 week interval)
5-6 months
None
Annual Annual
Schedule for vaccination against viral diseases of horses
Vaccine Age of vaccination Booster Dose Attenuated virus vaccines
Equine herpes virus 1 (Equine abortion virus African Horse sickness viruses (polyvalent)
3 months of age (three doses with 2 and 6 month intervals) 6-8 months of age (single dose)
9-12 months 2-3 years
Inactivated Virus Vaccines Influenza viruses (bivalent) Equine herpes virus 1 (Equine abortion virus & Equine herpes virus 4 (Equine rhinopneumonitis virus)
3-5 months of age (three doses with 2 and 6 month
intervals) 10 weeks of age (three doses with 1 and 6 month
intervals)
Every 3-6 months 6-12 months
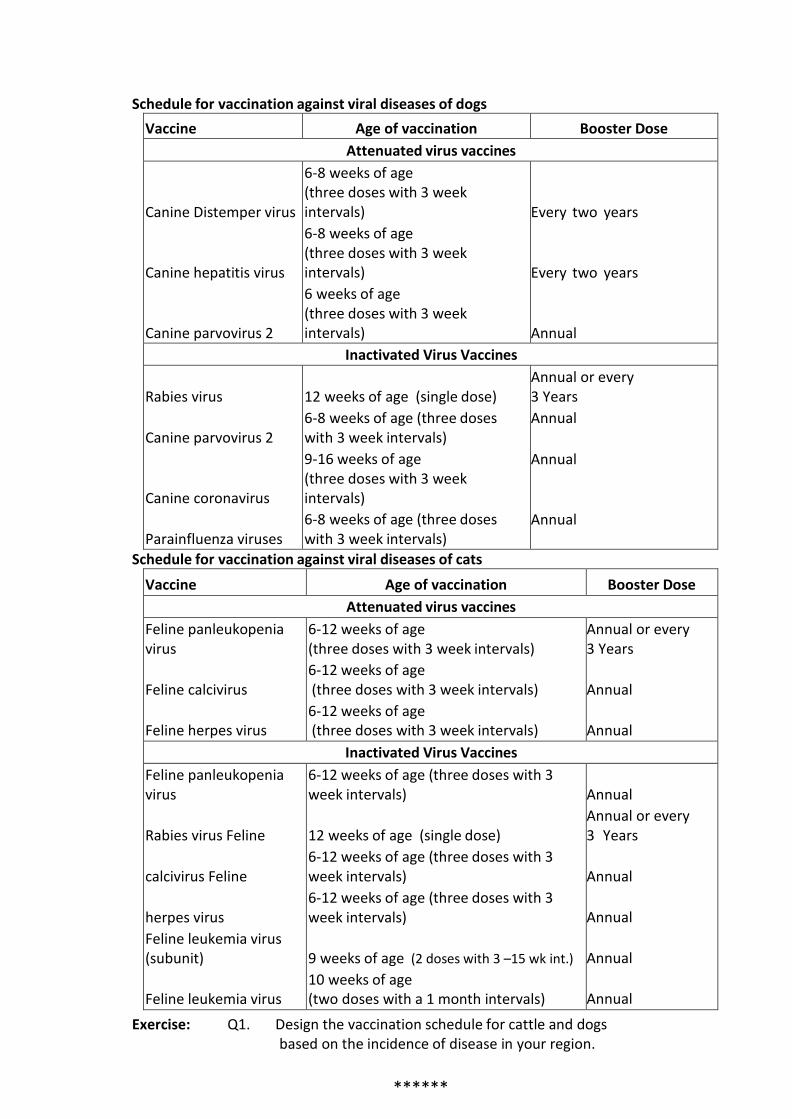
Schedule for vaccination against viral diseases of dogs Vaccine Age of vaccination Booster Dose
Attenuated virus vaccines
Canine Distemper virus
Canine hepatitis virus
Canine parvovirus 2
6-8 weeks of age (three doses with 3 week intervals) 6-8 weeks of age (three doses with 3 week intervals) 6 weeks of age (three doses with 3 week intervals)
Every two years
Every two years
Annual Inactivated Virus Vaccines
Rabies virus Canine parvovirus 2 Canine coronavirus Parainfluenza viruses
12 weeks of age (single dose) 6-8 weeks of age (three doses with 3 week intervals) 9-16 weeks of age (three doses with 3 week intervals) 6-8 weeks of age (three doses with 3 week intervals)
Annual or every 3 Years Annual Annual Annual
Schedule for vaccination against viral diseases of cats Vaccine Age of vaccination Booster Dose
Attenuated virus vaccines Feline panleukopenia virus Feline calcivirus Feline herpes virus
6-12 weeks of age (three doses with 3 week intervals) 6-12 weeks of age (three doses with 3 week intervals) 6-12 weeks of age (three doses with 3 week intervals)
Annual or every 3 Years Annual Annual
Inactivated Virus Vaccines Feline panleukopenia virus
Rabies virus Feline
calcivirus Feline
herpes virus Feline leukemia virus (subunit) Feline leukemia virus
6-12 weeks of age (three doses with 3 week intervals) 12 weeks of age (single dose) 6-12 weeks of age (three doses with 3 week intervals) 6-12 weeks of age (three doses with 3 week intervals) 9 weeks of age (2 doses with 3 –15 wk int.) 10 weeks of age (two doses with a 1 month intervals)
Annual Annual or every 3 Years
Annual
Annual
Annual
Annual Exercise: Q1. Design the vaccination schedule for cattle and dogs
based on the incidence of disease in your region.
******

APPENDIX
1.Anticoagulants for collection of blood:
Heparin: 5-6 IU units/ml of blood
EDTA: 1-2 mg /ml of blood
Oxalate phenol glycerin OCG solution: 1 part to 2 parts of blood.
Blood is transported in chilled condition.,but should never frozen for both
clinical examination and for virus isolation. Antibiotics can be added.
2.Transport media/preservatives:
50% Glycerine Phosphate Buffer Saline(GPB).
First prepare M/25 Phosphate Buffer
Phosphate Buffer Saline(PBS)(pH 7.4).
Saline (pH 7.4-7.6) as follows:
Sodium chloride 8.0gm
Potassium chloride 0.2 gm
Di sodium hydrogen phosphate 1.15 gm
Potassium Di-hydrogen phosphate 0.20 gm
Distilled water 1000ml
Add equal volume of sterile neutral glycerin to sterile M/25 PBS (pH 7.4-7.6) to
prepare 50/5 GPBS of pH 7.4. Add 0.1ml of 1% phenol red solution to 100 ml of that
solution so as to give a final concentration of phenol red to 0.001%. The solution when
sterile should have reddish tinge. Yellow color indicates contamination. Each vial must
contain 10mlk of PBS for collection of tissues.
*************

COVASU
Ashok V Bhonsle & A.G. Karpe
07721025073 ph
02385 258756 fax
Systematic Veter inary Vi rology
Pract ical
Manual
Department of Veterinary Microbiology
College of Veterinary & Animal Sciences, Udgir
MAHARASHTRA ANIMAL & FISHERY SCIENCES UNIVRESITY,
NAGPUR