Lab4 - Western · PDF filesomething else), and create a new ... Photoshop, automatically store...
35
CS 1033 Multimedia and Communications Lab 04: Introduction to Komposer (Website Design part 1 of 3) REMEMBER TO BRING YOUR MEMORY STICK TO EVERY LAB!
Transcript of Lab4 - Western · PDF filesomething else), and create a new ... Photoshop, automatically store...

CS 1033 Multimedia and Communications
Lab 04: Introduction to Komposer
(Website Design part 1 of 3)
REMEMBER TO BRING YOUR MEMORY STICK TO EVERY LAB!
2
KompoZer Installation on Your Laptop (Pc or Mac)
KompoZer is a complete web authoring system that combines web file management and easy-to-use
WYSIWYG (What You See Is What You Get) web page editing. KompoZer is designed to be extremely
easy to use, making it ideal for non-technical computer users who want to create an attractive,
professional-looking web site without needing to know HTML or web coding.
DO NOT DO THIS AS PART OF YOUR LAB
The software is on the lab machines. These instructions are only when you
want to download KompoZer on your laptop.
Download KompoZer:
Available for both the PC and MAC. You can download the freeware application from: Latest stable
version: 0.7.10 (2007-08-30)
http://kompozer.net/download.php
Installation Directions: Click on the button and it will begin the download operation, and once complete it will open a dialog box
asking to unzip the file.
Here are some resources to help you with the installation.
• http://howtech.tv/basics/how-to-install-kompozer-on-windows-7/
• It gives you step by step instructions on installing on a pc
• https://www.youtube.com/watch?v=pEbEdoOYF8c
• Tutorials: https://www.youtube.com/watch?v=xqLch0XtuVk

3
Creating Web Pages with KompoZer
KompoZer lets you create your own web pages and publish them on the web. You don't have to know
HTML to use KompoZer; it is as easy to use as a word processor.
Toolbar buttons let you add lists, tables, images, links to other pages, colors, and font styles. You can see
what your document will look like on the Web as you create it, and you can easily share your document
with other users, no matter what type of browser or HTML-capable email program they use.
When you open KompoZer it opens up the following screen. This screen layout is based on version
0.7.10
Composition Toolbar
Format Toolbar 1
Format Toolbar 2
Site Manager
Rulers
Edit Mode Toolbar
/View Mode
Status Bar
Use this picture as a KompoZer layout reference sheet as you work through labs 4-6.
If you are reading this on a paper printout be sure to open the original PDF file on your computer so you
can see the different colours!
This is the Document Window
This is where you enter your text,
images, etc when building your
webpage.

4
LAB #4 - Tutorial 1
Objectives: This exercise steps you through the process for understanding how to create a website and perform file management operations.
� Creating 3 new websites where files do not exist. (website1, website2, website3) � Creating a new website where files exist because we give them to you. (oplibrary) � Removing a Site because you no longer want to work with it ever again.
You are about to copy the necessary files you need for this tutorial. 1. Before you start KompoZer, browse to your
Memory Stick folder (F: or it may be called
something else), and create a new subfolder
within cs1033 called lab04. Then inside the
lab04 folder, create 4 new subfolders called
“oplibrary”, “website1”, “website2”,
“website3”. These folders are empty and
will represent 4 websites that you will be
creating/working with. In this situation, it
will look like the following:
2. Navigate inside your oplibrary folder and create a folder called “images”. Every website should
have an images folder to hold your images for the website. So when you create images in
Photoshop, automatically store them into this folder. You should now have the following folders:
• Remember F: just represents your Memory Stick Drive
• F:\cs1033\lab04\oplibrary
• F:\cs1033\lab04\website1
• F:\cs1033\lab04\website2
• F:\cs1033\lab04\website3
3. Navigate inside the oplibrary and create an images folder. The images folder will be where you
save any images that you create with Photoshop or that are given to you. Go to
http://www.csd.uwo.ca/courses/CS1033/labs/lab04/ and you will see an images folder. Click on
the images folder to go into it. Then one at a time, Right-click on each file and save each image
into the “images” folder you just created on our F: drive . On your F: drive you will have this
directory structure where the images folder holds the images.

5
4. Start up KompoZer by clicking on the KompoZer desktop icon.
5. From the KompoZer View menu, select Show/Hide and make sure the following toolbars are checked:
Composition Toolbar, Edit Mode Toolbar and Status Bar, Rulers and Site Manager.
6. Toggle each one on/off to see the differences in what they represent on your screen.
Composition Toolbar
Format Toolbar 1
Format Toolbar 2
Site Manager
Rulers
Edit Mode Toolbar
/View Mode
Status Bar

6
Creating a New Site: VERY IMPORTANT STEP ALWAYS TO DO WHEN YOU SET UP
YOUR WEBSITE FOR THE FIRST TIME � A website is a collection of webpages and all the images and media files associated with each
webpage in the site.
� Webpages are files that are written in a file format called HTML (Hypertext Markup Language).
When you create a website, you will save all of its associated webpages in the same folder (or
same directory) on your Memory Stick. A different website should have all of its webpages in a
different folder/directory. It is important to set up the site first, as this ensures all the ‘references’
to pages, elements and navigation, properly point to each other.
� In KompoZer, a website is simply called a Site. The site is linked to a folder on your hard disk (i.e.
to a specific subfolder in your F: drive). It is important to let KompoZer know that you are
working with a folder that represents your website.
� The site manager allows you to navigate between sites easily so you can work with them. Site
Manager lists directories which you have specifically set up as ‘Sites’. You can set up many sites;
they appear in Site Manager irrespective of where they appear in a normal directory on your hard
drive/memory stick.
� In the next few steps, you will create a new Site called “OP library” in order to associate the
oplibrary folder with Kompozer.
1. Press F9 to toggle the Site Manager pane on or off . Another alternative technique is to select
from the menu View > Show/Hide > Site Manager.
2. To create a site start by letting KompoZer
know that you want to work on a specific
website. Click on the Site Manager icon.
This is also called the Edit Sites button.
It will open up a new dialog box.
3. Now you are ready to define to
KompoZer the new site you are
creating/or the one you want to work on.
• In the box Site name: Type OP Library
website (case does not matter as it
is textual description not a
folder/file name)
• Click on the Select Directory button.
Navigate to where you have your
folder oplibrary (you created it in
step 2 above). So in this exercise it
will be: F:\cs1033\lab04\oplibrary
. Click OK button. Don’t change
anything else in this dialog box.
4. Now you are ready to work with your website. Your Site Manager panel now shows that it is working

7
with the OP Library website. If you click on the “+” and “-“ icon it expands the file
directory so that you can see the contents of the file. Right now, you only have 1 folder called
images. You are about to start building your first webpage next.
5. But first, the Site Manager also allows you to see more ie. details of the size and last date of
your files. So click on the “+ “ button to expand your images folder and see all the files inside
of it.
6. Click on the icon in the top right corner of your Site Manager panel.
You can click on any of the options: Name, Size and Last modified to select an option. Try it
and see that now your Site Manager shows those items beside the file names.
7. To adjust the site panel to see the
headings better, place your
mouse on the line between the
headings Name and Size and
your cursor turns into a
bidirectional arrow. Now drag to
resize it accordingly. If you
can’t see everything then, resize
the Site Manager panel so that
you can see all the information
by placing your cursor on the
separation line between the Site
Manager panel and the working panel and dragging.
8. Next reset your Site Manager to only show the file names. Click again on the in the Site
Manager panel, and click on Size. This deselects the option. Also deselect Last Modified so
that all you see is the Filenames in the Site Manager
box.
9. If you forget which folder OP Library Website is
pointing to on your computer/memory stick, you can
find this information out by clicking on the Edit Sites
button again. It will display the dialog box.

8
When the dialog box opens,
in the section Publishing
Sites, you can click on the
OP Library Website. Then
look at the information listed
under Publishing Address: It
tells you that right now the
website is located on your
memory stick at
F:/cs1033/lab04/oplibrary/
10. So now KompoZer associates the descriptive name OP Library Website with the folder located
at: F:\cs1033\lab04\oplibrary folder. KompoZer treats your oplibrary folder as the root to a
website which contains all files (images, videos, webpage etc).
TIP: Every time you use your memory stick on a lab machine, you will probably be sitting on a
different lab machine. So when you start up the application KompoZer, you will need to
perform the above steps in order to tell KompoZer where your files are stored and to keep the
pointers correctly linked from each webpage that you create.
Every time you start up KompoZer it will be pointing to the last site you were working on.
11. Now you will create three new Sites and associate them with the folders you created at the beginning of this lab. Look at the chart below to see what new Sites you will be creating
and the folders you will be associating them with. Instructions on how to do this are provided
AFTER THE CHART. The site name is descriptive so it can be upper and lower case and
spaces etc. Whereas the folder name should be lower case and not contain any spaces.
Site Name Local Root
Website 1 Project
F:\cs1033\lab04\website1
Website 2 Project
F:\cs1033\lab04\website2
Website 3 Project
F:\cs1033\lab04\website3

9
12. In the Site Manager panel,
click on the icon
(which is the Edit Sites
button). A dialog box
appears.
Click on New Site button.
13. In the Site Name box, type
Website 1 Project. This is a
descriptive name not a folder
name.
14. In the Publishing Server box, click on Select directory and navigate to
F:\cs1033\lab04\website1 and press OK.
15. Repeat the above steps to create the site names for
“Website 2 Project ” and “Website 3 Project”.
Note that there is a “+” beside each site name. And you
can click on it to expand the list. Remember “OP Library
Website”, “Website 1 Project”, “Website 2 Project” and
“Website 3 Project” etc are descriptive names and NOT the
folder names. Remember to see which directory each
website is associated with, you would have to go back into
the Edit Sites and check the path directory (you checked
this in step 14 above).
Now this allows you to work on multiple websites, but if
you want to keep it simple, keep your Site Manager with
only one website listed. In the next step, you will learn
how to remove the website from the Site Manager panel.
16. Removing a Site Name (Disassociating a Site from KompoZer)
There may be times when you will decide that you will no longer want to work on this site.
This may be because the site is old, or you may not be responsible for maintaining this site, or
you created a new site that is more current. To disassociate the Site name from KompoZer so
that the site no longer appears in the Site panel, perform the following steps:
• In the Site Manager panel, click on the
Edit Sites button. In the dialog box,
click on ‘OP Library Website’ and then
click the Remove Site button. And click
OK. Remember this disassociates the
site name but DOES NOT delete the
files in that folder. The folder with all
the files will remain on your hard
disk/memory stick.

10
If you really did not want to Remove the Site, you will have to go through the “New Site” steps as you did earlier.
• Go ahead and create the new site “OP Library Website”, and point it to: F:/cs1033/lab04/oplibrary
Once you re-created this site, you will see that the images folder is still there.
• Remove sites Website1 Project, Website 2 Project, Website 3 Project.
• Next close down the KompoZer application by using the menu option File Exit. It will prompt
you to save a webpage file called “untitled”. Say no since we haven’t added any content to this
webpage.
TIP: Remember when you open KompoZer on your laptop or on a lab machine, and you don’t see
a site name, you will have to perform the steps as you just did. Always, back up your files in
Windows Explorer on two different places (ie. memory stick and your hard drive). It never fails 1
person in 100 will lose their information on the memory stick or their laptop will die, and you will
lose all your information. SO BACKUP!

11
LAB #4 - Tutorial 2
Objectives:
� Creating and saving webpages
� Entering text into a webpage
� Formatting text, setting headers, color, size, alignment
� Using the view modes
Start up KompoZer.
Note that the Site Manager will open up showing the website OP Library Website.
Creating a Webpage for the website “OP library Website” KompZer has a webpage ready and open for you to start adding content to. The tab at the top of the
Document window indicates the file name and in this case it is labelled “untitled1” by default.
1. To create another file select from the menu File >
New. A dialog box appears.
2. Select A blank document and check Strict DTD.
Click on the “Create” button.
3. Notice that the Document window opens with a blank
file labelled “untitled” which appears in a tab directly
above the white space of the document window.
Extra Notes: When you checked off Strict DTD, it means that this file is of a certain format.
If you click on the Source Tab at the bottom of the document window, you will see the html code associated with the webpage. The <!DOCTYPE> declaration must be the very first thing in
your HTML document, before the <html> tag. Then click back to Normal mode by clicking on the
Normal tab at the bottom of the document window.
The <!DOCTYPE> declaration is not an HTML tag; it is an instruction to the web browser about
what version of HTML the page is written in.
In HTML 4.01, the <!DOCTYPE> declaration refers to a DTD, because HTML 4.01 was based on
SGML (Standard Markup Generalized Language). The DTD specifies the rules for the markup
language, so that the browsers render the content correctly when previewing the webpage in a
browser.
HTML5 is not based on SGML, and therefore does not require a reference to a DTD.
Tip: Always add the <!DOCTYPE> declaration to your HTML documents, so that the browser
knows what type of document to expect.You don’t need to know more right now. But you can read
more at: http://www.w3schools.com/tags/tag_doctype.asp

12
Saving an HTML (Webpage) File
It is best to immediately save your file with the filename you plan to give it.
1. From the Menu Bar, select File >Save As.
A Page title dialog box pops up. Provide the name index
(Do not add an extension as KompoZer will force the
extension .html) and click OK.
Another dialog box opens, and make sure you are in the oplibrary folder. The filename automatically is
filled with index.html in this case. Click the Save button.
Always make sure that you are saving index.html in the correct directory/subdirectory, the root folder
(F:\cs1033\lab04\oplibrary") because when you move around subdirectories, KompoZer may not
remember the correct last path designation you navigated to ( which may have been to another
subdirectory), so be careful and always check.
2. Notice how the tab over the document window has changed from “untitled” to “index.html”.
Note: When you save a file, it will appear in the File panel on the
left hand side of your screen to indicate that it is now part of the
Site (website). Every time you create a file and save it, it will show
up in the Site Manager panel. If it doesn’t show up, then click on
the Refresh icon. If the files still don’t appear then save the
files again and close the application and start it back up again.
On the same line where the Refresh icon is located are three
more buttons: Create a new folder; Rename a file; and delete a
file. I think this is self explanatory and you can experiment on
your own time.
Note: The first webpage of your website that kickstarts your website (known as the “landing page”) is
always a file called “index.html” (or “index.htm”). Internet browsers (such as Internet Explorer,
Firefox, and Safari) are programmed to look for this file first within any website, so it is important
that you always name your opening webpage of a website as index.html
Note: When you save a file, remember to make sure all your file names are lowercase with no spaces. For example: My first house.html is a BAD file name, myfirsthouse.html is a good file
name.

13
Entering Text into a Webpage
1. Before you start typing a paragraph, change the
format dropdown box from Body Text to
Paragraph tag and once it is selected start
typing. All text typed now will be a paragraph
meaning as long as you are typing, the text will
wrap automatically to the next line.
2. Now follow the chart below with the
instructions. (and read the Notes side)
3. In the chart below, look at the column labelled: Text to Enter, type that text into the document
window, while referring to the “Notes” column on the right. “<Enter>” means to press the “Enter” key,
and <Shift>+<Enter> means to hold down the Shift key while pressing “Enter”.
Text To Enter Notes
Roll Woods Park Public School Library<Enter> • When you press “Enter” it will insert a
paragraph break (it leaves a blank line
in between the text Roll Woods … Our
Library and the text you are about to
type: Welcome to our Library!)
Welcome to our Library! <Enter>
Take a tour of our Library where your children have access
to books, computer labs, and a quiet work space area for
reading, research and group work. <Enter>
• Keep typing and allow the line breaks to
occur as the text runs out of space on the
line on the right side of the document
window.
Welcome to our library <Shift>+<Enter>
…Where children, learning and fun <Shift>+<Enter>
……. are brought together <Enter>
• <Shift>+<Enter> forces cursor to the
next line.
Through books, computers and technology<Shift>+<Enter>
Open your child’s mind <Shift>+<Enter>
to learning and the future!<Enter >
Save the Webpage
From the menu, File > Save As and confirm the filename/folder location that it is still in the oplibrary
folder. (F:\cs1033\lab04\oplibrary") The name should be index.html. Always use File>Save As
when saving instead of “Save” because with the latter option it may save it in the wrong directory and
you may be wondering where the saved version is.
Closing the Webpage From the Menu Bar, File > Close or it is faster to
click on the “X” icon in the top right hand corner
of the document window. If you close the file

14
before saving the contents, KompoZer will prompt you to see if you want to save the file before
quitting.
Create another Webpage 1. Create a new webpage called “teachers” (by default it will save it as teachers.html) and hit the
Refresh button to see the new file in Site Manager panel. Next, add the following information in the
chart below. Don’t forget to select Paragraph from the Format Dropdown box when entering
paragraphs.
2. Once you have finished entering the information, save and close the file.
Text To Enter Notes
Roll Woods Staff Directory<Enter>
Principal: Mr. Hardwood<Shift>+<Enter>
(519) 656-2141<Shift>+<Enter>
[email protected]<Enter>
Grade 1: Mrs. Smith<Shift>+<Enter>
(519) 433-3167<Shift>+<Enter>
[email protected]<Enter>
Grade 2: Mr. Jordan<Shift>+<Enter>
(519) 471-2525<Shift>+<Enter>
[email protected]<Enter>
Between the text “Principal:” and “Mr.”, leave
three spaces. If you switch to Source view (the
tab at the bottom of the window pane)
you will see a tag   This is called a non-
breaking space command in HTML. Now click
back on Normal view.
Remember, if you want a blank line, for example
between paragraphs, hit the <Enter> key and if
you just want a line break, hold down the <Shift>
key and hit the <Enter> key, otherwise don’t hit
enter and just let the window decide where to
break the lines.
3. SAVE AND CLOSE YOUR FILE as teachers.html (remember you should not be typing the
.html component as it automatically saves it with the .html extension).
Open two Webpages at the same time 1. If your index.html file is not open, then from the Site Manager panel, open the file named index.html
by double clicking on the filename index.html.
2. Now open the file teachers.html. Notice now that the top of the Document window has two tabs, one
tab named “index” and one tab named “teachers”.
3. Try clicking on each of the two tabs. Notice this allows you to switch between the two files. This
allows you to easily select the file you wish to edit.
Note: Right now, the website “OP library” contains two webpages: index.html and teachers.html
and a folder called images
Copying between two webpages • From the index.html file, highlight the text “Roll Woods Park Public School Library”, copy it by going
to menu bar and selecting Edit >Copy, (or you can Ctrl-C or right-click and select Copy) and then
click on the “teachers.html” tab, and paste the text at the top of this file , again use the menu bar to do
this, select Edit > Paste.(or Ctrl-V or right-click and select Paste).
• Save and close the webpage teachers.html (keep index.html open).

15
Viewing the HTML Code - other modes 1. Open the file index.html from the Site Manager by double-clicking on the name.
At the bottom of the document
window, you will notice the three
buttons: Normal, HTML tags, Source
and Preview.
2. Press each one of these modes in
succession and you will see the
document window change.
Explanation of Modes
• Normal: This is the mode you will
normally be using. It displays the
webpage almost exactly like the webpage will look in a real browser. This is also called a
WYSIWYG mode (“What You See Is What You Get”). As you are entering text,images etc into the
Document window, KompoZer is actually creating the webpage using HTML code “under the
covers”.
• HTML Tags: This view assists those familiar with HTML. There is a yellow marker for the start tag
for all elements (end tags are omitted). Clicking on a marker selects and highlights the whole of the
element. Try clicking on these markers.
• Source: Clicking on this mode shows the actual HTML code being built in the background.
• Preview: Preview mode offers almost the same view as in a browser with the addition of rulers and
sizing boxes. The main differences are that scripts do not run (so their effects will not be seen), links
do not operate and the style for links does not respond to any class set.
Previewing Your Webpage
Webpages are stored as HTML code, and it is the job of Internet Browsers is to interpret this code and
display it in a format that humans can understand. To ensure that what you are creating will appear
properly in browsers, you need to preview it to see how it would behave in an Internet browser.
1. To preview your
webpage in a browser,
click on the Browse
icon found in the
Composition toolbar.
2. The first time it may come up with this
dialog box. Click on Remember my choice
for all links of this type. Click on Launch
application. It will open your default web
browser so you can see how your web page
16
will look once it is on the Web. If you have not saved your page, KompoZer will prompt you to do so
before it launches the browser.
3. Notice that the webpage’s first line in the paragraph may look longer when viewing the browser. This
happens because the page content is not built within a table to constrain the content to a fixed width.
(You will be learning later how to use tables). Play around with the browser’s “middle” button
in the top of your window screen, and then drag one of the browser window corners to see
the window get smaller and larger, and watch how the first paragraph in the webpage changes in
length. This occurs because the text is not stored inside of a table cell. We’ll talk more about this
later in the section with tables.
Setting a Page Title Property
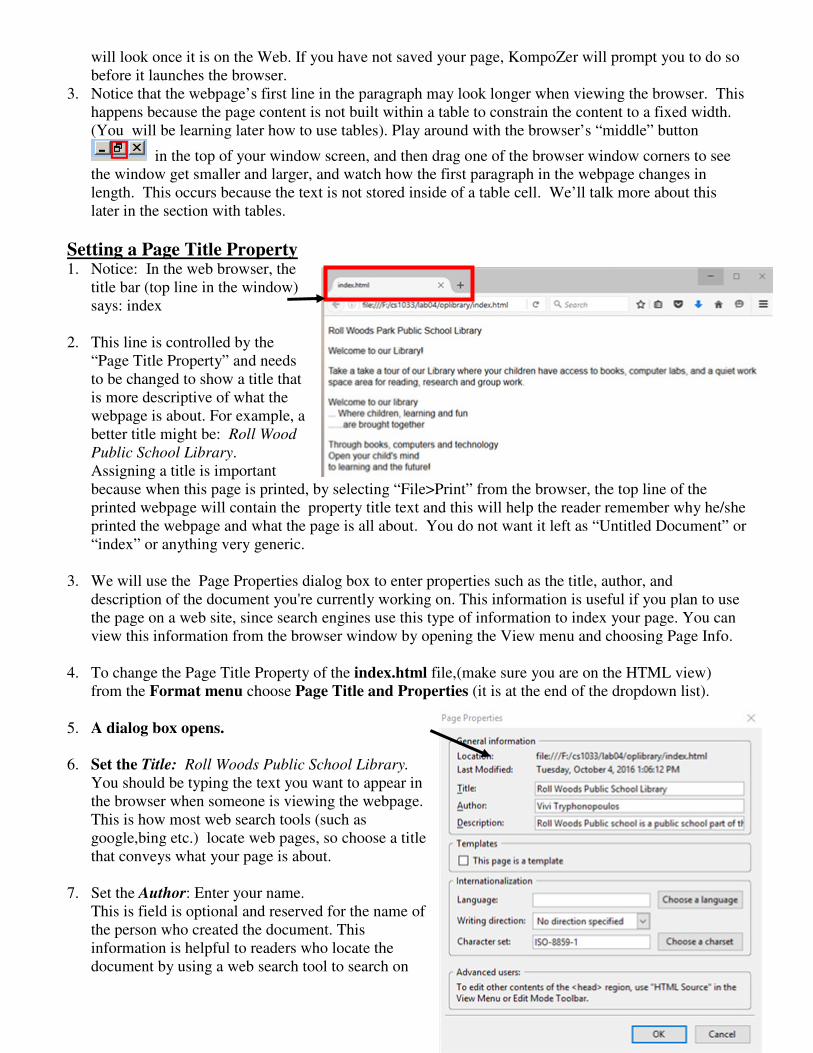
1. Notice: In the web browser, the
title bar (top line in the window)
says: index
2. This line is controlled by the
“Page Title Property” and needs
to be changed to show a title that
is more descriptive of what the
webpage is about. For example, a
better title might be: Roll Wood
Public School Library.
Assigning a title is important
because when this page is printed, by selecting “File>Print” from the browser, the top line of the
printed webpage will contain the property title text and this will help the reader remember why he/she
printed the webpage and what the page is all about. You do not want it left as “Untitled Document” or
“index” or anything very generic.
3. We will use the Page Properties dialog box to enter properties such as the title, author, and
description of the document you're currently working on. This information is useful if you plan to use
the page on a web site, since search engines use this type of information to index your page. You can
view this information from the browser window by opening the View menu and choosing Page Info.
4. To change the Page Title Property of the index.html file,(make sure you are on the HTML view)
from the Format menu choose Page Title and Properties (it is at the end of the dropdown list).
5. A dialog box opens.
6. Set the Title: Roll Woods Public School Library.
You should be typing the text you want to appear in
the browser when someone is viewing the webpage.
This is how most web search tools (such as
google,bing etc.) locate web pages, so choose a title
that conveys what your page is about.
7. Set the Author: Enter your name.
This is field is optional and reserved for the name of
the person who created the document. This
information is helpful to readers who locate the
document by using a web search tool to search on

17
name. Many times an organization name will go here. But many leave this blank. – it is optional.
8. Set the Description field to Roll Woods Public school is a public school part of the Thames Valley
Board in London, Ontario. And press OK.
9. Now preview the webpage again to see
if your webpage property title was set. It
should state: Roll Woods Public School
Library
NOTE: the standard convention for the
webpage property title is Website –
Webpage. For example, a good property
title on the Computer Science website’s
faculty description webpage would be:
The Computer Science Department –
Faculty
10. Now to see the Description and Author
information, while in the browser: If in Firefox or Google Chrome, right-click and select View Page
Source. The following screen shows the source HTML code. You could also view the source code by
clicking on the Source tab in KompoZer. Now pick out the tags on line 2 that reflect what you
entered for the fields above.
11. Save the index.html file but still keep it open.

18
IMPORTANT: In the below diagram, that because you changed the property title in the last step, notice
how the tab in the window pane has changed from index to Roll Woods Public School Library.
12. Now, in order to know what file you are working on, look in the first line of KompoZer
window (indicated in above diagram which shows the filename index.html. Below is a zoom shot of
the diagram above (the first line)
Setting Text Attributes: Formatting Text
Text formatting options/properties that you can apply to text and customize are:
• Headers - Heading 1, Heading 2, Heading 3, Heading 4, Heading 5, Heading 6 (predefined sizes
and bolds text).
Formats the paragraph as a heading. Heading 1 is the highest-level heading(largest text size),
while Heading 6 is the lowest-level heading (smallest text size).
• Text color – Setting text to a specific color
• Text size – Setting the size and box beside it has “pixels” or “points”
• Font type - New Times, Verdana etc.
• Special effects - Bold, Italics (menu Text >Style for additional options). Never use underlining
for emphasis since it is reserved for links)
• All formatting is controlled through the Composition and Format Toolbars 1 and 2.
Toolbar 1
Format Toolbar 2

19
To use Heading attributes (H1 to H6):
1. Highlight the text “Roll Woods Park Public School Our Library”
2. From the Format Toolbar 1 click on the first dropdown box and select Heading1. It is very big, so
try selecting Heading 2, and then try Heading 3 and etc. so you can see the approximate size of each
Heading. Notice a Heading is always formatted with boldness automatically. You can use the
headings to indicate any titles/headings/notes on your pages.
3. Do Not use headings for body of text formatting, reserve them for Heading, titles.
4. Set the text “Roll Woods Park Public School Library” to Heading 1
Changing Text Color, Style, and Font
1. To set the text color to Red, highlight the text “Roll Woods Park Public School Library”. From the
Format Toolbar, click on the icon .( Note that if you click on the black square it represents
changing the text. If you click on the white square behind it, it represents changing the background
color. )
2. Make sure you clicked the black square.
It opens a dialog box with the Text Color choices.
3. Click on either of the areas to select a color. If you know the
hexadecimal value of a color you can type it directly into the Hex:
code box. For example, try entering #FF0000 (this is red).
and click on OK button.
To change the Font Style to Arial:
1. Highlight the text “Roll Wood Park Public School Library”. From
the Format Toolbar, from the dropdown box “Variable Width”
select Arial. (You can also set the font type from the top menu
Format >Font)
.
• T
o
c
h
a
n
g
TIP: Not all fonts installed on your computer appear. Instead of specifying a font that may not
be available to all who view your web page, it's generally best to select one of the fonts
provided in the menu since these fonts work on every computer. For example, the fonts
Helvetica, Arial, Times, and Courier generally look the same when viewed on different
computers. If you select a different font, it may not look the same when viewed using a
different computer.
If you prefer to use fonts specified by the reader's browser, select Variable Width or Fixed
Width
.

20
Change the Font Size
1. Highlight the first paragraph starting with “Take a tour of our Library......”. From the Format
Toolbar, use the icons . Use this to choose a relative font size or select an option to increase or
decrease text size (relative to the surrounding text). Each time you click on the smaller or larger font
size, it decreases or increases the size. The only way you can use a pixel measurement is with setting
font size with Style Sheets which you will learn in the next section.
2. Other styles: Bold, Italics, and Underlining. It is acceptable to use bold and italics in a webpage,
but NEVER USE THE UNDERLINE FEATURE. If you underline text it is assumed that the
underlined text is a link and with this feature, it does not turn it into a link.

21
LAB #4 - Tutorial 3
Objectives:
� Learning how to work with styles to apply to text.
� Difference between internal and external stylesheet.
� How to create styles, how to modify and how to apply styles to the webpage.
Changing Text Formatting Attributes using Styles
To change text within KompoZer, you can create ‘rules’ or styles which will determine the different
attributes of the text (colour, size, alignment, etc.). Once you define a style, you can apply it to any text
and that text will take on the style’s colour, size, alignment, etc.
Cascade Style Sheets(CSS) can be used to style an HTML document in two ways:
a) Using internal style sheet.
The styles are embedded into the webpage that you have open and apply ONLY to that page.
b) Using external style sheets.
The styles are stored in an external file and can be linked to each webpage so that you can have
access to them ONLY to that page.
KompoZer has a built-in style sheet editor called CaScadeS.
CaScadeS can be used to produce either an internal style
sheet (styles are stored in the webpage) or an external one
(where the styles are stored in an external style sheet and
linked to a webpage. As opposed to inline styles, internal or external style sheets help to keep the content
and style information separate and consistent across all webpages.
1. To start the CaScadeS Editor
click on the CascadeS button
from the Format Toolbar. It
opens a dialog box where you
will begin to define/create
your own styles.
Style information can be
contained in the HTML file
itself or in an external file.
Right now you will be using
an internal stylesheet where
the styles will be embedded
in the actual webpage.

22
We want to change some of the Text Attributes on our
page
Now you will make a new rule to indicate the style settings for
Heading 1 so we can change the appearance of the title “Roll
Woods Park Public School Library” from the default setting.
1. In the dialog box under the General tab, you want to select style
applied to all elements of type.
2. Choose an element to create a style rule from the dropdown box.
Choose h1 which represents Heading 1.
3. Click the Create Style Rule button.
After choosing which element to create a style rule for and clicking on the Create Style Rule button,
we now see the H1 element just below the internal stylesheet heading on the left pane of the window.
Each element that we create style rules for will
appear in this list. In CSS, each of these elements
are called selectors. Let’s create the style rules
for our H1 selector.
4. Click on the h1 in the left pane of the window to
select it. Click the Text tab in the right pane. Here
we can choose a number of options for how the
h1 elements will look.
5. In the font family section, click the radio button labeled “Use custom font family” and choose “Arial”
from the menu below it.
6. Set the remaining attributes you want to apply
to the Heading 1 tag.
- Font Size to 24px (type directly in box)
- Set Color: #3366ff (or pick a blue from the color
square and use the color picker palette
- Font Weight to Bold
- Font Style to Normal (change Unspecified to
Normal)
- Alignment to Center
7. You have a preview of what you have defined at
the bottom of the dialog box.
8. Click on the General tab so that you can see the
CSS code that is being generated for these font attributes that you selected. If you want to add more
text attributes then click on the Text tab, but for now click OK to close the CSS Stylesheets dialog box

23
and enforces the style rules you just entered for Heading 1. You should see the following: Notice how
the styles do not show up in the Site Manager panel.
To edit a style or Add more Styles
1. Start the CaScadeS Editor by clicking on the CascadeS button from the Format Toolbar. It opens
the dialog box. Highlight h1 from the left panel, and then click on the Text tab. It will show you the
style attributes associated with Heading1. Change the color from a Blue to a Green (v#33CC00).
And click Ok.
2. To create a new style for the Heading 3 tag (which you will apply to
control the text Welcome to Our Library!) start up the CaScadeS
editor.
1. From the top left corner of the dialog box, click on the CSS
button in the upper left corner of the CSS Stylesheets dialog
(it looks like a little palette), or click on the arrow next to it
and choose “style rule” from the drop menu.
2. In the General tab, select the option the style applied to all
elements of type selector and from the dropdown box select h3
Then click on Create Style Rule and press OK.
3. Then click on the Text tab, and assign:
- Font Size to 24px (type directly in box)
- Set Color: # 3366FF (blue)
- Font Weight to Bold
- Alignment to Left
- Click OK to exit dialog box.
4. To apply the Heading 3 attribute, highlight
the text “Welcome to our Library!” and from
Toolbar1 select Heading 3. See how the title
“Welcome to our Library!” uses the Heading
3 settings you just applied.
5. Now your turn, change the Heading 3 Fonts
size to “20px” by entering the CaScadeS
editor. You should see the webpage take on
the appearance to the right.

24
Now your turn to follow the same steps as above and set the body selector which controls the body
of text that is not affected by any styles such as the Heading 1 and Heading 3 as you set already.
1. Start up the CaScadeS editor and select the New Style Rule.
2. Under the General tab, select “style applied to all elements of type” and from the dropdown box select
body(Body Text). Then click on Create Style rule button.
3. Click on Text tab
• Select Use Custom Font family and use Comic Sans.
• Font Size to 14px
• Font Weight to Normal
• Alignment to the left
• Set font color to Pink (#FA24FF) only so that you can see what gets affected in your webpage).
Move your dialog box over a bit so you can see the actual webpage content. See how the body of
text now appears as pink Comic Sans.
• Next, edit the font color to soft grey/black(#272727). Sometimes a bit of grey is easier on the eyes
4. To see the attributes/styles you assigned to each of your selectors (ie. Heading 1, Heading 2 and
Body), from the left pane click on each of the selectors and see the attributes you assigned in the right
pane under the Text tab. Also click on the General tab to see another view of the styles you created.
Selecting any element from the list allows you to edit the options. Click OK to exit the CaScadeS
editor.
5. This is what your webpage should look like now. And save the file index.html.

25
6. In case you were wondering what CSS style rules look like within the webpage, select the Source tab
at the bottom of the editor window. This shows the HTML code as the browser would read to display
the page on your screen.
The CSS code can be seen in the head section of the web page source code. Notice how the selector
attributes are embedded into the HTML code.
7. Click on the Normal view as this is the WYSIWYG mode… and easier to type and edit.

26
To create YOUR OWN STYLES that are
not associated with the standard tags of
Headings and body and paragraph and
stored inside the webpage rather than in an
external file.
In this part of the tutorial, you need to
understand how to make up your own style
rules that are not associated with the standard
HTML tags of Headings and body and
paragraphs. We call these types of styles
classes.
Let’s assume you want the first paragraph to take on a color green, the second paragraph orange, and the
last paragraph dark yellow (Horrible choice of colors but to show you how you can create your own
styles)
1. Start the CaScadeS Editor. It opens the dialog
box. This time, from the top left corner of the
dialog box, click on the CaScade icon and the right
pane is ready to allow you to enter a New Style
rule.
2. To create your own style rules, you need to select
the option “style applied to all elements of class”.
Next in the dropdown box, notice how it begins
with a dot “.” Class styles always start with a
leading dot.
3. Enter a descriptive name for the style that will
represent what you are doing. For example, in the
dropdown box enter .greentextparagraph.
Then click Create Style rule.
Then click on the Text tab. (notice in left side of
pane it shows that we are starting a new style called
.greentext paragraph). Set the following attributes
- Font Family: Tahoma
- Font size” leave it blank. It will take on the characteristics of the body style that you assigned in the
last few steps.
- Font style: italics
- Alignment: Left
- Color: #10F72E (Lime Green)
- Click Ok to exit from the CSS dialog box.
You will see that nothing got affected in the document pane. The new style .greentextparagraph has
not been applied yet.

27
To apply the style .greentextparagraph to the text, highlight the first paragraph “Take a tour of our
library…. Group work”. Then from the Format toolbar, click on the dropdown box which will contain any
class styles that you have created and select .greentextparagraph.
Create two new class styles but save them in an
external stylesheet.
KompoZer does not have a way to create the
stylesheet internally, thus you have to use an
external editor such as Notepad to create the file
that will be the external stylesheet. We will call
this stylesheet “mystyles.css”
1. From Windows Explorer open the
application Notepad. When the application
opens, do not type anything into the document.
Save the file using the menu command File >
Save As and call it mystyles.css . Make sure
that you are pointed to your memory stick and
in the folder F:/cs1033/lab04/oplibrary.
2. Close the Notepad application. Return back to the KompoZer application.
3. Next you will create a new class style called .blueheading but store it in the external stylesheet
mystyles.css that you just created in the last step.
4. Start the CaScadeS Editor.
It opens the dialog box. This
time, from the top left corner
of the dialog box, click on
the CaScade icon and select
Linked stylesheet.
A dialogue box will open.

28
5. In the dialog box click on the
General tab and click on the
Choose File button. Navigate to
the directory
F:/cs1033/lab04/oplibrary and
select mystyles.css. Then click
on the button Create Stylesheet.
You have now attached the
stylesheet mystyles.css to the
webpage index.html. But you
haven’t stored any styles in this
file mystyles.css. This is what
you will do next.
6. Look in the left pane and see whether the file
mystyles.css shows up. If it doesn’t then click on
the Refresh button.
If it still doesn’t show up, then click on the “-”
beside OP Library Website and then click again on
the “+”. This should refresh the screen so that you
can now see the all the files including mystyles.css.
29
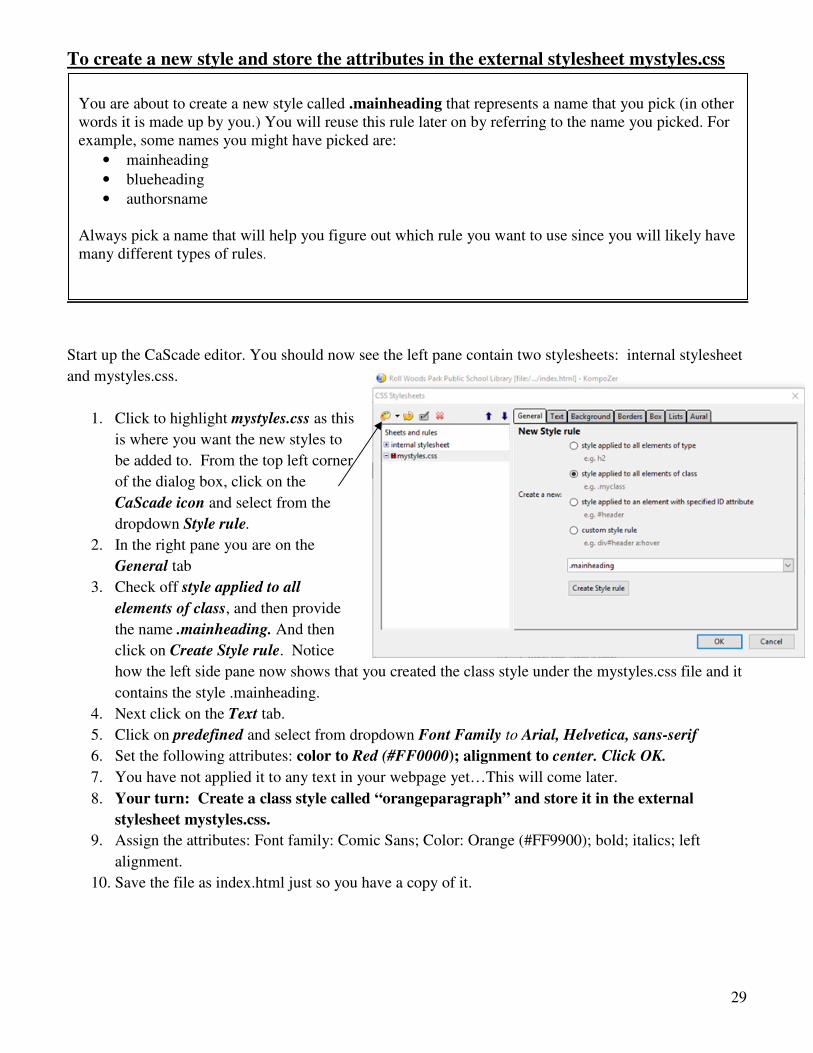
To create a new style and store the attributes in the external stylesheet mystyles.css
Start up the CaScade editor. You should now see the left pane contain two stylesheets: internal stylesheet
and mystyles.css.
1. Click to highlight mystyles.css as this
is where you want the new styles to
be added to. From the top left corner
of the dialog box, click on the
CaScade icon and select from the
dropdown Style rule.
2. In the right pane you are on the
General tab
3. Check off style applied to all
elements of class, and then provide
the name .mainheading. And then
click on Create Style rule. Notice
how the left side pane now shows that you created the class style under the mystyles.css file and it
contains the style .mainheading.
4. Next click on the Text tab.
5. Click on predefined and select from dropdown Font Family to Arial, Helvetica, sans-serif
6. Set the following attributes: color to Red (#FF0000); alignment to center. Click OK.
7. You have not applied it to any text in your webpage yet…This will come later.
8. Your turn: Create a class style called “orangeparagraph” and store it in the external
stylesheet mystyles.css.
9. Assign the attributes: Font family: Comic Sans; Color: Orange (#FF9900); bold; italics; left
alignment.
10. Save the file as index.html just so you have a copy of it.
You are about to create a new style called .mainheading that represents a name that you pick (in other
words it is made up by you.) You will reuse this rule later on by referring to the name you picked. For
example, some names you might have picked are:
• mainheading
• blueheading
• authorsname
Always pick a name that will help you figure out which rule you want to use since you will likely have
many different types of rules.

30
How to check what your external stylesheet contains in terms of styles:
1. At this point, your screen should like the image below. The problem with this is understanding
how to know what styles have been applied to your webpage and what styles are included in your
stylesheets: both internal and external.
2. To see what styles are stored with
your stylesheets, start up the
CaScadeS editor from the top right
hand of your screen.
A dialog box pops up.
3. In the left pane, you will see listed:
internal stylesheet and
mystyles.css. Click on the “+”
icons beside each stylesheet. It will
expand the list and you should see
at this point the styles stored in
both the internal and external
stylesheets.
4. Click OK to exit the editor and return back to your document window.

31
5. To see what styles are associated with the text in your webpage
6. Click anywhere on the text “Roll Woods Park Public School Library”.
7. In the diagram below, At the bottom of your KompoZer window, you will see the string
<body><h1> This is telling you that you have applied a Heading 1
8. Next, click on the text “Welcome to our Library. You will see the code: <body><h3>
9. Next click on the text “Take a tour of our Library…”. You will see the code: <p
class=”greentextparagraph”.

32
10. To see the classes you applied you can also see them in Source View (click on the tab at the
bottom of the document pane called Source.
This indicates that the styles
are internal because it starts
with <style
type=”text/css”>. Notice
that there is and </style>tag
to indicate the end of the
internal styles to this
webpage. These styles can
only be applied to this
webpage.
Line 41: indicates that an
external file called
mystyles.css is linked to this
webpage. But you can’t see
what the styles look like
unless you do the operation
you learned in the previous
section.
This section of the HTML
code shows you the styles
applied to the different
pieces of text in your
webpage. Notice the <h1>
and <h3> and the <p
class=”greentextparagraph”>

33
11. Next click at the bottom tab labelled “HTML Tags”. This view gives you an overview of the
HTML Tags such as body, H1, H3, P (paragraph). But it will not show you any classes you
applied. So you are best to stick to Normal view and Source view if you want to see the code.
12. Click on Normal view. Save your file index.html
To see remove a style associated with the text in your webpage
13. Click anywhere on the text “Roll Woods Park Public School Library”. In the Format toolbar you
will see it says Heading 1 to body of text. IMPORTANT: If you cannot change it to anything
else, then save the file and close the application and restart it. And open the file you were working
on. Notice how the text now has been stripped of the Heading 1 styles.
14. Now undo the operation ctrl- Z so that you can see another technique that is more universal for all
types of styles
15. Click anywhere on the text “Welcome to our Library”. In the Format toolbar change it from
Heading 3 to body of text.
16. At the bottom of the status bar, you will see the html code <body <h1>. Right click on the tag
<h1> and select Remove tag.
17. To remove a class, click on any part of the text “ Take a tour of our Library… group work”. At
the bottom in the status bar, Right-click on the tag: <p class=”greentextparagraph”> and select
Classes and a list is presented with a checkmark beside the class greentextparagraph.
18. Select the greentextparaph to uncheck this option. So you have indicated that you want to remove
the class greentextparagraph from the text “Take a tour… group work.
19. Next, remove the Heading 3 from the title “Welcome to our Library!”… you are on your
own based on what you learned above.
Save the file index.html
34
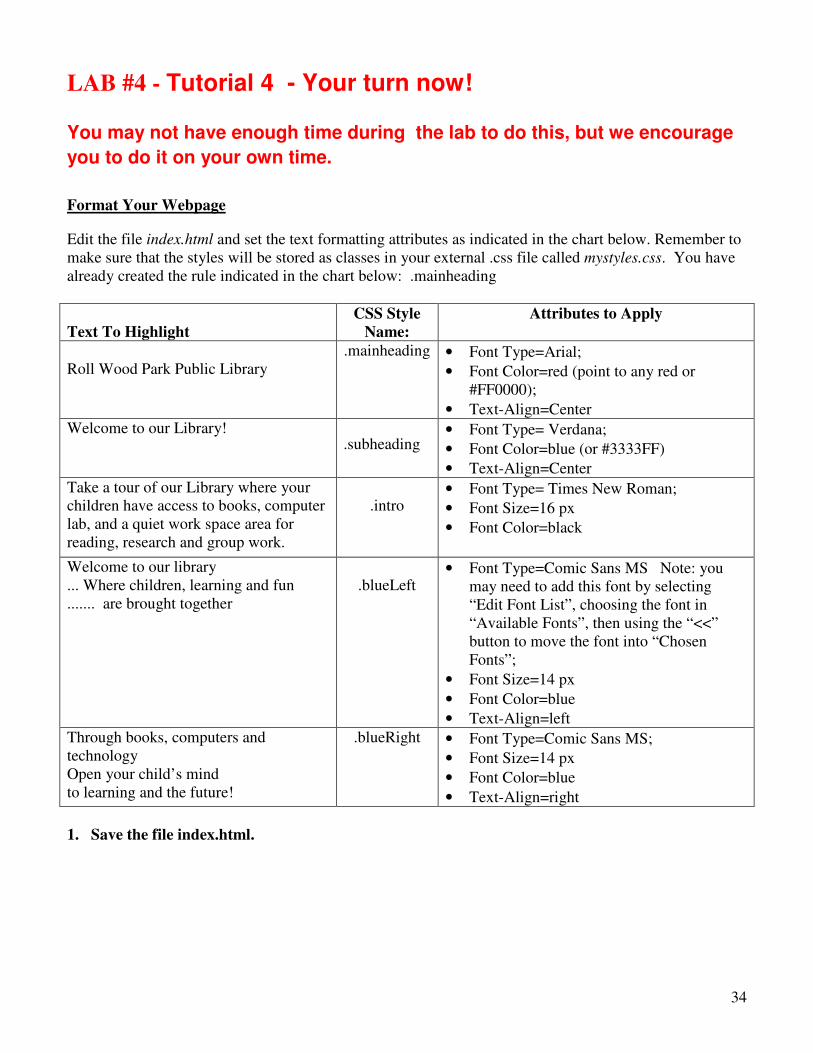
LAB #4 - Tutorial 4 - Your turn now!
You may not have enough time during the lab to do this, but we encourage
you to do it on your own time.
Format Your Webpage
Edit the file index.html and set the text formatting attributes as indicated in the chart below. Remember to
make sure that the styles will be stored as classes in your external .css file called mystyles.css. You have
already created the rule indicated in the chart below: .mainheading
Text To Highlight
CSS Style
Name:
Attributes to Apply
Roll Wood Park Public Library
.mainheading • Font Type=Arial;
• Font Color=red (point to any red or
#FF0000);
• Text-Align=Center
Welcome to our Library! .subheading
• Font Type= Verdana;
• Font Color=blue (or #3333FF)
• Text-Align=Center
Take a tour of our Library where your
children have access to books, computer
lab, and a quiet work space area for
reading, research and group work.
.intro • Font Type= Times New Roman;
• Font Size=16 px
• Font Color=black
Welcome to our library
... Where children, learning and fun
....... are brought together
.blueLeft • Font Type=Comic Sans MS Note: you
may need to add this font by selecting
“Edit Font List”, choosing the font in
“Available Fonts”, then using the “<<”
button to move the font into “Chosen
Fonts”;
• Font Size=14 px
• Font Color=blue
• Text-Align=left
Through books, computers and
technology
Open your child’s mind
to learning and the future!
.blueRight • Font Type=Comic Sans MS;
• Font Size=14 px
• Font Color=blue
• Text-Align=right
1. Save the file index.html.

35
2. Preview it in Internet Explorer: It should look like something as the illustration below the chart
when previewed. But because of your monitor resolution it will spread all the way across the width of
your screen. Click on the middle button and drag the corners of the browser window and
watch how the document looks different.
You are done with the first lab for KompoZer
DON’T FORGET TO TAKE YOUR
MEMORY STICK!