Lab 4- Writing Basic Software Applications · PDF fileLab 4: Writing Basic Software...
25
For Academic Use Only This material exempt per Department of Commerce license exception TSU Lab 4- Writing Basic Software Applications Targeting MicroBlaze™ on the Spartan™-3E Starter Kit
-
Upload
dangnguyet -
Category
Documents
-
view
223 -
download
2
Transcript of Lab 4- Writing Basic Software Applications · PDF fileLab 4: Writing Basic Software...

For Academic Use Only
This material exempt per Department of Commerce license exception TSU
Lab 4- Writing Basic Software
Applications
Targeting MicroBlaze™ on the Spartan™-3E Starter Kit

Writing Basic Software Applications Lab: www.xilinx.com/university 4-3 MicroBlaze Processor [email protected]
Lab 4: Writing Basic Software Applications
Introduction
This lab guides you through the process of writing a basic software application. The software will write to the LEDs on the Spartan-3E starter kit. You will add an XPS BRAM controller and
modify the linker script to place the text section in the BRAM. Finally, you will verify that the
design operates as expected in hardware.
Objectives
After completing this lab, you will be able to:
• Add an internal Block RAM memory controller
• Write a basic application to access an IP peripheral in SDK
• Develop a linker script
• Partition the executable sections onto both the LMB and PLB memory spaces
• Generate a bit file
• Download the bit file and verify on the Spartan-3E starter kit
Procedure
Extend the processor system created in lab3 by adding a memory controller (see figure 4-1) and the writing a basic software application to access the LEDs on the Spartan-3E starter kit. The
steps are listed below:
1. Add an internal BRAM
2. Invoke SDK and create a software project
3. Analyze assembled object files
4. Verify the design in hardware

Writing Basic Software Applications Lab: www.xilinx.com/university 4-4 MicroBlaze Processor [email protected]
Figure 4-1. Design Updated from Previous Lab
For each procedure within a primary step, there are general instructions (indicated by the symbol). These general instructions only provide a broad outline for performing the procedure.
Below these general instructions, you will find accompanying step-by-step directions and
illustrated figures that provide more detail for performing the procedure. If you feel confident
about completing a procedure, you can skip the step-by-step directions and move on to the next
general instruction.
LMB
BRAM
CNTLR
LMB
BRAM
CNTLR
BRAM
PLB
MDM UART
MicroBlaze
GPIO
GPIO
PSB
LEDs
LCD MYIP
GPIO DIP
BRAM
XPS
BRAM
CNTLR
MPMC
CNTLR DDR

Writing Basic Software Applications Lab: www.xilinx.com/university 4-5 MicroBlaze Processor [email protected]
Add an Internal BRAM Step 1
Create a lab4 folder and copy the contents of the lab3 folder into the lab4 folder,
or copy the content of the labsolution\lab3 folder into the lab4 folder. Launch
Xilinx Platform Studio (XPS) and open the project file.
� Create a lab4 folder in the C:\xup\embedded\labs directory and copy the contents from lab3 to
lab4, or copy the content of the labsolution\lab3folder into the lab4 folder
� Open XPS by selecting Start →→→→ All Programs →→→→ Xilinx ISE Design Suite 12 →→→→ EDK →→→→
Xilinx Platform Studio
� Browse to the lab4 directory and open the project system.xmp
Add a BRAM controller and BRAM to the design.
� From the IP catalog, add the following IP to the embedded hardware design, accepting the
default settings
• XPS BRAM Controller 1.00.b
• Block RAM (BRAM) block 1.00.a
� Connect the BRAM controller to the PLB and connect the BRAM to the BRAM controller
(see Figure 4-2).
Figure 4-2. Add internal XPS memory controller
� Select a size of 8K for the XPS BRAM controller under Unmapped Addresses in Addresses
tab, and click Generate Addresses

Writing Basic Software Applications Lab: www.xilinx.com/university 4-6 MicroBlaze Processor [email protected]
Figure 4-3. Specify Size and Address of Internal BRAM Memory Controller
� Generate hardware bitstream by clicking Hardware ���� Generate Bitstream (this is to
complete the hardware flow in XPS before we start the software development flow in SDK

Writing Basic Software Applications Lab: www.xilinx.com/university 4-7 MicroBlaze Processor [email protected]
Invoke SDK and Create Application Project Step 2
Start SDK from XPS, generate software platform project with default settings and
default software project name.
� Start SDK by clicking Project →→→→ Export Hardware Design to SDK …
� Click on Export & Launch SDK button with default settings
� In SDK, select File → New → Xilinx Board Support Package
� Click Finish with default settings (with standalone operating system)
This will open the Software Platform Settings form showing the OS and libraries selections
Figure 4-4. Board Support Package Settings
� Click OK to accept the default settings, as we want to create a standalone_bsp_0 software
platform project without requiring any additional libraries support, and
The library generator will run in the background and will create xparameters.h file in the
C:\xup\embedded\labs\lab4\SDK\SDK_Workspace_35\standalone_bsp_0\microblaze_0\i
nclude\ directory
� Select Standalone_bsp_0 in the project view, right-click, and select New → Project

Writing Basic Software Applications Lab: www.xilinx.com/university 4-8 MicroBlaze Processor [email protected]
� Select Xilinx C Project and then click Next
� Select Empty Application in the Select Project Template window, and enter TestApp as the
Project Name and click Next
Figure 4-5. Create a blank C Project
Select Target an existing Board Support Package and click Finish

Writing Basic Software Applications Lab: www.xilinx.com/university 4-9 MicroBlaze Processor [email protected]
Figure 4-6. Use Existing Board Support Package
The TestApp project will be created in the Project Explorer window of SDK
Import lab4.c file from the c:\xup\embedded\source directory.
� Select TestApp in the project view, right-click, and select Import
� Expand General category and double-click on File System
� Browse to c:\xup\embedded\source folder
� Select lab4.c and click Finish
Writing Basic Software Applications Lab: www.xilinx.com/university 4-10 MicroBlaze Processor [email protected]
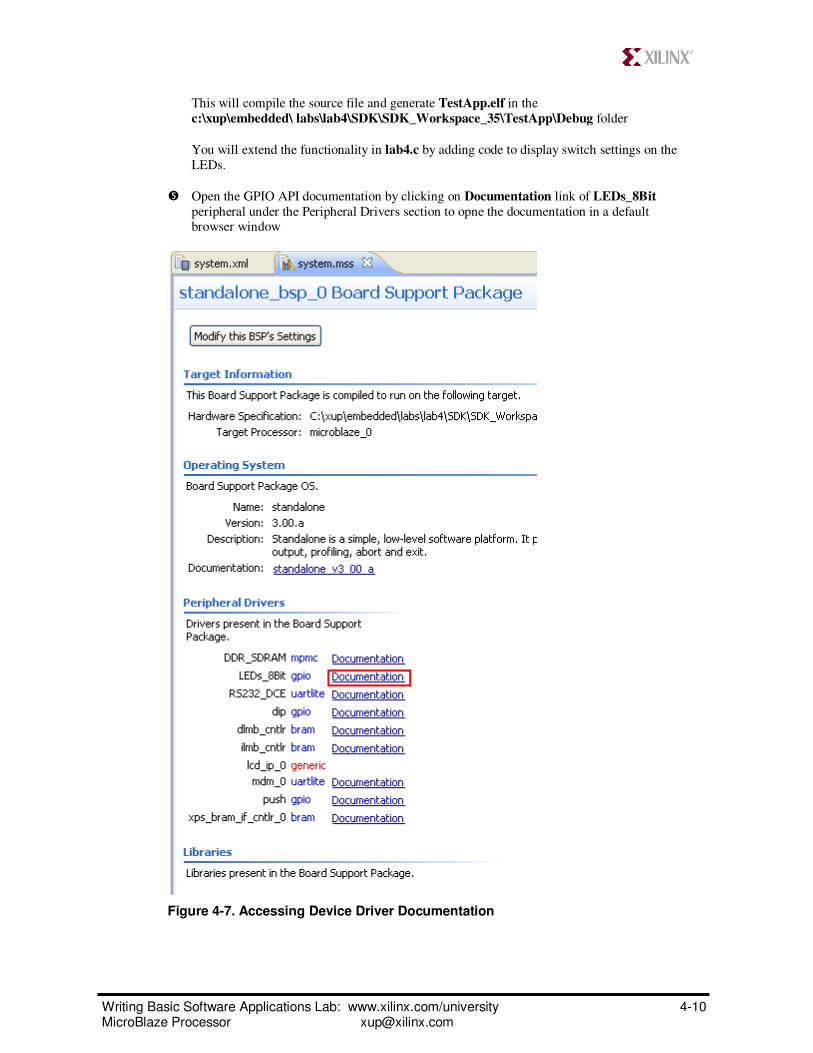
This will compile the source file and generate TestApp.elf in the
c:\xup\embedded\ labs\lab4\SDK\SDK_Workspace_35\TestApp\Debug folder
You will extend the functionality in lab4.c by adding code to display switch settings on the
LEDs.
� Open the GPIO API documentation by clicking on Documentation link of LEDs_8Bit
peripheral under the Peripheral Drivers section to opne the documentation in a default browser window
Figure 4-7. Accessing Device Driver Documentation

Writing Basic Software Applications Lab: www.xilinx.com/university 4-11 MicroBlaze Processor [email protected]
� View the various C and Header files associated with the GPIO by selecting File List at the top
� Click the header file xgpio.h and review the list of available function calls for the GPIO
� The following steps must be performed in the software application to enable writing to the
GPIO: 1) Initialize the GPIO, 2) Set data direction, and 3) Write the data
Find the descriptions for the following functions by clicking links:
XGpio_Initialize (XGpio *InstancePtr, u16 DeviceId)
InstancePtr is a pointer to an Xgpio instance. The memory the pointer references must
be pre-allocated by the caller. Further calls to manipulate the component through the XGpio API must be made with this pointer.
DeviceId is the unique id of the device controlled by this XGpio component. Passing in a
device id associates the generic XGpio instance to a specific device, as chosen by the
caller or application developer.
XGpio_SetDataDirection (XGpio * InstancePtr, unsigned
Channel, u32 DirectionMask)
InstancePtr is a pointer to the XGpio instance to be worked on.
Channel contains the channel of the GPIO (1 or 2) to operate on
DirectionMask is a bitmask specifying which discretes are input and which are output.
Bits set to 0 are output and bits set to 1 are input.
XGpio_DiscreteWrite (XGpio *InstancePtr, unsigned channel,
u32 data)
InstancePtr is a pointer to the XGpio instance to be worked on.
Channel contains the channel of the GPIO (1 or 2) to operate on
Data is the value data written to the discrete register.
Double-click on lab4.c in the Project Explorer view to open the file. This will populate the
Outline tab. Open the header file xparameters.h by double-clicking on xparameters.h in
the Outline tab
Figure 4-8. Double-Click the Generated Header File

Writing Basic Software Applications Lab: www.xilinx.com/university 4-12 MicroBlaze Processor [email protected]
In the xparameters.h file, find the following #define used to identify the LEDs_8Bit
peripheral:
#define XPAR_LEDS_8BIT_DEVICE_ID 1
Note: The LEDS_8BIT matches the instance name assigned in the MHS file for this
peripheral.
This #define can be used in the XGpio_Intialize function call.
� Modify your C code to echo the dip switch settings on the LEDS (Figure 4-9) and save the
application. The application will be compiled
Note: The number might be different

Writing Basic Software Applications Lab: www.xilinx.com/university 4-13 MicroBlaze Processor [email protected]
Figure 4-9. The Completed C File

Writing Basic Software Applications Lab: www.xilinx.com/university 4-14 MicroBlaze Processor [email protected]
Analyze Assembled Object Files Step 3
Generate liner script targeting .text section to ilmb and setting heap and stack
sizes to 400 each. Compile the application, and analyze the assembled object files
using the objdump utility.
� Select Xilinx Tools → Generate Linker Script…
� Select lscript.ld under c:\xup\embedded\labs\lab4\SDK\SDK_Workspace_35\TestApp\src
and click Save. Change Heap and Stack sizes to 400 each (to fit the program into single
memory) followed by clicking Generate
Figure 4-10. The Linker Script GUI
� Click Yes to overwrite the linker script
� Click somewhere in white space area in the lab4.c file, add a space and save it to recompile
the program
� Launch the Bash shell by selecting Xilinx Tools →→→→ Launch bash shell
� Change the directory to TestApp/Debug using the cd command in the bash shell.
You can determine your directory path by using the pwd command.
� Type mb-objdump –h TestApp.elf at the prompt in the shell window to list various sections of
the program, along with the starting address and size of each section

Writing Basic Software Applications Lab: www.xilinx.com/university 4-15 MicroBlaze Processor [email protected]
You should see results similar to that below:
Figure 4-11. Object Dump Results - .text in ILMB space
Change the location of the text section so that it resides in the XPS PLB memory.
Recompile the code, re-execute the objdump command, and analyze the output.
� Select Xilinx Tools → Generate Linker Script…
Loadable Memory Address (start address for
each section)
Virtual Memory
Address
Size of each
section
Note the start address of the text section resides in the lmb_bram space

Writing Basic Software Applications Lab: www.xilinx.com/university 4-16 MicroBlaze Processor [email protected]
� Select lscript.ld under c:\xup\embedded\labs\lab4\SDK\SDK_Workspace_35\TestApp\src
and click Save. Notice that the Heap and Stack sizes are changed to 1 KB (it will be OK as we
are going to target the .text section to XPS BRAM)
� Select the Code section to target in to XPS BRAM, click Generate, and click Yes to
overwrite
Figure 4-12. Target .text Section to XPS BRAM
� Click somewhere in white space area in the lab4.c file, add a space and save it to recompile
the program
� Execute the mb-objdump command in the bash shell

Writing Basic Software Applications Lab: www.xilinx.com/university 4-17 MicroBlaze Processor [email protected]
Figure 4-13. Object Dump Results - .text in XPS BRAM Space
Note the start address of the text section resides in the xps_bram space

Writing Basic Software Applications Lab: www.xilinx.com/university 4-18 MicroBlaze Processor [email protected]
Verify in Hardware Step 4
Connect and power the board. Select TestApp.elf as the application to intialize
the BRAM with and program the FPGA from SDK.
� Connect and power the board
� Open a hyperterminal session with the following settings
• Baud rate: 115200
• Data bits: 8
• Parity: none
• Stop bits: 1
• Flow control: none
� In SDK, select Xilinx Tools → Program FPGA
� Click on the drop-down button of the Software Configuration and select TestApp.elf
application to be targeted in BRAM
Figure 4-14. Assigning TestApp to BRAM Space
� Click Program button to program the FPGA
� Flip the DIP switches and verify that the LEDs will light according to the switch settings.
Verify that you see the results of the DIP switch and Push button settings in hyperterminal

Writing Basic Software Applications Lab: www.xilinx.com/university 4-19 MicroBlaze Processor [email protected]
Figure 4-15. DIP Switch and Push Button settings displayed in hyperterminal
Note: Setting the DIP switches and push buttons will change the results displayed
Change one of the xil_printf function calls to printf. Re-compile the code and
observe that the XPS BRAM space is not sufficient. Generate the linker script to
target the .text section to external memory (DDR_SDRAM).
� In the text editor, change the xil_printf function call to printf
� Compile the code and observe the output in the console window
Figure 4-16. Errors Shown in Console Window
Observe in the console window that the .text section is too big and sections overlap
� Select Xilinx Tools → Generate Linker Script…
� Target .text section to DDR_SDRAM memory, click Generate, and click Yes to overwrite
� Click somewhere in white space area in the lab4.c file, add a space and save it to recompile
the program

Writing Basic Software Applications Lab: www.xilinx.com/university 4-20 MicroBlaze Processor [email protected]
Initialize BRAM with bootloop application. Program the FPGA. Start the xmd
console window from SDK. Download the TestApp.elf application from the xmd
console window, and run the application
As the .text section is targeted to external memory, the FPGA must be initialized with a bootloop
program, and the test application must be downloaded and executed from XMD shell
� In SDK, select Xilinx Tools → Program FPGA, click Program to initialized the BRAM with the bootloop program, and program the FPGA
Figure 4-17: Initialize BRAM with Bootloop and Program the FPGA
� In SDK, select Xilinx Tools → XMD Console to open an XMD console window
� In the XMD console window, type cd SDK/SDK_Workspace_35/TestApp/Debug
� In the XMD console window, type connect mb mdm
� In the XMD console window, type dow TestApp.elf
This will download the application in the external memory.
� In the XMD window, type con to execute the program
Observe the HyperTerminal window as the program executes. Play with dip switches and
observe the LEDs
� In the XMD console window, type stop to stop the program execution. Close SDK and XPS

Writing Basic Software Applications Lab: www.xilinx.com/university 4-21 MicroBlaze Processor [email protected]
Conclusion
Use SDK to define, develop, and integrate the software components of the embedded system. You can define a device driver interface for each of the peripherals and the processor. SDK
imports an MSS file created in XPS and let you update the settings so you can represent the
software side of the processor system. You can then develop and compile peripheral-specific
functional software and generate the executable file from the compiled object codes and libraries.
If needed, you can also use a linker script to target various segments in various memories. When
the application is too big to fit in the internal BRAM, you can download the application in external
memory using XMD, and then execute the program.

Writing Basic Software Applications Lab: www.xilinx.com/university 4-22 MicroBlaze Processor [email protected]
Completed MHS File
# ##############################################################################
# Created by Base System Builder Wizard for Xilinx EDK 12.2 Build EDK_MS2.63c
# Tue Jul 20 10:08:16 2010 # Target Board: Xilinx Spartan-3E Starter Board Rev D
# Family: spartan3e
# Device: XC3S500e
# Package: FG320
# Speed Grade: -4
# Processor number: 1
# Processor 1: microblaze_0
# System clock frequency: 50.0
# Debug Interface: On-Chip HW Debug Module
# ##############################################################################
PARAMETER VERSION = 2.1.0
PORT fpga_0_RS232_DCE_RX_pin = fpga_0_RS232_DCE_RX_pin, DIR = I
PORT fpga_0_RS232_DCE_TX_pin = fpga_0_RS232_DCE_TX_pin, DIR = O
PORT fpga_0_LEDs_8Bit_GPIO_IO_O_pin = fpga_0_LEDs_8Bit_GPIO_IO_O_pin, DIR = O, VEC =
[0:7]
PORT fpga_0_DDR_SDRAM_DDR_Clk_pin = fpga_0_DDR_SDRAM_DDR_Clk_pin, DIR = O
PORT fpga_0_DDR_SDRAM_DDR_Clk_n_pin = fpga_0_DDR_SDRAM_DDR_Clk_n_pin, DIR = O
PORT fpga_0_DDR_SDRAM_DDR_CE_pin = fpga_0_DDR_SDRAM_DDR_CE_pin, DIR = O
PORT fpga_0_DDR_SDRAM_DDR_CS_n_pin = fpga_0_DDR_SDRAM_DDR_CS_n_pin, DIR = O
PORT fpga_0_DDR_SDRAM_DDR_RAS_n_pin = fpga_0_DDR_SDRAM_DDR_RAS_n_pin, DIR = O
PORT fpga_0_DDR_SDRAM_DDR_CAS_n_pin = fpga_0_DDR_SDRAM_DDR_CAS_n_pin, DIR = O PORT fpga_0_DDR_SDRAM_DDR_WE_n_pin = fpga_0_DDR_SDRAM_DDR_WE_n_pin, DIR = O
PORT fpga_0_DDR_SDRAM_DDR_BankAddr_pin = fpga_0_DDR_SDRAM_DDR_BankAddr_pin,
DIR = O, VEC = [1:0]
PORT fpga_0_DDR_SDRAM_DDR_Addr_pin = fpga_0_DDR_SDRAM_DDR_Addr_pin, DIR = O,
VEC = [12:0]
PORT fpga_0_DDR_SDRAM_DDR_DQ_pin = fpga_0_DDR_SDRAM_DDR_DQ_pin, DIR = IO, VEC
= [15:0]
PORT fpga_0_DDR_SDRAM_DDR_DM_pin = fpga_0_DDR_SDRAM_DDR_DM_pin, DIR = O, VEC
= [1:0]
PORT fpga_0_DDR_SDRAM_DDR_DQS_pin = fpga_0_DDR_SDRAM_DDR_DQS_pin, DIR = IO,
VEC = [1:0] PORT fpga_0_DDR_SDRAM_ddr_dqs_div_io_pin = fpga_0_DDR_SDRAM_ddr_dqs_div_io_pin, DIR =
IO
PORT fpga_0_clk_1_sys_clk_pin = dcm_clk_s, DIR = I, SIGIS = CLK, CLK_FREQ = 50000000
PORT fpga_0_rst_1_sys_rst_pin = sys_rst_s, DIR = I, SIGIS = RST, RST_POLARITY = 1
PORT push_GPIO_IO_I_pin = push_GPIO_IO_I, DIR = I, VEC = [0:3]
PORT dip_GPIO_IO_I_pin = dip_GPIO_IO_I, DIR = I, VEC = [0:3]
PORT lcd_ip_0_lcd_pin = lcd_ip_0_lcd, DIR = O, VEC = [0:6]
BEGIN microblaze
PARAMETER INSTANCE = microblaze_0 PARAMETER C_AREA_OPTIMIZED = 1
PARAMETER C_DEBUG_ENABLED = 1
PARAMETER HW_VER = 7.30.b

Writing Basic Software Applications Lab: www.xilinx.com/university 4-23 MicroBlaze Processor [email protected]
BUS_INTERFACE DLMB = dlmb
BUS_INTERFACE ILMB = ilmb
BUS_INTERFACE DPLB = mb_plb
BUS_INTERFACE IPLB = mb_plb
BUS_INTERFACE DEBUG = microblaze_0_mdm_bus
PORT MB_RESET = mb_reset END
BEGIN plb_v46
PARAMETER INSTANCE = mb_plb
PARAMETER HW_VER = 1.04.a
PORT PLB_Clk = clk_50_0000MHz
PORT SYS_Rst = sys_bus_reset
END
BEGIN lmb_v10
PARAMETER INSTANCE = ilmb
PARAMETER HW_VER = 1.00.a PORT LMB_Clk = clk_50_0000MHz
PORT SYS_Rst = sys_bus_reset
END
BEGIN lmb_v10
PARAMETER INSTANCE = dlmb
PARAMETER HW_VER = 1.00.a
PORT LMB_Clk = clk_50_0000MHz
PORT SYS_Rst = sys_bus_reset
END
BEGIN lmb_bram_if_cntlr
PARAMETER INSTANCE = dlmb_cntlr
PARAMETER HW_VER = 2.10.b
PARAMETER C_BASEADDR = 0x00000000
PARAMETER C_HIGHADDR = 0x00001fff
BUS_INTERFACE SLMB = dlmb
BUS_INTERFACE BRAM_PORT = dlmb_port
END
BEGIN lmb_bram_if_cntlr
PARAMETER INSTANCE = ilmb_cntlr
PARAMETER HW_VER = 2.10.b PARAMETER C_BASEADDR = 0x00000000
PARAMETER C_HIGHADDR = 0x00001fff
BUS_INTERFACE SLMB = ilmb
BUS_INTERFACE BRAM_PORT = ilmb_port
END
BEGIN bram_block
PARAMETER INSTANCE = lmb_bram
PARAMETER HW_VER = 1.00.a
BUS_INTERFACE PORTA = ilmb_port
BUS_INTERFACE PORTB = dlmb_port END
BEGIN xps_uartlite
PARAMETER INSTANCE = RS232_DCE

Writing Basic Software Applications Lab: www.xilinx.com/university 4-24 MicroBlaze Processor [email protected]
PARAMETER C_BAUDRATE = 115200
PARAMETER C_DATA_BITS = 8
PARAMETER C_USE_PARITY = 0
PARAMETER C_ODD_PARITY = 0
PARAMETER HW_VER = 1.01.a
PARAMETER C_BASEADDR = 0x84000000 PARAMETER C_HIGHADDR = 0x8400ffff
BUS_INTERFACE SPLB = mb_plb
PORT RX = fpga_0_RS232_DCE_RX_pin
PORT TX = fpga_0_RS232_DCE_TX_pin
END
BEGIN xps_gpio
PARAMETER INSTANCE = LEDs_8Bit
PARAMETER C_ALL_INPUTS = 0
PARAMETER C_GPIO_WIDTH = 8
PARAMETER C_INTERRUPT_PRESENT = 0
PARAMETER C_IS_DUAL = 0 PARAMETER HW_VER = 2.00.a
PARAMETER C_BASEADDR = 0x81440000
PARAMETER C_HIGHADDR = 0x8144ffff
BUS_INTERFACE SPLB = mb_plb
PORT GPIO_IO_O = fpga_0_LEDs_8Bit_GPIO_IO_O_pin
END
BEGIN mpmc
PARAMETER INSTANCE = DDR_SDRAM
PARAMETER C_NUM_PORTS = 1
PARAMETER C_SPECIAL_BOARD = S3E_STKIT PARAMETER C_MEM_TYPE = DDR
PARAMETER C_MEM_PARTNO = MT46V32M16-6
PARAMETER C_MEM_DATA_WIDTH = 16
PARAMETER C_PIM0_BASETYPE = 2
PARAMETER HW_VER = 6.01.a
PARAMETER C_MPMC_BASEADDR = 0x8c000000
PARAMETER C_MPMC_HIGHADDR = 0x8fffffff
BUS_INTERFACE SPLB0 = mb_plb
PORT MPMC_Clk0 = clk_100_0000MHzDCM0
PORT MPMC_Clk90 = clk_100_0000MHz90DCM0
PORT MPMC_Rst = sys_periph_reset
PORT DDR_Clk = fpga_0_DDR_SDRAM_DDR_Clk_pin PORT DDR_Clk_n = fpga_0_DDR_SDRAM_DDR_Clk_n_pin
PORT DDR_CE = fpga_0_DDR_SDRAM_DDR_CE_pin
PORT DDR_CS_n = fpga_0_DDR_SDRAM_DDR_CS_n_pin
PORT DDR_RAS_n = fpga_0_DDR_SDRAM_DDR_RAS_n_pin
PORT DDR_CAS_n = fpga_0_DDR_SDRAM_DDR_CAS_n_pin
PORT DDR_WE_n = fpga_0_DDR_SDRAM_DDR_WE_n_pin
PORT DDR_BankAddr = fpga_0_DDR_SDRAM_DDR_BankAddr_pin
PORT DDR_Addr = fpga_0_DDR_SDRAM_DDR_Addr_pin
PORT DDR_DQ = fpga_0_DDR_SDRAM_DDR_DQ_pin
PORT DDR_DM = fpga_0_DDR_SDRAM_DDR_DM_pin
PORT DDR_DQS = fpga_0_DDR_SDRAM_DDR_DQS_pin PORT DDR_DQS_Div_O = fpga_0_DDR_SDRAM_ddr_dqs_div_io_pin
PORT DDR_DQS_Div_I = fpga_0_DDR_SDRAM_ddr_dqs_div_io_pin
END

Writing Basic Software Applications Lab: www.xilinx.com/university 4-25 MicroBlaze Processor [email protected]
BEGIN clock_generator
PARAMETER INSTANCE = clock_generator_0
PARAMETER C_CLKIN_FREQ = 50000000
PARAMETER C_CLKOUT0_FREQ = 100000000
PARAMETER C_CLKOUT0_PHASE = 90
PARAMETER C_CLKOUT0_GROUP = DCM0 PARAMETER C_CLKOUT0_BUF = TRUE
PARAMETER C_CLKOUT1_FREQ = 100000000
PARAMETER C_CLKOUT1_PHASE = 0
PARAMETER C_CLKOUT1_GROUP = DCM0
PARAMETER C_CLKOUT1_BUF = TRUE
PARAMETER C_CLKOUT2_FREQ = 50000000
PARAMETER C_CLKOUT2_PHASE = 0
PARAMETER C_CLKOUT2_GROUP = NONE
PARAMETER C_CLKOUT2_BUF = TRUE
PARAMETER C_EXT_RESET_HIGH = 1
PARAMETER HW_VER = 4.00.a
PORT CLKIN = dcm_clk_s PORT CLKOUT0 = clk_100_0000MHz90DCM0
PORT CLKOUT1 = clk_100_0000MHzDCM0
PORT CLKOUT2 = clk_50_0000MHz
PORT RST = sys_rst_s
PORT LOCKED = Dcm_all_locked
END
BEGIN mdm
PARAMETER INSTANCE = mdm_0
PARAMETER C_MB_DBG_PORTS = 1
PARAMETER C_USE_UART = 1 PARAMETER C_UART_WIDTH = 8
PARAMETER HW_VER = 1.00.g
PARAMETER C_BASEADDR = 0x84400000
PARAMETER C_HIGHADDR = 0x8440ffff
BUS_INTERFACE SPLB = mb_plb
BUS_INTERFACE MBDEBUG_0 = microblaze_0_mdm_bus
PORT Debug_SYS_Rst = Debug_SYS_Rst
END
BEGIN proc_sys_reset
PARAMETER INSTANCE = proc_sys_reset_0
PARAMETER C_EXT_RESET_HIGH = 1 PARAMETER HW_VER = 2.00.a
PORT Slowest_sync_clk = clk_50_0000MHz
PORT Ext_Reset_In = sys_rst_s
PORT MB_Debug_Sys_Rst = Debug_SYS_Rst
PORT Dcm_locked = Dcm_all_locked
PORT MB_Reset = mb_reset
PORT Bus_Struct_Reset = sys_bus_reset
PORT Peripheral_Reset = sys_periph_reset
END
BEGIN xps_gpio PARAMETER INSTANCE = dip
PARAMETER HW_VER = 2.00.a
PARAMETER C_GPIO_WIDTH = 4
PARAMETER C_ALL_INPUTS = 1

Writing Basic Software Applications Lab: www.xilinx.com/university 4-26 MicroBlaze Processor [email protected]
PARAMETER C_BASEADDR = 0x81420000
PARAMETER C_HIGHADDR = 0x8142ffff
BUS_INTERFACE SPLB = mb_plb
PORT GPIO_IO_I = dip_GPIO_IO_I
END
BEGIN xps_gpio
PARAMETER INSTANCE = push
PARAMETER HW_VER = 2.00.a
PARAMETER C_GPIO_WIDTH = 4
PARAMETER C_ALL_INPUTS = 1
PARAMETER C_BASEADDR = 0x81400000
PARAMETER C_HIGHADDR = 0x8140ffff
BUS_INTERFACE SPLB = mb_plb
PORT GPIO_IO_I = push_GPIO_IO_I
END
BEGIN lcd_ip PARAMETER INSTANCE = lcd_ip_0
PARAMETER HW_VER = 1.00.a
PARAMETER C_BASEADDR = 0xcf400000
PARAMETER C_HIGHADDR = 0xcf40ffff
BUS_INTERFACE SPLB = mb_plb
PORT lcd = lcd_ip_0_lcd
END
BEGIN bram_block
PARAMETER INSTANCE = bram_block_0
PARAMETER HW_VER = 1.00.a BUS_INTERFACE PORTA = xps_bram_if_cntlr_0_PORTA
END
BEGIN xps_bram_if_cntlr
PARAMETER INSTANCE = xps_bram_if_cntlr_0
PARAMETER HW_VER = 1.00.b
PARAMETER C_SPLB_NATIVE_DWIDTH = 32
PARAMETER C_BASEADDR = 0x88208000
PARAMETER C_HIGHADDR = 0x88209fff
BUS_INTERFACE SPLB = mb_plb
BUS_INTERFACE PORTA = xps_bram_if_cntlr_0_PORTA
END