
Lab 16 OIM Reports - · PDF fileLab 16 – OIM Reports 1. ... OIM 11g reports are...
57
OIM 11g Workshop – Lab 16 1 Lab 16 – OIM Reports 1. Introduction In this lab, we will cover the steps required to install BI Publisher and the configuration needed to run OIM Reports. This lab will also include creating a custom OIM report. ACME usually maintains a fair track of operational and historical data in OIM as it is important from a compliance perspective. It helps their IT and Business teams to provide the right answers during audit and review cycles conducted by internal/external compliance officers. ACME uses the OIM BI publisher based operational and historical reports for addressing such compliance requirements. One of their latest problems is to deal with keeping a track of historical changes that would happen on the profiles of user records. OIM does keep a track of changes to user profile maintained in database (USR table) with audit turned on by default in 11g version. There is an OOTB OIM report called “User Profile History Report” that is shipped with OIM reports package which renders the User Profile historical changes. ACME has now been communicated via their compliance office about the following requirements related to User Profile reporting for which the IT team would need to go for customization of the OOTB report: 1. User Profile report for a user should also capture the information about which user made that particular change. E.g., <User 1> <Name:X> <Organization:Y> <Who changed: User 2> 2. The compliance officers also want to have ability to specify a user login and filter the report to show history reports based on login id. E.g. Show me a report with User Profile history for all users which were modified by delegated admin “User 3”. To address the above requirements of ACME Compliance team, we will customize the OOTB “User Profile History Report” and call it “ACME User Profile History” report in this lab. Note: BI Publisher is already installed on the OIM Training VM. The install steps below are provided for reference. The ACME User Profile History Custom report created in this lab is also provided on the local file system of the OIM Training VM.
Transcript of Lab 16 OIM Reports - · PDF fileLab 16 – OIM Reports 1. ... OIM 11g reports are...

OIM 11g Workshop – Lab 16
1
Lab 16 – OIM Reports
1. Introduction
In this lab, we will cover the steps required to install BI Publisher and the configuration needed to run OIM Reports. This lab will also include creating a custom OIM report.
ACME usually maintains a fair track of operational and historical data in OIM as it is important from a compliance perspective. It helps their IT and Business teams to provide the right answers during audit and review cycles conducted by internal/external compliance officers. ACME uses the OIM BI publisher based operational and historical reports for addressing such compliance requirements. One of their latest problems is to deal with keeping a track of historical changes that would happen on the profiles of user records. OIM does keep a track of changes to user profile maintained in database (USR table) with audit turned on by default in 11g version. There is an OOTB OIM report called “User Profile History Report” that is shipped with OIM reports package which renders the User Profile historical changes. ACME has now been communicated via their compliance office about the following requirements related to User Profile reporting for which the IT team would need to go for customization of the OOTB report:
1. User Profile report for a user should also capture the information about which user made that particular change.
E.g., <User 1> <Name:X> <Organization:Y> <Who changed: User 2>
2. The compliance officers also want to have ability to specify a user login and filter the report to show history reports based on login id.
E.g. Show me a report with User Profile history for all users which were modified by delegated admin “User 3”.
To address the above requirements of ACME Compliance team, we will customize the OOTB “User Profile History Report” and call it “ACME User Profile History” report in this lab.
Note: BI Publisher is already installed on the OIM Training VM. The install steps below are provided for reference. The ACME User Profile History Custom report created in this lab is also provided on the local file system of the OIM Training VM.
OIM 11g Workshop - Lab 16
2
This document was created using OIM 11.1.1.3 and BI Publisher 10.1.3.4.1 versions but the content should be relevant for OIM 11.1.1.5 PS1 release as most of the reports related tasks are performed using BI Publisher product.
2. Contents
2.1. Install BI Publisher Version 10.1.3.4.1 and deploy OIM Reports
We will go through the steps to install BI Publisher Version 10.1.3.4.1 inside the OIM Admin Server. In real deployments, you would use a separate Weblogic Managed Server for installing BI Publisher but for training and demonstration purposes we will install it in the Administration server. Download Version 10.1.3.4.1 of the BI Publisher Software from OTN => Middleware => BI Publisher

OIM 11g Workshop – Lab 16
3
Steps
Once the BI Publisher software has been downloaded, we will install it using the following steps:
2.1.1. Unzip and extract (untar) the BI Publisher Software

OIM 11g Workshop - Lab 16
4
2.1.2. Extract the BI Deployment war file
The BI Publisher war file that we need to install in our Weblogic Admin Server is in the “manual” directory as shown in screen shots below. Under the ../manual/generic directory is the “xmlpserver.war” file that we will be installing in Weblogic admin server.

OIM 11g Workshop – Lab 16
5
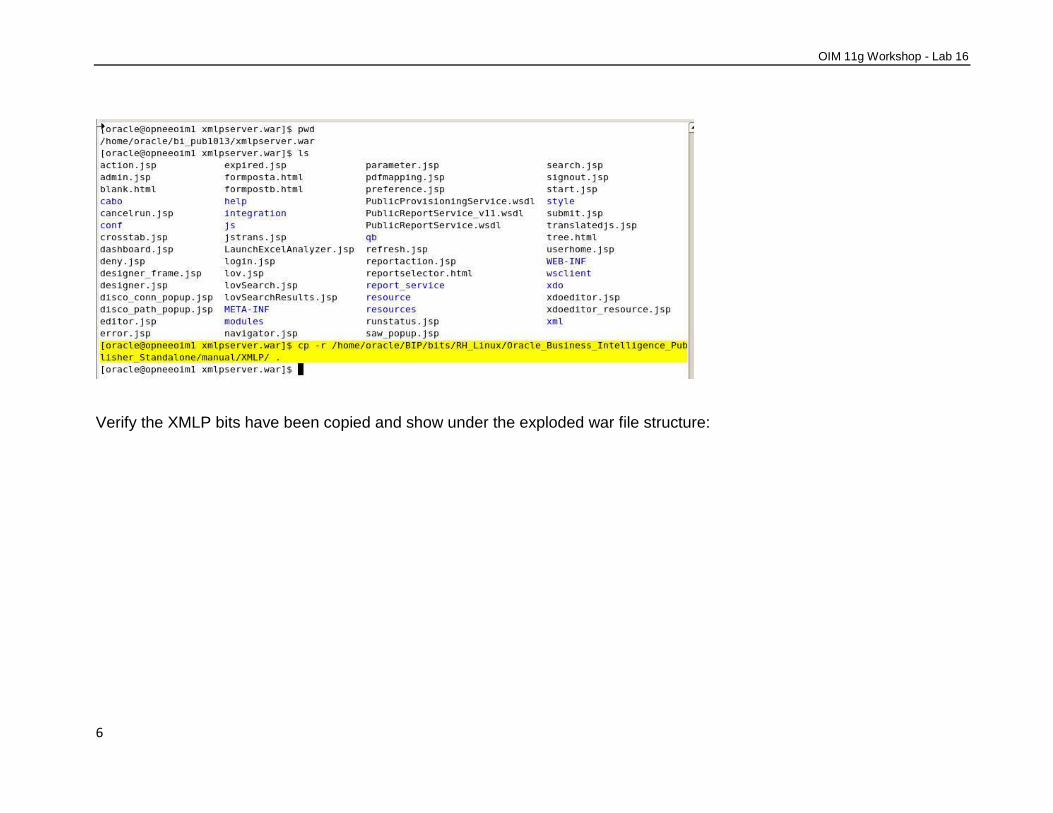
2.1.3. Extract the BI Publisher xmlpserver.war file and copy “XMLP” bits
Before installing the “xmlpserver.war” file, we will have to customize it. We will first copy the “xmlpserver.war” file into a directory. In our screen shots below, we have created a directory – “/home/oracle/bipub_1013/xmlpserver.war”. We will extract the war file into this directory:
Copy the “XMLP” bits into the extracted war file as shown in screen shot below.
OIM 11g Workshop - Lab 16
6
Verify the XMLP bits have been copied and show under the exploded war file structure:

OIM 11g Workshop – Lab 16
7
You can see the XMLP directory at the same level as WEB-INF & xdo, this is where it needs to be.
2.1.4. Edit the Configuration (WEB-INF/xmlp-server-config.xml)
Edit the WEB-INF/xmlp-server-config.xml file and change the file path to reflect the path on your environment where you will store this application.

OIM 11g Workshop - Lab 16
8
In our example, we will move the “bi_pub1013/xmlpserver.war” directory after making all changes to “/opt/Oracle/Middleware” directory. Hence the above path is shown as /opt/Oracle/Middleware/bi_pub1013/xmlpserver.war/XMLP”.
2.1.5. Deploy BI Publisher application in WLS Admin Server
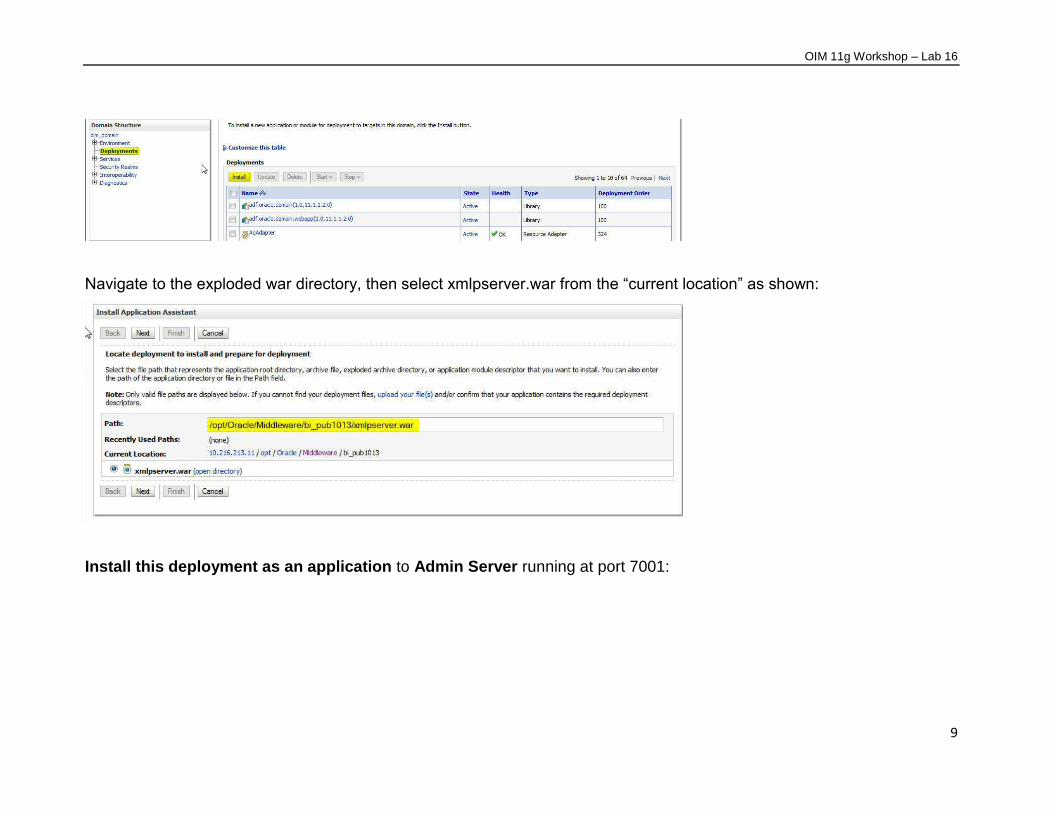
In our example, we are deploying BI Publisher in the Admin server. Make sure your admin server is up and running and then login to the console as “weblogic” user at http://localhost:7001/console
Under Deployments, click the “Install” button to install the application.
OIM 11g Workshop – Lab 16
9
Navigate to the exploded war directory, then select xmlpserver.war from the “current location” as shown:
Install this deployment as an application to Admin Server running at port 7001:
OIM 11g Workshop - Lab 16
10
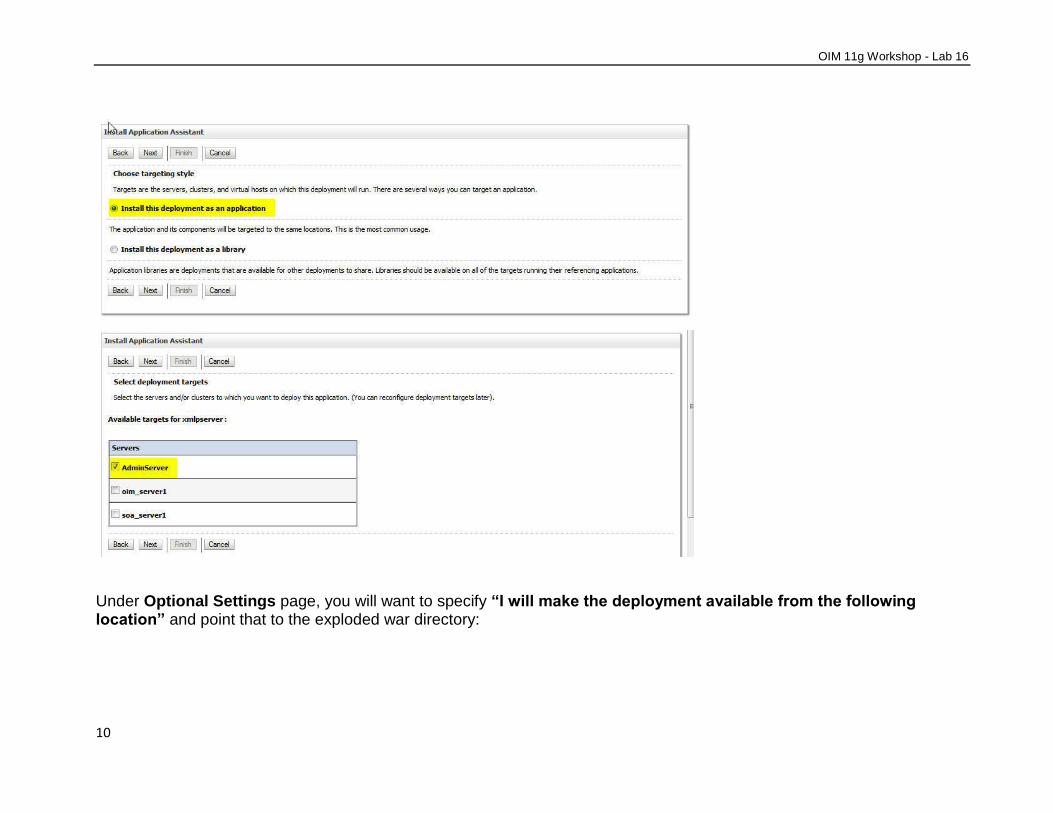
Under Optional Settings page, you will want to specify “I will make the deployment available from the following location” and point that to the exploded war directory:

OIM 11g Workshop – Lab 16
11
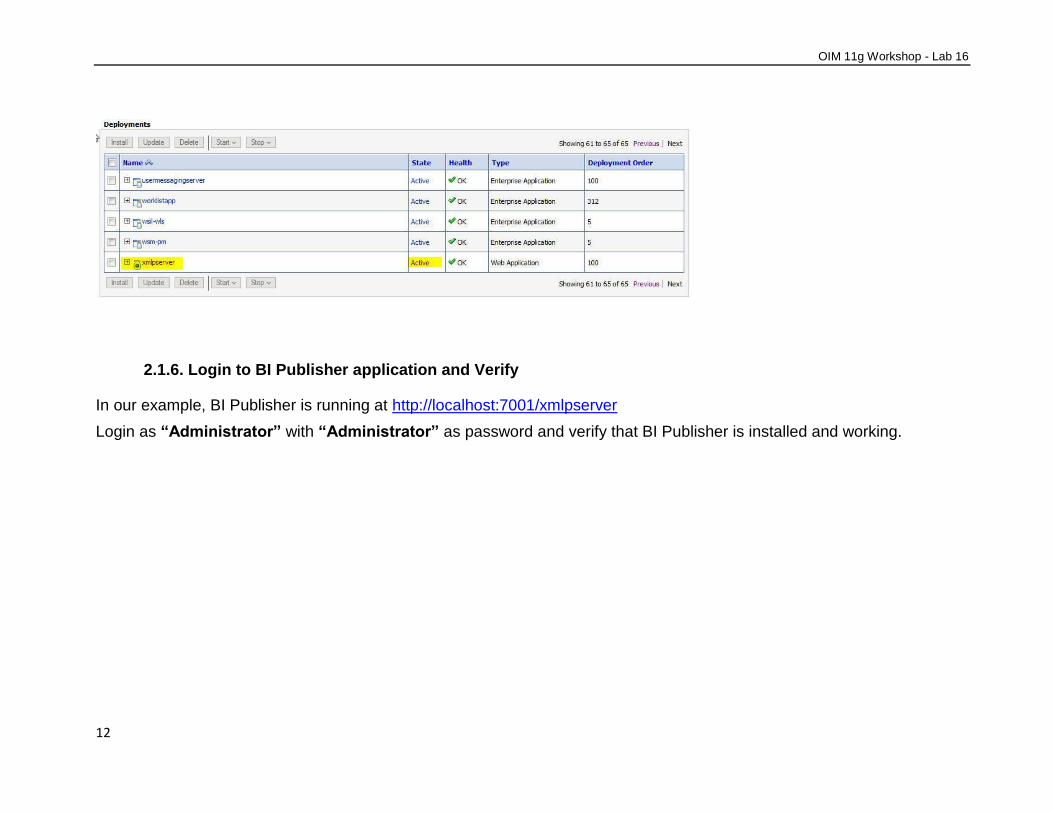
After deploying the application, verify the state for xmlpserver deployment. It should be Active state.
OIM 11g Workshop - Lab 16
12
2.1.6. Login to BI Publisher application and Verify
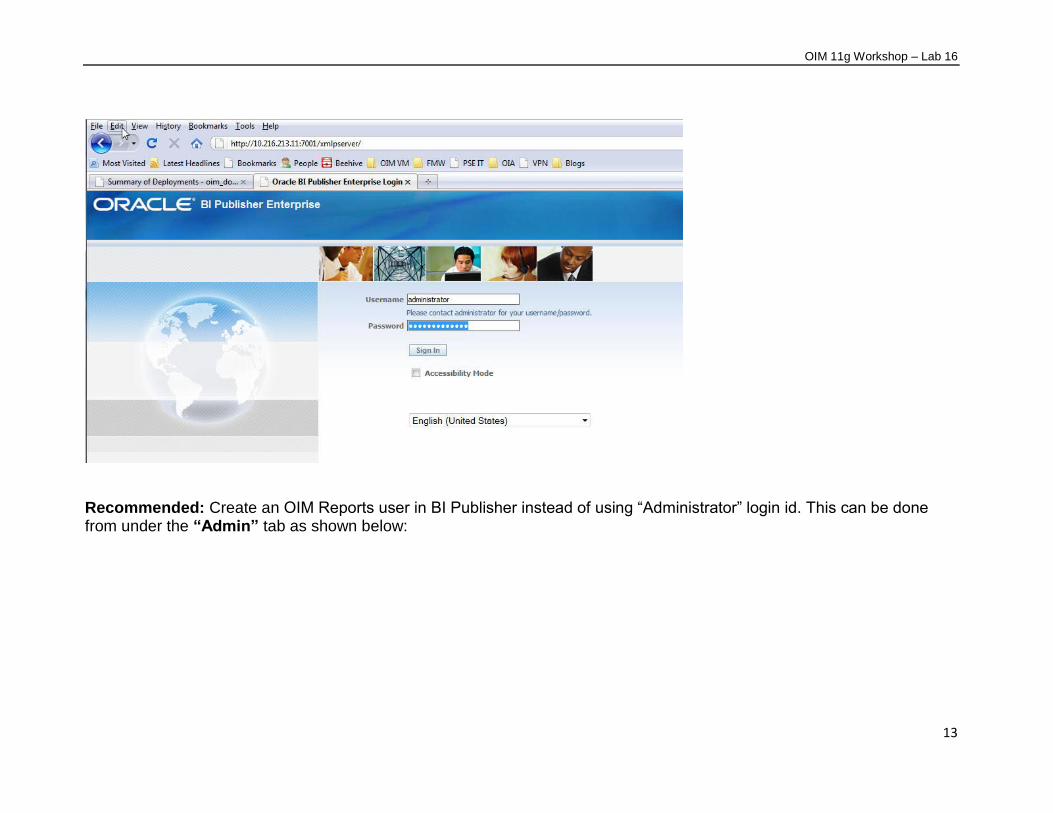
In our example, BI Publisher is running at http://localhost:7001/xmlpserver
Login as “Administrator” with “Administrator” as password and verify that BI Publisher is installed and working.
OIM 11g Workshop – Lab 16
13
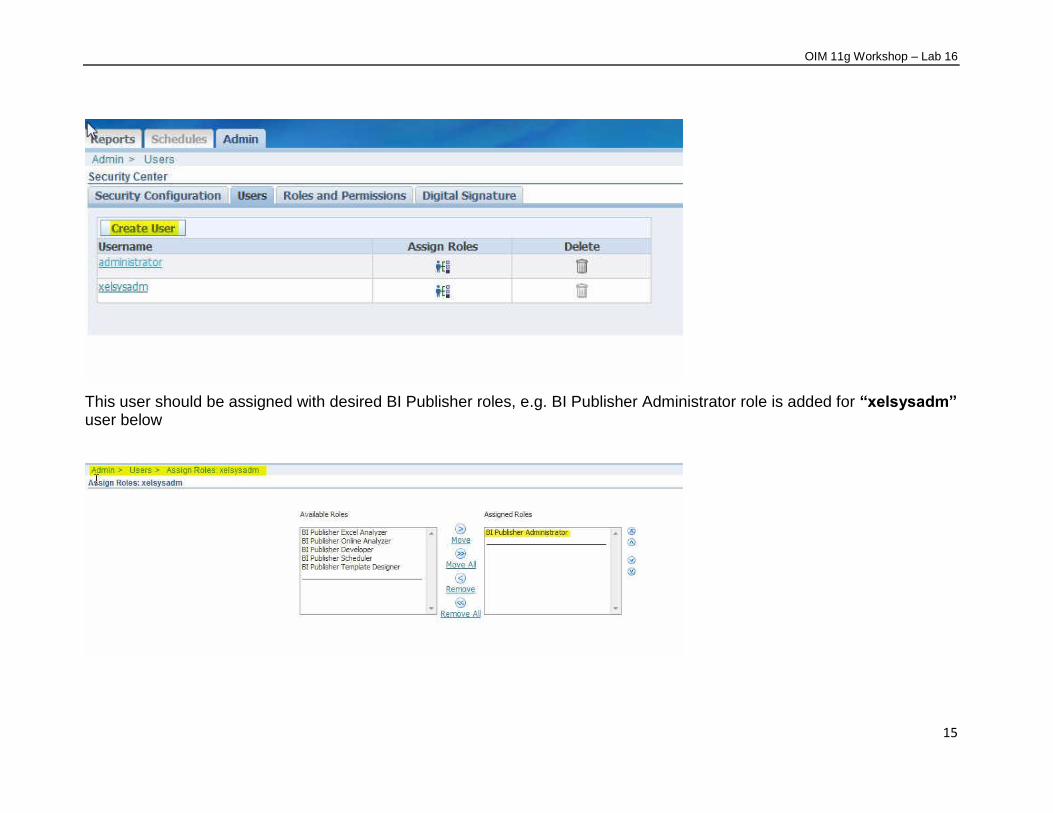
Recommended: Create an OIM Reports user in BI Publisher instead of using “Administrator” login id. This can be done from under the “Admin” tab as shown below:

OIM 11g Workshop - Lab 16
14
Select “Users” link and add an OIM reports user. Click the “Create User” button and add the user.
OIM 11g Workshop – Lab 16
15
This user should be assigned with desired BI Publisher roles, e.g. BI Publisher Administrator role is added for “xelsysadm” user below
OIM 11g Workshop - Lab 16
16
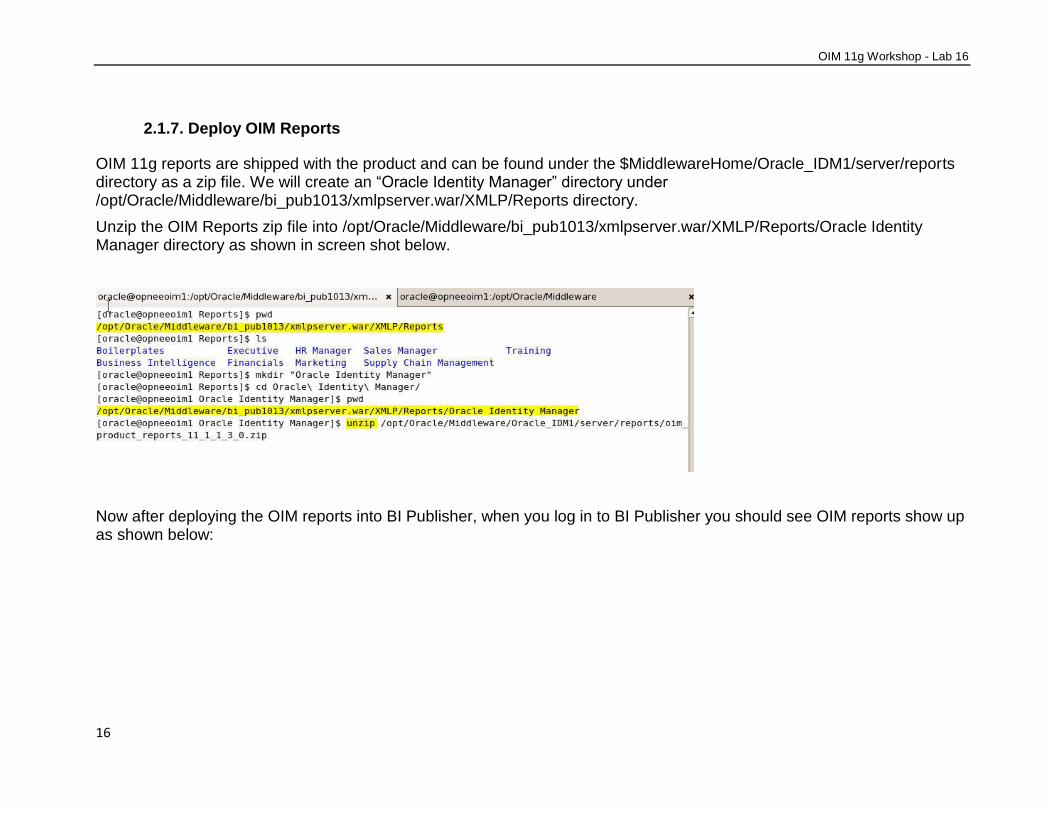
2.1.7. Deploy OIM Reports
OIM 11g reports are shipped with the product and can be found under the $MiddlewareHome/Oracle_IDM1/server/reports directory as a zip file. We will create an “Oracle Identity Manager” directory under /opt/Oracle/Middleware/bi_pub1013/xmlpserver.war/XMLP/Reports directory.
Unzip the OIM Reports zip file into /opt/Oracle/Middleware/bi_pub1013/xmlpserver.war/XMLP/Reports/Oracle Identity Manager directory as shown in screen shot below.
Now after deploying the OIM reports into BI Publisher, when you log in to BI Publisher you should see OIM reports show up as shown below:

OIM 11g Workshop – Lab 16
17
This completes the steps to install BI Publisher and deployment of OIM reports into BI Publisher.
2.2. Configure JDBC Data Sources in BI Publisher
The next step is to configure JDBC Data sources in BI Publisher. The data source used to connect BI Publisher to the OIM Repository is simple JDBC.
Select JDBC connection from the Admin => Data Sources screen of BI Publisher as shown in screen shots below:

OIM 11g Workshop - Lab 16
18
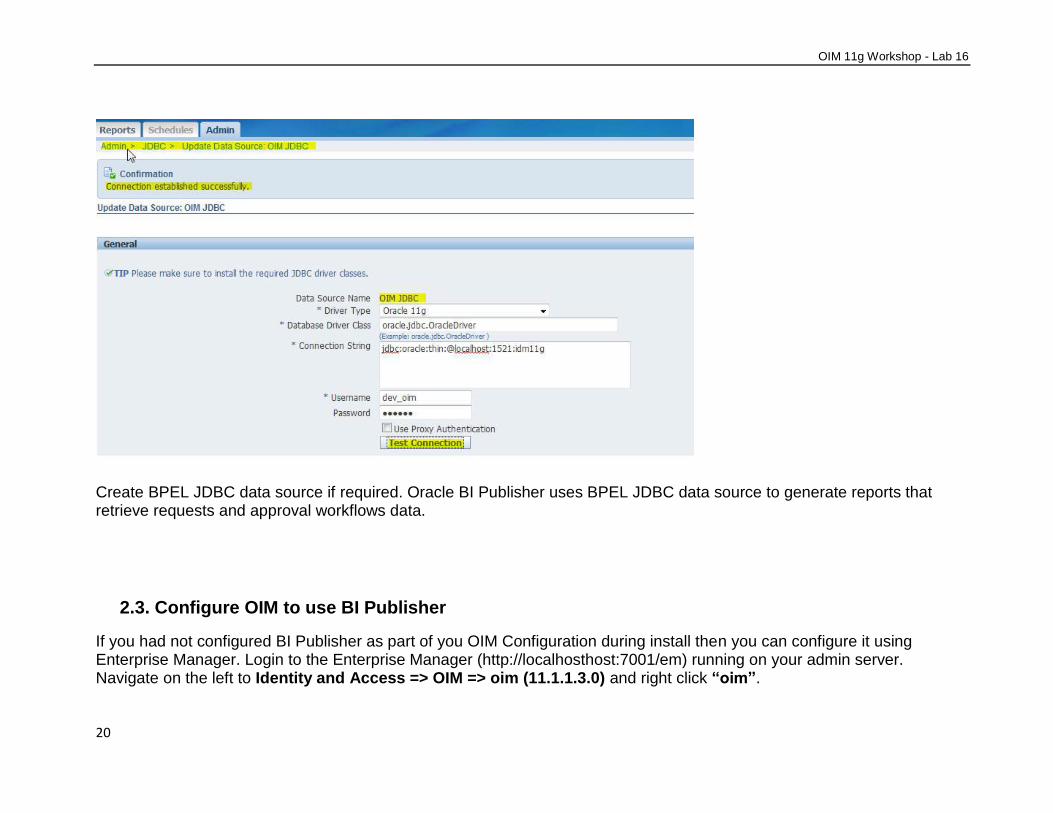
Click the “Add Data Source” button to create the OIM JDBC Datasource.

OIM 11g Workshop – Lab 16
19
Add you OIM DB instance specific configuration details and Test Connection. OOTB OIM Reports use “OIM JDBC” as the Data Source Name, you should use this name if you don’t plan to change OOTB OIM Reports.
OIM 11g Workshop - Lab 16
20
Create BPEL JDBC data source if required. Oracle BI Publisher uses BPEL JDBC data source to generate reports that retrieve requests and approval workflows data.
2.3. Configure OIM to use BI Publisher
If you had not configured BI Publisher as part of you OIM Configuration during install then you can configure it using Enterprise Manager. Login to the Enterprise Manager (http://localhosthost:7001/em) running on your admin server. Navigate on the left to Identity and Access => OIM => oim (11.1.1.3.0) and right click “oim”.

OIM 11g Workshop – Lab 16
21
In System MBean Browser, Under Application Defined MBeans, navigate to oracle.iam, Application:oim, XMLConfig, Config, XMLConfig.DiscoveryConfig, Discovery.

OIM 11g Workshop - Lab 16
22

OIM 11g Workshop – Lab 16
23
Now you will add the BI Publisher URL which will be picked up by OIM.
Under Application Defined MBeans, navigate to oracle.iam, Application:oim, XMLConfig, Config, XMLConfig.DiscoveryConfig, Discovery. Enter the URL in BIPublisherURL Attribute as shown below and click the Apply button.

OIM 11g Workshop - Lab 16
24
This completes the Configuration of BI Publisher for OIM. Now you can use the Reports from the OIM GUI:
2.4. Install BI Publisher Client software on Windows/Office setup
Purpose: BI Publisher is a template based publishing solution that provides a new approach to report design and publishing by integrating familiar desktop processing tools. In this section, we will demonstrate BI Publisher using MS Word to develop and design the report layout, RTF Template. To modify or create custom OIM reports, we will have to first install BI Publisher Desktop Client software on the Windows/Office setup. This MS Word Add-in called BI Publisher Template Builder provides you a graphical interface to help you develop and design the RTF Template easier and allow you to preview the report final output in many different formats. It is a MS Word Add-in that you launch from inside the MS Word. Following section shows the install screen shots for BIPublisherDesktop.exe application that will add the required Add-in to MS Word.

OIM 11g Workshop – Lab 16
25
Steps
2.4.1. Download the BIPublisherDesktop.exe executable.
This is available from BI Publisher install bits or you can also get it from BI Publisher GUI. BIPublisherDesktop.exe is available from GUI under Developer Tools section as “Template Builder”. Download this executable on your Windows/Office setup.

OIM 11g Workshop - Lab 16
26
OIM 11g Workshop – Lab 16
27
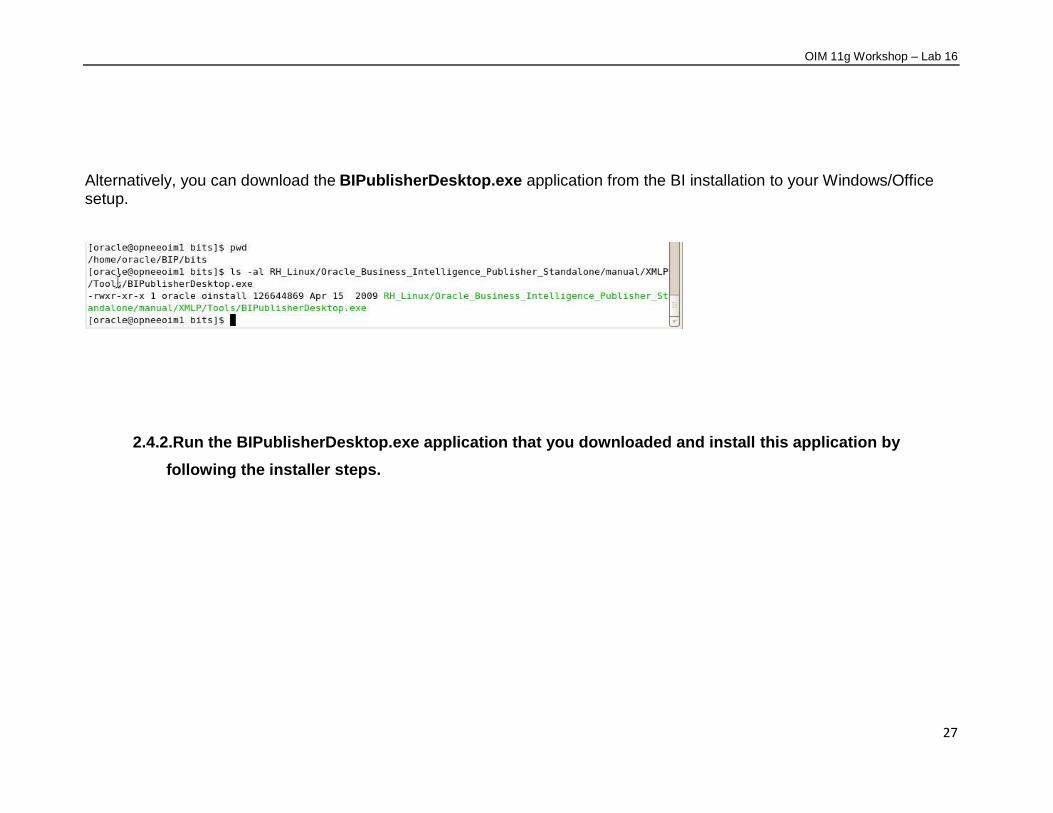
Alternatively, you can download the BIPublisherDesktop.exe application from the BI installation to your Windows/Office setup.
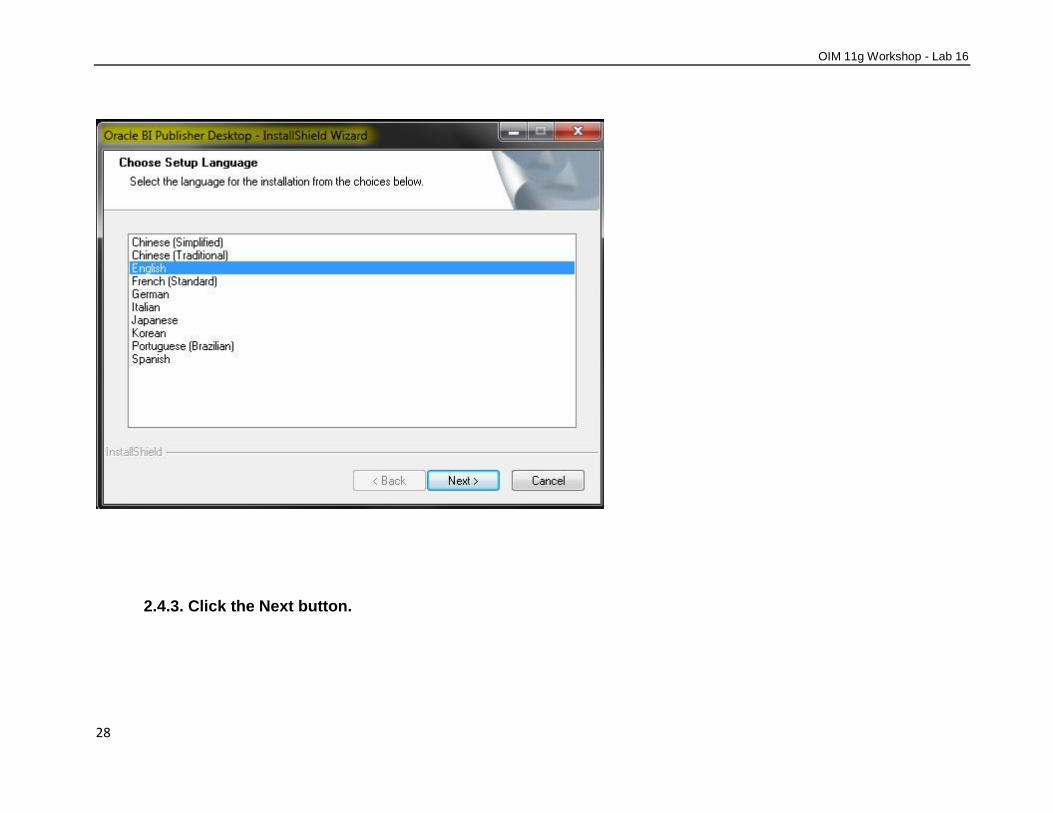
2.4.2.Run the BIPublisherDesktop.exe application that you downloaded and install this application by
following the installer steps.
OIM 11g Workshop - Lab 16
28
2.4.3. Click the Next button.

OIM 11g Workshop – Lab 16
29
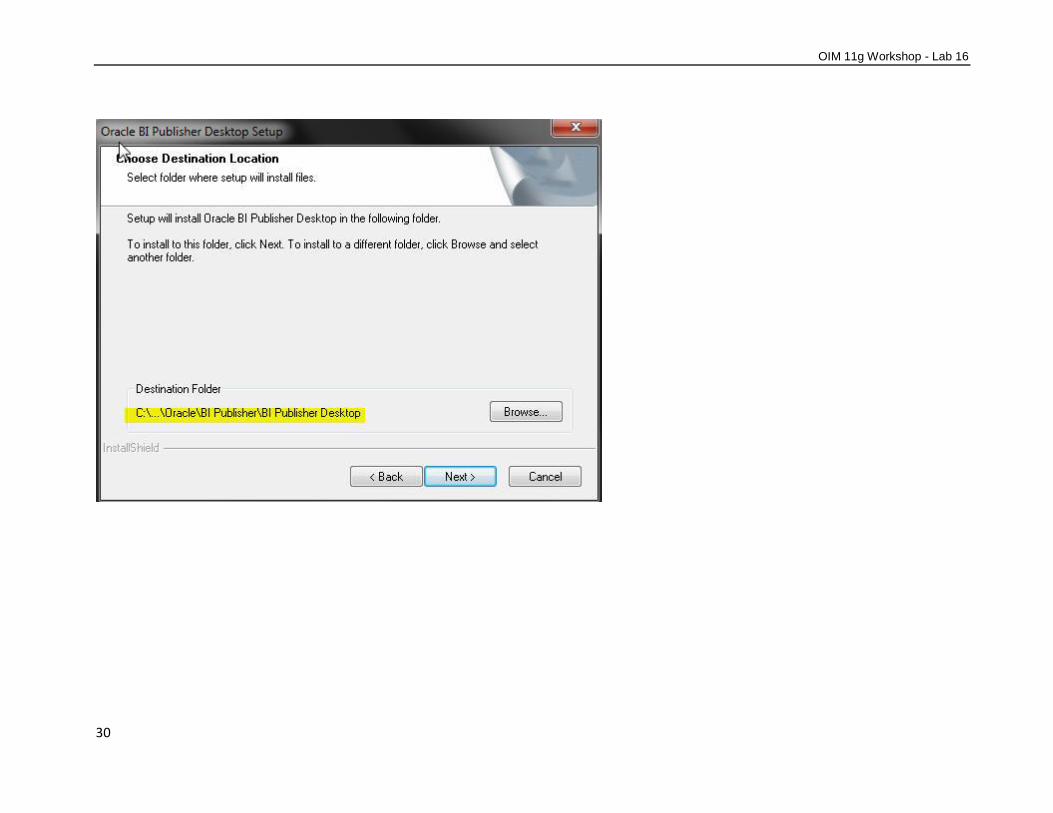
Click the Next button and choose Destination Folder.
OIM 11g Workshop - Lab 16
30

OIM 11g Workshop – Lab 16
31
2.4.4. Click the Finish button and verify that the BI Publisher Add-in is now available in MS Word. Launch MS
Word and you should see BI Publisher Add-in installed if the install went through fine.

OIM 11g Workshop - Lab 16
32
2.5. Create a custom Report called ACME User Profile History Task
Purpose: ACME has a requirement from compliance team to show a field called “Who changed the Attribute” for all users returned by the out-of-the-box User Profile History Report. This field will give the information about who changed a user’s attribute. We will customize the out of the box User Profile History Report and call the custom report “ACME User Profile History Report”. The steps involved to customize this report are as described below.
Note: The ACME User Profile History Report files are included in the training VM image. If you choose not to do the modifications, you can directly upload those files from the training VM image into BI Publisher. If you choose to upload the customized report then you can directly go to Uploading the ACME User Profile History Report section.
Steps
2.5.1. Modifying the “User Profile History.xdo” file. Rename to “ACME User History Report.xdo” after
modifications.
a. Edit the Default User Profile History Report found under OIM User Reports and save it as “ACME User
OIM 11g Workshop – Lab 16
33
Report.xdo” file.
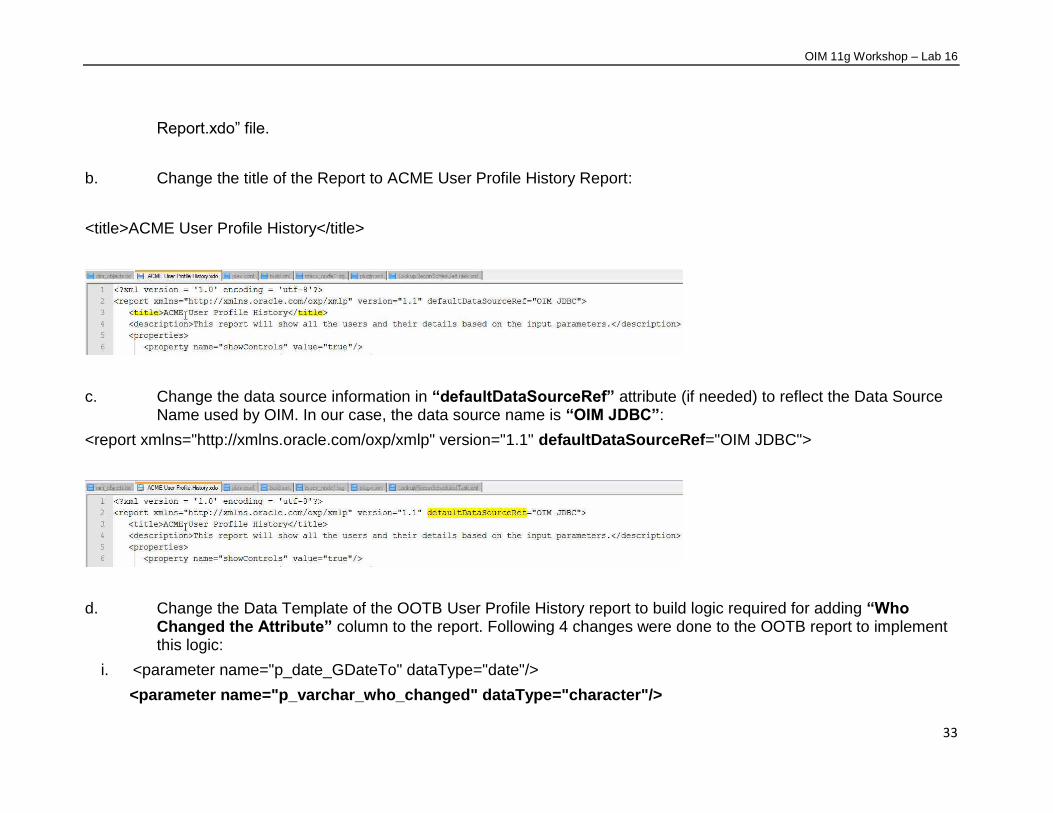
b. Change the title of the Report to ACME User Profile History Report:
<title>ACME User Profile History</title>
c. Change the data source information in “defaultDataSourceRef” attribute (if needed) to reflect the Data Source Name used by OIM. In our case, the data source name is “OIM JDBC”:
<report xmlns="http://xmlns.oracle.com/oxp/xmlp" version="1.1" defaultDataSourceRef="OIM JDBC">
d. Change the Data Template of the OOTB User Profile History report to build logic required for adding “Who Changed the Attribute” column to the report. Following 4 changes were done to the OOTB report to implement this logic:
i. <parameter name="p_date_GDateTo" dataType="date"/>
<parameter name="p_varchar_who_changed" dataType="character"/>
OIM 11g Workshop - Lab 16
34
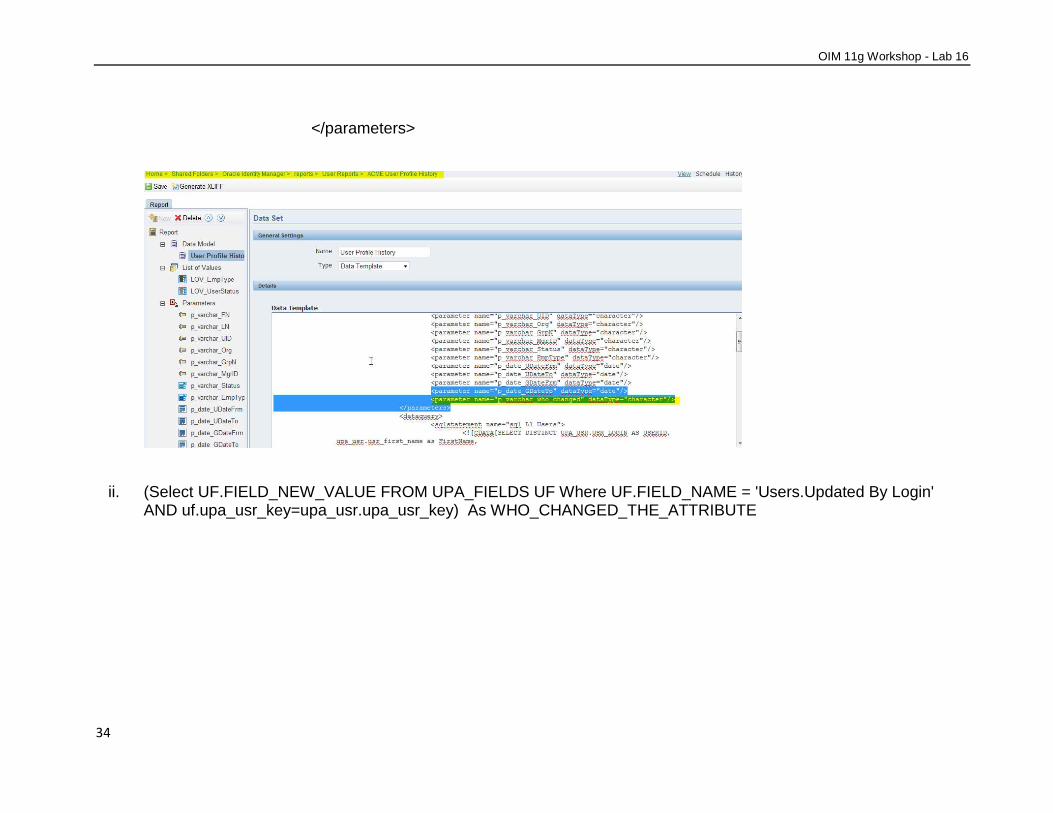
</parameters>
ii. (Select UF.FIELD_NEW_VALUE FROM UPA_FIELDS UF Where UF.FIELD_NAME = 'Users.Updated By Login' AND uf.upa_usr_key=upa_usr.upa_usr_key) As WHO_CHANGED_THE_ATTRIBUTE

OIM 11g Workshop – Lab 16
35
iii. AND (NVL(:P_VARCHAR_EMPTYPE, ' ') = ' ' OR UPPER(UPA_USR.USR_EMP_TYPE) LIKE UPPER(:P_VARCHAR_EMPTYPE))
AND (NVL(:p_varchar_who_changed, ' ') = ' ' OR UPPER(F1.FIELD_NEW_VALUE) LIKE UPPER(:p_varchar_who_changed))
OIM 11g Workshop - Lab 16
36
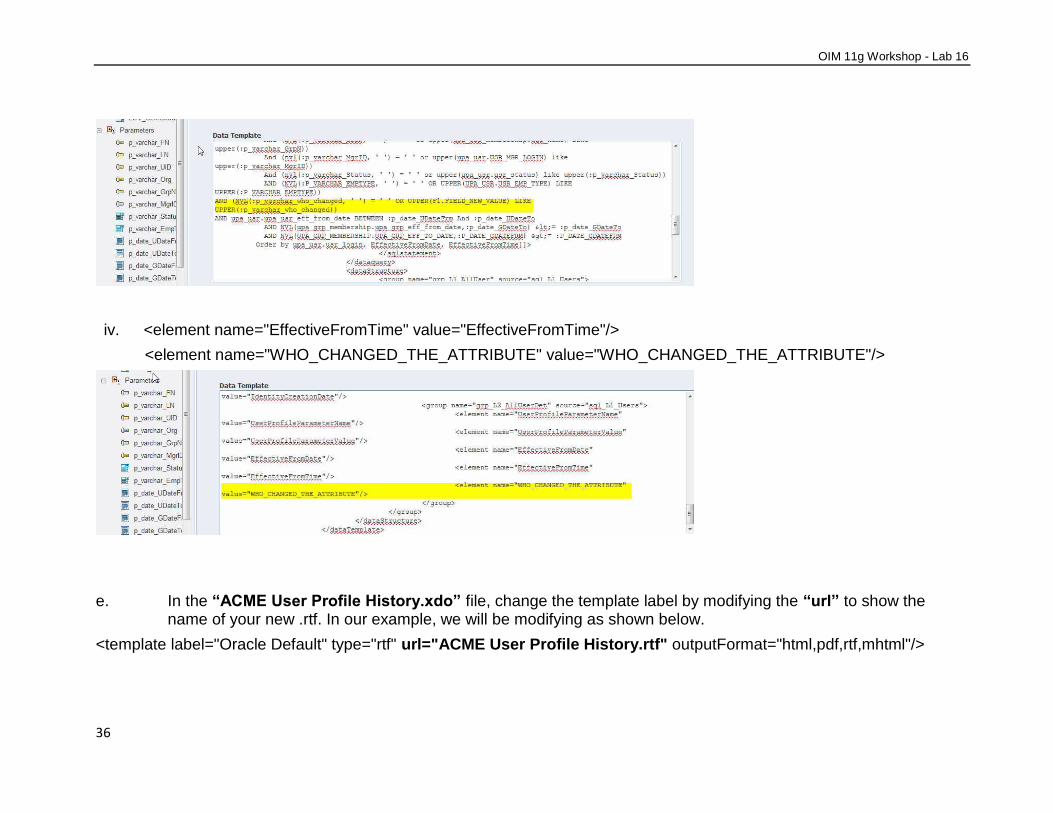
iv. <element name="EffectiveFromTime" value="EffectiveFromTime"/>
<element name="WHO_CHANGED_THE_ATTRIBUTE" value="WHO_CHANGED_THE_ATTRIBUTE"/>
e. In the “ACME User Profile History.xdo” file, change the template label by modifying the “url” to show the name of your new .rtf. In our example, we will be modifying as shown below.
<template label="Oracle Default" type="rtf" url="ACME User Profile History.rtf" outputFormat="html,pdf,rtf,mhtml"/>

OIM 11g Workshop – Lab 16
37
This completes the changes in the “ACME User Profile History.xdo” file. You can find this XDO file on the training VM in /odrive/dummydata/reports directory.
2.5.2. Export XML File for the modified “ACME User Profile History.rdo” file.
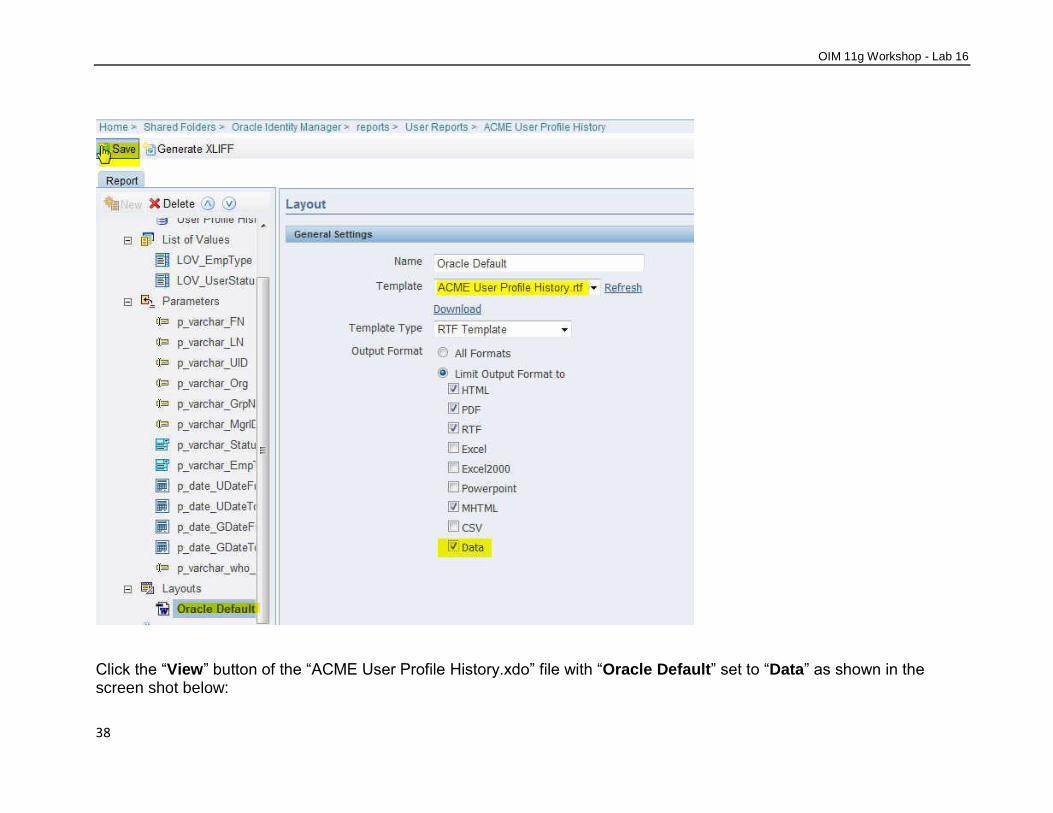
In this step, we will export the XML data file for the “ACME User Profile History.xdo”. This XML file will be used in the next step when we edit the RTF file using MS Word which has BI Publisher Add-in plugin. To export the XML file, Edit the “ACME User Profile History.xdo” file and go to Layouts => Oracle Default. Select the Data Output Format as shown in screen shot below. Save the Report XDO file.
OIM 11g Workshop - Lab 16
38
Click the “View” button of the “ACME User Profile History.xdo” file with “Oracle Default” set to “Data” as shown in the screen shot below:

OIM 11g Workshop – Lab 16
39
Set the desired range fields and Click the View button. It should display XML data for this report. Click the Export button to export the XML file for this report as shown in screen shot below.
OIM 11g Workshop - Lab 16
40
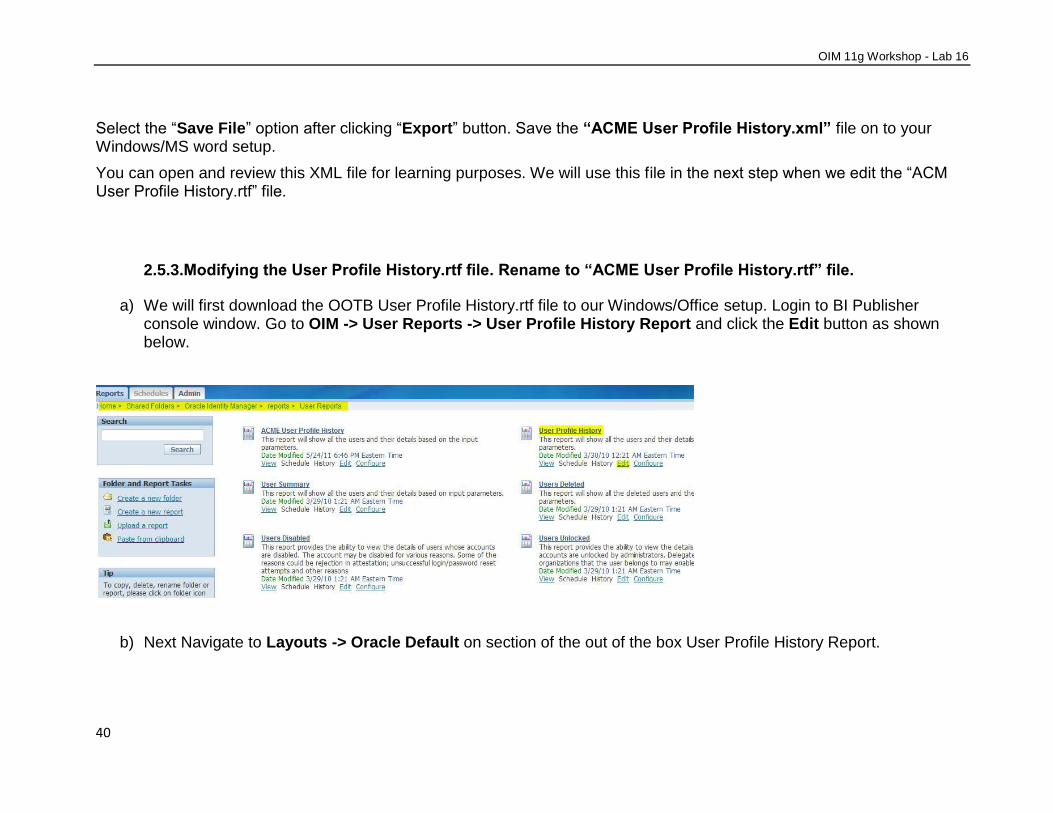
Select the “Save File” option after clicking “Export” button. Save the “ACME User Profile History.xml” file on to your Windows/MS word setup.
You can open and review this XML file for learning purposes. We will use this file in the next step when we edit the “ACM User Profile History.rtf” file.
2.5.3.Modifying the User Profile History.rtf file. Rename to “ACME User Profile History.rtf” file.
a) We will first download the OOTB User Profile History.rtf file to our Windows/Office setup. Login to BI Publisher console window. Go to OIM -> User Reports -> User Profile History Report and click the Edit button as shown below.
b) Next Navigate to Layouts -> Oracle Default on section of the out of the box User Profile History Report.

OIM 11g Workshop – Lab 16
41
c) Download the “User Profile History.rtf” file to your Windows/Office Setup where you installed the BI Publisher Desktop software. Rename the File to “ACME User Profile History.rtf” file.
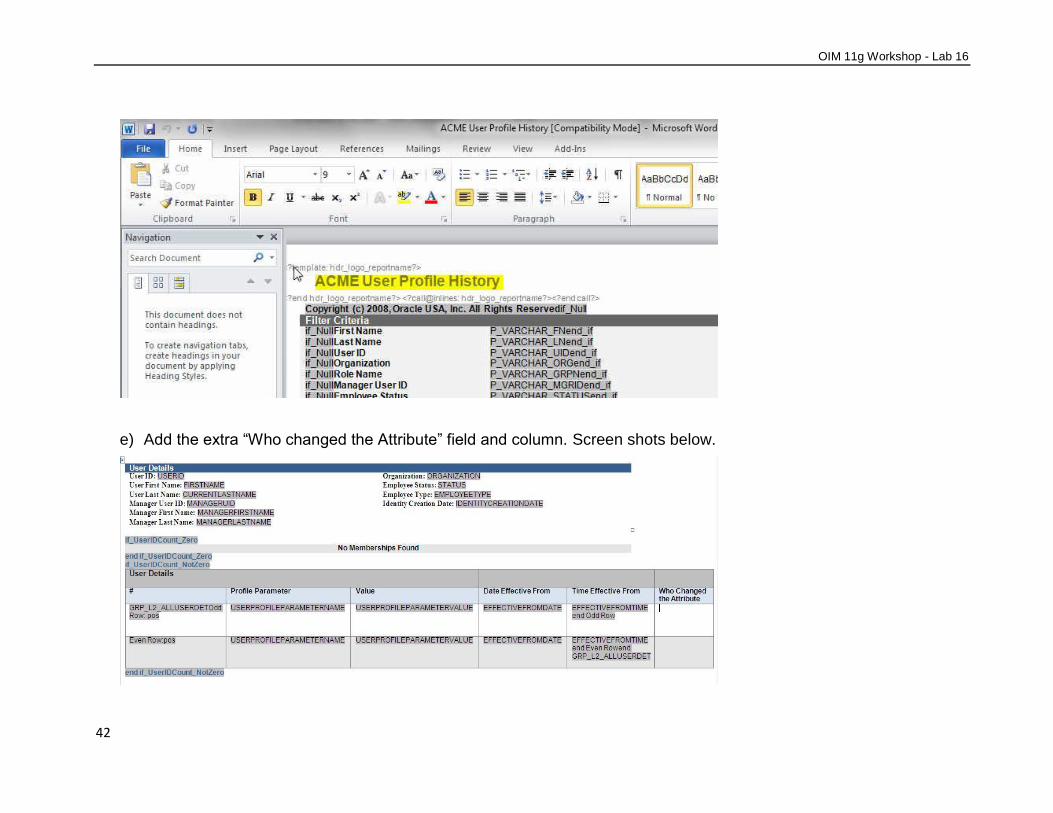
d) Open the “ACME User Profile History.rtf” file and change the “hdr_logo_under_reportname” to “ACME User Profile History.rtf” This is there in the top and bottom section of the RTF file.
OIM 11g Workshop - Lab 16
42
e) Add the extra “Who changed the Attribute” field and column. Screen shots below.

OIM 11g Workshop – Lab 16
43
f) Load the “ACME User Profile History.xml” data file into the “ACME User Profile History.rtf” file. To load the XML Data file, go to “Add-Ins => Data =>Load XML Data” and then load the “ACME User Profile History.xml” file.
g) Insert the “WHO_CHANGED_THE_ATTRIBUTE” element as shown below using the “Add-Ins => Insert Field” option.
OIM 11g Workshop - Lab 16
44
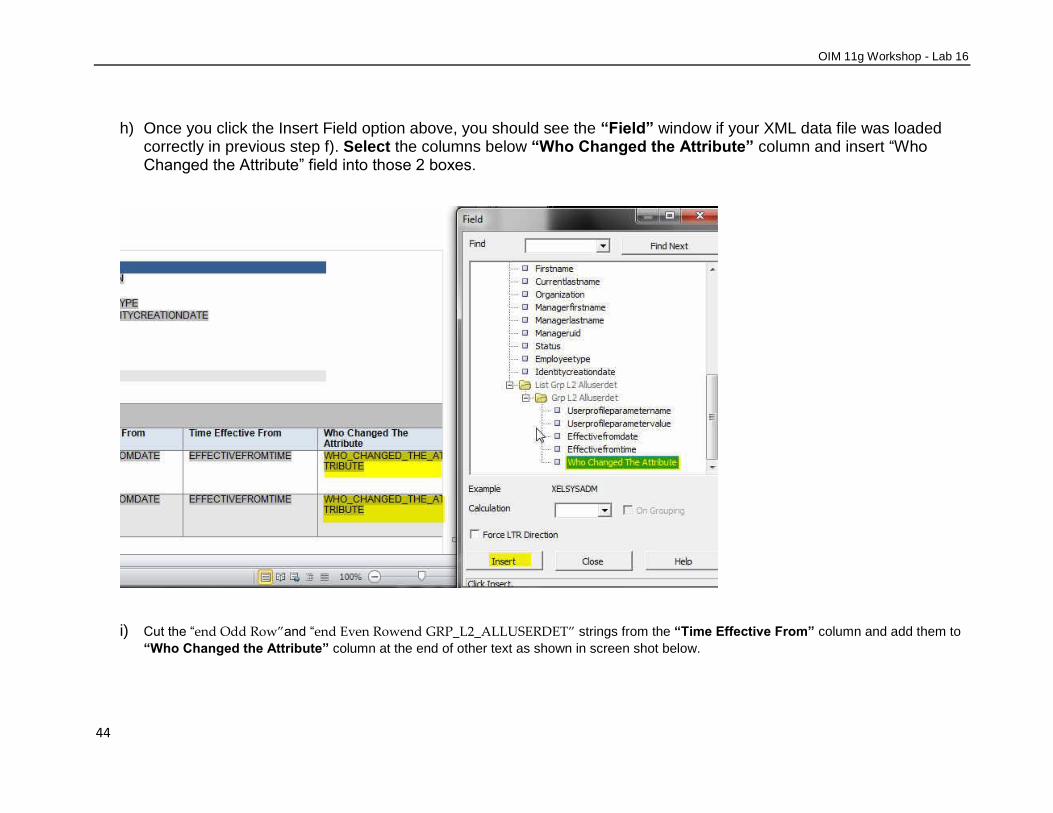
h) Once you click the Insert Field option above, you should see the “Field” window if your XML data file was loaded correctly in previous step f). Select the columns below “Who Changed the Attribute” column and insert “Who Changed the Attribute” field into those 2 boxes.
i) Cut the “end Odd Row”and “end Even Rowend GRP_L2_ALLUSERDET” strings from the “Time Effective From” column and add them to
“Who Changed the Attribute” column at the end of other text as shown in screen shot below.
OIM 11g Workshop – Lab 16
45
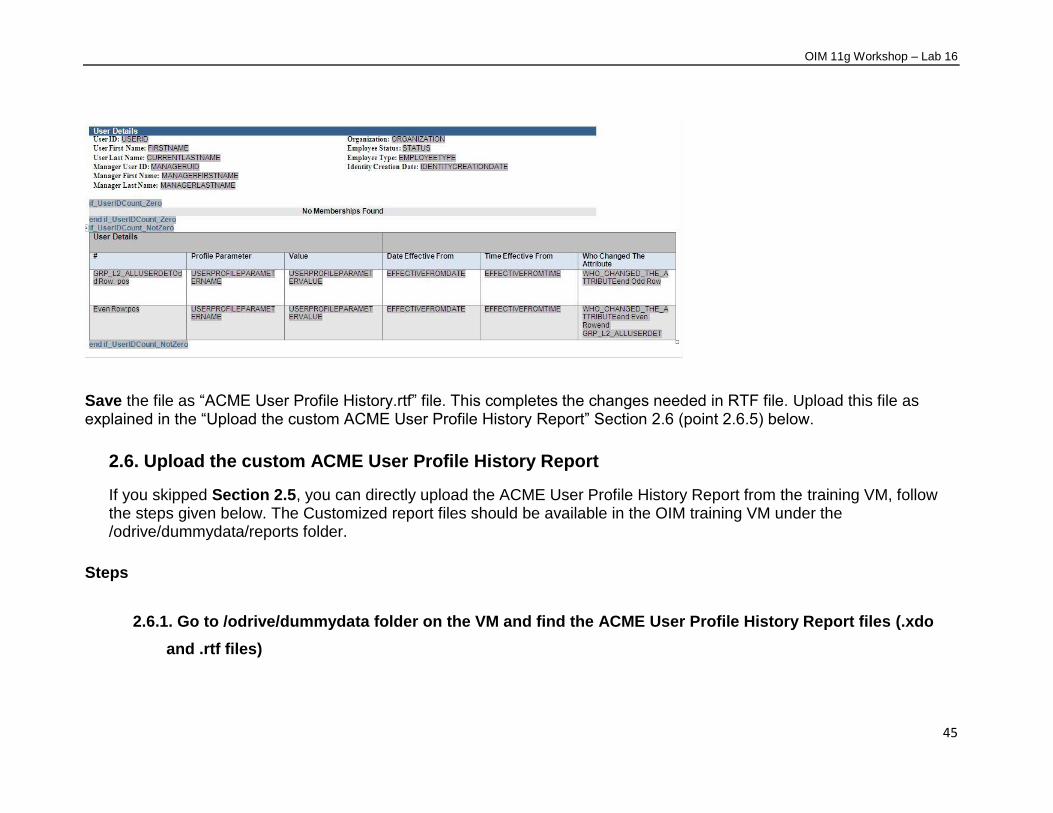
Save the file as “ACME User Profile History.rtf” file. This completes the changes needed in RTF file. Upload this file as explained in the “Upload the custom ACME User Profile History Report” Section 2.6 (point 2.6.5) below.
2.6. Upload the custom ACME User Profile History Report
If you skipped Section 2.5, you can directly upload the ACME User Profile History Report from the training VM, follow the steps given below. The Customized report files should be available in the OIM training VM under the /odrive/dummydata/reports folder.
Steps
2.6.1. Go to /odrive/dummydata folder on the VM and find the ACME User Profile History Report files (.xdo
and .rtf files)
OIM 11g Workshop - Lab 16
46
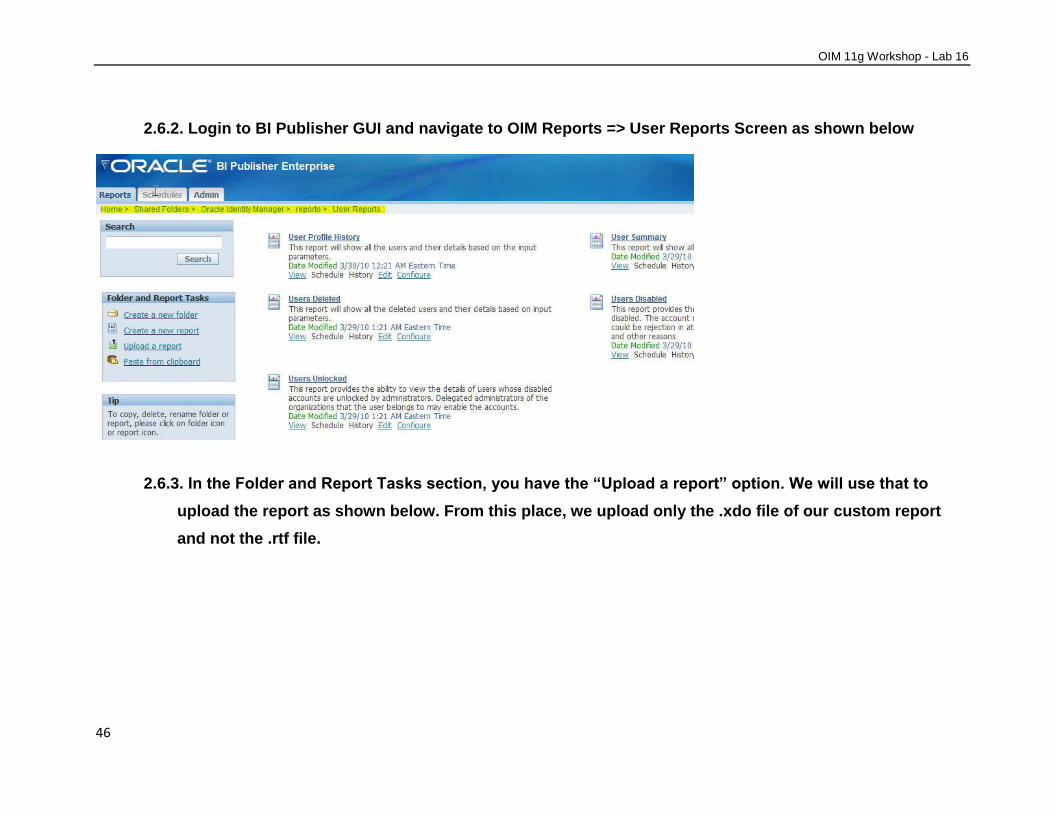
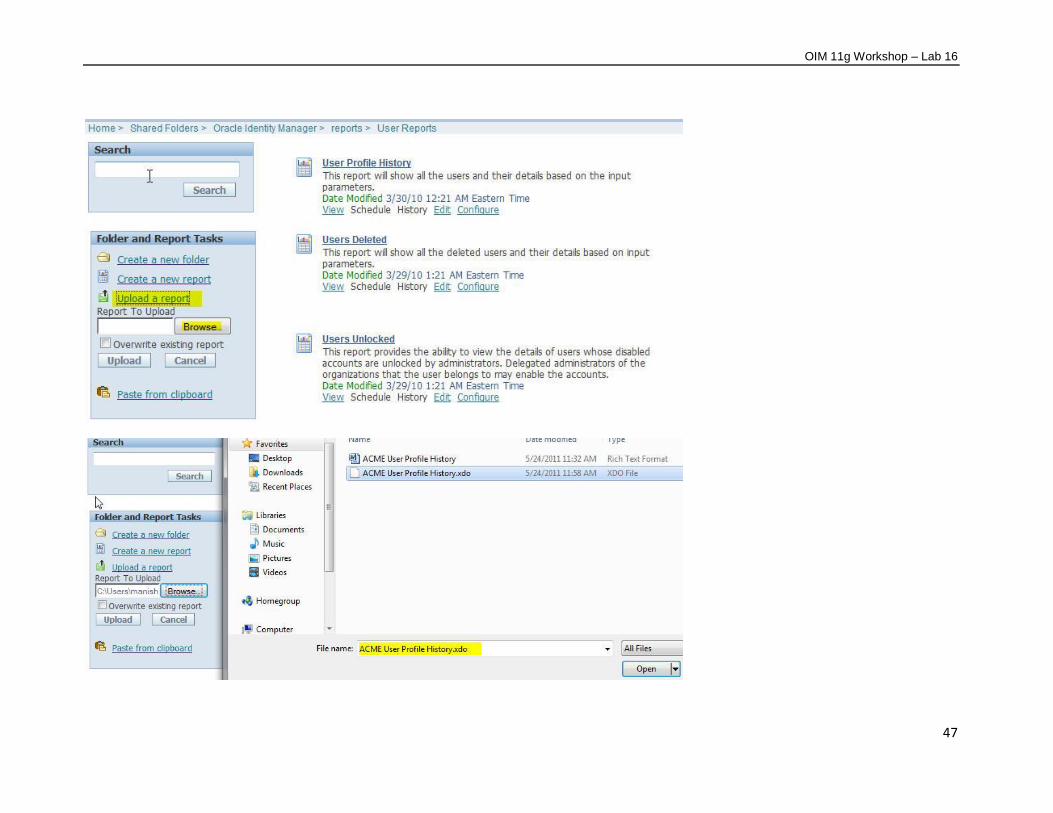
2.6.2. Login to BI Publisher GUI and navigate to OIM Reports => User Reports Screen as shown below
2.6.3. In the Folder and Report Tasks section, you have the “Upload a report” option. We will use that to
upload the report as shown below. From this place, we upload only the .xdo file of our custom report
and not the .rtf file.
OIM 11g Workshop – Lab 16
47

OIM 11g Workshop - Lab 16
48
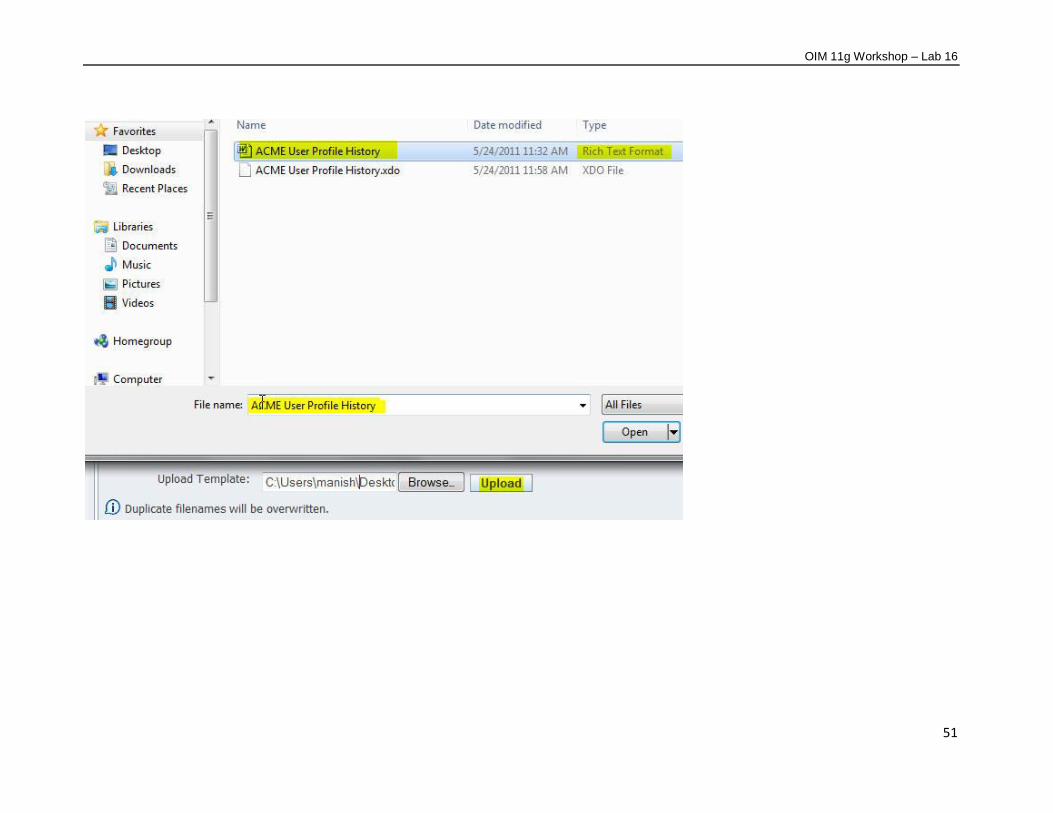
2.6.4.Verify the ACME User Profile History Report is uploaded and shows up in the GUI:
2.6.5. We will upload the RTF file now once the .xdo file has been uploaded. Edit the ACME User Profile
History Report from the GUI using Edit link.

OIM 11g Workshop – Lab 16
49
2.6.6. Go to Layouts section on the left panel once you are in the Edit mode. You will find the Manage
Template Section in here and this is where the .rtf file template will be uploaded.

OIM 11g Workshop - Lab 16
50
2.6.7. Upload the “ACME User Profile History.rtf” file.
OIM 11g Workshop – Lab 16
51

OIM 11g Workshop - Lab 16
52
Verify as shown below that it has uploaded correctly.

OIM 11g Workshop – Lab 16
53

OIM 11g Workshop - Lab 16
54
2.7. Run the ACME User Profile History custom report
Steps
2.7.1.You can now run the ACME User Profile History Report using BI Publisher. Go to User Reports and
click the “View” link as shown below:

OIM 11g Workshop – Lab 16
55
2.7.2.Enter the Date Ranges and any other information you need the report for. For example:
`
Click the View button to see the report. Sample report shown below:

OIM 11g Workshop - Lab 16
56
Verify that you see the title of your custom report and the additional “Who Changed the Attribute” column in the report. Verify the values in that column.
2.7.3. You can also try to filter and run the report for “acme_admin” user made changes. Sample Report below:

OIM 11g Workshop – Lab 16
57
Verify that the report is now filtered by login id “ACME_ADMIN” as shown above.
Conclusion:
In this lab, you learned the following:
Learnt how to install and configure BI Publisher for generating OIM Reports Learnt how to modify, customize and run OIM Reports