L-POS Nova NetEpay US
22
US – NOVA - NETePay INTERFACE CONFIGURATION MANUAL
-
Upload
kevin-wagoner -
Category
Documents
-
view
66 -
download
3
Transcript of L-POS Nova NetEpay US

US – NOVA - NETePay INTERFACE CONFIGURATION MANUAL

Page 2 of 22
Logivision has attempted to make this document accurate. Logivision is not responsible for any direct, incidental, or consequential damages resulting from this documentation or inaccuracies within. Specifications are subject to change.
Printed in Canada

Page 3 of 22
Table of Contents
Table of Contents ............................................................................................................ 3
The start-up procedure: ................................................................................................. 4
Installing L-POS with NETePAY Card Processing ....................................................... 5 Overview........................................................................................................................ 5 In order to process credit/debit card transactions using Nova: ...................................... 5 Connecting to the Internet ............................................................................................. 5 Installing the DSIClientX control .................................................................................... 5
LPOS Configuration ........................................................................................................ 8 Create the Buttons to use on the POS terminals ....................................................... 11
Menu Button ................................................................................................................ 12 Assigning a Key to a button ......................................................................................... 13 Debit function............................................................................................................... 15 Credit function properties ............................................................................................ 16 Check function ............................................................................................................. 18
Using the Nova credit/debit interface .......................................................................... 20 Finalizing a debit transaction ....................................................................................... 20 Finalizing a credit transaction ...................................................................................... 20
Nova NETePAY Installation Troubleshooting FAQs .................................................. 21

Page 4 of 22
NETePAY acts as a software gateway to process credit and debit transactions over Internet protocol in partnership with Nova.
The start-up procedure:
1. Merchant fills out the Merchant Service Application form with Nova Information systems at https://www.novainfo.com/signup.asp
or by calling 866.548.6826.
2. The reseller should purchase the Nova – NETePAY from Datacap software. Allow 2 to 4 weeks for this process.
3. If pin pads are needed they can be purchased from Nova or your usual supplier. Remember that if you purchase those from a supplier (not Nova), they will need to be encrypted by Nova, so plan additional time for this process.
4. Once Nova has set up the merchant account, they will send the form with the necessary merchant numbers, etc. to the Merchant. Allow 2-4 weeks for this process.
5. Nova will mail or e-mail the merchant a welcome letter containing their Merchant number,
6. Dealer installs POS equipment and software and the merchant is ready to process.
Customer Service and Support: • For information on deposits, and transactions, and for change of address, merchant
numbers, merchant bank or additional card types, etc. contact Nova Customer Service at 800.725.1243.
• For information about Datacap and NETePAY contact customer support at (215) 997-8989 or by e-mail [email protected]
Page 5 of 22
Installing L-POS with NETePAY Card Processing
Overview L-POS is interfaced to the NETePAY platform for Internet Protocol credit card processing. This provides merchants with 3-4 second processing of all credit cards and pin based debit. Nova has redundant servers that provide the processing without any additional hardware required.
In order to process credit/debit card transactions using Nova: 1. The NETePAY terminal needs to be connected to the Internet. 2. The DSIClientX control needs to be installed on each POS terminals. 3. The Bank module needs to be configured to use the DSIClientX control 4. The merchant’s information needs to be entered
Connecting to the Internet It is the user’s responsibility to ensure connection from the POS Terminal to the Internet. The router provided by the DSL/Cable provider does not always block incoming traffic that can be harmful to the POS network. Speak with a qualified technician who understands broadband routers and how to set them up to provide a secure environment.
Installing the DSIClientX control The DSIClientX control is not included in L-POS installation and must be installed on each POS terminal. The control is available as a free 10mb self installing executable from www.datacapsystems.com/dsiclientx/
It may be installed before or after L-POS and takes just a minute to install (requires a reboot). There is no configuration needed in the DSI client.

Page 6 of 22
Setting up the NETePAY software
About the application NETePAY by Datacap can be used to connect L-POS with Nova. Developed by Datacap Systems, NETePAY enables retail, restaurant and other businesses to perform reliable, debit, credit, EBT, gift card or prepaid card authorizations via the Internet or other TCP/IP Virtual Private Network (VPN) services in as little as two seconds or less.
NETePAY is multi-threaded to accept simultaneous requests from multiple clients, and scalable so that customers can configure their store and enterprise system to fit their requirements and get the most favorable rates from their payment service.
Datacap provides telephone and e-mail based support. Contact Datacap Support by phone, Monday through Friday from 8:30 AM to 5:30 PM Eastern time.
Datacap Systems, Inc. 100 New Britain Blvd. Chalfont, PA 18914 Phone: (215) 997-8989 Fax: (215) 997-3919 E-mail: [email protected]
How it works NETePAY is an application that executes on a server and monitors encrypted transaction requests from client machines using a POS integrated with DSIClientX, Datacap’s XML ActiveX control. When NETePAY receives an encrypted transaction request from a client machine, it sends the request to the Nova processor for approval via the Internet or other TCP/IP Virtual Private Network (VPN) services. The transactions are then stored in a database that resides on the server. NETePAY makes use of 128-bit encryption to provide secure transactions over the Internet.
Installing NETePAY The NETePAY CD-ROM includes client and server applications for Windows NT/2000/XP operating systems for both single and multi-pay point users.
NETePAY – server-side software that enables you to process authorization requests via the Internet or other TCP/IP Virtual Private Network (VPN) services.
DSIClientX – an XML ActiveX control that integrates into a Point of Sale or Restaurant application and sends encrypted authorization requests from client machines on a LAN to NETePAY for processing. DSIClientX also includes a utility program to enter payment transactions.
Server Requirements To successfully install and run NETePAY on your server, it should meet or exceed the following system requirements:
• Microsoft Windows NT 4.0 (SP6), Windows 2000 Professional (SP1), or Windows XP • 128MB minimum, 256MB or higher recommended • 1GB of available hard-disk space • Microsoft Internet Explorer 5.1 (or later) with 128-bit encryption, Microsoft Internet • Explorer 5.5 or higher recommended • TCP/IP network connectivity • Persistent Internet Connection (DSL, cable, frame relay, etc.)

Page 7 of 22
NOTE: Dial access that holds an open line will also work due to low bandwidth requirements.
Network Requirements
Before installing NETePAY or any of its components, you should know the names and IP addresses of the servers receiving transactions. For remote servers or enterprise systems, it may be necessary to contact your network administrator or your merchant service provider. You should also make port 9100 on the NETePAY server available for incoming traffic if you are behind a firewall and connected to the default port. If you are using a port other than the default IP port (9100), make sure you know the port on which the server is listening.
Page 8 of 22
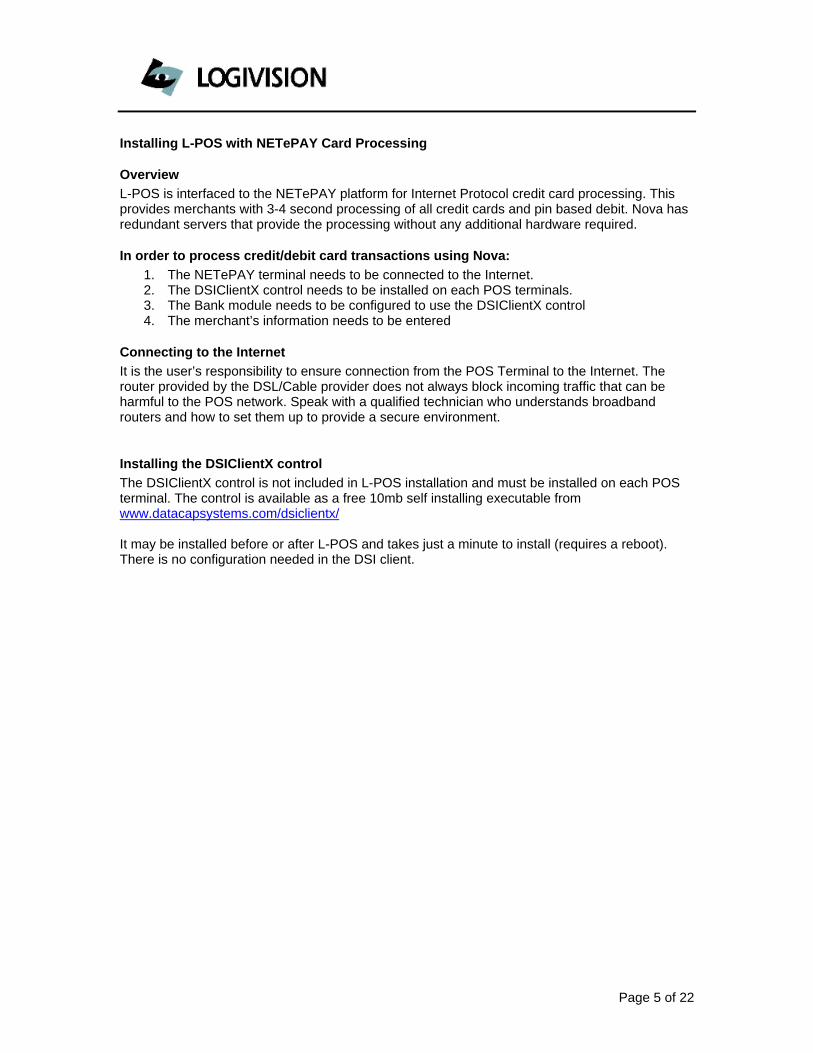
LPOS Configuration From each POS station, access POS setup, peripherals and select the bank tab.
Note: If you do not have any options on the list, you will need to install L-POS from the installation CD and choose “Custom” during the software installation set-up prompts. Select the Datacap Payment driver for installation.
Pull down the list of bank drivers and select Data cap and Setup device.

Page 9 of 22
Select the Host Nova Host-Based
Enter the IP of the Store server running NETePAY. And Select Use In-store Server.
Select the pin pad type and the appropriate COM Port. If you are using the Verifone 2000 (USA) The setup Pin pad will be available. Select this button to setup the Pin pad.
You can also use or combine any MSR with the Pin pad using L-POS or OPOS drivers.
Select Active to activate this bank on exiting. The connection and response timeouts are set to the automatic defaults.

Page 10 of 22
When this is completed you can now apply your changes and the bank setup is completed.
Select the appropriate COM port and DUKPT. Click on the [SET] button to set up your pin pad.
Enter the merchant information that will be printed on the credit card stub receipt.

Page 11 of 22
Create the Buttons to use on the POS terminals
To create a new “card function” on the POS, go to POS setup and select buttons and forms. A new form will appear with a list of the buttons that exist on the default set-up. You need to add several buttons to use the credit authorization system.
• Menu • Debit – Sales • Debit – Return • Credit - Sales • Credit – Return • Credit – Void Sale • Credit – Void return • Check (authorization sale)
Some of these functions may exist. By using an existing button you will save several steps. So search the list before adding new ones. For example, on the default system the Debit button is named Tender=Debit. For each new button you must create follow the steps listed below.
1. Create the button. 2. Assign a function to the button. 3. Set the function parameters (or properties) 4. Assign a keyboard or touch screen position for the new button.
These steps are explained in further detail below.
Open the POS Setup menu and access the Forms section.
Page 12 of 22
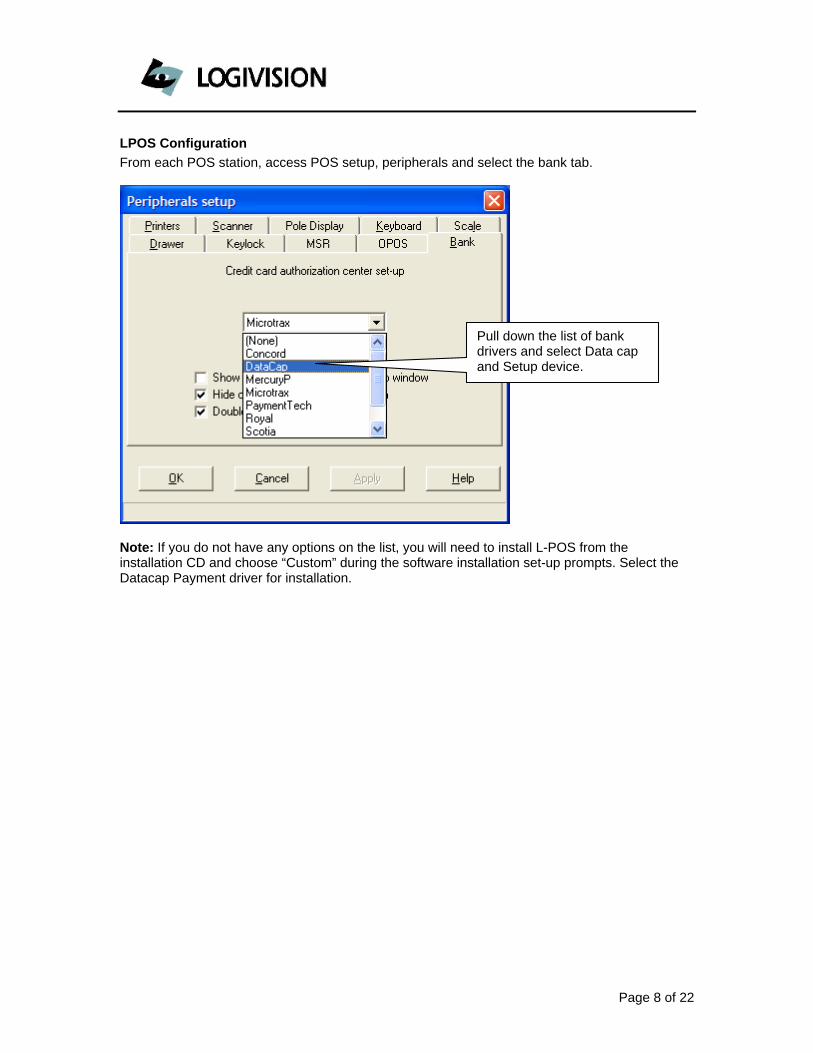
Menu Button An example here is given how to create a new button, set the propetries and assign to keyboard. Refer to the L-POS help guide for detailed instructions on button and form set-up.
Add the Card function type 8048 to be called when this button is pressed.
Access the properties of the function by clicking the properties sheet.
Use the calculator
icon to add a
new button. When prompted for a Description Enter Bank MENU.

Page 13 of 22
Assigning a Key to a button
If you are using a POS keyboard you will need a keyboard shortcut for the button.
When you click the properties sheet as shown in previous image a new window panel opens. Set the Card argument to MENU.

Page 14 of 22
Select the button to be assigned to the keyboard. Then click the Key icon to open the key assignment window.
Press the calculator to add a key position. You will be prompted to press a button on the keyboard.
Delete an existing key assignment by highlighting that assignment and pressing the trash bin icon.

Page 15 of 22
Debit function
You will need to assign a key to this function or add this button to the tender screen.
Select the function Tender=Debit
Access the properties of the function.
Set the Authorization centre to YES. Set the Card argument to DB.

Page 16 of 22
Credit function properties
You will need to assign a key to this function or add this button to the tender screen.
Set the Authorization centre to YES. Set the Card argument to CR
Select the function Tender=MC/VISA
Access the properties of the function.

Page 17 of 22
Note:
Use the override Bank DLL with more than one bank interface, such as Vital for
bank transactions and Givex for gift cards. When the processor for one call is different then the other processor, you will need to define the bank driver in the override bank dll field. Otherwise leave it selected to default.

Page 18 of 22
Check function
You will need to assign a key to this function or add this button to the tender screen.
Select the function Tender=Check
Access the properties of the function.
Set the Authorization centre to YES. Set the Card argument to CK

Page 19 of 22

Page 20 of 22
Using the Nova credit/debit interface
Once you have programmed the required options you should be ready to begin using the debit/credit application.
Finalizing a debit transaction
Once the sale is complete press [Debit].
• If your system is programmed for compulsory tender you need to enter the amount received before you press [Debit] .
• If your system is al lowed to give change you can enter an amount higher than the sale total . The over-tender amount wi l l be processed and change wi l l be issued to the customer.
• If your Debit function is programmed with the Cash out required option you can tender 2 di f ferent ways.
• Enter one total of the sale amount and the cash back amount before pressing [Debit]. Or
• Enter the sale amount and press [Debit]. Then enter the cash back amount at the prompt and press [Debit] . The total of the sale and the cash back amount wil l be processed and change wi l l be issued
Finalizing a credit transaction • Once the sale is complete press [Credit Card] twice.
• I f your syst em is programmed for compulsory t ender you need t o enter t he amount received before you press [ Credi t Card] t w ice.

Page 21 of 22
Nova NETePAY Installation Troubleshooting FAQs
Question: What steps should I go through if credit card processing isn’t working? When you are installing a new POS with Nova credit system, there are several steps to go through if you have problems with the credit module.
1) Verify that the machine acting as a credit card server can ping www.yahoo.com. (Get to a dos prompt and type ping www.yahoo.com) If not, try to ping by number: 65.82.159.222. If you can’t ping either of these, the server machine is not correctly connected to the internet. If you can ping by number and not by name, you have a DNS problem. Make sure you have a DNS server specified in the TCP/IP settings. You may need to get help from your ISP if you don’t know what DNS server address to use.
2) If you can ping, you next need to determine whether the problem lies in the POS or in the credit card communications through the DSIClientX control. Payment processing requires that the server be able to connect using TCP sockets (Winsock) through outgoing ports 1024-5000 to destination port 9000. If there is a firewall, policies may have to be implemented to allow this traffic through.
3) If the DSIClientX utility works, the POS program should work. Check to see that it is configured to use Nova, check the server addresses, merchant number, etc (make sure you have the text portion of the merchant number also, with no leading or trailing blanks).
4) Call Logivision for information on what might be wrong. Once you have verified that the settings have been followed you can call Logivision for further assistance. Charges may apply if you have not followed the steps described in this guide to set things up. Logivision can not assist with questions on connecting your system to the Internet or setting up the system on a specific router, etc.
Question: Visa/MC works but Amex (Discover, Diners, etc) doesn’t work Some POS systems have to be told which card types the merchant is accepting. They will filter out all other types. Check with Nova that the merchant is signed up to accept the card types. It is not uncommon for merchants to forget which card types they’ve signed up for. Nova can add whatever card types they need.
Question: I get a message “Invalid Merchant No” or “Merchant Not Found” Make sure you have typed the merchant number just as received from Nova. If you’ve entered it right and you still get the message, call Nova. They alone can confirm merchant related information.
Question: What does the message “Must Settle Now” mean? It means you must settle your batch!! You should close your batch daily. It will save you money and keep you from receiving this annoying error message while you’re in the middle of the rush hour. Close your batch once a day! If you believe that your batches should be closing automatically, call Nova and they will check how your account is set up.
Question: How do I tell if it worked? If the transaction works, the POS will return an approval, there will be a six digit authorization number and a sequential reference number.

Page 22 of 22
Question: How do I reach Nova Support? Nova offers you live support for Payment Services.
Nova Technical Support 800.725.1243 Live technical support is available to you through Nova's toll-free support line.
Nova Customer Service 800.725.1243 Nova's toll-free customer service line allows you to access support for your account issues such as terminal support, security, and charge backs. This support resource directs your inquiry to the appropriate department at Nova.