
Kurzweil 3000 Version 13 for Windows - College of Health...
19
Assistive Technology Resource Center Caitlin Anghilante Colorado State University March 2014 http://atrc.colostate.edu 1 Kurzweil 3000 Version 13 for Windows Overview Kurzweil 3000 software program offers integrated features that promote and aid students in Reading, Studying, and Writing. Based on Universal Design for Learning principles, it provides users with multiple ways to access information and curriculum, and with tools to help them accomplish tasks independently, practice active learning skills, and demonstrate acquired knowledge. The following quickstart guide has been adapted from the original product user guides for Kurzweil 3000, available from the following website link: Kurzweil 3000 Version 13 Product Guide (http://www.kurzweiledu.com/product-guides.html) To Use Opening and Closing Kurzweil 3000 To start Kurzweil 3000 double-click the Kurzweil 3000 icon on the desktop or in the AT Software folder. Note: You will always need to log on with your username and password. To stop Kurzweil 3000 Do one of the following: • From the File menu, choose Exit. • Or click Close. • Or press ALT+F+X.
-
Upload
phungthien -
Category
Documents
-
view
226 -
download
1
Transcript of Kurzweil 3000 Version 13 for Windows - College of Health...
Assistive Technology Resource Center Caitlin Anghilante Colorado State University March 2014
http://atrc.colostate.edu 1
Kurzweil 3000 Version 13 for Windows Overview Kurzweil 3000 software program offers integrated features that promote and aid students in Reading, Studying, and Writing. Based on Universal Design for Learning principles, it provides users with multiple ways to access information and curriculum, and with tools to help them accomplish tasks independently, practice active learning skills, and demonstrate acquired knowledge.
The following quickstart guide has been adapted from the original product user guides for Kurzweil 3000, available from the following website link:
Kurzweil 3000 Version 13 Product Guide (http://www.kurzweiledu.com/product-guides.html)
To Use
Opening and Closing Kurzweil 3000 To start Kurzweil 3000 double-click the Kurzweil 3000 icon on the desktop or in the AT Software folder.
Note: You will always need to log on with your username and password.
To stop Kurzweil 3000 Do one of the following:
• From the File menu, choose Exit. • Or click Close. • Or press ALT+F+X.
Assistive Technology Resource Center Caitlin Anghilante Colorado State University March 2014
http://atrc.colostate.edu 2
Organization
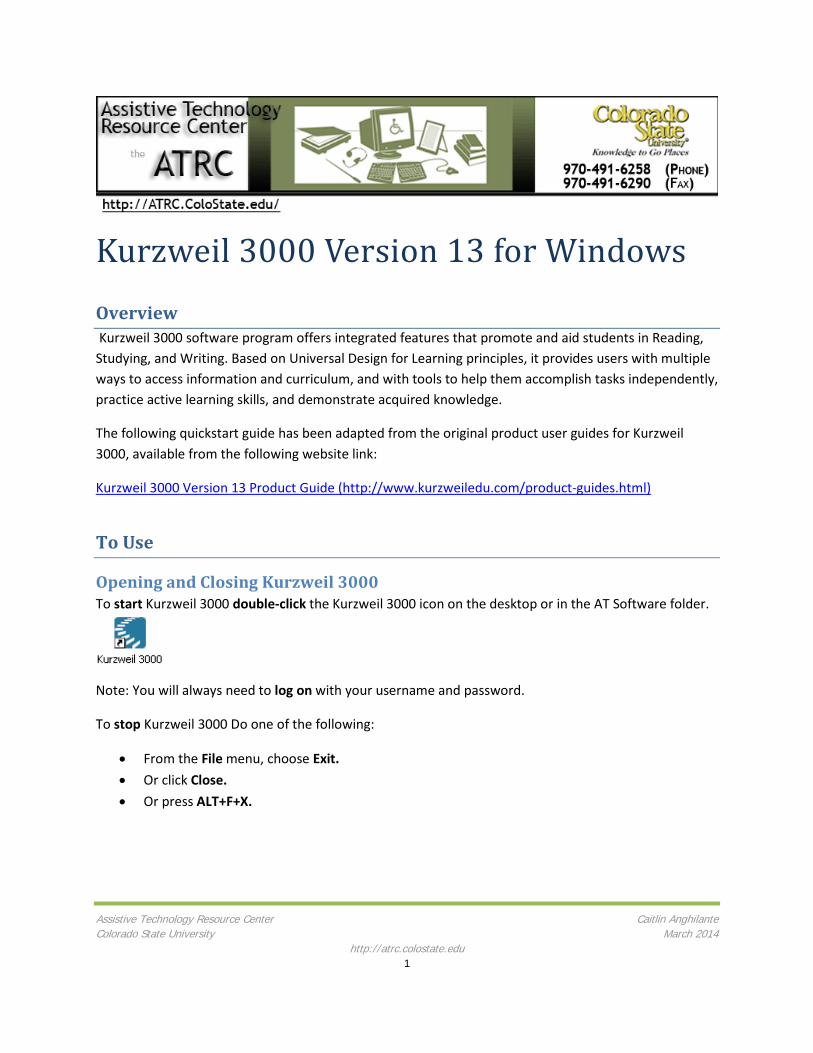
The Kurzweil 3000 Window Along the top of the Kurzweil 3000 window are the Main Menu bar and the Classic toolbar set:
Figure 1: Screen shot of Kurzweil 3000 Window with boxes and labels for main menu toolbar (purple box, A), main toolbar (red box, B), reading toolbar (yellow box, C), study skills toolbar (green box, D), and writing toolbar (blue box, E).
• Purple Box A: Main Menu Bar o Access all Kurzweil 3000 features and functions. Many Kurzweil 3000 features
and functions, as well as menu items, also have keyboard shortcuts. • Red Box B: Main Toolbar
o Access frequently used general functions. • Yellow Box C: Reading Toolbar
o Access frequently used Reading tools • Green Box D: Study skills Toolbar
o Access frequently used study skills tools • Blue Box E: Writing Toolbar
o Access frequently used Writing tools, including those in the Writing Path
Customization Tips • To show or hide a toolbar, click the color brick at the left edge of the toolbar.
Assistive Technology Resource Center Caitlin Anghilante Colorado State University March 2014
http://atrc.colostate.edu 3
• If this is the first time you are opening the Kurzweil 3000 window, you will see a Tip of the Day window. To hide Tip of the Day, go to the Tools menu, select Options and in the General pane Miscellaneous are, uncheck Tip of the Day.
Toolbars There are four default toolbars (also known as the Classic Toolbar set) in Kurzweil 3000 that let you point and click on buttons to perform frequently used functions.
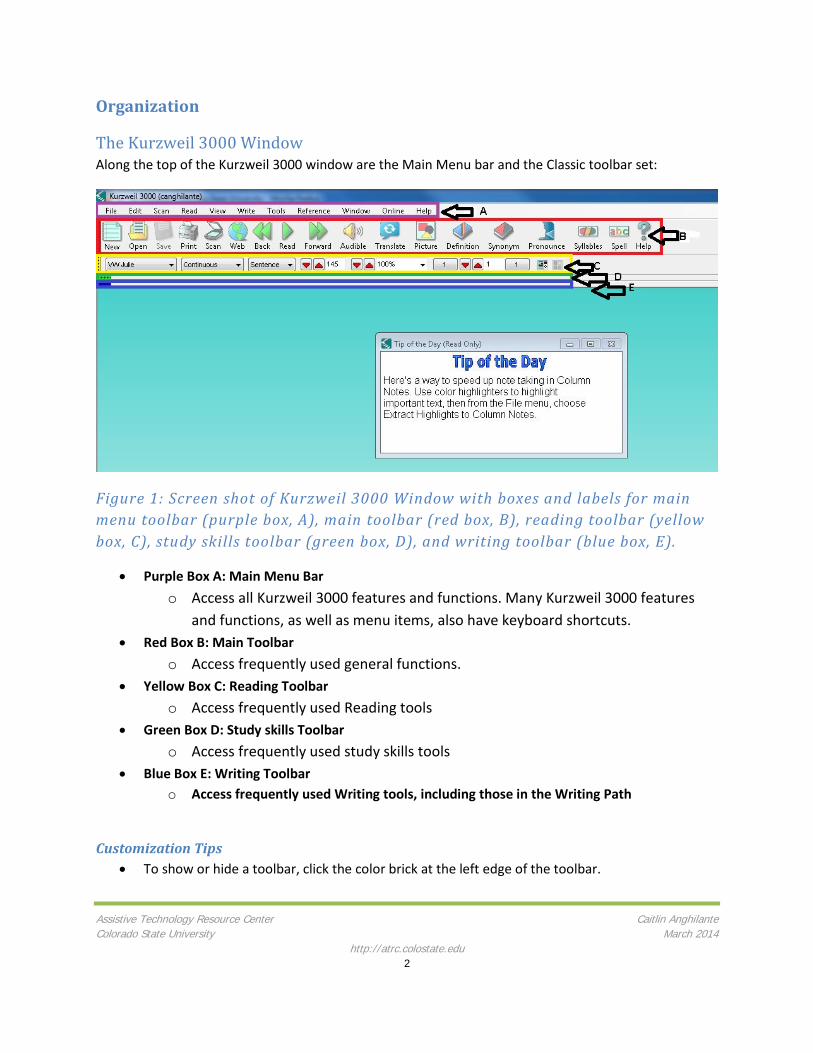
The Main Toolbar When a document is open the main toolbar is used to manage documents (new, open, save, print, scan), use common reading tools (web, back, read, forward, audible), use common reference tools (translate, picture, definition, synonym, pronounce, syllables, spell) and seek help.
Figure 2: Screen shot of main tool bar with common buttons grouped by document management tools, reading tools, reference tools, and help tools
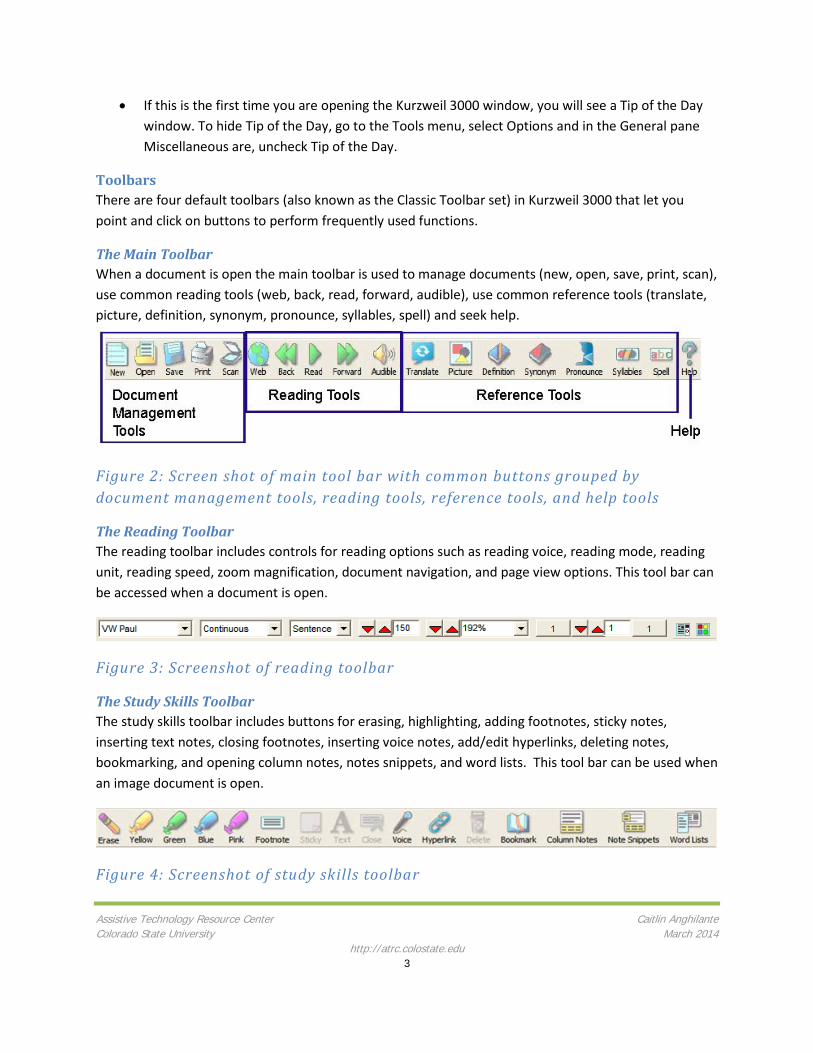
The Reading Toolbar The reading toolbar includes controls for reading options such as reading voice, reading mode, reading unit, reading speed, zoom magnification, document navigation, and page view options. This tool bar can be accessed when a document is open.
Figure 3: Screenshot of reading toolbar
The Study Skills Toolbar The study skills toolbar includes buttons for erasing, highlighting, adding footnotes, sticky notes, inserting text notes, closing footnotes, inserting voice notes, add/edit hyperlinks, deleting notes, bookmarking, and opening column notes, notes snippets, and word lists. This tool bar can be used when an image document is open.
Figure 4: Screenshot of study skills toolbar
Assistive Technology Resource Center Caitlin Anghilante Colorado State University March 2014
http://atrc.colostate.edu 4
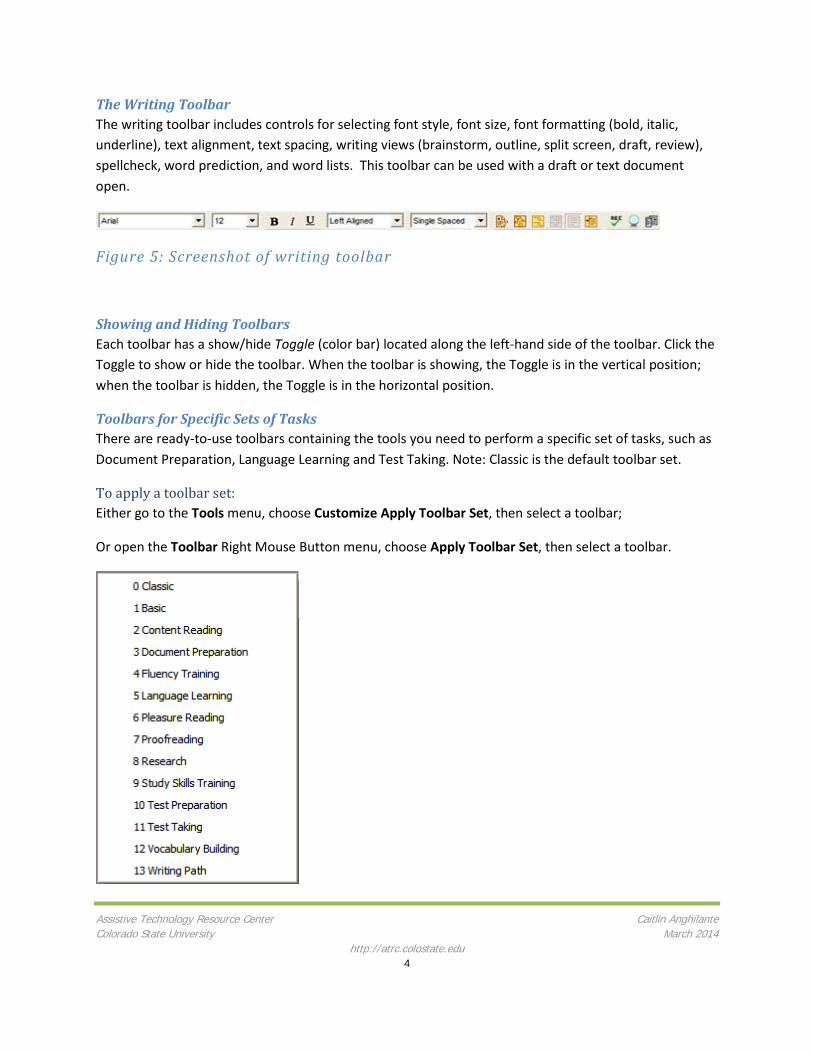
The Writing Toolbar The writing toolbar includes controls for selecting font style, font size, font formatting (bold, italic, underline), text alignment, text spacing, writing views (brainstorm, outline, split screen, draft, review), spellcheck, word prediction, and word lists. This toolbar can be used with a draft or text document open.
Figure 5: Screenshot of writing toolbar
Showing and Hiding Toolbars Each toolbar has a show/hide Toggle (color bar) located along the left-hand side of the toolbar. Click the Toggle to show or hide the toolbar. When the toolbar is showing, the Toggle is in the vertical position; when the toolbar is hidden, the Toggle is in the horizontal position.
Toolbars for Specific Sets of Tasks There are ready-to-use toolbars containing the tools you need to perform a specific set of tasks, such as Document Preparation, Language Learning and Test Taking. Note: Classic is the default toolbar set.
To apply a toolbar set: Either go to the Tools menu, choose Customize Apply Toolbar Set, then select a toolbar;
Or open the Toolbar Right Mouse Button menu, choose Apply Toolbar Set, then select a toolbar.
Assistive Technology Resource Center Caitlin Anghilante Colorado State University March 2014
http://atrc.colostate.edu 5
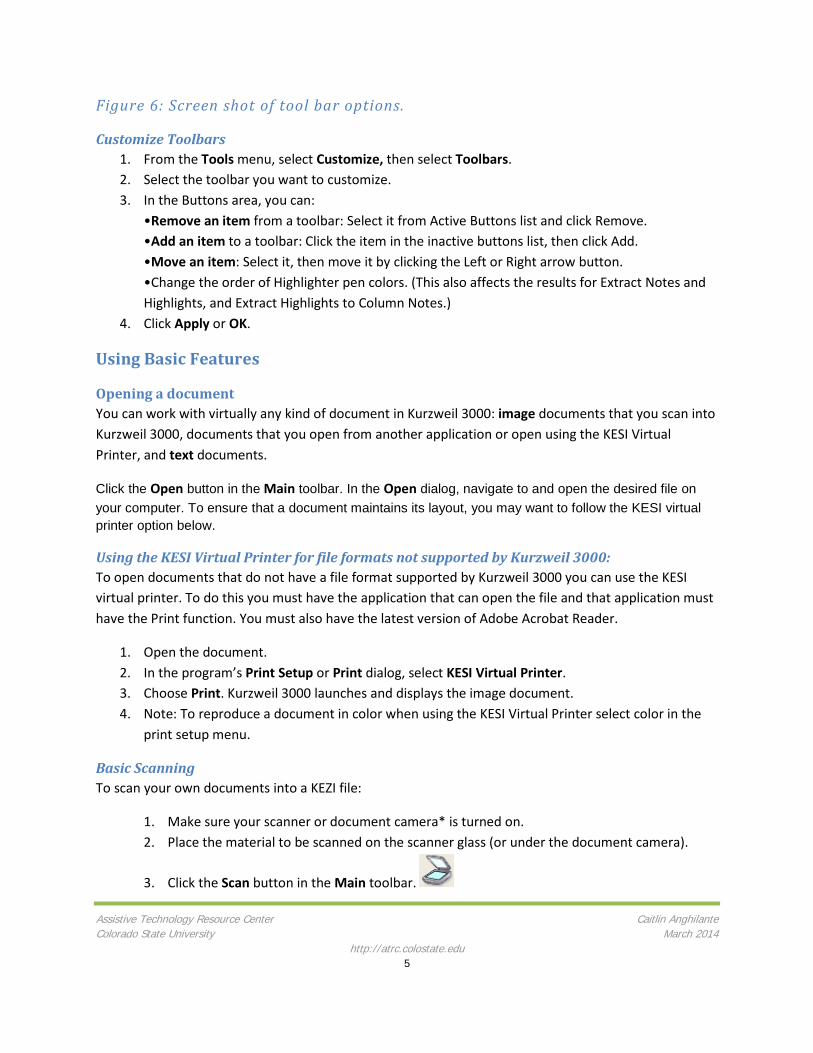
Figure 6: Screen shot of tool bar options.
Customize Toolbars 1. From the Tools menu, select Customize, then select Toolbars. 2. Select the toolbar you want to customize. 3. In the Buttons area, you can:
•Remove an item from a toolbar: Select it from Active Buttons list and click Remove. •Add an item to a toolbar: Click the item in the inactive buttons list, then click Add. •Move an item: Select it, then move it by clicking the Left or Right arrow button. •Change the order of Highlighter pen colors. (This also affects the results for Extract Notes and Highlights, and Extract Highlights to Column Notes.)
4. Click Apply or OK.
Using Basic Features
Opening a document You can work with virtually any kind of document in Kurzweil 3000: image documents that you scan into Kurzweil 3000, documents that you open from another application or open using the KESI Virtual Printer, and text documents.
Click the Open button in the Main toolbar. In the Open dialog, navigate to and open the desired file on your computer. To ensure that a document maintains its layout, you may want to follow the KESI virtual printer option below.
Using the KESI Virtual Printer for file formats not supported by Kurzweil 3000: To open documents that do not have a file format supported by Kurzweil 3000 you can use the KESI virtual printer. To do this you must have the application that can open the file and that application must have the Print function. You must also have the latest version of Adobe Acrobat Reader.
1. Open the document. 2. In the program’s Print Setup or Print dialog, select KESI Virtual Printer. 3. Choose Print. Kurzweil 3000 launches and displays the image document. 4. Note: To reproduce a document in color when using the KESI Virtual Printer select color in the
print setup menu.
Basic Scanning To scan your own documents into a KEZI file:
1. Make sure your scanner or document camera* is turned on. 2. Place the material to be scanned on the scanner glass (or under the document camera).
3. Click the Scan button in the Main toolbar.
Assistive Technology Resource Center Caitlin Anghilante Colorado State University March 2014
http://atrc.colostate.edu 6
4. When the scan is complete the page image appears in the Kurzweil 3000 document area. Each new page you scan is added to the end of the document.
5. A document undergoes optical character recognition (OCR) whenever scanned or printed to Kurzweil.
Saving a Document The default setting for saving a document is as a .kes file. Saving a file as a .kes ensures that all annotations (highlights, notes, brainstorms etc.) are preserved. Documents can be saved as several file types; however this does not ensure annotation preservations. To save:
1. Click the save button in the red main toolbar.
2. Select location on your computer to save document as a (.kes) file. 3. You will be prompted to save documents including column notes, outlines, etc. upon closing
them with the x in the upper right hand corner of the dialogue box.
Navigating within a Document • Use the Page buttons in the Reading toolbar to go to a page
o Click the Page box, and type the page number you want to go to.
o Or click the Up/Down arrow to move page by page.
• Use the Thumbnail buttons in the Reading toolbar to scroll in a document or to go to a page
o Click the Page Thumbnail button (left icon on image above) to display the page
navigation arrows. Click the desired arrows to move in its direction. o Or click the Document Thumbnail button (right icon on image above) to display
thumbnail views of the pages in the document. Click the thumbnail of the page you want to go to.
• Use the View menu to go to specific pages o From the Page submenu, select a specific page, First, Last, Next, Previous. o Or choose Go To and type the page number.
• Use keyboard keys to go to the Next, Previous or specified o Next page: press CTRL+E. o Previous page: press CTRL+ R. o Go to page: press CTRL+G.
• Use the bookmarks o Create Bookmarks, then use Go to Bookmark.
Assistive Technology Resource Center Caitlin Anghilante Colorado State University March 2014
http://atrc.colostate.edu 7
Reading Features Click inside an open document, then in the Main toolbar, click the following buttons to have a document read aloud.
• To start reading
• To pause reading
• then to read previous reading unit
• then to read next reading unit
• to switch between reading audibly and silent • As Kurzweil 3000 reads, it uses “dual highlighting,” one color for highlighting the current word
and the other color for highlighting the current reading unit. Note: You can change the dual highlighting colors in the Tools Options dialog, under the Text pane.
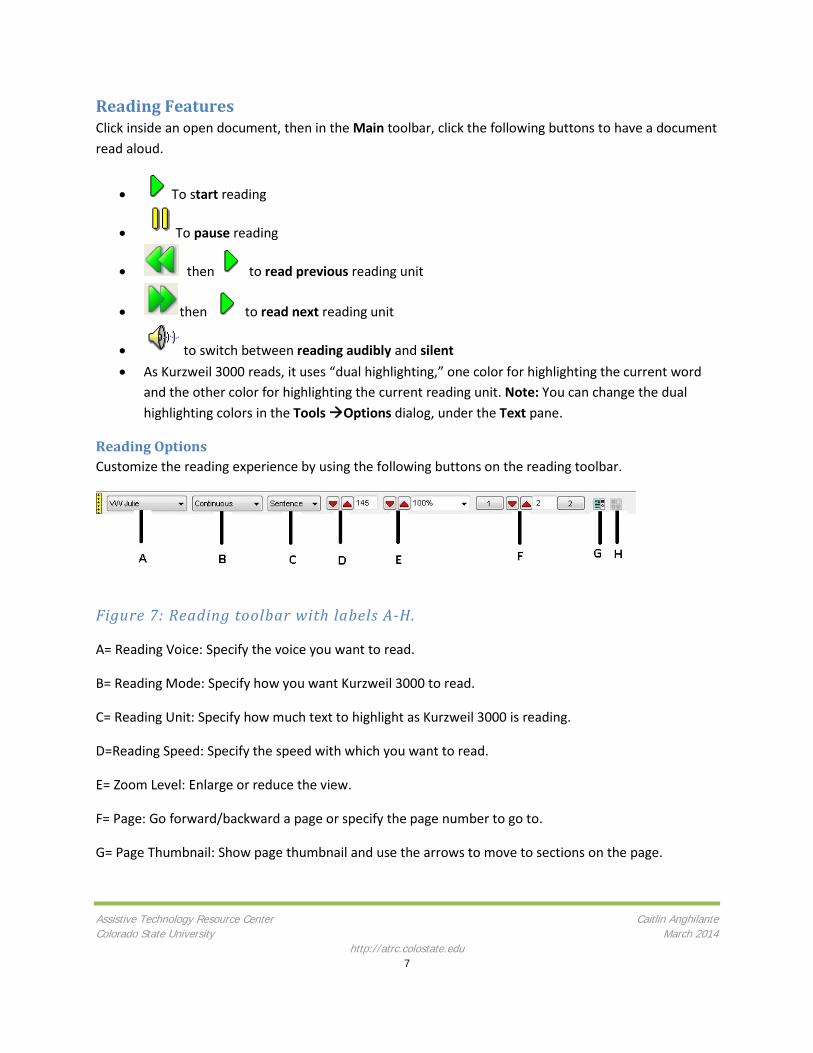
Reading Options Customize the reading experience by using the following buttons on the reading toolbar.
Figure 7: Reading toolbar with labels A-H.
A= Reading Voice: Specify the voice you want to read.
B= Reading Mode: Specify how you want Kurzweil 3000 to read.
C= Reading Unit: Specify how much text to highlight as Kurzweil 3000 is reading.
D=Reading Speed: Specify the speed with which you want to read.
E= Zoom Level: Enlarge or reduce the view.
F= Page: Go forward/backward a page or specify the page number to go to.
G= Page Thumbnail: Show page thumbnail and use the arrows to move to sections on the page.
Assistive Technology Resource Center Caitlin Anghilante Colorado State University March 2014
http://atrc.colostate.edu 8
H= Thumbnail View: Show all page thumbnails in the document. Click the thumbnail of the page you want to go to.
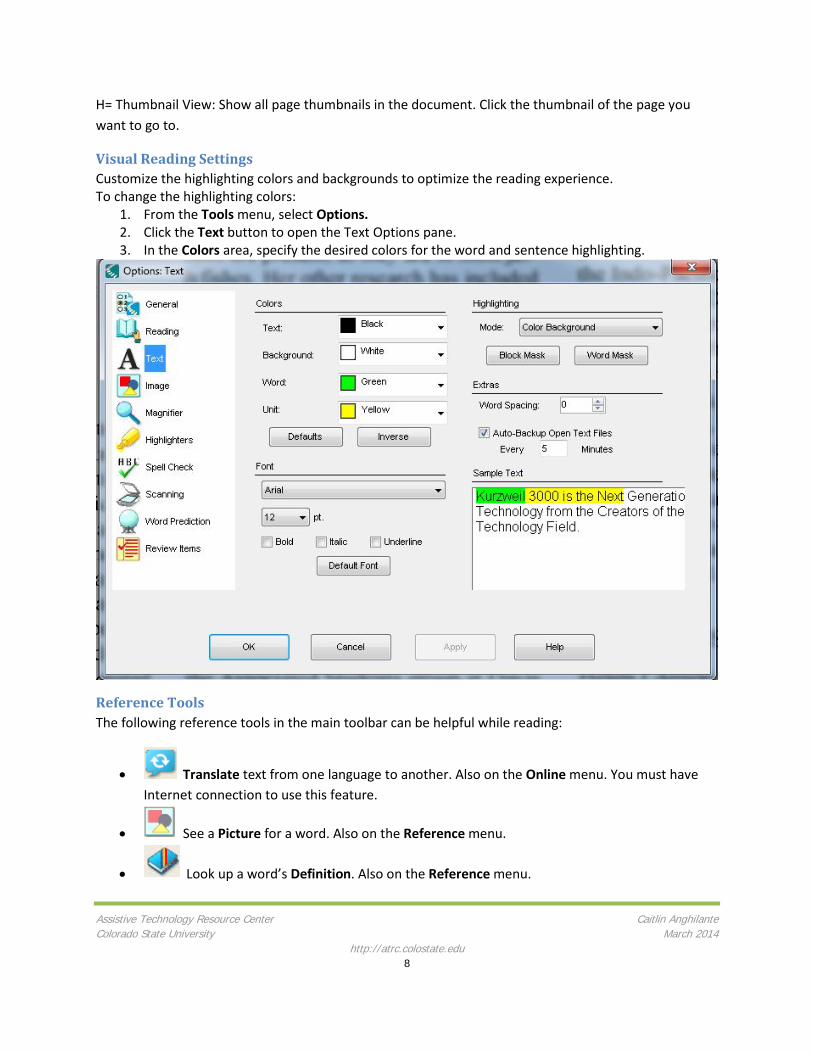
Visual Reading Settings Customize the highlighting colors and backgrounds to optimize the reading experience. To change the highlighting colors:
1. From the Tools menu, select Options. 2. Click the Text button to open the Text Options pane. 3. In the Colors area, specify the desired colors for the word and sentence highlighting.
Reference Tools The following reference tools in the main toolbar can be helpful while reading:
• Translate text from one language to another. Also on the Online menu. You must have Internet connection to use this feature.
• See a Picture for a word. Also on the Reference menu.
• Look up a word’s Definition. Also on the Reference menu.
Assistive Technology Resource Center Caitlin Anghilante Colorado State University March 2014
http://atrc.colostate.edu 9
• Find one or more Synonym. Also on the Reference menu.
• Hear a human Pronounce a word. Also on the Reference menu as Human Pronunciation.
• See and hear a word’s Syllables. Also on the Reference menu.
• Hear a word Spelled aloud. Also on the Reference menu.
Reading Websites The Read the Web feature lets you read Web sites using Kurzweil 3000 and one of two browsers: the latest version of Internet Explorer, or Mozilla Firefox. While reading the Web, you have access to Kurzweil 3000 reading and reference tools. If you want to use Mozilla Firefox, see online Help or the Installation Guide.
To read Web site content:
1. Click the Read the Web button in the Main toolbar, or from the Read menu, select Read the Web.
2. The Web browser opens and connects to your home page. In Internet Explorer, the Kurzweil 3000 Read the Web toolbar appears at the bottom of the browser. In Firefox, the Read the Web toolbar appears below the browser toolbars.
3. Click the Read button to begin reading. 4. Look up a word by selecting it, then clicking the desired Look Up button in the toolbar.
Change Reading Mode, Read By Unit, and WPM Reading Speed in the browser. Note Kurzweil must be
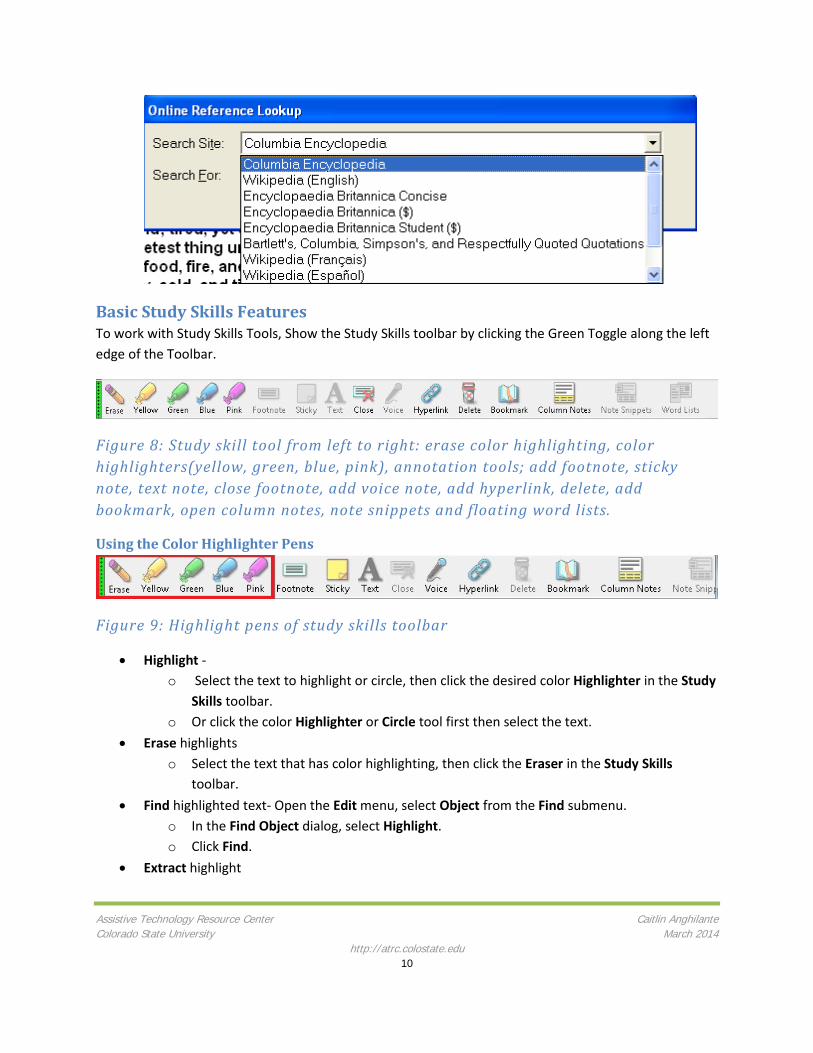
Online Encyclopedias and Reference sites This requires an internet connection to use this feature.
1. Select a word or phrase. 2. From the Online menu, select Online Reference Lookup. 3. In the Online Reference Lookup dialog, select a Search Site from the list, then click Search:
Assistive Technology Resource Center Caitlin Anghilante Colorado State University March 2014
http://atrc.colostate.edu 10
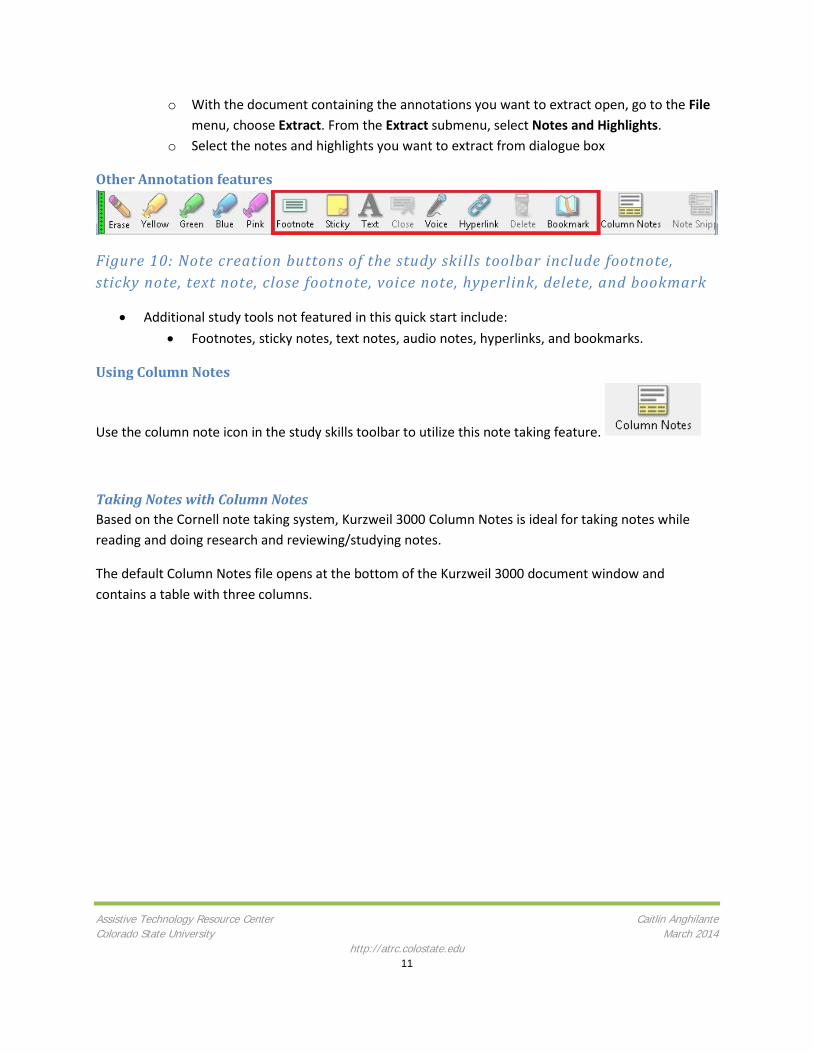
Basic Study Skills Features To work with Study Skills Tools, Show the Study Skills toolbar by clicking the Green Toggle along the left edge of the Toolbar.
Figure 8: Study skill tool from left to right: erase color highlighting, color highlighters(yellow, green, blue, pink), annotation tools; add footnote, sticky note, text note, close footnote, add voice note, add hyperlink, delete, add bookmark, open column notes, note snippets and floating word lists.
Using the Color Highlighter Pens
Figure 9: Highlight pens of study skills toolbar
• Highlight - o Select the text to highlight or circle, then click the desired color Highlighter in the Study
Skills toolbar. o Or click the color Highlighter or Circle tool first then select the text.
• Erase highlights o Select the text that has color highlighting, then click the Eraser in the Study Skills
toolbar. • Find highlighted text- Open the Edit menu, select Object from the Find submenu.
o In the Find Object dialog, select Highlight. o Click Find.
• Extract highlight
Assistive Technology Resource Center Caitlin Anghilante Colorado State University March 2014
http://atrc.colostate.edu 11
o With the document containing the annotations you want to extract open, go to the File menu, choose Extract. From the Extract submenu, select Notes and Highlights.
o Select the notes and highlights you want to extract from dialogue box
Other Annotation features
Figure 10: Note creation buttons of the study skills toolbar include footnote, sticky note, text note, close footnote, voice note, hyperlink, delete, and bookmark
• Additional study tools not featured in this quick start include: • Footnotes, sticky notes, text notes, audio notes, hyperlinks, and bookmarks.
Using Column Notes
Use the column note icon in the study skills toolbar to utilize this note taking feature.
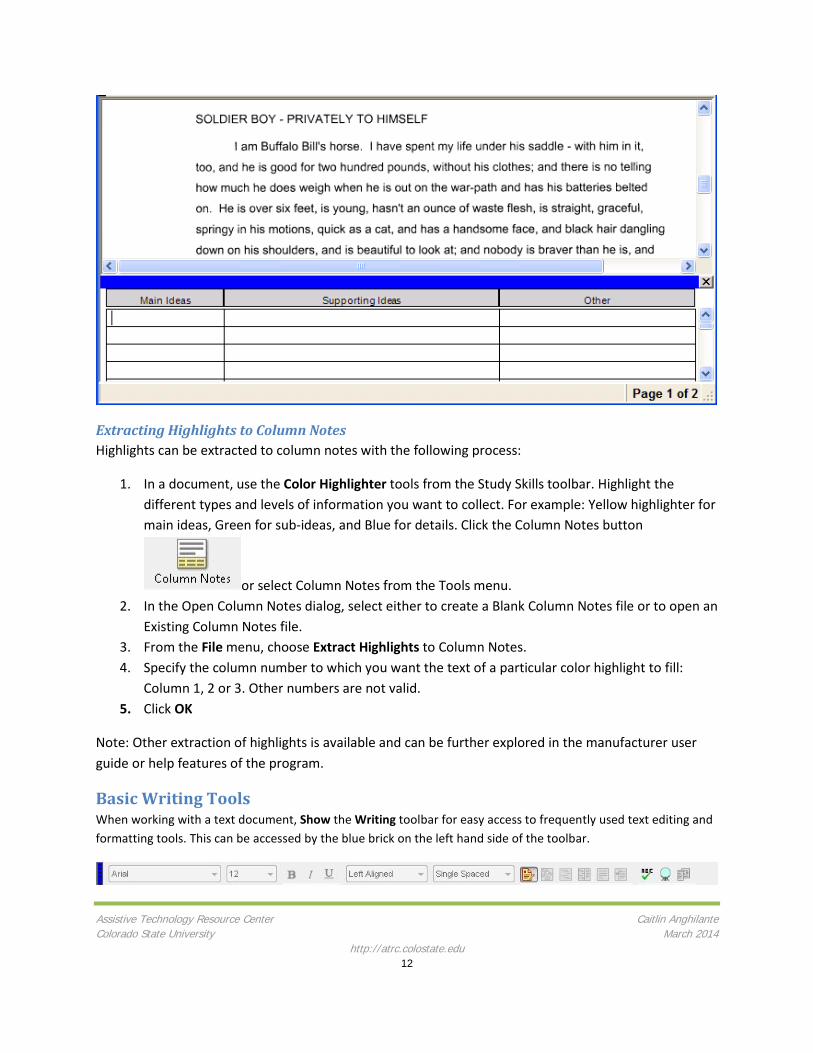
Taking Notes with Column Notes Based on the Cornell note taking system, Kurzweil 3000 Column Notes is ideal for taking notes while reading and doing research and reviewing/studying notes.
The default Column Notes file opens at the bottom of the Kurzweil 3000 document window and contains a table with three columns.
Assistive Technology Resource Center Caitlin Anghilante Colorado State University March 2014
http://atrc.colostate.edu 12
Extracting Highlights to Column Notes Highlights can be extracted to column notes with the following process:
1. In a document, use the Color Highlighter tools from the Study Skills toolbar. Highlight the different types and levels of information you want to collect. For example: Yellow highlighter for main ideas, Green for sub-ideas, and Blue for details. Click the Column Notes button
or select Column Notes from the Tools menu. 2. In the Open Column Notes dialog, select either to create a Blank Column Notes file or to open an
Existing Column Notes file. 3. From the File menu, choose Extract Highlights to Column Notes. 4. Specify the column number to which you want the text of a particular color highlight to fill:
Column 1, 2 or 3. Other numbers are not valid. 5. Click OK
Note: Other extraction of highlights is available and can be further explored in the manufacturer user guide or help features of the program.
Basic Writing Tools When working with a text document, Show the Writing toolbar for easy access to frequently used text editing and formatting tools. This can be accessed by the blue brick on the left hand side of the toolbar.
Assistive Technology Resource Center Caitlin Anghilante Colorado State University March 2014
http://atrc.colostate.edu 13
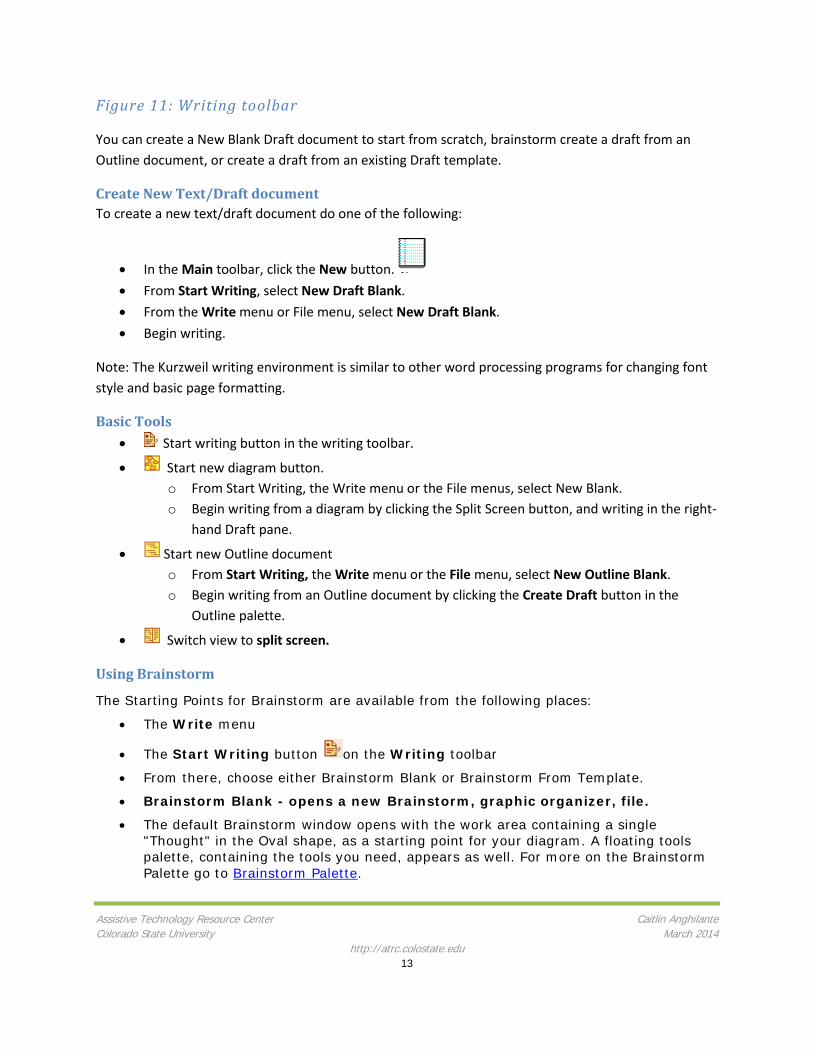
Figure 11: Writing toolbar
You can create a New Blank Draft document to start from scratch, brainstorm create a draft from an Outline document, or create a draft from an existing Draft template.
Create New Text/Draft document To create a new text/draft document do one of the following:
• In the Main toolbar, click the New button. • From Start Writing, select New Draft Blank. • From the Write menu or File menu, select New Draft Blank. • Begin writing.
Note: The Kurzweil writing environment is similar to other word processing programs for changing font style and basic page formatting.
Basic Tools • Start writing button in the writing toolbar.
• Start new diagram button. o From Start Writing, the Write menu or the File menus, select New Blank. o Begin writing from a diagram by clicking the Split Screen button, and writing in the right-
hand Draft pane.
• Start new Outline document o From Start Writing, the Write menu or the File menu, select New Outline Blank. o Begin writing from an Outline document by clicking the Create Draft button in the
Outline palette.
• Switch view to split screen.
Using Brainstorm
The Starting Points for Brainstorm are available from the following places:
• The Write menu
• The Start Writing button on the Writing toolbar
• From there, choose either Brainstorm Blank or Brainstorm From Template.
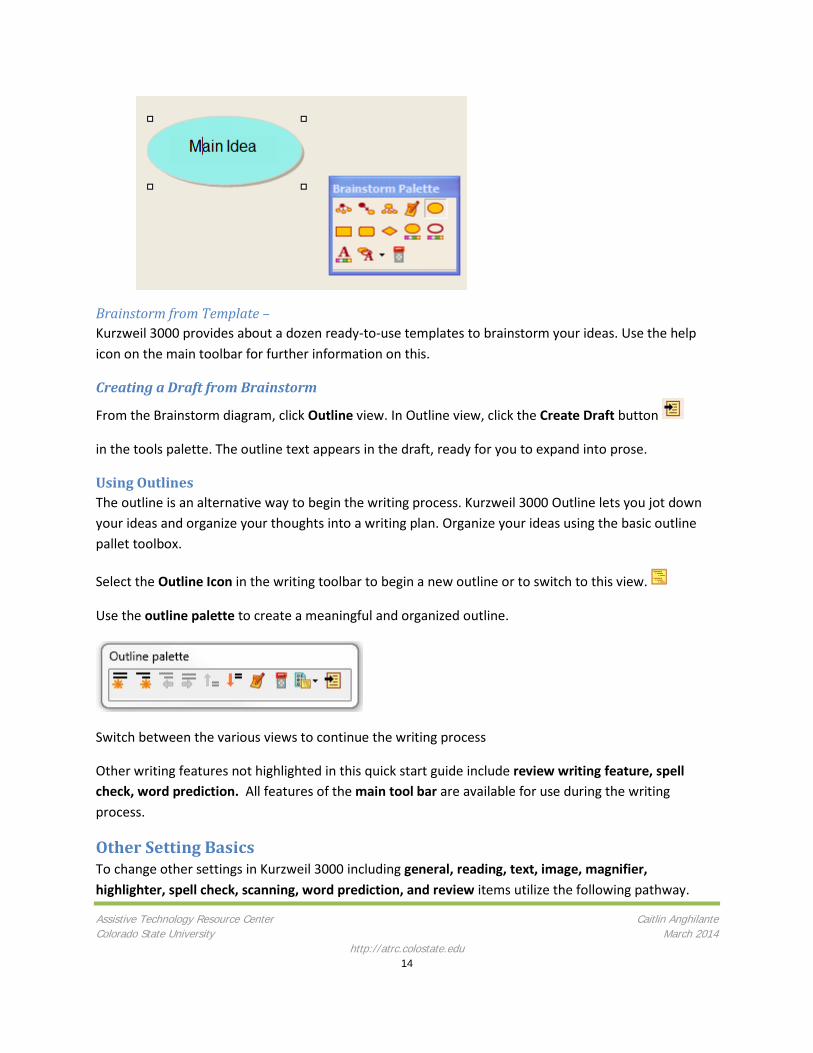
• Brainstorm Blank - opens a new Brainstorm, graphic organizer, file.
• The default Brainstorm window opens with the work area containing a single "Thought" in the Oval shape, as a starting point for your diagram. A floating tools palette, containing the tools you need, appears as well. For more on the Brainstorm Palette go to Brainstorm Palette.
Assistive Technology Resource Center Caitlin Anghilante Colorado State University March 2014
http://atrc.colostate.edu 14
Brainstorm from Template – Kurzweil 3000 provides about a dozen ready-to-use templates to brainstorm your ideas. Use the help icon on the main toolbar for further information on this.
Creating a Draft from Brainstorm
From the Brainstorm diagram, click Outline view. In Outline view, click the Create Draft button
in the tools palette. The outline text appears in the draft, ready for you to expand into prose.
Using Outlines The outline is an alternative way to begin the writing process. Kurzweil 3000 Outline lets you jot down your ideas and organize your thoughts into a writing plan. Organize your ideas using the basic outline pallet toolbox.
Select the Outline Icon in the writing toolbar to begin a new outline or to switch to this view.
Use the outline palette to create a meaningful and organized outline.
Switch between the various views to continue the writing process
Other writing features not highlighted in this quick start guide include review writing feature, spell check, word prediction. All features of the main tool bar are available for use during the writing process.
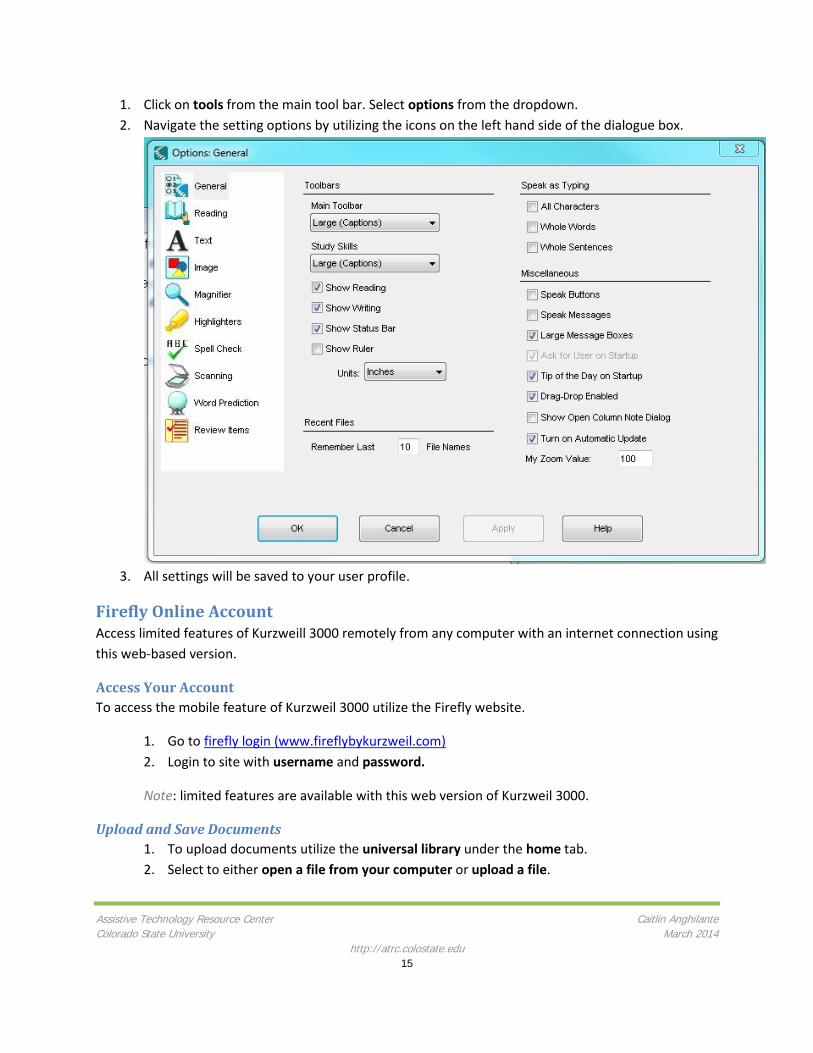
Other Setting Basics To change other settings in Kurzweil 3000 including general, reading, text, image, magnifier, highlighter, spell check, scanning, word prediction, and review items utilize the following pathway.
Assistive Technology Resource Center Caitlin Anghilante Colorado State University March 2014
http://atrc.colostate.edu 15
1. Click on tools from the main tool bar. Select options from the dropdown. 2. Navigate the setting options by utilizing the icons on the left hand side of the dialogue box.
3. All settings will be saved to your user profile.
Firefly Online Account Access limited features of Kurzweill 3000 remotely from any computer with an internet connection using this web-based version.
Access Your Account To access the mobile feature of Kurzweil 3000 utilize the Firefly website.
1. Go to firefly login (www.fireflybykurzweil.com) 2. Login to site with username and password.
Note: limited features are available with this web version of Kurzweil 3000.
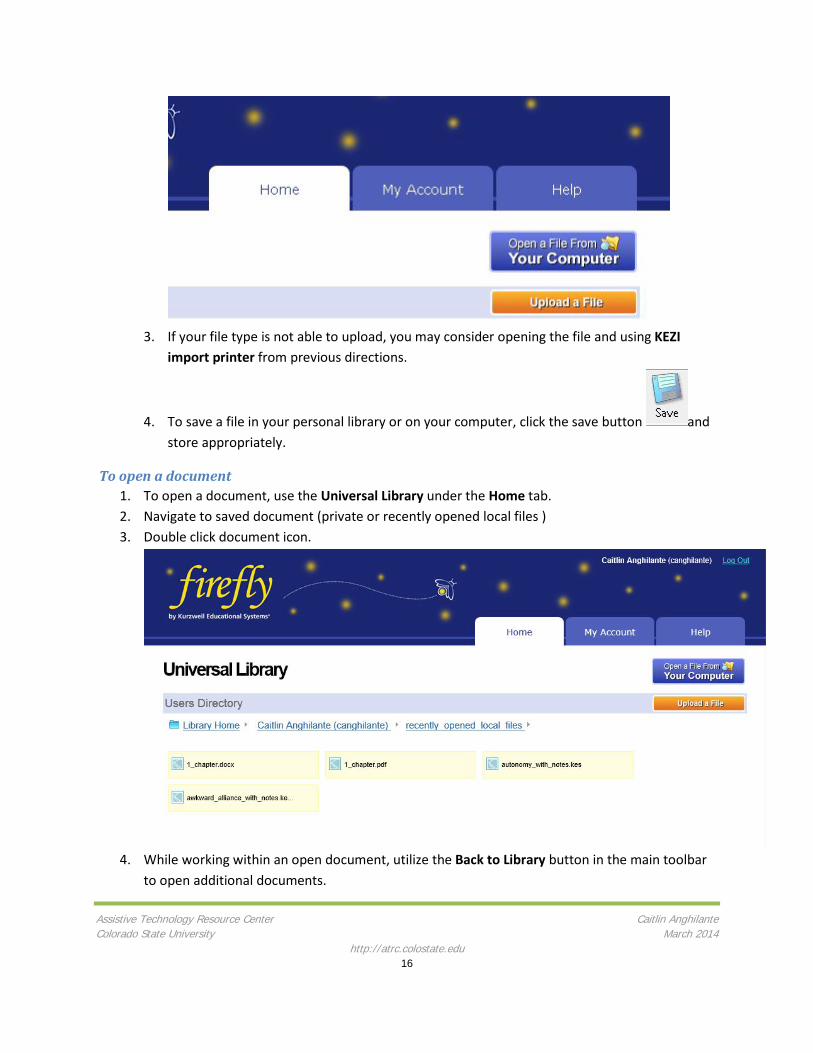
Upload and Save Documents 1. To upload documents utilize the universal library under the home tab. 2. Select to either open a file from your computer or upload a file.
Assistive Technology Resource Center Caitlin Anghilante Colorado State University March 2014
http://atrc.colostate.edu 16
3. If your file type is not able to upload, you may consider opening the file and using KEZI
import printer from previous directions.
4. To save a file in your personal library or on your computer, click the save button and store appropriately.
To open a document 1. To open a document, use the Universal Library under the Home tab. 2. Navigate to saved document (private or recently opened local files ) 3. Double click document icon.
4. While working within an open document, utilize the Back to Library button in the main toolbar
to open additional documents.
Assistive Technology Resource Center Caitlin Anghilante Colorado State University March 2014
http://atrc.colostate.edu 17
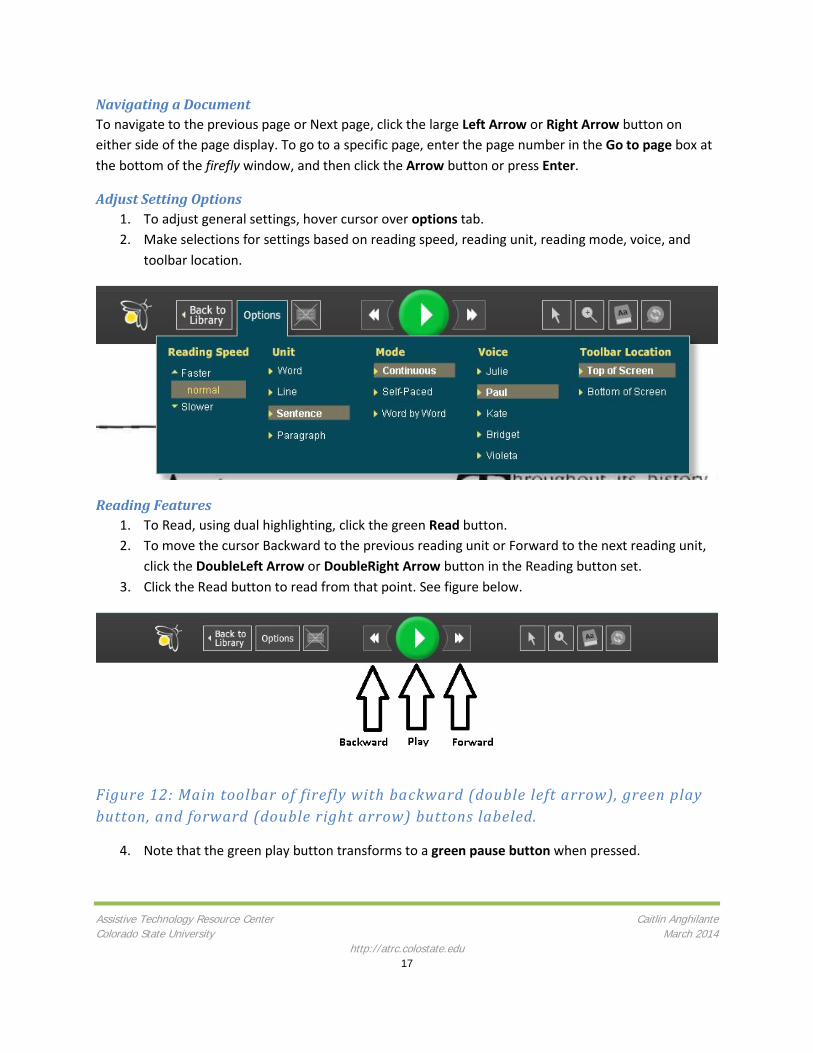
Navigating a Document To navigate to the previous page or Next page, click the large Left Arrow or Right Arrow button on either side of the page display. To go to a specific page, enter the page number in the Go to page box at the bottom of the firefly window, and then click the Arrow button or press Enter.
Adjust Setting Options 1. To adjust general settings, hover cursor over options tab. 2. Make selections for settings based on reading speed, reading unit, reading mode, voice, and
toolbar location.
Reading Features 1. To Read, using dual highlighting, click the green Read button. 2. To move the cursor Backward to the previous reading unit or Forward to the next reading unit,
click the DoubleLeft Arrow or DoubleRight Arrow button in the Reading button set. 3. Click the Read button to read from that point. See figure below.
Figure 12: Main toolbar of firefly with backward (double left arrow), green play button, and forward (double right arrow) buttons labeled.
4. Note that the green play button transforms to a green pause button when pressed.
Assistive Technology Resource Center Caitlin Anghilante Colorado State University March 2014
http://atrc.colostate.edu 18
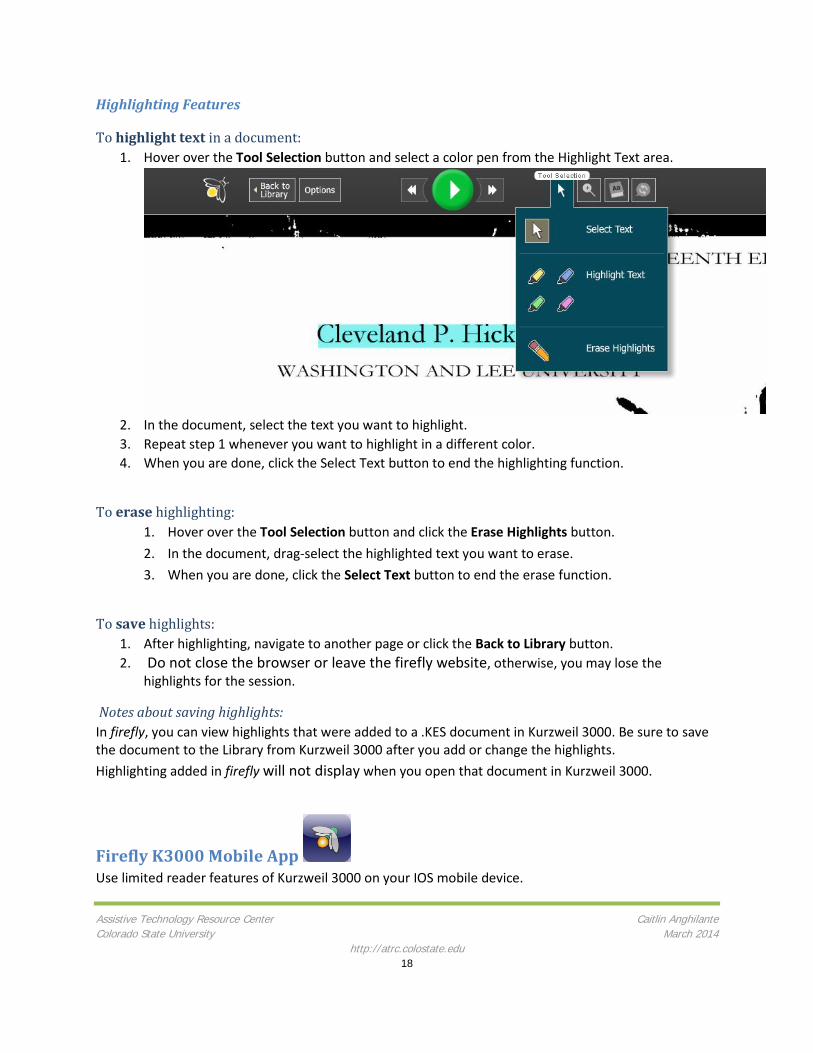
Highlighting Features
To highlight text in a document: 1. Hover over the Tool Selection button and select a color pen from the Highlight Text area.
2. In the document, select the text you want to highlight. 3. Repeat step 1 whenever you want to highlight in a different color. 4. When you are done, click the Select Text button to end the highlighting function.
To erase highlighting: 1. Hover over the Tool Selection button and click the Erase Highlights button. 2. In the document, drag-select the highlighted text you want to erase. 3. When you are done, click the Select Text button to end the erase function.
To save highlights: 1. After highlighting, navigate to another page or click the Back to Library button. 2. Do not close the browser or leave the firefly website, otherwise, you may lose the
highlights for the session.
Notes about saving highlights: In firefly, you can view highlights that were added to a .KES document in Kurzweil 3000. Be sure to save the document to the Library from Kurzweil 3000 after you add or change the highlights. Highlighting added in firefly will not display when you open that document in Kurzweil 3000.
Firefly K3000 Mobile AppUse limited reader features of Kurzweil 3000 on your IOS mobile device.
Assistive Technology Resource Center Caitlin Anghilante Colorado State University March 2014
http://atrc.colostate.edu 19
Download the free Firefly app from the itunes store at the following link:
Apple itunes firefly app (https://itunes.apple.com/us/app/firefly-k3000/id535277727?mt=8)
Find a detailed user guide from Kurzweil at the following link:
Kurzweil firefly app user guide (http://www.kurzweiledu.com/files/firefly/Using_Firefly_on_an_iPad.pdf)
Program Manufacturer Contact Info Cambium Learning Technologies
Kurzweil Educational Systems
Phone Number: 800-894-5374; Outside of US and Canada: +1-781-276-0600
Website: Kurzweil 3000 Website (http://www.kurzweiledu.com/products/k3000-win.html)
Cost of the product Cost: $1395 at the time of this quick start publication date.
(Students registered with the ATRC may be able to use Kurzweil on their home computers through our site license while they are students at CSU.)