Knowing What Your Students Kno · Web viewBlack and Wiliam – Inside the Black Box - 1998 Making...
29
Box Educational Consulting 2010 Assessment for Learning: It Makes a Difference! Cathy Box, PhD [email protected] Best Practices Conference, February, 2010
Transcript of Knowing What Your Students Kno · Web viewBlack and Wiliam – Inside the Black Box - 1998 Making...

Assessment for Learning:It Makes a Difference!
Cathy Box, [email protected] Practices Conference, February, 2010
2010Box Educational Consulting
Cathy Box, Ph.D., Lubbock Christian UniversityBest Practices Conference, February, 2010
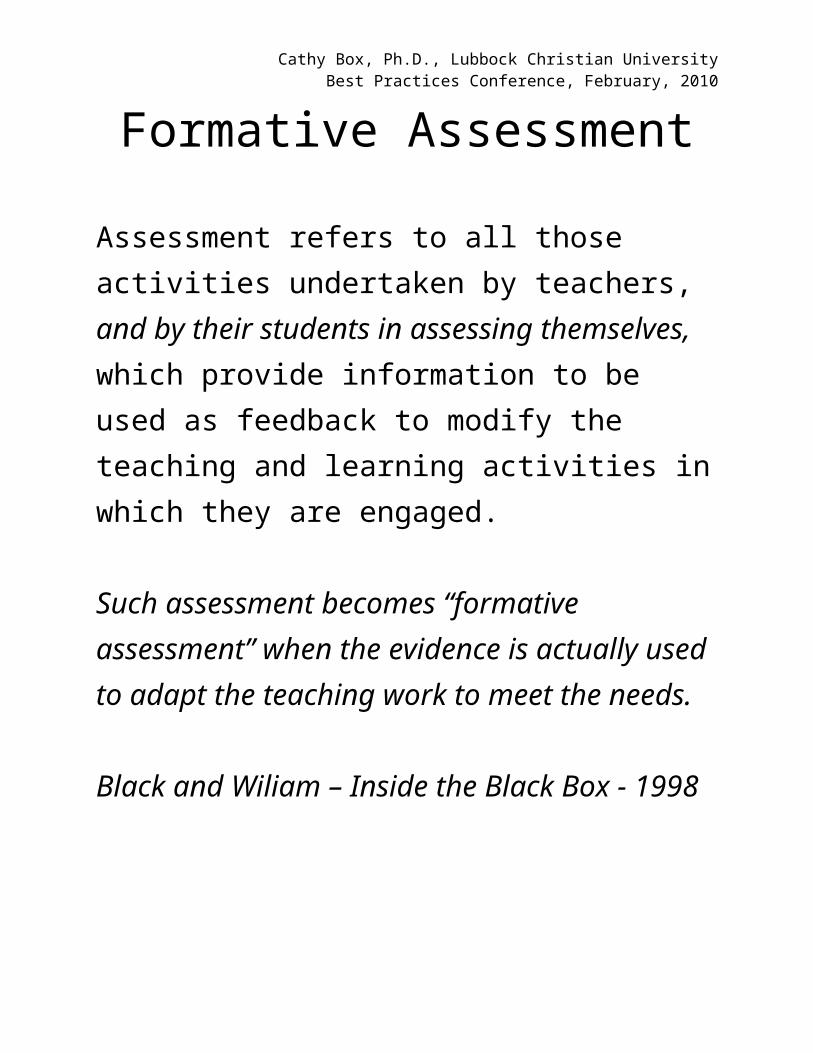
Formative Assessment
Assessment refers to all those activities undertaken by teachers, and by their students in assessing themselves, which provide information to be used as feedback to modify the teaching and learning activities in which they are engaged.
Such assessment becomes “formative assessment” when the evidence is actually used to adapt the teaching work to meet the needs.
Black and Wiliam – Inside the Black Box - 1998

Cathy Box, Ph.D., Lubbock Christian UniversityBest Practices Conference, February, 2010
Making Learning Visible
Cathy Box, Ph.D., Lubbock Christian UniversityBest Practices Conference, February, 2010
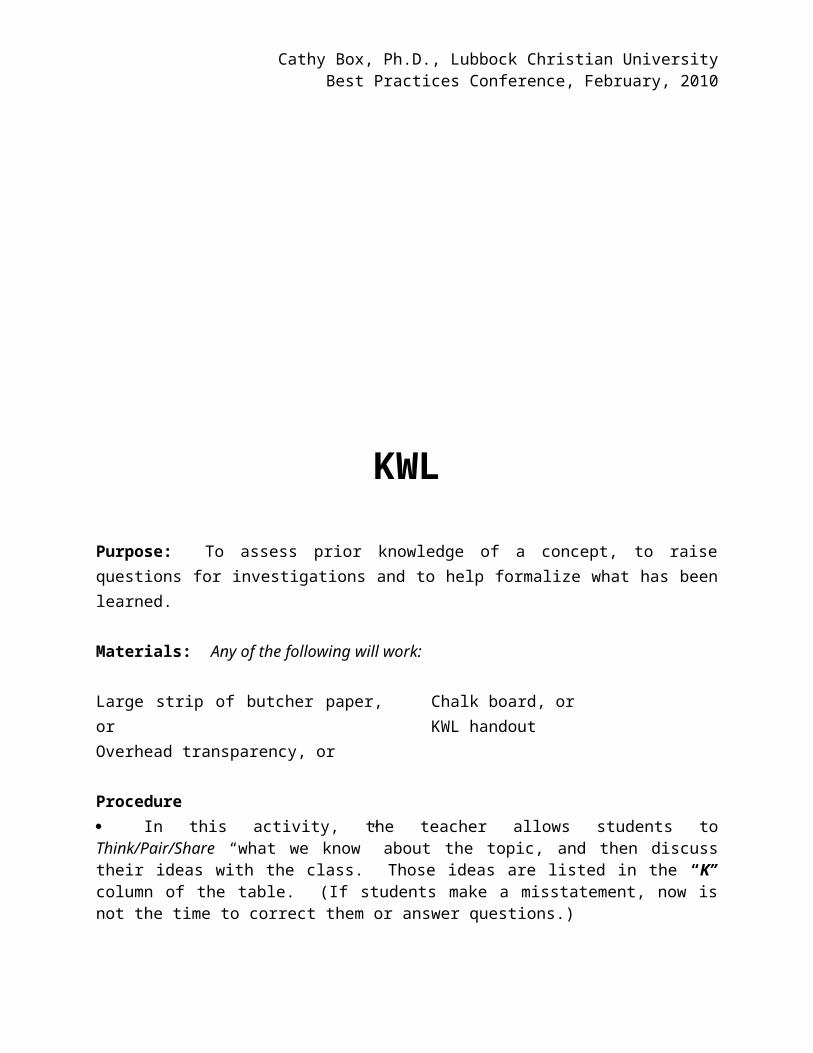
KWL
Purpose: To assess prior knowledge of a concept, to raise questions for investigations and to help formalize what has been learned.
Materials: Any of the following will work:
Large strip of butcher paper, orOverhead transparency, or
Chalk board, or KWL handout
Procedure In this activity, the teacher allows students to Think/Pair/Share “what we know” about the topic, and then discuss their ideas with the class. Those ideas are listed in the “K” column of the table. (If students make a misstatement, now is not the time to correct them or answer questions.)
Then the facilitator should lead the students to ask questions and voice what they wonder about the concept. These questions are recorded in the “W” column. This process is important in that it allows the facilitator to get an idea about the student’s level of knowledge in a given area, as well as discover any misconceptions that might be held.
It is critical at the end of the lesson, to complete the “L” or “What I Learned” column. This allows the students to process the information and knowledge that they have gained.
What We Know What We Want to Find
Out or What We Wonder
What We Have Learned
For the student, this strategy allows them to focus on the problem at hand and determine what questions need to be answered in order to solve the problem. It is recommended that you keep this chart up in the room during the entire duration of the unit. As questions are answered, or new ones arise, you should modify as necessary.

Cathy Box, Ph.D., Lubbock Christian UniversityBest Practices Conference, February, 2010
Think, Pair, Share
Description
Think, pair, share is a simple technique with great benefits. TPS results in increased student participation and improved retention of information. Using the procedure, students learn from one another and get to try out their ideas in a non-threatening context before venturing to make their ideas more public. Learner confidence improves and all students are given a way to participate in class, rather than the few who usually volunteer. The benefits for the teacher include increased time on task in the classroom and greater quality of students' contributions to class discussions. Students and teachers alike gain much clearer understandings of the expectation for attention and participation in classroom discussions. The model was first proposed by Frank Lyman of the University of Maryland. There are four steps to think, pair, share, with a time limit on each step signaled by the teacher. (An electronic kitchen timer works well for this.)
Procedure
Step One - Teacher poses a question
The process of think, pair, share begins when the teacher poses a thought-provoking question for the entire class. This may be a straightforward question or a
problem the teacher wants to pose to the class for solution. For example, “How do plants adapt to a hot, dry environment?” Low level, single right answer questions are to be avoided in this model. Questions must pose problems or dilemmas that students will be willing and able to think about.
Step Two - Students think individually
At a signal from the teacher, students are given a limited amount of time to think of their own answer to the problematic question. The time should be decided by the teacher on the basis of knowledge of the students, the nature of the question, and the demands of the schedule. It may be helpful, though it is not required, to have students write out their individual responses and solutions. Students should understand that while there may be no one right answer, it is important that everyone come up with some reasonable answer to the question. This step of the procedure automatically builds "wait time" into the classroom conversation.

Cathy Box, Ph.D., Lubbock Christian UniversityBest Practices Conference, February, 2010
Step Three - Each student discusses his or her answer with a fellow student
The end of the think step signals to the students the time to begin working with one other student to reach consensus on an answer to the question. Each student now has a chance to try out possibilities. Together, each pair of students can reformulate a common answer based on their collective insights to possible solutions to the problem. At times, the process can go one step farther by asking pairs of students to regroup into foursomes to further refine their thoughts before sharing with the group at large. These small group settings are less threatening to individual students than venturing forward before the whole group with an untried answer. The pair step in the model also promotes much more conversation among students about the issues entailed by the question.
Step Four - Students share their answers with the whole class
In this final step, individuals can present solutions individually or cooperatively to the class as a whole group. Where pairs of students have constructed displays of their answers, as in a chart or diagram, each member of the pair can take credit for the product of their thinking.
The final step of think, pair, share has several benefits to all students. They see the same concepts expressed in several different ways as different individuals find unique expressions for answers to the question. Moreover, the concepts embedded in the answers are in the language of the learners rather than the language of textbook or teacher. And where students can draw or otherwise picture their thoughts, different learning modalities and preferences can come into play in the attempt to understand the ideas behind the answers.
It may be worth repeating one caveat in closing: The success and quality of the think, pair, share activity will depend on the quality of the question posed in step one. If the question promotes genuine thought for students, genuine insights are sure to emerge in successive steps.
Adapted from: Gunter, M. A., Estes, T. H., & Schwab, J. H. (1999). Instruction: A models approach, 3rd edition. Boston: Allyn & Bacon, pp. 279-280. Retrieved from http://curry.edschool.virginia.edu, April 9, 2005.
Cathy Box, Ph.D., Lubbock Christian UniversityBest Practices Conference, February, 2010
Concept Mapping – Making Thinking Visible
Ongoing concept maps can provide vital insight into where students are in their understanding of a subject. It can make their thinking “visible” and illuminate misconceptions and misunderstandings of a concept as well as their knowledge and understanding.
How to use concept maps in a formative manner
1. Before beginning instruction, access students’ prior knowledge about the concept at hand. Tell them the name or topic of your unit of study and use the Think/Pair/Share strategy to pull from them what they already know.
Think, Pair, Share
a. Ask students to think individually about your topic and write down everything they know in their science journal.
b. Then ask students to pair up and share their list with a partner. Ask them to write down anything else they can think of.
c. Ask each group to share what they know with the class.
2. As students share, write one- or two-word concepts on the board that represents what they know, or think they know, so far. Resist the urge to correct them at this time.
3. Give groups of students (three per group is optimum) a sticky note pad, and sharpies or markers. Note: the larger sticky notes work much better than the small ones.
4. Have the students use the marker to write each concept on an individual sticky note. It should be visible from a distance.
5. After modeling for students how to construct a concept map (example provided below) have each group of students place their completed sticky notes on a large piece of butcher
Cathy Box, Ph.D., Lubbock Christian UniversityBest Practices Conference, February, 2010
paper in a concept map formation. They do not glue them down, draw connecting lines or add propositional phrases at this time.
6. Hang preliminary concept maps around the room. Encourage students to move their sticky notes at any time during instruction when they realize that they need correcting.
7. At the end of each class period, ask students to add relevant concepts to the map and make any adjustments they deem necessary.
8. At the completion of the unit, make sure that all of the relevant terms have been included. Provide student groups with a grading rubric that provides scoring criteria and have them finish their map.
9. Hang completed maps around the room and conduct a “galley walk”. Student groups move from poster to poster and provide feedback on each poster.
a. One way to do this is to tape a piece of writing paper to the wall by each poster for students to post comments. Direct them to state: 1) One thing we think you did right, 2) one thing we think was questionable or wrong and 3) what you could do to improve. Tell them not to focus on the neatness of the map, but rather on the organization of ideas.

Cathy Box, Ph.D., Lubbock Christian UniversityBest Practices Conference, February, 2010
Concept Maps
Concept mapping is a complex procedure that takes time and practice to learn. Before students build concept maps, the teacher may choose to make several maps and use them with students as advanced organizers to introduce a lesson, an activity, or as a review. Next, the teacher guides the entire class to build concept maps that organize information about something that is familiar such as pets, pizza, video games, soda drinks, shoes, jewelry, snacks, or songs. After becoming familiar with the structure of a concept map, students should begin making their own.
Building a Concept Map
The steps for building a concept map are as follows:Step 1: Select an item for mapping. This may be a short section of a textbook, directions or
results from a laboratory activity, a vocabulary list, or a list of words produced by brainstorming. A single, general concept such as water, sound, force, or magnetism is the starting point.
Step 2: Identify the major concepts (objects, events) branch from the general concept. (Each of the concepts can be copied onto a separate small card for easy rearrangement.)
Step 3: List or rank the concepts from the most inclusive (most general) to the least inclusive (most specific.) For example:
Step 4: Arrange the most general concept at the top of the map. Link it to the concepts that are less inclusive. Circle all concepts. (Concepts written on cards can be used in place of circled concepts.) Connect the concepts with arrows showing the direction in which the map is read. Label the arrows with linking words that explain how each pair of concepts is related. These words should bring the concepts together to form a propositional linkage. Overall, the map is read from top to bottom, and it moves from general to specific.
crust toppings sauce
pizza

Cathy Box, Ph.D., Lubbock Christian UniversityBest Practices Conference, February, 2010
Step 5: Try to branch out as concepts are added by adding additional concepts to the existing terms.
Step 6: Make cross-links between two concepts. Label all cross-links with words that explain how the concepts are related. Represent the cross-links with broken lines or a different color. An arrow can be used to show the direction of the relationship.
is made of
crust toppings sauce
pizza
is made of
crust toppings sauce
pizza
meat spices cheese tomato
combining such as
milk beef
cow
includingfrom
from is
Partially completed example

Cathy Box, Ph.D., Lubbock Christian UniversityBest Practices Conference, February, 2010
Scoring for Concept Maps
5 – Great job! 3 – Almost there 1 – Needs work
Content______I used all of the concepts that were relevant and/or required______My content connections were accurate
Propositions ______I used a connecting line and linking words to show a meaningful relationship between two concepts.______My relationships are valid
Hierarchy ______My map shows a logical hierarchy______Each subordinate concept is more specific and less general than the concept drawn above it
Cross Links ______My map shows meaningful connections between segments of the concept hierarchy______My cross links are valid
Examples______I used specific examples of the lowermost concepts______My examples are valid
Susan Talkmitt, 2004, CISER, Texas Tech University and Cathy Box, Lubbock Christian University

Cathy Box, Ph.D., Lubbock Christian UniversityBest Practices Conference, February, 2010
One Minute Cards
Purpose: To help the student communicate with the facilitator what they took away from the lesson or lecture and to have a non-threatening avenue for expressing concepts that are difficult to grasp.
Materials:One minute cards
Procedure:Direct teaching is an important part of what we do, but sometimes the message that we intend to get across gets lost and we have no idea if the students followed or not.
At the end of class, have the students fill these cards out independently. The purpose is to detect any misunderstandings, problem areas, or misconceptions that may exist. For students who are reluctant to participate, try a point system.
You will be surprised at the difference that these make in your future lectures. Students will be looking for main ideas and important points to write on their cards. Many shy students who don’t like to ask questions like to use the cards as a means to express what they didn’t understand in class.

Cathy Box, Ph.D., Lubbock Christian UniversityBest Practices Conference, February, 2010
Date:
Here is what I understood to be the MAIN IDEA of today’s class:
These are a few IMPORTANT POINTS I learned:
These are things you talked about that I DID NOT “get”:
Signed:
Date:
Here is what I understood to be the MAIN IDEA of today’s class:
These are a few IMPORTANT POINTS I learned:
These are things you talked about that I DID NOT “get”:
Signed:
Date:
Here is what I understood to be the MAIN IDEA of today’s class:
These are a few IMPORTANT POINTS I learned:
These are things you talked about that I DID NOT “get”:
Signed:
Date:
Here is what I understood to be the MAIN IDEA of today’s class:
These are a few IMPORTANT POINTS I learned:
These are things you talked about that I DID NOT “get”:
Signed:

Cathy Box, Ph.D., Lubbock Christian UniversityBest Practices Conference, February, 2010
Self and Peer Assessment

Cathy Box, Ph.D., Lubbock Christian UniversityBest Practices Conference, February, 2010
TSAR
TSAR (Think, Share, Advise, Revise) is a peer tutoring strategy created by BSCS (Biological Sciences Curriculum Study) that helps students gain a deep understanding of the concept at hand. Talking about what you read helps you understand what you read. That is because reading involves input, and speaking involves generating, hallmarks of information processing. When we generate sentences in speech, we reconfigure knowledge based on its meaning to us. Other people listen to what we say and give us feedback on whether our explanations make sense. That feedback tells us if we need to reread or rethink. This back-and-forth process is essential to constructing understanding.
In this strategy, students:
1. Think – Students read over the work that they have generated and think about how it meets the established criteria. As this occurs, students may note problems or shortcomings in their work.
Naturally, you encourage students to work to correct the problem before the next step.
2. Share – Students share their work with a partner and describe or discuss each feature. Model for your students how and what you expect them to share. This may seem
like you are overdoing it, but it will pay off in the end. If you do not show students how to share explicitly, many will gloss over important details.
If written work is included, have them read it out loud to their partner.
3. Advise – Students ask for advice on how to make their work better. Make sure that students understand how to provide constructive feedback. Monitor this interaction and control any inappropriate comments
4. Revise – If students agree with the advice they receive, they revise their work accordingly. You may want to have them document their revisions with a different color pen so
that you can be aware of their progression toward learning.
5. Switch roles and let the other student be the one to think, share, get advice and revise their work.

Cathy Box, Ph.D., Lubbock Christian UniversityBest Practices Conference, February, 2010
Traffic Lighting
From Working Inside the Black Box by Paul Black, Christine Harrison, Clare Lee, Bethan Marshall and Dylan Wiliam
One simple and effective idea is for students to use “traffic light” icons, labeling their work green, yellow or red according to whether they think they have good, partial, or little understanding of the concept at hand. These labels serve as a simple means of communication of pupils’ self-assessments. Students may then be asked to justify their judgments in a peer group, so linking peer- and self- assessment. This linkage can help in the development of the skills and the detachment needed for effective self-assessment.
Another approach is to ask students first to “traffic-light” a piece of (their own) work, and then to indicate by hands-up whether they put green, yellow or red; the teacher can then pair up the greens and ambers to deal with the problems between them, while the red students can be helped as a group to deal with their deeper problems.

Cathy Box, Ph.D., Lubbock Christian UniversityBest Practices Conference, February, 2010
Grading Rubric - Student Designed ExperimentsExceedsExpect-ations
MeetsExpect-ations
Below Expect-ations
NotPresent
Self Peer
Statement of purpose or problem-is clearly stated
10 8 6 0
Hypothesis-is testable-is clearly stated-matches the purpose of the lab
10 8 6 0
Procedure-includes a control-only tests one variable at a time-repeats experiment at least three times-includes how you are going to measure results
30 24 18 0
Data Table-has a title-has category labels-includes units-is neat and readable
10 8 6 0
Graph-has a title-has axis labels- is correctly plotted-X axis has independent variable-Y axis has dependent variable-includes units
20 16 12 0
Conclusion-addresses the hypothesis (our data does/does not support)
10 8 6 0
Error Analysis-tells how errors affected results
10 8 6 0
Annotated Portfolios

Cathy Box, Ph.D., Lubbock Christian UniversityBest Practices Conference, February, 2010
7.6 B Science Concepts. The student knows that there is a relationship between force and motion.The student is expected to:
- demonstrate that an object will remain at rest or move at a constant speed and in a straight line if it is not being subjected to an unbalanced force.
- Relate forces to basic processes in living organisms including the flow of blood and the emergence of seedlings.
Goal EvidenceExplain how your evidence
demonstrates that you’ve met your goal.
Example:
Show that something sitting still can be moved if a force is applied.
See Journal question from Aug. 21 on page 122.
I drew a picture of a football player pushing another football player who had been standing still. (He applied force)
Show that something moving in a straight line will keep moving at the same speed and in the same direction unless a force makes it change.

Cathy Box, Ph.D., Lubbock Christian UniversityBest Practices Conference, February, 2010
Classroom Practices Consistent with Formative Assessment
KWL (What I Know, what I Wonder, what I Learned)The teacher allows students to think/pair/share “what we know” about a topic and discuss their ideas with the class. Ideas are listen in the “K” column of the table. Again students think/pair/share and generate questions about the topic. These are listed in the “W” column. At the end of the lesson, students list what they have learned in the “L” column. This strategy allows students to focus on the problem at hand and determine what questions need to be answered in order to solve the problem. It helps the teacher monitor student concept development and reveals misconceptions
Concept MapConcept maps are drawings or diagrams showing the mental connections that students make between a major concept the instructor focuses on and the other concepts they have learned. This technique provides an observable and assessable record of the student’s conceptual development. To use in a formative fashion, brainstorm critical concepts associated with your topic and ask students to concept map them using sticky notes. Allow students to change them during the course of the unit as they learn.
Bell RingerOn your dry erase board, post a daily journal question that highlights key concepts that you wish students to attain. Have students write their answer in their journal and walk around the room checking their answers. The questions may be designed to introduce a new topic or to reinforce one. This ungraded activity helps you know where students are in their thinking and is quick and easy to implement, yet a very powerful formative assessment tool.
Discovery QuiltAt the beginning of a unit, ask students to brainstorm what they know about the target concept. Give each group of students, three colorful index cards. On each card, they should write down one thing the “know” about the topic. Have the group work together to come up with three questions about the topic. Those questions should be written on a white index card. Tape each completed index card to a large piece of butcher paper in a patchwork quilt fashion. The white index cards can be used as starting points for classroom discussion or lessons, or they can investigate one of the questions of their choice. At the end of class each day, have students answer one of the questions on the quilt by replacing one of the white cards with one of the colorful cards. This activity allows students to verbalize questions that they have and then formalize their learning while allowing the teacher the opportunity to assess where they are in their knowledge on the topic.

Cathy Box, Ph.D., Lubbock Christian UniversityBest Practices Conference, February, 2010
SurveyA survey can be developed for any topic at any level. Prior to teaching a unit, determine what your students should know about a topic, and what you want them to learn. Create a survey that reflects those goals. Have the students take the survey prior to instruction, and again after instruction.
One-minute CardsAt the end of class, have students answer, 1) here’s what I understand to be the main idea of today’s class 2) these are a few important points I learned about the main idea 3) these are some things you talked about today that I did not get. The purpose is to detect any misunderstandings, problem areas or misconceptions that may exist. This provides a safe way for students to let you know where they still need help.
ChecklistsA checklist of student knowledge and skills that should be mastered is developed and kept on each child. As the student meets each goal, it is checked off the list. This provides a concrete way for students, teachers and parents to know what progress is being made and what concepts need more work.
No handsUnless specifically asked, students should not put their hands up if they know the answer to the question. All students are expected to be able to answer at any time, even if it is to say “I don’t know”. The only time they should raise their hand is if they have a question. Limiting “hand-waiving” encourages everyone to participate.
Think/pair/shareA TPS strategy is a simple one, yet reaps great benefits. In this strategy, students are asked to independently think about a particular question introduced by the teacher. You should avoid lower level questions for this activity. After students have time to think about the question, have them pair up with another student and share their ideas. After students have had time for discussion, students present their ideas to the whole class. This strategy promotes genuine thought for students and reveals their level of understanding and potential misconceptions.
Wait time

Cathy Box, Ph.D., Lubbock Christian UniversityBest Practices Conference, February, 2010
Increasing the wait time after a question can lead to more students being involved in question and answer discussions, and to an increase in the length of their replies. This requires a deeper level of questioning, instead of factual recall or yes/no questions.
Annotated portfoliosAnnotated portfolios provide the teacher with a limited sample of students’ work along with the students’ explanation of the work in relation to the course content or goals. This technique allows students focus on their goals and where they are in relation to those goals.
FeedbackRather than providing numerical grades on some projects, write comments on their work expressing 1) what they did well 2) what they still need to improve and 3) how to make those improvement. Allow the student to redo the work before turning it in for a final grade.
Think, share, advise, revise (TSAR)TSAR is a peer tutoring strategy that helps students gain a deep understanding of the concept at hand. Students read over their work and think about how it could be improved and make any changes necessary. Then they share their work with a peer. They must read aloud their work and explain any diagrams, etc. The peer listens respectfully and asks questions when necessary. After listening, they provide advice to their partner on how to make their work better. The student is allowed to make any changes that they deem necessary. Students switch roles and repeat the process.
Traffic LightOne simple and effective idea is for students to use “traffic light” icons, labeling their work green, yellow or red according to whether they think they have good, partial, or little understanding of the concept at hand. These labels serve as a simple means of communication of pupils’ self-assessments. Students may then be asked to justify their judgments in a peer group, so linking peer- and self- assessment. This linkage can help in the development of the skills and the detachment needed for effective self-assessment. Another approach is to ask students first to “traffic-light” a piece of (their own) work, and then to indicate by hands-up whether they put green, yellow or red; the teacher can then pair up the greens and ambers to deal with the problems between them, while the red students can be helped as a group to deal with their deeper problems.
Rubrics

Cathy Box, Ph.D., Lubbock Christian UniversityBest Practices Conference, February, 2010
Assessment rubrics should be given to students prior to embarking on the assignment at hand. The teacher should go over the rubric with the students so that they know exactly what is expected of them. After students finish the assignment, they should be prompted to self-assess using the rubric, and allowed time to make any changes as necessary before turning in their work. To make the process even stronger, allow students to exchange papers and peer assess using the rubric, allowing students to make further corrections before turning in their work.
Peer assessmentDevelop a document that describes the learning criteria required to demonstrate mastery of the concept. Include a section that allows the peer to state the students strengths as well as what they should work on. This should include prompts and checklists. Have students exchange papers and assess each other’s work. Students are allowed to make changes before turning it in. Peer assessment is uniquely valuable because students may accept, from one another, criticisms of the work, which they would not take seriously if made by their teacher. Peer work is also valuable because the interchange will be in a language that students themselves would naturally use, and because students learn by taking the role of teachers and examiners of others.
Inductive Thinking (Mystery Envelopes)In this critical thinking activity, students work in teams to sort examples given in an envelope. The examples are pictures, words, cutouts, etc. and students sort them into categories they choose. All of their examples should have one common title, and students should name the subgroups and the overall title or concept. After students complete the sorting and the naming of their examples, a spokesperson from each group shares with the class the pattern the group followed for sorting. When all groups have presented, ask groups to sort the examples in a second way if time permits. Finally, share with the class the concept you were seeking and have students who do not have the same concept sort their items into these groups. This activity works well in both pre and post assessment and student grouping helps identify misconceptions.


![Kwl capital infrastructure plan[1]](https://static.fdocuments.in/doc/165x107/558a8e6ad8b42a887a8b4681/kwl-capital-infrastructure-plan1.jpg)