Knobology 01 2010 (1)
41
Ultrasound machine Ultrasound machine knobology knobology Copyright © 2010 Academy of Veterinary Imaging
-
Upload
pavan511 -
Category
Health & Medicine
-
view
511 -
download
8
Transcript of Knobology 01 2010 (1)

Ultrasound machine Ultrasound machine knobologyknobology
Copyright © 2010 Academy of Veterinary Imaging

Ultrasound machine knobology…Ultrasound machine knobology…
In other words, what the heck do all of those knobs and buttons do, and how can adjusting
them affect image quality?!?!

• Image optimization– Presets, depth, frequency, auto-optimize, focal
points, gain/TGC
• Features– Archiving, transducers, SRI, compounding,
harmonics, 3-D, LOGIQView, Doppler
GE ultrasoundGE ultrasound

GE ultrasoundGE ultrasound
LOGIQ 7
LOGIQ Book
Go to:Image optimization:
Presets
Depth
Frequency
Auto-optimize
Focal points
Gain/TGC
LOGIQ e
LOGIQ 5
Archiving
Transducers
SRI
CrossXBeam
Harmonics
3-D
LOGIQView
% affected
GE features:
LOGIQ P5
In this presentation, click on the Home button as pictured here to return to this page
Image optimizationImage optimization
• Image quality is comprised of many things• During an ultrasound exam, the ultrasound machine settings should be changed as needed to optimize image quality• Understanding just a few of the knobs can accomplish this for most scans
L7
L5
LB
Le
P5

PresetsPresets
• Settings can be saved as presets• Viewed in Application or Preset
screen• Different presets for different
transducers/structures/patient species/sizes
• The more ‘complicated’ machine settings are saved in presets, so these do not need to be adjusted during every scan
L7
L5
LB
P5
Le

DepthDepth
• Adjust as needed throughout scan
Optimal
L7
L5
LB
P5
Le

FrequencyFrequency
• High frequency• Better resolution• Less depth
• Lower frequency• Lower resolution • Better for depth
L7
L5
LB
P5
Le

Auto optimizeAuto optimize
• ‘Personal preference’ button.• Adds more contrast…Whites are
whiter, blacks are blacker• Try on or off. Chose the setting
that looks better to you. • Auto optimize must be deselected
then reselected for every new structure imaged.
L7
L5
LB
P5
Le

Focal pointsFocal points
• Improved resolution is seen where the focal points are.• Place focal points at the region of interest.
L7
L5
LB
P5
Le

GainGain
• Overall gain– Amplification of received signal
• TGC– Time Gain Compensation– Compensates for beam
attenuation (loss of energy as it passes through tissue)
L7
L5
LB
P5
Le

LOGIQ 7LOGIQ 7
TGC
Auto optimize
Gain
Depth
Frequency
Focal points
(touch screen)
L5
LB
Le
P5
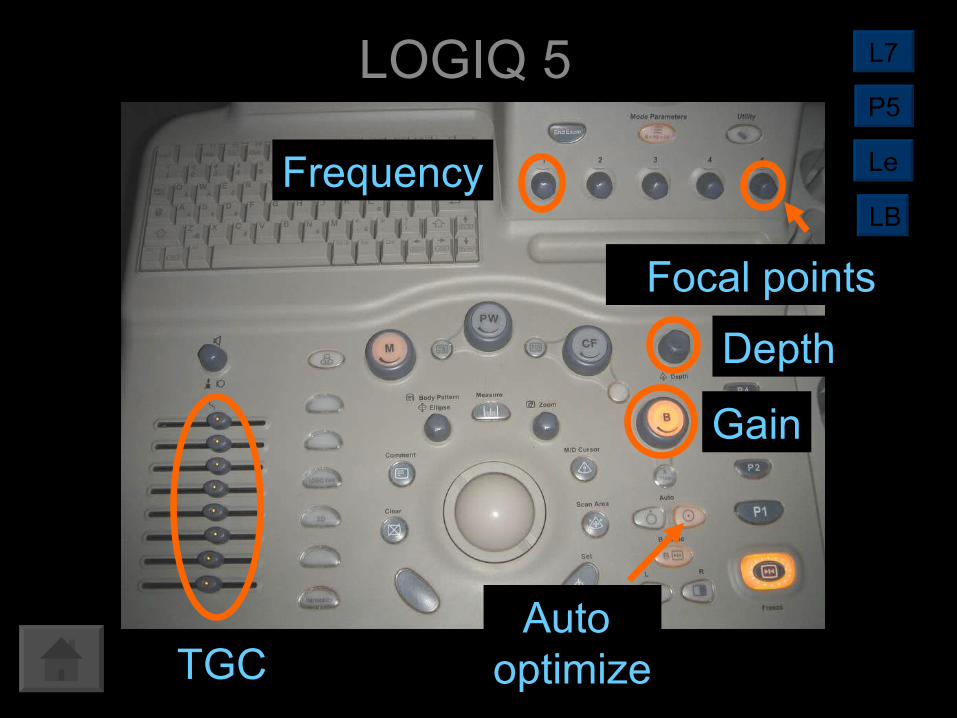
LOGIQ 5LOGIQ 5
TGCAuto
optimize
Gain
Depth
Focal points
Frequency
L7
LB
Le
P5

LOGIQ P5LOGIQ P5
Auto optimizeGain
DepthTGC
Focal points
Frequency
L7
L5
LB
Le
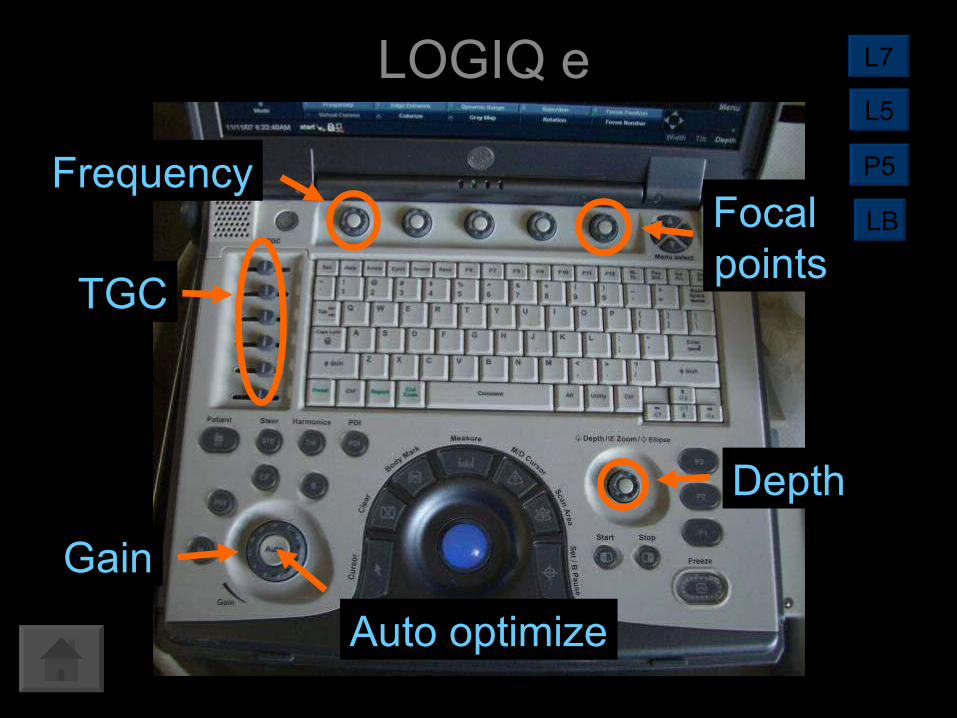
LOGIQ eLOGIQ e
Auto optimize
Gain
Depth
TGC
Focal points
Frequency
L7
L5
LB
P5
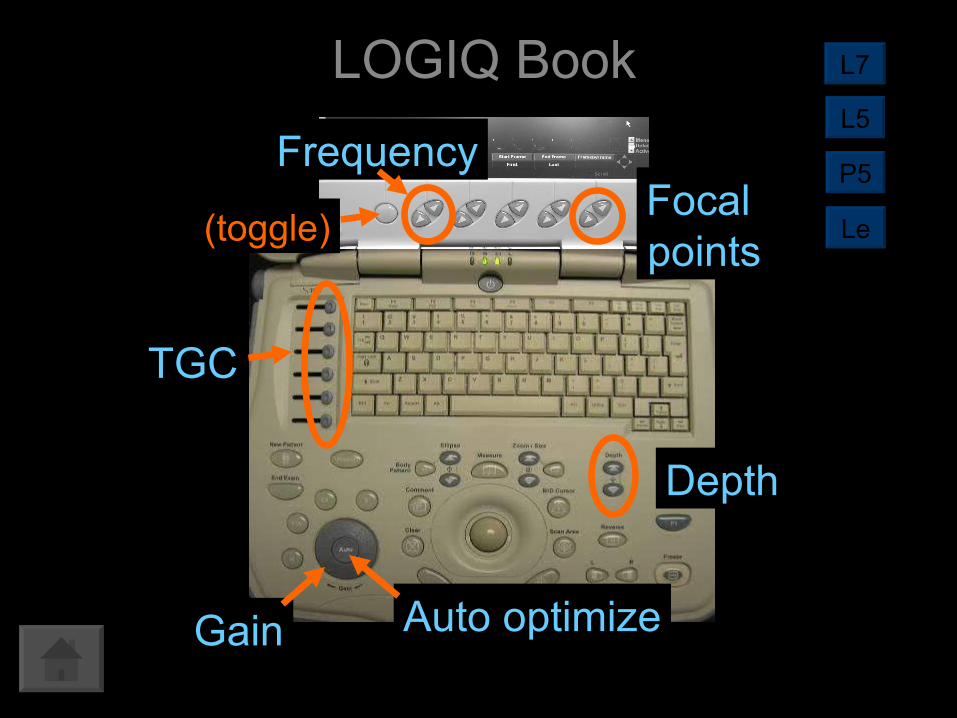
LOGIQ BookLOGIQ Book
Auto optimizeGain
Depth
TGC
Focal points
Frequency
(toggle)
L7
L5
Le
P5

Archiving Archiving
• ‘P’ buttons can be programmed
• Default settings:– P1: Saves as raw dicom clip or
still image (image appearance, M-mode, 3-D can be done on a raw dicom clip, but it is a very large file, thus too large to send)
– P2: Print on the thermal printer
– P3: Save as dicom

Archiving Archiving
• Images can be transferred to a CD or USB flash drive.
• Depending on GE model, media must be formatted first– Press Utilities button – Select Connectivity, then removable media
• To eject media after saving images, press F3– Select the media to eject, then finalize

Some GE transducersSome GE transducers
8C 12L
4C
3S
Rectal
i739

SRISRI
• Speckle Reduction Imaging:– Improved contrast resolution– Improved overall clarity– Smoothes regions where no feature or edges
appear– Maintains or enhances edges and borders– Does not eliminate any information– Increased Signal-to-Noise ratio

SRISRI
• Always is on in the LOGIQ e• Can adjust to have different levels in the
LOGIQ 7 and LOGIQ P5– Level is set within the preset (Application)
settings

Spatial compoundingSpatial compounding
• CrossXBeam – = GE’s spatial compounding– Available on the LOGIQ e and LOGIQ P5
• Interrogates tissue at multiple angles• Introduces new tissue info• Averages out speckle• SRI and CrossXBeam together can have
complimentary and additive effects

CrossXBeamCrossXBeam
• Perpendicular angle of insonation generates higher signal
• Images generated with compounding have more angles that are perpendicular to structures
CrossXBeam OFF CrossXBeam ON
CrossXBeamCrossXBeam
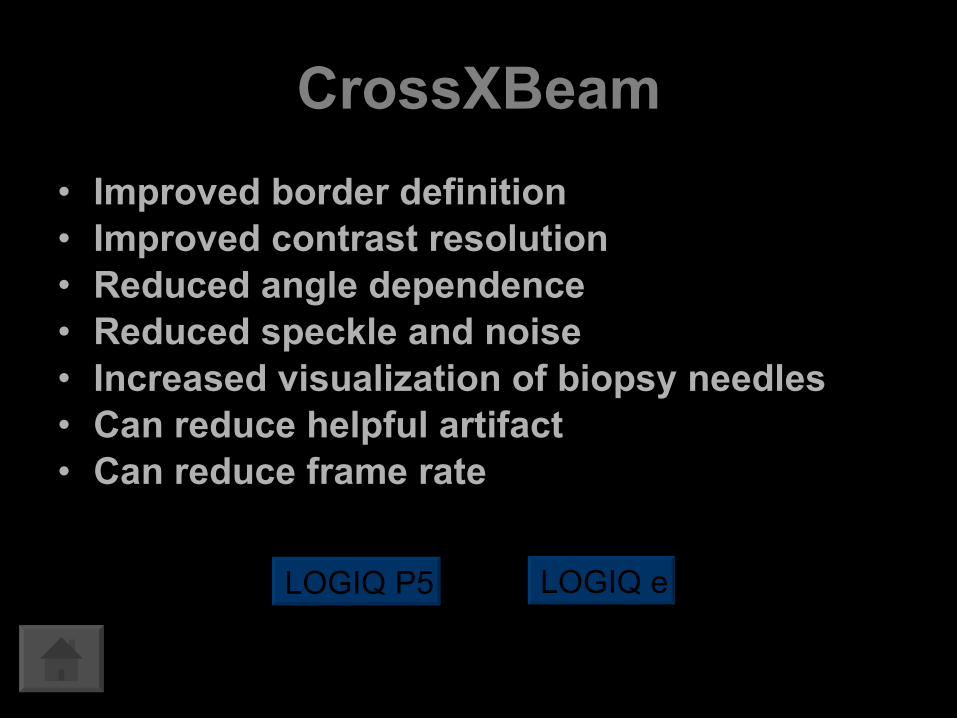
• Improved border definition• Improved contrast resolution• Reduced angle dependence • Reduced speckle and noise• Increased visualization of biopsy needles• Can reduce helpful artifact • Can reduce frame rate
LOGIQ eLOGIQ P5

CrossXBeam: P5CrossXBeam: P5
Press L and R buttons simultaneously to see side-by-side display of CrossXBeam on and CrossXBeam off
Press X Beam to turn on

CrossXBeam: LeCrossXBeam: Le
F9 or ‘Comp’ to turn on
Press L and R buttons simultaneously to see side-by-side display of CrossXBeam on and CrossXBeam off

Harmonics (THI)Harmonics (THI)
Display is from echos of a frequency different from the transmitted frequency (i.e. 2x transmitted frequency)
•Reduced artifact
•Improved axial and lateral resolution
•Better margin definition and increased contrast

Harmonics (THI)Harmonics (THI)
Press L and R buttons simultaneously to see side-by-side display of harmonics on and harmonics off
Press THI or Harmonics button to turn on

3-D3-D
• Volume imaging– Volume vs. area affected can be assessed
• Appears more ‘life-like’• Infinite viewing planes• May approximate CT or MRI imaging• Scan parallel* or sweep (fan)• Angle of imaging less operator dependent
LOGIQ eLOGIQ P5

3-D: P53-D: P5
Press Left button to start. Scan anatomy. Press Right button to stop.
Press 3D to turn on
Click arrow to go to images
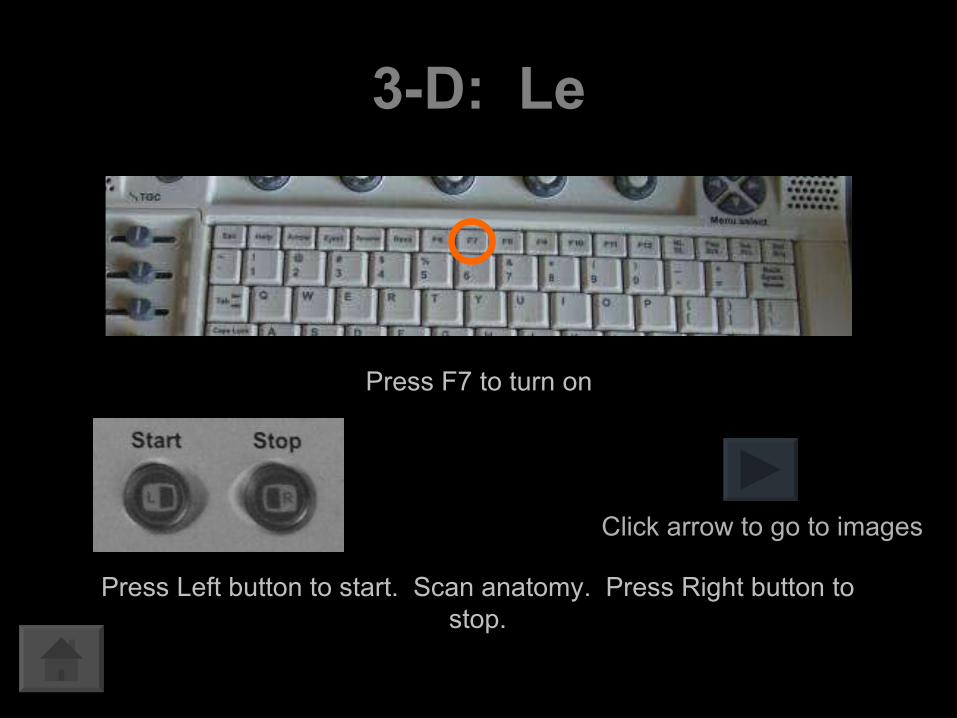
3-D: Le3-D: Le
Press F7 to turn on
Press Left button to start. Scan anatomy. Press Right button to stop.
Click arrow to go to images

3-D3-DUse set button to alternate
hand and rotate tools
Drag image to corner

3-D3-D
Rotate image
Use set button to alternate hand and rotate tools
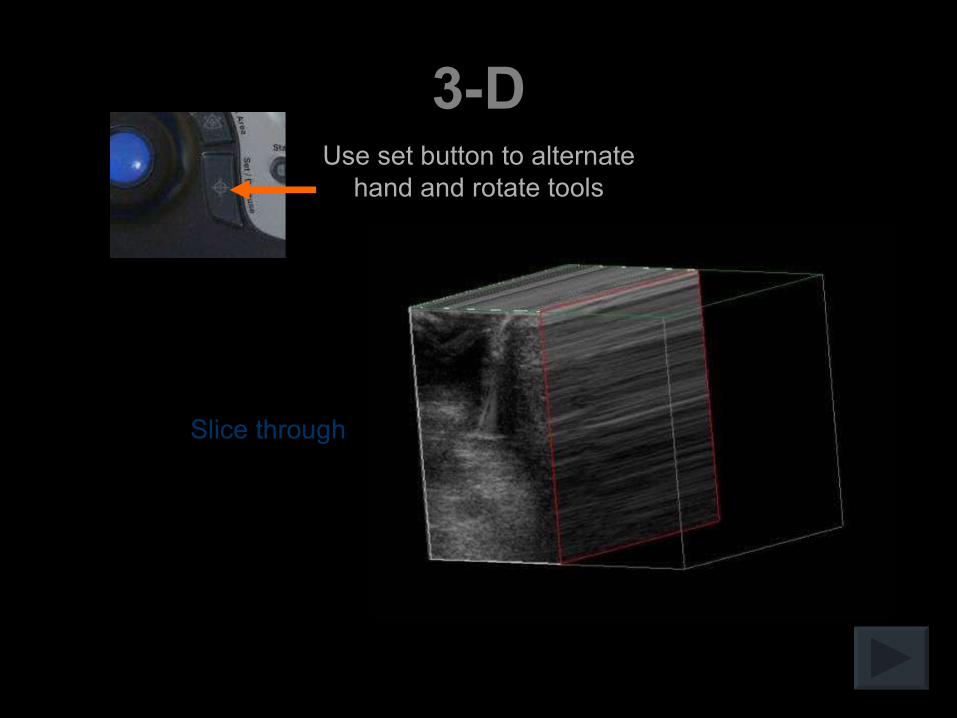
3-D3-D
Slice through
Use set button to alternate hand and rotate tools

3-D3-D
Rotate again
Use set button to alternate hand and rotate tools

3-D3-D
Slice through another plane
Use set button to alternate hand and rotate tools

LOGIQViewLOGIQView
• Extended field of view• Better demonstration of anatomical
relationships• Ability to measure large structures
LOGIQ e
LOGIQ P5

LOGIQView: P5LOGIQView: P5
Press LOGIQ View to turn on
Press Left button to start, scan anatomy. Press Right button to stop.

LOGIQView: LeLOGIQView: Le
Press F8 View to turn on
Press Left button to start, scan anatomy. Press Right button to stop.

LOGIQViewLOGIQView
Scan in a straight plane or image will ‘bend’

% affected% affected
• Measure % of tendon affected by the lesion– Press Measure button– Select % stenosis folder– Select % sten (area)– Trace around entire tendon– Press set– Trace around lesion– Press set– % affected = 100 - %sten