KNIME Server Enterprise Setup Guide...This guide covers advanced topics of a KNIME server...
35
KNIME Server Enterprise Setup Guide KNIME AG, Zurich, Switzerland Version 4.7 (last updated on 2018-12-13)
Transcript of KNIME Server Enterprise Setup Guide...This guide covers advanced topics of a KNIME server...

KNIME Server Enterprise SetupGuide
KNIME AG, Zurich, Switzerland
Version 4.7 (last updated on 2018-12-13)

Table of Contents
Introduction. . . . . . . . . . . . . . . . . . . . . . . . . . . . . . . . . . . . . . . . . . . . . . . . . . . . . . . . . . . . . . . . . . . . . 1
Enterprise User Authentication . . . . . . . . . . . . . . . . . . . . . . . . . . . . . . . . . . . . . . . . . . . . . . . . . . . . . 2
Configuring an LDAP connection for KNIME Server . . . . . . . . . . . . . . . . . . . . . . . . . . . . . . . . . 2
Configuring Single-Sign-On with Kerberos and LDAP . . . . . . . . . . . . . . . . . . . . . . . . . . . . . . . 16
Dynamic profiles for server-managed customizations . . . . . . . . . . . . . . . . . . . . . . . . . . . . . . . . 32
Introduction
This guide covers advanced topics of a KNIME server deployment, setup and configuration in
an enterprise environment.
If you are looking to install KNIME Server, you should first consult the KNIME Server
Installation Guide.
For guides on connecting to KNIME Server from KNIME Analytics Platform, or using KNIME
WebPortal please refer to the following guides:
• KNIME Explorer User Guide
• KNIME WebPortal User Guide
For all regular administration configuration options and a basic understanding of KNIME
server please consult the KNIME Server Administration Guide.
In the following it is assumed that you have a knowledge of all things covered in the
previously mentioned guides.
KNIME Server Enterprise Setup Guide
© 2018 KNIME AG. All rights reserved. 1
Enterprise User Authentication
User authentication in an enterprise environment is usually done through some centralized
service. The most used service is LDAP. LDAP authentication is the recommended
authentication in any case where an LDAP server is available. If you are familiar with your
LDAP configuration you can add the details during installation time, or edit the server.xml
file post installation. If you are unfamiliar with your LDAP settings, you may need to contact
your LDAP administrator, or use the configuration details for any other Tomcat based system
in your organization. This section describes how to set up KNIME Server for LDAP
authentication.
Another possibility of user authentication is single-sign-on. KNIME Server can be configured
to support Kerberos authentication in combination with LDAP. This section also contains
steps for a simple Kerberos setup.
Configuring an LDAP connection for KNIME Server
KNIME Server manages all user authentication by the built-in mechanisms of Apache
Tomcat. Therefore the most comprehensive documentation for configuring authentication is
the Apache Tomcat Realm Configuration HOW-TO. Specifically for information about LDAP
(also Active Directory) configuration, see section JNDIRealm.
Terminology. Throughout this document we refer to establishing an LDAP connection, LDAP
account etc. Since one of the popular ways to manage user authentication is Microsoft
Active Directory, and this supports LDAP, you may want to substitute LDAP account for
Active Directory account.
Quickstart
In most cases it should be possible to contact your local LDAP/Active Directory administrator
they should be able to provide the necessary information.
You can ask for the following:
1. Do they already have configuration details for a Tomcat server? If so, this connection
information can be reused.
2. LDAP Connection information (Hostname, Port, is TLS/SSL used?).
3. Whether they are using bind mode, or comparison mode.
4. How the group information is stored.
KNIME Server Enterprise Setup Guide
© 2018 KNIME AG. All rights reserved. 2
They will need to provide configuration that can fit into a template like this:
<Realm className="org.apache.catalina.realm.JNDIRealm" connectionURL="ldap://localhost:389" userPattern="uid={0},ou=people,dc=mycompany,dc=com" roleBase="ou=groups,dc=mycompany,dc=com" roleName="cn" roleSearch="(uniqueMember={0})"/>
This information is added to the server.xml file which is found in <apache-
tomee>/conf/server.xml.
A restart of the Apache TomEE process and KNIME Server is required for the changes to the
configuration file to take effect.
Advanced Troubleshooting
The remaining sections of this documentation describe how to setup an LDAP connection for
KNIME Server. This is only intended as a way to gather related information into one place, not
as comprehensive documentation for either LDAP or Tomcat.
The first prerequisite is Apache Directory Studio, or some other LDAP configuration tool. We
use Apache Directory Studio to do the testing. The benefit of using this tool is that it is open
source, free to download, works on Windows/Linux/Mac, so a customer can download the
software and do queries to get started.
We will follow three basic steps:
1. LDAP Connection information (Hostname, Port, SSL?).
2. Whether they are using bind mode, or comparison mode.
3. How the group information is stored.
LDAP Connection information (Hostname, Port, SSL)
To establish a connection to an LDAP server you’ll need to know:
• The LDAP server hostname (or IP)
• Whether the server uses SSL secured connections or not
• Which port is being used — default ports are 389 for LDAP (unencrypted, or encrypted by
TLS) and 636 for LDAPS (SSL secured)
KNIME Server Enterprise Setup Guide
© 2018 KNIME AG. All rights reserved. 3
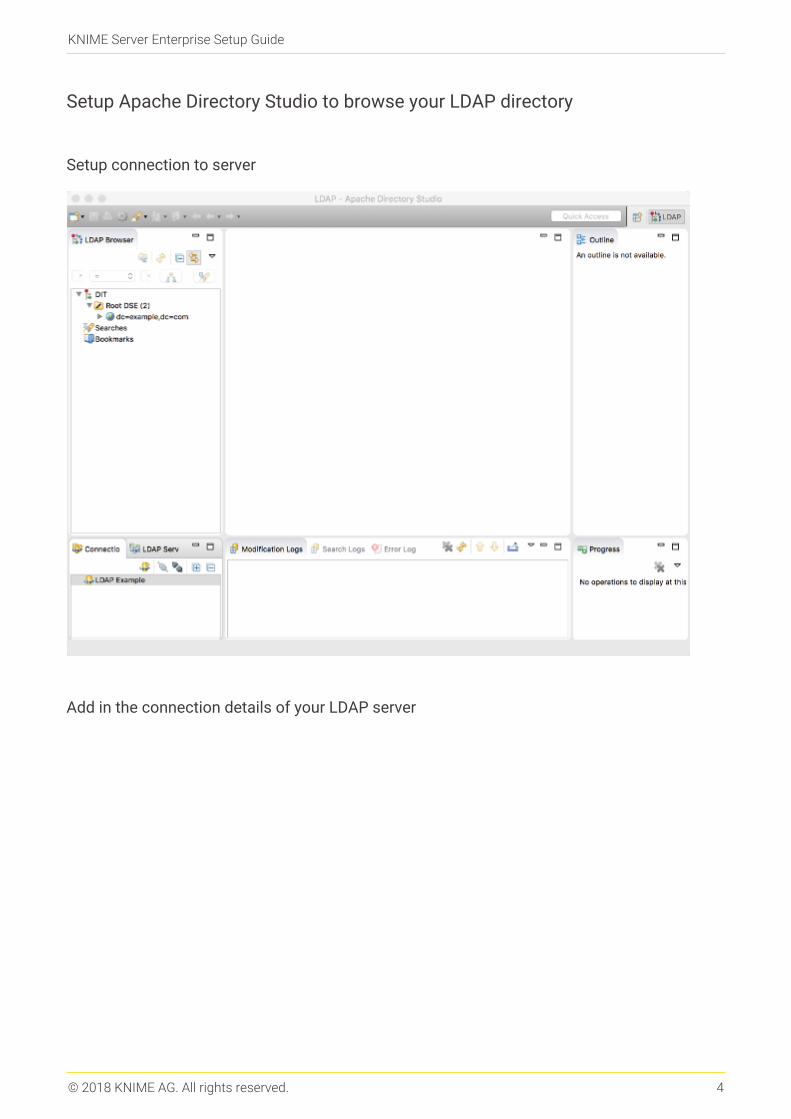
Setup Apache Directory Studio to browse your LDAP directory
Setup connection to server
Add in the connection details of your LDAP server
KNIME Server Enterprise Setup Guide
© 2018 KNIME AG. All rights reserved. 4
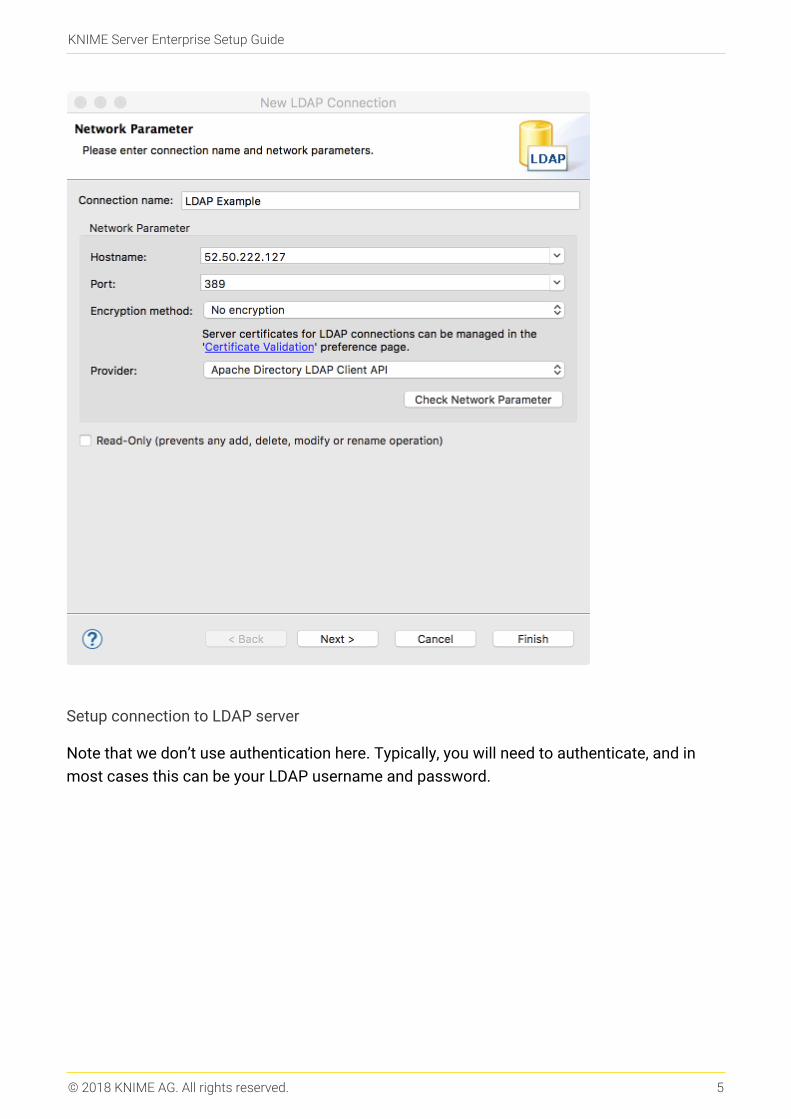
Setup connection to LDAP server
Note that we don’t use authentication here. Typically, you will need to authenticate, and in
most cases this can be your LDAP username and password.
KNIME Server Enterprise Setup Guide
© 2018 KNIME AG. All rights reserved. 5

Setup connection
You can click 'Fetch Base DNs' to autopopulate the answers. In our example the Base DN is
dc=example,dc=com. This will vary, for example knime.com might use the Base DN
dc=knime,dc=com.
KNIME Server Enterprise Setup Guide
© 2018 KNIME AG. All rights reserved. 6

Finalize connection
You can leave the the next page as is, and click Finish.
KNIME Server Enterprise Setup Guide
© 2018 KNIME AG. All rights reserved. 7
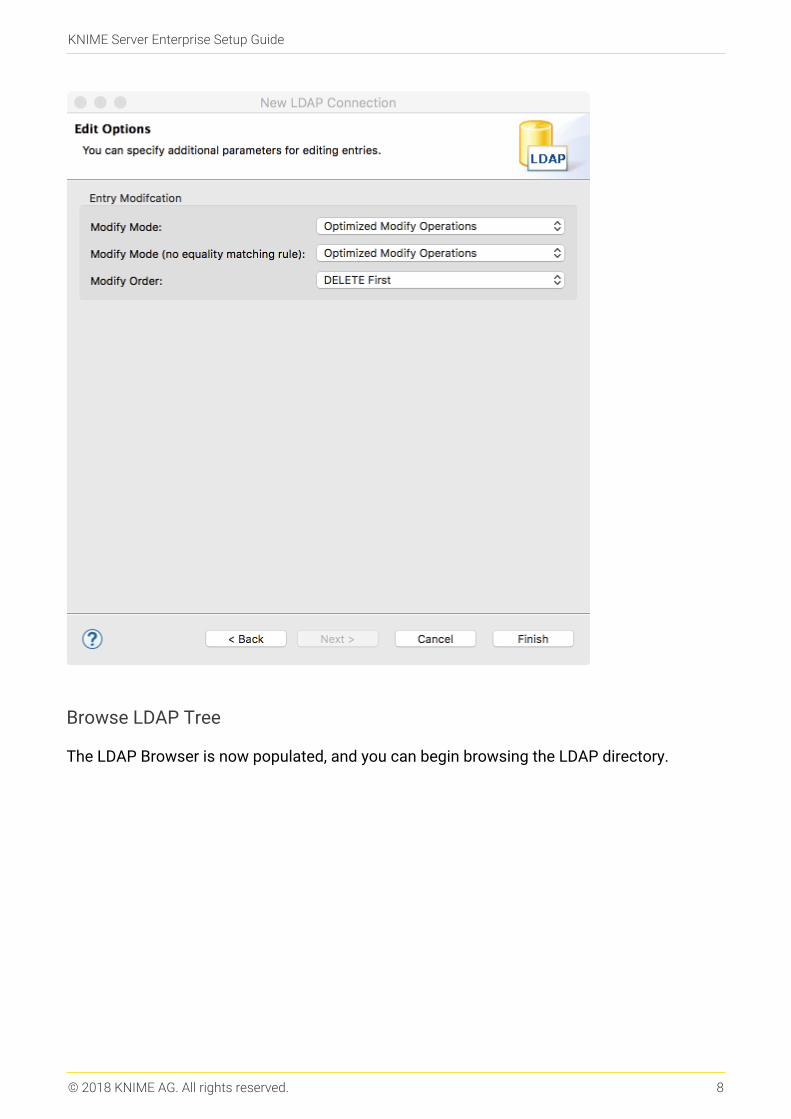
Browse LDAP Tree
The LDAP Browser is now populated, and you can begin browsing the LDAP directory.
KNIME Server Enterprise Setup Guide
© 2018 KNIME AG. All rights reserved. 8

Determine information required for KNIME/Tomcat LDAP configuration
First refer to the tomcat documentation on LDAP. The documentation is very comprehensive,
we distilled some of the key points below. For full details refer to the tomcat documentation.
Basically we need to construct something that looks like:
<Realm className="org.apache.catalina.realm.JNDIRealm" connectionURL="ldap://52.50.222.127:389" userPattern= TOBEDETERMINED roleBase= TOBEDETERMINED roleName= TOBEDETERMINED roleSearch= TOBEDETERMINED/>
We already know the connectionURL, since this was required to setup Apache Directory
KNIME Server Enterprise Setup Guide
© 2018 KNIME AG. All rights reserved. 9
Studio.
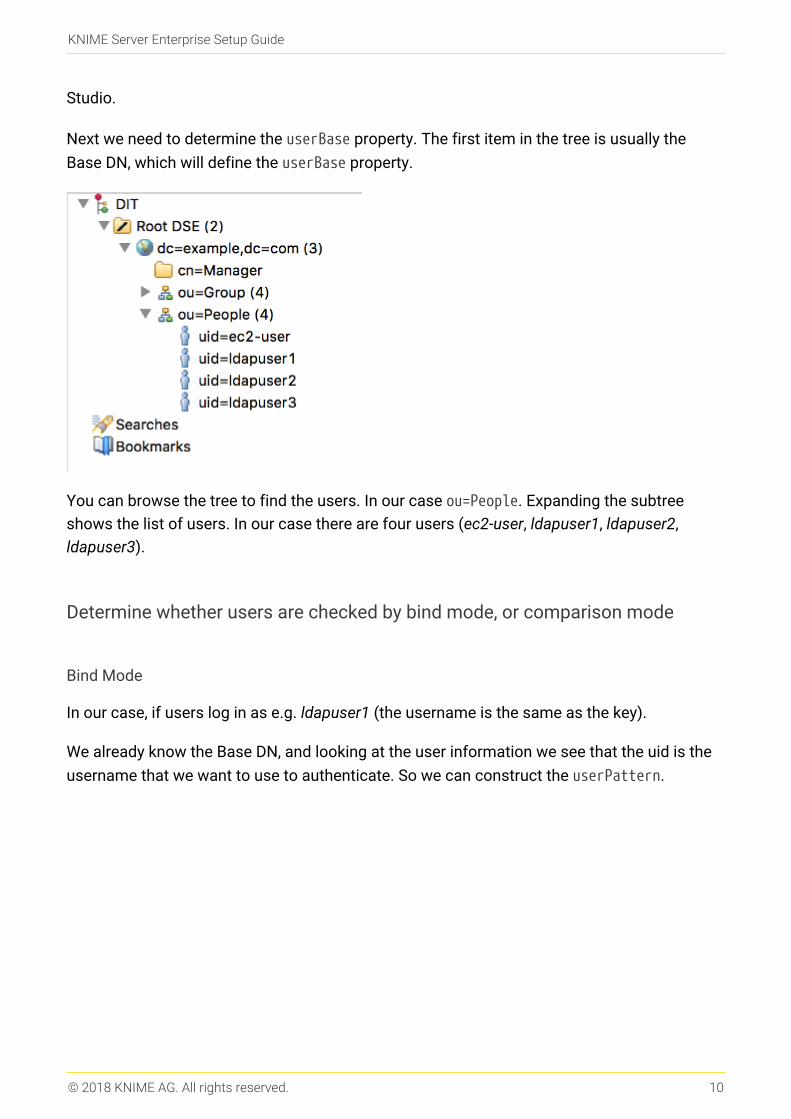
Next we need to determine the userBase property. The first item in the tree is usually the
Base DN, which will define the userBase property.
You can browse the tree to find the users. In our case ou=People. Expanding the subtree
shows the list of users. In our case there are four users (ec2-user, ldapuser1, ldapuser2,
ldapuser3).
Determine whether users are checked by bind mode, or comparison mode
Bind Mode
In our case, if users log in as e.g. ldapuser1 (the username is the same as the key).
We already know the Base DN, and looking at the user information we see that the uid is the
username that we want to use to authenticate. So we can construct the userPattern.
KNIME Server Enterprise Setup Guide
© 2018 KNIME AG. All rights reserved. 10
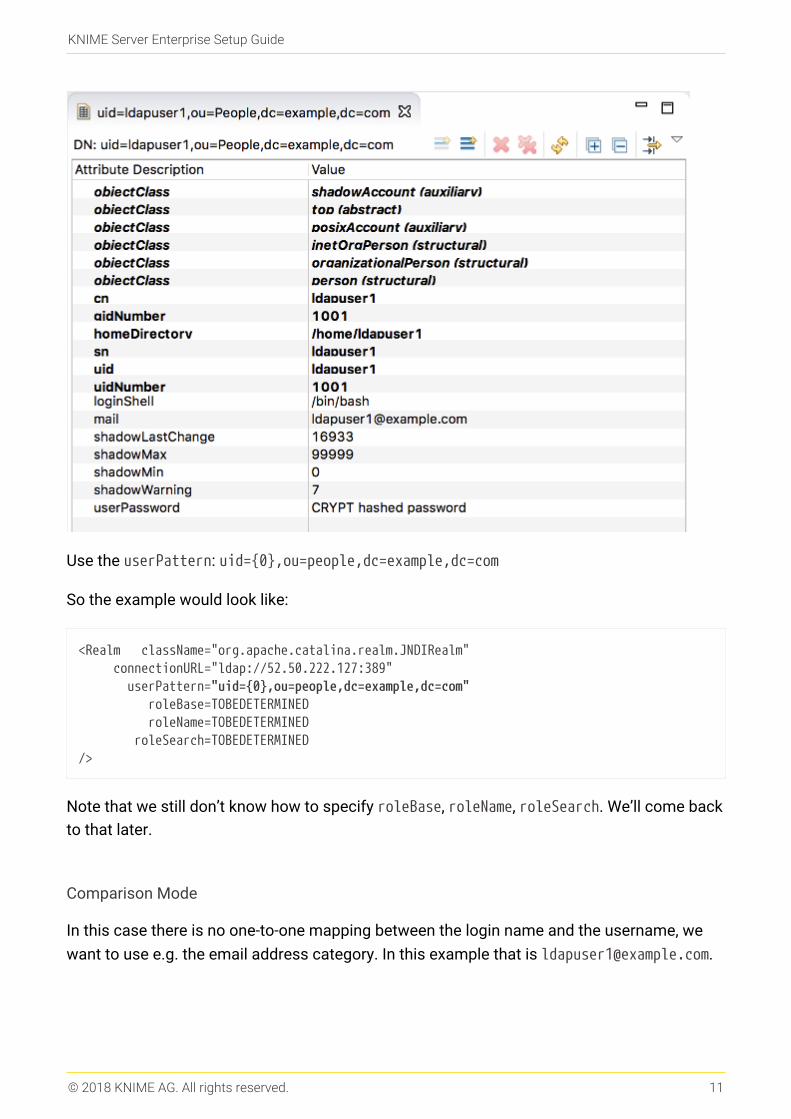
Use the userPattern: uid={0},ou=people,dc=example,dc=com
So the example would look like:
<Realm className="org.apache.catalina.realm.JNDIRealm" connectionURL="ldap://52.50.222.127:389" userPattern="uid={0},ou=people,dc=example,dc=com" roleBase=TOBEDETERMINED roleName=TOBEDETERMINED roleSearch=TOBEDETERMINED/>
Note that we still don’t know how to specify roleBase, roleName, roleSearch. We’ll come back
to that later.
Comparison Mode
In this case there is no one-to-one mapping between the login name and the username, we
want to use e.g. the email address category. In this example that is [email protected].
KNIME Server Enterprise Setup Guide
© 2018 KNIME AG. All rights reserved. 11
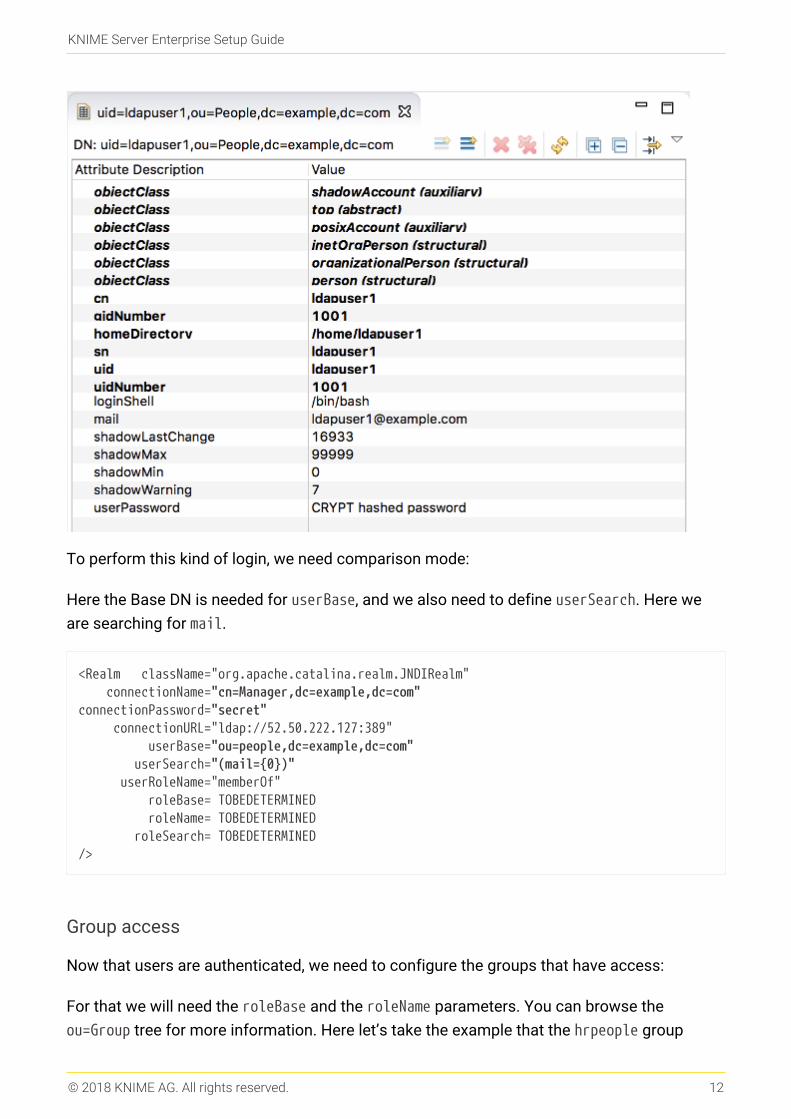
To perform this kind of login, we need comparison mode:
Here the Base DN is needed for userBase, and we also need to define userSearch. Here we
are searching for mail.
<Realm className="org.apache.catalina.realm.JNDIRealm" connectionName="cn=Manager,dc=example,dc=com"connectionPassword="secret" connectionURL="ldap://52.50.222.127:389" userBase="ou=people,dc=example,dc=com" userSearch="(mail={0})" userRoleName="memberOf" roleBase= TOBEDETERMINED roleName= TOBEDETERMINED roleSearch= TOBEDETERMINED/>
Group access
Now that users are authenticated, we need to configure the groups that have access:
For that we will need the roleBase and the roleName parameters. You can browse the
ou=Group tree for more information. Here let’s take the example that the hrpeople group
KNIME Server Enterprise Setup Guide
© 2018 KNIME AG. All rights reserved. 12

should be able to access KNIME Server.
In the example, value is member that we want to search for is 'member'.
Which leads to the configuration:
<Realm className="org.apache.catalina.realm.JNDIRealm" connectionURL="ldap://52.50.222.127:389" userBase="ou=people,dc=example,dc=com" userSearch="(mail={0})" userRoleName="memberOf" roleBase="ou=Group,dc=example,dc=com" roleName="cn" roleSearch="(member={0})"/>
KNIME Server Enterprise Setup Guide
© 2018 KNIME AG. All rights reserved. 13

There is a second possibility where group membership is stored in the user data (this is
uncommon, and not covered in this guide. See the full Tomcat documentation).
Nested roles (where a role/group can contain other roles/groups) are also possible, in which
case add the roleNested parameter. E.g. Group 'IT', contains some usernames, plus
'Windows', 'UNIX', 'Mac' groups. Those groups may also contain sub-groups.
Hopefully you now have the details that you need to connect KNIME Server to LDAP.
Active Directory Example
If you are using Active Directory as your user database and sticked to the default structure,
the following configuration serves as a good starting point:
<Realm className="org.apache.catalina.realm.JNDIRealm" connectionName="cn=Manager,dc=example,dc=com" connectionPassword="secret" connectionURL="ldap://52.50.222.127:389" userSubtree="true" userBase="cn=Users,dc=domain,dc=com" userSearch="(sAMAccountName={0})" userRoleName="memberOf" roleBase="cn=Users,dc=domain,dc=com" roleName="cn" roleSearch="(member={0})" roleSubtree="true" roleNested="true"/>
You have to adjust the three highlighted connection parameters, as well as the two dc values
in the userBase and roleBase. The other parameters can usually be used as they are.
Combined Realm
It is possible to setup a combined realm where both the user database and LDAP
authentication are used in parallel. Generally this is not recommended, but can be useful for
debugging and initial setup/testing. The example below shows how this might work.
KNIME Server Enterprise Setup Guide
© 2018 KNIME AG. All rights reserved. 14

<Realm className="org.apache.catalina.realm.LockOutRealm"> <Realm className="org.apache.catalina.realm.UserDatabaseRealm" resourceName="UserDatabase"/> <Realm className="org.apache.catalina.realm.JNDIRealm" connectionURL="ldap://52.50.222.127:389" userBase="ou=people,dc=example,dc=com" userSearch="(mail={0})" userRoleName="memberOf" roleBase="ou=Group,dc=example,dc=com" roleName="cn" roleSearch="(member={0})"/></Realm>
Encrypted LDAP
In case you are using encrypted LDAP authentication and your LDAP server is using a self-
signed certificate, Tomcat will refuse it. In this case you need to add the LDAP server’s
certificate to the global Java keystore, which is located in <jre-
directory>/lib/security/cacerts:
keytool -import -v -noprompt -trustcacerts -file<server certificate> -keystore <jre>/lib/security/cacerts -storepass changeit
Alternatively, you can copy the cacerts file, add your server certificate, and add the following
two system properties to <tomee-directory>/conf/catalina.properties:
javax.net.ssl.trustStrore=<copied keystore>javax.net.ssl.keyStorePassword=changeit
Troubleshooting
In some cases you will want to extract additional log file information about the LDAP
authentication process. In this case you can edit apache-tomee*/conf/logging.properties to
add:
org.apache.catalina.realm.level = ALLorg.apache.catalina.realm.useParentHandlers = trueorg.apache.catalina.authenticator.level = ALLorg.apache.catalina.authenticator.useParentHandlers = true
Once you have made the changes you will need to restart the apache-tomee process/service.
When you have successfully debugged your problem, don’t forget to comment out or remove
KNIME Server Enterprise Setup Guide
© 2018 KNIME AG. All rights reserved. 15

these lines from the logging.properties file, as it will create unnecessarily large log files.
Configuring Single-Sign-On with Kerberos and LDAP
Single-Sign-On can be configured for KNIME Server. This includes the WebPortal, but also all
other services (REST, SOAP, etc.) KNIME Server provides.
The technology used to achieve this is Kerberos, which is a network protocol used for
authentication by the means of tickets and strong encryption. In the following it is assumed
that you are familiar with the basic concepts of Kerberos and LDAP, as explained in the
section before. You can find comprehensive documentation for the latest version of Kerberos
here.
This section describes step-by-step how to set up Kerberos authentication by the means of
an Active Directory service and Windows clients. Other setups are possible and may require
different procedures to be functional.
Most setups will deviate in certain aspects from this guide, so make
adjustments where necessary.
Kerberos requires setup for all three parties involved: the Kerberos and LDAP service (Active
Directory), the TomEE server running KNIME Server, and the clients.
Active Directory Configuration
The first step is to set up the Active Directory correctly. It is assumed that you already have
an Active Directory domain with users and correct groups for KNIME Server usage set up.
Additional steps specific to Kerberos are:
1. Create a technical user for the TomEE server in LDAP.
2. Associate a Service Principal Name (SPN) on with the newly created user for the
TomEE server. To do so, open a Windows PowerShell and enter:
setspn -s HTTP/TOMEE_FQDN@REALM TECHNICAL_USER
In the above command, replace
◦ TOMEE_FQDN with the fully qualified domain name (FQDN) of the machine that runs
KNIME Server (and thus the TomEE server),
◦ REALM with the Kerberos realm of your Active Directory installation,
KNIME Server Enterprise Setup Guide
© 2018 KNIME AG. All rights reserved. 16

◦ and TECHNICAL_USER with the name of the technical user you have created in the
previous step.
It is important that for the TOMEE_FQDN the DNS entries (FQDN to IP) as well as
reverse DNS entries (IP to FQDN) entries can resolved by the domain controller
and all clients.
3. Make sure that the right encryption methods are active on the domain controller:
a. Go to Administrative Tools → Local Security Policy
b. Browse to Security Settings/Local Policies/Security Options
c. Find the entry Network security: Configure encryption types allowed for Kerberos. If
the value is not defined, then all encryption types are allowed. If it is defined, make
sure it contains at least the methods: RC4_HMAC, AES128, AES256 and Future
Encryption Types.
4. Open a Windows PowerShell and create a keytab file using the following command.
Adjust the values according to your settings:
ktpass /out PATH/tomcat.keytab /mapuser TECHNICAL_USER@REALM /princ HTTP/TOMEE_FQDN@REALM /Pass +rndPass /crypto AES256-SHA1 ptype KRB5_NT_PRINCIPAL
The created keytab file needs to be copied to the TomEE server later.
5. Open the "User Properties" in Active Directory for the technical TomEE user you have
created. Then go to the "Account" tab and make sure the following settings are set:
KNIME Server Enterprise Setup Guide
© 2018 KNIME AG. All rights reserved. 17

a. User logon name is correctly set
b. Password never expires = true
c. User cannot change password = true
d. This account supports Kerberos AES 128 bit encryption = true
e. This account supports Kerberos AES 256 bit encryption = true
f. Use Kerberos DES encryption for this account = false (recommended)
6. Then go to the "Delegation" tab and set the radio button to Trust this user for delegation
to any service (Kerberos only)
TomEE Server Configuration
1. Install KNIME Server as outlined in the KNIME Server Installation Guide.
KNIME Server Enterprise Setup Guide
© 2018 KNIME AG. All rights reserved. 18

2. Make appropriate configuration adjustments as explained in the KNIME Server
Administration Guide.
3. Setup LDAP authentication in the server.xml to connect to your Active Directory, as
described in Configuring an LDAP connection for KNIME Server . Note that it might be
necessary to create a temporary listing user to perform the LDAP lookups. This step is
optional, but recommended to test that basic LDAP authentication is functional.
4. Verify that the environment variables JAVA_HOME and CATALINA_HOME are properly
defined:
◦ JAVA_HOME should point to the JDK8 home directory (containing a bin folder)
◦ CATALINA_HOME should point to the TomEE directory (containing a bin folder).
On Windows this can be done in Control Panel → System → Advanced system settings
a. Click on Environment Variables
b. In the System Variables group check for the existence of JAVA_HOME and
CATALINA_HOME. Create or adjust the values accordingly.
On Linux create or change the values in /etc/default/apache-tomee
5. Once a working standard LDAP setup has been verified, make a backup of the contents
KNIME Server Enterprise Setup Guide
© 2018 KNIME AG. All rights reserved. 19

of CATALINA_HOME/conf by copying it to CATALINA_HOME/conf_ldap.
6. On Windows, open regedit and do the following:
a. Navigate to
HKEY_LOCAL_MACHINE\System\CurrentControlSet\Control\Lsa\Kerberos\Paramet
ers.
b. Add the key allowtgtsessionkey (REG_DWORD) and set the value to 1.
KNIME Server Enterprise Setup Guide
© 2018 KNIME AG. All rights reserved. 20
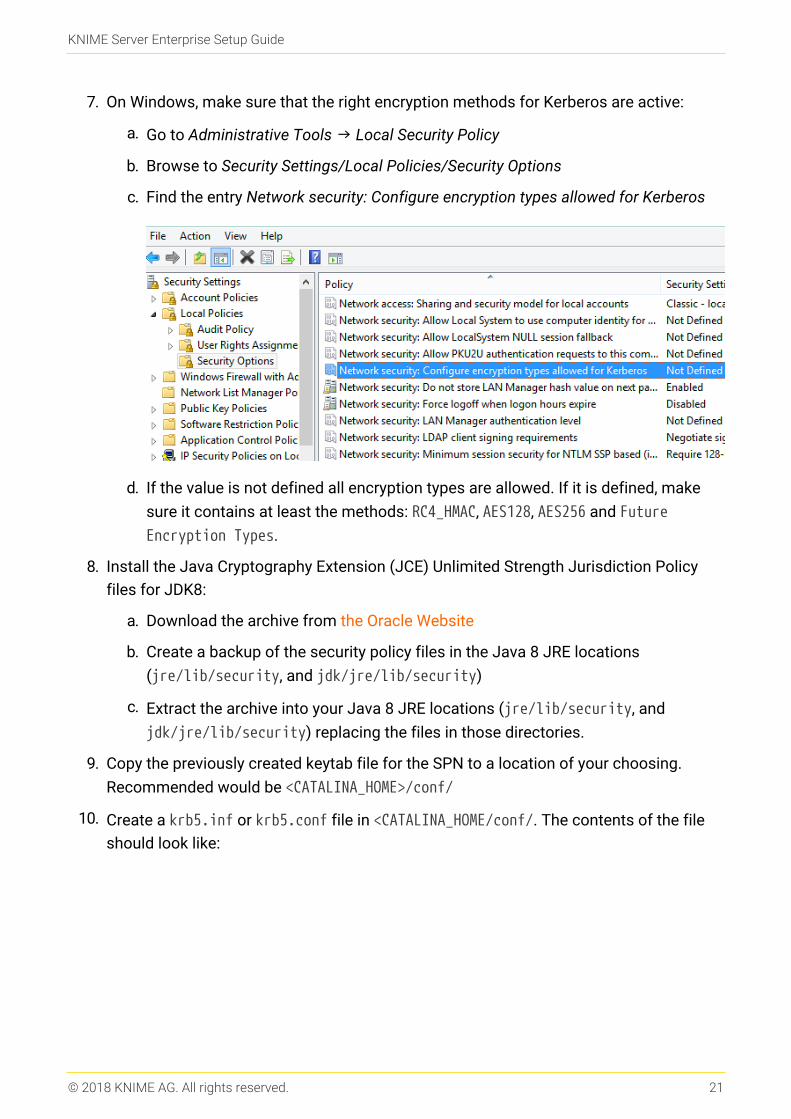
7. On Windows, make sure that the right encryption methods for Kerberos are active:
a. Go to Administrative Tools → Local Security Policy
b. Browse to Security Settings/Local Policies/Security Options
c. Find the entry Network security: Configure encryption types allowed for Kerberos
d. If the value is not defined all encryption types are allowed. If it is defined, make
sure it contains at least the methods: RC4_HMAC, AES128, AES256 and Future
Encryption Types.
8. Install the Java Cryptography Extension (JCE) Unlimited Strength Jurisdiction Policy
files for JDK8:
a. Download the archive from the Oracle Website
b. Create a backup of the security policy files in the Java 8 JRE locations
(jre/lib/security, and jdk/jre/lib/security)
c. Extract the archive into your Java 8 JRE locations (jre/lib/security, and
jdk/jre/lib/security) replacing the files in those directories.
9. Copy the previously created keytab file for the SPN to a location of your choosing.
Recommended would be <CATALINA_HOME>/conf/
10. Create a krb5.inf or krb5.conf file in <CATALINA_HOME/conf/. The contents of the file
should look like:
KNIME Server Enterprise Setup Guide
© 2018 KNIME AG. All rights reserved. 21

[libdefaults]default_realm=REALMdefault_keytab_name="CATALINA_BASE/conf/tomcat.keytab"default_txt_enctypes=aes256-cts-hmac-sha1-96,aes128-cts-hmac-sha1-96default_tgs_enctypes=aes256-cts-hmac-sha1-96,aes128-cts-hmac-sha1-96forwardable=true
[realms]REALM={ kdc=DOMAIN_CONTROLLER_FQDN:88}
[domain_realm]yourdomain.com=REALM*.yourdomain.com=REALM
Adjust the values according to your configuration. If you want to use a different location
or file name for this file you can do so by defining the following Java system property:
in CATALINA_HOME/conf/system.properties:
-Djava.security.krb5.conf=PATH_TO_KRB5_CONF
11. Create or edit the file <CATALINA_HOME>/conf/jaas.conf. The contents of the file should
look like:
KNIME Server Enterprise Setup Guide
© 2018 KNIME AG. All rights reserved. 22
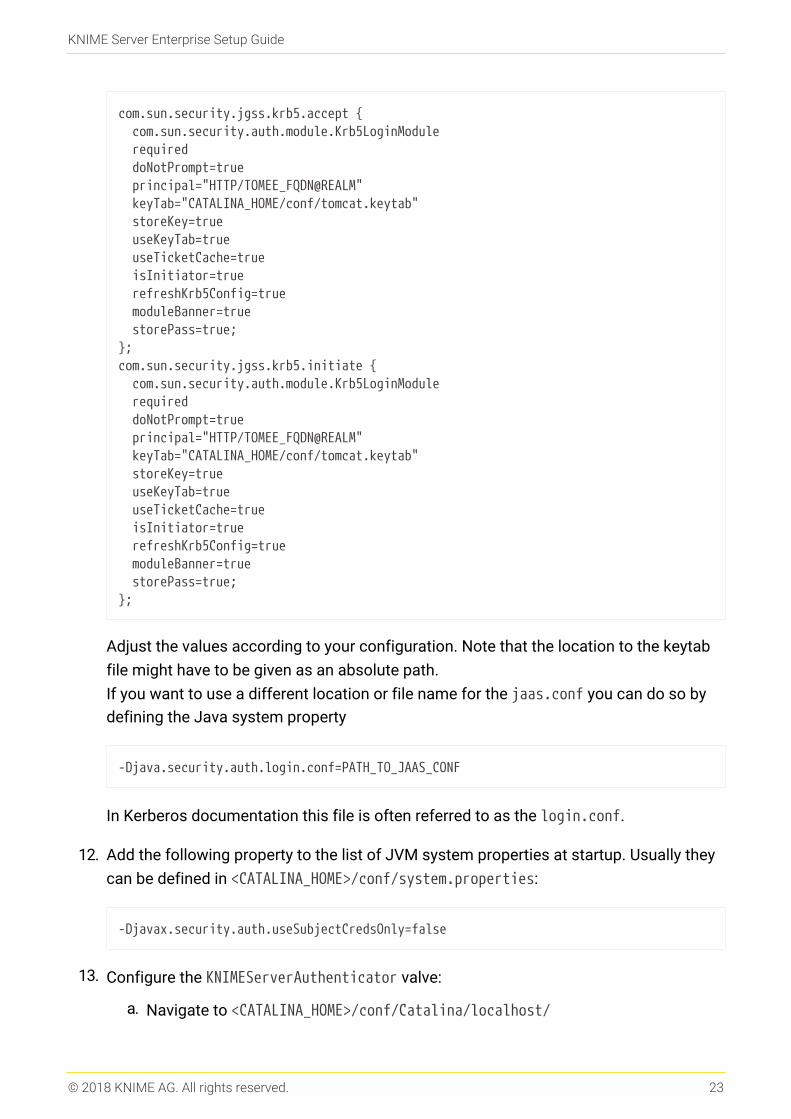
com.sun.security.jgss.krb5.accept { com.sun.security.auth.module.Krb5LoginModule required doNotPrompt=true principal="HTTP/TOMEE_FQDN@REALM" keyTab="CATALINA_HOME/conf/tomcat.keytab" storeKey=true useKeyTab=true useTicketCache=true isInitiator=true refreshKrb5Config=true moduleBanner=true storePass=true;};com.sun.security.jgss.krb5.initiate { com.sun.security.auth.module.Krb5LoginModule required doNotPrompt=true principal="HTTP/TOMEE_FQDN@REALM" keyTab="CATALINA_HOME/conf/tomcat.keytab" storeKey=true useKeyTab=true useTicketCache=true isInitiator=true refreshKrb5Config=true moduleBanner=true storePass=true;};
Adjust the values according to your configuration. Note that the location to the keytab
file might have to be given as an absolute path.
If you want to use a different location or file name for the jaas.conf you can do so by
defining the Java system property
-Djava.security.auth.login.conf=PATH_TO_JAAS_CONF
In Kerberos documentation this file is often referred to as the login.conf.
12. Add the following property to the list of JVM system properties at startup. Usually they
can be defined in <CATALINA_HOME>/conf/system.properties:
-Djavax.security.auth.useSubjectCredsOnly=false
13. Configure the KNIMEServerAuthenticator valve:
a. Navigate to <CATALINA_HOME>/conf/Catalina/localhost/
KNIME Server Enterprise Setup Guide
© 2018 KNIME AG. All rights reserved. 23
b. Edit the knime.xml file (the name of the file is equal to the context root that was
set in the KNIME Server installer, the default is knime, if the knime.war file was
renamed to renamed.war, the xml file will be called renamed.xml)
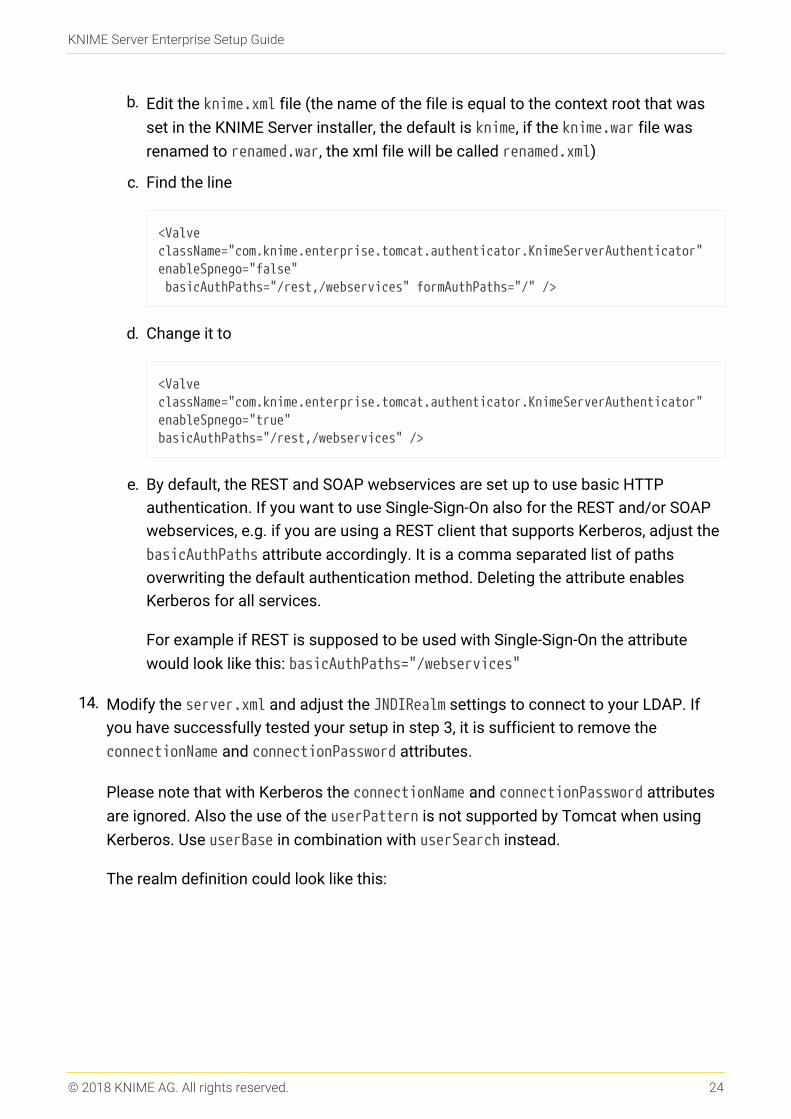
c. Find the line
<ValveclassName="com.knime.enterprise.tomcat.authenticator.KnimeServerAuthenticator"enableSpnego="false" basicAuthPaths="/rest,/webservices" formAuthPaths="/" />
d. Change it to
<ValveclassName="com.knime.enterprise.tomcat.authenticator.KnimeServerAuthenticator"enableSpnego="true"basicAuthPaths="/rest,/webservices" />
e. By default, the REST and SOAP webservices are set up to use basic HTTP
authentication. If you want to use Single-Sign-On also for the REST and/or SOAP
webservices, e.g. if you are using a REST client that supports Kerberos, adjust the
basicAuthPaths attribute accordingly. It is a comma separated list of paths
overwriting the default authentication method. Deleting the attribute enables
Kerberos for all services.
For example if REST is supposed to be used with Single-Sign-On the attribute
would look like this: basicAuthPaths="/webservices"
14. Modify the server.xml and adjust the JNDIRealm settings to connect to your LDAP. If
you have successfully tested your setup in step 3, it is sufficient to remove the
connectionName and connectionPassword attributes.
Please note that with Kerberos the connectionName and connectionPassword attributes
are ignored. Also the use of the userPattern is not supported by Tomcat when using
Kerberos. Use userBase in combination with userSearch instead.
The realm definition could look like this:
KNIME Server Enterprise Setup Guide
© 2018 KNIME AG. All rights reserved. 24

<Realm className="org.apache.catalina.realm.JNDIRealm" connectionURL="ldap://dc.domain.com:3268" userSubtree="true" userBase="cn=Users,dc=domain,dc=com" userSearch="(sAMAccountName={0})" userRoleName="memberOf" roleBase="cn=Users,dc=domain,dc=com" roleName="cn" roleSearch="(member={0})" roleSubtree="true" roleNested="true"/>
If you are using Kerberos in a combined realm, make sure the JNDIRealm connecting to
your LDAP is first in the list of realms.
15. Restart KNIME Server for the changes to take effect. Inspect the log files in
CATALINA_HOME/logs to make sure that there are no error messages relating to your
changes.
Client Configuration
Client configuration requires two steps:
1. The client machine needs to be part of the domain, and the end user logged into that
domain.
2. All browsers used by the client need to have Kerberos authentication enabled. The
following sections describe how to Internet Explorer and Firefox for Kerberos
authentication.
Enabling Kerberos Authentication in Internet Explorer
1. Open the "Internet Options" menu and browse to the "Advanced" tab.
KNIME Server Enterprise Setup Guide
© 2018 KNIME AG. All rights reserved. 25

The setting "Enable Integrated Windows Authentication" needs to be checked.
2. Browse to the "Security" tab, select "Local Intranet" and click on the "Sites" button.
KNIME Server Enterprise Setup Guide
© 2018 KNIME AG. All rights reserved. 26

3. Click on "Advanced" and add the URL of KNIME Server to the list of websites in the
zone.
4. Click on "Custom Level" and check that in Local Intranet Security Level → User
Authentication is set to "Automatic logon only in Intranet zone"
KNIME Server Enterprise Setup Guide
© 2018 KNIME AG. All rights reserved. 27
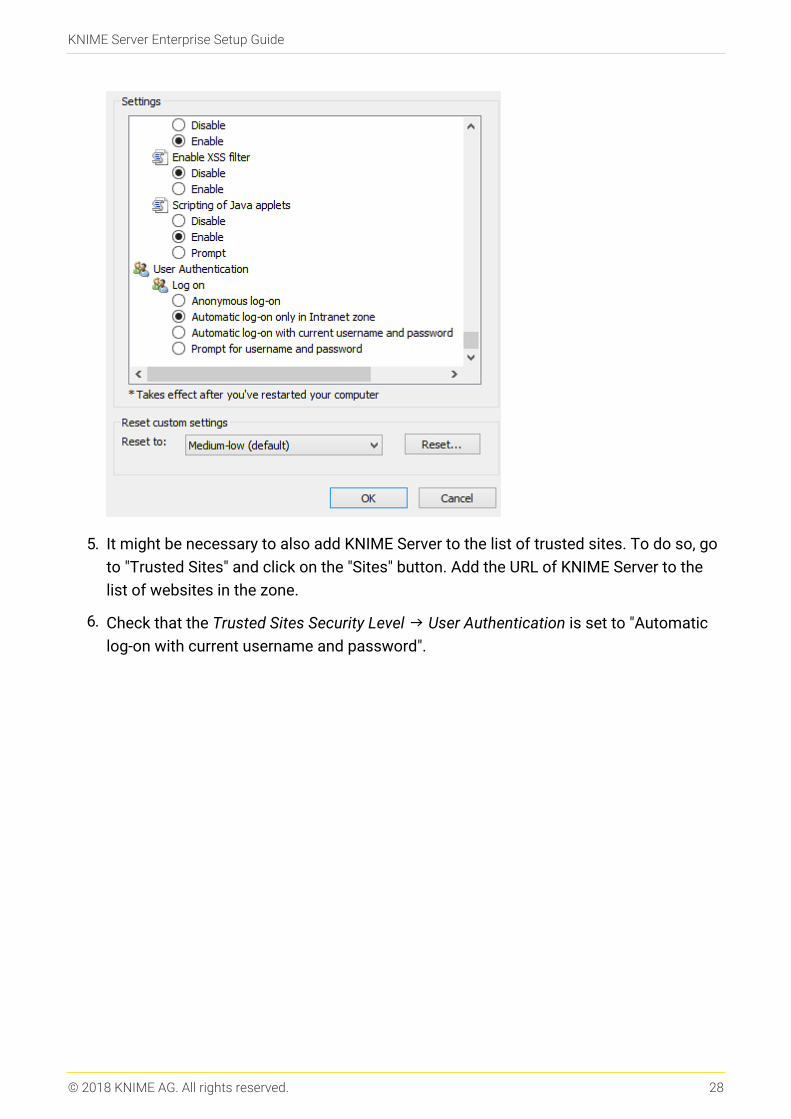
5. It might be necessary to also add KNIME Server to the list of trusted sites. To do so, go
to "Trusted Sites" and click on the "Sites" button. Add the URL of KNIME Server to the
list of websites in the zone.
6. Check that the Trusted Sites Security Level → User Authentication is set to "Automatic
log-on with current username and password".
KNIME Server Enterprise Setup Guide
© 2018 KNIME AG. All rights reserved. 28

Enable Kerberos Authentication in Firefox
1. Start Firefox and type about:config in the address bar.
2. Ignore the warning by clicking on the "I’ll be careful, I promise!" button.
3. Find the appropriate settings by typing network.negotiate-auth in the search field.
KNIME Server Enterprise Setup Guide
© 2018 KNIME AG. All rights reserved. 29
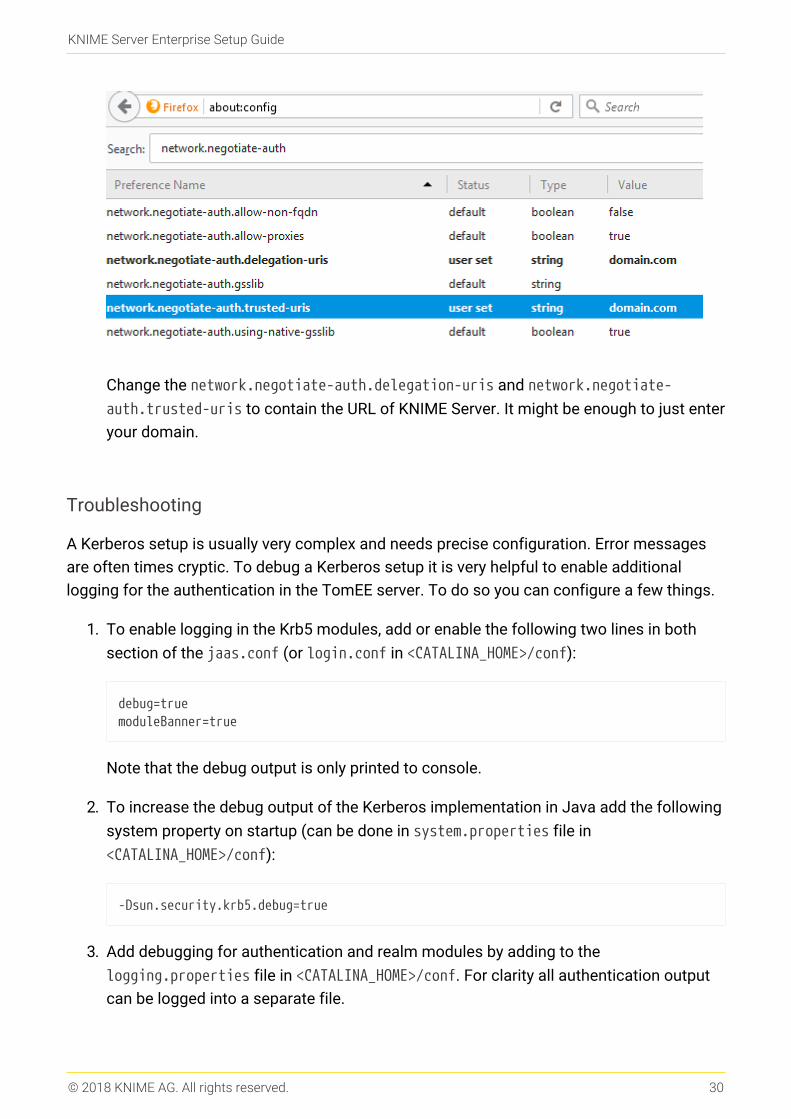
Change the network.negotiate-auth.delegation-uris and network.negotiate-
auth.trusted-uris to contain the URL of KNIME Server. It might be enough to just enter
your domain.
Troubleshooting
A Kerberos setup is usually very complex and needs precise configuration. Error messages
are often times cryptic. To debug a Kerberos setup it is very helpful to enable additional
logging for the authentication in the TomEE server. To do so you can configure a few things.
1. To enable logging in the Krb5 modules, add or enable the following two lines in both
section of the jaas.conf (or login.conf in <CATALINA_HOME>/conf):
debug=truemoduleBanner=true
Note that the debug output is only printed to console.
2. To increase the debug output of the Kerberos implementation in Java add the following
system property on startup (can be done in system.properties file in
<CATALINA_HOME>/conf):
-Dsun.security.krb5.debug=true
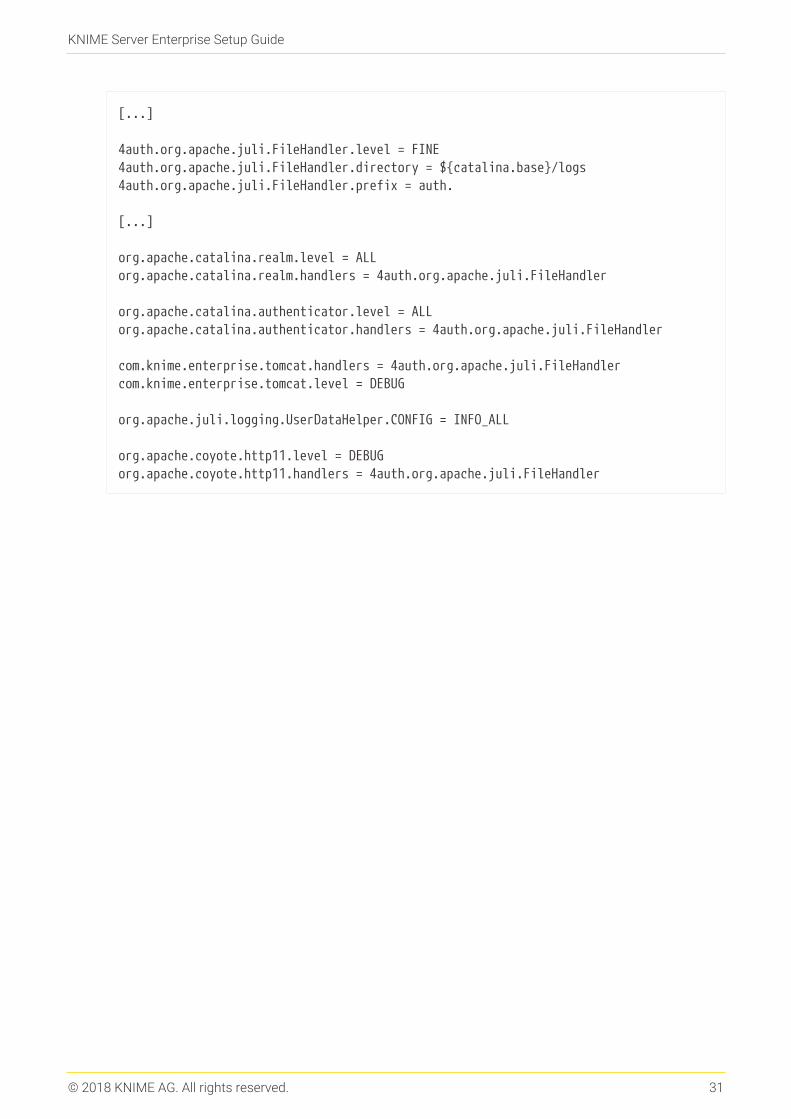
3. Add debugging for authentication and realm modules by adding to the
logging.properties file in <CATALINA_HOME>/conf. For clarity all authentication output
can be logged into a separate file.
KNIME Server Enterprise Setup Guide
© 2018 KNIME AG. All rights reserved. 30
[...]
4auth.org.apache.juli.FileHandler.level = FINE4auth.org.apache.juli.FileHandler.directory = ${catalina.base}/logs4auth.org.apache.juli.FileHandler.prefix = auth.
[...]
org.apache.catalina.realm.level = ALLorg.apache.catalina.realm.handlers = 4auth.org.apache.juli.FileHandler
org.apache.catalina.authenticator.level = ALLorg.apache.catalina.authenticator.handlers = 4auth.org.apache.juli.FileHandler
com.knime.enterprise.tomcat.handlers = 4auth.org.apache.juli.FileHandlercom.knime.enterprise.tomcat.level = DEBUG
org.apache.juli.logging.UserDataHelper.CONFIG = INFO_ALL
org.apache.coyote.http11.level = DEBUGorg.apache.coyote.http11.handlers = 4auth.org.apache.juli.FileHandler
KNIME Server Enterprise Setup Guide
© 2018 KNIME AG. All rights reserved. 31
Dynamic profiles for server-managedcustomizations
As mentioned in the KNIME Server Administration Guide it is possible to write a custom
profile provider which selects the server and the list of profiles dynamically. This custom
provider must be an implementation of the org.knime.product.profiles.IProfileProvider
interface which is contained in the org.knime.product plug-in. The implementation of this
interface must not make use of any classes that trigger reading preferences, otherwise the
default preferences cannot be changed any more. This includes usage of commonly used
KNIME classes such as KNIMEConstants or NodeLogger.
Therefore we suggest to create a new plug-in that only has a dependency to
org.knime.product (for the IProfileProvider interface) and doesn’t use any other KNIME
classes otherwise. An exception are classes from the org.knime.core.util plug-in because
it doesn’t use any preferences (and never will be). Other than that, the implementation is
straight-forward. The class org.knime.product.profiles.ExampleProfileProvider contains
a minimal example of a custom profile provider that you can use as a starting point. Don’t
forget to register your implementation at the extension point
org.knime.product.profileProvider.
If you have any questions implementing a custom profile provider, don’t hesitate to contact
us.
KNIME Server Enterprise Setup Guide
© 2018 KNIME AG. All rights reserved. 32

KNIME AGTechnoparkstrasse 18005 Zurich, [email protected]
The KNIME® trademark and logo and OPEN FOR INNOVATION® trademark are used by KNIME AG under license
from KNIME GmbH, and are registered in the United States. KNIME® is also registered in Germany.