
KKaasseeyyaa vv22 IInntteeggrraattiioonn ooff VVSSAA...
15
September 15, 2017 K K a a s s e e y y a a v v 2 2 I I n n t t e e g g r r a a t t i i o o n n o o f f V V S S A A w w i i t t h h K K a a s s e e y y a a ® ® B B M M S S ™ ™ Configuration Guide Requires BMS version 3.9 or later and VSA version 9.3.0.11 or later English
Transcript of KKaasseeyyaa vv22 IInntteeggrraattiioonn ooff VVSSAA...
September 15, 2017
KKaasseeyyaa vv22 IInntteeggrraattiioonn ooff
VVSSAA wwiitthh KKaasseeyyaa®® BBMMSS™™
Configuration Guide
Requires BMS version 3.9 or later and VSA version 9.3.0.11 or later
English

Copyright Agreement
The purchase and use of all Software and Services is subject to the Agreement as defined in Kaseya’s “Click-Accept” EULATOS as updated from time to time by Kseya at http://www.kaseya.com/legal.aspx. If Customer does not agree with the Agreement, please do not install, use or purchase any Software and Services from Kaseya as continued use of the Software or Services indicates Customer’s
acceptance of the Agreement.”
©2017 Kaseya. All rights reserved. | www.kaseya.com

RMM Integration Settings - Kaseya v2 - New
1
RMM Integration Settings - Kaseya v2
- New
Admin > Service Desk > RMM Integration Settings
The RMM Integration Settings page maintains configuration settings for integrating Kaseya® BMS™ with multiple remote monitoring and management (RMM) systems. Once integration is complete you can monitor machines and devices using an integrated RMM and manage their corresponding tickets in Kaseya® BMS™.
RMM Integration - Kaseya v2 (pdf) (http://help.kaseya.com/WebHelp/EN/BMS/EN_BMS_Kaseya_v2.pdf#zoom=70&navpanes=0)
Version Requirements
VSA must be running 9.3.0.11 or later. Kaseya® BMS™ must be running 3.9 or later.
RMM Integration - Kaseya v2 - New
These five topics contain all instructions required for a new integration and should be performed in
sequence.
1. Integrating Servers v2 (page 1)
2. Synchronizing Accounts v2 (page 3)
3. Assets Synchronization v2 (page 4)
4. Integrating Live Connect v2 (page 5)
5. Activating VSA Integration v2 (page 6)
6. Review Ticket Integration v2 (page 8)
RMM Integration - Kaseya v2 - Upgrade from Kaseya v1
Upgrading to RMM Integration - Kaseya v2 (page 10) - This single topic contains all instructions
required for upgrading.
Integrating Servers v2
Admin > Service Desk > RMM Integration Settings > General Settings
In this first procedure you integrate your Kaseya® BMS™ instance with a Kaseya VSA server. You
also select default ticket settings for tickets sourced from the VSA.
Note: Do not attempt to configure integration inside the VSA before configuring integration in BMS. Configuring the VSA is the last step of new BMS / Kaseya v2 integration. To upgrade see RMM
Integration - Kaseya v2 - Upgrade (page 10).
Integration Prerequisites
VSA must be running 9.3.0.11 or later. Kaseya® BMS™ must be running 3.9.
Identify the VSA address you will integrating with Kaseya® BMS™.
Create a dedicated VSA user account used by Kaseya® BMS™ to access the VSA. Example:
BMS_service. The VSA user account should have access to all organizations.

RMM Integration Settings - Kaseya v2 - New
2
Identify the "root" user in Kaseya® BMS™. The root user is the top most employee tile in the HR
> Organizational Chart page. Using this user for RMM Integration is recommended to ensure all BMS > CRM customer accounts and BMS > Service Desk tickets can be accessed.
Disable the VSA > Ticketing email server by checking the Disable email reader checkbox on the VSA
> Ticketing > Email Reader page.
If the Service Desk module is installed in the VSA:
Click the Disable button on the VSA > Service Desk > Incoming Email and Alarm Settings
page.
Uncheck the Activate Service Desk checkbox on the VSA > Service Desk > Global Settings
page.
Procedure
1. Select the Admin > Service Desk > RMM Integration Settings page.
2. Click New.
3. Enter the following fields in the General Settings tab, Configuration Options section.
Enable RMM Integration - Enable or Disable
Integration Name - Enter a unique name for this integration.
Integration Type - Kaseya Ver.2
Integrator Username - Enter the VSA username BMS uses to access the VSA. This should be
a dedicated service account, such as BMS_service.
Note: In the VSA, each username is unique across all tenant partitions, so you do not have to
specify a company name in the VSA as you do in BMS.
Integrator Password - Enter the password for the BMS service account.
Server Address - Enter the URL or IP address for the VSA. Optionally include a port.
Push CRM Accounts automatically to VSA - Enable or Disable - If enabled, new CRM
customer accounts create corresponding organizations in the VSA, as soon as the CRM customer account is created. The CRM customer account and VSA organization remains
mapped to each other from then on. This option does not apply to existing CRM accounts.
4. Select default values in the Ticket Defaults section. All Kaseya® BMS™ ticket values created from
an RMM ticket are initially set to these values. They can be automatically changed—based on the ticket's content—using a Kaseya® BMS™ workflow.
Priority
Queue

RMM Integration Settings - Kaseya v2 - New
3
Ticket Type
Ticket Note Type
Ticket Source
5. Click Save to save your settings.
6. Click Test Connection to ensure Kaseya® BMS™ can connect with the VSA instance you have
specified.
Synchronizing Accounts v2
Admin > Service Desk > RMM Integration Settings > Accounts Synchronization
Once a Kaseya version 2 RMM Integration Settings record has been saved, you can bulk import VSA organizations into Kaseya® BMS™ to create corresponding CRM customer accounts. Minor spelling differences are ignored to intelligently match accounts. TheKaseya® BMS™ remembers the mapping
so you can reimport as often as you like. This would typically occur at least once during your initial configuration. You can also export existing CRM customer accounts to create corresponding
organizations in the VSA.
Additional Guidelines
Running Accounts Synchronization initially is recommended. Whether or not Accounts Synchronization is run. Once BMS integration is activated in the VSA, Kaseya® BMS™ will create
a new CRM customer account for any new VSA organization referenced by a new ticket or new asset.
Changing the name of the organization or asset in the VSA does not update Kaseya® BMS™ unless you run Accounts Synchronization and Assets Synchronization again.
You can also manually associate an existing CRM customer account with an existing VSA organization, using the CRM > Accounts > (selected account) > RMM Integration tab.
Import Accounts Procedure
1. Click Load Accounts.
2. Optionally filter the loading of data from the VSA into Kaseya® BMS™ using the Filter by Name...
field. Click Load Accounts again to re-display the filtered list.
3. Select the organizations you want to import into Kaseya® BMS™.
4. Optionally click:
to edit the mapping

RMM Integration Settings - Kaseya v2 - New
4
to delete the mapping
(BMS account name) to display its account record in BMS
5. Click Import Results.
Note: If you get a 'There are no logs yet!' message you may have forgotten to select any
organizations to import.
Export Accounts Procedure
Use this procedure to export existing CRM customer accounts in Kaseya® BMS™ to the VSA. Any
new CRM account you create is automatically added to the VSA without having to use this feature.
1. Click Load Accounts.
2. Optionally filter the loading of data from the VSA into Kaseya® BMS™ using the Filter field.
3. Select the CRM customer accounts you want to export to the VSA.
4. Click Export Results.
Note: If you get a 'There are no logs yet!' message you may have forgotten to select any CRM
customer accounts to export.
Assets Synchronization v2
Admin > Service Desk > RMM Integration Settings
This procedure provides bulk synchronization of assets. Even if this bulk procedure is not run, asset synchronization occurs automatically for integrated organizations/customer accounts when:
An asset is detected using VSA > Discovery.
A new agent is installed in the VSA.
Additional Guidelines
Changing the name of the organization or asset in the VSA does not update Kaseya® BMS™ unless you run Assets Synchronization.
Once assets are imported, you can also manually create a ticket in Kaseya® BMS™ and select the imported asset, without having to initiate a ticket creation event in the VSA.
Procedure
1. Select the Admin > Service Desk > RMM Integration Settings page.
2. Click the integration record you created earlier.
3. Select the Assets Synchronization tab.

RMM Integration Settings - Kaseya v2 - New
5
4. Click Load Assets.
5. Optionally filter the loading of data from the VSA into Kaseya® BMS™ using filter fields.
Asset Name
Machine Group
Is Computer Agent - No or Yes - If Yes, the computer has a Kaseya agent installed.
6. Select the assets you want to import into Kaseya® BMS™.
7. Click Import Results.
Note: If you get a 'There are no logs yet!' message you may have forgotten to select any assets to import.
8. Review synchronized asset properties using the BMS > Service Desk > Asset Management >
Hardware Assets page.
Integrating Live Connect v2
From within a Kaseya® BMS™ ticket you can launch a VSA Live Connect session to a machine by
clicking the associated hardware asset.
Prerequisites
VSA v9.4
SSL enabled on VSA with valid certificate
The latest version of the Kaseya Live Connect app from VSA v9.4.
Allow popups for all sites on the browser you are using during configuration.
RMM Integration Settings - Kaseya v2 - New
6
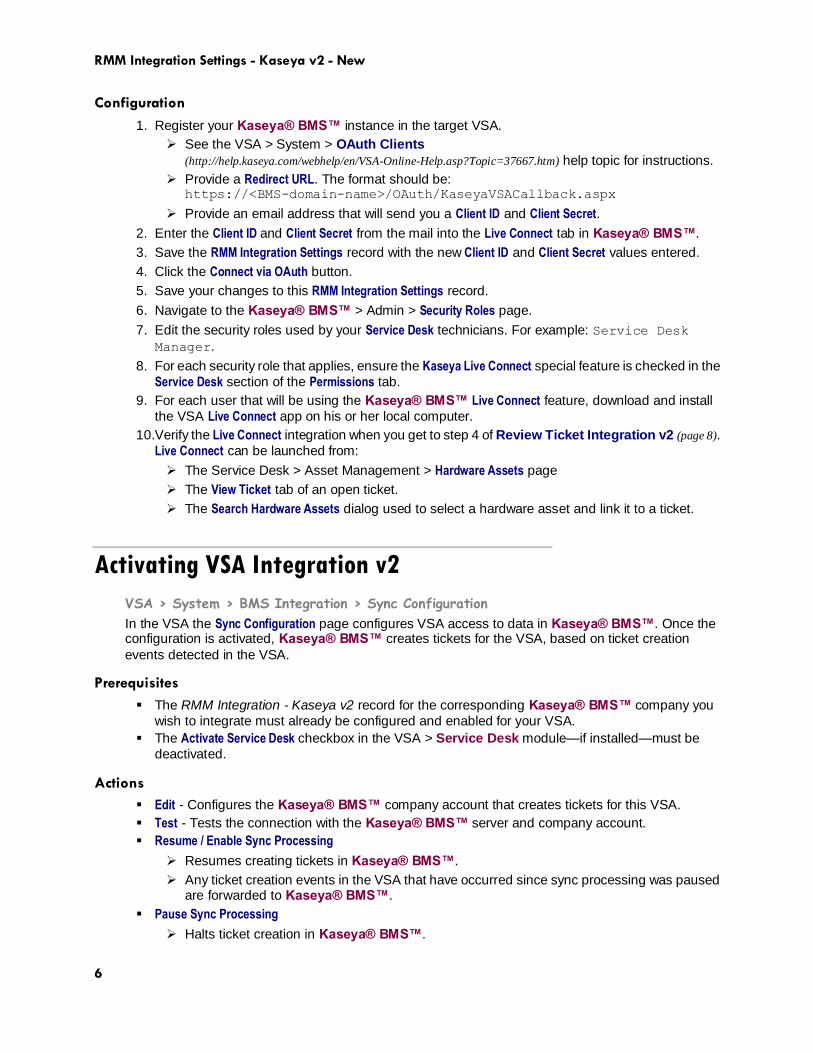
Configuration
1. Register your Kaseya® BMS™ instance in the target VSA.
See the VSA > System > OAuth Clients
(http://help.kaseya.com/webhelp/en/VSA-Online-Help.asp?Topic=37667.htm) help topic for instructions.
Provide a Redirect URL. The format should be: https://<BMS-domain-name>/OAuth/KaseyaVSACallback.aspx
Provide an email address that will send you a Client ID and Client Secret.
2. Enter the Client ID and Client Secret from the mail into the Live Connect tab in Kaseya® BMS™.
3. Save the RMM Integration Settings record with the new Client ID and Client Secret values entered.
4. Click the Connect via OAuth button.
5. Save your changes to this RMM Integration Settings record.
6. Navigate to the Kaseya® BMS™ > Admin > Security Roles page.
7. Edit the security roles used by your Service Desk technicians. For example: Service Desk
Manager.
8. For each security role that applies, ensure the Kaseya Live Connect special feature is checked in the
Service Desk section of the Permissions tab.
9. For each user that will be using the Kaseya® BMS™ Live Connect feature, download and install
the VSA Live Connect app on his or her local computer.
10.Verify the Live Connect integration when you get to step 4 of Review Ticket Integration v2 (page 8).
Live Connect can be launched from:
The Service Desk > Asset Management > Hardware Assets page
The View Ticket tab of an open ticket.
The Search Hardware Assets dialog used to select a hardware asset and link it to a ticket.
Activating VSA Integration v2
VSA > System > BMS Integration > Sync Configuration
In the VSA the Sync Configuration page configures VSA access to data in Kaseya® BMS™. Once the configuration is activated, Kaseya® BMS™ creates tickets for the VSA, based on ticket creation
events detected in the VSA.
Prerequisites
The RMM Integration - Kaseya v2 record for the corresponding Kaseya® BMS™ company you
wish to integrate must already be configured and enabled for your VSA.
The Activate Service Desk checkbox in the VSA > Service Desk module—if installed—must be
deactivated.
Actions
Edit - Configures the Kaseya® BMS™ company account that creates tickets for this VSA.
Test - Tests the connection with the Kaseya® BMS™ server and company account.
Resume / Enable Sync Processing
Resumes creating tickets in Kaseya® BMS™.
Any ticket creation events in the VSA that have occurred since sync processing was paused are forwarded to Kaseya® BMS™.
Pause Sync Processing
Halts ticket creation in Kaseya® BMS™.

RMM Integration Settings - Kaseya v2 - New
7
Ticket creation events continue to be queued, ready to create tickets when you resume sync
processing.
Activate Integration Module
The VSA > Service Desk and Ticketing modules will no longer create tickets for any ticket
creation events in the VSA. This includes tickets created for alerts and for inbound emails.
The email readers for Service Desk and Ticketing will no longer be polled.
Note: Existing tickets are not processed in this initial release of RMM Integration - Kaseya v2.
Deactivate Integration Module
Ticket creation events in the VSA begin creating tickets in the Ticketing module.
Procedure
1. In the VSA, select the System > BMS Integration > Sync Configuration page.
2. Click Edit.
3. Enter the following in the Edit Settings dialog.
URL of BMS Server - Enter the URL of your Kaseya® BMS™ server.
Company - Enter your Kaseya® BMS™ company name.
Username - Enter a Kaseya® BMS™ login username. The Kaseya® BMS™ "root" user
account is recommended. See the prerequisites in Integrating Servers v2 (page 1).
Password - Enter the password for your Kaseya® BMS™ login username.
Select Asset Push Rule
Agent Assets Only - Only computers with agents installed on them are pushed to
BMS.
All Assets - Devices without agents can be promoted to assets. Both computers
and devices promoted to assets are pushed to BMS.
None - No assets are pushed to BMS.
4. Click Test to verify your VSA can access the Kaseya® BMS™ server.
5. Click the Activate Integration Module.
6. Click the Resume/Enable Sync Processing button.
Both buttons must have a green checkmark to trigger the creation of tickets in Kaseya®
BMS™.
7. Configure ticket creation events in the VSA.
8. Optionally review log entries created by the VSA for ticket requests sent to Kaseya® BMS™
System > BMS Integration > Sync Transaction Log - Displays a log of sync transactions
between the VSA and Kaseya® BMS™.

RMM Integration Settings - Kaseya v2 - New
8
System > BMS Integration > BMS API Log - Displays a log of REST API requests related to
the integration between the VSA and Kaseya® BMS™.
Review Ticket Integration v2
Service Desk > Tickets > (selected ticket) > Edit > RMM Integration
Once integration is configured, you can test it by triggering a system-generated ticket in the VSA, then view the corresponding ticket in the Kaseya® BMS™.
Note: Closing the BMS ticket also closes the alarm in the VSA that was created by the same alert. This
feature requires the System > Configure > Enable auto close of alarms and tickets checkbox be checked in the VSA.
Procedure
1. In the VSA, use a monitoring event to create a Ticketing ticket for an agent in an integrated
organization and machine group.
2. In Kaseya® BMS™ select the Service Desk > Tickets page.
3. Select the Kaseya® BMS™ ticket created for the VSA monitoring event.

RMM Integration Settings - Kaseya v2 - New
9
The Ticket View > Affected Assets section identifies the machine, group and organization of
the agent account in the VSA.
4. Click Live Connect to start a session to this machine.
A separate Live Connect window opens. If this is the first time during your session you have
used Live Connect, you will be required to enter a VSA username and password. Your credentials determines the Live Connect assets you are authorized to access.
If no Live Connect asset is shown, you can add one manually. Click Edit, then click the plus icon next to the Affected Hardware Asset field. In the Search dialog you can start a Live Connect
session on any of the assets listed, without having to link it to the ticket.
5. Select the RMM Integration tab.
The Ticket Reference identifies the value shown in the Record Reference column in the Sync Transaction Log page in the VSA.
The Status column in the Sync Transaction Log displays the BMS ticket number created.
6. Select the Service Desk > Assets Management > Hardware Assets page.
Click any row that displays a Live Connect icon. A separate Live Connect window opens.
If a icon displays, this is the first time during your session you have used Live Connect. Click the icon to enter a VSA username and password. Your credentials determines the Live
Connect assets you are authorized to access.

RMM Integration Settings - Kaseya v2 - Upgrade
10
RMM Integration Settings - Kaseya v2
- Upgrade Customers who have already integrated their VSA with Kaseya® BMS™ using RMM Integration -
Kaseya v1 may wish to upgrade to RMM Integration - Kaseya v2. Upgrading to RMM Integration -
Kaseya v2:
Provides better performance and efficiency.
Enables users to take advantage of future integration enhancements.
Provides enhanced logging and tracking of integration transactions.
Enables temporary pausing of ticket creation events without loss of data.
Eliminates duplicate creation of tickets in both the VSA and BMS.
Supports cutover from either the VSA Service Desk module or the VSA Ticketing module.
Supports both on premises and SaaS VSA implementations.
Closing the BMS ticket also closes the alarm in the VSA that was created by the same alert. This feature requires the System > Configure > Enable auto close of alarms and tickets checkbox be
checked in the VSA.
Upgrade Prerequisites
VSA must be running 9.3.0.11 or later. Kaseya® BMS™ must be running 3.9.
The following two files are required to complete the uninstall of your existing RMM integration - Kaseya v1 configuration. You can download them from the Kaseya Community
(http://community.kaseya.com/resources/m/tpipinfo/86618.aspx). Copy these two files to the
//Kaseya/BMSSync folder of your VSA. Do not run these files until instructed to do so in the procedure below.
RemoveBMSSync.bat - You will run this from a command line on the system hosting your
VSA.
RemoveBMSSync.sql - You will execute this SQL query on the system hosting the SQL
Server used by your VSA.
Identify or create a new dedicated VSA user account used by Kaseya® BMS™ to access the
VSA. Example: BMS_service. The VSA user account should have access to all organizations.
You can re-use the same one you're already using for your existing RMM Integration - Kaseya v1.
Identify the "root" user in Kaseya® BMS™. The root user is the top most employee tile in the HR
> Organizational Chart page. Using this user for RMM Integration is recommended to ensure all BMS > CRM customer accounts and BMS > Service Desk tickets can be accessed.
Disable the VSA > Ticketing email server by checking the Disable email reader checkbox on the VSA
> Ticketing > Email Reader page.
If the Service Desk module is installed in the VSA:
Click the Disable button on the VSA > Service Desk > Incoming Email and Alarm Settings
page.
Uncheck the Activate Service Desk checkbox on the VSA > Service Desk > Global Settings
page.
In VSA
1. In the VSA, select the System > BMS Integration > Sync Configuration page.
2. Click the Activate Integration Module button.
This disables the creation of tickets in BMS using your existing RMM Integration - Kaseya v1 record.

RMM Integration Settings - Kaseya v2 - Upgrade
11
Ticket creation events in the VSA will continue to be collected with no loss of data. Tickets
will resume being created when the new integration has been configured and activated.
In BMS
1. Select the Admin > Service Desk > RMM Integration Settings page.
2. Select the existing RMM Integration - version 1 record you have been using.
Set Enable RMM Integration option to Disable.
Save, then close this record.
3. Click New to create a new integration record.
4. Enter the following fields in the General Settings tab, Configuration Options section.
Enable RMM Integration - Enable or Disable
Integration Name - Enter a unique name for this integration.
Integration Type - Kaseya Ver.2
Integrator Username - Enter the VSA username BMS uses to access the VSA. This should be
a dedicated service account, such as BMS_service.
Note: In the VSA, each username is unique across all tenant partitions, so you do not have to
specify a company name in the VSA as you do in BMS.
Integrator Password - Enter the password for the BMS service account.
Server Address - Enter the URL or IP address for the VSA. Optionally include a port.
Push CRM Accounts automatically to VSA - Enable or Disable - If enabled, new CRM
customer accounts create corresponding organizations in the VSA, as soon as the CRM customer account is created. The CRM customer account and VSA organization remains
mapped to each other from then on. This option does not apply to existing CRM accounts.
5. Optionally change the default values in the Ticket Defaults section. All Kaseya® BMS™ ticket
values created from an RMM ticket are initially set to these values. They can be automatically changed—based on the ticket's content—using a Kaseya® BMS™ workflow.
Priority
Queue
Ticket Type
Ticket Note Type
Ticket Source
6. Click Save to save your settings.
RMM Integration Settings - Kaseya v2 - Upgrade
12
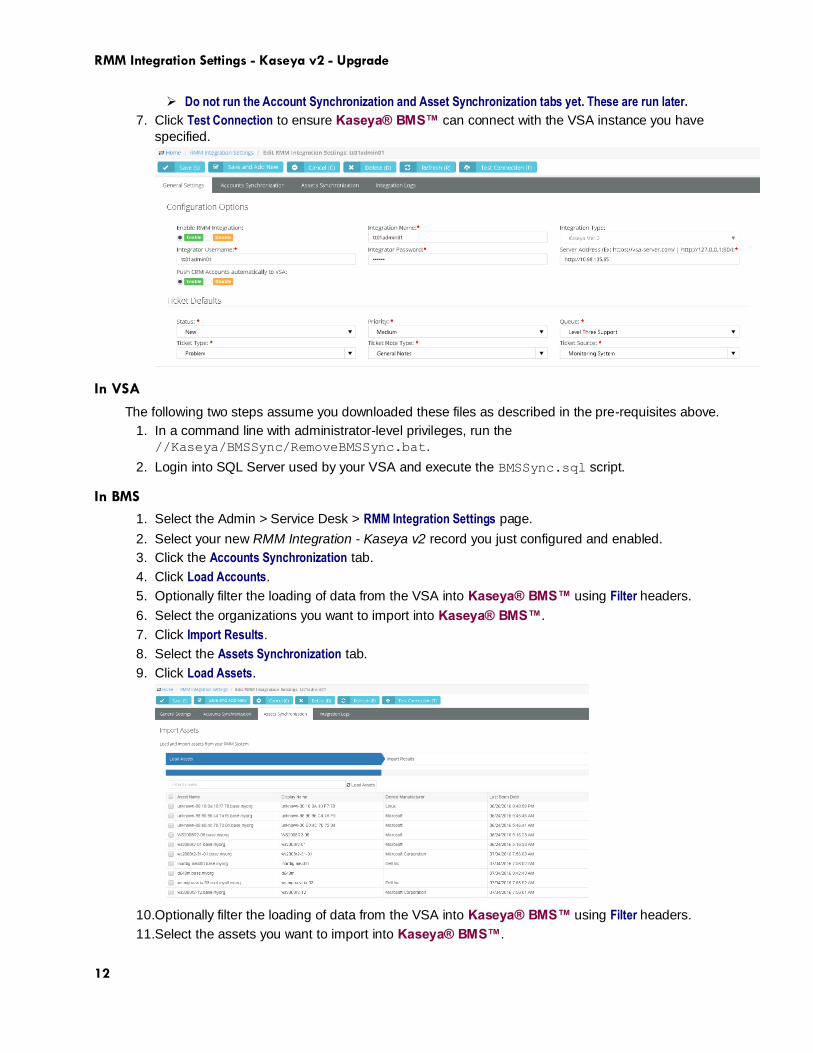
Do not run the Account Synchronization and Asset Synchronization tabs yet. These are run later.
7. Click Test Connection to ensure Kaseya® BMS™ can connect with the VSA instance you have
specified.
In VSA
The following two steps assume you downloaded these files as described in the pre-requisites above.
1. In a command line with administrator-level privileges, run the
//Kaseya/BMSSync/RemoveBMSSync.bat.
2. Login into SQL Server used by your VSA and execute the BMSSync.sql script.
In BMS
1. Select the Admin > Service Desk > RMM Integration Settings page.
2. Select your new RMM Integration - Kaseya v2 record you just configured and enabled.
3. Click the Accounts Synchronization tab.
4. Click Load Accounts.
5. Optionally filter the loading of data from the VSA into Kaseya® BMS™ using Filter headers.
6. Select the organizations you want to import into Kaseya® BMS™.
7. Click Import Results.
8. Select the Assets Synchronization tab.
9. Click Load Assets.
10.Optionally filter the loading of data from the VSA into Kaseya® BMS™ using Filter headers.
11.Select the assets you want to import into Kaseya® BMS™.

RMM Integration Settings - Kaseya v2 - Upgrade
13
12.Click Import Results.
In VSA
1. Select the System > BMS Integration > Sync Configuration page.
2. Click Edit.
3. Enter the following in the Edit Settings dialog.
URL of BMS Server - Enter the URL of your Kaseya® BMS™ server.
Company - Enter your Kaseya® BMS™ company name.
Username - Enter a Kaseya® BMS™ login username. The Kaseya® BMS™ "root" user
account is recommended. See the prerequisites in Integrating Servers v2 (page 1).
Password - Enter the password for your Kaseya® BMS™ login username.
4. Click Test to verify your VSA can access the Kaseya® BMS™ server.
5. Click the Activate Integration Module.
6. Click the Resume/Enable Sync Processing button.
Both buttons must have a green checkmark to trigger the creation of tickets in Kaseya®
BMS™.


