Kim Lapsley Crochets: Black Cat/Ginger Cat
8
Black Cat/Ginger Cat Finally. I’ve finished the cat patterns. My black cat turned into a bit of a scoundrel. He has one eye and a torn ear and a glint in his eye which suggests he's up to no good. His name is Jack. His counterpart, Abi (named after my wonderful niece), is much more genteel. It’s a bit of a Lady and the Tramp affair. Let me know if you need help or if I’ve made any mistakes. Happy hooking! Size 15cm/6in tall, 14cm/5 ½in wide Skill Level Moderate. This gets a moderate difficulty because of the tail. The tail requires doing a single crochet over another single crochet to make it curve– instructions and pictures are included under the tail section of the pattern. Note on yarn and hook size I crochet with a light worsted (DK) weight yarn. You can use a slightly heavier or lighter yarn as long as you use the same type of yarn for the different colours. This will ensure your toy is in proportion. Use a hook size that will give you a nice firm stitch. The 3.00mm is my favourite hook. Materials For Jack the Black Cat Yarn Black (approx. 100metres/109yards) Pink (small amount) White (small amount) Jack the Black Cat/Abi the Ginger Cat Kim Lapsley Crochets: Black Cat/Ginger Cat http://kimlapsley.blogspot.com.au/2012/04/black-catginger-cat.html 1 of 8 21/5/18, 10:47 pm
Transcript of Kim Lapsley Crochets: Black Cat/Ginger Cat
Black Cat/Ginger Cat
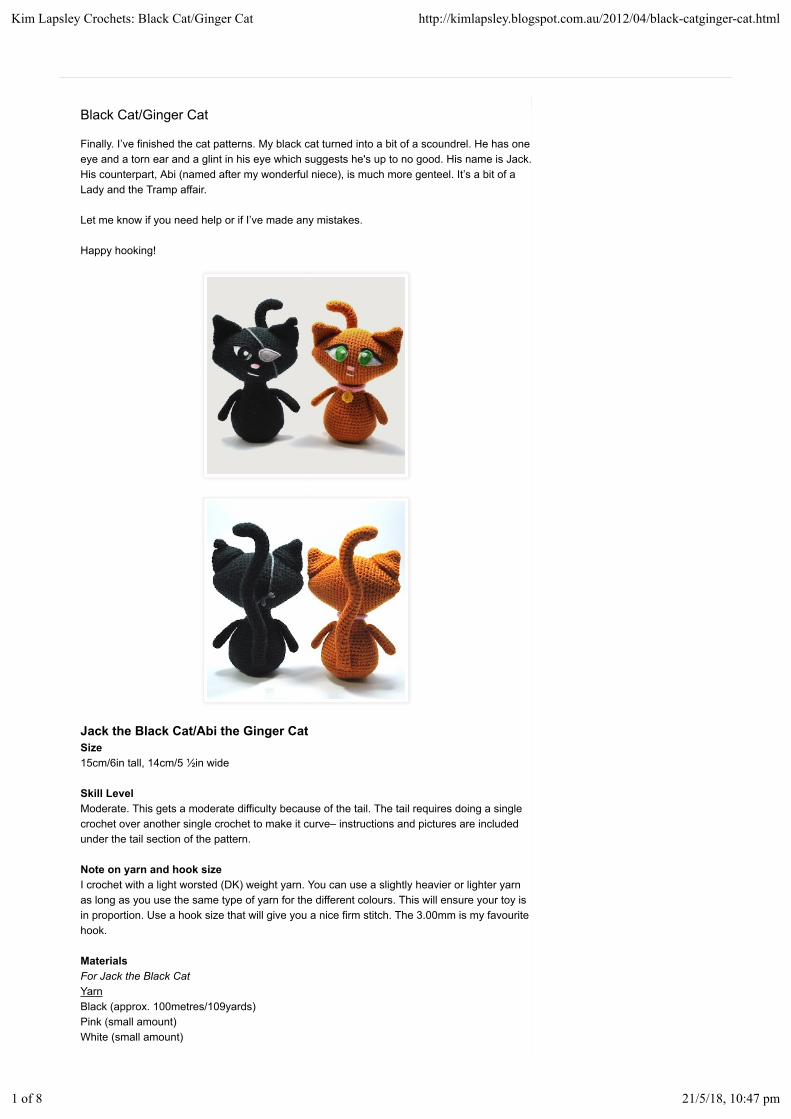
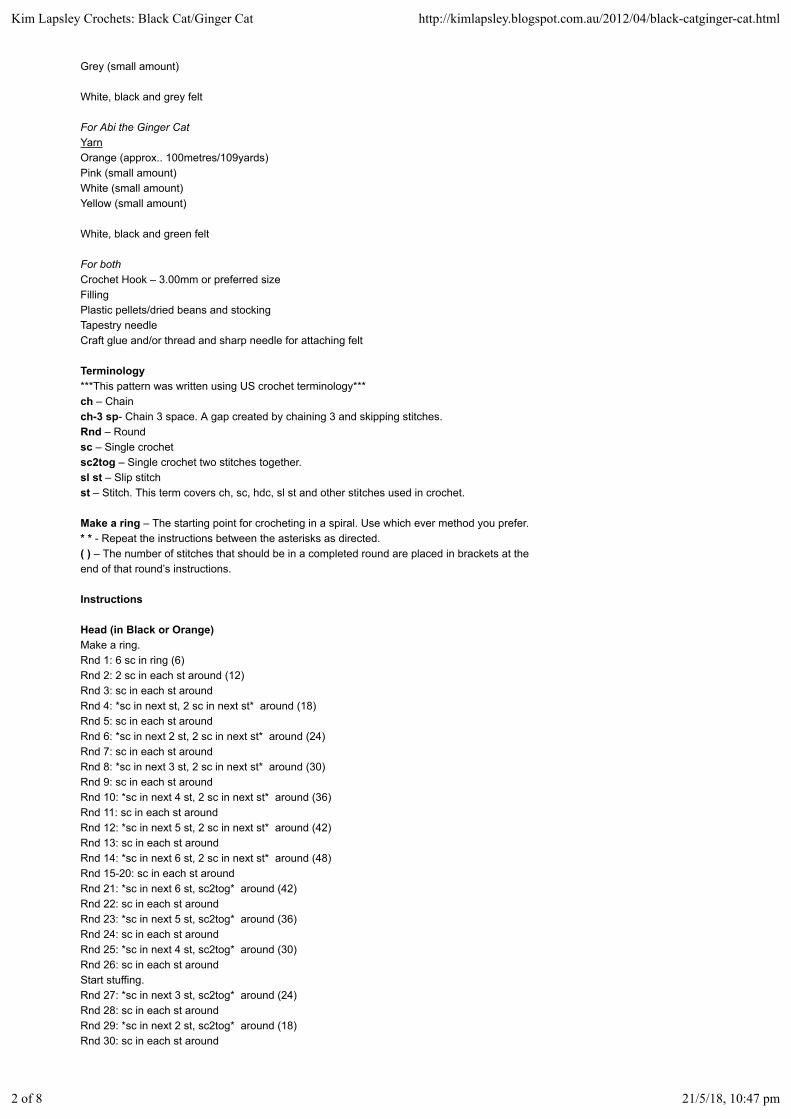
Finally. I’ve finished the cat patterns. My black cat turned into a bit of a scoundrel. He has oneeye and a torn ear and a glint in his eye which suggests he's up to no good. His name is Jack.His counterpart, Abi (named after my wonderful niece), is much more genteel. It’s a bit of aLady and the Tramp affair.
Let me know if you need help or if I’ve made any mistakes.
Happy hooking!
Size15cm/6in tall, 14cm/5 ½in wide
Skill LevelModerate. This gets a moderate difficulty because of the tail. The tail requires doing a singlecrochet over another single crochet to make it curve– instructions and pictures are includedunder the tail section of the pattern.
Note on yarn and hook sizeI crochet with a light worsted (DK) weight yarn. You can use a slightly heavier or lighter yarnas long as you use the same type of yarn for the different colours. This will ensure your toy isin proportion. Use a hook size that will give you a nice firm stitch. The 3.00mm is my favouritehook.
MaterialsFor Jack the Black CatYarnBlack (approx. 100metres/109yards)Pink (small amount)White (small amount)
Jack the Black Cat/Abi the Ginger Cat
Kim Lapsley Crochets: Black Cat/Ginger Cat http://kimlapsley.blogspot.com.au/2012/04/black-catginger-cat.html
1 of 8 21/5/18, 10:47 pm
Grey (small amount)
White, black and grey felt
For Abi the Ginger CatYarnOrange (approx.. 100metres/109yards)Pink (small amount)White (small amount)Yellow (small amount)
White, black and green felt
For bothCrochet Hook – 3.00mm or preferred sizeFillingPlastic pellets/dried beans and stockingTapestry needleCraft glue and/or thread and sharp needle for attaching felt
Terminology***This pattern was written using US crochet terminology***ch – Chainch-3 sp- Chain 3 space. A gap created by chaining 3 and skipping stitches.Rnd – Roundsc – Single crochetsc2tog – Single crochet two stitches together.sl st – Slip stitchst – Stitch. This term covers ch, sc, hdc, sl st and other stitches used in crochet.
Make a ring – The starting point for crocheting in a spiral. Use which ever method you prefer.* * - Repeat the instructions between the asterisks as directed.( ) – The number of stitches that should be in a completed round are placed in brackets at theend of that round’s instructions.
Instructions
Head (in Black or Orange)Make a ring.Rnd 1: 6 sc in ring (6)Rnd 2: 2 sc in each st around (12)Rnd 3: sc in each st aroundRnd 4: *sc in next st, 2 sc in next st* around (18)Rnd 5: sc in each st aroundRnd 6: *sc in next 2 st, 2 sc in next st* around (24)Rnd 7: sc in each st aroundRnd 8: *sc in next 3 st, 2 sc in next st* around (30)Rnd 9: sc in each st aroundRnd 10: *sc in next 4 st, 2 sc in next st* around (36)Rnd 11: sc in each st aroundRnd 12: *sc in next 5 st, 2 sc in next st* around (42)Rnd 13: sc in each st aroundRnd 14: *sc in next 6 st, 2 sc in next st* around (48)Rnd 15-20: sc in each st aroundRnd 21: *sc in next 6 st, sc2tog* around (42)Rnd 22: sc in each st aroundRnd 23: *sc in next 5 st, sc2tog* around (36)Rnd 24: sc in each st aroundRnd 25: *sc in next 4 st, sc2tog* around (30)Rnd 26: sc in each st aroundStart stuffing.Rnd 27: *sc in next 3 st, sc2tog* around (24)Rnd 28: sc in each st aroundRnd 29: *sc in next 2 st, sc2tog* around (18)Rnd 30: sc in each st around
Kim Lapsley Crochets: Black Cat/Ginger Cat http://kimlapsley.blogspot.com.au/2012/04/black-catginger-cat.html
2 of 8 21/5/18, 10:47 pm
Rnd 31: *sc in next st, sc2tog* around (12)Rnd 32: sc in each st aroundFinish stuffing firmly.Rnd 33: sc2tog around (6)Close up hole and fasten off. Weave in ends.
Body (in Black or Orange)Make a ring.Rnd 1: 6 sc in ring (6)Rnd 2: 2 sc in each st around (12)Rnd 3: *sc in next st, 2 sc in next st* around (18)Rnd 4: *sc in next 2 st, 2 sc in next st* around (24)Rnd 5: *sc in next 3 st, 2 sc in next st* around (30)Rnd 6: *sc in next 4 st, 2 sc in next st* around (36)Rnd 7: *sc in next 5 st, 2 sc in next st* around (42)Rnd 8: *sc in next 6 st, 2 sc in next st* around (48)Rnd 9: *sc in next 7 st, 2 sc in next st* around (54)Rnd 10-11: sc in each st aroundRnd 12: *sc in next 7 st, sc2tog* around (48)Rnd 13-15: sc in each st aroundRnd 16: *sc in next 6 st, sc2tog* around (42)Rnd 17: sc in each st aroundRnd 18: *sc in next 5 st, sc2tog* around (36)Tie some plastic pellets/dried beans in some stocking material and place in the bottom of thebody. This will help the cat stand up.Rnd 19: sc in each st aroundRnd 20: *sc in next 4 st, sc2tog* around (30)Rnd 21: sc in each st aroundRnd 22: *sc in next 3 st, sc2tog* around (24)Start stuffing and continue stuffing as you go.Rnd 23: sc in each st aroundRnd 24: *sc in next 2 st, sc2tog* around (18)Rnd 25-27: sc in each st aroundFinish stuffing firmly. Fasten off, leaving a long tail to use for joining.
Ears (in Black or Orange)Make a ring.Rnd 1: 6 sc in ring (6)Rnd 2: *sc in next 2 st, 2 sc in next st* twice (8)Rnd 3: sc in each st aroundRnd 4: *sc in next 3 st, 2 sc in next st* twice (10)Rnd 5: *sc in next 4 st, 2 sc in next st* twice (12)Rnd 6: *sc in next 2 st, 2 sc in next st* around (16)Rnd 7: *sc in next 3 st, 2 sc in next st* around (20)Rnd 8: *sc in next 4 st, 2 sc in next st* around (24)Rnd 9: sc in each st aroundFasten off, leaving a tail to use for joining. Leave unstuffed. Make one for Jack. Make two forAbi.
Torn Ear (in Black)Make a ring.Rnd 1: 6 sc in ring (6)Rnd 2: *sc in next 2 st, 2 sc in next st* twice (8)Rnd 3: sc in next 3 st, chain 3, skip next 3 st, sc in next 2 st (8)Rnd 4: sc in next 3 st, 4 sc in ch-3 sp, sc in next st, 2 sc in next st (10)Rnd 5: *sc in next 4 st, 2 sc in next st* twice (12)Rnd 6: *sc in next 2 st, 2 sc in next st* around (16)Rnd 7: *sc in next 3 st, 2 sc in next st* around (20)Rnd 8: *sc in next 4 st, 2 sc in next st* around (24)Rnd 9: sc in each st aroundFasten off, leaving long tail to use for joining. Flatten the ear so that the hole appears like atear in the edge of the ear. Thread the tail of yarn through the ear, pulling out at the top of thehole. Stitch the edges of the hole together. Thread the tail of yarn back down to the opening.
Kim Lapsley Crochets: Black Cat/Ginger Cat http://kimlapsley.blogspot.com.au/2012/04/black-catginger-cat.html
3 of 8 21/5/18, 10:47 pm
Arms (in Black or Orange)Make a ring.Rnd 1: 6 sc in ring (6)Rnd 2: *sc in next st, 2 sc in next st* around (9)Rnd 3-10: sc in each st aroundRnd 11: *sc in next st, sc2tog* around (6)Rnd 12: sc in each st aroundFasten off, leaving a long tail to use for joining. Leave unstuffed. Make two.
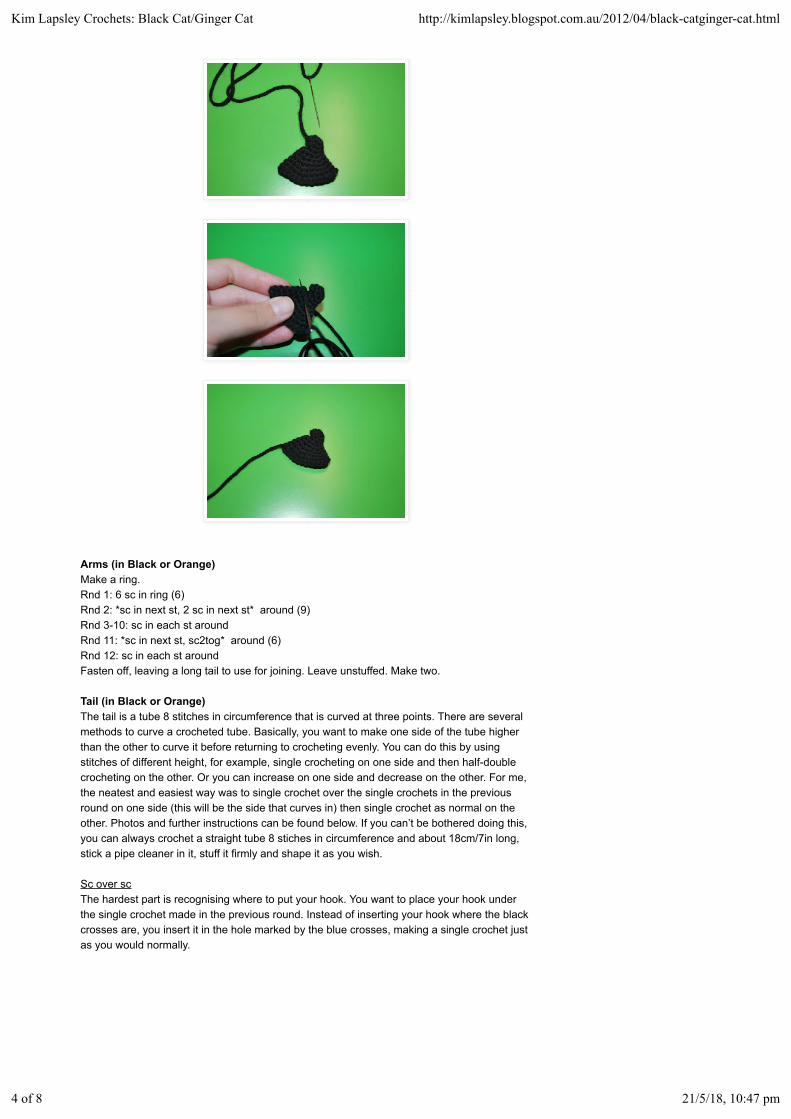
Tail (in Black or Orange)The tail is a tube 8 stitches in circumference that is curved at three points. There are severalmethods to curve a crocheted tube. Basically, you want to make one side of the tube higherthan the other to curve it before returning to crocheting evenly. You can do this by usingstitches of different height, for example, single crocheting on one side and then half-doublecrocheting on the other. Or you can increase on one side and decrease on the other. For me,the neatest and easiest way was to single crochet over the single crochets in the previousround on one side (this will be the side that curves in) then single crochet as normal on theother. Photos and further instructions can be found below. If you can’t be bothered doing this,you can always crochet a straight tube 8 stiches in circumference and about 18cm/7in long,stick a pipe cleaner in it, stuff it firmly and shape it as you wish.
Sc over scThe hardest part is recognising where to put your hook. You want to place your hook underthe single crochet made in the previous round. Instead of inserting your hook where the blackcrosses are, you insert it in the hole marked by the blue crosses, making a single crochet justas you would normally.
Kim Lapsley Crochets: Black Cat/Ginger Cat http://kimlapsley.blogspot.com.au/2012/04/black-catginger-cat.html
4 of 8 21/5/18, 10:47 pm
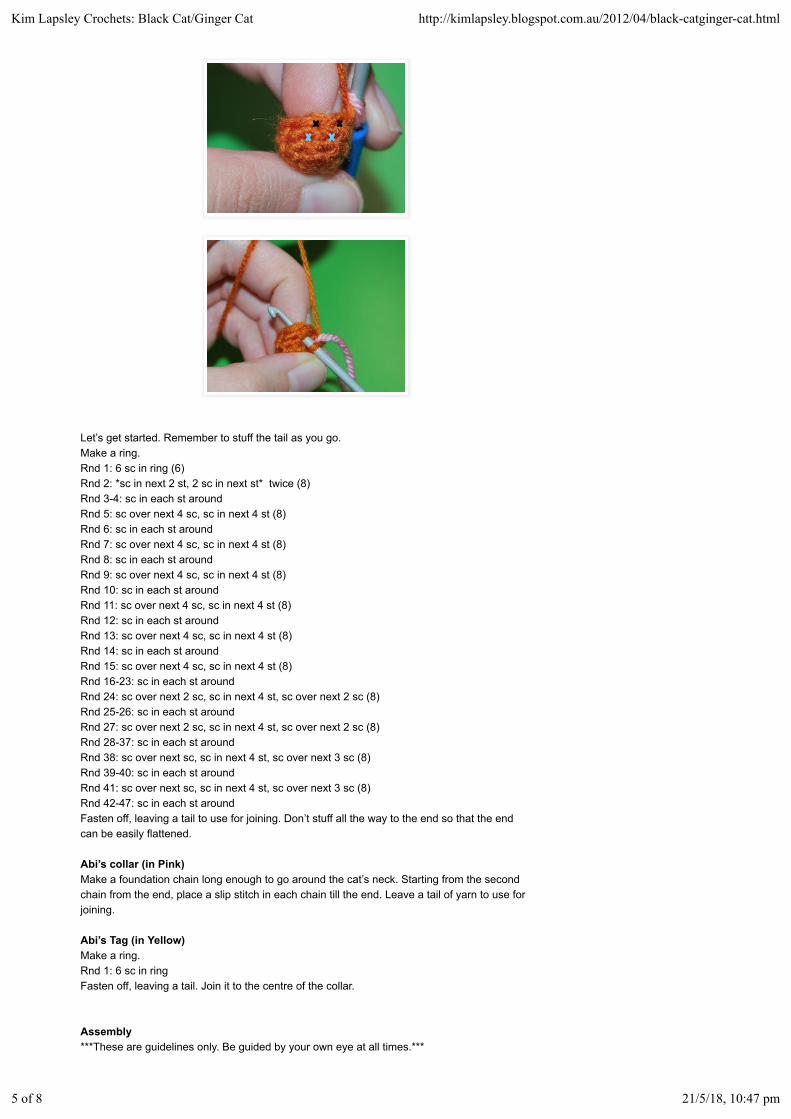
Let’s get started. Remember to stuff the tail as you go.Make a ring.Rnd 1: 6 sc in ring (6)Rnd 2: *sc in next 2 st, 2 sc in next st* twice (8)Rnd 3-4: sc in each st aroundRnd 5: sc over next 4 sc, sc in next 4 st (8)Rnd 6: sc in each st aroundRnd 7: sc over next 4 sc, sc in next 4 st (8)Rnd 8: sc in each st aroundRnd 9: sc over next 4 sc, sc in next 4 st (8)Rnd 10: sc in each st aroundRnd 11: sc over next 4 sc, sc in next 4 st (8)Rnd 12: sc in each st aroundRnd 13: sc over next 4 sc, sc in next 4 st (8)Rnd 14: sc in each st aroundRnd 15: sc over next 4 sc, sc in next 4 st (8)Rnd 16-23: sc in each st aroundRnd 24: sc over next 2 sc, sc in next 4 st, sc over next 2 sc (8)Rnd 25-26: sc in each st aroundRnd 27: sc over next 2 sc, sc in next 4 st, sc over next 2 sc (8)Rnd 28-37: sc in each st aroundRnd 38: sc over next sc, sc in next 4 st, sc over next 3 sc (8)Rnd 39-40: sc in each st aroundRnd 41: sc over next sc, sc in next 4 st, sc over next 3 sc (8)Rnd 42-47: sc in each st aroundFasten off, leaving a tail to use for joining. Don’t stuff all the way to the end so that the endcan be easily flattened.
Abi’s collar (in Pink)Make a foundation chain long enough to go around the cat’s neck. Starting from the secondchain from the end, place a slip stitch in each chain till the end. Leave a tail of yarn to use forjoining.
Abi’s Tag (in Yellow)Make a ring.Rnd 1: 6 sc in ringFasten off, leaving a tail. Join it to the centre of the collar.
Assembly***These are guidelines only. Be guided by your own eye at all times.***
Kim Lapsley Crochets: Black Cat/Ginger Cat http://kimlapsley.blogspot.com.au/2012/04/black-catginger-cat.html
5 of 8 21/5/18, 10:47 pm
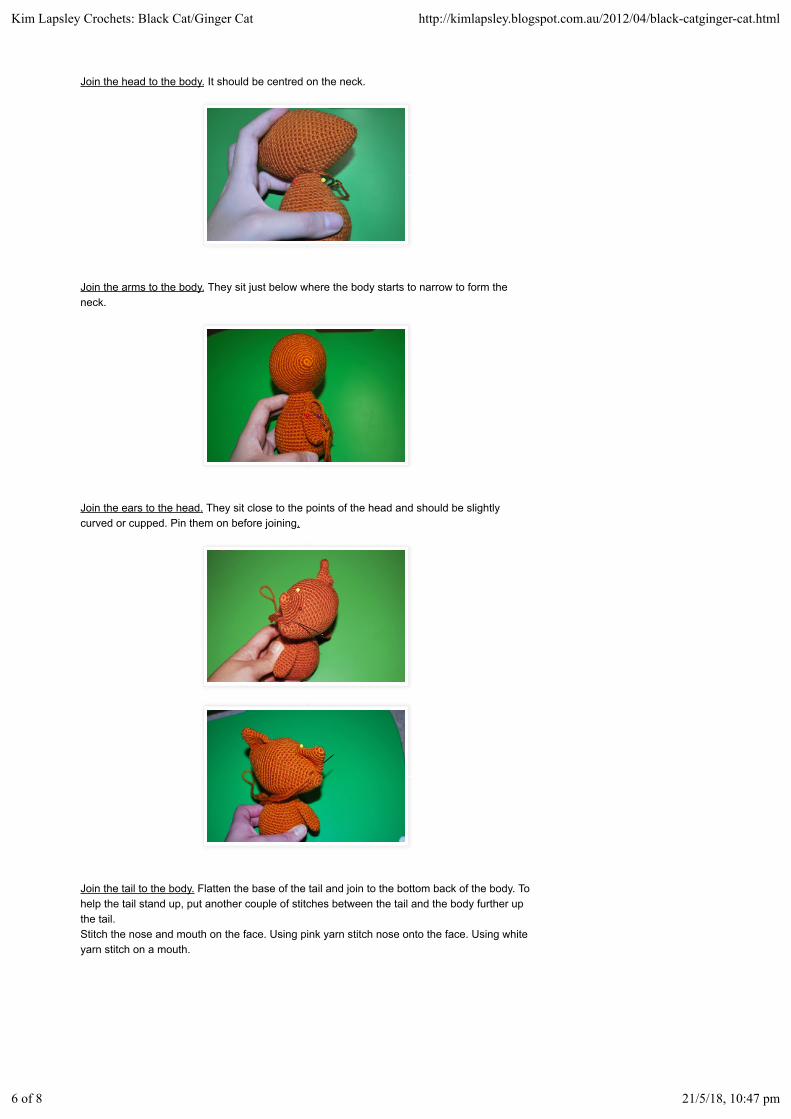
Join the head to the body. It should be centred on the neck.
Join the arms to the body. They sit just below where the body starts to narrow to form theneck.
Join the ears to the head. They sit close to the points of the head and should be slightlycurved or cupped. Pin them on before joining.
Join the tail to the body. Flatten the base of the tail and join to the bottom back of the body. Tohelp the tail stand up, put another couple of stitches between the tail and the body further upthe tail.Stitch the nose and mouth on the face. Using pink yarn stitch nose onto the face. Using whiteyarn stitch on a mouth.
Kim Lapsley Crochets: Black Cat/Ginger Cat http://kimlapsley.blogspot.com.au/2012/04/black-catginger-cat.html
6 of 8 21/5/18, 10:47 pm
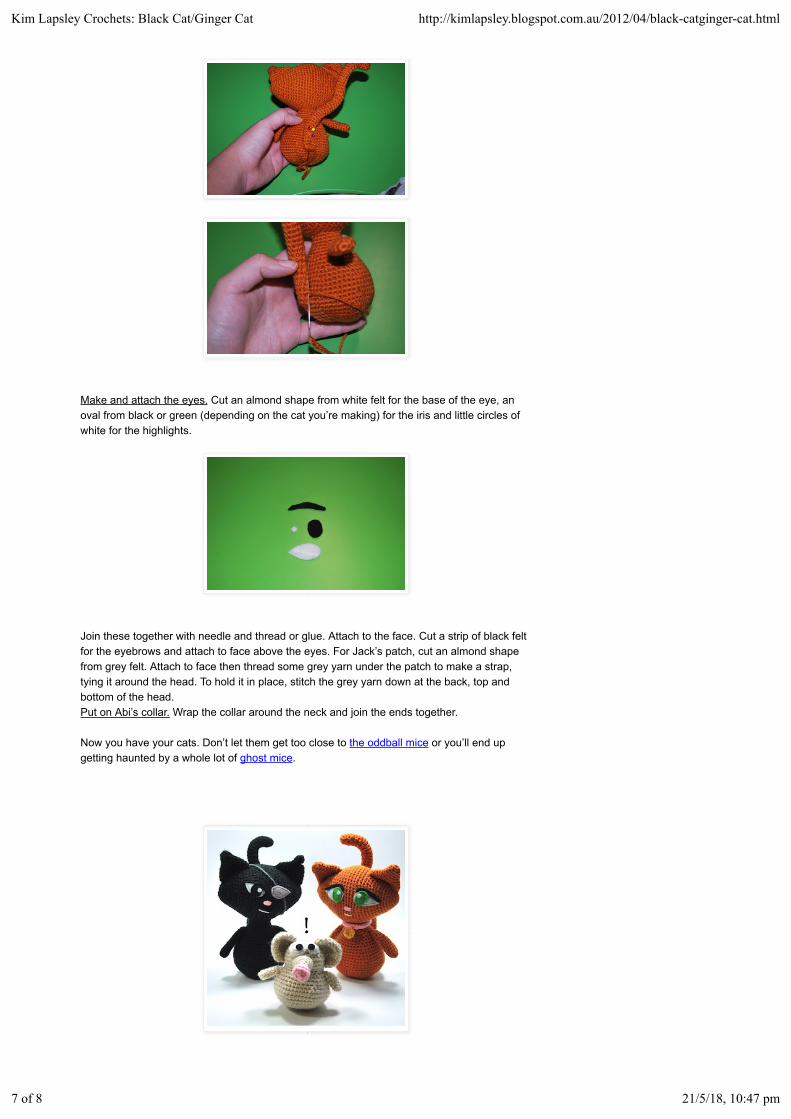
Make and attach the eyes. Cut an almond shape from white felt for the base of the eye, anoval from black or green (depending on the cat you’re making) for the iris and little circles ofwhite for the highlights.
Join these together with needle and thread or glue. Attach to the face. Cut a strip of black feltfor the eyebrows and attach to face above the eyes. For Jack’s patch, cut an almond shapefrom grey felt. Attach to face then thread some grey yarn under the patch to make a strap,tying it around the head. To hold it in place, stitch the grey yarn down at the back, top andbottom of the head.Put on Abi’s collar. Wrap the collar around the neck and join the ends together.
Now you have your cats. Don’t let them get too close to the oddball mice or you’ll end upgetting haunted by a whole lot of ghost mice.
Kim Lapsley Crochets: Black Cat/Ginger Cat http://kimlapsley.blogspot.com.au/2012/04/black-catginger-cat.html
7 of 8 21/5/18, 10:47 pm

Copyright © Kim Lapsley 2012
Kim Lapsley Crochets: Black Cat/Ginger Cat http://kimlapsley.blogspot.com.au/2012/04/black-catginger-cat.html
8 of 8 21/5/18, 10:47 pm