Kikicode_ Installing Android ADB Driver in Windows 8
4
kikicode Thursday, October 17, 2013 Installing Android ADB driver in Windows 8.1 64-bit when all else fails For some reason I just couldn't get my machine to recognize Xperia J in Windows 8.1 64-bit. Even after installing latest Sony PC Companion (2.10.174). Device Manager kept showing yellow exclamation mark to an 'Android'. Here's the solution, but I don't promise it will work on your device! 1. Open Device Manager, right-click that Android with yellow exclamation mark and click Properties. 2. Go to Details tab. 3. In Property, select Hardware Ids. 4. Right-click the value and click Copy. 5. Paste the value somewhere. 1. Run Android SDK Manager. 2. Expand Extras, tick Google USB Driver, click Install packages. 3. After installation, look for the driver location by hovering mouse over Google USB Driver. The location will appear in the tooltip. 1. Go to the usb driver location, for example in the above picture it is c:\Android\android- studio\sdk\extras\google\usb_driver 1. Find out your device's VID and PID 2. Download Android USB Driver 3. Modify android_winusb.inf Search Search This Blog Subscribe To Posts Comments Anuncie com o Google google.com.br/AdWor… Encontre seus clientes online. Pague por clique com o AdWords. fxam View my complete profile About Me ▼ 2013 (4) ► November (2) ▼ October (1) Installing Android ADB driver in Windows 8.1 64- bi... ► September (1) ► 2011 (6) ► 2010 (3) ► 2009 (6) Blog Archive 3 mais Próximo blog» Criar um blog Login
description
adb driver android
Transcript of Kikicode_ Installing Android ADB Driver in Windows 8
kikicode
Thursday, October 17, 2013
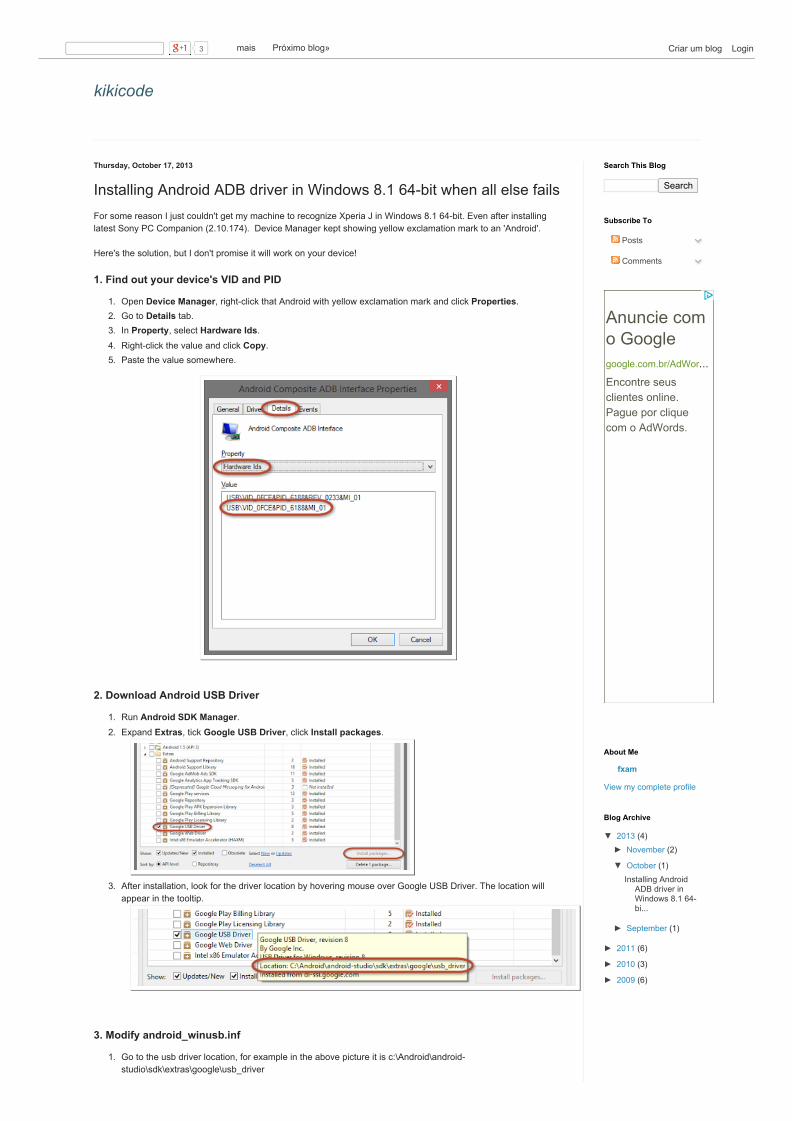
Installing Android ADB driver in Windows 8.1 64-bit when all else failsFor some reason I just couldn't get my machine to recognize Xperia J in Windows 8.1 64-bit. Even after installinglatest Sony PC Companion (2.10.174). Device Manager kept showing yellow exclamation mark to an 'Android'.
Here's the solution, but I don't promise it will work on your device!
1. Open Device Manager, right-click that Android with yellow exclamation mark and click Properties.2. Go to Details tab.3. In Property, select Hardware Ids.4. Right-click the value and click Copy.5. Paste the value somewhere.
1. Run Android SDK Manager.2. Expand Extras, tick Google USB Driver, click Install packages.
3. After installation, look for the driver location by hovering mouse over Google USB Driver. The location willappear in the tooltip.
1. Go to the usb driver location, for example in the above picture it is c:\Android\android-studio\sdk\extras\google\usb_driver
1. Find out your device's VID and PID
2. Download Android USB Driver
3. Modify android_winusb.inf
Search
Search This Blog
Subscribe To
Posts
Comments
Anuncie como Googlegoogle.com.br/AdWor…
Encontre seusclientes online.Pague por cliquecom o AdWords.
fxam
View my complete profile
About Me
▼ 2013 (4)► November (2)
▼ October (1)Installing Android
ADB driver inWindows 8.1 64-bi...
► September (1)
► 2011 (6)
► 2010 (3)
► 2009 (6)
Blog Archive
3 mais Próximo blog» Criar um blog Login
Posted by fxam at 9:11 PM
Labels: Android ADB Driver, Sony Xperia, Windows 8.1, Xperia J
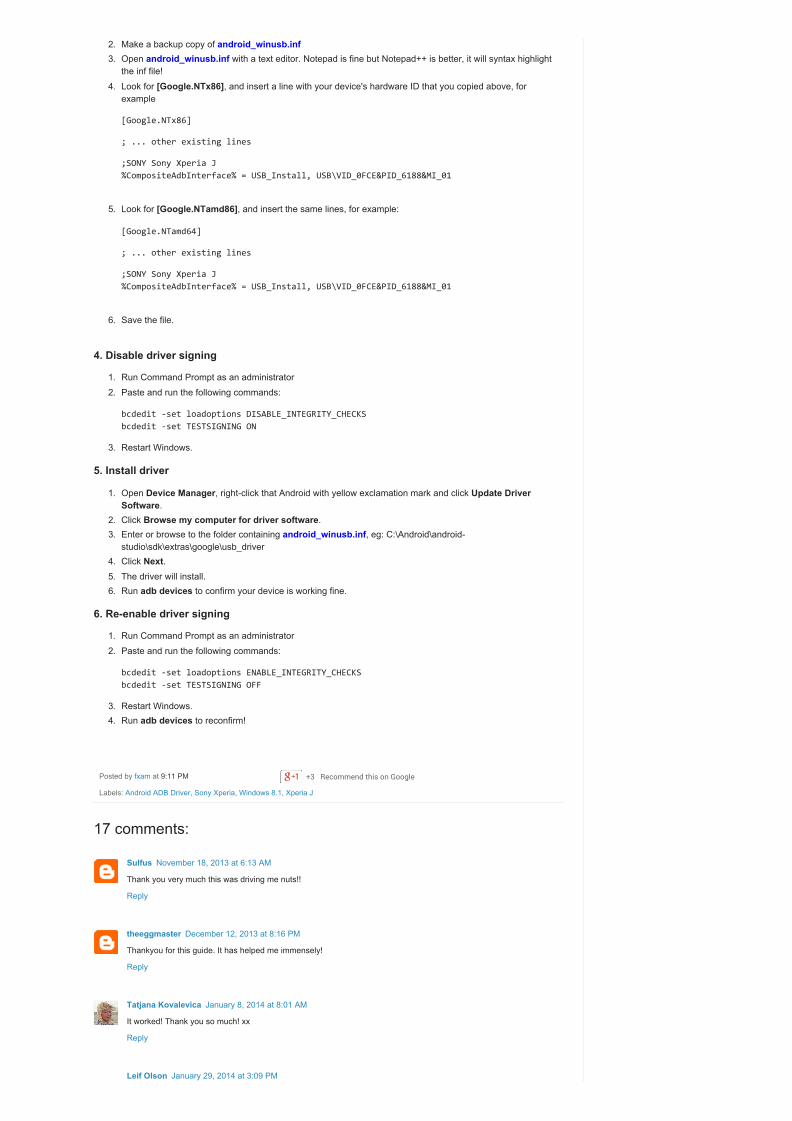
2. Make a backup copy of android_winusb.inf3. Open android_winusb.inf with a text editor. Notepad is fine but Notepad++ is better, it will syntax highlight
the inf file!4. Look for [Google.NTx86], and insert a line with your device's hardware ID that you copied above, for
example
[Google.NTx86]
; ... other existing lines
;SONY Sony Xperia J%CompositeAdbInterface% = USB_Install, USB\VID_0FCE&PID_6188&MI_01
5. Look for [Google.NTamd86], and insert the same lines, for example:
[Google.NTamd64]
; ... other existing lines
;SONY Sony Xperia J%CompositeAdbInterface% = USB_Install, USB\VID_0FCE&PID_6188&MI_01
6. Save the file.
1. Run Command Prompt as an administrator2. Paste and run the following commands:
bcdedit -set loadoptions DISABLE_INTEGRITY_CHECKSbcdedit -set TESTSIGNING ON
3. Restart Windows.
1. Open Device Manager, right-click that Android with yellow exclamation mark and click Update DriverSoftware.
2. Click Browse my computer for driver software.3. Enter or browse to the folder containing android_winusb.inf, eg: C:\Android\android-
studio\sdk\extras\google\usb_driver4. Click Next.5. The driver will install.6. Run adb devices to confirm your device is working fine.
1. Run Command Prompt as an administrator2. Paste and run the following commands:
bcdedit -set loadoptions ENABLE_INTEGRITY_CHECKSbcdedit -set TESTSIGNING OFF
3. Restart Windows.4. Run adb devices to reconfirm!
4. Disable driver signing
5. Install driver
6. Re-enable driver signing
+3 Recommend this on Google
17 comments:
Sulfus November 18, 2013 at 6:13 AM
Thank you very much this was driving me nuts!!
Reply
theeggmaster December 12, 2013 at 8:16 PM
Thankyou for this guide. It has helped me immensely!
Reply
Tatjana Kovalevica January 8, 2014 at 8:01 AM
It worked! Thank you so much! xx
Reply
Leif Olson January 29, 2014 at 3:09 PM

Replies
Reply
Replies
Reply
Replies
Reply
Replies
Unfortunately, this does NOT work for me:C:\WINDOWS\system32>bcdedit -set TESTSIGNING ONAn error has occurred setting the element data.The value is protected by Secure Boot policy and cannot be modified or deleted.
Reply
fxam February 25, 2014 at 9:05 PM
Gosh, maybe you can skip that bcdedit section and see what happens.
Kevin March 17, 2014 at 10:02 AM
Leif, I had the same problem attempting to use the bcdedit command. To disable driver signing, follow theprocedure described here instead: http://revryl.com/2013/08/06/install-unsigned-drivers/
worked for me with no issue after adding my hardware ids to the .inf file per step 3 above. Good luck!
A. Hsieh February 5, 2014 at 7:21 AM
Leif, have you tried running cmd.exe as an administrator?
Reply
Tips February 25, 2014 at 12:48 PM
Just wanted to say that this post helped greatly, but I don't get the whole bcdedit thing. I had 2 devices that I needed tostart working on my new computer. For the phone, I used this method with the bcdedit command and restarting to get itto work. But for the tablet, I followed a similar tutorial found here http://stackoverflow.com/a/19839812/2089675. Andwithout the whole command line fiasco, the tablet started working as well.
Reply
fxam February 25, 2014 at 9:02 PM
I don't know :) Maybe mine didn't need bcdedit too?
Dolphin March 22, 2014 at 1:33 PM
great. after searching and trying many solutions this one worked..
Reply
Alex Boey June 24, 2014 at 4:17 AM
Wow. awesome tutorial. It has helped me greatly. Thank you very much. It worked on my Windows 8.1 64bit withHuawei android phone.
Reply
Lukasz Kujawiak June 25, 2014 at 3:19 AM
Thanks. It works for me.
Reply
Vency Me July 10, 2014 at 7:49 PM
Thanks a lot. It works!!! BTW, in 3rd big step, "NTamd86" in "Look for [Google.NTamd86], and insert the same lines,for example" should be "NTamd64".
Reply
fxam July 12, 2014 at 8:22 AM
Interesting, mine has only [Google.NTamd86] though
Vency Me July 10, 2014 at 7:52 PM
One more question, what is Step 6 for?
Reply

Newer Post Older PostHome
Subscribe to: Post Comments (Atom)
Reply
Enter your comment...
Comment as: Google Account
Publish
Preview
fxam July 12, 2014 at 8:09 AM
It's to enable back driver signing for the safety of your computer :)
Viresh N Y July 30, 2014 at 6:09 PM
Thank you,,,, worked for me
Reply
Simple template. Powered by Blogger.