
KEYNOTE SPEAKERS - microbiology.prideconferences.com€¦ · KEYNOTE SPEAKERS iCjI3h-hT
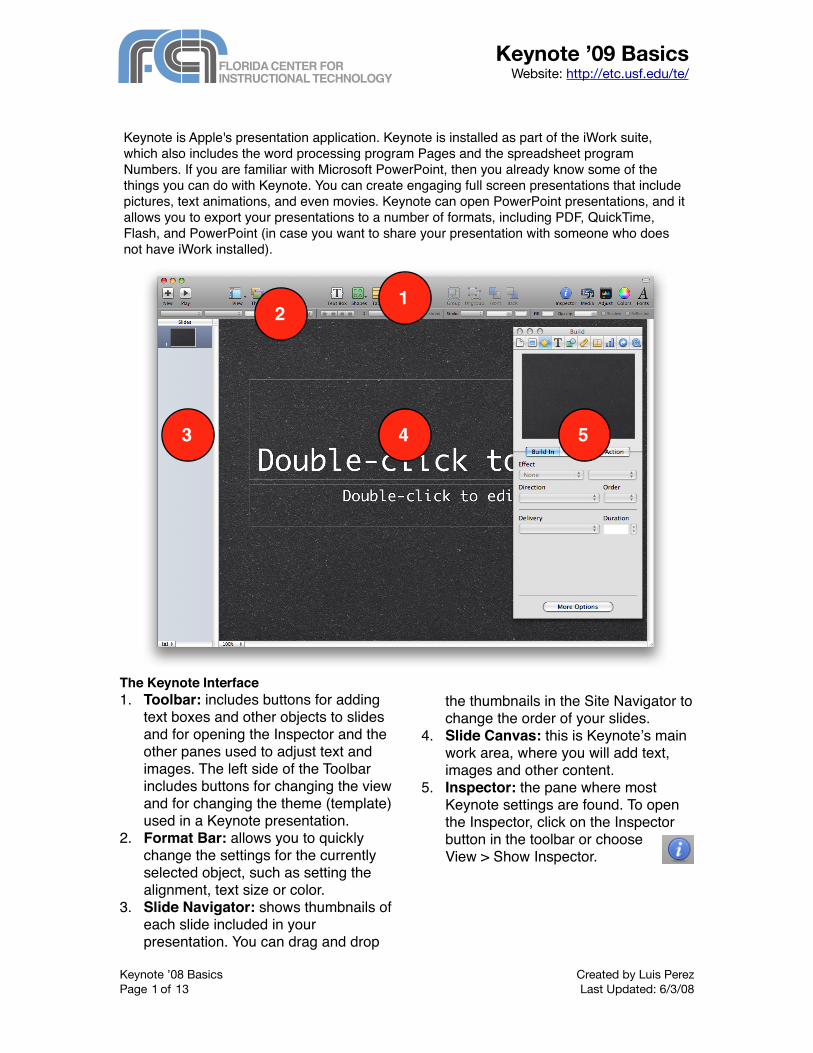
The Keynote Interface1. Toolbar: includes buttons for adding
text boxes and other objects to slides and for opening the Inspector and the other panes used to adjust text and images. The left side of the Toolbar includes buttons for changing the view and for changing the theme (template) used in a Keynote presentation.
2. Format Bar: allows you to quickly change the settings for the currently selected object, such as setting the alignment, text size or color.
3. Slide Navigator: shows thumbnails of each slide included in your presentation. You can drag and drop
the thumbnails in the Site Navigator to change the order of your slides.
4. Slide Canvas: this is Keynoteʼs main work area, where you will add text, images and other content.
5. Inspector: the pane where most Keynote settings are found. To open the Inspector, click on the Inspector button in the toolbar or choose View > Show Inspector.
Keynote ’08 Basics Created by Luis PerezPage 1 of 13 Last Updated: 6/3/08
Keynote ’09 BasicsWebsite: http://etc.usf.edu/te/
Keynote is Apple's presentation application. Keynote is installed as part of the iWork suite, which also includes the word processing program Pages and the spreadsheet program Numbers. If you are familiar with Microsoft PowerPoint, then you already know some of the things you can do with Keynote. You can create engaging full screen presentations that include pictures, text animations, and even movies. Keynote can open PowerPoint presentations, and it allows you to export your presentations to a number of formats, including PDF, QuickTime, Flash, and PowerPoint (in case you want to share your presentation with someone who does not have iWork installed).
12
3 4 5
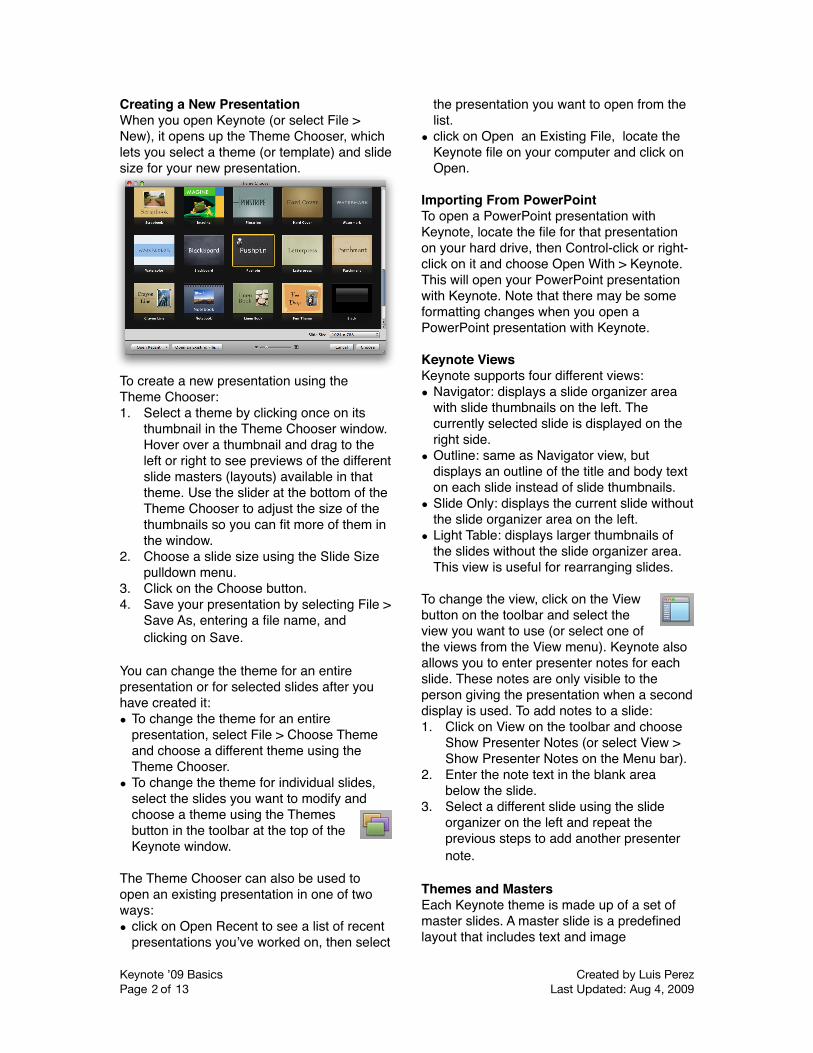
Creating a New Presentation When you open Keynote (or select File > New), it opens up the Theme Chooser, which lets you select a theme (or template) and slide size for your new presentation.
To create a new presentation using the Theme Chooser:1. Select a theme by clicking once on its
thumbnail in the Theme Chooser window. Hover over a thumbnail and drag to the left or right to see previews of the different slide masters (layouts) available in that theme. Use the slider at the bottom of the Theme Chooser to adjust the size of the thumbnails so you can fit more of them in the window.
2. Choose a slide size using the Slide Size pulldown menu.
3. Click on the Choose button.4. Save your presentation by selecting File >
Save As, entering a file name, and clicking on Save.
You can change the theme for an entire presentation or for selected slides after you have created it:• To change the theme for an entire
presentation, select File > Choose Theme and choose a different theme using the Theme Chooser.
• To change the theme for individual slides, select the slides you want to modify and choose a theme using the Themes button in the toolbar at the top of the Keynote window.
The Theme Chooser can also be used to open an existing presentation in one of two ways:• click on Open Recent to see a list of recent
presentations youʼve worked on, then select
the presentation you want to open from the list.
• click on Open an Existing File, locate the Keynote file on your computer and click on Open.
Importing From PowerPointTo open a PowerPoint presentation with Keynote, locate the file for that presentation on your hard drive, then Control-click or right-click on it and choose Open With > Keynote. This will open your PowerPoint presentation with Keynote. Note that there may be some formatting changes when you open a PowerPoint presentation with Keynote.
Keynote ViewsKeynote supports four different views:• Navigator: displays a slide organizer area
with slide thumbnails on the left. The currently selected slide is displayed on the right side.
• Outline: same as Navigator view, but displays an outline of the title and body text on each slide instead of slide thumbnails.
• Slide Only: displays the current slide without the slide organizer area on the left.
• Light Table: displays larger thumbnails of the slides without the slide organizer area. This view is useful for rearranging slides.
To change the view, click on the View button on the toolbar and select the view you want to use (or select one of the views from the View menu). Keynote also allows you to enter presenter notes for each slide. These notes are only visible to the person giving the presentation when a second display is used. To add notes to a slide:1. Click on View on the toolbar and choose
Show Presenter Notes (or select View > Show Presenter Notes on the Menu bar).
2. Enter the note text in the blank area below the slide.
3. Select a different slide using the slide organizer on the left and repeat the previous steps to add another presenter note.
Themes and MastersEach Keynote theme is made up of a set of master slides. A master slide is a predefined layout that includes text and image
Keynote ’09 Basics Created by Luis PerezPage 2 of 13 Last Updated: Aug 4, 2009
placeholders with a similar look and feel (matching backgrounds, text styles and colors, etc.).
When you edit a master slide, any slides in your presentation that are based on that master slide will reflect the changes you make. By using the masters included with a theme you can ensure that your slides are consistent in their appearance.
To edit a master slide:1. Choose View > Show Master Slides. The
master slides in the current theme will appear in the Master Slides Navigator on the left side of the screen.
2. Select a master slide and make your desired changes in the Slide Canvas. It is recommended that you make a copy of the master slide before you make your changes. This will preserve the original master slide included with Keynote. To make a copy of a master slide, right-click on it in the Master Slide Navigator and choose Duplicate.
3. When youʼre finished editing the master slides, choose View > Hide Master Slides to close the Master Slides Navigator.
One of the things you can do is change the background used in your slides: 1. Select the master slide you want to
modify. 2. Click on the Inspector button or
choose View > Show Inspector. The Inspector is where you will find most of the settings that determine how your presentation looks and behaves.
3. Click the Slide Inspector button (second from the left), then click Appearance and choose a background type from the Background pulldown menu.
4. Set the options for the background type you selected. For a solid color background, click on the color well and choose a color for your background. For a gradient fill, select two colors using each color well and then set the angle of the gradient using the Angle wheel. For an
image fill, click on the Choose button and locate an image on your hard drive.
You can also change the bullets used in your slides by opening the Inspector and choosing the Text Inspector. To change the bullet type: 1. Select the text box containing the bullets
you want to change on a master slide. 2. Click on Inspector in the toolbar, then
select the Text Inspector by clicking on the button with the T on it (fourth from the left).
3. Click on Bullets. 4. Use the pulldown menu to select a type of
bullet (no bullets, text bullets, image bullets, custom image, or numbers). Depending on the type you select, you will see different options below the pulldown menu.
5. If you choose Custom Image, you can click on the Choose button to navigate your hard drive so you can select any picture to use as your bullet type.
By editing master slides, you can create your own reusable theme that will be available when you launch the Theme Chooser. To create a custom theme:1. Edit your master slides as described in
this section.2. Choose File > Save Theme. 3. Enter a name for your custom theme and
click on Save. Adding Slides to a Presentation To add a slide to your presentation, click on the New (+) button in the toolbar or select Slide > New Slide .
The new slide will inherit the theme and master of the previous slide. To change the master of the new slide, click on the Masters button and choose a different layout. You can also create new slides quickly by duplicating slides. An easy way to do this is by using the Navigator view (choose View > Navigator). To create a duplicate of an existing slide:
Keynote ’09 Basics Created by Luis PerezPage 3 of 13 Last Updated: Aug 4, 2009
• Select the slide in the slide organizer on the left side of the window, and press the Return key on your keyboard, or
• Hold down the Option key and drag the slide until you see a blue triangle. When your release the mouse, a duplicate slide will be created.
Using the slide organizer, you can change the order of slides by dragging and dropping. You can also organize your slides into groups by using indentation. To indent a set of slides:1. Select the slide where you want to begin
indentation.2. Press the Tab key on your keyboard. 3. Use the disclosure triangle that appears
next to the slide above your indented slides to collapse and expand the group of indented slides.
This is useful when you have large presentations open and wish to hide some slides while you work.
If you want to hide a slide so it doesnʼt play during a presentation, choose the slide in the slide organizer and then select Slide > Skip Slide. A thick line will take the place of the hidden slide in the slide organizer. To unhide the slide, choose Slide > Donʼt Skip Slide.
Adding Text Most of the master slides in Keynote include body text with bullets. To add text without bullets, you can create a free text box. A free text box will expand or contract depending on the text inside of it. However, the text included in it will not show up in outline view.
To add a free text box: 1. Choose Insert > Text or click the
Text button in the toolbar. 2. In the text box that appears on the
slide canvas, double-click the word Text and begin typing.
3. Drag the text box where you want it. 4. Drag the handles on the text box to
change its width. You can change the appearance of text using the Text tab of the Text Inspector.
In this window, you can use a set of sliders to change the character and line spacing, and a set of buttons at the top to change alignment options. You can also click on the color well to change the color of your text. To change the font used in your free text box, click on the Fonts button in the toolbar and select a font family, font typeface, and size using the different columns. The buttons at the top of this window will allow you to add underlining, a shadow, or other styling to your text. Adding Links You can add hyperlinks that you can click during a presentation to jump to another slide, exit the slideshow, or open another Keynote document, an email message, or a URL on the Internet. To add a hyperlink: 1. Select the text, shape, image, or movie
you want to turn into a hyperlink. 2. Click the Hyperlink Inspector button, and
select "Enable as a hyperlink".
3. Choose an option from the Link To pop-up menu (Slide, Webpage, Keynote File, Email Message, or Exit Slideshow).
4. Set the options for the link type selected in step 3. For links to slides, choose the slide you want to link to by clicking on one of the radio buttons. For links to web pages, enter the address of the web page in the URL field.
Adding ImagesThere are several ways to add images to a Keynote presentation:• Drag and drop an image from a Finder
window. • Select Insert > Choose to navigate to the
location where the picture is stored on your hard drive.
• Click on the Media button in the toolbar, select the Photos tab and choose an image from your iPhoto library or from one of your iPhoto albums.
Keynote ’09 Basics Created by Luis PerezPage 4 of 13 Last Updated: Aug 4, 2009
Once you have added the image, you can drag it to a different location or use the handles that appear around it to resize it (hold down the Shift key before you resize an image to constrain its proportions). Many Keynote themes include image placeholders which you can replace with your own images. To replace an image placeholder, drag an image from the Media browser until it is over the placeholder and a green plus sign appears, then drop the image into the placeholder.
The Graphic Inspector can be used to customize the appearance of an image:
• Check the box next to Shadow to add a drop shadow. Use the controls to change the angle, offset, and set other options for the drop shadow.
• Check the box next to Reflection to create a reflection effect. Use the slider to change the opacity of the reflection.
• Use the opacity slider to increase the level of transparency in the image.
The Metrics Inspector also has options that apply to images:
• Use the flip buttons to flip the image vertically or horizontally.
• Use the Angle wheel to rotate your image.
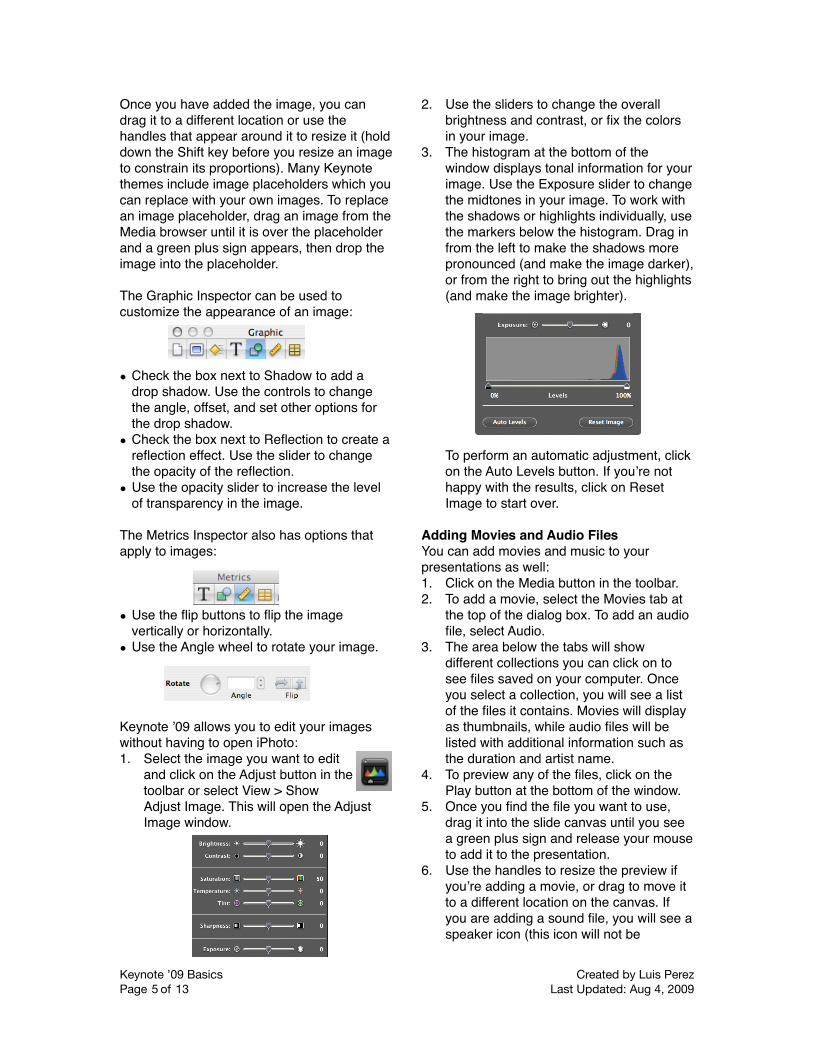
Keynote ʼ09 allows you to edit your images without having to open iPhoto:1. Select the image you want to edit
and click on the Adjust button in the toolbar or select View > Show Adjust Image. This will open the Adjust Image window.
2. Use the sliders to change the overall brightness and contrast, or fix the colors in your image.
3. The histogram at the bottom of the window displays tonal information for your image. Use the Exposure slider to change the midtones in your image. To work with the shadows or highlights individually, use the markers below the histogram. Drag in from the left to make the shadows more pronounced (and make the image darker), or from the right to bring out the highlights (and make the image brighter).
To perform an automatic adjustment, click on the Auto Levels button. If youʼre not happy with the results, click on Reset Image to start over.
Adding Movies and Audio FilesYou can add movies and music to your presentations as well:1. Click on the Media button in the toolbar. 2. To add a movie, select the Movies tab at
the top of the dialog box. To add an audio file, select Audio.
3. The area below the tabs will show different collections you can click on to see files saved on your computer. Once you select a collection, you will see a list of the files it contains. Movies will display as thumbnails, while audio files will be listed with additional information such as the duration and artist name.
4. To preview any of the files, click on the Play button at the bottom of the window.
5. Once you find the file you want to use, drag it into the slide canvas until you see a green plus sign and release your mouse to add it to the presentation.
6. Use the handles to resize the preview if youʼre adding a movie, or drag to move it to a different location on the canvas. If you are adding a sound file, you will see a speaker icon (this icon will not be
Keynote ’09 Basics Created by Luis PerezPage 5 of 13 Last Updated: Aug 4, 2009
displayed when you play the presentation).
7. Open the QuickTime Inspector (last button on the right when you open the Inspector) to set additional options.
8. The slider at the top can be used to change the poster frame (the preview image displayed before the movie plays in your presentation). A slider for adjusting the volume is also available.
The media file will play only when its slide is displayed. To add a soundtrack (the file will play throughout the presentation):1. Open the Document Inspector.
2. Choose the Audio tab, then click on the iTunes Library button to open up the Media browser so you can choose the audio file you want to add.
3. Once you find the audio file you want to use, drag it from the Media Inspector to the audio well that appears under the word Soundtrack.
4. Use the slider to adjust the volume level.5. Click on the pulldown menu above the
iTunes library button and select Loop to have the soundtrack repeat as long as the presentation is playing.
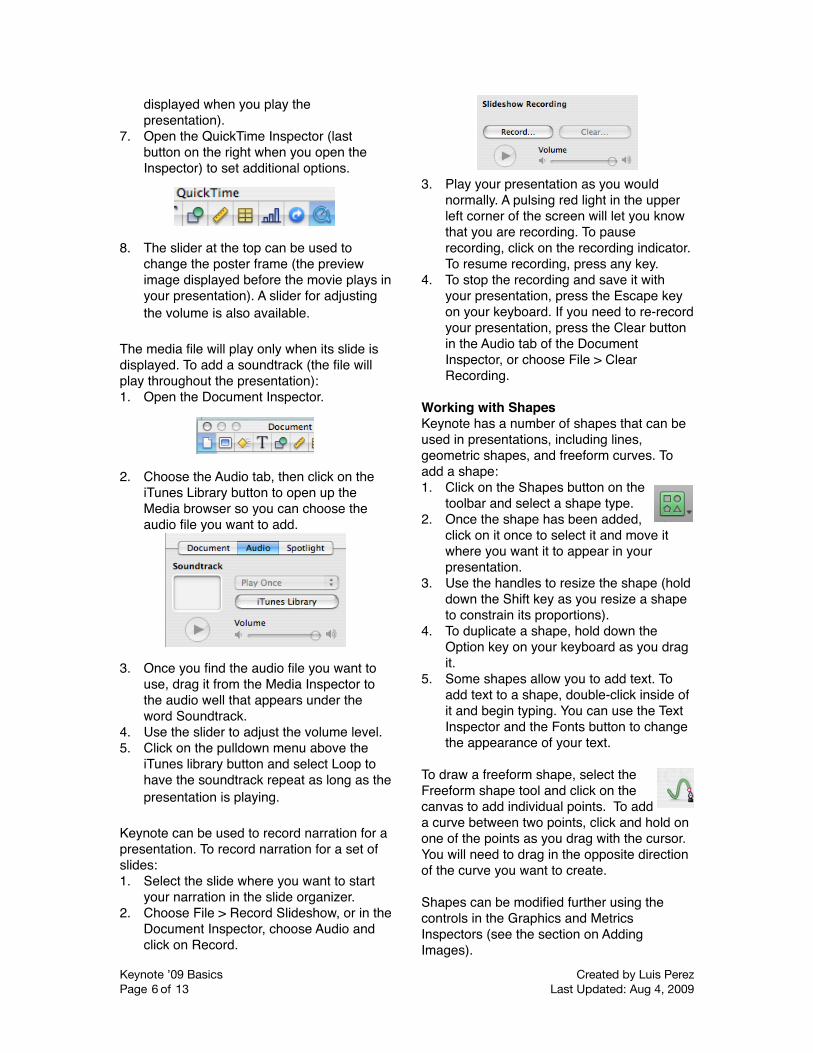
Keynote can be used to record narration for a presentation. To record narration for a set of slides:1. Select the slide where you want to start
your narration in the slide organizer.2. Choose File > Record Slideshow, or in the
Document Inspector, choose Audio and click on Record.
3. Play your presentation as you would normally. A pulsing red light in the upper left corner of the screen will let you know that you are recording. To pause recording, click on the recording indicator. To resume recording, press any key.
4. To stop the recording and save it with your presentation, press the Escape key on your keyboard. If you need to re-record your presentation, press the Clear button in the Audio tab of the Document Inspector, or choose File > Clear Recording.
Working with ShapesKeynote has a number of shapes that can be used in presentations, including lines, geometric shapes, and freeform curves. To add a shape:1. Click on the Shapes button on the
toolbar and select a shape type.2. Once the shape has been added,
click on it once to select it and move it where you want it to appear in your presentation.
3. Use the handles to resize the shape (hold down the Shift key as you resize a shape to constrain its proportions).
4. To duplicate a shape, hold down the Option key on your keyboard as you drag it.
5. Some shapes allow you to add text. To add text to a shape, double-click inside of it and begin typing. You can use the Text Inspector and the Fonts button to change the appearance of your text.
To draw a freeform shape, select the Freeform shape tool and click on the canvas to add individual points. To add a curve between two points, click and hold on one of the points as you drag with the cursor. You will need to drag in the opposite direction of the curve you want to create.
Shapes can be modified further using the controls in the Graphics and Metrics Inspectors (see the section on Adding Images).
Keynote ’09 Basics Created by Luis PerezPage 6 of 13 Last Updated: Aug 4, 2009
GuidesBy default, Keynote uses smart guides, which will only be displayed whenever an image or other object aligns with the center or edge of another object. If smart guides are not enabled, you can turn on this feature in the Keynote Preferences:1. Select Keynote > Preferences.2. Click on the Rulers tab.3. Check the boxes next to “Show guides at
object center” and “Show guides at object edges.” You can also use the color well to change the color of your guides from the default, which is yellow.
4. Keynote ʼ09 also includes spacing and sizing guides that show you when objects are distributed evenly on a slide or when their sizes match. To turn on these spacing and sizing guides, check the boxes next to “Show relative spacing” and “Show relative sizes.” As with the alignment guides, you can click on the color well and choose a different color for the spacing and sizing guides.
You can also create a fixed guide on any slide (if you create the guide on a master slide it will be available in any slide based on that master slide). To create guides: 1. Choose View > Show Rulers.2. Place the pointer on a ruler and drag into
the slide canvas. A yellow guide will be displayed as you drag.
3. Drag the yellow guide to where you want it. If you drag away from the top ruler you will create a vertical guide, while if you drag away from the left ruler you will create a horizontal guide. To remove a guide, drag it off the edge of the slide canvas.
Guides will not be visible when you play your presentation.
Using MasksMasks allow you to perform non-destructive editing on an image (the part of the image covered by the mask is only hidden, not deleted).
To add a mask to an image:1. Click on the image to select it.
2. Select Format > Mask. The grayed out area outside the square will be hidden once the mask is set.
3. Press Return to set your mask. If you need to start over, select Format > Unmask. When you select an image that has a mask attached to it, an Edit Mask popup window will appear. You can use the slider to change the zoom level of the image inside the mask, or you can click on Edit Mask to modify the mask.
You can create more complex masks using shapes:1. Select the image you want to mask.2. Select Format > Mask with Shape and
choose one of the shapes listed.3. Adjust the mask by moving the shape and
resizing it with the handles.4. Press Return to set the mask.
Keynote allows you to use a mask to remove an object from its background. This feature, which is called Instant Alpha, works well when the object is on a solid background. To use Instant Alpha:1. Choose the image you want to modify.2. Select Format > Instant Alpha.3. Click on the color you want to make
transparent with the mask. As you drag, the area that will be made transparent will grow. You can also click and drag multiple times to select other areas of the image you want to make transparent.
4. When youʼre finished, press the Return key on your keyboard.
Tables Tables are useful for organizing and summarizing information. Keynote 3 adds support for formulas in tables.
To add a table in Keynote:1. Click on the Table button on the
toolbar (or choose Insert > Table).2. Use the handles to resize the table.3. Drag the table to position it where you
want it on the slide.4. Double-click on a table cell and start
typing. Press Tab or use the arrow keys to move to other cells.
Keynote ’09 Basics Created by Luis PerezPage 7 of 13 Last Updated: Aug 4, 2009
Another way to add a table is by drawing it on the slide canvas. To draw a table:1. Press the Option key as you click on
Table on the toolbar. The pointer changes to crosshairs.
2. Drag on the slide canvas while holding down your mouse to draw the table.
3. Use the Table button in the Table Inspector to change the number of rows and columns.
To select a cell, click on it until it has a yellow outline around it. The Table tab of the Table Inspector has the following options for working with tables:• add header rows, header columns, or footer
rows by clicking on one of the buttons at the top of the Inspector
• edit rows and columns: this is a pulldown menu with options for adding and removing rows and columns, sorting the contents of cells, and splitting and joining cells.
• change cell borders and backgrounds• use alternating colors for rows to make data
easier to view The Format tab of the Table Inspector has the following options for working with numeric values:• format cells as currency, data and time, etc.• determine the number of decimal places to
display when number is chosen as the format, and the style for negative numbers (for example, you can display them in red)
• apply conditional formatting so that cells matching specific criteria show up in a different color
• apply formulas by using the Quick Formula pulldown menu (these formulas allow you to find the average of the values in a range of cells, find the min or max value, or perform a sum or count). The same options can be accessed by choosing Insert > Function from the menu bar.
The last option in the pulldown menu allows you to open a Formula Editor where you can perform more advanced calculations using cell references. To reference a specific cell, you will need to use the letter of the column
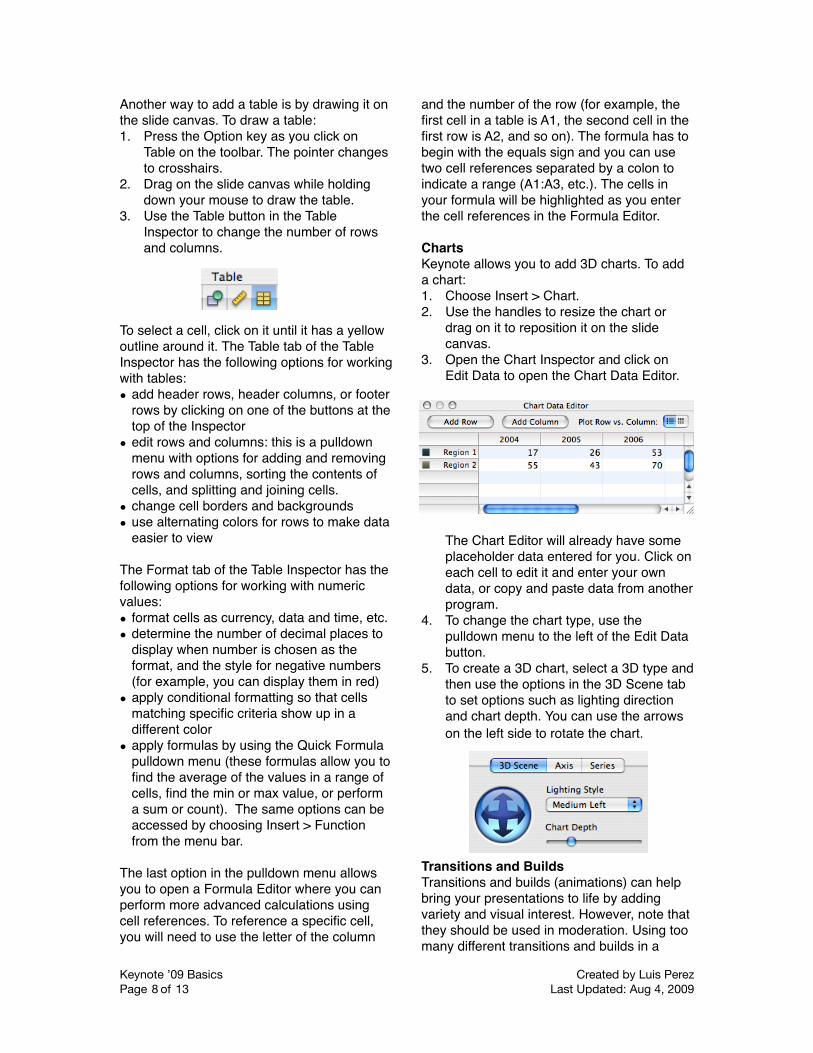
and the number of the row (for example, the first cell in a table is A1, the second cell in the first row is A2, and so on). The formula has to begin with the equals sign and you can use two cell references separated by a colon to indicate a range (A1:A3, etc.). The cells in your formula will be highlighted as you enter the cell references in the Formula Editor. ChartsKeynote allows you to add 3D charts. To add a chart:1. Choose Insert > Chart.2. Use the handles to resize the chart or
drag on it to reposition it on the slide canvas.
3. Open the Chart Inspector and click on Edit Data to open the Chart Data Editor.
The Chart Editor will already have some placeholder data entered for you. Click on each cell to edit it and enter your own data, or copy and paste data from another program.
4. To change the chart type, use the pulldown menu to the left of the Edit Data button.
5. To create a 3D chart, select a 3D type and then use the options in the 3D Scene tab to set options such as lighting direction and chart depth. You can use the arrows on the left side to rotate the chart.
Transitions and Builds Transitions and builds (animations) can help bring your presentations to life by adding variety and visual interest. However, note that they should be used in moderation. Using too many different transitions and builds in a
Keynote ’09 Basics Created by Luis PerezPage 8 of 13 Last Updated: Aug 4, 2009
slideshow can overwhelm the audience and actually detract from the message you are trying to convey. To add a build to a slide: 1. Select an object in your presentation and
open the Build Inspector.
2. Click on Build In to set options for how the object will enter into view in your presentation.
3. Select a build type from the Effect pulldown menu. The preview area at the top of the Inspector window will show you how the effect will display when you play the presentation.
4. Set the options for the effect you selected. You can choose a direction, a delivery method (all at once or as a sequence of individual elements), and duration.
5. Click on the Build Out button to set options for how the selected object will exit from view when you play the presentation.
6. Click on the More Options button at the bottom to open a drawer to the left with a list of all builds and the order in which they will play.
7. To rearrange the list, click on a build and drag it to another spot on the list.
8. Select a build from the list and click on the Start Build menu to select whether the build will play after a click, automatically with the previous build, automatically after the previous build. You can enter a delay if you choose one of the automatic options.
9. Click on Close Drawer when youʼre finished setting your build order and timings.
The Actions tab of the Build Inspector is used to animate any object on the slide canvas. To animate an object on a slide:1. Select the object you want to animate.2. In the Actions tab of the Build Inspector,
choose Move from the Effects pulldown menu.
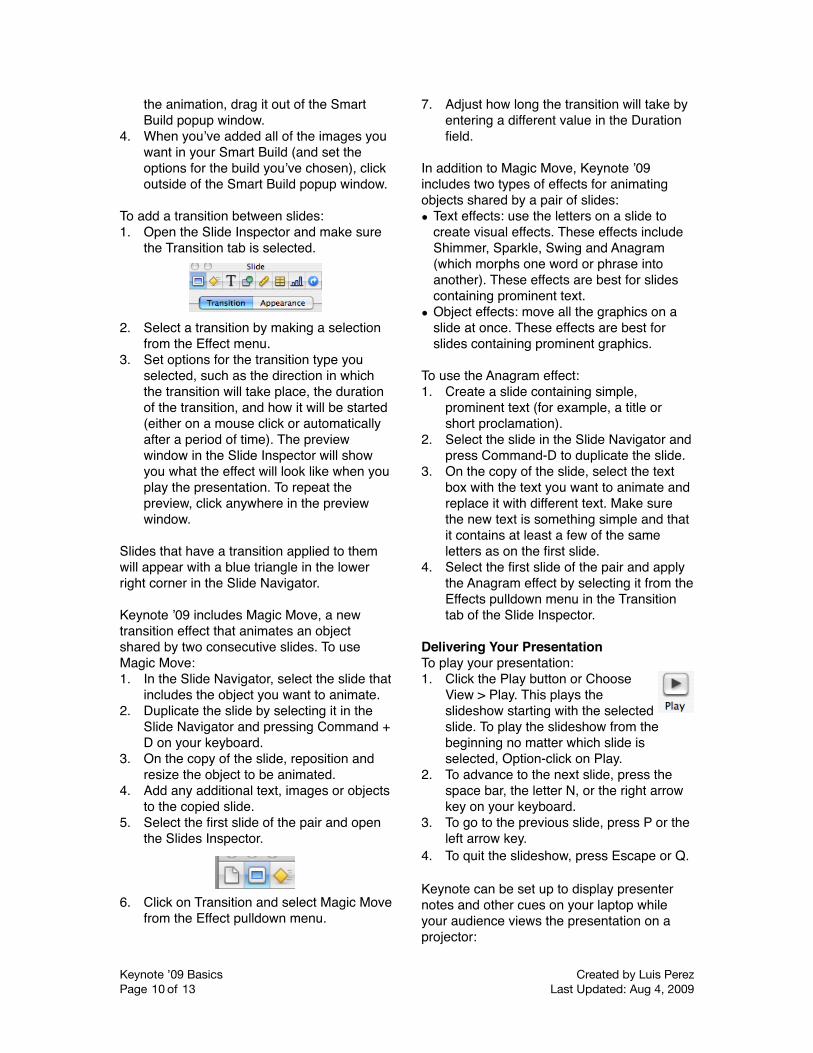
3. A ghosted copy of the object will be displayed to show you the destination of the object at the end of the animation, and a red line will indicate the path. To change
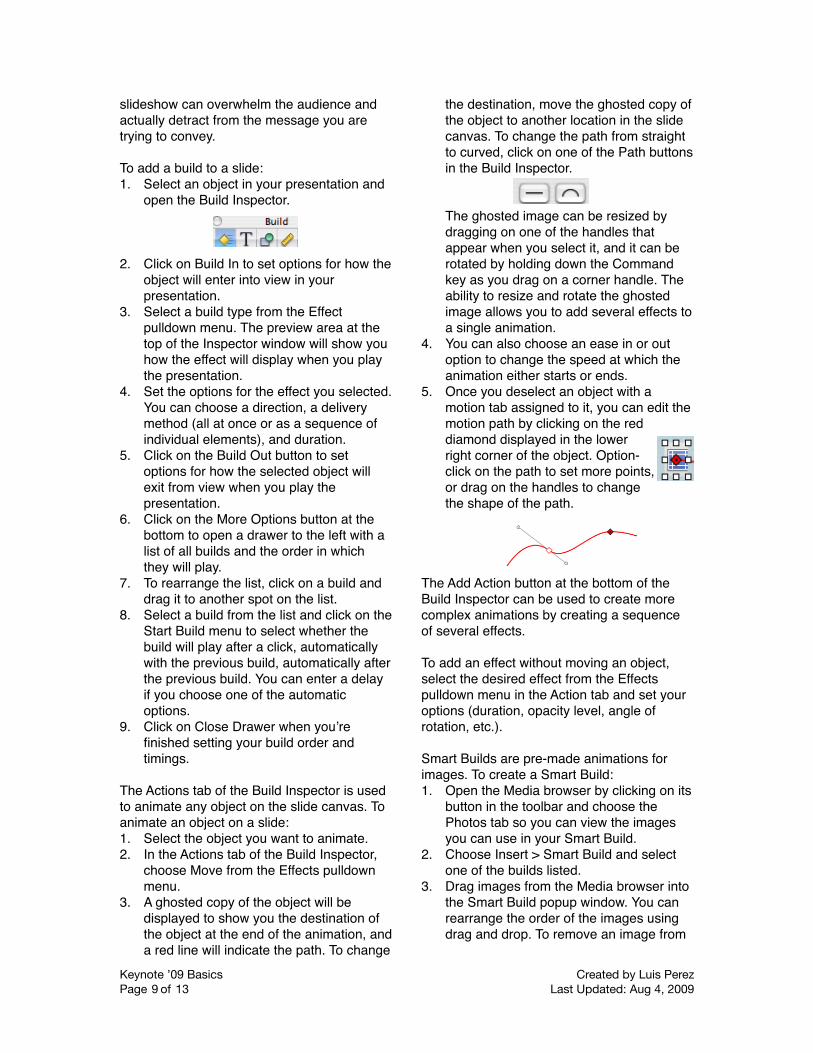
the destination, move the ghosted copy of the object to another location in the slide canvas. To change the path from straight to curved, click on one of the Path buttons in the Build Inspector.
The ghosted image can be resized by dragging on one of the handles that appear when you select it, and it can be rotated by holding down the Command key as you drag on a corner handle. The ability to resize and rotate the ghosted image allows you to add several effects to a single animation.
4. You can also choose an ease in or out option to change the speed at which the animation either starts or ends.
5. Once you deselect an object with a motion tab assigned to it, you can edit the motion path by clicking on the red diamond displayed in the lower right corner of the object. Option-click on the path to set more points, or drag on the handles to change the shape of the path.
The Add Action button at the bottom of the Build Inspector can be used to create more complex animations by creating a sequence of several effects.
To add an effect without moving an object, select the desired effect from the Effects pulldown menu in the Action tab and set your options (duration, opacity level, angle of rotation, etc.).
Smart Builds are pre-made animations for images. To create a Smart Build:1. Open the Media browser by clicking on its
button in the toolbar and choose the Photos tab so you can view the images you can use in your Smart Build.
2. Choose Insert > Smart Build and select one of the builds listed.
3. Drag images from the Media browser into the Smart Build popup window. You can rearrange the order of the images using drag and drop. To remove an image from
Keynote ’09 Basics Created by Luis PerezPage 9 of 13 Last Updated: Aug 4, 2009
the animation, drag it out of the Smart Build popup window.
4. When youʼve added all of the images you want in your Smart Build (and set the options for the build youʼve chosen), click outside of the Smart Build popup window.
To add a transition between slides:1. Open the Slide Inspector and make sure
the Transition tab is selected.
2. Select a transition by making a selection from the Effect menu.
3. Set options for the transition type you selected, such as the direction in which the transition will take place, the duration of the transition, and how it will be started (either on a mouse click or automatically after a period of time). The preview window in the Slide Inspector will show you what the effect will look like when you play the presentation. To repeat the preview, click anywhere in the preview window.
Slides that have a transition applied to them will appear with a blue triangle in the lower right corner in the Slide Navigator.
Keynote ʼ09 includes Magic Move, a new transition effect that animates an object shared by two consecutive slides. To use Magic Move:1. In the Slide Navigator, select the slide that
includes the object you want to animate.2. Duplicate the slide by selecting it in the
Slide Navigator and pressing Command + D on your keyboard.
3. On the copy of the slide, reposition and resize the object to be animated.
4. Add any additional text, images or objects to the copied slide.
5. Select the first slide of the pair and open the Slides Inspector.
6. Click on Transition and select Magic Move from the Effect pulldown menu.
7. Adjust how long the transition will take by entering a different value in the Duration field.
In addition to Magic Move, Keynote ʼ09 includes two types of effects for animating objects shared by a pair of slides:• Text effects: use the letters on a slide to
create visual effects. These effects include Shimmer, Sparkle, Swing and Anagram (which morphs one word or phrase into another). These effects are best for slides containing prominent text.
• Object effects: move all the graphics on a slide at once. These effects are best for slides containing prominent graphics.
To use the Anagram effect:1. Create a slide containing simple,
prominent text (for example, a title or short proclamation).
2. Select the slide in the Slide Navigator and press Command-D to duplicate the slide.
3. On the copy of the slide, select the text box with the text you want to animate and replace it with different text. Make sure the new text is something simple and that it contains at least a few of the same letters as on the first slide.
4. Select the first slide of the pair and apply the Anagram effect by selecting it from the Effects pulldown menu in the Transition tab of the Slide Inspector.
Delivering Your Presentation To play your presentation: 1. Click the Play button or Choose
View > Play. This plays the slideshow starting with the selected slide. To play the slideshow from the beginning no matter which slide is selected, Option-click on Play.
2. To advance to the next slide, press the space bar, the letter N, or the right arrow key on your keyboard.
3. To go to the previous slide, press P or the left arrow key.
4. To quit the slideshow, press Escape or Q. Keynote can be set up to display presenter notes and other cues on your laptop while your audience views the presentation on a projector:
Keynote ’09 Basics Created by Luis PerezPage 10 of 13 Last Updated: Aug 4, 2009
1. Connect the projector to your laptop. 2. From the Apple menu, select System
Preferences, and then click Displays.3. Click Arrangement and follow the
onscreen instructions. The primary display is the one with the menu bar on it. This is the display on which your presentation will be displayed for your audience while you follow along with the presenter notes on your laptop. If there is no Arrange button, your computer has not detected the projector. Make sure to check your connection to the projector.
4. Make sure Mirror Displays is not selected. 5. In Keynote, choose Keynote >
Preferences and then click on Slideshow.6. Select “Present on secondary display” 7. Click on Presenter Display and select
“Use alternate display to view presenter information.”
8. Under Show, select which elements (Next Slide, Notes, Clock, etc.) you want to be able to see on your laptop as you deliver your presentation.
When you launch the presentation and the presenter display opens on your laptop, hover over the top of the screen to display a toolbar with the following options:• Slides: displays a slide browser with
thumbnails of the slides in your presentation. Click on any thumbnail to go directly to that slide or type the slide number in the text box.
• Black: displays a black screen. Use this feature when you want to pause your presentation and expand on a point you just made without the distraction of the onscreen content.
• Options: includes an option for swapping displays. This option is useful when using Keynote with an external monitor and you need to switch where the presentation is displayed.
Using Keynote RemoteIf you have an iPhone or iPod touch, you can purchase and download the Keynote Remote application from the App Store and use it to control your presentation. After youʼve purchased the Keynote Remote application, you must link it to your computer before you can use it. To do this, your iPhone or iPod
touch and computer must be on the same Wi-Fi network.
To link your Keynote Remote:1. Open Keynote on your computer and
choose Keynote > Preferences.2. Click Remote in the Preferences window
and select “Enable iPhone and iPod touch Remotes.”
3. Open the Keynote Remote application icon on your iPhone or iPod touch.
4. On your iPhone or iPod touch, create a link to Keynote, following the instructions on the device. A passcode appears.
5. In Keynote, click the link button next to the remote device that you want to pair with Keynote.
6. Type the passcode into the window that opens in Keynote.
7. Close Keynote preferences.8. Advance your slides on the iPhone or
iPod touch by swiping as you normally would to switch screens on the device.
Sharing a PresentationKeynote ʼ09 includes an option for emailing a copy of your presentation. To email your presentation, choose Share > Send via Mail and select a format (Keynote, PowerPoint or PDF).
To use the slides youʼve created in Keynote in any of the programs in the iLife suite, choose Share > Send to and select the program from the list. This menu also includes an option for uploading your slides directly to YouTube as a movie.
To export the slides to your hard drive as a different format:1. Choose Share > Export. 2. When the export window opens, select a
format (Quicktime movie, PowerPoint, PDF, Images, HTML or iPod) and set your export options (these will vary depending on the format you choose).
3. Click on Next to continue.4. Enter a name for the exported file, choose
a save location, and click on Export.
You can create a podcast with Keynote by recording narration on your slides and then choosing to export the presentation as either a Quicktime movie (for playback on your
Keynote ’09 Basics Created by Luis PerezPage 11 of 13 Last Updated: Aug 4, 2009
computer) or as an iPod movie (for playback on an iPod, iPhone or iPod touch). When you select one of these formats, make sure that Recorded Timing is selected from the Playback Uses pulldown menu. This will make sure that each slide is displayed for the duration of your narration. The Audio checkbox should also be enabled for this to work.
iWork.comiWork.com is a new service from Apple that allows you to share Keynote presentations and other iWork documents over the Web. Each presentation uploaded to iWork.com has its own web page where other people can view the slides, provide feedback by adding comments, or download the original version of the presentation to open it with Keynote on their computers. iWork.com is a free service that is currently in public beta.
To share a Keynote presentation using iWork.com:1. Choose Share > Share via iWork.com.2. Enter your Apple ID and Password and
click on Sign In.3. Invite others to view your Keynote
presentation by entering their email addresses and a short message.
4. Check the boxes next to “Leave Comments” and “Download the document” if you want to allow these actions when the presentation is viewed on iWork.com.
5. Click on Show Advanced to specify which file formats (PDF, PowerPoint, or Keynote ʼ08 and ʼ09) will be provided for downloading.
6. Click on Share. Your presentation will be uploaded to iWork.com in the background.
Once the presentation has been uploaded, a message will be sent to each person youʼve invited with a link to access the presentation on the Web. The presentationʼs web page will include navigation links at the top. Clicking on Show Navigator will display slide thumbnails on the left side of the page for added navigation.
The visitors to your presentationʼs web page can leave a comment by selecting any piece of text, image or other object and clicking on
the Add Comment button at the top of the page. To leave general comments they can add notes by entering their text in the Document Notes area of the page and clicking on Post Note.
To download the presentation, they can click on the Download button and select from the list of formats you have made available (each download link will also include the file size of the document to let them know how big it is).
To manage your iWork.com documents, click on Share > Show Shared Documents in Keynote. This will open the Shared Documents page where you will see a list of shared documents along with the date they were published, their type and file size. To open a shared document in your web browser, click on the name of the document. To stop sharing a document, click on the Delete link to the right of the documentʼs name.
Presentation Tips• Donʼt start in Keynote: the most important
part of your presentation is your message. No amount of animation and effects in Keynote can make up for a weak message. Before you start designing your presentation in Keynote, take some time to brainstorm and organize your ideas away from the computer. You can use post it notes to create mockups of your slides. You can quickly rearrange these post its to try out different sequences in your presentation. Another way to brainstorm a presentation is by using a whiteboard.
• Limit the amount of text on your slides: using images along with narration has been found to be the most effective means of conveying information through a multimedia presentation. Instead of including everything youʼre going to say on a slide, take the text and move it into the presenter notes where you can use it as a script when you deliver the presentation. Replace the text with high resolution images that reinforce your point and work as a visual organizers (images of people work well for emotional connection). By setting up your laptop to use dual displays, you can view the presenter notes on your laptop as you deliver the presentation on a projector.
Keynote ’09 Basics Created by Luis PerezPage 12 of 13 Last Updated: Aug 4, 2009
• Use more slides: a common mistake is to create a few slides with several points on each of them. This results in busy, confusing slides where each piece of information has to compete for attention. A better approach is to divide a complex slide into a sequence of simpler slides with one key point per slide. This will improve the pacing of your presentation.
• Use animation sparingly: Keynote includes many animation effects to add visual appeal to a presentation. These effects should only be used when they help reinforce the idea you want to convey on a slide. A good time to use an animation is at the start of your presentation (to get your audienceʼs attention). This applies to transitions as well. They should not be used on every slide, but instead should help the audience understand that you are switching topics.
• Get out from behind the podium: interact with the audience and get to know them. Building rapport with your audience will help build trust and create an environment where they will feel comfortable asking good questions. This will make for a richer presentation. To move away from the podium you will need some way of controlling the computer as you move about. Presentation remote are inexpensive (about $50), or you can use your iPhone or iPod touch (see the section on Keynote Remote).
Presentation Resources• Presentations ETC (http://etc.usf.edu/
presentations/) This site includes more than 20,000 backgrounds as well as many Keynote themes to help set your presentation apart from ones that stick with the built-in themes. • Presentation Zen (http://
www.presentationzen.com)One of the best sites for keeping up on the latest techniques for planning, designing and delivering presentations.
• TED (http://www.ted.com)Watch presentations from leading thinkers in the fields of technology, entertainment and design. This is a good place to view examples of the many presentation styles good presenters use.
Keyboard Shortcuts• Option drag: duplicates the currently
selected object.• Option + Command + G: groups selected
objects into one object you can move, resize and rotate.
• H (while playing your presentation): hides the presentation so you can use another application. This is helpful when you want to show something on the web using your web browser. When youʼre done using the other application, click on the Keynote icon in the Dock to return to your presentation.
• B or W (while playing your presentation): displays either a black or white screen, respectively. To return to your presentation, click the B or W key again.
• C (while playing your presentation): shows the cursor.
Keynote ’09 Basics Created by Luis PerezPage 13 of 13 Last Updated: Aug 4, 2009