KB 51770 Lab Manual - VBA Converting RSView32
42
This document is a modified excerpt of the Hands-On Lab session (PV14) from RS Tech Ed 2008. KNOWLEDGEBASE Using VBA with FT View SE Hands on Lab Excerpt Answer ID 51770 Exercise in converting RSView32 VBA to FactoryTalk View SE VBA
-
Upload
pablo-herson-black-rodriguez-elias -
Category
Documents
-
view
315 -
download
53
Transcript of KB 51770 Lab Manual - VBA Converting RSView32

This document is a modified excerpt of the Hands-On Lab session (PV14) from RS Tech Ed 2008.
KNOWLEDGEBASE
Using VBA with FT View SE
Hands on Lab Excerpt
Answer ID 51770
Exercise in converting
RSView32 VBA to FactoryTalk View SE VBA

2 of 42
Using VBA with FactoryTalk View SE
Contents
Before you begin .........................................................................................................................................3
About this lab.................................................................................................................................................3
Tools & prerequisites.....................................................................................................................................3
Lab Setup ......................................................................................................................................................5
Document Conventions ..............................................................................................................................6
Section 1: RSView 32 to SE........................................................................................................................7
About This Section ........................................................................................................................................7
Differences of VBA in View32 and View SE..................................................................................................8
More Info and Notes ..................................................................................................................................35
Appendix: Exploring the VBA IDE (Integrated Development Environment) in View SE ...................36
About This Section ......................................................................................................................................36
Add a button to a display.............................................................................................................................36
Open the VBA IDE.......................................................................................................................................37
Editor Format Options for the VBA IDE.......................................................................................................39
View the FactoryTalk View SE object model...............................................................................................41

3 of 42
Before you begin
About this lab
This lab demonstrates how to extend capabilities of FactoryTalk View SE by using Visual Basic for
Applications (VBA). The lab is aimed at a broad range of users; users should be familiar with VBA
Integrated Development Environment (IDE) of FactoryTalk View SE and writing VBA code.
The main section of this lab includes:
§ VBA considerations that should be made when migrating an RSView 32 application to
FactoryTalk View SE
Tools & prerequisites
The following software has been installed and configured on the VMWare image:
§¤ RSLogix 5000 v16.03
§¤ SoftLogix5800 v16.03
§¤ FactoryTalk Services Platform v2.10
§¤ FactoryTalk View SE v5.00
§¤ RSLinx Enterprise v5.00
§¤ RSView32 7.40.00
§¤ RSLinx Classic v2.52.017

4 of 42
The following FactoryTalk View and RSLogix 5000 files are available for this example in the Lab Files
subdirectory. The code examples and instructions followed in this manual assume that this subdirectory
is located on the C: drive at C:\Lab Files .
The focus of the lab is to explain the VBA functionality in the View 32 application, then presents an exercise in converting it to View SE. You can convert the entire View32 application yourself, or you can import individually prepared components manually into an existing View SE application described below. You may choose which path to follow.
� In the strong person path, you will do the entire conversion yourself.
� In the normal person path, you will import prepared RSView32 files into your existing VBA_Lab
application.
To complete either exercise, you will need the following files:
RSLogix 5000 file: RSLogix 5000\VBA_Lab.ACD
View32 Application: RSView32\View32 Project with VBA\view32hmi.rsv
And some or all of the following files, depending which path you follow..
If you choose the �path, then you will also need an existing SE application where you can import the
View32 files. A complete FactoryTalk View v5.0 SE application with many VBA examples, including
the View32 ones detailed in this technote. This can be found in: _Complete SE
Application\VBA_Lab_v1_0.apa

5 of 42
Lab Setup
SoftLogix/RS Emulate/ControlLogix
§¤ Load the RSLogix 5000 application into your controller. The examples in this manual use slot 2. Put
the controller in Run Mode.
FactoryTalk View SE
§¤ Restore the FactoryTalk View back-up apa file and follow the �normal person path or manually
convert the SE application by following the �strong person path.
§¤ Ensure that your RSLinx Enterprise topic exists and points to the controller. The examples and HMI
tags in this manual use the topic name SoftLogix.
RSView 32
§¤ Ensure that your RSLinx topic exists and points to the controller. The examples and HMI tags in this
manual use the topic name SoftLogix.

6 of 42
Document Conventions
Throughout this workbook, we have used the following conventions to help guide you through the lab
materials.
This style or symbol: Indicates:
Words shown in bold italics (e.g., RSLogix 5000 or OK)
Any item or button that you must click on, or a menu name from which you must choose an option or command. This will be an actual name of an item that you see on your screen or in an example.
Words shown in bold italics, enclosed in single quotes (e.g., 'Controller1')
An item that you must type in the specified field. This is information that you must supply based on your application (e.g., a variable).
Note: When you type the text in the field, remember that you do not need to type the quotes; simply type the words that are contained within them (e.g., Controller1).
The text that appears inside a box is supplemental information regarding the lab materials, but not information that is required reading in order for you to complete the lab exercises. The text that follows this symbol may provide you with helpful hints that can make it easier for you to use this product. Most often, authors use this “Tip Text” style for important information they want their students to see.
Note: If the mouse button is not specified in the text, you should click on the left mouse button.

7 of 42
Section 1: RSView 32 to SE
About This Section
In this section of the lab, you will go through the exercise of migrating a sample View32 project with VBA
to View SE. It’s important that before the migration, you understand what the VBA code is doing so you
can figure out how to do the same task in View SE.
In this section you will have:
• A brief explanation of how VBA execution differs in View32 and ViewSE.
• An explanation of what this sample VBA code in this lab demo is doing.
You will then:
• Migrate this application to View SE, step-by-step.
Ø Most of the new code can either be typed in by you or copied from already finished code.

8 of 42
Differences of VBA in View32 and View SE
In Section 1 of this lab manual, you learned how to view the View SE object model, but that is not the only
difference between View32 VBA execution and View SE execution. In View32, VBA code executes on
the server and does not have exposure to the any of the client graphical objects. In View SE, VBA code
executes independently on the client side of the application and client graphical objects are exposed.
View32 VBA execution model
View SE VBA execution model
In View32, the Tag Database is an exposed object and most of the VBA functionality is based on the manipulation of HMI tags. In View SE, VBA functionality is based on events from graphic objects, such as button clicks or changing number displays. It is possible to create tag groups that can manipulate HMI tags as you can do in View32, but you have to create and destroy the groups yourself programmatically.

9 of 42
Migrating to View32 VBA to FactoryTalk View SE VBA
In this section of the lab, you may choose one of two different paths:
� In the strong person path, you will do the entire conversion yourself. You will work with
RSView32 directly, convert the application to a new FactoryTalk View SE application, and
continue the lab with that. The focus of this path is the View32 conversion and all related parts.
�
In the normal person path, you will import prepared RSView32 files into your existing VBA_Lab
application. The focus of this path is not the View32 conversion, but instead how VBA differs
between the two systems.
It is recommended, however, that you still read through the strong person path so you can review
the VBA functionality in detail.
�Start here. You have chosen the strong person path. Good choice.
Converting the View32 Application
1. � If you are running either the SE client or FactoryTalk View Studio, then quit both applications and wait a minute or so to allow the SE Client to completely shutdown . You will not be able to start RSView32 if either is running.
2. � Go to the directory C:\Lab Files\RSView32\View32 Project with VBA Double-click on the RSView32 application view32hmi.rsv. This will start RSView32 Works and we can observe the HMI application:

10 of 42
3. � When RSView32 Works is started, open the TankDetail screen.
4. � Test Run the screen.
5. � Initially you will probably see that the Tank Selected is 0 and most of the display fields are blank.
6. � Now select a tank to detail by clicking one of the Tank buttons under the Tank Selected display.
You will notice once you select a tank that the display fields are set with information about that particular tank. Also note that the loading of all this data takes about 6 seconds – or about 1 second per tag. This is not a problem for our demonstration, but here is an explanation why: we are using RSLinx Classic

11 of 42
and our communication rate is 0.5 seconds. Therefore, the read/write operation to get tag data takes about 1 second total since we do not already have the requested tags on scan.
7. � Selecting Tank 1, for example, shows something like this:
8. � Stop testing the display.
And let’s explore, in detail, the sequence of code behind this display.
9. � Double-click the Tank 1, Tank 2, and Tank 3 buttons to see the command associated with each.
You will see that each button is calling the VBA procedure called ShowTankData and passing its respective tank number: Tank 1: VbaExec ShowTankData 1 Tank 2: VbaExec ShowTankData 2 Tank 3: VbaExec ShowTankData 3

12 of 42
10. � Because it’s important to completely understand the code you’re trying to migrate to ViewSE, in the RSView32 Works project explorer, open the Visual Basic Editor.
11. � When the VBA editor opens, you will see the procedure titled ShowTankData which contains the
following code:
Notice that the code using the global object gTagDb which gives access to HMI tags in RSView32.
You can read and write to them using the .Value parameter.
In this snippet of code, the first thing done is to clear the StatusLine.
à If the loading of the tank data is successful, then Write a success message to the StatusLine. else Write an error message to the StatusLine.
12. � Now let’s explore the procedure LoadTankInfo(DesiredTank) . Open the module titled TankDataManipulation.

13 of 42
13. � You’ll see that the operation of this procedure is quite simple –
If XX is the NewTankNumber, the procedure is doing these operations: TankDetail\SelectedTank = XX TankDetail\Contents = TankDetailXX\Contents TankDetail\Date = TankDetailXX\Date TankDetail\Level = TankDetailXX\Level TankDetail\Capacity = TankDetailXX\Capacity TankDetail\Customer = TankDetailXX\Customer Again, note we’re using the global object gTagDb which gives access to HMI tags in RSView32.
14. � Take a moment now, while all these tag operations are fresh in your brain, to go back to the RSView32 Works to explore the HMI tags in the project, as well as the HMI tags on the screen. A couple exploration tips to point you in the right direction… The HMI tags on the screen are from the TankDetail\.... tag subfolder.
14 of 42
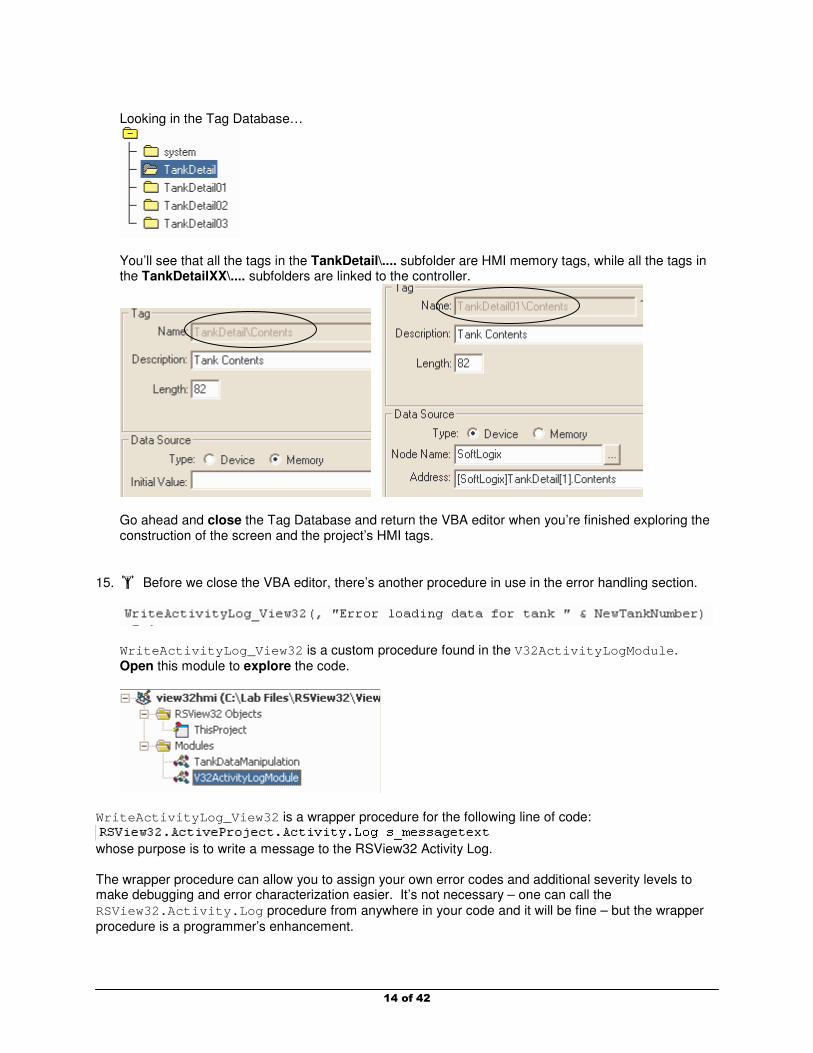
Looking in the Tag Database…
You’ll see that all the tags in the TankDetail\.... subfolder are HMI memory tags, while all the tags in the TankDetailXX\.... subfolders are linked to the controller.
Go ahead and close the Tag Database and return the VBA editor when you’re finished exploring the construction of the screen and the project’s HMI tags.
15. � Before we close the VBA editor, there’s another procedure in use in the error handling section.
WriteActivityLog_View32 is a custom procedure found in the V32ActivityLogModule . Open this module to explore the code.
WriteActivityLog_View32 is a wrapper procedure for the following line of code:
whose purpose is to write a message to the RSView32 Activity Log. The wrapper procedure can allow you to assign your own error codes and additional severity levels to make debugging and error characterization easier. It’s not necessary – one can call the RSView32.Activity.Log procedure from anywhere in your code and it will be fine – but the wrapper
procedure is a programmer’s enhancement.

15 of 42
For example, pressing the Tank 1 button generates this activity in the Activity Log:
because of both the button press and this line of code:
16. � At this point, you should understand the functionality of the VBA code within this RSView32. Since our goal is to migrate this to View SE, and by default VBA code is not automatically migrated, we’ll need to export all of the VBA code so we can manually add it to our View SE project. For each of the 3 components in the VBA application, right-click and Export File…
Save your exported files to a place where you can remember, like the desktop. ThisProject.cls TankDataManipulation.bas V32ActivityLogModule.bas
Note: the default directory will be C:\Windows\system32. Don’t save the files there. After you are finished exporting the VBA components, close RSView32 Works.
17. � Open FactoryTalk View Studio. You are going to create a NEW Site Edition (Local) application. Type a name for your application and select Import not Create.

16 of 42
MyView32Conversion is good name to use.
18. � Select the import type as RSView32 Project (*.rsv)
Click Next.
19. � Select the project file located at: C:\Lab Files\RSView32\View32 Project with VBA\view32hmi.rsv
Click Finish.

17 of 42
The conversion will begin…
…and end with your new application open in Studio.
20. � From the FactoryTalk View Studio Explorer, open the TankDetail screen.
Check it out – it looks just like it did in RSView32!
�End here. The strong person’s path is finished. Proceed to step 21 to complete the lab.
�Start here. You have chosen the normal person path. And there’s nothing wrong with that.
Importing View32 Application files into View SE
For the purposes of this lab, steps 1-20 of the strong person’s path was done for you and the files are
exported and ready for you to import into the existing VBA_Lab application.
1. � If not done already, open the Site Edition standalone project VBA_Lab in FactoryTalk View Studio.

18 of 42
2. � Right-click on Displays and Add Component Into Application…
3. � Select the file TankDetail.gfx from the directory C:\Lab Files\RSView32\Import files - FTView SE. This is a native RSView32 graphics file.
4. � When you get the prompt asking if you’d like to continue overwriting the existing TankDetail.gfx screen, select Yes. A TankDetail screen was made in this original application only to be a placeholder.
When the import is complete (it should only take a few seconds), you will see this message in the Diagnostics display.
Open the screen if you want, to make sure everything imported OK.
5. � This screen uses HMI Tags that are not yet a part of our SE application, but we can import them. Select the Tools menu from FactoryTalk View Studio and select Tag Import Export Wizard.

19 of 42
6. � From the pull-down menu, select Import FactoryTalk View tag CSV files
Click Next.
7. � Select the project you’d like to import to, which is Site Edition and VBA_Lab.sed
8. � We only want to import the HMI tags. So select the tag file from: C:\Lab Files\RSView32\Import files - FTView SE\FTView_RSView32_HMI_Tags.csv

20 of 42
9. � Click Next, then Next again, then Finish. Make sure the import went OK and no errors were reported.
10. � If not done already, open the display TankDetail try a test run.
If all is well, you should not see wire frames or any errors on the Diagnostic display.
�End here. The normal person’s path is finished. Proceed to step 21 to complete the lab.
At this point, regardless of which path you selected, you now have a View SE application with a TankDetail screen and no VBA code. In this part, we will import our VBA code from RSView32, and make some changes so it can properly execute in our SE application. If you remember from the TankDetail screen in RSView32, the VBA code was triggered from one of these 3 buttons from the RSView32 command vbaexec. This command does not exist in View SE.
Updating the VBA Code
21. For each of the three Tank buttons, right-click to get button properties.
From
remove the release action:
à

21 of 42
and from Button Properties à Common, give each of the buttons an appropriate name
22. Right-click the Tank 1 button and open the VBA code.
Notice that VBA starts automatically opened to the btnTank1_Released() event.
The button Released() event in View SE corresponds to putting the vbaexec command on a
button release action in View 32. Repeat this for the other 2 buttons and you will see: btnTank2_Released() btnTank3-Released()
This code is executed every time the button is clicked and released. We’ll add the code here later – first, let’s stop for a second and talk about VBA migration.
Tank 1 button named btnTank1 Tank 2 button named btnTank2 Tank 3 button named btnTank3

22 of 42
There is no golden rule that will tell you exactly how to port your RSView32 code to FactoryTalk View SE. The migration requires analytical thought about desired functionality and implementation. This lab demonstrates some straight-forward examples that we can migrate fairly easily to show you how it’s done. In order to make it as easy-to-follow as possible, a lot of the conversion has already been done and is available for you to import, then copy & paste. Here are the steps that need to be taken for this particular project.
Task Steps
Create a tag group object when the TankDetail screen is loaded. This step is required for View SE since the tag database is not part of the SE object model and we will need to access HMI tags that are not displayed on the screen.
23 (via import)
Destroy tag group when the TankDetail screen is unloaded. 23 (via import)
Create btnTank1_Released(),
btnTank2_Released(),btnTank3_Released() events and add code that
used to be called from vbaexec.
27-32
Modify the LoadTankInfo(NewTankNumber) procedure to include a reference
to the tag group.
33
Because the tag database is not a part of the View SE object model like it is in View32, we are going to create a tag group and add all of the HMI tags we want to access. We will do this when the TankDetail screen loads initially by using the screen’s Display_AnimationStart() event.
Similarly, using the screen’s Display_BeforeAnimationStop() event, we’ll destroy the tag group
that we created just to tidy things up. You can type the code in, but this is not an exercise in typing. You just need to understand what we’re doing. So in the next step, you’re going to import a bit of code and copy it into your application.
23. In this step, you are going to import some code and copy it to the VBA in your TankDetail screen.
Select the file C:\Lab Files\RSView32\Import files - FTView SE\TankDetail_AllProcedures.bas

23 of 42
The result will be this:
24. Double-click on the module TankDetail_AllProcedures. Copy the procedures Display_AnimationStart() and Display_BeforeAnimationStop()
from that module and paste it to the module ThisDisplay. TankDetail_AllProcedures
ThisDisplay
ThisDisplay should now include at least 2 new procedures: Display_AnimationStart() Display_BeforeAnimationStop()
Tip: This module contains a finished version of all the procedures you will be working with in the following steps. You can use the finished code as a reference while you make your own changes, or you may copy & paste the finished code as necessary.

24 of 42
25. Take the time now to explore the code now behind the TankDetail screen.
In Display_AnimationStart(), a tag group is created with this line:
Set gpGroup = Application.CreateTagGroup(Me.Ar eaName)
And in subsequent lines, HMI tags are added to the group.
gpGroup.Add "TankDetail\Contents"
gpGroup.Add "TankDetail\Date"
…
Also take note of the following ErrorWatch settings.
ErrorWatch = 1
ErrorWatch = 2
That helps us debug and figure out what went wrong and where.
In Display_ BeforeAnimationStop (), the tag group is set to nothing for a bit of cleanup.
26. Add these lines of code in the very beginning of the VBA in your TankDetail screen.
27. Next let’s import our VBA code from View32, so we can easily copy & paste. Import the following two files: TankDataManipulation.bas ThisProject.cls
If you followed the strong person path, select the files from the desktop or wherever you saved them to from Step 16. If you followed the normal person path, the files can be found at: C:\Lab Files\RSView32\Import files - FTView SE\View32 VBA export files

25 of 42
After the import, your VBA editor explorer will now look like this:
If you are familiar with how VBA works in View 32 and not View SE, it’s important to note here that the import of classes and modules is only for the TankDetail display. If you were to open the VBA editor for another screen, they would not automatically have the same classes or modules added.
28. In RSView 32, each of the Tank buttons used vbaexec command to execute a procedure called ShowTankData . We can implement the same functionality in View SE with the
btnTank1_Released() event.
Select the code from inside the procedure ShowTankData within the ThisProject class and
copy. Note: It’s not necessary to copy the Public Sub ShowTankData … declaration.

26 of 42
29. Paste the copied procedure code into the btnTank1_Released event.
If the btnTank1_Released event is not there, go back to the display and right-click the Tank 1
button and select VBA Code... from the Properties tab,

27 of 42
You should have this after the paste:
The circled bits indicate what needs to be modified before it will work successfully in View SE.
A. Change all references from the RSView32 global tag database to the tag group that we just created. All instances of gTagDb() become gpGroup.Item() .
For example, the code above: gTagDb("TankDetail\StatusLine").Value = "" becomes gpGroup.Item("TankDetail\StatusLine").Value = ""
B. DesiredTank is no longer a necessary variable. We already know that 1 is our desired
tank since the procedure is triggered on the Tank1_Released() event.
C. WriteActivityLog_View32 is not valid for us; we need to write to the FactoryTalk
Diagnostics Log instead.
D. LoadTankInfo() needs to include a reference to our tag group since the procedure
will be reading from HMI tags.
30. For your convenience, an already modified version of this procedure is available in the module TankDetail_AllProcedures. Open the module and find the procedure btnTank1_Released().
A
A
A
B,D
B
B
C

28 of 42
Shown below is the new procedure with the circled bits modified for ViewSE.
A. Changed all references from the RSView32 global tag database gTagDb() to the tag
group that we just created: gpGroup.Item() .
B. Variable DesiredTank is replaced with a hard-coded “1”.
C. WriteActivityLog_View32 is replaced with
Application.LogDiagnosticsMessage , a function that logs the string sent to it to
the FactoryTalk Diagnostics Log.
D. The call to LoadTankInfo() now includes a reference to our tag group since the
procedure will be reading from HMI tags, but we’ll modify the actual procedure in the following steps.
31. Take the time now to observe and understand the differences in the code between Steps 28 and 29.. Make the changes illustrated in Step 29 in the btnTank1_Released() event from ThisDisplay
in Step 28 (or copy the code from the btnTank1_Released() procedure from the module
TankDetail_AllProcedures and paste it to ThisDisplay , overwriting the original code from
Step 28.)
A
C
A
A
B,D
B
B

29 of 42
32. Duplicate this code for Tank 2 and Tank 3, called from the btnTank2 and btnTank3 Released()
events. Shown below is the code for btnTank2 with the differences from btnTank1 circled.
Like the previous step, either add the new code yourself to ThisDisplay.
(Or copy the finished code from the module TankDetail_AllProcedures and paste it to ThisDisplay .)

30 of 42
33. Last but not least, we must update our own procedure LoadTankInfo from the module
TankDataManipulation . Shown below is the original procedure with the RSView32 things circled.
As in the previous step, references to the View32 global tag database must be replaced a reference to our tag group. WriteActivityLog_View32 must also be replaced with LogDiagnosticsMessage. In the next step, you’ll see the finished code with the modifications circled.

31 of 42
34. Shown below is the updated procedure LoadTankInfo with the modifications circled.
Make these changes yourself manually in the LoadTankInfo procedure from the module
TankDataManipulation .
(Or copy and paste the updated code from TankDetail_AllProcedures.)
Observe that because we made a reference to TagGroup.Item which is the tag group created when
our display loads up, and this procedure is loaded in a separate module, we had to add a ByRef
reference to our tag group as a parameter for the procedure.
!!!

32 of 42
Clean-up and Test
Congratulations! At this point, the code modifications are complete! Let’s do a bit of a recap.
Module name Should contain:
ThisDisplay - 2 lines of code before everything else:
Option Explicit Dim gpGroup As TagGroup
- Private Sub Display_AnimationStart() - Private Sub Display_BeforeAnimationStop() - Private Sub btnTank1_Released() - Private Sub btnTank2_Released() - Private Sub btnTank3_Released()
TankDataManipulation - Public Function LoadTankInfo(NewTankNumber As
Integer, ByRef TagGroup As TagGroup) As Boolean
TankDetail_AllProcedures To be removed.
Class Module/This Project To be removed
35. In order to test your work, you will need to remove TankDetail_AllProcedures and the class
module ThisProject .
Do not export either file before removing it.
36. Save your work in the VBA editor.
37. Go back to Studio and test run the TankDetail display..

33 of 42
38. Pressing any of the Tank 1, Tank 2, or Tank 3 buttons should display the data for that tank.
with a message in the Diagnostics status display:
Troubleshooting
As any programmer will know, troubleshooting your code can sometimes be more complicated and take longer than writing the code itself. Our example here was pretty simple, but no doubt you may still have questions or problems getting it to work. All that copy & pasting is somewhat tedious!
If you’d like, you may import a finished version of the screen complete with functional VBA code. In Studio, right-click on Display and Add Component…

34 of 42
Select the screen (GFX file) from C:\Lab Files\RSView32\Import files - FTView SE\ TankDetail_withVBA_forSE.gfx
If you open that display and view the VBA code, you may be able to compare it with yours to figure out what the problem may be.
Conclusion
The purpose of this exercise was to give you some ideas about how you can begin to migrate your RSView32 VBA code to View SE. As we have seen, modules from View32 can be re-used in View SE, and code can be copy & pasted once it’s imported temporarily, but depending on what your code is doing, you may need to rework more than what we have done here.
Additionally, there is functionality native to View SE that may replace some of what your View32 VBA code is doing – functionality such as language switching, or numeric entry limit checking, just to name a couple.
Good job on this part of the lab!
J

35 of 42
More Info and Notes
Listed below are some helpful Answer IDs from our Knowledgebase that you may find useful.
OTHER KNOWLEDGEBASE ANSWER IDS
30399: Recommendations For Writing Visual Basic for Applications in RSView SE
22114: How to Read and Write Tags in Display Client VBA Code
38494: How to retrieve a list of files in a directory using VBA
34733: How to execute a batch file from VBA
27726: How to execute VBA code from a keypress in RSView SE using Display Keys or Client Keys
33075: How to print a text file using VBA and Notepad
32067: How to execute different code based on computer name

36 of 42
Appendix: Exploring the VBA IDE (Integrated Development
Environment) in View SE
About This Section
In this section you will explore the VBA integrated development environment within FactoryTalk View SE.
We’ll create a button in a graphic display and assign an event handler to it. We also cover some tips for
working with the VBA IDE.
This section is included because while you may be familiar with RSView 32, this gives you an opportunity
to work with FactoryTalk View SE.
Add a button to a display
1. Create a new display.
2. Add a button object to the display.
3. Click OK on the Button Properties Dialog to create a default blank button.
4. Right-click the button object and select property panel.

37 of 42
2. From the Properties tab, change the button’s ExposeToVBA property to Type Info Extension.
Open the VBA IDE
1. Click the View Studio View menu and select Visual Basic Editor to open the VBA IDE.
2. Open the Display Code Window
This property is set to Not Exposed
Right-click and
select View Code
Use Alt-Tab to quickly switch between View Studio and the VBA IDE.
Not Exposed means that the object cannot interact with VBA
code on the display. This is for performance reasons. If there were 10,000 objects on a display and VBA code was used to change a property of one of the objects, the code would have to search through 10,000 objects to find the right one.
Type Info Extension means that you can read and write
properties of that object but its VBA events cannot be used. Again this is for performance reasons.
VBA Control is for creating an event handler for that object.
For example, for the button object you create the click event. The Property Panel is a floating dialog, so you can leave it open.

38 of 42
3. Observe the following in the Display Code Window.
4. The button object isn’t in the Object box because you haven’t created an event handler yet.
5. Switch back to View Studio and change the button’s ExposeToVBA property to VBA Control.
6. Switch back to the VBA IDE. Now you’ll see the button1 object in the Object box list.
% Tips
1. When you want an object to interact with VBA you must configure the ExposeToVBA property to
either Type Info Extension or VBA Control.
2. When you create an object in the display and press F7 or right-click and select VBA code you
automatically set the property to VBA Control and go to the default event handler for that object.
3. Clicking F7 automatically creates the default event handler for that object. A common problem
people encounter is pressing F7 on a group to automatically bring up the VBA IDE. If the object is
a group, that is the click event. If there is a button in the group, the group object now takes the
click event away from the button.
4. You can change the properties of multiple objects at the same time by opening the property
panel, selecting all the objects, and then changing common properties.
Object box
displays the name
of the selected
object and shows
objects with events
Procedures/Events box
lists all the events for
the selected object
Code window

39 of 42
Editor Format Options for the VBA IDE
You can have two instances of the VBA IDE opened at once; one for View Studio and one for the View
Client. Sometimes it can be confusing to figure out which one you are working in. To help avoid this
confusion, we are going to set the font settings in the View Studio VBA IDE to be something different than
the Client instance.
1. Select the Tools > Options menu item.
2. Click on the Editors Format tab and change the Normal Text font and font size.
Font Settings
Change the font
settings for Normal
Text

40 of 42
3. Click on the General tab and observe that there are Error Trapping options to determine how errors
are handled in the VBA development environment.
You can take some time to change some options to your liking. Note that changing the Error Trapping
options might alter the expected steps in Section 1 of the lab. We suggest you don’t change these
options until after you complete that section.

41 of 42
View the FactoryTalk View SE object model
1. From the VBA IDE, select the View > Object Browser menu item or press the F2 key.
2. To get help on an object or property, select it and click the help button.
All the properties, methods, and
events for the client object
All the properties, methods, events, and
constants for the client object model and
the display object model
Properties, methods, and events
for existing objects in the display

42 of 42
3. Navigate back to View Studio and close the untitled display.
4. When prompted to save changes, select the No button.