K9-Classic-EDP2.pdf
16
COPYRIGHT 2010: OMEGA RESEARCH & DEVELOPMENT, INC. K9 CLASSIC- EDP2 OPERATION MANUAL FRONT COVER PRINTER’S NOTE: production front cover is color; this is a place marker cover. Products manufactured and sold by OMEGA RESEARCH & DEVELOPMENT, INC. (the "Company"), are warranted to be free from defects in materials and workmanship under normal use. If a product sold by the Company proves to be defective, the Company will repair or replace it free of charge within the first year and thereafter all parts to be repaired will be free with only a nominal charge for Omega's labor and return shipping, to the original owner during the lifetime of the car in which it was originally ins talled. All products for warranty repair must be sent postage prepaid to Omega Research & Development, Inc., P.O. Box 508, Douglasville, Georgia 30133, or send via UPS to: 981 N. Burnt Hickory Rd., Douglasville, Georgia 30134, with bill of sale or other dated proof of purchase. This warranty is nontransferable and does not apply to any product damaged by accident, physical or electrical misuse or abuse, improper installation, alteration, any use contrary to its intended function, unauthorized service, fire, flood, lightning, or other acts of God. This warranty limits the Company's liability to the repair or replacement of the product. The Company shall not be responsible for removal and/or reinstall ation charges, damage to or theft of the vehicle or its contents, or any incidental or consequential damages caused by any failure or alleged failure of the product to function properly. UNDER NO CIRCUMSTANCES SHOULD THIS WARRANTY, OR THE PRODUCT COVERED BY IT, BE CONSTRUED AS A GUARANTEE OR INSURANCE POLICY AGAINST LOSS. The Company neither assumes nor authorizes any person or organization to make any warranties or assume any liability in connection with the sale, installation, or use of this product. This device complies with F.C.C Rules part 15. Operation is subject to the following two conditions: (1) This device may not cause harmful interference and, (2) This device must accept any interference that may be received, including interference that may cause undesired operation. The manufacturer is not responsible for any radio TV interference caused by unauthorized modifications to this equipment. Such modifications could void the user’s authority to operate the equipment. L I M I T E D L I F E T I M E W A R R A N T Y Omega Research and Development, Inc. 981 North Burnt Hickory Road Douglasville, Georgia 30134 www.caralarm.com 01/09 MO-AK9-CLASSIC- EDP2 BACK COVER PRINTER’S NOTE: production back cover is color; this is a place marker cover.
-
Upload
diana-rivera -
Category
Documents
-
view
72 -
download
0
Transcript of K9-Classic-EDP2.pdf

7/16/2019 K9-Classic-EDP2.pdf
http://slidepdf.com/reader/full/k9-classic-edp2pdf 1/16
COPYRIGHT 2010: OMEGA RESEARCH & DEVELOPMENT, INC.
K9
CLASSIC-EDP2
OPERATION MANUAL
FRONT COVER
PRINTER’S NOTE:
production front cover
is color; this is aplace marker cover.
Products manufactured and sold by OMEGA RESEARCH & DEVELOPMENT,
INC. (the "Company"), are warranted to be free from defects in materials and
workmanship under normal use. If a product sold by the Company proves to be
defective, the Company will repair or replace it free of charge within the first year
and thereafter all parts to be repaired will be free with only a nominal charge for
Omega's labor and return shipping, to the original owner during the lifetime of the
car in which it was originally installed.
All products for warranty repair must be sent postage prepaid to Omega
Research & Development, Inc., P.O. Box 508, Douglasville, Georgia 30133, or
send via UPS to: 981 N. Burnt Hickory Rd., Douglasville, Georgia 30134, with
bill of sale or other dated proof of purchase. This warranty is nontransferable and
does not apply to any product damaged by accident, physical or electrical misuse
or abuse, improper installation, alteration, any use contrary to its intended
function, unauthorized service, fire, flood, lightning, or other acts of God.
This warranty limits the Company's liability to the repair or replacement of
the product. The Company shall not be responsible for removal and/or reinstallation
charges, damage to or theft of the vehicle or its contents, or any incidental or
consequential damages caused by any failure or alleged failure of the product tofunction properly. UNDER NO CIRCUMSTANCES SHOULD THIS
WARRANTY, OR THE PRODUCT COVERED BY IT, BE CONSTRUED
AS A GUARANTEE OR INSURANCE POLICY AGAINST LOSS. The
Company neither assumes nor authorizes any person or organization to make any
warranties or assume any liability in connection with the sale, installation, or use
of this product.
This device complies with F.C.C Rules part 15. Operation is subject to the
following two conditions: (1) This device may not cause harmful interference and,
(2) This device must accept any interference that may be received, includinginterference that may cause undesired operation.
The manufacturer is not responsible for any radio TV interference caused by
unauthorized modifications to this equipment. Such modifications could void the
user’s authority to operate the equipment.
L I M I T E D L I F E T I M E W A R R A N T Y
Omega Research and Development, Inc.
981 North Burnt Hickory Road
Douglasville, Georgia 30134
www.caralarm.com01/09 MO-AK9-CLASSIC-
EDP2
BACK COVER
PRINTER’S NOTE:
production back cover
is color; this is a
place marker cover.

7/16/2019 K9-Classic-EDP2.pdf
http://slidepdf.com/reader/full/k9-classic-edp2pdf 2/16
This device complies with FCC Rules part 15. Operation is subject to the
following two conditions, (1) This device may not cause harmful interfer-
ence and, (2) This device must accept any interference that may be
received, including interference that may cause undesired operation.
The manufacturer is not responsible for any radio or TV interference
caused by unauthorized modifications to this equipment. Such modifica-
tions could void the user's authority to operate the equipment.
One or more of these patents may apply to this product:
#5,612,669 #5,654,688 #5,663,704 #5,729,191 #5,818,329 #5,612,578 #5,739,747
#382,558 #385,878 #5,750,942 #5,739,748 #5,719,551 #406,107 #701,285
#5,973,592 #5,982,277 #5,986,571 #6,011,460 #6,037,859 #6,049,268 #6,130,605#6,130,606 #6,140,938 #6,140,939 #6,150,926 #6,144,315 #6,184,780 #6,188,326
#6,243,004 #6,249,216 #6,275,147 #6,297,731 #6,320,514 #6,320,498
Foreign Patent #199700312 #EP0817734B1 #98906445.6 #2,320,248 #701,285
Omega Research and Development, Inc.
www.caralarm.com
Page - 2
Coin batteries used in the transmitter which is used to operate this
security system may contain Perchlorate Material - special handling
may apply. See www.dtsc.ca.gov/hazardouswaste/perchlorate
Page - 31
Complete Programmable Features Matrix
Features Ignition on, off, then press Valet Switch 5 times (Status Light turns on steady).
# Feature Default Setting Option 2nd Option 3rd Option
1 SecureCode 1 & 0 2 stages, of up to 9 presses each (total of 99 possible combinations)
2 Last Door Arming OFF (L) ON w/o doorlock (U) ON w/ doorlock (2)
3 Automatic Rearming OFF (L) ON w/o doorlock (U) ON w/ doorlock (2)
4 Starter Interrupt Functions Alarm only (L) Off (U) Automatic (2)
5 Ignition Activated Override OFF (U) ON (L)
6 Doors Lock With Ignition On ON (L) OFF (U)
7 Doors Unlock With Ignition Off ON (3) OFF (L) o/p 1 only (U) o/p 2 only (2)
8 Open Door Bypass to above ON (L) OFF (U)
9 Confirmation Chirps ON (L) OFF (U) exc. Valet (2) Valet only (3)
10 Confirmation Chirp Volume Medium Loud (2) Low (L) Med Lo (U) Loud (3)
11 Activated Alarm Cycle 30 Seconds (L) 60 Sec. (U) 90 Sec. (2) 120 Sec. (3)
12 Lights On Upon Disarm ON (L) OFF (U)
13 Disarm Upon Trunk Release ON (L) OFF (U)
14 Arming Delay 3 Seconds (L) 15 Seconds (U) 30 Seconds (2) 45 Seconds (3)
15 Steady Siren / Pulsed Horn Steady Siren (L) Pulsed Horn Lo (U) Pulsed Med. (2) Pulsed Hi (3)
16 Alarm Functions Bypass OFF (U) ON (L)
17 Ignition Anti-Carjacking OFF (U) ON (L)
18 Door Anti-Carjacking OFF (U) ON (L)
19 Remote Anti-Carjacking OFF (U) ON (L)
20 Open Door Warning at Arm OFF (U) ON (L)
21 III Button Operation 3rd Chan. (L) Panic (U) 4th Chan. (2) 5th Chan. (3)
22 Doorlock Functions .8 second (L) 3 Seconds (U) Double Unlock(2) Total Closure (3)
23 (-) Parking Light Output Parking Light (U) Arm (L) Chan. 4 Latch (2) Chan. 4 On Demand (3)
24 (-) Horn Output Horn, med (U) D isarm (L) Chan. 5 Latch (2) Chan. 5 On Demand (3)
installation features

7/16/2019 K9-Classic-EDP2.pdf
http://slidepdf.com/reader/full/k9-classic-edp2pdf 3/16
Page - 3
This Booklet Contains
Introduction to the System ..................................................... 4-6
Transmitter, Status Light, Valet Switch
System Versatility - An Important Note ......................................... 5-6
Using the System ............................ ............................. ............ 7
Arming Using the Transmitter ................................................ 7-8
Arming Bypass, Sensor Bypass
Automatic “Last Door Arming” of the System ....................... 8-9
While the System is Armed, and should it Trigger ................. 9
Prewarning
Disarming the System Using the Transmitter ......................... 10-11
Safety Disarm Feature; Activation Alert; Automatic Rearming
Disarming By Emergency Override ........................................ 11
Remote Panic Feature ............................ ............................ ...... 12
Other Transmitter Operations ................................................. 13Silent Arming & Disarming , Sensor Bypass; 2nd, 3rd, 4th & 5th Channels
Using the Valet Switch ............................................................ 14
SecureCode ............................ ............................. ..................... 15
The Status Light ...................................................................... 16
Anti-Carjacking Protection ..................................................... 17
Transmitter Protection ............................................................. 18
How to Program Transmitters ................................................. 18-19
Programmable Features List.................................................... 20
How to Program Features ........................................................ 21-22
Programmable Features Descriptions ..................................... 22-30
Programmable Features Matrix ............................................... 31
Limited Lifetime Warranty .............................................. Back Cover
Page - 30
The final 3 Programmable Features are for the installer’s use.
Feature #24 Horn Honk Output FunctionsFactory Default Setting Horn Honk Output
( press “disarm/unlock ” button to program)
Options:
OEM Alarm Disarm Output ( press “arm/lock ” button to program)
Channel 5 Latch Output ( press “II” button to program)
Channel 5 On Demand Output ( press “III” button to program)
The default setting of this feature is to operate the vehicle’s existing horn; either
in conjunction with the electronic siren, or in place of the siren. Using both the
siren and the horn creates an extremely effective security system, and be configured
in many vehicles without further parts. The remaining options are OEM alarm
disarm, and Channel 5, with the same operation parameters as described above for
Channel 4, except that the “disarm/unlock ” and “III” buttons operate it, and
Feature #21 can also change this channel’s button assignment.
Feature #23 (-) Parking Light Output FunctionsFactory Default Setting Parking Light Flash Output
( press “disarm/unlock ” button to program)
Options:
OEM Alarm Arm Output ( press “arm/lock ” button to program)
Channel 4 Latch Output ( press “II” button to program)
Channel 4 On Demand Output ( press “III” button to program)
The default setting of this feature is to provide a negative flashing light output.
Options for this output are a (-) OEM alarm arm output, which is more frequentlyencountered in newer vehicles. Other options are an additional remote output,
operated by the transmitter’s “arm/lock ” and “II” buttons together, and in two
forms of operation: “Latch”, in which the output toggles (i.e.- turns on and turns
off) with each buttons press, and “On Demand” which is output occurring while
the buttons are being pressed. Feature #21 can change this channel’s button
assignment.
Note: Features #23 and #24 involve two outputs of the system’s control unit
which give the installer greater flexibility. These outputs can be programmed to
perform several different functions. The primary function, or default setting, of
these outputs are designed to control the vehicles parking light circuit and honk
the vehicle’s horn.
But there are also several other functions of these two outputs which may
be programmed to operate, and more importantly, they must be configured bythe installer to perform the desired operations.
7/16/2019 K9-Classic-EDP2.pdf
http://slidepdf.com/reader/full/k9-classic-edp2pdf 4/16
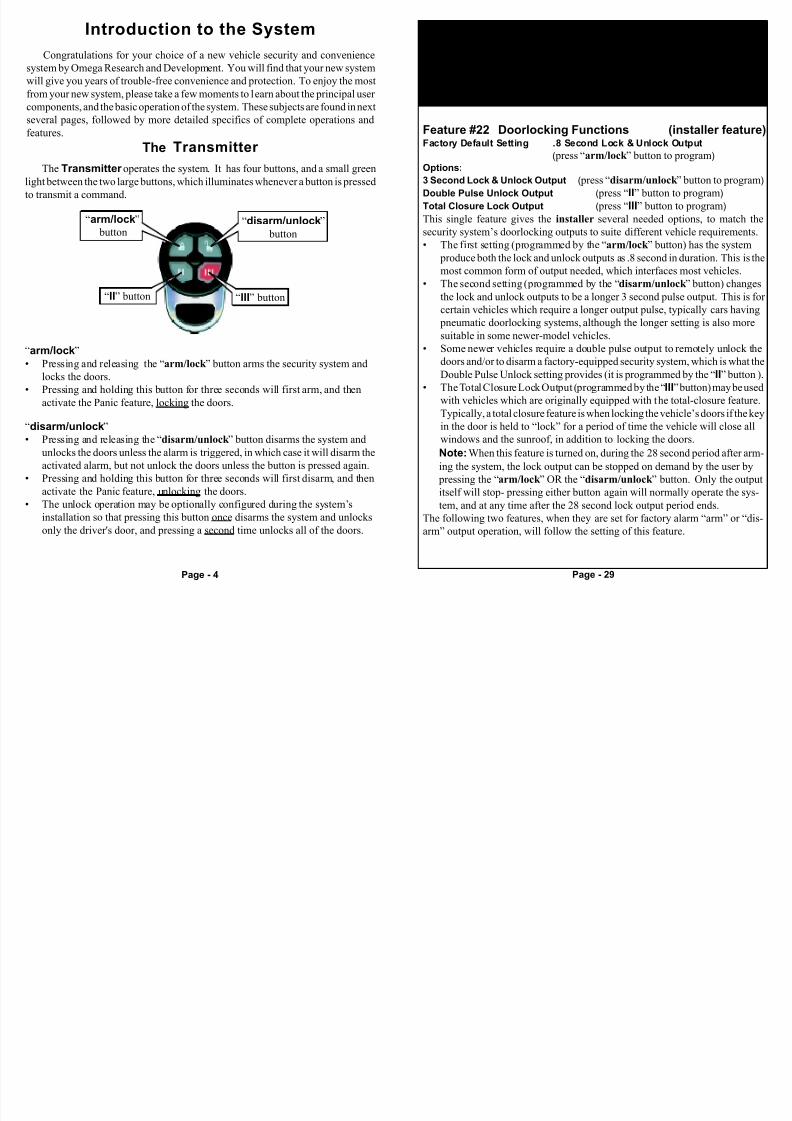
Feature #22 Doorlocking Functions (installer feature)Factory Default Setting .8 Second Lock & Unlock Output
( press “arm/lock ” button to program)
Options:
3 Second Lock & Unlock Output ( press “disarm/unlock ” button to program)
Double Pulse Unlock Output ( press “II” button to program)
Total Closure Lock Output ( press “III” button to program)
This single feature gives the installer several needed options, to match the
security system’s doorlocking outputs to suite different vehicle requirements.
• The first setting (programmed by the “arm/lock ” button) has the system
produce both the lock and unlock outputs as .8 second in duration. This is the
most common form of output needed, which interfaces most vehicles.
• The second setting (programmed by the “disarm/unlock ” button) changes
the lock and unlock outputs to be a longer 3 second pulse output. This is for
certain vehicles which require a longer output pulse, typically cars having
pneumatic doorlocking systems, although the longer setting is also more
suitable in some newer-model vehicles.
• Some newer vehicles require a double pulse output to remotely unlock the
doors and/or to disarm a factory-equipped security system, which is what the
Double Pulse Unlock setting provides (it is programmed by the “II” button ).
• The Total Closure Lock Output (programmed by the “III” button) may be used
with vehicles which are originally equipped with the total-closure feature.
Typically, a total closure feature is when locking the vehicle’s doors if the keyin the door is held to “lock” for a period of time the vehicle will close all
windows and the sunroof, in addition to locking the doors.
Note: When this feature is turned on, during the 28 second period after arm-
ing the system, the lock output can be stopped on demand by the user by
pressing the “arm/lock ” OR the “disarm/unlock ” button. Only the output
itself will stop- pressing either button again will normally operate the sys-
tem, and at any time after the 28 second lock output period ends.
The following two features, when they are set for factory alarm “arm” or “dis-
arm” output operation, will follow the setting of this feature.
Page - 29
The final 3 Programmable Features are for the installer’s use.
These features are described to explain their function; as these
features are dependent upon the installation configuration within the
vehicle, they should not be changed except by the original dealer or
qualified installer.
Congratulations for your choice of a new vehicle security and convenience
system by Omega Research and Development. You will find that your new system
will give you years of trouble-free convenience and protection. To enjoy the most
from your new system, please take a few moments to learn about the principal user
components, and the basic operation of the system. These subjects are found in next
several pages, followed by more detailed specifics of complete operations and
features.
Page - 4
Introduction to the System
“disarm/unlock”
• Pressing and releasing the “disarm/unlock ” button disarms the system and
unlocks the doors unless the alarm is triggered, in which case it will disarm the
activated alarm, but not unlock the doors unless the button is pressed again.
• Pressing and holding this button for three seconds will first disarm, and then
activate the Panic feature, unlocking the doors.
• The unlock operation may be optionally configured during the system’s
installation so that pressing this button once disarms the system and unlocks
only the driver's door, and pressing a second time unlocks all of the doors.
The Transmitter
The Transmitter operates the system. It has four buttons, and a small green
light between the two large buttons, which illuminates whenever a button is pressed
to transmit a command.
“III” button“II” button
“disarm/unlock”
button
“arm/lock”
button
“arm/lock”
• Pressing and releasing the “arm/lock ” button arms the security system and
locks the doors.
• Pressing and holding this button for three seconds will first arm, and then
activate the Panic feature, locking the doors.
7/16/2019 K9-Classic-EDP2.pdf
http://slidepdf.com/reader/full/k9-classic-edp2pdf 5/16
Page - 28
Feature #19 Remote Activated Anti-Carjacking Protection
Factory Default Setting Off ( press “disarm/unlock ” button to program)Option: On ( press “arm/lock ” button to program)
This form of Anti-Carjacking is initiated by a signal from the transmitter. The Anti-
Carjacking protection, including the three ways to initiate it are described on page
17.
Feature #20 Open Door Warning Upon ArmingFactory Default Setting Off ( press “disarm/unlock ” button to program)
Option: On ( press “arm/lock ” button to program)
When this feature is turned on, if one of the vehicle's doors is open at the time that
the system is armed via the transmitter, the siren will chirp 3 times and the parkinglights will flash 3 times instead of once.
Feature #18 Door Activated Anti-Carjacking ProtectionFactory Default Setting Off ( press “disarm/unlock ” button to program)
Option: On ( press “arm/lock ” button to program)
This form of Anti-Carjacking is initiated by a door being opened. The Anti-
Carjacking protection, including the three ways to initiate it are described on page
17.
“II”
• Pressing the “II” button for two seconds can be used to activate an extra output,
known as the “2nd channel”, for an optional function such as trunk release.
• Pressing and releasing this button twice arms or disarms the system without the
confirmation chirps.
• Pressing this button immediately after arming will leave the alarm armed, but
with the shock sensor feature bypassed.
The Valet Switch is a small push-button, and it has three main functions:
1- The Valet Switch can be used to turn off the security operation of the system,
including the Last Door Arming feature (if used). This is “placing the system
into Valet Mode”.
2- The Valet Switch can also be used, in conjunction with the vehicle’s ignition
key, to disarm the security system in the event the transmitter is lost or becomes
inoperable. This is “performing an Emergency Override”.
3- The Valet Switch is used in the procedures for programming operational
features and also for programming transmitters to operate the system.
The Valet Switch
The Status Light shows the armed / disarmed / Valet Mode status of the
security system at all times, and it also serves as a visual deterrent to break-ins and
theft. Should the security system trigger, sounding an alarm and flashing the lights,
it will indicate which protected zone was violated. The Status Light will also showthe number of operating transmitters every time the ignition key is turned on.
The Status Light
- IMPORTANT -
The K9 is one of the most versatile vehicle security systems made.
It has many programmable features which can offer more functions
and operations which are described in the basic system instruc-
tions.To a large degree, these extra features and operations are config-Page - 5
Feature #21 “III” Button OperationFactory Default Setting 3rd Channel
( press “arm/lock ” button to program)
Options:
Panic ( press “disarm/unlock ” button to program)
4th Channel ( press “II” button to program)
5th Channel ( press “III” button to program)
This feature changes how the controller’s or transmitter’s “III” button operates. Normal operation, or the default setting, has the “III” button operate the 3rd channel
output. This feature allows changing it to instead operate the panic function or either
of the two other optional channel outputs. Panic can always be operated, by the
alternative methods of pressing either the “arm/lock ” and “disarm/unlock ” button
for 3 seconds. This feature can also assign the 4th and 5th channels to the “III” button,
in the same manner as the 3rd channel.
“III”
• Pressing and releasing the “III” button 2 times in 5 seconds will activate the3rd channel output. This will also activate a factory remote start if your vehicle
is equipped and the K9 is configured to do so (optional parts required)
• The “III” button can be reprogrammed for additonal operations. See programmable
feature #21.

7/16/2019 K9-Classic-EDP2.pdf
http://slidepdf.com/reader/full/k9-classic-edp2pdf 6/16
Feature #15 Steady Siren or Pulsed HornFactory Default Setting Steady Siren
( press “arm/lock ” button to program)
Options:
Pulsed Horn Low ( press “disarm/unlock ” button to program)
Pulsed Horn Medium ( press “II” button to program)
Pulsed Horn High ( press “III” button to program)
It is important to first understand that the system has a primary audible output, for
the electronic siren, and that it also has a programmable output which among its
optional applications is being used to sound the vehicle’s existing horn as a second-
ary audible output. This feature changes only the primary audible output, so that
it can be utilized to sound the existing horn by itself. In this case it is not necessary
to use the programmable output, so that it can still be used for its other features,
such as disarming the factory alarm or as an additional channel output.The Steady Siren setting is exactly that- a steady output which the electronic
siren requires. When programming this feature for using the output for the vehicle’s
horn, the optional setting produce pulsed output on the system’s siren wire, in
three different pulse timings, which allow a degree of customization of the horn’s
sound during the alarm activation.
Feature #16 Alarm Functions BypassFactory Default Setting Off ( press “disarm/unlock ” button to program)
Option: On ( press “arm/lock ” button to program)
This feature converts the system into a strictly Remote Keyless Entry System byeliminating all antitheft alarm-oriented operations and features. When this feature
is programmed on, the Excalibur has remote keyless entry operation only.
Page - 27
Feature #17 Ignition Activated Anti-Carjacking ProtectionFactory Default Setting Off ( press “disarm/unlock ” button to program)
Option: On ( press “arm/lock ” button to program)
This form of Anti-Carjacking is initiated by the ignition key being turned on. The
Anti-Carjacking protection, and the three ways to initiate it are described on page
17.
there is a brief period of time in which a system activation, or alarm, cannot occur.
This Arming Delay allows the system to completely process its sensory parameters,
which can include allowing the vehicle itself to stabilize. In some cases more time
is needed than the factory-set 3 seconds, and this feature offers three longer delay
options.
Page - 6
ured at the installation of the system. Please read the sections of
this manual which explain programmable features, and please
consult your installer for specifics on how your system is config-
ured, and for installation options which may have used, or can be
added to system after installation.
EXAMPLE- the system can sound the vehicle’s horn in place of or in
addition to the electronic siren which is included with it. But the
operations are described with the siren only.
Status
Light
ValetSwitch
The Status Light and Valet Switch may be mounted in an included holder,
shown here, or these items may be independently custom-mounted within the
vehicle. If the optional Echo 2-
way controller is used, the Status
Light and Valet Switch are within
a long-range receiver module,
typically mounted to the windshield
or other glass. The Status Light may
be either blue or red; included with
your system is a blue
light (red is available optionally),
and it is red in the Echo receiver module.
Considering the flexible location choices for the Status Light and Valet Switch,
and the available options, please discuss with the installer your preferences, or
ensure that they show the location and operation of these important system
components.
The system is capable of having the optional Omega “Echo” added
to it, which would add 2-way control and confirmation paging. If theEcho is added, the instructions included with the Echo kit would then
supplement this instruction booklet.

7/16/2019 K9-Classic-EDP2.pdf
http://slidepdf.com/reader/full/k9-classic-edp2pdf 7/16
Feature #11 Alarm DurationFactory Default Setting 30 Seconds
( press “arm/lock ” button to program)
Options:
60 Seconds ( press “disarm/unlock ” button to program)
90 Seconds ( press “II” button to program)
120 Seconds ( press “III” button to program)
This feature allows four choices of the Alarm Duration, which is the period of time
for which the system sounding the siren (and/or horn, optionally) and flashes the
parking lights when it is triggered. Caution: Before lengthening the Alarm
Duration you should always check and determine if there are any local anti-
noise or nuisance ordinances in your area, to avoid the possibility of receiving
a violation citation.
Feature #12 Parking Light Illumination Upon DisarmFactory Default Sett ing On ( press “arm/lock ” button to program)
Option: Off ( press “disarm/unlock ” button to program)
This feature affects the parking light operation when the system is disarmed. When
this feature is turned on, the parking lights flash once, and then turn back on for
external illumination for 30 seconds unless the ignition key is turned on during thattime. If this feature is turned off, the parking lights flash once only, and do not
illuminate. This feature only affects the Excalibur’s parking light operation, and not
the interior light operation.
Feature #13 2nd Channel Also Disarms SystemFactory Default Sett ing On ( press “arm/lock ” button to program)
Option: Off ( press “disarm/unlock ” button to program)
“2nd channel” is most commonly used to remotely open the vehicle’s trunk, in
which case the alarm should also disarm. This feature, turned on, configures the
system to disarm when the 2nd channel is used. If turned off, the 2nd channel outputwill still occur, without chirps or parking light flashes; and if armed, the system will
not disarm.
Feature #14 3 or 45 Second Arming DelayFactory Default Setting 3 Seconds
( press “arm/lock ” button to program)
Options:
15 Seconds ( press “disarm/unlock ” button to program)
30 Seconds ( press “II” button to program)
45 Seconds ( press “III” button to program)When the system is armed, whether by the transmitter or by an automatic feature,Page - 26
Arming Using the Transmitter
The system can always be armed from the transmitter if the ignition key is “off”
and the system is not in the Valet Mode. To arm the system, exit the vehicle, close
all of the doors, and simply press and release the “arm/lock” button once.
Your system is designed to deter theft of both your vehicle and its contents.
“Arming” your system turns on the protection, disabling the vehicle’s starter and
locking the doors. Once the system isArmed, any intrusion attempt will Activate
it, sounding the electronic “Psyren” psycho siren and flashing the parking and interior
lights to attract attention. The unique and patented “2-in-1” Psyren psycho siren
actually produces the sounds of two different sirens at once, ensuring that it won’t
be ignored like all of the other “common” car alarms. Disarming the system turns
off the protection, unlocking the doors and turning on the parking and interior lights,allowing lighted access to, and normal use of, the vehicle.
There are two methods of arming the system:
1- The first method is to use the transmitter, by pressing and releasing the
“arm/lock ” button. The system must not already be armed or be in Valet Mode,
and the vehicle’s ignition key must be off.
2- The second method is Last Door Arming, which configures the system to
automatically arm itself every time you exit the vehicle. This method of arming
is programmable, and may be used or not used as desired.
Using the System
Regardless of how it became armed, if the system is armed the Status Light flashesin a slow, steady manner.
The system’s reaction: The parking lights will flash once, the siren will chirp
once and the Status Light will begin to flash, confirming that the system is armed.*In addition, the doors will lock and the starter interrupt will engage to prevent any
attempt to start the vehicle. Your security system is now fully armed, and is ready
to respond if an intrusion attempt is detected.
Page - 7
*The system is described in its most common and basic configuration, with
doorlocks connected, and the interior lights connected. Also, the vehicle hornmay used in place of, or in addition to, the system’s electronic siren.
The system’s separate “arm/lock ” and “disarm/unlock ” button design allows
repetitive operation- if already armed, pressing the “arm/lock ” button will simply
rearm the system, and vice versa when pressing the “disarm/unlock ” button.

7/16/2019 K9-Classic-EDP2.pdf
http://slidepdf.com/reader/full/k9-classic-edp2pdf 8/16
Arming Bypass: Upon arming, if any system sensing circuit is inoperable,
that circuit only will automatically be bypassed. When an unsecured sensing circuit
is in a bypassed state, all other normally operating circuits will be protected. Should
the bypassed circuit become secured, it will automatically be reinstated for
protection 5 seconds later. When certain protection circuits are bypassed, such as
the hood/trunk and impact sensor, and the system is armed, it will indicate this by
chirping the siren three times and flashing the parking lights three times instead of
the normal arming indication of one chirp and one flash.
For example, should the trunk be open, such as when containing an oversized
object, you can still arm the system with the transmitter, and in this case the armingindicator will be 3 siren chirps and 3 parking light flashes. Arming Bypass will only
operate when arming the system with the transmitter.
Sensor Bypass: When arming the system with the transmitter, you may
conveniently and easily temporarily deactivate the impact sensor without affecting
the system’s other sensing circuits. To deactivate the sensor, arm the system by
pressing the “arm/lock ” button, then press and release the transmitter’s “II” button
within three seconds. You will hear a second siren chirp confirming that the security
system has armed without the sensor protecting the vehicle. The next time the system
is armed normally with one “arm/lock ” button press, the sensor will again be partof your protection.
Automatic “Last Door Arming” of the System
The system can also be programmed to automatically arm itself, and in this
process, to lock or not lock the doors. When this feature is utilized, closing the
vehicle's last door will cause the siren to chirp once, the parking lights to flash once
and the Status Light to start rapidly flashing. Thirty seconds later the siren will chirp
again and the parking lights will flash again, the doors will lock (which is separately
programmable) and the Status Light will slow to a steady flash, confirming that thesecurity system is fully armed. If a point of entry is reopened before the single siren
chirp at 30 seconds, the Last Door Arming process stops, and will reset to start over
when the point of entry is again closed. All protected entries must be closed to initiate
the Last Door Arming sequence.
To temporarily prevent the system from automatically Last Door Arming, you
have these options: put the system into Valet Mode (page 14), leave the door open,
or, in most cases turning on the dome light may cause the system to detect that your
door is still open. Leaving the ignition key turned "on" is not recommended.
Last Door Arming offers a high level of security, since you do not have to
remember to arm the security system every time you leave the vehicle, and using it
may entitle you to an insurance discount (please check with your agent or carrier).
Page - 8
Feature #8 Open Door Bypass of Ignition LockingFactory Default Sett ing On ( press “arm/lock ” button to program)
Option: Off ( press “disarm/unlock ” button to program)
This feature cancels the automatic locking or unlocking of the vehicle’s doors
should one of the doors be open when the ignition switch is turned on or off.
Page - 25
Feature #9 Confirmation ChirpsFactory Default Setting On
( press “arm/lock ” button to program)Options:
Off ( press “disarm/unlock ” button to program)
Chirps Excepting Valet Mode ( press “II” button to program)
Chirps in Valet Mode Only ( press “III” button to program)
This feature removes the system’s 1 arming and 2 disarming confirmation chirps.
When this feature is used to remove these chirps, the system will still have 3 chirps
upon arming if a protected zone is violated, and still have 4 chirps upon disarming
if the system was previously activated. Using this feature to turn off the arm and
disarming chirps will also not affect the Prewarning operation, Unauthorized
Transmitter Alert (if used), nor will it affect the chirps used when programming.
The other two settings will have the confirmation chirps operate only when the
system is in Valet Mode, and not otherwise; or, the chirps will operate except when
the system is in Valet Mode.
Feature #10 Confirmation Chirp VolumeFactory Default Setting Medium High
( press “II” button to program)
Options:
Low (softest) ( press “arm/lock ” button to program)
Medium Low ( press “disarm/unlock ” button to program)
High (loudest) ( press “III” button to program)This feature allows the choice of four different volume levels of the system’s con-
firmation chirps, and when programming it, the buttons can be repeatedly and
sequentially pressed, thus making it easy to hear and choose the setting with the
best chirp volume.
This feature operates regardless of how feature #15, “Steady Siren” or “Pulsed
Horn” is set. Feature #15 sets “Steady”; or “Pulsed” as three different timings, for
the activated alarm period output. This feature, #10, affects only the confirmation
chirps.

7/16/2019 K9-Classic-EDP2.pdf
http://slidepdf.com/reader/full/k9-classic-edp2pdf 9/16
Page - 9
While the System is Armed, and should it Trigger
While the security system is armed, this is indicated by a slowly flashing Status
Light. Should any intrusion attempt be detected, the system will instantly activate,
or "trigger". Once triggered, the system loudly sounds the siren and flashes the
parking and interior lights on and off.
When it is first triggered, the Status Light changes its flash pattern, and the doors
will automatically relock. Should a door be open when the system triggers, it will
wait until the door is closed, and at that time relock the doors. The automaticrelocking of the doors denies access to the thief, and is just one of the many exclusive
patented features of the system. The siren will sound and the parking and interior
lights will flash for 30 seconds unless you disarm the system first (60, 90 and 120
seconds activated periods are options- see Feature #11, page 26). If all protected
entries are secure at the end of the 30 seconds, the system will stop and rearm itself,
ready to detect further entry attempts. If there is a protected entry still open or the
impact sensor still in a violated state at the end of 30 seconds, the system will
reactivate for two more 30 second cycles. In this case the system will stop after a
total of 3 cycles and rearm automatically, and then ignore only the open entry or
violated sensor. When the entry is closed or the sensor is reset, protection will begin
instantly for the formerly affected circuit.
When triggered, the alarm condition can be stopped instantly by pressing either
of these transmitter buttons:
• Pressing “arm/lock ” will rearm the system, stopping both system’s alarmcondition (leaving it armed).
• Pressing “disarm/unlock ” will disarm the system, leaving the doors locked,
stopping both system’s alarm condition (leaving it disarmed). Pressing this
button a second time unlocks the doors.
Anytime that the security system triggers, the Status Light will indicate which
protected zone triggered the system by flashing two (hood/trunk), three (door) or
four (sensor) times between pauses. This “Zone Violation” code will continue to
flash, even after disarming. The system can hold two different violation codes in it's
memory, which is cleared by turning the ignition switch "on". Once the system has
been activated and reset, the disarming confirmation changes to make the user aware
that it was activated.
Prewarning Detection Circuit: When the sensor is triggered by a light
impact or shock to the vehicle, the security system will respond by chirping the siren
3 times and locking the doors. After this Prewarning circuit has been triggered five
times it will automatically shutdown until the alarm system is disarmed, then armed.
Feature #5 Ignition Activated OverrideFactory Default Setting Off ( press “disarm/unlock ” button to program)
Option: On ( press “arm/lock ” button to program)
This feature allows an activated system to be overridden and disarmed by simply
turning the ignition switch on within 10 seconds of the system’s activation. After
10 seconds, the Emergency Override must be performed or the transmitter “dis-
arm/unlock ” button can be used to disarm the system.
Feature #6 Doors Lock With Ignition OnFactory Default Sett ing On ( press “arm/lock ” button to program)
Option: Off ( press “disarm/unlock ” button to program)
This feature configures the system to automatically lock the vehicle’s doors every
time that the ignition switch is turned on. An exception to this would be if feature
#8 is turned on, and a door being open when the ignition switch is turned on. The
following feature #7 controls the automatic unlocking operations, and feature #8
provides for an override of this automatic locking if a door is open when the ignition
is turned on.
Feature #7 Doors Unlock With Ignition Off Factory Default Setting On (all doors will unlock)*
( press “III” button to program)
Options:
Off ( press “arm/lock ” button to program)
Driver’s Door Only* ( press “disarm/unlock ” button to program)
All Doors Except Driver’s Door* ( press “II” button to program)
Similar to the previous locking feature, except this feature controls the unlock
operations when the ignition is turned off, and it has more options because of the
system’s multiple unlocking outputs.
*Multiple unlock outputs offer the capability of unlocking only the driver’s
door when the system is disarmed (Driver Door Priority Unlocking), and then theoption of unlocking all doors with a second press of the “disarm/unlock ” button.
The driver’s door unlocking differently from the other doors must be config-
ured when the system is installed!
If the system is installed without the Driver’s Door Priority Unlocking interface,
this feature unlocks all of the doors when the ignition switch is turned off.
If Driver’s Door Priority Unlocking is installed, this feature can control only the
driver’s door unlocking when the ignition is turned off, all doors unlocking, or all doors
except the driver’s. The following feature provides for an override of this automatic
unlocking if a door is open when the ignition is turned off.
Page - 24

7/16/2019 K9-Classic-EDP2.pdf
http://slidepdf.com/reader/full/k9-classic-edp2pdf 10/16
Feature #2 Last Door ArmingFactory Default Setting Off
( press “arm/lock ” button to program)
Options:
On without doors locking ( press “disarm/unlock ” button to program)
On with doors locking ( press “II” button to program)
“Last Door Arming” has the system automatically arm itself every time you exit the
vehicle (the complete operation is described on page 8). This feature turns that
operation on or off, and with options of having Last Door Arming operate with or
without also locking the doors when the system does arm.
Feature #3 Automatic RearmingFactory Default Setting Off
( press “arm/lock ” button to program)
Options:
On without doors locking ( press “disarm/unlock ” button to program)
On with doors locking ( press “II” button to program)
“Automatic Rearming”, described on page 11, prevents the system from becoming
accidentally disarmed by having it arm itself after being disarmed, if a door is not
then opened or the ignition turned on. Options are to have Automatic Rearmingoperate with or without also locking the doors when the system does rearm.
Feature #4 Starter Interrupt FunctionsFactory Default Setting On
( press “arm/lock ” button to program)
Options:
Off ( press “disarm/unlock ” button to program)
Automatic ( press “II” button to program)
This feature controls the Starter Interrupt circuit, in several ways. In its default
setting, “On”, the Starter Interrupt is operable whenever the alarm is armed.The “Automatic” option will cause the Starter Interrupt output to automati-
cally engage 90 seconds after the ignition switch is turned "off", and also 90 sec-
onds after disarming the system. This automatic engagement will occur even if the
security system is in a disarmed state, but not if it is in Valet Mode. Once the
Starter Interrupt output is activated, the system must be armed, then disarmed with
the transmitter, or placed into the Valet Mode by pressing and holding the Valet
Switch for 2 seconds to disengage it. There are no Status Light indications with
this automatic form of Starter Interrupt.
Programming this feature “Off” completely eliminates the Starter Interrupt
output, while leaving all other system operations fully functional.
Page - 23Page - 10
There are two methods of disarming the system:
Disarming the System
Disarming the System Using the Transmitter
2- The second method is an “Emergency Override” alternative, should the
transmitter become lost or inoperable. This method uses the Valet Switch, but
the vehicle’s ignition key is also required.
1- The primary method is to use the transmitter by pressing and releasing its
“disarm/unlock ” button. This is the normal “daily use” method.
Press and release the transmitter’s “disarm/unlock” button once to instantly
disarm the system, disengage the starter interrupt and unlock the doors. If you have
the optional unlock driver's door feature installed, then upon disarming only the
driver's door will unlock, and if the “disarm/unlock ” button is pressed again at
anytime thereafter, all of the doors will unlock.
The system’s reaction: Disarming is confirmed by the siren chirping twice, the
Status Light turning off, and the parking lights flashing twice, then with the interior
lights illuminating for 30 seconds for approach illumination. The lights will turn
off instantly if the ignition switch is turned "on" before the 30 seconds expires.
Safety Disarm/Storm Mode: While the system is activated, i.e. sounding
the siren and flashing the lights, pressing the “disarm/unlock ” button will disarm
the system, but not unlock the doors. This safety feature ensures that the vehicle
remain secure should the system require disarming due to being activated from
nuisance or malicious false sensory inputs, such as typically produced by severe
weather conditions. To remotely unlock the doors if the system is disarmed while
activated, simply repeat the disarm operation by pressing and releasing the “disarm/
unlock ” button again. If disarmed from a panic mode, the normal disarm indications
are present, including the unlocking of the doors.
If the system was activated and reset itself: The disarming confirmation
will no longer be 2 siren chirps, and the parking lights flashing twice before staying
on with the interior lights. Instead, the system will respond with 4 siren chirps and
the parking and interior lights flashing 4 times before staying on for 30 seconds. The
Status Light will have changed to flashing two to four times between pauses as a
“Zone Violation” code to indicate which protection circuit triggered the system (2
flashes, hood/trunk; 3 flashes, doors; 4 flashes , impact sensor). These special audible
and visual disarming indications, and Zone Violation code, will remain this way until
the ignition key is turned “on”.
7/16/2019 K9-Classic-EDP2.pdf
http://slidepdf.com/reader/full/k9-classic-edp2pdf 11/16
Page - 11
Automatic Rearming Feature: Automatic Rearming is a programmable
feature which ensures that your system is never inadvertently disarmed. It is
possible to accidentally or unknowingly operate the transmitter from a pocket or
purse. You may not even be aware of an accidental disarming due to the enhanced
operating distance offered by the system’s extended range, it is not noticed.
Automatic Rearming has the alarm rearm itself 90 seconds after it has been disarmed,
unless a vehicle door is opened or the ignition key turned on. Automatic Rearming
is confirmed by a fast flashing Status Light after the disarming, unless the system
was triggered, in which case a Zone Violation code will flash instead.
During the 90 second period, Automatic Rearming can be paused by openingthe door or stopped completely by turning the ignition key "on". Also, Automatic
Rearming can be cancelled by the Safety Disarm/Storm Mode feature; if the system
is disarmed while triggered, Automatic Rearming will not occur.
Disarming the System by Emergency Override
Should the transmitter become lost, damaged, or its batteries become exhausted,
the Valet Switch and the vehicle’s ignition key may be used to disarm the system:
Step 1 With the system in the armed condition, enter the vehicle via the driver's
door (be aware that the alarm will trigger when the door is opened).
The number of Valet Switch presses which are required for the Emergency
Override is custom-programmable! This is the SecureCode feature, which is
described on page 15. The above Emergency Override instructions reflect the
“as received from the factory” default setting.
Step 3 Within 5 seconds press and release the Valet Switch one time. The system
will disarm.
Step 2 Using the ignition key, turn the vehicle’s ignition switch on.
Step 7 Allow 10 seconds to pass without performing any programming
actions, or turn the vehicle’s ignition on.
Exit Programming mode:
• The siren will sound briefly and the Status Light will go out.
Programmable Features Descriptions
To custom program a new SecureCode:
Step 3 After entering the first stage by pressing the “arm/lock ” button thedesired number of times, and receiving a chirp for each press, wait for the
Step 2 Within 10 seconds slowly press and release the transmitter’s “arm/lock ”
button the number of times equal to the desired SecureCode for stage 1,
allow the system to respond to each transmitter button press with a siren
chirp before pressing the button again.
Step 1 Follow Steps 1 to 4 in the previous “How to Program Features” instruc-
tions; at Step 4 the Valet Switch will be pressed and released once (the
siren chirps once) to access “feature #1”.
Feature #1 SecureCodeFactory Default Setting 1 Press
Options:
1 to 9 presses, in each of two stages
Step 4 Continue to configure stage 2 of the SecureCode by now pressing and
releasing the “disarm/unlock ” button the number of times desired for the
stage 2. This should be done in the exact same fashion as the stage 1 entry-
press the “disarm/unlock ” button, wait for a single chirp before pressing
the button again, and then when final button press is done, wait after the
single chirp for the siren to chirp the total number of entered Valet Switch
presses.
system, after the final button press, to chirp the siren again the total
number of times that the button was pressed.
SecureCode is a unique patented feature which allows you to custom select the
number of Valet Switch presses in two stages, instead of a single “1 press”, which
would be required in order to perform an Emergency Override. If any of the three
anti-carjacking features are utilized, a customized SecureCode would also be
required to turn it off once it is fully activated. The SecureCode operation is
described on page 15.
Page - 22

7/16/2019 K9-Classic-EDP2.pdf
http://slidepdf.com/reader/full/k9-classic-edp2pdf 12/16
Page - 12
Should you feel threatened, or the need to attract attention, you can activate your
system's remote “Panic” feature at any time by pressing and holding for 3 seconds
the transmitter’s “arm/lock ”, the “disarm/unlock ”, or the “III” button (see
programmable feature #21 to enable). Your system will respond by sounding the
siren and flashing the parking lights for the normal activated alarm period of 30
seconds. The system features an unique “enhanced” remote Panic operation,
regarding the additional operations during Panic, and in association with the
transmitter button used in it’s activation or deactivation:
Remote Panic Feature
To disengage remote Panic, simply press and release any one of the same three
transmitter buttons, or, allow it to automatically stop after 30 seconds.
• Activating Panic with the “III” button will not affect the system’s armed or
disarmed status; the doors locked or unlock condition; nor will it affect the
starter disable circuit.
• Activating it with the “disarm/unlock ” button will unlock the doors, disarm
the system and does not engage the starter interrupt.
• Activating Panic with the “arm/lock ” button will lock the doors, arm the
system and engage the starter interrupt.
• Deactivating Panic with the “arm/lock ” button will stop Panic, and leave the
system armed with the starter interrupt engaged, and the doors locked.
• Deactivating it with the “disarm/unlock ” button will stop Panic, and leave the
system disarmed with the starter interrupt disengaged, and the doors unlocked.
• If the system is allowed to reset itself from remote Panic, it will enter the armed
state, locking the doors and engaging the starter interrupt, regardless of which
of the three buttons was used to activate it.
• Deactivating Panic with the “III” button will stop Panic, and leave the system
in the same state it was in at the moment Panic started, without locking or
unlocking the doors.
The vehicle ignition key and the Valet Switch are used to enter the Programming
Mode, then the transmitter is used to change features. Once the system is in
Programming Mode, a 10 second period without programming activity will cause
the system to automatically exit Programming Mode. Features can be selected in
any order as desired.
How to Program Features
Step 6 If there are more features to be programmed, within 10 seconds of
the previous action Press & Release the Valet Switch the same
number of times as the next desired feature’s number.
• Again the siren will chirp and the Status Light will flash as many times as
the Valet Switch was pressed to indicate the new feature number which is
now accessed. Then again use the transmitter as described in Step 5 to
change the newly accessed feature as desired.
To Access and Change further Features:
Step 5 After accessing the desired feature, within 10 seconds Press &
Release the appropriate transmitter button.
• Pressing the “arm/lock ” button typically turns the feature on; or sets the
feature’s first option. The siren will chirp once when this button is pressed.
• Pressing the “disarm/unlock ” button also typically turns the feature off;
or, sets the feature’s second option. The siren will chirp twice.
• Many features have third, and even fourth setting options. Pressing the“II” and “III” buttons select these options. Confirmation chirps when
these buttons are pressed are three and four chirps respectively.
Change the Feature:
Step 4 Within 10 seconds, Press & Release the Valet Switch the same
number of times as the desired feature’s number.
• The siren will chirp and the Status Light will flash off the same number of times as the Valet Switch was pressed to indicate the feature number
accessed.
Access a Feature:
• The siren will chirp then sound briefly and the Status Light will light
steady to confirm that the system is entering Programing Mode.
Step 3 Within 5 seconds, Press & Release the Valet Switch 5 times.
Step 2 Turn the ignition off.Step 1 Turn the vehicles’s ignition on.
Enter Programming mode:
Page - 21

7/16/2019 K9-Classic-EDP2.pdf
http://slidepdf.com/reader/full/k9-classic-edp2pdf 13/16
Other Transmitter Operations
The 2nd channel output, which is operated by pressing and holding the
transmitter “II” button for 1 second, is designed specifically to operate your
vehicle’s electric power trunk release. Your vehicle will respond by releasing
the trunk lid or rear hatch, chirping the siren twice, turning on your parking and
interior lights for 30 seconds, unlocking the doors, and disarming the system if it was
armed. The 2nd channel output will not operate when the ignition switch is "on"
unless the vehicle's door is open. If desired, the security system can be programmed
to remain armed when this feature is used, and connection of the 2nd channel may
require extra parts or installation.
To Silently Arm or Disarm the alarm, press and release the “II” button
twice. The siren’s confirmation chirps will not occur, and this operation simply
reverses, or “toggles” the armed and disarmed status of the system.
The sensor may be temporarily bypassed. When arming the alarm with
the transmitter, within 3 seconds after the arming chirp press the “II” button. The
system will respond with another single chirp, confirming that the sensor is
bypassed.
The system also has a 3rd channel outputwhich is similar to the 2nd channel,
but it does have some special operational design differences. To operate it, press
and release the “III” button 2 times in 5 seconds to operate this output.
The differences are that 3rd channel output will operate regardless of the ignition
switch being "on" or "off", and there is no audible or visual confirmation. Connection
of the 3rd channel will vary, depending upon the chosen application, and may require
extra parts or installation.
There are also optional 4th channel and 5th channel outputs, which areavailable if more remote control functions are desired. These outputs can be
repurposed from two other system outputs which are designed to interface the
system with an existing factory alarm system, by Programmable Features #23 and
#24. The system must be configured to utilize these outputs; please consult your
installer.
When these outputs are programmed and configured to operate, pressing the
transmitter’s “arm/lock ” and “II” buttons together will activate the 4th channel
output. Pressing the “disarm/unlock ” and “III” buttons will activate the 5th
channel. Or, if desired, the transmitter’s “III” button can be programmed by to
operate either of these channels.
Page - 13Page - 20
The Programmable Features
It is important to note that programmable features affect the exact
operation of the system, and that the descriptions of any features
utilized should be used to supplement the basic system operations
which were described in previous sections of this booklet.
Each of the Programmable Features is described in detail in the pages
following the features’ list and programming instructions.
1 SecureCode
2 Last Door Arming
3 Automatic Rearming
4 Starter Interrupt Functions
5 Ignit ion Activated Override
6 Doors Lock With Ignition On
7 Doors Unlock With Ignition Off
8 Open Door Bypass To Previous Two Features
9 Confirmation Chirps
10 Confirmation Chirp Volume
11 Activated Alarm Cycle
12 Lights On Upon Disarm
13 Disarm Alarm Upon Trunk Release
14 Arming Delay
15 Steady Siren Output / Pulsed Horn
16 Alarm Functions Bypass17 Ignition Activated Anti-Carjacking Protection
18 Door Activated Anti-Carjacking Protection
19 Remote Activated Anti-Carjacking Protection
20 Open Door Warning Upon Arming
21 III Button Operation
22 Doorlock Functions (an installation feature)
23 (-) Parking Light Output (an installation feature)
24 (-) Horn Honk Output (an installation feature)
The system’s versatility is due to an incredible array of programmable features.
These are:
“Features Programming Mode” is the means for changing any of the features.
7/16/2019 K9-Classic-EDP2.pdf
http://slidepdf.com/reader/full/k9-classic-edp2pdf 14/16
The Valet Switch may be mounted in a special holder with the Status light, or
optionally, the installer may have mounted it independently in a hidden, yet
accessible location. Please ensure that you and others who use your vehicle are
aware of the location of the Valet Switch and its uses. The Valet Switch has several
functions:
Using the Valet Switch
• It is also used in the procedures for programming features and programming
transmitters to operate the Excalibur system. See the “Programming”
sections of this manual for details on these uses.
• Should your transmitter be lost or become inoperable, the Valet Switch, andthe ignition key, can be used to disarm the system with an Emergency
Override.
• Placing your system into Valet Mode, which prevents it from arming.
Page - 14
Valet Mode: This allows you to turn off all of the “alarm” operations of the security
system while retaining the remote convenience features such as keyless entry, Panic,
and the Auxiliary Outputs. The system may only be placed into Valet Mode when
it’s disarmed; if armed, an Emergency Override must be performed before placing
into Valet Mode. Once the system is in Valet Mode, it cannot become armed from
the transmitter, Last Door Arming, or Automatic Rearming.
Valet Mode and Emergency Override are two similar, but different procedures,
although both operations use the Valet Switch. Emergency Override disarms an
armed and activated system, and requires the ignition key. Valet Mode turns off the
alarm operations of the disarmed system, but without the need of the ignition key.
Valet Mode is designed for situations in which it is not convenient for the
security portion of the system to be operational, such as during extended stopovers
for vehicle servicing, maintenance, valet parking, washing, etc.
To Enter Valet Mode: With the system disarmed, press and hold the ValetSwitch for 2 seconds.
• The siren will chirp twice, the parking lights will flash twice and the Status
Light will illuminate on solid.
• To indicate that the system is in Valet Mode, the Status Light remains on
whenever the system is in Valet Mode.
• To remind the user that the system is in Valet Mode, the siren will chirp once
every time the vehicle’s ignition is turned off.
To Exit Valet Mode, simply Press & Release the Valet Switch at any time.
• The Status Light will turn off to confirm exit from Valet Mode.
If the Unauthorized Transmitter Alert feature is on, programming a
transmitter to the system will activate the Unauthorized Transmitter
Alert warning and the extended Status Light visual display; for the
next 48 hours the siren will sound a brief series of chirps every time
the vehicle’s ignition key is turned on.
The following special procedure programs the transmitters and
also turns the Unauthorized Transmitter Alert feature on.
Step 3 Press the “arm/lock ” button on each remaining transmitter.
The system will chirp the siren once to confirm that each was learned.
The transmitter’s other three button's functions will automatically be
assigned when the “arm/lock ” button is learned. If a code is not received
within a 10 second period, the learning process will automatically terminate,
as indicated by another siren burst.
Page - 19
Special Programming procedure to turn On the UTA feature: Use thismethod to program transmitters, and at the same time to turn on or turn off the
Unauthorized Transmitter Alert feature.
Follow the same steps as the Standard Programming, but on any transmitter
being programmed instead of pressing the “arm/lock ” button, press the “arm/lock ”
and the “disarm/unlock ” buttons together. This action turns on the Unauthorized
Transmitter Alert feature and at the same time programs the transmitter to operate
the system.
Once the Unauthorized Transmitter Alert feature is turned on, the warning will
sound for 48 hours after any transmitter programming, including the programming
session which was used to turn it on.
system). When the first transmitter code is learned all existing stored
codes will be erased.

7/16/2019 K9-Classic-EDP2.pdf
http://slidepdf.com/reader/full/k9-classic-edp2pdf 15/16
“SecureCode” allows the user to customize the number of Valet Switch presses
which are required to successfully perform an Emergency Override. The basic
Emergency Override procedure is described on page 11 . Instead of a single “1
press” of the Valet Switch which would be required in order to perform an
Emergency Override, two stages of Valet Switch presses must be made. In each of
the two stages, the Valet Switch will need to be pressed 1 through 9 times, as
programmed by the user. This is the Emergency Override procedure if the system
has programmed with a customized SecureCode:Step 1 With the system in the armed condition, enter the vehicle via the driver's
door (be aware that the system will activate to an alarm condition when the
SecureCode
Page - 15
Once the system is disarmed, if Valet Mode is desired, just press and hold the
Valet Switch for 2 seconds to place the system into Valet Mode.
door is opened).
Step 2 Using the ignition key, turn the vehicle’s ignition switch on.
Step 3 Within 5 seconds press and release the Valet Switch the same number of
times that have been programmed for stage #1.
Step 4 After a few seconds, the siren will stop sounding, chirp once, and then
resume sounding.
Step 5 Now, within 5 seconds press and release the Valet Switch the same number
of times that have been programmed for stage #2. Within a few seconds
the siren will stop sounding, and the unit will disarm.
In addition to Emergency Override, if any of the three anti-carjacking features
are utilized, a correct customized SecureCode would also be required to turn off
anti-carjacking once it has become fully activated. How to program your own
customized SecureCode is explained on page 22.
Should a mistake be made entering the SecureCode for an Emergency Override,
after a failed attempt the ignition switch must be turned off, then on again before
another SecureCode entry attempt is made. Should two failed SecureCode
attempts be made, the system will ignore any further presses of the Valet
Switch for two minutes.
Page - 18
Unauthorized Transmitter AlertTM is a protection feature which may be turned
on by the user (see the next section, “How to Program Transmitters”). When this
protection feature is utilized, whenever a transmitter is added to operate the system,
for 48 hours afterward a warning consisting of a brief series of siren chirps sounds
every time the vehicle’s ignition is turned on.
Also during this 48 hour warning period, the 10 second Automatic Transmitter
Verification visual display will increase to being displayed for 90 seconds insteadof the usual 10 seconds. When this feature is used and activated, after 48 hours the
warning chirps disappear and the Status Light flashing the number of transmitters
returns to being displayed for 10 seconds.
Automatic Transmitter VerificationTM shows the total number of transmitters
which can operate the system, by flashing the Status Light with this number for 10
seconds every time that the ignition key is turned on.
The system features several security safeguards in one of the most vulnerable
areas of any remotely controlled system. These features are:
Transmitter Protection
Code JumpingTM It is quite easy, with the proper equipment, to record an alarm
or keyless entry system’s transmitter signal, and simply play the captured signal
back to the system to defeat it. The Code Jumping renders such “code grabbing”
devices useless by randomly changing each signal that the transmitter sends.
The system is capable of being operated by as many as four transmitters.
Transmitters must be encoded, or programmed, to the system in order to operate it
(excepting the originals, which were programmed at the factory). It is during the
transmitter programming procedure that the Unauthorized Transmitter Alert featuremay be turned on if desired.
How to Program Transmitters
Step 1 Have all transmitters which are to operate the system at hand. Turn the
ignition “on”.
Standard Programming: Using this method to program additional or replacement
transmitters does not affect Unauthorized Transmitter Alert.
Step 2 Within 5 seconds of turning on the ignition, press the Valet Switch 5 times.
The siren will briefly sound, confirming that for the next 10 seconds the
system is ready to learn a transmitter code. To enter a code, simply press
and release the “arm/lock ” button (the button which is designed to arm the

7/16/2019 K9-Classic-EDP2.pdf
http://slidepdf.com/reader/full/k9-classic-edp2pdf 16/16
The Status Light
Security System Status: These are the “normal” operations of the Status Light,
indicating the state of the security system. Exceptions to normal operation are the
transmitter verification display upon turning on the ignition key, and
1) Off = The security system is disarmed and not performing automatic functions.
2) On Constant = The security system is in the Valet Mode.
3) Flashing Slowly = The security system is fully armed.
4) Flashing Fast = Last Door Arming or Automatic Rearming is in progress.
Page - 16
Automatic Transmitter Verification: For the first 10 seconds after the
vehicle’s ignition is turned on, the Status Light will flash a number of times between
pauses that equal the number of transmitters that are programmed to operate the
system:
5) 1 Flash /pause = 1 transmitter is programmed.
6) 2 Flashes /pause = 2 transmitters are programmed.
7) 3 Flashes /pause = 3 transmitters are programmed.
8) 4 Flashes /pause = 4 transmitters are programmed.
Zone Violation: If the system enters an alarm condition, the Status Light will stop
flashing slowly and begin to flash in a sequence between pauses to indicate which
protected zone caused the alarm condition. The Status Light will flash and pause to
indicate which protected zone was violated while the system is still armed, after it
is disarmed, and until the vehicle’s ignition is turned on. The system’s Zone
Violation feature’s memory can store two consecutive zone violations. If there have
been multiple violations, the Status Light will show the two most recent violations
in the order in which they occurred.
9) 2 Flashes / Pause = System was triggered by open hood or trunk.
10) 3 Flashes / Pause = System was triggered by an open door.
11) 4 Flashes / Pause = System was triggered by the sensor.
• Turning on the ignition will clear the Zone Violation.
The Status Light visually confirms the status of the system and provides a high
level of visual deterrence. The Status Light in this model is independent, and Blue
in color. It may be mounted by itself, or contained in a special holder, with the Valet
Switch, which is included with the system.
The Status Light by itself is also available in the color Red. If the system is
upgraded to 2-way operation, with the optional Echo, the Status Light then may be
within the 2-way window-mounted transceiver unit, in the form of two LED lights,
with identical operation, which illuminate Red in color. So while the standardStatus Light is described as Blue, other colors may be found.
Step 2 Turning the ignition back on.
Page - 17
Anti-Carjacking ProtectionThe system is equipped with three separate Anti-Carjacking protection features,
whose operation may be selectively activated by the ignition, by an open door, or
by the transmitter. All three are programmable, and must be turned on to operate.
Once activated, the user has 53 seconds to cancel the Anti-Carjacking protection
process by pressing the Valet Switch once. If Anti-Carjacking is not cancelled, 53
seconds after being activated the siren will begin to chirp for 7 seconds to alert the
user that the system is about to enter into an alarm condition. The Valet Switch may
still be pressed once during this period to cancel the Anti-Carjacking process.
If the Anti-Carjacking process is not cancelled before the 60 second count-
down expires, the system will enter an alarm condition, sounding the siren and
flashing the parking lights. 30 seconds after this occurs, or should the ignition be
turned off in the meantime, the stater interrupt will engage. Once the system
enters the alarm condition, it will not respond to the transmitter, nor will the sys-
tem reset automatically after 60 seconds, and it can only be disengaged by:
Step 1 Turning the vehicle’s ignition off.
Step 3 Within 5 seconds, perform an Emergency Override using the Valet
The three types of Anti-Carjacking protection features are:
Switch. If the SecureCode has been customized, the correct number of
Valet Switch presses must be made.
Anti-Carjacking protection activated using the transmitter has the
process start by pressing and holding the “III” button for 3 seconds, but only if the
vehicle’s ignition is on. The Valet Switch must be pressed within 60 seconds after
this is done to cancel Anti-Carjacking. This is User Programmable Feature #19 (see
page 28).
Anti-Carjacking protection activated by an open door has the process start
should a door be opened after the vehicle is started and the engine is running. The
Valet Switch must be pressed within 60 seconds after the door is opened to cancel
Anti-Carjacking. This is User Programmable Feature #18 (see page 28).
Anti-Carjacking protection activated by the vehicle’s ignition has the
process start every time the vehicle’s ignition is turned on. The Valet Switch must
be pressed within 60 seconds every t ime the vehicle is started to cancel Anti-
Carjacking. This is User Programmable Feature #17 (see page 27).
The transmitter can NOT stop Anti-Carjacking; only the Valet Switch!