K3960—Page 1 of 2 LAYOUT CODE FABRIC …printsew.com/instructions/ksp3960.pdf · Fuse to wrong...
2
VIEW A ¼" (6 mm) seam allowances are included. For correct stitches see Sewing Procedures. APPLIQUÉS Apply appliqués to the cut out pieces before sewing romper together. Transfer details from guides to left front. and to toe pieces. The outer edges of the appliqués can be finished with a straight stitch close to the edge, or with satin stitches. To satin stitch, use a medium zigzag width and a very short stitch length. Test your stitches on a scrap piece of fabric and adjust the length and width of the stitches as necessary. Trace all the pieces for each chosen appliqué separately to the paper side of the paper backed fusible web. Place the rough side of the paper (web side) to the wrong side of the chosen appliqué fabrics and fuse. Cut out all the pieces. Transfer any stitching lines to the right side of the appliqué. Remove the paper from the cut out pieces and fuse them to the right side at the designated placements. paper side of fusible web wrong side of appliqué fabrics Place a piece of tear-away material on the wrong side of the fabric under area of appliqués. Pin or baste the tear- away in place. Stitch around all the raw edges of the appliqués with a straight stitch or with a satin stitch. Change your thread color as necessary. Once the stitching is complete, remove the tear-away material. Using three strands of embroidery floss, stitch swirls on left front and antenae on left front and toes with a seed stitch. 1. Stitch fronts, right sides together, at center, in a 5/8” (1.5cm) seam, from crotch to large circle. 2. Insert zipper in center front as follows: Pin zipper to left front, right sides together, place zipper pull below neckline, end of zipper at large circle and zipper tape even with raw edge of fabric. Baste zipper to seam allowance. Baste other side of zipper to right front. Using a zipper foot, stitch zipper to seam allowances, close to zipper teeth. 3. Stitch backs, right sides together, at center back seam. Right side of fabric Wrong side of fabric Pattern piece with printed side of pattern down Pattern piece with printed side of pattern up LAYOUT CODE SEWING PROCEDURES Use an all purpose thread and a size 12/80 ball-point sewing machine needle. Standard sewing machine Sew the seam with an overlock stitch - sews and overcasts in one step. Sew the seams with a narrow zigzag width and a medium stitch length and overcast seam allowances together, using a wide zigzag stitch or a three step zigzag stitch. Finish the raw edges of hems, facings and single layers of fabric, using a wide zigzag stitch or a three-step zigzag stitch. Straight stitch machine Sew the seams with a medium stitch length and stretch the fabric as you sew. Stitch seam allowances together close to the raw edges. Serger (overlock machine) Sew the seams. Finish the raw edges of facings, hems and single layers of fabric. Guide fabric, being sure that only 1/4" (6 mm) seam allowance is used. SEAM ALLOWANCES 1/4" (6 mm) seam allowances are included for all seams, unless otherwise speci- fied in the following instructions. PRESSING Steam press each seam as sewn. Press seam allowances to one side, unless otherwise specified in the following instructions. Clip seam allowances where necessary so seams are flat. CLIP INNER CURVES NOTCH OUTER CURVES TRIM CORNERS FABRIC 42" (106 cm) or 58" (148 cm) WIDE Selvage Selvage Fold Single Layer 2 7 8 6 1 5 4 VIEW A All Sizes 9 9 9 3 1 5 6 Selvage Selvage Fold Single Layer KWIK SEW ® K3960—Page 1 of 2 Baby Sizes: XS-S-M-L-XL For View A use pattern pieces 1 through 11. For View B use pattern pieces 1 through 8 and 12 through 16. 1 2 3 4 5 6 7 8 10 11 12 13 14 15 16 9 1. Front View A and B 2. Back View A and B 3. Toe View A and B 4. Neckband View A and B 5. Sleeve View A and B 6. Cuff View A and B 7. Sole View A and B 8. Tab View A and B 9. Ruffle View A 10. Guide (Left Front) View A 11. Guide (Toes) View A 12. Ears (Left Front) View B 13. Guide (Left Front) View B 14. Ears (Toes) View B 15. Guide (Toes) View B 16 Mane View B CONTRAST A All Sizes FUSIBLE INTERFACING 22” (56 cm) WIDE VIEW A & B - ALL SIZES 8 Selvage Selvage Single Layer FABRIC ILLUSTRATION CODE Wrong Side Right Side Contrast Fabric Contrast View B Back View A Front View A Back View B Front HOW TO USE A KWIK•SEW MULTI-SIZE PATTERN For optimum results, READ ALL INSTRUCTIONS before beginning this project. Pattern includes five sizes. Pattern is made to fit specific body measurements with ease allowed for comfort and style. Compare body measurements to measurements listed on the back of the pattern enve- lope and choose the size closest to body measurements. Compare the measurement of the finished garment, printed on the pattern piece, to body measurements. If the garment is loose fitting you may want to choose the smaller size. Select the pattern pieces for the view you have chosen and press pattern pieces with a dry iron. Cut out pattern pieces following lines for the selected size and view. CUTTING Be sure to use fabric with the correct degree of stretch given on the back of the pattern envelope. Test the degree of stretch of fabric to the stretch chart on the pattern enve- lope. Preshrink and press fabric if necessary. Fabric layouts are shown for fabric with nap, one-way design, or shading. Layouts are given as a guide, if adjustments are made on the pattern pieces, this may change the position of the pattern pieces. Find the layouts by garment view, fabric width and size. Circle chosen layout. Fold fabric double, right sides together, unless otherwise indicated on the layout and place pattern pieces on the wrong side of fabric. If placing pattern pieces on a single layer of fabric, place pattern pieces on the right side of fabric. Place pattern pieces on the fabric with the arrow and the grain line in the same direc- tion. Follow arrows for correct grain, placing ends of grain line an even distance from the selvage and be sure to place pattern pieces with the stretch of fabric as marked on the pattern. Hold pattern pieces in place with weights or pins. Cut out pattern pieces, using scissors or rotary cutter. Transfer all construction lines, dots and notches to fabric. The easiest way to mark notches, center front, center back, and fold lines is to make tiny clips on the seam al- lowances. Or, mark with chalk or water soluble pen. If marking is needed on right side of fabric, mark with pins or hand basting stitches. Label pattern pieces on wrong side with tape. Selvages Fold 2 5 1 6 7 8 4 VIEW B All Sizes FABRIC 42" (106 cm) WIDE FABRIC 58" (148 cm) WIDE Selvages Fold 2 1 5 6 7 8 4 VIEW B All Sizes EASING AND GATHERING is a process of stitching one or two rows of machine stitching on the seam allowance with a longer stitch length and looser thread tension. Stitch lengths vary from 6 to 10 stitches per inch (3-5 per cm), shorter for sheer or lightweight fabrics and longer for medium to heavyweight fabrics.
Transcript of K3960—Page 1 of 2 LAYOUT CODE FABRIC …printsew.com/instructions/ksp3960.pdf · Fuse to wrong...

VIEW A
¼" (6 mm) seam allowances are included. For correct stitches see Sewing Procedures.
APPLIQUÉS
Apply appliqués to the cut out pieces before sewing romper together.
Transfer details from guides to left front. and to toe pieces.
The outer edges of the appliqués can be finished with a straight stitch close to the edge, or with satin stitches. To satin stitch, use a medium zigzag width and a very short stitch length. Test your stitches on a scrap piece of fabric and adjust the length and width of the stitches as necessary.
Trace all the pieces for each chosen appliqué separately to the paper side of the paper backed fusible web. Place the rough side of the paper (web side) to the wrong side of the chosen appliqué fabrics and fuse.
Cut out all the pieces. Transfer any stitching lines to the right side of the appliqué.
Remove the paper from the cut out pieces and fuse them to the right side at the designated placements.
paper side of fusible web
wrong side ofappliqué fabrics
Place a piece of tear-away material on the wrong side of the fabric under area of appliqués. Pin or baste the tear-away in place.
Stitch around all the raw edges of the appliqués with a straight stitch or with a satin stitch. Change your thread color as necessary. Once the stitching is complete, remove the tear-away material.
Using three strands of embroidery floss, stitch swirls on left front and antenae on left front and toes with a seed stitch.
1. Stitch fronts, right sides together, at center, in a 5/8” (1.5cm) seam, from crotch to large circle.
2. Insert zipper in center front as follows: Pin zipper to left front, right sides together, place zipper pull below neckline, end of zipper at large circle and zipper tape even with raw edge of fabric. Baste zipper to seam allowance. Baste other side of zipper to right front.
Using a zipper foot, stitch zipper to seam allowances, close to zipper teeth.
3. Stitch backs, right sides together, at center back seam.
Right side of fabric
Wrong side of fabric
Pattern piece with printed side of pattern down
Pattern piece with printed side of pattern up
LAYOUT CODE
SEWING PROCEDURESUse an all purpose thread and a size 12/80 ball-point sewing machine needle.
Standard sewing machineSew the seam with an overlock stitch - sews and overcasts in one step.Sew the seams with a narrow zigzag width and a medium stitch length and overcast seam allowances together, using a wide zigzag stitch or a three step zigzag stitch. Finish the raw edges of hems, facings and single layers of fabric, using a wide zigzag stitch or a three-step zigzag stitch.
Straight stitch machineSew the seams with a medium stitch length and stretch the fabric as you sew. Stitch seam allowances together close to the raw edges.
Serger (overlock machine)Sew the seams. Finish the raw edges of facings, hems and single layers of fabric.Guide fabric, being sure that only 1/4" (6 mm) seam allowance is used.
SEAM ALLOWANCES1/4" (6 mm) seam allowances are included for all seams, unless otherwise speci-fied in the following instructions.
PRESSINGSteam press each seam as sewn. Press seam allowances to one side, unless otherwise specified in the following instructions. Clip seam allowances where necessary so seams are flat.
CLIP INNERCURVES NOTCH
OUTERCURVES
TRIMCORNERS
FABRIC 42" (106 cm) or 58" (148 cm) WIDE
Selvage
Selvage
Fold
Sin
gle
Laye
r
27
8
6
1
54
VIEW A All Sizes
99 9
3
1
5 6
Selvage
Selvage
Fold
Sin
gle
Laye
r
KWIK SEW®
K3960—Page 1 of 2
Baby Sizes: XS-S-M-L-XL
For View A use pattern pieces 1 through 11.For View B use pattern pieces 1 through 8 and 12 through 16.
1 2
3 45
6
7 8
10 1112
13 1415 16
9
1. Front View A and B2. Back View A and B3. Toe View A and B4. Neckband View A and B5. Sleeve View A and B6. Cuff View A and B 7. Sole View A and B8. Tab View A and B9. Ruffle View A10. Guide (Left Front) View A11. Guide (Toes) View A12. Ears (Left Front) View B13. Guide (Left Front) View B14. Ears (Toes) View B15. Guide (Toes) View B16 Mane View B
CONTRAST A All Sizes
FUSIBLE INTERFACING 22” (56 cm) WIDE VIEW A & B - ALL SIZES
8Selvage
Selvage
Sin
gle
Laye
r
FABRIC ILLUSTRATION CODE
Wrong SideRight Side Contrast
Fabric
Contrast
View B Back
View A Front View A Back
View B Front
HOW TO USE A KWIK•SEW MULTI-SIZE PATTERN
For optimum results, READ ALL INSTRUCTIONS before beginning this project.
Pattern includes five sizes. Pattern is made to fit specific body measurements with ease allowed for comfort and style. Compare body measurements to measurements listed on the back of the pattern enve-lope and choose the size closest to body measurements.Compare the measurement of the finished garment, printed on the pattern piece, to body measurements. If the garment is loose fitting you may want to choose the smaller size.Select the pattern pieces for the view you have chosen and press pattern pieces with a dry iron.Cut out pattern pieces following lines for the selected size and view.
CUTTING Be sure to use fabric with the correct degree of stretch given on the back of the pattern envelope. Test the degree of stretch of fabric to the stretch chart on the pattern enve-lope. Preshrink and press fabric if necessary. Fabric layouts are shown for fabric with nap, one-way design, or shading.Layouts are given as a guide, if adjustments are made on the pattern pieces, this may change the position of the pattern pieces. Find the layouts by garment view, fabric width and size. Circle chosen layout.Fold fabric double, right sides together, unless otherwise indicated on the layout and place pattern pieces on the wrong side of fabric. If placing pattern pieces on a single layer of fabric, place pattern pieces on the right side of fabric.Place pattern pieces on the fabric with the arrow and the grain line in the same direc-tion. Follow arrows for correct grain, placing ends of grain line an even distance from the selvage and be sure to place pattern pieces with the stretch of fabric as marked on the pattern. Hold pattern pieces in place with weights or pins. Cut out pattern pieces, using scissors or rotary cutter.Transfer all construction lines, dots and notches to fabric. The easiest way to mark notches, center front, center back, and fold lines is to make tiny clips on the seam al-lowances. Or, mark with chalk or water soluble pen. If marking is needed on right side of fabric, mark with pins or hand basting stitches.Label pattern pieces on wrong side with tape.
Selvages
Fold
2
51
6 7
8 4
VIEW B All Sizes
FABRIC 42" (106 cm) WIDE FABRIC 58" (148 cm) WIDE
Selvages
Fold
2
1
5 6 78
4
VIEW B All Sizes
EASING AND GATHERING is a process of stitching one or two rows of machine stitching on the seam allowance with a longer stitch length and looser thread tension. Stitch lengths vary from 6 to 10 stitches per inch (3-5 per cm), shorter for sheer or lightweight fabrics and longer for medium to heavyweight fabrics.
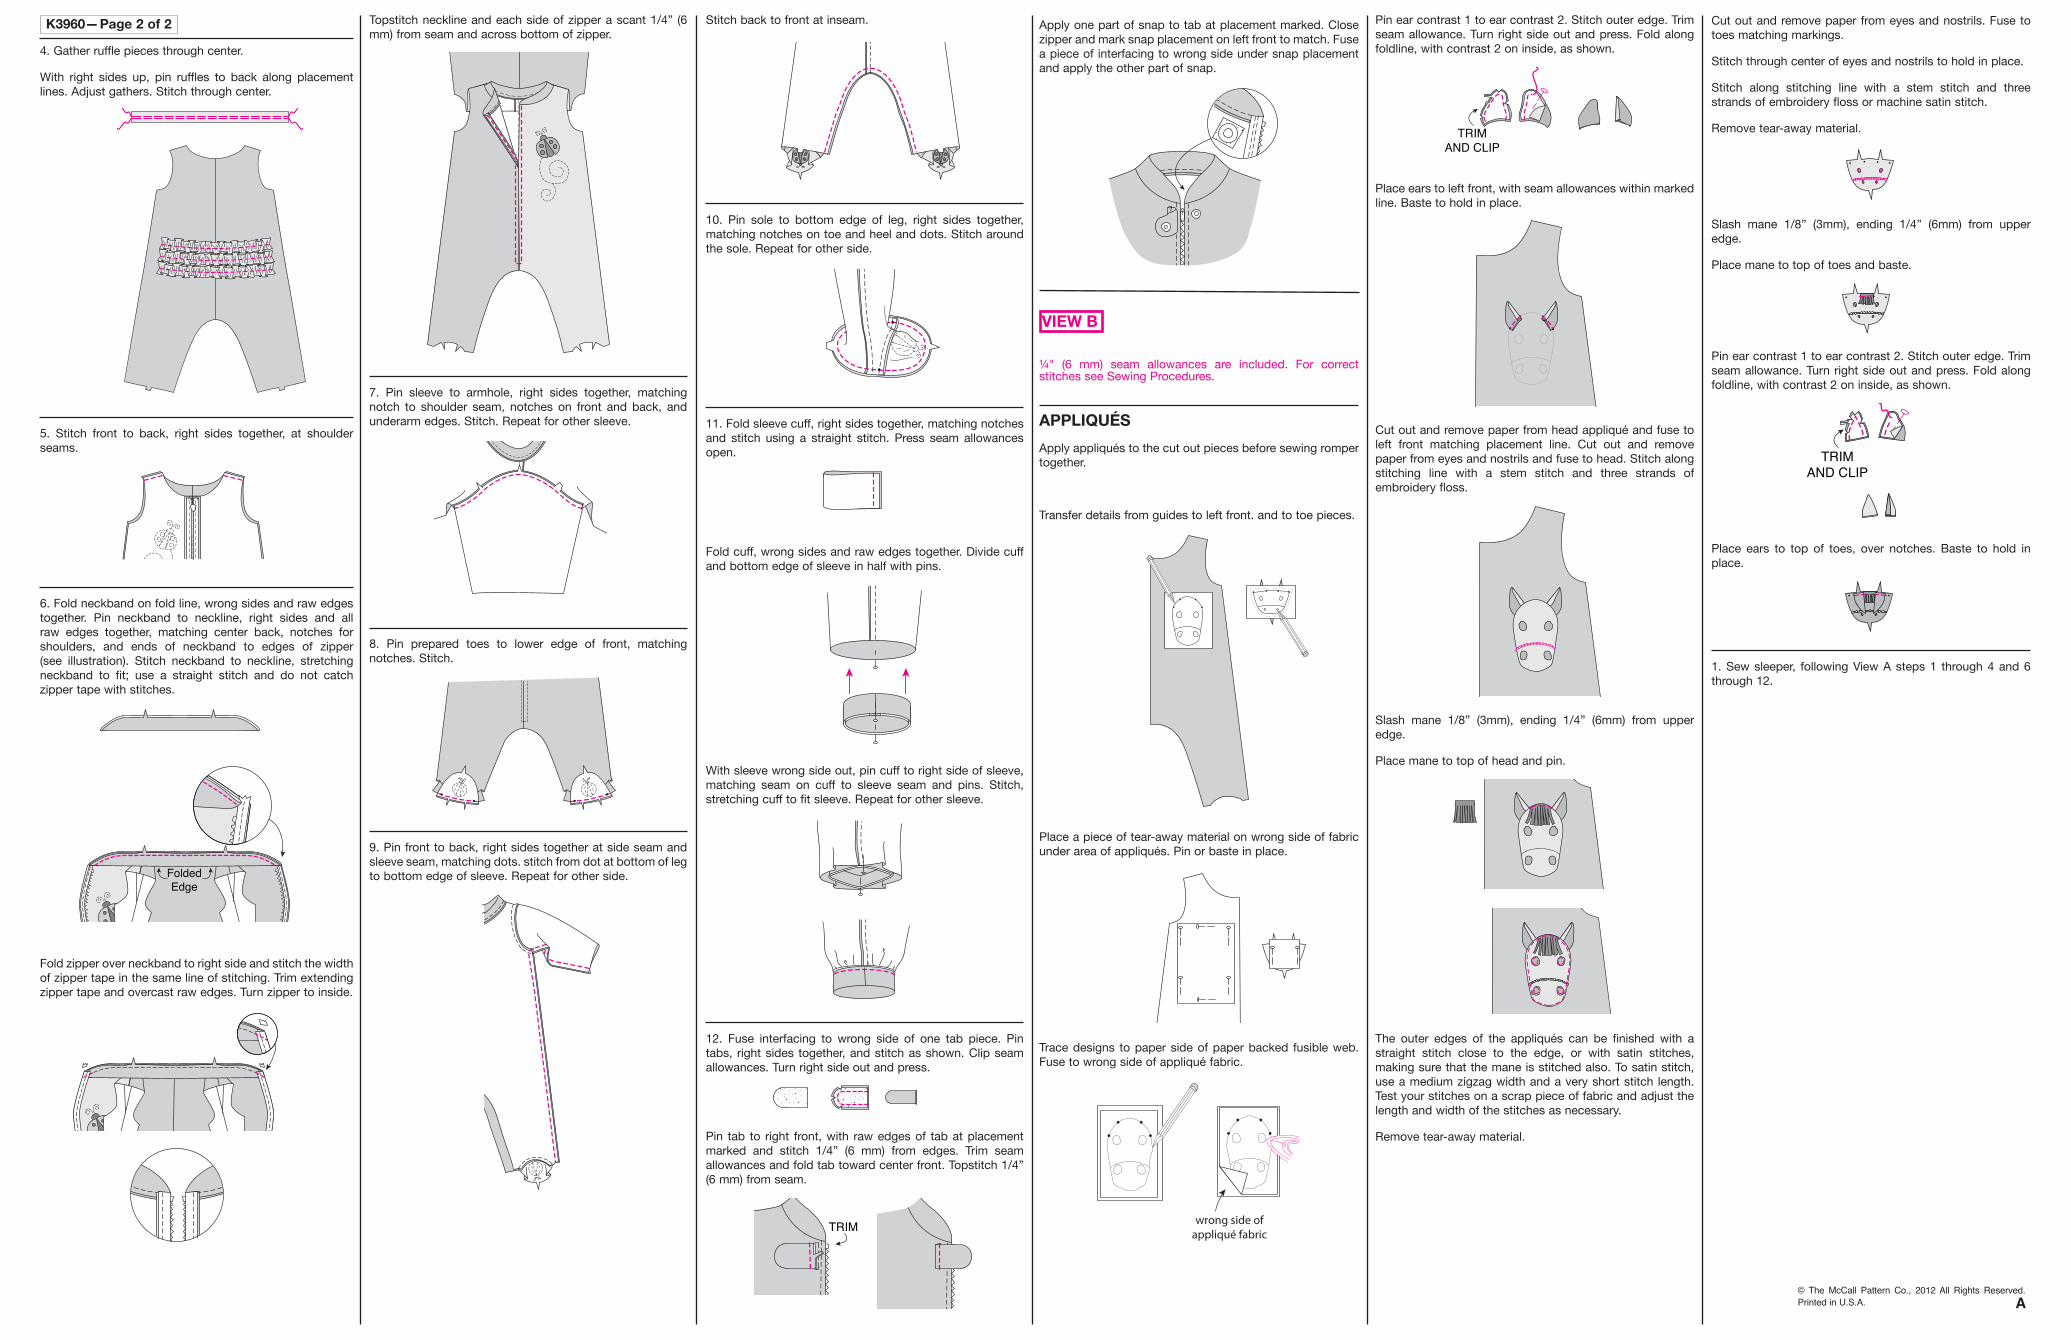
4. Gather ruffle pieces through center.
With right sides up, pin ruffles to back along placement lines. Adjust gathers. Stitch through center.
5. Stitch front to back, right sides together, at shoulder seams.
6. Fold neckband on fold line, wrong sides and raw edges together. Pin neckband to neckline, right sides and all raw edges together, matching center back, notches for shoulders, and ends of neckband to edges of zipper (see illustration). Stitch neckband to neckline, stretching neckband to fit; use a straight stitch and do not catch zipper tape with stitches.
FoldedEdge
Fold zipper over neckband to right side and stitch the width of zipper tape in the same line of stitching. Trim extending zipper tape and overcast raw edges. Turn zipper to inside.
K3960—Page 2 of 2
© The McCall Pattern Co., 2012 All Rights Reserved. Printed in U.S.A. A
Stitch back to front at inseam.
10. Pin sole to bottom edge of leg, right sides together, matching notches on toe and heel and dots. Stitch around the sole. Repeat for other side.
11. Fold sleeve cuff, right sides together, matching notches and stitch using a straight stitch. Press seam allowances open.
Fold cuff, wrong sides and raw edges together. Divide cuff and bottom edge of sleeve in half with pins.
With sleeve wrong side out, pin cuff to right side of sleeve, matching seam on cuff to sleeve seam and pins. Stitch, stretching cuff to fit sleeve. Repeat for other sleeve.
12. Fuse interfacing to wrong side of one tab piece. Pin tabs, right sides together, and stitch as shown. Clip seam allowances. Turn right side out and press.
Pin tab to right front, with raw edges of tab at placement marked and stitch 1/4” (6 mm) from edges. Trim seam allowances and fold tab toward center front. Topstitch 1/4” (6 mm) from seam.
TRIM
Topstitch neckline and each side of zipper a scant 1/4” (6 mm) from seam and across bottom of zipper.
7. Pin sleeve to armhole, right sides together, matching notch to shoulder seam, notches on front and back, and underarm edges. Stitch. Repeat for other sleeve.
8. Pin prepared toes to lower edge of front, matching notches. Stitch.
9. Pin front to back, right sides together at side seam and sleeve seam, matching dots. stitch from dot at bottom of leg to bottom edge of sleeve. Repeat for other side.
Apply one part of snap to tab at placement marked. Close zipper and mark snap placement on left front to match. Fuse a piece of interfacing to wrong side under snap placement and apply the other part of snap.
VIEW B
¼" (6 mm) seam allowances are included. For correct stitches see Sewing Procedures.
APPLIQUÉS
Apply appliqués to the cut out pieces before sewing romper together.
Transfer details from guides to left front. and to toe pieces.
Place a piece of tear-away material on wrong side of fabric under area of appliqués. Pin or baste in place.
Trace designs to paper side of paper backed fusible web. Fuse to wrong side of appliqué fabric.
wrong side ofappliqué fabric
Pin ear contrast 1 to ear contrast 2. Stitch outer edge. Trim seam allowance. Turn right side out and press. Fold along foldline, with contrast 2 on inside, as shown.
TRIMAND CLIP
Place ears to left front, with seam allowances within marked line. Baste to hold in place.
Cut out and remove paper from head appliqué and fuse to left front matching placement line. Cut out and remove paper from eyes and nostrils and fuse to head. Stitch along stitching line with a stem stitch and three strands of embroidery floss.
Slash mane 1/8” (3mm), ending 1/4” (6mm) from upper edge.
Place mane to top of head and pin.
The outer edges of the appliqués can be finished with a straight stitch close to the edge, or with satin stitches, making sure that the mane is stitched also. To satin stitch, use a medium zigzag width and a very short stitch length. Test your stitches on a scrap piece of fabric and adjust the length and width of the stitches as necessary.
Remove tear-away material.
Cut out and remove paper from eyes and nostrils. Fuse to toes matching markings.
Stitch through center of eyes and nostrils to hold in place.
Stitch along stitching line with a stem stitch and three strands of embroidery floss or machine satin stitch.
Remove tear-away material.
Slash mane 1/8” (3mm), ending 1/4” (6mm) from upper edge.
Place mane to top of toes and baste.
Pin ear contrast 1 to ear contrast 2. Stitch outer edge. Trim seam allowance. Turn right side out and press. Fold along foldline, with contrast 2 on inside, as shown.
TRIMAND CLIP
Place ears to top of toes, over notches. Baste to hold in place.
1. Sew sleeper, following View A steps 1 through 4 and 6 through 12.