JUNOGiWS04—Realtime Control in the JUNO-Gi
9
1 ®ÂØÒňΠ® Workshop Realtime Control in the JUNO-Gi © 2011 Roland Corporation U.S. All rights reserved. No part of this publication may be reproduced in any form without the written permission of Roland Corporation U.S. JUNOGiWS04 JUNO-Gi Mobile Synthesizer and Digital Recorder
Transcript of JUNOGiWS04—Realtime Control in the JUNO-Gi
1
®ÂØÒňή Workshop
Realtime Control in the JUNO-Gi© 2011 Roland Corporation U.S.
All rights reserved. No part of this publication may be reproduced in any form without the written permission of Roland Corporation U.S.
JUNOGiWS04
JUNO-Gi Mobile Synthesizerand Digital Recorder

2
About the JUNO-Gi Workshop Booklets
The Roland JUNO-Gi Mobile Synthesizer with Digital Recorder is an affordable, portable, perfect instrument for performers and songwriters. It’s got a top-of-the-line sound engine and over 1300 exciting new sounds. The onboard digital recorder allows you to record and develop your songs, with dedicated faders and acclaimed BOSS GT-class effects. With USB MIDI capabilities and its instant MIDI Controller mode, the JUNO-Gi also fits nicely into any computer-based recording system. Finally, the JUNO-Gi sports a versatile USB song player for playing backing tracks onstage.
Each JUNO-Gi Workshop Series booklet focuses on one JUNO-Gi topic, and is intended as a companion to the JUNO-Gi Owner’s Manual.
This booklet requires JUNO-Gi Operating System v1.01 or higher. You can download the latest JUNO-Gi O.S. for free from www.RolandUS.com.
About This Booklet
The JUNO-Gi is packed with realtime controls that allow you to shape its sounds as you play into something only you could create. This booklet explains the JUNO-Gi’s realtime controllers and how to use them..
Understanding the Symbols in This Booklet
Throughout this booklet, you’ll come across information that deserves special attention—that’s the reason it’s labeled with one of the following symbols.
A note is something that adds information about the topic at hand.
A tip offers suggestions for using the feature being discussed.
Warnings contain important information that can help you avoid possible damage to your equipment, your data, or yourself.
The JUNO-Gi’s Realtime Controllers
What Is “Realtime Control?
When we use the term “realtime control,” we’re referring to instantaneous changes you make to live sets and their effects as you play. “Realtime controllers” are the physical tools you use to make those changes.
The types of realtime changes you can make are nearly infinite. This allows you to create sonic textures that are uniquely your own, truly personalizing the sounds your JUNO-Gi produces.
Some Basic Ideas
We’re Not Talking Keyboard Here So Much
The main realtime device with which you control your JUNO-Gi sounds is, of course, its keyboard. Though it is technically a controller, it’s not our concern right now.
In this booklet we’ll be talking about realtime controls designed for turning, poking, stomping, and waving your hand at (seriously), that allow you to manipulate sounds in a very tactile way. The JUNO-Gi’s realtime-controls are customizable since which controllers feel the best to you is a personal issue.
The Mechanics of Realtime Control
Realtime control requires two elements: a realtime controller, and the thing being controlled. Here’s they work together most often.
• The realtime controller—As the controller is moved, it produces MIDI Control Change, or “CC,” messages.
• The thing being controlled—Live set and effect settings can be programmed to respond to particular Control Change messages, so their values change in response to the realtime controller producing that message.
There are also other types of data realtime controllers can generate and to which the JUNO-Gi responds, as we’ll see.

3
The SOUND MODIFY Knobs
For on-the-fly sound-shaping, there’s nothing better than the dedicated SOUND MODIFY knobs. A quick twist or two changes the character of a live set, and a couple of the knobs practically beg for use while you’re playing synth sounds. There are actually three sets of knobs we’ll explain separately.
You can see any SOUND MODIFY knob’s current setting without changing it by holding down the SHIFT button and turning the knob.
The REVERB Knob
The REVERB knob, which—as you’d guess—changes the amount of reverb, or ambience, a live set has. Turn it down to lower its reverb level. Turn it up to add reverb.
The EQ Knobs
Pretty much every sound you hear is a combination of sound waves playing over and over at the same time—together, they produce what it is you hear. These sound waves are different lengths, and thus run at different speeds, or “frequencies.” The slowest, lowest frequencies contribute the bass portion of a sound. Fast, or high, frequencies contribute the treble element.
Introducing the JUNO-Gi Realtime Controllers
The Pitch Bend/Modulation Lever
The Pitch Bend/Modulation lever is located to the left of the keyboard, and allows you to change a sound in two ways. When you
• flip the lever left or right—you bend the pitch of notes downward or upward, respectively. The further you flip the lever, the greater the amount of bending. You can set both the maximum and minimum amount of pitch bend in a live set.
• push the lever forward—you apply modulation, which means “change,” to the sound you’re using. Typically, sounds acquire vibrato when you push the lever forward, though you can customize this behavior. When you let go, the lever returns to its original position, and modulation’s no longer applied.
Bend pitch Add vibrato
The response to lever movements is programmed for each live set. See page 36 of the JUNO-Gi Owner’s Manual to learn more. The lever can also be used for realtime control of effects, as described on page 46 of the Owner’s Manual.
4
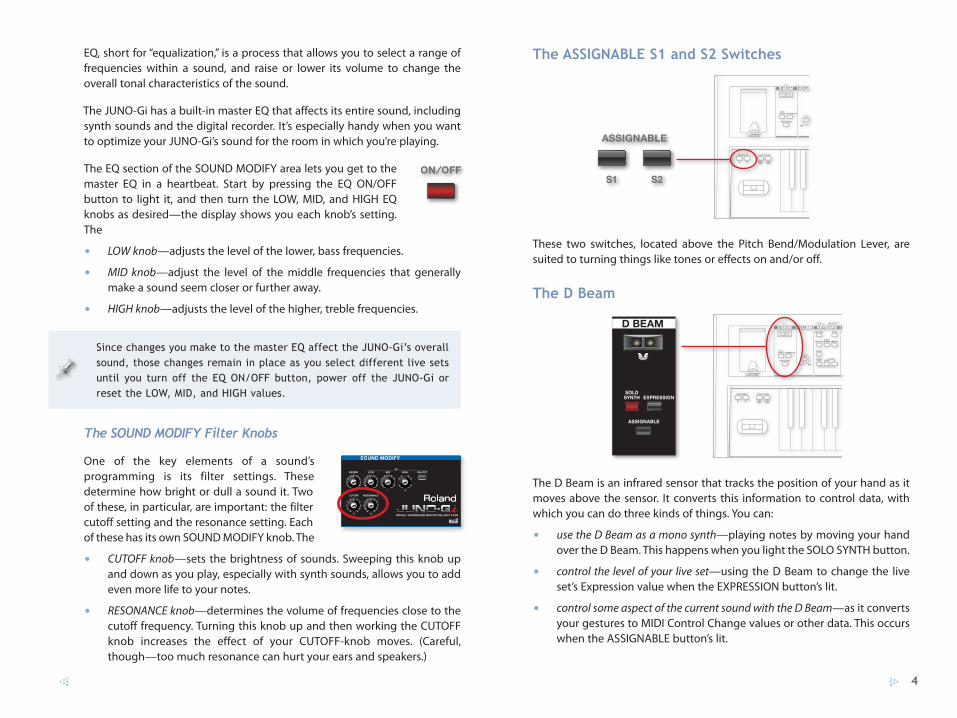
The ASSIGNABLE S1 and S2 Switches
These two switches, located above the Pitch Bend/Modulation Lever, are suited to turning things like tones or effects on and/or off.
The D Beam
The D Beam is an infrared sensor that tracks the position of your hand as it moves above the sensor. It converts this information to control data, with which you can do three kinds of things. You can:
• use the D Beam as a mono synth—playing notes by moving your hand over the D Beam. This happens when you light the SOLO SYNTH button.
• control the level of your live set—using the D Beam to change the live set’s Expression value when the EXPRESSION button’s lit.
• control some aspect of the current sound with the D Beam—as it converts your gestures to MIDI Control Change values or other data. This occurs when the ASSIGNABLE button’s lit.
EQ, short for “equalization,” is a process that allows you to select a range of frequencies within a sound, and raise or lower its volume to change the overall tonal characteristics of the sound.
The JUNO-Gi has a built-in master EQ that affects its entire sound, including synth sounds and the digital recorder. It’s especially handy when you want to optimize your JUNO-Gi’s sound for the room in which you’re playing.
The EQ section of the SOUND MODIFY area lets you get to the master EQ in a heartbeat. Start by pressing the EQ ON/OFF button to light it, and then turn the LOW, MID, and HIGH EQ knobs as desired—the display shows you each knob’s setting. The
• LOW knob—adjusts the level of the lower, bass frequencies.
• MID knob—adjust the level of the middle frequencies that generally make a sound seem closer or further away.
• HIGH knob—adjusts the level of the higher, treble frequencies.
Since changes you make to the master EQ affect the JUNO-Gi’s overall sound, those changes remain in place as you select different live sets until you turn off the EQ ON/OFF button, power off the JUNO-Gi or reset the LOW, MID, and HIGH values.
The SOUND MODIFY Filter Knobs
One of the key elements of a sound’s programming is its filter settings. These determine how bright or dull a sound it. Two of these, in particular, are important: the filter cutoff setting and the resonance setting. Each of these has its own SOUND MODIFY knob. The
• CUTOFF knob—sets the brightness of sounds. Sweeping this knob up and down as you play, especially with synth sounds, allows you to add even more life to your notes.
• RESONANCE knob—determines the volume of frequencies close to the cutoff frequency. Turning this knob up and then working the CUTOFF knob increases the effect of your CUTOFF-knob moves. (Careful, though—too much resonance can hurt your ears and speakers.)
5
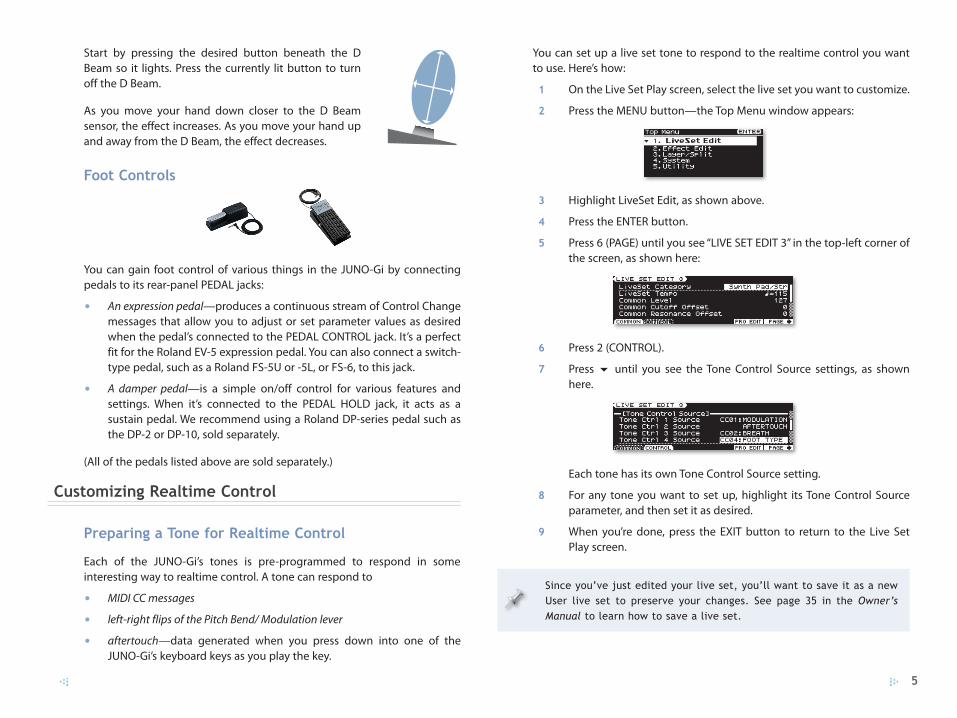
You can set up a live set tone to respond to the realtime control you want to use. Here’s how:
1 On the Live Set Play screen, select the live set you want to customize.
2 Press the MENU button—the Top Menu window appears:
3 Highlight LiveSet Edit, as shown above.
4 Press the ENTER button.
5 Press 6 (PAGE) until you see “LIVE SET EDIT 3” in the top-left corner of the screen, as shown here:
6 Press 2 (CONTROL).
7 Press 6 until you see the Tone Control Source settings, as shown here.
Each tone has its own Tone Control Source setting.
8 For any tone you want to set up, highlight its Tone Control Source parameter, and then set it as desired.
9 When you’re done, press the EXIT button to return to the Live Set Play screen.
Since you’ve just edited your live set, you’ll want to save it as a new User live set to preserve your changes. See page 35 in the Owner’s Manual to learn how to save a live set.
Start by pressing the desired button beneath the D Beam so it lights. Press the currently lit button to turn off the D Beam.
As you move your hand down closer to the D Beam sensor, the effect increases. As you move your hand up and away from the D Beam, the effect decreases.
Foot Controls
You can gain foot control of various things in the JUNO-Gi by connecting pedals to its rear-panel PEDAL jacks:
• An expression pedal—produces a continuous stream of Control Change messages that allow you to adjust or set parameter values as desired when the pedal’s connected to the PEDAL CONTROL jack. It’s a perfect fit for the Roland EV-5 expression pedal. You can also connect a switch-type pedal, such as a Roland FS-5U or -5L, or FS-6, to this jack.
• A damper pedal—is a simple on/off control for various features and settings. When it’s connected to the PEDAL HOLD jack, it acts as a sustain pedal. We recommend using a Roland DP-series pedal such as the DP-2 or DP-10, sold separately.
(All of the pedals listed above are sold separately.)
Customizing Realtime Control
Preparing a Tone for Realtime Control
Each of the JUNO-Gi’s tones is pre-programmed to respond in some interesting way to realtime control. A tone can respond to
• MIDI CC messages
• left-right flips of the Pitch Bend/ Modulation lever
• aftertouch—data generated when you press down into one of theJUNO-Gi’s keyboard keys as you play the key.

6
Select this value: And lower your hand in the D Beam to:
TAP TEMPO set the synth tempo after several downward movements.
AFTERTOUCH generate aftertouch messages as if your were pressing down into the keyboard keys.
You can also customize the D Beam’s Expression mode, setting the minimum and maximum amounts of Expression to be applied. Just hold down SHIFT and press the D Beam’s EXPRESSION button.
If you like, you can easily tweak the D Beam’s sensitivity from this screen by pressing 1 (GENERAL) and setting D Beam Sens as desired.
3 To make your D Beam settings permanent, press 6 (WRITE)—D Beam settings are saved into the JUNO-Gi’s system memory. If you’re not sure, press 5 (EXIT) to simply leave the D Beam setup area.
Setting Up the ASSIGNABLE S Switches as Realtime Controllers
You can program the two ASSIGNABLE S switches—S1 and S2—above the Pitch Bend/Modulation Lever to perform various realtime control actions. Here’s how:
1 While holding down SHIFT, press either S button to display the LIVE SET EDIT 3 CONTROL screen, as shown here.
To make the screen look exactly like this, press 6 a few times to scroll these settings into view.
Configuring Your Realtime Controllers
Setting Up the D Beam as a Realtime Controller
The D Beam can operate as a realtime controller in two ways. When its
• EXPRESSION button is lit—you can control the level of the current live set by adjusting its MIDI Expression setting from the D Beam.
• ASSIGNABLE button is lit—you can generate the type of data you’ve selected, by moving your hand above the D Beam. This is where the D Beam’s power as a realtime controller lies once you’ve set up a live set’s tones to respond to the data type you’ve selected.
When the D Beam’s SOLO SYNTH button is lit, it acts as an instrument, with your hand movements playing the solo-synth sound.
Here’s how to configure the D Beam so it produces the desired type of data:
1 While holding down the SHIFT button, press the D BEAM’s ASSIGNABLE button. The D BEAM ASSIGN screen appears:
2 The Type parameter sets the behavior of the D Beam when ASSIGNABLE’s lit.
Select this value: And lower your hand in the D Beam to:
CC01 – CC95 generate the selected MIDI CC message.
BEND UP bend pitches of currently playing notes up.
BEND DOWN bend pitches of currently playing notes down.
USB SONG START toggle playback of the USB Song Player on and off.
RECORDER START toggle playback of the digital recorder on and off.

7
With this Assign value: The S switch:
SYS CTRL 1-4 SRC generates the MIDI Control Change message to which the selected Sys Ctrl is set. Pressing the switch down generates a value of 127; letting go generates a value of 0. (We’ll explain the Sys Ctrls in a bit.)
LAYER 1-4 SW (U1-L2) toggles the selected tone in the current live set on and off with each press.
Setting Up Pedals as Realtime Controllers
There are two pedal jacks on the JUNO-Gi’s rear panel.
Connect a Roland EV-5 or EV-7
expression pedal or FS-series pedal
to this jack.
Connect a Roland DP-series pedal to this jack.
To get to the pedal settings:
1 Press the MENU button to show the Top Menu window.
2 Select System from the Top Menu, and then press ENTER.
3 Press 2 (KBD/CTRL) to show the SYSTEM KBD/CTRL screen.
4 Press 2 (PEDAL) to show the Pedal Setting screen.
For this section, we’ll call the pedal connected to the CONTROL jack the “CONTROL pedal,” and the pedal plugged into the HOLD jack the “HOLD pedal.”
Each of the switches has two settings:
• Switch [1 or 2] Assign—selects the job the switch is to perform.
• Switch [1 or 2] Type—sets the manner in which the switch behaves. When this is set to LATCH, a single touch causes the switch to act as if you’re holding it down, until you touch it again. When it’s set to MOMENTARY, the switch only performs its job while you’re actually pressing it.
For Assign values where a switch-type choice makes no sense, the Type setting is disabled.
2 Configure the S switches as desired, and then press EXIT.
Here are the things you can program an S switch to do:
With this Assign value: The S switch:
TRANSPOSE UP shifts the pitch of keyboard notes up an octave with each press.
TRANSPOSE DOWN shifts the pitch of keyboard notes down an octave with each press.
TAP TEMPO can be tapped to set the keyboard tempo to the desired speed.
MONO/POLY toggles the JUNO-Gi’s current sound between monophonic and polyphonic modes with each press.
PORTAMENTO toggles gliding between notes on and off with each press.
HOLD acts as a sustain pedal.
MFX1, MFX2 SWITCH toggles the corresponding MFX processor on or off with each press.
CHORUS SW toggles the Chorus effect processor on or off with each press.
REVERB SW toggles the Reverb effect processor on or off with each press.
8
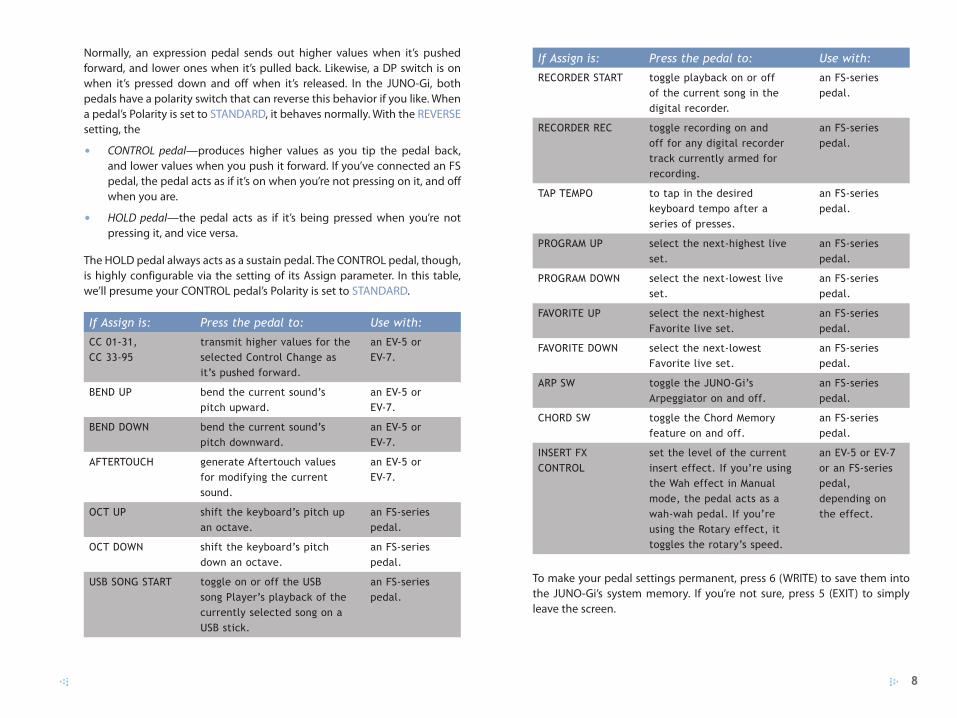
If Assign is: Press the pedal to: Use with:
RECORDER START toggle playback on or off of the current song in the digital recorder.
an FS-series pedal.
RECORDER REC toggle recording on and off for any digital recorder track currently armed for recording.
an FS-series pedal.
TAP TEMPO to tap in the desired keyboard tempo after a series of presses.
an FS-series pedal.
PROGRAM UP select the next-highest live set.
an FS-series pedal.
PROGRAM DOWN select the next-lowest live set.
an FS-series pedal.
FAVORITE UP select the next-highest Favorite live set.
an FS-series pedal.
FAVORITE DOWN select the next-lowest Favorite live set.
an FS-series pedal.
ARP SW toggle the JUNO-Gi’s Arpeggiator on and off.
an FS-series pedal.
CHORD SW toggle the Chord Memory feature on and off.
an FS-series pedal.
INSERT FX CONTROL
set the level of the current insert effect. If you’re using the Wah effect in Manual mode, the pedal acts as a wah-wah pedal. If you’re using the Rotary effect, it toggles the rotary’s speed.
an EV-5 or EV-7 or an FS-series pedal, depending on the effect.
To make your pedal settings permanent, press 6 (WRITE) to save them into the JUNO-Gi’s system memory. If you’re not sure, press 5 (EXIT) to simply leave the screen.
Normally, an expression pedal sends out higher values when it’s pushed forward, and lower ones when it’s pulled back. Likewise, a DP switch is on when it’s pressed down and off when it’s released. In the JUNO-Gi, both pedals have a polarity switch that can reverse this behavior if you like. When a pedal’s Polarity is set to STANDARD, it behaves normally. With the REVERSE setting, the
• CONTROL pedal—produces higher values as you tip the pedal back, and lower values when you push it forward. If you’ve connected an FS pedal, the pedal acts as if it’s on when you’re not pressing on it, and off when you are.
• HOLD pedal—the pedal acts as if it’s being pressed when you’re not pressing it, and vice versa.
The HOLD pedal always acts as a sustain pedal. The CONTROL pedal, though, is highly configurable via the setting of its Assign parameter. In this table, we’ll presume your CONTROL pedal’s Polarity is set to STANDARD.
If Assign is: Press the pedal to: Use with:
CC 01-31, CC 33-95
transmit higher values for the selected Control Change as it’s pushed forward.
an EV-5 or EV-7.
BEND UP bend the current sound’s pitch upward.
an EV-5 or EV-7.
BEND DOWN bend the current sound’s pitch downward.
an EV-5 or EV-7.
AFTERTOUCH generate Aftertouch values for modifying the current sound.
an EV-5 or EV-7.
OCT UP shift the keyboard’s pitch up an octave.
an FS-series pedal.
OCT DOWN shift the keyboard’s pitch down an octave.
an FS-series pedal.
USB SONG START toggle on or off the USB song Player’s playback of the currently selected song on a USB stick.
an FS-series pedal.
9
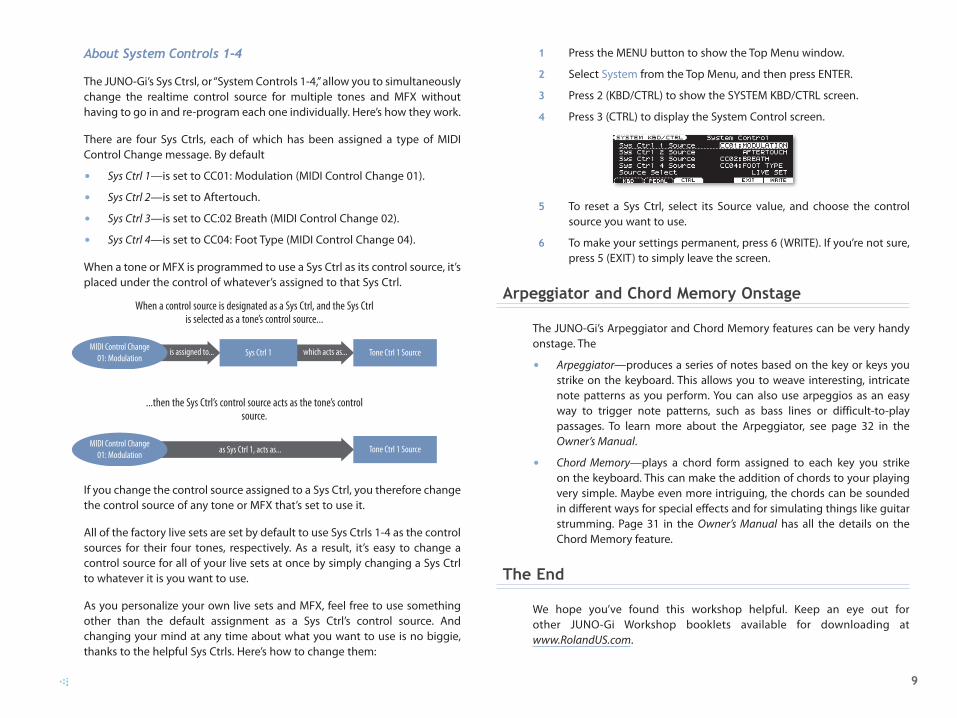
1 Press the MENU button to show the Top Menu window.
2 Select System from the Top Menu, and then press ENTER.
3 Press 2 (KBD/CTRL) to show the SYSTEM KBD/CTRL screen.
4 Press 3 (CTRL) to display the System Control screen.
5 To reset a Sys Ctrl, select its Source value, and choose the control source you want to use.
6 To make your settings permanent, press 6 (WRITE). If you’re not sure, press 5 (EXIT) to simply leave the screen.
Arpeggiator and Chord Memory Onstage
The JUNO-Gi’s Arpeggiator and Chord Memory features can be very handy onstage. The
• Arpeggiator—produces a series of notes based on the key or keys you strike on the keyboard. This allows you to weave interesting, intricate note patterns as you perform. You can also use arpeggios as an easy way to trigger note patterns, such as bass lines or difficult-to-play passages. To learn more about the Arpeggiator, see page 32 in the Owner’s Manual.
• Chord Memory—plays a chord form assigned to each key you strike on the keyboard. This can make the addition of chords to your playing very simple. Maybe even more intriguing, the chords can be sounded in different ways for special effects and for simulating things like guitar strumming. Page 31 in the Owner’s Manual has all the details on the Chord Memory feature.
The End
We hope you’ve found this workshop helpful. Keep an eye out for other JUNO-Gi Workshop booklets available for downloading at www.RolandUS.com.
About System Controls 1-4
The JUNO-Gi’s Sys Ctrsl, or “System Controls 1-4,” allow you to simultaneously change the realtime control source for multiple tones and MFX without having to go in and re-program each one individually. Here’s how they work.
There are four Sys Ctrls, each of which has been assigned a type of MIDI Control Change message. By default
• Sys Ctrl 1—is set to CC01: Modulation (MIDI Control Change 01).
• Sys Ctrl 2—is set to Aftertouch.
• Sys Ctrl 3—is set to CC:02 Breath (MIDI Control Change 02).
• Sys Ctrl 4—is set to CC04: Foot Type (MIDI Control Change 04).
When a tone or MFX is programmed to use a Sys Ctrl as its control source, it’s placed under the control of whatever’s assigned to that Sys Ctrl.
When a control source is designated as a Sys Ctrl, and the Sys Ctrl is selected as a tone’s control source...
...then the Sys Ctrl’s control source acts as the tone’s control source.
MIDI Control Change01: Modulation
Sys Ctrl 1 Tone Ctrl 1 Source is assigned to... which acts as...
MIDI Control Change01: Modulation
Tone Ctrl 1 Source as Sys Ctrl 1, acts as...
If you change the control source assigned to a Sys Ctrl, you therefore change the control source of any tone or MFX that’s set to use it.
All of the factory live sets are set by default to use Sys Ctrls 1-4 as the control sources for their four tones, respectively. As a result, it’s easy to change a control source for all of your live sets at once by simply changing a Sys Ctrl to whatever it is you want to use.
As you personalize your own live sets and MFX, feel free to use something other than the default assignment as a Sys Ctrl’s control source. And changing your mind at any time about what you want to use is no biggie, thanks to the helpful Sys Ctrls. Here’s how to change them: