
JUNIPER WORKBOOK - · PDF filejuniper workbook a junos guide by an ios guy volume 1 jeffrey...
162
JUNIPER WORKBOOK A JUNOS GUIDE BY AN IOS GUY VOLUME 1 JEFFREY FRY CCIE R&S 22061 ©AUGUST, 2012 WWW.FRYGUY. NET
Transcript of JUNIPER WORKBOOK - · PDF filejuniper workbook a junos guide by an ios guy volume 1 jeffrey...

JUNIPER WORKBOOK A JUNOS GUIDE BY AN IOS GUY
VOLUME 1
JEFFREY FRY
CCIE R&S 22061
©AUGUST, 2012
WWW.FRYGUY.NET
2 © 2012 Jeffrey Fry – Fryguy.net Juniper Workbook
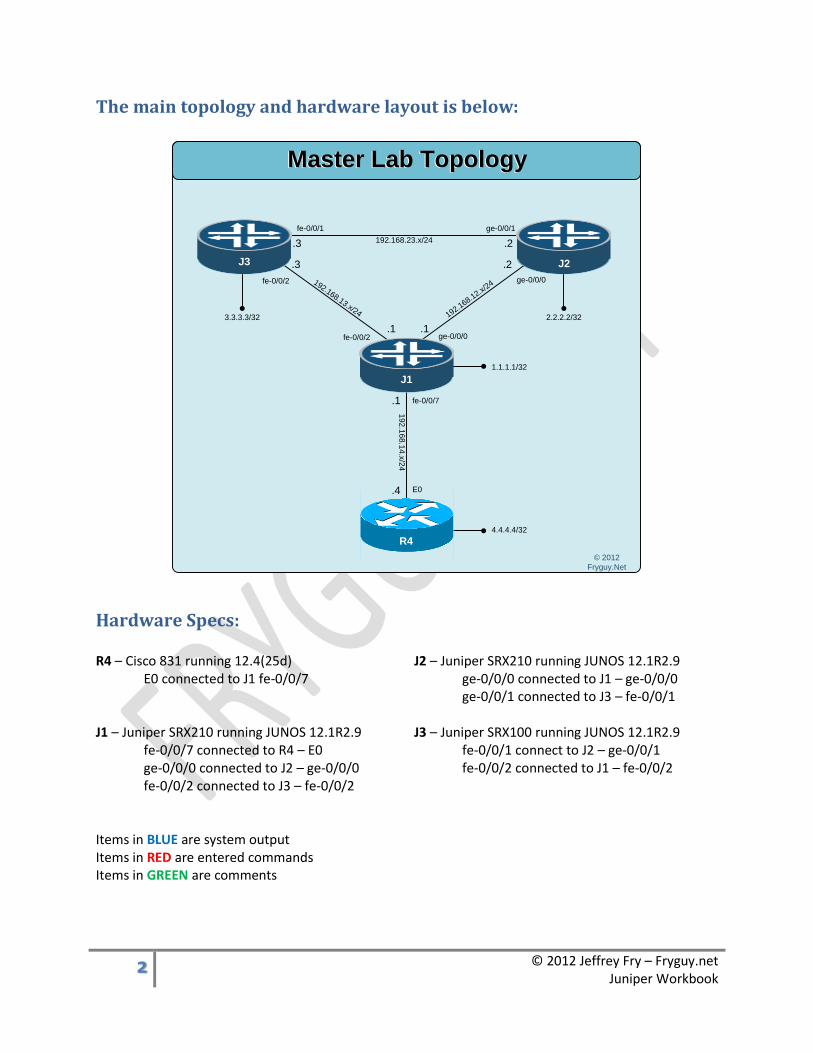
The main topology and hardware layout is below:
192.168.13.x/24
192.168.23.x/24
192.168.1
2.x/24
19
2.1
68
.14
.x/2
4
ge-0/0/0
J2J3
ge-0/0/0
ge-0/0/1fe-0/0/1
fe-0/0/2
fe-0/0/2
fe-0/0/7
E0
.3 .2
.1
.4
.1
.1
.2.3
Master Lab TopologyMaster Lab Topology
© 2012
Fryguy.Net
2.2.2.2/323.3.3.3/32
1.1.1.1/32
4.4.4.4/32
R4
J1
Hardware Specs: R4 – Cisco 831 running 12.4(25d)
E0 connected to J1 fe-0/0/7
J2 – Juniper SRX210 running JUNOS 12.1R2.9 ge-0/0/0 connected to J1 – ge-0/0/0 ge-0/0/1 connected to J3 – fe-0/0/1
J1 – Juniper SRX210 running JUNOS 12.1R2.9
fe-0/0/7 connected to R4 – E0 ge-0/0/0 connected to J2 – ge-0/0/0 fe-0/0/2 connected to J3 – fe-0/0/2
J3 – Juniper SRX100 running JUNOS 12.1R2.9 fe-0/0/1 connect to J2 – ge-0/0/1 fe-0/0/2 connected to J1 – fe-0/0/2
Items in BLUE are system output Items in RED are entered commands Items in GREEN are comments

3 © 2012 Jeffrey Fry – Fryguy.net Juniper Workbook
Table of Contents
1. Preface and Information
2. Password Recovery, Zeroize, and Loading a Configuration, and other basics
3. Interface Configuration and Connectivity
4. JWeb
5. RIP
6. RIP Authentication and Preferences
7. IS-IS
8. OSPF and Rollback
9. OSPF Router-ID and Traceoptions
10. OSPF Authentication - Interface
11. OSPF Authentication – Area Auth
12. OSPF Multi-Area, Stub, and NSSA
13. Multi-Protocol Lab – OSPF and RIP
14. iBGP
15. iBGP – Route Reflector
16. iBGP – Juniper and Cisco
17. eBGP – Juniper to Juniper
18. eBGP – Juniper to Cisco (and some MD5)
19. NHRP
20. System Services – NTP – Telnet – SSH – SNMP – Monitor - LAG
21. Route Filtering
22. Notes

4 © 2012 Jeffrey Fry – Fryguy.net Juniper Workbook
Preface
I just wanted to take a moment and explain what this “workbook” is and thank a few people for their
help, guidance, and inspiration.
It is my intention for this “workbook” to help those of us who know Cisco IOS to learn and understand
Juniper Junos. I will admit that I was initially intimidated by the look of the Junos configuration, but as
time has gone on I have learned to understand it and actually like it. As they say, the more you work
with something, the more comfortable you feel with it.
The way that I came up with this guide was by first drawing the scenarios I wanted to figure out. Take
the things that I knew worked and how they worked in IOS and then figure out how they worked in
Junos. This approach was not structured per-se, it was more – go at it and figure it out. There are
technologies that I struggled with in Junos, but once I figured them out, they quickly become clear and
easier to me.
I have sketches for some other ideas that I want to learn with Junos and I will work on these as time
allows. Perhaps we will see additional “workbooks” released as I continue to learn more about Junos!
I wanted to thank Kurt, Steve, and Damien for their help with commands and their honest feedback
while I was working on this document. I know I bombarded their inboxes with the drafts and questions;
I really appreciate all the help gents! I also wanted to thank Chris Jones for helping me get some of the
icons used in this document, he provided me a dirty template that I was able to modify and tweak to get
things to look the way I wanted. And finally I want to thank my old Juniper SE, Matt McGuirl for
introducing me to Junos.
You can find them at their websites below and on Twitter
Kurt Bales – http://www.network-janitor.net/ – @networkjanitor
Steve Rossen – http://steverossen.com/ – @steve
Damien DeVille – http://www.damiendeville.com/ – @ddeville
Chris Jones – http://www.3fives.com/ – @ipv6freely
Matt McGuirl – http://www.mcguirl.net/ – @mcguirl

5 © 2012 Jeffrey Fry – Fryguy.net Juniper Workbook
Password Recovery, Zeroize, and Loading a Configuration, and other basics
192.168.13.x/24
192.168.23.x/24
192.168.1
2.x/24
19
2.1
68
.14
.x/2
4ge-0/0/0
R4
J1
J2J3
ge-0/0/0
ge-0/0/1fe-0/0/1
fe-0/0/2
fe-0/0/2
fe-0/0/7
E0
.3 .2
.1
.4
.1
.1
.2.3
Introduction Lab TopologyIntroduction Lab Topology
© 2012
Fryguy.Net
2.2.2.2/323.3.3.3/32
1.1.1.1/32
4.4.4.4/32
I am not going to cover how to recovery a lost root password, but if you need that information here is a link to the Juniper KB Article KB17565 below. This article is for Junos 10.x and higher. http://kb.juniper.net/InfoCenter/index?page=content&id=KB17565 What I will cover though is getting your Junos device up and running after you recover the root password. First thing you will want to do is zeroize the device, this will erase all configuration information and reboot the device. root@J1> request system zeroize warning: System will be rebooted and may not boot without configuration Erase all data, including configuration and log files? [yes,no] (no) yes warning: zeroizing re0 root@J1> Waiting (max 60 seconds) for system process `vnlru_mem' to stop...done

6 © 2012 Jeffrey Fry – Fryguy.net Juniper Workbook
Waiting (max 60 seconds) for system process `vnlru' to stop...done Waiting (max 60 seconds) for system process `bufdaemon' to stop...done Waiting (max 60 seconds) for system process `syncer' to stop... Syncing disks, vnodes remaining...0 0 0 done syncing disks... All buffers synced. Uptime: 5m9s Rebooting... [--- Removed the reboot cycle output for this document ----] Once the device finishes rebooting, you will be at the Amnesiac prompt. This is the prompt the system give you when there is no configuration on the device. Almost like is it brand new, out of the box! Amnesiac (ttyu0) login: root (Note: No prompt for a root password as the system is not yet configured) --- JUNOS 12.1R2.9 built 2012-05-31 08:58:52 UTC root@% Cool, now we are logged in. You will notice that you are at a % prompt. This is actually a BSD type prompt where you can run normal BSD type commands like uname to show the version. root@% uname -a JUNOS 12.1R2.9 JUNOS 12.1R2.9 #0: 2012-05-31 08:58:52 UTC builder@greteth:/volume/build/junos/12.1/release/12.1R2.9/obj-octeon/junos/bsd/kernels/JSRXNLE/kernel octeon root@% Ok, enough of that – we need to get to the command line. You do that by entering cli from the prompt. Note: You will only need to do this if you are logged in as Root (I believe). root@% cli root> There, the prompt changed. Ok, time to see what the running config looks like by issuing the command show configuration: root> show configuration ## Last commit: 2012-08-09 02:41:49 UTC by root version 12.1R2.9; system { autoinstallation { delete-upon-commit; ## Deletes [system autoinstallation] upon change/commit traceoptions {

7 © 2012 Jeffrey Fry – Fryguy.net Juniper Workbook
level verbose; flag { all; } } interfaces { ge-0/0/0 { bootp; } } } name-server { 208.67.222.222; 208.67.220.220; } services { ssh; telnet; xnm-clear-text; web-management { http { interface vlan.0; } https { system-generated-certificate; interface vlan.0; } } dhcp { router { 192.168.1.1; } pool 192.168.1.0/24 { address-range low 192.168.1.2 high 192.168.1.254; } propagate-settings ge-0/0/0.0; } } syslog { archive size 100k files 3; user * { any emergency; } file messages { any critical; authorization info; }

8 © 2012 Jeffrey Fry – Fryguy.net Juniper Workbook
file interactive-commands { interactive-commands error; } } max-configurations-on-flash 5; ## ## Warning: statement ignored: unsupported platform (srx210h) ## max-configuration-rollbacks 5; license { autoupdate { url https://ae1.juniper.net/junos/key_retrieval; } } ## Warning: missing mandatory statement(s): 'root-authentication' } interfaces { ge-0/0/0 { unit 0; } ge-0/0/1 { unit 0 { family ethernet-switching { vlan { members vlan-trust; } } } } fe-0/0/2 { unit 0 { family ethernet-switching { vlan { members vlan-trust; } } } } fe-0/0/3 { unit 0 { family ethernet-switching { vlan { members vlan-trust; } } } }

9 © 2012 Jeffrey Fry – Fryguy.net Juniper Workbook
fe-0/0/4 { unit 0 { family ethernet-switching { vlan { members vlan-trust; } } } } fe-0/0/5 { unit 0 { family ethernet-switching { vlan { members vlan-trust; } } } } fe-0/0/6 { unit 0 { family ethernet-switching { vlan { members vlan-trust; } } } } fe-0/0/7 { unit 0 { family ethernet-switching { vlan { members vlan-trust; } } } } vlan { unit 0 { family inet { address 192.168.1.1/24; } } } } protocols { stp; }

10 © 2012 Jeffrey Fry – Fryguy.net Juniper Workbook
security { screen { ids-option untrust-screen { icmp { ping-death; } ip { source-route-option; tear-drop; } tcp { syn-flood { alarm-threshold 1024; attack-threshold 200; source-threshold 1024; destination-threshold 2048; timeout 20; } land; } } } nat { source { rule-set trust-to-untrust { from zone trust; to zone untrust; rule source-nat-rule { match { source-address 0.0.0.0/0; } then { source-nat { interface; } } } } } } policies { from-zone trust to-zone untrust { policy trust-to-untrust { match { source-address any; destination-address any; application any;

11 © 2012 Jeffrey Fry – Fryguy.net Juniper Workbook
} then { permit; } } } } zones { security-zone trust { host-inbound-traffic { system-services { all; } protocols { all; } } interfaces { vlan.0; } } security-zone untrust { screen untrust-screen; interfaces { ge-0/0/0.0 { host-inbound-traffic { system-services { dhcp; tftp; } } } } } } } vlans { vlan-trust { vlan-id 3; l3-interface vlan.0; } } root>

12 © 2012 Jeffrey Fry – Fryguy.net Juniper Workbook
WOW! There is a lot of stuff there! The joys of any new device, they usually come with some type of pre-configuration on them. Well, for this lab we don’t want any of that, so we will erase the configuration on the device and start from a blank slate. To delete the config, we need to get into configuration mode (or edit mode) You can use the edit command or configure command. I usually use edit. Be warned though, this is actually a hidden command and will not autocomplete. root> edit Entering configuration mode [edit] root# There, we are in edit mode now. Now we should delete the current config. You do that by entering delete from the top most level, that is the level you enter. If you are unsure if you are at the top level, enter the command top. [edit] root# delete This will delete the entire configuration Delete everything under this level? [yes,no] (no) yes [edit] root# Now we can commit that and figure out what is next. [edit] root# commit error: cannot commit an empty configuration Hmm, cannot commit an empty config. Guess we need to setup the root account and perhaps a user account so that we can access the system. We will set the system host-name and root-authentication to accept a plain-text password that we enter. For this lab we will use juniper123 [edit] root# set system root-authentication plain-text-password New password: juniper123 Retype new password: juniper123 [edit] root# set system host-name JJ1

13 © 2012 Jeffrey Fry – Fryguy.net Juniper Workbook
Whoops, we meant to set it to J1. Well, we can delete that line by re-entering it but instead of using set, we will use delete [edit] root# delete system host-name JJ1 [edit] root# set system host-name J1 Now we get to create a user for this lab. I will create jfry and assign him as a super-user, set his full name to Jeff Fry, and set his password to juniper123 [edit] root# set system login user jjfry class super-user Uh-oh, we meant to enter jfry and we entered jjfry. So do we need to delete that line and re-add it? Nope. We can use rename instead. [edit] root# rename system login user jjfry to user jfry [edit] root# set system login user jfry full-name "Jeff Fry" [edit] root# set system login user jfry authentication plain-text-password New password: juniper123 Retype new password: juniper123 Time to look at the configuration before we commit it: root# show ## Last changed: 2012-08-09 02:55:41 UTC system { host-name J1; root-authentication { encrypted-password "$1$KzNk.qW/$snaQkMp/4d3vZWjO5YONG/"; ## SECRET-DATA } login { user jfry { full-name "Jeff Fry"; class super-user; authentication { encrypted-password "$1$GlR67aAm$uTukNzdwUDf7VDIBxi6sq/"; ## SECRET-DATA } } } } [edit]

14 © 2012 Jeffrey Fry – Fryguy.net Juniper Workbook
root# You will notice that the output is in a stanza set, if you want to see the set based commands, just issue the command show | display set [edit] root# show | display set set system host-name J1 set system root-authentication encrypted-password "$1$KzNk.qW/$snaQkMp/4d3vZWjO5YONG/" set system login user jfry full-name "Jeff Fry" set system login user jfry class super-user set system login user jfry authentication encrypted-password "$1$GlR67aAm$uTukNzdwUDf7VDIBxi6sq/" [edit] root# Ok, time to check our config and make sure its ok. To do this, you can issue commit check [edit] root# commit check configuration check succeeds Good, lets commit the changes. I will add in a comment for this commit by issuing commit comment “comment goes here” [edit] root# commit comment "Initial Setup for lab" commit complete Once you have committed the changes, you are still in edit mode. Just issue the command quote to get back to the cli. [edit] root@J1# quit Exiting configuration mode root@J1> So what did that comment do, well let’s see: root@J1> show system commit 0 2012-08-09 02:59:04 UTC by root via cli Initial Setup for lab root@J1>

15 © 2012 Jeffrey Fry – Fryguy.net Juniper Workbook
There is our comment below our commit. It is a way that you can associate why you made the change. For business, think of a change control procedure – you can enter the Change number as part of your commit. Taking a lab? You can write the comment after the task number so you can revert if you make a mistake. I can be used for many things – notations of a change control, customer incident number, personal note in a lab, etc. There we are back at the cli on J1. Now, we need to do a similar config on J2 and J3 for this lab. The question is, is there an easier way to do this? Yes, there is and it is called load merge terminal. You can even load a file from file if you wanted to – say a USB drive? We will merge in this config to the J2 router. system { host-name J2; root-authentication { encrypted-password "$1$KzNk.qW/$snaQkMp/4d3vZWjO5YONG/"; ## SECRET-DATA } login { user jfry { full-name "Jeff Fry"; uid 2002; class super-user; authentication { encrypted-password "$1$GlR67aAm$uTukNzdwUDf7VDIBxi6sq/"; ## SECRET-DATA } } } } Since we are logged in as root, time to get to the CLI root@% cli And then Edit mode root> edit Entering configuration mode Now we can delete the default configuration [edit] root# delete This will delete the entire configuration Delete everything under this level? [yes,no] (no) yes Now we can load the config from the terminal. Yup, you use the load merge terminal command and just paste your config in ending with a CTRL-D [edit]

16 © 2012 Jeffrey Fry – Fryguy.net Juniper Workbook
root# load merge terminal [Type ^D at a new line to end input] system { host-name J2; root-authentication { encrypted-password "$1$KzNk.qW/$snaQkMp/4d3vZWjO5YONG/"; ## SECRET-DATA } login { user jfry { full-name "Jeff Fry"; uid 2002; class super-user; authentication { encrypted-password "$1$GlR67aAm$uTukNzdwUDf7VDIBxi6sq/"; ## SECRET-DATA } } } } ^D load complete There, the config is now loaded! Time to check out what got imported. [edit] root# show | display set set system host-name J2 set system root-authentication encrypted-password "$1$KzNk.qW/$snaQkMp/4d3vZWjO5YONG/" set system login user jfry full-name "Jeff Fry" set system login user jfry uid 2002 set system login user jfry class super-user set system login user jfry authentication encrypted-password "$1$GlR67aAm$uTukNzdwUDf7VDIBxi6sq/" [edit] root# Now we can commit it and we are done with J2 base configuration. I will admit , that is a nice way to get the configuration loaded! Now to J3: root@% cli root> edit Entering configuration mode [edit] root# delete This will delete the entire configuration

17 © 2012 Jeffrey Fry – Fryguy.net Juniper Workbook
Delete everything under this level? [yes,no] (no) yes root# load merge terminal [Type ^D at a new line to end input] system { host-name J3; root-authentication { encrypted-password "$1$KzNk.qW/$snaQkMp/4d3vZWjO5YONG/"; ## SECRET-DATA } login { user jfry { full-name "Jeff Fry"; uid 2002; class super-user; authentication { encrypted-password "$1$GlR67aAm$uTukNzdwUDf7VDIBxi6sq/"; ## SECRET-DATA } } } } ^D load complete [edit] root# commit and-quit Exiting configuration mode root@J3> Cool, J3 done! One last thing I wanted to cover and that is navigating the stanzas. Most of the time you will use a single command line to enter a command, but there are times when it is easier to edit a section. For instance I will use BGP. Instead of using set protocols bgp, I will use edit protocols bgp [edit] root@J1# edit protocols bgp [edit protocols bgp] root@J1# As you can see, the [edit] line changed to the stanza that I am in [edit protocols bgp]. Now there are a few ways that we can get back to the top of the config [edit].

18 © 2012 Jeffrey Fry – Fryguy.net Juniper Workbook
First, we can enter the command top and that will immediately take up to the top: [edit protocols bgp] root@J1# top [edit] root@J1# We can use up to navigate up one level: [edit] root@J1# edit protocols bgp [edit protocols bgp] root@J1# up [edit protocols] root@J1# up [edit] root@J1# Or we can enter up and a number, here 2, and we will go up that many levels. [edit] root@J1# edit protocols bgp [edit protocols bgp] root@J1# up 2 [edit] root@J1# Ok, one more thing, shutting your device down and rebooting. To reboot, from the main CLI root@J1> request system reboot Reboot the system ? [yes,no] (no) yes And to power off: root@J1> request system power-off Power Off the system ? [yes,no] (no) yes
19 © 2012 Jeffrey Fry – Fryguy.net Juniper Workbook
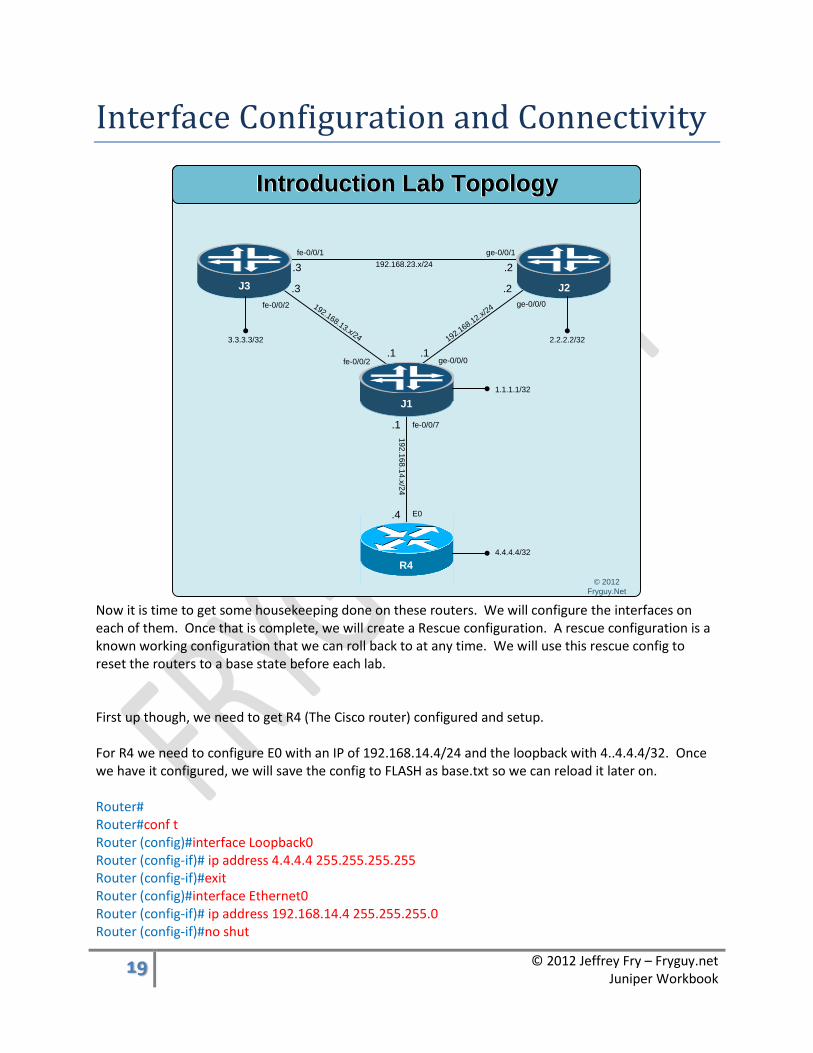
Interface Configuration and Connectivity
192.168.13.x/24
192.168.23.x/24
192.168.1
2.x/24
19
2.1
68.1
4.x
/24
ge-0/0/0
R4
J1
J2J3
ge-0/0/0
ge-0/0/1fe-0/0/1
fe-0/0/2
fe-0/0/2
fe-0/0/7
E0
.3 .2
.1
.4
.1
.1
.2.3
Introduction Lab TopologyIntroduction Lab Topology
© 2012
Fryguy.Net
2.2.2.2/323.3.3.3/32
1.1.1.1/32
4.4.4.4/32
Now it is time to get some housekeeping done on these routers. We will configure the interfaces on each of them. Once that is complete, we will create a Rescue configuration. A rescue configuration is a known working configuration that we can roll back to at any time. We will use this rescue config to reset the routers to a base state before each lab. First up though, we need to get R4 (The Cisco router) configured and setup. For R4 we need to configure E0 with an IP of 192.168.14.4/24 and the loopback with 4..4.4.4/32. Once we have it configured, we will save the config to FLASH as base.txt so we can reload it later on. Router# Router#conf t Router (config)#interface Loopback0 Router (config-if)# ip address 4.4.4.4 255.255.255.255 Router (config-if)#exit Router (config)#interface Ethernet0 Router (config-if)# ip address 192.168.14.4 255.255.255.0 Router (config-if)#no shut

20 © 2012 Jeffrey Fry – Fryguy.net Juniper Workbook
Router(config-if)#exit Router(config)#hostname R4 R4(config)#exit R4#wr mem Building configuration... [OK] R4#copy run flash:base.txt Destination filename [base.txt]? Erase flash: before copying? [confirm]n Verifying checksum... OK (0xECC2) 991 bytes copied in 2.048 secs (484 bytes/sec) R4# Ok, R4 has a base configuration on it. Now we can get back to Junos, starting with J1. J1 specs are as follows:
fe-0/0/7 will have an IP of 192.168.14.1/24 ge-0/0/0 will have an IP of 192.168.12.1/24 fe-0/0/2 will have an IP of 192.168.13.1/24
lo0 will have an IP of 1.1.1.1/32 root@J1> edit Entering configuration mode [edit] root@J1# set interfaces fe-0/0/7 unit 0 family inet address 192.168.14.1/24 [edit] root@J1# set interfaces ge-0/0/0 unit 0 family inet address 192.168.12.1/24 [edit] root@J1# set interfaces fe-0/0/2 unit 0 family inet address 192.168.13.1/24 [edit] root@J1# set interfaces lo0 unit 0 family inet address 1.1.1.1/32 Ok, let us take a look at what we are about to commit to the router. You do this by issuing the command show | compare root@J1# show | compare [edit] + interfaces { + ge-0/0/0 { + unit 0 { + family inet { + address 192.168.12.1/24;

21 © 2012 Jeffrey Fry – Fryguy.net Juniper Workbook
+ } + } + } + fe-0/0/2 { + unit 0 { + family inet { + address 192.168.13.1/24; + } + } + } + fe-0/0/7 { + unit 0 { + family inet { + address 192.168.14.1/24; + } + } + } + lo0 { + unit 0 { + family inet { + address 1.1.1.1/32; + } + } + } + } [edit] root@J1# Ok, let’s get this committed and quit the config. [edit] root@J1# commit and-quit commit complete Exiting configuration mode root@J1> Good, that is done. Now we should be able to PING R4 root@J1> ping 192.168.14.4 rapid PING 192.168.14.4 (192.168.14.4): 56 data bytes ..... --- 192.168.14.4 ping statistics --- 5 packets transmitted, 0 packets received, 100% packet loss Hmm, it’s not pinging. Why?

22 © 2012 Jeffrey Fry – Fryguy.net Juniper Workbook
Ahh!!! these are SRX devices – aka firewalls! We need to disable packet inspection! [edit] root@J1# set security forwarding-options family inet6 mode packet-based [edit] root@J1# set security forwarding-options family mpls mode packet-based [edit] root@J1# set security forwarding-options family iso mode packet-based Time to check to see what we will be applying to this SRX as well as J2 and J3! root@J1# show | compare [edit] + security { + forwarding-options { + family { + inet6 { + mode packet-based; + } + mpls { + mode packet-based; + } + iso { + mode packet-based; + } + } + } + } [edit] root@J1# Looking good - let’s commit the change. [edit] root@J1# commit warning: You have changed mpls flow mode. You have to reboot the system for your change to take effect. If you have deployed a cluster, be sure to reboot all nodes. commit complete [edit] root@J1# exit Exiting configuration mode Time to reboot - the command to do that is request system reboot

23 © 2012 Jeffrey Fry – Fryguy.net Juniper Workbook
root@J1> request system reboot Reboot the system ? [yes,no] (no) yes Shutdown NOW! [pid 1660] root@J1> *** FINAL System shutdown message from root@J1 *** System going down IMMEDIATELY While J1 reboots, we should apply those commands to J2 and J3. Again, we will use the load merge command to merge in the following: security { forwarding-options { family { inet6 { mode packet-based; } mpls { mode packet-based; } iso { mode packet-based; } } } } J2: [edit] root@J2# load merge terminal [Type ^D at a new line to end input] security { forwarding-options { family { inet6 { mode packet-based; } mpls { mode packet-based; } iso { mode packet-based; } } }

24 © 2012 Jeffrey Fry – Fryguy.net Juniper Workbook
} ^D load complete [edit] root@J2# commit and-quit warning: You have changed mpls flow mode. You have to reboot the system for your change to take effect. If you have deployed a cluster, be sure to reboot all nodes. commit complete Exiting configuration mode root@J2> request system reboot Reboot the system ? [yes,no] (no) yes And now J3: [edit] root@J3# load merge terminal [Type ^D at a new line to end input] security { forwarding-options { family { inet6 { mode packet-based; } mpls { mode packet-based; } iso { mode packet-based; } } } } ^D load complete [edit] root@J3# commit and-quit warning: You have changed mpls flow mode. You have to reboot the system for your change to take effect. If you have deployed a cluster, be sure to reboot all nodes. commit complete Exiting configuration mode root@J3> request system reboot Reboot the system ? [yes,no] (no) yes

25 © 2012 Jeffrey Fry – Fryguy.net Juniper Workbook
Ok, that is all three of them updated. Now, back to J1 to see if we can PING between J1 and R4. J1 (ttyu0) login: jfry Password: --- JUNOS 12.1R2.9 built 2012-05-31 08:58:52 UTC jfry@J1> Since I logged in as jfry here, right to the CLI! jfry@J1> ping 192.168.14.4 rapid PING 192.168.14.4 (192.168.14.4): 56 data bytes !!!!! --- 192.168.14.4 ping statistics --- 5 packets transmitted, 5 packets received, 0% packet loss round-trip min/avg/max/stddev = 4.408/6.723/10.290/2.699 ms jfry@J1> There we go, that was the problem. Little things like that can drive you nuts! Oh, and that PING statement, rapid, means it will send 5 rapid ping commands. Ok, so now that J1 is working, we can finish the config on J2 and J3! J2 is configured as follows: ge-0/0/0 with an IP of 192.168.12.2/24 ge-0/0/1 with an IP of 192.168.23.2/24 lo0 with an IP of 2.2.2.2/32 [edit] jfry@R2# set interfaces ge-0/0/0 unit 0 family inet address 192.168.12.2/24 [edit] jfry@R2# set interfaces ge-0/0/1 unit 0 family inet address 192.168.23.2/24 [edit] jfry@R2# set interfaces lo0 unit 0 family inet address 2.2.2.2/32 [edit] jfry@J2# commit and-quit commit complete Exiting configuration mode

26 © 2012 Jeffrey Fry – Fryguy.net Juniper Workbook
Now we should be able to Ping R1’s interface of 192.168.12.1 jfry@J2> ping 192.168.12.1 rapid PING 192.168.12.1 (192.168.12.1): 56 data bytes !!!!! --- 192.168.12.1 ping statistics --- 5 packets transmitted, 5 packets received, 0% packet loss round-trip min/avg/max/stddev = 2.374/8.066/29.766/10.853 ms Good, now to J3! J3 is configured as follows: fe-0/0/1 with an IP of 192.168.23.3/24
fe-0/0/2 with an IP of 192.168.13.3/24 lo0 with an IP of 3.3.3.3/32
[edit] jfry@J3# set interfaces fe-0/0/1 unit 0 family inet address 192.168.23.3/24 [edit] jfry@J3# set interfaces fe-0/0/3 unit 0 family inet address 192.168.13.3/24 Whoops! That was supposed to be fe-0/0/2, hmm. What can we do? Delete the command and re-enter it all? Nope! Here is another cool feature of Junos, rename! First, here is the interface configuration jfry@J3> show configuration interfaces fe-0/0/3 unit 0 { family inet { address 192.168.13.3/24; } } jfry@J3> Now, we let us rename it to fe-0/0/2. jfry@j3> edit Entering configuration mode [edit] jfry@J3# rename interfaces fe-0/0/3 to fe-0/0/2 [edit] jfry@J3# commit and-quit
27 © 2012 Jeffrey Fry – Fryguy.net Juniper Workbook
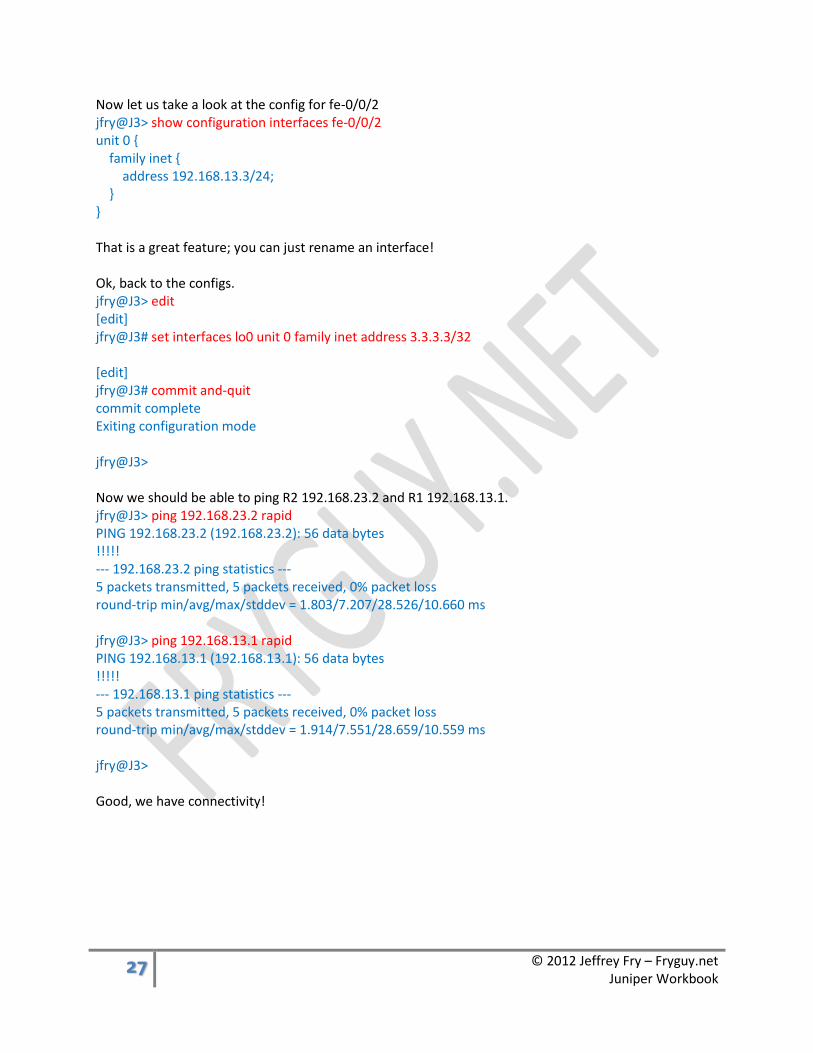
Now let us take a look at the config for fe-0/0/2 jfry@J3> show configuration interfaces fe-0/0/2 unit 0 { family inet { address 192.168.13.3/24; } } That is a great feature; you can just rename an interface! Ok, back to the configs. jfry@J3> edit [edit] jfry@J3# set interfaces lo0 unit 0 family inet address 3.3.3.3/32 [edit] jfry@J3# commit and-quit commit complete Exiting configuration mode jfry@J3> Now we should be able to ping R2 192.168.23.2 and R1 192.168.13.1. jfry@J3> ping 192.168.23.2 rapid PING 192.168.23.2 (192.168.23.2): 56 data bytes !!!!! --- 192.168.23.2 ping statistics --- 5 packets transmitted, 5 packets received, 0% packet loss round-trip min/avg/max/stddev = 1.803/7.207/28.526/10.660 ms jfry@J3> ping 192.168.13.1 rapid PING 192.168.13.1 (192.168.13.1): 56 data bytes !!!!! --- 192.168.13.1 ping statistics --- 5 packets transmitted, 5 packets received, 0% packet loss round-trip min/avg/max/stddev = 1.914/7.551/28.659/10.559 ms jfry@J3> Good, we have connectivity!

28 © 2012 Jeffrey Fry – Fryguy.net Juniper Workbook
Now we need to save these configs as Rescue configs. The command to do that is request system configuration rescue save. The rescue config is then saved in /config/db/rescue.conf on the system. J1: jfry@J1> request system configuration rescue save J2: jfry@J2> request system configuration rescue save J3: jfry@J3> request system configuration rescue save Ok, that is all done.
Just a couple of other quick things that you might want to know.
How to check to see who is logged into the system: jfry@J1> show system users 2:24PM up 38 mins, 1 user, load averages: 0.19, 0.08, 0.17 USER TTY FROM LOGIN@ IDLE WHAT jfry u0 - 1:50PM - -cli (cli) How to check the uptime on the device and last configuration: jfry@J1> show system uptime Current time: 2012-08-09 14:24:26 UTC System booted: 2012-08-09 13:46:52 UTC (00:37:34 ago) Protocols started: 2012-08-09 13:49:45 UTC (00:34:41 ago) Last configured: 2012-08-09 13:44:03 UTC (00:40:23 ago) by root 2:24PM up 38 mins, 1 user, load averages: 0.17, 0.08, 0.17 How to disable spacebar auto-completion To disable the spacebar auto-completion in Junos, you can enter the following command from the prompt ( you are not in edit mode ) jfry@J1> set cli complete-on-space off Disabling complete-on-space To turn back on: jfry@J1> set cl com on Enabling complete-on-space

29 © 2012 Jeffrey Fry – Fryguy.net Juniper Workbook
JWeb
192.168.13.x/24
192.168.23.x/24
192.168.1
2.x/24
19
2.1
68.1
4.x
/24
ge-0/0/0
R4
J1
J2J3
ge-0/0/0
ge-0/0/1fe-0/0/1
fe-0/0/2
fe-0/0/2
fe-0/0/7
E0
.3 .2
.1
.4
.1
.1
.2.3
Introduction Lab TopologyIntroduction Lab Topology
© 2012
Fryguy.Net
2.2.2.2/323.3.3.3/32
1.1.1.1/32
4.4.4.4/32
Junos devices have a web interface called Jweb. I am not going to cover using JWeb, but I will show you how to enable it and access it. To enable Jweb on the device, issue the following command and commit it. [edit] jfry@J1# set system services web-management http [edit] jfry@J1# commit and-quit commit complete Exiting configuration mode jfry@J1> Ok, time to see what this looks like. From a web browser, enter the IP address of the router http://192.168.14.1
30 © 2012 Jeffrey Fry – Fryguy.net Juniper Workbook
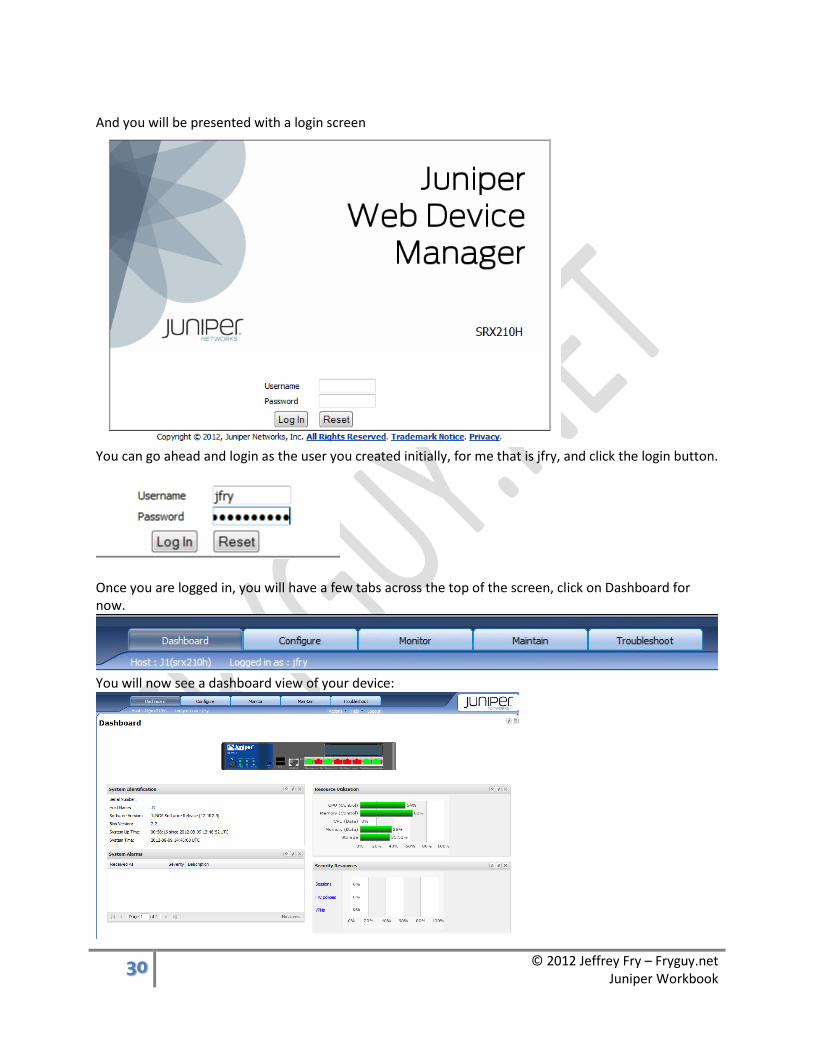
And you will be presented with a login screen
You can go ahead and login as the user you created initially, for me that is jfry, and click the login button.
Once you are logged in, you will have a few tabs across the top of the screen, click on Dashboard for now.
You will now see a dashboard view of your device:

31 © 2012 Jeffrey Fry – Fryguy.net Juniper Workbook
If you look at the Configure tab you will see configuration options on the left hand side of the screen.
From these you can configure interfaces, access, NAT, security, etc. They are an easy way to manage the
device if need be.
If we look at the monitor tab and select the interface (here fe-0/0/7) that connects us to R4, we can see we have some traffic being generated. ( I set off a bunch of 9000 byte pings )
32 © 2012 Jeffrey Fry – Fryguy.net Juniper Workbook
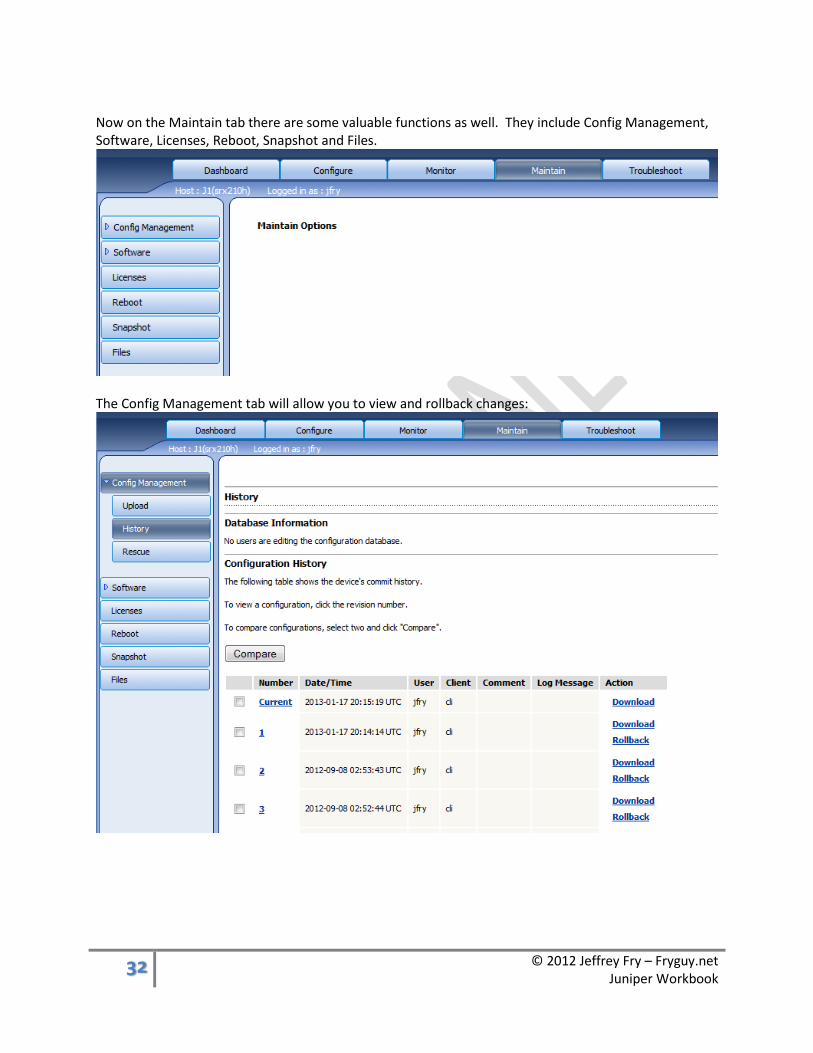
Now on the Maintain tab there are some valuable functions as well. They include Config Management, Software, Licenses, Reboot, Snapshot and Files.
The Config Management tab will allow you to view and rollback changes:
33 © 2012 Jeffrey Fry – Fryguy.net Juniper Workbook
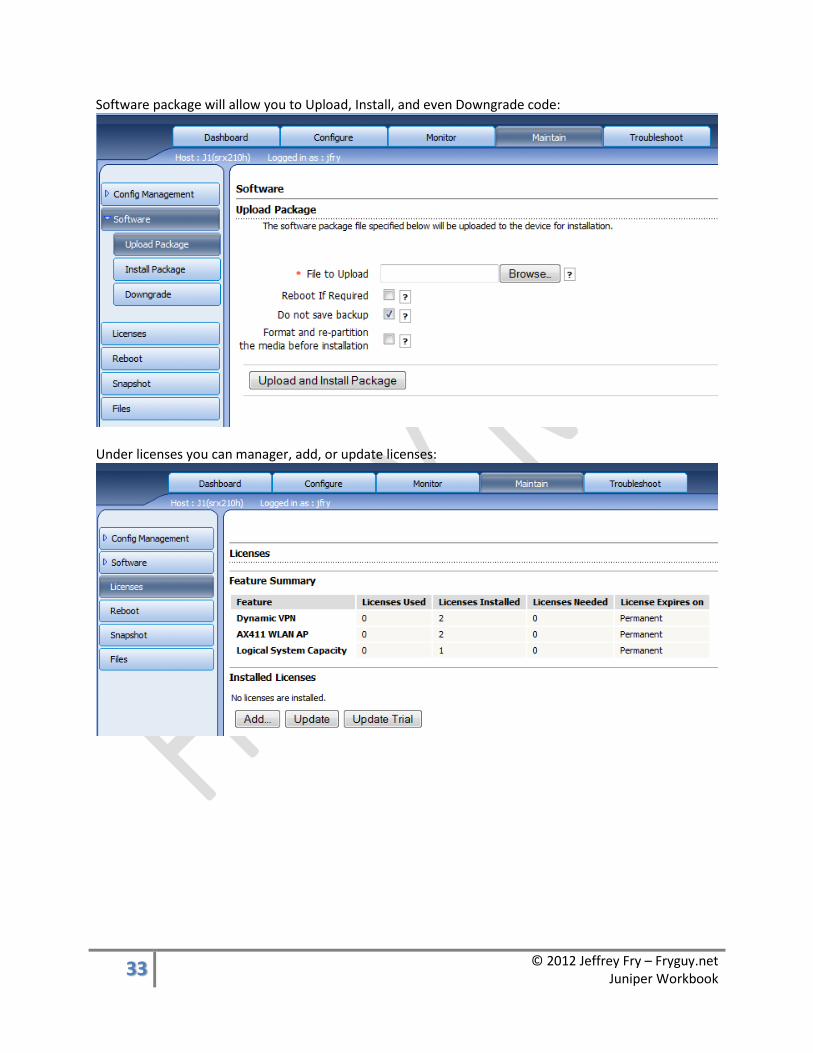
Software package will allow you to Upload, Install, and even Downgrade code:
Under licenses you can manager, add, or update licenses:
34 © 2012 Jeffrey Fry – Fryguy.net Juniper Workbook
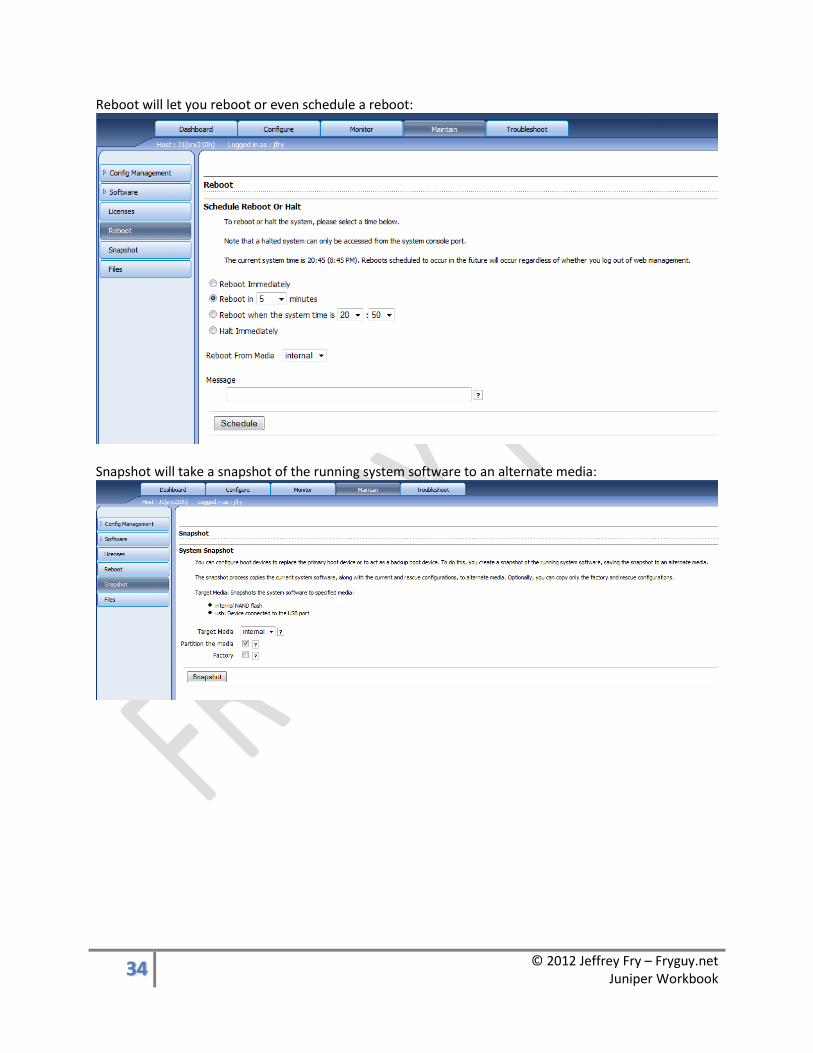
Reboot will let you reboot or even schedule a reboot:
Snapshot will take a snapshot of the running system software to an alternate media:
35 © 2012 Jeffrey Fry – Fryguy.net Juniper Workbook
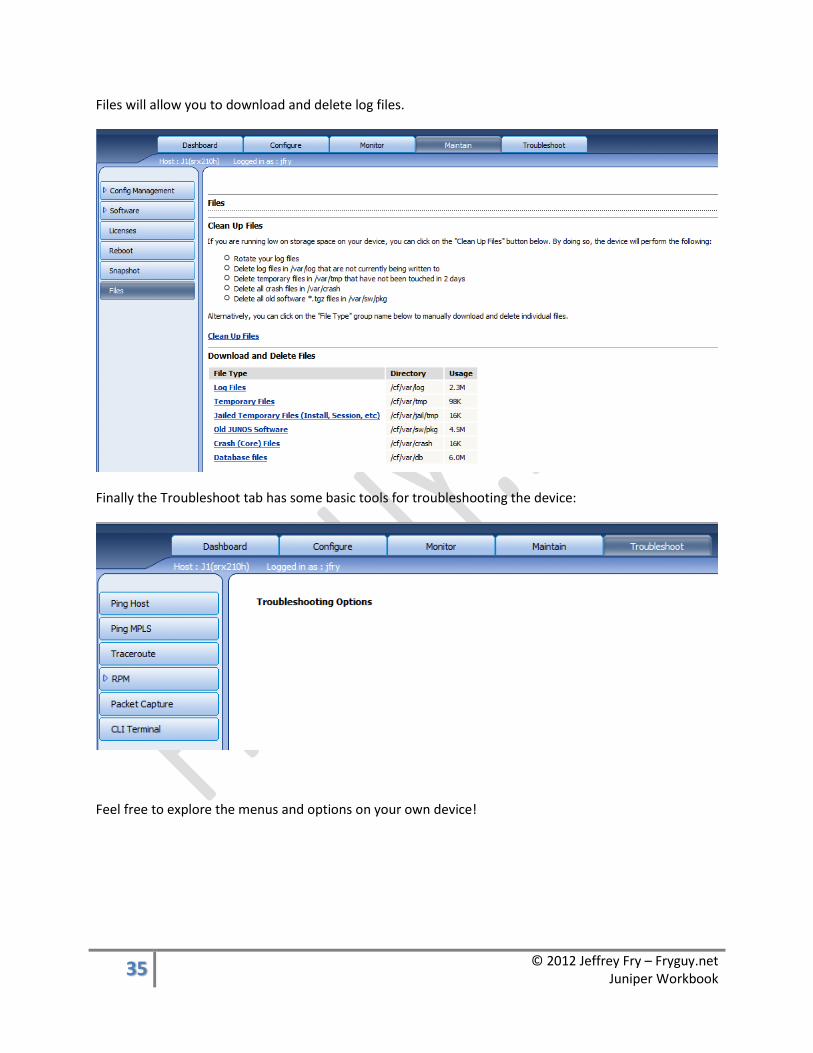
Files will allow you to download and delete log files.
Finally the Troubleshoot tab has some basic tools for troubleshooting the device:
Feel free to explore the menus and options on your own device!

36 © 2012 Jeffrey Fry – Fryguy.net Juniper Workbook
RIP
192.168.13.x/24
192.168.23.x/24
192.168.1
2.x/24
19
2.1
68.1
4.x
/24
ge-0/0/0
J2J3
ge-0/0/0
ge-0/0/1fe-0/0/1
fe-0/0/2
fe-0/0/2
fe-0/0/7
E0
.3 .2
.1
.4
.1
.1
.2.3
RIP Lab TopologyRIP Lab Topology
© 2012
Fryguy.Net
2.2.2.2/323.3.3.3/32
1.1.1.1/32
4.4.4.4/32
R4
J1
Ok, time to get some routing. First up, Routing Information Protocol, RIP! So, first up we will configure the Cisco router, R4 for RIP. R4(config)#router rip R4(config-router)#ver 2 R4(config-router)#net 192.168.14.0 R4(config-router)#net 4.0.0.0 R4(config-router)#no auto-summary Now onto the Juniper configuration. J1 is up first. To configure rip, we need to be under the Protocols stanza [edit] jfry@J1# edit protocols

37 © 2012 Jeffrey Fry – Fryguy.net Juniper Workbook
Once there we configure the Interfaces that we want to participate in RIP. In IOS you configure the networks, in Junos you tell the router what interfaces will participate in RIP. Also, you need to give the process an identifier, here I called it FryguyRIP [edit protocols] jfry@J1# set rip group FryguyRIP neighbor fe-0/0/7.0 [edit protocols] jfry@J1# set rip group FryguyRIP neighbor ge-0/0/0.0 [edit protocols] jfry@J1# set rip group FryguyRIP neighbor fe-0/0/2.0 [edit protocols] jfry@J1# show | compare [edit protocols] + rip { + group FryguyRIP { + neighbor fe-0/0/7.0; + neighbor ge-0/0/0.0; + neighbor fe-0/0/2.0; + } + } [edit protocols] jfry@J1# Time to commit that and see if R4 has routes to R1 interfaces. jfry@J1# commit and-quit commit complete Exiting configuration mode jfry@J1> Now for J2: jfry@J2> edit Entering configuration mode [edit] jfry@J2# edit protocols [edit protocols] jfry@J2# set rip group FryguyRIP neighbor ge-0/0/0.0 [edit protocols] jfry@J2# set rip group FryguyRIP neighbor ge-0/0/1.0

38 © 2012 Jeffrey Fry – Fryguy.net Juniper Workbook
[edit protocols] jfry@J2# commit and-quit commit complete Exiting configuration mode jfry@J2> and finally J3: jfry@J3> edit Entering configuration mode [edit] jfry@J3# edit protocols [edit protocols] jfry@J3# set rip group FryguyRIP neighbor fe-0/0/1.0 [edit protocols] jfry@J3# set rip group FryguyRIP neighbor fe-0/0/2.0 [edit protocols] jfry@J3# commit and-quit commit complete Exiting configuration mode jfry@J3> Ok, that should be RIP configured. Let’s take a look at R4 and see what routes we now have. R4#sh ip route Codes: C - connected, S - static, R - RIP, M - mobile, B - BGP D - EIGRP, EX - EIGRP external, O - OSPF, IA - OSPF inter area N1 - OSPF NSSA external type 1, N2 - OSPF NSSA external type 2 E1 - OSPF external type 1, E2 - OSPF external type 2 i - IS-IS, su - IS-IS summary, L1 - IS-IS level-1, L2 - IS-IS level-2 ia - IS-IS inter area, * - candidate default, U - per-user static route o - ODR, P - periodic downloaded static route Gateway of last resort is not set C 192.168.14.0/24 is directly connected, Ethernet0 4.0.0.0/32 is subnetted, 1 subnets C 4.4.4.4 is directly connected, Loopback0 R4# Hmm, no routes. Does J1 have a route?

39 © 2012 Jeffrey Fry – Fryguy.net Juniper Workbook
The way to check the routing table on Junos is with show route table inet.0 (for IPv4) jfry@J1> show route table inet.0 inet.0: 9 destinations, 9 routes (9 active, 0 holddown, 0 hidden) + = Active Route, - = Last Active, * = Both 1.1.1.1/32 *[Direct/0] 02:12:04 > via lo0.0 4.4.4.4/32 *[RIP/100] 00:10:08, metric 2, tag 0 > to 192.168.14.4 via fe-0/0/7.0 192.168.12.0/24 *[Direct/0] 02:07:48 > via ge-0/0/0.0 192.168.12.1/32 *[Local/0] 02:11:25 Local via ge-0/0/0.0 192.168.13.0/24 *[Direct/0] 02:08:16 > via fe-0/0/2.0 192.168.13.1/32 *[Local/0] 02:11:24 Local via fe-0/0/2.0 192.168.14.0/24 *[Direct/0] 02:11:20 > via fe-0/0/7.0 192.168.14.1/32 *[Local/0] 02:11:24 Local via fe-0/0/7.0 224.0.0.9/32 *[RIP/100] 00:10:09, metric 1 MultiRecv jfry@J1> Yeah, it has a route to R4 loopback. Here is a difference with Junos and IOS, Junos requires the use of policy-statements to advertise routes. You can think of them as Cisco route-maps to advertise and filter routes in certain protocols. Why is this required, well it has to do with the default import and export polices for the protocols. The default for RIP is to accept all learn routes from neighbors, but reject exporting them to neighbors unless there is a policy that permits it. This is definitely a more secure way to approach routing! As a bonus to this, this is also how you advertise the loopback interfaces on the Junos router. So, let’s create a policy to export RIP routes as well as our loopback address. The use of the direct keyword is analogous to connected in IOS. J1 up first! We will create a policy called RIP_Routes and allow routes from the RIP protocol to be passed [edit] jfry@J1# set policy-options policy-statement RIP_Routes term 1 from protocol rip As well as let Direct attached networks (loopback) be passed [edit] jfry@J1# set policy-options policy-statement RIP_Routes term 1 from protocol direct

40 © 2012 Jeffrey Fry – Fryguy.net Juniper Workbook
And finally this is the term that means that they can pass [edit] jfry@J1# set policy-options policy-statement RIP_Routes term 1 then accept Ok, lets take a look at our statement so far jfry@J1# show | compare [edit] + policy-options { + policy-statement RIP_Routes { + term 1 { + from protocol [ rip direct ]; + then accept; + } + } + } [edit] jfry@J1# Ok, now that we have a policy-statement, we now need to apply that to the protocol RIP and to our RIP group, FryguyRIP. First we will change stanza to the rip protocol [edit] jfry@J1# edit protocols rip And then configure our export statement: [edit protocols rip] jfry@J1# set group FryguyRIP export RIP_Routes Now we can look at our configuration [edit protocols rip] jfry@J1# top [edit] jfry@J1# show | compare [edit protocols rip group FryguyRIP] + export RIP_Routes; [edit] + policy-options { + policy-statement RIP_Routes { + term 1 { + from protocol [ rip direct ]; + then accept; + } + } + }

41 © 2012 Jeffrey Fry – Fryguy.net Juniper Workbook
[edit] jfry@J1# And then commit and it and check R4 for a route to J1 loopback. I have a debut on R4 for ip routing, this way I can see changes. R4# *Mar 1 03:44:03.419: RT: SET_LAST_RDB for 1.1.1.1/32 NEW rdb: via 192.168.14.1 *Mar 1 03:44:03.423: RT: add 1.1.1.1/32 via 192.168.14.1, rip metric [120/1] *Mar 1 03:44:03.423: RT: NET-RED 1.1.1.1/32 *Mar 1 03:44:03.423: RT: NET-RED queued, Queue size 1 R4# Yup, the route to J1 Loopback is in the routing table. Wonder if anything else is there? R4#sh ip route Codes: C - connected, S - static, R - RIP, M - mobile, B - BGP D - EIGRP, EX - EIGRP external, O - OSPF, IA - OSPF inter area N1 - OSPF NSSA external type 1, N2 - OSPF NSSA external type 2 E1 - OSPF external type 1, E2 - OSPF external type 2 i - IS-IS, su - IS-IS summary, L1 - IS-IS level-1, L2 - IS-IS level-2 ia - IS-IS inter area, * - candidate default, U - per-user static route o - ODR, P - periodic downloaded static route Gateway of last resort is not set R 192.168.12.0/24 [120/1] via 192.168.14.1, 00:00:08, Ethernet0 1.0.0.0/32 is subnetted, 1 subnets R 1.1.1.1 [120/1] via 192.168.14.1, 00:00:08, Ethernet0 R 192.168.13.0/24 [120/1] via 192.168.14.1, 00:00:08, Ethernet0 C 192.168.14.0/24 is directly connected, Ethernet0 4.0.0.0/32 is subnetted, 1 subnets C 4.4.4.4 is directly connected, Loopback0 R4# Nice, we now have routes to J2 and J3 interfaces – but not their loopbacks. Time to grab the changes from J1 and apply the same ones to J2 and J3. Here is what we are merging into J2 and J3 configs protocols { rip { group FryguyRIP { export RIP_Routes; } } }

42 © 2012 Jeffrey Fry – Fryguy.net Juniper Workbook
policy-options { policy-statement RIP_Routes { term 1 { from protocol [ rip direct ]; then accept; } } } Time to get these loaded so we have full reachability in this network! J2: jfry@J2> edit Entering configuration mode [edit] jfry@J2# load merge terminal [Type ^D at a new line to end input] protocols { rip { group FryguyRIP { export RIP_Routes; } } } policy-options { policy-statement RIP_Routes { term 1 { from protocol [ rip direct ]; then accept; } } } ^D load complete [edit] jfry@J2# commit and-quit commit complete Exiting configuration mode jfry@J2> and J3 jfry@J3> edit Entering configuration mode

43 © 2012 Jeffrey Fry – Fryguy.net Juniper Workbook
[edit] jfry@J3# load merge terminal [Type ^D at a new line to end input] protocols { rip { group FryguyRIP { export RIP_Routes; } } } policy-options { policy-statement RIP_Routes { term 1 { from protocol [ rip direct ]; then accept; } } } ^D load complete [edit] jfry@J3# commit and-quit commit complete Exiting configuration mode jfry@J3> Now we can check the routing table on R4: R4#sh ip route Codes: C - connected, S - static, R - RIP, M - mobile, B - BGP D - EIGRP, EX - EIGRP external, O - OSPF, IA - OSPF inter area N1 - OSPF NSSA external type 1, N2 - OSPF NSSA external type 2 E1 - OSPF external type 1, E2 - OSPF external type 2 i - IS-IS, su - IS-IS summary, L1 - IS-IS level-1, L2 - IS-IS level-2 ia - IS-IS inter area, * - candidate default, U - per-user static route o - ODR, P - periodic downloaded static route Gateway of last resort is not set R 192.168.12.0/24 [120/1] via 192.168.14.1, 00:00:00, Ethernet0 1.0.0.0/32 is subnetted, 1 subnets R 1.1.1.1 [120/1] via 192.168.14.1, 00:00:00, Ethernet0 R 192.168.13.0/24 [120/1] via 192.168.14.1, 00:00:00, Ethernet0 2.0.0.0/32 is subnetted, 1 subnets R 2.2.2.2 [120/2] via 192.168.14.1, 00:00:00, Ethernet0 C 192.168.14.0/24 is directly connected, Ethernet0 3.0.0.0/32 is subnetted, 1 subnets

44 © 2012 Jeffrey Fry – Fryguy.net Juniper Workbook
R 3.3.3.3 [120/2] via 192.168.14.1, 00:00:00, Ethernet0 4.0.0.0/32 is subnetted, 1 subnets C 4.4.4.4 is directly connected, Loopback0 R 192.168.23.0/24 [120/2] via 192.168.14.1, 00:00:01, Ethernet0 R4# Looks great! Let’s check J1 to make sure: jfry@J1> show route table inet.0 inet.0: 12 destinations, 12 routes (12 active, 0 holddown, 0 hidden) + = Active Route, - = Last Active, * = Both 1.1.1.1/32 *[Direct/0] 03:52:17 > via lo0.0 2.2.2.2/32 *[RIP/100] 00:01:37, metric 2, tag 0 > to 192.168.12.2 via ge-0/0/0.0 3.3.3.3/32 *[RIP/100] 00:01:26, metric 2, tag 0 > to 192.168.13.3 via fe-0/0/2.0 4.4.4.4/32 *[RIP/100] 00:08:44, metric 2, tag 0 > to 192.168.14.4 via fe-0/0/7.0 192.168.12.0/24 *[Direct/0] 03:48:01 > via ge-0/0/0.0 192.168.12.1/32 *[Local/0] 03:51:38 Local via ge-0/0/0.0 192.168.13.0/24 *[Direct/0] 03:48:29 > via fe-0/0/2.0 192.168.13.1/32 *[Local/0] 03:51:37 Local via fe-0/0/2.0 192.168.14.0/24 *[Direct/0] 03:51:33 > via fe-0/0/7.0 192.168.14.1/32 *[Local/0] 03:51:37 Local via fe-0/0/7.0 192.168.23.0/24 *[RIP/100] 00:01:37, metric 2, tag 0 > to 192.168.12.2 via ge-0/0/0.0 to 192.168.13.3 via fe-0/0/2.0 224.0.0.9/32 *[RIP/100] 00:04:13, metric 1 MultiRecv jfry@J1> Yup, we have all the routes.

45 © 2012 Jeffrey Fry – Fryguy.net Juniper Workbook
Since R4 is the furthest away, we can test all our PINGs from its loopback R4#p 3.3.3.3 so l0 Type escape sequence to abort. Sending 5, 100-byte ICMP Echos to 3.3.3.3, timeout is 2 seconds: Packet sent with a source address of 4.4.4.4 !!!!! Success rate is 100 percent (5/5), round-trip min/avg/max = 1/3/8 ms R4#p 2.2.2.2 so l0 Type escape sequence to abort. Sending 5, 100-byte ICMP Echos to 2.2.2.2, timeout is 2 seconds: Packet sent with a source address of 4.4.4.4 !!!!! Success rate is 100 percent (5/5), round-trip min/avg/max = 1/2/4 ms R4#p 1.1.1.1 so l0 Type escape sequence to abort. Sending 5, 100-byte ICMP Echos to 1.1.1.1, timeout is 2 seconds: Packet sent with a source address of 4.4.4.4 !!!!! Success rate is 100 percent (5/5), round-trip min/avg/max = 1/3/8 ms R4# Nice! Full reachability!

46 © 2012 Jeffrey Fry – Fryguy.net Juniper Workbook
RIP Authentication and Preferences
192.168.13.x/24
192.168.23.x/24
192.168.1
2.x/24
19
2.1
68.1
4.x
/24
ge-0/0/0
J2J3
ge-0/0/0
ge-0/0/1fe-0/0/1
fe-0/0/2
fe-0/0/2
fe-0/0/7
E0
.3 .2
.1
.4
.1
.1
.2.3
RIP Lab TopologyRIP Lab Topology
© 2012
Fryguy.Net
2.2.2.2/323.3.3.3/32
1.1.1.1/32
4.4.4.4/32
R4
J1
Let’s do RIP Authentication first. First, up – md5 authentication between R4 and J1 only. For this exercise, we will use the password of JNPRCSCO for the link authentication between the routers. First up, R4. Enter configuration commands, one per line. End with CNTL/Z. R4(config)#key chain 1 R4(config-keychain)#key 1 R4(config-keychain-key)#key-string JNPRCSCO R4(config)#int e0 R4(config-if)#ip rip authentication mode md5 R4(config-if)#ip rip authentication key-chain 1 R4(config-if)#exit

47 © 2012 Jeffrey Fry – Fryguy.net Juniper Workbook
Now let’s check the routing table: R4#sh ip route Codes: C - connected, S - static, R - RIP, M - mobile, B - BGP D - EIGRP, EX - EIGRP external, O - OSPF, IA - OSPF inter area N1 - OSPF NSSA external type 1, N2 - OSPF NSSA external type 2 E1 - OSPF external type 1, E2 - OSPF external type 2 i - IS-IS, su - IS-IS summary, L1 - IS-IS level-1, L2 - IS-IS level-2 ia - IS-IS inter area, * - candidate default, U - per-user static route o - ODR, P - periodic downloaded static route Gateway of last resort is not set C 192.168.14.0/24 is directly connected, Ethernet0 4.0.0.0/32 is subnetted, 1 subnets C 4.4.4.4 is directly connected, Loopback0 R4# No routes there, ok – time to configure the other end of this circuit for authentication. Now onto J1: We need to configure RIP authentication on the interface connected to R4, fe-0/0/7.0. jfry@J1> edit Entering configuration mode [edit] jfry@J1# set protocols rip group FryguyRIP neighbor fe-0/0/7.0 authentication-type md5 [edit] jfry@J1#set protocols rip group FryguyRIP neighbor fe-0/0/7.0 authentication-key JNPRCSCO [edit] jfry@J1# commit and-quit That was it, 2 commands under Junos! Note: If you wanted to enable authentication for the WHOLE RIP routing process, you would use the commands below. These would then need to be applied to ALL RIP connected routers. For my example, I just did one interface. set protocols rip authentication-type md5 set protocols rip authentication-key JNPRCSCO Now let’s see what that looks like in the config. What is cool with Junos is you can just show the config for a section of the config, like below. jfry@J1> show configuration protocols rip group FryguyRIP { export RIP_Routes;

48 © 2012 Jeffrey Fry – Fryguy.net Juniper Workbook
neighbor ge-0/0/0.0; neighbor fe-0/0/7.0 { authentication-type md5; authentication-key "$9$OvyZIhydVsY4J36Au1IyrvM87Vs"; ## SECRET-DATA } neighbor fe-0/0/2.0; } And back on R4 we have routes! R4#sh ip route Codes: C - connected, S - static, R - RIP, M - mobile, B - BGP D - EIGRP, EX - EIGRP external, O - OSPF, IA - OSPF inter area N1 - OSPF NSSA external type 1, N2 - OSPF NSSA external type 2 E1 - OSPF external type 1, E2 - OSPF external type 2 i - IS-IS, su - IS-IS summary, L1 - IS-IS level-1, L2 - IS-IS level-2 ia - IS-IS inter area, * - candidate default, U - per-user static route o - ODR, P - periodic downloaded static route Gateway of last resort is not set R 192.168.12.0/24 [120/1] via 192.168.14.1, 00:00:07, Ethernet0 1.0.0.0/32 is subnetted, 1 subnets R 1.1.1.1 [120/1] via 192.168.14.1, 00:00:07, Ethernet0 R 192.168.13.0/24 [120/1] via 192.168.14.1, 00:00:07, Ethernet0 2.0.0.0/32 is subnetted, 1 subnets R 2.2.2.2 [120/2] via 192.168.14.1, 00:00:07, Ethernet0 C 192.168.14.0/24 is directly connected, Ethernet0 3.0.0.0/32 is subnetted, 1 subnets R 3.3.3.3 [120/2] via 192.168.14.1, 00:00:07, Ethernet0 4.0.0.0/32 is subnetted, 1 subnets C 4.4.4.4 is directly connected, Loopback0 R 192.168.23.0/24 [120/2] via 192.168.14.1, 00:00:08, Ethernet0 R4# Now to setting up metrics for RIP routes. When you look at the diagram you see that the shortest path between R4 and J2 is via J1. What happens if the link between J1 and J2 is a slow link, it would be faster to have the traffic go R4-J1-J3-J2. So this means that we need to add some metrics to these interfaces to influence the hops.

49 © 2012 Jeffrey Fry – Fryguy.net Juniper Workbook
First let’s confirm the path from R4 to J2 with a tracert. R4#traceroute 2.2.2.2 Type escape sequence to abort. Tracing the route to 2.2.2.2 1 192.168.14.1 0 msec 4 msec 0 msec 2 2.2.2.2 0 msec 4 msec 4 msec R4# Yup, J1-J2. Ok, lets sent the metric-in on the J2-J1 link, on the J1 side to 5 [edit[ jfry@J1# set protocols rip group FryguyRIP neighbor ge-0/0/0.0 metric-in 5 [edit] jfry@J1# commit and-quit commit complete Exiting configuration mode jfry@J1> Now we can check the path from R4 again: R4#traceroute 2.2.2.2 Type escape sequence to abort. Tracing the route to 2.2.2.2 1 192.168.14.1 4 msec 0 msec 4 msec 2 192.168.13.3 0 msec 0 msec 8 msec 3 2.2.2.2 0 msec 0 msec 0 msec R4# There we go, R1-R3-R2!

50 © 2012 Jeffrey Fry – Fryguy.net Juniper Workbook
IS-IS
192.168.13.x/24
192.168.23.x/24
192.168.1
2.x/24
19
2.1
68.1
4.x
/24
ge-0/0/0
J2J3
ge-0/0/0
ge-0/0/1fe-0/0/1
fe-0/0/2
fe-0/0/2
fe-0/0/7
E0
.3 .2
.1
.4
.1
.1
.2.3
IS-IS Lab TopologyIS-IS Lab Topology
© 2012
Fryguy.Net
2.2.2.2/323.3.3.3/32
1.1.1.1/32
4.4.4.4/32
J1
R4
Time to do some IS-IS labs. I am going to try and make these short and simple. I am sure as I get more into Junos I will write more complex IS-IS topologies and start to include LDP as well. For this I just want to show what an IS-IS configuration would look like. Up first replacing the config on R4 R4#configure replace flash:base.txt Ok, that’s done – J1, J2, and J3 next. First up, we need to roll-back to the rescue config. This is done from the edit mode by issuing the command rollback rescue. jfry@J1> edit Entering configuration mode

51 © 2012 Jeffrey Fry – Fryguy.net Juniper Workbook
[edit] jfry@J1# rollback rescue load complete [edit] jfry@J1# commit and-quit commit complete Exiting configuration mode jfry@J1> Let’s take a look at the config we have loaded: jfry@J1> show configuration | display set set version 12.1R2.9 set system host-name J1 set system root-authentication encrypted-password "$1$KzNk.qW/$snaQkMp/4d3vZWjO5YONG/" set system login user jfry full-name "Jeff Fry" set system login user jfry uid 2002 set system login user jfry class super-user set system login user jfry authentication encrypted-password "$1$GlR67aAm$uTukNzdwUDf7VDIBxi6sq/" set interfaces ge-0/0/0 unit 0 family inet address 192.168.12.1/24 set interfaces fe-0/0/2 unit 0 family inet address 192.168.13.1/24 set interfaces fe-0/0/7 unit 0 family inet address 192.168.14.1/24 set interfaces lo0 unit 0 family inet address 1.1.1.1/32 set security forwarding-options family inet6 mode packet-based set security forwarding-options family mpls mode packet-based set security forwarding-options family iso mode packet-based jfry@J1> See, back to the base config that we first saved as a ‘rescue’ config. Now to J2: jfry@J2> edit Entering configuration mode [edit] jfry@J2# rollback rescue load complete [edit] jfry@J2# commit and-quit commit complete Exiting configuration mode And J3:

52 © 2012 Jeffrey Fry – Fryguy.net Juniper Workbook
jfry@J3> edit Entering configuration mode [edit] jfry@J3# rollback rescue commload complete [edit] jfry@J3# commit and-quit commit complete Exiting configuration mode jfry@J3> Ok, time to configure IS-IS on R4, J1, J2, and J3. For this, we will use 49.0000.0000.0000.000X.00 where X=Router Number Also for the sake of this lab we will disable Level 1 and only do Level 2. R4 real quick: R4(config)#router isis Fryguy R4(config-router)# net 49.0000.0000.0000.0004.00 R4(config-router)#is-type level-2 R4(config-router)#int e0 R4(config-if)#ip router isis Fryguy R4(config-if)#router isis Fryguy R4(config-router)#passive-interface Loopback0 R4(config-router)# J1 is up first! jfry@J1> edit Entering configuration mode First this we do is enable isis on the interfaces, starting with ge-0/0/0. And when we configure this, we will need to disable Level 1 on them. [edit] jfry@J1# set protocols isis interface ge-0/0/0 level 1 disable [edit] jfry@J1# set protocols isis interface fe-0/0/2 level 1 disable [edit] jfry@J1# set protocols isis interface fe-0/0/7 level 1 disable Yup, we enable it for the loopback address as well. [edit] jfry@J1# set protocols isis interface lo0 passive

53 © 2012 Jeffrey Fry – Fryguy.net Juniper Workbook
Now we need to enable the ISO family for the interface. ISIS is an iso level protocol, it does not rely on IP or IPv6. [edit] jfry@J1# set interfaces ge-0/0/0 unit 0 family iso [edit] jfry@J1# set interfaces fe-0/0/2 unit 0 family iso [edit] jfry@J1# set interfaces fe-0/0/7 unit 0 family iso And under the loopback interface we configure our ISO family address for this router. [edit] jfry@J1# set interfaces lo0 unit 0 family iso address 49.0000.0000.0000.0001.00 Let’s look at the config [edit] jfry@J1# show | compare [edit interfaces ge-0/0/0 unit 0] + family iso; [edit interfaces fe-0/0/2 unit 0] + family iso; [edit interfaces fe-0/0/7 unit 0] + family iso; [edit interfaces lo0 unit 0] + family iso { + address 49.0000.0000.0000.0001.00; + } [edit] + protocols { + isis { + interface ge-0/0/0.0 { + level 1 disable; + } + interface fe-0/0/2.0 { + level 1 disable; + } + interface fe-0/0/7.0 { + level 1 disable; + } + interface lo0.0; + } + } And then commit and-quit. [edit]

54 © 2012 Jeffrey Fry – Fryguy.net Juniper Workbook
jfry@J1# commit and-quit commit complete Exiting configuration mode Ok, time to do J2 and J3, same way. J2: jfry@J2> edit Entering configuration mode [edit] jfry@J2# set protocols isis interface ge-0/0/0 level 1 disable [edit] jfry@J2# set protocols isis interface ge-0/0/1 level 1 disable [edit] jfry@J2# set protocols isis interface lo0 passive [edit] jfry@J2# set interfaces ge-0/0/0 unit 0 family iso [edit] jfry@J2# set interfaces ge-0/0/1 unit 0 family iso [edit] jfry@J2# set interfaces lo0 unit 0 family iso address 49.0000.0000.0000.0002.00 [edit] jfry@J2# commit and-quit commit complete Exiting configuration mode jfry@J2> And now J3: jfry@J3> edit Entering configuration mode [edit] jfry@J3# set protocols isis interface fe-0/0/2 level 1 disable [edit] jfry@J3# set protocols isis interface fe-0/0/3 level 1 disable [edit] jfry@J3# set protocols isis interface lo0 passive

55 © 2012 Jeffrey Fry – Fryguy.net Juniper Workbook
[edit] jfry@J3# set interfaces fe-0/0/2 unit 0 family iso [edit] jfry@J3# set interfaces fe-0/0/3 unit 0 family iso [edit] jfry@J3# set interfaces lo0 unit 0 family iso address 49.0000.0000.0000.0003.00 [edit] jfry@J3# commit and-quit commit complete Exiting configuration mode Ok, now to check the inet.0 routing table on J1: jfry@J1> show route table inet.0 inet.0: 11 destinations, 11 routes (11 active, 0 holddown, 0 hidden) + = Active Route, - = Last Active, * = Both 1.1.1.1/32 *[Direct/0] 00:47:08 > via lo0.0 2.2.2.2/32 *[IS-IS/18] 00:29:34, metric 10 > to 192.168.12.2 via ge-0/0/0.0 3.3.3.3/32 *[IS-IS/18] 00:28:12, metric 10 > to 192.168.13.3 via fe-0/0/2.0 4.4.4.4/32 *[IS-IS/18] 00:00:47, metric 10 > to 192.168.14.4 via fe-0/0/7.0 192.168.12.0/24 *[Direct/0] 00:46:05 > via ge-0/0/0.0 192.168.12.1/32 *[Local/0] 00:46:31 Local via ge-0/0/0.0 192.168.13.0/24 *[Direct/0] 00:46:27 > via fe-0/0/2.0 192.168.13.1/32 *[Local/0] 00:46:31 Local via fe-0/0/2.0 192.168.14.0/24 *[Direct/0] 00:12:32 > via fe-0/0/7.0 192.168.14.1/32 *[Local/0] 00:46:31 Local via fe-0/0/7.0 192.168.23.0/24 *[IS-IS/18] 00:29:34, metric 20 > to 192.168.12.2 via ge-0/0/0.0 There we go, we have routes to J2 and J3 loopback interfaces. As you can see, it says they are being advertised by IS-IS.

56 © 2012 Jeffrey Fry – Fryguy.net Juniper Workbook
Now let’s configure some Level 2 authentication using MD5 with a key of Juniper First we will do the Cisco router, R4: R4(config)#key chain ISIS R4(config-keychain)#key 1 R4(config-keychain-key)#key-string Juniper R4(config-keychain-key)#router isis Fryguy R4(config-router)#authentication mode md5 R4(config-router)#authentication key-chain ISIS Now for the Juniper routers, J1 first: [edit] jfry@J1# set protocols isis level 2 authentication-key Juniper [edit] jfry@J1# set protocols isis level 2 authentication-type md5 [edit] jfry@J1# show | compare [edit protocols isis] + level 2 { + authentication-key "$9$cJTrKWNdsJGiLxGik.zFcyl"; ## SECRET-DATA + authentication-type md5; + } [edit] jfry@J1# commit and-quit commit complete Exiting configuration mode jfry@J1> Now we will take that config and merge it into J2 and J3: protocols { isis { level 2 { authentication-key "$9$cJTrKWNdsJGiLxGik.zFcyl"; ## SECRET-DATA authentication-type md5; } } }

57 © 2012 Jeffrey Fry – Fryguy.net Juniper Workbook
J2: jfry@J2# load merge terminal [Type ^D at a new line to end input] protocols { isis { level 2 { authentication-key "$9$cJTrKWNdsJGiLxGik.zFcyl"; ## SECRET-DATA authentication-type md5; } } } load complete [edit] jfry@J2# commit and-quit commit complete Exiting configuration mode And now J3: jfry@J3# load merge terminal [Type ^D at a new line to end input] protocols { isis { level 2 { authentication-key "$9$cJTrKWNdsJGiLxGik.zFcyl"; ## SECRET-DATA authentication-type md5; } } } load complete [edit] jfry@J3# commit and-quit There, we have area authentication now and we can check by using show isis authentication. Let’s look at J1: jfry@J1> show isis authentication Interface Level IIH Auth CSN Auth PSN Auth
fe-0/0/2.0 2 MD5 MD5 MD5
fe-0/0/7.0 2 MD5 MD5 MD5
ge-0/0/0.0 2 MD5 MD5 MD5
That is about all that I will cover for IS-IS in this lab. Maybe when I get into the MPLS portion I will do more on IS-IS.
58 © 2012 Jeffrey Fry – Fryguy.net Juniper Workbook
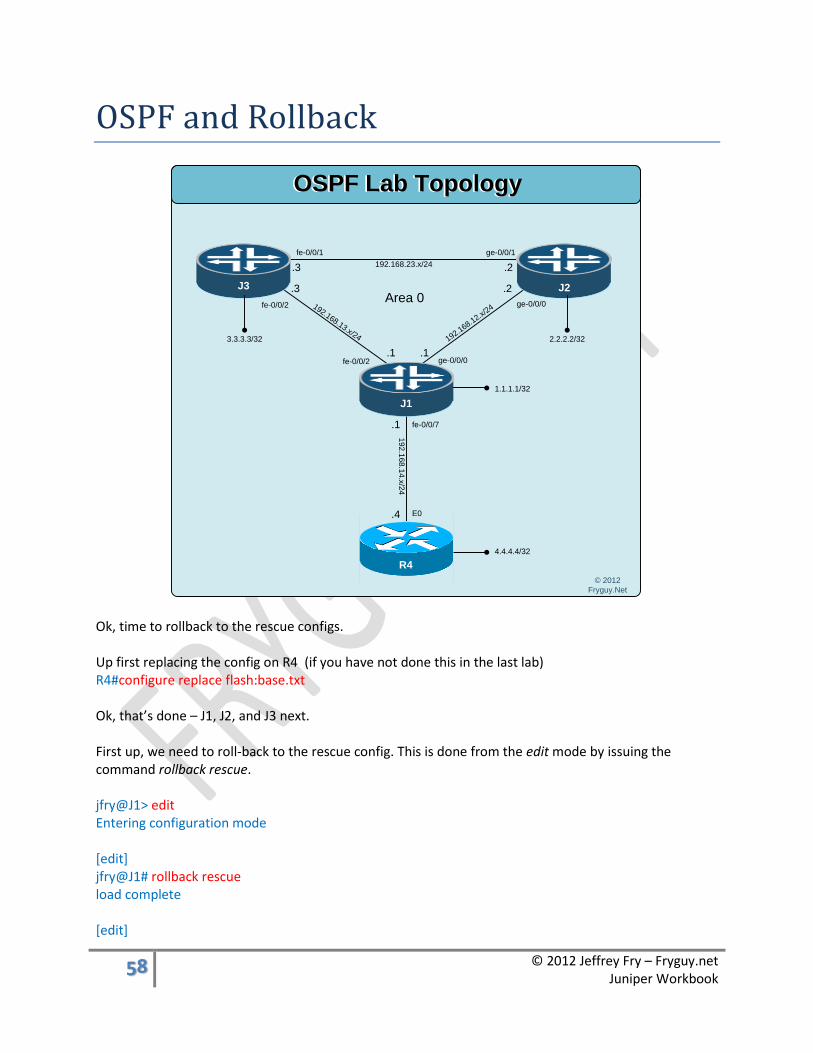
OSPF and Rollback
192.168.13.x/24
192.168.23.x/24
192.168.1
2.x/24
19
2.1
68
.14
.x/2
4
ge-0/0/0
J2J3
ge-0/0/0
ge-0/0/1fe-0/0/1
fe-0/0/2
fe-0/0/2
fe-0/0/7
E0
.3 .2
.1
.4
.1
.1
.2.3
OSPF Lab TopologyOSPF Lab Topology
Area 0
© 2012
Fryguy.Net
2.2.2.2/323.3.3.3/32
1.1.1.1/32
4.4.4.4/32
J1
R4
Ok, time to rollback to the rescue configs. Up first replacing the config on R4 (if you have not done this in the last lab) R4#configure replace flash:base.txt Ok, that’s done – J1, J2, and J3 next. First up, we need to roll-back to the rescue config. This is done from the edit mode by issuing the command rollback rescue. jfry@J1> edit Entering configuration mode [edit] jfry@J1# rollback rescue load complete [edit]

59 © 2012 Jeffrey Fry – Fryguy.net Juniper Workbook
jfry@J1# commit and-quit commit complete Exiting configuration mode jfry@J1> Now to J2: jfry@J2> edit Entering configuration mode [edit] jfry@J2# rollback rescue load complete [edit] jfry@J2# commit and-quit commit complete Exiting configuration mode And J3: jfry@J3> edit Entering configuration mode [edit] jfry@J3# rollback rescue load complete [edit] jfry@J3# commit and-quit commit complete Exiting configuration mode jfry@J3> Ok, back to the rescue config, now to configure up OSPF!
For this lab we will be using a single OSPF Area, Area 0. Up first will be R4, we will configure all interfaces in Area 0. R4#conf t Enter configuration commands, one per line. End with CNTL/Z. R4(config)#router ospf 1 R4(config-router)#net 192.168.14.4 0.0.0.0 a 0 R4(config-router)#net 4.4.4.4 0.0.0.0 a 0 R4(config-router)#no auto-summary

60 © 2012 Jeffrey Fry – Fryguy.net Juniper Workbook
R4(config-router)#^Z R4# Ok, now we can configure J1 for OSPF. [edit] jfry@J1# set protocols ospf area 0 interface fe-0/0/7.0 [edit] jfry@J1# set protocols ospf area 0 interface ge-0/0/0.0 [edit] jfry@J1# set protocols ospf area 0 interface fe-0/0/2.0 [edit] jfry@J1# set protocols ospf area 0 interface lo0.0 passive [edit] jfry@J1# commit and-quit Ok, we should check R4 for OSPF neighbor: R4#sh ip ospf neighbor Neighbor ID Pri State Dead Time Address Interface 1.1.1.1 128 FULL/BDR 00:00:37 192.168.14.1 Ethernet0 R4# Good, now we should see what that command looks like on J1 jfry@J1> show ospf neighbor Address Interface State ID Pri Dead 192.168.14.4 fe-0/0/7.0 Full 4.4.4.4 1 34 jfry@J1> Ok, J1 and R4 are OSPF neighbors. Let’s get J2 and J3 configured. J2: jfry@J2> edit Entering configuration mode [edit] jfry@J2# set protocols ospf area 0 interface ge-0/0/0.0 [edit] jfry@J2# set protocols ospf area 0 interface ge-0/0/1.0 [edit] jfry@J2# set protocols ospf area 0 interface lo0.0 passive

61 © 2012 Jeffrey Fry – Fryguy.net Juniper Workbook
[edit] jfry@J2# commit and-quit J3: jfry@J3> edit Entering configuration mode [edit] jfry@J3# set protocols ospf area 0 interface fe-0/0/1.0 [edit] jfry@J3# set protocols ospf area 0 interface fe-0/0/2.0 [edit] jfry@J3# set protocols ospf area 0 interface lo0.0 passive [edit] jfry@J3# command and-quit Ok, back to R4 to see what the routing table looks like (since it is the furtherst router): R4#sh ip route Codes: C - connected, S - static, R - RIP, M - mobile, B - BGP D - EIGRP, EX - EIGRP external, O - OSPF, IA - OSPF inter area N1 - OSPF NSSA external type 1, N2 - OSPF NSSA external type 2 E1 - OSPF external type 1, E2 - OSPF external type 2 i - IS-IS, su - IS-IS summary, L1 - IS-IS level-1, L2 - IS-IS level-2 ia - IS-IS inter area, * - candidate default, U - per-user static route o - ODR, P - periodic downloaded static route Gateway of last resort is not set O 192.168.12.0/24 [110/11] via 192.168.14.1, 00:04:46, Ethernet0 1.0.0.0/32 is subnetted, 1 subnets O 1.1.1.1 [110/10] via 192.168.14.1, 00:04:46, Ethernet0 O 192.168.13.0/24 [110/11] via 192.168.14.1, 00:04:46, Ethernet0 2.0.0.0/32 is subnetted, 1 subnets O 2.2.2.2 [110/11] via 192.168.14.1, 00:04:46, Ethernet0 C 192.168.14.0/24 is directly connected, Ethernet0 3.0.0.0/32 is subnetted, 1 subnets O 3.3.3.3 [110/11] via 192.168.14.1, 00:04:46, Ethernet0 4.0.0.0/32 is subnetted, 1 subnets C 4.4.4.4 is directly connected, Loopback0 O 192.168.23.0/24 [110/12] via 192.168.14.1, 00:04:47, Ethernet0 R4#

62 © 2012 Jeffrey Fry – Fryguy.net Juniper Workbook
Looks like we have a full table! Time to PING R3 loopback R4#ping 3.3.3.3 so l0 Type escape sequence to abort. Sending 5, 100-byte ICMP Echos to 3.3.3.3, timeout is 2 seconds: Packet sent with a source address of 4.4.4.4 !!!!! Success rate is 100 percent (5/5), round-trip min/avg/max = 1/1/4 ms R4# We have full connectivity! Ok, on Cisco if we want to advertise a default route (0/0) with OSPF, we use Default-information
originate. Below we will show that, but first we will create a new loopback (Loopback 1) on R4 and
assign it an IP of 200.200.200.200.
R4(config)#int loop1 R4(config-if)#ip add 200.200.200.200 255.255.255.255 R4(config-if)# Now we should test that we do not currently have connectivity to 200.200.200.200. jfry@J3> show route table inet.0 inet.0: 11 destinations, 11 routes (11 active, 0 holddown, 0 hidden) + = Active Route, - = Last Active, * = Both 1.1.1.1/32 *[OSPF/10] 00:49:23, metric 1 > to 192.168.13.1 via fe-0/0/2.0 2.2.2.2/32 *[OSPF/10] 00:49:13, metric 1 > to 192.168.23.2 via fe-0/0/1.0 3.3.3.3/32 *[Direct/0] 05:48:56 > via lo0.0 4.4.4.4/32 *[OSPF/10] 00:31:56, metric 3 > to 192.168.13.1 via fe-0/0/2.0 192.168.12.0/24 *[OSPF/10] 00:49:13, metric 2 to 192.168.23.2 via fe-0/0/1.0 > to 192.168.13.1 via fe-0/0/2.0 192.168.13.0/24 *[Direct/0] 05:47:00 > via fe-0/0/2.0 192.168.13.3/32 *[Local/0] 05:48:30 Local via fe-0/0/2.0 192.168.14.0/24 *[OSPF/10] 00:49:23, metric 2 > to 192.168.13.1 via fe-0/0/2.0 192.168.23.0/24 *[Direct/0] 05:46:36 > via fe-0/0/1.0 192.168.23.3/32 *[Local/0] 05:48:30 Local via fe-0/0/1.0
63 © 2012 Jeffrey Fry – Fryguy.net Juniper Workbook
224.0.0.5/32 *[OSPF/10] 00:49:33, metric 1 MultiRecv jfry@J3> Nope, no route nor any default route there. Time for a PING just to make sure. jfry@J3> ping 200.200.200.200 rapid PING 200.200.200.200 (200.200.200.200): 56 data bytes ping: sendto: No route to host .ping: sendto: No route to host .ping: sendto: No route to host .ping: sendto: No route to host .ping: sendto: No route to host . --- 200.200.200.200 ping statistics --- 5 packets transmitted, 0 packets received, 100% packet loss jfry@J3> Ok, good. Time to configure the Cisco router to advertise a default route. R4(config)#router ospf 1 R4(config-router)#default-information originate always R4(config-router)#^Z R4# Ok, J3 should now have a default route: jfry@J3> show route table inet.0 | match 0.0.0.0 0.0.0.0/0 *[OSPF/150] 00:00:27, metric 1, tag 1 jfry@J3> There it is, so now J3 should be able to ping 200.200.200.200 jfry@J3> ping 200.200.200.200 rapid PING 200.200.200.200 (200.200.200.200): 56 data bytes !!!!! --- 200.200.200.200 ping statistics --- 5 packets transmitted, 5 packets received, 0% packet loss round-trip min/avg/max/stddev = 3.094/3.538/4.385/0.451 ms jfry@J3> Good, it can. So, now that you know how to advertise a default in IOS, we can do the same thing on J3.

64 © 2012 Jeffrey Fry – Fryguy.net Juniper Workbook
First, remove the default and loopback1 interface on R4. R4(config)#router ospf 1 R4(config-router)#no default-information originate always R4(config-router)#no int loop1 R4(config)# Now to check J3 and make sure default is gone: jfry@J3> show route table inet.0 | match 0.0.0.0 Ok, now we can configure J3 to advertise a default route. In Junos it is a little bit different. Here we actually need to create the 0/0 route and then write a policy to permit it. This is something that I actually like about Junos, you need to be sure of what you are doing. No need to worry about someone just entering a command and being done. I suggest that anytime you redistribute a route (Junos or Cisco), a policy should be in place to permit that route. Junos just helps you make sure that happens. Ok, let’s create a null route for 0/0 on J3. We will configure the router to discard packets that match this statement and to no install the route in the forwarding table. [edit] jfry@J3# set routing-options static route 0.0.0.0/0 discard [edit] jfry@J3# set routing-options static route 0.0.0.0/0 no-install jfry@J3# show | compare [edit] + routing-options { + static { + route 0.0.0.0/0 { + discard; + no-install; + } + } + } Ok, we have the static 0/0 route configured. Now we need to configure the policy to allow this route to be advertised. [edit] jfry@J3# set policy-options policy-statement Default from protocol static [edit] jfry@J3# set policy-statement Default from route-filter 0.0.0.0/0 exact

65 © 2012 Jeffrey Fry – Fryguy.net Juniper Workbook
[edit] jfry@J3# set policy-options policy-statement Default then accept [edit] jfry@J3# show | compare [edit] + policy-options { + policy-statement Default { + from { + protocol static; + route-filter 0.0.0.0/0 exact; + } + then accept; + } + } [edit] jfry@J3# Ok, now we need to apply that policy to the OSPF protocol What is cool with Junos, if you forget what you called the policy, you can hit ? and it will list all the policies configured on the router. jfry@J3# set protocols ospf export ? Possible completions: <value> Export policy ( Open an expression Default [ Open a set of values [edit] jfry@J3# set protocols ospf export Default [edit] jfry@J3# commit and-quit Now let’s get back to R4 and see if we have a default route: R4# sh ip route 0.0.0.0 Routing entry for 0.0.0.0/0, supernet Known via "ospf 1", distance 110, metric 0, candidate default path, type extern 2, forward metric 11 Last update from 192.168.14.1 on Ethernet0, 00:01:31 ago Routing Descriptor Blocks: * 192.168.14.1, from 3.3.3.3, 00:01:31 ago, via Ethernet0 Route metric is 0, traffic share count is 1
66 © 2012 Jeffrey Fry – Fryguy.net Juniper Workbook
There we go, we have a default route being advertised from R3 (3.3.3.3). Ok, since we cannot create more than one loopback interface on the SRX we will have to cheat a bit. I am going to connect J3 fe-0/0/7 to my home network and give it an IP address of 192.168.0.200/24. [edit] jfry@J3# set interface fe-0/0/7 unit 0 family inet address 192.168.0.200/24 [edit] jfry@J3# commit and-quit commit complete Exiting configuration mode jfry@J3> Ok, now that is done we should look at R4 and make sure that we do not have a route to 192.168.0.0/24 R4#sh ip route 192.168.0.0 % Network not in table R4# Good, no route. Let’s try and PING 192.168.0.200 (J3 interface) R4#ping 192.168.0.200 Type escape sequence to abort. Sending 5, 100-byte ICMP Echos to 192.168.0.200, timeout is 2 seconds: !!!!! Success rate is 100 percent (5/5), round-trip min/avg/max = 1/1/4 ms And there you go, we can PING the route! Ok, time to rollback R3 to before we started with all these changes. So how do we do this? Well, rollback! For my router, its rollback # 4. jfry@J3> show system commit 0 2012-08-10 21:20:06 UTC by jfry via cli 1 2012-08-10 21:19:03 UTC by jfry via cli 2 2012-08-10 21:17:50 UTC by jfry via cli 3 2012-08-10 21:06:16 UTC by jfry via cli 4 2012-08-10 19:42:50 UTC by jfry via cli You can view the rollback by issuing the command: show system rollback # jfry@J3> show system rollback 4 ## Last changed: 2012-08-10 19:42:42 UTC version 12.1R2.9;

67 © 2012 Jeffrey Fry – Fryguy.net Juniper Workbook
system { host-name J3; root-authentication { encrypted-password "$1$KzNk.qW/$snaQkMp/4d3vZWjO5YONG/"; ## SECRET-DATA } login { user jfry { full-name "Jeff Fry"; uid 2002; class super-user; authentication { encrypted-password "$1$GlR67aAm$uTukNzdwUDf7VDIBxi6sq/"; ## SECRET-DATA } } } } interfaces { fe-0/0/1 { unit 0 { family inet { address 192.168.23.3/24; } } } fe-0/0/2 { unit 0 { family inet { address 192.168.13.3/24; } } } lo0 { unit 0 { family inet { address 3.3.3.3/32; } } } } protocols { ospf { area 0.0.0.0 { interface fe-0/0/1.0; interface fe-0/0/2.0; interface lo0.0 { passive; }

68 © 2012 Jeffrey Fry – Fryguy.net Juniper Workbook
} } } security { forwarding-options { family { inet6 { mode packet-based; } mpls { mode packet-based; } iso { mode packet-based; } } } } jfry@J3> And as we can see, that is the config after OSPF was configured but before we did all the static routes. So, let’s roll!(back). Load the rollback [edit] jfry@J3# rollback 4 load complete And to see what it is going to change (here remove), do show | compare [edit] jfry@J3# show | compare [edit interfaces] - fe-0/0/7 { - unit 0 { - family inet { - address 192.168.0.200/24; - } - } - } [edit] - routing-options { - static { - route 0.0.0.0/0 { - discard; - no-install; - }

69 © 2012 Jeffrey Fry – Fryguy.net Juniper Workbook
- } - } [edit protocols ospf] - export Default; [edit] - policy-options { - policy-statement Default { - from { - protocol static; - route-filter 0.0.0.0/0 exact; - } - then accept; - } - } [edit] jfry@J3# Ok, and commit the config! Now for more fun stuff with OSPF!

70 © 2012 Jeffrey Fry – Fryguy.net Juniper Workbook
OSPF Router-ID and Traceoptions
192.168.13.x/24
192.168.23.x/24
192.168.1
2.x/24
19
2.1
68
.14
.x/2
4
ge-0/0/0
J2J3
ge-0/0/0
ge-0/0/1fe-0/0/1
fe-0/0/2
fe-0/0/2
fe-0/0/7
E0
.3 .2
.1
.4
.1
.1
.2.3
OSPF Router-ID Lab TopologyOSPF Router-ID Lab Topology
Area 0
© 2012
Fryguy.Net
2.2.2.2/323.3.3.3/32
1.1.1.1/32
4.4.4.4/32
Router ID
33.33.33.33Router ID
22.22.22.22
Router ID
11.11.11.11
Router ID
44.44.44.44
R4
J1
Ok, time for some of the other things that we might do with OSPF. First up, router-ids. For this lab, we will create router-ids in the form of xx.xx.xx.xx where x=Router number. For example, R4 will be 44.44.44.44, and we won’t use a loopback interface for this. First we can start with changing it on R4: R4(config)#router ospf 1 R4(config-router)#router-id 44.44.44.44 Reload or use "clear ip ospf process" command, for this to take effect So we have to clear the OSPF process in order for this to take effect. R4(config-router)#^Z R4#clear ip ospf process Reset ALL OSPF processes? [no]: y R4# Ok, we should now have a Router-ID of 44.44.44.44. R4#sh ip ospf | inc ID Routing Process "ospf 1" with ID 44.44.44.44

71 © 2012 Jeffrey Fry – Fryguy.net Juniper Workbook
Good. Time to recheck connectivity. R4#ping 3.3.3.3 so lo 0 Type escape sequence to abort. Sending 5, 100-byte ICMP Echos to 3.3.3.3, timeout is 2 seconds: Packet sent with a source address of 4.4.4.4 !!!!! Success rate is 100 percent (5/5), round-trip min/avg/max = 1/1/4 ms R4# Good, we can still ping R3 from R4. Now, let’s do the same thing on J2. But first we will turn on some trace options (debugs) on the Juniper router to see what happens. First we will tell it what log file to use/create, for this example ospf-log is my choice [edit] jfry@J1# set protocols ospf traceoptions file ospf-log And then we tell it what to log, here restart-signaling. [edit] jfry@J1# set protocols ospf traceoptions flag restart-signaling And what we will do is now show the log file and have it refresh for us every 30 seconds jfry@J1> show log ospf-log | refresh 30 ---(refreshed at 2012-08-13 18:41:29 UTC)--- Aug 13 18:40:10 J1 clear-log[1513]: logfile cleared Aug 13 18:40:56 trace_on: Tracing to "/var/log/ospf-log" started ---(*more 100%)--- Ok, time to change the router-id on J2 to 22.22.22.22 [edit] jfry@J2# set routing-options router-id 22.22.22.22 [edit] jfry@J2# commit and-quit commit complete Ok, that is it. No need to reset the process as Junos will do that. Now, let’s see what happened on J1: Aug 13 18:57:18.901347 RPD_OSPF_NBRDOWN: OSPF neighbor 192.168.12.2 (realm ospf-v2 ge-0/0/0.0 area 0.0.0.0) state changed from Full to Init due to 1WayRcvd (event reason: neighbor is in one-way mode) Aug 13 18:57:18.959459 RPD_OSPF_NBRUP: OSPF neighbor 192.168.12.2 (realm ospf-v2 ge-0/0/0.0 area 0.0.0.0) state changed from Init to ExStart due to 2WayRcvd (event reason: neighbor detected this router) Aug 13 18:57:18.976382 OSPF restart signaling: Received DBD with LR bit on from nbr ip=192.168.12.2 id=22.22.22.22. Save its oob-resync capability 1

72 © 2012 Jeffrey Fry – Fryguy.net Juniper Workbook
Aug 13 18:57:22.878433 RPD_OSPF_NBRUP: OSPF neighbor 192.168.12.2 (realm ospf-v2 ge-0/0/0.0 area 0.0.0.0) state changed from Exchange to Full due to ExchangeDone (event reason: DBD exchange of slave completed) ---(*more 100%)---[abort] Yup, we can see we had a neighbor state change. We can confirm the change by looking at the OSPF neighbors detail information on the J1: jfry@J1> show ospf neighbor detail Address Interface State ID Pri Dead 192.168.13.3 fe-0/0/2.0 Full 3.3.3.3 128 38 Area 0.0.0.0, opt 0x52, DR 192.168.13.3, BDR 192.168.13.1 Up 05:10:27, adjacent 05:09:47 192.168.14.4 fe-0/0/7.0 Full 44.44.44.44 1 31 Area 0.0.0.0, opt 0x52, DR 192.168.14.1, BDR 192.168.14.4 Up 00:13:29, adjacent 00:13:29 192.168.12.2 ge-0/0/0.0 Full 22.22.22.22 128 34 Area 0.0.0.0, opt 0x52, DR 192.168.12.1, BDR 192.168.12.2 Up 00:05:26, adjacent 00:05:26 jfry@J1> As you can see, the neighbor has only been up for about 5 minutes compared to R4 at 13 minutes (that is when we reset the router-id), and J3 is up for over 5 hours. Ok, time to check the neighbors again ( I stepped away for work, so timers will be different) and we can change J3 to 33.33.33.33. jfry@J1> show ospf neighbor detail Address Interface State ID Pri Dead 192.168.13.3 fe-0/0/2.0 Full 3.3.3.3 128 38 Area 0.0.0.0, opt 0x52, DR 192.168.13.3, BDR 192.168.13.1 Up 07:06:20, adjacent 07:05:40 192.168.14.4 fe-0/0/7.0 Full 44.44.44.44 1 39 Area 0.0.0.0, opt 0x52, DR 192.168.14.1, BDR 192.168.14.4 Up 02:09:22, adjacent 02:09:22 192.168.12.2 ge-0/0/0.0 Full 22.22.22.22 128 36 Area 0.0.0.0, opt 0x52, DR 192.168.12.1, BDR 192.168.12.2 Up 02:01:19, adjacent 02:01:19 Ok, we have our uptime times now. Time to clear the log on J1 jfry@J1> clear log ospf-log Instead of monitoring the log, we will just do a show after we make our change. We will also setup a repetitive ping from R4 to J3 loopback to see what happens to connectivity.

73 © 2012 Jeffrey Fry – Fryguy.net Juniper Workbook
R4#ping 3.3.3.3 so l0 repeat 1000000 !!!!!!!!!!!!!!!!!!!!!!!!!!!!!!!!!!!!!!!!!!!!!!!!!!!!!!!!!!!!!!!!!!!!!! !!!!!!!!!!!!!!!!!!!!!!!!!!!!!!!!!!!!!!!!!!!!!!!!!!!!!!!!!!!!!!!!!!!!!! (continues) Ok, time to make the change! [edit] jfry@J3# set routing-options router-id 33.33.33.33 [edit] jfry@J3# commit and-quit And back to R4 – as you can see, we do lose connectivity to J3 loopback during this change – so be aware that this change will impact the network. !!!!!!!!!!!!!!!!!!!!!!!!!!!!!!!!!!!!!!!!!!!!!!!!!!!!!!!!!!!!!!!!!!!!!! !!!!!!!!!!!!!!!!!!!!!!!!!!.UUUUUUUUUUUU.......!!!!!!!!!!!!!!!!!!!!!!!! !!!!!!!!!!!!!!!!!!!!!!!!!!!!!!!!!!!!!!!!!!!!!!!!!!!!!!!!!!!!!!!!!!!!!! !!!!!!!!!!!!!!!!!!!!!!!!!!!!!!!!!!!!!!!!!!!!!!!!!!!!!!!!!!!!!!!!!!!!!! !!!!!!!!!!!!!!!!!!!!!!!!!!!!!!!!!!!!!!!!!!!!!!!!!!!!!!!!!!!!!!!!!!!!!! And let’s look at the log on J1 jfry@J1> show log ospf-log Aug 13 20:58:49 J1 clear-log[1873]: logfile cleared Aug 13 21:01:17.947876 RPD_OSPF_NBRDOWN: OSPF neighbor 192.168.13.3 (realm ospf-v2 fe-0/0/2.0 area 0.0.0.0) state changed from Full to Init due to 1WayRcvd (event reason: neighbor is in one-way mode) Aug 13 21:01:17.992586 RPD_OSPF_NBRUP: OSPF neighbor 192.168.13.3 (realm ospf-v2 fe-0/0/2.0 area 0.0.0.0) state changed from Init to ExStart due to 2WayRcvd (event reason: neighbor detected this router) Aug 13 21:01:18.016898 OSPF restart signaling: Received DBD with LR bit on from nbr ip=192.168.13.3 id=33.33.33.33. Save its oob-resync capability 1 Aug 13 21:01:18.107276 RPD_OSPF_NBRUP: OSPF neighbor 192.168.13.3 (realm ospf-v2 fe-0/0/2.0 area 0.0.0.0) state changed from Loading to Full due to LoadDone (event reason: OSPF loading completed) And check our neighbor states: jfry@J1> show ospf neighbor detail Address Interface State ID Pri Dead 192.168.13.3 fe-0/0/2.0 Full 33.33.33.33 128 35 Area 0.0.0.0, opt 0x52, DR 192.168.13.1, BDR 192.168.13.3 Up 00:04:33, adjacent 00:04:33 192.168.14.4 fe-0/0/7.0 Full 44.44.44.44 1 35 Area 0.0.0.0, opt 0x52, DR 192.168.14.1, BDR 192.168.14.4 Up 02:16:35, adjacent 02:16:35 192.168.12.2 ge-0/0/0.0 Full 22.22.22.22 128 36 Area 0.0.0.0, opt 0x52, DR 192.168.12.1, BDR 192.168.12.2 Up 02:08:32, adjacent 02:08:32

74 © 2012 Jeffrey Fry – Fryguy.net Juniper Workbook
Now to remove the traceoptions, you just need to delete the section! [edit] jfry@J1# delete protocols ospf traceoptions [edit] jfry@J1# commit and-quit And we can then delete the log jfry@J1> clear log ospf-log …and that is Router-ID and traceoptions! Now for some OSPF Authentication!

75 © 2012 Jeffrey Fry – Fryguy.net Juniper Workbook
OSPF Authentication
192.168.13.x/24
192.168.23.x/24
192.168.1
2.x/24
19
2.1
68
.14
.x/2
4
ge-0/0/0
J2J3
ge-0/0/0
ge-0/0/1fe-0/0/1
fe-0/0/2
fe-0/0/2
fe-0/0/7
E0
.3 .2
.1
.4
.1
.1
.2.3
OSPF Authentication Lab TopologyOSPF Authentication Lab Topology
Area 0
© 2012
Fryguy.Net
2.2.2.2/323.3.3.3/32
1.1.1.1/32
4.4.4.4/32
Router ID
33.33.33.33Router ID
22.22.22.22
Router ID
11.11.11.11
Router ID
44.44.44.44
R4
J1
Ok, time for some OSPF Authentication. First up, link authentication! We will configure authentication on the link between J1 and R4. R4 up first! R4(config-if)#int e0 R4(config-if)#ip ospf authentication message-digest R4(config-if)# ip ospf message-digest-key 1 md5 JtoC1234 Then across the console comes a message that OSPF Adjacency changed: *Mar 1 10:05:56.757: %OSPF-5-ADJCHG: Process 1, Nbr 1.1.1.1 on Ethernet0 from FULL to DOWN, Neighbor Down: Dead timer expired Ok, time to check J1 and see if the R4 neighbor is down
76 © 2012 Jeffrey Fry – Fryguy.net Juniper Workbook
jfry@J1> show ospf neighbor Address Interface State ID Pri Dead 192.168.13.3 fe-0/0/2.0 Full 33.33.33.33 128 37 192.168.12.2 ge-0/0/0.0 Full 22.22.22.22 128 31 Good, time to configured J1 for OSPF link authentication [edit] jfry@J1# set protocols ospf area 0 interface fe-0/0/7 authentication md5 1 key JtoC1234 [edit] jfry@J1# commit and-quit Ok, we should be back up. jfry@J1> show ospf neighbor Address Interface State ID Pri Dead 192.168.13.3 fe-0/0/2.0 Full 33.33.33.33 128 37 192.168.14.4 fe-0/0/7.0 Full 44.44.44.44 1 38 192.168.12.2 ge-0/0/0.0 Full 22.22.22.22 128 39 jfry@J1> We have neighbors, now to check to make sure they are MD5 authenticated jfry@J1> show ospf interface fe-0/0/7.0 detail Interface State Area DR ID BDR ID Nbrs fe-0/0/7.0 DR 0.0.0.0 1.1.1.1 44.44.44.44 1 Type: LAN, Address: 192.168.14.1, Mask: 255.255.255.0, MTU: 1500, Cost: 1 DR addr: 192.168.14.1, BDR addr: 192.168.14.4, Priority: 128 Adj count: 1 Hello: 10, Dead: 40, ReXmit: 5, Not Stub Auth type: MD5, Active key ID: 1, Start time: 1970 Jan 1 00:00:00 UTC Protection type: None Topology default (ID 0) -> Cost: 1 jfry@J1> Good, auth type is MD5 and Active Key is 1! Time to ping R3 from R4 loopback to test! R4#ping 3.3.3.3 so l0 Type escape sequence to abort. Sending 5, 100-byte ICMP Echos to 3.3.3.3, timeout is 2 seconds: Packet sent with a source address of 4.4.4.4 !!!!! Success rate is 100 percent (5/5), round-trip min/avg/max = 1/2/8 ms R4# Now time to configure Area authentication!
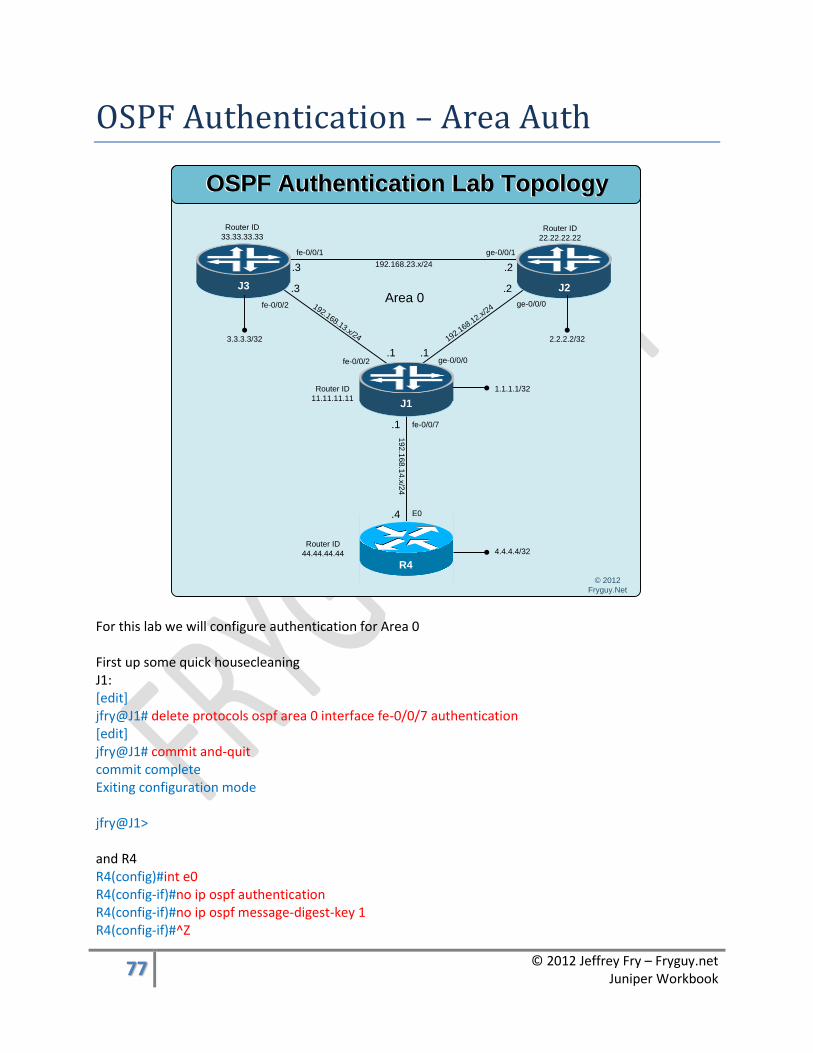
77 © 2012 Jeffrey Fry – Fryguy.net Juniper Workbook
OSPF Authentication – Area Auth
192.168.13.x/24
192.168.23.x/24
192.168.1
2.x/24
19
2.1
68
.14
.x/2
4
ge-0/0/0
J2J3
ge-0/0/0
ge-0/0/1fe-0/0/1
fe-0/0/2
fe-0/0/2
fe-0/0/7
E0
.3 .2
.1
.4
.1
.1
.2.3
OSPF Authentication Lab TopologyOSPF Authentication Lab Topology
Area 0
© 2012
Fryguy.Net
2.2.2.2/323.3.3.3/32
1.1.1.1/32
4.4.4.4/32
Router ID
33.33.33.33Router ID
22.22.22.22
Router ID
11.11.11.11
Router ID
44.44.44.44
R4
J1
For this lab we will configure authentication for Area 0 First up some quick housecleaning J1: [edit] jfry@J1# delete protocols ospf area 0 interface fe-0/0/7 authentication [edit] jfry@J1# commit and-quit commit complete Exiting configuration mode jfry@J1> and R4 R4(config)#int e0 R4(config-if)#no ip ospf authentication R4(config-if)#no ip ospf message-digest-key 1 R4(config-if)#^Z

78 © 2012 Jeffrey Fry – Fryguy.net Juniper Workbook
R4 up first! Configure it for the area R4(config)#router ospf 1 R4(config-router)#area 0 authentication message-digest And then add our key under the interface: R4(config-router)#int e0 R4(config-if)#ip ospf message-digest-key 1 md5 JunosIOS R4(config-if)# And there goes the neighborhood! *Mar 1 10:28:16.905: %OSPF-5-ADJCHG: Process 1, Nbr 1.1.1.1 on Ethernet0 from FULL to DOWN, Neighbor Down: Dead timer expired R4(config-if)# Time for J1! [edit] jfry@J1# set protocols ospf area 0.0.0.0 interface fe-0/0/7.0 authentication md5 1 key JunosIOS [edit] jfry@J1# set protocols ospf area 0.0.0.0 interface ge-0/0/0.0 authentication md5 1 key JunosIOS [edit] jfry@J1# set protocols ospf area 0.0.0.0 interface fe-0/0/2.0 authentication md5 1 key JunosIOS [edit] jfry@j1# commit and-quit Hey, that command looks familiar! That is because it is the same command we ran before Now for J2: [edit] jfry@J2# set protocols ospf area 0.0.0.0 interface ge-0/0/0.0 authentication md5 1 key JunosIOS [edit] jfry@J2# set protocols ospf area 0.0.0.0 interface ge-0/0/1.0 authentication md5 1 key JunosIOS [edit] jfry@J2# commit and-quit and J3: [edit] jfry@J3# set protocols ospf area 0.0.0.0 interface fe-0/0/1.0 authentication md5 1 key JunosIOS [edit] jfry@J3# set protocols ospf area 0.0.0.0 interface fe-0/0/2.0 authentication md5 1 key JunosIOS [edit] jfry@J3# commit and-quit And like that, we have OSPF authentication. Not so much area on this one as Junos
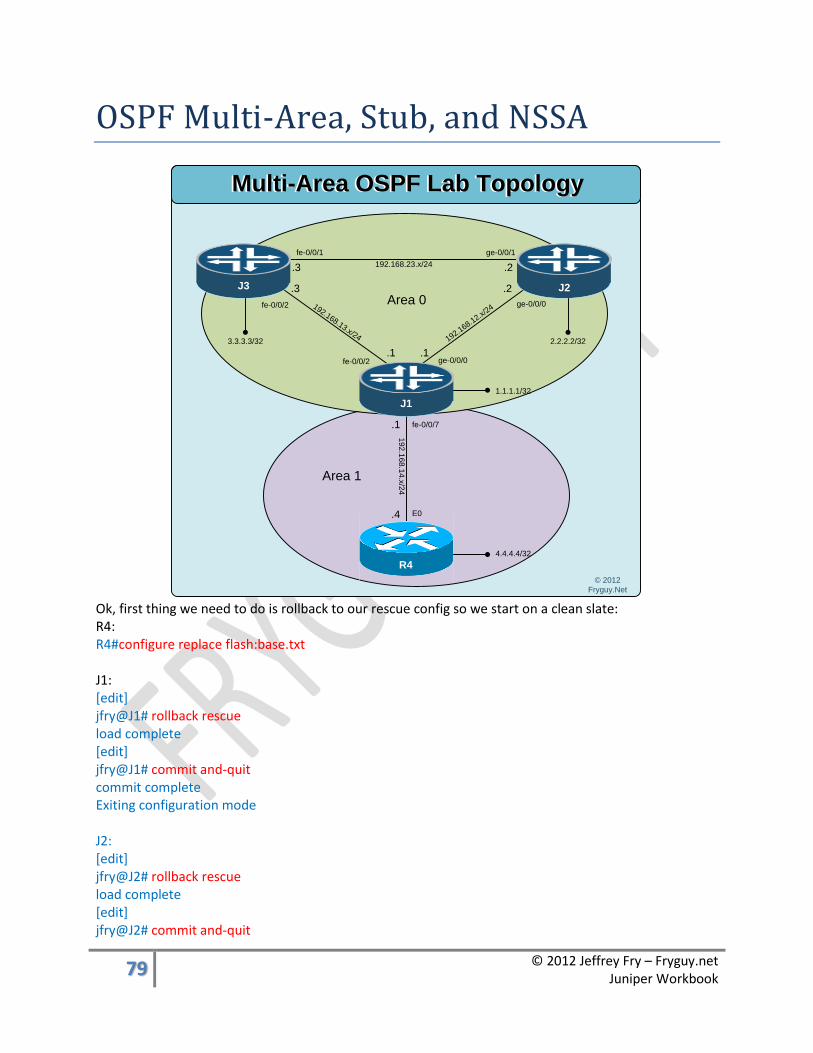
79 © 2012 Jeffrey Fry – Fryguy.net Juniper Workbook
OSPF Multi-Area, Stub, and NSSA
192.168.13.x/24
192.168.23.x/24
192.168.1
2.x/24
19
2.1
68
.14
.x/2
4
ge-0/0/0
R4
J1
J2J3
ge-0/0/0
ge-0/0/1fe-0/0/1
fe-0/0/2
fe-0/0/2
fe-0/0/7
E0
.3 .2
.1
.4
.1
.1
.2.3
Multi-Area OSPF Lab TopologyMulti-Area OSPF Lab Topology
Area 0
Area 1
© 2012
Fryguy.Net
2.2.2.2/323.3.3.3/32
1.1.1.1/32
4.4.4.4/32
Ok, first thing we need to do is rollback to our rescue config so we start on a clean slate: R4: R4#configure replace flash:base.txt J1: [edit] jfry@J1# rollback rescue load complete [edit] jfry@J1# commit and-quit commit complete Exiting configuration mode J2: [edit] jfry@J2# rollback rescue load complete [edit] jfry@J2# commit and-quit

80 © 2012 Jeffrey Fry – Fryguy.net Juniper Workbook
commit complete Exiting configuration mode J3: [edit] jfry@J3# rollback rescue load complete [edit] jfry@J3# commit and-quit commit complete Exiting configuration mode OK, time to configure Area 0 between J1, J2, and J3: J1: [edit] jfry@J1# set protocols ospf area 0 interface ge-0/0/0 [edit] jfry@J1# set protocols ospf area 0 interface fe-0/0/2 [edit] jfry@J1# set protocols ospf area 0 interface lo0.0 passive [edit] jfry@J1# commit and-quit Ok, J2 time: [edit] jfry@J2# set protocols ospf area 0 interface lo0.0 passive [edit] jfry@J2# set protocols ospf area 0 interface ge-0/0/0 [edit] jfry@J2# set protocols ospf area 0 interface ge-0/0/1 [edit] jfry@J2# commit and-quit And now J3: [edit] jfry@J3# set protocols ospf area 0 interface lo0.0 passive [edit] jfry@J3# set protocols ospf area 0 interface fe-0/0/1

81 © 2012 Jeffrey Fry – Fryguy.net Juniper Workbook
[edit] jfry@J3# set protocols ospf area 0 interface fe-0/0/2 [edit] jfry@J3# commit and-quit Now if we look at our ospf neighbors, we should be all neighbored up! jfry@J1> show ospf neighbor Address Interface State ID Pri Dead 192.168.13.3 fe-0/0/2.0 Full 3.3.3.3 128 33 192.168.12.2 ge-0/0/0.0 Full 2.2.2.2 128 39 jfry@J1> Good, now we need to configure J1 fe-0/0/7 in Area 1 and R4 in Area 1. R4 first: R4(config)#router ospf 1 R4(config-router)#net 192.168.14.4 0.0.0.0 a 1 R4(config-router)#net 4.4.4.4 0.0.0.0 a 1 R4(config-router)# And now J1: [edit] jfry@J1# set protocols ospf area 1 interface fe-0/0/7 [edit] jfry@J1# commit and-quit And now R4 should be able to ping R3 loopback: R4#p 3.3.3.3 so l0 Type escape sequence to abort. Sending 5, 100-byte ICMP Echos to 3.3.3.3, timeout is 2 seconds: Packet sent with a source address of 4.4.4.4 !!!!! Success rate is 100 percent (5/5), round-trip min/avg/max = 1/1/4 ms R4# Good! That is multi-area OSPF! Time to configure Area 1 as a Stub area! R4 up first! R4(config)#router ospf 1 R4(config-router)#area 1 stub R4(config-router)#

82 © 2012 Jeffrey Fry – Fryguy.net Juniper Workbook
And now J1: [edit] jfry@J1# set protocols ospf area 1 stub [edit] jfry@J1# commit and-quit And there you have it, stub configured! Ok, now time to make area 1 a NSSA area. First, we need to create an exit point from R4, for this we will add a static null route for 200.0.0.0/8. R4#conf t Enter configuration commands, one per line. End with CNTL/Z. R4(config)#ip route 200.0.0.0 255.0.0.0 null 0 Now we need to remove the STUB command from OSPF R4(config)#router ospf 1 R4(config-router)#no area 1 stub And now make it a NSSA area R4(config-router)#area 1 nssa And then redistribute our static subnets R4(config-router)#redistribute static subnets R4(config-router)#^Z R4# Ok, now we need to make the change on J1: [edit] jfry@J1# set protocols ospf area 1 nssa [edit] jfry@J1# commit and-quit Ok, now J3 should have a route to 200.0.0.0/8 jfry@J3> show route 200.0.0.0/8 inet.0: 12 destinations, 12 routes (12 active, 0 holddown, 0 hidden) + = Active Route, - = Last Active, * = Both 200.0.0.0/8 *[OSPF/150] 00:00:14, metric 20, tag 0 > to 192.168.13.1 via fe-0/0/2.0 There we go!

83 © 2012 Jeffrey Fry – Fryguy.net Juniper Workbook
Multi-Protocol Lab – OSPF and RIP
192.168.13.x/24
192.168.23.x/24
192.168.1
2.x/24
19
2.1
68
.14
.x/2
4
ge-0/0/0
R4
J1
J2J3
ge-0/0/0
ge-0/0/1fe-0/0/1
fe-0/0/2
fe-0/0/2
fe-0/0/7
E0
.3 .2
.1
.4
.1
.1
.2.3
Multi-Protocol Lab TopologyMulti-Protocol Lab Topology
Area 0
RIP
© 2012
Fryguy.Net
2.2.2.2/323.3.3.3/32
1.1.1.1/32
4.4.4.4/32
Ok, we have done RIP and we have done OSPF. Now time to put them together! For this lab the Juniper devices will be in OSPF Area 0 and the Cisco device will be in RIP. J1 will sit in both RIP and OSPF and handle the redistribution between the protocols. First up, we need to restore R4 config to our base and remove fe-0/0/7 from Area 1 on J1. R4: R4#configure replace flash:base.txt And J1: [edit] jfry@J1# delete protocols ospf area 1 nssa [edit] jfry@J1# delete protocols ospf area 1 interface fe-0/0/7 [edit] jfry@J1# commit and-quit

84 © 2012 Jeffrey Fry – Fryguy.net Juniper Workbook
Ok, that is done. Time to configure RIP on R4 and J1. R4: R4#conf t Enter configuration commands, one per line. End with CNTL/Z. R4(config)#router rip R4(config-router)#ver 2 R4(config-router)#no au R4(config-router)#net 192.168.14.0 R4(config-router)#net 4.0.0.0 R4(config-router)#^Z R4# Ok, now can configure J1 for RIP to R4, also we will advertise our Loopback to R4. Ok, since we know we need to advertise our loopback to R4, we should create a prefix list to permit that route [edit] jfry@J1# set policy-options prefix-list loopback 1.1.1.1/32 Ok, time to create our policy statements. We will use terms here since we will be adding more to these later on in this lab. [edit] jfry@J1# edit policy-options policy-statement FromR4 term 1 [edit policy-options policy-statement FromR4 term 1] jfry@J1# set from protocol rip [edit policy-options policy-statement FromR4 term 1] jfry@J1# set then accept [edit policy-options policy-statement FromR4 term 1] jfry@J1# up [edit policy-options policy-statement FromR4] jfry@J1# up [edit policy-options] jfry@J1# edit policy-statement ToR4 [edit policy-options policy-statement ToR4] jfry@J1# set term 1 from protocol direct [edit policy-options policy-statement ToR4] jfry@J1# set term 1 from prefix-list loopback [edit policy-options policy-statement ToR4] jfry@J1# set term 1 then accept

85 © 2012 Jeffrey Fry – Fryguy.net Juniper Workbook
[edit policy-options policy-statement ToR4] jfry@J1# up Ok, time to check our policy-options section to see what we have so far and make sure it all looks right. [edit policy-options] jfry@J1# show prefix-list loopback { 1.1.1.1/32; } policy-statement FromR4 { term 1 { from protocol rip; then accept; } } policy-statement ToR4 { term 1 { from { protocol direct; prefix-list loopback; } then accept; } } [edit policy-options] jfry@J1# top Now to configure RIP: [edit] jfry@J1# set protocols rip group Fryguy neighbor fe-0/0/7.0 And our export/import groups: [edit] jfry@J1# set protocols rip group Fryguy export ToR4 [edit] jfry@J1# set protocols rip group Fryguy import FromR4 Ok, time to look over all the changes before we commit them: [edit] jfry@J1# show | compare [edit] + protocols { + rip { + group Fryguy {

86 © 2012 Jeffrey Fry – Fryguy.net Juniper Workbook
+ export ToR4; + import FromR4; + neighbor fe-0/0/7.0; + } + } + } + policy-options { + prefix-list loopback { + 1.1.1.1/32; + } + policy-statement FromR4 { + term 1 { + from protocol rip; + then accept; + } + } + policy-statement ToR4 { + term 1 { + from { + protocol direct; + prefix-list loopback; + } + then accept; + } + } + } [edit] jfry@J1# commit and-quit commit complete Exiting configuration mode Ok, now let’s take a look at the routing table on R4: R4#sh ip route Codes: C - connected, S - static, R - RIP, M - mobile, B - BGP D - EIGRP, EX - EIGRP external, O - OSPF, IA - OSPF inter area N1 - OSPF NSSA external type 1, N2 - OSPF NSSA external type 2 E1 - OSPF external type 1, E2 - OSPF external type 2 i - IS-IS, su - IS-IS summary, L1 - IS-IS level-1, L2 - IS-IS level-2 ia - IS-IS inter area, * - candidate default, U - per-user static route o - ODR, P - periodic downloaded static route Gateway of last resort is not set 1.0.0.0/32 is subnetted, 1 subnets R 1.1.1.1 [120/1] via 192.168.14.1, 00:00:03, Ethernet0 C 192.168.14.0/24 is directly connected, Ethernet0

87 © 2012 Jeffrey Fry – Fryguy.net Juniper Workbook
4.0.0.0/32 is subnetted, 1 subnets C 4.4.4.4 is directly connected, Loopback0 R4# Perfect, we have a route to J1 Loopback. Let’s see what J1 shows for routes for RIP jfry@J1> show route protocol rip inet.0: 9 destinations, 9 routes (9 active, 0 holddown, 0 hidden) + = Active Route, - = Last Active, * = Both 4.4.4.4/32 *[RIP/100] 01:39:28, metric 2, tag 0 > to 192.168.14.4 via fe-0/0/7.0 224.0.0.9/32 *[RIP/100] 00:45:27, metric 1 MultiRecv jfry@J1> Perfect, we have a route to R4 loopback. Time to PING! jfry@J1> ping 4.4.4.4 source 1.1.1.1 rapid PING 4.4.4.4 (4.4.4.4): 56 data bytes !!!!! --- 4.4.4.4 ping statistics --- 5 packets transmitted, 5 packets received, 0% packet loss round-trip min/avg/max/stddev = 4.119/4.536/4.882/0.268 ms jfry@J1> Excellent, we have RIP connectivity. Time for OSPF! First up, we can quickly configure J2 and J3 for OSPF area 0 J2: Instead of using a single line, I will actually edit the protocols area. It accomplishes the same things, just uses less repetitive commands jfry@J2> edit Entering configuration mode [edit] jfry@J2# edit protocols ospf area 0 As you can see, the top edit line actually changes to the context you are editing. [edit protocols ospf area 0.0.0.0] jfry@J2# set interface ge-0/0/1 [edit protocols ospf area 0.0.0.0] jfry@J2# set interface ge-0/0/0

88 © 2012 Jeffrey Fry – Fryguy.net Juniper Workbook
[edit protocols ospf area 0.0.0.0] jfry@J2# commit and-quit commit complete Exiting configuration mode …and J3: jfry@J3> edit Entering configuration mode [edit] jfry@J3# edit protocols ospf area 0 [edit protocols ospf area 0.0.0.0] jfry@J3# set interface fe-0/0/1 [edit protocols ospf area 0.0.0.0] jfry@J3# set interface fe-0/0/2 [edit protocols ospf area 0.0.0.0] jfry@J3# commit and-quit commit complete Exiting configuration mode Now we can do J1: jfry@J1> edit Entering configuration mode [edit] jfry@J1# edit protocols ospf area 0 [edit protocols ospf area 0.0.0.0] jfry@J1# set interface fe-0/0/2 [edit protocols ospf area 0.0.0.0] jfry@J1# set interface ge-0/0/0 [edit protocols ospf area 0.0.0.0] jfry@J1# commit and-quit Ok, we should have OSPF connectivity between J1, J2, and J3 now jfry@J1> show route protocol ospf inet.0: 13 destinations, 13 routes (13 active, 0 holddown, 0 hidden) + = Active Route, - = Last Active, * = Both 2.2.2.2/32 *[OSPF/10] 00:00:17, metric 1

89 © 2012 Jeffrey Fry – Fryguy.net Juniper Workbook
> to 192.168.12.2 via ge-0/0/0.0 3.3.3.3/32 *[OSPF/10] 00:00:17, metric 1 > to 192.168.13.3 via fe-0/0/2.0 192.168.23.0/24 *[OSPF/10] 00:00:17, metric 2 > to 192.168.12.2 via ge-0/0/0.0 to 192.168.13.3 via fe-0/0/2.0 224.0.0.5/32 *[OSPF/10] 00:00:27, metric 1 MultiRecv jfry@J1> Good. Now we can look at the routing table on R1, R4, and R2: R4: R4#sh ip route Codes: C - connected, S - static, R - RIP, M - mobile, B - BGP D - EIGRP, EX - EIGRP external, O - OSPF, IA - OSPF inter area N1 - OSPF NSSA external type 1, N2 - OSPF NSSA external type 2 E1 - OSPF external type 1, E2 - OSPF external type 2 i - IS-IS, su - IS-IS summary, L1 - IS-IS level-1, L2 - IS-IS level-2 ia - IS-IS inter area, * - candidate default, U - per-user static route o - ODR, P - periodic downloaded static route Gateway of last resort is not set 1.0.0.0/32 is subnetted, 1 subnets R 1.1.1.1 [120/1] via 192.168.14.1, 00:00:13, Ethernet0 C 192.168.14.0/24 is directly connected, Ethernet0 4.0.0.0/32 is subnetted, 1 subnets C 4.4.4.4 is directly connected, Loopback0 R4# J1: jfry@J1> show route inet.0: 13 destinations, 13 routes (13 active, 0 holddown, 0 hidden) + = Active Route, - = Last Active, * = Both 1.1.1.1/32 *[Direct/0] 05:13:21 > via lo0.0 2.2.2.2/32 *[OSPF/10] 00:00:34, metric 1 > to 192.168.12.2 via ge-0/0/0.0 3.3.3.3/32 *[OSPF/10] 00:00:34, metric 1 > to 192.168.13.3 via fe-0/0/2.0 4.4.4.4/32 *[RIP/100] 01:48:50, metric 2, tag 0 > to 192.168.14.4 via fe-0/0/7.0

90 © 2012 Jeffrey Fry – Fryguy.net Juniper Workbook
192.168.12.0/24 *[Direct/0] 05:12:17 > via ge-0/0/0.0 192.168.12.1/32 *[Local/0] 05:12:43 Local via ge-0/0/0.0 192.168.13.0/24 *[Direct/0] 05:12:38 > via fe-0/0/2.0 192.168.13.1/32 *[Local/0] 05:12:42 Local via fe-0/0/2.0 192.168.14.0/24 *[Direct/0] 05:12:38 > via fe-0/0/7.0 192.168.14.1/32 *[Local/0] 05:12:42 Local via fe-0/0/7.0 192.168.23.0/24 *[OSPF/10] 00:00:34, metric 2 > to 192.168.12.2 via ge-0/0/0.0 to 192.168.13.3 via fe-0/0/2.0 224.0.0.5/32 *[OSPF/10] 00:00:44, metric 1 MultiRecv 224.0.0.9/32 *[RIP/100] 00:00:44, metric 1 MultiRecv jfry@J1> and J2: jfry@J2> show route inet.0: 8 destinations, 8 routes (8 active, 0 holddown, 0 hidden) + = Active Route, - = Last Active, * = Both 2.2.2.2/32 *[Direct/0] 05:14:11 > via lo0.0 3.3.3.3/32 *[OSPF/10] 05:12:21, metric 1 > to 192.168.23.3 via ge-0/0/1.0 192.168.12.0/24 *[Direct/0] 05:13:11 > via ge-0/0/0.0 192.168.12.2/32 *[Local/0] 05:13:16 Local via ge-0/0/0.0 192.168.13.0/24 *[OSPF/10] 00:01:27, metric 2 > to 192.168.12.1 via ge-0/0/0.0 to 192.168.23.3 via ge-0/0/1.0 192.168.23.0/24 *[Direct/0] 05:13:11 > via ge-0/0/1.0 192.168.23.2/32 *[Local/0] 05:13:16 Local via ge-0/0/1.0 224.0.0.5/32 *[OSPF/10] 05:14:13, metric 1 MultiRecv jfry@J2>

91 © 2012 Jeffrey Fry – Fryguy.net Juniper Workbook
There, as you can see R4 only has a route to J1 loopback; J1 has a route to everyone’s loopback, and J2 only had a route to J1 and J3 loopback. Now we can configure J1 to redistribute (aka import/export) the routes as we see fit. To do this we need to edit our RIP import/export statement and create an import statement for OSPF. First up, lets create a policy statement called ToOSPF that will accept anything from the RIP protocol. jfry@J1> edit Entering configuration mode [edit] jfry@J1# set policy-options policy-statement ToOSPF term 1 from protocol rip [edit] jfry@J1# set policy-options policy-statement ToOSPF term 1 then accept Ok, now we can edit our policy-statement ToR4 and add term 2 to accept routes from OSPF area 0 [edit] jfry@J1# set policy-options policy-statement ToR4 term 2 from protocol ospf area 0.0.0.0 [edit] jfry@J1# set policy-options policy-statement ToR4 term 2 then accept Now we need to apply our export statement to send the routes to OSPF [edit] jfry@J1# set protocols ospf export ToOSPF We do not need to edit RIP import/export since we just added a second term to the existing policy! Quick look at what we are doing: [edit] jfry@J1# show | compare [edit protocols ospf] + export ToOSPF; [edit policy-options] + policy-statement ToOSPF { + term 1 { + from protocol rip; + then accept; + } + } [edit policy-options policy-statement ToR4] term 1 { ... } + term 2 { + from {

92 © 2012 Jeffrey Fry – Fryguy.net Juniper Workbook
+ protocol ospf; + area 0.0.0.0; + } + then accept; + } And run a quick check: [edit] jfry@J1# commit check configuration check succeeds And Commit the changes! [edit] jfry@J1# commit and-quit Now we can check the routes on R4 and J3: R4: R4#sh ip route Codes: C - connected, S - static, R - RIP, M - mobile, B - BGP D - EIGRP, EX - EIGRP external, O - OSPF, IA - OSPF inter area N1 - OSPF NSSA external type 1, N2 - OSPF NSSA external type 2 E1 - OSPF external type 1, E2 - OSPF external type 2 i - IS-IS, su - IS-IS summary, L1 - IS-IS level-1, L2 - IS-IS level-2 ia - IS-IS inter area, * - candidate default, U - per-user static route o - ODR, P - periodic downloaded static route Gateway of last resort is not set 1.0.0.0/32 is subnetted, 1 subnets R 1.1.1.1 [120/1] via 192.168.14.1, 00:00:14, Ethernet0 2.0.0.0/32 is subnetted, 1 subnets R 2.2.2.2 [120/1] via 192.168.14.1, 00:00:14, Ethernet0 C 192.168.14.0/24 is directly connected, Ethernet0 3.0.0.0/32 is subnetted, 1 subnets R 3.3.3.3 [120/1] via 192.168.14.1, 00:00:14, Ethernet0 4.0.0.0/32 is subnetted, 1 subnets C 4.4.4.4 is directly connected, Loopback0 R 192.168.23.0/24 [120/1] via 192.168.14.1, 00:00:14, Ethernet0 R4# J3: jfry@J3> show route inet.0: 9 destinations, 9 routes (9 active, 0 holddown, 0 hidden) + = Active Route, - = Last Active, * = Both 2.2.2.2/32 *[OSPF/10] 06:18:01, metric 1

93 © 2012 Jeffrey Fry – Fryguy.net Juniper Workbook
> to 192.168.23.2 via fe-0/0/1.0 3.3.3.3/32 *[Direct/0] 06:21:07 > via lo0.0 4.4.4.4/32 *[OSPF/150] 00:01:39, metric 2, tag 0 > to 192.168.13.1 via fe-0/0/2.0 192.168.12.0/24 *[OSPF/10] 00:21:05, metric 2 to 192.168.23.2 via fe-0/0/1.0 > to 192.168.13.1 via fe-0/0/2.0 192.168.13.0/24 *[Direct/0] 06:19:15 > via fe-0/0/2.0 192.168.13.3/32 *[Local/0] 06:20:41 Local via fe-0/0/2.0 192.168.23.0/24 *[Direct/0] 06:18:54 > via fe-0/0/1.0 192.168.23.3/32 *[Local/0] 06:20:41 Local via fe-0/0/1.0 224.0.0.5/32 *[OSPF/10] 06:21:08, metric 1 MultiRecv jfry@J3> And now we can test PING from R3 loopback to R4 loopback: jfry@J3> ping 4.4.4.4 source 3.3.3.3 rapid PING 4.4.4.4 (4.4.4.4): 56 data bytes !!!!! --- 4.4.4.4 ping statistics --- 5 packets transmitted, 5 packets received, 0% packet loss round-trip min/avg/max/stddev = 3.411/8.504/27.947/9.724 ms jfry@J3> There you have it, OSPF <-> RIP route redistribution!

94 © 2012 Jeffrey Fry – Fryguy.net Juniper Workbook
iBGP
ASN 123192.168.13.x/24
192.168.23.x/24
192.168.1
2.x/24
19
2.1
68
.14
.x/2
4
ge-0/0/0
R4
J1
J2J3
ge-0/0/0
ge-0/0/1fe-0/0/1
fe-0/0/2
fe-0/0/2
fe-0/0/7
E0
.3 .2
.1
.4
.1
.1
.2.3
iBGP Lab TopologyiBGP Lab Topology
Sta
tic
0/0
Sta
tic
To
4.4
.4.4
/32
© 2012
Fryguy.Net
2.2.2.2/323.3.3.3/32
1.1.1.1/32
4.4.4.4/32
Ok, BGP time. First thing we need to do is rollback all configs to the base. You should be Ok with doing that now on your own, so I will skip documenting that again here. Again, all configs, J1 – J2 – J3 – J4, are all back at their base/rescue level. Now we need to configure R4 with a static default route to J1 for this lab. R4#conf t Enter configuration commands, one per line. End with CNTL/Z. R4(config)#ip route 0.0.0.0 0.0.0.0 192.168.14.1 R4(config)#^Z Now we can configure a static route on J1 to R4 4.4.4.4/32 [edit] jfry@J1# set routing-options static route 4.4.4.4/32 next-hop 192.168.14.4 install [edit] jfry@J1# commit and-quit

95 © 2012 Jeffrey Fry – Fryguy.net Juniper Workbook
And now we can test connectivity to R4 loopback: jfry@J1> ping 4.4.4.4 rapid PING 4.4.4.4 (4.4.4.4): 56 data bytes !!!!! --- 4.4.4.4 ping statistics --- 5 packets transmitted, 5 packets received, 0% packet loss round-trip min/avg/max/stddev = 3.792/3.996/4.149/0.116 ms jfry@J1> Good! Now we can configure iBGP between J1, J2, and J3 using ASN123. We will peer via the connected interfaces on the routers, and then advertise the loopbacks into BGP. J1: Ok, time to define our AS. This is done, like router-id, under the routing-options. [edit] jfry@J1# set routing-options autonomous-system 123 Now we can configure our BGP neighbors. For this we will use a group called ibgp. This is done under protocols bgp: [edit] jfry@J1# edit protocols bgp group ibgp We will set this to an internal (ibgp) group: [edit protocols bgp group ibgp] jfry@J1# set type internal Configure our Peer-as: [edit protocols bgp group ibgp] jfry@J1# set peer-as 123 Then define our neighbors: [edit protocols bgp group ibgp] jfry@J1# set neighbor 192.168.13.3 [edit protocols bgp group ibgp] jfry@J1# set neighbor 192.168.12.2

96 © 2012 Jeffrey Fry – Fryguy.net Juniper Workbook
Ok, time to head to the top of the stanza and check our config: [edit protocols bgp group ibgp] jfry@J1# top [edit] jfry@J1# show | compare [edit routing-options] + autonomous-system 123; [edit] + protocols { + bgp { + group ibgp { + type internal; + peer-as 123; + neighbor 192.168.13.3; + neighbor 192.168.12.2; + } + } + } [edit] jfry@J1# Ok, let’s commit it on J1! [edit] jfry@J1# commit and-quit commit complete Now onto J2: [edit] jfry@J2# set routing-options autonomous-system 123 [edit] jfry@J2# edit protocols bgp group ibgp [edit protocols bgp group ibgp] jfry@J2# set type internal [edit protocols bgp group ibgp] jfry@J2# set peer-as 123 [edit protocols bgp group ibgp] jfry@J2# set neighbor 192.168.12.1 [edit protocols bgp group ibgp] jfry@J2# set neighbor 192.168.23.3

97 © 2012 Jeffrey Fry – Fryguy.net Juniper Workbook
[edit protocols bgp group ibgp] jfry@J2# top [edit] jfry@J2# commit and-quit and now J3: [edit] jfry@J3# set routing-options autonomous-system 123 [edit] jfry@J3# edit protocols bgp group ibgp [edit protocols bgp group ibgp] jfry@J3# set type internal [edit protocols bgp group ibgp] jfry@J3# set peer-as 123 [edit protocols bgp group ibgp] jfry@J3# set neighbor 192.168.13.1 [edit protocols bgp group ibgp] jfry@J3# set neighbor 192.168.23.2 [edit protocols bgp group ibgp] jfry@J3# commit and-quit commit complete Ok, that is J1, J2, and J3 configured for BGP. Time to check our bgp summary: jfry@J1> show bgp summary Groups: 1 Peers: 2 Down peers: 0 Table Tot Paths Act Paths Suppressed History Damp State Pending inet.0 0 0 0 0 0 0 Peer AS InPkt OutPkt OutQ Flaps Last Up/Dwn State|#Active/Received/Accepted/Damped... 192.168.12.2 123 11 11 0 0 3:42 0/0/0/0 0/0/0/0 192.168.13.3 123 8 7 0 0 2:23 0/0/0/0 0/0/0/0

98 © 2012 Jeffrey Fry – Fryguy.net Juniper Workbook
Ok, J1 looks good. Time to check J2 quick: jfry@J2> show bgp summary Groups: 1 Peers: 2 Down peers: 0 Table Tot Paths Act Paths Suppressed History Damp State Pending inet.0 0 0 0 0 0 0 Peer AS InPkt OutPkt OutQ Flaps Last Up/Dwn State|#Active/Received/Accepted/Damped... 192.168.12.1 123 11 12 0 0 4:14 0/0/0/0 0/0/0/0 192.168.23.3 123 8 8 0 0 2:52 0/0/0/0 0/0/0/0 jfry@J2> And J2 has two neighbors. Ok, let’s take a look at the routing table on J2: jfry@J2> show route inet.0: 5 destinations, 5 routes (5 active, 0 holddown, 0 hidden) + = Active Route, - = Last Active, * = Both 2.2.2.2/32 *[Direct/0] 00:43:34 > via lo0.0 192.168.12.0/24 *[Direct/0] 00:42:38 > via ge-0/0/0.0 192.168.12.2/32 *[Local/0] 00:42:42 Local via ge-0/0/0.0 192.168.23.0/24 *[Direct/0] 00:42:39 > via ge-0/0/1.0 192.168.23.2/32 *[Local/0] 00:42:42 Local via ge-0/0/1.0 jfry@J2> Hmm, only local and direct routes. Guess we need to tell BGP what routes it can export to its neighbors! For this lab, we will only advertise loopback addresses from the routers. First up, J1. (Remember, we also need to advertise R4 loopback) [edit] jfry@J1# set policy-options prefix-list Loopbacks 1.1.1.1/32 [edit] jfry@J1# set policy-options prefix-list Loopbacks 4.4.4.4/32 [edit] jfry@J1# set policy-options policy-statement Advertise term 1 from prefix-list Loopbacks

99 © 2012 Jeffrey Fry – Fryguy.net Juniper Workbook
[edit] jfry@J1# set policy-options policy-statement Advertise term 1 then accept [edit] jfry@J1# set protocols bgp export Advertise [edit] jfry@J1# show | compare [edit protocols bgp] + export Advertise; [edit] + policy-options { + prefix-list Loopbacks { + 1.1.1.1/32; + 4.4.4.4/32; + } + policy-statement Advertise { + term 1 { + from { + prefix-list Loopbacks; + } + then accept; + } + } + } [edit] jfry@J1# commit and-quit commit complete Now we do J2: jfry@J2> edit Entering configuration mode [edit] jfry@J2# set policy-options prefix-list Loopbacks 2.2.2.2/32 [edit] jfry@J2# set policy-options policy-statement Advertise term 1 from prefix-list Loopbacks [edit] jfry@J2# set policy-options policy-statement Advertise term 1 then accept [edit] jfry@J2# set protocols bgp export Advertise

100 © 2012 Jeffrey Fry – Fryguy.net Juniper Workbook
[edit] jfry@J2#commit and-quit Now, J3: jfry@J3> edit Entering configuration mode [edit] jfry@J3# set protocols bgp export Advertise [edit] jfry@J3# set policy-options prefix-list Loopbacks 3.3.3.3/32 [edit] jfry@J3# set policy-options policy-statement Advertise term 1 from prefix-list Loopbacks [edit] jfry@J3# set policy-options policy-statement Advertise term 1 then accept [edit] jfry@J3# commit and-quit Now that is all configured, time to look at J2’s routing table: jfry@J2> show route inet.0: 8 destinations, 8 routes (7 active, 0 holddown, 1 hidden) + = Active Route, - = Last Active, * = Both 1.1.1.1/32 *[BGP/170] 00:03:07, localpref 100 AS path: I > to 192.168.12.1 via ge-0/0/0.0 2.2.2.2/32 *[Direct/0] 00:51:52 > via lo0.0 3.3.3.3/32 *[BGP/170] 00:00:22, localpref 100 AS path: I > to 192.168.23.3 via ge-0/0/1.0 192.168.12.0/24 *[Direct/0] 00:50:56 > via ge-0/0/0.0 192.168.12.2/32 *[Local/0] 00:51:00 Local via ge-0/0/0.0 192.168.23.0/24 *[Direct/0] 00:50:57 > via ge-0/0/1.0 192.168.23.2/32 *[Local/0] 00:51:00 Local via ge-0/0/1.0 jfry@J2> Hmm, we have a route to all the loopbacks EXCEPT R4. Why?

101 © 2012 Jeffrey Fry – Fryguy.net Juniper Workbook
Well, first we should check to see if R2 is receiving the route. That is done by the command show route receive-protocol bgp neighbor jfry@J2> show route receive-protocol bgp 192.168.12.1 all inet.0: 8 destinations, 8 routes (7 active, 0 holddown, 1 hidden) Prefix Nexthop MED Lclpref AS path * 1.1.1.1/32 192.168.12.1 100 I 4.4.4.4/32 192.168.14.4 100 I __juniper_private1__.inet.0: 7 destinations, 9 routes (7 active, 0 holddown, 0 hidden) __juniper_private2__.inet.0: 1 destinations, 1 routes (0 active, 0 holddown, 1 hidden) jfry@J2> We are getting it, so why is it not being installed? Remember, BGP won’t install a route if the Nexthop is not in the local routing table – and for us, 192.168.14.4 is listed as the next hop – and we don’t have a route for that? So, how do we overcome this problem? Easy, J1 needs to set itself as the next-hop! So to do this we will edit our existing Advertise statement and add next-hop self. J1: jfry@J1# edit policy-options policy-statement Advertise term 1 [edit policy-options policy-statement Advertise term 1] jfry@J1# set then next-hop self [edit policy-options policy-statement Advertise term 1] jfry@J1# commit and-quit Now we can jump back to J2 and check to see if R4 loopback is listed: jfry@J2> show route receive-protocol bgp 192.168.12.1 all inet.0: 8 destinations, 8 routes (8 active, 0 holddown, 0 hidden) Prefix Nexthop MED Lclpref AS path * 1.1.1.1/32 192.168.12.1 100 I * 4.4.4.4/32 192.168.12.1 100 I __juniper_private1__.inet.0: 7 destinations, 9 routes (7 active, 0 holddown, 0 hidden) __juniper_private2__.inet.0: 1 destinations, 1 routes (0 active, 0 holddown, 1 hidden) jfry@J2> Yup, as you can see the next-hop is now 192.168.12.1

102 © 2012 Jeffrey Fry – Fryguy.net Juniper Workbook
Let’t ping R4 from J2! jfry@J2> ping 4.4.4.4 source 2.2.2.2 rapid PING 4.4.4.4 (4.4.4.4): 56 data bytes !!!!! --- 4.4.4.4 ping statistics --- 5 packets transmitted, 5 packets received, 0% packet loss round-trip min/avg/max/stddev = 3.807/4.195/4.588/0.283 ms jfry@J2> There we go, we can ping R4 loopback!

103 © 2012 Jeffrey Fry – Fryguy.net Juniper Workbook
iBGP – Route Reflector
192.168.13.x/24
192.168.23.x/24
192.168.1
2.x/24
19
2.1
68
.14
.x/2
4
ge-0/0/0
R4
J1
J2J3
ge-0/0/0
ge-0/0/1fe-0/0/1
fe-0/0/2
fe-0/0/2
fe-0/0/7
E0
.3 .2
.1
.4
.1
.1
.2.3
iBGP Lab TopologyiBGP Lab Topology
© 2012
Fryguy.Net
2.2.2.2/323.3.3.3/32
1.1.1.1/32
4.4.4.4/32
RR
RRC
RRC
ASN 123
OSPF Area 0
RRC
Now onto BGP Route-Reflectors. For this lab our IGP will be OSPF, our BGP will be done via the connected interfaces, J1 will be the RR, and we will advertise our loopbacks into BGP. First though, reset the lab to the rescue config on J1, J2 and J3, and load the base on R4. Ok, now to configure OSPF and BGP on R4:
R4#conf t Enter configuration commands, one per line. End with CNTL/Z. R4(config)#router ospf 123 R4(config-router)#no au R4(config-router)#net 192.168.14.0 0.0.0.255 a 0 R4(config-router)#exit R4(config)#router bgp 123 R4(config-router)#no au R4(config-router)#nei 192.168.14.1 remote-as 123 R4(config-router)#net 4.4.4.4 mask 255.255.255.255 R4(config-router)#^Z R4#

104 © 2012 Jeffrey Fry – Fryguy.net Juniper Workbook
Will will configure J1 last. So, now for J2: jfry@J2> edit Entering configuration mode [edit] jfry@J2# set routing-options autonomous-system 123 [edit] jfry@J2# edit protocols ospf area 0 [edit protocols ospf area 0.0.0.0] jfry@J2# set interface ge-0/0/0 [edit protocols ospf area 0.0.0.0] jfry@J2# exit [edit] jfry@J2# edit protocols bgp group ibgp [edit protocols bgp group ibgp] jfry@J2# set type internal [edit protocols bgp group ibgp] jfry@J2# set peer-as 123 [edit protocols bgp group ibgp] jfry@J2# set neighbor 192.168.12.1 [edit protocols bgp group ibgp] jfry@J2# top [edit] jfry@J2# set policy-options prefix-list Loopbacks 2.2.2.2/32 [edit] jfry@J2# set policy-options policy-statement Advertise term 1 from prefix-list Loopbacks [edit] jfry@J2# set policy-options policy-statement Advertise term 1 then accept [edit] jfry@J2# set protocols bgp export Advertise [edit] jfry@J2# commit and-quit

105 © 2012 Jeffrey Fry – Fryguy.net Juniper Workbook
Now for J3! Entering configuration mode [edit] jfry@J3# set routing-options autonomous-system 123 [edit] jfry@J3# edit protocols ospf area 0 [edit protocols ospf area 0.0.0.0] jfry@J3# set interface fe-0/0/2 [edit protocols ospf area 0.0.0.0] jfry@J3# exit [edit] jfry@J3# edit protocols bgp group ibgp [edit protocols bgp group ibgp] jfry@J3# set type internal [edit protocols bgp group ibgp] jfry@J3# set peer-as 123 [edit protocols bgp group ibgp] jfry@J3# set neighbor 192.168.13.1 [edit protocols bgp group ibgp] jfry@J3# top [edit] jfry@J3# set policy-options prefix-list Loopbacks 3.3.3.3/32 [edit] jfry@J3# set policy-options policy-statement Advertise term 1 from prefix-list Loopbacks [edit] jfry@J3# set policy-options policy-statement Advertise term 1 then accept [edit] jfry@J3# set protocols bgp export Advertise [edit] jfry@J3# show | compare [edit] + routing-options { + autonomous-system 123; + } + protocols {

106 © 2012 Jeffrey Fry – Fryguy.net Juniper Workbook
+ bgp { + export Advertise; + group ibgp { + type internal; + peer-as 123; + neighbor 192.168.13.1; + } + } + ospf { + area 0.0.0.0 { + interface fe-0/0/2.0; + } + } + } + policy-options { + prefix-list Loopbacks { + 3.3.3.3/32; + } + policy-statement Advertise { + term 1 { + from { + prefix-list Loopbacks; + } + then accept; + } + } + } And now for J1! jfry@J1> edit Entering configuration mode [edit] jfry@J1# set routing-options autonomous-system 123 [edit] jfry@J1# edit protocols ospf area 0 [edit protocols ospf area 0.0.0.0] jfry@J1# set interface ge-0/0/0 [edit protocols ospf area 0.0.0.0] jfry@J1# set interface fe-0/0/2 [edit protocols ospf area 0.0.0.0] jfry@J1# set interface fe-0/0/7

107 © 2012 Jeffrey Fry – Fryguy.net Juniper Workbook
[edit protocols ospf area 0.0.0.0] jfry@J1# top [edit] jfry@J1# edit protocols bgp group ibgp [edit protocols bgp group ibgp] jfry@J1# set type internal [edit protocols bgp group ibgp] jfry@J1# set peer-as 123 Here is where tell J1 that it is a Route-Reflector and what clients are associated with it. [edit protocols bgp group ibgp] jfry@J1# set cluster 1.1.1.1 [edit protocols bgp group ibgp] jfry@J1# set neighbor 192.168.13.3 [edit protocols bgp group ibgp] jfry@J1# set neighbor 192.168.12.2 [edit protocols bgp group ibgp] jfry@J1# set neighbor 192.168.14.4 [edit protocols bgp group ibgp] jfry@J1# top [edit] jfry@J1# set policy-options prefix-list Loopbacks 1.1.1.1/32 [edit] jfry@J1# set policy-statement Advertise term 1 from prefix-list Loopbacks [edit] jfry@J1# set policy-options policy-statement Advertise term 1 then accept [edit] jfry@J1# set protocols bgp export Advertise

108 © 2012 Jeffrey Fry – Fryguy.net Juniper Workbook
Ok, let’s look at the whole config now for this: [edit] jfry@J1# show | compare [edit] + routing-options { + autonomous-system 123; + } + protocols { + bgp { + export Advertise; + group ibgp { + type internal; + cluster 1.1.1.1; + peer-as 123; + neighbor 192.168.13.3; + neighbor 192.168.12.2; + neighbor 192.168.14.4; + } + } + ospf { + area 0.0.0.0 { + interface ge-0/0/0.0; + interface fe-0/0/2.0; + interface fe-0/0/7.0; + } + } + } + policy-options { + prefix-list Loopbacks { + 1.1.1.1/32; + } + policy-statement Advertise { + term 1 { + from { + prefix-list Loopbacks; + } + then accept; + } + } + } [edit] jfry@J1# commit and-quit

109 © 2012 Jeffrey Fry – Fryguy.net Juniper Workbook
Ok, all that is now configure. Let’s hop back to R4 and look at our BGP: R4#sh ip bgp BGP table version is 5, local router ID is 4.4.4.4 Status codes: s suppressed, d damped, h history, * valid, > best, i - internal, r RIB-failure, S Stale Origin codes: i - IGP, e - EGP, ? - incomplete Network Next Hop Metric LocPrf Weight Path *>i1.1.1.1/32 192.168.14.1 100 0 i *>i2.2.2.2/32 192.168.12.2 100 0 i *>i3.3.3.3/32 192.168.13.3 100 0 i *> 4.4.4.4/32 0.0.0.0 0 32768 i R4# Cool! We have all the loopbacks in BGP. Time to see if R4 can ping the other loopbacks! R4#p 2.2.2.2 so l0 Type escape sequence to abort. Sending 5, 100-byte ICMP Echos to 2.2.2.2, timeout is 2 seconds: Packet sent with a source address of 4.4.4.4 !!!!! Success rate is 100 percent (5/5), round-trip min/avg/max = 1/1/4 ms R4#p 3.3.3.3 so l0 Type escape sequence to abort. Sending 5, 100-byte ICMP Echos to 3.3.3.3, timeout is 2 seconds: Packet sent with a source address of 4.4.4.4 !!!!! Success rate is 100 percent (5/5), round-trip min/avg/max = 1/3/8 ms R4#ping 1.1.1.1 so l0 Type escape sequence to abort. Sending 5, 100-byte ICMP Echos to 1.1.1.1, timeout is 2 seconds: Packet sent with a source address of 4.4.4.4 !!!!! Success rate is 100 percent (5/5), round-trip min/avg/max = 1/1/4 ms R4#

110 © 2012 Jeffrey Fry – Fryguy.net Juniper Workbook
iBGP – Juniper and Cisco
192.168.13.x/24
192.168.23.x/24
192.168.1
2.x/24
19
2.1
68
.14
.x/2
4
ge-0/0/0
R4
J1
J2J3
ge-0/0/0
ge-0/0/1fe-0/0/1
fe-0/0/2
fe-0/0/2
fe-0/0/7
E0
.3 .2
.1
.4
.1
.1
.2.3
iBGP Cisco Lab TopologyiBGP Cisco Lab Topology
ASN 14
© 2012
Fryguy.Net
2.2.2.2/323.3.3.3/32
1.1.1.1/32
4.4.4.4/32
Area 0
Ok, again we need to reset the lab to the rescue config on J1, J2 and J3, and load the base on R4. Now that you have done that, we can configure OSPF area 0 on J1, J2, and J3. We will advertise the loopbacks into OSPF as well. J1: jfry@J1> edit Entering configuration mode [edit] jfry@J1# edit protocols ospf area 0 [edit protocols ospf area 0.0.0.0] jfry@J1# set interface ge-0/0/0 [edit protocols ospf area 0.0.0.0] jfry@J1# set interface fe-0/0/2

111 © 2012 Jeffrey Fry – Fryguy.net Juniper Workbook
[edit protocols ospf area 0.0.0.0] jfry@J1# set interface lo0 passive [edit protocols ospf area 0.0.0.0] jfry@J1# commit and-quit Now J2: jfry@J2> edit Entering configuration mode [edit] jfry@J2# edit protocols ospf area 0 [edit protocols ospf area 0.0.0.0] jfry@J2# set interface ge-0/0/0 [edit protocols ospf area 0.0.0.0] jfry@J2# set interface ge-0/0/1 [edit protocols ospf area 0.0.0.0] jfry@J2# set interface lo0 passive [edit protocols ospf area 0.0.0.0] jfry@J2# commit and-quit and J3: [edit] jfry@J3# edit protocols ospf area 0 [edit protocols ospf area 0.0.0.0] jfry@J3# set interface fe-0/0/1 [edit protocols ospf area 0.0.0.0] jfry@J3# set interface fe-0/0/2 [edit protocols ospf area 0.0.0.0] jfry@J3# set interface lo0 passive [edit protocols ospf area 0.0.0.0] jfry@J3# commit and-quit

112 © 2012 Jeffrey Fry – Fryguy.net Juniper Workbook
Ok, time to check the route table on J1 to make sure all is looking good: jfry@J1> show route | match OSPF 2.2.2.2/32 *[OSPF/10] 00:02:18, metric 1 3.3.3.3/32 *[OSPF/10] 00:02:40, metric 1 192.168.23.0/24 *[OSPF/10] 00:02:02, metric 2 224.0.0.5/32 *[OSPF/10] 00:03:32, metric 1 jfry@J1> Good, we have the right OSPF routes. Now to configure BGP between J1 and R4: R4: R4#conf t Enter configuration commands, one per line. End with CNTL/Z. R4(config)#router bgp 14 R4(config-router)#no au R4(config-router)#net 4.4.4.4 mask 255.255.255.255 R4(config-router)#nei 192.168.14.1 remote-as 14 R4(config-router)#^Z R4# and now J1: [edit] jfry@J1# set routing-options autonomous-system 14 [edit] jfry@J1# edit protocols bgp group ibgp [edit protocols bgp group ibgp] jfry@J1# set type internal [edit protocols bgp group ibgp] jfry@J1# set peer-as 14 [edit protocols bgp group ibgp] jfry@J1# set neighbor 192.168.14.4 [edit protocols bgp group ibgp] jfry@J1# commit and-quit Now we can check J1 for a route in BGP to R4’s loopback: jfry@J1> show route | match BGP 4.4.4.4/32 *[BGP/170] 00:00:33, MED 0, localpref 100 jfry@J1>

113 © 2012 Jeffrey Fry – Fryguy.net Juniper Workbook
Excellent! Now we should be able to PING from R1 to R4 loopback: jfry@J1> ping 4.4.4.4 rapid PING 4.4.4.4 (4.4.4.4): 56 data bytes !!!!! --- 4.4.4.4 ping statistics --- 5 packets transmitted, 5 packets received, 0% packet loss round-trip min/avg/max/stddev = 4.063/10.586/20.208/7.804 ms Good, now we need to redistribute on J1 between OSPF and BGP to get full reachability. First up we need to configure a policy to allow OSPF into BGP [edit] jfry@J1# set policy-options policy-statement OSPF-to-BGP term 1 from protocol ospf area 0 [edit] jfry@J1# set policy-options policy-statement OSPF-to-BGP term 1 then accept And our directly attached interfaces: [edit] jfry@J1# set policy-options policy-statement OSPF-to-BGP term 2 from protocol direct [edit] jfry@J1# set policy-options policy-statement OSPF-to-BGP term 2 then accept Now we can export that statement to BGP: [edit] jfry@J1# set protocols bgp export OSPF-to-BGP [edit] jfry@J1# commit commit complete Ok, that should get us a full routing table on R4. Let’s check: R4#sh ip route Codes: C - connected, S - static, R - RIP, M - mobile, B - BGP D - EIGRP, EX - EIGRP external, O - OSPF, IA - OSPF inter area N1 - OSPF NSSA external type 1, N2 - OSPF NSSA external type 2 E1 - OSPF external type 1, E2 - OSPF external type 2 i - IS-IS, su - IS-IS summary, L1 - IS-IS level-1, L2 - IS-IS level-2 ia - IS-IS inter area, * - candidate default, U - per-user static route o - ODR, P - periodic downloaded static route Gateway of last resort is not set B 192.168.12.0/24 [200/0] via 192.168.14.1, 00:07:33 1.0.0.0/32 is subnetted, 1 subnets B 1.1.1.1 [200/0] via 192.168.14.1, 00:07:33

114 © 2012 Jeffrey Fry – Fryguy.net Juniper Workbook
B 192.168.13.0/24 [200/0] via 192.168.14.1, 00:07:33 2.0.0.0/32 is subnetted, 1 subnets B 2.2.2.2 [200/1] via 192.168.12.2, 00:07:33 C 192.168.14.0/24 is directly connected, Ethernet0 3.0.0.0/32 is subnetted, 1 subnets B 3.3.3.3 [200/1] via 192.168.13.3, 00:07:33 4.0.0.0/32 is subnetted, 1 subnets C 4.4.4.4 is directly connected, Loopback0 B 192.168.23.0/24 [200/2] via 192.168.13.3, 00:07:34 R4# Now let’s get the BGP routes into OSPF: Configure our policy to allow routes learned from BGP [edit] jfry@J1# set policy-options policy-statement BGP-to-OSPF term 1 from protocol bgp [edit] jfry@J1# set policy-options policy-statement BGP-to-OSPF term 1 then accept And then export those routes to OSPF: [edit] jfry@J1# set protocols ospf export BGP-to-OSPF [edit] jfry@J1# commit And now we can look at J2: jfry@J2> show route | match OSPF 1.1.1.1/32 *[OSPF/10] 00:40:51, metric 1 3.3.3.3/32 *[OSPF/10] 00:40:36, metric 1 4.4.4.4/32 *[OSPF/150] 00:02:09, metric 0, tag 0 192.168.13.0/24 *[OSPF/10] 00:40:36, metric 2 224.0.0.5/32 *[OSPF/10] 00:41:42, metric 1 jfry@J2> Great! Now let's see if J2 can ping R4 loopback: jfry@J2> ping 4.4.4.4 source 2.2.2.2 rapid PING 4.4.4.4 (4.4.4.4): 56 data bytes !!!!! --- 4.4.4.4 ping statistics --- 5 packets transmitted, 5 packets received, 0% packet loss round-trip min/avg/max/stddev = 3.883/4.075/4.305/0.145 ms There you go, we have connectivity!
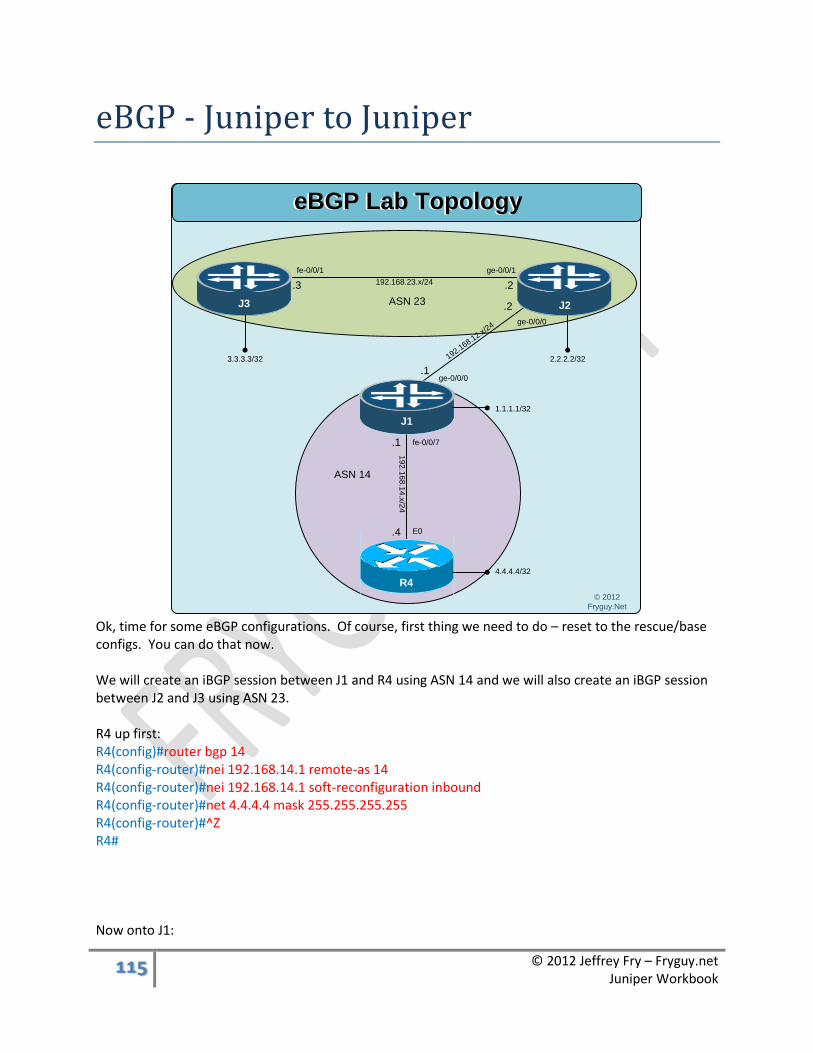
115 © 2012 Jeffrey Fry – Fryguy.net Juniper Workbook
eBGP - Juniper to Juniper
192.168.23.x/24
192.168.1
2.x/24
19
2.1
68
.14
.x/2
4
ge-0/0/0
R4
J1
J2J3
ge-0/0/0
ge-0/0/1fe-0/0/1
fe-0/0/7
E0
.3 .2
.1
.4
.1
.2
eBGP Lab TopologyeBGP Lab Topology
ASN 14
ASN 23
© 2012
Fryguy.Net
2.2.2.2/323.3.3.3/32
1.1.1.1/32
4.4.4.4/32
Ok, time for some eBGP configurations. Of course, first thing we need to do – reset to the rescue/base configs. You can do that now. We will create an iBGP session between J1 and R4 using ASN 14 and we will also create an iBGP session between J2 and J3 using ASN 23. R4 up first: R4(config)#router bgp 14 R4(config-router)#nei 192.168.14.1 remote-as 14 R4(config-router)#nei 192.168.14.1 soft-reconfiguration inbound R4(config-router)#net 4.4.4.4 mask 255.255.255.255 R4(config-router)#^Z R4# Now onto J1:

116 © 2012 Jeffrey Fry – Fryguy.net Juniper Workbook
[edit] jfry@J1# set routing-options autonomous-system 14 Create our prefix list to advertise our Loopback address: [edit] jfry@J1# set policy-options prefix-list Loopback 1.1.1.1/32 Create our policy to permit the loopbackL [edit] jfry@J1# set policy-options policy-statement ibgp term 1 from prefix-list Loopback [edit] jfry@J1# set policy-options policy-statement ibgp term 1 then accept Now configure our iBGP peering: [edit] jfry@J1# edit protocols bgp group ibgp [edit protocols bgp group ibgp] jfry@J1# set type internal [edit protocols bgp group ibgp] jfry@J1# set peer-as 14 [edit protocols bgp group ibgp] jfry@J1# set neighbor 192.168.14.4 And finally what we are going to Export to BGP: [edit protocols bgp group ibgp] jfry@J1# set export ibgp [edit protocols bgp group ibgp] jfry@J1# show type internal; export ibgp; peer-as 14; neighbor 192.168.14.4; [edit protocols bgp group ibgp] jfry@J1# commit and-quit commit complete Exiting configuration mode jfry@J1>

117 © 2012 Jeffrey Fry – Fryguy.net Juniper Workbook
Quick check on R4: R4#sh ip route Codes: C - connected, S - static, R - RIP, M - mobile, B - BGP D - EIGRP, EX - EIGRP external, O - OSPF, IA - OSPF inter area N1 - OSPF NSSA external type 1, N2 - OSPF NSSA external type 2 E1 - OSPF external type 1, E2 - OSPF external type 2 i - IS-IS, su - IS-IS summary, L1 - IS-IS level-1, L2 - IS-IS level-2 ia - IS-IS inter area, * - candidate default, U - per-user static route o - ODR, P - periodic downloaded static route Gateway of last resort is not set 1.0.0.0/32 is subnetted, 1 subnets B 1.1.1.1 [200/0] via 192.168.14.1, 00:02:05 C 192.168.14.0/24 is directly connected, Ethernet0 4.0.0.0/32 is subnetted, 1 subnets C 4.4.4.4 is directly connected, Loopback0 R4#ping 1.1.1.1 so l0 Type escape sequence to abort. Sending 5, 100-byte ICMP Echos to 1.1.1.1, timeout is 2 seconds: Packet sent with a source address of 4.4.4.4 !!!!! Success rate is 100 percent (5/5), round-trip min/avg/max = 1/3/8 ms R4#
Good, now onto J2: jfry@J2> edit Entering configuration mode [edit] jfry@J2# set routing-options autonomous-system 23 [edit] jfry@J2# set policy-options prefix-list Loopback 2.2.2.2/32 [edit] jfry@J2# set policy-options policy-statement ibgp term 1 from prefix-list Loopback [edit] jfry@J2# set policy-options policy-statement ibgp term 1 then accept [edit] jfry@J2# edit protocols bgp group ibgp

118 © 2012 Jeffrey Fry – Fryguy.net Juniper Workbook
[edit protocols bgp group ibgp] jfry@J2# set type internal [edit protocols bgp group ibgp] jfry@J2# set peer-as 23 [edit protocols bgp group ibgp] jfry@J2# set neighbor 192.168.23.3 [edit protocols bgp group ibgp] jfry@J2# set export ibgp [edit protocols bgp group ibgp] jfry@J2# commit and-quit jfry@J2> and finally J3: jfry@J3> edit Entering configuration mode [edit] jfry@J3# set routing-options autonomous-system 23 [edit] jfry@J3# edit protocols bgp group ibgp [edit protocols bgp group ibgp] jfry@J3# set type internal [edit protocols bgp group ibgp] jfry@J3# set peer-as 23 [edit protocols bgp group ibgp] jfry@J3# set neighbor 192.168.23.2 [edit protocols bgp group ibgp] jfry@J3# set export Loopback [edit protocols bgp group ibgp] jfry@J3# top [edit] jfry@J3# set policy-options prefix-list Loobacks 3.3.3.3/32 [edit] jfry@J3# set policy-options policy-statement ibgp term 1 from prefix-list Loopbacks

119 © 2012 Jeffrey Fry – Fryguy.net Juniper Workbook
[edit] jfry@J3# set policy-options policy-statement ibgp term 1 then accept [edit] jfry@J3# commit and-quit commit complete Exiting configuration mode All good! Back to J2 to see what BGP and routing looks like: jfry@J2> show bgp summary Groups: 1 Peers: 1 Down peers: 0 Table Tot Paths Act Paths Suppressed History Damp State Pending inet.0 1 1 0 0 0 0 Peer AS InPkt OutPkt OutQ Flaps Last Up/Dwn State|#Active/Received/Accepted/Damped... 192.168.23.3 23 27 26 0 0 10:29 1/1/1/0 0/0/0/0 jfry@J2> And now to PING: jfry@J2> ping 3.3.3.3 source 2.2.2.2 rapid PING 3.3.3.3 (3.3.3.3): 56 data bytes !!!!! --- 3.3.3.3 ping statistics --- 5 packets transmitted, 5 packets received, 0% packet loss round-trip min/avg/max/stddev = 2.424/2.734/3.358/0.345 ms jfry@J2> Great, we have iBGP working between J2 and J3 as well as J1 and R4. Now we can move onto eBGP! J1 up first! We will create a new policy-statement called ebgp and advertise our loopbacks jfry@J1> edit Entering configuration mode [edit] jfry@J1# set policy-options policy-statement ebgp term 1 from prefix-list Loopback [edit] jfry@J1# set policy-options policy-statement ebgp term 1 then accept

120 © 2012 Jeffrey Fry – Fryguy.net Juniper Workbook
Now we will create a new bgp group and call it ebgp [edit] jfry@J1# edit protocols bgp group ebgp Set the type to External [edit protocols bgp group ebgp] jfry@J1# set type external Set the peer-as for ASN23 [edit protocols bgp group ebgp] jfry@J1# set peer-as 23 Identify our neighbor: [edit protocols bgp group ebgp] jfry@J1# set neighbor 192.168.12.2 And then set our export policy: [edit protocols bgp group ebgp] jfry@J1# set export ebgp [edit protocols bgp group ebgp] jfry@J1# commit and-quit And now for J2: [edit] jfry@J2# set policy-options policy-statement ebgp term 1 from prefix-list Loopback [edit] jfry@J2# set policy-options policy-statement ebgp term 1 then accept [edit] jfry@J2# edit protocols bgp group ebgp [edit] jfry@J2# set type external [edit] jfry@J2# set peer-as 14 [edit] jfry@J2# set neighbor 192.168.12.1 [edit] jfry@J2# set export ebgp

121 © 2012 Jeffrey Fry – Fryguy.net Juniper Workbook
[edit] jfry@J2# commit and-quit commit complete Exiting configuration mode There, all done. Time to check J2 to see if we neighbored up: jfry@J2> show bgp summary Groups: 2 Peers: 2 Down peers: 0 Table Tot Paths Act Paths Suppressed History Damp State Pending inet.0 3 3 0 0 0 0 Peer AS InPkt OutPkt OutQ Flaps Last Up/Dwn State|#Active/Received/Accepted/Damped... 192.168.12.1 14 7 8 0 0 2:12 2/2/2/0 0/0/0/0 192.168.23.3 23 147 148 0 0 1:04:32 1/1/1/0 0/0/0/0 jfry@J2> Ok, time to look at the routing table on J2: jfry@J2> show route inet.0: 8 destinations, 8 routes (8 active, 0 holddown, 0 hidden) + = Active Route, - = Last Active, * = Both 1.1.1.1/32 *[BGP/170] 00:04:19, localpref 100 AS path: 14 I > to 192.168.12.1 via ge-0/0/0.0 2.2.2.2/32 *[Direct/0] 09:39:16 > via lo0.0 3.3.3.3/32 *[BGP/170] 01:06:39, localpref 100 AS path: I > to 192.168.23.3 via ge-0/0/1.0 4.4.4.4/32 *[BGP/170] 00:04:19, localpref 100 AS path: 14 I > to 192.168.12.1 via ge-0/0/0.0 192.168.12.0/24 *[Direct/0] 09:38:13 > via ge-0/0/0.0 192.168.12.2/32 *[Local/0] 09:38:18 Local via ge-0/0/0.0 192.168.23.0/24 *[Direct/0] 09:38:14 > via ge-0/0/1.0 192.168.23.2/32 *[Local/0] 09:38:17 Local via ge-0/0/1.0 jfry@J2>

122 © 2012 Jeffrey Fry – Fryguy.net Juniper Workbook
Good, we have routes there! Let’s look at J3 jfry@J3> show route inet.0: 8 destinations, 8 routes (6 active, 0 holddown, 2 hidden) + = Active Route, - = Last Active, * = Both 2.2.2.2/32 *[BGP/170] 01:05:11, localpref 100 AS path: I > to 192.168.23.2 via fe-0/0/1.0 3.3.3.3/32 *[Direct/0] 09:38:58 > via lo0.0 192.168.13.0/24 *[Direct/0] 09:37:09 > via fe-0/0/2.0 192.168.13.3/32 *[Local/0] 09:38:31 Local via fe-0/0/2.0 192.168.23.0/24 *[Direct/0] 09:36:44 > via fe-0/0/1.0 192.168.23.3/32 *[Local/0] 09:38:32 Local via fe-0/0/1.0 jfry@J3> Hmm, we are missing routes to J1 and R4. Time to check to see what routes R2 is sending us. jfry@J3> show route receive-protocol bgp 192.168.23.2 all inet.0: 8 destinations, 8 routes (6 active, 0 holddown, 2 hidden) Prefix Nexthop MED Lclpref AS path 1.1.1.1/32 192.168.12.1 100 14 I * 2.2.2.2/32 192.168.23.2 100 I 4.4.4.4/32 192.168.12.1 100 14 I __juniper_private1__.inet.0: 7 destinations, 9 routes (7 active, 0 holddown, 0 hidden) __juniper_private2__.inet.0: 1 destinations, 1 routes (0 active, 0 holddown, 1 hidden) jfry@J3> We are getting them, but wait – the next hop is 192.168.12.1. We don’t have a route to that network, ahh. So, we have two choices here – we can either advertise the 192.168.12.x/24 network OR we can configure J2 with next-hop-self. Let’s do the next-hop-self here.

123 © 2012 Jeffrey Fry – Fryguy.net Juniper Workbook
Back to J2: jfry@J2> edit Entering configuration mode What we are going to do is add a second term (term 2) for all other routes. Term 1 is addressing our loopback, so we don’t need to worry about that. [edit] jfry@J2# set policy-options policy -statement ibgp term 2 then next-hop self [edit] jfry@J2# set policy-options policy-statement ibgp term 2 then accept [edit] jfry@J2# Ok, quick check on J3 for bgp routes: jfry@J3> show route | match bgp 1.1.1.1/32 *[BGP/170] 00:02:27, localpref 100 2.2.2.2/32 *[BGP/170] 01:12:04, localpref 100 4.4.4.4/32 *[BGP/170] 00:02:27, localpref 100 192.168.12.0/24 *[BGP/170] 00:02:27, localpref 100 [BGP/170] 00:02:27, localpref 100 jfry@J3> There they are! This means that we also need to do this on R1. So let’s check R4 received routes from J1: R4#sh ip bgp neighbors 192.168.14.1 received-routes BGP table version is 31, local router ID is 4.4.4.4 Status codes: s suppressed, d damped, h history, * valid, > best, i - internal, r RIB-failure, S Stale Origin codes: i - IGP, e - EGP, ? - incomplete Network Next Hop Metric LocPrf Weight Path *>i1.1.1.1/32 192.168.14.1 100 0 i * i2.2.2.2/32 192.168.12.2 100 0 23 i * i3.3.3.3/32 192.168.12.2 100 0 23 i Total number of prefixes 3 R4# Yup, same problem. Our next hop is 192.168.12.2, J2’s interface. Let’s do the same here and set J1 as next-hop-self. jfry@J1> edit Entering configuration mode

124 © 2012 Jeffrey Fry – Fryguy.net Juniper Workbook
[edit] jfry@J1# set policy-options policy-statement ibgp term 2 then next-hop self [edit] jfry@J1# set policy-options policy-statement ibgp term 2 then accept [edit] jfry@J1# commit and-quit Now we can check R4 routing table: R4#sh ip route Codes: C - connected, S - static, R - RIP, M - mobile, B - BGP D - EIGRP, EX - EIGRP external, O - OSPF, IA - OSPF inter area N1 - OSPF NSSA external type 1, N2 - OSPF NSSA external type 2 E1 - OSPF external type 1, E2 - OSPF external type 2 i - IS-IS, su - IS-IS summary, L1 - IS-IS level-1, L2 - IS-IS level-2 ia - IS-IS inter area, * - candidate default, U - per-user static route o - ODR, P - periodic downloaded static route Gateway of last resort is not set B 192.168.12.0/24 [200/0] via 192.168.14.1, 00:00:49 1.0.0.0/32 is subnetted, 1 subnets B 1.1.1.1 [200/0] via 192.168.14.1, 00:53:08 B 192.168.13.0/24 [200/0] via 192.168.14.1, 00:00:49 2.0.0.0/32 is subnetted, 1 subnets B 2.2.2.2 [200/0] via 192.168.14.1, 00:00:50 C 192.168.14.0/24 is directly connected, Ethernet0 3.0.0.0/32 is subnetted, 1 subnets B 3.3.3.3 [200/0] via 192.168.14.1, 00:00:50 4.0.0.0/32 is subnetted, 1 subnets C 4.4.4.4 is directly connected, Loopback0 R4# And we have all the routes. Time to check R4 loopback to R3 loopback connectivity: R4# ping 3.3.3.3 so l0 Type escape sequence to abort. Sending 5, 100-byte ICMP Echos to 3.3.3.3, timeout is 2 seconds: Packet sent with a source address of 4.4.4.4 !!!!! Success rate is 100 percent (5/5), round-trip min/avg/max = 1/2/4 ms R4# Bingo, it all works!

125 © 2012 Jeffrey Fry – Fryguy.net Juniper Workbook
eBGP – Juniper to Cisco (and some MD5)
192.168.13.x/24
192.168.23.x/24
192.168.1
2.x/24
19
2.1
68
.14
.x/2
4
ge-0/0/0
R4
J1
J2J3
ge-0/0/0
ge-0/0/1fe-0/0/1
fe-0/0/2
fe-0/0/2
fe-0/0/7
E0
.3 .2
.1
.4
.1
.1
.2.3
eBGP Cisco Lab TopologyeBGP Cisco Lab Topology
ASN 4
© 2012
Fryguy.Net
2.2.2.2/323.3.3.3/32
1.1.1.1/32
4.4.4.4/32
ASN 1
Before we begin this lab, reset all the configs back to the rescue/base before beginning. Ok, let’s configure our J1-J2-J3 OSPF Configuration. J1: jfry@J1> edit Entering configuration mode [edit] jfry@J1# edit protocols ospf area 0 [edit protocols ospf area 0.0.0.0] jfry@J1# set interface ge-0/0/0 [edit protocols ospf area 0.0.0.0] jfry@J1# set interface fe-0/0/2

126 © 2012 Jeffrey Fry – Fryguy.net Juniper Workbook
[edit protocols ospf area 0.0.0.0] jfry@J1# set interface lo0 passive [edit protocols ospf area 0.0.0.0] jfry@J1# commit and-quit Now, J2: jfry@J2> edit Entering configuration mode [edit] jfry@J2# edit protocols ospf area 0 [edit protocols ospf area 0.0.0.0] jfry@J2# set interface ge-0/0/0 [edit protocols ospf area 0.0.0.0] jfry@J2# set interface ge-0/0/1 [edit protocols ospf area 0.0.0.0] jfry@J2# set interface lo0 passive [edit protocols ospf area 0.0.0.0] jfry@J2# commit and-quit And finally, J3: jfry@J3> edit Entering configuration mode [edit] jfry@J3# edit protocols ospf area 0 [edit protocols ospf area 0.0.0.0] jfry@J3# set interface fe-0/0/1 [edit protocols ospf area 0.0.0.0] jfry@J3# set interface fe-0/0/2 [edit protocols ospf area 0.0.0.0] jfry@J3# set interface lo0 passive [edit protocols ospf area 0.0.0.0] jfry@J3# commit and-quit

127 © 2012 Jeffrey Fry – Fryguy.net Juniper Workbook
Ok, back to J1 to check on the state of our OSPF and routing table First up, let’s check our neighbors: jfry@J1> show ospf neighbor Address Interface State ID Pri Dead 192.168.13.3 fe-0/0/2.0 Full 3.3.3.3 128 38 192.168.12.2 ge-0/0/0.0 Full 2.2.2.2 128 33 Good, and now our ospf routing table: jfry@J1> show route protocol ospf inet.0: 11 destinations, 11 routes (11 active, 0 holddown, 0 hidden) + = Active Route, - = Last Active, * = Both 2.2.2.2/32 *[OSPF/10] 00:02:21, metric 1 > to 192.168.12.2 via ge-0/0/0.0 3.3.3.3/32 *[OSPF/10] 00:01:29, metric 1 > to 192.168.13.3 via fe-0/0/2.0 192.168.23.0/24 *[OSPF/10] 00:01:29, metric 2 > to 192.168.12.2 via ge-0/0/0.0 to 192.168.13.3 via fe-0/0/2.0 224.0.0.5/32 *[OSPF/10] 00:03:52, metric 1 MultiRecv jfry@J1> Looking good. Now we can configure ebgp between J1 and R4: R4 up first for BGP. R4#config t Enter configuration commands, one per line. End with CNTL/Z. R4(config)#router bgp 4 R4(config-router)#no au R4(config-router)#net 4.4.4.4 mask 255.255.255.0 R4(config-router)#nei 192.168.14.1 remote-as 1 R4(config-router)#^Z R4#

128 © 2012 Jeffrey Fry – Fryguy.net Juniper Workbook
Now onto J1 for ebgp J1: [edit] jfry@J1# set routing-options autonomous-system 1 I am going to deviate a bit here on how I have been doing the policies. Now that you should be familiar with the set based way to do it, I will use the edit based way. I will edit my policy statement: [edit] jfry@J1# edit policy-options policy-statement ebgp Then edit my first term to accept OSPF Area 0 routes: [edit policy-options policy-statement ebgp] jfry@J1# edit term 1 [edit policy-options policy-statement ebgp term 1] jfry@J1# set from protocol ospf area 0 [edit policy-options policy-statement ebgp term 1] jfry@J1# set then accept Then move up one Stanza in the edit config: [edit policy-options policy-statement ebgp term 1] jfry@J1# up And now edit Term 2 to accept directly connected interfaces: [edit policy-options policy-statement ebgp] jfry@J1# edit term 2 [edit policy-options policy-statement ebgp term 2] jfry@J1# set from protocol direct [edit policy-options policy-statement ebgp term 2] jfry@J1# set then accept [edit policy-options policy-statement ebgp term 2] jfry@J1# top Now we will edit our ebgp group like we did in the last lab: [edit] jfry@J1# edit protocols bgp group ebgp [edit protocols bgp group ebgp] jfry@J1# set type external [edit protocols bgp group ebgp] jfry@J1# set peer-as 4

129 © 2012 Jeffrey Fry – Fryguy.net Juniper Workbook
[edit protocols bgp group ebgp] jfry@J1# set neighbor 192.168.14.4 [edit protocols bgp group ebgp] jfry@J1# set export ebgp [edit protocols bgp group ebgp] jfry@J1# commit and-quit Now time to check the bgp neighbors: jfry@J1> show bgp summary Groups: 1 Peers: 1 Down peers: 0 Table Tot Paths Act Paths Suppressed History Damp State Pending inet.0 1 1 0 0 0 0 Peer AS InPkt OutPkt OutQ Flaps Last Up/Dwn State|#Active/Received/Accepted/Damped... 192.168.14.4 4 15 19 0 0 6:07 1/1/1/0 0/0/0/0 jfry@J1> Good, we are neighbored with R4. Time to check the routing table on J1: jfry@J1> show route inet.0: 12 destinations, 12 routes (12 active, 0 holddown, 0 hidden) + = Active Route, - = Last Active, * = Both 1.1.1.1/32 *[Direct/0] 03:27:14 > via lo0.0 2.2.2.2/32 *[OSPF/10] 00:22:15, metric 1 > to 192.168.12.2 via ge-0/0/0.0 3.3.3.3/32 *[OSPF/10] 00:21:23, metric 1 > to 192.168.13.3 via fe-0/0/2.0 4.4.4.4/32 *[BGP/170] 00:00:48, MED 0, localpref 100 AS path: 4 I > to 192.168.14.4 via fe-0/0/7.0 192.168.12.0/24 *[Direct/0] 03:26:03 > via ge-0/0/0.0 192.168.12.1/32 *[Local/0] 03:26:33 Local via ge-0/0/0.0 192.168.13.0/24 *[Direct/0] 03:26:28 > via fe-0/0/2.0 192.168.13.1/32 *[Local/0] 03:26:32 Local via fe-0/0/2.0 192.168.14.0/24 *[Direct/0] 03:26:28 > via fe-0/0/7.0 192.168.14.1/32 *[Local/0] 03:26:32

130 © 2012 Jeffrey Fry – Fryguy.net Juniper Workbook
Local via fe-0/0/7.0 192.168.23.0/24 *[OSPF/10] 00:21:23, metric 2 > to 192.168.12.2 via ge-0/0/0.0 to 192.168.13.3 via fe-0/0/2.0 224.0.0.5/32 *[OSPF/10] 00:23:46, metric 1 MultiRecv jfry@J1> Good, now to check R4: R4#sh ip route Codes: C - connected, S - static, R - RIP, M - mobile, B - BGP D - EIGRP, EX - EIGRP external, O - OSPF, IA - OSPF inter area N1 - OSPF NSSA external type 1, N2 - OSPF NSSA external type 2 E1 - OSPF external type 1, E2 - OSPF external type 2 i - IS-IS, su - IS-IS summary, L1 - IS-IS level-1, L2 - IS-IS level-2 ia - IS-IS inter area, * - candidate default, U - per-user static route o - ODR, P - periodic downloaded static route Gateway of last resort is not set B 192.168.12.0/24 [20/0] via 192.168.14.1, 00:06:52 1.0.0.0/32 is subnetted, 1 subnets B 1.1.1.1 [20/0] via 192.168.14.1, 00:06:52 B 192.168.13.0/24 [20/0] via 192.168.14.1, 00:06:52 2.0.0.0/32 is subnetted, 1 subnets B 2.2.2.2 [20/1] via 192.168.14.1, 00:06:52 C 192.168.14.0/24 is directly connected, Ethernet0 3.0.0.0/32 is subnetted, 1 subnets B 3.3.3.3 [20/1] via 192.168.14.1, 00:06:52 4.0.0.0/32 is subnetted, 1 subnets C 4.4.4.4 is directly connected, Loopback0 B 192.168.23.0/24 [20/2] via 192.168.14.1, 00:06:52 R4# Cool both routers have all the routes. Now, time to check if R4 can PING J1 loopback: R4# ping 1.1.1.1 so l0 Type escape sequence to abort. Sending 5, 100-byte ICMP Echos to 1.1.1.1, timeout is 2 seconds: Packet sent with a source address of 4.4.4.4 !!!!! Success rate is 100 percent (5/5), round-trip min/avg/max = 1/1/4 ms R4#

131 © 2012 Jeffrey Fry – Fryguy.net Juniper Workbook
Good, how about J2 loopback: R4#ping 2.2.2.2 so l0 Type escape sequence to abort. Sending 5, 100-byte ICMP Echos to 2.2.2.2, timeout is 2 seconds: Packet sent with a source address of 4.4.4.4 ..... Success rate is 0 percent (0/5) R4# Nope, why is this? Let’s check J2 routing table: jfry@J2> show route inet.0: 9 destinations, 9 routes (9 active, 0 holddown, 0 hidden) + = Active Route, - = Last Active, * = Both 1.1.1.1/32 *[OSPF/10] 00:24:37, metric 1 > to 192.168.12.1 via ge-0/0/0.0 2.2.2.2/32 *[Direct/0] 03:29:29 > via lo0.0 3.3.3.3/32 *[OSPF/10] 00:23:43, metric 1 > to 192.168.23.3 via ge-0/0/1.0 192.168.12.0/24 *[Direct/0] 03:28:25 > via ge-0/0/0.0 192.168.12.2/32 *[Local/0] 03:28:31 Local via ge-0/0/0.0 192.168.13.0/24 *[OSPF/10] 00:23:43, metric 2 to 192.168.12.1 via ge-0/0/0.0 > to 192.168.23.3 via ge-0/0/1.0 192.168.23.0/24 *[Direct/0] 03:28:26 > via ge-0/0/1.0 192.168.23.2/32 *[Local/0] 03:28:30 Local via ge-0/0/1.0 224.0.0.5/32 *[OSPF/10] 00:24:47, metric 1 MultiRecv jfry@J2> Hmm, no route. Why? Well, it is because we did not redistribute routes from BGP to OSPF on J1. Time to configure that on J1: jfry@J1> edit Entering configuration mode [edit] jfry@J1# edit policy-options policy-statement ospf

132 © 2012 Jeffrey Fry – Fryguy.net Juniper Workbook
[edit policy-options policy-statement ospf] jfry@J1# edit term 1 [edit policy-options policy-statement ospf term 1] jfry@J1# set from protocol bgp [edit policy-options policy-statement ospf term 1] jfry@J1# set then accept [edit policy-options policy-statement ospf term 1] jfry@J1# top [edit] jfry@J1# edit protocols ospf [edit protocols ospf] jfry@J1# set export ospf [edit protocols ospf] jfry@J1# commit and-quit Ok, time to check the routing table on J2: jfry@J2> show route protocol ospf inet.0: 10 destinations, 10 routes (10 active, 0 holddown, 0 hidden) + = Active Route, - = Last Active, * = Both 1.1.1.1/32 *[OSPF/10] 00:31:25, metric 1 > to 192.168.12.1 via ge-0/0/0.0 3.3.3.3/32 *[OSPF/10] 00:30:31, metric 1 > to 192.168.23.3 via ge-0/0/1.0 4.4.4.4/32 *[OSPF/150] 00:02:12, metric 0, tag 0 > to 192.168.12.1 via ge-0/0/0.0 192.168.13.0/24 *[OSPF/10] 00:30:31, metric 2 to 192.168.12.1 via ge-0/0/0.0 > to 192.168.23.3 via ge-0/0/1.0 224.0.0.5/32 *[OSPF/10] 00:31:35, metric 1 MultiRecv Good, now we can retest R4 ping to J2: R4#ping 2.2.2.2 so l0 Type escape sequence to abort. Sending 5, 100-byte ICMP Echos to 2.2.2.2, timeout is 2 seconds: Packet sent with a source address of 4.4.4.4 !!!!! Success rate is 100 percent (5/5), round-trip min/avg/max = 1/6/20 ms

133 © 2012 Jeffrey Fry – Fryguy.net Juniper Workbook
Ok, now to MD5 Auth between J1 and R4 for good measure. R4 first: R4(config)#nei R4(config)#router bgp 4 R4(config-router)#neighbor 192.168.14.1 password 0 JunosIOS And now J1: jfry@J1> edit Entering configuration mode [edit] jfry@J1# edit protocols bgp group ebgp Authentication is configured under the neighbor: [edit protocols bgp group ebgp] jfry@J1# edit neighbor 192.168.14.4 And now we configure the password: [edit protocols bgp group ebgp neighbor 192.168.14.4] jfry@J1# set authentication-key JunosIOS [edit protocols bgp group ebgp neighbor 192.168.14.4] jfry@J1# commit and-quit commit complete Exiting configuration mode jfry@J1 Ok, We should have a bgp neighbor now: jfry@J1> show bgp neighbor 192.168.14.4 Peer: 192.168.14.4+11005 AS 4 Local: 192.168.14.1+179 AS 1 Type: External State: Established Flags: <Sync> Last State: OpenConfirm Last Event: RecvKeepAlive Last Error: None Export: [ ebgp ] Options: <Preference AuthKey PeerAS Refresh> Authentication key is configured There we go, BGP authentication!

134 © 2012 Jeffrey Fry – Fryguy.net Juniper Workbook
NHRP
192.168.13.x/24
192.168.23.x/24
192.168.1
2.x/24
19
2.1
68.1
4.x
/24
ge-0/0/0
R4
J1
J2J3
ge-0/0/0
ge-0/0/1fe-0/0/1
fe-0/0/2
fe-0/0/2
fe-0/0/7
E0
.3 .2
.1
.4
.1
.1
.2.3
NHRP Lab TopologyNHRP Lab Topology
© 2012
Fryguy.Net
2.2.2.2/323.3.3.3/32
1.1.1.1/32
4.4.4.4/32
VRRP - .23
OSPF Area 0
Before beginning, reset all configs back to rescue/base. Junos only supports the standard NHRP, VRRP. For this lab we will configure a VRRP address of 192.168.23.23 on the link between J2 and J3. We will then PING that address from R4 to validate traffic. In order to test failover, we will deactivate an interface on J2 (Master VRRP) and check that J3 is now the active VRRP device. Ok, basics first – let’s get OSPF configured on this network. R4: R4(config)#router ospf 1 R4(config-router)#no au R4(config-router)#net 0.0.0.0 255.255.255.255 a 0 R4(config-router)#^Z

135 © 2012 Jeffrey Fry – Fryguy.net Juniper Workbook
Now onto J1: [edit] jfry@J1# edit protocols ospf area 0 [edit protocols ospf area 0.0.0.0] jfry@J1# set interface fe-0/0/7 [edit protocols ospf area 0.0.0.0] jfry@J1# set interface ge-0/0/0 [edit protocols ospf area 0.0.0.0] jfry@J1# set interface fe-0/0/2 [edit protocols ospf area 0.0.0.0] jfry@J1# set interface lo0 passive [edit protocols ospf area 0.0.0.0] jfry@J1# commit and-quit Now J2: [edit] jfry@J2# edit protocols ospf area 0 [edit protocols ospf area 0.0.0.0] jfry@J2# set interface ge-0/0/0 [edit protocols ospf area 0.0.0.0] jfry@J2# set interface ge-0/0/1 [edit protocols ospf area 0.0.0.0] jfry@J2# set interface lo0 passive [edit protocols ospf area 0.0.0.0] jfry@J2# commit and-quit And J3: [edit] jfry@J3# edit protocols ospf area 0 [edit protocols ospf area 0.0.0.0] jfry@J3# set interface fe-0/0/1 [edit protocols ospf area 0.0.0.0] jfry@J3# set interface fe-0/0/2

136 © 2012 Jeffrey Fry – Fryguy.net Juniper Workbook
[edit protocols ospf area 0.0.0.0] jfry@J3# set interface lo0 passive [edit protocols ospf area 0.0.0.0] jfry@J3# commit and-quit Ok, time to test ping from J3 to R4: jfry@J3> ping 4.4.4.4 source 3.3.3.3 rapid PING 4.4.4.4 (4.4.4.4): 56 data bytes !!!!! --- 4.4.4.4 ping statistics --- 5 packets transmitted, 5 packets received, 0% packet loss round-trip min/avg/max/stddev = 3.052/3.154/3.334/0.110 ms jfry@J3> Good, now for VRRP. J2 up first since that will be the master. For J2 I will use all set based commands from the top, and for J3 I will navigate to the interface. First we will define our VRRP address of 192.168.23.23 [edit] jfry@J2# set interface ge-0/0/1 unit 0 family inet address 192.168.23.2/24 vrrp-group 1 virtual-address 192.168.23.23 Now we will configure a higher priority to make sure we are the master: [edit] jfry@J2# set interface ge-0/0/1 unit 0 family inet address 192.168.23.2/24 vrrp-group 1 priority 150 We will configure preempt to make sure we are always the master: [edit] jfry@J2# set interface ge-0/0/1 unit 0 family inet address 192.168.23.2/24 vrrp-group 1 preempt And finally we need to tell Junos that we will respond to that address via ICMP and SNMP: [edit] jfry@J2# set interface ge-0/0/1 unit 0 family inet address 192.168.23.2/24 vrrp-group 1 accept-data [edit] jfry@J2# commit and-quit Ok, let us check it quick and make sure we are master: jfry@J2> show vrrp Interface State Group VR state VR Mode Timer Type Address
ge-0/0/1.0 up 1 master Active A 0.495 lcl 192.168.23.2
vip 192.168.23.23
jfry@J2> Good, we are master!

137 © 2012 Jeffrey Fry – Fryguy.net Juniper Workbook
and now for J3: jfry@J3> edit Entering configuration mode Now we can navigate to the interface: [edit] jfry@J3# edit interface fe-0/0/1 unit 0 family inet address 192.168.23.3/24 Good, now we can edit our vrrp-group: [edit interfaces fe-0/0/1 unit 0 family inet address 192.168.23.3/24] jfry@J3# edit vrrp-group 1 And now just do the set based commands for VRRP! [edit interfaces fe-0/0/1 unit 0 family inet address 192.168.23.3/24 vrrp-group 1] jfry@J3# set virtual-address 192.168.23.23 [edit interfaces fe-0/0/1 unit 0 family inet address 192.168.23.3/24 vrrp-group 1] jfry@J3# set accept-data [edit interfaces fe-0/0/1 unit 0 family inet address 192.168.23.3/24 vrrp-group 1] jfry@J3# commit and-quit commit complete Exiting configuration mode Good, now we can check our VRRP on J3: jfry@J3> show vrrp Interface State Group VR state VR Mode Timer Type Address
fe-0/0/1.0 up 1 backup Active D 3.455 lcl 192.168.23.3
vip 192.168.23.23
mas 192.168.23.2
jfry@J3> Good, we are in backup state and 192.168.23.2 is master. Time to ping from R4: R4#ping 192.168.23.23 Type escape sequence to abort. Sending 5, 100-byte ICMP Echos to 192.168.23.23, timeout is 2 seconds: !!!!! Success rate is 100 percent (5/5), round-trip min/avg/max = 1/2/4 ms R4# Now we can deactivate the interface on J2 and make J3 active: [edit] jfry@J2# deactivate interfaces ge-0/0/1 [edit] jfry@J2# commit and-quit

138 © 2012 Jeffrey Fry – Fryguy.net Juniper Workbook
And back to J3 to check VRRP status: jfry@J3> show vrrp Interface State Group VR state VR Mode Timer Type Address
fe-0/0/1.0 up 1 master Active A 0.163 lcl 192.168.23.3
vip 192.168.23.23
jfry@J3> Good, we are master since J2 is now longer active. Time to ping from R4: R4#ping 192.168.23.23 Type escape sequence to abort. Sending 5, 100-byte ICMP Echos to 192.168.23.23, timeout is 2 seconds: !!!!! Success rate is 100 percent (5/5), round-trip min/avg/max = 1/2/8 ms R4# And now let’s reactivate J2 interface: [edit] jfry@J2# activate interfaces ge-0/0/1 [edit] jfry@J2# commit and-quit Now J3 should be in backup again and J2 should be master: jfry@J3> show vrrp Interface State Group VR state VR Mode Timer Type Address
fe-0/0/1.0 up 1 backup Active D 2.893 lcl 192.168.23.3
vip 192.168.23.23
mas 192.168.23.2
jfry@J3> And that is VRRP in a nutshell!

139 © 2012 Jeffrey Fry – Fryguy.net Juniper Workbook
System Services NTP – Telnet – SSH – SNMP – Monitor - LAG
192.168.13.x/24
192.168.23.x/24
192.168.1
2.x/24
19
2.1
68
.14
.x/2
4
ge-0/0/0
R4
J1
J2J3
ge-0/0/0
ge-0/0/1fe-0/0/1
fe-0/0/2
fe-0/0/2
fe-0/0/7
E0
.3 .2
.1
.4
.1
.1
.2.3
Base Functions Lab TopologyBase Functions Lab Topology
© 2012
Fryguy.Net
2.2.2.2/323.3.3.3/32
1.1.1.1/32
4.4.4.4/32
OSPF Area 0
To InternetE1
There are a few services that I wanted to cover but wanted to wait until near the end. The reason for waiting is that I wanted you to focus on the configuration on the protocols and not so much the access and supporting features. Plus, having an routing protocol configured simplifies the testing of these commands. For this lab you will need to rollback to the rescue config and then configure OSPF Area 0 on all the routers, configure R4 to connect to the Internet and advertise a default-route to OSPF. Once you have that completed, we will continue on to discuss:
NTP
Telnet / SSH Access
SNMP
Monitor
LAG (Link Aggregation Group)

140 © 2012 Jeffrey Fry – Fryguy.net Juniper Workbook
NTP So, onto configure NTP on your J1, J2, and J3 routers. For this lab, configure your Cisco router in UTC, set it to sync with 198.245.60.153, and finally as a NTP master. R4: R4(config)# R4(config)# R4(config)#clock time R4(config)#clock timezone UTC -0 R4(config)#ntp server 198.245.60.153 R4(config)#ntp master Now we will configure J1, J2, and J3 to all sync with R4 4.4.4.4 interface for NTP. First let’s see what time it is on J1: jfry@J1> show system uptime Current time: 2010-09-04 11:01:01 UTC System booted: 2010-09-04 10:46:02 UTC (00:14:59 ago) Protocols started: 2010-09-04 10:48:51 UTC (00:12:10 ago) Last configured: 2012-09-04 23:02:04 UTC (-12:-1:-3 ago) by jfry 11:01AM up 15 mins, 1 user, load averages: 0.04, 0.50, 0.75 jfry@J1> Ok, its September 4, 2012 at around 11 AM UTC. Now to configure NTP: [edit] jfry@J1# set system time-zone UTC [edit] jfry@J1# set system ntp server 4.4.4.4 [edit] jfry@J1# commit and-quit Now, time to recheck: jfry@J1> show system uptime Current time: 2012-09-05 00:43:56 UTC System booted: 2012-09-05 00:27:35 UTC (00:16:21 ago) Protocols started: 2012-09-05 00:30:24 UTC (00:13:32 ago) Last configured: 2010-09-04 11:02:00 UTC (104w3d 13:41 ago) by jfry 12:43AM up 16 mins, 1 user, load averages: 0.47, 0.49, 0.72 And we can check our associations: jfry@J1> show ntp associations remote refid st t when poll reach delay offset jitter ============================================================================== 4.4.4.4 .STEP. 16 - 114 64 0 0.000 0.000 4000.00 jfry@J1>

141 © 2012 Jeffrey Fry – Fryguy.net Juniper Workbook
Now, lets configure J2 and J3 the same way: J2: jfry@J2> edit Entering configuration mode [edit] jfry@J2# set system time-zone UTC [edit] jfry@J2# set system ntp server 4.4.4.4 [edit] jfry@J2# commit and-quit And finally J3: jfry@J3> edit Entering configuration mode [edit] jfry@J3# set system time-zone UTC [edit] jfry@J3# set system ntp server 4.4.4.4 [edit] jfry@J3# commit and-quit commit complete There is NTP in a nutshell!

142 © 2012 Jeffrey Fry – Fryguy.net Juniper Workbook
Telnet/SSH Now let’s configure Telnet/SSH access to these routers. Note: I have configured the necessary routes to access this lab from my home network. Ok, first up time to create a quick banner message to alert the user they are accessing a device: [edit] jfry@J1# set system login message "Ask yourself, are you allowed to login to this device?" Now we will set a message for after then are authenticated. The \n means New Line, so this will place a new line between the message and the prompt. [edit] jfry@J1# set system login announcement "Well, I guess so! \n" Now we can enable telnet and SSH [edit] jfry@J1# set system services telnet [edit] jfry@J1# set system services ssh [edit] jfry@J1# commit and-quit Now you should notice that it did not tell you that you need to generate a keygen like on Cisco. That is because the underling FreeBSD, already did that when it was initially installed. Time to test out Telnet access to J1 from R4: R4#telnet 1.1.1.1 Trying 1.1.1.1 ... Open Ask yourself, are you allowed to login to this device? J1 (ttyp1) login: jfry Password: --- JUNOS 12.1R2.9 built 2012-05-31 08:58:52 UTC It appears so! jfry@J1>

143 © 2012 Jeffrey Fry – Fryguy.net Juniper Workbook
Now we can try SSH from a client – I use Secure CRT: Upon connection I am presented to accept the key:
Ask yourself, are you allowed to login to this device? --- JUNOS 12.1R2.9 built 2012-05-31 08:58:52 UTC It appears so! jfry@J1> To keep things consistent, we can add this config to J2 and J3: jfry@J2> edit Entering configuration mode [edit] jfry@J2# set system message "Ask yourself, are you allowed to login to this device?" [edit] jfry@J2# set system login announcement "Well, I guess so! \n" [edit] jfry@J2# set system services telnet [edit] jfry@J2# set system services ssh [edit] jfry@J2# commit and-quit commit complete and finally J3: jfry@J3> edit Entering configuration mode [edit] jfry@J3# set system login announcement "Well, I guess so! \n"

144 © 2012 Jeffrey Fry – Fryguy.net Juniper Workbook
[edit] jfry@J3# set system login message "Ask yourself, are you allowed to login to this device?" [edit] jfry@J3# set system services ssh [edit] jfry@J3# set system services telnet [edit] jfry@J3# commit and-quit Basic SNMP Ok, time for some basic SNMP stuff. Since this is all the same across all the devices, we will just focus on J1 from here on out until we get to LAG. For this one, we will create an SNMP community of fryguy and limit it to the loopback interface. jfry@J1> edit Entering configuration mode [edit] jfry@J1# set snmp community fryguy Before we tell it lo0, here is what the interface command options provide you: [edit] jfry @J1# set snmp interface ? Possible completions: <value> Restrict SNMP requests to interfaces [ Open a set of values lo0.0 Restrict SNMP requests to interfaces [edit] jfry @J1# set snmp interface lo0 [edit] jfry @J1# set snmp contact [email protected] [edit] jfry @J1# set snmp location Fryguy's Lab ^ syntax error. We got an error because of the space, since it has a space it needs to be in “ quotes “ [edit] jfry@J1# set snmp location "Fryguy's Lab"

145 © 2012 Jeffrey Fry – Fryguy.net Juniper Workbook
[edit] jfry@J1# commit and-quit If you want, you can even MIB walk right from the Junos CLI: jfry@J1> show snmp mib walk 1.3.6 sysDescr.0 = Juniper Networks, Inc. srx210h internet router, kernel JUNOS 12.1R2.9 #0: 2012-05-31 08:58:52 UTC builder@greteth:/volume/build/junos/12.1/release/12.1R2.9/obj-octeon/junos/bsd/kernels/JSRXNLE/kernel Build date: 2012-05-31 11:07:04 UTC Copyright (c) sysObjectID.0 = jnxProductNameSRX210 sysUpTime.0 = 1988441 sysContact.0 = [email protected] sysName.0 = J1 sysLocation.0 = Fryguy's Lab sysServices.0 = 4 ifNumber.0 = 39 ---(more)---[abort] Monitoring Ok, now onto monitoring. Say we want to monitor the usage of an interface on J1, the interface facing R4 – fe-0/0/7. We want to see input/output etc. We could do show interface fe-0/0/7 root@J1> show interfaces fe-0/0/7 Physical interface: fe-0/0/7, Enabled, Physical link is Up Interface index: 141, SNMP ifIndex: 518 Link-level type: Ethernet, MTU: 1514, Link-mode: Full-duplex, Speed: 100mbps, BPDU Error: None, MAC-REWRITE Error: None, Loopback: Disabled, Source filtering: Disabled, Flow control: Enabled Device flags : Present Running Interface flags: SNMP-Traps Internal: 0x0 CoS queues : 8 supported, 8 maximum usable queues Current address: 00:24:dc:d4:b5:c7, Hardware address: 00:24:dc:d4:b5:c7 Last flapped : 2012-09-06 14:00:36 UTC (05:38:10 ago) Input rate : 472 bps (0 pps) Output rate : 472 bps (0 pps) Active alarms : None Active defects : None Interface transmit statistics: Disabled And then do that again, and again, and again monitoring the delta changes OR we could use the monitor command: jfry @J1> monitor interface fe-0/0/7

146 © 2012 Jeffrey Fry – Fryguy.net Juniper Workbook
And you will get a screen that will constantly refresh and look like the following:
Now what if we want to monitor the actual packets, in other words – sniff the traffic – we can use the command monitor traffic jfry@J1> monitor traffic interface fe-0/0/7 verbose output suppressed, use <detail> or <extensive> for full protocol decode Address resolution is ON. Use <no-resolve> to avoid any reverse lookup delay. Address resolution timeout is 4s. Listening on fe-0/0/7, capture size 96 bytes Reverse lookup for 192.168.14.1 failed (check DNS reachability). Other reverse lookup failures will not be reported. Use <no-resolve> to avoid reverse lookups on IP addresses. 19:46:34.038029 Out IP truncated-ip - 20 bytes missing! 192.168.14.1 > 224.0.0.5: OSPFv2, Hello, length 60 19:46:41.290532 In IP 192.168.14.4 > 224.0.0.5: OSPFv2, Hello, length 60 19:46:42.234807 In 00:11:20:df:84:90 > 01:00:0c:cc:cc:cc SNAP Unnumbered, ui, Flags [Command], length 60 19:46:42.550634 In IP 192.168.0.28.57575 > 1.1.1.1.telnet: S 908673441:908673441(0) win 8192 <mss 1260,nop,wscale 2,nop,nop,sackOK> 19:46:42.550884 Out IP 1.1.1.1.telnet > 192.168.0.28.57575: S 3451348271:3451348271(0) ack 908673442 win 65535 <mss 1460,nop,wscale 1,sackOK,eol> 19:46:42.553560 In IP 192.168.0.28.57575 > 1.1.1.1.telnet: . ack 1 win 16695 19:46:42.555222 In IP 192.168.0.28.57575 > 1.1.1.1.telnet: P 1:7(6) ack 1 win 16695 19:46:42.628810 Out IP 1.1.1.1.telnet > 192.168.0.28.57575: P 1:16(15) ack 7 win 33387 Neat, we can do a quick packet capture from the CLI. The output above shows OSPF at 224.0.0.5 and a telnet session from 192.168.0.28 to 1.1.1.1.
J1 Seconds: 34 Time: 19:41:38 Delay: 0/0/8 Interface: fe-0/0/7, Enabled, Link is Up Encapsulation: Ethernet, Speed: 100mbps Traffic statistics: Current delta Input bytes: 341152 (33352 bps) [46940] Output bytes: 561080 (34480 bps) [57584] Input packets: 4199 (3 pps) [58] Output packets: 4267 (2 pps) [55] Error statistics: Input errors: 0 [0] Input drops: 0 [0] Input framing errors: 0 [0] Policed discards: 0 [0] L3 incompletes: 0 [0] L2 channel errors: 0 [0] L2 mismatch timeouts: 0 Carrier transiti [0] Next='n', Quit='q' or ESC, Freeze='f', Thaw='t', Clear='c', Interface='i'

147 © 2012 Jeffrey Fry – Fryguy.net Juniper Workbook
Link Aggregation Groups (LAG) Ok, for this lab we will need to cable things up quick. I have installed a cable between J2 and J3 on ports fe-0/0/6 and fe-0/0/7 as per the diagram below:
Once that is cabled, we can now configure our LAG connection between the two devices. First up though, we need to delete the existing configuration on the old interfaces since we will be reusing IPs and such. Want to keep this simple. J2: jfry@J2> edit Entering configuration mode [edit] jfry@J2# delete interfaces ge-0/0/1 [edit] jfry@J2# commit and-quit J3: jfry@J3> edit Entering configuration mode [edit] jfry@J3# delete interfaces fe-0/0/1 [edit] jfry@J3# commit and-quit Now we can configure our LAG on J2 first: jfry@J2> edit Entering configuration mode First we need to tell it how many aggregate interfaces we want, for this example we will use 2: [edit] jfry@J2# set chassis aggregated-devices ethernet device-count 2 Now we need to tell the device what interfaces will be in 802.3ad and assigned them to aggregate Ethernet interface 0 (ae0)

148 © 2012 Jeffrey Fry – Fryguy.net Juniper Workbook
[edit] jfry@J2# set interfaces fe-0/0/6 fastether-options 802.3ad ae0 [edit] jfry@J2# set interfaces fe-0/0/7 fastether-options 802.3ad ae0 Now we can configure the ae0 interface with an IP. This is just like any other interface we have configured. [edit] jfry@J2# set interfaces ae0 unit 0 family inet address 192.168.23.3/24 And then set LACP to ACTIVE mode under the aggregate interface: [edit] jfry@J2# set interfaces ae0 aggregated-ether-options lacp active [edit] jfry@J2# commit and-quit commit complete And now J3: jfry@J3> edit Entering configuration mode [edit] jfry@J3# set chassis aggregated-devices ethernet device-count 2 [edit] jfry@J3# set interfaces fe-0/0/6 fastether-options 802.3ad ae0 [edit] jfry@J3# set interfaces fe-0/0/7 fastether-options 802.3ad ae0 [edit] jfry@J3# set interfaces ae0 unit 0 family inet address 192.168.23.3/24 [edit] jfry@J3# set interfaces ae0 aggregated-ether-options lacp active [edit] jfry@J3# commit and-quit commit complete
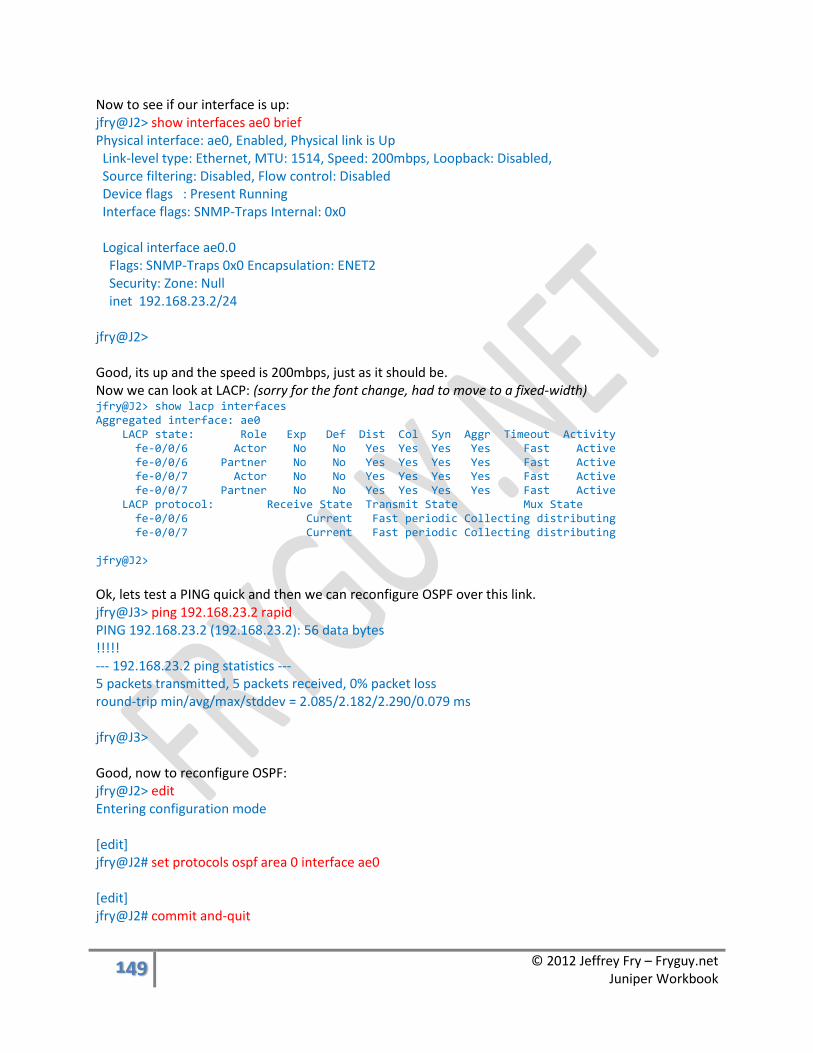
149 © 2012 Jeffrey Fry – Fryguy.net Juniper Workbook
Now to see if our interface is up: jfry@J2> show interfaces ae0 brief Physical interface: ae0, Enabled, Physical link is Up Link-level type: Ethernet, MTU: 1514, Speed: 200mbps, Loopback: Disabled, Source filtering: Disabled, Flow control: Disabled Device flags : Present Running Interface flags: SNMP-Traps Internal: 0x0 Logical interface ae0.0 Flags: SNMP-Traps 0x0 Encapsulation: ENET2 Security: Zone: Null inet 192.168.23.2/24 jfry@J2> Good, its up and the speed is 200mbps, just as it should be. Now we can look at LACP: (sorry for the font change, had to move to a fixed-width) jfry@J2> show lacp interfaces Aggregated interface: ae0 LACP state: Role Exp Def Dist Col Syn Aggr Timeout Activity fe-0/0/6 Actor No No Yes Yes Yes Yes Fast Active fe-0/0/6 Partner No No Yes Yes Yes Yes Fast Active fe-0/0/7 Actor No No Yes Yes Yes Yes Fast Active fe-0/0/7 Partner No No Yes Yes Yes Yes Fast Active LACP protocol: Receive State Transmit State Mux State fe-0/0/6 Current Fast periodic Collecting distributing fe-0/0/7 Current Fast periodic Collecting distributing jfry@J2>
Ok, lets test a PING quick and then we can reconfigure OSPF over this link. jfry@J3> ping 192.168.23.2 rapid PING 192.168.23.2 (192.168.23.2): 56 data bytes !!!!! --- 192.168.23.2 ping statistics --- 5 packets transmitted, 5 packets received, 0% packet loss round-trip min/avg/max/stddev = 2.085/2.182/2.290/0.079 ms jfry@J3> Good, now to reconfigure OSPF: jfry@J2> edit Entering configuration mode [edit] jfry@J2# set protocols ospf area 0 interface ae0 [edit] jfry@J2# commit and-quit
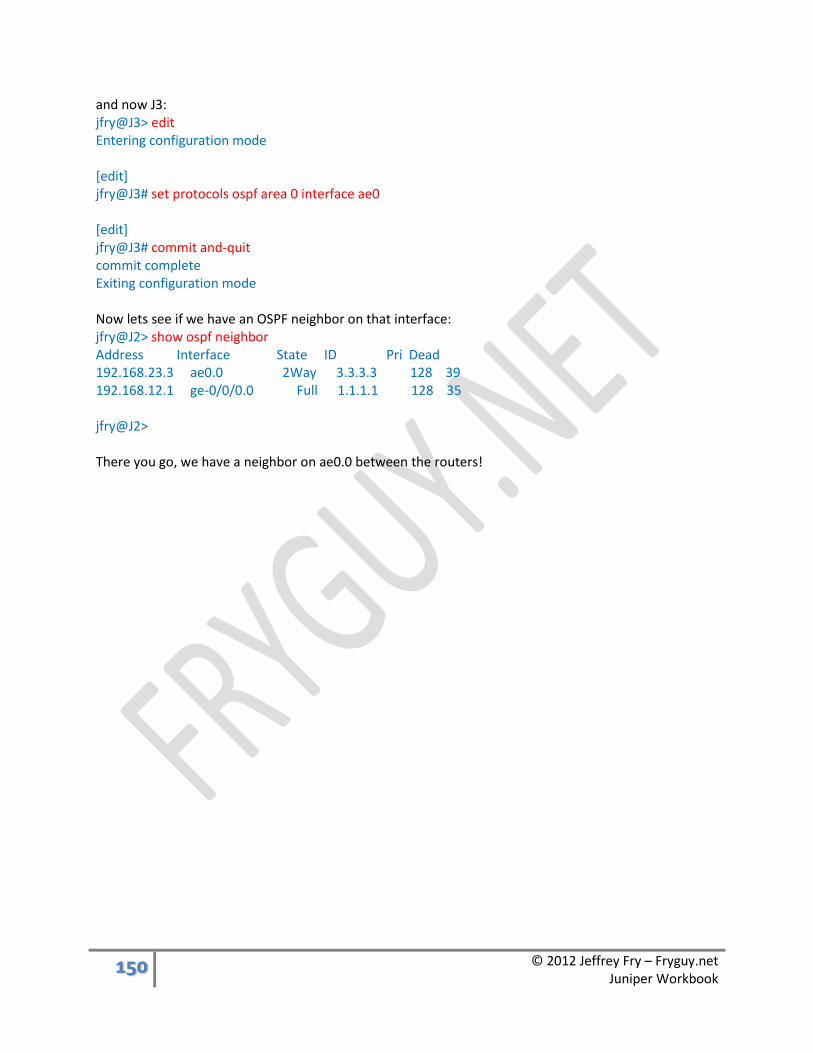
150 © 2012 Jeffrey Fry – Fryguy.net Juniper Workbook
and now J3: jfry@J3> edit Entering configuration mode [edit] jfry@J3# set protocols ospf area 0 interface ae0 [edit] jfry@J3# commit and-quit commit complete Exiting configuration mode Now lets see if we have an OSPF neighbor on that interface: jfry@J2> show ospf neighbor Address Interface State ID Pri Dead 192.168.23.3 ae0.0 2Way 3.3.3.3 128 39 192.168.12.1 ge-0/0/0.0 Full 1.1.1.1 128 35 jfry@J2> There you go, we have a neighbor on ae0.0 between the routers!

151 © 2012 Jeffrey Fry – Fryguy.net Juniper Workbook
Route Filtering
192.168.13.x/24
192.168.23.x/24
192.168.1
2.x/24
19
2.1
68
.14
.x/2
4
ge-0/0/0
R4
J1
J2J3
ge-0/0/0
ge-0/0/1fe-0/0/1
fe-0/0/2
fe-0/0/2
fe-0/0/7
E0
.3 .2
.1
.4
.1
.1
.2.3
Route Filtering Lab TopologyRoute Filtering Lab Topology
ASN 4
© 2012
Fryguy.Net
2.2.2.2/323.3.3.3/32
1.1.1.1/32
4.4.4.4/32
ASN123
44.44.44.44/32
Ok, lets discuss Route Filtering in this lab, and to keep is simple, we will use eBGP for the routing
protocol. For this lab we will need to create another loopback on R4 for 44.44.44.44/32.
The goal of this lab is in 3 parts.
Part 1: Full reachability
Part 2: Filter 44.44.44.44/32 in on J1
Part 3: Filter 1.1.1.1/32, 2.2.2.2/32, and 3.3.3.3/32 to R4
The first step is yours as we need to reset all configs to the rollback/base configurations.
Ok, lets get started! On R4 we will need to create Loopback1 and configure BGP to peer with J1: R4# config t R4(config)#int lo1 R4(config-if)#ip add 44.44.44.44 255.255.255.255

152 © 2012 Jeffrey Fry – Fryguy.net Juniper Workbook
R4(config-if)# router bgp 4 R4(config-router)#no auto-summary R4(config-router)#nei 192.168.14.1 remote-as 123 R4(config-router)#net 4.4.4.4 mask 255.255.255.255 R4(config-router)#net 44.44.44.44 mask 255.255.255.255 R4(config-router)#^Z R4# Ok, we will start with J2, then J3, and finally J1 for the configuration. J2: jfry@J2> edit Entering configuration mode [edit] jfry@J2# set policy-options policy-statement Connected term 1 from protocol direct [edit] jfry@J2# set policy-options policy-statement Connected term 1 then accept [edit] jfry@J2# set routing-options autonomous-system 123 [edit] jfry@J2# edit protocols bgp group ibgp [edit protocols bgp group ibgp] jfry@J2# set type internal [edit protocols bgp group ibgp] jfry@J2# set neighbor 192.168.23.3 [edit protocols bgp group ibgp] jfry@J2# set neighbor 192.168.12.1 [edit protocols bgp group ibgp] jfry@J2# up [edit protocols bgp] jfry@J2# set export Connected [edit protocols bgp] jfry@J2# commit and-quit commit complete Exiting configuration mode

153 © 2012 Jeffrey Fry – Fryguy.net Juniper Workbook
jfry@J2> Ok, onto J3: jfry@J3> edit Entering configuration mode [edit] jfry@J3# set policy-options policy-statement Connected term 1 from protocol direct [edit] jfry@J3# set policy-options policy-statement Connected term 1 then accept [edit] jfry@J3# set routing-options autonomous-system 123 [edit] jfry@J3# edit protocols bgp group ibgp [edit protocols bgp group ibgp] jfry@J3# set type internal [edit protocols bgp group ibgp] jfry@J3# set neighbor 192.168.23.2 [edit protocols bgp group ibgp] jfry@J3# set neighbor 192.168.13.1 [edit protocols bgp group ibgp] jfry@J3# up [edit protocols bgp] jfry@J3# set export Connected [edit protocols bgp] jfry@J3# commit and-quit

154 © 2012 Jeffrey Fry – Fryguy.net Juniper Workbook
Now for J1: jfry@J1> edit Entering configuration mode [edit] jfry@J1# set policy-options policy-statement Connected term 1 from protocol direct [edit] jfry@J1# set policy-options policy-statement Connected term 1 then accept [edit] jfry@J1# set routing-options autonomous-system 123 [edit] jfry@J1# edit protocols bgp group ibgp [edit protocols bgp group ibgp] jfry@J1# set type internal [edit protocols bgp group ibgp] jfry@J1# set neighbor 192.168.12.2 [edit protocols bgp group ibgp] jfry@J1# set neighbor 192.168.13.3 [edit protocols bgp group ibgp] jfry@J1# up [edit protocols bgp] jfry@J1# set export Connected [edit protocols bgp] jfry@J1# edit group ebgp [edit protocols bgp group ebgp] jfry@J1# set type external [edit protocols bgp group ebgp] jfry@J1# set neighbor 192.168.14.4 peer-as 4 [edit protocols bgp group ebgp] jfry@J1# up [edit protocols bgp] jfry@J1# commit and-quit

155 © 2012 Jeffrey Fry – Fryguy.net Juniper Workbook
Ok, now that is complete we should have a full routing table on R4 and J3: R4: R4#sh ip route Codes: C - connected, S - static, R - RIP, M - mobile, B - BGP D - EIGRP, EX - EIGRP external, O - OSPF, IA - OSPF inter area N1 - OSPF NSSA external type 1, N2 - OSPF NSSA external type 2 E1 - OSPF external type 1, E2 - OSPF external type 2 i - IS-IS, su - IS-IS summary, L1 - IS-IS level-1, L2 - IS-IS level-2 ia - IS-IS inter area, * - candidate default, U - per-user static route o - ODR, P - periodic downloaded static route Gateway of last resort is not set B 192.168.12.0/24 [20/0] via 192.168.14.1, 00:02:12 1.0.0.0/32 is subnetted, 1 subnets B 1.1.1.1 [20/0] via 192.168.14.1, 00:02:12 B 192.168.13.0/24 [20/0] via 192.168.14.1, 00:02:12 2.0.0.0/32 is subnetted, 1 subnets B 2.2.2.2 [20/0] via 192.168.14.1, 00:02:12 C 192.168.14.0/24 is directly connected, Ethernet0 3.0.0.0/32 is subnetted, 1 subnets B 3.3.3.3 [20/0] via 192.168.14.1, 00:02:12 4.0.0.0/32 is subnetted, 1 subnets C 4.4.4.4 is directly connected, Loopback0 B 192.168.23.0/24 [20/0] via 192.168.14.1, 00:02:12 44.0.0.0/32 is subnetted, 1 subnets C 44.44.44.44 is directly connected, Loopback1 R4# J3: jfry@J3> show route inet.0: 11 destinations, 14 routes (11 active, 0 holddown, 0 hidden) + = Active Route, - = Last Active, * = Both 1.1.1.1/32 *[BGP/170] 00:02:46, localpref 100 AS path: I > to 192.168.13.1 via fe-0/0/2.0 2.2.2.2/32 *[BGP/170] 00:05:45, localpref 100 AS path: I > to 192.168.23.2 via fe-0/0/1.0 3.3.3.3/32 *[Direct/0] 00:24:18 > via lo0.0 4.4.4.4/32 *[BGP/170] 00:02:42, MED 0, localpref 100 AS path: 4 I > to 192.168.13.1 via fe-0/0/2.0 44.44.44.44/32 *[BGP/170] 00:02:42, MED 0, localpref 100

156 © 2012 Jeffrey Fry – Fryguy.net Juniper Workbook
AS path: 4 I > to 192.168.13.1 via fe-0/0/2.0 192.168.12.0/24 *[BGP/170] 00:02:46, localpref 100 AS path: I > to 192.168.13.1 via fe-0/0/2.0 [BGP/170] 00:05:45, localpref 100 AS path: I > to 192.168.23.2 via fe-0/0/1.0 192.168.13.0/24 *[Direct/0] 00:24:18 > via fe-0/0/2.0 [BGP/170] 00:02:46, localpref 100 AS path: I > to 192.168.13.1 via fe-0/0/2.0 192.168.13.3/32 *[Local/0] 00:24:18 Local via fe-0/0/2.0 192.168.14.0/24 *[BGP/170] 00:02:46, localpref 100 AS path: I > to 192.168.13.1 via fe-0/0/2.0 192.168.23.0/24 *[Direct/0] 00:06:20 > via fe-0/0/1.0 [BGP/170] 00:05:45, localpref 100 AS path: I > to 192.168.23.2 via fe-0/0/1.0 192.168.23.3/32 *[Local/0] 00:06:20 Local via fe-0/0/1.0 jfry@J3> Good, now to test a PING from J3 to R4 Loopback1: jfry@J3> ping 44.44.44.44 source 3.3.3.3 rapid PING 44.44.44.44 (44.44.44.44): 56 data bytes !!!!! --- 44.44.44.44 ping statistics --- 5 packets transmitted, 5 packets received, 0% packet loss round-trip min/avg/max/stddev = 3.201/3.352/3.735/0.194 ms jfry@J3> Good.

157 © 2012 Jeffrey Fry – Fryguy.net Juniper Workbook
Now time to do some filtering. First up, we will filter R4 Loop1 (44.44.44.44/32) inbound on J1: jfry@J1> edit Entering configuration mode First we will create a prefix-list matching 44.44.44.44/32: [edit] jfry@J1# set policy-options prefix-list R4ASN 44.44.44.44/32 Now we will create our policy statement to Reject the 44.44.44.44/32: [edit] jfry@J1# set policy-options policy-statement FromR4 term 1 from prefix-list R4ASN [edit] jfry@J1# set policy-options policy-statement FromR4 term 1 then reject Then we will set our next statement to permit everything else: [edit] jfry@J1# set policy-options policy-statement FromR4 term 2 then accept And finally we will edit our group/neighbor [edit] jfry@J1# edit protocols bgp group ebgp [edit protocols bgp group ebgp] jfry@J1# edit neighbor 192.168.14.4 And set our import rule: [edit protocols bgp group ebgp neighbor 192.168.14.4] jfry@J1# set import FromR4 [edit protocols bgp group ebgp neighbor 192.168.14.4] jfry@J1# commit and-quit Ok, now back to J3 to see what the routing table looks like: jfry@J3> show route inet.0: 10 destinations, 13 routes (10 active, 0 holddown, 0 hidden) + = Active Route, - = Last Active, * = Both 1.1.1.1/32 *[BGP/170] 00:07:12, localpref 100 AS path: I > to 192.168.13.1 via fe-0/0/2.0 2.2.2.2/32 *[BGP/170] 00:10:11, localpref 100 AS path: I > to 192.168.23.2 via fe-0/0/1.0 3.3.3.3/32 *[Direct/0] 00:28:44

158 © 2012 Jeffrey Fry – Fryguy.net Juniper Workbook
> via lo0.0 4.4.4.4/32 *[BGP/170] 00:07:08, MED 0, localpref 100 AS path: 4 I > to 192.168.13.1 via fe-0/0/2.0 192.168.12.0/24 *[BGP/170] 00:07:12, localpref 100 AS path: I > to 192.168.13.1 via fe-0/0/2.0 [BGP/170] 00:10:11, localpref 100 AS path: I > to 192.168.23.2 via fe-0/0/1.0 192.168.13.0/24 *[Direct/0] 00:28:44 > via fe-0/0/2.0 [BGP/170] 00:07:12, localpref 100 AS path: I > to 192.168.13.1 via fe-0/0/2.0 192.168.13.3/32 *[Local/0] 00:28:44 Local via fe-0/0/2.0 192.168.14.0/24 *[BGP/170] 00:07:12, localpref 100 AS path: I > to 192.168.13.1 via fe-0/0/2.0 192.168.23.0/24 *[Direct/0] 00:10:46 > via fe-0/0/1.0 [BGP/170] 00:10:11, localpref 100 AS path: I > to 192.168.23.2 via fe-0/0/1.0 192.168.23.3/32 *[Local/0] 00:10:46 Local via fe-0/0/1.0 jfry@J3> There you go, the 44.44.44.44/32 route is now filter from being accepted. Now time to filter routes to R4: jfry@J1> edit Entering configuration mode First up, create our prefix-lists to match J1, J2, and J3 loopbacks: [edit] jfry@J1# set policy-options prefix-list JLoopbacks 1.1.1.1/32 [edit] jfry@J1# set policy-options prefix-list JLoopbacks 2.2.2.2/32 [edit] jfry@J1# set policy-options prefix-list JLoopbacks 3.3.3.3/32

159 © 2012 Jeffrey Fry – Fryguy.net Juniper Workbook
Now to create out policy statement to reject JLoopbacks and then permit everything else. [edit] jfry@J1# set policy-options policy-statement ToR4 term 1 from prefix-list JLoopbacks [edit] jfry@J1# set policy-options policy-statement ToR4 term 1 then reject [edit] jfry@J1# set policy-options policy-statement ToR4 term 2 then accept Then, in one command, we will apply the export map: [edit] jfry@J1# set protocols bgp group ebgp neighbor 192.168.14.4 export ToR4 [edit] jfry@J1# commit and-quit Now back to look at R4 Routing table: R4#sh ip route Codes: C - connected, S - static, R - RIP, M - mobile, B - BGP D - EIGRP, EX - EIGRP external, O - OSPF, IA - OSPF inter area N1 - OSPF NSSA external type 1, N2 - OSPF NSSA external type 2 E1 - OSPF external type 1, E2 - OSPF external type 2 i - IS-IS, su - IS-IS summary, L1 - IS-IS level-1, L2 - IS-IS level-2 ia - IS-IS inter area, * - candidate default, U - per-user static route o - ODR, P - periodic downloaded static route Gateway of last resort is not set B 192.168.12.0/24 [20/0] via 192.168.14.1, 00:07:04 B 192.168.13.0/24 [20/0] via 192.168.14.1, 00:07:04 C 192.168.14.0/24 is directly connected, Ethernet0 4.0.0.0/32 is subnetted, 1 subnets C 4.4.4.4 is directly connected, Loopback0 B 192.168.23.0/24 [20/0] via 192.168.14.1, 00:07:04 44.0.0.0/32 is subnetted, 1 subnets C 44.44.44.44 is directly connected, Loopback1 R4# There you go, routes filter to R4!

160 © 2012 Jeffrey Fry – Fryguy.net Juniper Workbook
Notes
Route Filtering Ok, as you have seen there are different import and export policies for different protocols. Below is a chart that shows the Protocol – Default Import – Default Export policy for each:
Protocol Default Import Default Export
BGP Accept all learned routes from configured neighbor
Export active BGP routes
IS-IS Accept all IS-IS Routes Reject Everything (uses flooding)
OSPF Accept all OSPF routes Reject Everything (uses flooding)
RIP Accept all RIP routes from configured neighbors
Reject Everything. Must configure policy
EIGRP Not supported Not supported
Routing Protocol Administrative Distance Differences and Route Preferences Junos has different Route Preference (Admin Distance) then Cisco IOS. A table that shows these differences is as follows:
Protocol Cisco Admin Distance Juniper Route Preference
Connected 0 0
Static 1 5
EIGRP 90 (Internal) 170 (External)
Not Applicable
OSPF 110 10 – Internal 150 – External
IS-IS 115 15 – Level 1 Internal 18 – Level 2 Internal 160 – Level 1 External 165 – Level 2 External
RIP 120 100
iBGP 200 170
eBGP 20 170
161 © 2012 Jeffrey Fry – Fryguy.net Juniper Workbook
Juniper Routing Tables Like Cisco IOS, Junos has different routing tables. Below is a list of what each one is and does:
Routing Table Name Description
inet.0 IPv4 Unicast Routes
inet.1 Multicast Forwarding Cache
inet.2 Multicast BGP for RPF
inet.3 MPLS Path Information
inet.4 MSDP Routes
inet.6 IPV6 Unicast Routes
mpls.0 MPLS Next hops

162 © 2012 Jeffrey Fry – Fryguy.net Juniper Workbook
This page intentionally left blank


