
JUNGLE - Andover Fabrics · JUNGLE Quilt size: 42" square Designed by Hilary Gooding, using the...
5
JUNGLE Quilt size: 42" square Designed by Hilary Gooding, using the Jungle range from Makower UK 118 Grey’s Road, Henley on Thames, Oxon RG9 1QW www.makoweruk.com Email: [email protected]
Transcript of JUNGLE - Andover Fabrics · JUNGLE Quilt size: 42" square Designed by Hilary Gooding, using the...

JUNGLEQuilt size: 42" square
Designed by Hilary Gooding, using the Jungle range from Makower UK
118 Grey’s Road, Henley on Thames, Oxon RG9 1QW www.makoweruk.com Email: [email protected]

JUNGLEQuilt size: 42" square
Designed by Hilary Gooding, using the Baby Jungle range of fabrics by Makower
Fabrics Amount First Cut 2nd Cut Position1201/1 Scenic
27 1/2 in x 1 1/4 yd
Cut two 12½" wide strips across width of fabric
Cut five 12½" squares Background squares
1206/B Birds on Clouds
27 1/2 in x 1 1/4 yd
Cut two 12½" wide strips across width of fabric
Cut four 12½" squares Background squares
1205/X Noises
1 1/9 yd Cut five 2" wide strips for binding
For elephants see instructions below. Cut four 2¾" squares from remnants.
Elephants, corner posts and Binding
1206/Q Birds on Clouds
Fat Eighth Cut 4 ears from template.For appliqué instructions see below
Ears
1207/B Scatter
Fat Eighth Cut 5 ears from template.For appliqué instructions see below
Ears
1207/R Scatter
7 7/8 in x 1 1/4 yd
Cut four 1" wide strips Cut two strips 36½" long and two strips 38½" long
Inner Border
1203 Elephants
19 3/4 in x 1 1/4 yd
Fussy cut four strips of elephants each 2¾" wide
Cut each strip 38½" long
Outer Border
1202 Animals
1 1/3 yd Backing
Optional extras: Fusible web (Bondaweb) 1 4/9 yd Tear-away stabilizer if satin stitching appliqué.
INSTRUCTIONSAll seam allowances are ¼" unless specified.
AppliquéThe elephants may be appliquéd using your favourite technique: fused, turned-under, by hand or machine. The templates given do not include a seam allowance so please remember to add one if you are using the turned-under method.
Fused Method:
1. Print out the template for the elephant and the ear and either trace onto template plastic or paste onto card and cut out.
2. Trace out the 9 elephants onto the paper side of the fusible leaving a small amount of space between each shape. If you would like elephants walking in different directions turn the template over. NB Remember that these images will be reversed when you iron them in place! This will apply to the ears as well.
Page 2 of 5 Free pattern download at www.makoweruk.com 25/09/2013
FABRIC REQUIREMENTS

3. Do not cut out the shapes before ironing the fusible web to the wrong side of the elephant fabric. Follow the manufacturer’s instructions for ironing.
4. Now cut out the shapes. 5. Remove the paper backing, place in position and iron the shapes to the background blocks. 6. Satin stitch the edges using a close zigzag stitch (recommended stitch width 2.5/3 and stitch length 0.3).
It is strongly recommended that you place at least one layer of stabilizer behind your shape if you are satin stitching the outline of the elephants and ears to prevent disortion and help the stitch tension.
7. Remove the stabilizer once the stitching is complete.
Turned-under Method: 1. Print out the template for the elephant and the ear and either trace onto template plastic or paste onto
card and cut out.2. Trace the outline of the elephants and the ears onto the wrong side of your fabric. Leave space between
the shapes to add the seam allowances.3. Then cut them out including your seam allowance. 4. Turn under the seam allowance, place the shapes in position on the background blocks and stitch by hand
or machine.
Eyes and Tails: At this point you may want to add the eyes and tails by hand or machine embroidery.
Assembly1. Lay out the blocks in order and sew the rows together. Press the seams.2. Next sew the rows together matching the seams between the blocks. Press seams.3. Sew a 36½" red Inner Border strip to the left and right sides of the top. Press the seams under the red
border.4. Sew a 38½" red Inner Border to the top and bottom of the top. Press the seams under the red border.5. Sew a 2¾" Corner Post to each end of two of the 2¾" wide Outer Border strips. Press the seam under the
posts.6. NB Remember that the elephant Outer Borders are directional - check which way you want the elephants
to face.7. Sew the two 38½" Outer border strips to the left and right sides of the top. Press the seams under the red
border.8. Now sew the two remaining Outer Border strips with the Corner Posts to the top and bottom of the quilt
top. Press the seams under the red border.
9. Lay out the backing fabric wrong side facing up on a large flat surface.10. Lay the wadding over the baking and smooth out any wrinkles.11. Place the quilt top over the wadding. Make sure the backing and top are lined up and the backing fabric
extends beyond the edges of the top.12. Use you favourite method of securing the layers together: basting, pinning or spray basting.13. Quilt by hand or machine.
14. Trim the excess wadding and backing back to the edge of the quilt top.15. Join the five binding strips together using mitred seams. Press the long strip in half along the length of
the binding to create a double binding.16. Sew on the binding using a ¼" seam.17. Turn to the back and hand stitch in place.
Remember to label your quilt with the important details of your name, the date and the occasion.
Congratulations on your quilt!
Page 3 of 5 Free pattern download at www.makoweruk.com 25/09/2013
JUNGLE
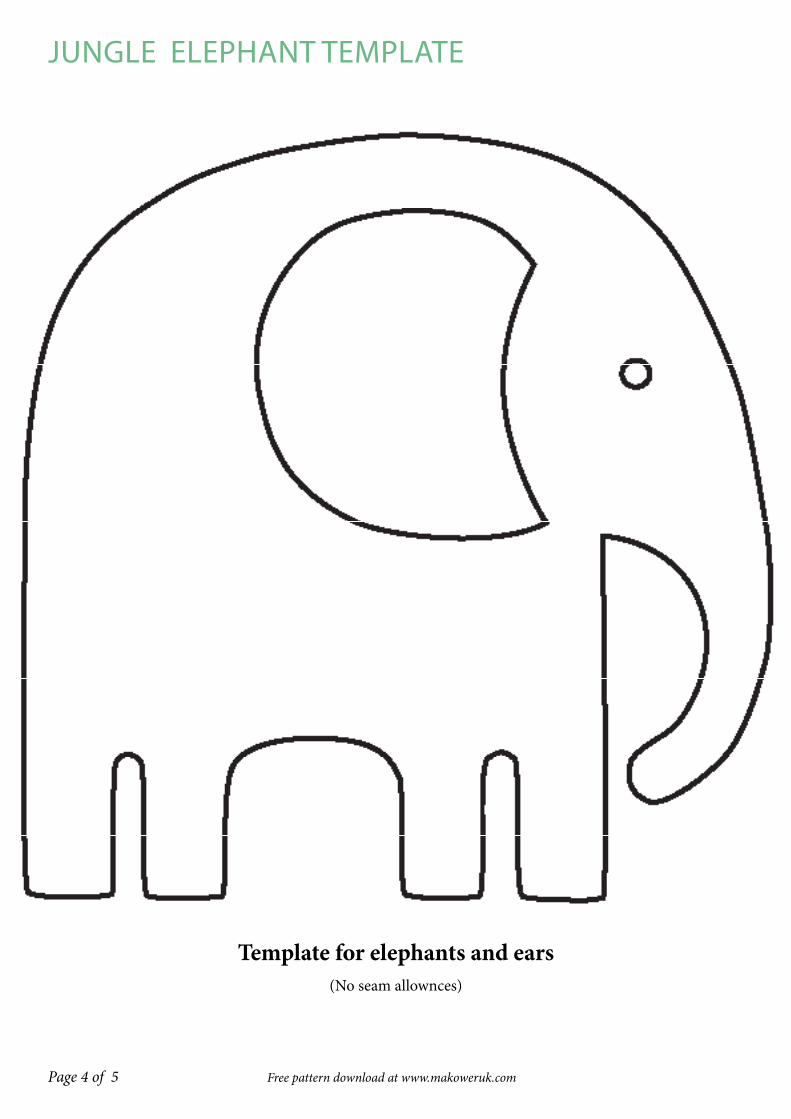
Template for elephants and ears(No seam allownces)
Page 4 of 5 Free pattern download at www.makoweruk.com
JUNGLE ELEPHANT TEMPLATE

1203/1 ELEPHANTS
1202/1 ANIMALS
1207/R SCATTER
1205/Q NOISES
1206/B BIRDS ON A CLOUD 1204/R BIRDS
1201/1 SCENIC
JUNGLE by HILARY GOODINGFINISHED SIZE APPROX 42” x 42” (107 x 107cms)FULL INSTRUCTIONS AVAILABLE TO DOWNLOAD
www.makoweruk.com
1205/X NOISES
1204/B BIRDS
1207/B SCATTER
1206/Q BIRDS ON A CLOUD
JUNGLEfrom makoweruk +44(0)1491 579727 www.makoweruk.com
All images 50% of actual size.