JSF Quickstart -- MyEclipse Enterprise Workbench -...
19
JSF Quickstart Last Revision: September 26, 2005 Outline 1. Preface 2. Introduction 3. Requirements 4. New Project Setup & Structure 5. Creating the Message Bundle 6. Creating the Managed Bean 7. Creating the JSP Pages 8. Running the Application 9. Summary 10. User Feedback 1. Preface This document was written using Sun JDK 1.5.0, Eclipse 3.1 and MyEclipse 4.0. If you notice discrepancies between this document and the version of Eclipse/MyEclipse you are using to perform the install that make it difficult or impossible to follow this guide, please see the User Feedback section on how to report the issue. Back to Top 2. Introduction In this tutorial we will be walking through a small JSF demo application using MyEclipse Enterprise Workbench. Previous knowledge of JSF and/or MyEclipse is not necessary, but would be helpful. Since Struts is such a prevalent web application framework, similarities between JSF and Struts will be noted, where appropriate, to help the reader with previous Struts experience. However, if you have no prior experience with Struts, you may feel free to skip these sections . Back to Top 3. Requirements Below is a list of software used by this guide: • JDK 1.4+ (Sun or IBM) • http://java.sun.com/j2se/downloads/index.html • Eclipse 3.1 SDK • http://www.eclipse.org/downloads/index.php • MyEclipse 4.0 • http://www.myeclipseide.com/ContentExpress-display-ceid-10.html • Tomcat 5.x (5.5.9 Preferred, or other compliant Servlet/EJB container) • http://jakarta.apache.org/tomcat/index.html • For this demo the User Name is "myeclipse" and the Password is "myeclipse" as well. Note: After installing the JDK and restarting your computer, be sure to install Eclipse then MyEclipse next followed by Tomcat. After all the software have been installed, be sure to setup the Tomcat 5 connector in MyEclipse accordingly; using the correct Tomcat Home directory and valid JDK that you just installed. You may refer to the Using Application Servers Quickstart guide if you don't know how to setup Tomcat in MyEclipse. Back to Top 4. New Project Setup & Structure To organize our development artifacts, we will need to create a new Web Module Project in MyEclipse that has JSF Capabilities added to it. You can create a web project using the wizard located at File > New > Other > Project > J2EE > Web Project, as shown in Figure 4.1, below.
Transcript of JSF Quickstart -- MyEclipse Enterprise Workbench -...

JSF Quickstart
Last Revision: September 26, 2005
Outline1. Preface 2. Introduction 3. Requirements 4. New Project Setup & Structure 5. Creating the Message Bundle 6. Creating the Managed Bean 7. Creating the JSP Pages 8. Running the Application 9. Summary 10.User Feedback
1. PrefaceThis document was written using Sun JDK 1.5.0, Eclipse 3.1 and MyEclipse 4.0. If you notice discrepancies between this document and the version of Eclipse/MyEclipse you are using to perform the install that make it difficult or impossible to follow this guide, please see the User Feedback section on how to report the issue.
Back to Top
2. IntroductionIn this tutorial we will be walking through a small JSF demo application using MyEclipse Enterprise Workbench. Previous knowledge of JSF and/or MyEclipse is not necessary, but would be helpful.
Since Struts is such a prevalent web application framework, similarities between JSF and Struts will be noted, where appropriate, to help the reader with previous Struts experience. However, if you have no prior experience with Struts, you may feel free to skip these sections .
Back to Top
3. RequirementsBelow is a list of software used by this guide:
• JDK 1.4+ (Sun or IBM)• http://java.sun.com/j2se/downloads/index.html
• Eclipse 3.1 SDK• http://www.eclipse.org/downloads/index.php
• MyEclipse 4.0• http://www.myeclipseide.com/ContentExpress-display-ceid-10.html
• Tomcat 5.x (5.5.9 Preferred, or other compliant Servlet/EJB container) • http://jakarta.apache.org/tomcat/index.html
• For this demo the User Name is "myeclipse" and the Password is "myeclipse" as well.
Note: After installing the JDK and restarting your computer, be sure to install Eclipse then MyEclipse next followed by Tomcat. After all the software have been installed, be sure to setup the Tomcat 5 connector in MyEclipse accordingly; using the correct Tomcat Home directory and valid JDK that you just installed. You may refer to the Using Application Servers Quickstart guide if you don't know how to setup Tomcat in MyEclipse.
Back to Top
4. New Project Setup & Structure To organize our development artifacts, we will need to create a new Web Module Project in MyEclipse that has JSF Capabilities added to it. You can create a web project using the wizard located at File > New > Other > Project > J2EE > Web Project, as shown in Figure 4.1, below.

Figure 4.1: Create a new web project
Figure 4.2: Web Project Wizard Dialog
The wizard will allow you to customize your project settings by entering your preferences into the dialog fields, as demonstrated in Figure 4.2.
Note: It is popular when developing JSF applications to also use the JSTL libraries, so selecting add "JSTL Libraries" during project creation is recommended. However, it is also possible to add the JSTL libraries later, via the "Add JSTL Libraries" item from the MyEclipse context menu.
Once the Web Project is created, we need to add JSF Capabilities to it. This is done by right clicking on the root of our project in the Package Explorer View, and selecting MyEclipse > Add JSF Capabilities, as shown in Figure 4.3.

Figure 4.3: Adding JSF Capabilities to a Web Project
The default values for the JSF dialog are fine for the purposes of this tutorial. Advanced users may perform additional configuration by changing the default settings in the dialog, as shown in Figure 4.4.
Figure 4.4: Configuring JSF Capabilities
After the wizard completes, the project structure will look like what is shown in Figure 4.5.

Figure 4.5: Project Layout After Configuration
Now that the project has been created, we can start editing and creating our application.
Back to Top
5. Creating the Message BundleLet's start off our new application with the creation of the MessageBundle file. This is a simple property file that stores all our messages along with their associated keys. Then the bundle can be used in any of our JSP pages to allow our application to be easily internationalized. As an analogy, Struts provided similar support in this area by using the ApplicationResources.properties file, the various <bean /> tags, and the message bundle attributes that the bean tags accepted.
In JSF, we can load a message bundle into a page with the line:<f:loadBundle basename="com.jsfdemo.MessageBundle" var= "bundle"/>
Note: This line of code creates a page-scoped message bundle that we can reference later in the page via the 'bundle' variable name, use to lookup messages keys, and return the associated message value.
Before creating the message bundle file, create a com.jsfdemo package in the source folder by right-clicking it and selecting New > Package. To create the message bundle file, we'll use the New File Wizard that is accessed from the context menu of the project by right-clicking on the project's 'source' folder and selecting New > File, as shown in Figure 5.1 below.
Figure 5.1: Creating the Message Bundle file
When specifying the file location, select Browse..., choose the directory /JSFLoginDemo/src/com/jsfdemo, name the file MessageBundle.properties, and select Finish.
After successfully creating the new message bundle file, we need to fill the file with key/value pairs for each label or text string that we want to display in the JSP page. Paste the contents from Figure 5.2 into your message bundle file and save it:
MessageBundle.properties
user_name_label=User Name:user_password_label=Password:login_button_label=Login
Figure 5.2: Contents of MessageBundle.properties
Now that we have the MessageBundle complete, in the next section we will create the ManagedBean now that will handle our user logging in.
Back to Top

6. Creating the Managed BeansIn this section we'll see how to create the ManagedBean that will perform the login operation when prompted by the login JSP page as well as store the user name and password entered by the user. For the purpose of this demo, the login operation simply checks if the username and password are both "myeclipse" and then redirects the user to the userLoginSuccess.jsp page. Otherwise it sends them back to the login page.
First open up the faces-config.xml file with the MyEclipse JSF Editor:
Figure 6.1: Opening faces-config.xml file for editing
With MyEclipse 4.0 the faces-config.xml editor has been enhanced from previous releases, not only can you create and manage your application flow (Navigation Cases) you can also create/edit and manage all the resources that go into the config file from the Outline View. You will click the down arrow in the top right corner of the Outline View in order to add the new bean as shown in Figure 6.2:
Figure 6.2: Launch the ManagedBean wizard from the Outline View
You will then be presented with the new Managed Bean wizard; Fill out the values as shown in Figures 6.3 and 6.4 below:

Figure 6.3: Setup the new ManagedBean's class and properties
Figure 6.4: Managed Bean Wizard Final Page
You will now notice that the new UserBean was added to the Outline View as shown in Figure 6.5:
Figure 6.5: UserBean now shown in the Outline View
And the new UserBean.java source file will also be opened in the java editor:

Figure 6.6: UserBean Java source opened up in an editor
Notice that the getters and setters for our two properties (username and password) were already generated for us, so the only thing we need to add to this class is the implementation of the loginUser method that will be called to process the user login.
The code snippet for the loginUser method is in Figure 6.7 below. Please copy and paste it into your file, adding any new imports as necessary:
UserBean.java
public String loginUser() { if("myeclipse".equals(getUserName()) && "myeclipse".equals(getPassword())) return "success"; FacesContext facesContext = FacesContext.getCurrentInstance(); FacesMessage facesMessage = new FacesMessage( "You have entered an invalid user name and/or password"); facesContext.addMessage("loginForm", facesMessage); return "failure"; }
Figure 6.7: loginUser code for the new UserBean.java file
Looking at the bean code, we can notice some unique properties about it. For example, the UserBean class doesn't extend or implement any classes or interfaces tied to JSF. It is simply a javabean that includes the additional logic to perform a useful operation. In Struts terms, it contains all the functionality of a Struts Form and a Struts Action, conveniently located in one class.
Another thing to note is that unlike Struts, these methods do not return special classes, like an ActionForward, because navigation is specified externally in a declarative fashion in the faces-config.xml deployment descriptor. And, in Section 8 we will show how this descriptor is created and configured.
Back to Top
7. Creating the JSP PagesIn this section we are going to focus on creating the JSP pages for our example JSF application, which will mimic a simple website login screen. As a result, we will only need 2 JSP pages, one to prompt the user to login and the other to indicate that login was successful. We will call these pages loginUser.jsp and loginUserSuccess.jsp, respectively. For simplicity, if there is an authorization error during the login attempt, we will redirect the user back to the loginUser.jsp page. To avoid confusion, we are not using any validation in this demo, but you can easily add validators to the two inputText/Secret JSF components. We will use these fields to validate the user's entry for length and additionally display an error message if the login was incorrect.
Another new feature in MyEclipse 4.0 is the ability to create the web pages for our JSF application by editing the faces-config.xml file in the MyEclipse JSF Editor. So make sure that file is still open and we can get started creating our userLogin.jsp page.
To create our userLogin.jsp page we are going to first click the JSP button, then click on our canvas. When the new JSP wizard comes up, type in the File Name and select the JSF template as shown in Figure 7.1:

Figure 7.1: Creating userLogin.jsp using the faces-config.xml editor
We can also create our userLoginSuccess.jsp now in the same manner:
Figure 7.2: Creating userLoginSuccess.jsp using the faces-config.xml editor
Let's start working on our application now by opening up the userLogin.jsp page:

Figure 7.3: Begin editing the userLogin.jsp page
Something to notice from Figure 7.3 are the tabs that run along the bottom of the MyEclipse editor (MyEclipse JSP Designer), you have your choice to edit this page in Source mode, Design mode, Design/Source mode or just Preview. For this demo we will switch to the Design/Source as it is very handy to have both views available while editing a page. What you will see right away looks very similar to Figure 7.4 below:

Figure 7.4: Switched to Design/Source mode and expanded JSF palettes
Now, what we need to do now on this page is:
• Add an h:inputText component for the user name • Add an h:inputSecret component for the password • Add an h:outputLabel for the user name inputText • Add an h:outputLabel for the password
NOTE: In version 4.0 the JSF designer does not support rendering the MessageBundle values for outputLabel, so in order to see our outputLabels in the designer, we are going to manually change them in the code to wrap outputText components that have their values bound to our MessageBundle. This will be fixed in MyEclipse 4.1 release.
First thing we need to do is remove the default template text as well as type in our bundle basename so our page can use our MessageBundle. We will end up with JSP that looks like Figure 7.5:
Figure 7.5: Remove template text and add our MessageBundle to the JSP page
Now let's create our h:inputText component for the user name, this is shown in Figures 7.6 and 7.7:
Figure 7.6: Adding new inputText component

Figure 7.7: Adding new inputText component continued
Now let's add our h:inputSecret component (no labels yet):
Figure 7.8 Adding new inputSecret component
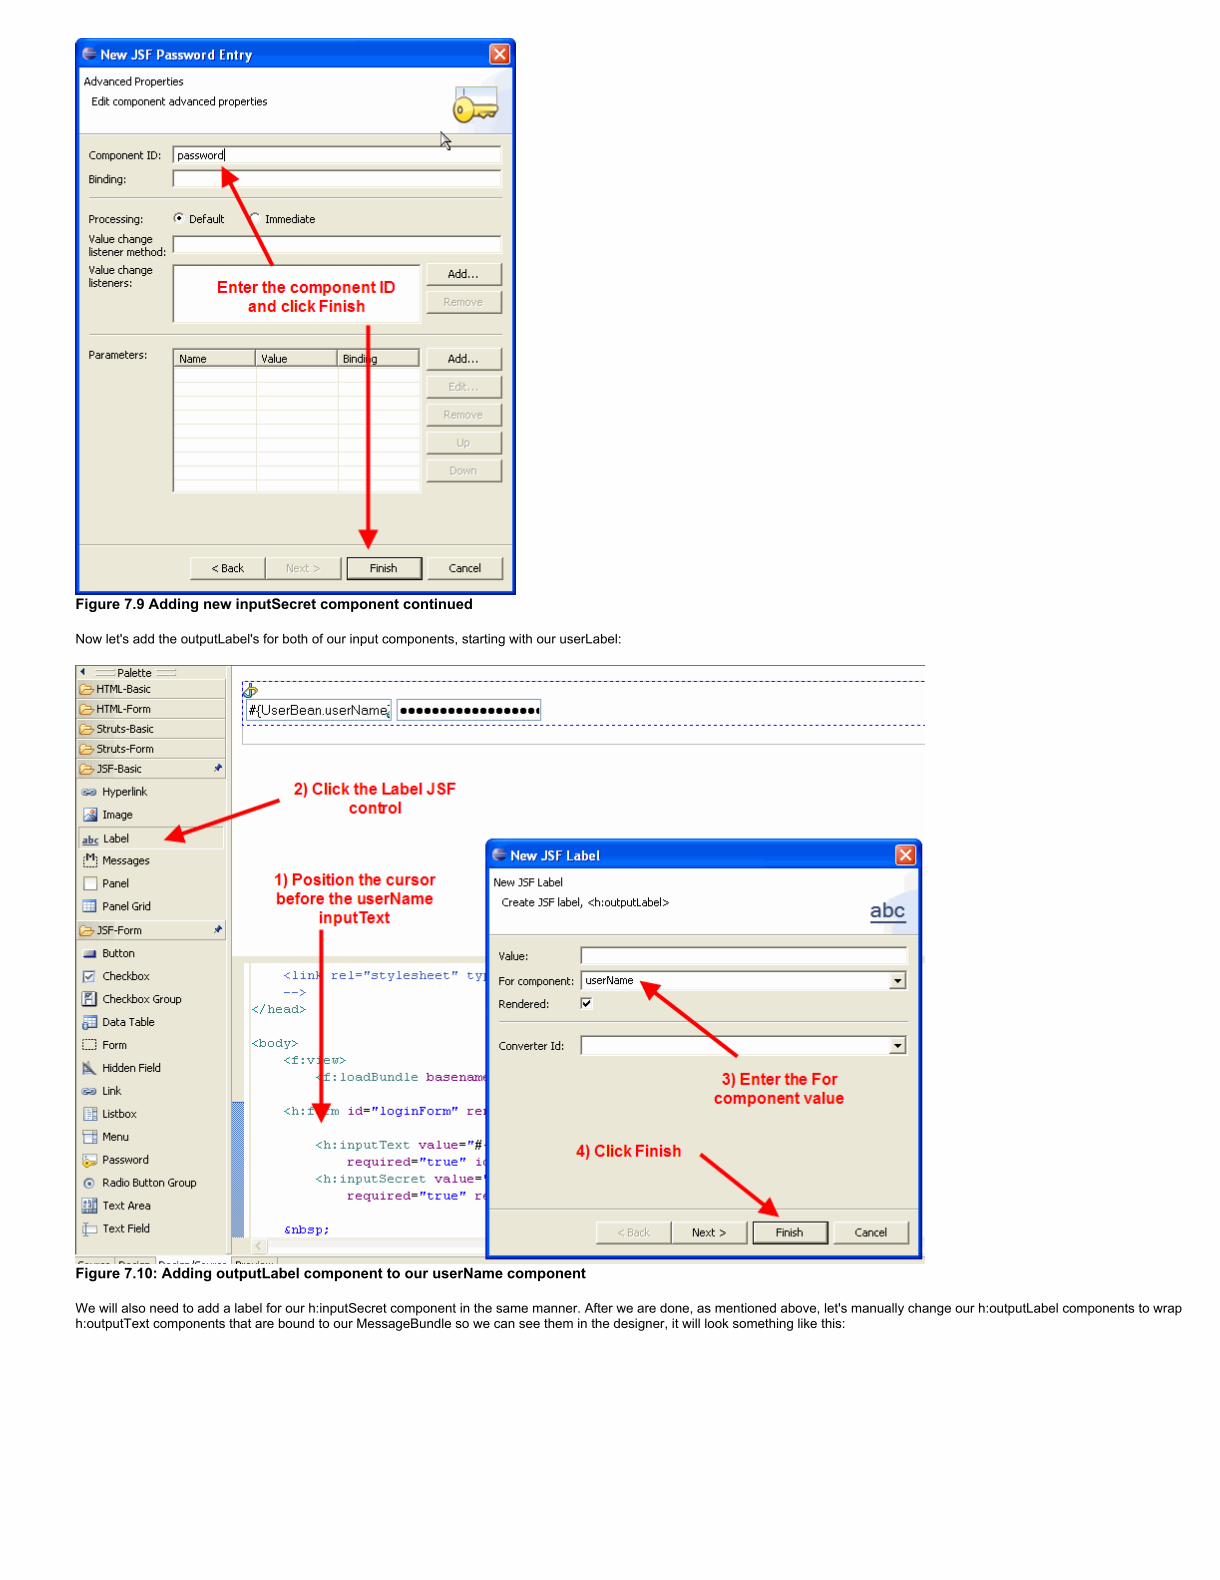
Figure 7.9 Adding new inputSecret component continued
Now let's add the outputLabel's for both of our input components, starting with our userLabel:
Figure 7.10: Adding outputLabel component to our userName component
We will also need to add a label for our h:inputSecret component in the same manner. After we are done, as mentioned above, let's manually change our h:outputLabel components to wrap h:outputText components that are bound to our MessageBundle so we can see them in the designer, it will look something like this:

Figure 7.11: Adding outputText components to our labels
Be sure to make the modification to both the userName label and password label.
Now it is time to add our login button, we will do that almost identically to how we have added the other components so far, as shown in Figures 7.12 and 7.13:
Figure 7.12: Adding a new commandButton component

Figure 7.13: Adding a new commandButton component continued
Now we have a page that looks something like this:
Figure 7.14: Our almost-complete userLogin.jsp page
You might notice that everything looks pretty ugly on 1 line, so let's add some space to put things on separate lines:
Figure 7.15: Nicely laid out userLogin.jsp page
Now that our userLogin.jsp page is done, let's quickly do our userLoginSuccess.jsp page which is much simpler. Open that file up and edit it, simply adding a line to print out the name of the user that logged in as shown in Figure 7.16:

Figure 7.16: Making userLoginSuccess.jsp page print out the user's name
Now that we have created our two pages, the only thing left for us to do is hook them together with proper Navigation Cases, that is done by visual editing our faces-config.xml file, so open that file. After the file is open for editing, perform the following steps to create the navigation case:
1. Click the Navigation Case tool2. Click your userLogin.jsp file3. Then click on your userLoginSuccess.jsp file4. You will be prompted with a wizard to create the navigation case.
Follow Figures 7.17 and 7.18 for creating the success navigation case. In order to create the failure navigation case, we simply do the same steps as before but click twice on the userLogin.jsp file, in order to create a circular navigation case.
Figure 7.17: Creating the success navigation case
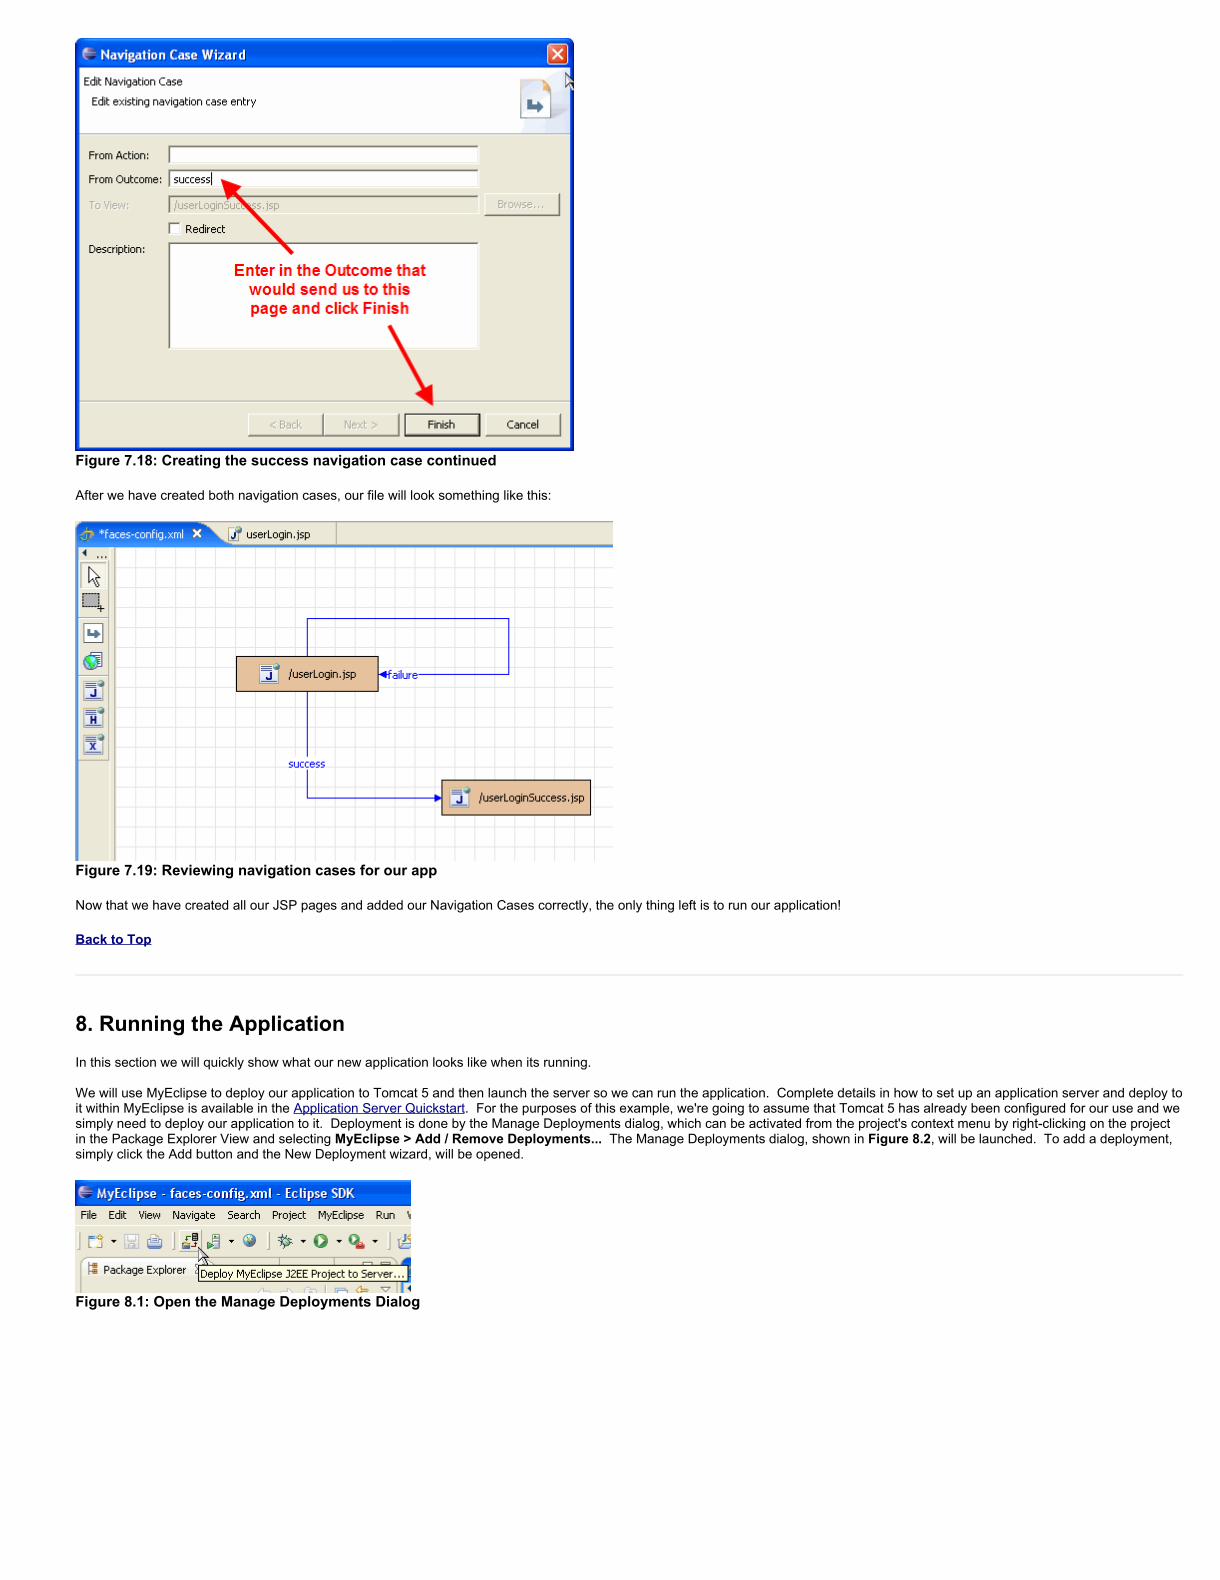
Figure 7.18: Creating the success navigation case continued
After we have created both navigation cases, our file will look something like this:
Figure 7.19: Reviewing navigation cases for our app
Now that we have created all our JSP pages and added our Navigation Cases correctly, the only thing left is to run our application!
Back to Top
8. Running the ApplicationIn this section we will quickly show what our new application looks like when its running.
We will use MyEclipse to deploy our application to Tomcat 5 and then launch the server so we can run the application. Complete details in how to set up an application server and deploy to it within MyEclipse is available in the Application Server Quickstart. For the purposes of this example, we're going to assume that Tomcat 5 has already been configured for our use and we simply need to deploy our application to it. Deployment is done by the Manage Deployments dialog, which can be activated from the project's context menu by right-clicking on the project in the Package Explorer View and selecting MyEclipse > Add / Remove Deployments... The Manage Deployments dialog, shown in Figure 8.2, will be launched. To add a deployment, simply click the Add button and the New Deployment wizard, will be opened.
Figure 8.1: Open the Manage Deployments Dialog

Figure 8.2: Creating the new deployment for our project
Select Tomcat 5 as the server, exploded archive as the deployment type, and select Finish as shown in Figure 8.2. After the wizard completes execution, the Deployment Manager will show that the deployment was successful. This is depicted in Figure 8.3. Now that the deployment has completed, you can select OK to close the dialog.
Figure 8.3: Successful Deployment
At this point the Tomcat 5 server can be started by selecting Start from the Tomcat 5 management menu from the main Eclipse toolbar, as shown in Figure 8.4, below.
Figure 8.4: Starting Tomcat 5
The output from the server log will be redirected to the Eclipse Console View. From the log shown in Figure 8.5, it is evident that the sever started successfully.

Figure 8.5: Tomcat 5 Startup Log
Once Tomcat 5 is running, we can test it by opening the MyEclipse Browser View. This can be done by clicking the Browser button as shown in Figure 8.6.
Figure 8.6: Opening the Web Browser View
In the browser's address bar, enter http://localhost:8080/JSFLoginDemo/userLogin.faces to activate the example application, as shown in Figure 8.7.
Figure 8.7: Accessing the Example Application
Now type in myeclipse for the user name and password and click Login to see your app in action!
Figure 8.8: Logging in...
Figure 8.9: Successful Login
We see our navigation rules kick in as we are validated and directed to the userLoginSuccess.jsp page where our name is displayed. While this application is certainly simple, it does convey the basics of developing a JSF application using MyEclipse.
Back to Top
9. SummaryIn this demo we took a look at developing a simple JSF application using MyEclipse Enterprise Workbench. If you would like to download a zipped up version of the MyEclipse project used to create this demo, click here . This concludes your introduction to JSF. Additional Quickstart documents are available that introduce working with Web Projects, editing, application server configuration, enterprise application projects and database development. For more information visit the MyEclipse Quickstart library .
Back to Top

10. User FeedbackWe welcome all constructive feedback. If you have comments or ideas for how to improve this document please go to the Documentation Forum on our Support Site. MyEclipse Documentation Forum
Back to Top
Copyright © 2003 - 2005 by Genuitec L.L.C