
JobsNSW - Conveners V2 CR · Interview Scheduling Pages 48 – 53 Interview Outcome pre-referee...
87
jobs.nsw Guide for conveners
Transcript of JobsNSW - Conveners V2 CR · Interview Scheduling Pages 48 – 53 Interview Outcome pre-referee...

jobs.nswGuide for conveners

Index
Accessing your job requisitions Pages 1 – 5
Preparing your advertisement Pages 6 – 20
Managing your requisition Pages 21 – 23
Review Applicants for Short Listing Pages 24 – 31
Short List Referee Check Outcome Pages 33 – 40
Submit Short List to HRSO Pages 42 – 46
Interview Scheduling Pages 48 – 53
Interview Outcome pre-referee check Pages 54 – 60
Selection Process Outcome Pages 62 – 68
Submit Selection Report to HRSO Pages 70 – 74
Position Offer Pages 75 – 79
e-Learning Materials Page 81

Accessing your job requisitions
Add Jobs.NSW (eRecruitment Pilot) to your Essentials by clicking on My applications
1.

Click on Add to my Essentials
Accessing your job requisitions
2.
Click on Requisitions
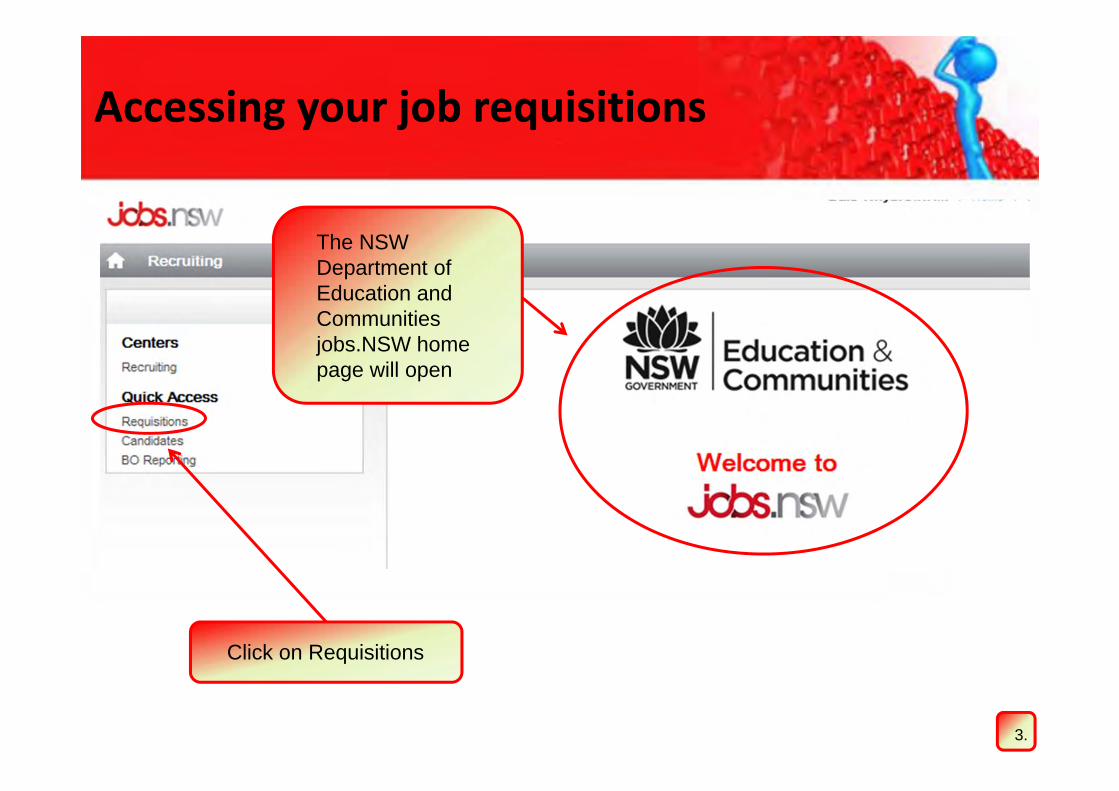
Accessing your job requisitions
The NSW Department of Education and Communities jobs.NSW home page will open
3.
Accessing your job requisitions
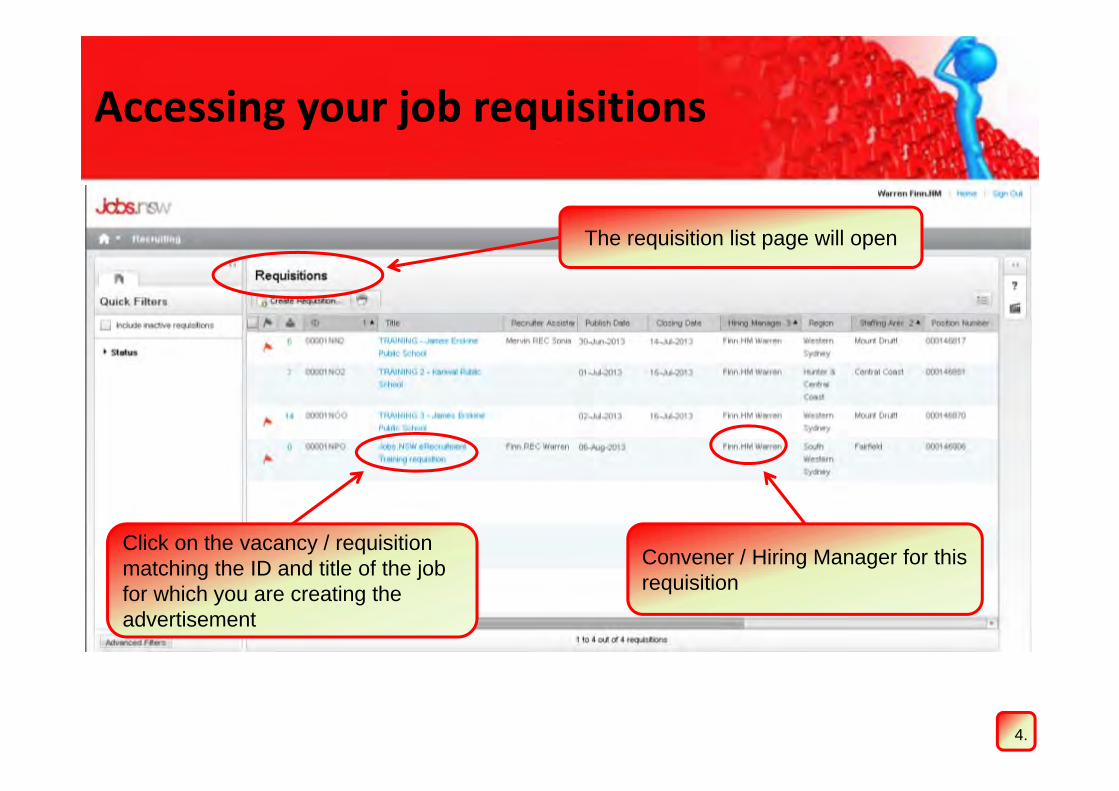
Click on the vacancy / requisition matching the ID and title of the job for which you are creating the advertisement
The requisition list page will open
Convener / Hiring Manager for this requisition
4.
Accessing your job requisitions
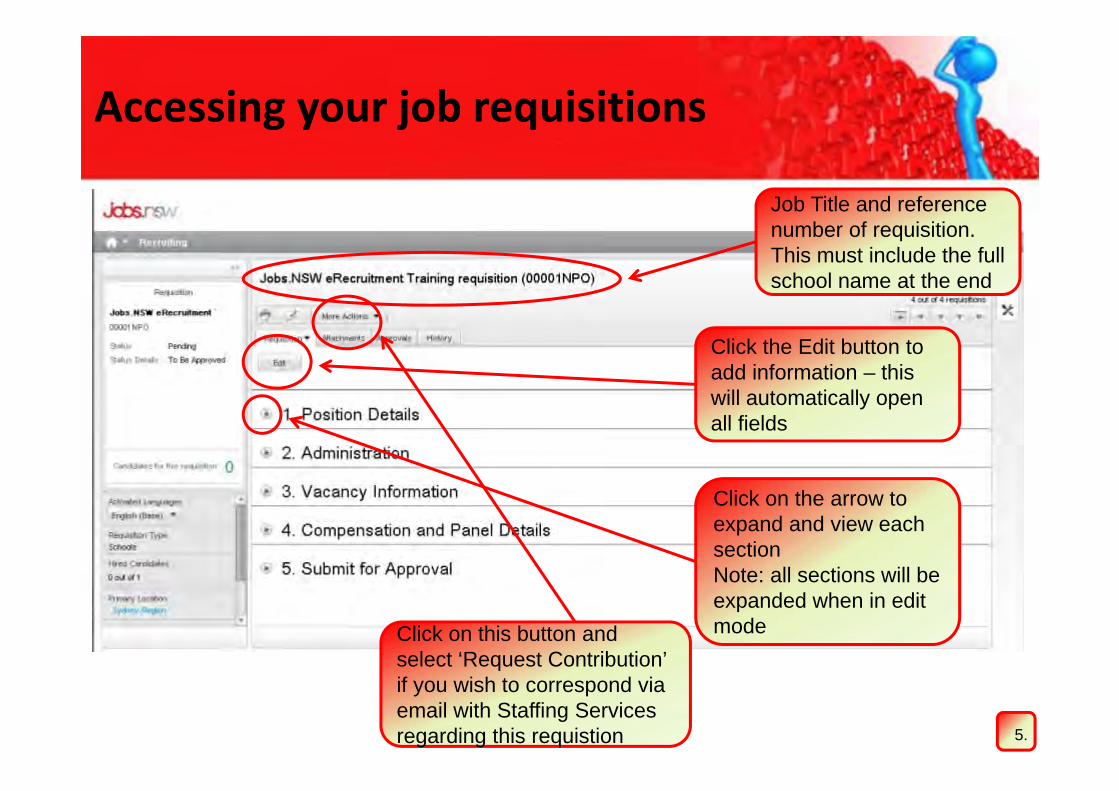
Job Title and reference number of requisition. This must include the full school name at the end
Click the Edit button to add information – this will automatically open all fields
Click on the arrow to expand and view each sectionNote: all sections will be expanded when in edit mode
5.
Click on this button and select ‘Request Contribution’ if you wish to correspond via email with Staffing Services regarding this requistion
Preparing your advertisement
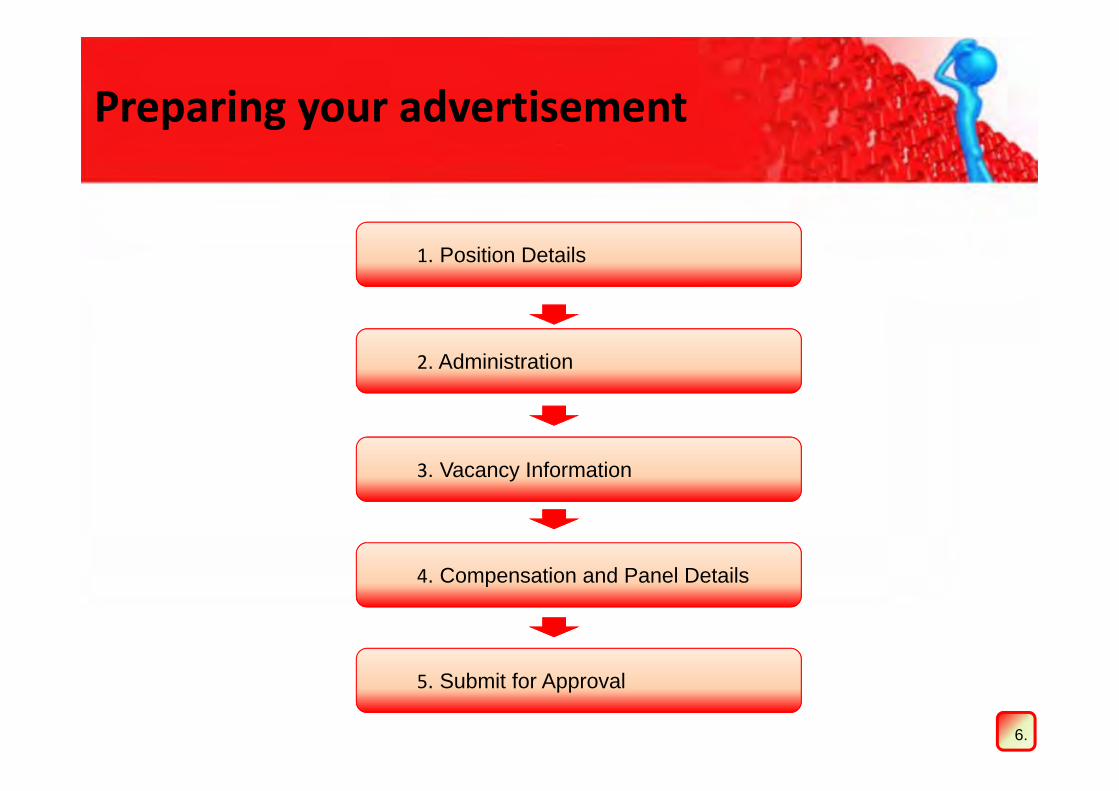
1. Position Details
2. Administration
3. Vacancy Information
4. Compensation and Panel Details
5. Submit for Approval
6.

Preparing your advertisement
The pre-set fields which can’t be changed include:• Schools details• Position details• Approved subjects• Willing to teach subjects• General Selection Criteria
As Hiring Manager / convener you need to check the accuracy of all information
This field must be completed as it is the title that will be used by the system in correspondance
Add the title of the role, for example: Teacher, Assistant Principal, Deputy Principal
7.
You may wish to change the title for teacher position and Head Teacher positions to include the KLA in the title, examples: Head Teacher Mathematics – Test High School Teacher Librarian – Test Public School

Preparing your advertisement
As Hiring Manager / convener you need to check the accuracy of all information
You need to select a “Publish Date” for your advertisement
This will always say “Teacher”
8.
If you are nominating another teacher to be the convener, you need to change the details in these fields

Preparing your advertisement
Click on the calendar icon to see a large date pad. Select Wednesday in the week you would like to advertise the position
9.
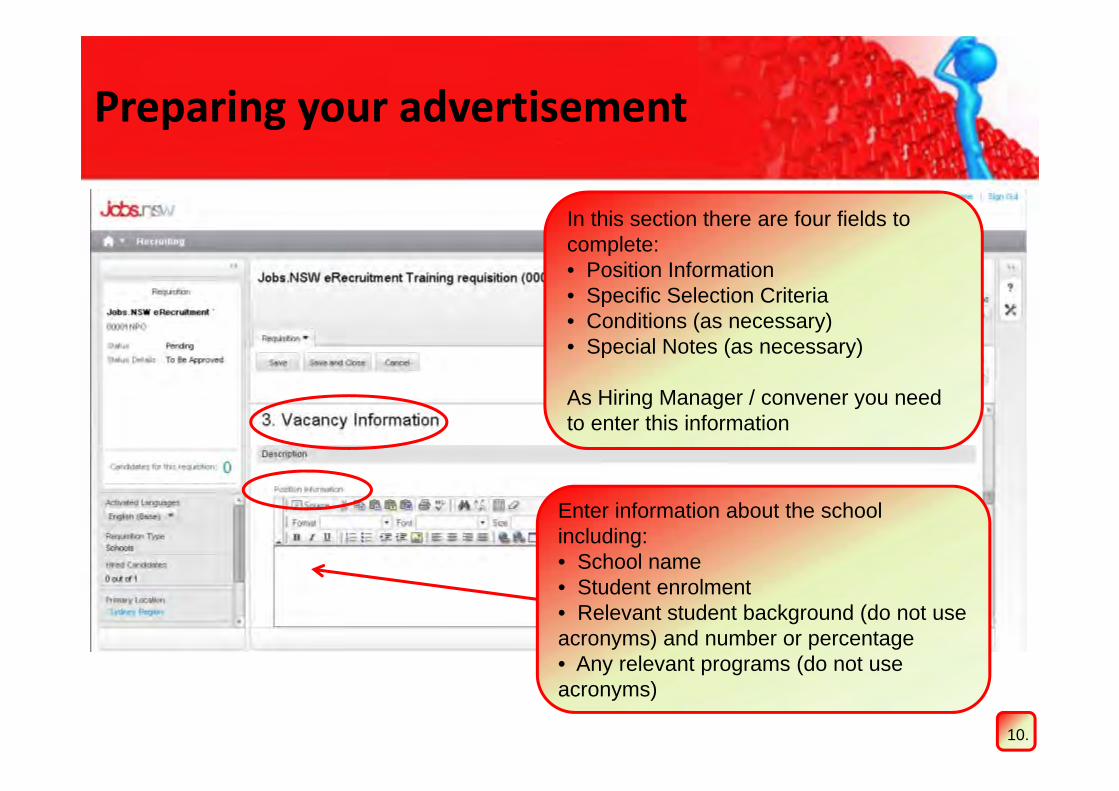
Preparing your advertisement
In this section there are four fields to complete:• Position Information• Specific Selection Criteria• Conditions (as necessary)• Special Notes (as necessary)
As Hiring Manager / convener you need to enter this information
Enter information about the school including:• School name• Student enrolment• Relevant student background (do not use acronyms) and number or percentage• Any relevant programs (do not use acronyms)
10.

Preparing your advertisement
Sample completed field• You may cut and paste from Notepad• Some format errors may occur if you copy
and paste from other applications• The first sentence must state the full name
of the school and enrolment details
11.

Preparing your advertisement
Enter appropriate information, noting that it must align with the Position Details in Section 1
Approval to teach … must reflect subjects in Subjects – Approved in Position Details
Willingness to teach … must reflect subjects in Subjects – Not Approved in Position Details
Other selection criteria relating to the curriculum needs of the school should also be included
12.
General Selection Criteria is prepopulated into executive positions

Preparing your advertisement
It is not mandatory to enter anything in this field
For some specialist positions this field will auto-populate
13.

Preparing your advertisement
It is not mandatory to enter anything in this field
For some specialist positions this field will auto-populate
You may include a link to the local government website or school website. This is particularly useful for schools in rural or remote areas
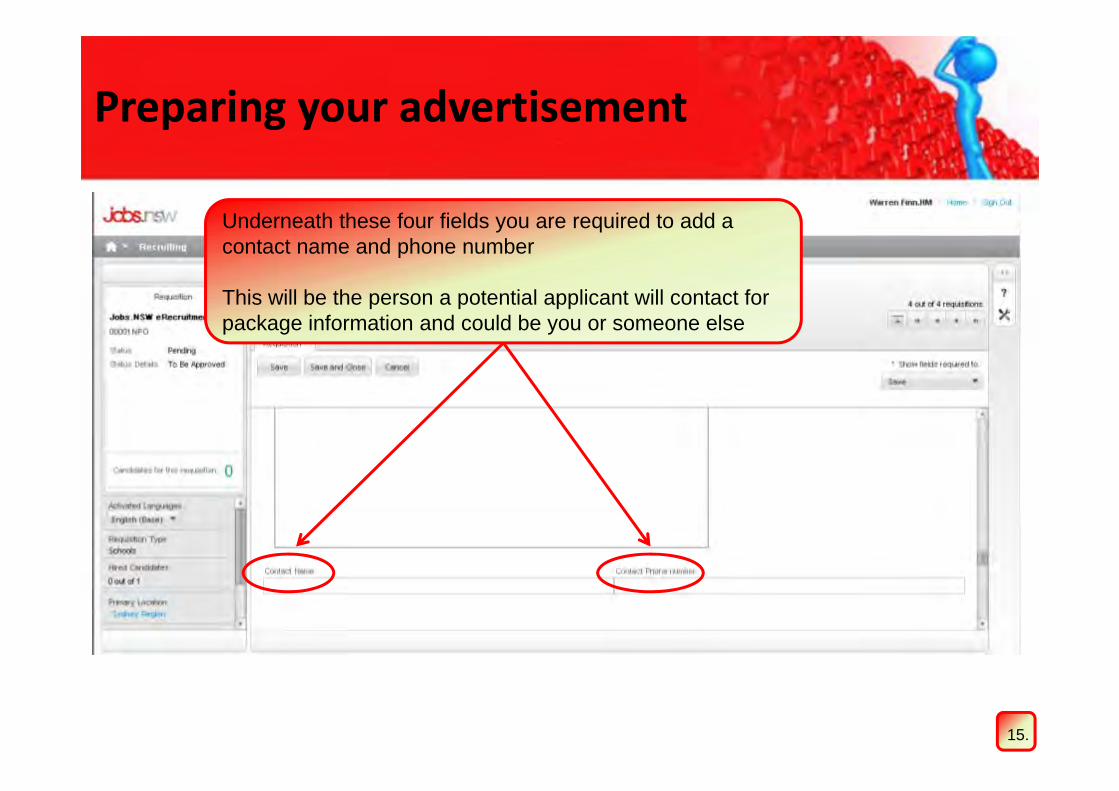
14.
Preparing your advertisement
Underneath these four fields you are required to add a contact name and phone number
This will be the person a potential applicant will contact for package information and could be you or someone else
15.
Preparing your advertisement
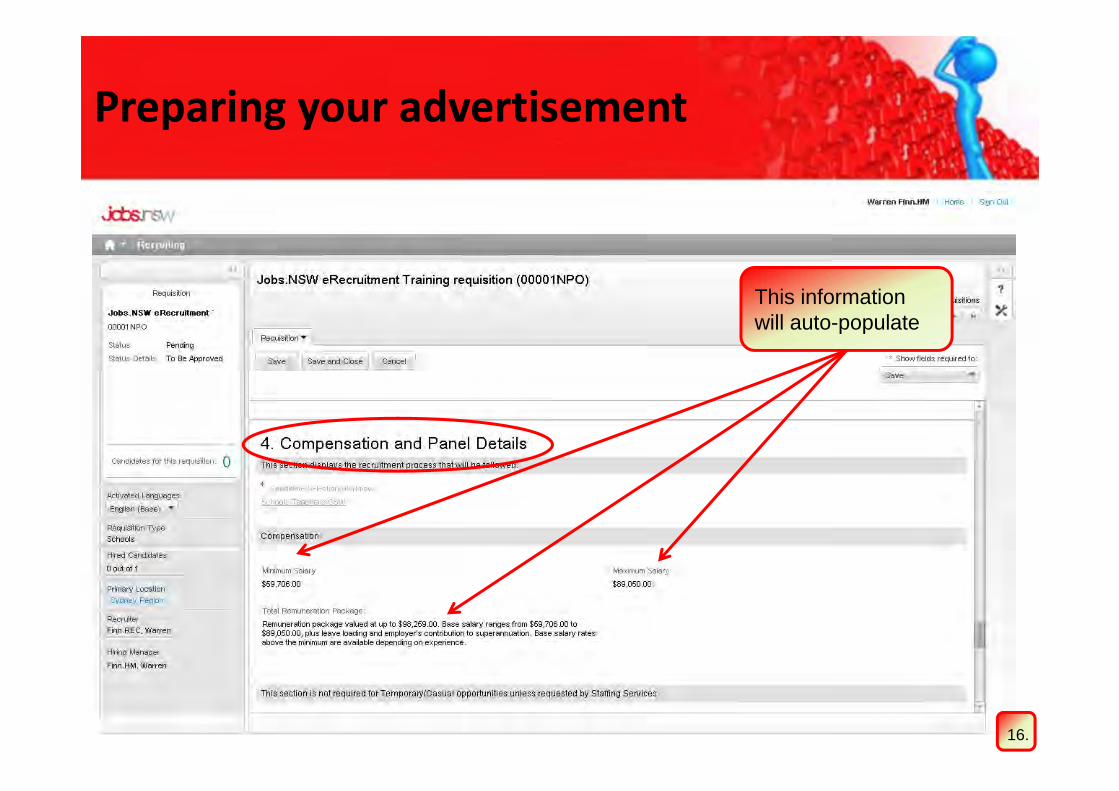
This information will auto-populate
16.

Preparing your advertisement
Complete details for the convener and each panel member
Add name and select from drop-down menus
17.

Preparing your advertisement
If the school has a significant enrolment of students with a language background other than English (60%), the selection panel will include a representative from the local ethnic community
If the school has more than 20 Aboriginal students or 20% of enrolments, the selection panel will include an AECG representative
For further information about selection panel procedures see: Selection Panel Procedures for School Teachers 2012http://www.teach.nsw.edu.au/documents/sel_panelproc12.pdf
18.
Preparing your advertisement
19.
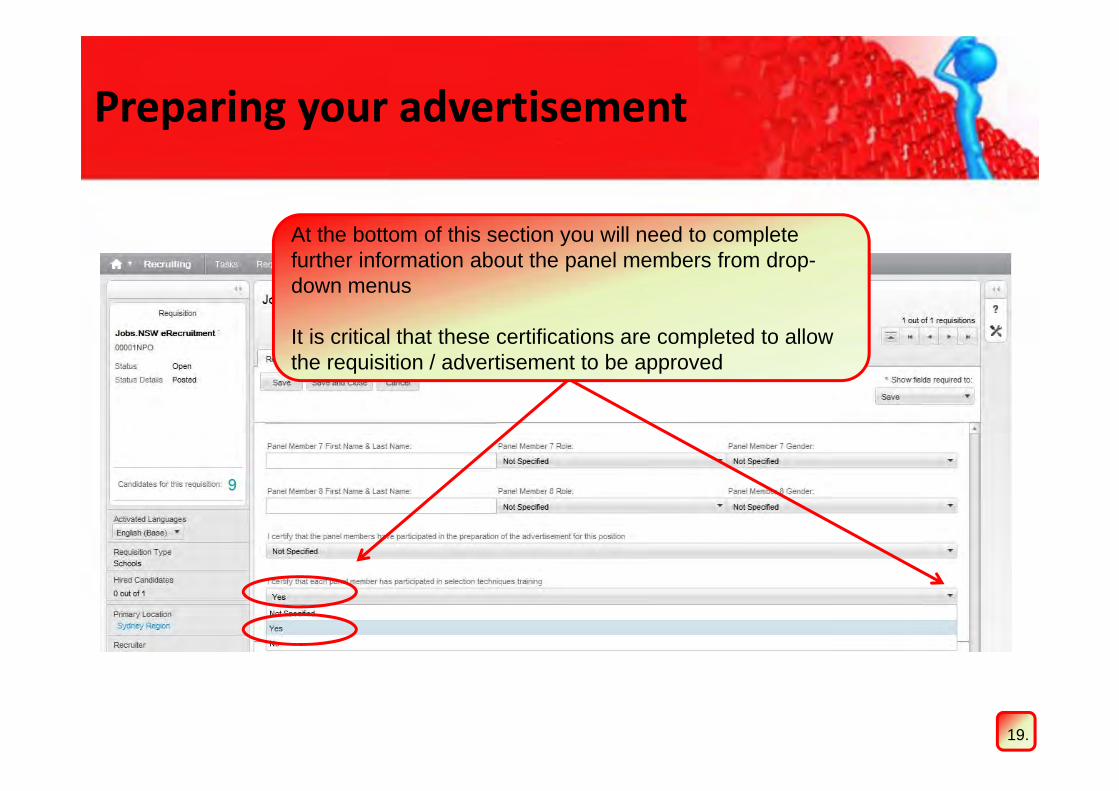
At the bottom of this section you will need to complete further information about the panel members from drop-down menus
It is critical that these certifications are completed to allow the requisition / advertisement to be approved

Preparing your advertisement
When you are ready to submit the requisition to Staffing for approval, select ‘Yes’ from the drop-down menu
Return to the top of the requisition and click ‘Save and Close’
20.

Take a breakYou now need to wait until your advertisement closes

Managing your requisition
21.
Candidate Selection Workflow (CSW)
Yellow = Hiring ManagerGreen = Staffing Services
Managing your requisition
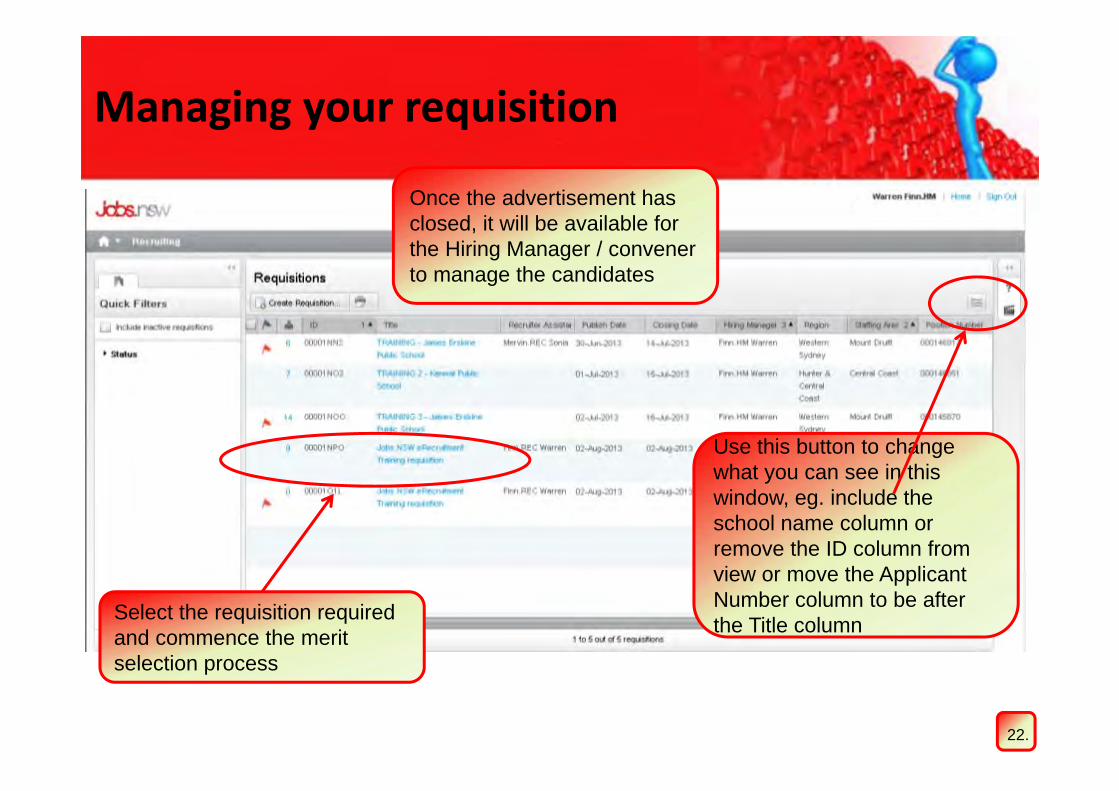
Once the advertisement has closed, it will be available for the Hiring Manager / convener to manage the candidates
Select the requisition required and commence the merit selection process
22.
Use this button to change what you can see in this window, eg. include the school name column or remove the ID column from view or move the Applicant Number column to be after the Title column

Managing your requisition
Status of the requisition
Number of candidates / applicants
Click on the number next to “Candidates for this requisition” to gain access to the candidates’ applications
23.

Managing your requisition‐ Review Applicants for Short Listing
Click on “Review Applicants for Short Listing” to start the short listing process
24.

In the step “Review Applicants for Short Listing”, the Hiring Manager moves the candidates from “Select Step Outcome” to either:• “Actively Considering For Short Listing“OR• “Not Considering For Short Listing”OR• “Candidate Withdrawn” where an
applicant has advised you they wish to withdraw their application
Managing your requisition‐ Review Applicants for Short Listing
25.

Select each candidate, one at a time, to select them to be Short List for interview
After the candidate has been selected, click on the green arrow to move them to the “Actively Considering For Short Listing” status
Managing your requisition‐ Review Applicants for Short Listing
26.

Double check the “New Step” and “New Status” are correct
Do not check the “Send correspondence” boxCheck the selection criteria
boxes as appropriate
Comments are mandatory. These should reflect the merit of the written application against the criteria
Select “Save and Close” when you are finished with this candidate
Managing your requisition‐ Review Applicants for Short Listing
27.
If you wish to see the details of the candidate you are currently moving through the Candidate Selection Process use this link
Instructions for this Step/Status can be accessed at any Step/Status

One candidate has been moved
This process needs to be repeated for each candidate to be short listed
Managing your requisition‐ Review Applicants for Short Listing
28.

Select the candidates, one at a time, to add them to the “Not Considering For Short Listing” status
Click “More Actions” and then click “Change Step/status” to select the “Not Considering For Short Listing” status
Managing your requisition‐ Review Applicants for Short Listing
29.

Managing your requisition‐ Review Applicants for Short Listing
30.
Use the drop-down box to select “Not Considering For Short Listing”
Check the selection criteria boxes as appropriate
Comments are mandatory. These should reflect the reason/s for not considering for interview based on the selection criteria for the position
Select “Save and Close” when you are finished with this candidate
Do not check the “Send correspondence” box
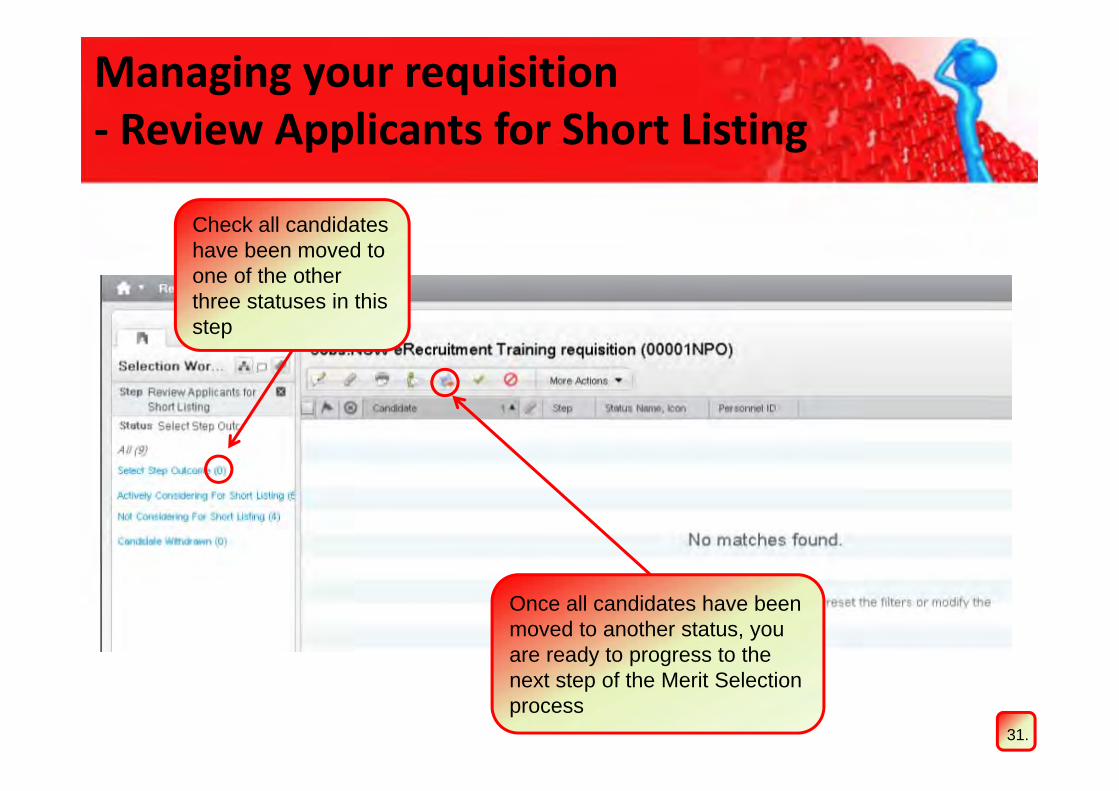
Check all candidates have been moved to one of the other three statuses in this step
Once all candidates have been moved to another status, you are ready to progress to the next step of the Merit Selection process
Managing your requisition‐ Review Applicants for Short Listing
31.

Managing your requisition
A total of 9 candidates applied for this position
4 candidates have been culled and referees would not need to be contacted
5 candidates have progressed in the short listing process and two referees need to be contacted for each candidate before a final decision regarding an interview is made
32.
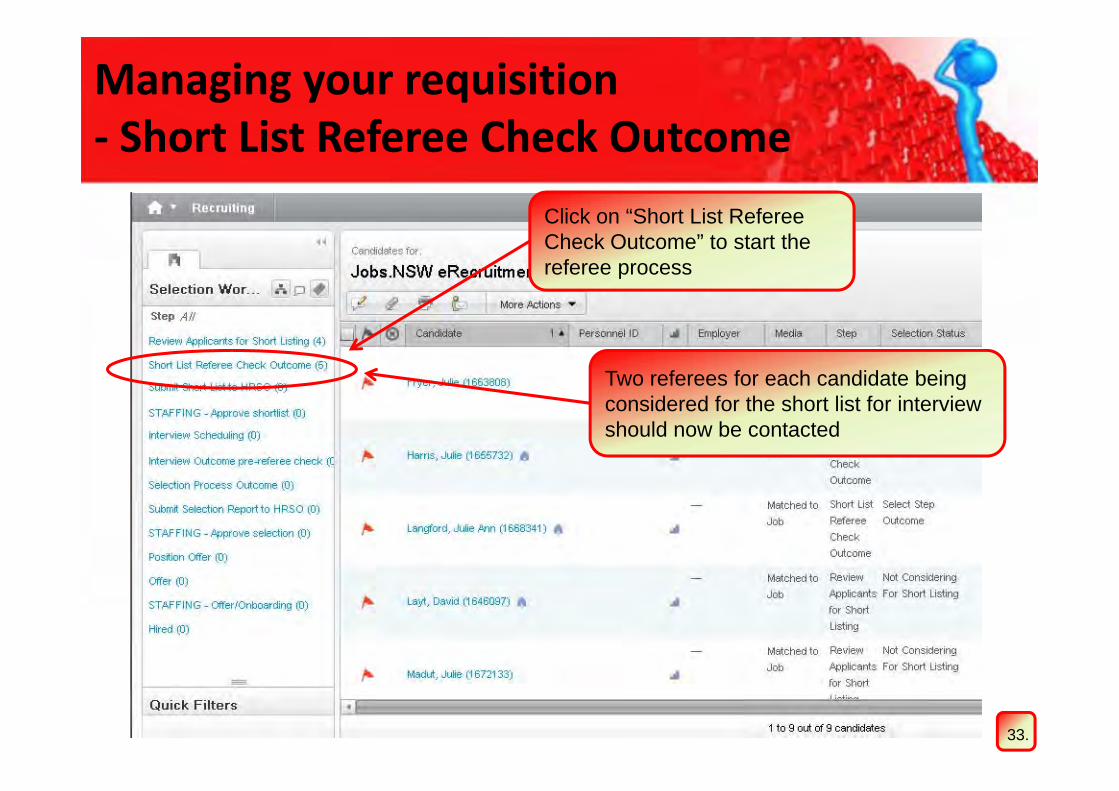
Two referees for each candidate being considered for the short list for interview should now be contacted
Click on “Short List Referee Check Outcome” to start the referee process
Managing your requisition‐ Short List Referee Check Outcome
33.

In the step “Short List Referee Check Outcome”, the Hiring Manager moves the candidates from “Select Step Outcome” to either:• “Recommended for Short Listing“OR• “Not Short Listed (Unsuccessful)”OR• “Candidate Withdrawn” where an
applicant has advised you they wish to withdraw their application
Managing your requisition‐ Short List Referee Check Outcome
34.

Select each candidate, one at a time, to move them to the Short List for interview status
After the candidate has been selected, click on the green arrow to move them to the “Recommended for Short Listing” status
Managing your requisition‐ Short List Referee Check Outcome
35.
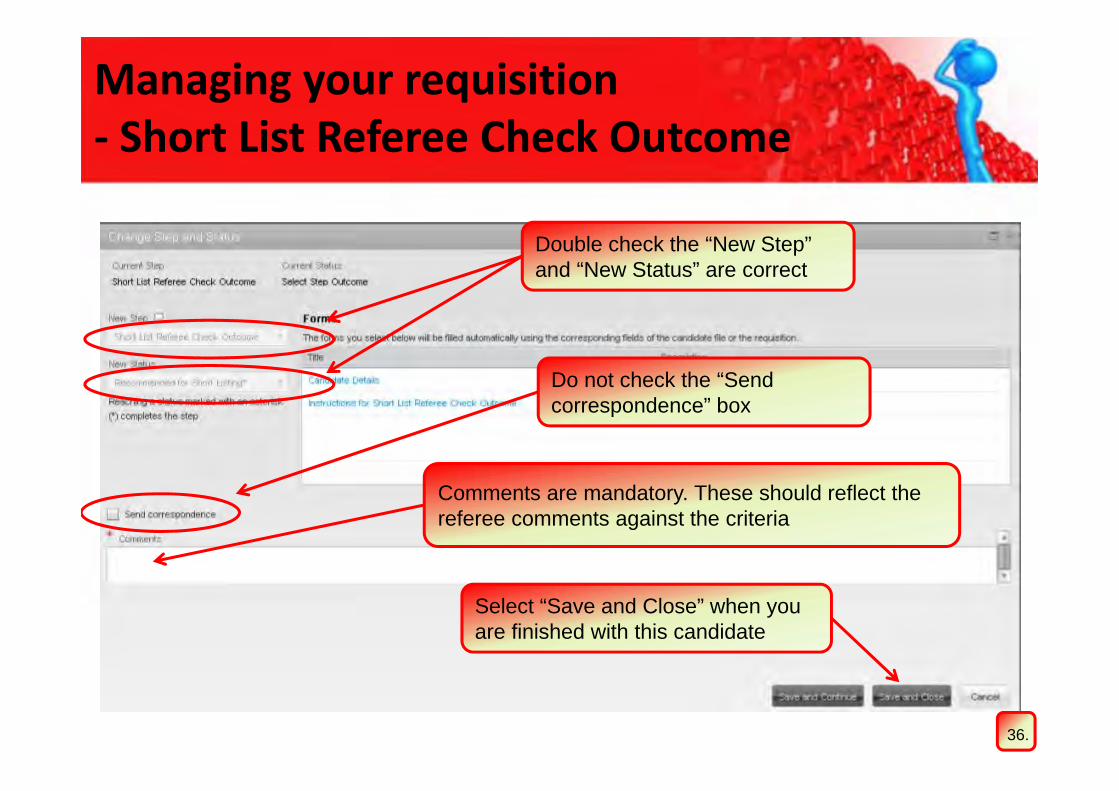
Double check the “New Step” and “New Status” are correct
Do not check the “Send correspondence” box
Comments are mandatory. These should reflect the referee comments against the criteria
Select “Save and Close” when you are finished with this candidate
Managing your requisition‐ Short List Referee Check Outcome
36.

One candidate has been moved
The green tick is confirmation that they have been successfully moved to the next status
This process needs to be repeated for each candidate to be short listed
Managing your requisition‐ Short List Referee Check Outcome
37.
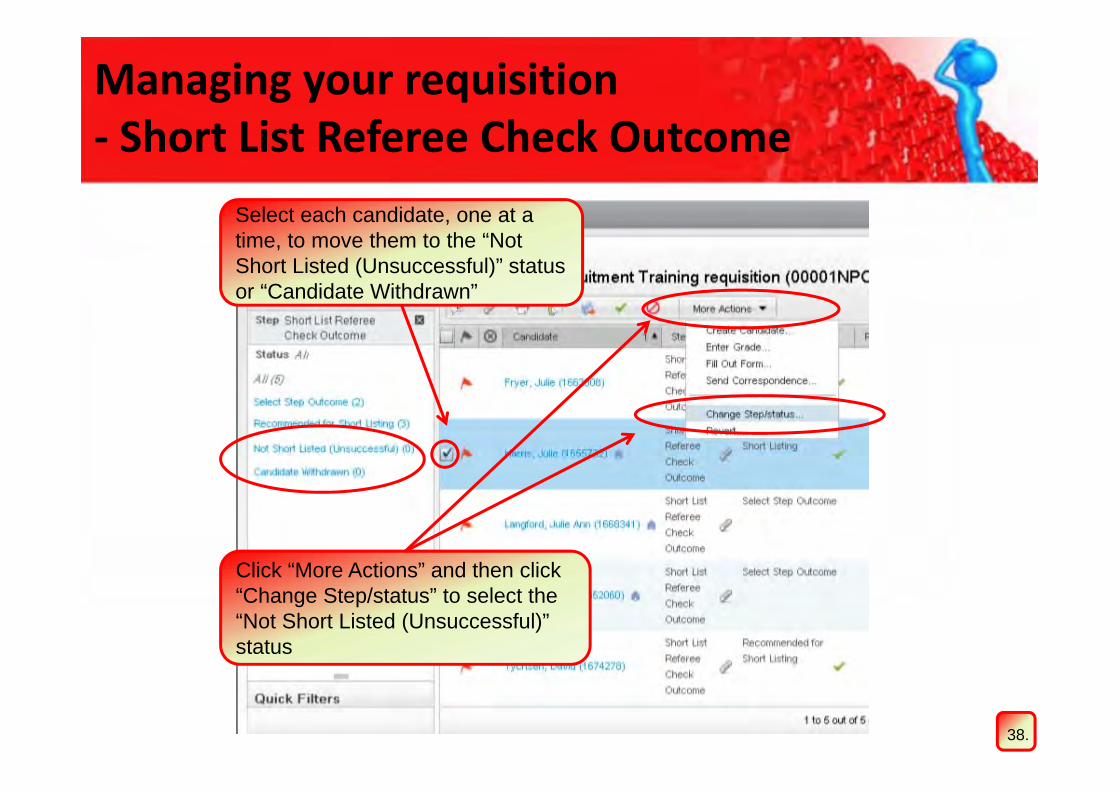
Select each candidate, one at a time, to move them to the “Not Short Listed (Unsuccessful)” status or “Candidate Withdrawn”
Click “More Actions” and then click “Change Step/status” to select the “Not Short Listed (Unsuccessful)” status
Managing your requisition‐ Short List Referee Check Outcome
38.

Use the drop-down box to select the “Not Short Listed (Unsuccessful)”
Comments are mandatory. These should reflect the reason/s for not considering for interview
Select “Save and Close” when you are finished with this candidate
Managing your requisition‐ Short List Referee Check Outcome
39.
Do not check the “Send correspondence” box

Check all candidates have been moved to one of the other status groups in this step
Once all candidates have been moved to another status, you are ready to progress to the next step of the Merit Selection process
Managing your requisition‐ Short List Referee Check Outcome
40.

A total of 9 candidates applied for this position
4 candidates have been culled and referees would not need to be contacted – “Review Applicants for Short Listing”
2 candidates have been culled following contact with referees – “Short List Referee Check Outcome”
3 candidates have been moved to the short list step to be reviewed by Staffing Services – “Submit Short List to HRSO”
Managing your requisition
41.

Managing your requisition‐ Submit Short List to HRSO
Click on “Submit Short List HRSO” to release the requisition to Staffing for review and approval of the candidates short listed
42.
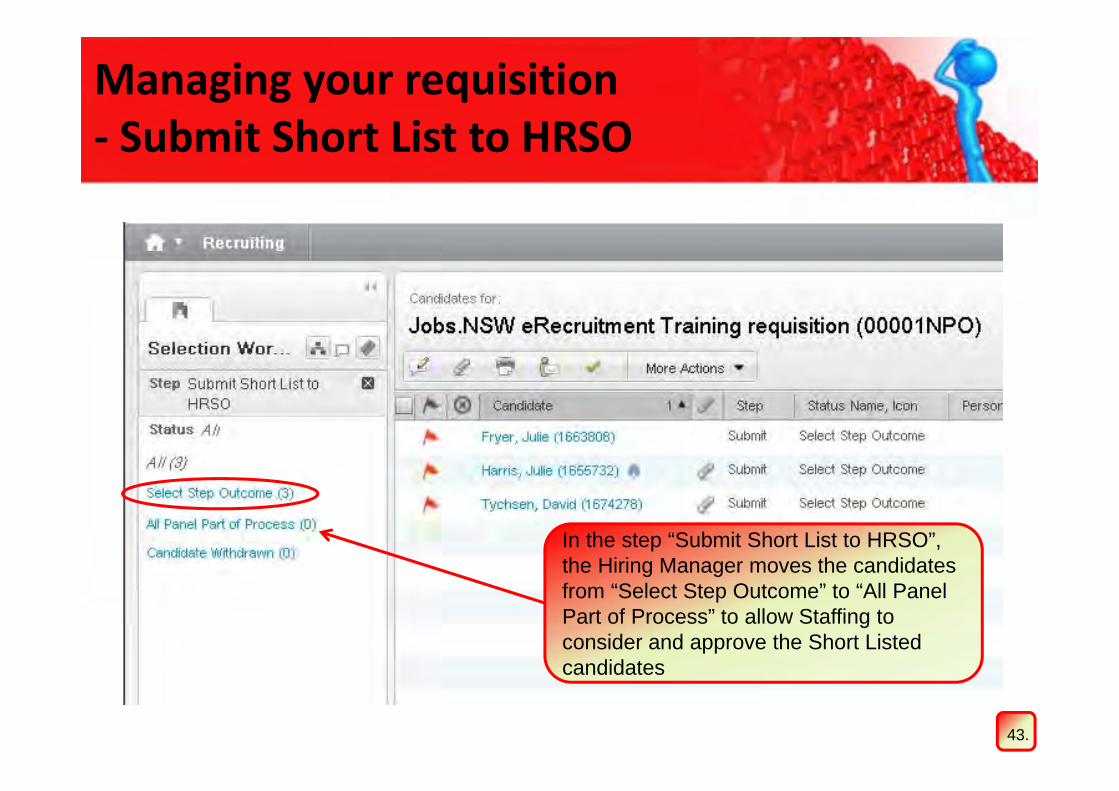
Managing your requisition‐ Submit Short List to HRSO
In the step “Submit Short List to HRSO”, the Hiring Manager moves the candidates from “Select Step Outcome” to “All Panel Part of Process” to allow Staffing to consider and approve the Short Listed candidates
43.

Managing your requisition‐ Submit Short List to HRSO
This is one of the times you can ‘bulk’ select all candidates to move them to the next status
After all candidates have been selected, click on the green arrow to move them to the “All Panel Part of Process” status
44.

Managing your requisition‐ Submit Short List to HRSO
Double check the “New Step” and “New Status” are correct
Do not check the “Send correspondence” box
Comments are optional. Please note: any notes made when you are ‘bulk’ moving candidates will only be entered by the system on the first candidate’s application. So if you need to make comments on specific candidates you should move candidates individually instead of using the ‘bulk’ move function
Select “Save and Close” when you are finished
Check this box to certify that all panel members have participated fully in the Short Listing process
45.

Managing your requisition‐ Submit Short List to HRSO
Check all candidates have been moved to the “All Panel Part of Process” status
The green ticks are confirmation that the candidates have been successfully moved to the next status
46.
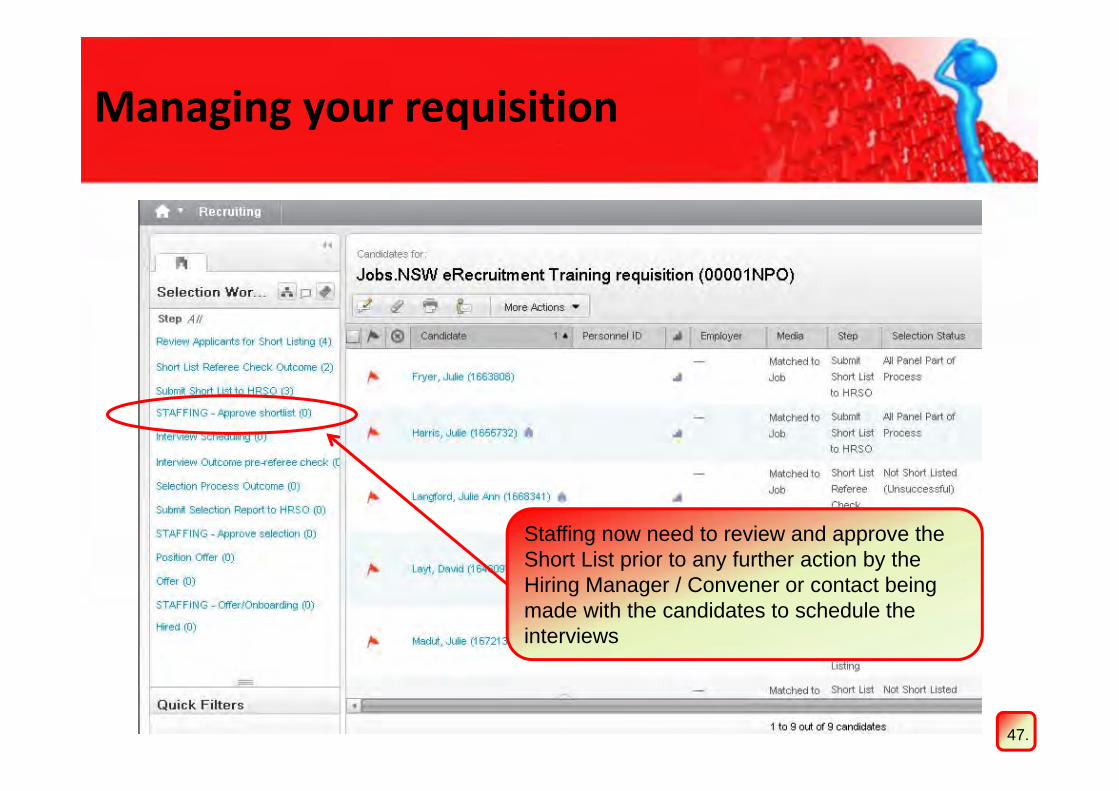
Managing your requisition
Staffing now need to review and approve the Short List prior to any further action by the Hiring Manager / Convener or contact being made with the candidates to schedule the interviews
47.

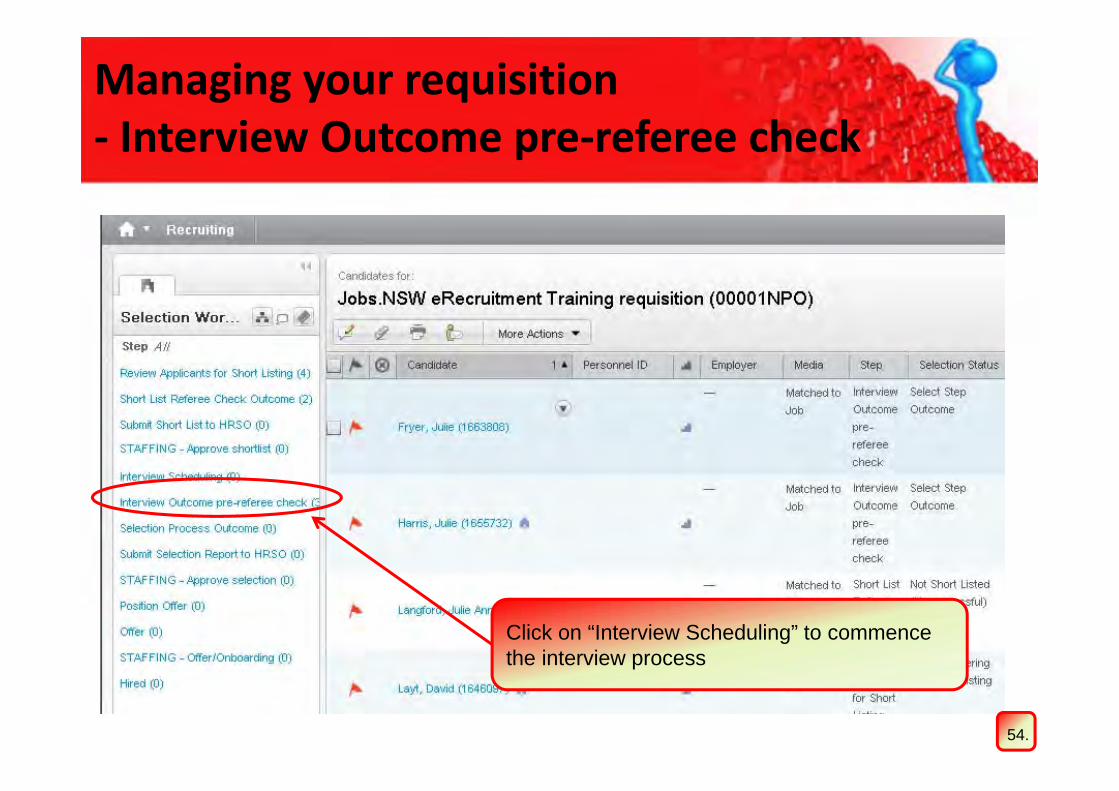
Take a breakYou need to wait until you receive asystem generated email to proceed
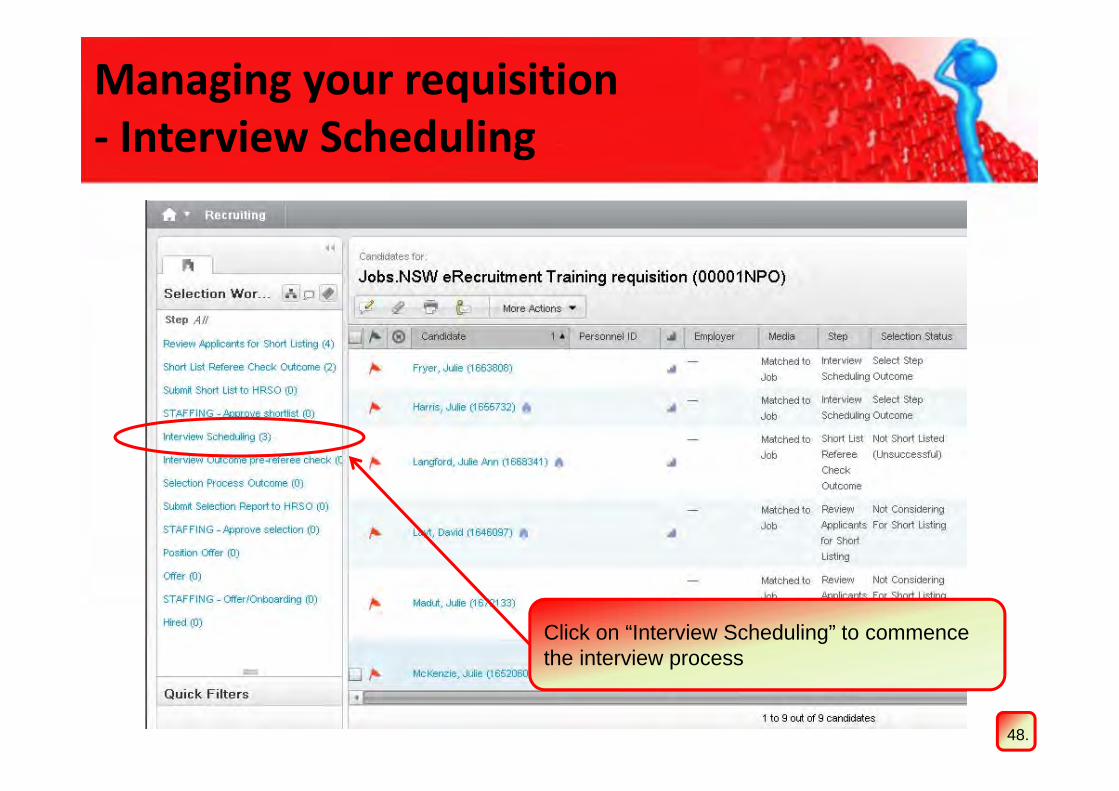
Click on “Interview Scheduling” to commence the interview process
Managing your requisition‐ Interview Scheduling
48.

Managing your requisition‐ Interview Scheduling
In the step “Interview Scheduling”, the Hiring Manager moves the candidates from “Select Step Outcome” to “Interview scheduled” status
49.
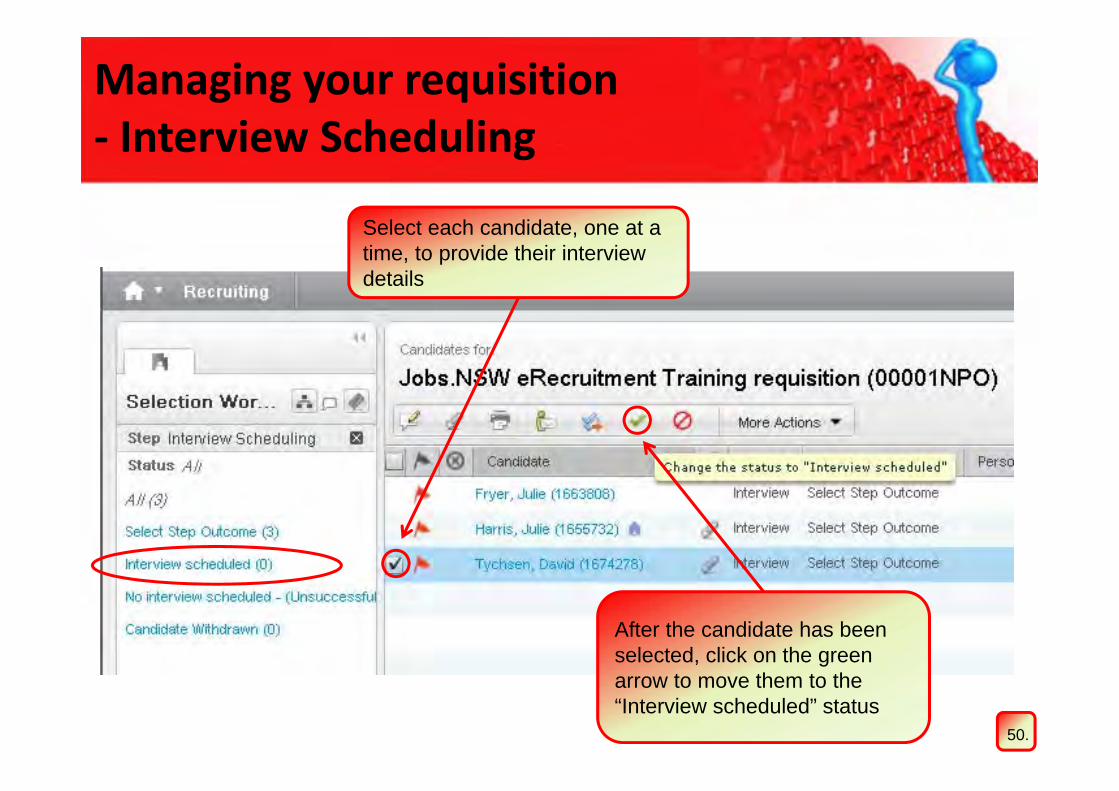
Managing your requisition‐ Interview Scheduling
Select each candidate, one at a time, to provide their interview details
After the candidate has been selected, click on the green arrow to move them to the “Interview scheduled” status
50.

Managing your requisition‐ Interview Scheduling
Double check the “New Step” and “New Status” are correct
Do not check the “Send correspondence” box
Enter the interview date
Select the type of interview to be conducted
Select “Save and Close” when you are finished
51.
€€

Managing your requisition‐ Interview Scheduling
One candidate has been moved
The green tick is confirmation that they have been successfully moved to the “Interview scheduled” status
This process needs to be repeated for each candidate to be interviewed
52.

Managing your requisition‐ Interview Scheduling
Check all candidates have been moved to one of the three statuses available in this Step. If a candidate is not to be interviewed because for example Staffing Services has advised they are not eligible then move them to the status “No interview scheduled – (Unsuccessful)”. Move candidates to “Candidate Withdrawn” if a candidate advises the panel of their withdrawal from the selection process at this point
Once all candidates have been moved to “Interview scheduled” status you are ready to progress to the next step of the Merit Selection processClick on the double blue arrows to move candidates to the next step
This is one of the times you can ‘bulk’ select all candidates to move them to the next status
53.
Click on “Interview Scheduling” to commence the interview process
Managing your requisition‐ Interview Outcome pre‐referee check
54.

Managing your requisition‐ Interview Outcome pre‐referee check
In the step “Interview Outcome pre-referee check”, the Hiring Manager moves the candidates from “Select Step Outcome” to either:• “Referee to be Contacted“OR• “Unsuccessful at Interview”OR• “Not Eligible” is Staffing Services has advised the panel at this
point that the candidate not eligible to be considered for the position
OR• “Candidate Withdrawn” if the candidate advises the panel they
wish to withdraw their application for the position at this point 55.
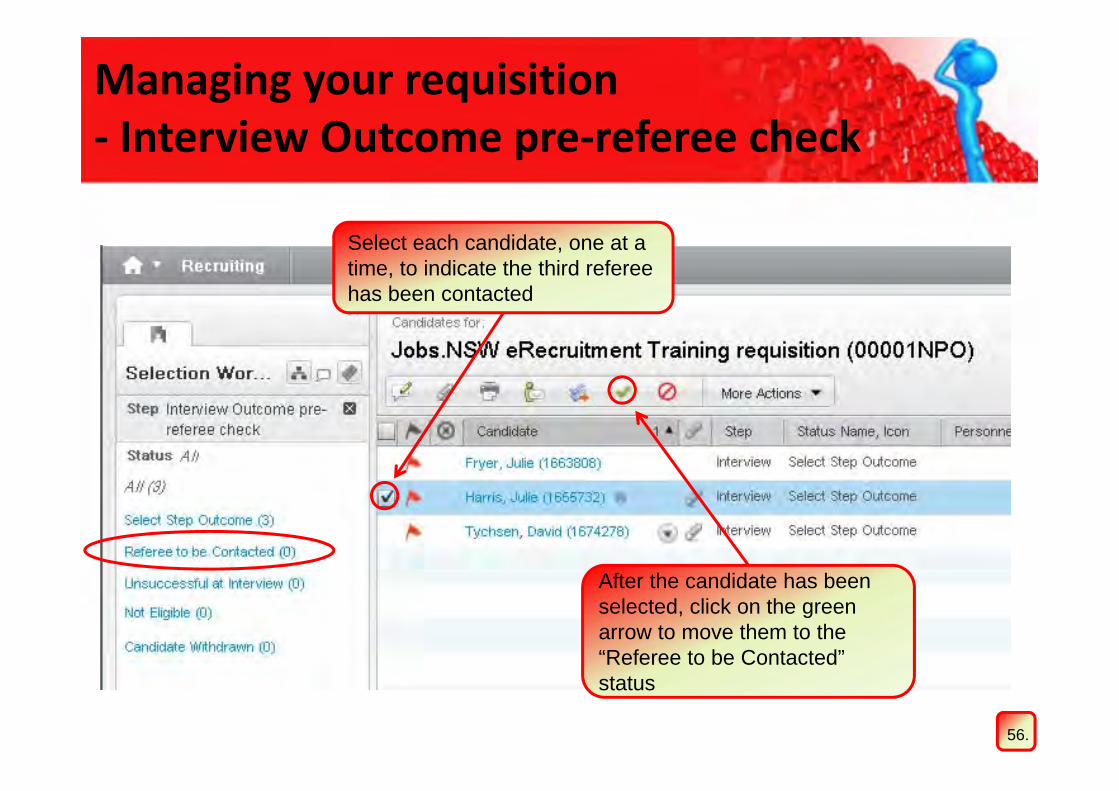
Managing your requisition‐ Interview Outcome pre‐referee check
Select each candidate, one at a time, to indicate the third referee has been contacted
After the candidate has been selected, click on the green arrow to move them to the “Referee to be Contacted” status
56.

Managing your requisition‐ Interview Outcome pre‐referee check
Select each candidate, one at a time, to add them to the “Unsuccessful at Interview” status or “Not Eligible” or “Candidate Withdrawn” where relevant
Click “More Actions” and then click “Change Step/status” to select the “Unsuccessful at Interview” status
57.

Managing your requisition‐ Interview Outcome pre‐referee check
Double check the “New Step” and “New Status” are correct
Select “Save and Close” when you are finished
Do not check the “Send correspondence” box
Comments are mandatory
58.

Managing your requisition‐ Interview Outcome pre‐referee check
Check all candidates have been moved to the another status in this step
59.
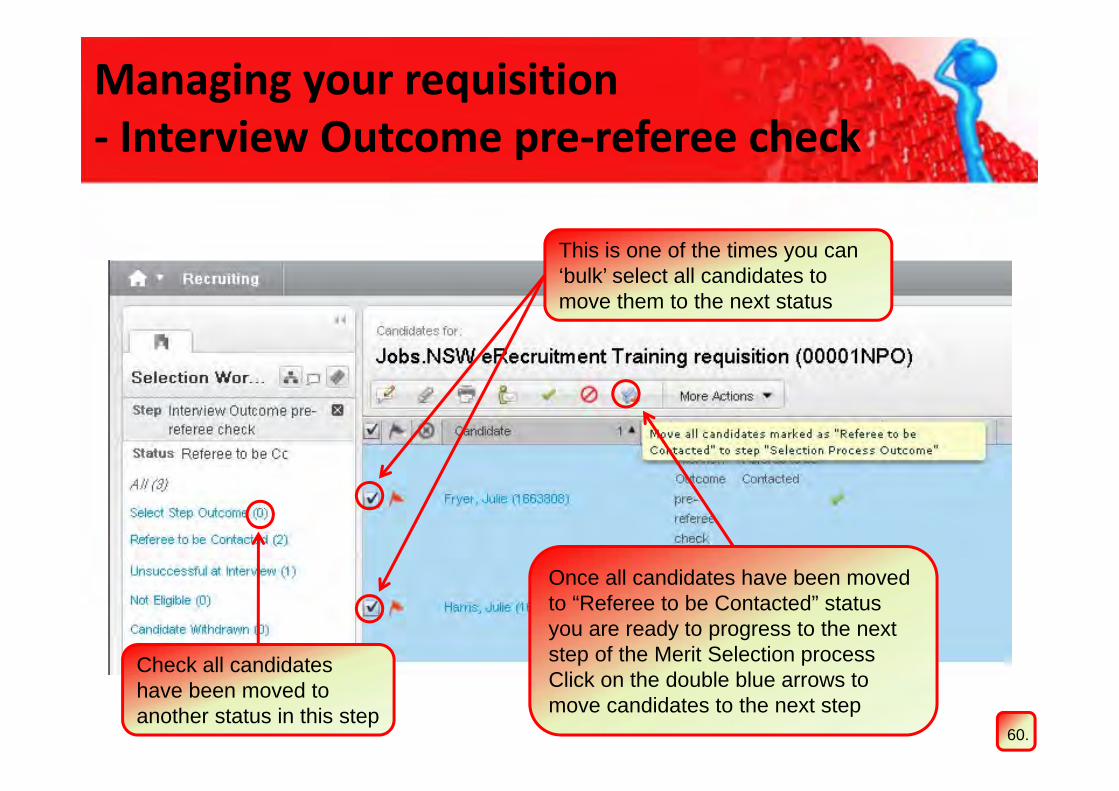
Managing your requisition‐ Interview Outcome pre‐referee check
Check all candidates have been moved to another status in this step
Once all candidates have been moved to “Referee to be Contacted” status you are ready to progress to the next step of the Merit Selection processClick on the double blue arrows to move candidates to the next step
This is one of the times you can ‘bulk’ select all candidates to move them to the next status
60.
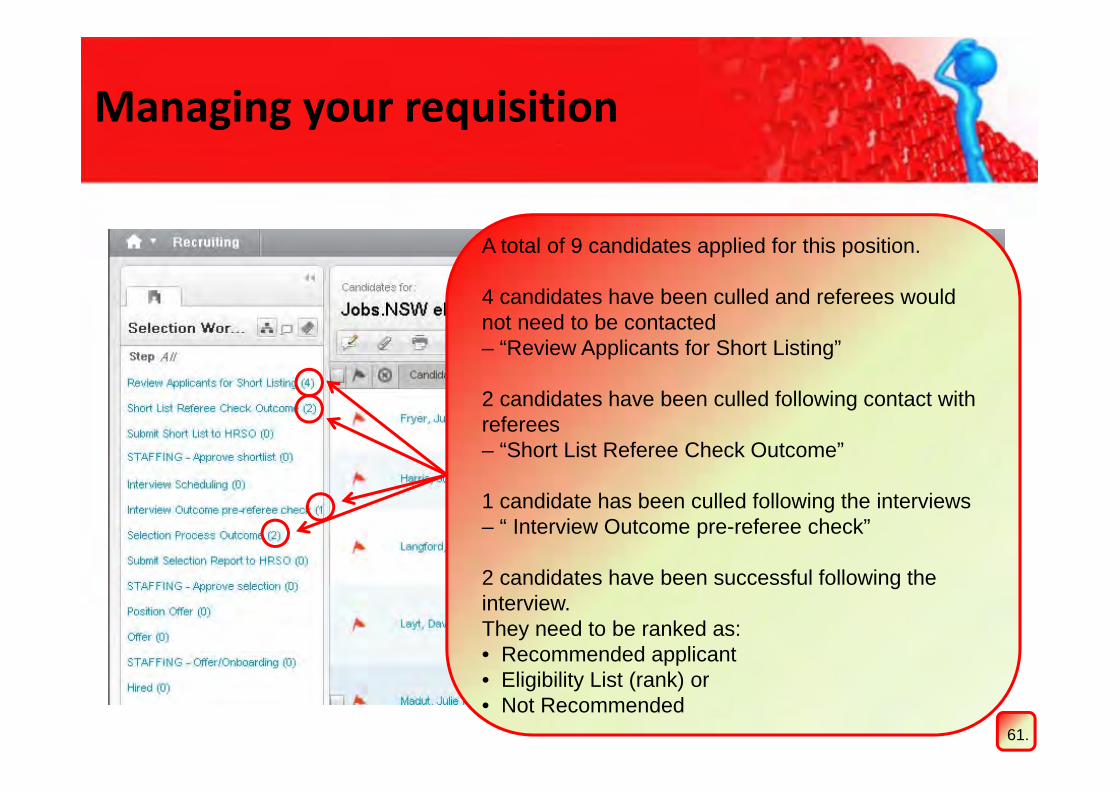
A total of 9 candidates applied for this position.
4 candidates have been culled and referees would not need to be contacted – “Review Applicants for Short Listing”
2 candidates have been culled following contact with referees – “Short List Referee Check Outcome”
1 candidate has been culled following the interviews – “ Interview Outcome pre-referee check”
2 candidates have been successful following the interview. They need to be ranked as:• Recommended applicant • Eligibility List (rank) or • Not Recommended
Managing your requisition
61.

Managing your requisition‐ Selection Process Outcome
Click on “Selection Process Outcome” to progress the Merit selection process to the next stage
62.
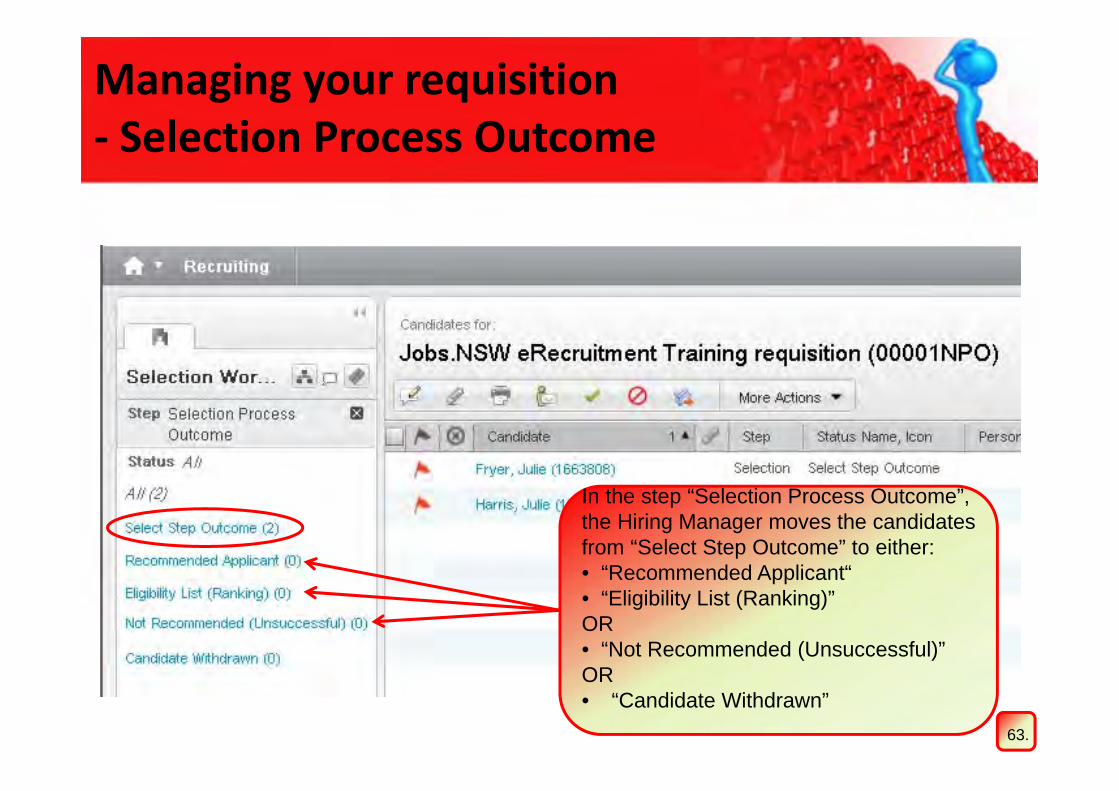
Managing your requisition‐ Selection Process Outcome
In the step “Selection Process Outcome”, the Hiring Manager moves the candidates from “Select Step Outcome” to either:• “Recommended Applicant“• “Eligibility List (Ranking)”OR• “Not Recommended (Unsuccessful)”OR• “Candidate Withdrawn”
63.

Managing your requisition‐ Selection Process Outcome
Select the candidate to be recommended for the position
After the candidate has been selected, click on the green arrow to move them to the “Recommended Applicant” status
64.

Managing your requisition‐ Selection Process Outcome
Double check the “New Step” and “New Status” are correct
Select “Save and Close” when you are finished
Do not check the “Send correspondence” box
Comments are mandatoryReasons need to reflect a summary of how the selection criteria was addressed at interview
65.

Managing your requisition‐ Selection Process Outcome
Select the candidate to be placed on the eligibility list
Click “More Actions” and then click “Change Step/status” to select the “Eligibility List (Ranking)” status
66.

Managing your requisition‐ Selection Process Outcome
Double check the “New Step” and “New Status” are correct
Select “Save and Close” when you are finished
Comments are mandatoryReasons for suitability need to reflect a summary of how the selection criteria was addressed with a degree of difference between applicants
Do not check the “Send correspondence” box
Select the “Merit Rank” for the candidate on the Eligibility list
67.

Managing your requisition‐ Selection Process Outcome
Check all candidates have been moved to another status group in this step
Select the candidate that is the recommended applicant and click on the double blue arrows to move the recommended applicant to the step “Submit Selection Report to HRSO”
68.

A total of 9 candidates applied for this position
4 candidates have been culled and referees would not need to be contacted – “Review Applicants for Short Listing”
2 candidates have been culled following contact with referees – “Short List Referee Check Outcome”
1 candidate has been culled following the interviews – “ Interview Outcome pre-referee check”
1 candidate is on the eligibility list – “Selection Process Outcome”
1 candidate is the Recommended Applicant– “Submit Selection Report to HRSO”
Managing your requisition
69.

Managing your requisition‐ Submit Selection Report to HRSO
Click on “Submit Selection Report to HRSO” to progress the Merit selection process to the next step
70.

Managing your requisition‐ Submit Selection Report to HRSO
Select the recommended applicant to move them to the next status and certify the panel process and participation
After the candidate has been selected, click on the green arrow to move them to the “All Panel Part of Process” status
71.

Managing your requisition‐ Submit Selection Report to HRSO
Double check the “New Step” and “New Status” are correct
Do not check the “Send correspondence” box
Select “Save and Close” when you are finished
Check this box to certify that all panel members have participated fully in the Merit Selection process
72.
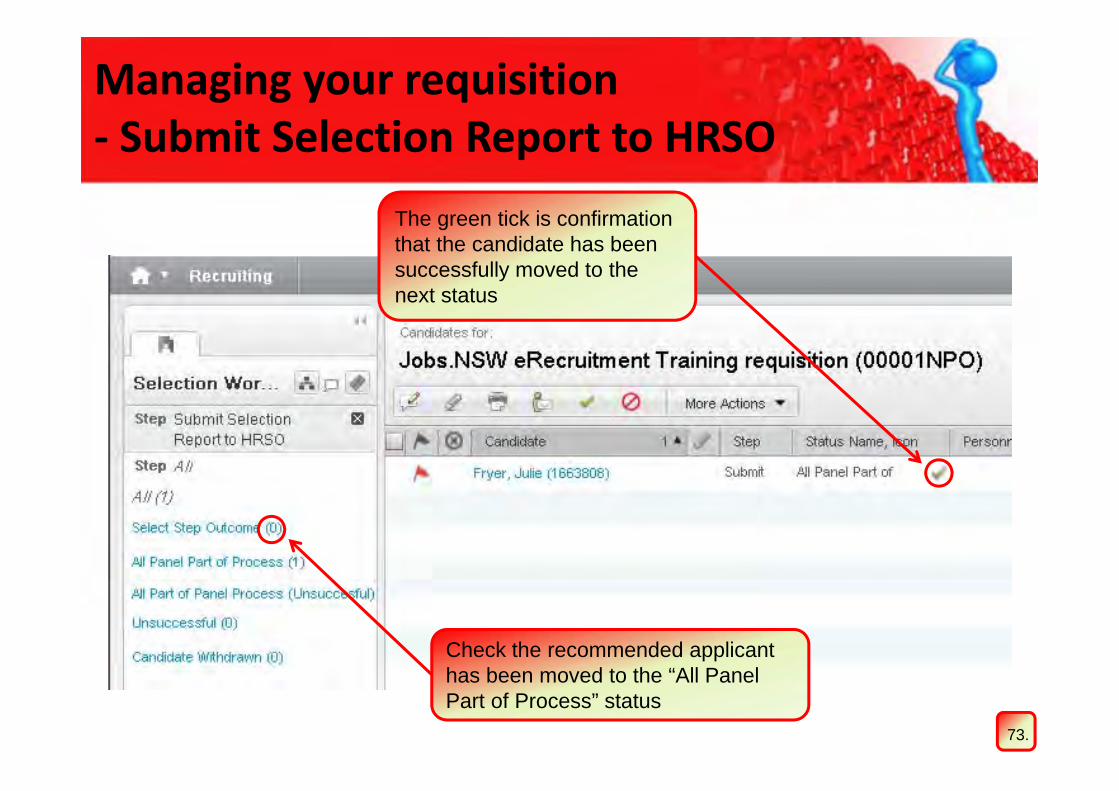
Managing your requisition‐ Submit Selection Report to HRSO
Check the recommended applicant has been moved to the “All Panel Part of Process” status
The green tick is confirmation that the candidate has been successfully moved to the next status
73.

Staffing now need to review and approve the “Selection Report” prior to any further action by the Hiring Manager / Convener or contact being made with the candidates
Managing your requisition
74.

Take a breakYou need to wait until you receive asystem generated email to proceed

Managing your requisition‐ Position Offer
Click on “Position Offer” to progress to the next step of the merit selection process
75.

In the step “Position Offer”, the Hiring Manager moves the recommended and approved applicant from “Select Step Outcome” to either:• “Accepted“OR• “Declined”
Managing your requisition‐ Position Offer
76.

Select the Recommended Applicant to move them to the next status
After the candidate has been selected, click on the green arrow to move them to the “Accepted” status
Managing your requisition‐ Position Offer
77.

Managing your requisition‐ Position Offer
78.
Double check the “New Step” and “New Status” are correct
Do not check the “Send correspondence” box
Select “Save and Close” when you are finished
The anticipated Entry on Duty (EOD) date to be provided by the Hiring Manager
These boxes MUST be ticked

Managing your requisition‐ Position Offer
Check the recommended applicant has been moved to the “Accepted” status
The green tick is confirmation that the recommended candidate has been successfully moved to the next status
79.
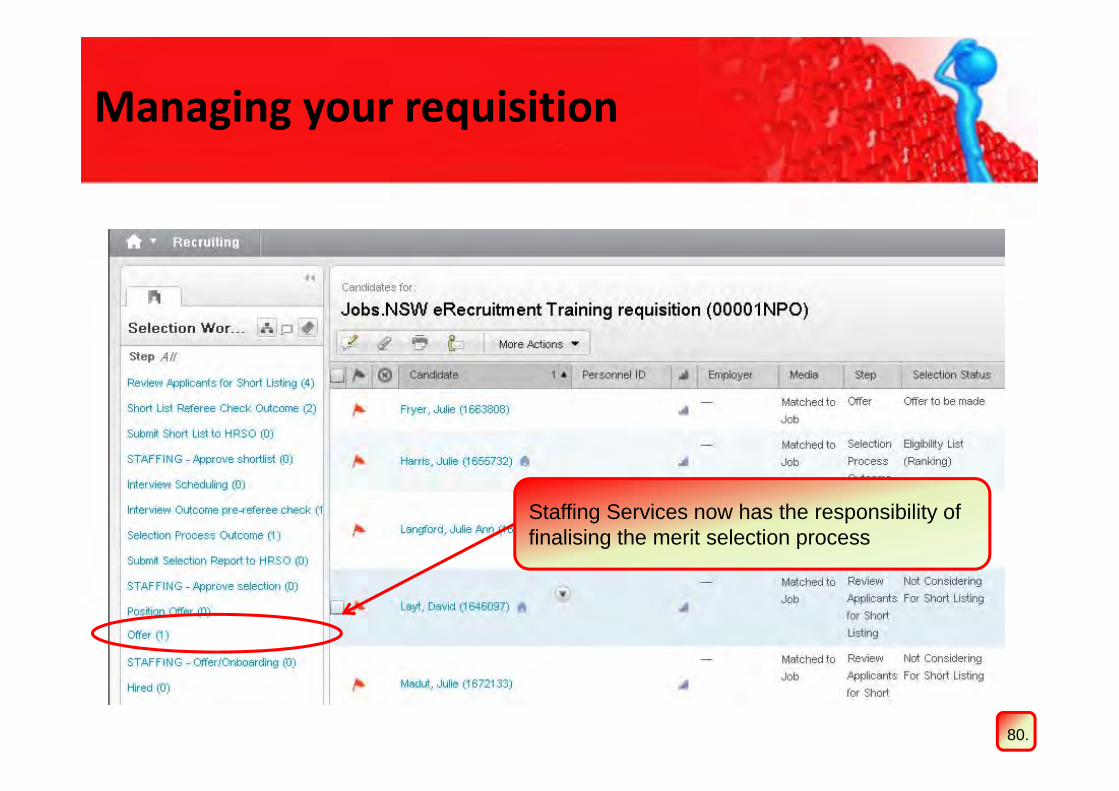
Staffing Services now has the responsibility of finalising the merit selection process
80.
Managing your requisition

CongratulationsYou have now successfully completedthe Merit Selection eRecrutiment process

81.
e‐Learning Materials
The e-Learning materials for jobs.nsw can be accessed at:http://www.teach.nsw.edu.au/jobsnsw/elearning.htm


