Job Safety Analysis (JSA) Guideline...Job Safety Analysis - Guideline Version 3.1 Instructions JSA...
10
Job Safety Analysis - Guideline Version 3.1 Job Safety Analysis (JSA) – Guideline A job safety analysis (JSA) is a procedure which helps integrate accepted safety and health principles and practices into a particular task or job operation. In a JSA, potential hazards are identified for each step of the task and controls recommended for the safest way to do the job. A JSA risk assessment must be developed when: the work activity involves a number of different tasks and hazards for which risk controls need to be planned, communicated and implemented changes at the workplace occur that may impact on the effectiveness of control measures a Permit to Work is required developing SOPs A Take 5 risk assessment can be used instead of a JSA when the work activity involves a simple task with a limited number of low risk hazards and there is good understanding about how the hazards should be controlled to ensure the task is completed safely. For example doing a visual inspection of a worksite, or closing off a valve, or investigating a tripped switch. Developing a JSA The person leading the work is responsible for developing the JSA. This is typically the: Person doing the work for single person tasks Person supervising the work for team tasks Person in charge of designing new work or equipment. One method of doing a JSA is to have a group of experienced workers complete the analysis through discussion. An advantage of this method is that more people are involved in a wider base of experience and promoting a more ready acceptance of the resulting work procedure. This method is most suitable for infrequently performed or new jobs; or situations where observation may not be practical. When leading JSA discussions ask: 1. What are we doing? 2. What could go wrong? 3. What do we need to do to make it safe? These three prompt questions will provide you with the basic information needed to build your JSA. Once you have your JSA framework built, use available guidance to ensure the risk control measured selected are sufficient to reduce the risk so far as reasonably practicable i.e. standards, best practice guidelines, WSL Key Requirements and risks assessments. Include diagrams and photos where needed. Benefits of doing a JSA The JSA process helps identify hazards and increase the job knowledge of those participating. Safety and health awareness is raised, communication between workers and supervisors is improved, and acceptance of safe work procedures is promoted.
Transcript of Job Safety Analysis (JSA) Guideline...Job Safety Analysis - Guideline Version 3.1 Instructions JSA...

Job Safety Analysis - Guideline Version 3.1
Job Safety Analysis (JSA) – Guideline
A job safety analysis (JSA) is a procedure which helps integrate accepted safety and health principles and
practices into a particular task or job operation. In a JSA, potential hazards are identified for each step of the
task and controls recommended for the safest way to do the job.
A JSA risk assessment must be developed when:
the work activity involves a number of different tasks and hazards for which risk controls need to be
planned, communicated and implemented
changes at the workplace occur that may impact on the effectiveness of control measures
a Permit to Work is required
developing SOPs
A Take 5 risk assessment can be used instead of a JSA when the work activity involves a simple task with a
limited number of low risk hazards and there is good understanding about how the hazards should be
controlled to ensure the task is completed safely. For example doing a visual inspection of a worksite, or
closing off a valve, or investigating a tripped switch.
Developing a JSA
The person leading the work is responsible for developing the JSA. This is typically the:
Person doing the work for single person tasks
Person supervising the work for team tasks
Person in charge of designing new work or equipment.
One method of doing a JSA is to have a group of experienced workers complete the analysis through
discussion. An advantage of this method is that more people are involved in a wider base of experience and
promoting a more ready acceptance of the resulting work procedure. This method is most suitable for
infrequently performed or new jobs; or situations where observation may not be practical.
When leading JSA discussions ask:
1. What are we doing?
2. What could go wrong?
3. What do we need to do to make it safe?
These three prompt questions will provide you with the basic information needed to build your JSA. Once you
have your JSA framework built, use available guidance to ensure the risk control measured selected are
sufficient to reduce the risk so far as reasonably practicable i.e. standards, best practice guidelines, WSL Key
Requirements and risks assessments. Include diagrams and photos where needed.
Benefits of doing a JSA
The JSA process helps identify hazards and increase the job knowledge of those participating. Safety and
health awareness is raised, communication between workers and supervisors is improved, and acceptance of
safe work procedures is promoted.

Job Safety Analysis - Guideline Version 3.1
Instructions
JSA Process
There are seven basic steps to follow:
Step 1: Select job to be analysed. When writing the description of the works, clearly define the activities for
which the JSA applies. Complex jobs, or jobs that last several weeks, it’s often more effective to break the job
analysis into specific work packs each with an individual JSA.
When selecting a job to be analysed, consider the following:
• The scope of the work.
• When and where is the job performed?
• Who has to do it and how often?
• The activities involved and how are they done?
• What equipment or procedures are needed to perform the job safely?
Step 2: Record the steps in the task. Examine a specific job by breaking it down into a series of steps or tasks.
This will enable you to discover potential hazards you and the Work Team may encounter. Each job or
operation will consist of a set of steps or tasks. Be sure to list all the steps needed to perform the job. Some
steps may not be performed each time, i.e. setting up the work area, however, if that step is generally part of
the job, it should be listed.
Example:
Step 3: Identify the hazards and assess the risks. A hazard is a potential danger. The purpose of the Job Safety
Analysis is to identify ALL hazards, both those produced by the environment or conditions and those
connected with the work activities. Compiling an accurate and complete list of potential hazards will allow you
to develop the recommended controls to ensure that work proceeds safely.
Select job to be analysed
Record the steps in the
task
Identify the hazards and assess the
risks.
Develop control
measures
Follow Control of Work
Proceedure to obtain
authorisation to proceed with work
Communicate and implement
the JSA
Monitor the work and maintain controls

Job Safety Analysis - Guideline Version 3.1
Example:
Tip: Insert a new row for each hazard identified.
How to Assess the Risk
When we refer to risk in relation to occupational safety and health the most commonly used definition is 'risk
is the likelihood that a person may be harmed or suffers adverse health effects if exposed to a hazard.'
Once you have identified the hazards involved in the task, estimate what realistic severity of harm that may
occur, and the likelihood of that occurring. A risk matrix tool provides a numerical score for the risk
assessment.
Firstly assess the Existing Risk by:
1. Identifying the hazard; take into consideration who may be harmed and how that harm may occur
2. Identifying existing controls that will remain active during the work
3. Using the risk matrix determine the LIKELIHOOD and SEVERITY of harm

Job Safety Analysis - Guideline Version 3.1
Example:
Step 4: Develop control measures.
Hierarchy of Control
Reduce the LIKELIHOOD of harm occurring by
adding Prevention Controls. These are controls
which are designed to prevent an event
occurring (the point where control is lost). For
example: a guard isolates moving machinery
from body parts, isolations prevent energy from
harming humans, training enables workers to
work safely, and signage informs others. All of
these are Prevention Controls.
Reduce the SEVERITY of potential harm by
adding Mitigation Controls. These controls acknowledge that sometimes prevention controls fail and when
this happens, mitigation controls can reduce the severity of the harm. For example; seat belts and airbags in
vehicles minimise the severity of harm in a crash, a harness will catch you if you fall and a rescue plan will
enable the team to get you down safely. When a hazard comes into direct contact with a human, PPE can
minimise the harm it causes and decontamination, evacuation and emergency plans all work to mitigate the
severity of harm.
Job Safety Analysis - Guideline Version 3.1
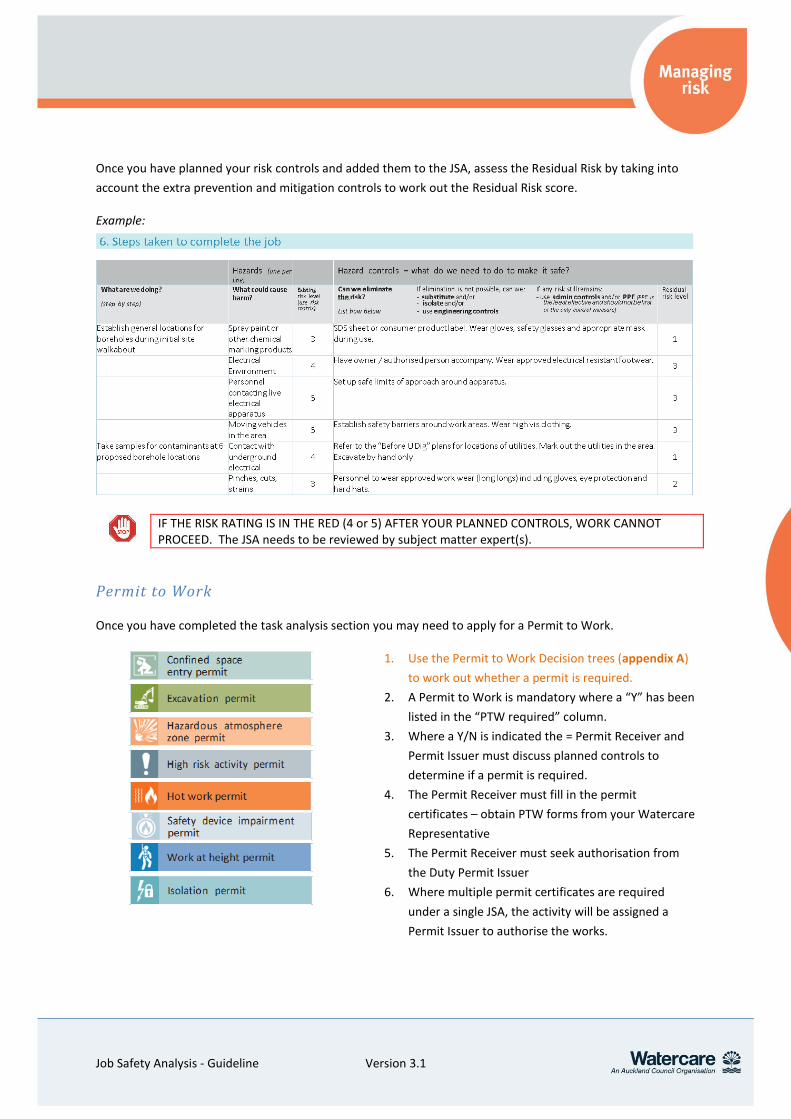
Once you have planned your risk controls and added them to the JSA, assess the Residual Risk by taking into
account the extra prevention and mitigation controls to work out the Residual Risk score.
Example:
IF THE RISK RATING IS IN THE RED (4 or 5) AFTER YOUR PLANNED CONTROLS, WORK CANNOT PROCEED. The JSA needs to be reviewed by subject matter expert(s).
Permit to Work
Once you have completed the task analysis section you may need to apply for a Permit to Work.
1. Use the Permit to Work Decision trees (appendix A)
to work out whether a permit is required.
2. A Permit to Work is mandatory where a “Y” has been
listed in the “PTW required” column.
3. Where a Y/N is indicated the = Permit Receiver and
Permit Issuer must discuss planned controls to
determine if a permit is required.
4. The Permit Receiver must fill in the permit
certificates – obtain PTW forms from your Watercare
Representative
5. The Permit Receiver must seek authorisation from
the Duty Permit Issuer
6. Where multiple permit certificates are required
under a single JSA, the activity will be assigned a
Permit Issuer to authorise the works.

Job Safety Analysis - Guideline Version 3.1
The chart below outlines the work supervision and permit authorisation requirements based on the residual
risk assessment score.
Residual risk
assessment
score
High
(4-5)
Medium
(3)
Low
(1-2)
Required
controls
PI to authorise
permits.
Site/Asset manager to
authorise JSA
PI must view the site
and verify controls
with the PR prior to
work starting.
PI to authorise permits
PI to authorise
permits
Supervision
required by
Permit Receiver
PR must be at the job
at all times.
Absences from the job site of
1–2 hours acceptable at the
PI’s discretion. Must be
contactable at all times.
Absences from the
job site of 2–4 hours
acceptable at the
PI’s discretion. Must
be contactable at all
times.
Simultaneous
permits
PR cannot be
responsible for any
other permits.
PR can be responsible for
one orange-level permit and
one green-level permit.
PR can be
responsible for up
to three green-level
permits.
Step 5: Follow Control of Work Procedure (appendix B) to obtain Watercare authorisation to proceed with
work. The Person in Charge of the Work is responsible for all aspects of the implementation and adherence to
the JSA.
Step 6: Communicate and implement the JSA
Make sure that the JSAs are easy to read and understand. Communicate the JSA to all personnel and have the
documents available onsite to read, sign-on and update.

Job Safety Analysis - Guideline Version 3.1
Step 7: Monitor the work and maintain controls
During the work an appropriate level of supervision must be provided to ensure that the controls are
maintained.
Whenever a variation from the JSA occurs, for example a new task, change of risk, unexpected event; the
variation must be clearly identified, hazards identified and risk controls planned. The variation must be
authorised by your Watercare Representative before work can continue.
Any variations to the JSA need to be reviewed by your Watercare Representative(s).
Job Safety Analysis - Guideline Version 3.1
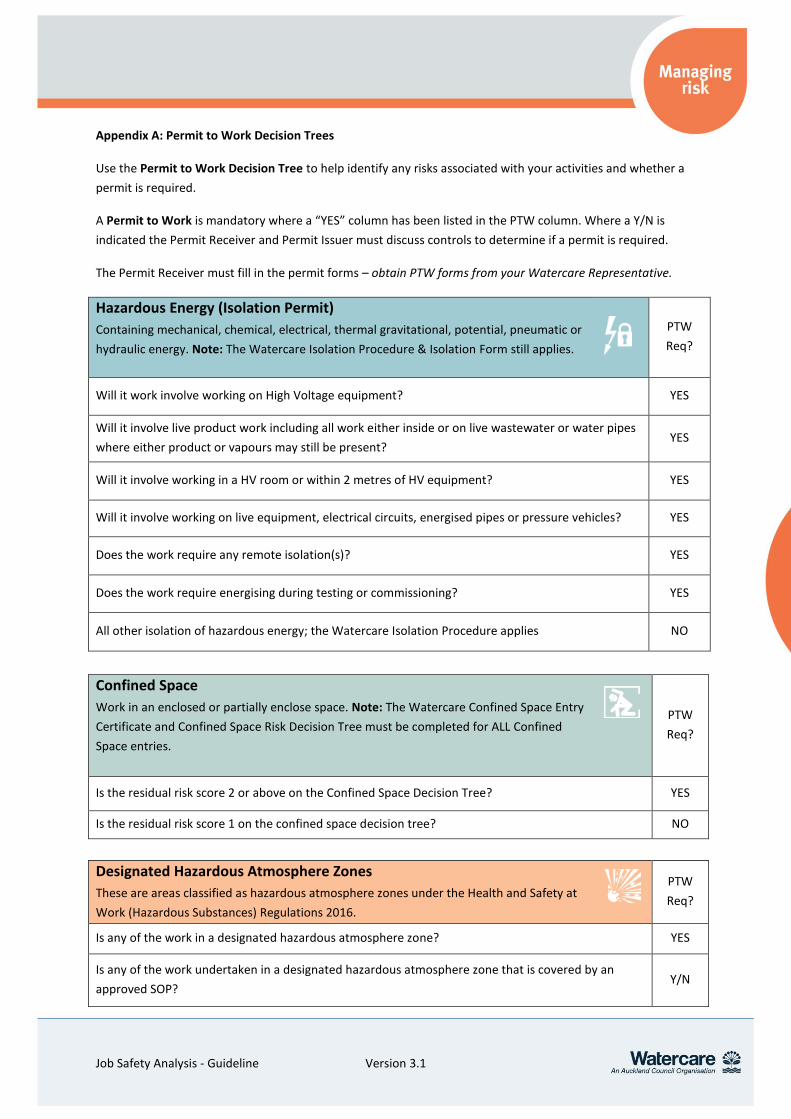
Appendix A: Permit to Work Decision Trees
Use the Permit to Work Decision Tree to help identify any risks associated with your activities and whether a
permit is required.
A Permit to Work is mandatory where a “YES” column has been listed in the PTW column. Where a Y/N is
indicated the Permit Receiver and Permit Issuer must discuss controls to determine if a permit is required.
The Permit Receiver must fill in the permit forms – obtain PTW forms from your Watercare Representative.
Hazardous Energy (Isolation Permit)
Containing mechanical, chemical, electrical, thermal gravitational, potential, pneumatic or
hydraulic energy. Note: The Watercare Isolation Procedure & Isolation Form still applies.
PTW
Req?
Will it work involve working on High Voltage equipment? YES
Will it involve live product work including all work either inside or on live wastewater or water pipes
where either product or vapours may still be present? YES
Will it involve working in a HV room or within 2 metres of HV equipment? YES
Will it involve working on live equipment, electrical circuits, energised pipes or pressure vehicles? YES
Does the work require any remote isolation(s)? YES
Does the work require energising during testing or commissioning? YES
All other isolation of hazardous energy; the Watercare Isolation Procedure applies NO
Confined Space
Work in an enclosed or partially enclose space. Note: The Watercare Confined Space Entry
Certificate and Confined Space Risk Decision Tree must be completed for ALL Confined
Space entries.
PTW
Req?
Is the residual risk score 2 or above on the Confined Space Decision Tree? YES
Is the residual risk score 1 on the confined space decision tree? NO
Designated Hazardous Atmosphere Zones
These are areas classified as hazardous atmosphere zones under the Health and Safety at
Work (Hazardous Substances) Regulations 2016.
PTW
Req?
Is any of the work in a designated hazardous atmosphere zone? YES
Is any of the work undertaken in a designated hazardous atmosphere zone that is covered by an
approved SOP? Y/N

Job Safety Analysis - Guideline Version 3.1
Working at Heights
Working in place where a person could be injured if they fell from one level to another. PTW
Req?
Will it involve working at a height of 5 metres or higher? (Notification to Worksafe?) YES
Will it involve working at a height between 2 metres and 5 metres? Excludes: Under 5 metres when
working from a scaffold erected by a competent person or from a scissor lift, a boom lift or a
permanent ladder where the fall protection is permanently engineered into the plant or
equipment.
YES
Hot Work
Where a source of ignition is introduced to a work environment
PTW
Req?
Does it involve any non-intrinsically safe activity within a confined space or designated hazardous
atmosphere zone? YES
Will there be any hot work on equipment or pipes? YES
Will there be any hot work in an operational plant, offices or admin areas? Y/N
Will the hot work be undertaken outdoors, when a fire ban is in place and/or within 3 metres of a
structure? Y/N
Excavation
Work involving the removal of soil or rock from a site to form an open face trench, hole or
cavity.
PTW
Req?
Will the excavation be deeper than 1.5metres? YES
Is there a risk of atmospheric contamination or build-up of gases or fumes within the excavation? YES
Is de-watering required? YES
Will the excavation contain contaminated soil? YES
Safety Device Impairment
Where the work will disable or affect emergency systems (emergency monitoring systems,
fire fighting, escape or rescue systems) or safety critical elements on a Major Hazard
Facility.
PTW
Req?
Will the work disable or affect emergency systems, including leaving a site operating with a
disabled emergency alert system or safety device? YES
Will the work disable or affect a MHF safety critical element as specified in the site MHF Safety Case
(applies to Ardmore WTP only) YES

Job Safety Analysis - Guideline Version 3.1
Appendix B
Decide risk assessment Tools
JSA
Take 5 (with a SOP)
Residual risk high (4-5)?
YES
Permit to Work Required? (Refer PTW decision trees)
NO
Isolations Required?
Watercare-approved self-isolation (within one working shift, four or
less isolation points).
All other Isolations
OR
Yes
Risk level reduced to 3 or
less?
YES
Work Pack documents must include a risk assessment (JSA) or an SOP or a combination of both.Additional documents may include:- Permit Certificates- Isolation Requests- Plans / drawings-Other relevant information
NO
Work Starts
Work Initiated
Watercare Control of Work – Process flow
NO
Control =- Control Room (manned sites)- Duty Operator / Process Technician (non-metro)-Networks Engineer (Networks and transmission)
Permit to Work Required?
Watercare Representative Assigns the Work
Watercare Representative reviews the work pack
Person in Charge of the Work obtains confirmation to
proceed from Control (fills in Work Authority Register)
Person in Charge of the Work prepares the risk assessment
and the work pack documents
Subject Matter Expert(s) (SME) reviews JSA
Site / Asset Manager JSA approval required
NO
Permit Receiver to prepare permit forms for the
work pack
YES
Person in Charge of the Work
to fill in Isolation request form
Select isolation OR
Watercare Approver authorises work pack
Approved?
Approved work packlodged with Control
Control gives final Go or No- go
Permit Issuer checks for conflicting activities, issues permits for a defined time-period
Permit Issued?
Person in Charge of the Work obtains confirmation to proceed from Control
(fills in Work Authority Register)
Approved?
Approved Person(s) to apply isolations
as required
Watercare Approved
Person to apply locks
Person in Charge of the Work communicates work plan to
the Work Team, verifies hazards, risks and controls, monitors the work (Take 5).
Work Pack returned to Person in Charge
of the Work for additional information