JioFi 1 2 3 4 About your device LED/jmr_1140_qsg-fifth.pdf · 2 Open the back cover and install the...
6
2 Open the back cover and install the SIM and SD cards. To install the SIM card, insert the SIM card with the IC chip facing down. To install the SD card, slide the SD tray downwards (OPEN) to lift the tray, insert the SD card with the IC chip facing down, and slide the tray upwards (LOCK) to secure the tray. 4 The Setup is done. Now Turn ON your device and connect up to 31 WiFi enabled devices on your wireless network by using the SSID and password. To connect quickly, press WPS button for 3 seconds and then press the WPS button on your wireless device to connect. 5 Welcome to your digital life. Download Jio4GVoice on your smart phone to enable HD Voice Calling and Video Calling using your JioFi. * JioFi works with Jio SIM card only. About your device Charging the device When charging the battery for the first time, it is recommended to charge it to 100% with adapter and cable provided in turned OFF position. Charging time USB Cable ~ Approx. 6hrs 10mins Power adapter ~ Approx. 3hrs 30mins Battery life on LTE* *Depends on network conditions Standby time ~ Approx. 480hrs Running time ~ Approx. 7-8hrs Turning the device ON or OFF To turn ON the device, press and hold the Power button for 1 second. To turn OFF the device, press and hold the Power button for 3 seconds. Resetting the device Occasionally, you may need to perform a Factory reset when you forget login username or password. To reset, press the Power button and the WPS button simultaneously for 5 seconds. The four LED indicators will blink in blue at the same time. 3 Remember or write down the SSID (Service Set Identifier) and Password mentioned in the battery compartment before inserting the battery and replacing back cover. JioFi 5 steps to be connected everywhere. 1 Know your JioFi WiFi indicator USB charging port Power button Power indicator Network signal strength indicator Battery indicator WPS button RSN: RAMMFLC00000001 IMEI: 911504950000010 SSID: JioFi4_000000 PWD: abcd000000 MAC ID: 581D91000000 EAN: 8809423980096 System Log IN USERNAME/PWD: administrator Commodity: Router JMR1140(Black) RSN: RAMMFLC00000001 IMEI: 911504950000010 SSID: JioFi4_000000 PWD: abcd000000 MAC ID: 581D91000000 EAN: 8809423980096 System Log IN USERNAME/PWD: administrator Commodity: Router JMR1140(Black)
Transcript of JioFi 1 2 3 4 About your device LED/jmr_1140_qsg-fifth.pdf · 2 Open the back cover and install the...
2 Open the back cover and install the SIM and SD cards. To install the SIM card, insert the SIM card with the IC chip facing down. To install the SD card, slide the SD tray downwards (OPEN) to lift the tray, insert the SD card with the IC chip facing down, and slide the tray upwards (LOCK) to secure the tray.
4 The Setup is done. Now Turn ON your device and connect up to 31 WiFi enabled devices on your wireless network by using the SSID and password.
To connect quickly, press WPS button for 3 seconds and then press the WPS button on your wireless device to connect.
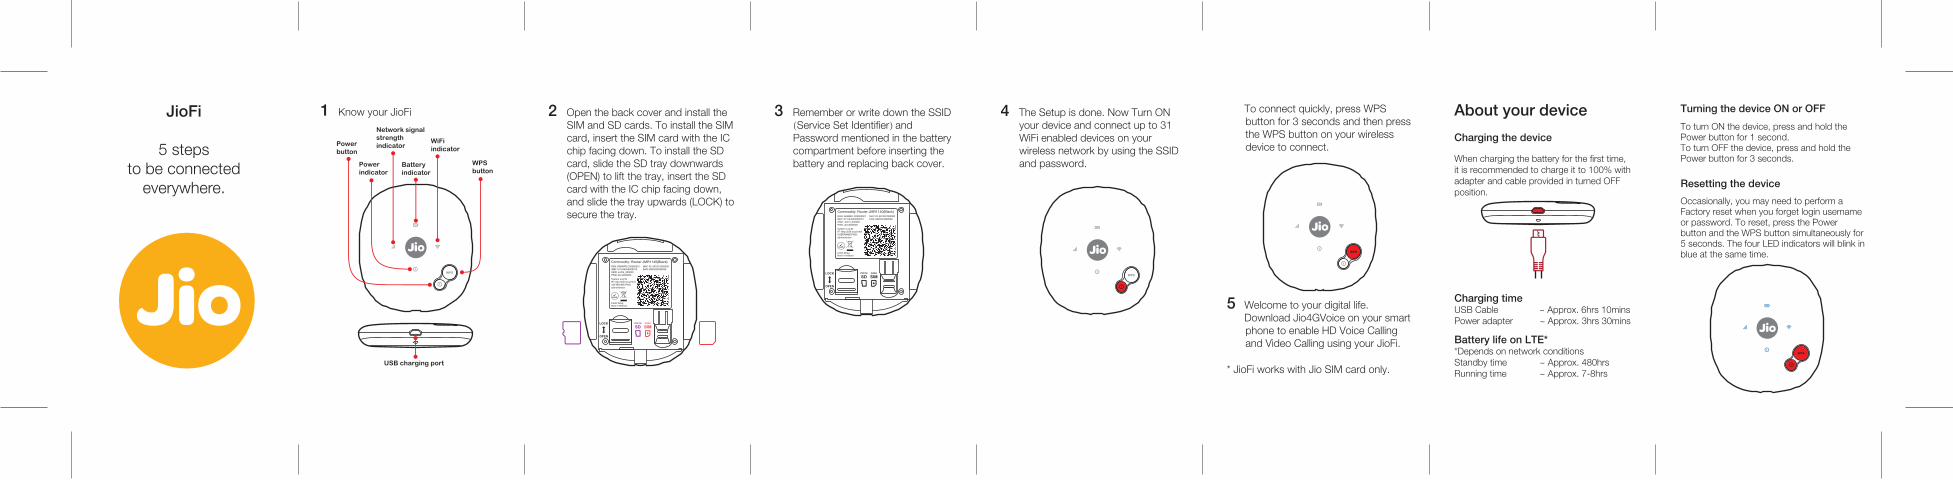
5 Welcome to your digital life. Download Jio4GVoice on your smart
phone to enable HD Voice Calling and Video Calling using your JioFi.
* JioFi works with Jio SIM card only.
About your device
Charging the device
When charging the battery for the first time, it is recommended to charge it to 100% with adapter and cable provided in turned OFF position.
Charging timeUSB Cable ~ Approx. 6hrs 10minsPower adapter ~ Approx. 3hrs 30mins
Battery life on LTE**Depends on network conditionsStandby time ~ Approx. 480hrs Running time ~ Approx. 7-8hrs
Turning the device ON or OFF
To turn ON the device, press and hold the Power button for 1 second.To turn OFF the device, press and hold the Power button for 3 seconds.
Resetting the device
Occasionally, you may need to perform a Factory reset when you forget login username or password. To reset, press the Power button and the WPS button simultaneously for 5 seconds. The four LED indicators will blink in blue at the same time.
Indicators
*Sleep mode (Low power consumption)Your device will enter a sleep mode after some time (when there is no device connected).Short press the Power button to bring it back to active state. This time period can be altered through WebGUI or managed devices section of MyJio App or jio.com.
Manage your deviceUsing the Web Configuration utility
Change the network name (SSID), the Security Mode and Key, configure the sleep mode and other settings.
Connect your Computer/Smartphone to JioFi device over USB or WiFi interface.
Enter the URL: http://jiofi.local.html in address bar of the browser to open the web configuration page.
Click the 'Login' button on the top right corner of web page screen by using 'administrator' as username and password to access the homepage of Web Configuration utility.
Customize network, WiFi and other parameters and access SD card over WiFi using the web configuration utility. You can also customize some settings by accessing the JioFi widget. Download the MyJio App and access the above widget.
Certain end user applications like online console gaming and online streaming like DVR need certain ports to be opened. Kindly check for Gaming andApps Management Tab in Web Configuration Utility for more details, and for further help please contactJioCare.
For fast supportA user cannot access the Internet
Please check if the user is connected to JioFi SSID. Make sure your SIM card is properly inserted.Check if your JioFi is connected to the network.Ensure your sim card is activated and has adequate data balance available.
Not able to change my device settings
Please connect computer/smartphone to your JioFi device over USB/WiFi interface.Enter http://jiofi.local.html in the browser’s URL input field. Click the 'Login' button on the top right corner of your web page screen. The default username and password are 'administrator'.
Cannot establish a WiFi connection
Please make sure the WiFi is active on your JioFi. Refresh the network list in your computer/smartphone and select the correct SSID. Type the
correct network
key (WiFi password) when you connected to your JioFi.
SafetyTo the Owner
Always keep the device at a distance of 20cm from medical devices like hearing aids, pacemakers as it may interfere while the device is turned on. It is advisable to consult your physician or the manufacturer of the medical device before using your device.
Avoid using device in areas with high electromagnetic radiations.
Avoid overnight charging of the device.
Be aware of the usage limitation when using your device at places such as aircrafts, petrol stations, hospitals, oil warehouses or chemical factories, where there are explosive gases or explosive products being processed. Turn off your device if required.
Do not open and touch the inner area of your device as it may affect your device performance.
Keep the device out of children’s reach. Your device may cause injury if used as a toy.Do not touch metallic parts of your device as they may become hot when the device is working.
Using your Device
Use only original and authorized accessories. Unauthorized accessories may affect your device performance.Do not expose your device to moisture or water.Handle carefully. Do not drop!Kindly use your device with a Nano Sim card only. Do not try to insert sim card of any other size as this may lead to damage to sim slot connector pins and might render your device useless.
Battery Usage precautions
DO NOT - short circuit or try to disassemble the battery as it may cause fire.Always store battery in cool dry place.Always use genuine and authorized charger to charge the battery.Replace worn out battery with authorized and genuine battery.Dispose worn out battery in an appropriate way.Battery to be used for intended purpose only.
Information
Technical specifications
GeneralSupported OS WinXP (SP3 onwards)/Vista/Win7/ Win8/Win10/MAC/LinuxInput voltage 5VOutput voltage 4.35V MaximumMaximum power 3.5Wconsumption Memory 2Gbit ROM and 2Gbit RAM
External interfaces Micro-USB port Nano-SIM card interface Micro-SD card interface (up to 32GB)Operating temp. charge Charging: 0 ˚C~+40 ˚C Discharge: 0 ˚C~+60 ˚CDimensions (L*W*H) 88.7 x 78.9 x 16.6mmNo. of device supported 31(WiFi) + 1(USB tethering)
BandsStandards compliance WAN: LTE (2300/1800/850MHz) WLAN: IEEE 802.11b/g/n 2.4G only
BatteryRated capacity 2,600mAhMaximum charge voltage 4.35V
Power adaptorInput power supply AC 100~240VOutput power supply DC 5V
EnvironmentalAmbient temperature Operating: 0 ˚C~+40 ˚C Storage: -20 ˚C~+60 ˚CHumidity 5% to 95% (non-condensing)SAR body value 0.843 W/kg
3 Remember or write down the SSID (Service Set Identifier) and Password mentioned in the battery compartment before inserting the battery and replacing back cover.
JioFi
5 steps to be connected
everywhere.
1 Know your JioFi
WiFi indicator
USB charging port
Power button
Power indicator
Network signal strength indicator
Battery indicator
WPS button
RSN: RAMMFLC00000001IMEI: 911504950000010SSID: JioFi4_000000PWD: abcd000000
MAC ID: 581D91000000EAN: 8809423980096
System Log IN
USERNAME/PWD:administrator
Commodity: Router JMR1140(Black)
RSN: RAMMFLC00000001IMEI: 911504950000010SSID: JioFi4_000000PWD: abcd000000
MAC ID: 581D91000000EAN: 8809423980096
System Log IN
USERNAME/PWD:administrator
Commodity: Router JMR1140(Black)

2 Open the back cover and install the SIM and SD cards. To install the SIM card, insert the SIM card with the IC chip facing down. To install the SD card, slide the SD tray downwards (OPEN) to lift the tray, insert the SD card with the IC chip facing down, and slide the tray upwards (LOCK) to secure the tray.
4 The Setup is done. Now Turn ON your device and connect up to 31 WiFi enabled devices on your wireless network by using the SSID and password.
To connect quickly, press WPS button for 3 seconds and then press the WPS button on your wireless device to connect.
5 Welcome to your digital life. Download Jio4GVoice on your smart
phone to enable HD Voice Calling and Video Calling using your JioFi.
* JioFi works with Jio SIM card only.
About your device
Charging the device
When charging the battery for the first time, it is recommended to charge it to 100% with adapter and cable provided in turned OFF position.
Charging timeUSB Cable ~ Approx. 6hrs 10minsPower adapter ~ Approx. 3hrs 30mins
Battery life on LTE**Depends on network conditionsStandby time ~ Approx. 480hrs Running time ~ Approx. 7-8hrs
Turning the device ON or OFF
To turn ON the device, press and hold the Power button for 1 second.To turn OFF the device, press and hold the Power button for 3 seconds.
Resetting the device
Occasionally, you may need to perform a Factory reset when you forget login username or password. To reset, press the Power button and the WPS button simultaneously for 5 seconds. The four LED indicators will blink in blue at the same time.
Indicators
*Sleep mode (Low power consumption)Your device will enter a sleep mode after some time (when there is no device connected).Short press the Power button to bring it back to active state. This time period can be altered through WebGUI or managed devices section of MyJio App or jio.com.
Manage your deviceUsing the Web Configuration utility
Change the network name (SSID), the Security Mode and Key, configure the sleep mode and other settings.
Connect your Computer/Smartphone to JioFi device over USB or WiFi interface.
Enter the URL: http://jiofi.local.html in address bar of the browser to open the web configuration page.
Click the 'Login' button on the top right corner of web page screen by using 'administrator' as username and password to access the homepage of Web Configuration utility.
Customize network, WiFi and other parameters and access SD card over WiFi using the web configuration utility. You can also customize some settings by accessing the JioFi widget. Download the MyJio App and access the above widget.
Certain end user applications like online console gaming and online streaming like DVR need certain ports to be opened. Kindly check for Gaming andApps Management Tab in Web Configuration Utility for more details, and for further help please contactJioCare.
For fast supportA user cannot access the Internet
Please check if the user is connected to JioFi SSID. Make sure your SIM card is properly inserted.Check if your JioFi is connected to the network.Ensure your sim card is activated and has adequate data balance available.
Not able to change my device settings
Please connect computer/smartphone to your JioFi device over USB/WiFi interface.Enter http://jiofi.local.html in the browser’s URL input field. Click the 'Login' button on the top right corner of your web page screen. The default username and password are 'administrator'.
Cannot establish a WiFi connection
Please make sure the WiFi is active on your JioFi. Refresh the network list in your computer/smartphone and select the correct SSID. Type the
correct network
key (WiFi password) when you connected to your JioFi.
SafetyTo the Owner
Always keep the device at a distance of 20cm from medical devices like hearing aids, pacemakers as it may interfere while the device is turned on. It is advisable to consult your physician or the manufacturer of the medical device before using your device.
Avoid using device in areas with high electromagnetic radiations.
Avoid overnight charging of the device.
Be aware of the usage limitation when using your device at places such as aircrafts, petrol stations, hospitals, oil warehouses or chemical factories, where there are explosive gases or explosive products being processed. Turn off your device if required.
Do not open and touch the inner area of your device as it may affect your device performance.
Keep the device out of children’s reach. Your device may cause injury if used as a toy.Do not touch metallic parts of your device as they may become hot when the device is working.
Using your Device
Use only original and authorized accessories. Unauthorized accessories may affect your device performance.Do not expose your device to moisture or water.Handle carefully. Do not drop!Kindly use your device with a Nano Sim card only. Do not try to insert sim card of any other size as this may lead to damage to sim slot connector pins and might render your device useless.
Battery Usage precautions
DO NOT - short circuit or try to disassemble the battery as it may cause fire.Always store battery in cool dry place.Always use genuine and authorized charger to charge the battery.Replace worn out battery with authorized and genuine battery.Dispose worn out battery in an appropriate way.Battery to be used for intended purpose only.
Information
Technical specifications
GeneralSupported OS WinXP (SP3 onwards)/Vista/Win7/ Win8/Win10/MAC/LinuxInput voltage 5VOutput voltage 4.35V MaximumMaximum power 3.5Wconsumption Memory 2Gbit ROM and 2Gbit RAM
External interfaces Micro-USB port Nano-SIM card interface Micro-SD card interface (up to 32GB)Operating temp. charge Charging: 0 ˚C~+40 ˚C Discharge: 0 ˚C~+60 ˚CDimensions (L*W*H) 88.7 x 78.9 x 16.6mmNo. of device supported 31(WiFi) + 1(USB tethering)
BandsStandards compliance WAN: LTE (2300/1800/850MHz) WLAN: IEEE 802.11b/g/n 2.4G only
BatteryRated capacity 2,600mAhMaximum charge voltage 4.35V
Power adaptorInput power supply AC 100~240VOutput power supply DC 5V
EnvironmentalAmbient temperature Operating: 0 ˚C~+40 ˚C Storage: -20 ˚C~+60 ˚CHumidity 5% to 95% (non-condensing)SAR body value 0.843 W/kg
3 Remember or write down the SSID (Service Set Identifier) and Password mentioned in the battery compartment before inserting the battery and replacing back cover.
Power save mode/Sleep mode*OnPower
OnPower save mode/Sleep mode* in no service
Network signalstrength
On Good Signal
On Medium Signal
On Weak Signal
BatteryOn
On
On
Battery high/AC adaptor connected without battery inside
Battery medium
Battery low
Blink
Blink
Blink
Charging while Battery is high
Blink FastToo low to power on (when device is powered off)
Charging while Battery is medium
Charging while Battery is low
WiFi
All 4 LEDs
On WiFi connected
On WiFi standby
Blink Fast WPS standby
1
2
3
4
5
Blink Normal mode
Normal mode in no serviceBlink Fast
Blink FastNo service/SIM card error/no SIM card
Transferring dataBlink
Firmware upgradeOn
With love, from Jio
Reach us
If you have further question or require personal assistance, please contact JioCare by calling or sending on email.
We wish you a beautiful experience with Jio.
Phone: 198 from your Jio number or 1800-88-99999 from any network (24 Hrs.)
Email: [email protected]
Visit www.jio.com
RoHS and Disposal
This product is RoHS compliant.Do not dispose with household waste.