Jaws - Pinball Guide by...
34
Page 1 of 34 Jaws Table Guide By ShoryukenToTheChin 1 2 3 4 6 5 7 8 9 10 11 12 13
Transcript of Jaws - Pinball Guide by...
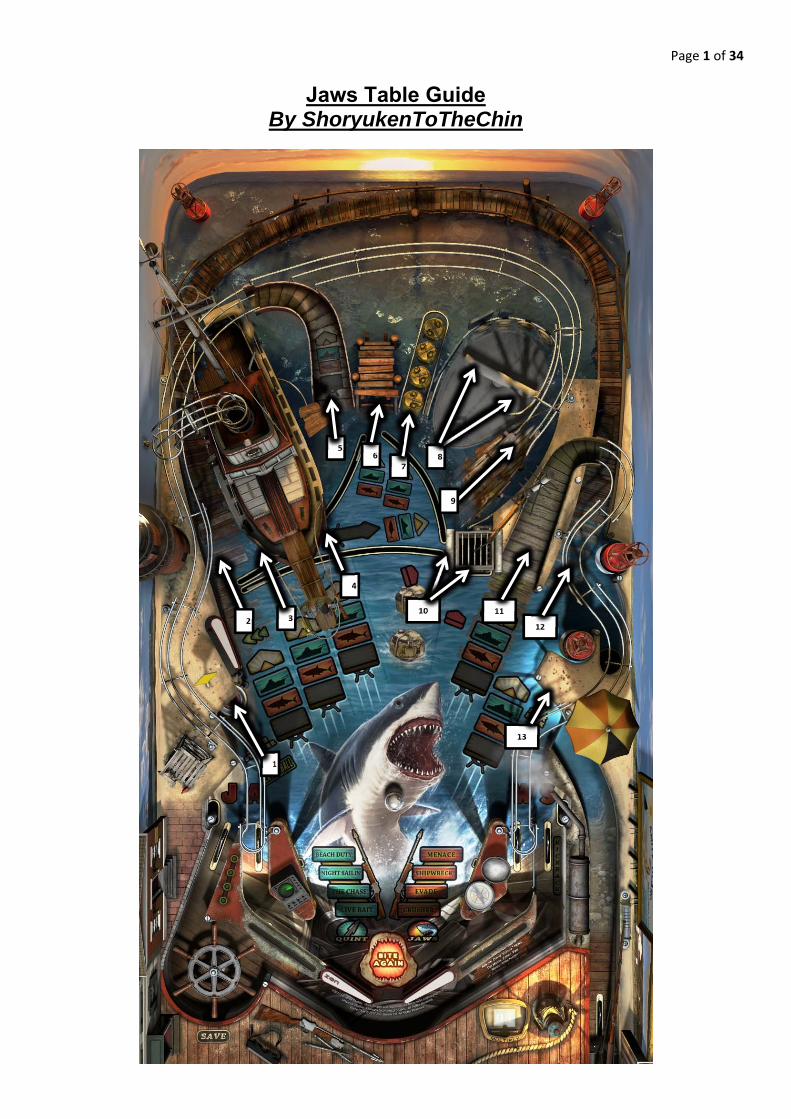
Page 1 of 34
Jaws Table Guide By ShoryukenToTheChin
1
2 3
4
65
78
9
10 11
12
13
Page 2 of 34
Key to Table Overhead Image –
1. Jaws Sink Hole 2. Left Orbit 3. Left Orca Loop 4. Right Orca Loop 5. Left Ramp 6. Pier Target 7. Barrel Target 8. Rader Loops 9. Cross Ramp 10. Cage Target/Sink Hole 11. Right Ramp 12. Right Orbit 13. Kickback Target
In this guide when I mention a Ramp, Lane, Hole etc. I will put a number in brackets which will correspond to the above Key, so that you know where on the Table that feature is located.
Page 3 of 34
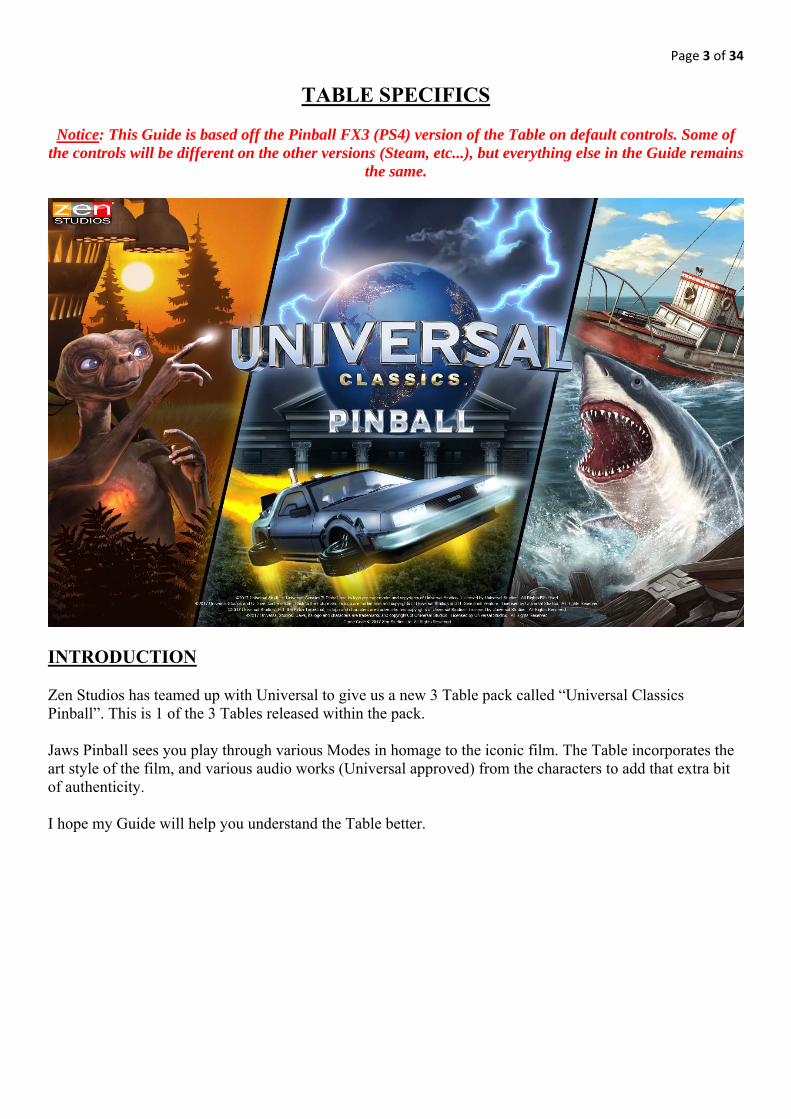
TABLE SPECIFICS
Notice: This Guide is based off the Pinball FX3 (PS4) version of the Table on default controls. Some of the controls will be different on the other versions (Steam, etc...), but everything else in the Guide remains
the same.
INTRODUCTION Zen Studios has teamed up with Universal to give us a new 3 Table pack called “Universal Classics Pinball”. This is 1 of the 3 Tables released within the pack. Jaws Pinball sees you play through various Modes in homage to the iconic film. The Table incorporates the art style of the film, and various audio works (Universal approved) from the characters to add that extra bit of authenticity. I hope my Guide will help you understand the Table better.
Page 4 of 34
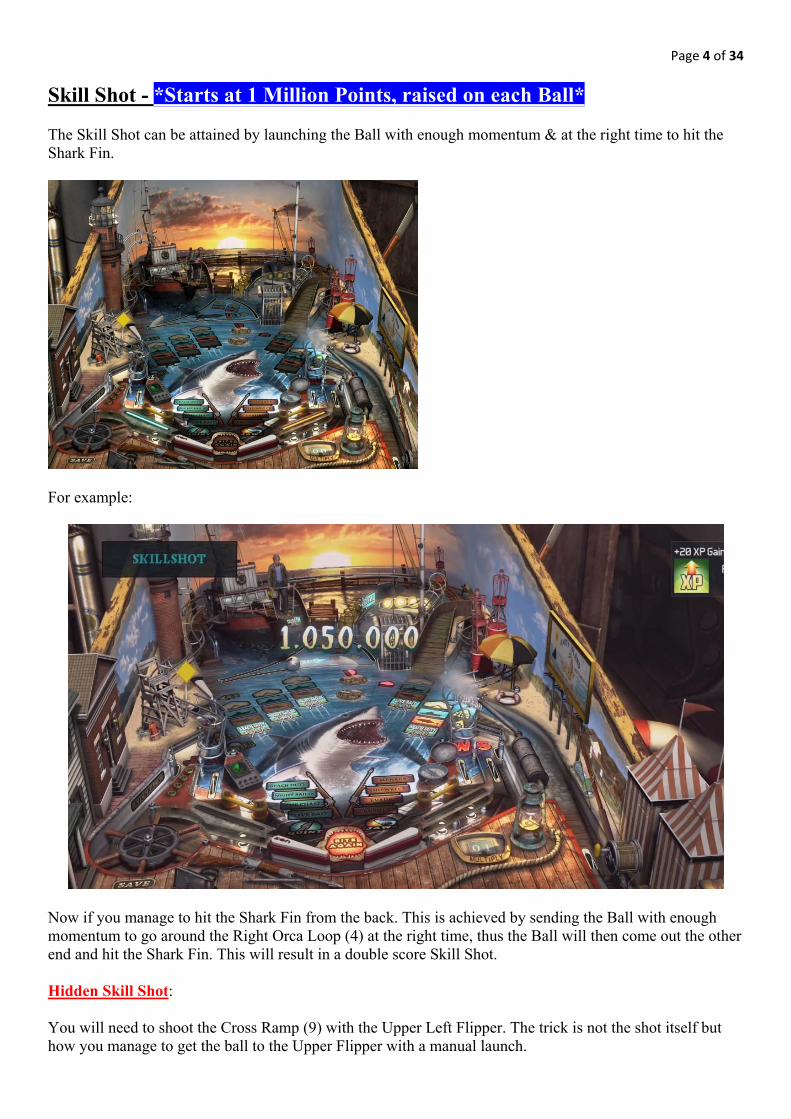
Skill Shot - *Starts at 1 Million Points, raised on each Ball* The Skill Shot can be attained by launching the Ball with enough momentum & at the right time to hit the Shark Fin.
For example:
Now if you manage to hit the Shark Fin from the back. This is achieved by sending the Ball with enough momentum to go around the Right Orca Loop (4) at the right time, thus the Ball will then come out the other end and hit the Shark Fin. This will result in a double score Skill Shot. Hidden Skill Shot: You will need to shoot the Cross Ramp (9) with the Upper Left Flipper. The trick is not the shot itself but how you manage to get the ball to the Upper Flipper with a manual launch.
Page 5 of 34
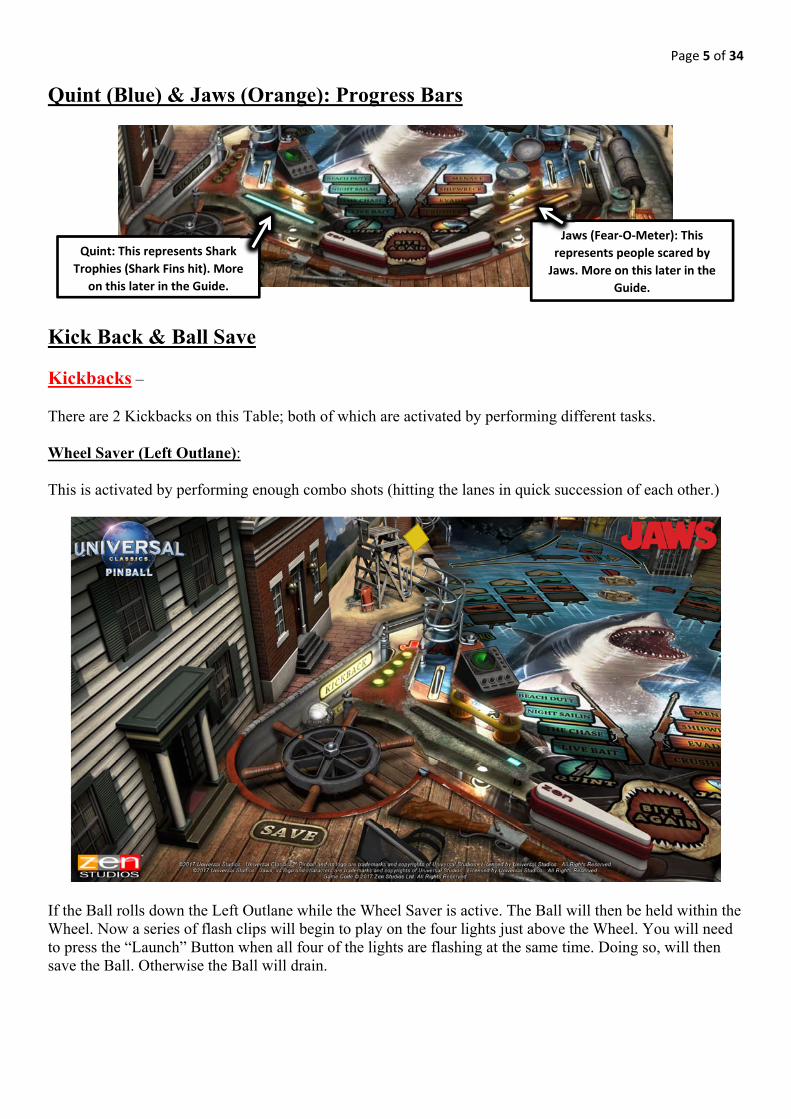
Quint (Blue) & Jaws (Orange): Progress Bars
Kick Back & Ball Save Kickbacks – There are 2 Kickbacks on this Table; both of which are activated by performing different tasks. Wheel Saver (Left Outlane): This is activated by performing enough combo shots (hitting the lanes in quick succession of each other.)
If the Ball rolls down the Left Outlane while the Wheel Saver is active. The Ball will then be held within the Wheel. Now a series of flash clips will begin to play on the four lights just above the Wheel. You will need to press the “Launch” Button when all four of the lights are flashing at the same time. Doing so, will then save the Ball. Otherwise the Ball will drain.
Quint: This represents Shark
Trophies (Shark Fins hit). More
on this later in the Guide.
Jaws (Fear‐O‐Meter): This
represents people scared by
Jaws. More on this later in the
Guide.
Page 6 of 34
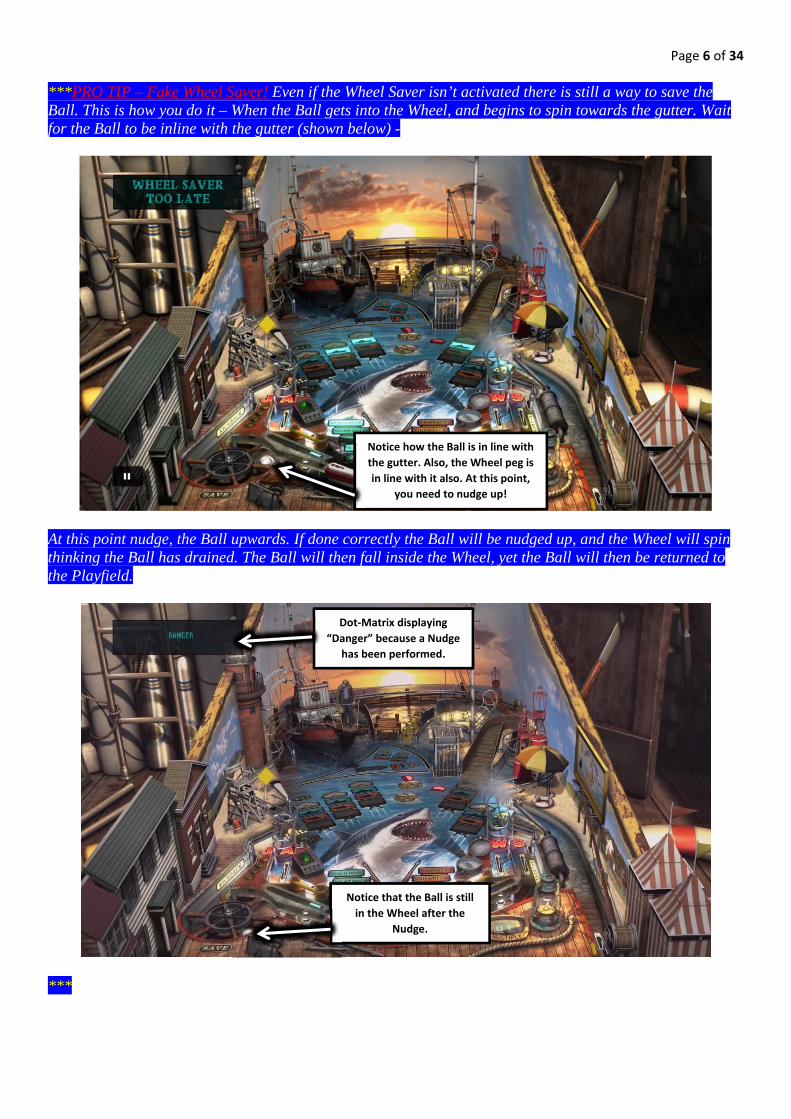
***PRO TIP – Fake Wheel Saver! Even if the Wheel Saver isn’t activated there is still a way to save the Ball. This is how you do it – When the Ball gets into the Wheel, and begins to spin towards the gutter. Wait for the Ball to be inline with the gutter (shown below) -
At this point nudge, the Ball upwards. If done correctly the Ball will be nudged up, and the Wheel will spin thinking the Ball has drained. The Ball will then fall inside the Wheel, yet the Ball will then be returned to the Playfield.
***
Notice how the Ball is in line with
the gutter. Also, the Wheel peg is
in line with it also. At this point,
you need to nudge up!
Notice that the Ball is still
in the Wheel after the
Nudge.
Dot‐Matrix displaying
“Danger” because a Nudge
has been performed.
Page 7 of 34
Right Kickback (Right Outlane): To activate the Right Kickback, you will need to do the following -
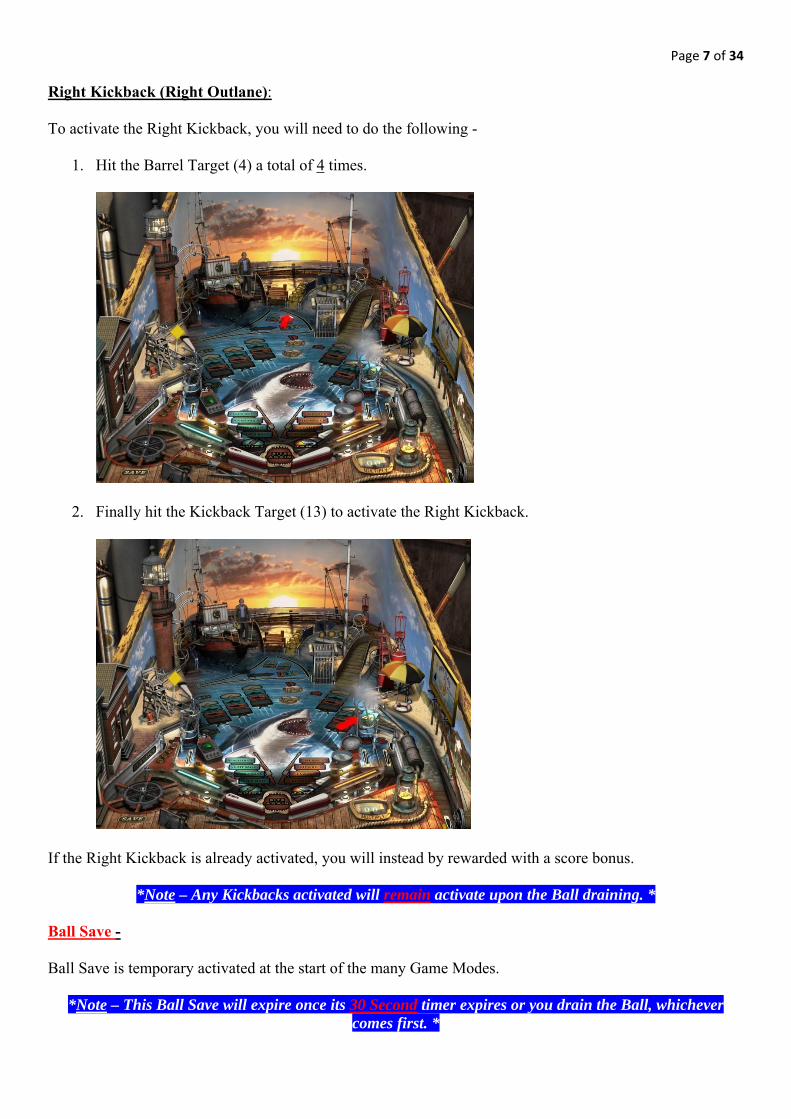
1. Hit the Barrel Target (4) a total of 4 times.
2. Finally hit the Kickback Target (13) to activate the Right Kickback.
If the Right Kickback is already activated, you will instead by rewarded with a score bonus.
*Note – Any Kickbacks activated will remain activate upon the Ball draining. * Ball Save - Ball Save is temporary activated at the start of the many Game Modes.
*Note – This Ball Save will expire once its 30 Second timer expires or you drain the Ball, whichever comes first. *
Page 8 of 34
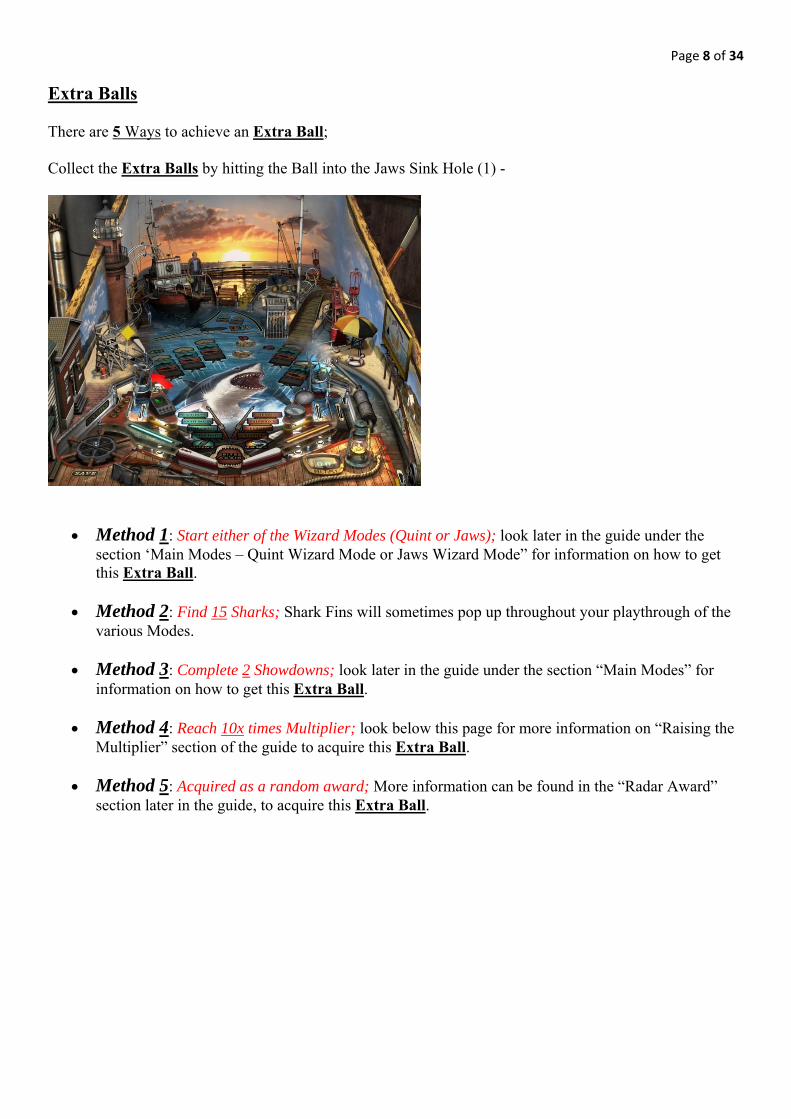
Extra Balls There are 5 Ways to achieve an Extra Ball; Collect the Extra Balls by hitting the Ball into the Jaws Sink Hole (1) -
Method 1: Start either of the Wizard Modes (Quint or Jaws); look later in the guide under the section ‘Main Modes – Quint Wizard Mode or Jaws Wizard Mode” for information on how to get this Extra Ball.
Method 2: Find 15 Sharks; Shark Fins will sometimes pop up throughout your playthrough of the
various Modes.
Method 3: Complete 2 Showdowns; look later in the guide under the section “Main Modes” for information on how to get this Extra Ball.
Method 4: Reach 10x times Multiplier; look below this page for more information on “Raising the
Multiplier” section of the guide to acquire this Extra Ball.
Method 5: Acquired as a random award; More information can be found in the “Radar Award” section later in the guide, to acquire this Extra Ball.
Page 9 of 34
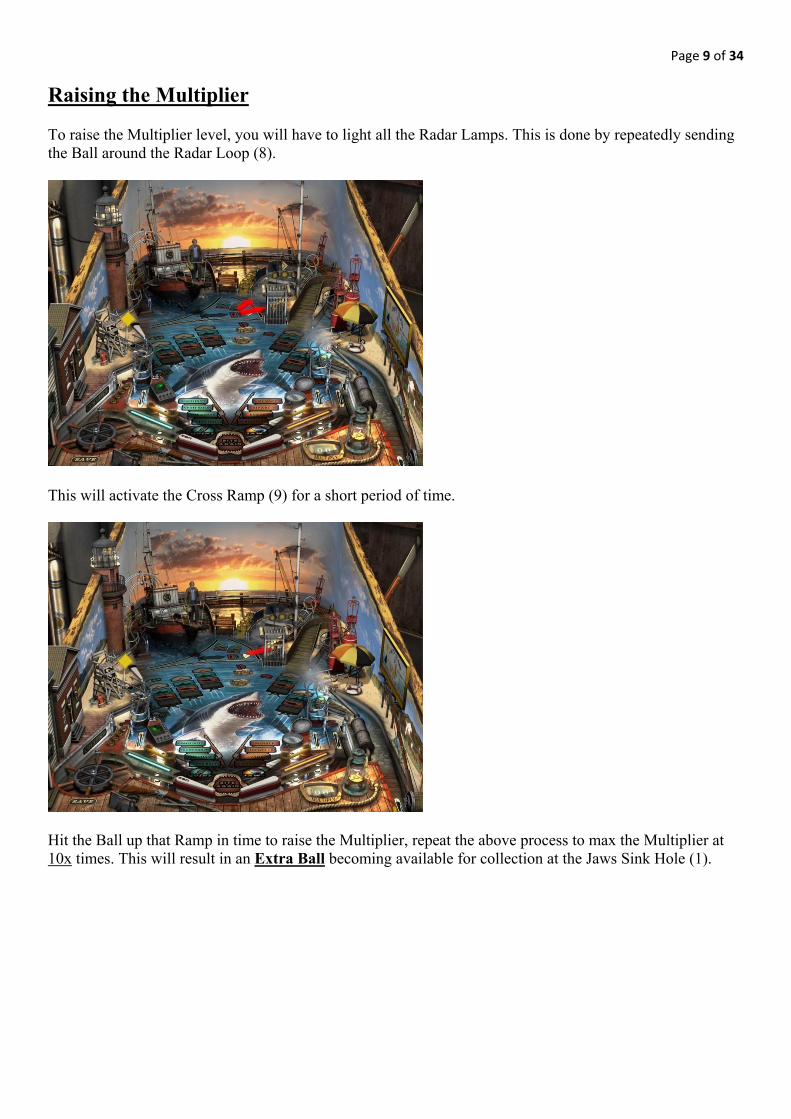
Raising the Multiplier To raise the Multiplier level, you will have to light all the Radar Lamps. This is done by repeatedly sending the Ball around the Radar Loop (8).
This will activate the Cross Ramp (9) for a short period of time.
Hit the Ball up that Ramp in time to raise the Multiplier, repeat the above process to max the Multiplier at 10x times. This will result in an Extra Ball becoming available for collection at the Jaws Sink Hole (1).
Page 10 of 34
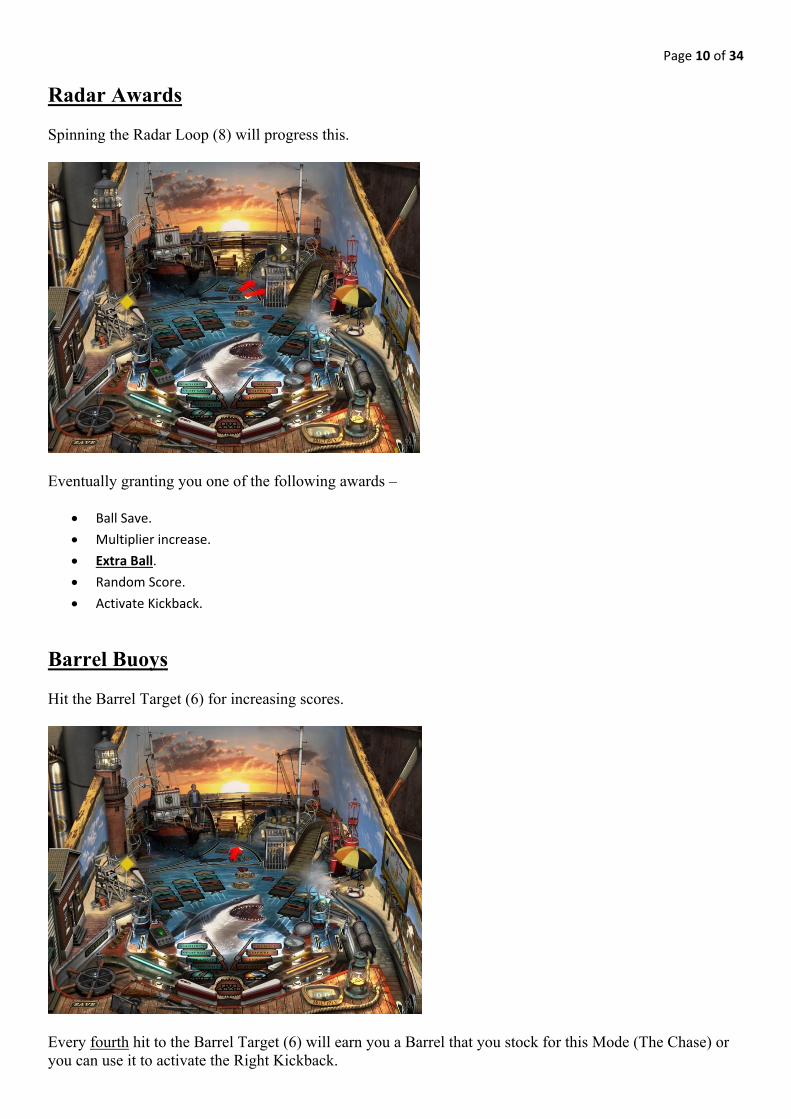
Radar Awards Spinning the Radar Loop (8) will progress this.
Eventually granting you one of the following awards –
Ball Save.
Multiplier increase.
Extra Ball.
Random Score.
Activate Kickback.
Barrel Buoys Hit the Barrel Target (6) for increasing scores.
Every fourth hit to the Barrel Target (6) will earn you a Barrel that you stock for this Mode (The Chase) or you can use it to activate the Right Kickback.
Page 11 of 34
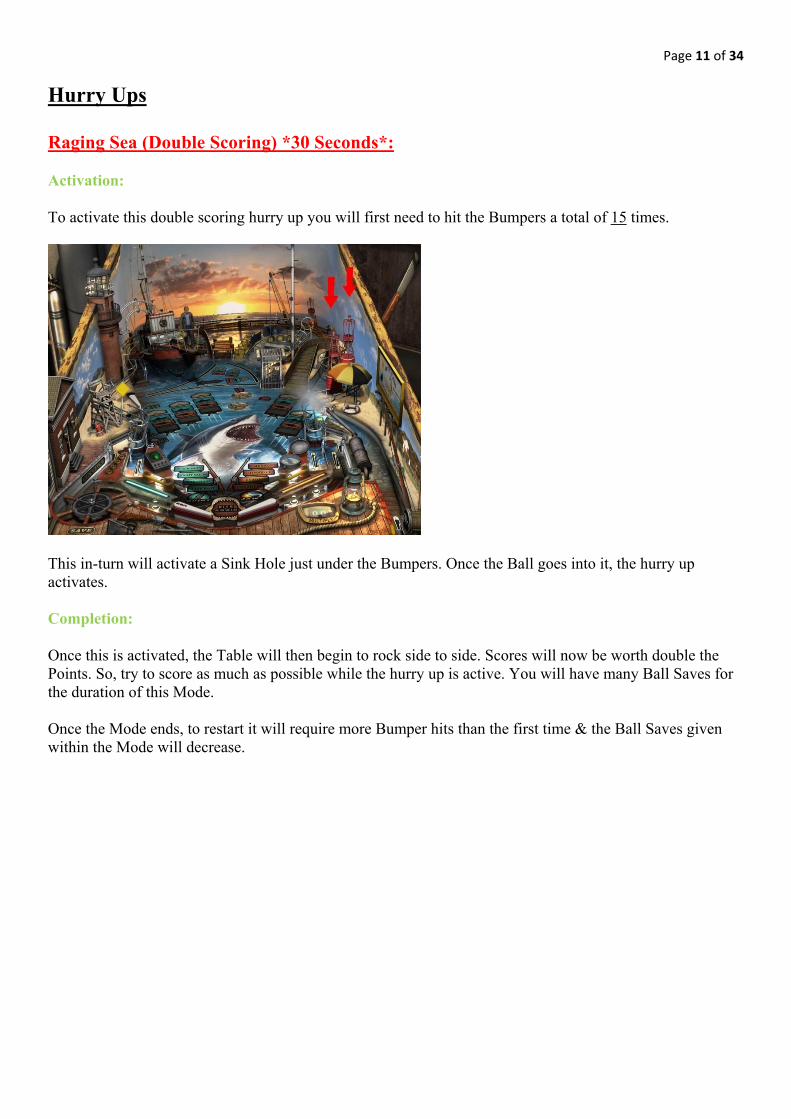
Hurry Ups Raging Sea (Double Scoring) *30 Seconds*: Activation: To activate this double scoring hurry up you will first need to hit the Bumpers a total of 15 times.
This in-turn will activate a Sink Hole just under the Bumpers. Once the Ball goes into it, the hurry up activates. Completion: Once this is activated, the Table will then begin to rock side to side. Scores will now be worth double the Points. So, try to score as much as possible while the hurry up is active. You will have many Ball Saves for the duration of this Mode. Once the Mode ends, to restart it will require more Bumper hits than the first time & the Ball Saves given within the Mode will decrease.
Page 12 of 34
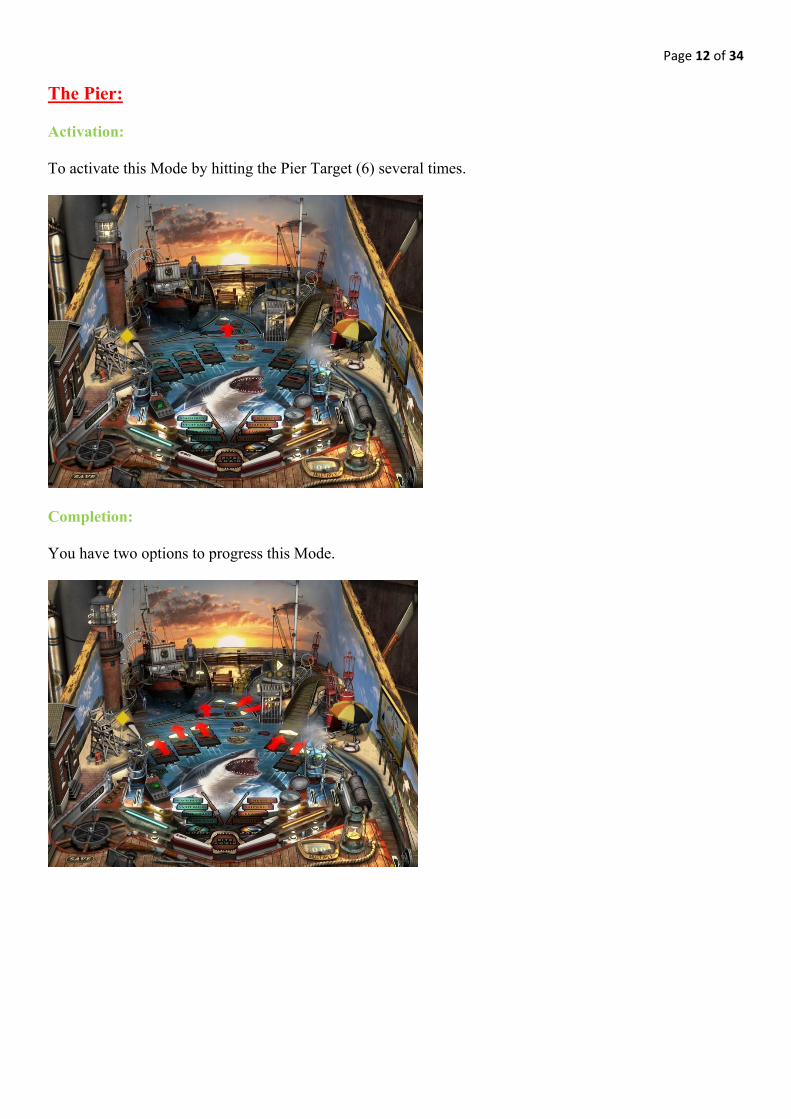
The Pier: Activation: To activate this Mode by hitting the Pier Target (6) several times.
Completion: You have two options to progress this Mode.
Page 13 of 34
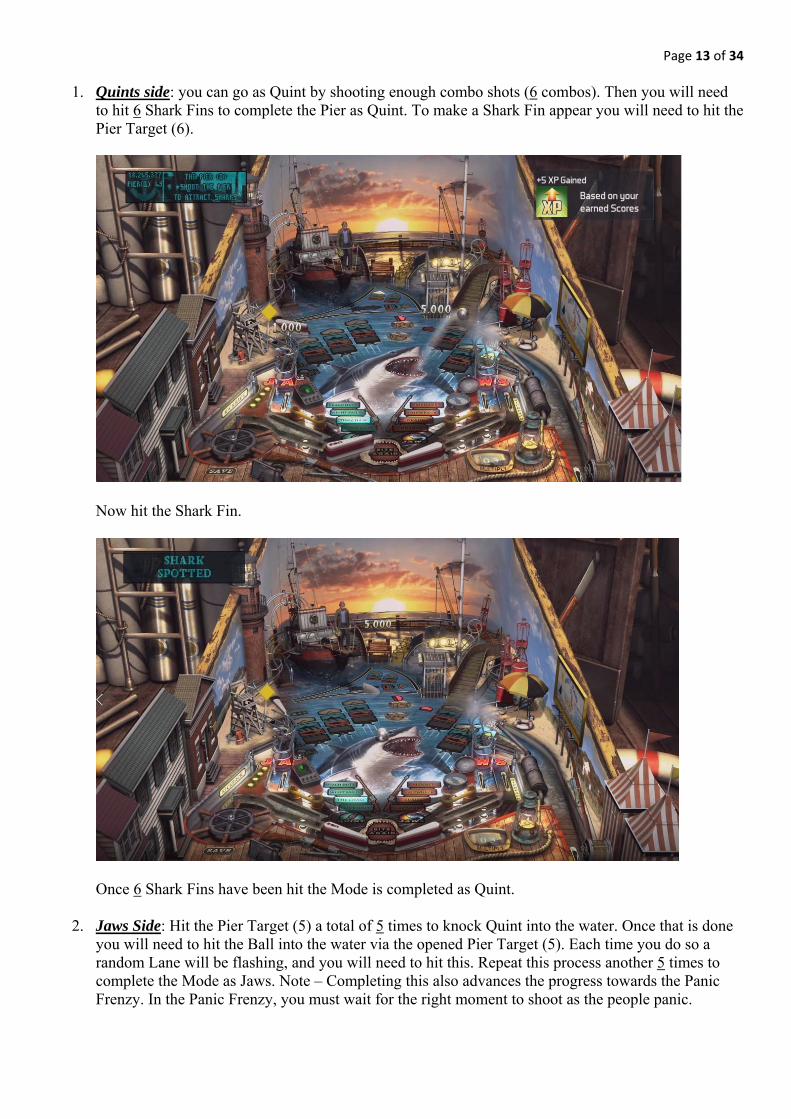
1. Quints side: you can go as Quint by shooting enough combo shots (6 combos). Then you will need to hit 6 Shark Fins to complete the Pier as Quint. To make a Shark Fin appear you will need to hit the Pier Target (6).
Now hit the Shark Fin.
Once 6 Shark Fins have been hit the Mode is completed as Quint.
2. Jaws Side: Hit the Pier Target (5) a total of 5 times to knock Quint into the water. Once that is done you will need to hit the Ball into the water via the opened Pier Target (5). Each time you do so a random Lane will be flashing, and you will need to hit this. Repeat this process another 5 times to complete the Mode as Jaws. Note – Completing this also advances the progress towards the Panic Frenzy. In the Panic Frenzy, you must wait for the right moment to shoot as the people panic.

Page 14 of 34
MultiballModes There are 2 Multiball Modes available for activation on this Table; Cage Multiball Mode *3 Balls* Activation – First you will to lock 3 Balls into the Cage Target/Sink Hole (10). This is done by hitting the Cage several times. Doing so will open the Cage for a short time, thus allowing you to lock 1 Ball.
The Cage will open either at the bottom or the Left side. Left side will require you to use the Top Left Flipper to hit the Ball into the opening. Once the Ball is locked, you will need to repeat this process a further 2 times. Upon the 3rd Ball being locked, the Multiball will begin. Mode itself - The 3 Ball Multiball will then begin: Jackpot Lanes will change as you progress through the Mode. You can increase the Jackpot score by hitting the moving Cage. The Multiball Mode will continue if you have more than a single Ball alive on the Playfield. Otherwise the Mode will end, and you will need to repeat the above activation process to re-enter this Mode.

Page 15 of 34
Bait Multiball Mode *3 Balls* Activation – You will have to hit 10 Shark Fins in any game Mode.
There may be some modes that prevent this Multiball from starting but the Fin hits would still count. After the preventing mode is finished the Multiball will start. With the Extra Ball (15 Shark Fin Hits in total) it's the same, every Fin hit counts. Mode itself - The 3 Ball Multiball will then begin: during this Multiball spotting & hitting additional Shark Fins will unlock new Jackpot Lanes. After a while Jaws himself will show up as a Target which can be hit. The Multiball Mode will continue if you have more than a single Ball alive on the Playfield. Otherwise the Mode will end, and you will need to repeat the above activation process to re-enter this Mode.
Page 16 of 34
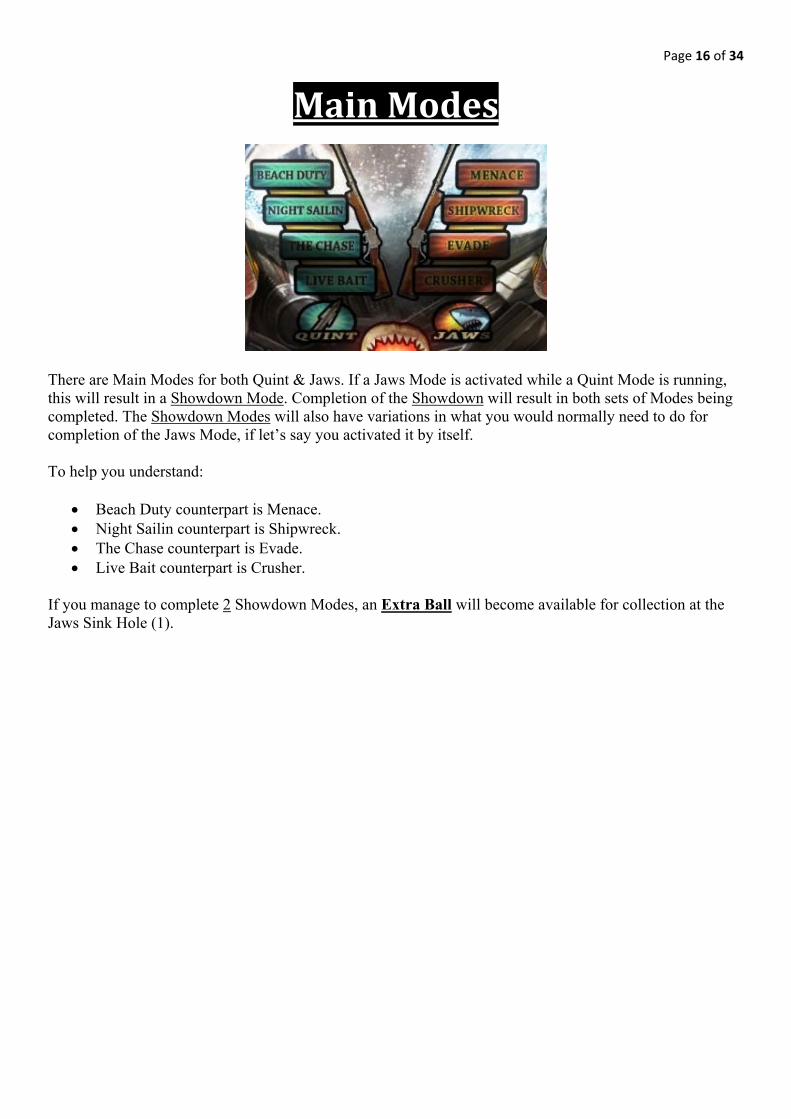
MainModes
There are Main Modes for both Quint & Jaws. If a Jaws Mode is activated while a Quint Mode is running, this will result in a Showdown Mode. Completion of the Showdown will result in both sets of Modes being completed. The Showdown Modes will also have variations in what you would normally need to do for completion of the Jaws Mode, if let’s say you activated it by itself. To help you understand:
Beach Duty counterpart is Menace. Night Sailin counterpart is Shipwreck. The Chase counterpart is Evade. Live Bait counterpart is Crusher.
If you manage to complete 2 Showdown Modes, an Extra Ball will become available for collection at the Jaws Sink Hole (1).

Page 17 of 34
QuintModes
“BeachDuty”*Timed* Activation – To activate this Mode, you will need to send the Ball around the Orbits – Left Orbit (2) &/or Right Orbit (12) several times.
Once done, the Mode will activate.

Page 18 of 34
Completion - Once the Mode starts many Lanes will begin flashing. The Sharks are lurking within them. The goal here is to hit the Ball into these Lanes to alert the People. This needs to be done a total of 7 times to complete the Mode.
Also look out for the occasionally emerging Shark Fins, hit them to gain extra score.
Page 19 of 34
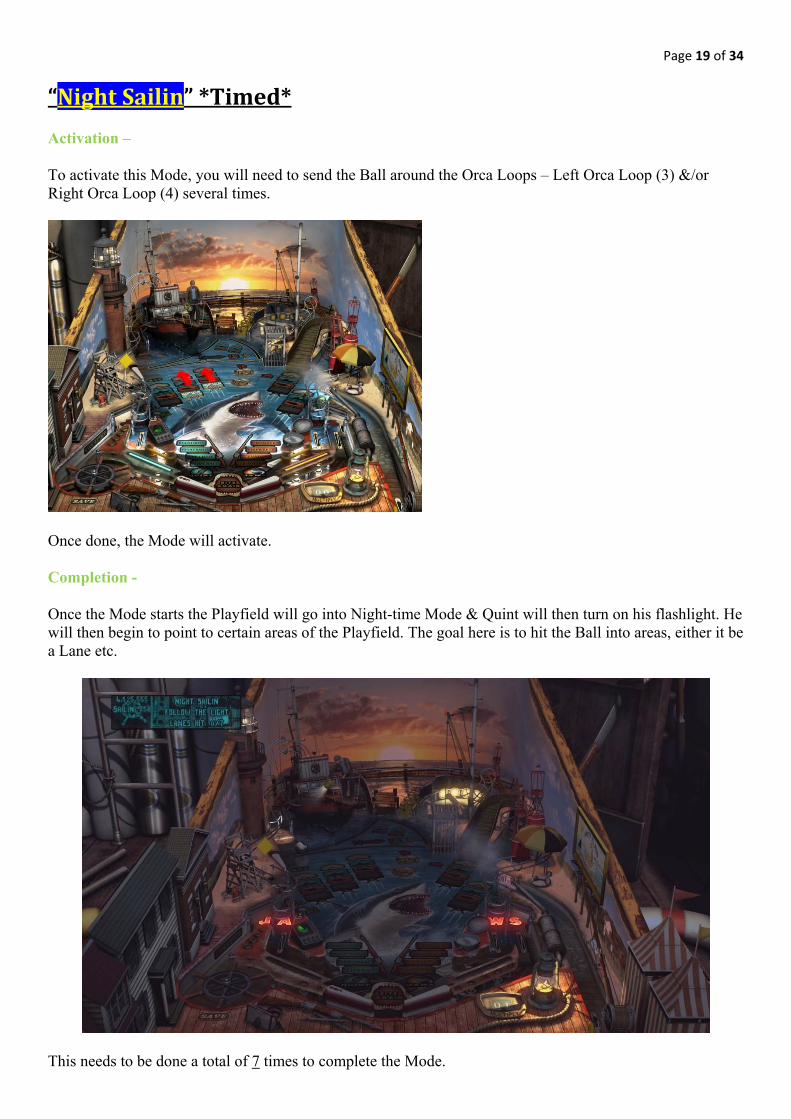
“NightSailin”*Timed* Activation – To activate this Mode, you will need to send the Ball around the Orca Loops – Left Orca Loop (3) &/or Right Orca Loop (4) several times.
Once done, the Mode will activate. Completion - Once the Mode starts the Playfield will go into Night-time Mode & Quint will then turn on his flashlight. He will then begin to point to certain areas of the Playfield. The goal here is to hit the Ball into areas, either it be a Lane etc.
This needs to be done a total of 7 times to complete the Mode.
Page 20 of 34
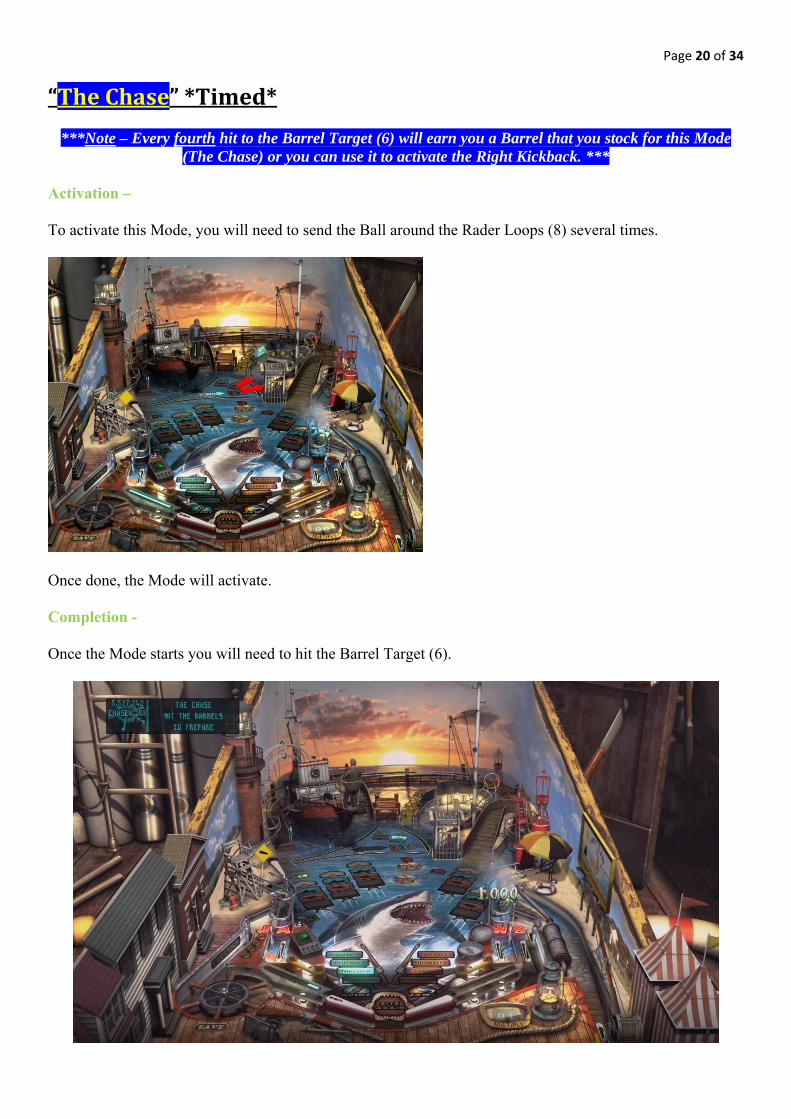
“TheChase”*Timed*
***Note – Every fourth hit to the Barrel Target (6) will earn you a Barrel that you stock for this Mode (The Chase) or you can use it to activate the Right Kickback. ***
Activation – To activate this Mode, you will need to send the Ball around the Rader Loops (8) several times.
Once done, the Mode will activate. Completion - Once the Mode starts you will need to hit the Barrel Target (6).
Page 21 of 34
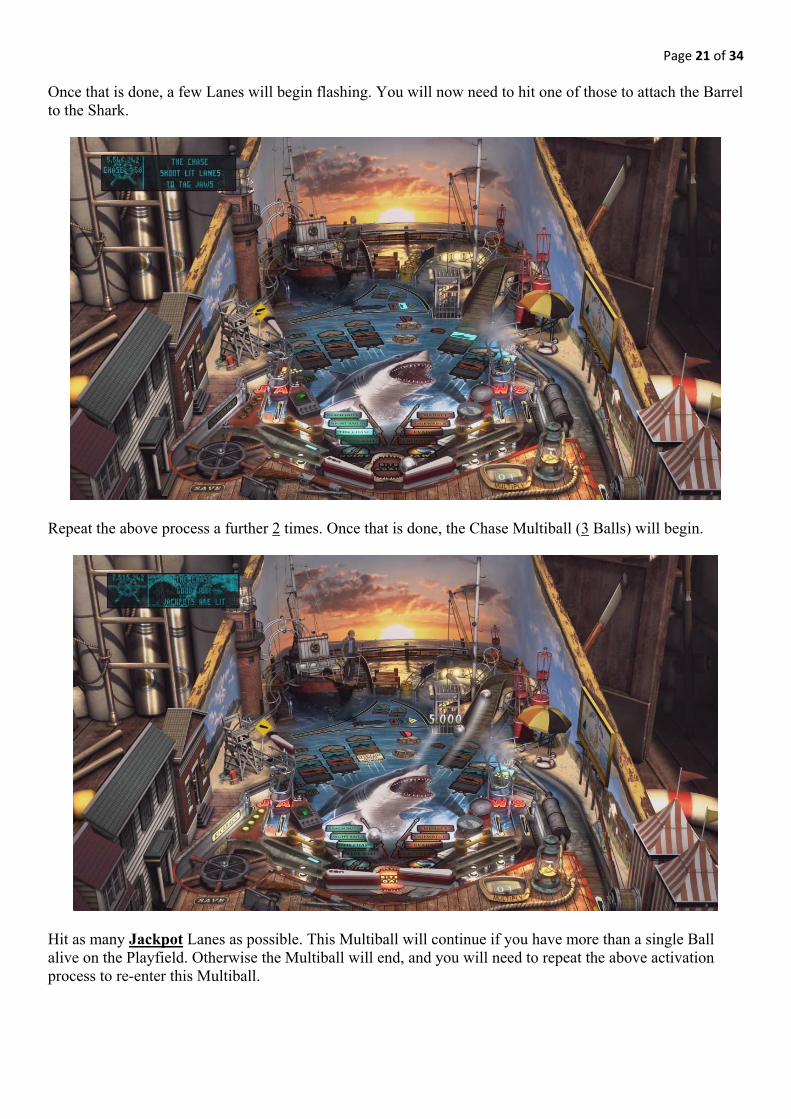
Once that is done, a few Lanes will begin flashing. You will now need to hit one of those to attach the Barrel to the Shark.
Repeat the above process a further 2 times. Once that is done, the Chase Multiball (3 Balls) will begin.
Hit as many Jackpot Lanes as possible. This Multiball will continue if you have more than a single Ball alive on the Playfield. Otherwise the Multiball will end, and you will need to repeat the above activation process to re-enter this Multiball.

Page 22 of 34
“LiveBait”*Timed* Activation – To activate this Mode, you will need to send the Ball up the Left (5) &/or Right Ramps (11) several times.
Once done, the Mode will activate. Completion - Once the Mode starts you will need to move the Crane which has the Shark Cage attached to it. Move it to the Left by hitting either of these Left Lanes – Left Orbit (2) &/or Left Orca Loop (3).
Page 23 of 34
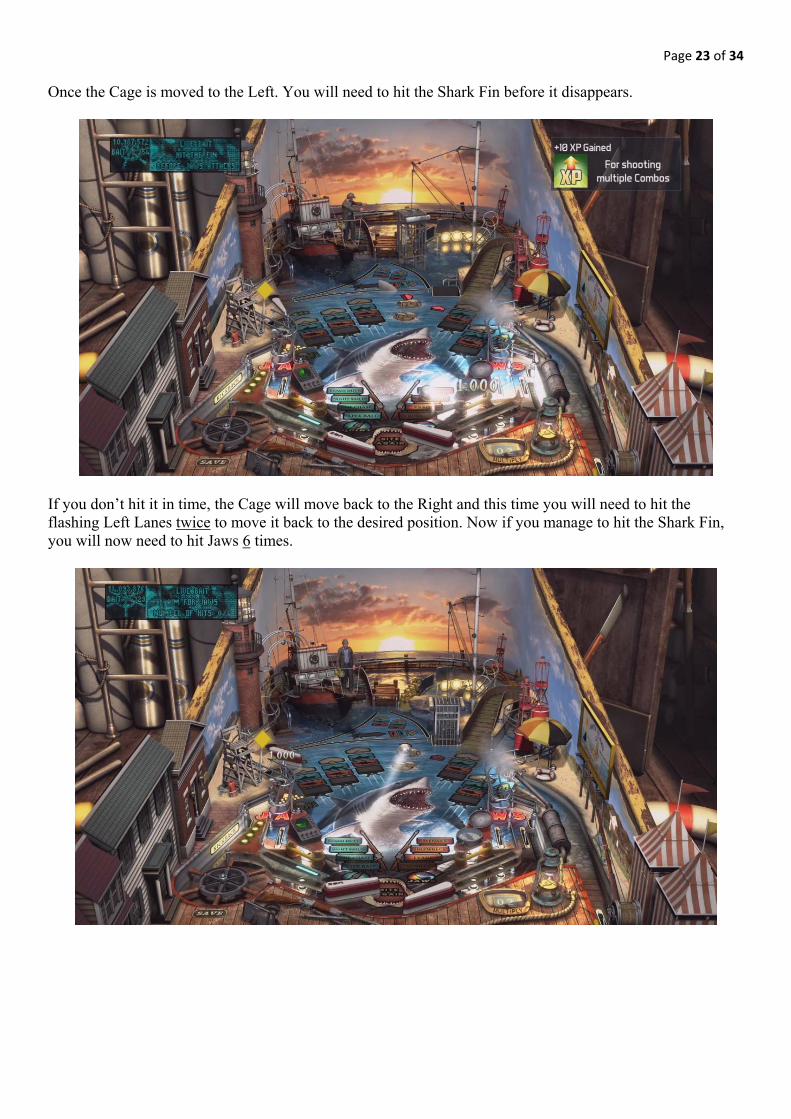
Once the Cage is moved to the Left. You will need to hit the Shark Fin before it disappears.
If you don’t hit it in time, the Cage will move back to the Right and this time you will need to hit the flashing Left Lanes twice to move it back to the desired position. Now if you manage to hit the Shark Fin, you will now need to hit Jaws 6 times.

Page 24 of 34
After Jaws is hit enough times, to complete the Mode you need to hit the Ball into Jaws mouth.
When that is done, the Mode is completed.

Page 25 of 34
JawsModes
To activate the Jaws Mode selection process you will need to first light all the 4 “JAWS” Rollovers on the Ins & Outlanes.
Once that is done, sink the Ball into the Jaws Sink Hole (1) to begin the selection process of the Jaws Modes.
Note – if you do this within a Quint Mode, the counterpart of that Mode will automatically be selected. Showdown Modes will also alter the running Modes a bit, and grant bigger scores.
Page 26 of 34
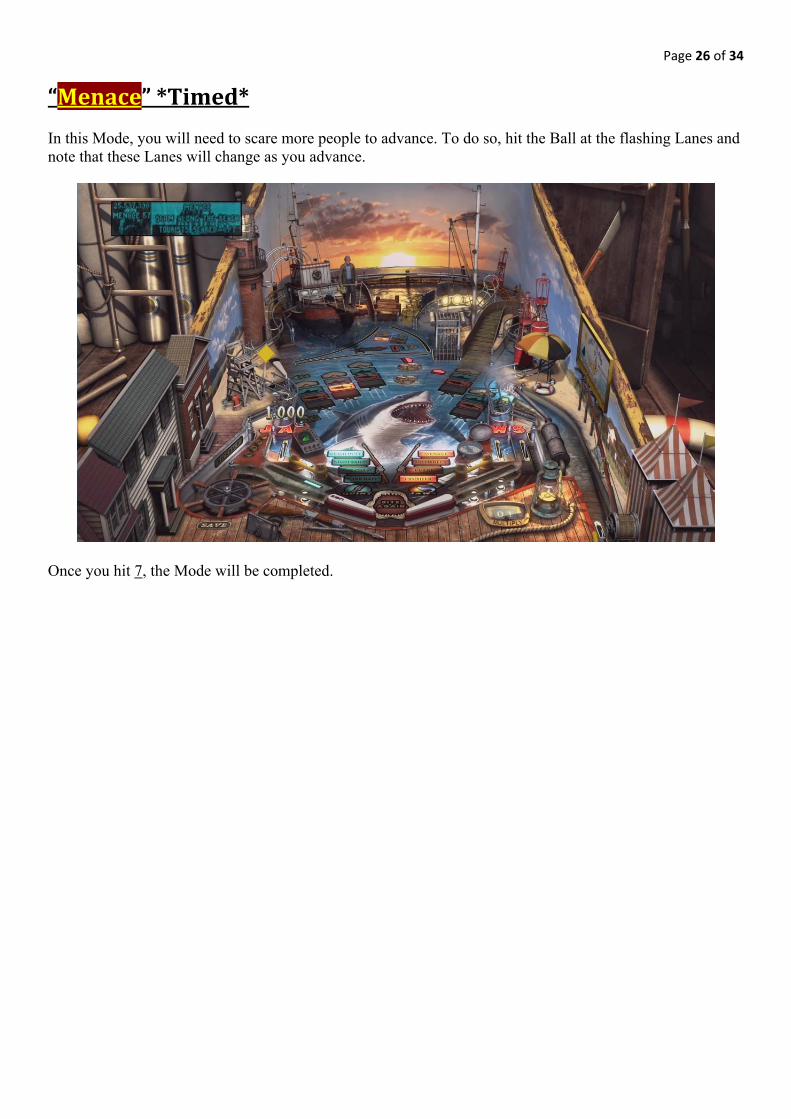
“Menace”*Timed* In this Mode, you will need to scare more people to advance. To do so, hit the Ball at the flashing Lanes and note that these Lanes will change as you advance.
Once you hit 7, the Mode will be completed.
Page 27 of 34
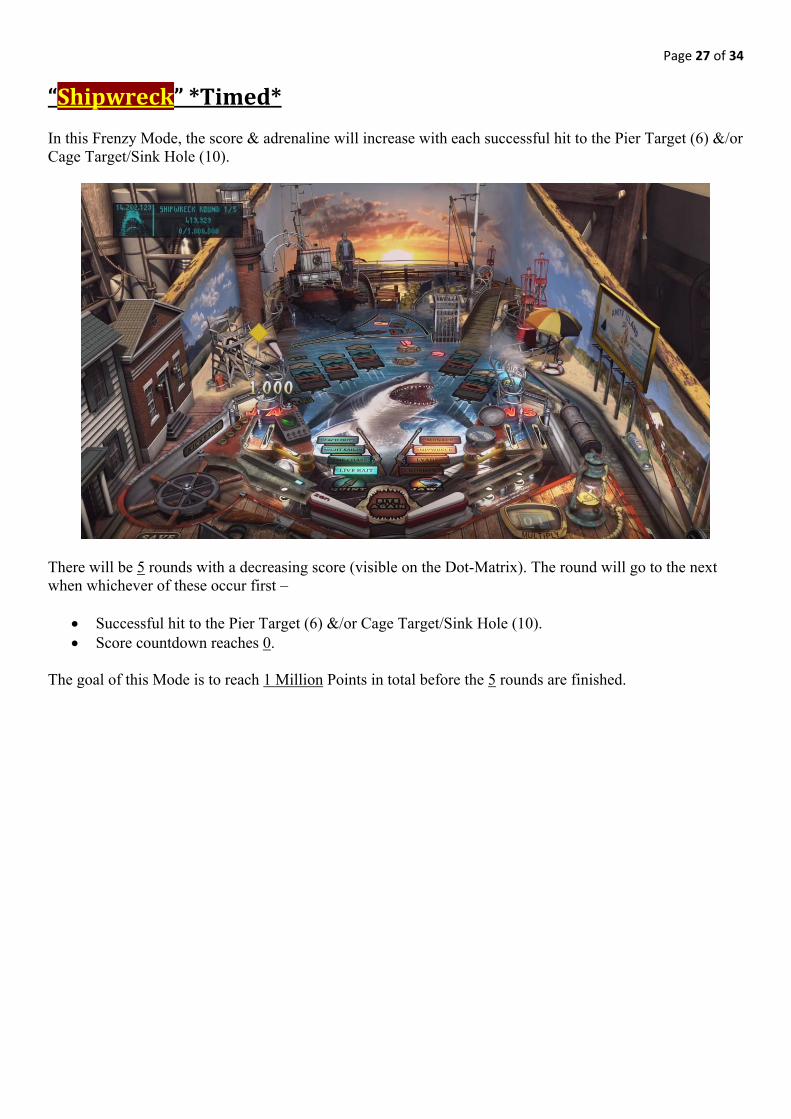
“Shipwreck”*Timed* In this Frenzy Mode, the score & adrenaline will increase with each successful hit to the Pier Target (6) &/or Cage Target/Sink Hole (10).
There will be 5 rounds with a decreasing score (visible on the Dot-Matrix). The round will go to the next when whichever of these occur first –
Successful hit to the Pier Target (6) &/or Cage Target/Sink Hole (10). Score countdown reaches 0.
The goal of this Mode is to reach 1 Million Points in total before the 5 rounds are finished.
Page 28 of 34
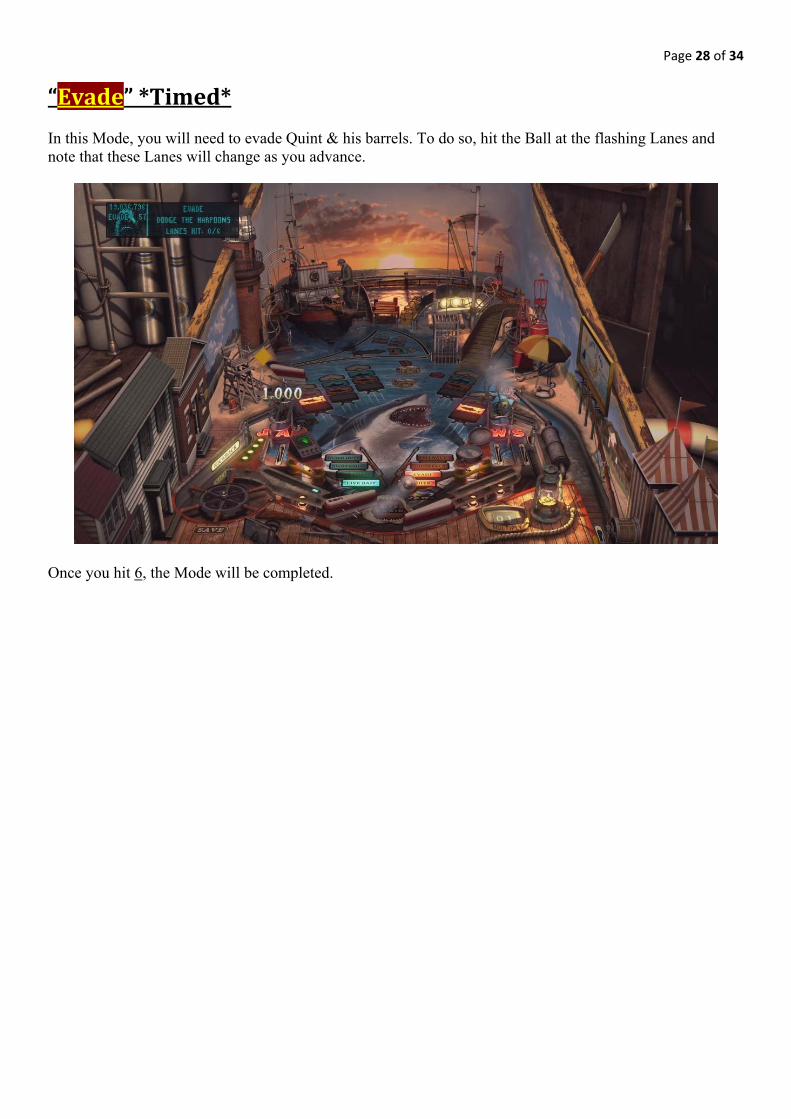
“Evade”*Timed* In this Mode, you will need to evade Quint & his barrels. To do so, hit the Ball at the flashing Lanes and note that these Lanes will change as you advance.
Once you hit 6, the Mode will be completed.
Page 29 of 34
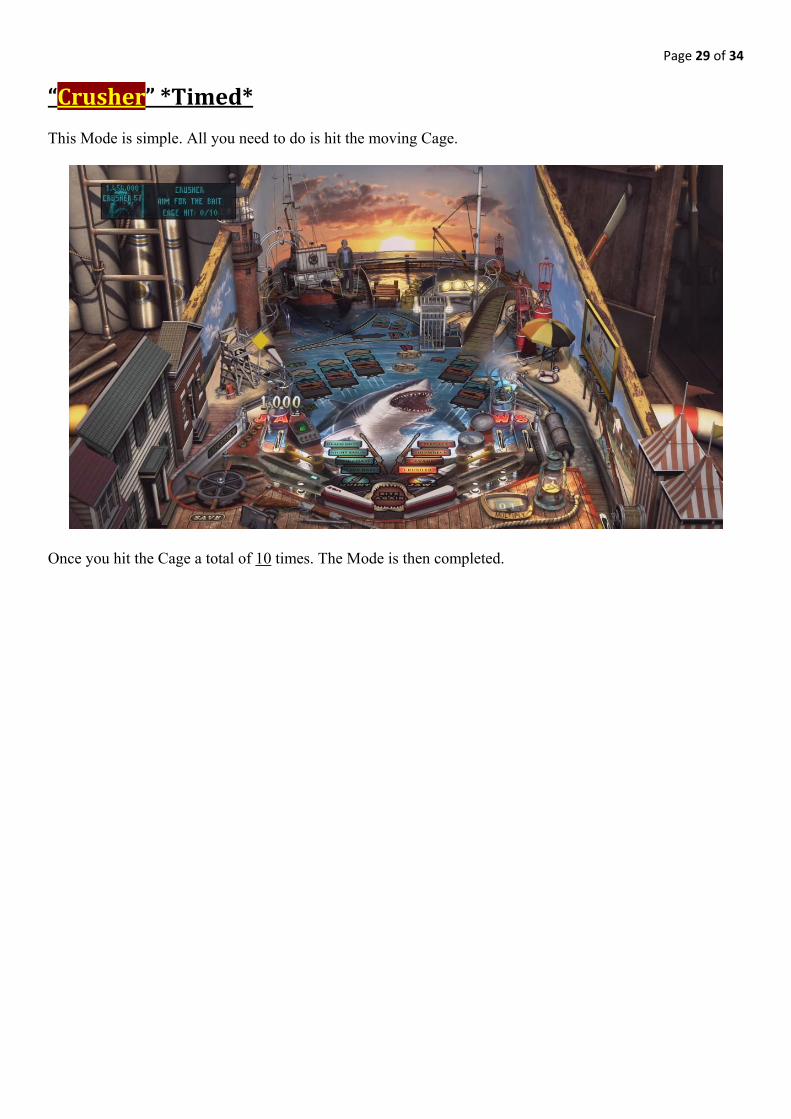
“Crusher”*Timed* This Mode is simple. All you need to do is hit the moving Cage.
Once you hit the Cage a total of 10 times. The Mode is then completed.
Page 30 of 34
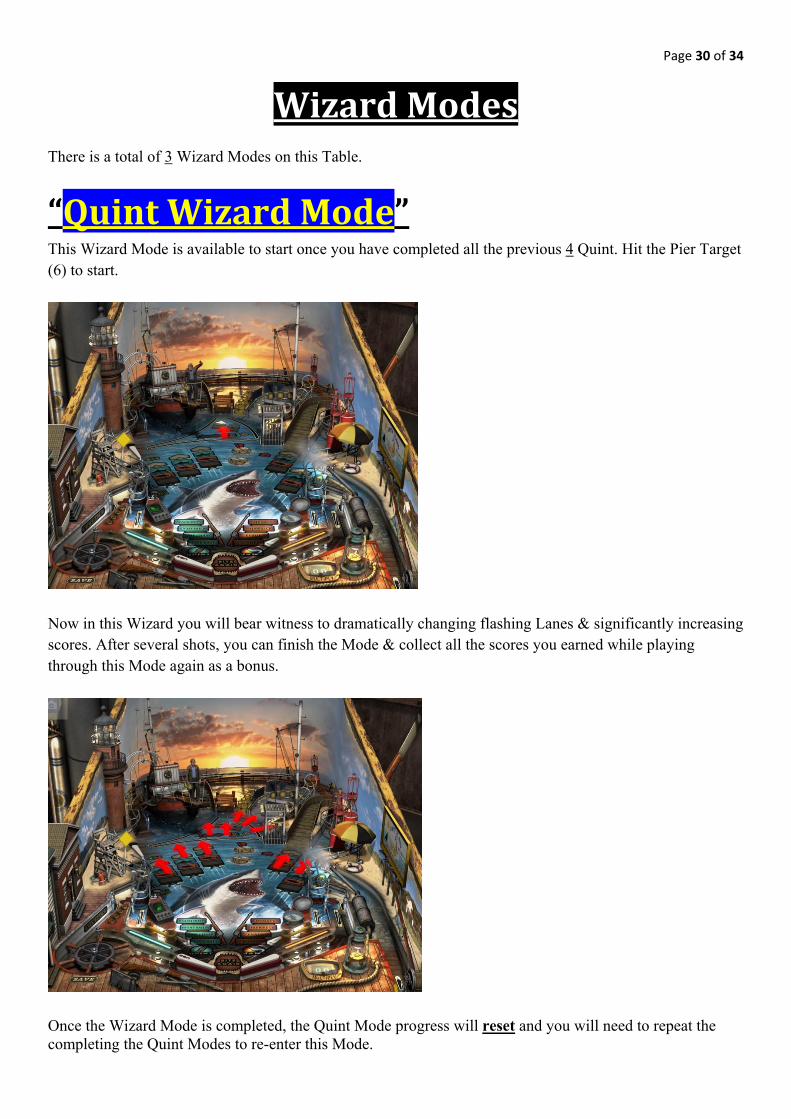
WizardModes There is a total of 3 Wizard Modes on this Table.
“QuintWizardMode”
This Wizard Mode is available to start once you have completed all the previous 4 Quint. Hit the Pier Target (6) to start.
Now in this Wizard you will bear witness to dramatically changing flashing Lanes & significantly increasing scores. After several shots, you can finish the Mode & collect all the scores you earned while playing through this Mode again as a bonus.
Once the Wizard Mode is completed, the Quint Mode progress will reset and you will need to repeat the completing the Quint Modes to re-enter this Mode.
Page 31 of 34
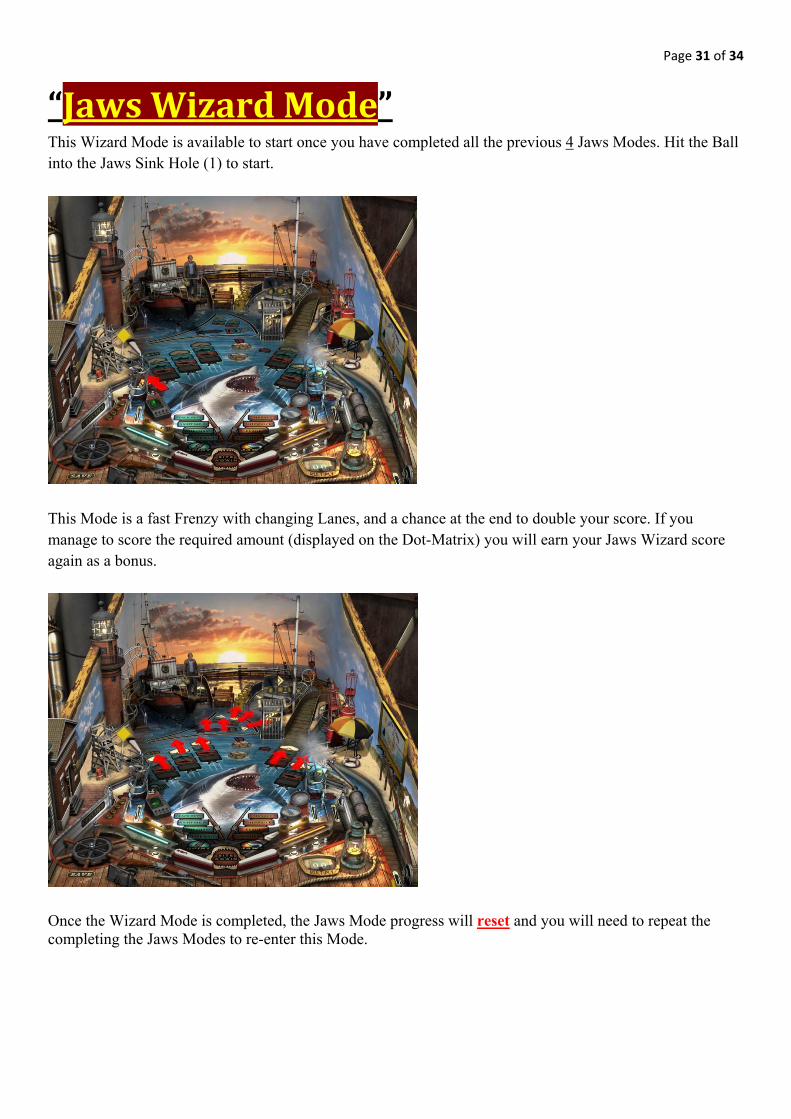
“JawsWizardMode”
This Wizard Mode is available to start once you have completed all the previous 4 Jaws Modes. Hit the Ball into the Jaws Sink Hole (1) to start.
This Mode is a fast Frenzy with changing Lanes, and a chance at the end to double your score. If you manage to score the required amount (displayed on the Dot-Matrix) you will earn your Jaws Wizard score again as a bonus.
Once the Wizard Mode is completed, the Jaws Mode progress will reset and you will need to repeat the completing the Jaws Modes to re-enter this Mode.

Page 32 of 34
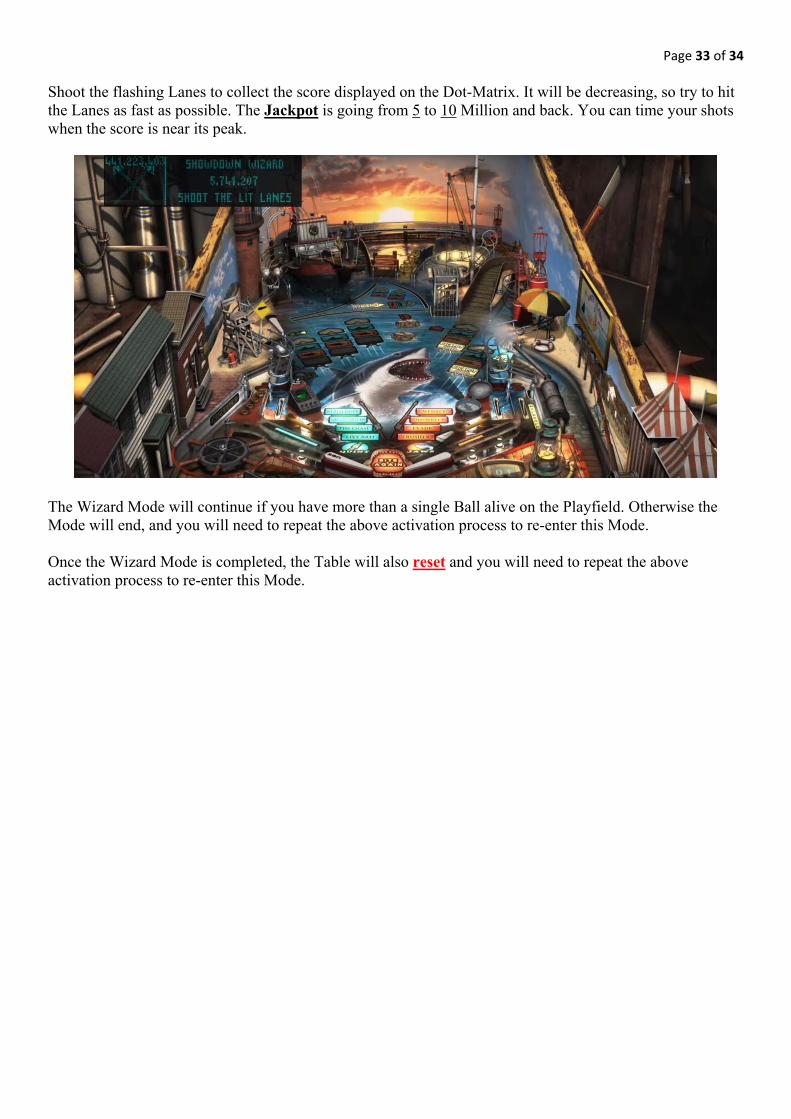
“ShowdownWizardMode”
This Wizard Mode is available to start once you have completed all the previous 8 Quint & Jaws Modes. This means you can’t access either of the above Wizard Modes for Quint & Jaws. This is because once those Wizard Modes end, the progress for their corresponding Modes will be reset. I find it a good strategy to complete each of the Modes (Quint & Jaws) using the Showdown mechanic, since if you complete both sets of objectives in time then both Modes are completed. If you have completed all the 8 Main Modes, you can then hit either the Jaws Sink Hole (1) &/or Pier Target (6).
Page 33 of 34
Shoot the flashing Lanes to collect the score displayed on the Dot-Matrix. It will be decreasing, so try to hit the Lanes as fast as possible. The Jackpot is going from 5 to 10 Million and back. You can time your shots when the score is near its peak.
The Wizard Mode will continue if you have more than a single Ball alive on the Playfield. Otherwise the Mode will end, and you will need to repeat the above activation process to re-enter this Mode. Once the Wizard Mode is completed, the Table will also reset and you will need to repeat the above activation process to re-enter this Mode.
Page 34 of 34
Special Thanks to all the Zen Studios Forum Community! Members such as shogun00, Cloda, Ty-43, ndever (without his help this guide wouldn’t have been possible!), Deep, terry 2taps, wims, skyway73, tenorhero, DiscoKing & surf1der. I couldn’t have completed the Guide without your help either directly or indirectly - you are all awesome!!!
In closing I hope you enjoyed this Table, I certainly have and I hope by using this Guide it increases that Fun factor for you and everyone else who plays with you.
Check out the other Tables available, they are all available to download on the Xbox Live Marketplace in Add-Ons section or download it straight from the PFX2 Platform itself. Zen Pinball 2 on PlayStation Network, Zen Pinball on the Apple AppStore, Zen Pinball 3D on Nintendo 3DS and Zen Pinball THD on Android Marketplace. Thanks for viewing my Guide; any feedback would be greatly appreciated -
“We’re gonna need bigger Flippers!!!” Yours ShoryukenToTheChin