ITSM Installation Guide-7003
74
www.bmc.com BMC Remedy IT Service Management 7.0.03 Installation Guide December 2007
-
Upload
yesurathnam -
Category
Documents
-
view
812 -
download
0
Transcript of ITSM Installation Guide-7003

www.bmc.com
BMC Remedy IT Service Management 7.0.03
Installation Guide
December 2007

If you have comments or suggestions about this documentation, contact Information Design and Development by email at [email protected].
Contacting BMC Software
You can access the BMC Software website at http://www.bmc.com. From this website, you can obtain information about the company, its products, corporate offices, special events, and career opportunities.
United States and Canada
Address BMC SOFTWARE INC2101 CITYWEST BLVDHOUSTON TX 77042-2827 USA
Telephone 713 918 8800 or800 841 2031
Fax 713 918 8000
Outside United States and Canada
Telephone (01) 713 918 8800 Fax (01) 713 918 8000
© Copyright 1991 - 2007 BMC Software, Inc.
BMC, BMC Software, and the BMC Software logo are the exclusive properties of BMC Software, Inc., are registered with the U.S. Patent and Trademark Office, and may be registered or pending registration in other countries. All other BMC trademarks, service marks, and logos may be registered or pending registration in the U.S. or in other countries. All other trademarks or registered trademarks are the property of their respective owners.
DB2 is a registered trademark of International Business Machines Corporation.
IBM is a registered trademark of International Business Machines Corporation in the United States, other countries, or both.
ITIL is a registered trademark, and a registered community trademark of the Office of Government Commerce, and is registered in the U.S. Patent and Trademark Office.
Linux is the registered trademark of Linus Torvalds in the U.S. and other countries.
Oracle is a registered trademark of Oracle Corporation.
UNIX is a registered trademark of The Open Group.
BMC Software considers information included in this documentation to be proprietary and confidential. Your use of this information is subject to the terms and conditions of the applicable End User License Agreement for the product and the proprietary and restricted rights notices included in this documentation.
Restricted rights legendU.S. Government Restricted Rights to Computer Software. UNPUBLISHED -- RIGHTS RESERVED UNDER THE COPYRIGHT LAWS OF THE UNITED STATES. Use, duplication, or disclosure of any data and computer software by the U.S. Government is subject to restrictions, as applicable, set forth in FAR Section 52.227-14, DFARS 252.227-7013, DFARS 252.227-7014, DFARS 252.227-7015, and DFARS 252.227-7025, as amended from time to time. Contractor/Manufacturer is BMC Software, Inc., 2101 CityWest Blvd., Houston, TX 77042-2827, USA. Any contract notices should be sent to this address.
Customer Support
You can obtain technical support by using the Support page on the BMC Software website or by contacting Customer Support by telephone or email. To expedite your inquiry, please see “Before Contacting BMC Software.”
Support website
You can obtain technical support from BMC Software 24 hours a day, 7 days a week at http://www.bmc.com/support_home. From this website, you can:
■ Read overviews about support services and programs that BMC Software offers.■ Find the most current information about BMC Software products.■ Search a database for problems similar to yours and possible solutions.■ Order or download product documentation.■ Report a problem or ask a question.■ Subscribe to receive email notices when new product versions are released.■ Find worldwide BMC Software support center locations and contact information, including email addresses, fax
numbers, and telephone numbers.
Support by telephone or email
In the United States and Canada, if you need technical support and do not have access to the Web, call 800 537 1813 or send an email message to [email protected]. (In the Subject line, enter SupID:<yourSupportContractID>, such as SupID:12345.) Outside the United States and Canada, contact your local support center for assistance.
Before contacting BMC Software
Have the following information available so that Customer Support can begin working on your issue immediately:
■ Product information
— Product name— Product version (release number)— License number and password (trial or permanent)
■ Operating system and environment information
— Machine type— Operating system type, version, and service pack— System hardware configuration— Serial numbers— Related software (database, application, and communication) including type, version, and service pack or
maintenance level
■ Sequence of events leading to the problem
■ Commands and options that you used
■ Messages received (and the time and date that you received them)
— Product error messages— Messages from the operating system, such as file system full— Messages from related software

License key and password information
If you have a question about your license key or password, contact Customer Support through one of the following methods:
■ E-mail [email protected]. (In the Subject line, enter SupID:<yourSupportContractID>, such as SupID:12345.)
■ In the United States and Canada, call 800 537 1813. Outside the United States and Canada, contact your local support center for assistance.
■ Submit a new issue at http://www.bmc.com/support_home.

Contents
Preface 7
Audience . . . . . . . . . . . . . . . . . . . . . . . . . . . . . . . . . . . . . . . . . . . . . . . . . . . . . . . . . . . . . . . . . 7New icon . . . . . . . . . . . . . . . . . . . . . . . . . . . . . . . . . . . . . . . . . . . . . . . . . . . . . . . . . . . . . . . . . 7ITSM applications overview. . . . . . . . . . . . . . . . . . . . . . . . . . . . . . . . . . . . . . . . . . . . . . . . . 8
BMC Remedy Asset Management . . . . . . . . . . . . . . . . . . . . . . . . . . . . . . . . . . . . . . . . 8BMC Remedy Change Management . . . . . . . . . . . . . . . . . . . . . . . . . . . . . . . . . . . . . . 9BMC Remedy Incident Management . . . . . . . . . . . . . . . . . . . . . . . . . . . . . . . . . . . . . 9BMC Remedy Problem Management . . . . . . . . . . . . . . . . . . . . . . . . . . . . . . . . . . . . . 9BMC Service Level Management . . . . . . . . . . . . . . . . . . . . . . . . . . . . . . . . . . . . . . . . 10
Supporting applications overview . . . . . . . . . . . . . . . . . . . . . . . . . . . . . . . . . . . . . . . . . . 10BMC Service Request Management . . . . . . . . . . . . . . . . . . . . . . . . . . . . . . . . . . . . . . 10BMC Remedy Knowledge Management . . . . . . . . . . . . . . . . . . . . . . . . . . . . . . . . . . 10BMC Atrium CMDB . . . . . . . . . . . . . . . . . . . . . . . . . . . . . . . . . . . . . . . . . . . . . . . . . . . 11BMC Remedy Approval Server. . . . . . . . . . . . . . . . . . . . . . . . . . . . . . . . . . . . . . . . . . 11AR System Assignment Engine. . . . . . . . . . . . . . . . . . . . . . . . . . . . . . . . . . . . . . . . . . 11
ITSM modules overview . . . . . . . . . . . . . . . . . . . . . . . . . . . . . . . . . . . . . . . . . . . . . . . . . . . 12Foundation . . . . . . . . . . . . . . . . . . . . . . . . . . . . . . . . . . . . . . . . . . . . . . . . . . . . . . . . . . 12Financial Management . . . . . . . . . . . . . . . . . . . . . . . . . . . . . . . . . . . . . . . . . . . . . . . . . 12Contract Management System. . . . . . . . . . . . . . . . . . . . . . . . . . . . . . . . . . . . . . . . . . . 12Asset Inventory System . . . . . . . . . . . . . . . . . . . . . . . . . . . . . . . . . . . . . . . . . . . . . . . . 12Definitive Software Library . . . . . . . . . . . . . . . . . . . . . . . . . . . . . . . . . . . . . . . . . . . . . 12Task Management System . . . . . . . . . . . . . . . . . . . . . . . . . . . . . . . . . . . . . . . . . . . . . . 13Command Automation Interface . . . . . . . . . . . . . . . . . . . . . . . . . . . . . . . . . . . . . . . . 13Requester Console . . . . . . . . . . . . . . . . . . . . . . . . . . . . . . . . . . . . . . . . . . . . . . . . . . . . . 13
BMC Remedy IT Service Management documentation . . . . . . . . . . . . . . . . . . . . . . . . . 14Solution documentation . . . . . . . . . . . . . . . . . . . . . . . . . . . . . . . . . . . . . . . . . . . . . . . . 15Related documentation. . . . . . . . . . . . . . . . . . . . . . . . . . . . . . . . . . . . . . . . . . . . . . . . . 15
Chapter 1 Before you install 17
Installation order . . . . . . . . . . . . . . . . . . . . . . . . . . . . . . . . . . . . . . . . . . . . . . . . . . . . . . . . . 18General prerequisites. . . . . . . . . . . . . . . . . . . . . . . . . . . . . . . . . . . . . . . . . . . . . . . . . . . . . . 19Prerequisites related to AR System . . . . . . . . . . . . . . . . . . . . . . . . . . . . . . . . . . . . . . . . . . 20
Contents 5

Database-related prerequisites . . . . . . . . . . . . . . . . . . . . . . . . . . . . . . . . . . . . . . . . . . . . . . 21All databases. . . . . . . . . . . . . . . . . . . . . . . . . . . . . . . . . . . . . . . . . . . . . . . . . . . . . . . . . . 21Databases not configured to extend automatically. . . . . . . . . . . . . . . . . . . . . . . . . . 22IBM® DB2® . . . . . . . . . . . . . . . . . . . . . . . . . . . . . . . . . . . . . . . . . . . . . . . . . . . . . . . . . . . 22Microsoft SQL Server. . . . . . . . . . . . . . . . . . . . . . . . . . . . . . . . . . . . . . . . . . . . . . . . . . . 25Oracle . . . . . . . . . . . . . . . . . . . . . . . . . . . . . . . . . . . . . . . . . . . . . . . . . . . . . . . . . . . . . . . . 25Sybase . . . . . . . . . . . . . . . . . . . . . . . . . . . . . . . . . . . . . . . . . . . . . . . . . . . . . . . . . . . . . . . 26
Reports-related prerequisites . . . . . . . . . . . . . . . . . . . . . . . . . . . . . . . . . . . . . . . . . . . . . . . 28Web services-related prerequisites . . . . . . . . . . . . . . . . . . . . . . . . . . . . . . . . . . . . . . . . . . 28Minimum hardware requirements . . . . . . . . . . . . . . . . . . . . . . . . . . . . . . . . . . . . . . . . . . 30
AR System application hardware requirements . . . . . . . . . . . . . . . . . . . . . . . . . . . . 30Mid tier hardware requirements . . . . . . . . . . . . . . . . . . . . . . . . . . . . . . . . . . . . . . . . . 31
Reviewing the compatibility matrix . . . . . . . . . . . . . . . . . . . . . . . . . . . . . . . . . . . . . . . . . 31Running the environment pre-check utility . . . . . . . . . . . . . . . . . . . . . . . . . . . . . . . . . . . 31Changes to AR System and BMC Atrium CMDB . . . . . . . . . . . . . . . . . . . . . . . . . . . . . . 33
Chapter 2 Installing ITSM 35
Activating application licenses . . . . . . . . . . . . . . . . . . . . . . . . . . . . . . . . . . . . . . . . . . . . . . 36Obtaining license keys for AR System 7.0.01 . . . . . . . . . . . . . . . . . . . . . . . . . . . . . . . 36
Installing the applications . . . . . . . . . . . . . . . . . . . . . . . . . . . . . . . . . . . . . . . . . . . . . . . . . . 37Configuring the AR System server for the installation . . . . . . . . . . . . . . . . . . . . . . 37Installing as non-root. . . . . . . . . . . . . . . . . . . . . . . . . . . . . . . . . . . . . . . . . . . . . . . . . . . 37Installing the Approval Server . . . . . . . . . . . . . . . . . . . . . . . . . . . . . . . . . . . . . . . . . . . 38Installing the Assignment Engine . . . . . . . . . . . . . . . . . . . . . . . . . . . . . . . . . . . . . . . . 38Installing ITSM applications. . . . . . . . . . . . . . . . . . . . . . . . . . . . . . . . . . . . . . . . . . . . . 41Installing help . . . . . . . . . . . . . . . . . . . . . . . . . . . . . . . . . . . . . . . . . . . . . . . . . . . . . . . . 47
Installing ITSM to a server group. . . . . . . . . . . . . . . . . . . . . . . . . . . . . . . . . . . . . . . . . . . . 52Performing post-installation activities . . . . . . . . . . . . . . . . . . . . . . . . . . . . . . . . . . . . . . . 54
Downloading ITSM patches . . . . . . . . . . . . . . . . . . . . . . . . . . . . . . . . . . . . . . . . . . . . . 54Changing the tenancy mode. . . . . . . . . . . . . . . . . . . . . . . . . . . . . . . . . . . . . . . . . . . . . 55Changing the schema sort order . . . . . . . . . . . . . . . . . . . . . . . . . . . . . . . . . . . . . . . . . 56Configuring AR System Server for CAI . . . . . . . . . . . . . . . . . . . . . . . . . . . . . . . . . . . 57Changing the time zone . . . . . . . . . . . . . . . . . . . . . . . . . . . . . . . . . . . . . . . . . . . . . . . . 61Creating Windows shortcuts to ITSM applications . . . . . . . . . . . . . . . . . . . . . . . . . 61Creating AR System User Preference records . . . . . . . . . . . . . . . . . . . . . . . . . . . . . . 61
Appendix A Installation logging 63
ITSM log files. . . . . . . . . . . . . . . . . . . . . . . . . . . . . . . . . . . . . . . . . . . . . . . . . . . . . . . . . . . . . 64Summary log files . . . . . . . . . . . . . . . . . . . . . . . . . . . . . . . . . . . . . . . . . . . . . . . . . . . . . 64Detailed log files. . . . . . . . . . . . . . . . . . . . . . . . . . . . . . . . . . . . . . . . . . . . . . . . . . . . . . . 64Error log files . . . . . . . . . . . . . . . . . . . . . . . . . . . . . . . . . . . . . . . . . . . . . . . . . . . . . . . . . 64
Using log files to troubleshoot an installation . . . . . . . . . . . . . . . . . . . . . . . . . . . . . . . . . 65
Index 67
6 Installation Guide

Preface
This guide describes how to install the BMC Remedy IT Service Management (ITSM) applications:
! BMC Remedy Asset Management
! BMC Remedy Change Management
! BMC Remedy Service Desk solution, which includes the BMC Remedy Incident Management application and the BMC Remedy Problem Management application
NOTE Installing BMC Service Level Management (SLM) is explained in the BMC Service Level Management Installation Guide.
The applications run on the BMC Remedy Action Request System (AR System) platform and share a common database. All five applications consume data from the BMC Atrium Configuration Management Database (CMDB) application.
AudienceThis guide is intended for the following IT professionals:
! AR System administrators
! Other qualified IT professionals who are responsible for installing the ITSM applications
New iconThis guide contains the New icon, to identify information that is new or substantially changed with version 7.0.03.
Preface 7

BMC Remedy IT Service Management 7.0.03
ITSM applications overviewEach ITSM application contains the consoles, forms, active links, escalations, flashboards, and so on, needed to execute their basic functions. The applications also use several integrated modules and supporting applications that extend and enhance these basic functions.
You install the ITSM applications and their supporting applications manually. The integrated modules are installed automatically by the individual ITSM application installers. For an overview of the supporting applications, see “Supporting applications overview” on page 10. For an overview of the individual modules, see “ITSM modules overview” on page 12.
Depending on the needs of your organization, you can install one or more of the ITSM applications. If you are installing only some of the ITSM applications now, you can install the others later without having to perform any special integration procedures.
When installing more than one ITSM application, you can install them in any order. You must, however, install the supporting applications for each ITSM application a in a specific sequence. See “Installation order” on page 18.
NOTE If SLM is already installed on your system, the individual ITSM application installers detect it and prompt you to install some integration software when the installer finishes. The integration software is shipped with the SLM application. See the BMC Service Level Management Installation Guide for more information about the integration installation.
BMC Remedy Asset Management The BMC Remedy Asset Management application lets IT professionals track and manage enterprise CIs—and their changing relationships—throughout the entire CI lifecycle. As part of the BMC Remedy ITSM Suite, Asset Management is integrated with BMC Remedy Service Desk (which contains the BMC Remedy Incident Management and BMC Remedy Problem Management applications), BMC Remedy Change Management, and BMC Service Level Management, and offers flexibility to support customized business processes.
For more information, see the BMC Remedy Asset Management User’s Guide.
8 Installation Guide

ITSM applications overview
BMC Remedy Change ManagementUsing ITIL®-compatible best practices, BMC Remedy Change Management provides IT organizations with the ability to manage changes by enabling them to assess impact, risk, and resource requirements, and then create plans and automate approval functions for implementing changes. It provides scheduling and task assignment functionality, and reporting capabilities for reviewing performance and improving processes. Because Change Management is integrated with the BMC Atrium CMDB, it lets you relate changes to other records, such as configuration items (including services) and incidents.
For more information, see the BMC Remedy Change Management User’s Guide.
BMC Remedy Incident Management BMC Remedy Incident Management is used to manage incidents. Incident management is reactive, and is typically initiated in response to a customer call or an automated event. An example of an automated event might be an alert from a monitoring system, such as BMC Service Impact Management (SIM). The primary goal of the incident management process, according to ITIL standards, is “to restore normal service operation as quickly as possible with minimum disruption to the business, thus ensuring that the best achievable levels of availability and service are maintained.”
An incident is any event that is not part of the standard operation of a service and that causes an interruption to or a reduction in the quality of that service. Normal service operation is the operation of services within the limits specified by BMC Service Level Management (SLM).
For more information, see the BMC Service Desk: Incident Management User's Guide.
BMC Remedy Problem Management BMC Remedy Problem Management is used to manage problem investigations, known errors, and solution database entries. Problem management can proactively prevent the occurrence of incidents, errors, and additional problems. A problem investigation helps an IT organization get to the root cause of incidents. It initiates actions that help to improve or correct the situation, preventing the incident from recurring.
After a problem investigation identifies the cause, this information can result in either a known error or a solution database entry. A known error is a problem that has been successfully diagnosed and for which a temporary work-around or permanent solution has been identified. A solution database entry contains information that might be required to provide or restore a service.
For more information, see the BMC Service Desk: Problem Management User's Guide.
Preface 9

BMC Remedy IT Service Management 7.0.03
BMC Service Level Management BMC Service Level Management enables a service provider, such as an IT organization, a customer support group, or an external service provider, to formally document the needs of its customers or lines of business using service level agreements, and provide the correct level of service to meet those needs.
Service Level Management also provides a means to review, enforce, and report on the level of service provided. It streamlines the most important task of all, which is the communication between a service provider and its customers. Multiple service targets can be defined and monitored, acting as a bridge between IT service support and IT operations. This enables costs to be controlled and helps to provide a consistent level of service in support of a key business service.
For more information, see the BMC Service Level Management User's Guide.
Supporting applications overviewThis section contains a brief description of each supporting application. For a complete description of the supporting applications, see the related supporting application’s guide (the guide titles are shown at the end of each brief description, where applicable).
BMC Service Request Management BMC Service Request Management (SRM) allows IT to define offered services, publish those services in a service catalog and automate the fulfillment of those services for their users. With SRM, users have the ability to help themselves, which reduces the requests coming into the service desk. This enables IT to focus on more mission-critical activities, such as resolving incidents related to service failures and restoring critical services. SRM also provides the ability to automate workflows for each service, enforcing consistency of process and faster fulfillment of the request.
For more information, see the BMC Service Request Management Administrator’s and User's Guide.
BMC Remedy Knowledge ManagementBMC Remedy Knowledge Management is a world-class application that allows users to author and search for solutions in a knowledge base. It includes a comprehensive editor with extensive editing tools and a robust search engine that allows users to search for solutions using natural language or Boolean searches. BMC Remedy KM is also tightly integrated with the BMC Remedy Action Request System (AR System), providing a seamless integration between knowledge management and service management.
10 Installation Guide

Supporting applications overview
BMC Remedy KM can improve staff efficiency, customer service and satisfaction, and business service quality. Call center efficiencies can be dramatically improved by providing agents with quick answers and solutions to customer issues. In addition, web-based self-service options allow employees or customers to find their own answers at any time using a natural language search.
For more information, see the BMC Remedy Knowledge Management Installation and Integration Guide.
BMC Atrium CMDB BMC Atrium CMDB stores information about configuration items and their relationships in an inheritance-based data model, and has the ability to reconcile data from different sources. BMC Atrium CMDB provides a “single source of truth” about your IT environment, enabling other BMC applications to manage CIs, predict the impact of configuration changes, and perform other Business Service Management (BSM) functions.
For more information, see the BMC Atrium CMDB User’s Guide.
BMC Remedy Approval ServerApproval Server lets you automate approval processes. When an AR System application triggers an approval process, the Approval Server routes a request to collect signatures within a defined approval process, handling all notifications and requests for more information as it collects each response (approving or rejecting). Approval Server then reactivates the original application, reporting the result of the approval process. You can have multiple Approval Servers running with multiple AR System Servers on one computer.
For more information, see the BMC Remedy Approval Server Guide for Users and Administrators.
AR System Assignment EngineAssignment Engine is used to automatically determine an assignee for a ticket, based on a set of rules that you can configure. Such rules typically include the availability of employees and group membership. The engine can be configured to assign employees either on a round-robin basis or by load balancing. The latter method can be further configured by capacity of employees or by the number of requests assigned.
If you specify fall-back rules, the assignment engine makes sure that no ticket goes unassigned, and allows the application to find an available assignee who is best suited to work on the request.
For more information, see the BMC Remedy Action Request System Configuring guide.
Preface 11

BMC Remedy IT Service Management 7.0.03
ITSM modules overviewEach ITSM application installer automatically installs several modules. Like the supporting applications, the modules provide background functionality and extend the capabilities of the applications.
Some modules are required by more than one ITSM application. Where this is the case, the installer installs the module only once. For example, if you install Change Management, then later install Asset Management (both of which use the Definitive Software Library [DSL]), the installer skips the DSL installation during the Asset Management installation.
Foundation Foundation contains all of the forms, workflow, and data that are needed to support the applications.
Financial Management Financial Management improves corporate budgetary accountability by tracking the expenses (both forecast and actual) for material, labor, and so on, associated with records in the ITSM applications.
Contract Management SystemContract Management tracks the status, type, terms, conditions, payments, and other information regarding lease, software, warranty, and maintenance contracts.
Asset Inventory SystemAsset Inventory enters, tracks, and manages individual assets and bulk items.
Definitive Software LibraryThe Definitive Software Library (DSL) is a central repository of approximately 10,000 approved product dictionary entries. These entries are the “master” names of the software applications. Any application that uses the DSL can specifically identify a single name for a software application and its versions, which in turn supports software license compliance.
12 Installation Guide

ITSM modules overview
Task Management SystemTask Management System (TMS) is an AR System subsystem that is used to create task templates and task group templates that can be used by the Change Management, Incident Management, and Problem Management applications. Besides the ability to set up predecessor-successor relationships, TMS supports branching and multiple task paths as well as the data exchange between tasks. TMS also supports integration with BMC Change and Configuration Management (CCM) through a launch mechanism.
For more information, see the BMC Remedy Task Management System Administrator’s Guide.
Command Automation InterfaceThe Command Automation Interface (CAI) is a subcomponent used by TMS to execute commands on external systems. CAI uses a command definition (a type of template) to construct commands using the parameters sent to it by TMS. CAI then uses a predefined conduit (for example, a web service, a command line, a URL, and so on) to execute the command.
Requester ConsoleThe Requester Console is the customer-facing, user interface of the Change Management and Incident Management applications. It is a single entry point where users of these applications can submit a change request or report an incident.
The BMC Service Request Management (SRM) application provides a richer set of features and functions as compared to the Requestor Console. If SRM is implemented, it is used instead of the Requestor Console as the customer-facing interface.
For more information, see the BMC Service Request Management Administrator’s and User's Guide.
Preface 13

BMC Remedy IT Service Management 7.0.03
BMC Remedy IT Service Management documentation
The following table lists the documentation available for ITSM.
Unless otherwise noted, online documentation is available with the product and on the Customer Support website at http://www.bmc.com/support_home.
Title Document provides Audience
ITSM Configuration Quick Start
A reference card to quickly install and configure applications in the ITSM suite.
Administrators
BMC Remedy IT Service Management 7.0.03 Release Notes
Information about known issues in each release of BMC Remedy IT Service Management. Also provides a list of new features included with the applications.
Everyone
BMC Remedy IT Service Management 7.0.03 Installation Guide
Procedures for installing the BMC Remedy IT Service Management applications and solutions, BMC Remedy Service Desk solution (BMC Remedy Incident Management and BMC Remedy Problem Management), BMC Remedy Change Management, and BMC Remedy Asset Management.
Administrators
BMC Remedy IT Service Management 7.0 Configuration Guide
Procedures for configuring the BMC Remedy IT Service Management applications.
Administrators
BMC Remedy Asset Management 7.0 User’s Guide
Procedures for using the BMC Remedy Asset Management application; includes new features and overview.
Everyone
BMC Remedy Change Management 7.0 User’s Guide
Procedures for using the BMC Remedy Change Management application; includes new features and overview.
Everyone
BMC Remedy Service Desk: Incident Management 7.0 User’s Guide
Procedures for using the BMC Remedy Service Desk: Incident Management application; includes new features and overview.
Everyone
BMC Remedy Service Desk: Problem Management 7.0 User’s Guide
Procedures for using the BMC Remedy Service Desk: Problem Management application; includes new features and overview.
Everyone
BMC Remedy Task Management System 7.0 Administrator’s Guide
Procedures to configure Task Management. This guide also includes steps to configure seamless authentication between BMC Remedy Change Management and the other components of BMC Change and Configuration Management (CCM).
Administrators
Help Help for using and configuring ITSM, available by clicking Help in the product interface.Available from help links after help is installed.
Everyone
14 Installation Guide

BMC Remedy IT Service Management documentation
Solution documentationThe following table lists documentation for BMC solutions that include ITSM. This documentation is available on the Customer Support website athttp://www.bmc.com/support_home.
Related documentationThe following table lists documentation for related BMC products that might be of interest to ITSM users. This documentation is available on the Customer Support website at http://www.bmc.com/support_home.
Title Document provides Audience
BMC Dashboards for Business Service Management Getting Started
Information about installing, configuring, and using BMC Dashboards for BSM.
Everyone
BMC Change and Configuration Management Installation and Configuration Guide
Information about installing and configuring the CCM (Change and Configuration Management) offerings.
Administrators
BMC Service Impact Manager: Integration for BMC Remedy Service Desk User Guide
Detailed information about the Integration for the BMC Remedy Service Desk (IBRSD) component. This guide is intended for system administrators and users with an understanding of the BMC Impact Manager and BMC Remedy Service Desk environments.
Everyone
Service Management Solutions Release Notes
Information about new features, open issues, and resolved issues.
Everyone
Service Management Solutions Installation and Configuration Guide
A certified path, which has been tested and validated, to successfully install the Service Management Solution offerings.
Administrators
Service Management Solutions Installation Overview
A reference to quickly installing and configuring Service Management Solutions applications.
Administrators
Title Document provides Audience
BMC Remedy Action Request System 7.x Concepts
Concepts for using the Action Request System. Administrators
BMC Remedy Action Request System 7.x Installing
Procedures for installing the AR System. Administrators
BMC Remedy Action Request System 7.x Configuring
Procedures about configuring AR System servers and clients, localizing, importing and exporting data, and archiving data.
Administrators
BMC Remedy Action Request System 7.x Installing and Configuring BMC Remedy Mid Tier
Procedures about the mid tier, including mid tier installation and configuration, and web server configuration.
Administrators
BMC Remedy 7.x Approval Server Guide for Users and Administrators
Topics on installation and configuration of the Approval Server, how to use the Approval Server, and understanding the approval workflow.
Everyone
Preface 15
BMC Remedy IT Service Management 7.0.03
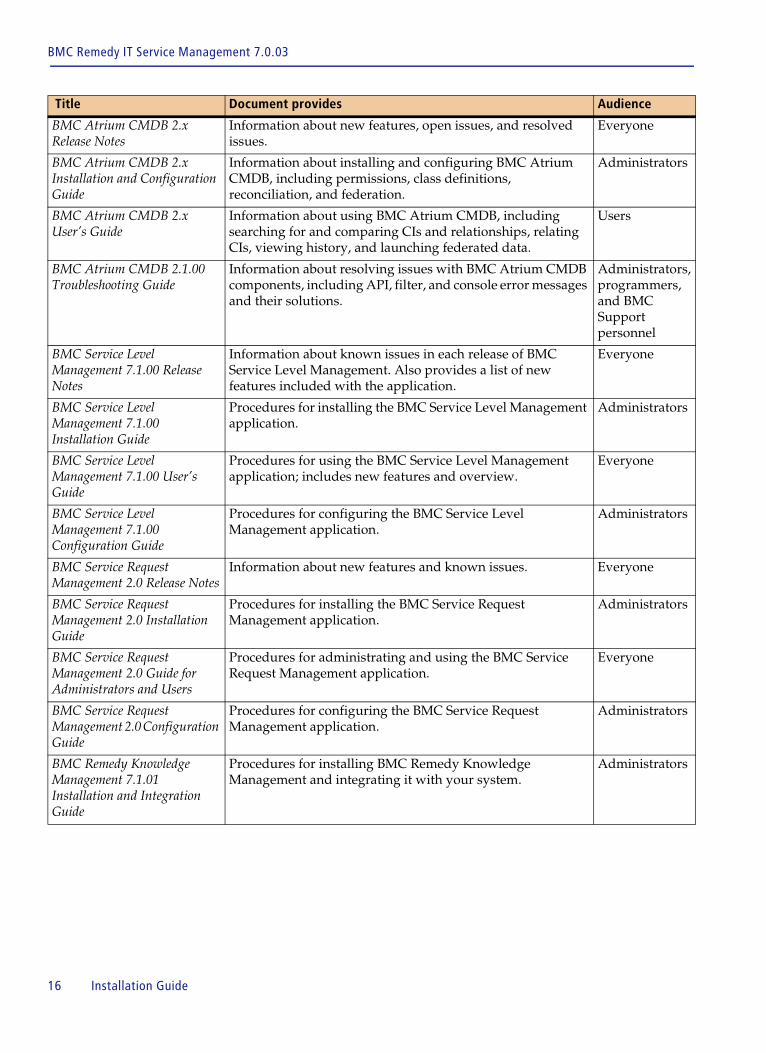
BMC Atrium CMDB 2.x Release Notes
Information about new features, open issues, and resolved issues.
Everyone
BMC Atrium CMDB 2.x Installation and Configuration Guide
Information about installing and configuring BMC Atrium CMDB, including permissions, class definitions, reconciliation, and federation.
Administrators
BMC Atrium CMDB 2.x User’s Guide
Information about using BMC Atrium CMDB, including searching for and comparing CIs and relationships, relating CIs, viewing history, and launching federated data.
Users
BMC Atrium CMDB 2.1.00 Troubleshooting Guide
Information about resolving issues with BMC Atrium CMDB components, including API, filter, and console error messages and their solutions.
Administrators, programmers, and BMC Support personnel
BMC Service Level Management 7.1.00 Release Notes
Information about known issues in each release of BMC Service Level Management. Also provides a list of new features included with the application.
Everyone
BMC Service Level Management 7.1.00 Installation Guide
Procedures for installing the BMC Service Level Management application.
Administrators
BMC Service Level Management 7.1.00 User’s Guide
Procedures for using the BMC Service Level Management application; includes new features and overview.
Everyone
BMC Service Level Management 7.1.00 Configuration Guide
Procedures for configuring the BMC Service Level Management application.
Administrators
BMC Service Request Management 2.0 Release Notes
Information about new features and known issues. Everyone
BMC Service Request Management 2.0 Installation Guide
Procedures for installing the BMC Service Request Management application.
Administrators
BMC Service Request Management 2.0 Guide for Administrators and Users
Procedures for administrating and using the BMC Service Request Management application.
Everyone
BMC Service Request Management 2.0 Configuration Guide
Procedures for configuring the BMC Service Request Management application.
Administrators
BMC Remedy Knowledge Management 7.1.01 Installation and Integration Guide
Procedures for installing BMC Remedy Knowledge Management and integrating it with your system.
Administrators
Title Document provides Audience
16 Installation Guide

Chapter
1
Before you installThis section contains important information about installation prerequisites. Review this section before installing the BMC Remedy IT Service Management (ITSM) applications.
The following topics are provided:
! Installation order (page 18)! General prerequisites (page 19)! Prerequisites related to AR System (page 20)! Database-related prerequisites (page 21)! Reports-related prerequisites (page 28)! Web services-related prerequisites (page 28)! Minimum hardware requirements (page 30)! Reviewing the compatibility matrix (page 31)! Running the environment pre-check utility (page 31)! Changes to AR System and BMC Atrium CMDB (page 33)
Chapter 1 Before you install 17

BMC Remedy IT Service Management 7.0.03
Installation orderThe following table shows the order in which to perform the installations. It also suggests when to make backups and install help. Use it when planning your installation.
Completed? Step number
Operation Comments Windows procedure location
UNIX®
procedurelocation
1 Run the environment pre-check utility.
Make sure your system meets the environmental requirements.
See page 31 See page 31
2 Install BMC Atrium CMDB.
This is an installation prerequisite. See the BMC Atrium CMDB Installation and Configuration Guide.
N/A N/A
3 Back up the AR System database.
This allows you to restore AR System to its preinstallation state if you encounter problems.
N/A N/A
4 Install BMC Remedy Approval Server.
Install the Approval Server before installing Asset Management or Change Management.If you are installing multiple AR System applications, install the Approval Server only once.
See page 38 See page 38
5 Install AR System Assignment Engine.
Install the Assignment Engine before installing ITSM applications.If you are installing multiple AR System applications, install the Assignment Engine only once.
See page 38 See page 40
6 Activate the application licenses.
License the applications before you install them.
See page 36 See page 36
7 Install ITSM. Install the ITSM applications. See page 42 See page 45
8 Install ITSM patches.
For information about downloading patches, see “Downloading ITSM patches” on page 54.
Patch Readme file
Patch Readme file
9 Install help. Install help after installing the application.
See page 48 See page 51
18 Installation Guide

General prerequisites
General prerequisitesBefore installing ITSM, make sure the following installation prerequisites are met.
! ITSM must be compatible with your system. See “Reviewing the compatibility matrix” on page 31.
! Make sure that you obtain all of the licenses that you need and that you install the licenses to the AR System server before you install the applications.
! If you are downloading the applications from the Web, make sure you extract the compressed files into a working directory, from which you can run the installation.
! Make sure you install the latest patches for:
! BMC Remedy Action Request System
! BMC Remedy Administrator
! BMC Remedy User (required if you access the application using the BMC Remedy User client)
! BMC Remedy Mid Tier
! BMC Remedy Approval Server
! AR System Assignment Engine
For information about downloading patches, see “Downloading ITSM patches” on page 54.
For more information, see release notes and technical bulletins for AR System and for ITSM.
! The BMC Atrium CMDB should be installed before installing ITSM. If you need to install it later, see the BMC Atrium CMDB Installation and Configuration Guide for information.
! Before you install ITSM applications, make sure the server meets the minimum hardware requirements described in “Minimum hardware requirements” on page 30. Installing applications onto an underpowered server can result in unexpected system behavior, which can include installation errors, slow response time, and sudden application stoppages.
! For HP-UX and Linux® systems, you might find operating system configuration issues in installing directly from a DVD. In some cases, the DVD mount might cause long file names from the DVD not to work. To prevent this problem, configure the operating system to allow long file names to be read and copied.
! Check the websites of the suppliers of the platforms in use at your site to verify that they are still supported. BMC does not support platforms that are no longer supported by the vendor. Carefully read the system requirements for your particular operating system, especially the patch requirements.
Chapter 1 Before you install 19

BMC Remedy IT Service Management 7.0.03
Prerequisites related to AR SystemBefore installing an ITSM application, make sure that the following installation prerequisites related to AR System are met.
! Make sure that you have installed and licensed (or have upgraded to) AR System 7.0.01, patch 004, or later on all servers and BMC Remedy User clients that you are using with the application. For more information, see “Reviewing the compatibility matrix” on page 31.
! To install an ITSM application, make sure you are a member of the Administrator group in the AR System User form.
! To use email notifications, install the BMC Remedy Email Engine. For information about the email engine, see the BMC Remedy Action Request System Administering BMC Remedy Email Engine guide. You can also use BMC Remedy Alert for notifications.
! To access the application using a browser or to use BMC Remedy Flashboards with an ITSM application, install a supported web server and the BMC Remedy Mid Tier.
For a list of supported web servers, see product compatibility information on the Customer Support website. For more information, see “Reviewing the compatibility matrix” on page 31.
NOTE As part of AR System installation, the Flashboards components required by ITSM to view real-time Flashboards are installed automatically. You do not have to perform a separate Flashboards server installation. However, you need a Flashboards license to use all the flashboards included with the ITSM applications.
! For improved performance if you are using ITSM with BMC Atrium CMDB 2.1.00, BMC recommends running your AR System server on a private RPC socket with the following values:
Windows
! RE-RPC-Socket 390698 (for the Reconciliation Engine)
! Private-RPC-Socket 390698 10 10 (for the AR System Server)
UNIX
! RE-RPC-Socket 390698 (for the Reconciliation Engine)
! Private-RPC-Socket 390698 6 6 (for the AR System Server)
NOTE You can also use port number 390699, but the port numbers for the Reconciliation Engine and the AR System Server must match.
20 Installation Guide

Database-related prerequisites
You must configure the AR System server to run on a private server first to allow this. For more information about private servers, see the BMC Remedy Action Request System Configuring guide.
Database-related prerequisitesBefore installing ITSM applications, make sure that the database meets the prerequisites listed in this section.
IMPORTANT Review this section before running the environment pre-check utility, as described in “Running the environment pre-check utility” on page 31.
In addition to a general section that applies to all database types, this section contains references to the following, specific database types:
! IBM® DB2® (page 22)
! Microsoft SQL Server (page 25)
! Oracle (page 25)
! Sybase (page 26)
Depending on the database you are using, make the following adjustments.
All databasesBMC recommends at least 2000 MB of disk space for the database. Depending on the number of records your system handles and the specific type of database you are using, however, you might need more than this.
If you do not have 2000 MB or more before beginning the installation, you might run out of free space during installation. As the transaction log fills up, AR System suspends operation. When the transaction log is completely full, AR System writes a message to the AR System error log and the installation terminates.
NOTE If the transaction log fills during the installation and the installation fails, clear the transaction log, and then increase the size of the transaction log before reinstalling ITSM applications.
See the documentation for your database for information about how to increase the size of the database transaction log or how to clear it.
Chapter 1 Before you install 21

BMC Remedy IT Service Management 7.0.03
Databases not configured to extend automaticallyThe following information relates to databases that are not configured to extend automatically.
NOTE This information does not apply to Oracle®, which has separate requirements listed in “Oracle” on page 25.
! Set the AR System data file size to at least 2000 MB for one ITSM application, or to at least 4000 MB if you are installing all ITSM applications.
! Set the log file size to 2000 MB, or higher.
IBM® DB2®
Make sure your DB2 environment is set up as described in this section.
Some IT Service Management (ITSM), Service Request Management (SRM), and Approval Server forms have entries that exceed the default AR System size limit for each record. The following steps help optimize the way DB2 determines which forms it places in larger containers. Perform these steps to provide a balanced performance standard across all of the forms.
NOTE If you are installing ITSM applications on Windows using DB2 8.1 on AR System 7.0.01, you must install DB2 Fix Pack 12 or later before installing the applications.
To perform the following steps, make sure you are logged in as the DB2 instance owner, for example: su - db2<instance>.
1 Set up the database configuration options by running the following example commands:
DB2=> UPDATE DB CFG for <DATABASE NAME> using APP_CTL_HEAP_SZ 40480DB2=> UPDATE DB CFG for <DATABASE NAME> using UTIL_HEAP_SZ 95000DB2=> UPDATE DB CFG for <DATABASE NAME> using STMTHEAP 60000DB2=> UPDATE DB CFG for <DATABASE NAME> using LOGFILSIZ 4000
NOTE The default database name is ARSYSTEM.
2 Stop the AR System server.
3 Create a 32 KB buffer pool, as shown in the following example commands:
DB2=> connect to <databasename>DB2=> create bufferpool <bufferpoolname> immediate size <size>
pagesize 32KDB2=> connect reset
22 Installation Guide

Database-related prerequisites
4 Create a 32 KB table space, using a command similar to the following example:
NOTE This step is not required if only SLM is installed, and no other ITSM applications, BMC Service Request Management (SRM), or the BMC Remedy Approval Server will be installed.
DB2=> create regular tablespace <tablespacename> pagesize 32K managed by system using ('/<dir>/<dir>/<container name>') extentsize 32 [overhead 10.5] prefetchsize 32 [transferrate 0.14] bufferpool <bufferpoolname> [dropped table recovery off]
! Optional parameters enclosed in square brackets, for example:
[dropped table recovery off]
! Replace /<dir>/<dir>/<container name> with the complete path to the location where the container will be stored. The container can be an absolute or relative directory name.
! Replace <bufferpoolname> with the name of the buffer space you created in step 3.
IMPORTANT The Dropped Table Recovery Off option can improve performance but means that you cannot recover a table if it is accidentally dropped.
5 If the database is on a remote computer, grant the table space permission to the ARAdmin user by running the following command:
DB2=> grant use of tablespace <tablespacename> to user <aradmin user> with grant option;
6 If you are using system managed space (SMS), a temporary table space with a larger page size than the default system-managed temporary table space is required.
IMPORTANT Determine whether a temporary table space exists. If you do not have a temporary table space, run a command similar to the following example.
DB2=> create system temporary tablespace <tablespacename> pagesize 32K managed by system using ('/<dir>/<dir>/<container name>') extentsize 32 prefetchsize 32 bufferpool <bufferpoolname>
! Replace /<dir>/<dir>/<container name> with the complete path to the location where the container will be stored. The container can be an absolute or relative directory name.
! Replace <bufferpoolname> with the name of the buffer pool you created in step 3.
Chapter 1 Before you install 23

BMC Remedy IT Service Management 7.0.03
7 Unless you are installing only SLM, add the following lines to the database configuration file:
Form: NTE:SYS-NT Process ControlClause: IN <tablespacename>Form: NTE:SYS-Individual NT ControlClause: IN <tablespacename>Form: NTE:SYS-Group NT ControlClause: IN <tablespacename>
where <tablespacename> is the name of the table space created in step 4.
8 Add these lines if you are installing Incident Management, Change Management, or Problem Management.
Form: TMS:TaskClause: IN <tablespacename>Form: TMS:TaskGroupClause: IN <tablespacename>
where <tablespacename> is the name of the table space created in step 4.
9 Add these lines if you are installing Asset Management.
Form: AST:PurchaseRequisition-Detail-SignatureClause: IN <tablespacename>
where <tablespacename> is the name of the table space created in step 4.
10 Add these lines if you are installing Change Management.
Form: CHG:Infrastructure ChangeClause: IN <tablespacename>
where <tablespacename> is the name of the table space created in step 4.
11 Add these lines if you are installing Incident Management.
Form: HPD:Help DeskClause: IN <tablespacename>Form: HPD:Search-Assignment LogsClause: IN <tablespacename>Form: HPD:Search-WorklogClause: IN <tablespacename>Form: HPD:IncidentInterface_CreateClause: IN <tablespacename>
where <tablespacename> is the name of the table space created in step 4.
12 Add these lines if you are installing the BMC Remedy Approval Server.
Form: AP:Rule DefinitionClause: IN <tablespacename>
where <tablespacename> is the name of the table space created in step 4.
For more information, see the BMC Remedy Action Request System 7.1.00 Database Reference guide. See the procedure for creating a table space with a larger page size for a given form in the “Using IBM DB2 Universal Database with AR System” section of the “Using Relational databases with AR System” chapter.
24 Installation Guide

Database-related prerequisites
13 For a Unicode DB2 installation, make sure that the DB2CODEPAGE variable is set to 1208.
On Windows, for example, enter the following command from the DB2 command window:
db2set DB2CODEPAGE=1208
NOTE The DB2CODEPAGE setting is part of the database client libraries. Make sure that this setting is correct on the computer where AR System is running, which might be different from the computer where the database is located.
For more information about the syntax and usage of DB2 commands, see the DB2 documentation.
Microsoft SQL ServerMake sure your Microsoft SQL Server environment is set up as described in this section.
! If you are using Microsoft SQL Server 2000, make sure you have installed Service Pack 4 or later.
! Purge the transaction log frequently to prevent it from filling up during installation.
If the database is configured to extend automatically, specify the following:
! Set the AR System data file size to 1000 MB or higher; BMC recommends 2000 MB.
! Set the log file size to 1000 MB or higher.
OracleMake sure your Oracle environment is set up as described in this section.
WARNING Oracle 9i libraries with HP-UX and Linux-based systems have a large memory leak. This is a known issue, unrelated to BMC. If you are using Oracle 9i, it is crucial to install, at a minimum, Oracle 9.2.0.4 patch 3095277 before installing ITSM applications. Without this patch, the application installations fail.
! Set the AR System data file size = 2000 MB.
! Set the log file size = 1000 MB.
NOTE For each additional ITSM application, add at least 200 MB to the data file size and at least 100 MB to the log file size.
Chapter 1 Before you install 25

BMC Remedy IT Service Management 7.0.03
! Set table space, temporary table space, and rollback segments. Set arsys1 = 500 and artmpf = 150. Add the optional, but recommended, rollback segment to the init<oracleSID>.ora file in the $ORACLE_HOME/dbs directory.
! To avoid timeout errors during installation, set the System Global Area (SGA) minimum size to at least 250 MB. For Oracle 9i or 10g, BMC recommends setting the maximum SGA size and allowing the database to automatically manage the internal memory structures of the SGA.
! For Oracle 9i or 10g:
! Add the following line to the ar.cfg file (Windows) or ar.conf file (UNIX):
Oracle-Cursor Sharing: FORCE
! Add the following line to the Oracle initialization file:
CURSOR_SHARING: FORCE
For more information, see the Oracle's Cursor Sharing for BMC Remedy Products white paper on the Customer Support website at:
http://www.bmc.com/support_home
SybaseMake sure your Sybase environment is set up as described in this section.
! If the database is configured to extend automatically, specify the following values:
! Set the AR System data file size = 3000 MB or larger.
! Set the log file size = 2048 MB or larger.
! To prevent the transaction log from filling up during installation, set the trunc log on chkpt database option on the following databases:
! AR System database
! tempdb
Use the following commands:
sp_dboption <database_name>, ‘trunc log on chkpt’, true
go
! Change the minimum page size to 8 KB. For information about increasing the page size, see your Sybase documentation.
! Change the Sybase configuration file to the following recommended minimal values, and then restart the Sybase server.
[Meta-Data Caches]number of open objects = 1310072number of open indexes = 512000number of open partitions = 6000
[Physical Memory]max memory = 128000
26 Installation Guide

Database-related prerequisites
[SQL Server Administration]procedure cache size = 6400
[Lock Manager]lock scheme=datarows
! If you created a device other than a master device, designate the database device as a default database device. This is required because AR System is always created on the default device.
! Increase the default tempdb size to 600 MB.
IMPORTANT Disable the trunc log on chkpt option for all databases after the successful installation and before any production activity.
Forms with more than 254 fieldsBy default, Sybase does not work with forms that have more than 254 fields. Because some ITSM forms have more than 254 fields at installation time, or can be expanded to have more than 254 fields during an integration with another application, you can receive an error message similar to the following example when installing the application on Sybase:
552 Failure during SQL operation to the database Number of variable length columns exceeds limit of 254 for allpage locked tables. ALTER TABLE for 'T566' failed
If this happens during an integration, you might also receive a message similar to the following example:
303 Form does not exist on server SIT:Site Group
This occurs when the integration process adds fields to a form (using the ALTER TABLE command) that increase the number of fields to more than 254. When this happens, Sybase rolls back the change and drops the original table.
This generates further installation errors because other dependencies fail to import.
Workaround
To prevent this from happening, create an ardb.conf file before you install the ITSM applications. The ardb.conf file applies the Sybase “lock datarows” feature to forms with more than 254 fields.
The ardb.conf file must contain the following entries and be located under the AR System installation directory (for example, c:/Program Files/AR System/<ar_system_server_name>/CONF).
Form:NTE:SYS-Group NT ControlClause: lock datarowsForm:NTE:SYS-NT Process ControlClause: lock datarowsForm:CHG:Infrastructure ChangeClause: lock datarowsForm:SRM:Request
Chapter 1 Before you install 27

BMC Remedy IT Service Management 7.0.03
Clause: lock datarowsForm:SRM:RequestApDetailsSignatureClause: lock datarowsForm:SRM:RequestInterfaceClause: lock datarows
Reports-related prerequisitesTo view reports using a browser, install Crystal Reports software (purchased separately). For information about supported versions of Crystal Reports, see product compatibility information on the Customer Support website. For more information, see “Reviewing the compatibility matrix” on page 31.
The Crystal Reports Web Components server runs only on Windows. However, if you use the UNIX Web Connector component that comes with Crystal Enterprise, you can connect the UNIX BMC Remedy Mid Tier with Crystal Enterprise running on Windows. For more information, see the BMC Remedy Action Request System Installing and Administering BMC Remedy Mid Tier guide.
The installation of BMC Remedy User (with the default ODBC option selected) automatically includes a Crystal DLL that is used for viewing reports. You cannot design or modify reports created in Crystal Reports using BMC Remedy User. If you do not own Crystal Reports, you can use the reporting tool in BMC Remedy User to generate reports for requests from a search.
Web services-related prerequisitesTo use web services for integrations among ITSM and third-party applications, make sure that the following installation prerequisites are met.
! You must install J2SE Java Runtime Environment (JRE) before installing or upgrading ITSM applications.
For information about the required version of JRE, see “Reviewing the compatibility matrix” on page 31.
! You must choose the web service option during the installation of AR System.
If you install JRE after installing AR System, or do not select the web service option during installation of AR System, either reinstall AR System or perform the following modifications:
! Add the following lines to your ar.cfg file (default location:C:\Program Files\AR System\ITSM\CONF).
For AR System 7.1.00:
ARF-Java-Class-Path: C:\Program Files\AR System\ITSM\arapi71.jar;ARF-Java-Class-Path: C:\Program Files\AR System\ITSM\axis.jar;ARF-Java-Class-Path: C:\Program Files\AR System\ITSM\log4j-1.2.8.jar;
ARF-Java-Class-Path: C:\Program Files\AR System\ITSM\websvc71.jar;
28 Installation Guide

Web services-related prerequisites
ARF-Java-Class-Path: C:\Program Files\AR System\ITSM\wsdl4j-1.5.1.jar;
ARF-Java-Class-Path: C:\Program Files\AR System\ITSM\xercesImpl.jar;ARF-Java-Class-Path: C:\Program Files\AR System\ITSM\xmlParserAPIs.jar;
ARF-Java-Class-Path: C:\Program Files\AR System\ITSM\commons-logging-1.0.4.jar;
ARF-Java-Class-Path: C:\Program Files\AR System\ITSM\commons-discovery-0.2.jar;
ARF-Java-Class-Path: C:\Program Files\AR System\ITSM\jaxrpc.jar;ARF-Java-Class-Path: C:\Program Files\AR System\ITSM\saaj.jar;Plugin: WebService.dll
For AR System 7.0.01:
ARF-Java-Class-Path: C:\Program Files\ITSM\AR System\arapi70.jar;ARF-Java-Class-Path: C:\Program Files\AR System\ITSM\axis.jar;ARF-Java-Class-Path: C:\Program Files\AR System\ITSM\log4j-1.2.8.jar;
ARF-Java-Class-Path: C:\Program Files\AR System\ITSM\websvc70.jar;ARF-Java-Class-Path: C:\Program Files\AR System\ITSM\wsdl4j-1.5.1.jar;
ARF-Java-Class-Path: C:\Program Files\AR System\ITSM\xercesImpl.jar;ARF-Java-Class-Path: C:\Program Files\AR System\ITSM\xmlParserAPIs.jar;
ARF-Java-Class-Path: C:\Program Files\AR System\ITSM\commons-logging-1.0.4.jar;
ARF-Java-Class-Path: C:\Program Files\AR System\ITSM\\commons-discovery-0.2.jar;
ARF-Java-Class-Path: C:\Program Files\AR System\ITSM\jaxrpc.jar;ARF-Java-Class-Path: C:\Program Files\AR System\ITSM\saaj.jar;Plugin: WebService.dll
! Add the Java directory to your PATH, for example:
C:\Program Files\Java\jre1.50_01\bin\client
If you install AR System after installing JRE, the server installer automatically updates your ar.cfg file and sets your PATH.
IMPORTANT The first time you use the web service after installation, you must access the Web Service Settings page in the Mid Tier Configuration Tool for this AR System server and enter “Demo” or some other user name in the Anonymous User Name field. Otherwise, the following error message appears: “Error 149: A user name must be supplied... .” For information about accessing the Mid Tier Configuration Tool, see the “Accessing the Mid Tier Configuration Tool” section of the BMC Remedy Action Request System Installing and Administering BMC Remedy Mid Tier guide.
Chapter 1 Before you install 29

BMC Remedy IT Service Management 7.0.03
Minimum hardware requirementsThe hardware requirements for any given environment depend on the size and amount of activity you expect. This section describes minimum requirements.
BMC recommends that you perform an analysis of your organization’s needs to determine the hardware requirements for your installation.
Minimum requirements
The minimum requirements given are intended for use in non-production, proof of concept, or small development environments. Using the minimum requirements, you can install AR System, launch BMC Remedy User, and view the AR System sample application without further customization on a Windows-based server.
NOTE The following requirements are for Windows-based servers. UNIX-based servers have comparable hardware requirements. They do not include database minimum requirements, which vary by vendor. See the database vendor’s documentation for recommended database system requirements.
AR System application hardware requirementsThe basic AR System hardware requirements increase when you install applications that run on top of AR System. The following description provides the minimum hardware requirements for AR System and one complex application (for example, an ITSM application), in a production environment, on a Windows server.
! Available RAM: 4 GB
! Available hard disk space: 7 GB
! Dual processor: 3 GHz
For each additional, complex application, an additional 2 GB of disk space is required.
NOTE For certain environments, BMC recommends increased hardware requirements. Using Oracle on HP-UX and installing three or more language packs, for example, requires a minimum of 5 GB available RAM.
30 Installation Guide

Reviewing the compatibility matrix
Mid tier hardware requirementsIf you use a mid tier, BMC strongly recommends that you install it on a separate server, with the same minimum and recommended requirements as an AR System server. If, however, you combine a mid tier and an AR System installation on the same server, add the requirements listed in the following table to AR System application hardware requirements.
Reviewing the compatibility matrix
Before installing the ITSM applications, review the compatibility matrix on the Customer Support website to make sure that your system is compatible with the applications that you are installing.
� To access the compatibility matrix
1 Access the Customer Support website at http://www.bmc.com/support_home.
2 Click the Support Login link, and then log in.
3 Click the Product Availability & Compatibility link.
4 On the Product Availability and Compatibility page, click the BMC Remedy Product Compatibility link.
5 Review the product compatibility matrixes for the products you are installing.
Running the environment pre-check utility
BMC recommends that you run the environment pre-check utility before installing an ITSM application to make sure that your system meets the environmental requirements.
IMPORTANT Review “Database-related prerequisites” on page 21, and then run the environment pre-check utility before you install any ITSM applications, to make sure the database environment on your system meets the basic requirements for installing the applications.
Minimum Recommended
512 MB of available RAM 1 GB of available RAM
800 MB of available hard disk space 2 GB of available hard disk space
2.8 GHz processor 2.8 GHz processor
Chapter 1 Before you install 31

BMC Remedy IT Service Management 7.0.03
The latest version of the environment pre-check utility is available from the Customer Support website at http://www.bmc.com/support_home. Log in, and then click Downloads & Patches in the left navigation pane. Click the “Remedy Heritage Products, visit the Patch Download site” link. Search for your ITSM application in the Product field and 7.0.03 in the Version field to find the latest environment pre-check utility.
Perl, which is typically installed with UNIX, is required to run the pre-checker on UNIX. A free download of Perl is available from the ActiveState website. You do not need to install Perl to run the pre-check utility on Windows.
NOTE Make sure that you have set the database environment variables before running the pre-check utility on UNIX.
� To run the environment pre-check utility
1 Copy the envUtil.tar or envUtil.zip file from the Utilities directory on the product DVD or the downloaded product files to a directory on your system, then extract the files as follows:
UNIX:
type tar -xvf envUtil.tar
Windows:
Extract the files from the envUtil.zip file
2 Change to the directory that contains the Perl executable you extracted, and then run the following command:
From the UNIX command lineperl <path to utility>/envUtil.pl -db_type <DB2 | MSSQL | Oracle | Sybase>
From the Windows command prompt (use run > db2cmd for DB2)<path to utility<\envUtil.exe -db_type <DB2 | MSSQL | Oracle | Sybase>
depending on which database you have.
3 Respond to the prompts.
For a Microsoft SQL Server database:
a Enter <sa> username:
Enter your system administrator (sa) user name.
b Enter password for user <sa> <username>:
Enter your system administrator (sa) password.
c Enter the SQLSERVER name:
Enter the name of the computer where SQL Server is running, or enter localhost.
d Enter valid data database name:
Enter ARSystem, or the name of your AR System database.
32 Installation Guide

Changes to AR System and BMC Atrium CMDB
For an Oracle database:
a Enter the Oracle SID:
Enter the Oracle SID where the AR System database is running.
b Enter Oracle database system username:
Enter your Oracle system user name.
c Enter password for system user:
Enter your Oracle user password.
For an IBM DB2 database:
a Enter the DB2 Instance:
Type the name of the database instance.
b Enter the Database for (instancename)
Enter the database for the instance.
For a Sybase database:
a Enter Sybase (SA) user name:
Enter your system administrator (SA) user name.
b Enter password for user (SA):
Enter your system administrator (SA) password.
c Enter sybase dataserver:
Enter the name of the data server.
d Enter sybase database name:
Enter ARSystem, or the name of your AR System database.
4 A list of the test results appears. Fix any listed incompatibilities before installing the applications. For more information, review the Report_<database>.log file.
Changes to AR System and BMC Atrium CMDBThis section describes changes that occur to the existing AR System and the BMC Atrium CMDB when you install ITSM applications.
! The Group form modifies the Public record from View to Change Access.
! The Business Time Holiday and Business Working Day forms have several new fields added (the fields added depend on your geographical location).
! Numerous new fields are added to the BMC Atrium CMDB form: objstr:attributedefinition. Depending on the classes installed, these fields might also be rolled into subforms.
! The Share:Application Properties form has a new entry for each ITSM application installed.
Chapter 1 Before you install 33

BMC Remedy IT Service Management 7.0.03
! The following two lines are added to the AR System configuration file for each plug-in installed (the number of plug-ins installed depends on how many and which of the ITSM applications you are installing):
plugin: <fully_qualify_plugin_path>plugin-path: <plugin_directory>
NOTE Windows installations use the ar.cfg configuration file; on UNIX the file is named ar.conf.
34 Installation Guide

Chapter
2
Installing ITSMThis section contains procedures for installing ITSM and supporting applications.
The following topics are provided:
! Activating application licenses (page 36)! Installing the applications (page 37)! Installing ITSM to a server group (page 52)! Performing post-installation activities (page 54)
These installation instructions assume you have installed or upgraded to the Action Request System 7.0.01, patch 004, or later, and that the AR System server is running when you perform the installation. For more information, see “Reviewing the compatibility matrix” on page 31.
If you downloaded the software, make sure you have extracted the compressed files you downloaded into a working directory, from which you can later run the installation.
IMPORTANT Before installing ITSM applications, review the installation order and make sure your system meets the required prerequisites. See “Installation order” on page 18 and “General prerequisites” on page 19.
Chapter 2 Installing ITSM 35

BMC Remedy IT Service Management 7.0.03
Activating application licensesYou must understand your licensing needs before you start the installation process. Depending on the features that you use, you might need several licenses to activate an application. You must activate the licenses before installing the applications.
IMPORTANT Licensing requirements vary, depending on which version of AR System you use.
If you have questions about your licensing requirements, contact Customer Support. See “Support by telephone or email” on page 3.
For information about activating licenses, see the guide that supports the version of AR System on which you are installing the applications:
! BMC Remedy Action Request System 7.1.00 Configuring (AR System 7.1.00)
! BMC Remedy Action Request System 7.0 Configuring (AR System 7.0.01)
Obtaining license keys for AR System 7.0.01You can obtain license keys for applications that you are installing on AR System 7.0.01 from the BMC electronic product download (EPD) page. Access the EPD page from the BMC Customer Support site at http://www.bmc.com/support_home.
NOTE If you do not know your user ID and password for the site, contact Customer Support by telephone or email. See “Support by telephone or email” on page 3.
NOTE AR System 7.1.00 does not require keys for application licenses; it requires keys only for AR System server licenses. For more information, see the BMC Remedy Action Request System 7.1.00 Configuring guide.
To obtain a key, you must provide the following information:
! Support contract ID
! Purchase order number
! Email address
! Version of AR System
! Host ID of your AR System server (see the following procedure)
� To determine the host ID in AR System 7.0.01
1 Open BMC Remedy Administrator.
2 In the navigation pane, select the AR System server on which you will install the applications.
36 Installation Guide

Installing the applications
3 Choose File > Licenses > Add/Remove Licenses.
The Add/Remove Licenses dialog box appears.
Figure 2-1: Add/Remove Licenses dialog box
4 From the Product Feature list, select AR Server.
The host ID of the selected AR System server automatically appears in the Host ID field. Record this number to use when requesting your licenses.
Installing the applicationsThis section contains instructions for installing on both Windows and UNIX®. For information about the order in which to perform these installations, see “Installation order” on page 18.
Configuring the AR System server for the installationTo install the applications more quickly, you can disable escalations on the AR System server from the Server Information dialog box in BMC Remedy Administrator. For more information, see the BMC Remedy Action Request System Configuring guide.
Installing as non-rootWhen installing the application on UNIX, BMC recommends performing the installation as a root user. However, you can perform the installation as a non-root user.
NOTE If you choose to install the application as a non-root user, you must log in to the UNIX system under the same UNIX user ID that was used to install AR System.
Product Feature list
Host ID
Chapter 2 Installing ITSM 37

BMC Remedy IT Service Management 7.0.03
If you install as a non-root user, you might need to manually update some system configuration files. When the installer script detects a non-root installation, it lists the names of the files that you must update manually and tells you where to find the installation logs listing the information to add. If you do not have the permissions required to update the configuration files, you must ask your UNIX system administrator to update them before using an ITSM application.
Installing the Approval ServerFor information about installing and configuring Approval Server, see the BMC Remedy Approval Server Guide for Users and Administrators.
NOTE If you are installing multiple AR System applications, you only need to install Approval Server once. If Approval Server is already installed, do not install it again.
Installing the Assignment EngineThis section describes how to install Assignment Engine. If you are installing multiple AR System applications, you need to install the Assignment Engine only once. If AR System Assignment Engine is already installed, do not install it again.
See the installation instructions that are appropriate for your environment.
! Windows—See “Installing the Assignment Engine—Windows” on page 38.
! UNIX—See “Installing Assignment Engine—UNIX” on page 40.
IMPORTANT Before you install, make sure the server meets the minimum hardware requirements. Installing applications on an underpowered server might result in unexpected system behavior, which can include installation errors, slow response, and sudden application stoppages. See “Minimum hardware requirements” on page 30 for information about minimum hardware requirements.
Installing the Assignment Engine—Windows Use this procedure to install Assignment Engine on Windows.
NOTE At the end of this procedure, the installer needs to restart the computer to complete the installation process.
38 Installation Guide

Installing the applications
� To install Assignment Engine on Windows
1 Run AssignEngine.exe. The location from where you run this executable file depends on how you received the application.
! If your files are on a DVD, the executable file is under the root directory.
! If you downloaded the application, you access the executable file from the top level of the working directory. This is the directory that you created to hold the files you extracted after downloading them.
After a brief initialization, the welcome panel appears.
Figure 2-2: AR System Assignment Engine welcome panel
2 Click Next.
The License Agreement panel appears.
3 Click Yes.
The Enter Required Information for BMC Remedy Assignment Engine panel appears.
4 Select the AR System server to use, then specify the administrator user name and password for the selected server.
5 Click Next.
The Choose Destination Location panel appears.
6 Click Next to use the default location, or click Browse to select the destination folder for the Assignment Engine software. The Choose Folder dialog box appears. Use the Browse function to select the folder, and then click OK.
NOTE If you are installing multiple instances of Assignment Engine, install each instance into a separate folder.
7 Click Next.
The Start Copying Files panel appears.
Chapter 2 Installing ITSM 39

BMC Remedy IT Service Management 7.0.03
8 Review the content of the Current Settings area, and then click Next.
A series of messages appears as the installer performs the installation. After all of the files are copied, a message appears that provides the location of the installation log files. Note this location so you can review the log files later.
9 Click OK.
The Setup Complete panel appears.
10 Click Finish to exit the installer and restart your computer.
11 When the computer restarts, review the ARSystemAssignmentEngine.log and ARSystemAssignmentEngine_error.log files for any errors or warnings.
Installing Assignment Engine—UNIXUse this procedure to install Assignment Engine on UNIX.
� To install Assignment Engine on UNIX
Before you start the installation, you must know the location of assignEngine.tar, either on the installation DVD or in the working directory that you created when you downloaded the files. You are asked for this information during the installation.
1 Run the application installation script according to one of the following methods.
If you are installing from the DVD
a Mount the DVD, either locally or remotely.
For details about mounting the DVD, see the BMC Remedy Action Request System Installing guide.
b From the DVD’s root directory, run type ./ae_install, and then press ENTER.
If you are installing from files you downloaded
a Change to the working directory containing the Assignment Engine files you downloaded, then uncompressed.
b From that directory’s root, type ./ae_install, and then press ENTER.
2 At the Enter the Product Directory prompt, type the path to the product directory, which is the name of the directory that contains the assignEngine.tar file. An example path is /usr/saved/ae700.
3 At the licensing prompt, press ENTER.
4 At the prompt asking to choose a server, press ENTER to accept the default AR System server, or type the name of the AR System server on which to run the Assignment Engine.
5 At the server confirmation prompt, press ENTER.
6 When the installation script asks for the directory where AR System server is installed, press ENTER to accept the default path, or type an alternative path.
40 Installation Guide

Installing the applications
7 At the confirmation prompt, press ENTER to accept the AR System server path.
The installer checks the ar.conf file to see if AR System is using the portmapper or if it is using a specified port.
8 At the TCP/IP port prompt, press ENTER to accept the default value, or type another port number for the AR System server.
9 At the prompt for a valid AR System Administrator ID, type the administrator’s login ID for the AR System to which you want Assignment Engine to connect.
10 At the confirmation prompt, press ENTER.
11 At the password prompt, type the password for the AR System Administrator’s ID that you provided in step 9.
12 At the confirmation prompt for the Assignment Engine installation path, press ENTER to accept the default installation path. Or, type n and press ENTER to install to a different path, and then type the different path name.
13 When prompted to restart the AR System daemon, press ENTER to restart the AR System daemon and continue the installation, or type n to end the installation.
14 After the installer has copied the files and loaded the workflow, an installation completed message appears.
Review the assignEngine_inst.log file for any error or warning messages.
Installing ITSM applicationsYou must run the installation from the server that is running AR System and be logged in to that server as a local user.
IMPORTANT If you have not done so already, make sure you create a backup of the AR System database before you proceed with the installation.
How you install the applications depends on the type of operating system your host machine is running:
! Windows—See “Installing ITSM—Windows” on page 42.
! UNIX—See “Installing ITSM—UNIX” on page 45.
IMPORTANT Before you install, make sure the server meets the minimum hardware requirements. Installing applications on an underpowered server might result in unexpected system behavior, which can include installation errors, slow response, and sudden application stoppages. See “Prerequisites related to AR System” on page 20 for information about minimum hardware requirements.
Chapter 2 Installing ITSM 41

BMC Remedy IT Service Management 7.0.03
Installing ITSM—Windows Use this procedure to install ITSM on Windows.
� To install ITSM applications on Windows
1 Run setup.exe. The location from which you run this executable file depends on how you received the application.
! If your files are on a DVD, the executable file is under the root directory.
! If you downloaded the application, you access the executable file from the top level of the working directory. This is the directory that you created to hold the files you extracted after downloading them.
A prompt appears reminding you to run the environment pre-check utility. If you have run the utility, click Yes to continue with the installation.
2 After brief initialization messages appear, the welcome panel appears. The following example welcome panel is from the BMC Remedy Problem Management application.
Figure 2-3: ITSM application installation welcome panel
3 Click Next.
The License Agreement panel appears.
4 Review the agreement, and then click I Agree.
The AR System Server Information panel appears.
Perform the following step only if you are using an AR System server other than the default server selected by the installer.
5 Select the AR System Server to use with ITSM and specify:
42 Installation Guide

Installing the applications
a The administrator user name and password for the selected AR System server.
IMPORTANT The default Administrator login user name is Demo with no password. To keep AR System secure, add a password for the AR System administrator as soon as possible.
b The TCP port and the RPC port for the selected AR System server, if the defaults were not used when AR System was installed.
6 Click Next.
NOTE The installer checks to make sure that you have the required software versions and patches installed. If the required versions and patches are not found, a prompt appears. If you receive this prompt, you must install the software or patches, and then restart the installation. For information about downloading patches, see “Downloading ITSM patches” on page 54.
A prompt appears listing the recommended minimum data file and log file sizes.
7 If you meet the recommended file sizes, click Yes. Otherwise, click No, which terminates the installation.
The Select additional language packs panel appears.
8 In the Select user languages area, select any additional language packs to install, and then click Next.
NOTE If you are installing Incident Management or Problem Management, Russian appears as a language option if the installer detects that the BMC Atrium CMDB 2.1.00 is installed and AR System is installed on a non-Unicode database. The Russian language is available only for a system with a Russian operating system.
The Choose Destination Location panel appears.
If you want to install the application to the c:\Program Files\AR System Applications\<server name>\BMC Service Request Management default location, skip to step 11.
9 Click Browse to select the destination folder for the application software.
The Choose Folder dialog box appears.
10 Choose the folder, and then click OK.
NOTE If you want to install a copy of the application on an additional AR System server on this computer, install each copy of the application into a separate folder.
Chapter 2 Installing ITSM 43

BMC Remedy IT Service Management 7.0.03
11 Click Next.
If you have not previously installed DSL data, the DSL Data Options panel appears.
12 If you do not want to install Definitive Software Library (DSL) data now, clear the “Do you want to install DSL data” option, which will save up to an hour of installation time. To get the DSL data later, you can download the latest DSL data patch from the Customer Support website. For information about downloading patches, see “Downloading ITSM patches” on page 54.
13 Click Next.
The Start Copying Files panel appears.
14 Review the information in the Current Settings area. When the information is correct, click Install to continue.
If your AR System thread settings are less than the recommended values, a prompt appears that lists the recommended thread values.
15 If you would like the installer to increase the thread values, click Yes.
After all files are copied and the workflow is loaded, a prompt appears reminding you to install the latest patch.
16 Click OK.
The Installation Summary panel appears.
17 Review the information, and then click Next.
The InstallShield Wizard Complete panel appears.
18 If you want to restart your computer later, select the “No, I will restart my computer later” option. You must restart your computer before using the application.
19 Click Finish.
Review the installation logs for any error or warning messages. For more information, see “ITSM log files” on page 64.
NOTE You can ignore errors in the installation log similar to: ARVersionCMP- Cannot get application version information from the server.
20 After installation of the product completes, install the latest patch.
NOTE A patch is included with the product, but check the Customer Support website for a later patch. If you are installing the Russian localized version of Incident Management or Problem Management, download a patch that includes Russian instead of installing the patch that is included with the product. For more information, see “Downloading ITSM patches” on page 54.
44 Installation Guide

Installing the applications
Installing ITSM—UNIX Use this procedure to install ITSM applications on UNIX.
� To install an ITSM application on UNIX
1 Run the application installation script according to one of the following methods.
If you are installing from the DVD
a Mount the DVD, either locally or remotely.
For details about mounting the DVD, see the BMC Remedy Action Request System Installing guide.
b From the DVD’s root directory, type ./appinstall, and then press ENTER.
If you are installing files you downloaded
a Change to the working directory containing the application files you downloaded, then uncompressed.
b From the directory’s root, type ./appinstall, and then press ENTER.
2 At the environment pre-check utility prompt, press ENTER if you have run the utility.
3 At the required software prompt, type y and press enter if you have the required software installed.
For software requirements, see “Before you install” on page 17.
4 At the licensing prompt, press ENTER.
5 At the prompt asking to choose a server, press ENTER to accept the default AR System server, or type the name of the AR System server to use with ITSM.
6 At the server confirmation prompt, press ENTER.
7 At the AR System installation directory prompt, press ENTER to accept the default directory, or type the path to the AR System installation directory to use.
8 At the confirmation prompt, press ENTER.
The installer checks the ar.conf file to see if AR System is using the portmapper or if it is using a specified port.
9 At the TCP/IP port prompt, press ENTER to accept the default value, or type another port number for the AR System server.
10 At the confirmation prompt, press ENTER.
In the following two steps, you are providing login information for the AR System server to which ITSM will connect.
Chapter 2 Installing ITSM 45

BMC Remedy IT Service Management 7.0.03
11 At the AR System Administrator ID prompt, press ENTER to accept the default value, or type a different administrator login ID.
The default Administrator login user name and password for a new AR System is as follows:
! user name = Demo
! password = no password
IMPORTANT To keep AR System secure, add a password as soon as possible.
12 At the AR System Administrator password prompt, type the AR System administrator password.
NOTE The installer checks to make sure that you have the required software versions and patches installed. If the required versions and patches are not found, a prompt appears. If you receive this prompt, you must install the software or patches, and then restart the installation. For information about downloading patches, see “Downloading ITSM patches” on page 54.
A prompt appears listing the recommended minimum data file and log file sizes.
13 If you meet the recommended file sizes, press ENTER. Otherwise, type n, which terminates the installation.
The Select additional language packs panel appears.
A list of available language packs appears.
14 At the language packs prompt, type the numbers of additional language packs to install, separated by commas.
NOTE If you are installing Incident Management or Problem Management, Russian appears as a language option if the installer detects that the BMC Atrium CMDB 2.1.00 is installed and AR System is installed on a non-Unicode database. The Russian language is available only for a system with a Russian operating system.
15 At the confirmation prompt, press ENTER.
16 The installer checks to make sure the specified partition contains sufficient free disk space required to install the application.
At the installation directory prompt, press ENTER to accept the default directory for the application software, or type n to enter another directory and path.
17 At the confirmation prompt, press ENTER.
46 Installation Guide

Installing the applications
18 If you have not previously installed DSL data, at the DSL data installation prompt, press ENTER to install DSL data, or type n to skip installation of DSL data, which will save up to an hour of installation time.
To get the latest DSL data later, you can download the latest DSL data patch from the Customer Support website. For information about downloading patches, see “Downloading ITSM patches” on page 54.
19 At the installation summary prompt, review the installation information, and then press ENTER.
If your AR System thread settings are less than the recommended values, a prompt appears that lists the recommended thread values.
20 Press ENTER if you would like the installer to increase the thread values.
A reminder to install help appears.
21 After the installer has copied the files and loaded the workflow, a reminder to install the latest patch appears.
22 Press ENTER to continue.
23 At the installation summary prompt, press ENTER to view a summary installation log.
The installation summary appears.
24 Review the installation logs for any error or warning messages. For more information, see “ITSM log files” on page 64.
NOTE You can ignore errors in the installation log similar to: ARVersionCMP- Cannot get application version information from the server.
25 After installing of the product completes, install the latest patch.
NOTE A patch is included with the product, but check the Customer Support website for a later patch. If you are installing the Russian localized version of Incident Management or Problem Management, download the patch for Russian instead of using the patch that is included with the product. For more information, see “Downloading ITSM patches” on page 54.
Installing help After installing ITSM applications, you must install help separately. To make help available to all of the application’s users, you must install help on a system that is running a web server, which is typically a different system from the system where the ITSM applications are installed.
Chapter 2 Installing ITSM 47

BMC Remedy IT Service Management 7.0.03
IMPORTANT You must run the help installer locally on the web server system onto which you are installing help.
Do not install help for products not installed on your system. Otherwise, you will overwrite the Configuration help for the products that are installed.
The installer overwrites the SHARE:Application_Properties record for the Configuration help when the help for multiple application help is installed. The Configuration help points to the directory of the last application help installed. If the administrator installs help for an application that is not installed, no help files are installed and the SHARE:Application_Properties record for Configuration help is updated to a blank path. As a result, the Configuration help no longer works as expected. To correct this problem, reinstall the help of one of your installed applications. The Configuration help will appear, as expected.
See the installation instructions that are appropriate for your environment.
! Windows—See “Installing help—Windows” on page 48.
! UNIX—See “Installing help—UNIX” on page 51.
Before you begin, make sure the following prerequisites are met:
! ITSM is installed.
! The help web server is running.
Installing help—Windows Use this procedure to install help on Windows.
� To install help on Windows
1 Run the setup.exe help installation executable file. The executable file is located in the Help directory, which you access from one of the following locations:
! If your files are on a DVD, help is under the root directory.
! If you downloaded the application, you access help from the top level of the working directory that holds the files you extracted after downloading them.
48 Installation Guide

Installing the applications
After a brief initialization, the welcome panel appears.
Figure 2-4: Help installation welcome panel
2 Click Next.
The License Agreement panel appears.
3 Review the agreement, and then click I Agree.
The Enter Required Information panel appears. In this panel, you provide information about the AR System server to which the ITSM application connects.
4 Provide the missing information, or make any necessary corrections to the following fields:
! User Name—The AR System server administrator’s user name.
! Password—The password for the user name you provided.
! Server—The name of the AR System server to which ITSM connects.
! Port Number—The TCP port number of the AR System server.
NOTE Click Skip if you want to copy the help files without identifying the AR System Server for ITSM. However, the help files cannot be accessed by the application without making them available to the AR System Server.
5 Click Next.
6 If the installer did not find a web server on the system where you are installing help, a message appears asking if you have a web server installed.
7 If you receive this message, click Yes or click No, and then proceed to step 12.
Chapter 2 Installing ITSM 49

BMC Remedy IT Service Management 7.0.03
8 If you select No, the help files will be copied locally without using a web server.
9 If the installer detects a web server, the Select Web Server panel appears.
10 From the Select Web Server panel, perform one of the following options:
! Select the option for the web server to use from the list of servers.
! Other—Choose this option to use a web server that does not appear in the list. If you select this option, you must manually configure the web server so that it recognizes where to find help.
! None—Choose this option to copy the help files locally without using a web server. However, the help files cannot be accessed by the application without making them available on a web server.
11 Click Next.
The Select language packs panel appears.
12 Select the language packs to install.
The user languages you select here are the languages in which your help appears.
13 Click Next.
The Choose Destination Location panel appears.
14 Click Next to use the default location, or click Browse to select the destination folder for help, and then click Next.
If a web server was found by the installer or you answered yes to the web server message, the Confirm URL panel appears.
15 Review the information, make any changes to the URL for help, and then click Next.
The Start Copying Files panel appears.
16 Review the settings and click Install to continue or Back to make any changes.
After the files are copied, the InstallShield Wizard Complete panel appears.
17 Select the View Installation Log File option to review the installation log for any error or warning messages. For more information, see “Using log files to troubleshoot an installation” on page 65.
18 Click Finish.
50 Installation Guide

Installing the applications
Installing help—UNIXUse this procedure to install help on UNIX.
� To install help on UNIX
1 Run the application installation script according to one of the following methods.
If you are installing from the DVD
a Mount the DVD that contains ITSM.
You can do this either locally or remotely.
For details about mounting the DVD, see the BMC Remedy Action Request System Installing guide.
b Run helpinstall from the Help directory, which is located under the root directory.
If you are installing files you downloaded
a Change to the working directory containing the application files you downloaded, then uncompressed.
b Change directory to Help.
c Run helpinstall.
2 At the license agreement prompt, review the user license and maintenance agreement.
3 When prompted to accept the Licensing and Maintenance agreement, press ENTER.
4 At the AR System server prompt, type n if you only want to copy the help files; otherwise press ENTER.
In a typical installation, where ITSM is installed on another system, a message appears indicating that no local AR System server was detected.
5 When prompted for the AR System server name, type the name of the AR System server on which ITSM is installed.
6 When prompted for the directory where AR System is installed, press ENTER to accept the default, or type the directory and path.
7 At the TCP/IP port prompt, press ENTER to use the portmapper, or type the port number.
8 At the confirmation prompt, press ENTER.
9 When prompted for the AR System administrator ID, press ENTER to accept the default value or, type another AR System Administrator ID.
10 When prompted for the AR System administrator password, type the AR System administrator password corresponding to the Administrator ID you typed.
11 When prompted to select the language for help, type the number for the language. If needed, separate the numbers for multiple languages with commas.
Chapter 2 Installing ITSM 51

BMC Remedy IT Service Management 7.0.03
12 Choose one of these options for installing on the web server.
! Type the letter corresponding to one of the listed web server types.
! Type O to install help on a different web server. If you select this option, you must configure your web server and specify a URL pointing to Help. This is the location that you indicate in step 16.
! Type N to install help in the directory you specify, but without making it available on a web server. Skip to step 16.
13 When prompted for the web server configuration file, type the path to the web server’s configuration file.
14 Press ENTER to accept the default HTTP port number, or type another port number.
15 At the confirmation prompt for web server information, press ENTER to accept the default value, or type n to make changes.
16 When prompted for the Help installation directory, press ENTER to accept the default directory, or type a different directory.
The installer checks to make sure the target directory contains sufficient free disk space required to install help.
17 If you are installing help on a web server, a prompt appears asking for the help URL.
18 When prompted to confirm the installation information, press ENTER.
The installer begins copying the files.
19 An installation complete message appears when the installation completes.
Installing ITSM to a server groupIn a server group environment, two or more AR System servers point to the same database. This is often done for load balancing or high availability issues. For example, if one of the AR System servers goes off-line, the other AR System server is still available to process transactions. Because both servers use the same database, there are no database synchronization problems.
To use a server group, the AR System server must first be configured to support this type of environment. For information about configuring the AR System server for a server group environment and for supporting multiple servers, see the BMC Remedy Action Request System Configuring guide.
This section describes how to install the applications into an existing AR System server group environment.
NOTE Perform the following procedure only after you finish a standard installation, as described in “Installing ITSM applications” on page 41.
52 Installation Guide

Installing ITSM to a server group
A server group often has more than two servers. You must, therefore, perform this procedure on each of the servers in your server group, with the exception of the primary server, which is the server on which you performed the initial application installation.
� To install ITSM to a server group
1 On the primary server (that is, where you completed the original installation), determine the location for all of the applications in the BMC application stack. This might include, for example, the location of the AR System, BMC Atrium CMDB, Approval Server, Assignment Engine, ITSM, and any other application or supporting system that you installed to run your BMC applications.
The default location for these applications is:
! UNIX—under the ARserver directory.
! Windows—C:\Program Files\AR System Applications.
For the full path to these applications, review the following files:
! Windows—armonitor.cfg and ar.cfg.
! UNIX—armonitor.conf and ar.conf.
2 On the secondary servers in the server group, recreate the directory structure of the applications that you identified in step 1.
3 From the primary server, copy the bin subdirectories (which contain the plugins and executables) and place them in the same relative location in the newly created directory structure on the secondary servers.
NOTE The data in the workflow and log subdirectories is not required by the secondary servers.
4 Manually update the following configuration files to specify the plug-ins and the plug-in paths.
NOTE Providing you maintained the original directory structure on the secondary servers, you can copy these lines directly from the configuration files on the original server.
! Windows—ar.cfg:
! Plugin <full path>omfobjiefilapi.dll"
! Plugin <full path>arfslasetup.dll"
! Plugin <full path>arfcbdata.dll"
! Plugin-Path <concatenation of paths>
! Alternate-Approval-Reg: T
Chapter 2 Installing ITSM 53

BMC Remedy IT Service Management 7.0.03
! UNIX—ar.conf:
! Plugin: <full path>libomfobjiefilapi.so (or libomfobjiefilapi.sl)
! Plugin: <full path>libarfslasetup.so (or libarfslasetup.sl)
! Plugin: <full path>libarfcbdata.so (or libarfcbdata.sl)
! Plugin-Path: (There might be several lines like this)
! Alternate-Approval-Reg: T
5 Manually update the following configuration files to specify the server processes that should be running.
! Windows—armonitor.cfg:
! <full path>/brsvcbrie.exe" -d <AR System path> -m
! <full path>/arrecond.exe" -i <AR System path> -m
! <full path>/arcmdbd.exe" -i <AR System path> -m
! UNIX—armonitor.conf:
! <full path>/arcmdbd.sh
! <full path>/arrecond.sh
! <full path>/brsvcbrie.sh
6 Copy the arsystem.tag file, which resides in the same directory as arsystem.lic file, from the primary server to the corresponding directory on the secondary servers.
7 Starting with the primary server, restart each of the AR System servers in the server group.
Performing post-installation activitiesThis section contains activities that you must perform after you install ITSM and before you perform any of the procedures described in the BMC Remedy IT Service Management Configuration Guide.
Downloading ITSM patchesAfter installing ITSM, you must download and apply the latest ITSM patches.
� To download the patches
1 Log in to the Customer Support website: http://www.bmc.com/support_home.
To download patches, you must have a support contract.
2 Click Product Downloads, Patches, and Fixes.
54 Installation Guide

Performing post-installation activities
3 In “Remedy Heritage Customers, visit the Patch Download site” under Patches, click Patch Download.
The Patch Downloads for BMC Remedy Products page appears.
4 In the Product field, select your ITSM application.
5 Click Search.
The available patches are listed.
6 Download and apply the latest patch.
For information about installing a patch, see the Readme file that is included with the patch.
Changing the tenancy modeIf your organization plans to run the applications in Multi-Tenancy mode, you must set the Multi-Tenancy option in the System Settings form. Multi-Tenancy mode is a way to keep the data separate among multiple companies, departments, or other groups. It also makes it possible to host multiple companies and their data on a single server.
� To update the Systems Settings form
1 Open the application using BMC Remedy User or a browser.
For information about opening the application, see the BMC Remedy IT Service Management Configuration Guide.
2 From the Quick Links pane, open the Application Administration Console.
Chapter 2 Installing ITSM 55

BMC Remedy IT Service Management 7.0.03
3 From the Custom Configuration tab, choose Foundation > Advanced Options > System Configuration Settings > System Settings, and then click Open.
The System Settings form appears.
Figure 2-5: System Settings form
4 In the Tenancy Mode field, select Multi-Tenancy.
5 Click Save.
Changing the schema sort orderIf your database is either Microsoft SQL Server or Sybase, skip this procedure.
If you are using Oracle® or IBM® DB2®, you must perform the procedure described in this section. This procedure changes the default application database schema sort, and makes it compatible with your database type.
If you do not change the sort order, database searches might return the wrong records or return results in an unpredictable way.
� To change the schema sort order
1 Open the application using BMC Remedy User or a browser.
For information about opening the application, see the BMC Remedy IT Service Management Configuration Guide.
2 From the Quick Links pane, open the Application Administration Console.
Tenancy Mode list
56 Installation Guide

Performing post-installation activities
3 From the Application Administration Console, click the Custom Configuration tab.
4 Choose Foundation > Advanced Options > System Configuration Settings > Application Database Sort Order, and then click Open.
The Schema Sort form appears.
Figure 2-6: Schema Sort form
5 Search for all records. To do this, click Search without specifying any search criteria.
6 In the Functions area, select Oracle or DB2 for the Sort Order Type, depending on which database you are using.
7 Click Modify All.
NOTE You will see the changed sort order when you restart the AR System server.
Configuring AR System Server for CAI ITSM uses Command Automation Interface (CAI) to integrate with backend applications, such as BMC Remedy Incident Management and BMC Configuration Management.
CAI is a subcomponent that is used to execute commands on external systems. CAI uses a command definition (a type of template) to construct commands using the parameters sent to it by ITSM. CAI then uses a predefined conduit (for example, a web service, a command line, a URL, and so on) to execute the command.
Sort Order Type list
Enabled
Search button
Chapter 2 Installing ITSM 57

BMC Remedy IT Service Management 7.0.03
By default, CAI uses the AR System’s fast and list server queues, which in high-volume installations can have a detrimental effect on performance. To improve performance, however, you can create a private server queue for CAI to use exclusively for its processing. This takes pressure off AR System’s queues to improve performance.
Creating a private server queue In this procedure, you use BMC Remedy Administrator to create a private queue.
NOTE To complete this procedure, you must determine the minimum and maximum number of threads to specify for the private server queue.
� To create a private server queue
1 From BMC Remedy Administrator, select the AR System server on which to create the private queue.
2 From the File menu, choose Server Information.
58 Installation Guide

Performing post-installation activities
3 On the Server Information form, click the Server Ports and Queues tab.
Figure 2-7: Server Information form, Server Ports and Queues tab
4 Create a private queue. In the Type column, click Click To Add.
A row is inserted in the Server Queue table and a list appears in the Type cell of the new row.
5 From the Type cell list, select Private, and then click inside the new RPC Program Number cell.
6 From the RPC Program Number cell list, select the next available RPC Program Number. Note this number because you need it to configure the CAI Plugin Registry form.
7 Click in the new Min Threads cell, and then change the value to at least 2.
8 Click in the new Max Threads cell, and then change the value to at least 6.
9 Click OK.
Click to add
Chapter 2 Installing ITSM 59

BMC Remedy IT Service Management 7.0.03
Configuring the CAI:PluginRegistry formIn this procedure, you configure the CAI:PluginRegistry form to recognize the private server queue.
� To configure the CAI:PluginRegistry form
1 From the File menu in BMC Remedy User, choose Open > Object List.
2 In the Object List dialog box, click the Find tab.
3 In the Search What Keywords field, type CAI Plugin Registry, and then click Search.
4 From the results list, select the CAI Plugin Registry entry, and then click Open.
The CAI Plug-in Registry form appears.
Figure 2-8: CAI:Plug-in Registry form
5 In the Private Queue # field, type the private queue number that you created in “Creating a private server queue” on page 58.
6 In the Number of Threads field, type the maximum number of threads that you specified in “Creating a private server queue” on page 58.
7 Click Close to save the entry, and then close the CAI:Plug-in Registry form.
8 Restart AR System so that CAI picks up the new private queue information.
60 Installation Guide

Performing post-installation activities
Changing the time zoneThe default time zone in ITSM for your application server is specified by a value of Yes in the Server Timer Zone field on the Time Zone form. You must verify the default time zone and change it if necessary.
� To specify a time zone
1 Open the application using BMC Remedy User or a browser.
For information about opening the application, see the BMC Remedy IT Service Management Configuration Guide.
2 From the Quick Links pane, open the Application Administration Console.
3 From the Application Administration Console, click the Custom Configuration tab.
4 Choose Foundation > Organizational Structures > Time zone, and then click Open.
The Time Zone form appears.
5 Click Search to find the time zone where your application server is located.
6 Select your time zone from the results list.
7 To make the selected time zone the default, select Yes in the Server Time Zone field.
8 Click Save.
Creating Windows shortcuts to ITSM applicationsFor users to open ITSM applications through BMC Remedy User, they must perform several manual procedures. To simplify this process, you can create a shortcut that takes the users directly to an ITSM console or to the application Home Page.
For information about creating application shortcuts, see the BMC Remedy Action Request System Form and Application Objects guide.
Creating AR System User Preference recordsYou must create an AR System User Preference record for each user who needs user preferences for using ITSM on the Web.
The user preference forms are installed if the Centralized Preferences option was selected (which is the default setting) when AR System was installed. If the Centralized Preferences option was not selected, use BMC Remedy Administrator to manually import the AdminPref.def and UserPref.def definition files from the Arserver\Samples\<language> directory.
When users log in, they specify the report server name in the Preference server field of the Login dialog box.
Chapter 2 Installing ITSM 61

BMC Remedy IT Service Management 7.0.03
� To add a user preference record
1 From BMC Remedy User, choose File > Open > Object List.
2 In the Object List dialog box, click the Find tab.
3 Type user preference in the Search What Keywords field, and then click Find.
4 From the results list, select the AR System User Preference form, and then click New.
The AR System User Preferences form appears.
Figure 2-9: User Preferences form
5 In the Login Name field, type the login name of the user for whom you are adding this record.
6 In the Short Description field, type any additional information for the user.
7 Click the Advanced tab.
8 Type the name of the server on which you installed ITSM (which includes the predefined reports server) in the Report server field.
9 If this user needs to view reports from the Web:
a Click the Web tab.
b In the Crystal Report Viewer field, select ActiveX for a Microsoft Internet Explorer browser or HTML with frames for a Firefix or Mozilla browser.
10 Click Save.
Login Name
62 Installation Guide

Appendix
A
Installation loggingThe ITSM installers write notes, warnings, error messages, and other information to various log files. This section describes these log files, including their location, the types of information they contain, and how to read the information.
The following topics are provided:
! ITSM log files (page 64)! Using log files to troubleshoot an installation (page 65)
Appendix A Installation logging 63

BMC Remedy IT Service Management 7.0.03
ITSM log filesITSM installation log files contain comprehensive details for each component, including user prompts and answers, and any outputs from programs running at the time of installation.
The installer creates summary, detailed, and error log files. These log files are stored by default in:
! Windows: <install_dir>\Logs
! UNIX®: <install_dir>/Logs
The install log files are:
<app_name>_inst.log, where <app_name> is either Problem, Incident, Change, or Asset, according to the application you are installing.
Summary log filesThe following file contains a high-level summary, including a line-by-line success/fail tally for each .def and .arx file. At the end of the log is a summary table indicating the total number of objects, number of objects that imported successfully, and number of objects that failed to import.
BMCRemedy<app_name>Management.html, where <app_name> is either Problem, Incident, Change, or Asset, according to the application you are installing.
Detailed log filesThe following file contains detailed status information about the import of all components, including user prompts and answers.
BMCRemedy<app_name>Manage.log, where <app_name> is either Problem, Incident, Change, or Asset, according to the application you are installing.
Error log filesThe following file contains an extract of the error and warning messages from the log files.
BMCRemedy<app_name>Management_error.log, where <app_name> is either Problem, Incident, Change, or Asset, according to the application you are installing.
64 Installation Guide

Using log files to troubleshoot an installation
Using log files to troubleshoot an installationError and warning messages have [MESSAGETYPE] prefixes, for example, [ERROR] or [WARNING] that indicate the category of the message. Included with the prefix is a timestamp or called routine, if applicable. Installation step outlines have no prefixes.
TIP You can monitor the last update to the log files to see if an installation is still running.
� To troubleshoot an installation
1 Review the <app_name>.html summary log file for failures. Search for “Failed.”
2 If you find any errors, review the <app_name>_error.log file for details about the errors.
3 If you find an indication of cascading failures, review the <app_name>.log file to obtain more complete information about the source of the errors.
4 If you find any errors, review the arerror.log file and the database error logs to determine the source of installation errors.
Appendix A Installation logging 65

BMC Remedy IT Service Management 7.0.03
66 Installation Guide

A B C D E F G H I J K L M N O P Q R S T U V W X Y Z
Index
Aapplication licenses
activating 36obtaining license keys 36
applicationsinstalling 37supporting 10
Approval Server. See BMC Remedy Approval ServerAR System
application hardware requirements 30Assignment Engine
about 11installing on UNIX 40installing on Windows 38
CAI, configuring queues for 57changes to 33configuring for installation 37installation prerequisites 20mid tier, hardware requirements 31private server queue, creating 58supported version 20User Preference records 61web service installation option 28
Asset Inventory System module 12Asset Management, about 8Assignment Engine. See AR System Assignment
Engine
BBMC Atrium CMDB
about 11changes to 33improving performance with 20
BMC Remedy Approval Serverabout 11installing 38
BMC Software, contacting 2browser, requirements for 20
Business Time Holiday form 33Business Working Day form 33
CCAI
CAI Plugin Registry form 60configuring queues for 57PluginRegistry form 60
CAI Plugin Registry form 59Change Management, about 9changing
schema sort order 56time zones 61
Command Automation Interface. See CAIcompatibility matrix, accessing 31component import, log files for 64Contract Management System module 12Crystal Reports 28, 62customer support 3
Ddatabase
changing schema sort order 56disk space for 21not configured to extend automatically 22prerequisites
all 21IBM DB2 22Microsoft SQL Server 25Oracle 25Sybase 26
DB2. See IBM DB2Definitive Software Library. See DSLdisk space for database 21documents
ITSM 14related 15solution 15
Index 67

A B C D E F G H I J K L M N O P Q R S T U V W X Y Z
downloading patches 54DSL, installing 44, 47
Eemail notifications, requirements for 20environment pre-check utility 31error logs. See log filesescalations, disabling before installing the
applications 37
FFinancial Management module 12finding log files 64Flashboards, requirements for 20forms
Business Time Holiday 33Business Working Day 33CAI Plugin Registry 59, 60exceeding the default AR System size limit 22Group 33Schema Sort 57Server Information 59Share Application Properties 33System Settings 55, 56Time Zone 61User 20User Preferences 62
Foundation module 12
GGroup form 33
Hhardware requirements
AR System applications 30mid tier 31minimum 30
helpabout installing 47installing on UNIX 51installing on Windows 48
host ID, determining 36
IIBM DB2 prerequisites 22importing components 64
Incident Management, about 9installing
Approval Server 38AR System Assignment Engine
on UNIX 40on Windows 38
downloading ITSM patches 54DSL 44, 47general prerequisites 19help
about 47on UNIX 51on Windows 48
ITSMabout 37on a server group 52on UNIX 45on Windows 42
language packs 43, 46non-root user on UNIX 37order of 18post-installation activities 54troubleshooting 65
ITSMapplication licenses
activating 36determining host ID 36obtaining license keys 36
applicationsAsset Management 8Change Management 9Incident Management 9overview of ITSM applications 8Problem Management 9SLM 10supporting 10
available documents 14creating shortcuts to 61installing
about 37downloading patches 54on UNIX 45on Windows 42post installation activities 54to server groups 52
68 Installation Guide

A B C D E F G H I J K L M N O P Q R S T U V W X Y Z
ITSM (continued)modules
Asset Inventory 12CAI 13Contract Management 12Financial Management 12Foundation 12overview 12Requester Console 13TMS 13
JJava prerequisites 28
KKnowledge Management, about 10
Llanguage packs, installing 43, 46licenses
application 36determining host ID 36obtaining license keys 36
log filesabout 63component import 64detailed 64error 64finding 64troubleshooting an installation with 65
MMicrosoft SQL Server prerequisites 25mid tier hardware requirements 31minimum hardware requirements 30multi-tenancy, enabling 55
Nnon-root users on UNIX, installing as 37notifications, requirements for email 20
OOracle prerequisites 25order of installation 18
Ppatches
downloading 54required for installation 19
Perl, requirements 32prerequisites
AR System 20database
all types 21IBM DB2 22Microsoft SQL Server 25Oracle 25Sybase 26
general 19Java 28patches 19reports-related 28web services 28
private server queue, creating 58Problem Management, about 9product support 3
Rrelated documents 15reports-related prerequisites 28requirements, hardware
AR System 30mid tier 31minimum 30
SSchema Sort form 57schema sort order, changing 56server groups, installing applications to 52Server Information form 59Service Level Management. See SLMShare Application Properties form 33shortcuts, creating for Windows 61SLM, about 10solutions, available documents 15sort order, changing for schema 56SQL Server. See Microsoft SQL ServerSRM, about 10support, customer 3Sybase
forms with more than 254 fields 27prerequisites 26
System Settings form 55, 56
Index 69

A B C D E F G H I J K L M N O P Q R S T U V W X Y Z
TTask Management System. See TMStechnical support 3Time Zone form 61time zone, changing 61troubleshooting, using log files to 65
UUNIX
installingAR System Assignment Engine on 40help on 51ITSM on 45non-root users and 37
log files location 64User form 20User Preference records, creating 61User Preferences form 62users, non-root on UNIX, installing as 37
Wweb server, requirements for 20web service option, AR System 28web services prerequisites 28Windows
creating shortcuts 61installing
AR System Assignment Engine on 38help on 48ITSM on 42
log files location 64
70 Installation Guide

Third-party product termsThe following terms apply to third-party products that are included with or in a BMC Software product as described in the BMC Software, Inc., License Agreement that is applicable to the BMC Software product.
Apache Software License, Version 2.0This product includes the Apache software product found at http://apache.org, and the Apache software product is distributed to us pursuant to the following terms and conditions:
Copyright (c) 2000-2004 The Apache Software Foundation. All rights reserved.TERMS AND CONDITIONS FOR USE, REPRODUCTION, AND DISTRIBUTION1. Definitions. “License” shall mean the terms and conditions for use, reproduction, and distribution as defined by Sections 1 through 9 of this document. “Licensor” shall mean the copyright owner or entity authorized by the copyright owner that is granting the License. “Legal Entity” shall mean the union of the acting entity and all other entities that control, are controlled by, or are under common control with that entity. For the purposes of this definition, “control” means (i) the power, direct or indirect, to cause the direction or management of such entity, whether by contract or otherwise, or (ii) ownership of fifty percent (50%) or more of the outstanding shares, or (iii) beneficial ownership of such entity. “You” (or “Your”) shall mean an individual or Legal Entity exercising permissions granted by this License. “Source” form shall mean the preferred form for making modifications, including but not limited to software source code, documentation source, and configuration files. “Object” form shall mean any form resulting from mechanical transformation or translation of a Source form, including but not limited to compiled object code, generated documentation, and conversions to other media types. “Work” shall mean the work of authorship, whether in Source or Object form, made available under the License, as indicated by a copyright notice that is included in or attached to the work (an example is provided in the Appendix below). “Derivative Works” shall mean any work, whether in Source or Object form, that is based on (or derived from) the Work and for which the editorial revisions, annotations, elaborations, or other modifications represent, as a whole, an original work of authorship. For the purposes of this License, Derivative Works shall not include works that remain separable from, or merely link (or bind by name) to the interfaces of, the Work and Derivative Works thereof. “Contribution” shall mean any work of authorship, including the original version of the Work and any modifications or additions to that Work or Derivative Works thereof, that is intentionally submitted to Licensor for inclusion in the Work by the copyright owner or by an individual or Legal Entity authorized to submit on behalf of the copyright owner. For the purposes of this definition, “submitted” means any form of electronic, verbal, or written communication sent to the Licensor or its representatives, including but not limited to communication on electronic mailing lists, source code control systems, and issue tracking systems that are managed by, or on behalf of, the Licensor for the purpose of discussing and improving the Work, but excluding communication that is conspicuously marked or otherwise designated in writing by the copyright owner as “Not a Contribution.” “Contributor” shall mean Licensor and any individual or Legal Entity on behalf of whom a Contribution has been received by Licensor and subsequently incorporated within the Work.2. Grant of Copyright License. Subject to the terms and conditions of this License, each Contributor hereby grants to You a perpetual, worldwide, non-exclusive, no-charge, royalty-free, irrevocable copyright license to reproduce, prepare Derivative Works of, publicly display, publicly perform, sublicense, and distribute the Work and such Derivative Works in Source or Object form.3. Grant of Patent License. Subject to the terms and conditions of this License, each Contributor hereby grants to You a perpetual, worldwide, non-exclusive, no-charge, royalty-free, irrevocable (except as stated in this section) patent license to make, have made, use, offer to sell, sell, import, and otherwise transfer the Work, where such license applies only to those patent claims licensable by such Contributor that are necessarily infringed by their Contribution(s) alone or by combination of their Contribution(s) with the Work to which such Contribution(s) was submitted. If You institute patent litigation against any entity (including a cross-claim or counterclaim in a lawsuit) alleging that the Work or a Contribution incorporated within the Work constitutes direct or contributory patent infringement, then any patent licenses granted to You under this License for that Work shall terminate as of the date such litigation is filed.4. Redistribution. You may reproduce and distribute copies of the Work or Derivative Works thereof in any medium, with or without modifications, and in Source or Object form, provided that You meet the following conditions: (a) You must give any other recipients of the Work or Derivative Works a copy of this License; and (b) You must cause any modified files to carry prominent notices stating that You changed the files; and (c) You must retain, in the Source form of any Derivative Works that You distribute, all copyright, patent, trademark, and attribution notices from the Source form of the Work, excluding those notices that do not pertain to any part of the Derivative Works; and (d) If the Work includes a “NOTICE” text file as part of its distribution, then any Derivative Works that You distribute must include a readable copy of the attribution notices contained within such NOTICE file, excluding those notices that do not pertain to any part of the Derivative Works, in at least one of the following places: within a NOTICE text file distributed as part of the Derivative Works; within the Source form or documentation, if provided along with the Derivative Works; or, within a display generated by the Derivative Works, if and wherever such third-party notices normally appear. The contents of the NOTICE file are for informational purposes only and do not modify the License. You may add Your own attribution notices within Derivative Works that You distribute, alongside or as an addendum to the NOTICE text from the Work, provided that such additional attribution notices cannot be construed as modifying the License. You may add Your own copyright statement to Your modifications and may provide additional or different license terms and conditions for use, reproduction, or distribution of Your modifications, or for any such Derivative Works as a whole, provided Your use, reproduction, and distribution of the Work otherwise complies with the conditions stated in this License.5. Submission of Contributions. Unless You explicitly state otherwise, any Contribution intentionally submitted for inclusion in the Work by You to the Licensor shall be under the terms and conditions of this License, without any additional terms or conditions.

Notwithstanding the above, nothing herein shall supersede or modify the terms of any separate license agreement you may have executed with Licensor regarding such Contributions.6. Trademarks. This License does not grant permission to use the trade names, trademarks, service marks, or product names of the Licensor, except as required for reasonable and customary use in describing the origin of the Work and reproducing the content of the NOTICE file.7. Disclaimer of Warranty. Unless required by applicable law or agreed to in writing, Licensor provides the Work (and each Contributor provides its Contributions) on an “AS IS” BASIS,WITHOUT WARRANTIES OR CONDITIONS OF ANY KIND, either express or implied, including, without limitation, any warranties or conditions of TITLE, NON-INFRINGEMENT, MERCHANTABILITY, or FITNESS FOR A PARTICULAR PURPOSE. You are solely responsible for determining the appropriateness of using or redistributing the Work and assume any risks associated with Your exercise of permissions under this License.8. Limitation of Liability. In no event and under no legal theory, whether in tort (including negligence), contract, or otherwise, unless required by applicable law (such as deliberate and grossly negligent acts) or agreed to in writing, shall any Contributor be liable to You for damages, including any direct, indirect, special, incidental, or consequential damages of any character arising as a result of this License or out of the use or inability to use the Work (including but not limited to damages for loss of goodwill, work stoppage, computer failure or malfunction, or any and all other commercial damages or losses), even if such Contributor has been advised of the possibility of such damages.9. Accepting Warranty or Additional Liability. While redistributing the Work or Derivative Works thereof, You may choose to offer, and charge a fee for, acceptance of support, warranty, indemnity, or other liability obligations and/or rights consistent with this License. However, in accepting such obligations, You may act only on Your own behalf and on Your sole responsibility, not on behalf of any other Contributor, and only if You agree to indemnify, defend, and hold each Contributor harmless for any liability incurred by, or claims asserted against, such Contributor by reason of your accepting any such warranty or additional liability.

*87245**87245**87245**87245*
*87245*