ItemTracker Installation Guidesupport.itemtracker.com/Install/Installing_ItemTracker.docx · Web...
87
ItemTracker Installation Guide Ref. ItemTracker version 3.5.2 The latest version of this document can be obtained from here: Microsoft Word format: http://support.itemtracker.com/Install/Installing_ItemTracker.docx Adobe PDF format: http://support.itemtracker.com/Install/Installing_ItemTracker.pdf 1 ItemTracker Software Ltd.
Transcript of ItemTracker Installation Guidesupport.itemtracker.com/Install/Installing_ItemTracker.docx · Web...

ItemTrackerInstallation Guide
Ref. ItemTracker version 3.5.2
The latest version of this document can be obtained from here:Microsoft Word format: http://support.itemtracker.com/Install/Installing_ItemTracker.docxAdobe PDF format: http://support.itemtracker.com/Install/Installing_ItemTracker.pdf
Alternatively, you may request that it be emailed to you from [email protected].
1 ItemTracker Software Ltd.

Contents
Contents........................................................................................................................................................... 2
Overview........................................................................................................................................................... 3
Complete Installation........................................................................................................................................ 4
Minimum Installation....................................................................................................................................... 10
Client Installation............................................................................................................................................ 15
Pre-configuring Values for Client Installations.............................................................................................19
SQL Server Only Installation..........................................................................................................................20
Creating your ItemTracker database..............................................................................................................24
Creating the database................................................................................................................................. 24
Database Security....................................................................................................................................... 25
Connectivity Check..................................................................................................................................... 27
Appendix A: Installing Prerequisite Software..................................................................................................29
Microsoft .NET Framework version 3.5 not installed...................................................................................29
Microsoft Installer 4.5 not installed..............................................................................................................31
Microsoft Powershell not installed...............................................................................................................34
Microsoft .NET Framework version 2.0 not installed...................................................................................36
Appendix B: Configuring Network Share and Folder Permissions..................................................................39
ItemTracker Folder...................................................................................................................................... 39
License Folder............................................................................................................................................ 42
Database_Backups Folder.......................................................................................................................... 46
Pictures Folder............................................................................................................................................ 50
ITRDocCache Folder.................................................................................................................................. 55
Permissions Quick Summary for Administrators.........................................................................................60
Appendix C: Installing Microsoft SQL Server..................................................................................................61
Appendix D: Configuring ItemTracker for use with Active Directory...............................................................71
Installing the Active Directory support files..................................................................................................71
Activating ItemTracker Active Directory support.........................................................................................74
Appendix E: Troubleshooting..........................................................................................................................76
Installation of ItemTracker or the Active Directory support module.............................................................76
During Login to ItemTracker........................................................................................................................ 76
During Logout from ItemTracker................................................................................................................. 78
2 ItemTracker Software Ltd.

Overview
ItemTracker is installed onto your computer using a Setup Factory™ setup program.
There are four installation types:
1. Complete Installation You should select this option when installing if:
You haven’t heard of Microsoft SQL Server before; and/or You don’t think it’s on:
o The machine you want to install on (if running in a standalone environment)o On the server if running over the network
2. Minimum Installation Select this option if Microsoft SQL Server is already installed on the machine that you want to install ItemTracker on.
3. Client Installation Used when running ItemTracker over a network, to install ItemTracker on a client computer. You should already have a Minimum or Complete installation on your network.
4. SQL Server Only Installation Sometimes you will need to install the SQL Server on a separate machine.
Once installation is complete you should create your ItemTracker database.
Network Installations:As of version 3.4.17, ItemTracker includes a new licensing system (CTL) which no longer requires a shared license folder on a server. This means that customers can now choose to have Minimum installations of ItemTracker on each PC rather than sharing out a centrally located installation.
Advantages:- Faster program startup times if your network is slow.- Less/no network share security issues to consider
Disadvantages:- Upgrading ItemTracker requires every PC to have the ItemTracker application updated which
would increase downtime while this takes place. Usually this just involves replacing the application executable however.
- Custom ItemType Pictures requires the pictures to be copied to each installation. Not applicable in version 3.5.3 of ItemTracker.
How to obtain the ItemTracker installation programs:
To obtain instructions for downloading the ItemTracker installation program please contact [email protected].
3 ItemTracker Software Ltd.

Complete Installation
Double click on the ItemTrackerSetup.exe file. This will initiate the ItemTracker Setup program and the following window will appear.
Left click on the Next button. The license agreement will appear. If you want to install ItemTracker left click on the ‘I agree …’ option and then left click on the Next button.
Alternatively, to abort the installation of ItemTracker, left click on the Cancel button. You will be asked whether you are sure that you want to cancel the ItemTracker installation.
4 ItemTracker Software Ltd.

If you do want to cancel, left click on the Yes button. Otherwise left click on the No button.
Assuming that you accepted the license agreement, left click on the Next button and you will be presented with the following screen.
You should select the Complete option by left clicking on it and then left click Next.
At this point you may see a “Prerequisites check failure” warning message. This means that some of the software that SQL Server requires to function correctly is not installed on your computer. If your computer reboots after installing any of the prerequisites then you may safely start the ItemTracker installation again from the beginning.Click here to go directly to Appendix A for more information on installing prerequisite software.
Generally it is best to accept the default installation directory, but you can if you wish, change the directory to which the program is installed.
5 ItemTracker Software Ltd.

Either accept the default or enter the path where you want to install ItemTracker to. Then left click on the Next button. The following window will then be shown.
Check the information shown is correct. If it is, left click on the Next button. Otherwise, to change any of the information shown, left click on the Back button.
The following window will be shown, with the progress bar moving along as it installs ItemTracker onto your computer. As this is a Complete Installation the setup program will also copy files required to install Microsoft SQL Server onto your computer.
6 ItemTracker Software Ltd.

Windows Vista / 7 users might see an additional message. Left click the “This program installed correctly” option to dismiss the message.
Once the ItemTracker application and support files have finished installing, the Configure Database Connection window will display.
Ensure that the Instance Name that you specify during the SQL Server install stage matches the details below otherwise ItemTracker will not be able to connec to the database.
If your local network uses domain or Active Directory logons choose the Windows Authentication option. If you are not sure choose SQL Authentication.
7 ItemTracker Software Ltd.

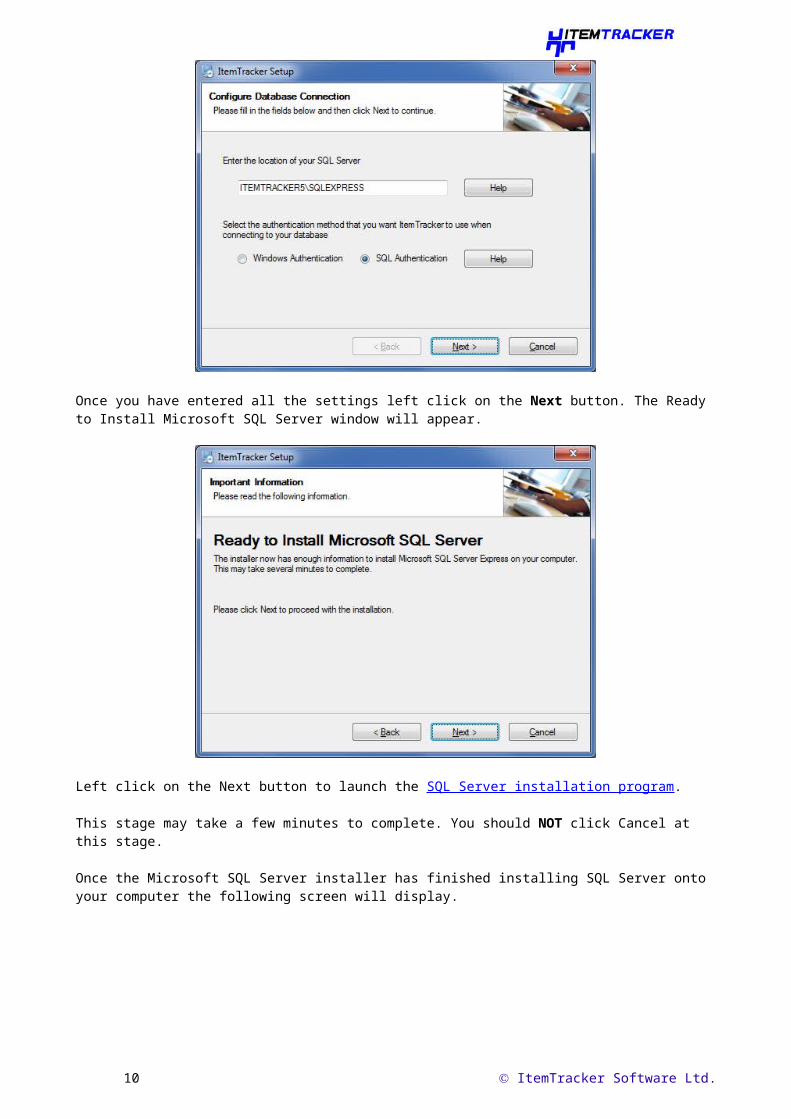
Once you have entered all the settings left click on the Next button. The Ready to Install Microsoft SQL Server window will appear.
Left click on the Next button to launch the SQL Server installation program.
This stage may take a few minutes to complete. You should NOT click Cancel at this stage.
Once the Microsoft SQL Server installer has finished installing SQL Server onto your computer the following screen will display.
8 ItemTracker Software Ltd.

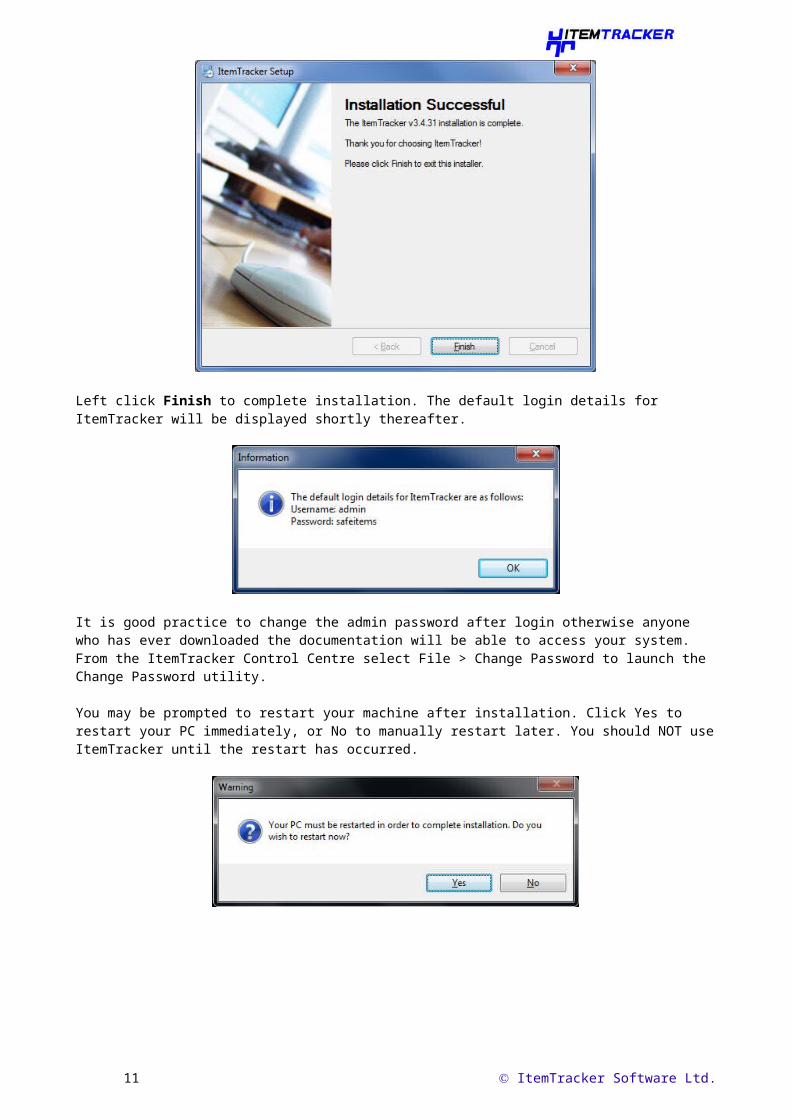
Left click Finish to complete installation. The default login details for ItemTracker will be displayed shortly thereafter.
It is good practice to change the admin password after login otherwise anyone who has ever downloaded the documentation will be able to access your system. From the ItemTracker Control Centre select File > Change Password to launch the Change Password utility.
You may be prompted to restart your machine after installation. Click Yes to restart your PC immediately, or No to manually restart later. You should NOT use ItemTracker until the restart has occurred.
9 ItemTracker Software Ltd.
Minimum Installation
Double click on the ItemTrackerSetup.exe file. This will initiate the ItemTracker Setup program and the following window will appear.
Left click on the Next button. The license agreement will appear.
If you want to install ItemTracker left click on the ‘I agree …’ option and then left click on the Next button.
Alternatively, to abort the installation of ItemTracker, left click on the Cancel button. You will be asked whether you are sure that you want to cancel the ItemTracker installation.
10 ItemTracker Software Ltd.
If you do want to cancel, left click on the Yes button. Otherwise left click on the No button.
Assuming that you accepted the license agreement, left click on the Next button and you will be presented with the following screen.
You should select the Minimum option by left clicking on it and then left click Next.
Generally it is best to accept the default installation directory, but you can if you want, change the directory to which the program is installed.
11 ItemTracker Software Ltd.

Either accept the default or enter the path where you want to install ItemTracker to. Then left click on the Next button. The following window will then be shown.
Check the information shown is correct. If it is, left click on the Next button. Otherwise, to change any of the information shown, left click on the Back button.
The following window will be shown, with the progress bar moving along as it installs ItemTracker onto your computer.
Windows Vista / 7 users might see an additional message. Left click the “This program installed correctly” option to dismiss the message.
12 ItemTracker Software Ltd.

Once the ItemTracker application and support files have finished installing the Configure Database Connection window will display. You must enter the location and name of your SQL Server, e.g. SQLServerComputer\SQLEXPRESS
If your local network uses domain or Active Directory logons choose the Windows Authentication option. If you are not sure choose SQL Authentication.
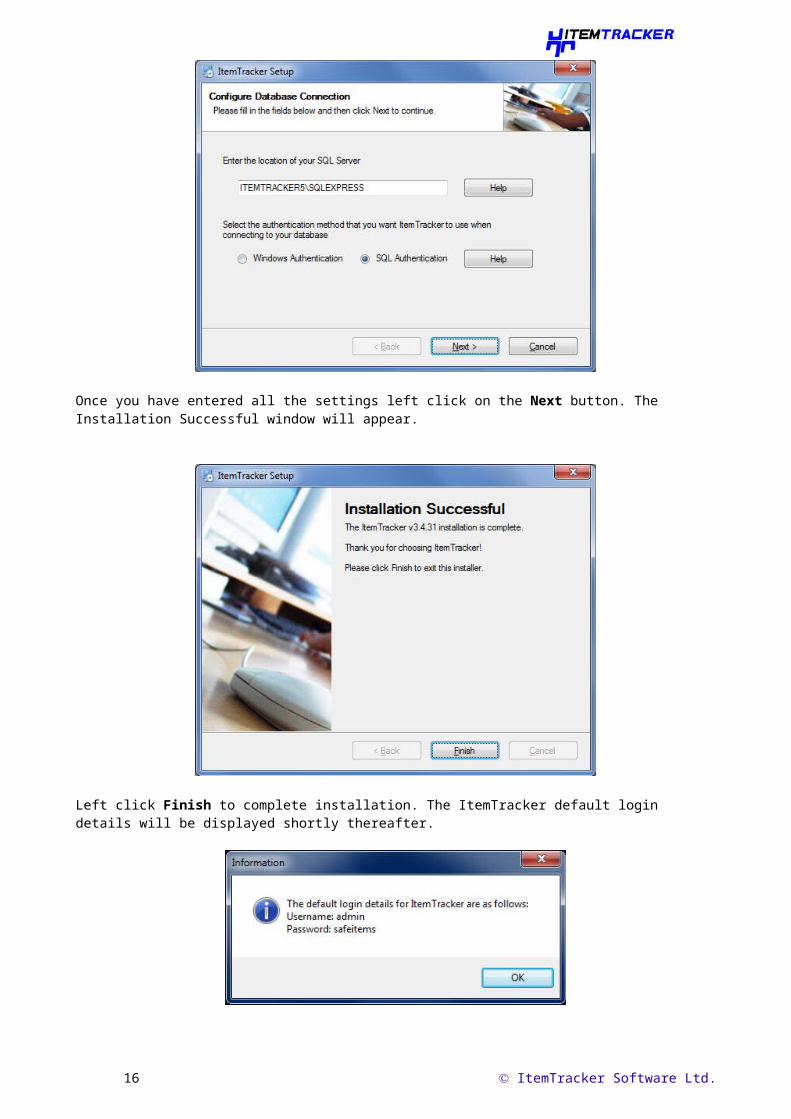
Once you have entered all the settings left click on the Next button. The Installation Successful window will appear.
13 ItemTracker Software Ltd.

Left click Finish to complete installation. The ItemTracker default login details will be displayed shortly thereafter.
It is good practice to change the admin password after login otherwise anyone who has ever downloaded the documentation will be able to access your system. From the ItemTracker Control Centre select File > Change Password to launch the Change Password utility.
If you have Microsoft Windows 7 you must restart your PC to complete installation. Click Yes to restart your PC immediately, or No to manually restart later.
14 ItemTracker Software Ltd.

Client Installation
Used when running ItemTracker over a network, to install ItemTracker on a client computer. It is possible to automatically populate the installation settings to make it easier to perform multiple client installs. Instructions on how to do this are included at the end of the client installation section.
Double click on the ItemTrackerSetup.exe file. This will initiate the ItemTracker Setup program and the following window will appear.
Left click on the Next button. The license agreement will appear.
If you want to install ItemTracker left click on the ‘I agree …’ option and then left click on the Next button.
Alternatively, to abort the installation of ItemTracker, left click on the Cancel button. You will be asked whether you are sure that you want to cancel the ItemTracker installation.
15 ItemTracker Software Ltd.
If you do want to cancel, left click on the Yes button. Otherwise left click on the No button.
Assuming that you accepted the license agreement, left click on the Next button and you will be presented with the following screen.
You should select the Client option by left clicking on it and then left click Next.
Enter the ItemTracker Network Share Location, e.g. \\ItemTrackerComputer\ItemTracker\, and then click Next.
16 ItemTracker Software Ltd.

Generally it is best to accept the default installation directory, but you can if you wish, change the directory to which the client files are installed.
Either accept the default or enter the path where you want to install ItemTracker to. Then left click on the Next button.
The following window will then be shown.
Check the information shown is correct. If it is, left click on the Next button. Otherwise, to change any of the information shown, left click on the Back button.
The following window will be shown, with the progress bar moving along as it installs ItemTracker onto your computer.
17 ItemTracker Software Ltd.

Windows Vista / 7 users might see an additional message. Left click the “This program installed correctly” option to dismiss the message.
Once the installation has completed you will see the final screen.
18 ItemTracker Software Ltd.

Left click Finish to complete installation.
Pre-configuring Values for Client InstallationsTo avoid entering the same information repeatedly it is possible to automatically populate the installation settings. To do this both the ItemTrackerSetup.exe and ItemTrackerSetup.ini file must exist in the same folder. The ItemTrackerSetup.ini file is located in the main ItemTracker installation folder on the machine that you performed a Complete or Minimum installation upon.
There are three sections in the ini file: Setup, Main and Client. Setup is for generic settings, Main for Complete / Minimum installs and finally Client for Client installations only. Usually the ini file will only be used for client installations. Since the ini file itself contains descriptions of the settings there is no need for any real detail here. The following notes may however prove useful:
Complete Installations:Set InstallType to complete in the Setup sectionUpdate the settings in both Setup and Main to match your requirements
Minimum Installations:Set InstallType to minimum in the Setup sectionUpdate the settings in both Setup and Main sections to match your requirements
Client Installations:Set InstallType to client in the Setup sectionUpdate the settings in both Setup and Client sections to match your requirements
SQL Server Express only installations:Set InstallType to sql in the Setup section.No other edits are required.
19 ItemTracker Software Ltd.

SQL Server Only Installation
Double click on the ItemTrackerSetup.exe file. This will initiate the ItemTracker Setup program and the following window will appear.
Left click on the Next button. The license agreement will appear.
If you want to install ItemTracker left click on the ‘I agree …’ option and then left click on the Next button.
Alternatively, to abort the installation of ItemTracker, left click on the Cancel button. You will be asked whether you are sure that you want to cancel the ItemTracker installation.
20 ItemTracker Software Ltd.

If you do want to cancel, left click on the Yes button. Otherwise left click on the No button.
Assuming that you accepted the license agreement, left clicking on the Next button and you will be presented with the following screen.
You should select the SQL Server option by left clicking on it and then left click Next.
At this point you may see a “Prerequisites check failure” warning message. This means that some of the software that SQL Server requires to function correctly is not installed on your computer. If your computer reboots after installing any of the prerequisites then you may safely start the ItemTracker installation again from the beginning.Click here to go directly to Appendix A for more information on installing prerequisite software.
The following window will be shown, with the progress bar moving along as it installs ItemTracker onto your computer. As this is an SQL Server only installation the setup program will just copy the files required to install SQL Server onto your computer.
21 ItemTracker Software Ltd.

Once finished, the Ready to Install Microsoft SQL Server window will appear.
Left click on the Next button to launch the SQL Server installation program.
This stage may take a few minutes to complete. You should NOT click Cancel at this stage.
Once the Microsoft SQL Server installer has finished installing SQL Server onto your computer the following screen will display.
22 ItemTracker Software Ltd.

Left click Finish to complete installation.
23 ItemTracker Software Ltd.

Creating your ItemTracker database
Sections:Creating the databaseDatabase SecurityConnectivity Check
Creating the databaseFirst locate the ItemTracker database creation script file appropriate to your version of SQL Server.
SQL Server 2005 and above: itdb2005.sqlSQL Server 2000: itdb.sql
The files are located in ItemTracker program files folder on the application server, e.g. C:\Program Files (x86)\ItemTracker\. Copy the script to the machine that has SQL Server installed upon it.
Login to the machine that has SQL Server installed upon it using an account that has administrator rights for the SQL Server.
You will need to open the ItemTracker database creation script file in either SQL Server Management Studio or Query Analyzer and execute it. For the purposes of these instructions we will assume the existence of the newer SQL Server Management Studio.
Run the SQL Server Management Studio program, e.g. Windows Start > All Programs > Microsoft SQL Server 2008 R2 > SQL Server Management Studio.
The Connect to Server dialog will appear. You must enter the server name, authentication method and SQL Server administrator account details if applicable. Typically the displayed details are fine. Click Connect to proceed.
Then click on the open file icon at the top of the window.
24 ItemTracker Software Ltd.

When the Open File dialog appears navigate to the appropriate ItemTracker database creation script and then click on the Open button.
After the file loads into SQL Server Management Studio locate the Execute button and click on it.
After a few moments you should see a green tick and “Query executed successfully”. If this is not the case then please email [email protected] with the output as an attachment and do not proceed further with the installation.
Database SecurityIf you have configured ItemTracker to connect using SQL Authentication (Trusted_Connection=No in the ItemTracker.dsn file) then you may skip this section as the database security has been preconfigured by the database creation script.
If you are using ItemTracker in conjunction with Active Directory then follow these instructions for both Active Directory groups. You must also configure ItemTracker for use with Active Directory.
SQL Server 2005 / 2008 / 2008 R2
1. Launch SQL Server Management Studio and connect to your database server.2. Add a new Login
a. Drill down to “Security > Logins”b. Right-click on Logins and select “New login...”
25 ItemTracker Software Ltd.

c. When the “Login – New” window appears enter the name of your user group prepended by the domain into the Login name box, e.g. DomainName\UserGroupName
d. Change the Default database to ItemTracker.e. Select the “User Mapping” page.f. Check the box in the Map column for the ItemTracker database.g. Click OK.
3. Add a new Schemaa. From the root node drill down to “Databases > ItemTracker > Security > Schemas”b. Right-click on Schemas and select “New Schema...”c. When the “Schema – New” window opens enter the name of your user group prepended by
the domain for both the “Schema name” and “Schema owner”d. Select the “Permissions” pagee. Click the “Search” buttonf. Click the “Browse...” button when the “Select Users or Roles” window appearsg. Locate your user group in the list and check the box next to ith. Click OKi. Click OKj. You should now be back at the “Schema – New” window. Select your user group in the list.k. Scroll down the permissions and check that the following permissions are ticked in the Grant
column: Delete, Execute, Insert, Select, Update, View Definitionl. Click OK
4. Setup the database permissions for the user groupa. From the root node drill down to “Databases > ItemTracker”b. Locate the ItemTracker database in the list and right-click on it. Select the “Properties”
optionc. Select the “Permissions” paged. Select your user group in the list.e. Scroll down the permissions and check that the following Permissions are ticked in the Grant
column: Backup Database, Backup Log, Connect, Create Table, Delete, Execute, Insert, Select, Update, View Database State, View Definition.
f. Click OK
SQL Server 2000 only
1. Launch SQL Server Management Studio and connect to your database server.
2. Add a new Logina. Drill down to “Security > Logins”b. Right-click on Logins and select “New login...”c. When the “Login – New” window appears enter the name of your user group prepended by
the domain into the Login name box, e.g. DomainName\UserGroupNamed. Change the Default database to ItemTracker.e. Select the “User Mapping” page.f. Check the box in the Map column for the ItemTracker database.g. Click OK.
3. Setup the database permissions for the user groupa. From the root node drill down to “Databases > ItemTracker”b. Locate the ItemTracker database in the list and right-click on it. Select the “Properties”
optionc. Select the “Permissions” paged. Click on the Search buttone. Enter the name of your user group prepended by the domain, e.g. DomainName\
UserGroupNamef. Click OKg. Select your user group in the list.h. Scroll down the permissions and check that the following Permissions are ticked in the Grant
column: Backup database, Backup log, Create table.i. Click OK
26 ItemTracker Software Ltd.

Connectivity CheckOnce the ItemTracker database has been created and the security added it is a good idea to test the connectivity. You should login to ItemTracker from both the server and client machines (if applicable).
SQL Authentication:
Login to ItemTracker from both the server and client machines (if applicable). You should use the default login details for ItemTracker which are admin / safeitems.
Windows Authentication:
First login to Windows using a user that exists in the windows user group that you specified in the Database Security section. Then login to ItemTracker from both the server and client machines (if applicable). You should use the default login details for ItemTracker which are admin / safeitems.
Active Directory Authentication:
This is slightly different as a full test cannot be performed until ItemTracker has been correctly configured. Login to windows with a user that is listed in the Active Directory group that is specified by the ADADMINGROUP in the ItemTracker.dsn file. Once an ItemTracker user group has been setup which contains users specified in the ADUSERGROUP you can test further.
Launch ItemTracker by double-clicking on the desktop shortcut.
After the ItemTracker Log In window appears, enter ‘admin’ and ‘safeitems’ as the User Name and Password. Then click OK.
You will be shown the License expiry message. New installations of ItemTracker automatically receive a 60-day trial license. Click OK to dismiss the message.
You will then be prompted to set the default date format for the ItemTracker database. Click on the Yes button to confirm the date format.
27 ItemTracker Software Ltd.

Once the ItemTracker Control Centre displays click on the Items button.
The Items window should then open without showing any error messages. As an additional test click on the Retrieve button. Again, no errors should show.
28 ItemTracker Software Ltd.

Appendix A: Installing Prerequisite Software
Depending on the error message you may need to install any of the following: Microsoft .NET Framework 3.5 Microsoft Installer 4.5 Microsoft Powershell Microsoft .NET Framework 2.0
These are all free and can be downloaded from the Microsoft website.
Please note the information displayed at the end of the message as it contains information about your computers operating system. Some of the Microsoft web pages for the prerequisites contain multiple downloads and this information will be helpful in determining which file that you need to download.
If you do not have direct internet access from your server the Microsoft web pages links will be listed at the start of each prerequisite section so that you download the packages from a internet enabled PC.
Microsoft .NET Framework version 3.5 not installedDownload from http://www.microsoft.com/download/en/details.aspx?id=22
There is a Full Package download link near the end of the web page if you need it.
Navigate to the location that you downloaded the Microsoft .NET 3.5 installation program to and run the file called dotnetfx35setup.exe.
The installation program will then launch and you will see the following dialog.
The welcome screen will then display. Accept the license terms by clicking on the option “I have read and ACCEPT the terms of the License Agreement”. Then click on the Install button to proceed.
29 ItemTracker Software Ltd.

The installation will then proceed automatically. Files will be downloaded as needed from the Microsoft web servers.
30 ItemTracker Software Ltd.

Finally the following screen will appear. Click Exit and then return to the ItemTracker installation program.
Return to your previous position in:Complete InstallationSQL Server Only Installation
Microsoft Installer 4.5 not installedDownload from http://www.microsoft.com/download/en/details.aspx?id=8483
To determine which file to download please read the Instructions at the end of the web page.
31 ItemTracker Software Ltd.

Navigate to the location that you downloaded the Microsoft Installer 4.5 installation program to and run the installation program. The file name and version number will vary according to your computer requirements but will always contain the code KB942288.
You may receive the warning message below. This is normal for downloaded programs. Click the Run button to proceed.
The Microsoft Installer program will then launch and you will see this screen.
Click on the Next button. The License Agreement window will then appear. You should click the “I Agree” option and then click Next.
32 ItemTracker Software Ltd.

The installation process will then begin.
Finally you will see this screen. Almost certainly you will need to restart your computer before you can continue the ItemTracker installation process. If you do not wish to restart your machine then click the “Do not restart now” option. Finally click Finish.
33 ItemTracker Software Ltd.

Return to your previous position in:Complete InstallationSQL Server Only Installation
Microsoft Powershell not installedDownload from http://support.microsoft.com/kb/926139
Navigate to the location that you downloaded the Microsoft Powershell installation program to and run the installation program. The file name will vary according to your computer requirements but will always contain the code KB926139.
You may receive the warning message below. This is normal for downloaded programs. Click the Run button to proceed.
34 ItemTracker Software Ltd.

The Windows PowerShell installation program will then launch.
Click on the Next button. The License Agreement window will then appear. You should click the “I Agree” option and then click Next.
The installation process will then begin.
35 ItemTracker Software Ltd.

Once the installation has completed you will see this screen. Click Finish to close the installation program.
Return to your previous position in:Complete InstallationSQL Server Only Installation
Microsoft .NET Framework version 2.0 not installedDownload from http://www.microsoft.com/download/en/details.aspx?id=1639
If the displayed check failure message states a 32-bit operating system then you should download the file ending with x86.exe otherwise download the file ending with x64.exe.
36 ItemTracker Software Ltd.

Navigate to the location that you downloaded the Microsoft .NET 2.0 installation program to and run the file. The program name will begin with NetFx20SP2.
When prompted select the option for “I have read and accept the terms of the license agreement” and then click on the button marked Install.
The installation process will then begin. This may take a few minutes to complete.
37 ItemTracker Software Ltd.

Eventually the Setup Complete screen will appear. Click on the Exit button to finish.
Click here to return to the Active Directory support installation instructions
38 ItemTracker Software Ltd.

Appendix B: Configuring Network Share and Folder PermissionsDepending on how you are configuring ItemTracker, you may need to setup one or network shares and folder permissions.
If you already know how to setup shares and NTFS permissions for folders, skip to the Permissions Quick Summary for Administrators section.
ItemTracker folder – if you have a centrally located installation of ItemTracker and want to share the program out to client PC’s. Also if you have multiple windows users on the same PC as a Minimum / Complete installation.
License folder – If you have a version of ItemTracker older than 3.4.17. Applies to Minimum / Complete installations.
Database_Backups folder – if your IT/IS Department does not backup your database for you. This folder can exist anywhere on the same machine that has Microsoft SQL Server installed.
Pictures folder – if you are going to use custom pictures for ItemTypes.
ITRDocCache folder – if you are going to use document attachment fields in ItemTracker.
ItemTracker FolderFor other users on your network to access the ItemTracker installation you will need to create network shares and set the folder permissions.
Note that if you are using a domain you may substitute the Domain Users group instead wherever you encounter the Users or Authenticated Users group in these instructions.
Navigate to the Program Files folder for your computer, e.g. C:\Program Files or C:\Program Files (x86).
Select the ItemTracker folder by left-clicking it. Then right-click the folder and select the option for “Advanced sharing...”.
The ItemTracker properties window will then appear. Click the option for “Advanced sharing...”
39 ItemTracker Software Ltd.

Click on the option for “Share this folder” and type “ItemTracker$” into the Share name box. Then click on the Permissions button.
We will now need to remove the Everyone group from the list and replace it with the Authenticated Users group.
Select the Everyone group and then click Remove. Then click on the Add button.
40 ItemTracker Software Ltd.

Type in “Authenticated Users” and click the button marked Check Names. If it has been typed correctly it will be underlined. Click OK to close the window.
We now need to set the share permissions for ItemTracker$. Ensure that the Read permission is checked on in the Allow column. Then click on the Apply and OK buttons. Click OK to close the Advanced sharing window.
41 ItemTracker Software Ltd.

On the ItemTracker properties window click on the Security tab. The Authenticated Users group should have the following permissions checked on in the Allow column: Read & Execute, List Folder Contents and Read. If it does not you can click on Edit and change the permissions. Click Apply and then click OK to close the window.
License Folder
42 ItemTracker Software Ltd.

Next we need to set the share and folder permissions for the License folder. Open the ItemTracker folder by double-clicking on it. Then locate the License folder and select it. Right-click on the License folder and then select “Properties”.
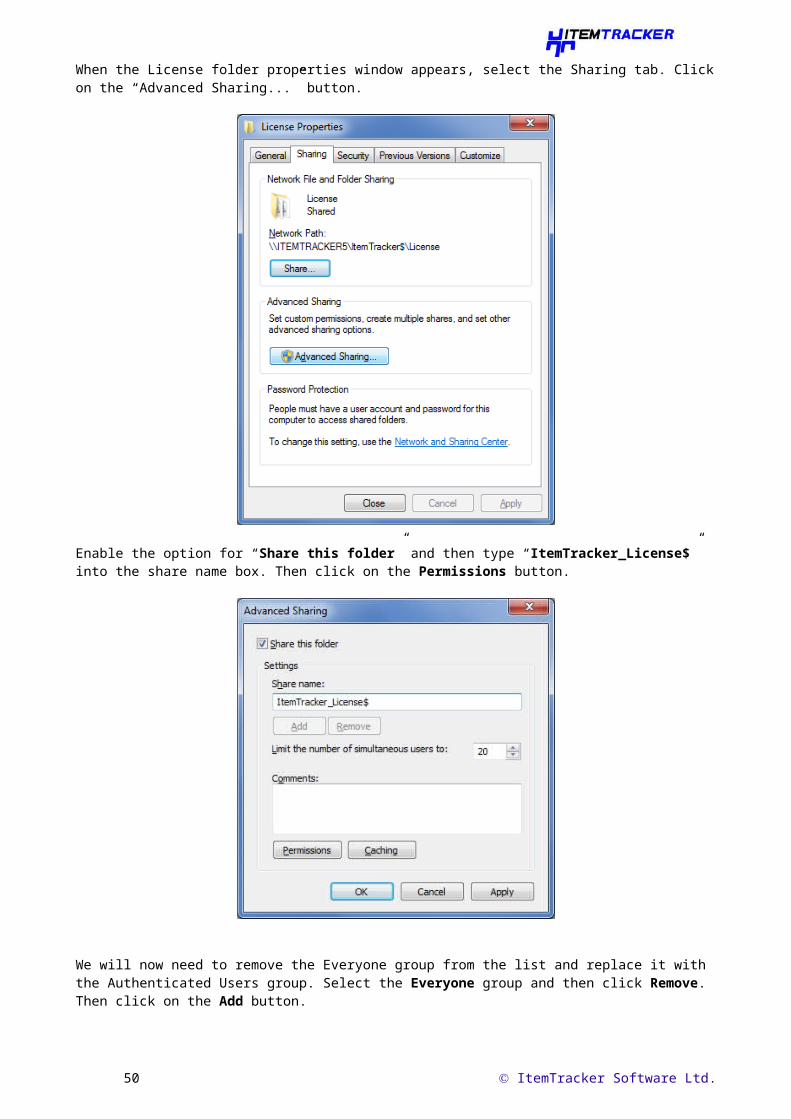
When the License folder properties window appears, select the Sharing tab. Click on the “Advanced Sharing...” button.
Enable the option for “Share this folder” and then type “ItemTracker_License$” into the share name box. Then click on the Permissions button.
43 ItemTracker Software Ltd.

We will now need to remove the Everyone group from the list and replace it with the Authenticated Users group. Select the Everyone group and then click Remove. Then click on the Add button.
Type in “Authenticated Users” and click the button marked Check Names. If it has been typed correctly it will be underlined. Click OK to close the window.
44 ItemTracker Software Ltd.

We now need to set the share permissions for ItemTracker_License$. Ensure that the Change and Read permissions are checked on in the Allow column.
Then click on the Apply and OK buttons. Click OK to close the Advanced Sharing window.
On the License properties window click on the Security tab. The Authenticated Users group should have the following permissions checked on in the Allow column: Modify, Read & Execute, List Folder Contents, Read and Write. Click Close if the permissions are correct or click Edit to change them.
45 ItemTracker Software Ltd.

When the Permissions window appears correct the permissions to those listed above. Click Apply and then click OK to close the window. Click Apply and Close to dismiss the License properties window.
Database_Backups FolderIf you have pre-installed Microsoft SQL Server and perform your own database backups you may skip this final step.
46 ItemTracker Software Ltd.

Next we need to create the Database_Backups folder (if applicable). Due to security restrictions in Windows 7 and above, as well as other possible complications, you should NOT create this folder within the Program Files folder structure.
Choose a location to create your folder and then select “File > New > Folder” from the top menu (New Folder button in newer versions of windows). Type in the name “Database_Backups” and press enter. Preferably backups should be created on a different physical disk drive to Microsoft SQL Server.
Depending on your exact system configuration you may also need to add permission for the SQL Server to write to the Database_Backups folder as well.
Select the Database_Backups folder by left-clicking it. Then Right-click on the folder and select Properties.
When the Properties window opens, select the Security tab and then click on the “Edit...” button.
47 ItemTracker Software Ltd.

The Permissions window will open which will allow you to change the user permissions for the backup folder.
Then click on the “Add...” button.
48 ItemTracker Software Ltd.

Click the Advanced button.
Click the Find Now button. Scroll down and select the SQL Server User. This will look something like SQLServerMSSQLUser$ComputerName$SQLEXPRESS or SQLServerMSSQLUser$ComputerName$MSSQLSERVER
ComputerName will be the name of the computer that SQL Server is installed on. The final part of the text will be determined by the instance name of the SQL Server.
Click on the OK button.
49 ItemTracker Software Ltd.
Then click the OK button again. The SQL Server user will be added to the Security list. Change the permissions so that the following are checked on: Modify, Read & Execute, List Folder Contents, Read, Write.
Finally click on the Apply button followed by OK.
Return to your previous position in:Complete InstallationMinimum Installation
Pictures FolderAs of version 3.5.3 of ItemTracker you can specify a folder share location for the Pictures folder. The pictures folder is used to store custom images for ItemTypes. If you have an older version of ItemTracker, you only need worry about setting the NTFS permissions for the folder.
Next we need to create the Pictures folder (if applicable). Due to security restrictions in Windows 7 and above, as well as other possible complications, you should NOT create this folder within the Program Files folder structure.
50 ItemTracker Software Ltd.

Choose a location to create your folder and then select “File > New > Folder” from the top menu (New Folder button in newer versions of windows). Type in the name “Pictures” and press enter.
Select the Pictures folder by left-clicking it. Then Right-click on the folder and select Properties.
When the Pictures folder properties window appears, select the Sharing tab. Click on the “Advanced Sharing...” button.
51 ItemTracker Software Ltd.

Enable the option for “Share this folder” and then type “Pictures$” into the share name box. Then click on the Permissions button.
We will now need to remove the Everyone group from the list and replace it with the Authenticated Users group. Select the Everyone group and then click Remove. Then click on the Add button.
52 ItemTracker Software Ltd.

Type in “Authenticated Users” and click the button marked Check Names. If it has been typed correctly it will be underlined. Click OK to close the window.
We now need to set the share permissions for Pictures$. Ensure that the Change and Read permissions are checked on in the Allow column.
53 ItemTracker Software Ltd.

Then click on the Apply and OK buttons. Click OK to close the Advanced Sharing window.
On the Pictures properties window click on the Security tab. The Authenticated Users group should have the following permissions checked on in the Allow column: Modify, Read & Execute, List Folder Contents, Read and Write. Click Close if the permissions are correct or click Edit to change them.
When the Permissions window appears correct the permissions to those listed above. Click Apply and then click OK to close the window. Click Apply and Close to dismiss the Pictures properties window.
54 ItemTracker Software Ltd.

Return to your previous position in:Complete InstallationMinimum Installation
ITRDocCache FolderThe ITRDocCache folder is used to store the documents that users attach to Document fields in ItemTracker. Note that if you are using a version of ItemTracker older than version 3.5.3, you will need to share the ITRDocCache folder indirectly, e.g. C:\ItemTracker_files\ITRDocCache\ instead of C:\ITRDocCache\.
Next we need to create the ITRDocCache folder (if applicable). Due to security restrictions in Windows 7 and above, as well as other possible complications, you should NOT create this folder within the Program Files folder structure.
Choose a location to create your folder and then select “File > New > Folder” from the top menu (New Folder button in newer versions of windows). Type in the name “ITRDocCache” and press enter.
Select the ITRDocCache folder by left-clicking it. Then Right-click on the folder and select Properties.
55 ItemTracker Software Ltd.

When the ITRDocCache folder properties window appears, select the Sharing tab. Click on the “Advanced Sharing...” button.
Enable the option for “Share this folder” and then type “ITRDocCache$” into the share name box. Then click on the Permissions button.
56 ItemTracker Software Ltd.

We will now need to remove the Everyone group from the list and replace it with the Authenticated Users group. Select the Everyone group and then click Remove. Then click on the Add button.
Type in “Authenticated Users” and click the button marked Check Names. If it has been typed correctly it will be underlined. Click OK to close the window.
57 ItemTracker Software Ltd.

We now need to set the share permissions for ITRDocCache$. Ensure that the Change and Read permissions are checked on in the Allow column.
Then click on the Apply and OK buttons. Click OK to close the Advanced Sharing window.
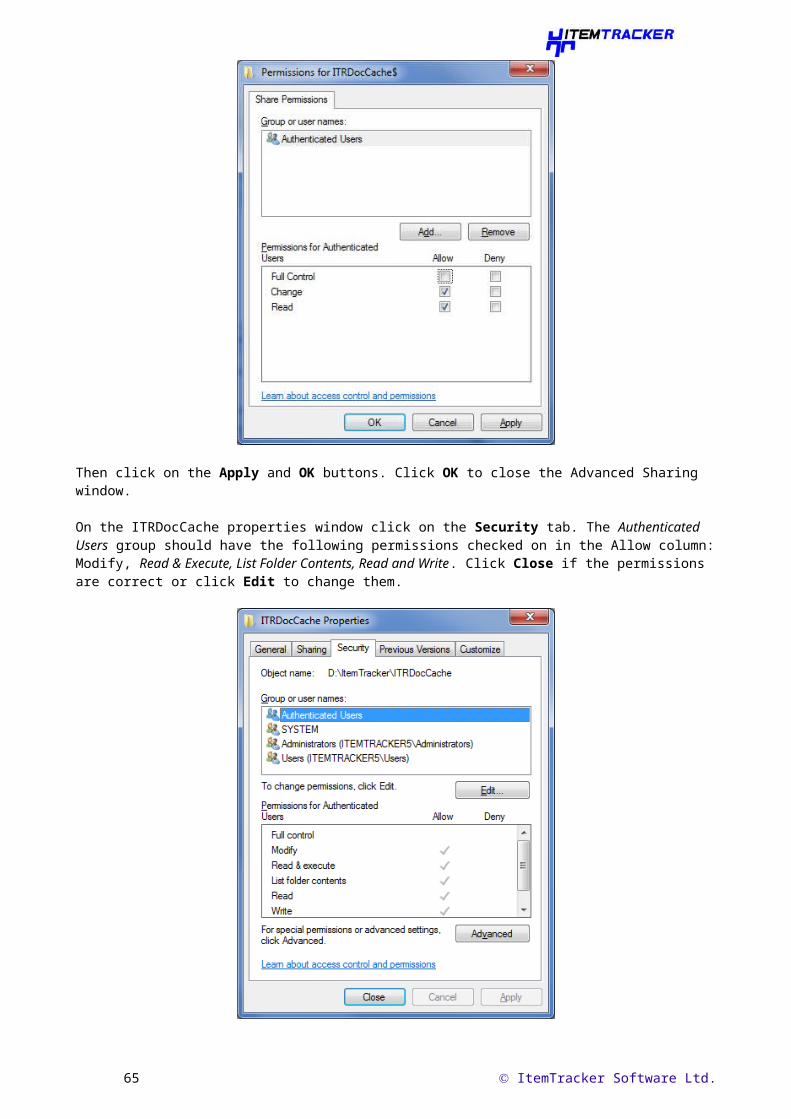
On the ITRDocCache properties window click on the Security tab. The Authenticated Users group should have the following permissions checked on in the Allow column: Modify, Read & Execute, List Folder Contents, Read and Write. Click Close if the permissions are correct or click Edit to change them.
58 ItemTracker Software Ltd.

When the Permissions window appears correct the permissions to those listed above. Click Apply and then click OK to close the window. Click Apply and Close to dismiss the Pictures properties window.
Return to your previous position in:Complete InstallationMinimum Installation
59 ItemTracker Software Ltd.

Permissions Quick Summary for AdministratorsItemTracker folder:-
Network share: ReadNTFS: Read & Execute, List Folder Contents, Read
License folder:-Network share: Change, ReadNTFS: Modify, Read & Execute, List Folder Contents, Read, Write
Database_Backups folder:-Network share: N/ANTFS: The account that Microsoft SQL Server runs under must have the following permissions for
the folder - Modify, Read & Execute, List Folder Contents, Read, Write
Pictures folder:-Network share: N/ANTFS: Modify, Read & Execute, List Folder Contents, Read, Write
ITRDocCache folder:-Network share: Change, ReadNTFS: Modify, Read & Execute, List Folder Contents, Read, Write
Return to your previous position in:Complete InstallationMinimum Installation
60 ItemTracker Software Ltd.

Appendix C: Installing Microsoft SQL Server
The ItemTracker installer passes all the needed setup information directly to the SQL Server installer so usually you will not need to do anything other than click Next a lot. If you do change any of the settings make notes of changes.
Initially you will see a small status window while the SQL Server installer extracts the files required for the installation procedure.
Once this is completed the main part of the installer will start up. You may need to wait a few minutes before it continues.
Accept the license terms by clicking “I accept the license terms” and then click Next.
61 ItemTracker Software Ltd.

The setup support files will then be automatically installed. This will take a few minutes and then the installer will move onto the next screen.
62 ItemTracker Software Ltd.

Next the Feature Selection screen will appear. Ensure that all the features except “SQL Client Connectivity – SDK” are checked on. Click on the Next button to proceed.
63 ItemTracker Software Ltd.

The Instance Configuration screen will then appear. The named instance should match the value you entered earlier in the ItemTracker installer. You can always edit the SERVER= line in the ItemTracker.dsn file later on if they do not match. Click Next to proceed.
64 ItemTracker Software Ltd.
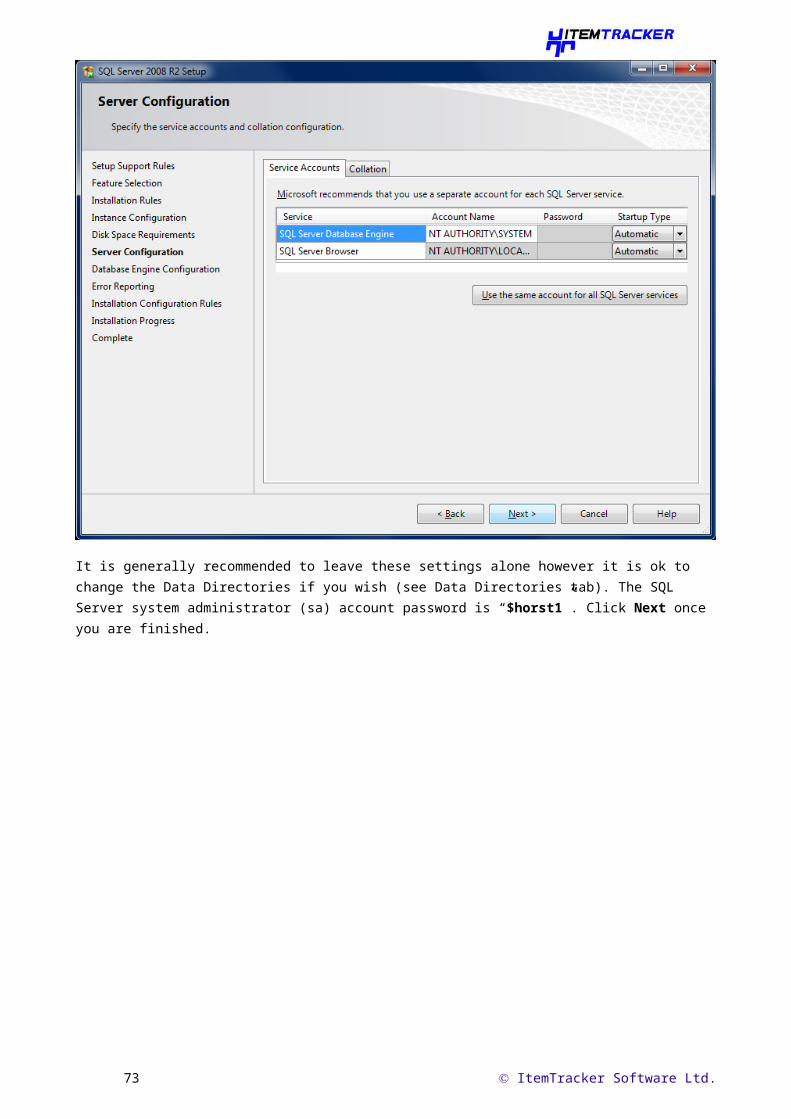
You should not need to change anything on the Server configuration screen. In fact you should not attempt to do so unless you are familiar with SQL Server. Click Next to continue.
65 ItemTracker Software Ltd.

It is generally recommended to leave these settings alone however it is ok to change the Data Directories if you wish (see Data Directories tab). The SQL Server system administrator (sa) account password is “$horst1”. Click Next once you are finished.
66 ItemTracker Software Ltd.

The Error Reporting screen will appear. Decide whether you want to send error reports or not and then click Next.
67 ItemTracker Software Ltd.

The Installation Progress window will then appear. This stage will likely take a length amount of time.
68 ItemTracker Software Ltd.

Eventually the final screen will show. Click the Close button. The ItemTracker installer will then continue.
69 ItemTracker Software Ltd.

If there are any errors please email a ‘zipped-up’ copy of the summary log to [email protected].
Return to your previous position in:Complete InstallationSQL Server Only
70 ItemTracker Software Ltd.

Appendix D: Configuring ItemTracker for use with Active Directory
Before explaining how to connect ItemTracker it is important to understand the limitations in the connectivity provided by ItemTracker.
What it will do: Automatically populate the User name box on the ItemTracker login form with the username of the
currently logged in Windows user. Connect to Active Directory and authenticate against the password stored there. Determine whether the user logging in should be an ItemTracker system administrator based on the
Active Directory group that the user is a member of.
What it will not do: Import all Active Directory users in the specified Active Directory group(s). Allow users who are not windows system administrators to add new users to ItemTracker user
groups. This is an Active Directory security restriction.
Important note: You must have ItemTracker version 3.2.7 or above to enable Active Directory functionality.
Installing the Active Directory support files Activating ItemTracker Active Directory support
Installing the Active Directory support filesThe ItemTracker Active Directory support files must be installed to the ItemTracker program files folder on BOTH the server and client machines. The installation program for this is available from the ItemTracker installation folder on either the server or client (ActiveDirectoryModuleSetup.exe).
Ensure that you are logged into the computer as a system administrator.
Navigate to the Active Directory installation program and run it. The initial screen will appear as below. Click Next to begin.
Select the option for “I agree to the terms of this license agreement” and then click on the Next button.
71 ItemTracker Software Ltd.

If you see a Prerequisites check failure error message you will need to install additional software before continuing.Click here to go to the Microsoft .NET Framework 2.0 installation instructions
The support files should be installed into the ItemTracker folder. Change the folder if necessary and then click Next.
Check the displayed details and then click Next to begin the installation.
72 ItemTracker Software Ltd.
You will briefly see this screen while the installation program configures your Active Directory support files.
After a short period you will see the Installation Successful screen. Click Finish to close the installer.
73 ItemTracker Software Ltd.

Just before the installer closes you will see a reminder about adding the 3 configuration lines into the ItemTracker.dsn file.
Activating ItemTracker Active Directory supportYou only need to perform this section once on the server.
Create two new Active Directory groups called ItemTrackerAdmin & ItemTrackerUsers and then assign users to the two groups. You may use existing Active Directory groups but for the purpose of these instructions we will use the ones specified.
The ItemTrackerAdmin group should only contain users that will have complete UNRESTRICTED access to everything in ItemTracker and may perform any operation. It should also contain the user account that you are currently logged in with.
The ItemTrackerUsers group should contain all other users including group administrators.
IMPORTANT NOTE: Users should only be added to ONE of the two Active Directory groups above.
Once this has been done, log out of windows and then log back in again as a Windows Administrator.
Next we need to configure the ItemTracker connection settings. Locate the ItemTracker.dsn file in the ItemTracker program files folder on the server and open it for editing using Notepad. You should see something similar to this:
[ODBC]
74 ItemTracker Software Ltd.

DRIVER=SQL ServerUID=itemtracker_userPWD=$horst1Trusted_Connection=NoDATABASE=ItemTrackerAPP=ItemTrackerSERVER=(local)
Add in the 3 Active Directory configuration lines and change the file so that it matches your settings, e.g.
[ODBC]DRIVER=SQL ServerTrusted_Connection=YesDATABASE=ItemTrackerAPP=ItemTrackerSERVER=SQLSERVER_MACHINE_NAME\SQLSERVER_INSTANCENAMEADSERVER=YourADServerNameADUSERGROUP=ItemTrackerUsersADADMINGROUP=ItemTrackerAdmin
Trusted_Connection should be set to Yes.
SERVER should point to the location of your SQL Server. The example above assumes that your installation of SQL Server has been assigned an instance name. If this is not the case simply remove everything from the backslash onwards on that line.
ADSERVER should contain the name of your Active Directory server.
ADUSERGROUP should contain the name of the ItemTracker Users group in Active Directory
ADADMINGROUP should contain the name of the ItemTracker Administrators group in Active Directory
When you have finished editing the file close Notepad saving when prompted.
75 ItemTracker Software Ltd.

Appendix E: Troubleshooting
Installation of ItemTracker or the Active Directory support module
“Prerequisites check failure” message during installation. Please see Appendix A: Installing Prerequisite Software.
“This program might not have installed correctly” message part way through installation. Windows Vista / 7 users might see an additional message. Left click the “This program installed correctly” option to dismiss the message.
During Login to ItemTracker “Database was not detected” – this message covers a wide range of issues. You should click
on the Show Error button to see additional details.
The displayed message will be one of the following:
o “Login failed for ‘itemtracker_user’”o If you have not yet created your ItemTracker database you should do so now. Please
follow the instructions here to do so.
o If you are using SQL Authentication (Trusted_Connection=No in the ItemTracker.dsn file) please check that the login details for the UID and PWD lines are present and correct.
76 ItemTracker Software Ltd.

The default SQL authentication username (UID) and password (PWD) are “itemtracker_user” and “$horst1” respectively.
The ItemTracker.dsn file will be located in the ItemTracker installation folder, e.g. C:\Program Files\ItemTracker\.
o “Method ‘~’ of object ‘~’ failed”o Check that the remote SQL Server is running. Open the Windows Control Panel –
“Start > Control Panel”. Then open Administrative Tools > Services.
Scroll down until you find the entry for your installation of SQL Server. This will probably be SQL Server (SQLEXPRESS). The example below has an instance name of SQL2008R2. In the Status column it should show “Started”. If it does not select the entry for SQL Server by left clicking on it and then click on the “Start” option that will be displayed to the left.
o If you are using Windows or Active Directory Authentication ensure that you have followed the instructions for setting up database security.
o If you are using SQL Server 2000 or 2005 ensure that the SQL Server Browser service is installed and running. Open the Windows Control Panel – “Start > Control Panel”. Then open Administrative Tools > Services.
Scroll down until you find the entry that says SQL Server Browser. In the Status column it should show “Started”. If it does not select the entry for SQL Server Browser by left clicking on it and then click on the “Start” option that will be displayed to the left.
77 ItemTracker Software Ltd.

o If you have a Firewall running ensure that connections to SQL Server are allowed. This Microsoft article may be useful:http://msdn.microsoft.com/en-us/library/ms175043%28v=sql.105%29.aspx
o Check that the authentication method that you have chosen in the ItemTracker.dsn file is available on the installed instance of SQL Server. If your SQL Server was installed with the Windows Authentication option then you will not be able to use the Trusted_Connection=No option in the ItemTracker.dsn file. In later versions of SQL Server it is possible to enable Mixed Mode authentication after installation.
o If you are using SQL Authentication (Trusted_Connection=No in the ItemTracker.dsn file) please check that the login details for the UID and PWD lines are present and correct.
o Windows Vista users – you must use the “Run As Administrator” option when starting ItemTracker otherwise you will not be able to create the database.
o Windows 7/Windows Server 2008 users – please follow the instructions here to create your database.
o Using the SQL Server Configuration Manager check that TCP/IP protocols are enabled for SQL Server. If however you are using Named Pipes to connect to your ItemTracker database ensure that the Named Pipes protocol is enabled and properly configured.
o Ensure that the TCP/IP networking protocol is installed for all machines either hosting or running ItemTracker.
“SQL Server does not exist or access denied”
o Check that the SQL Server is running
o Check that the SQL Server specified by the SERVER= line in the ItemTracker.dsn file is correct and has no typographic errors.
"Provider cannot be found. It may not be properly installed." – The msdasql.dll file may need re-registering. You will need to login to the PC as an administrator and execute the following commands in the command shell:
o regsvr32.exe /u "C:\Program Files\Common Files\System\OleDB\msdasql.dll"
o regsvr32.exe "C:\Program Files\Common Files\System\OleDB\msdasql.dll"
During Logout from ItemTracker Failed to backup the ItemTracker database
o Cannot open backup device ‘C:\Program Files\ItemTracker\Database_Backups\ITR-120709122252.bak’. Operating system error 5(failed to retrieve text for this error. Reason 1815).
It is likely that if you have just installed ItemTracker, the security for Database_Backups folder has not been correctly set. Please follow the instructions here.
78 ItemTracker Software Ltd.