
iStick User Manual en V1.3 - PQI Group Edit menu “Cancel”:Cancel button, click to Cancel all...
39
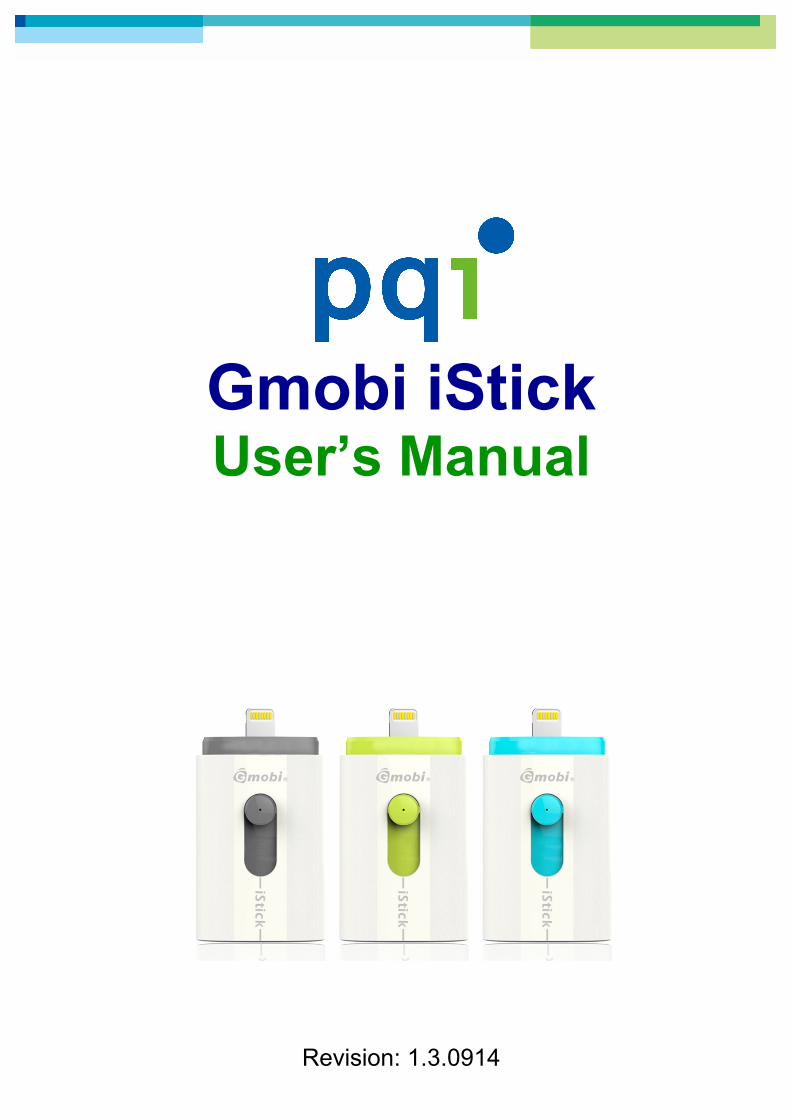
Gmobi iStick User’s Manual Revision: 1.3.0914
Transcript of iStick User Manual en V1.3 - PQI Group Edit menu “Cancel”:Cancel button, click to Cancel all...
Gmobi iStick User’s Manual
Revision: 1.3.0914
2
1. Introduction
iStick is an user friendly storage accessory for Apple iDevices and PC which enables users to – 1) do file management ( Copy , Paste , Delete and so on ) among iDevices ( iPhone / iPad
), PC and iStick . 2) Work as an USB pen drive on PC 3) let users View / play photos, documents and videos files stored in the iStick or iDevices w/
an dedicated App 4) do contact list backup and restore
2. Contents l iStick 1 PCS l Quick Reference guide 1 PCS
3. System Requirements iDevice :iPhone 5/5s/6/6 Plus,iPad mini/mini 2/ipad 4/ipad Air,iPod Touch 5 or above;
iOS :iOS 6.X/7.X/8.X or above PC OS :Windows XP/7/8,Linux 2.6.x,Mac OS 10.x or above;
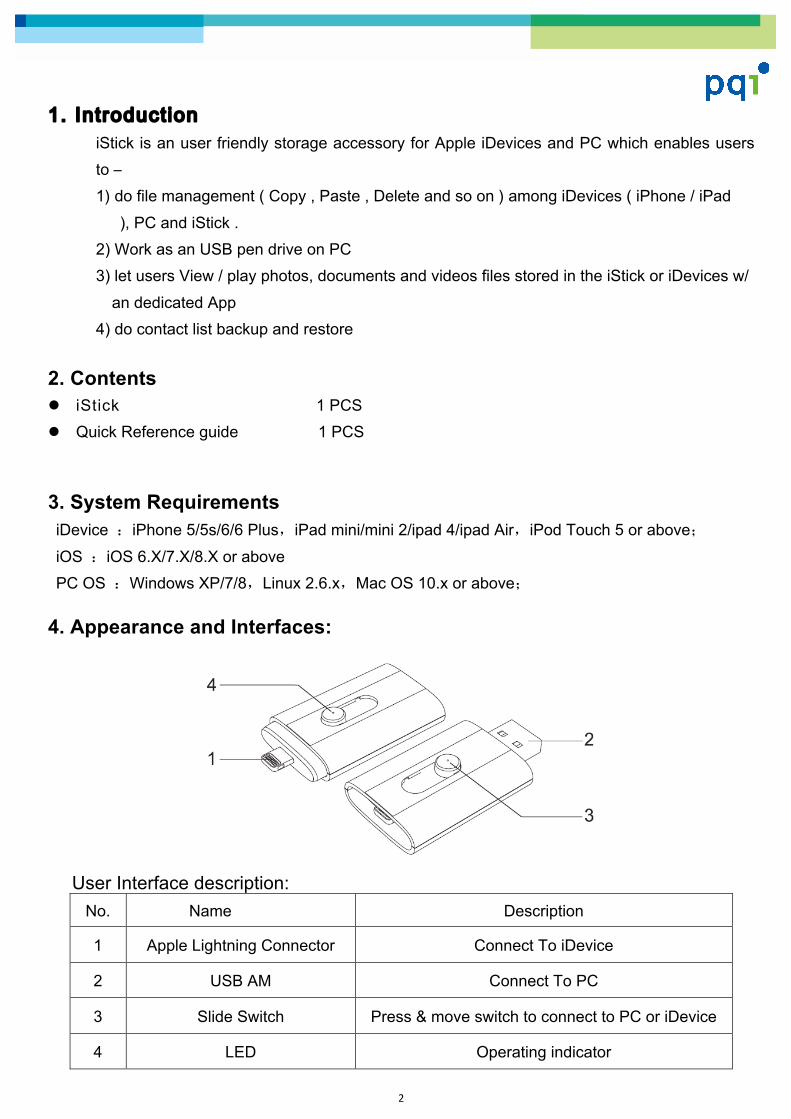
4. Appearance and Interfaces:
User Interface description:
No. Name Description
1 Apple Lightning Connector Connect To iDevice
2 USB AM Connect To PC
3 Slide Switch Press & move switch to connect to PC or iDevice
4 LED Operating indicator
3
5. App Instal lat ion(eg. iPhone 5s ; iOS8)
There are three approaches to install iStick App , described in 5.1 , 5.3 , 5.4 respectively .
Notice :
App installation must ensure that your iDevices and computers can connect to the
Internet properly, and must have the Apple ID. If you don’t have Apple ID, please apply
for it before App. installation
Please refer to the following link to apply for Apple ID :
Chinese: http://support.apple.com/kb/HT5622?viewlocale=zh_TW&locale=en_US
English:http://support.apple.com/kb/HT5622
5.1 App Auto Installation
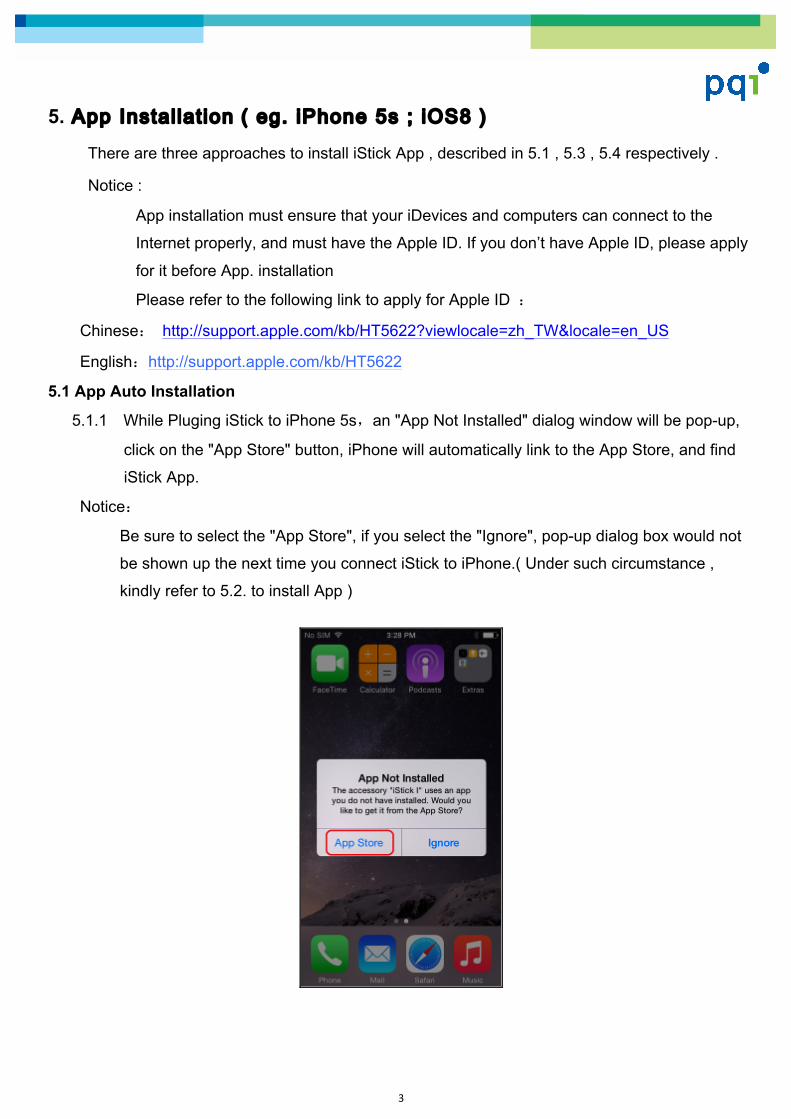
5.1.1 While Pluging iStick to iPhone 5s,an "App Not Installed" dialog window will be pop-up,
click on the "App Store" button, iPhone will automatically link to the App Store, and find
iStick App.
Notice:
Be sure to select the "App Store", if you select the "Ignore", pop-up dialog box would not
be shown up the next time you connect iStick to iPhone.( Under such circumstance ,
kindly refer to 5.2. to install App )
4
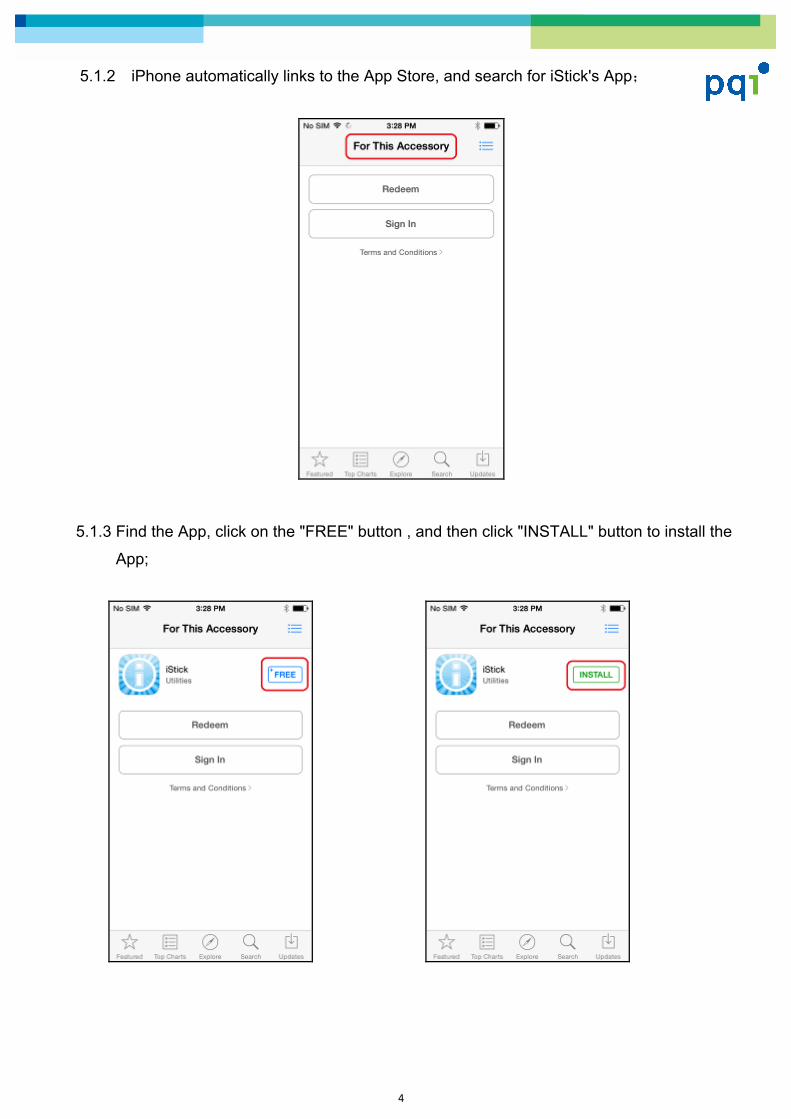
5.1.2 iPhone automatically links to the App Store, and search for iStick's App;
5.1.3 Find the App, click on the "FREE" button , and then click "INSTALL" button to install the
App;
5
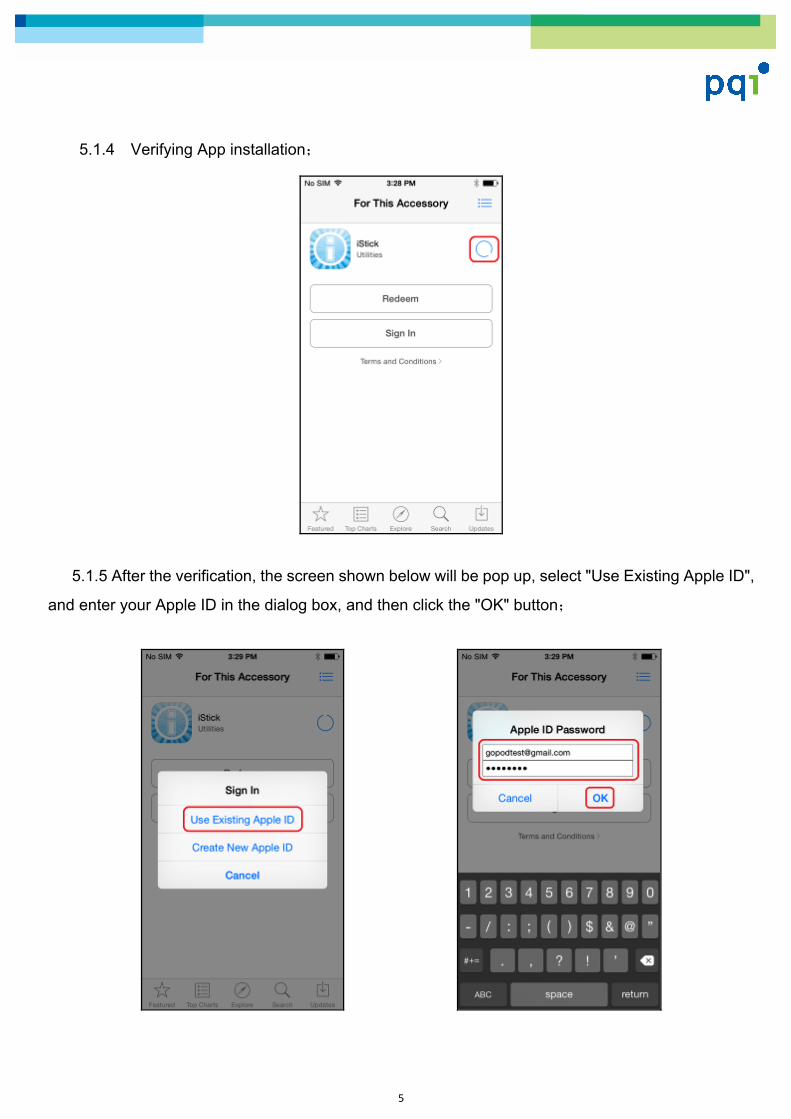
5.1.4 Verifying App installation;
5.1.5 After the verification, the screen shown below will be pop up, select "Use Existing Apple ID",
and enter your Apple ID in the dialog box, and then click the "OK" button;
6
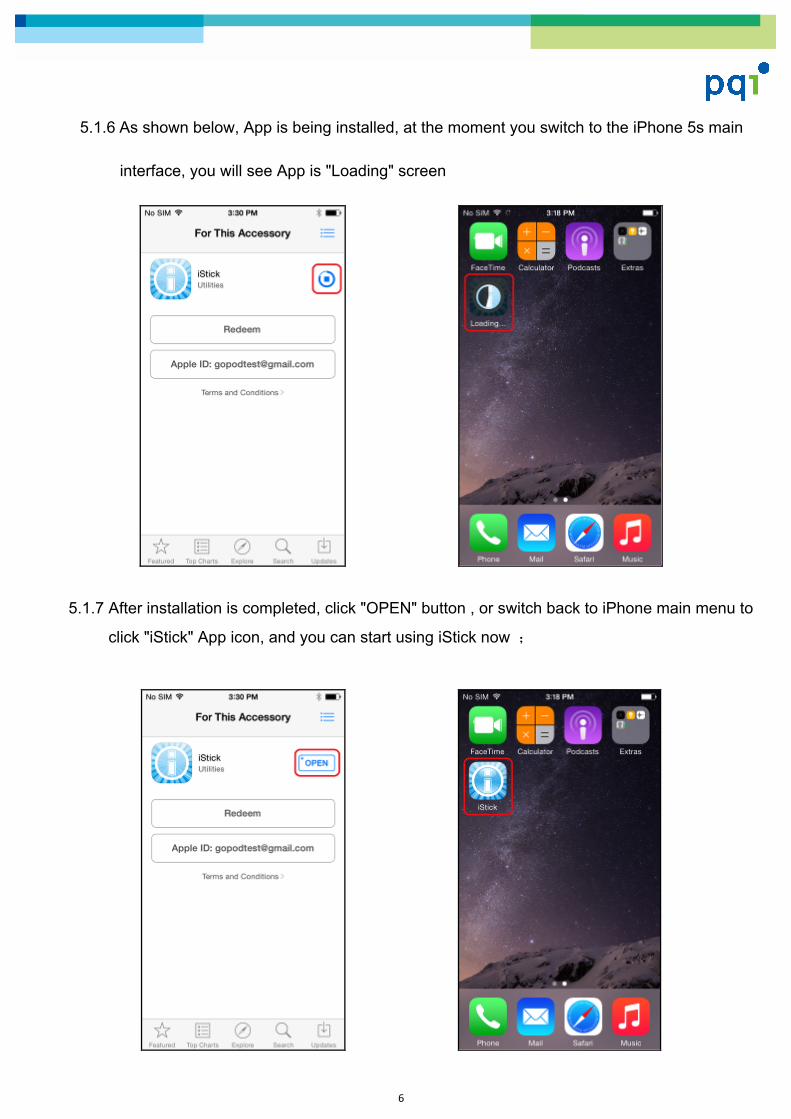
5.1.6 As shown below, App is being installed, at the moment you switch to the iPhone 5s main
interface, you will see App is "Loading" screen
5.1.7 After installation is completed, click "OPEN" button , or switch back to iPhone main menu to
click "iStick" App icon, and you can start using iStick now ;
7
5.2 As above mentioned , If to select " Ignore " the "" App Not Installed " , the next time you plug
iStick to iPhone , it will not pop up the dialog box ; in this case please follow below procedures to
install App .
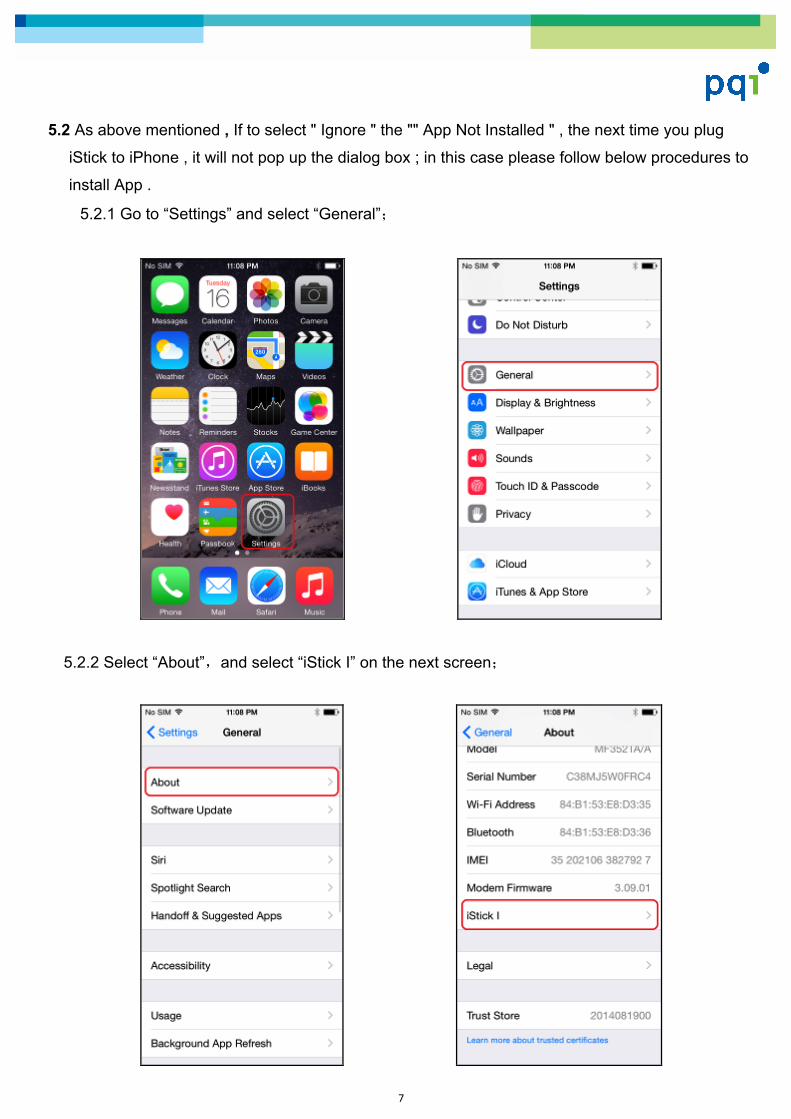
5.2.1 Go to “Settings” and select “General”;
5.2.2 Select “About”,and select “iStick I” on the next screen;

8
5.2.3 In the "iStick I" interface, click on "Find App for Accessory" to get iStick App , and proceed
App installation as 5.1.3 described
5.3 Get iStick APP on the App store
Notice : make sure your device can connect to the Internet properly and have an Apple ID。
5.3.1 As shown below ,click “App Store” icon to go to the App Store;
9
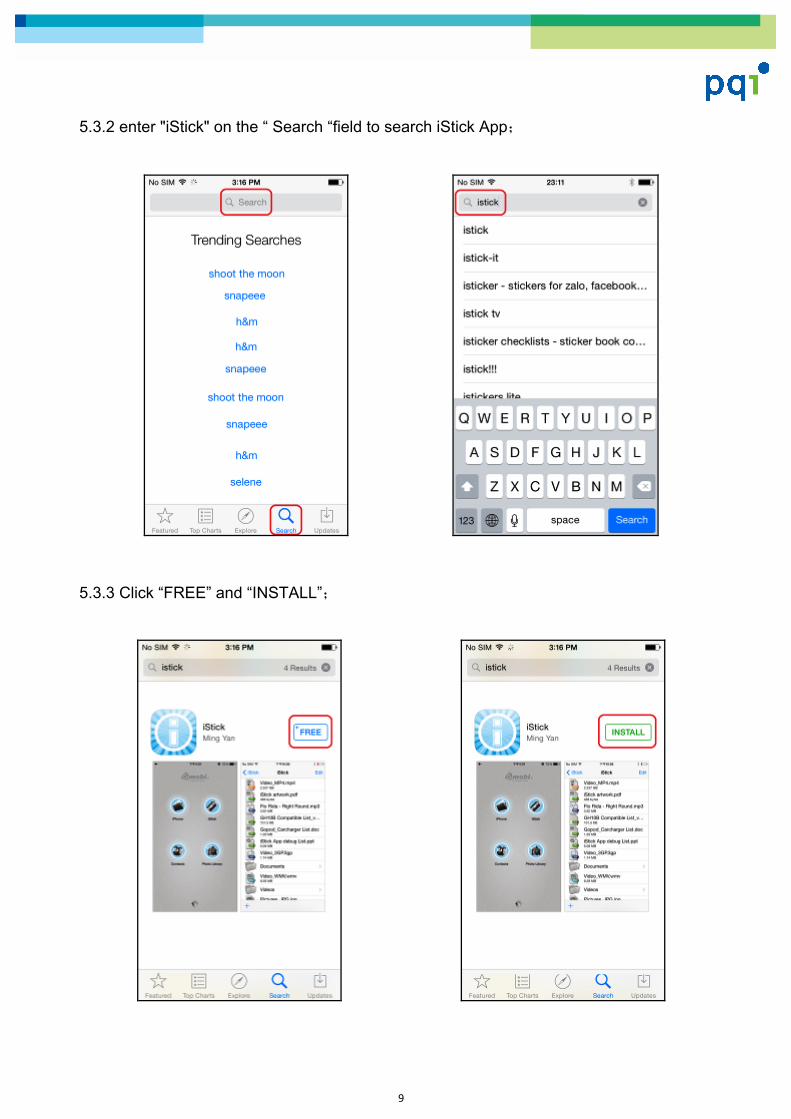
5.3.2 enter "iStick" on the “ Search “field to search iStick App;
5.3.3 Click “FREE” and “INSTALL”;
10
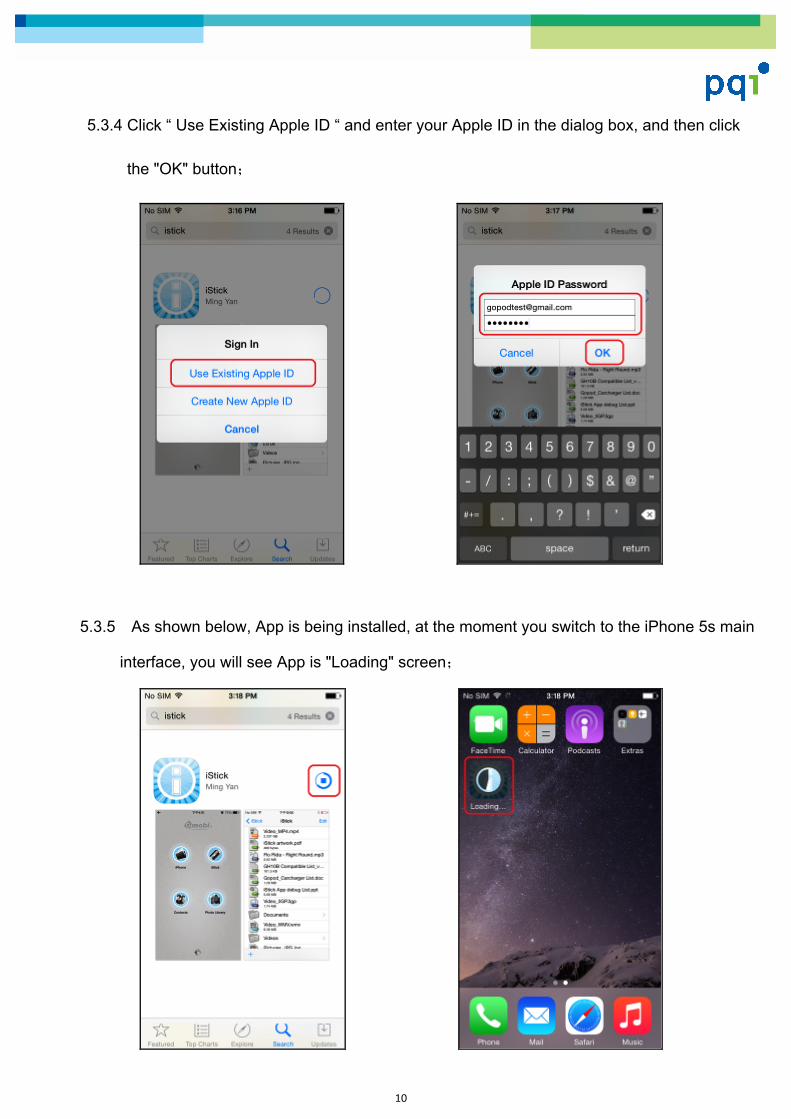
5.3.4 Click “ Use Existing Apple ID “ and enter your Apple ID in the dialog box, and then click
the "OK" button;
5.3.5 As shown below, App is being installed, at the moment you switch to the iPhone 5s main
interface, you will see App is "Loading" screen;
11
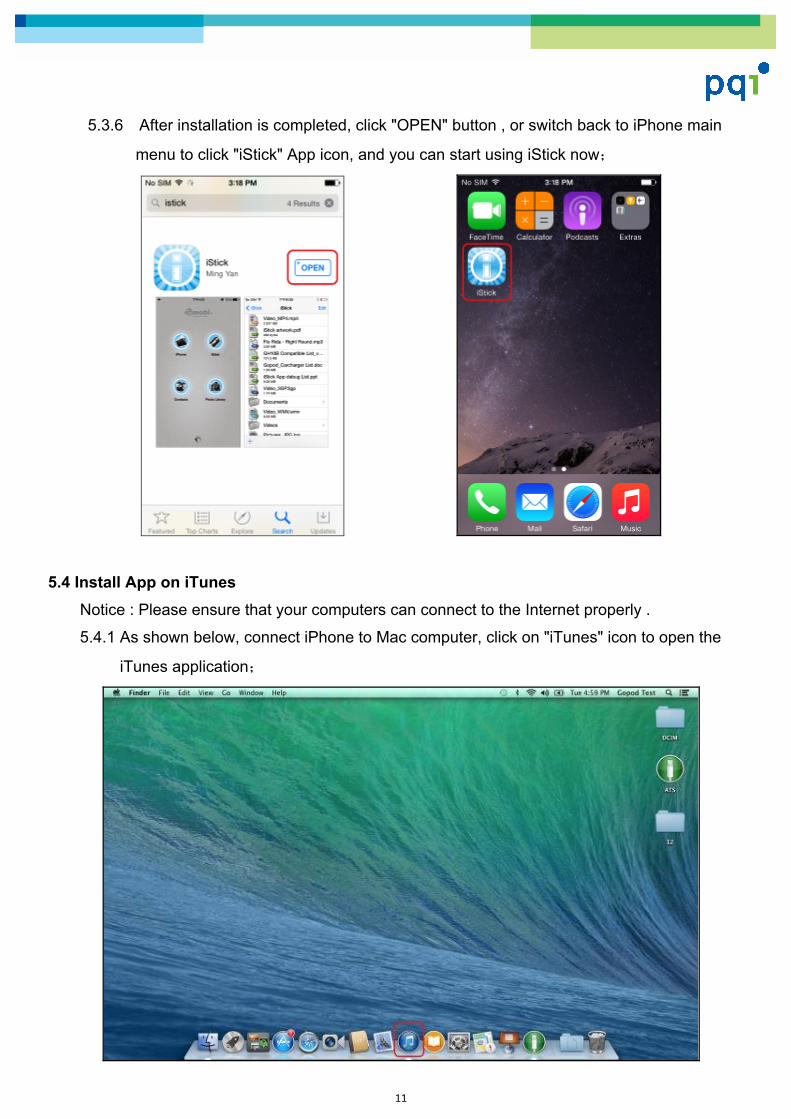
5.3.6 After installation is completed, click "OPEN" button , or switch back to iPhone main
menu to click "iStick" App icon, and you can start using iStick now;
5.4 Install App on iTunes
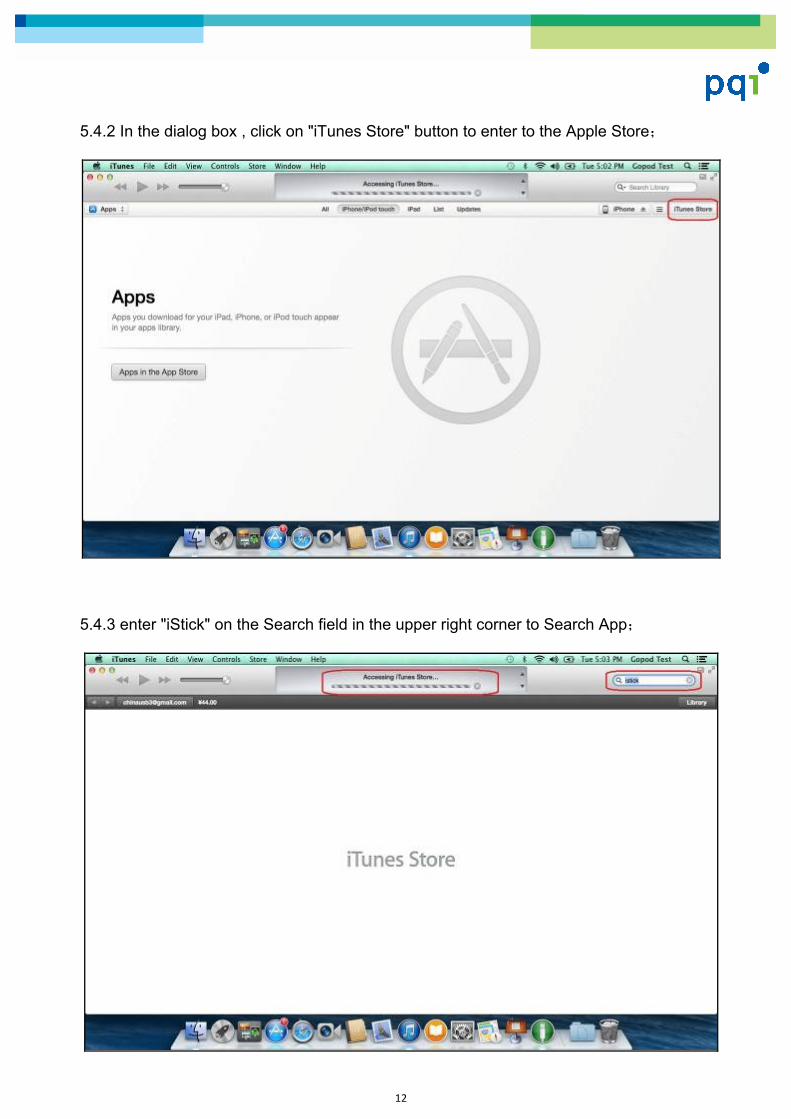
Notice : Please ensure that your computers can connect to the Internet properly .
5.4.1 As shown below, connect iPhone to Mac computer, click on "iTunes" icon to open the
iTunes application;
12
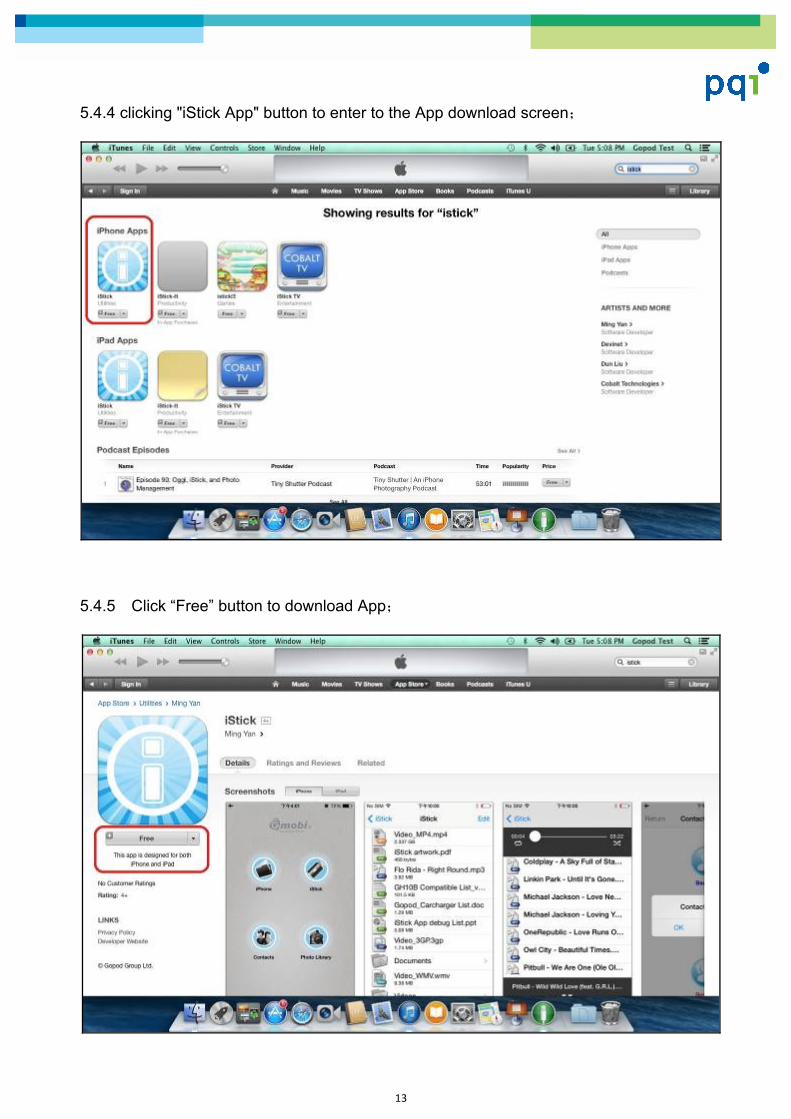
5.4.2 In the dialog box , click on "iTunes Store" button to enter to the Apple Store;
5.4.3 enter "iStick" on the Search field in the upper right corner to Search App;
13
5.4.4 clicking "iStick App" button to enter to the App download screen;
5.4.5 Click “Free” button to download App;
14
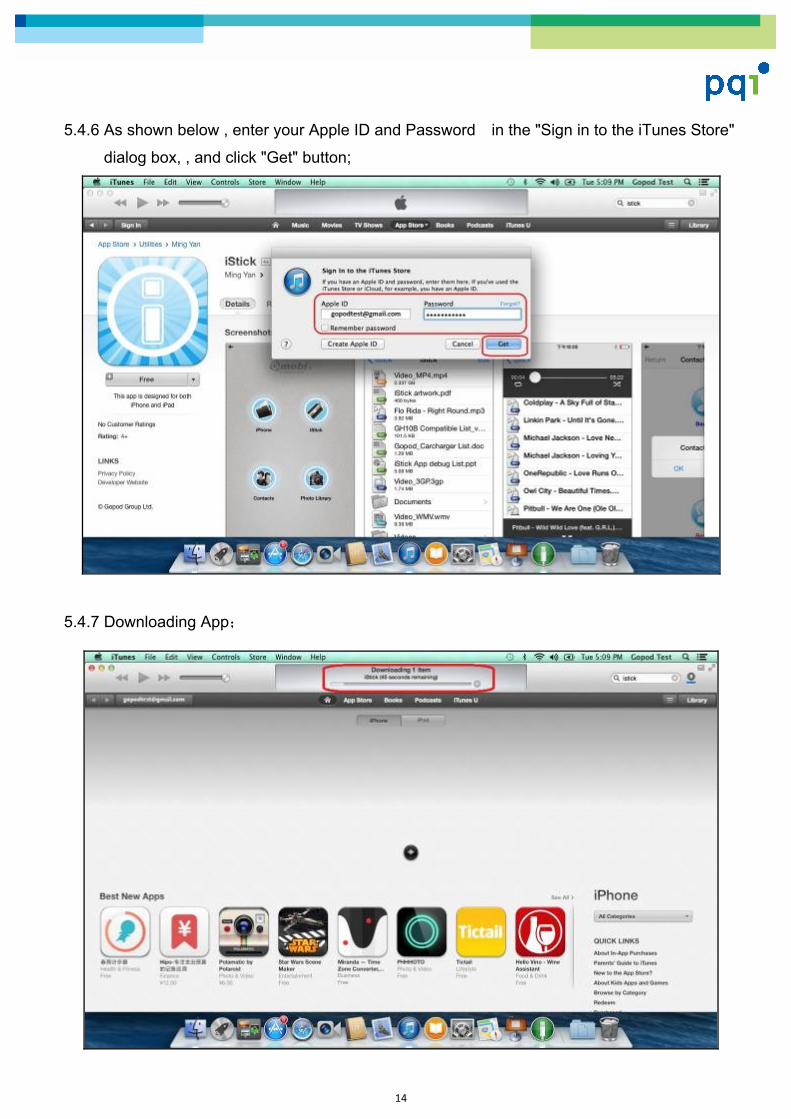
5.4.6 As shown below , enter your Apple ID and Password in the "Sign in to the iTunes Store"
dialog box, , and click "Get" button;
5.4.7 Downloading App;
15
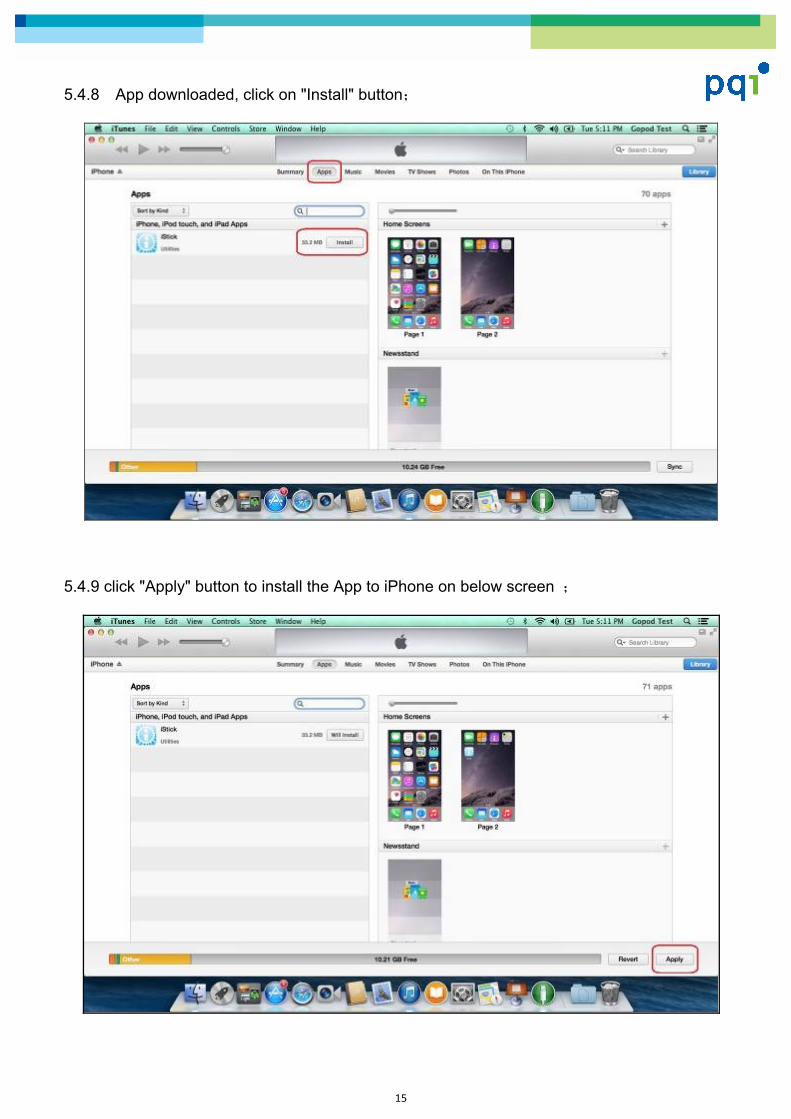
5.4.8 App downloaded, click on "Install" button;
5.4.9 click "Apply" button to install the App to iPhone on below screen ;
16
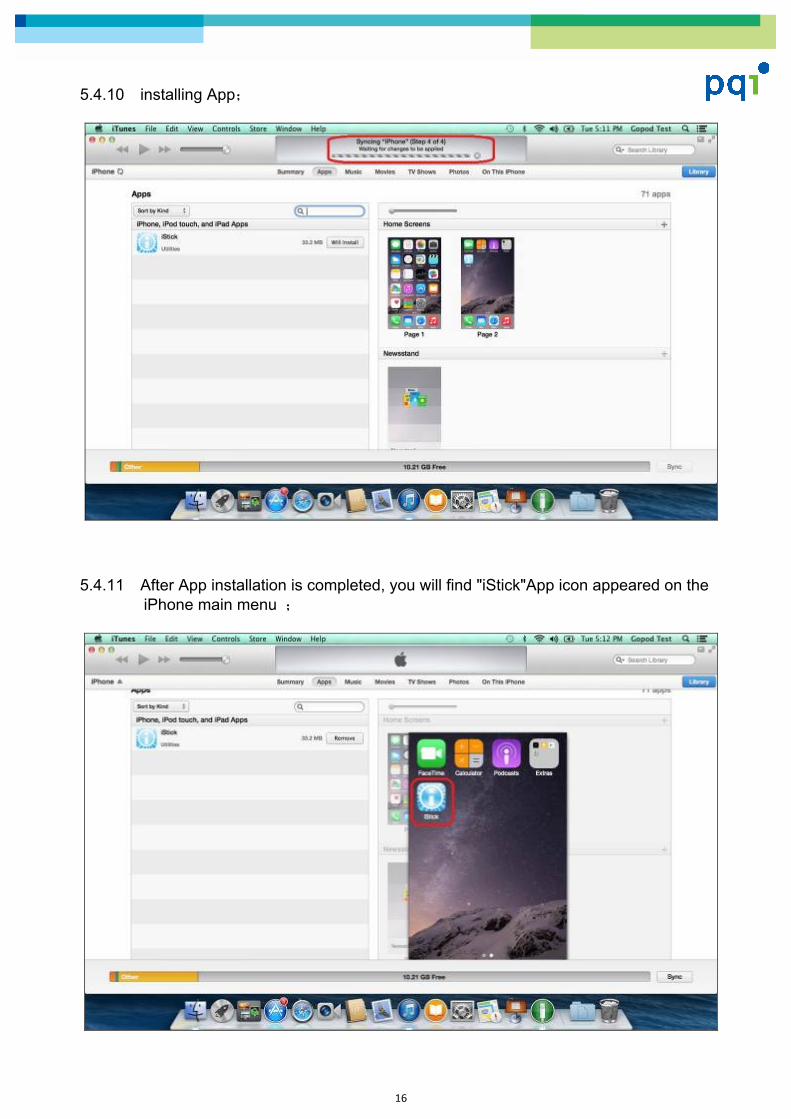
5.4.10 installing App;
5.4.11 After App installation is completed, you will find "iStick"App icon appeared on the
iPhone main menu ;
17
6. App User guide
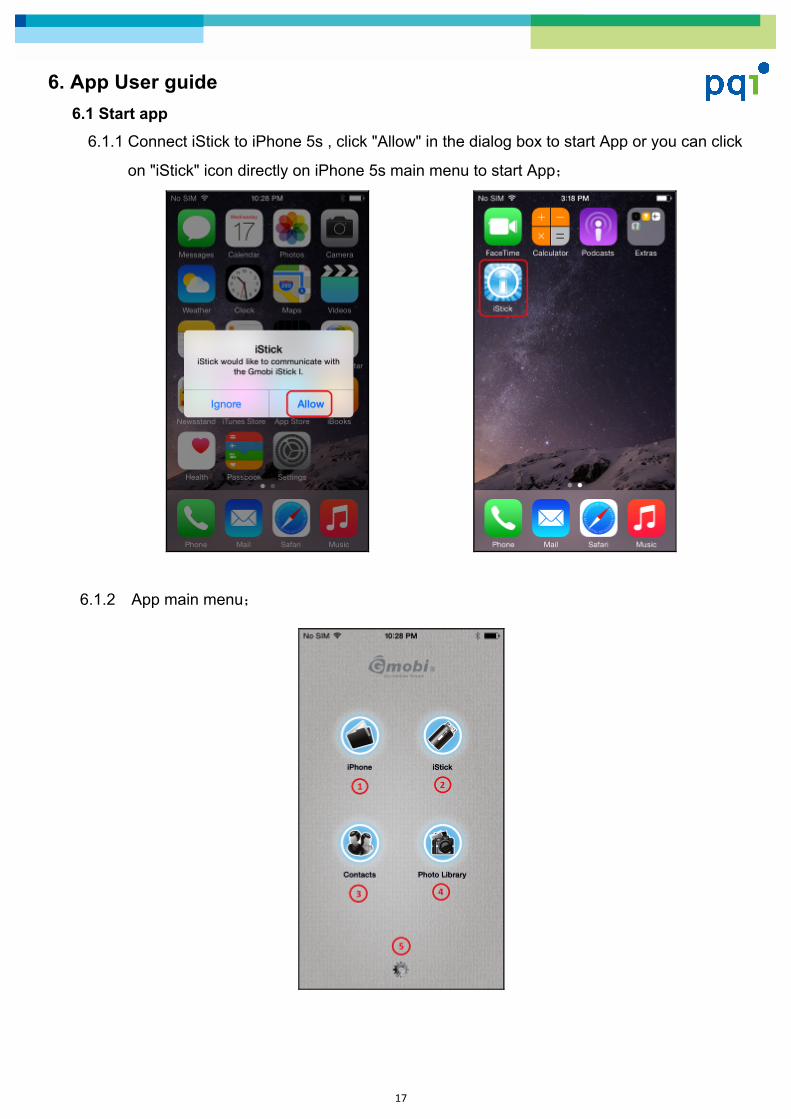
6.1 Start app 6.1.1 Connect iStick to iPhone 5s , click "Allow" in the dialog box to start App or you can click
on "iStick" icon directly on iPhone 5s main menu to start App;
6.1.2 App main menu;
18
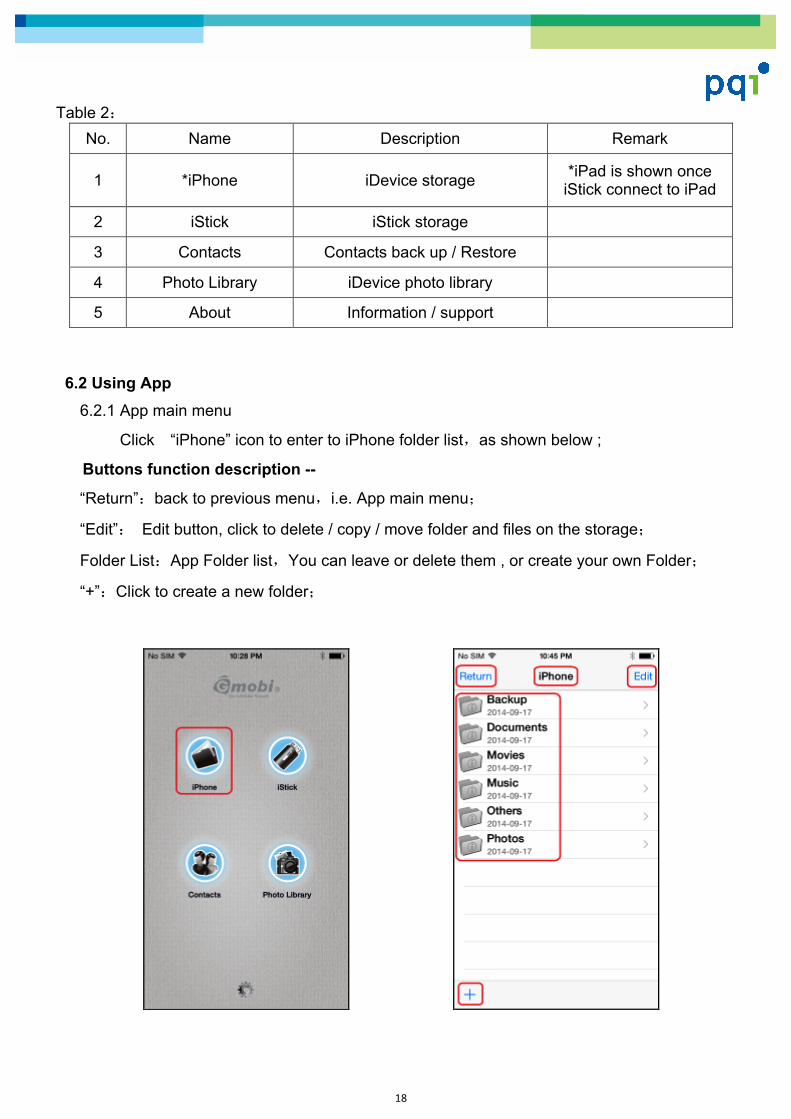
Table 2:
No. Name Description Remark
1 *iPhone iDevice storage *iPad is shown once iStick connect to iPad
2 iStick iStick storage
3 Contacts Contacts back up / Restore
4 Photo Library iDevice photo library
5 About Information / support
6.2 Using App
6.2.1 App main menu
Click “iPhone” icon to enter to iPhone folder list,as shown below ;
Buttons function description --
“Return”:back to previous menu,i.e. App main menu;
“Edit”: Edit button, click to delete / copy / move folder and files on the storage;
Folder List:App Folder list,You can leave or delete them , or create your own Folder;
“+”:Click to create a new folder;
19
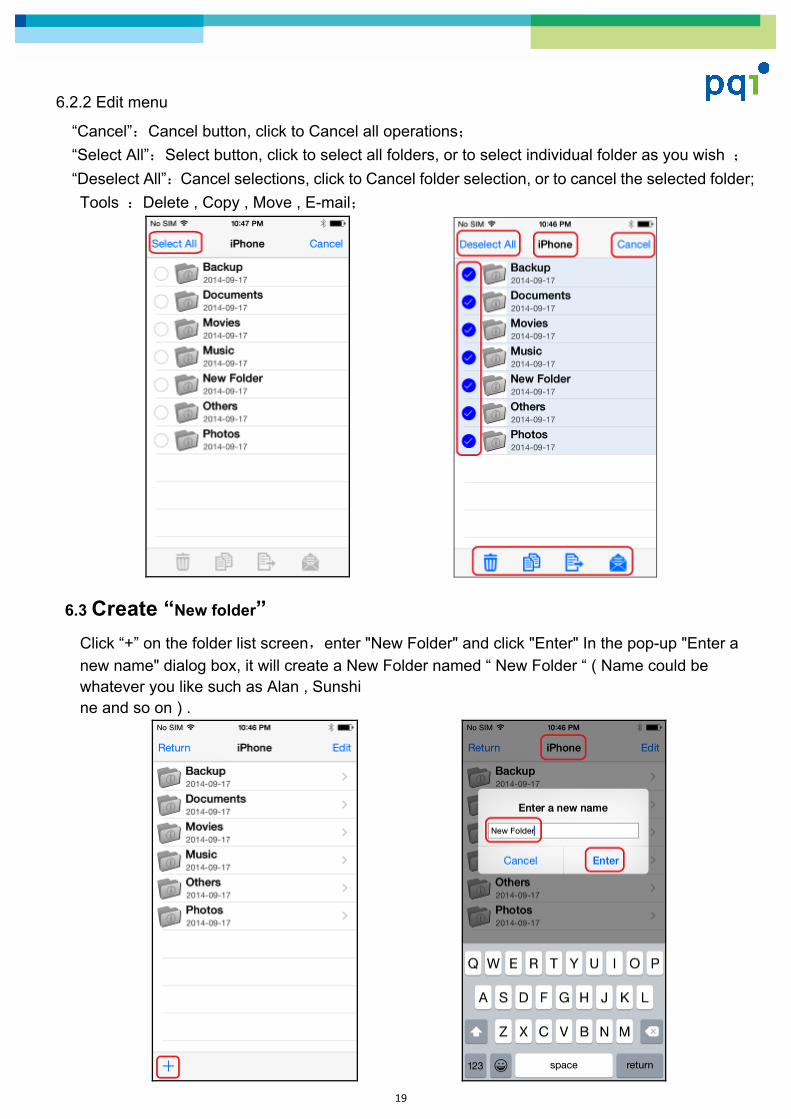
6.2.2 Edit menu
“Cancel”:Cancel button, click to Cancel all operations; “Select All”:Select button, click to select all folders, or to select individual folder as you wish ; “Deselect All”:Cancel selections, click to Cancel folder selection, or to cancel the selected folder; Tools :Delete , Copy , Move , E-mail;
6.3 Create “New folder” Click “+” on the folder list screen,enter "New Folder" and click "Enter" In the pop-up "Enter a new name" dialog box, it will create a New Folder named “ New Folder “ ( Name could be whatever you like such as Alan , Sunshi ne and so on ) .
20
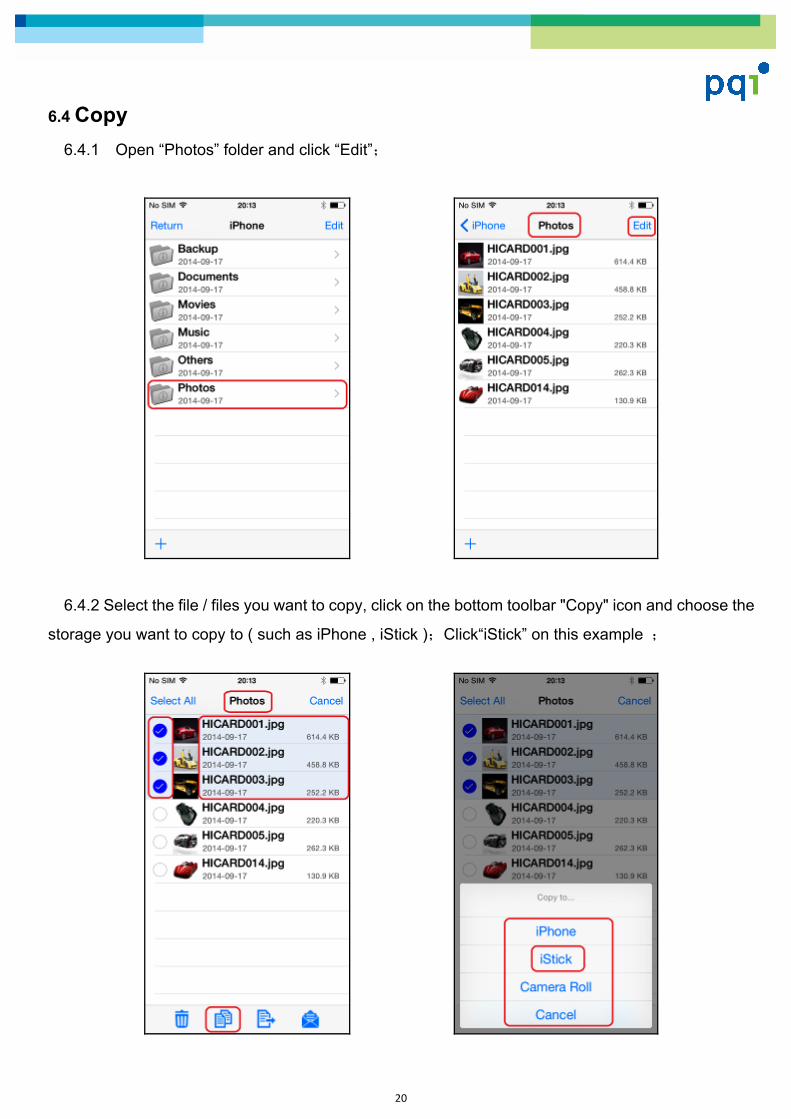
6.4 Copy
6.4.1 Open “Photos” folder and click “Edit”;
6.4.2 Select the file / files you want to copy, click on the bottom toolbar "Copy" icon and choose the
storage you want to copy to ( such as iPhone , iStick );Click“iStick” on this example ;
21
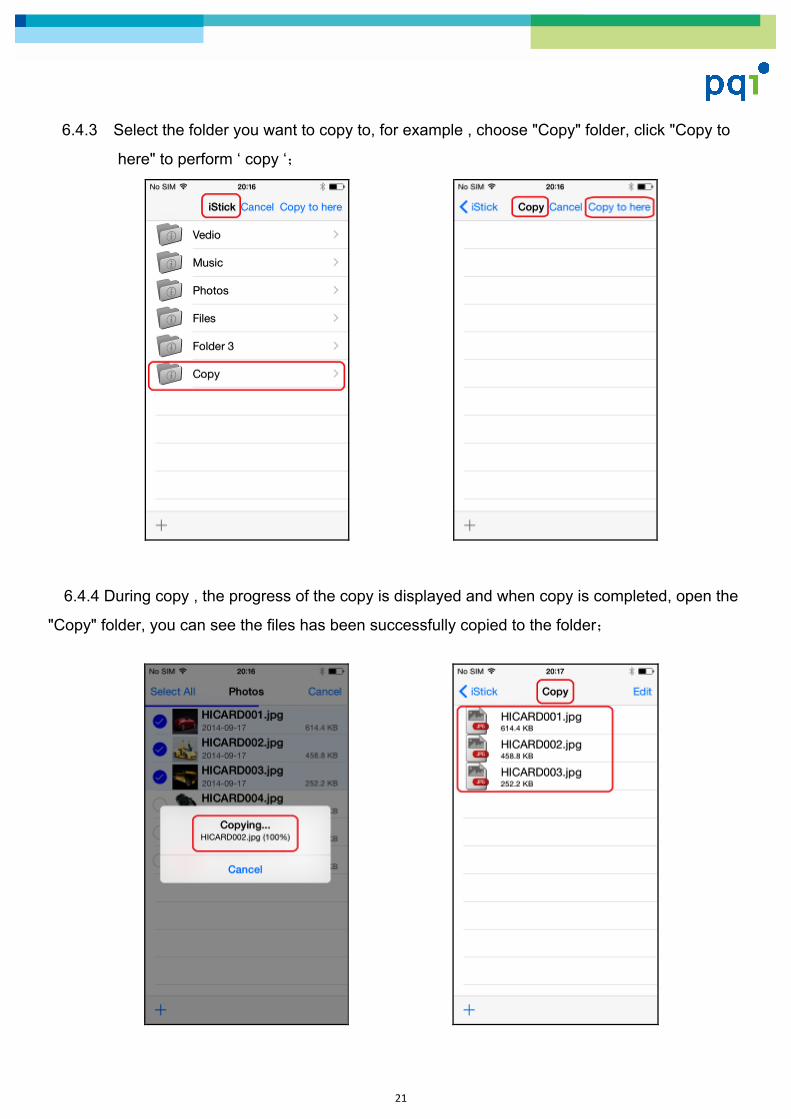
6.4.3 Select the folder you want to copy to, for example , choose "Copy" folder, click "Copy to
here" to perform ‘ copy ‘;
6.4.4 During copy , the progress of the copy is displayed and when copy is completed, open the
"Copy" folder, you can see the files has been successfully copied to the folder;
22
Note :
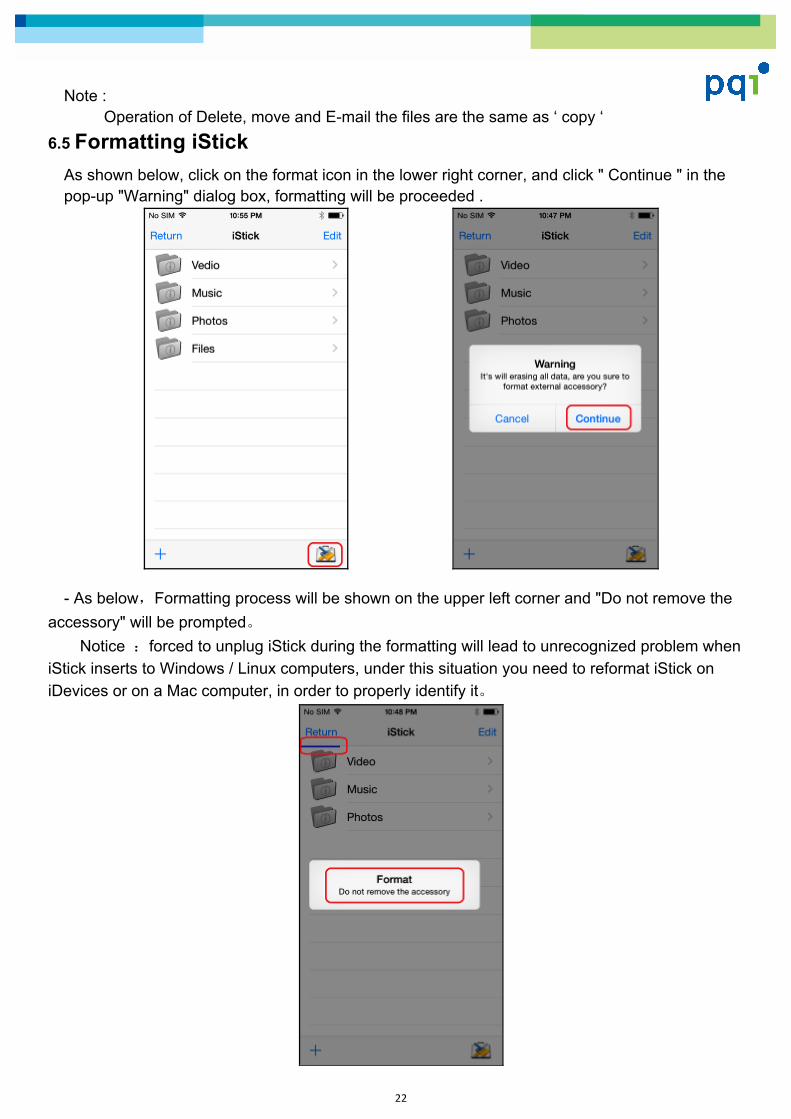
Operation of Delete, move and E-mail the files are the same as ‘ copy ‘ 6.5 Formatting iStick
As shown below, click on the format icon in the lower right corner, and click " Continue " in the pop-up "Warning" dialog box, formatting will be proceeded .
- As below,Formatting process will be shown on the upper left corner and "Do not remove the accessory" will be prompted。
Notice :forced to unplug iStick during the formatting will lead to unrecognized problem when iStick inserts to Windows / Linux computers, under this situation you need to reformat iStick on iDevices or on a Mac computer, in order to properly identify it。
23
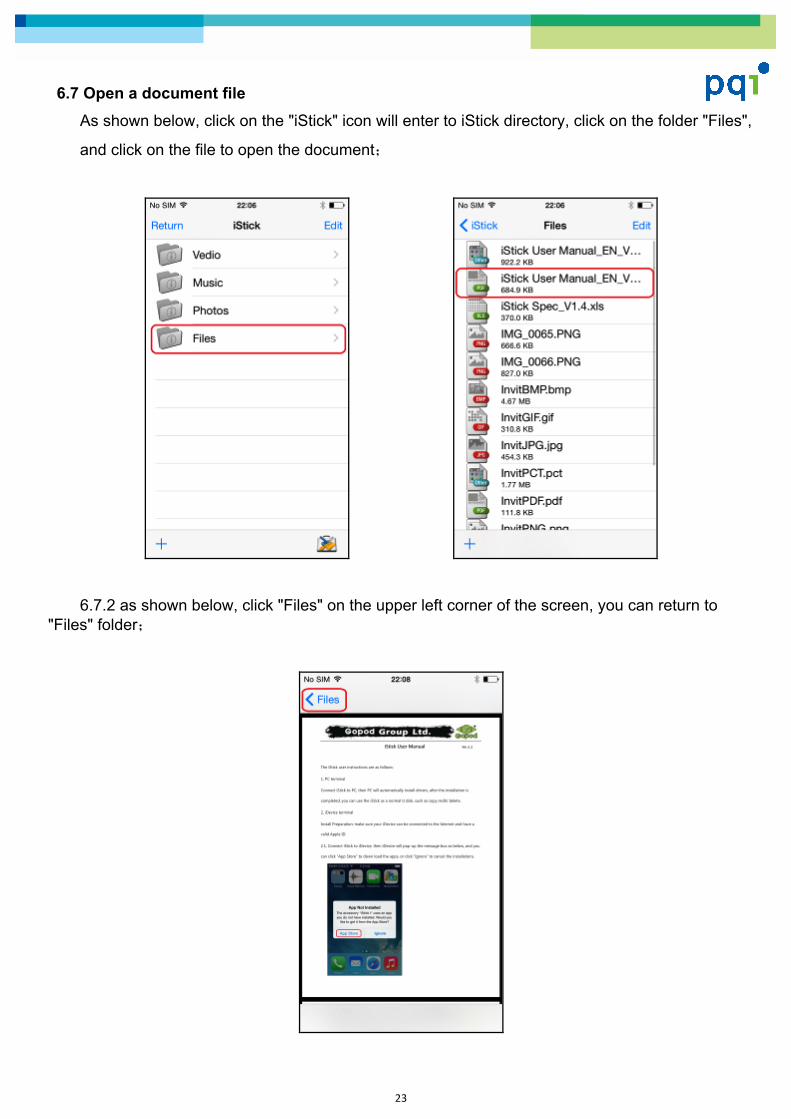
6.7 Open a document file
As shown below, click on the "iStick" icon will enter to iStick directory, click on the folder "Files",
and click on the file to open the document;
6.7.2 as shown below, click "Files" on the upper left corner of the screen, you can return to "Files" folder;
24
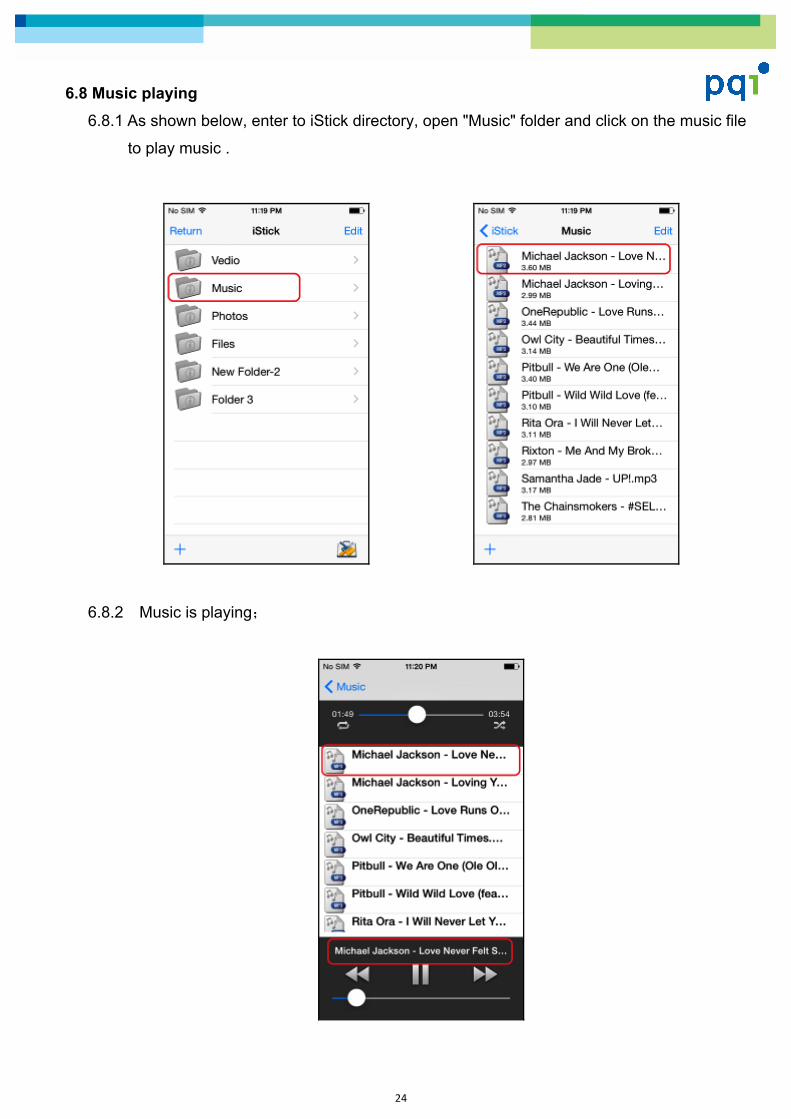
6.8 Music playing
6.8.1 As shown below, enter to iStick directory, open "Music" folder and click on the music file
to play music .
6.8.2 Music is playing;
25
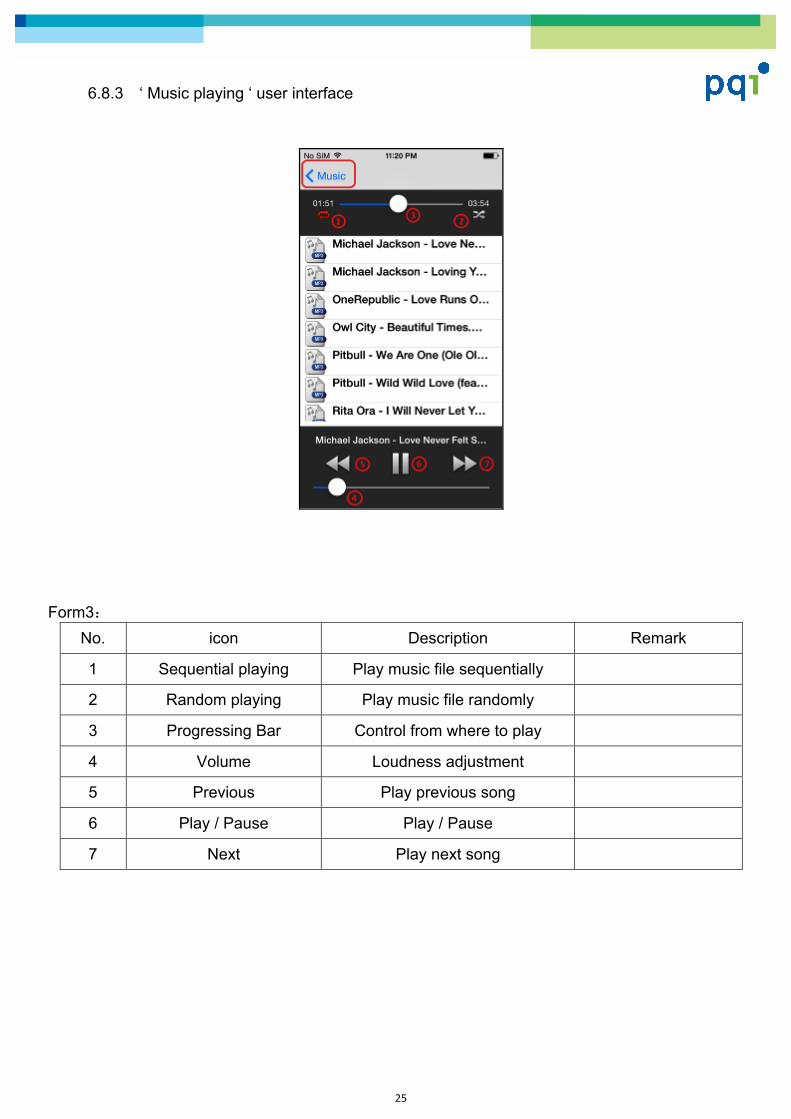
6.8.3 ‘ Music playing ‘ user interface
Form3:
No. icon Description Remark
1 Sequential playing Play music file sequentially
2 Random playing Play music file randomly
3 Progressing Bar Control from where to play
4 Volume Loudness adjustment
5 Previous Play previous song
6 Play / Pause Play / Pause
7 Next Play next song
26
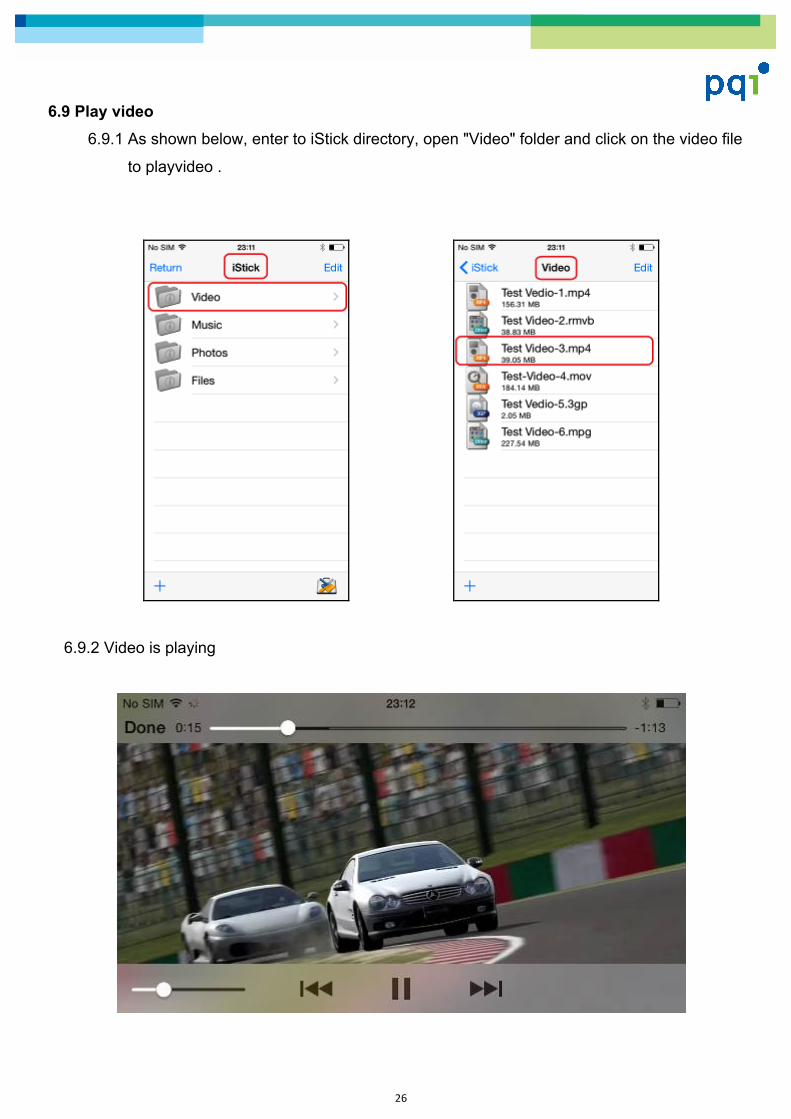
6.9 Play video
6.9.1 As shown below, enter to iStick directory, open "Video" folder and click on the video file
to playvideo .
6.9.2 Video is playing
27
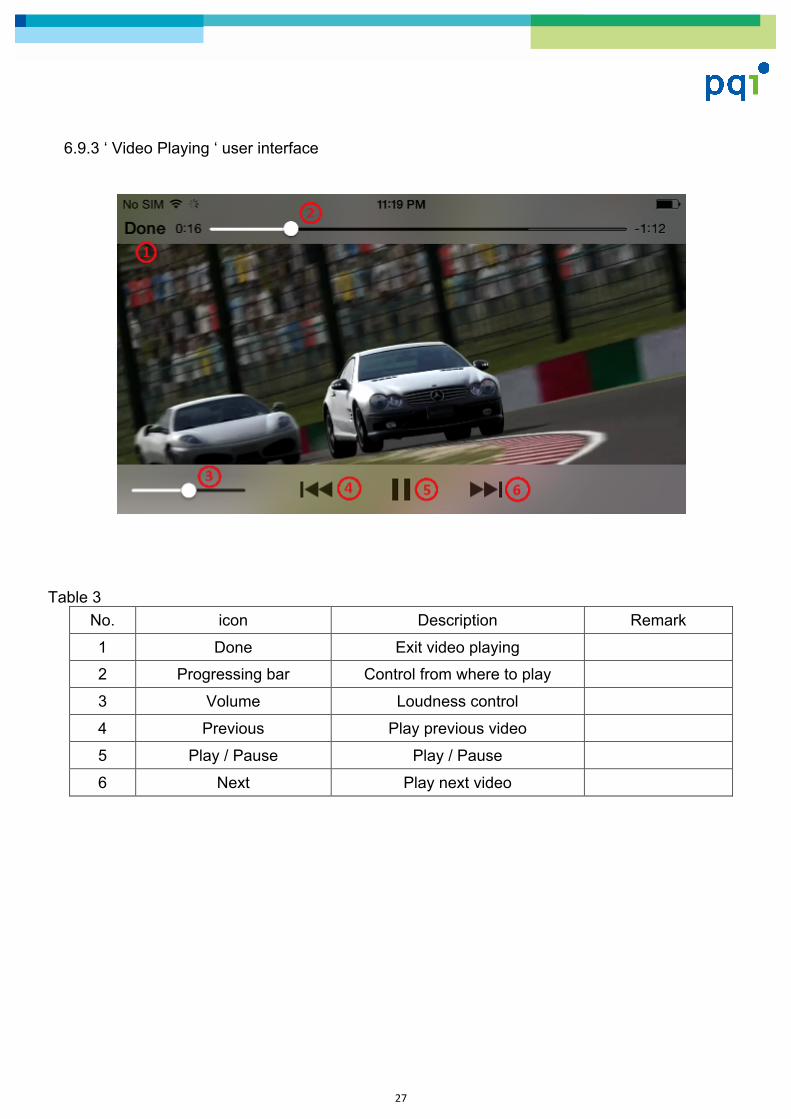
6.9.3 ‘ Video Playing ‘ user interface
Table 3
No. icon Description Remark
1 Done Exit video playing
2 Progressing bar Control from where to play
3 Volume Loudness control
4 Previous Play previous video
5 Play / Pause Play / Pause
6 Next Play next video
28
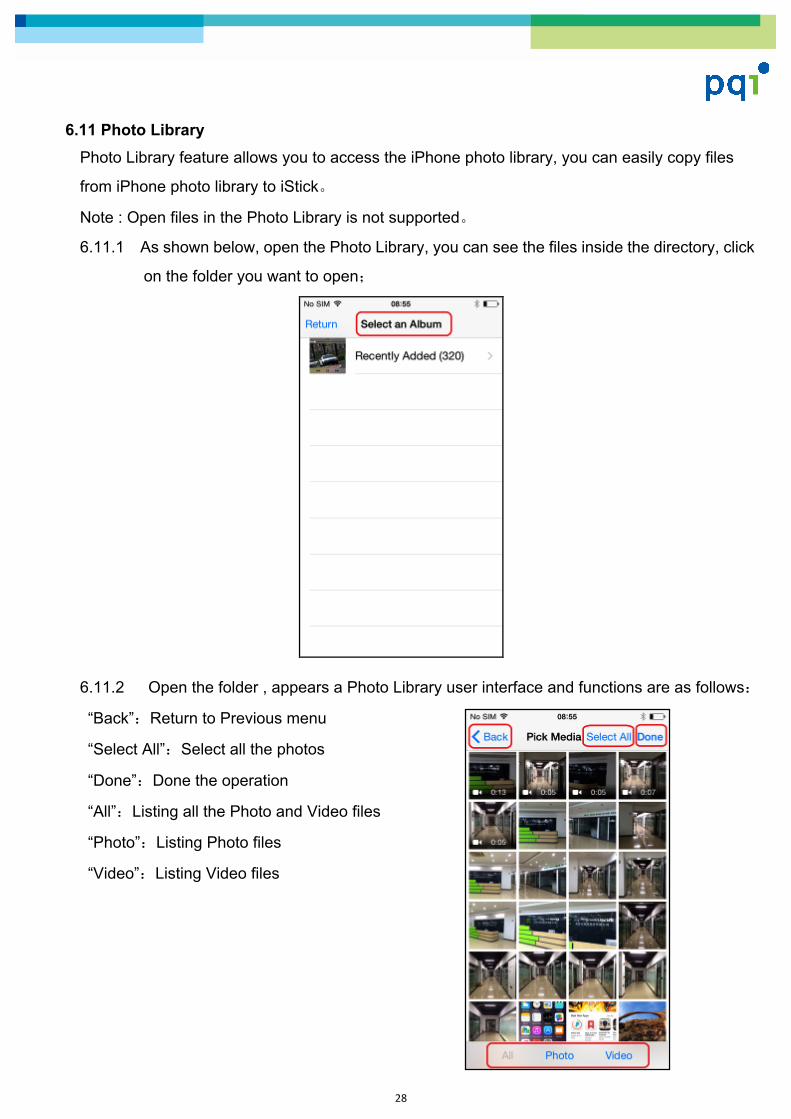
6.11 Photo Library Photo Library feature allows you to access the iPhone photo library, you can easily copy files
from iPhone photo library to iStick。
Note : Open files in the Photo Library is not supported。
6.11.1 As shown below, open the Photo Library, you can see the files inside the directory, click
on the folder you want to open;
6.11.2 Open the folder , appears a Photo Library user interface and functions are as follows:
“Back”:Return to Previous menu
“Select All”:Select all the photos
“Done”:Done the operation
“All”:Listing all the Photo and Video files
“Photo”:Listing Photo files
“Video”:Listing Video files
29
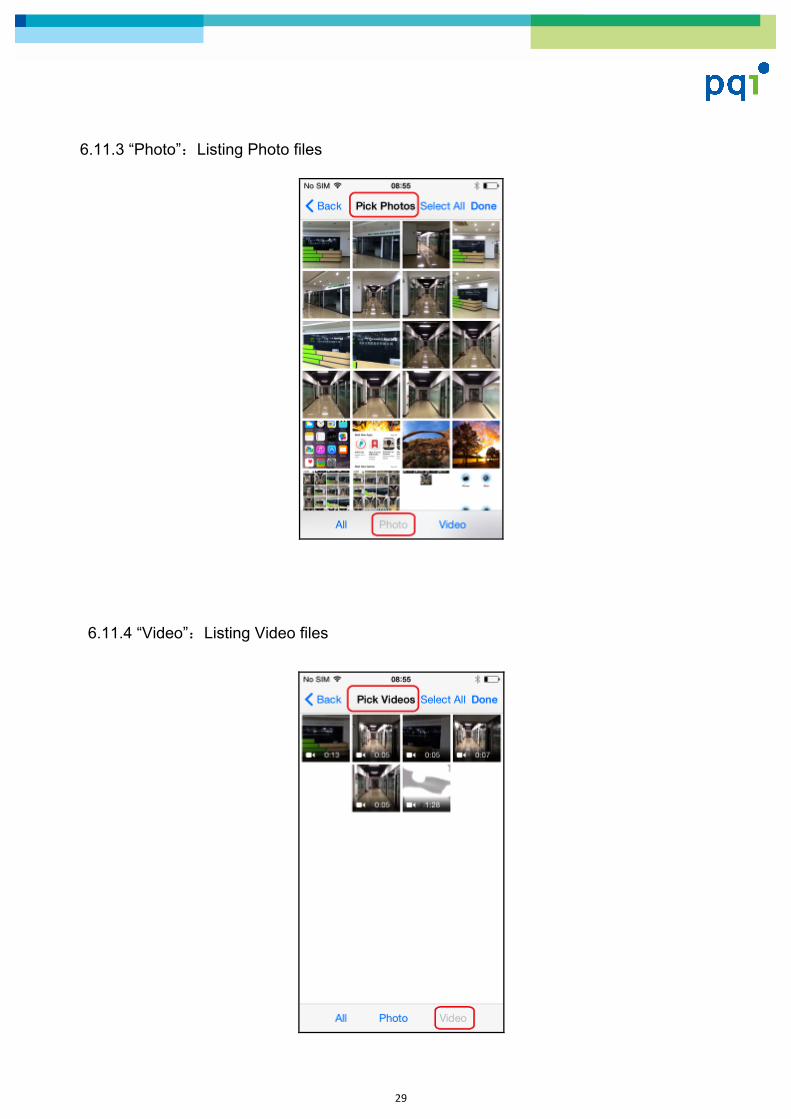
6.11.3 “Photo”:Listing Photo files
6.11.4 “Video”:Listing Video files
30
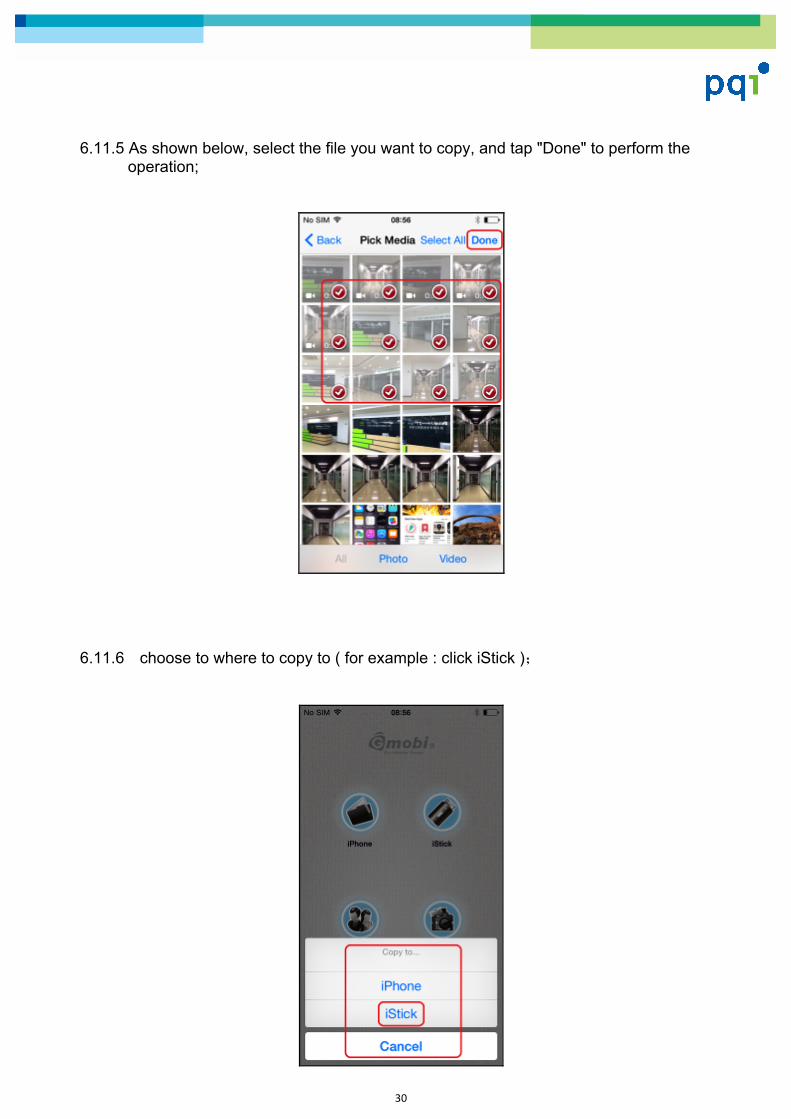
6.11.5 As shown below, select the file you want to copy, and tap "Done" to perform the operation;
6.11.6 choose to where to copy to ( for example : click iStick );
31
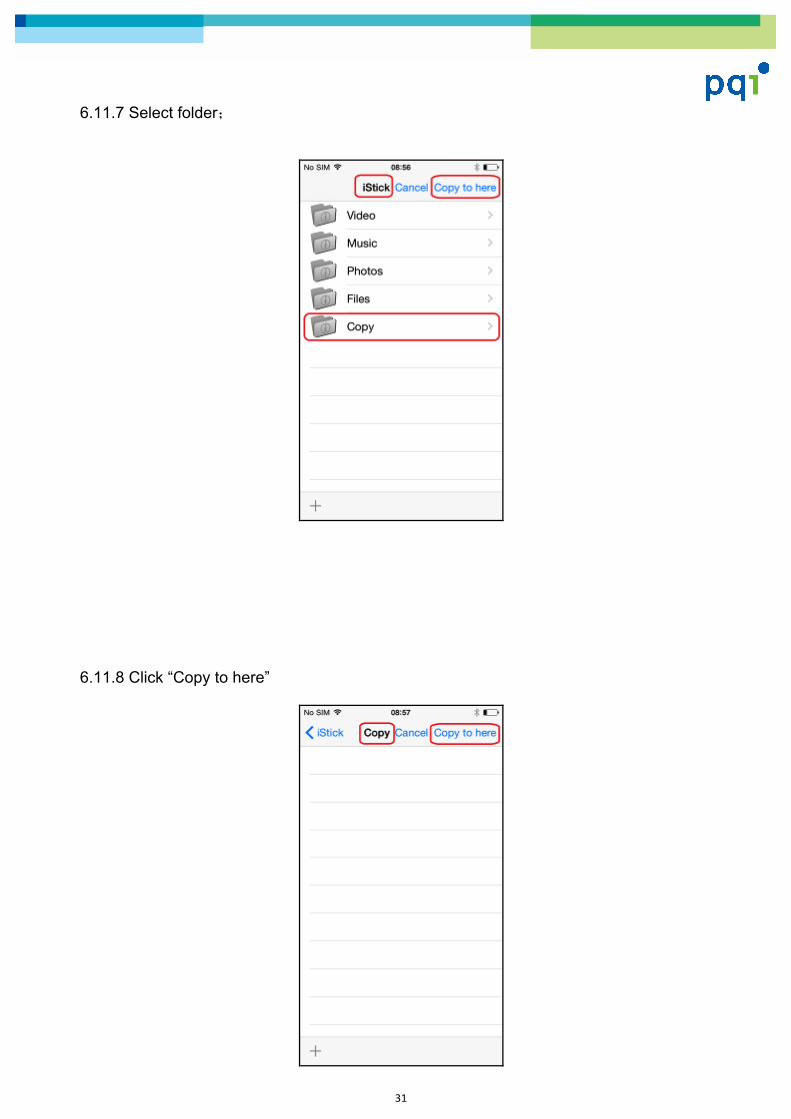
6.11.7 Select folder;
6.11.8 Click “Copy to here”
32
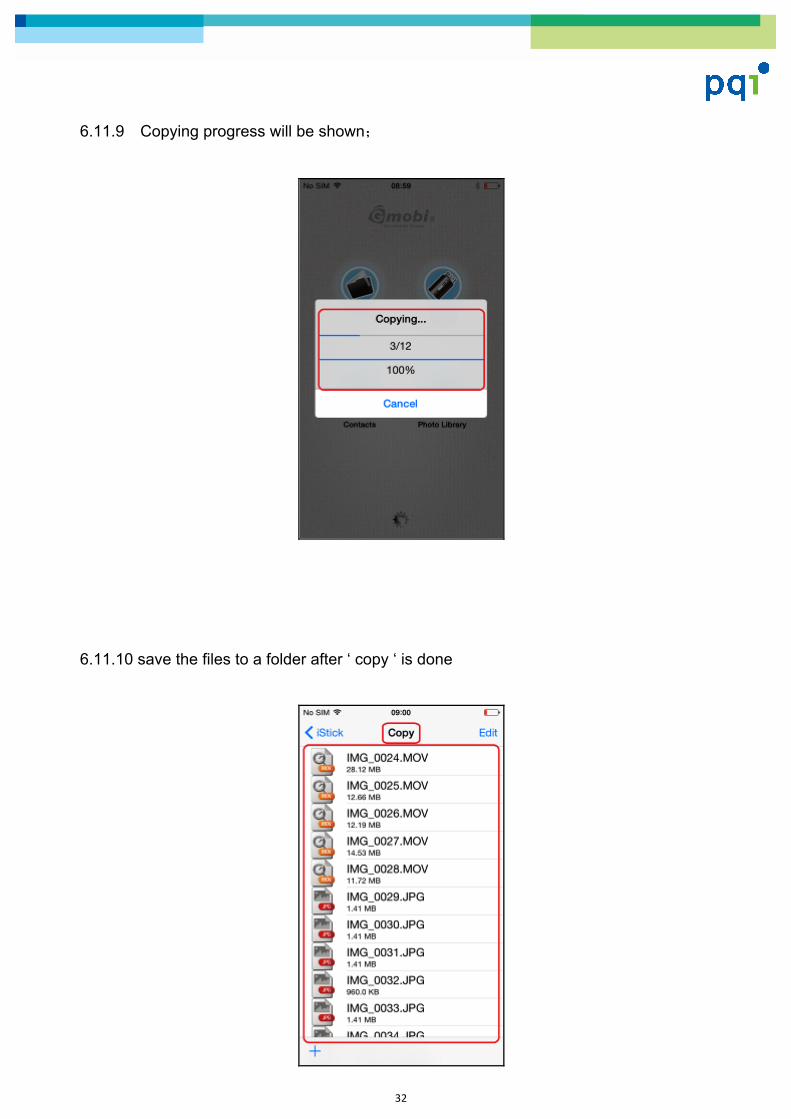
6.11.9 Copying progress will be shown;
6.11.10 save the files to a folder after ‘ copy ‘ is done
33
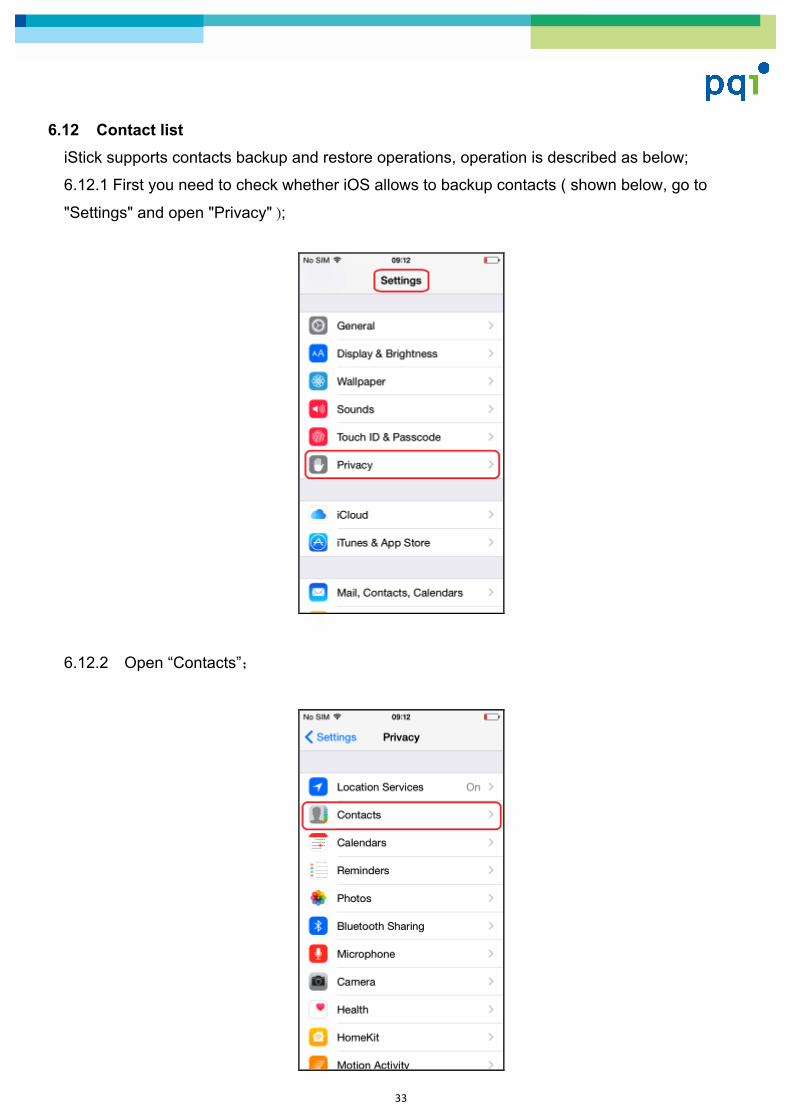
6.12 Contact list
iStick supports contacts backup and restore operations, operation is described as below;
6.12.1 First you need to check whether iOS allows to backup contacts ( shown below, go to
"Settings" and open "Privacy" );
6.12.2 Open “Contacts”;
34
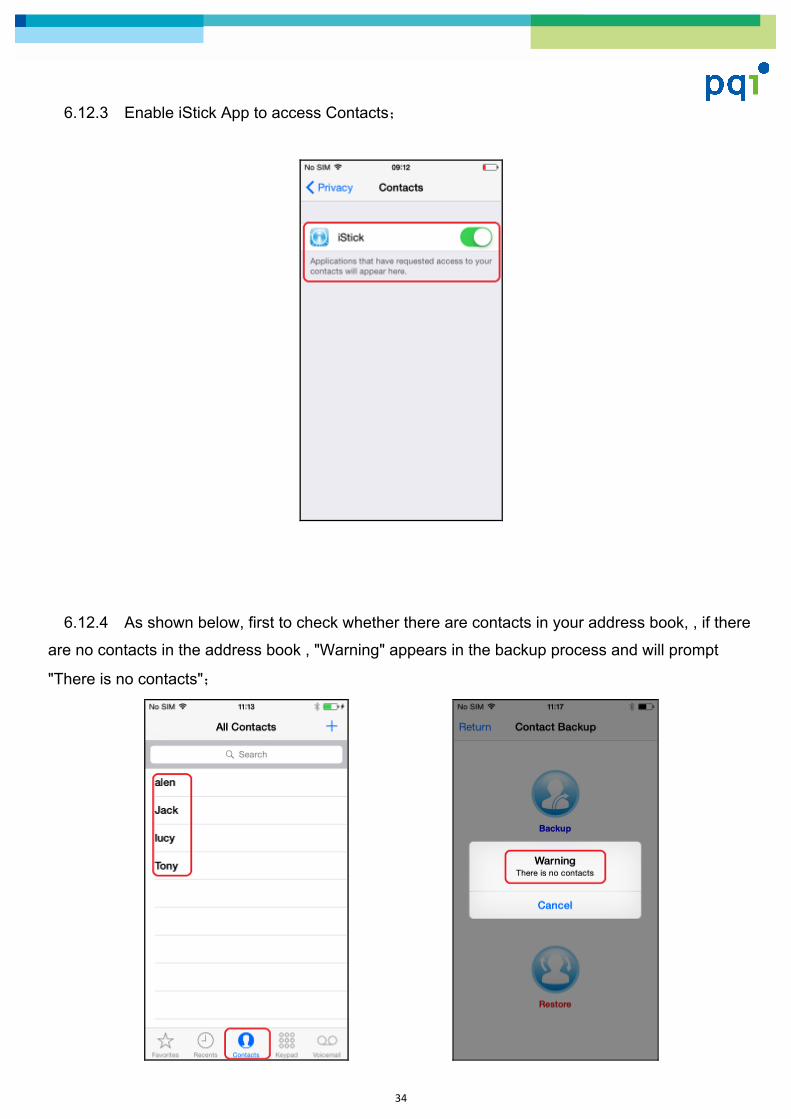
6.12.3 Enable iStick App to access Contacts;
6.12.4 As shown below, first to check whether there are contacts in your address book, , if there
are no contacts in the address book , "Warning" appears in the backup process and will prompt
"There is no contacts";
35
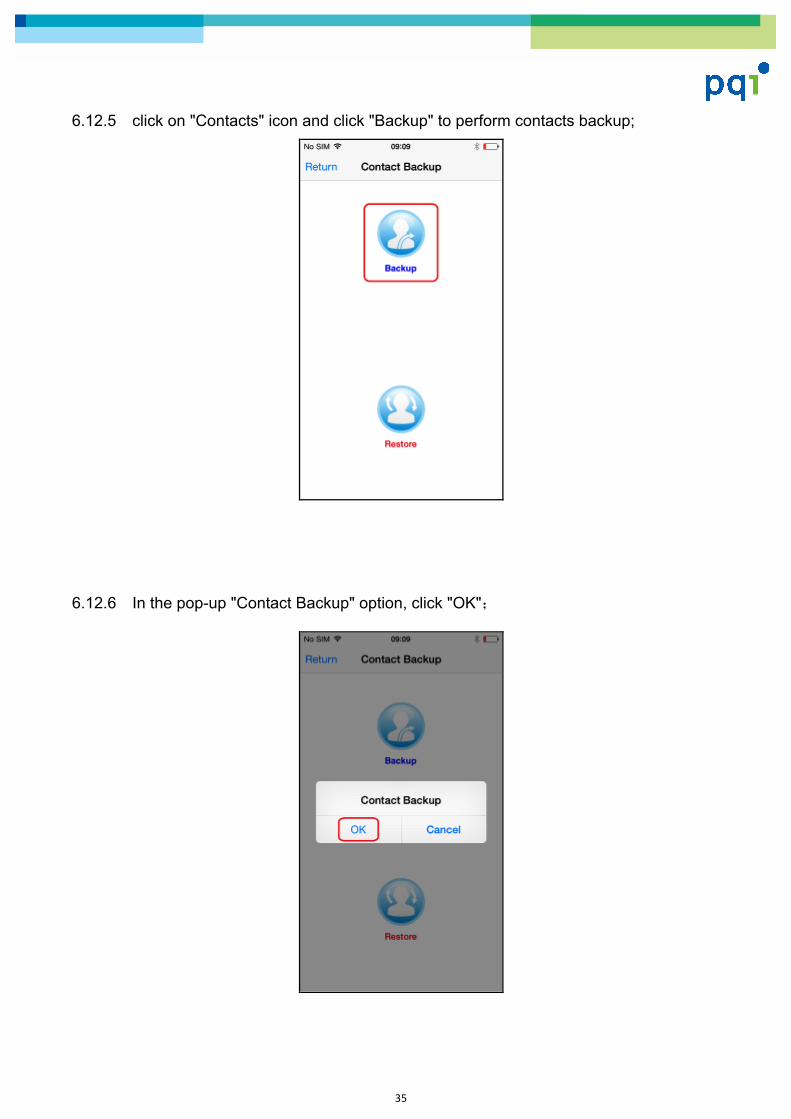
6.12.5 click on "Contacts" icon and click "Backup" to perform contacts backup;
6.12.6 In the pop-up "Contact Backup" option, click "OK";
36
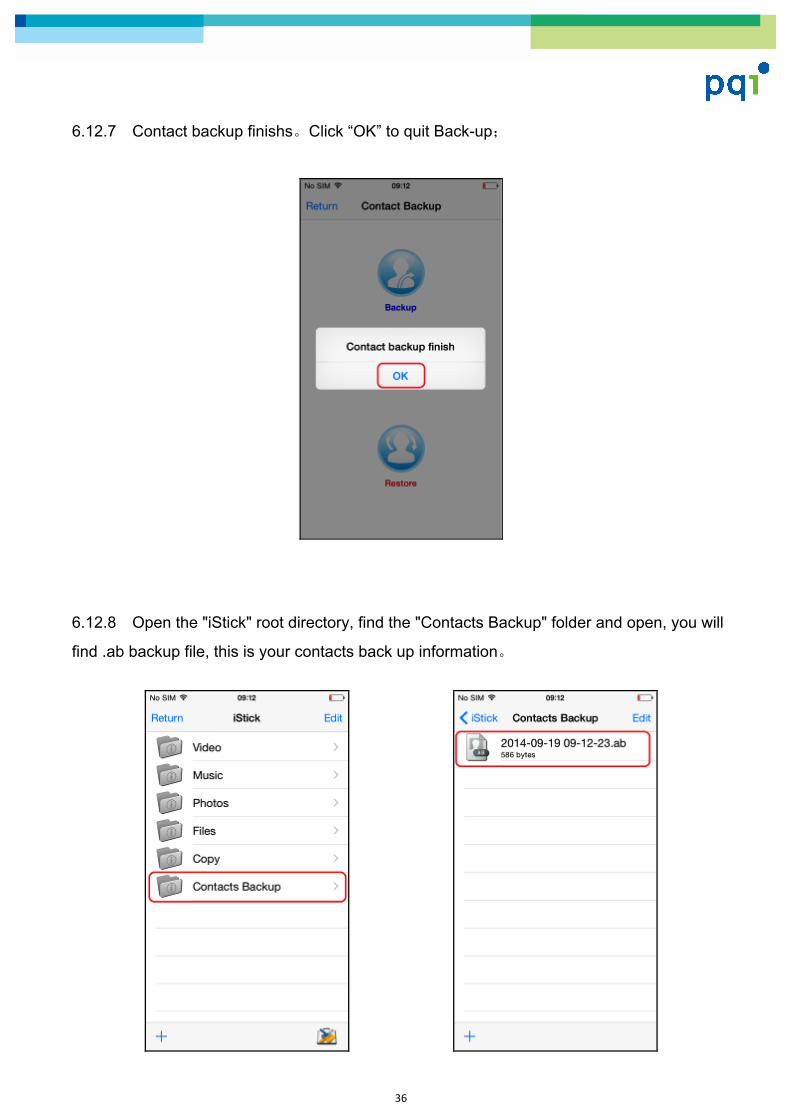
6.12.7 Contact backup finishs。Click “OK” to quit Back-up;
6.12.8 Open the "iStick" root directory, find the "Contacts Backup" folder and open, you will
find .ab backup file, this is your contacts back up information。
37
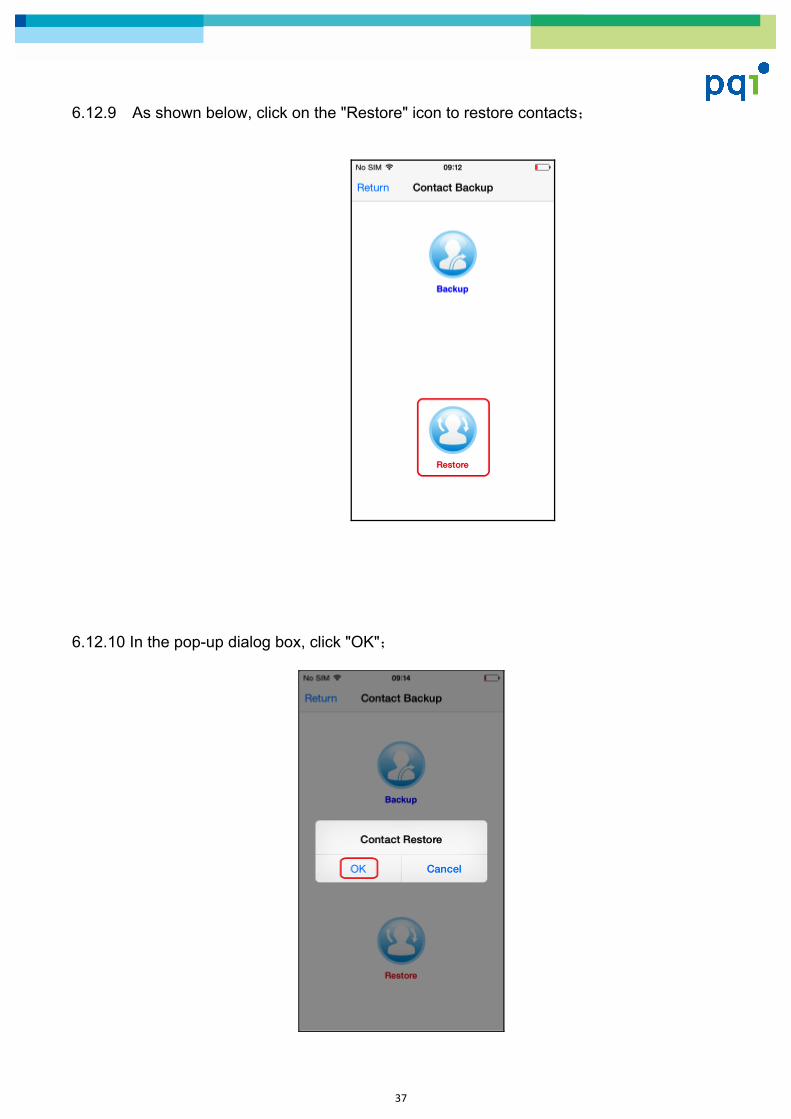
6.12.9 As shown below, click on the "Restore" icon to restore contacts;
6.12.10 In the pop-up dialog box, click "OK";
38
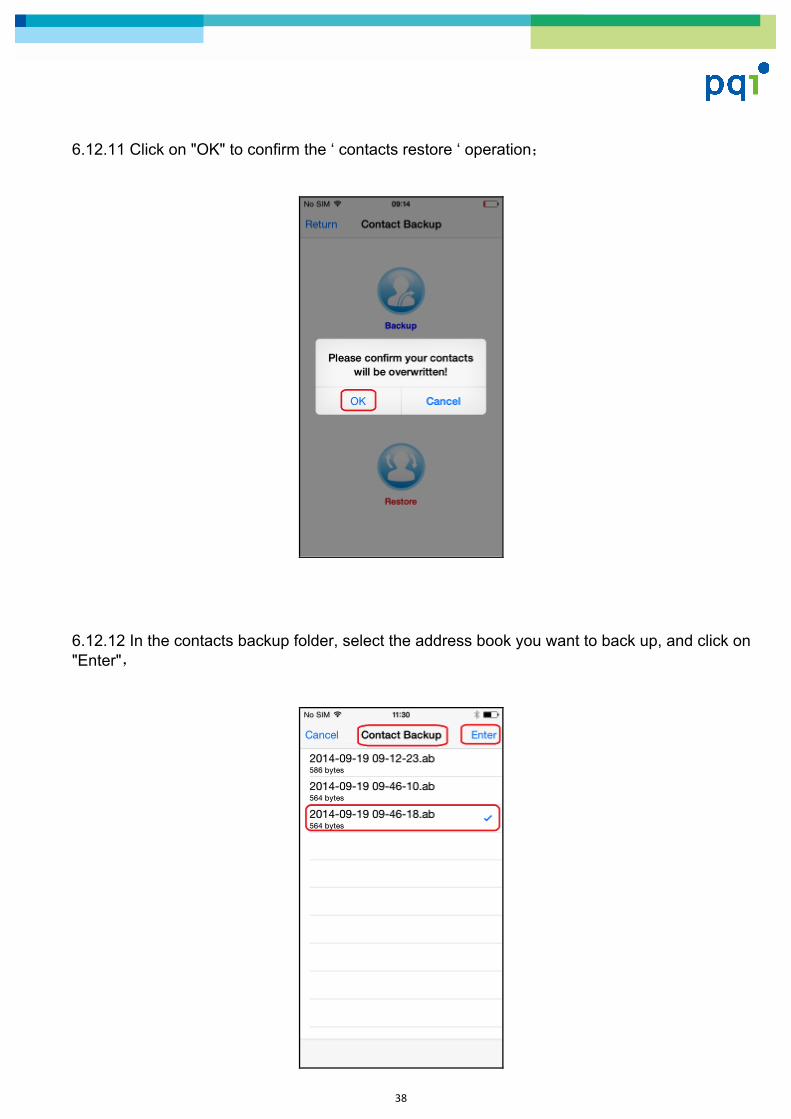
6.12.11 Click on "OK" to confirm the ‘ contacts restore ‘ operation;
6.12.12 In the contacts backup folder, select the address book you want to back up, and click on "Enter",
39
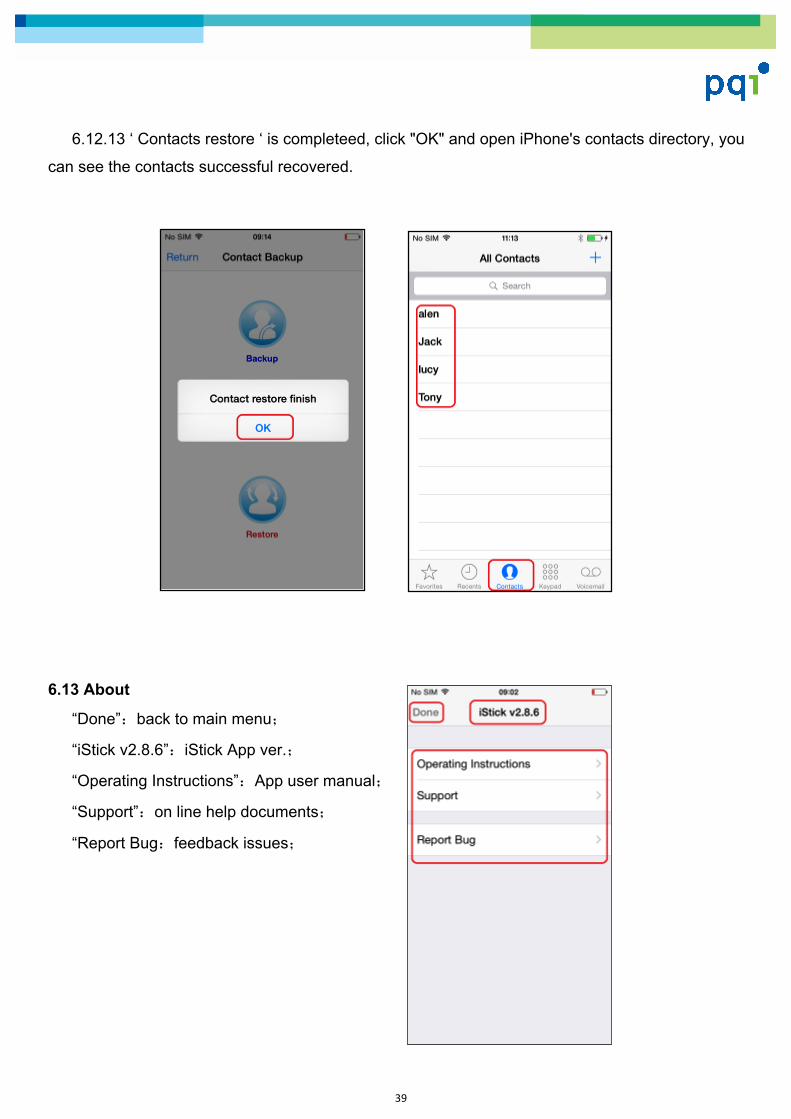
6.12.13 ‘ Contacts restore ‘ is completeed, click "OK" and open iPhone's contacts directory, you
can see the contacts successful recovered.
6.13 About
“Done”:back to main menu;
“iStick v2.8.6”:iStick App ver.;
“Operating Instructions”:App user manual;
“Support”:on line help documents;
“Report Bug:feedback issues;


![Advanced Manual Get started using your camera right away. · button to select [D]. f. Press the 3# button. g. Press the 1F button and the 2Y button to select the hours and minutes.](https://static.fdocuments.in/doc/165x107/5f5c90b6927c1615a83d33d3/advanced-manual-get-started-using-your-camera-right-away-button-to-select-d.jpg)