
isCOBOL Evolve - veryant · jQuery Mobile or Dojo Mobile or Sencha Touch The COBOL program have to...
22
isCOBOL Evolve isCOBOL Mobile for Android Veryant 4241 Orange River Loop Road Fort Myers, FL 33905 http://www.veryant.com
-
Upload
nguyentuong -
Category
Documents
-
view
214 -
download
0
Transcript of isCOBOL Evolve - veryant · jQuery Mobile or Dojo Mobile or Sencha Touch The COBOL program have to...

isCOBOL EvolveisCOBOL Mobile for Android
Veryant4241 Orange River Loop RoadFort Myers, FL 33905
http://www.veryant.com

Copyrights
Copyright (c) 2013 Veryant4241 Orange River Loop Road, Fort Myers, FL 33905
All rights reserved.
This product or document is protected by copyright and distributed under licenses restricting its use, copying,distribution and recompilation. No part of this product or document may be reproduced in any form by anymeans without prior written authorization of Veryant and its licensors, if any.
Introduction
isCOBOL 2013 R1 introduces the new product isCOBOL Mobile that allows to bring COBOL code on mobile devices. The goal is to reuse the existing backend COBOL logic as well as sequential, relative and indexed files (in JIsam format) on a mobile application while the UI is rewritten using a HTML5/CSS3 UI Framework such as jQuery Mobile or Dojo Mobile or Sencha Touch
The COBOL program have to be transormed in a WebService REST stateful. This objective is achieved through a new internal class that allows to communicate with HTML pages through AJAX retrieving data and printing results.
The UI is rendered on mobile devices using the WebView component available on Android ADT while the COBOL logic runs locally on the device thanks to the new Framework library provided along with isCOBOL Mobile. Such library is compatible for Android version 3.0 or greater and also allows to interact with API functions of your mobile devices such as Phone Book, Memo, etc.
This book will guide you in building your first Android app using isCOBOL IDE.
In the shown example we take advantage of JQuery Mobile for the UI. You can find documentation about JQuery Mobile at http://view.jquerymobile.com/1.3.0/.
Preliminary stepsVeryant supports the development of an Android application through their Eclipse based IDE. In order to develop your first isCOBOL Android application, you need the following items:
• a Java JDK version 1.5 or greater
• isCOBOL IDE version 2012 or greater
• Android SDK for Eclipse
If you don’t have Java on your Windows, download the latest JDK from http://www.oracle.com/technetwork/java/javase/downloads/index.html.
The latest isCOBOL IDE setup can be found at http://www.veryant.com/support/signedin/software.php.
In order to download the Android SDK, navigate to http://developer.android.com/sdk/index.html and choose USE AN EXISTING IDE, accept the license agreement and proceed with the download.
The installation wizard asks for the products to install. Keep the default choice:
isCOBOL Evolve 2013 R1: isCOBOL Mobile 1
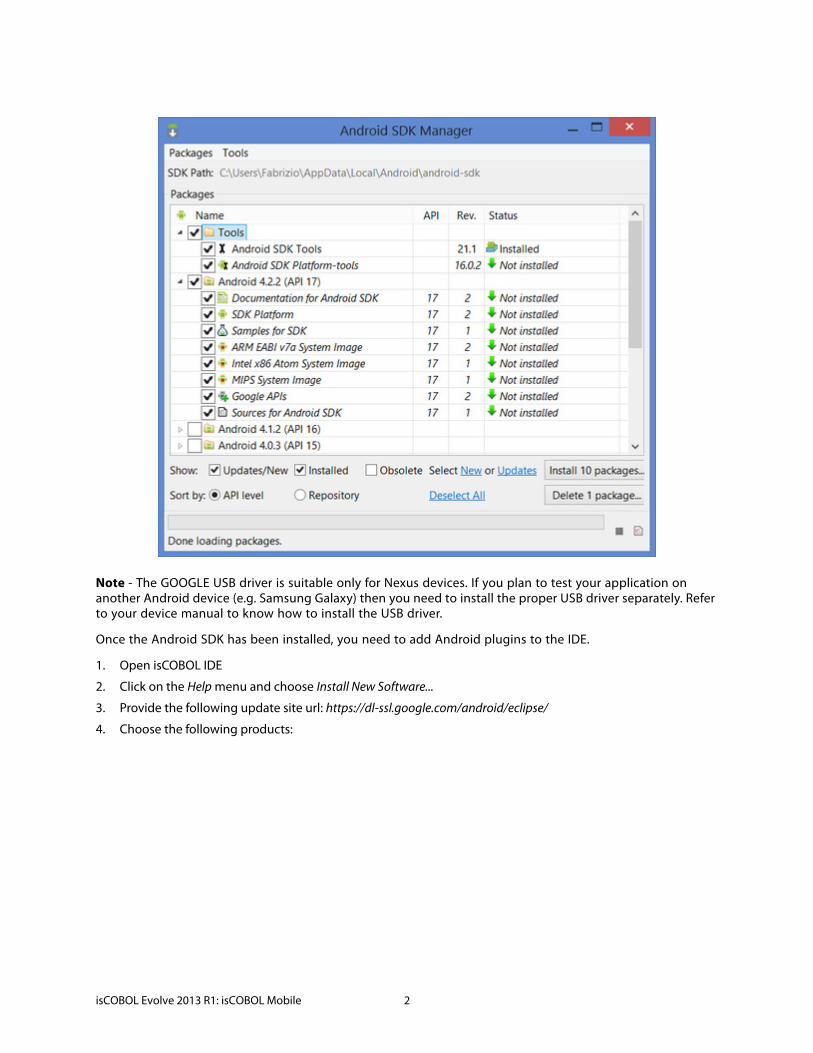
Note - The GOOGLE USB driver is suitable only for Nexus devices. If you plan to test your application on another Android device (e.g. Samsung Galaxy) then you need to install the proper USB driver separately. Refer to your device manual to know how to install the USB driver.
Once the Android SDK has been installed, you need to add Android plugins to the IDE.
1. Open isCOBOL IDE
2. Click on the Help menu and choose Install New Software...
3. Provide the following update site url: https://dl-ssl.google.com/android/eclipse/
4. Choose the following products:
isCOBOL Evolve 2013 R1: isCOBOL Mobile 2

Note - You might be prompted with a security warning about the plugin you’re going to install. Ignore it and complete the installation.
You’re now ready to develop Android applications.
Development of a simple Android ApplicationIn order to create an Android application we’ll use three different projects
1. An isCOBOL project to maintain the backend COBOL code
2. An HTML/JavaScript project to maintain the application user interface
3. An Android project to merge the output of the other two project and produce the app
Building the COBOL program
1. Switch to the File view in the isCOBOL Explorer
2. Click on the File menu
3. Choose New
isCOBOL Evolve 2013 R1: isCOBOL Mobile 3

4. Choose isCOBOL Project
5. Give it the name "simple_COBOL"
Note - currently there are known problems in running programs with debug information within Android. Veryant is working to fix these problems, but until they’re fixed, compile without debug.
6. Click on the Next button until you reach the page where you can set Compiler/Runtime options
7. Switch the "Current Mode:" value from Debug to Release
8. If you’re working with JDK 1.7, switch to the "J" page below and fill the "-jo=" field as follows
9. Click on the OK button to confirm settings
10. Right click on the source folder and choose New
11. Choose Source File
12. Give it the name "hello.cbl" and click on the Finish button.
13. Put the following code into the program and compile it
Note - the above COBOL source takes advantage of one of the new methods provided by the internal class com.iscobol.rts.HTTPHandler. These methods allows to send and retrieve data to and from the HTML interface explained later. In this case, displayXML() is used in order to send the hello world string to the HTML page. Refer to Veryant javadoc for details about these new methods.
"-source 1.6 -target 1.6"
PROGRAM-ID. hello. CONFIGURATION SECTION. REPOSITORY. class web-area as "com.iscobol.rts.HTTPHandler" . WORKING-STORAGE SECTION. 01 hello-buffer identified by "_comm_buffer". 03 filler identified by "_status". 05 response-status pic x(2). 03 filler identified by "_message". 05 response-message pic x any length. 03 filler identified by "hellotext". 05 xml-hellotext pic x any length.
LINKAGE SECTION. 01 lnk-area object reference web-area. PROCEDURE DIVISION using lnk-area. main-logic. move "Operation successful" to response-message. move "OK" to response-status. move "Hello World from isCOBOL!" to xml-hellotext. lnk-area:>displayXML (hello-buffer). goback.
isCOBOL Evolve 2013 R1: isCOBOL Mobile 4
Once HELLO.class has been created in the project output folder, you need to include it in a jar to use it in the future steps.
1. Open a command prompt
2. Change to the project output folder
3. Run the command:
Building the HTML interface
1. Click on the File menu
2. Choose New
3. Choose Other..
4. Choose Web > Dynamic Web Project
5. Give it the name "simple_HTML"
6. Click on the Finish button
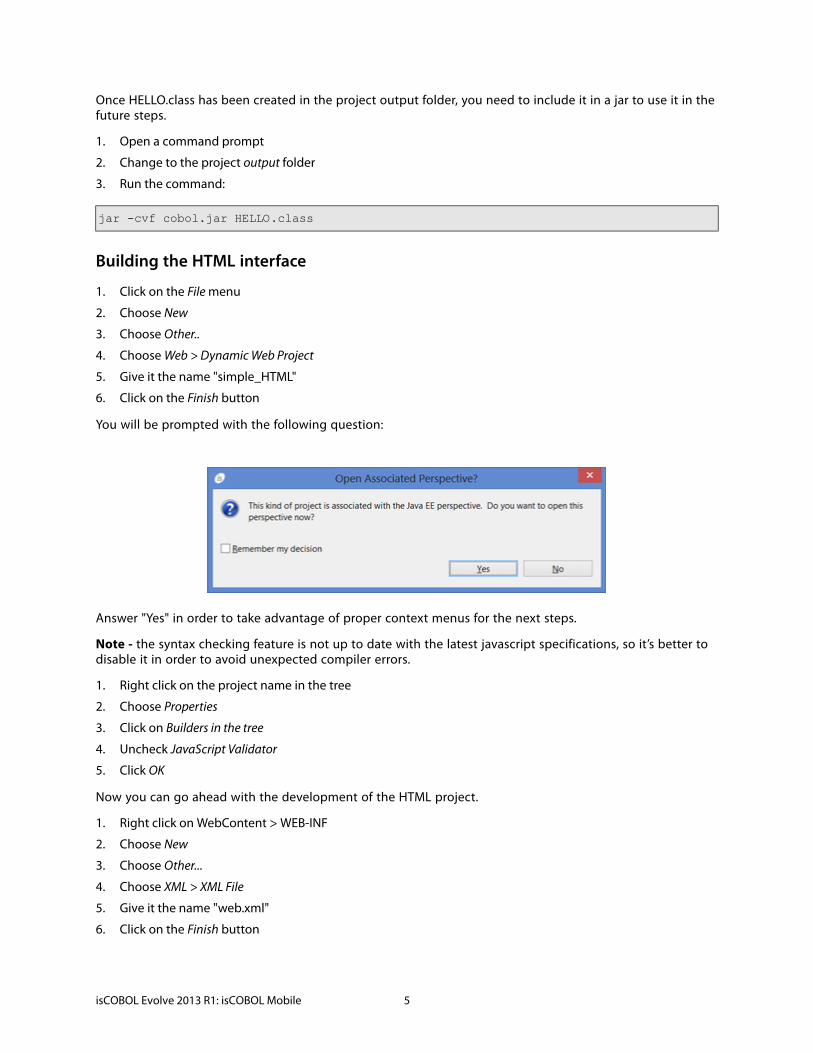
You will be prompted with the following question:
Answer "Yes" in order to take advantage of proper context menus for the next steps.
Note - the syntax checking feature is not up to date with the latest javascript specifications, so it’s better to disable it in order to avoid unexpected compiler errors.
1. Right click on the project name in the tree
2. Choose Properties
3. Click on Builders in the tree
4. Uncheck JavaScript Validator
5. Click OK
Now you can go ahead with the development of the HTML project.
1. Right click on WebContent > WEB-INF
2. Choose New
3. Choose Other...
4. Choose XML > XML File
5. Give it the name "web.xml"
6. Click on the Finish button
jar -cvf cobol.jar HELLO.class
isCOBOL Evolve 2013 R1: isCOBOL Mobile 5
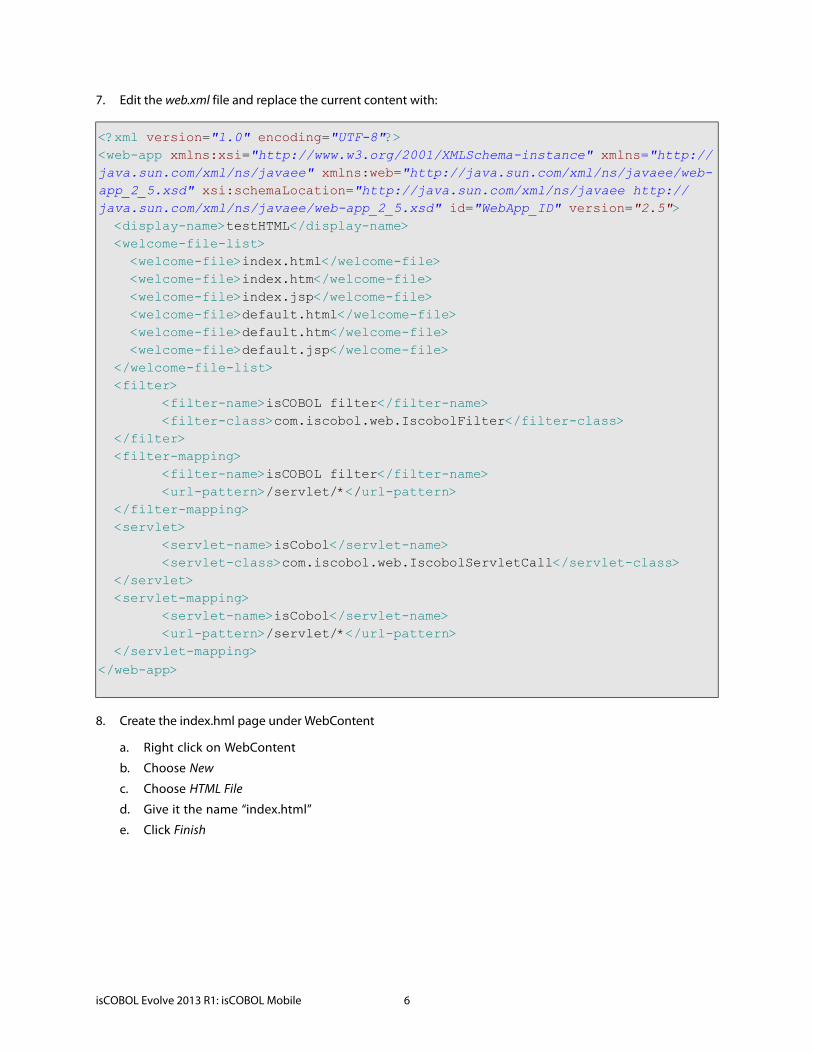
7. Edit the web.xml file and replace the current content with:
8. Create the index.hml page under WebContent
a. Right click on WebContent
b. Choose New
c. Choose HTML File
d. Give it the name “index.html”
e. Click Finish
<?xml version="1.0" encoding="UTF-8"?><web-app xmlns:xsi="http://www.w3.org/2001/XMLSchema-instance" xmlns="http://java.sun.com/xml/ns/javaee" xmlns:web="http://java.sun.com/xml/ns/javaee/web-app_2_5.xsd" xsi:schemaLocation="http://java.sun.com/xml/ns/javaee http://java.sun.com/xml/ns/javaee/web-app_2_5.xsd" id="WebApp_ID" version="2.5"> <display-name>testHTML</display-name> <welcome-file-list> <welcome-file>index.html</welcome-file> <welcome-file>index.htm</welcome-file> <welcome-file>index.jsp</welcome-file> <welcome-file>default.html</welcome-file> <welcome-file>default.htm</welcome-file> <welcome-file>default.jsp</welcome-file> </welcome-file-list> <filter> <filter-name>isCOBOL filter</filter-name> <filter-class>com.iscobol.web.IscobolFilter</filter-class> </filter> <filter-mapping> <filter-name>isCOBOL filter</filter-name> <url-pattern>/servlet/*</url-pattern> </filter-mapping> <servlet> <servlet-name>isCobol</servlet-name> <servlet-class>com.iscobol.web.IscobolServletCall</servlet-class> </servlet> <servlet-mapping> <servlet-name>isCobol</servlet-name> <url-pattern>/servlet/*</url-pattern> </servlet-mapping> </web-app>
isCOBOL Evolve 2013 R1: isCOBOL Mobile 6

f. Put the following code in the file
<html> <head> <title>Test Mobile </title> <link href="jquery.mobile-1.3.0.min.css" rel="stylesheet" type="text/css" /> <script src="jquery-1.8.2.min.js"></script> <script src="jquery.mobile-1.3.0.min.js"></script> <script> function handleError (jqXHR, textStatus, errorThrown) { alert (textStatus +" "+ jqXHR.status + " "+jqXHR.statusText + "\n" + jqXHR.responseText); } function handleSuccess (data, textStatus, jqXHR) { response = jqXHR.responseText; try { xmlDoc = jQuery.parseXML (response); } catch (err) { alert (response); return false; } xml = jQuery (xmlDoc); _status = xml.find ("_status"); _message = xml.find( "_message" ); _hello = xml.find( "hellotext" ); jQuery("#hello_div").html(_hello.text()); return true; }
function callServer (cobolProg) { var url = "servlet/isCobol(" + cobolProg + ")"; var parm = jQuery("form").serialize(); jQuery.ajax(url, { success: handleSuccess, error: handleError, data: parm }); return false; } window.onload = callServer("HELLO");</script>
isCOBOL Evolve 2013 R1: isCOBOL Mobile 7

9. Download the following files from the respective web sites:
10. Add the above files under WebContent by dragging them in the Project Explorer:
11. Add iscobol.jar (taken from C:\Program Files\isCOBOL 2013R1\lib) and cobol.jar (previously produced) to the WebContent >WEB-INF > lib folder of the project.
At the end, the HTML project should look like this:
</head><body>
<div data-role="page">
<div data-role="header" data-theme="a"> <h1>isCOBOL MOBILE</h1> </div><!-- /header -->
<div data-role="content" data-fullscreen="true"> <div id="hello_div" align="center"></div> </div><!-- /content -->
</div><!-- /page -->
</body></html>
File Web Site Direct URL
jquery-1.8.2.min.js http://jquery.com http://code.jquery.com/jquery-1.8.2.min.js
jquery.mobile-1.3.0.min.css http://jquerymobile.com/ http://code.jquery.com/mobile/1.3.0/jquery.mobile-1.3.0.min.css
jquery.mobile-1.3.0.min.js http://jquerymobile.com/ http://code.jquery.com/mobile/1.3.0/jquery.mobile-1.3.0.min.js
isCOBOL Evolve 2013 R1: isCOBOL Mobile 8

You can test the HTML application in the Eclipse to have a clue on how it will look on Android. To do so:
1. Right click on the project name in the tree
2. Choose Run As > Run on server
Note - if it’s the first time you do such operation you will be asked to choose which servlet container to use. Veryant suggest to use a Tomcat whose version is the same as the current JDK version (e.g. if you’re using JDK 1.7, install Tomcat 7). Eclipse will take care of downloading the necessary items and start a Tomcat session for the test.
Using Windows tools create a zip archive named "html.zip" and include the following items into it, taking them from the project folders:
iscobol.properties must include the following entries:
iscobol.mobile.license.2013=<put a valid license code here>iscobol.exception.message=2
isCOBOL Evolve 2013 R1: isCOBOL Mobile 9
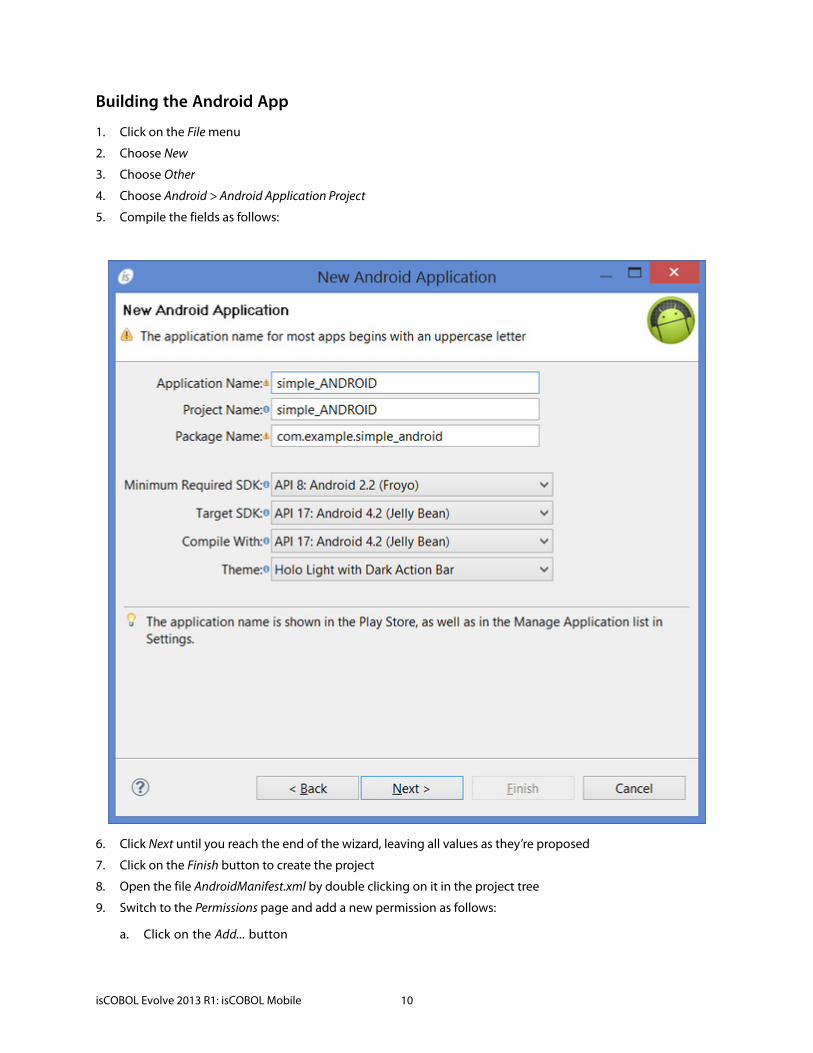
Building the Android App
1. Click on the File menu
2. Choose New
3. Choose Other
4. Choose Android > Android Application Project
5. Compile the fields as follows:
6. Click Next until you reach the end of the wizard, leaving all values as they’re proposed
7. Click on the Finish button to create the project
8. Open the file AndroidManifest.xml by double clicking on it in the project tree
9. Switch to the Permissions page and add a new permission as follows:
a. Click on the Add... button
isCOBOL Evolve 2013 R1: isCOBOL Mobile 10

b. Choose "Uses Permission" in the dialog and click OK
c. Choose "android.permission.WRITE_EXTERNAL_STORAGE" from the list on the right
After it, Permissions should look like this
10. Open res > layout > activity_main.xml by double clicking on it in the tree
11. Switch from Graphical Layout to activity_main.xml in the Editor and replace the current content by
12. Create a new folder named "raw" under the res folder of the project.
13. Add html.zip produced in the previous step to the raw foloder
14. Add ismobile.jar (taken from C:\Program Files\Veryant\isCOBOL2013R1\mobile\lib) and cobol.jar (produced in the previous steps) to the libs folder of the project
At the end, your project should look like this:
<WebView xmlns:android="http://schemas.android.com/apk/res/android" android:id="@+id/webView1" android:layout_width="fill_parent" android:layout_height="fill_parent"/>
isCOBOL Evolve 2013 R1: isCOBOL Mobile 11

isCOBOL Evolve 2013 R1: isCOBOL Mobile 12
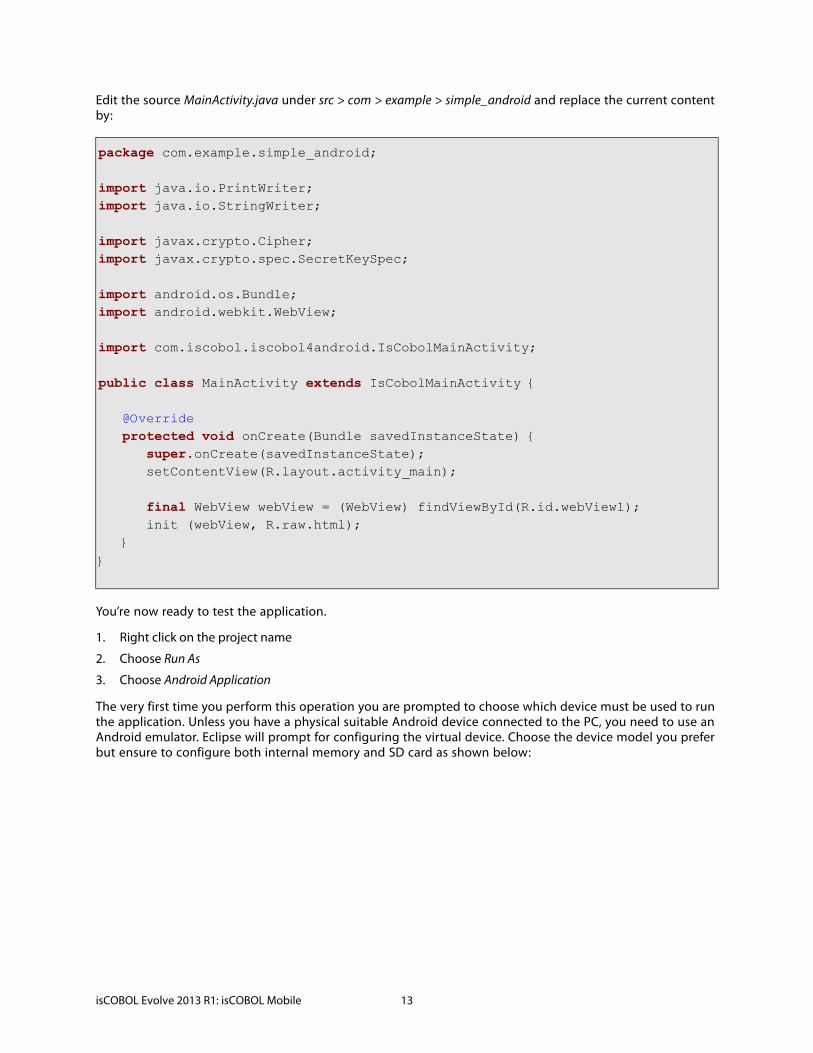
Edit the source MainActivity.java under src > com > example > simple_android and replace the current content by:
You’re now ready to test the application.
1. Right click on the project name
2. Choose Run As
3. Choose Android Application
The very first time you perform this operation you are prompted to choose which device must be used to run the application. Unless you have a physical suitable Android device connected to the PC, you need to use an Android emulator. Eclipse will prompt for configuring the virtual device. Choose the device model you prefer but ensure to configure both internal memory and SD card as shown below:
package com.example.simple_android;
import java.io.PrintWriter;import java.io.StringWriter;
import javax.crypto.Cipher;import javax.crypto.spec.SecretKeySpec;
import android.os.Bundle;import android.webkit.WebView;
import com.iscobol.iscobol4android.IsCobolMainActivity;
public class MainActivity extends IsCobolMainActivity {
@Override protected void onCreate(Bundle savedInstanceState) { super.onCreate(savedInstanceState); setContentView(R.layout.activity_main); final WebView webView = (WebView) findViewById(R.id.webView1); init (webView, R.raw.html); }}
isCOBOL Evolve 2013 R1: isCOBOL Mobile 13

The emulator will start and show the following screen:
isCOBOL Evolve 2013 R1: isCOBOL Mobile 14
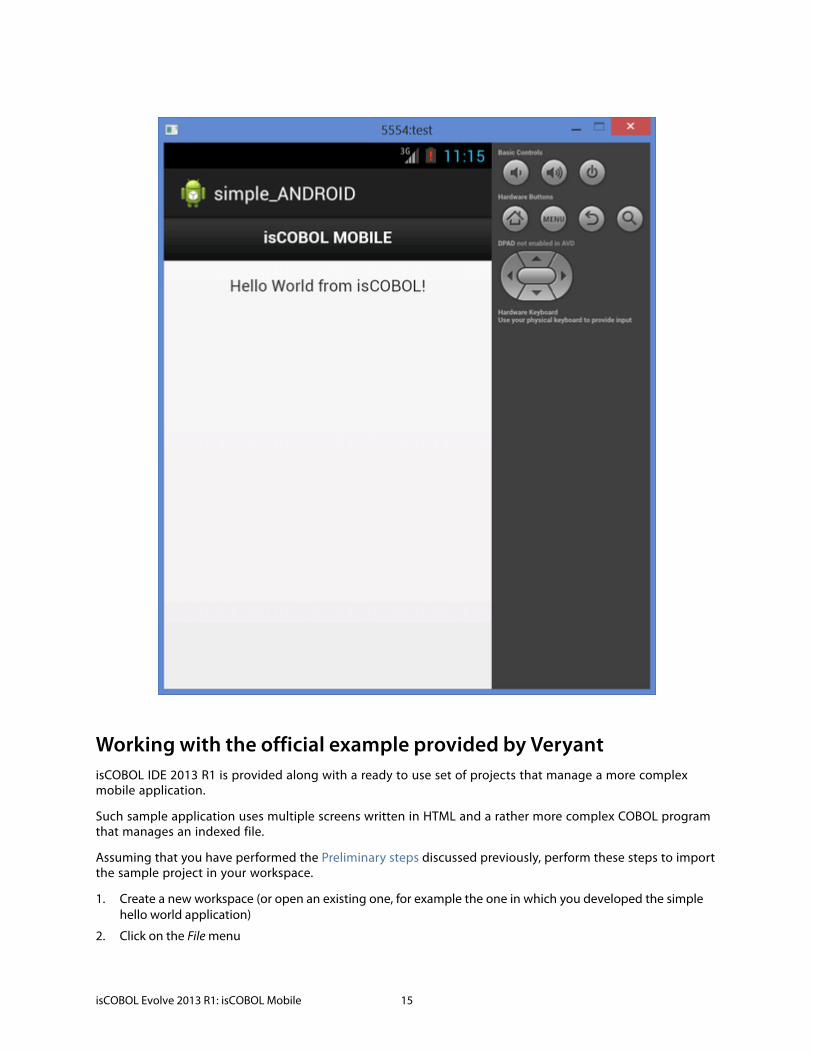
Working with the official example provided by VeryantisCOBOL IDE 2013 R1 is provided along with a ready to use set of projects that manage a more complex mobile application.
Such sample application uses multiple screens written in HTML and a rather more complex COBOL program that manages an indexed file.
Assuming that you have performed the Preliminary steps discussed previously, perform these steps to import the sample project in your workspace.
1. Create a new workspace (or open an existing one, for example the one in which you developed the simple hello world application)
2. Click on the File menu
isCOBOL Evolve 2013 R1: isCOBOL Mobile 15

3. Choose Import
4. Choose General > Existing Project into Workspace
5. Having Select root directory checked, browse for the folder “C:\Program Files\Veryant\isCOBOL IDE2013R1\sample\mobile”
6. Check all the projects and click Finish
At this point you can run the sample application
1. Right click on pwdReminder_ANDROID in the Explorer tree
2. Choose Run As > Android Application
isCOBOL Evolve 2013 R1: isCOBOL Mobile 16

The following screen will appear in your emulator and you have to provide the main password to proceed.
isCOBOL Evolve 2013 R1: isCOBOL Mobile 17
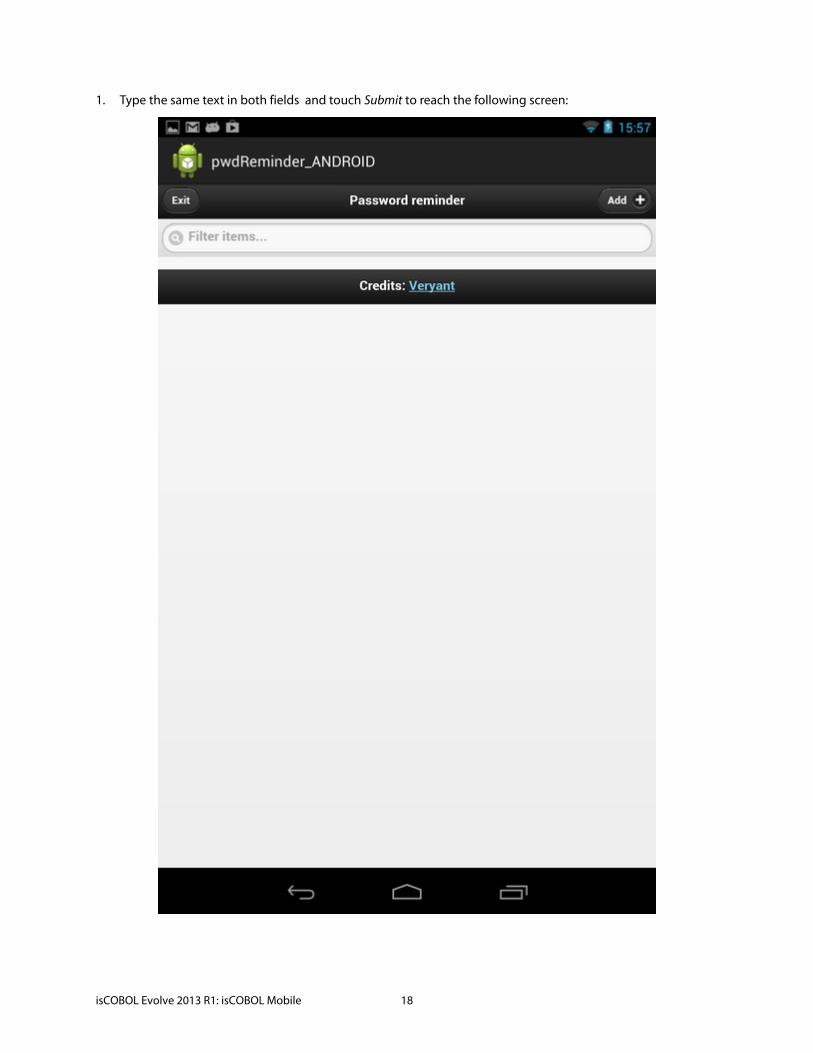
1. Type the same text in both fields and touch Submit to reach the following screen:
isCOBOL Evolve 2013 R1: isCOBOL Mobile 18
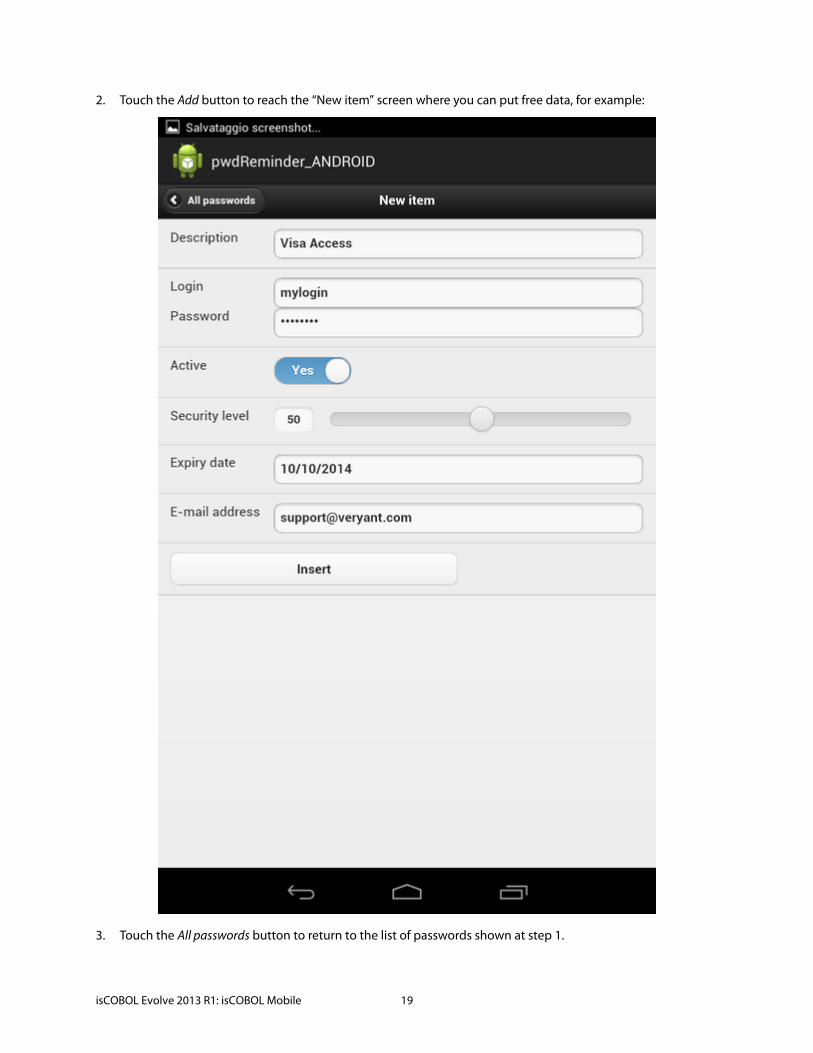
2. Touch the Add button to reach the “New item” screen where you can put free data, for example:
3. Touch the All passwords button to return to the list of passwords shown at step 1.
isCOBOL Evolve 2013 R1: isCOBOL Mobile 19
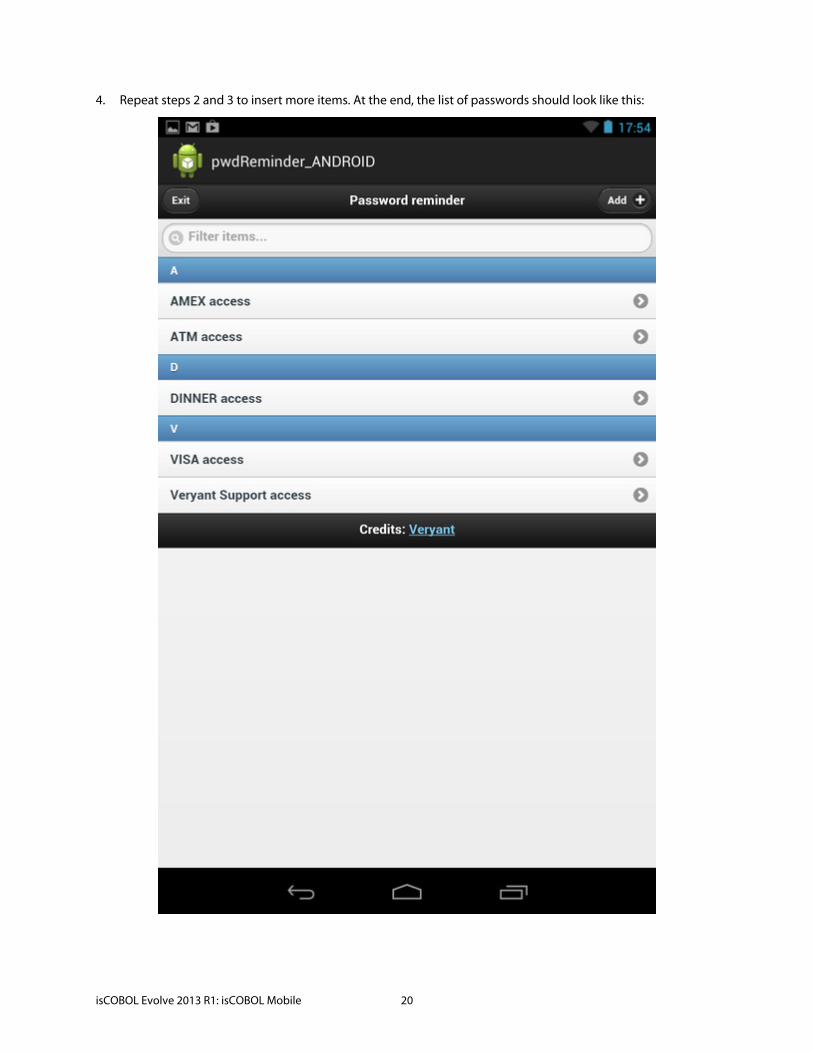
4. Repeat steps 2 and 3 to insert more items. At the end, the list of passwords should look like this:
isCOBOL Evolve 2013 R1: isCOBOL Mobile 20