is a beautiful symphony of colors and prints laced with ... Canto is a beautiful symphony of colors...
3
Bel Canto is a beautiful symphony of colors and prints laced with sparkling metallic golds to really shine! Charming bowties, draped gold fabric and an elegant print dedicated to the Opera. This will be the grand �inale to decorating any space. Uses Kanvas’s Night at the Opera collection Finished Size: 60” x 72” THE QUILT SHOWN IS A DIGITAL REPRESENTATION. ACTUAL FABRIC REPEATS WILL VARY FROM DESIGN SHOWN. © 2014 Stitched Together Studios for Benartex, LLC
Transcript of is a beautiful symphony of colors and prints laced with ... Canto is a beautiful symphony of colors...
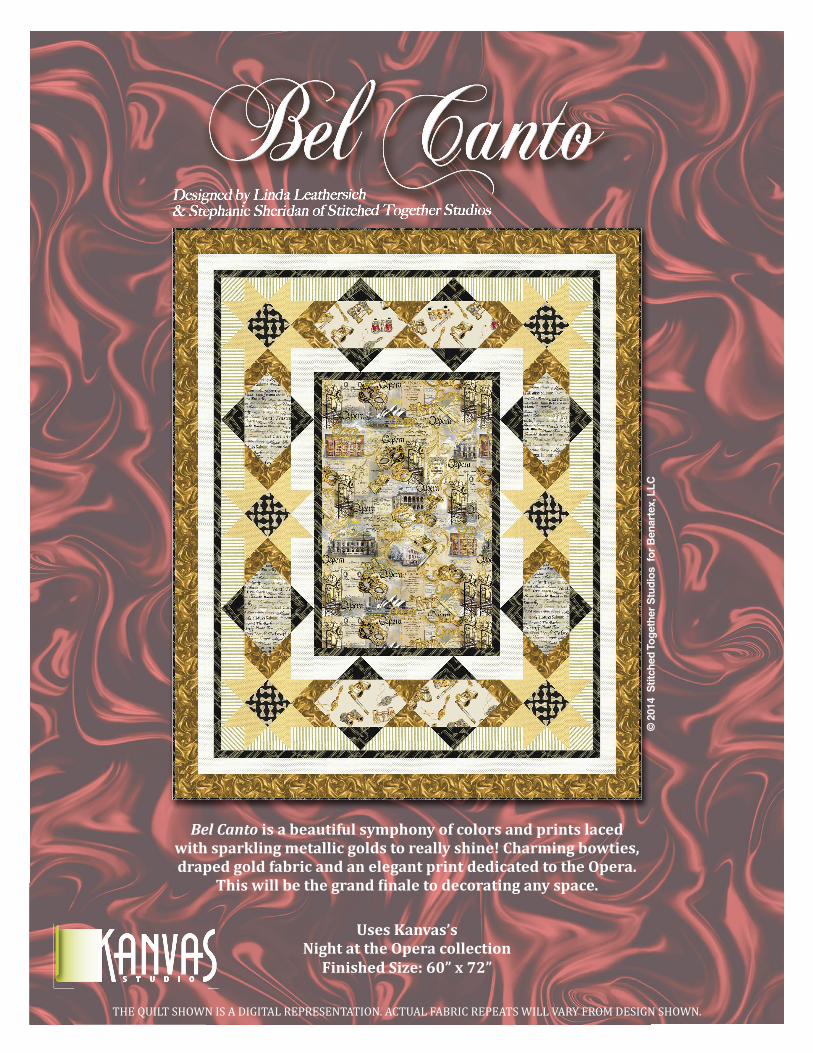
Bel Canto is a beautiful symphony of colors and prints laced with sparkling metallic golds to really shine! Charming bowties, draped gold fabric and an elegant print dedicated to the Opera.
This will be the grand �inale to decorating any space.
Uses Kanvas’s Night at the Opera collection
Finished Size: 60” x 72”
THE QUILT SHOWN IS A DIGITAL REPRESENTATION. ACTUAL FABRIC REPEATS WILL VARY FROM DESIGN SHOWN.
© 2
014
Stit
ched
Tog
ethe
r S
tudi
os f
or B
enar
tex,
LLC

SAMPLE KEY/SKU QTY CUT
A
5706-30 Curtain Call Gold
1 1/4 YD (2) 3-1/2" X WOF strips, subcut: (12) 3-1/2" X 6-1/2" rectangles (3) 3-1/2" X WOF strips, subcut: (32) 3-1/2" squares (7) 3-1/2" X WOF strips*, BORDER 7
B 8002M-07 @ Opera Night Gold
1 YD (1) 22-1/2" X 34-1/2" rectangle Fussy Cut
C 8003-07 @ Composers Ecru
1/2 YD (2) 6-1/2" X WOF strips, subcut: (4) 6-1/2" X 12-1/2" rectangles
D 8006-12 Black Tie Black
1/4 YD (1) 6-1/2" X WOF strip, subcut: (6) 6-1/2" X 6-1/2" squares
E 8007M-07 Opera Glasses Cream
1/2 YD (2) 6-1/2" X WOF strips, subcut: (4) 6-1/2" X 12-1/2" rectangles
F
4927M-07 Pin Dot Cream/Gold
1 YD (4) 3-1/2" X WOF strips, subcut: (18) 3-1/2" X 6-1/2" rectangles (8) 3-1/2" squares (7) 2-1/2" X WOF strips*, BORDER 6
G 4927M-30 Pin Dot Ochre/Gold
3/4 YD (7) 3-1/2" X WOF strips, subcut: (72) 3-1/2" square
H
4928M-07 @ Shirting Stripe Cream/Gold
7/8 YD (6) 3-1/2" X WOF strips, subcut: (26) 3-1/2" X 6-1/2" rectangles (12) 3-1/2" squares (1) 5" X WOF strip, subcut (4) 3-1/2" squares, cut on-point
I
5029M-99 The Right Angle Black/Gold
1 1/4 YD (3) 3-1/2" X WOF strips, subcut: (16) 3-1/2" X 6-1/2" rectangles (4) 1-1/2" X WOF strips, subcut: (2) 1-1/2" X 34-1/2" strips (2) 1-1/2" X 24-1/2" strips (6) 1-1/2" X WOF strips*, BORDER 5 (7) 2-1/4" X WOF strips, BINDING
WOF=WIDTH OF FABRIC @=DIRECTIONAL FABRIC * SEW STRIPS VIA SHORT ENDS THEN GO TO ASSEMBLY
BENARTEX, LLC • 132 WEST 36TH STREET, 4TH FLOOR • NEW YORK, NY 10018 • T:212-840-3250 • WWW.BENARTEX.COM
4. Sew (1) H 3-1/2” on point square to left side of (1) GHG UNIT, then sew (1) H 3-1/2” square to right side to create HGHGH UNIT, Make (4). 5. Sew (1) H 3-1/2” square to left side of (1) GAG UNIT, then sew (1) F 3-1/2” square to right side to create HGAGF UNIT, Make (6). 6. Sew (1) F 3-1/2” square to left side of (1) GAG UNIT, then sew (1) H 3-1/2” square to right side to create FGAGH UNIT, Make (2). 7. Sew (1) GHG UNIT to the left side of (1) DG UNIT, then sew (1) GAG UNIT to right side. Sew (1) HGHGH UNIT to top, then sew (1) HGAGF UNIT to bottom to complete BLOCK 1A. Square to 12-1/2”, Make (4). 8. Sew (1) GHG UNIT to the left side of (1) DG UNIT, then sew (1) GFG UNIT to right side. Sew (1) FGAGH UNIT to top, then sew (1) HGAGH UNIT to bottom to complete BLOCK 1B. Square to 12-1/2”, Make (2).
BLOCK ASSEMBLY: Refer to BLOCK DIAGRAMS and COVER PHOTO for proper fabric placement and rotation. BLOCKS 1A and 1B: 1. Draw a diagonal line on wrong side of a (1) G 3-1/2” square. Place G square in one corner of (1) D 6-1/2” square and sew on diagonal line. Press G open towards D corner. Trim ex-cess fabric on reverse side to 1/4”. Repeat for the remaining three corners. Square to 6-1/2”. Make (6) DG UNITS. 2. Draw a diagonal line on wrong side of (1) G 3-1/2" square. Place G square in one corner of (1) H 3-1/2" X 6-1/2" rectangle and sew on diagonal line. Press G open towards H corner. Trim excess fabric on reverse side to 1/4". Repeat on other side. Square to 3-1/2" X 6-1/2". Make (10) GHG UNITS. 3. Repeat step 2 using G 3-1/2” squares and A 3-1/2” X 6-1/2” rectangle. Make (12) GAG UNITS. Repeat step 2 using G 3-1/2” squares and F 3-1/2” X 6-1/2” rectangle. Make (2) GFG UNITS.
BLOCK 1A & 1B DIAGRAMS
TRIM EXCESS
1/4”
D D
G G
DG UNIT Make (6)
1.
2. G G
TRIM EXCESS
1/4”
H H
GHG UNIT Make (10)
GAG UNIT Make (12)
GFG UNIT Make (2)
3.
4.
HGHGH UNIT Make (4)
5.
HGAGF UNIT Make (6)
6.
7. BLOCK 1A Make (4)
BLOCK 1B Make (2)
FGAGH UNIT Make (2)
8.
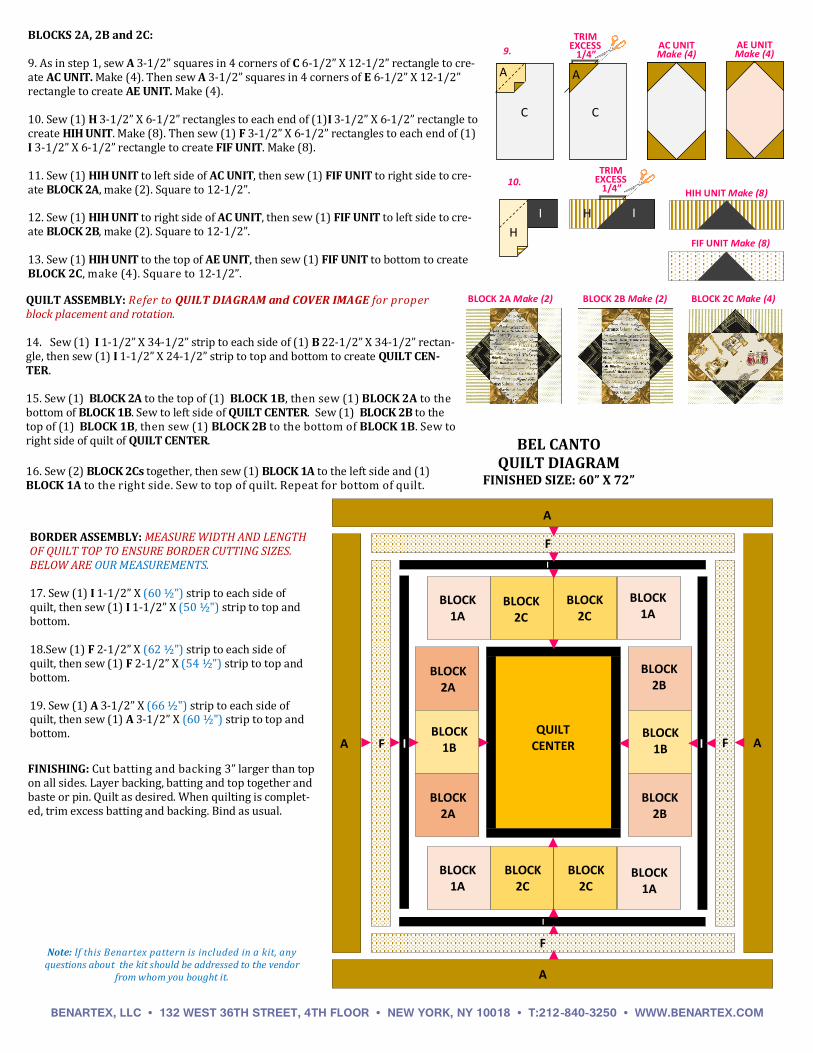
BEL CANTO QUILT DIAGRAM
FINISHED SIZE: 60” X 72”
Note: If this Benartex pattern is included in a kit, any questions about the kit should be addressed to the vendor
from whom you bought it.
BORDER ASSEMBLY: MEASURE WIDTH AND LENGTH OF QUILT TOP TO ENSURE BORDER CUTTING SIZES. BELOW ARE OUR MEASUREMENTS. 17. Sew (1) I 1-1/2” X (60 ½") strip to each side of quilt, then sew (1) I 1-1/2” X (50 ½") strip to top and bottom. 18.Sew (1) F 2-1/2” X (62 ½") strip to each side of quilt, then sew (1) F 2-1/2” X (54 ½") strip to top and bottom. 19. Sew (1) A 3-1/2” X (66 ½") strip to each side of quilt, then sew (1) A 3-1/2” X (60 ½") strip to top and bottom.
FINISHING: Cut batting and backing 3” larger than top on all sides. Layer backing, batting and top together and baste or pin. Quilt as desired. When quilting is complet-ed, trim excess batting and backing. Bind as usual.
BLOCKS 2A, 2B and 2C: 9. As in step 1, sew A 3-1/2” squares in 4 corners of C 6-1/2” X 12-1/2” rectangle to cre-ate AC UNIT. Make (4). Then sew A 3-1/2” squares in 4 corners of E 6-1/2” X 12-1/2” rectangle to create AE UNIT. Make (4). 10. Sew (1) H 3-1/2” X 6-1/2” rectangles to each end of (1)I 3-1/2” X 6-1/2” rectangle to create HIH UNIT. Make (8). Then sew (1) F 3-1/2” X 6-1/2” rectangles to each end of (1) I 3-1/2” X 6-1/2” rectangle to create FIF UNIT. Make (8). 11. Sew (1) HIH UNIT to left side of AC UNIT, then sew (1) FIF UNIT to right side to cre-ate BLOCK 2A, make (2). Square to 12-1/2”. 12. Sew (1) HIH UNIT to right side of AC UNIT, then sew (1) FIF UNIT to left side to cre-ate BLOCK 2B, make (2). Square to 12-1/2”. 13. Sew (1) HIH UNIT to the top of AE UNIT, then sew (1) FIF UNIT to bottom to create BLOCK 2C, make (4). Square to 12-1/2”.
BLOCK 2A Make (2) BLOCK 2B Make (2) BLOCK 2C Make (4)
C C
A A
AC UNIT Make (4)
TRIM EXCESS
1/4” AE UNIT Make (4)
H
TRIM EXCESS
1/4”
I I H
HIH UNIT Make (8)
FIF UNIT Make (8)
QUILT ASSEMBLY: Refer to QUILT DIAGRAM and COVER IMAGE for proper block placement and rotation. 14. Sew (1) I 1-1/2” X 34-1/2” strip to each side of (1) B 22-1/2” X 34-1/2” rectan-gle, then sew (1) I 1-1/2” X 24-1/2” strip to top and bottom to create QUILT CEN-TER. 15. Sew (1) BLOCK 2A to the top of (1) BLOCK 1B, then sew (1) BLOCK 2A to the bottom of BLOCK 1B. Sew to left side of QUILT CENTER. Sew (1) BLOCK 2B to the top of (1) BLOCK 1B, then sew (1) BLOCK 2B to the bottom of BLOCK 1B. Sew to right side of quilt of QUILT CENTER.
16. Sew (2) BLOCK 2Cs together, then sew (1) BLOCK 1A to the left side and (1) BLOCK 1A to the right side. Sew to top of quilt. Repeat for bottom of quilt.
9.
10.
BENARTEX, LLC • 132 WEST 36TH STREET, 4TH FLOOR • NEW YORK, NY 10018 • T:212-840-3250 • WWW.BENARTEX.COM
BLOCK 2A
BLOCK 2A
BLOCK 2B
BLOCK 2B
BLOCK 1B
BLOCK 1B
BLOCK 1A
BLOCK 1A
BLOCK 1A
BLOCK 1A
BLOCK 2C
BLOCK 2C
BLOCK 2C
BLOCK 2C
QUILT CENTER A A F F I I
I
F
A
I
F
A