IRBManager User Guide for IACUC · 2019-05-15 · xForm to the user. (For example, a faculty...
24
1 Revised 4.24.19 IRBManager User Guide for IACUC
Transcript of IRBManager User Guide for IACUC · 2019-05-15 · xForm to the user. (For example, a faculty...

1 Revised 4.24.19
IRBManager
User Guide for IACUC

2 Revised 4.24.19
Table of Contents
1.0 IRBManager Introduction and Login ...................................................................................................... 4
1.1 What Is IRBManager? .................................................................................................................................... 4
1.2 How Do I Access IRBManager? ...................................................................................................................... 4
1.2.1 CWU-Affiliated Users ............................................................................................................................ 4
1.2.2 Externally-Affiliated Users .................................................................................................................... 5
1.3 Passwords ...................................................................................................................................................... 5
1.3.1 CWU-Affiliated Users ............................................................................................................................. 5
1.3.2 Externally-Affiliated Users ..................................................................................................................... 5
2.0 Navigating the Home Page – Dashboard ................................................................................................ 7
2.1 Sidebar .......................................................................................................................................................... 7
2.1.1 Actions .................................................................................................................................................. 7
2.1.2 Recent Items ......................................................................................................................................... 7
2.1.3 My Docs and xForms ............................................................................................................................ 8
2.2 My Studies .................................................................................................................................................... 9
2.2.1 Studies (_Active) ................................................................................................................................... 9
2.2.2 xForms (protocol submission forms) (_Active) .................................................................................... 9
2.2.3 Events (_Open) ................................................................................................................................... 10
2.2.4 My Studies (_Active) ........................................................................................................................... 10
2.3 Top Headings .............................................................................................................................................. 10
2.3.1 Change My Password .......................................................................................................................... 11
2.3.2 Change My Profile ............................................................................................................................... 11
2.3.3 My Phone Number(s) .......................................................................................................................... 12
2.3.4 My Address(es) .................................................................................................................................... 12
2.3.5 My Expirations ..................................................................................................................................... 13
2.3.6 Last 25 Logins ...................................................................................................................................... 13
2.3.7 Email Signatures .................................................................................................................................. 13
3.0 Navigating the Study Protocol Page ..................................................................................................... 14
3.1 Study ........................................................................................................................................................... 14
3.2 Study-Site .................................................................................................................................................... 14
3.3 Study-Site Contacts ..................................................................................................................................... 15
3.4 Reference xForms ....................................................................................................................................... 15
3.5 Events .......................................................................................................................................................... 15
3.5.1 Event Details ........................................................................................................................................ 15

3 Revised 4.24.19
3.5.2 Actions in the Event Details ................................................................................................................. 16
4.0 xForms (Study [Protocol] Submission Forms) ....................................................................................... 17
4.1 How to Open an xForm ............................................................................................................................... 17
4.1.1 Opening xForm for a New Study (Initial Protocol Submission Form) ................................................ 17
4.1.2 Opening xForm for Existing Study (Amendment [Modification], Annual Review, Final Report)...... 17
4.1.3 Opening an Existing Unsubmitted xForm ............................................................................................ 18
4.2 Completing an xForm .................................................................................................................................. 18
4.2.1 General Instructions ............................................................................................................................ 18
4.2.2 Navigation Bar at the Top of Each Page .............................................................................................. 19
4.2.3 Navigation Buttons at the Bottom of Each Page ................................................................................. 19
4.2.4 Attaching Documents .......................................................................................................................... 20
4.2.5 Features for Entering Bodies of Text ................................................................................................... 20
4.2.6 Signatures ............................................................................................................................................ 21
4.3 Submitting an xForm ................................................................................................................................... 21
5.0 Faculty Supervisor Review ................................................................................................................... 22
5.1 Faculty Supervisor Viewing of Study (Protocol) .......................................................................................... 22
5.1.1 Via Email .............................................................................................................................................. 22
5.1.2 Via Dashboard ..................................................................................................................................... 22
5.2 Study (Protocol) Review .............................................................................................................................. 22
5.2.1 Reading the PI’s protocol .................................................................................................................... 22
5.2.2 Completing the Faculty Supervisor Review ......................................................................................... 23
5.3 Post-Faculty Supervisor Approval ................................................................................................................ 23
6.0 Help and Support ................................................................................................................................ 24

4 Revised 4.24.19
1.0 IRBManager Introduction and Login
1.1 What Is IRBManager? IRBManager is an electronic management system that serves as the “front door” for the
submission, tracking, and retention of research protocols and research compliance
documents. This includes Institutional Animal Care and Use Committee (IACUC)
application forms. Users can fill out and submit forms directly in IRBManager, and all
forms, attachments, and documents submitted with a participating study (protocol) will
be accessible via IRBManager. IRBManager is a fully web-based system that is accessible
both on- and off-campus.
1.2 How Do I Access IRBManager? IRBManager can be accessed here: https://cwu.my.irbmanager.com. The following login page will appear:
1.2.1 CWU-Affiliated Users Click the “To login using your CWU username and password click here” hyperlink (or
simply click the large CWU logo in the middle of the page). You will then be prompted
to enter your CWU credentials (network email and password) in a separate pop-up
window.

5 Revised 4.24.19
Upon entering your credentials, you will automatically be redirected to the
IRBManager Dashboard screen/home page (see Section 3.0).
1.2.2 Externally-Affiliated Users Non-CWU users (e.g., IACUC community members, project co-investigators at
another institution, etc.) must be issued an IRBManager username and password to
access the system. This is done manually by IACUC staff. Contact staff via email at
[email protected]. Include in the subject line “IRBManager Access for Non-CWU User.”
Provide an email address for the non-affiliated user.
Upon being added into the system, the new user will receive an email with their
username and temporary password. If this password link is not used within 24 hours,
it will become inactive. In this case, the user will instead need to use the “Non-CWU
affiliated users, click here to login” hyperlink on the login page and then click on the
“Forgot Password?” link to reset their password.
Upon entering your credentials, you will automatically be redirected to the
IRBManager Dashboard screen/home page (see Section 3.0).
1.3 Passwords Once you log in with your username and password, you will be able to provide an electronic signature on any xForm (protocol submission form) by entering your password. If you have forgotten your password, please click the “Forgot Password?” link on the
login screen.
1.3.1 CWU-Affiliated Users CWU users are prompted for their username and current network password upon
login to IRBManager. (If your CWU network password has recently changed, you will
need to enter your new network password the next time you login into IRBManager.)
You will never need to change your password in IRBManager.
1.3.2 Externally-Affiliated Users For those unaffiliated with CWU, on your first login, you will be prompted to change
your password.
6 Revised 4.24.19
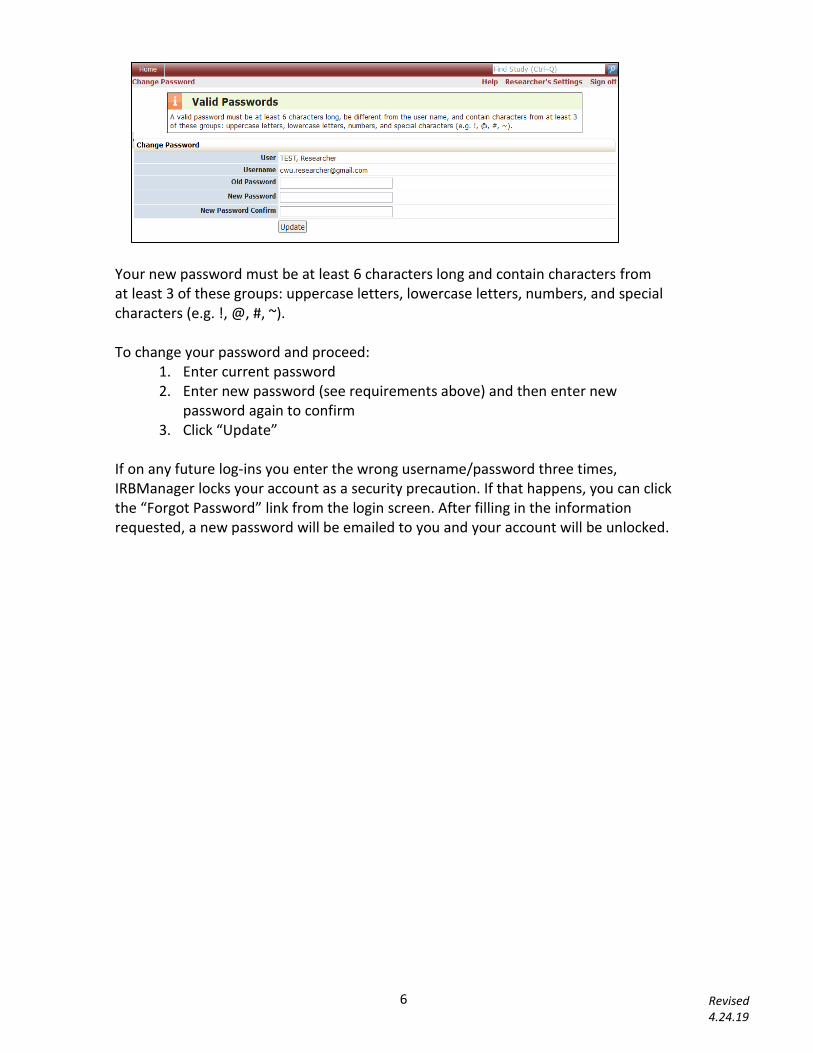
Your new password must be at least 6 characters long and contain characters from at least 3 of these groups: uppercase letters, lowercase letters, numbers, and special characters (e.g. !, @, #, ~). To change your password and proceed:
1. Enter current password 2. Enter new password (see requirements above) and then enter new
password again to confirm 3. Click “Update”
If on any future log-ins you enter the wrong username/password three times, IRBManager locks your account as a security precaution. If that happens, you can click the “Forgot Password” link from the login screen. After filling in the information requested, a new password will be emailed to you and your account will be unlocked.

7 Revised 4.24.19
2.0 Navigating the Home Page – Dashboard Once you are logged in, you will be directed to the dashboard, which looks like this:
Read below for information on how to use and navigate away from the dashboard. To navigate back to the dashboard from another page, simply click “Home” at the top of the page.
2.1 Sidebar On the left side of the dashboard, there are multiple headers:
Actions (see Section 2.1.1)
Recent Items (see Section 2.1.2)
Messages (note: will only appear if there are messages posted)
Useful Links (note: will only appear if there are links posted)
My Docs & xForms (see Section 2.1.3) This sidebar will remain present as you navigate to different pages.
2.1.1 Actions Click “New IACUC Application” or "Start xForm" to start a new protocol submission form (See Section 4.1.1). Please note that certain xForms (Amendment [modification] Form, Annual Review Form, and Final Report Form) can only be completed for a protocol that is already approved and active in IRBManager. These xForms are not available from the Dashboard. (See Section 5.1.2) Note: The items under the “Actions” heading will change as you navigate through the site to display appropriate actions corresponding to the current page.
2.1.2 Recent Items The hyperlinks under this heading will show the most recent items you have viewed in IRBManager. Click on any link under “Recent Items” to go directly to that item.
2.1 2.2
2.3

8 Revised 4.24.19
2.1.3 My Docs and xForms This heading shows how many attachments and xForms (protocol submission forms) you have. If you click the “__ Attachments” link, it will take you to a separate page showing your personal attachments. You can add attachments (e.g. SOPs, wildlife permits, etc.) to your IRBManager account by clicking “Add Attachment” in the Actions menu on the left sidebar:
This will bring you to a page where you can name and upload a new attachment:
Once your documents are uploaded into your profile, they will only be viewable to you, but they will be available on any “Add Attachment” question asked on an xForm. You must first add attachments into the xForm for the IACUC to be able to view them. They can be accessed by clicking “Add Attachment” on any xForm question and then clicking on the “My Profile” tab in the pop-up window that appears:
If you click the “__ xForms” link under the “My Docs & xForms” header, it will take you to a separate page showing your xForms. On this page, under the “Actions” header on the left side of the screen, there is a toggle button to “Show Complete/Hide Complete” xForms. If you do not see previously completed xForms on this screen, it likely means you need to press the “Show Complete” button. There is also a “Status”

9 Revised 4.24.19
drop-down menu at the top of the page where you can filter your search to show only certain xForms (e.g., unsubmitted, awaiting other signatures, complete, etc.):
There is also a “Filter” search bar on the top right of this page where you can type in key words to narrow down the xForms displayed and quickly find your desired xForm.
2.2 My Studies In the center of the Dashboard, there are four sections:
2.2.1 Studies (__ Active) This shows your approved studies, organized by the capacity in which you are involved (as Principal Investigator [PI], Co-Investigator, Research Assistant,
or Faculty Supervisor). Both active and inactive studies are displayed here. By clicking on an underlined link, you will be taken to a separate screen showing the pertinent studies.
2.2.2 xForms (protocol submission forms) (__ Active) The xForms section shows your currently active protocol submission forms including Initial Submission, Annual Review, Amendment (modification), and Final Report.
In the above view of “xForms” section of the Dashboard:
“You have 2 unsubmitted xForms” = The user has 2 xForms (protocol submissions) started, but has not yet submitted them for further processing. (The user may have clicked “Save for Later” or just closed an xForm before pressing the “Submit” button at the end of the xForm.) Note: By clicking the underlined link, “2 unsubmitted xForms,” the user can go straight to the unsubmitted xForms to continue working on and/or to complete the submission.
“You have 3 xForms being processed at a later stage” = In this case, the user has

10 Revised 4.24.19
successfully submitted 3 xForms (protocol submissions), and the xForms are currently under review at a later stage in the processing cycle (e.g., faculty supervisor review or processing by IACUC administrator).
“There are 1 xForms awaiting your attention” = The user has 1 xForm that requires their attention and will not be processed to the next stage in the system until the user addresses and submits the xForm. This will appear if someone else sends an xForm to the user. (For example, a faculty supervisor will see this when a student PI sends an xForm to them for review and approval. The PI would see this if the IACUC administrator returned an xForm for revisions, etc.). Note: By clicking the underlined link, “1 xForms,” the user can go straight to the xForm that needs attention.
“You have __xForms in error” = The user has an xForm that has a back-end error. This is a software issue that the IACUC administrator will be made aware of and will resolve.
2.2.3 Events (__ Open) The events section of the Dashboard shows the submissions open by submission type.
This section shows all open events and the submission name, such as Annual Review, Initial Submission, and Amendment (modification).
Note: An event stays open until the IACUC is notified of the approval. It is possible for the xForm to be completed and approved, but the event is still open until an IACUC meeting occurs.
2.2.4 My Studies (__ Active) This section lists all of the active studies (protocols) with which the user is associated. By clicking on the blue link under the “Study” column, the user can go straight to the study (protocol).
Studies can be sorted in the list by study (protocol) number, site, PI, study title, expiration date, or status by clicking the corresponding arrows in each column header. See Section 4.0 for how to navigate a study protocol page.
2.3 Top Headings
Find Study search bar = Search to find existing studies. Studies can be searched by study protocol number, site, PI name, title, expiration date, or status.

11 Revised 4.24.19
Take a tour… = Provides a basic overview of the sections on the Dashboard. Help = Hovering over the “Help” button brings up several options, including “Contact Administrator.” Clicking on “Contact Administrator” allows you to send an email directly to the IACUC administrator. (Note: If you click on “Help” rather than hovering over “Help,” you will get a message saying there is no help available for this page.)
(Your Name)’s Settings = Allows the user to edit their profile settings.
Sign off = Click to log off IRBManager.
After clicking “(Your Name)’s Settings,” the following options are available:
2.3.1 Change My Password This is applicable only for externally-affiliated users without a CWU login credentials
(e.g., IACUC community members). Click on “change password” link. You will then see
this view:
1. Enter old password. 2. Enter new password. Your new password must be at least 6 characters long
and contain characters, from at least 3 of these groups: uppercase letters, lowercase letters, numbers, and special characters (e.g., !, @, #, ~).
3. Click “Update.”
2.3.2 Change My Profile 1. Click on “Change My Profile” link. You will then see this view:

12 Revised 4.24.19
2. Update your name or other user information. 3. Click “Update.”
2.3.3 My Phone Number(s) 1. Click on “My Phone Number(s)” link. 2. To add a phone number, click the “Add Phone” link under the Actions menu
in the left sidebar. You will then see this view:
3. To update your phone number, click the edit icon under the Action column corresponding with your phone number, make your changes, and click “Update Phone.”
2.3.4 My Address(es) 1. Click on “My Address(es)” link.
2. To add an address, click the “Add Address” link under the Actions menu in
the left sidebar. You will then see this view:
3. To update your address, click the edit icon under the Action column

13 Revised 4.24.19
corresponding with your address, make your changes, and click “Update
Address.”
2.3.5 My Expirations Shows expiration dates for the researcher’s occupational health and medical clearance, CITI training certifications, etc. IRBManager should send out reminders to researchers as these expiration dates approach. For expiration dates relevant to particular protocols, such as the Annual Review due date, refer to the study protocol page (see Section 4.2).
2.3.6 Last 25 Logins Lists the time and date of the last 25 times the user logged into IRBManager. 2.3.7 Email Signature Allows you to enter an email signature when sending email(s) through IRBManager.
1. Click on “Email Signature” link. 2. Enter your preferred signature. 3. Click “Save.”
Note: You may copy/paste a signature (with an image) from another platform into IRBManager. If entering information directly, use ‘shift+enter’ to eliminate double spaces between line text.

14 Revised 4.24.19
3.0 Navigating the Study (Protocol) Page From the Dashboard (home page) page, you can access the study details for each of your studies (protocols). Click on the blue study code (protocol number) link under “My Studies” at the bottom of the Dashboard (see Section 3.2) to access the specific study. You can click on any blue link in this section to view more information.
3.1 Study This section notes all of the basic information about the individual study (protocol). There may be many blanks in this section for some studies (protocols).
Study = Protocol number
Sponsor = if applicable
Committee = IACUC
Grants = if applicable
Department = Principal Investigator’s parent department within the university
Agent Type = applicable research types (i.e., Educational Use, Field Research, Lab
Research, Standard Operating Procedures)
Title = of the study or project
Year = of initial approval
Animal Species to be Used = lists the number of animals approved to be used per species
3.2 Study-Site This section notes information about the study and the study site, such as:
Site(s) = primary location of study
PI = Principal Investigator’s name
Status = open, approved, pending, withdrawn, closed, etc.
Approval = date of recent/current approval of Annual Review
Expiration = date of study (protocol) expiration
Initial approval = date of study (protocol) approval
Other Expirations = due date for Annual Review (required for protocols with durations longer than one year) or other items related to the protocol (for expirations that are

15 Revised 4.24.19
applicable to the Principal Investigator such as CITI trainings or occupational health medical clearance, see “My Expirations” in Section 3.3.5.)
3.3 Study-Site Contacts This section lists the contact(s) and role(s), if any, associated with the study (protocol).
3.4 Reference xForms This section lists the submission forms associated with the study (protocol) and corresponding action items that are possible for each one. This section enables you to complete an Amendment (modification) Form for your protocol (see Section 6.1.2).
3.5 Events This section lists all the IRB “events” or submissions that have been or are being conducted for this protocol. These include Initial Submissions, Amendments (modifications), Annual Reviews, and Final Reports.
Event = type of event (Initial Submission, Amendment (modification), Annual Review,
Final Report, etc.)
Att = number of attachments associated with that event
FE = not currently in use
Instance/UDF = information about an event; may be blank depending on responses in
xForm
Start = the date the event was started or loaded into IRBManager
Complete = the date the event was completed and reported to the IACUC
Last Mtg = shows the last meeting this event or review was submitted to
You can click on the blue event link in this section to view the event details.
3.5.1 Event Details Once you have clicked on the blue event link in the study (protocol) page, you will be taken to the event details.

16 Revised 4.24.19
“Study-Site” = shows basic study information, including study (protocol) number, title, name of principal investigator, etc.
“Event” = shows specific details about the submission you are viewing.
“Notes” = lists the summary of communication on the study, including any notes from IACUC to the research team and emails between IACUC and the research team that were sent within the IRBManager system. Note: This section may be empty for many studies, and therefore not displayed.
“Steps” = shows the steps of the event’s submission and review with the corresponding dates. Each event will have the steps listed with a planned date, actual date, and when (if applicable) it will go to the full committee for review.
3.5.2 Actions in Event Details In the event details screen, Actions on the left sidebar are available as follows:
“Attachments (__)” = These are the attachments uploaded by the PI for this event. This may include SOPs, wildlife permits, or other documents provided for this submission. PIs should not upload new attachments into this section, as they will not be viewable to the IACUC.
“Send Email” = PIs may send emails from within the event page.
“Start xForm” = Not currently in use within an event page. See Section 5.0 for information on starting new xForms.
“xForms” = Shows all study (protocol) submission forms associated with the event.

17 Revised 4.24.19
4.0 xForms (Study [Protocol] Submission Forms)
4.1 How to Open an xForm
4.1.1 Opening xForm for a New Study (Initial Protocol Submission Form) On the left side of the Dashboard, select the relevant application under the Actions menu. You can select “New IACUC Application” directly, or you can select “Start xForm,” which will open a new screen with a list of all the study (protocol) application forms available and a description of each xForm. Click on the name of the xForm you wish to complete.
Note: Only certain xForms are available from the Dashboard (i.e. new IACUC application forms). xForms that can be completed only after a study is approved (such as an Amendment [Modification], Annual Review, or Final Report form) are not available from the Dashboard; these must be opened from within a study (Section 6.1.2 below). As described in more detail in Section 6.4, these xForms use smart logic to guide the user through a series of questions. Depending upon the responses provided, additional questions may or may not appear. If you wish to see the entire xForm (i.e., all questions, regardless of the user’s responses), this can be done by clicking the Print
icon under the Action column to the left of the xForm name.
4.1.2 Opening xForm for an Existing/Approved Study (Amendment
[modification], Annual Review, Final Report)
In order to complete an event (submission) for an active/approved study, such as an Amendment (Modification), Annual Review, or Final Report, you must first go to the active/approved study page. For Annual Reviews and Final Reports, you should receive a reminder email 30 days before the due dates for those submissions providing a link directly to the study page. Otherwise, active/approved studies can be accessed by clicking on the corresponding blue study link in the “My Studies” section on the bottom of the Dashboard (see Section 3.2.4). To complete an Amendment (Modification) Form:
1. Under the “Reference xForms” header on the study protocol page, click on the

18 Revised 4.24.19
“Copy for Amend” icon under the “Action” header corresponding with the IACUC Application that you wish to modify.
2. Clicking this icon will create a copy of the most recent version (including previous amendments) of your IACUC study (protocol) and will allow you to submit requests for modifications to your study. Select all the modifications/amendments that apply, as shown below.
To complete an Annual Review or Final Report Form:
1. Once you are in the study (protocol) page, click the “Start xForm” button under the Action menu in the left sidebar. This will open a new screen with a list of all of the application forms available and a description of each xForm. Click on the name of the xForm you wish to complete, as shown below.
4.1.3 Opening an Existing Unsubmitted xForm To return to an xForm you previously began for a study (protocol), but did not yet submit, you can access the xForm via one of two methods:
1. The “__xForms” link under the “My Documents and Forms” menu on the left sidebar of the Dashboard (see Section 3.1.3)
2. The “You have __ unsubmitted xForms” link from the “xForms” section in the middle of the Dashboard (see Section 3.2.2)
Click on the form name to open the xForm and continue entering your study information for submission.
4.2 Completing an xForm
4.2.1 General Instructions xForms use smart logic to guide the user through a series of questions. Depending upon the responses provided, additional questions may appear. For example, if you answer that your study is funded, subsequent questions will prompt you to describe

19 Revised 4.24.19
the funding source. If you indicate that you do not have funding related to the study, those subsequent questions asking about funding details will be hidden.
The majority of questions in the xForms require a response; however, some may be optional. IRBManager will not allow the user to submit the xForm until all required responses have been completed.
Note that some information in the xForm may be automatically generated. For example, when completing an Annual Review form, the system will automatically populate the study details (such as project title, name of PI, etc.) on the top of the xForm.
Please carefully read all instructions provided on the xForm and answer all required questions.
4.2.2 Navigation Bar at the Top of Each xForm Page The top of each xForm page will contain a header that looks as follows:
Page Titles Drop-down menu = Allows you to “jump” between pages of an xForm before completing all required questions on a page. Note that depending on the responses to the questions in an xForm, entire pages of questions may not be required. Therefore, there may be some pages that are not listed in the drop-down menu.
Page Numbers = Shows “Page __ of __” on each page of the xForm. The number of pages on the xForm may fluctuate due to new pages being opened up as a result of your answers to questions on the xForm.
Next Button = Saves your progress on the current page and takes you to the next page in the xForm.
4.2.3 Navigation Buttons at the Bottom of Each xForm Page The bottom of each xForm page will contain a footer that looks as follows:
Previous = Saves your progress on the current page and takes you to the previous page in the xForm.
Next = Saves your progress on the current page and takes you to the next page in the xForm.
Save for Later = Saves your current progress and prompts you to exit or go

20 Revised 4.24.19
back to the last page you were working on.
View Attachment Questions = Shows only the questions in the xForm that have “Add Attachment” buttons.
View as PDF = Allows you to print/convert/save the xForm as a PDF file. Note: Clicking “PDF” does not save the changes that you make to the xForm. To save changes to the xForm, you must click “Next” or “Save for Later” before signing out of IRBManager.
4.2.4 Attaching Documents Attachments can be added to xForms wherever an “Add Attachment” button is found. Documents to be attached will depend on the xForm being submitted (SOPs, permits, etc.).
To attach a document to an xForm: 1. Click “Add Attachment.” 2. Enter the name for your attachment. (Optional. If left blank, the system will
use the file name.) 3. Select the type of attachment in the drop-down list. (On some questions, the
type is pre-set with only one option.) 4. Select the appropriate tab option to insert your attachment:
• “My computer” = You make click “Select” to browse your computer files for the document, or you may drag and drop your files directly into the tab
• “Dropbox” = Choose the relevant attachment from within Dropbox. • “box” = Choose the relevant attachment from within Dropbox. • “My Profile” = If you have already uploaded the relevant
attachment into your IRBManager profile (See Section 3.1.3). 5. Click “Attach” to finish the process.
4.2.5 Features for Entering Bodies of Text For some questions in an xForm, your responses may consist of full paragraphs. In these cases, you will have the option to format your text to your preference. You can also hit the spell check icon on the far right of the text box to check your spelling.

21 Revised 4.24.19
4.2.6 Signatures Most xForms require the submitter to electronically sign the xForm and attest to the accuracy of the information provided within the xForm, as well as other compliance stipulations. This electronic signature is equivalent to a paper signature.
CWU-affiliated users: Click the “Sign” box. This will bring up a pop-up window for you to enter your CWU credentials (email and network password). Externally-affiliated users: Enter your IRBManager password in the signature box.
4.3 Submitting an xForm Once all of the required questions have been answered and the xForm has been signed, IRBManager will allow you to advance to the submission screen.
You may either save the xForm for later, print the xForm, submit the xForm, or press the browser’s back button to return to the previous page in the xForm.
You must click the “Submit” button to advance the xForm to the next person/office in the review process. The xForm will automatically route to the next person who is required to review and sign the xForm—you do not need to specifically add anyone to the xForm. If you choose any other action than “Submit,” the xForm will remain in your list of unsubmitted xForms and will not reach IACUC for review.
Note: Clicking “Submit” is equivalent to routing the paper version of the xForm for signatures. Once “Submit” is pressed, you will not have the opportunity to make any changes to the xForm unless it gets returned to you by someone who has reviewed it (e.g., faculty supervisor, IACUC administrator, etc.).
If an xForm is submitted by someone other than the PI, the xForm will be routed to the PI. Only the PI can submit the xForm and forward to the next person in the review process.
Once the xForm has been submitted to IACUC (after PI submission and authorizing officials approval), IRBManager will automatically assign a study event on the protocol page (see Section 4.5). You can then click on the event name (blue link) to track the event progress.

22 Revised 4.24.19
5.0 Faculty Supervisor Review If a student is listed as the Principal Investigator (PI) for an IACUC study (protocol), that study (protocol) will go to a faculty supervisor for review before being submitted to the IACUC. The following xForms require faculty supervisor review:
Initial IACUC Application xForm
IACUC Amendment (Modification) xForm
IACUC Annual Review xForm
IACUC Final Report xForm
Student PIs will list their faculty supervisor in their application and faculty supervisors will be automatically notified by IRBManager via email when a PI has submitted a protocol for review.
5.1 Faculty Supervisor Access to Study (Protocol) Faculty supervisors can access the study (protocol) via one of two methods.
5.1.1 Via Email The faculty supervisor will receive an email notification with a link that can take them directly to the student’s study (protocol) application xForm. (They will be prompted to enter their CWU credentials upon clicking the link.)
5.1.2 Via Dashboard Alternatively, the faculty supervisor can access the study (protocol) from the xForms section in the middle of their Dashboard, by clicking the link in “There are __ xForms awaiting your attention” (see Section 3.2.2).
Clicking on the red underlined link will open a screen with all xForms awaiting attention by the faculty supervisor.
To open the xForm, click on the blue xForm name.
5.2 Study (Protocol) Review
5.2.1 Reading the PI’s protocol Upon clicking open the xForm, the faculty supervisor will see the entire xForm as submitted by the PI. To review the study (protocol), simply scroll through the page. Additional features to aid in the review process:

23 Revised 4.24.19
“Hide Help Text” = This hides the xForm instructions the PI viewed when filling out the xForm. When this is checked, all responses from the PI will still be visible.
Page Name Drop-Down menu at top of page = Use this to jump to a particular section of the xForm.
5.2.2 Completing the Faculty Supervisor Review Once you have finished reading the study (protocol), click “Next” either at the top of the page or at the very bottom of the page. This will take you to the faculty supervisor review page. If you approve the study (protocol):
1. Answer “yes” to the question asking if the protocol is ready for submission to IACUC.
2. Read the faculty supervisor attestation and electronically sign the xForm by clicking the “Sign” box and entering your CWU credentials (email address and password).
3. Click “Next” to take you to the submission page. 4. Click “Submit.”
Note: You must click “Submit” for the xForm to be routed to IACUC for processing.
If you require changes to the study (protocol):
1. Answer “no” to the question asking if the study (protocol) is ready for submission to IACUC.
2. Enter the changes you want the PI to make in the text box. All text entered in this text box will be sent to the PI via email.
3. Click “Next” to take you to the submission page. 4. Click “Submit” to route the xForm back to the PI. 5. The PI will receive an email indicating you require changes. Once the PI has
made the changes, the xForm will be routed back to the faculty supervisor again for approval.
5.3 Post-Faculty Supervisor Approval For all xForms requiring faculty supervisor approval, the faculty supervisor will be copied on all emails from IACUC to the PI, including final decision notifications.
Note: If IACUC needs to return the xForm to the PI for any reason, the faculty supervisor approval process will need to be repeated upon re-submission of the xForm by the PI.

24 Revised 4.24.19
6.0 Help and Support If you have any questions or problems using IRBManager, please contact the IACUC administrator at
(509) 963-3111 or [email protected].