IPMS SALISBURY NEWSLETTER Monday, 1 February 2021 …
8
IPMS SALISBURY NEWSLETTER Monday, 1 February 2021 February 2021 1 Zoom Meetings Virtual Club Meetings. Come and join us on the 1st & 3rd Tuesday of the month, details on our website & via email. Please Note: Articles and news are always welcome for inclusion in this newsletter. BUT views and information thus expressed are solely those of the author(s) and do not necessarily represent the views of the editor or the club as a whole. Articles for the April 2021 Issue to me please by March 26th 2021 PLASE NOTE NEW EMAIL ADDRESS: [email protected] FEBRUARY 2021 H ere we are the first Newsletter of 2021, and we are still in lockdown, for how much longer who can tell, but with the sad news that over 100,000 people have died in the UK due to COVID, I think it is a small price to pay to keep us safe, and to help the NHS. We have a provisional date for our model show this year of 5th June. If we are able to hold our show will be dependent on the restrictions at the time, but we will be keeping our fingers crossed that we will have some normality by then. We will be continuing with our Zoom meetings for the foreseeable future. It is great to see so many of you joining in the conversations and keeping us all abreast of what you are doing, especially modelling during the current restrictions. Please keep safe.
Transcript of IPMS SALISBURY NEWSLETTER Monday, 1 February 2021 …

IPMS SALISBURY NEWSLETTER Monday, 1 February 2021
February 2021 1
Zoom Meetings
Virtual Club Meetings. Come and join us on the 1st & 3rd Tuesday of the month, details on our website & via email.
Please Note:Articles and news are always welcome for inclusion in this newsletter. BUT views and information thus expressed are solely those of the author(s) and do not necessarily represent the views of the editor or the club as a whole.
Articles for the April 2021 Issue to me please by March 26th 2021PLASE NOTE NEW EMAIL ADDRESS: [email protected]
FEBRUARY 2021
H ere we are the first Newsletter of 2021, and we are still in lockdown, for how much longer who can tell, but with the sad news that over 100,000 people have died in the UK due to
COVID, I think it is a small price to pay to keep us safe, and to help the NHS.We have a provisional date for our model show this year of 5th June.If we are able to hold our show will be dependent on the restrictions at the time, but we will be keeping our fingers crossed that we will have some normality by then.We will be continuing with our Zoom meetings for the foreseeable future. It is great to see so many of you joining in the conversations and keeping us all abreast of what you are doing, especially modelling during the current restrictions.Please keep safe.

IPMS SALISBURY NEWSLETTER Monday, 1 February 2021
February 2021 2
Club News
Calendar of Events & Model Shows
Scalextric Conversion - Hanomag
D ue to the current restrictions our calendar of events have been cancelled until fourth notice, and it seems model show are going the same way as last year, however we have a provisional date of 5th June for our annual model show.
We will still be holding virtual club meetings via Zoom, details are emailed out the Friday before the event.Please join us, you can stay for as long as you like, just pop you head round the virtual door and say hello, we would love to hear from you.You can access Zoom via any mobile device by clicking on the link and selecting the mobile option.
1941 Limited Edition Scalextric or Hanomag Slot car Conversion
O ver half a decade ago, (yes it really was that long ago, in fact the final club night of 2015 being the first race night after Sibo and Don suggested the event during the summer) IPMS Salisbury enjoyed the first ‘Wacky Race’. As those who participated know, the main consideration was to
build a self powered model to race over a set length. I found this most fun, and often spent more time tweaking the best from my mechanised model than anything else I worked on that year. It is a shame it all came to an end.But that hankering to fettle with motors, batteries and a scale model would resurrect itself during the 2nd
pre-Christmas lockdown and resulted in a very limited edition Scalextric model.As I locked up my shop to embark on another forced break while Covid gripped the country I decided to clear out some of the junk that had accumulated in the back. One item was a broken Scalextric F1 car as well as a Ninco Ford Mustang that had been crushed. Thankfully I didn’t bin the stuff straight away and took it home to recycle. Missing the Wacky Racer builds and knowing I had a very old Nitto Sd.Kfz 251 in my loft plus a month of free time (as
long as the wife was kept sweet) I wondered if I could make a 1/35 Halftrack to run on a Slot car circuit. The answer is yes and here’s how I did it. I laid out all the items I was going to use. (fig1) I did not want to add anything I did not already own as I’m a tight bugger and I’ve enough money tied up in my stash without wasting more. I stripped down the 2 slot cars and decided to use the motor from the F1 car and the guide blade from the Ninco. The reason for choosing the Ninco came down to its simpler construction and that it relied on a sprung bayonet fitting to stay in place. The Scalextric F1 car needed a screw to keep the blade secure which would be un-reachable once the halftrack was assembled.The actual Halftrack was kit number 350 when it was first release in 1968 (Fig 2), and my example was from that period. How I have ended up with it I do not know, but think it came from Ex club member Brian Stoddart as he has a habit of buying kits from his youth. He is a lot older than me, the kit was manufactured before I was born.

IPMS SALISBURY NEWSLETTER Monday, 1 February 2021
February 2021 3
Because of this the inside of the box was quite marked from some corrosion of the working parts. I discarded the motor and tried to clean up the gears. A squirt of WD40 was then removed with a paper towel before a big dollop of bike grease was applied. It was able to rotate but not freely. I decided to rig up the whole drive train to see if it was worth pursuing further. The Scalextric motor was a very snug fit in the bonnet area of the Hanomag. I had to do a little carving to both the top and bottom hulls to get the motor to sit flat. A single screw kept the gear box in place. I removed the pinion from the old Nitto motor and hammered that onto the new motor so that the teeth would be correct. The Capacitor was already fitted to the motor so I re-soldered on the positive and negative wires with resistors also from the F1 car. These were threaded through the suspension area of the model. I had very little space to secure the motor and any movement would cause erratic running of the gears so I completely filled the void around the motor with Milliput and left it to harden. (fig 3)The proof came 24 hours later once fully hard, I used a 9v battery to provide some power and it turned over slowly but smoothly. I could justify spending more time on this project now knowing it would work.
Normally the weakest area with motorised tanks is the tracks and road wheels. I felt confident as the track was already a complete band and not reliant on a join. The axles where metal rods, tougher than plastic stubs. The next phase was once again an all or nothing stage as completing the characteristic interlaced road wheels meant I had to prepare them and fit them in one go. The kit comes with 3 shaped spacers that are intended to prevent distorting the dish shaped wheels while hammering them onto the axles. I did use them and can say I did not break a single road wheel, but these spacers where almost more of a hindrance and I did not use them as directed preferring to remove the locating lugs meant to keep the wheel
attached to the spacer and align everything by eye.The completed wheels were sprayed German grey while unfitted as the overlap would make painting in place very difficult. A long belly plate trapped all the axles for wheels and idlers in place. I applied more grease to the trough and the axels before assembling. (fig5) As this was all taking place, I had been adding other build details such as exhaust, stowage boxes and interior as per the normal kit instructions.The plastic kit builds as any model does so I won’t bore you with the process. It is a little more basic than a Tamiya kit but remember this appeared 5 years before Tamiya’s offering. It is also an Ausf A, Tamiya’s first Hanomag was an Ausf C. I decided to compare the models for scale and was pleasantly
surprised. The bodies are almost the same. Nitto looses out on the finesse though as many parts are thicker. And some parts are truly awful- the MG34 is like a cartoon. (fig6)Thankfully I have enough spares to be able to replace all the suspect parts so fitted new MG’s, new tools and also decided to put a crew on board. The driver is almost invisible which is good as I had to cut his toes off to get him in.

IPMS SALISBURY NEWSLETTER Monday, 1 February 2021
February 2021 4
I used a set of 88mm Flak crew to make up 4 panzer grenadiers for the troop compartment, swapping parts around to have two men sitting and two standing and seeming to be interacting. The aim wasn’t for a show piece so I decided on this build to use a box set from ‘Lifecolor’ for German uniforms. It certainly sped things up, I could just switch off from looking for that ‘just right’ shade, but I was surprised at the brightness of some of the colours. A full body wash off ‘Army Painter’ Dark Tone helped sort that out. As all this came together I had to work out how the front wheels and guide blade would work together. This was the area that needed the most thought but all seemed to click at the same time. I used the front axle from the Mustang complete with PTFE bushes. I glued the bushes onto the chassis then built up the join with Milliput. These allowed the metal shaft to rotate freely. Either side of the shaft at the vehicle’s centre-line a stout palsticard box was constructed that had a hole drilled through that just misses the axel for the blade to slot into. This ensures the pivot is lined up with the front wheels. These were then fitted to each end of the axel and with a tiny bit of adjustment just touch the floor when the blade is inserted into the racetrack slot. I omitted any attempt to have the wheels steer. Before clicking the blade fully into place (the bayonet fitting will hold it from falling out) I soldered the terminals on that fit into the blade. These connect with the braids to supply electricity from the track. Final assembly was fun, putting the crew in, adding details that were not in the kit such as width markers and headlight covers as well as some soldier’s equipment in the back. The decals were no good as would be expected from 1968 so I hand painted everything except a VRN that came from the spares box.Finished and looking good, but how did it run? A test showed it worked and trundled along with the gears making a bit of noise but the tracks actually propelling it and the front wheels turning so job done. However this Christmas when the Scalextric came out as it does this time of year it seemed to metamorphoses itself. After a couple of laps just plodding along the grease must have been distributed and the gearbox bedded in as it began to get quicker and quicker. The site of a Hanomag fishtailing out of a bend is pretty cool even if it wasn’t able to beat the conventional slot cars.
Sibo
IPMS SALISBURY NEWSLETTER Monday, 1 February 2021
February 2021 5
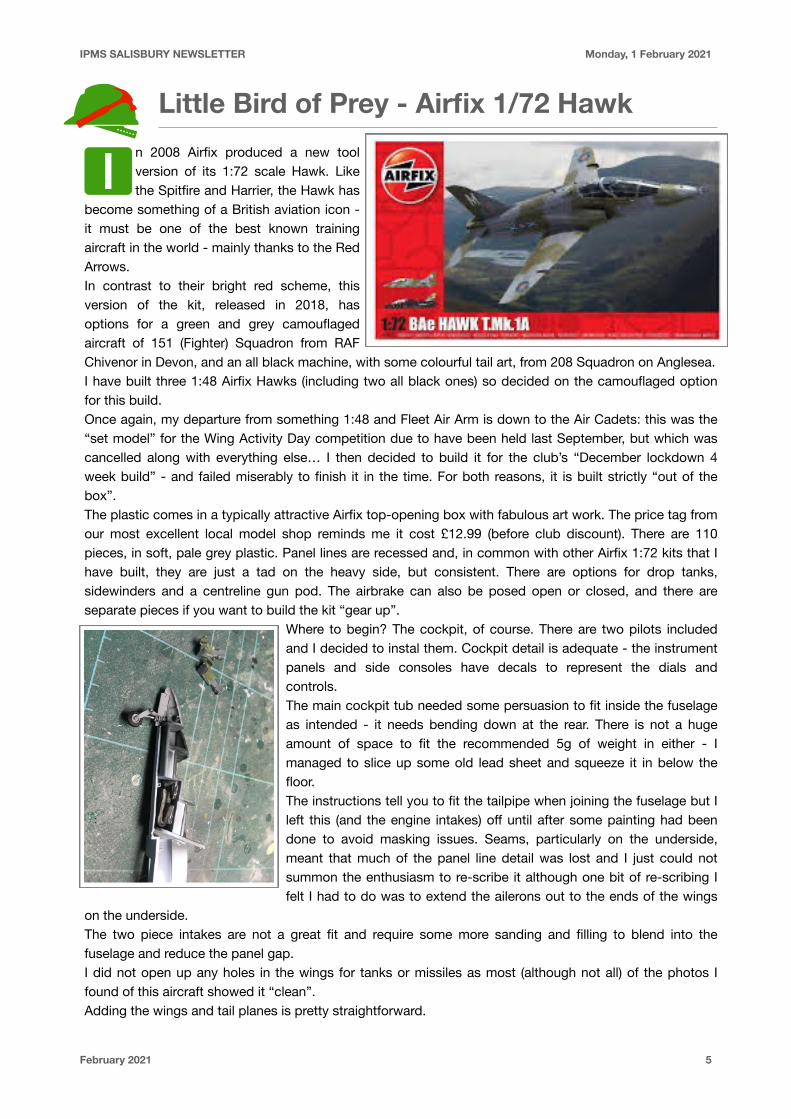
Little Bird of Prey - Airfix 1/72 Hawk
I n 2008 Airfix produced a new tool version of its 1:72 scale Hawk. Like the Spitfire and Harrier, the Hawk has
become something of a British aviation icon - it must be one of the best known training aircraft in the world - mainly thanks to the Red Arrows.In contrast to their bright red scheme, this version of the kit, released in 2018, has options for a green and grey camouflaged aircraft of 151 (Fighter) Squadron from RAF Chivenor in Devon, and an all black machine, with some colourful tail art, from 208 Squadron on Anglesea.I have built three 1:48 Airfix Hawks (including two all black ones) so decided on the camouflaged option for this build. Once again, my departure from something 1:48 and Fleet Air Arm is down to the Air Cadets: this was the “set model” for the Wing Activity Day competition due to have been held last September, but which was cancelled along with everything else… I then decided to build it for the club’s “December lockdown 4 week build” - and failed miserably to finish it in the time. For both reasons, it is built strictly “out of the box”.The plastic comes in a typically attractive Airfix top-opening box with fabulous art work. The price tag from our most excellent local model shop reminds me it cost £12.99 (before club discount). There are 110 pieces, in soft, pale grey plastic. Panel lines are recessed and, in common with other Airfix 1:72 kits that I have built, they are just a tad on the heavy side, but consistent. There are options for drop tanks, sidewinders and a centreline gun pod. The airbrake can also be posed open or closed, and there are separate pieces if you want to build the kit “gear up”.
Where to begin? The cockpit, of course. There are two pilots included and I decided to instal them. Cockpit detail is adequate - the instrument panels and side consoles have decals to represent the dials and controls.The main cockpit tub needed some persuasion to fit inside the fuselage as intended - it needs bending down at the rear. There is not a huge amount of space to fit the recommended 5g of weight in either - I managed to slice up some old lead sheet and squeeze it in below the floor.The instructions tell you to fit the tailpipe when joining the fuselage but I left this (and the engine intakes) off until after some painting had been done to avoid masking issues. Seams, particularly on the underside, meant that much of the panel line detail was lost and I just could not summon the enthusiasm to re-scribe it although one bit of re-scribing I felt I had to do was to extend the ailerons out to the ends of the wings
on the underside.The two piece intakes are not a great fit and require some more sanding and filling to blend into the fuselage and reduce the panel gap.I did not open up any holes in the wings for tanks or missiles as most (although not all) of the photos I found of this aircraft showed it “clean”.Adding the wings and tail planes is pretty straightforward.

IPMS SALISBURY NEWSLETTER Monday, 1 February 2021
February 2021 6
The clear parts are another story, however, and the weakest point on this kit. The main canopy part had some serious distortion and flow lines that no amount of polishing was going to remove. The moulded detonation cord is not ideal. There is an internal windscreen between the front and rear seats - this is much too big, and there is no way it can fit over the top of the rear instrument panel shroud with the canopy closed. I was happy to leave it out as it seemed to me that glueing one clear part to the inside of another (highly visible one) was going to be disastrous in any event. The fit of these parts was far from great, needing filler around the front of the windscreen and leaving gaps between the windscreen and the opening part of the canopy, and gaps and/or steps between the canopy and the fuselage. If the cockpit were more detailed, it might be an idea to pose the canopy open to avoid these fit issues; otherwise I’m sure there is a vac-formed one out there somewhere that, in this instance, I would recommend over the kit parts.
With the airframe complete I began painting with my usual pre-shade of the panel lines in black. I then mixed up a grey using roughly 50:50 Tamiya XF-83 Medium Sea Grey and XF-24 Dark Grey. I copied the camouflage pattern with “white-tac sausages”. My first attempt failed as these would not stick to the matt paint finish, so I gave the model a coat of Clear and tried again, this time with more success. It was quite a fiddly process as this is a wrap-around scheme. I then painted out the grey areas with some Humbrol Maskol and moved onto the green - Tamiya XF-81 Dark Green 2 (RAF). With both this and the grey I also added some
white to the airbrush colour cup to provide some variation to the tone and give a slightly faded appearance.After another coat of Klear I moved onto the decals. These are excellent. They are thin, well printed, opaque and settled into the panel lines nicely with the help of some MicroSol. Whilst I admire Airfix for providing a full suite of stencil decals, there are dozens of them (as befits a fast jet) and many are so tiny as to be almost invisible. I persevered for as long as I could, but I was getting rather fed up with this model and the time it was taking me to complete it, so some of the decals didn’t make it… I gave the model a wash of Flory Models “dark dirt”. I was conscious that with the panel lines being a little heavy, this might look wrong - especially in this scale - but photos of the aircraft showed it to be quite weathered and so I thought it was appropriate. Looking at the completed model, I’m glad I did.I was then able to finish off with a flat varnish, and adding the undercarriage, pitot, jet pipe, blade ariels and nose light. I opened up the jet pipe orifice as the kit item doesn’t look anything like the back end of a Hawk.
I did a little detail painting to show wingtip navigation lights and anti-collision beacons and finally I could call it done.My internet research revealed that the real XX353 was lost in a mid-air collision with another Hawk - and I have to confess that at times during this build I thought the model might end it’s life in a similarly spectacular manner. Looking the finished result there is lots that could be better - both about the kit and the way I built it. Most obvious is that the canopy is really poor and that is a shame on a Hawk where it is a major feature of the aircraft. If you want a mediocre kit with superb decals, however, then this is the one for you…
Nick W.

IPMS SALISBURY NEWSLETTER Monday, 1 February 2021
February 2021 7
Buyer Beware
A nother lockdown which might mean a little more modelling time but also the need to source stuff. While some club members have linked up with me to get supplies as well as collect the latest arrival, it is a fact that during this Pandemic online purchasing has become an easier
alternative.However some words of caution. This was sent out by Hannants – ‘We just want to mention about the increasing number of websites out there that give the impression they are in the UK because they have .co.uk in their web address. More and more are not in the UK. So you could order from them and then get charged a huge amount for postage and probably duty, vat and the dreaded £13.00 Post Office handling fee. Unless you already know for sure we recommend you check before ordering. Sadly .co.uk does not mean they are in the UK. We ourselves have seen Oriental sites with bizarre names which are out and out fraud charging triple the price with pictures copied from Ebay.”I use Ebay, it can be fun though there are less bargains than in the good old days. I always limit my search to UK ONLY, but have found that you need to look down to the dispatching country as often the address is a UK front. It is not much fun waiting 6 weeks for something to arrive, may as well build something from the stash instead. And Ebay has become a bit more restricted in its descriptions, or so it would seem. The following picture was listed as NEW. According to the seller it was ex shop stock and not made hence new. I think I’d disagree on that.
Sibo
Do you have an online purchasing story?
P lease let us know, it might help your fellow members from falling into the same trap.I personally, touch wood, have not had any problems whilst ordering online.During the first lockdown back in March 2020 I purchased a 1/32 Scale Tamiya Mosquito from
Hobby Link Japan, even with the cost of delivery it still worked out cheaper then any UK prices I saw, also there was no stock available in the UK.I had never ordered from Hobby Link Japan before, but I found the process a little confusing as they put the item into a virtual storage bin until they had received payment, the stock level was still showing one item I was a bit concerned that the item might get released to someone else.The stock level did not change until the item had been remove from the virtual bin into the virtual despatch area, it was only until DHL sent me a dispatch notice that I saw the stock levels change.A bit worrying, but happy to say I was able to track the package across Japan into China, then Germany, eventually arriving in the UK via France, it stayed longer in France then it did to get across China.
Richard

IPMS SALISBURY NEWSLETTER Monday, 1 February 2021
February 2021 8