
iPhone 6 Plus Teardown - ifixit-guide-pdfs.s3.amazonaws.com · procedure) of the iPhone 5—the...
24
iPhone 6 Plus Teardown iPhone 6 Plus Teardown on September 18, 2014. Redigido por: Miroslav Djuric iPhone 6 Plus Teardown © iFixit — CC BY-NC-SA pt.iFixit.com Página 1 de 24
Transcript of iPhone 6 Plus Teardown - ifixit-guide-pdfs.s3.amazonaws.com · procedure) of the iPhone 5—the...
iPhone 6 Plus TeardowniPhone 6 Plus Teardown on September 18, 2014.
Redigido por: Miroslav Djuric
iPhone 6 Plus Teardown
© iFixit — CC BY-NC-SA pt.iFixit.com Página 1 de 24

INTRODUÇÃO
Over the years, we've seen the iPhone evolve—and grow. It began as just the iPhone. Soon itlearned how to 3G, it gained an S (it would lose and gain this every other year), and it even learnedto read fingerprints. Years of hard work and dedication have made the iPhone into what it is today,the iPhone 6 Plus. Join us live as we explore this gargantuan iPhone 6 Plus.
Oh, were you looking for the normal-sized iPhone 6 teardown? We've got that, too.
Follow us on Facebook, Instagram, or Twitter for all the latest teardown news.
[video: https://www.youtube.com/watch?v=65yYqoX_1As]
FERRAMENTAS:iSclack (1)
Precision Tweezers Set (1)
Jimmy (1)
iFixit Opening Tools (1)
Spudger (1)
64 Bit Driver Kit (1)
iPhone 6 Plus Teardown
© iFixit — CC BY-NC-SA pt.iFixit.com Página 2 de 24
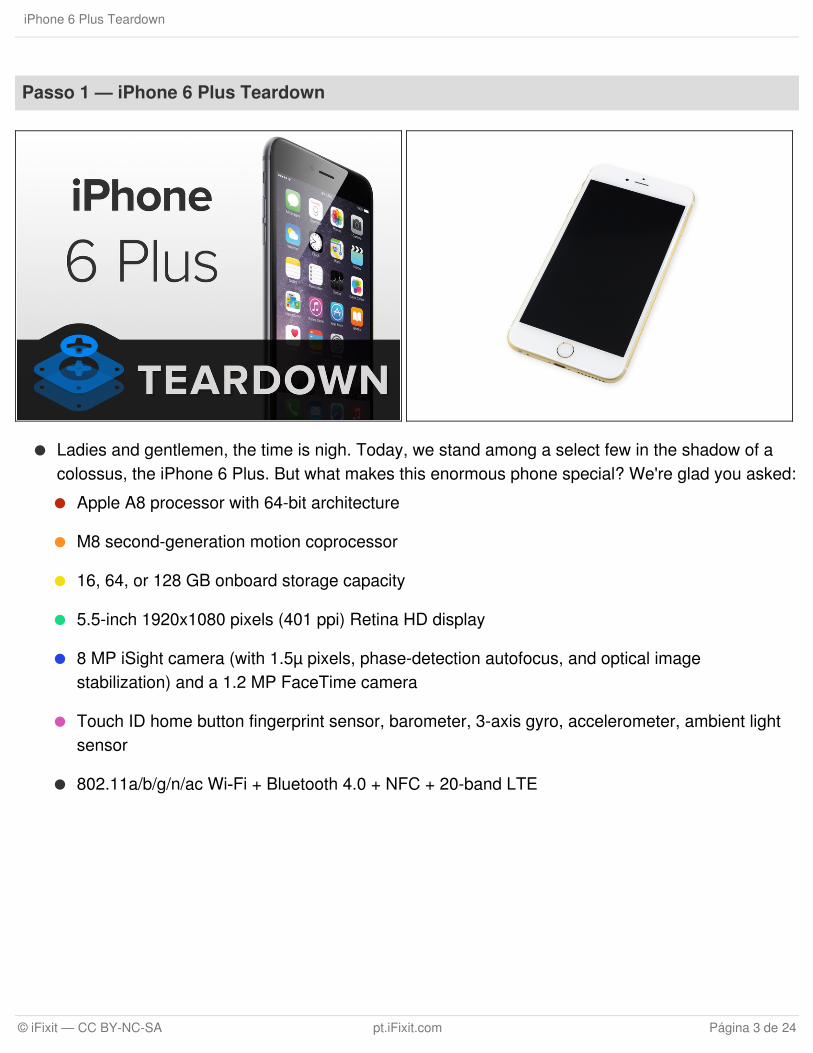
Passo 1 — iPhone 6 Plus Teardown
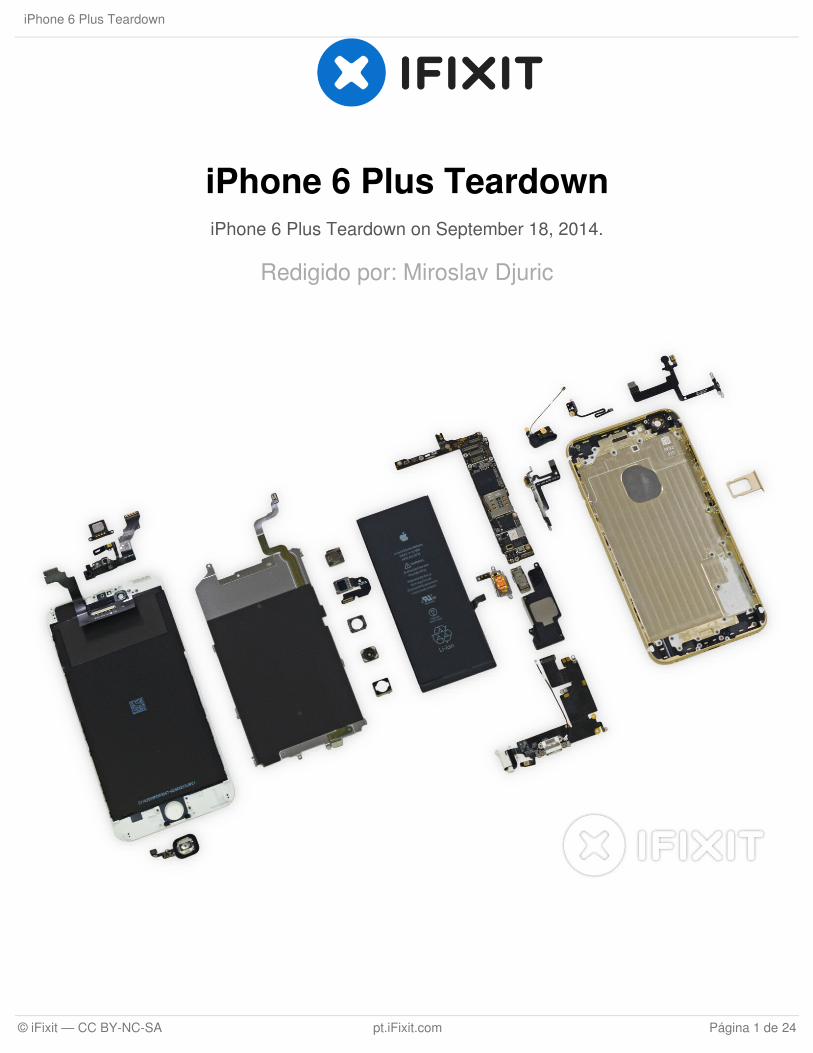
Ladies and gentlemen, the time is nigh. Today, we stand among a select few in the shadow of acolossus, the iPhone 6 Plus. But what makes this enormous phone special? We're glad you asked:
Apple A8 processor with 64-bit architecture
M8 second-generation motion coprocessor
16, 64, or 128 GB onboard storage capacity
5.5-inch 1920x1080 pixels (401 ppi) Retina HD display
8 MP iSight camera (with 1.5µ pixels, phase-detection autofocus, and optical imagestabilization) and a 1.2 MP FaceTime camera
Touch ID home button fingerprint sensor, barometer, 3-axis gyro, accelerometer, ambient lightsensor
802.11a/b/g/n/ac Wi‑Fi + Bluetooth 4.0 + NFC + 20-band LTE
iPhone 6 Plus Teardown
© iFixit — CC BY-NC-SA pt.iFixit.com Página 3 de 24

Passo 2
News flash from the Land Down Under:
The line was already 50 people strong yesterday around 1 PM local Aussie time.
By 7 AM there were close to a thousand people in line.
Our teardown team was #53 in line, and the Apple Store only had 40 iPhone 6 Plus models instock.
But hey, no worries—we got our hands on an iPhone 6 Plus, all thanks to a wonderful AustralianiFixit fan named Ricky. Thanks Ricky!
It turns out Ricky is not related to this Ricky.
After our little Apple Store adventure, we skedaddled back to MacFixit Australia, where theteardown's taking place. We want to send out a big thanks to our good friends at MacFixit forletting us use their office. They stock Mac and iPhone upgrades/accessories, and also carry ouriFixit toolkits. Thanks MacFixit Australia!
iPhone 6 Plus Teardown
© iFixit — CC BY-NC-SA pt.iFixit.com Página 4 de 24
Passo 3
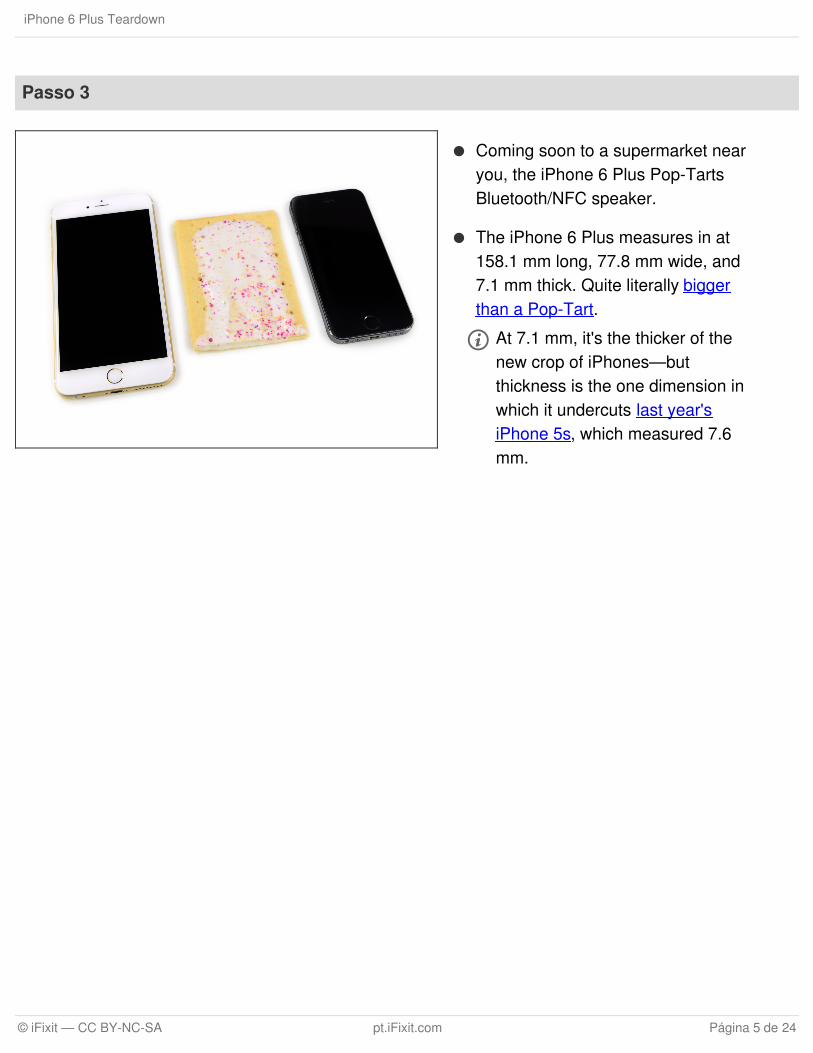
Coming soon to a supermarket nearyou, the iPhone 6 Plus Pop-TartsBluetooth/NFC speaker.
The iPhone 6 Plus measures in at158.1 mm long, 77.8 mm wide, and7.1 mm thick. Quite literally biggerthan a Pop-Tart.
At 7.1 mm, it's the thicker of thenew crop of iPhones—butthickness is the one dimension inwhich it undercuts last year'siPhone 5s, which measured 7.6mm.
iPhone 6 Plus Teardown
© iFixit — CC BY-NC-SA pt.iFixit.com Página 5 de 24
Passo 4
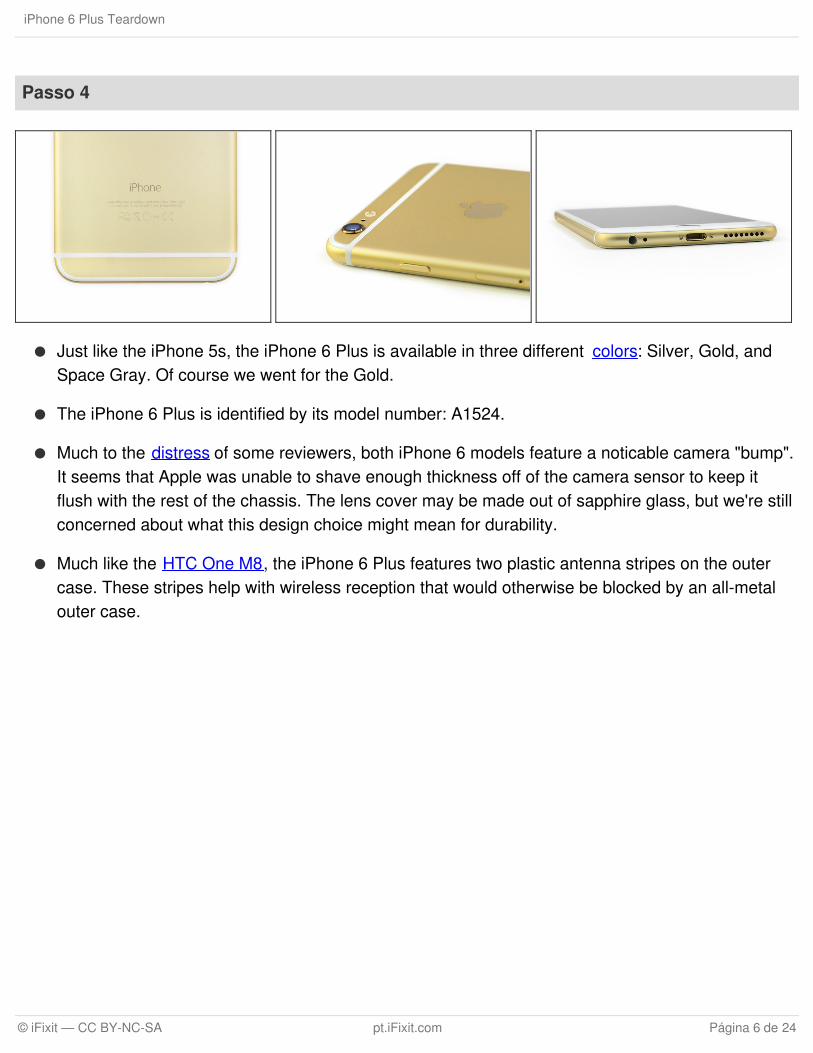
Just like the iPhone 5s, the iPhone 6 Plus is available in three different colors: Silver, Gold, andSpace Gray. Of course we went for the Gold.
The iPhone 6 Plus is identified by its model number: A1524.
Much to the distress of some reviewers, both iPhone 6 models feature a noticable camera "bump".It seems that Apple was unable to shave enough thickness off of the camera sensor to keep itflush with the rest of the chassis. The lens cover may be made out of sapphire glass, but we're stillconcerned about what this design choice might mean for durability.
Much like the HTC One M8, the iPhone 6 Plus features two plastic antenna stripes on the outercase. These stripes help with wireless reception that would otherwise be blocked by an all-metalouter case.
iPhone 6 Plus Teardown
© iFixit — CC BY-NC-SA pt.iFixit.com Página 6 de 24
Passo 5
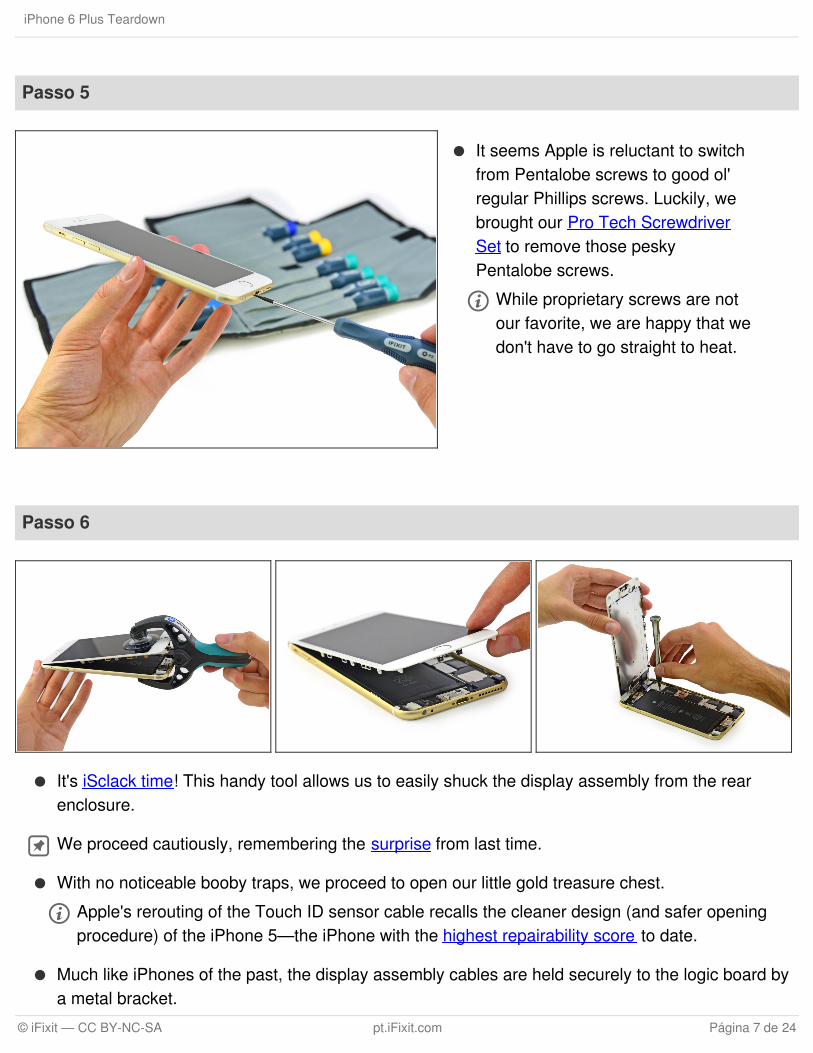
It seems Apple is reluctant to switchfrom Pentalobe screws to good ol'regular Phillips screws. Luckily, webrought our Pro Tech ScrewdriverSet to remove those peskyPentalobe screws.
While proprietary screws are notour favorite, we are happy that wedon't have to go straight to heat.
Passo 6
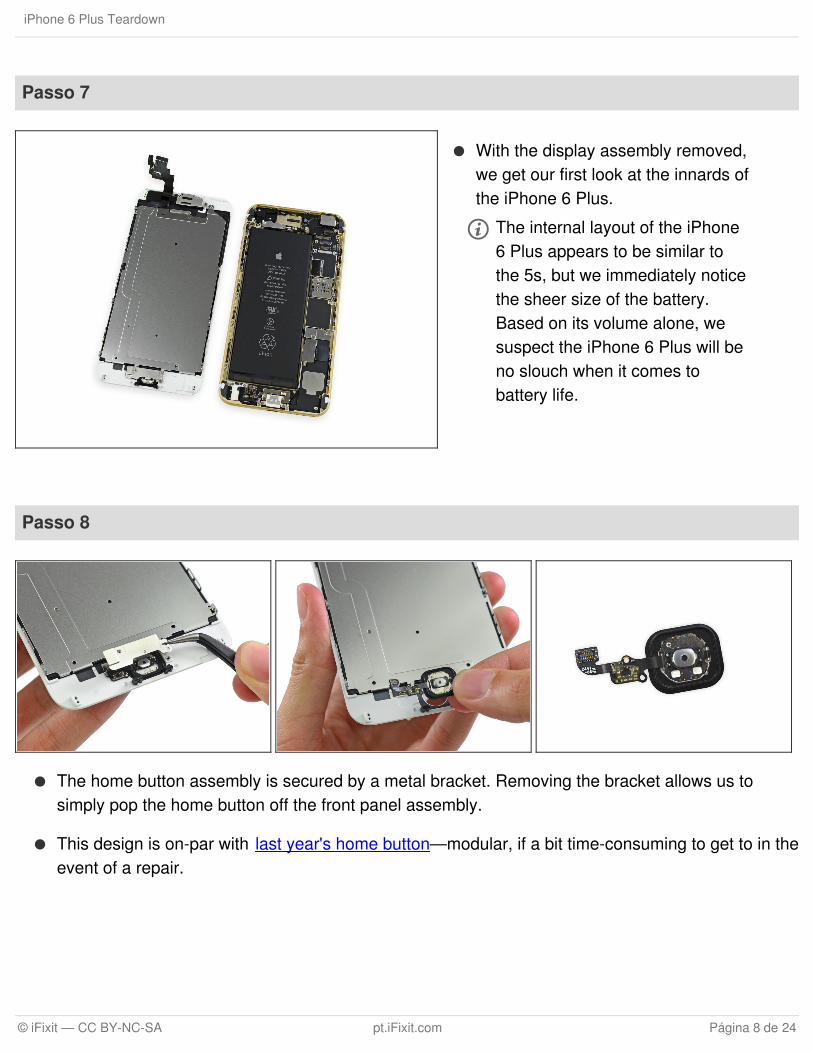
It's iSclack time! This handy tool allows us to easily shuck the display assembly from the rearenclosure.
We proceed cautiously, remembering the surprise from last time.
With no noticeable booby traps, we proceed to open our little gold treasure chest.
Apple's rerouting of the Touch ID sensor cable recalls the cleaner design (and safer openingprocedure) of the iPhone 5—the iPhone with the highest repairability score to date.
Much like iPhones of the past, the display assembly cables are held securely to the logic board bya metal bracket.
iPhone 6 Plus Teardown
© iFixit — CC BY-NC-SA pt.iFixit.com Página 7 de 24
Passo 7
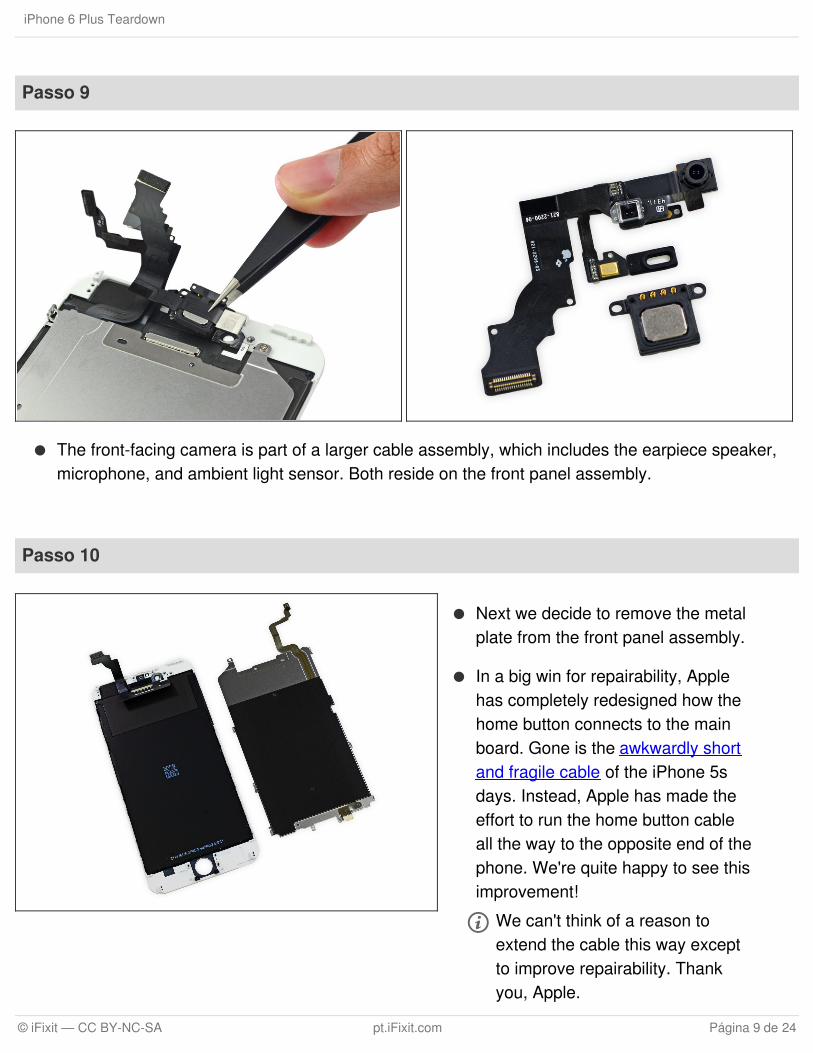
With the display assembly removed,we get our first look at the innards ofthe iPhone 6 Plus.
The internal layout of the iPhone6 Plus appears to be similar tothe 5s, but we immediately noticethe sheer size of the battery.Based on its volume alone, wesuspect the iPhone 6 Plus will beno slouch when it comes tobattery life.
Passo 8
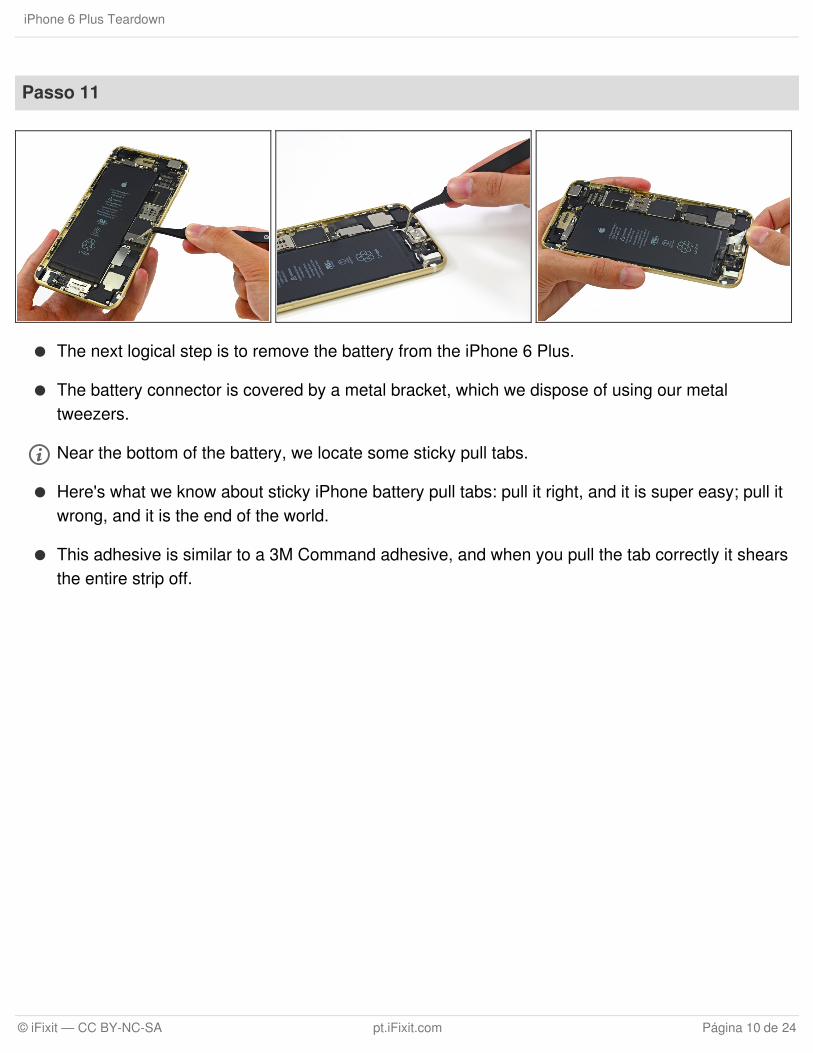
The home button assembly is secured by a metal bracket. Removing the bracket allows us tosimply pop the home button off the front panel assembly.
This design is on-par with last year's home button—modular, if a bit time-consuming to get to in theevent of a repair.
iPhone 6 Plus Teardown
© iFixit — CC BY-NC-SA pt.iFixit.com Página 8 de 24
Passo 9
The front-facing camera is part of a larger cable assembly, which includes the earpiece speaker,microphone, and ambient light sensor. Both reside on the front panel assembly.
Passo 10
Next we decide to remove the metalplate from the front panel assembly.
In a big win for repairability, Applehas completely redesigned how thehome button connects to the mainboard. Gone is the awkwardly shortand fragile cable of the iPhone 5sdays. Instead, Apple has made theeffort to run the home button cableall the way to the opposite end of thephone. We're quite happy to see thisimprovement!
We can't think of a reason toextend the cable this way exceptto improve repairability. Thankyou, Apple.
iPhone 6 Plus Teardown
© iFixit — CC BY-NC-SA pt.iFixit.com Página 9 de 24
Passo 11
The next logical step is to remove the battery from the iPhone 6 Plus.
The battery connector is covered by a metal bracket, which we dispose of using our metaltweezers.
Near the bottom of the battery, we locate some sticky pull tabs.
Here's what we know about sticky iPhone battery pull tabs: pull it right, and it is super easy; pull itwrong, and it is the end of the world.
This adhesive is similar to a 3M Command adhesive, and when you pull the tab correctly it shearsthe entire strip off.
iPhone 6 Plus Teardown
© iFixit — CC BY-NC-SA pt.iFixit.com Página 10 de 24
Passo 12
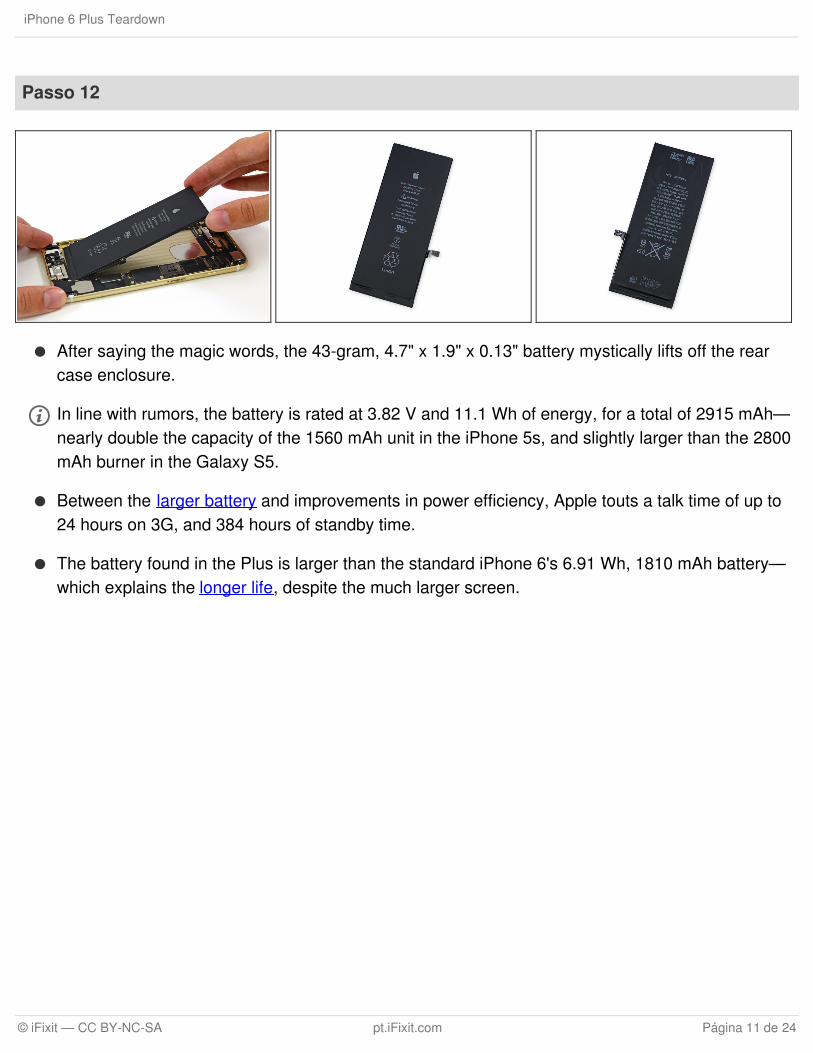
After saying the magic words, the 43-gram, 4.7" x 1.9" x 0.13" battery mystically lifts off the rearcase enclosure.
In line with rumors, the battery is rated at 3.82 V and 11.1 Wh of energy, for a total of 2915 mAh—nearly double the capacity of the 1560 mAh unit in the iPhone 5s, and slightly larger than the 2800mAh burner in the Galaxy S5.
Between the larger battery and improvements in power efficiency, Apple touts a talk time of up to24 hours on 3G, and 384 hours of standby time.
The battery found in the Plus is larger than the standard iPhone 6's 6.91 Wh, 1810 mAh battery—which explains the longer life, despite the much larger screen.
iPhone 6 Plus Teardown
© iFixit — CC BY-NC-SA pt.iFixit.com Página 11 de 24
Passo 13
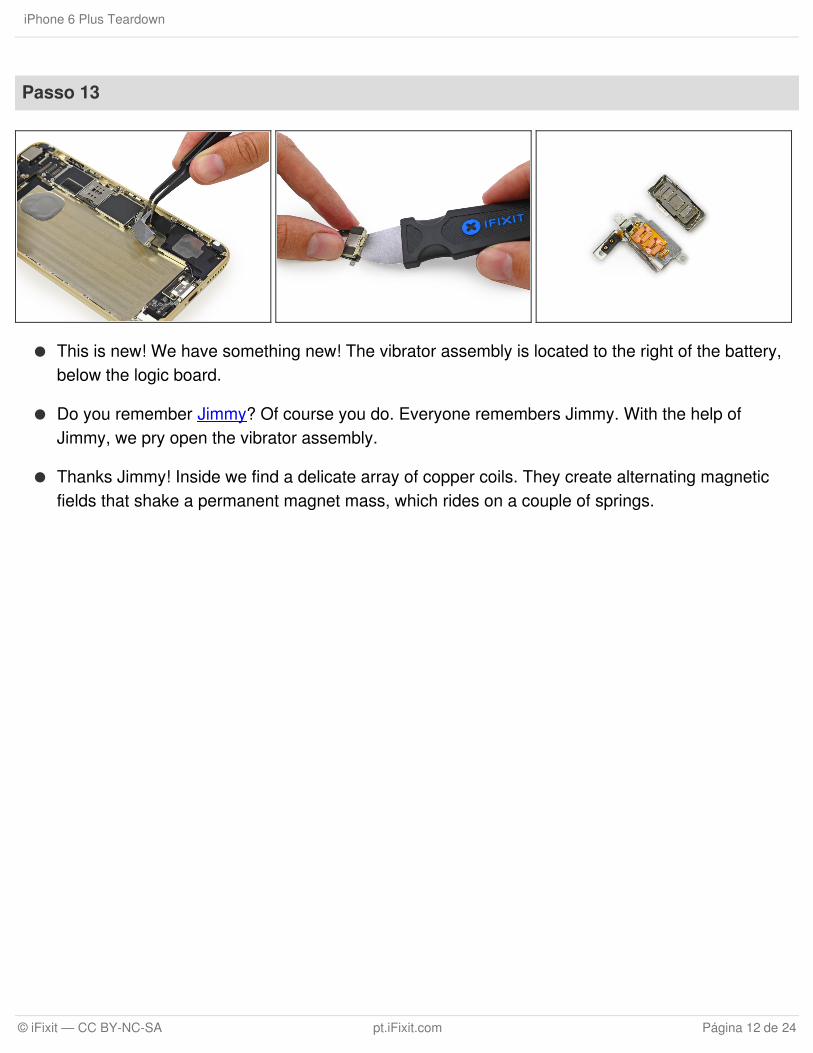
This is new! We have something new! The vibrator assembly is located to the right of the battery,below the logic board.
Do you remember Jimmy? Of course you do. Everyone remembers Jimmy. With the help ofJimmy, we pry open the vibrator assembly.
Thanks Jimmy! Inside we find a delicate array of copper coils. They create alternating magneticfields that shake a permanent magnet mass, which rides on a couple of springs.
iPhone 6 Plus Teardown
© iFixit — CC BY-NC-SA pt.iFixit.com Página 12 de 24
Passo 14
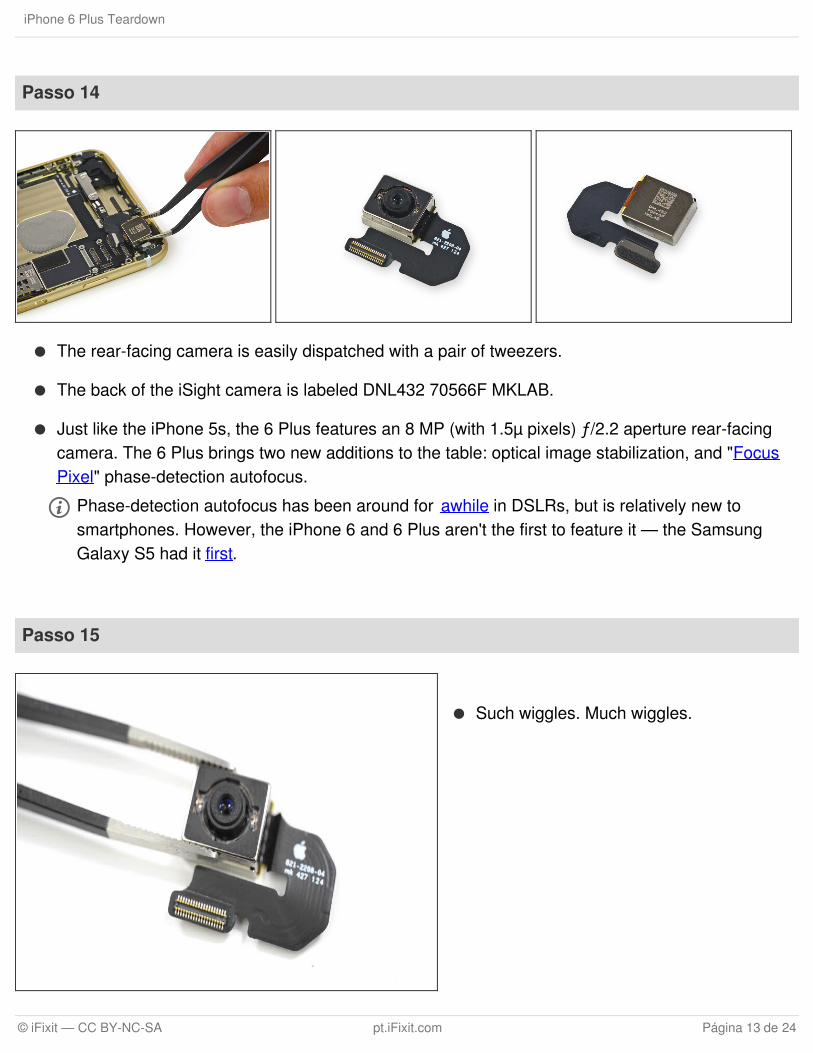
The rear-facing camera is easily dispatched with a pair of tweezers.
The back of the iSight camera is labeled DNL432 70566F MKLAB.
Just like the iPhone 5s, the 6 Plus features an 8 MP (with 1.5µ pixels) ƒ/2.2 aperture rear-facingcamera. The 6 Plus brings two new additions to the table: optical image stabilization, and "FocusPixel" phase-detection autofocus.
Phase-detection autofocus has been around for awhile in DSLRs, but is relatively new tosmartphones. However, the iPhone 6 and 6 Plus aren't the first to feature it — the SamsungGalaxy S5 had it first.
Passo 15
Such wiggles. Much wiggles.
iPhone 6 Plus Teardown
© iFixit — CC BY-NC-SA pt.iFixit.com Página 13 de 24
Passo 16
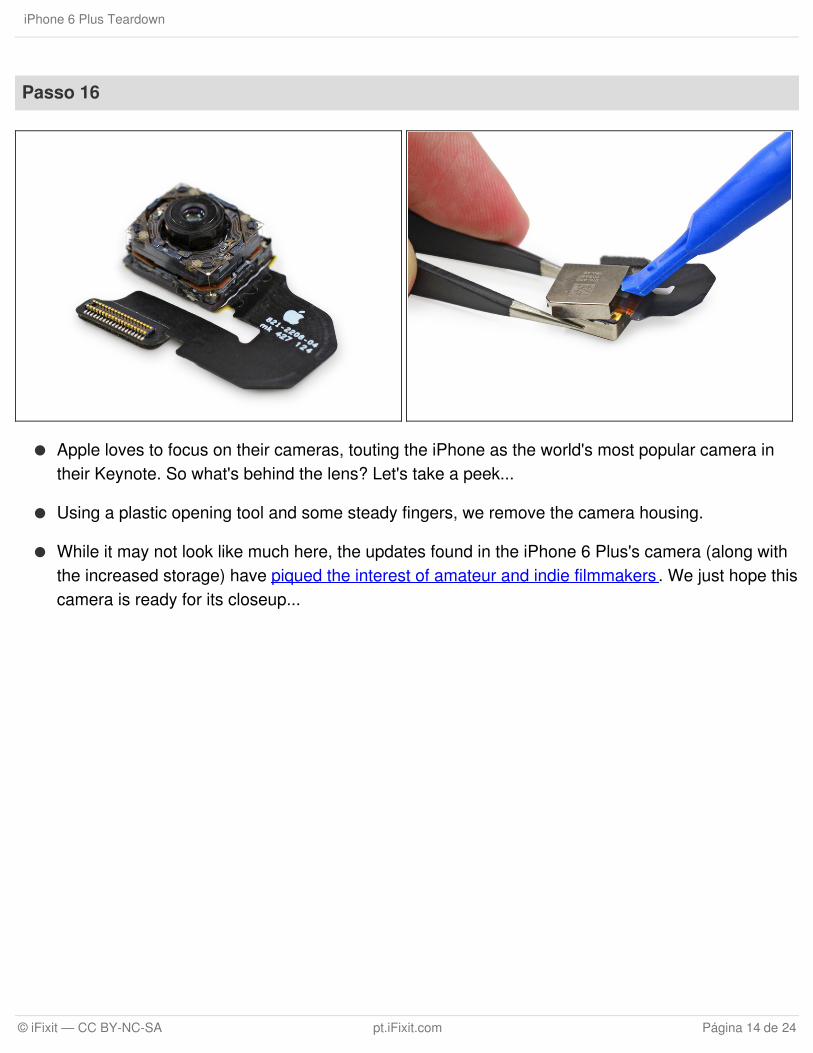
Apple loves to focus on their cameras, touting the iPhone as the world's most popular camera intheir Keynote. So what's behind the lens? Let's take a peek...
Using a plastic opening tool and some steady fingers, we remove the camera housing.
While it may not look like much here, the updates found in the iPhone 6 Plus's camera (along withthe increased storage) have piqued the interest of amateur and indie filmmakers . We just hope thiscamera is ready for its closeup...
iPhone 6 Plus Teardown
© iFixit — CC BY-NC-SA pt.iFixit.com Página 14 de 24
Passo 17
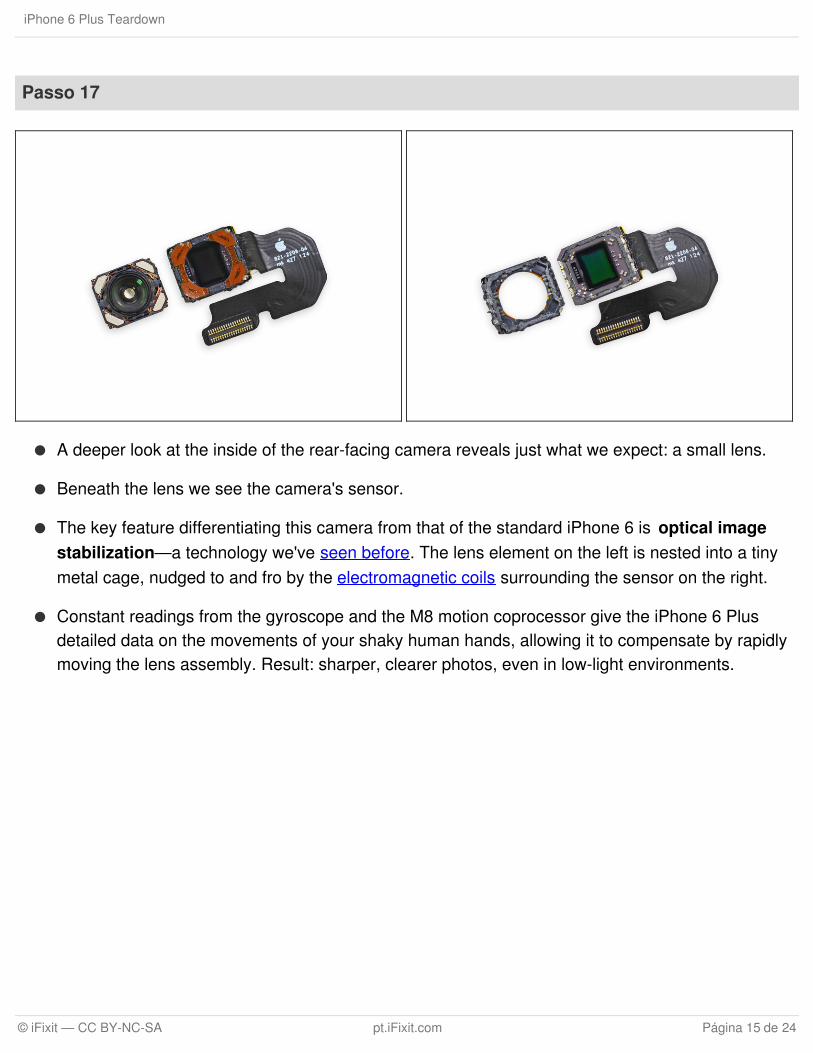
A deeper look at the inside of the rear-facing camera reveals just what we expect: a small lens.
Beneath the lens we see the camera's sensor.
The key feature differentiating this camera from that of the standard iPhone 6 is optical imagestabilization—a technology we've seen before. The lens element on the left is nested into a tinymetal cage, nudged to and fro by the electromagnetic coils surrounding the sensor on the right.
Constant readings from the gyroscope and the M8 motion coprocessor give the iPhone 6 Plusdetailed data on the movements of your shaky human hands, allowing it to compensate by rapidlymoving the lens assembly. Result: sharper, clearer photos, even in low-light environments.
iPhone 6 Plus Teardown
© iFixit — CC BY-NC-SA pt.iFixit.com Página 15 de 24

Passo 18
It's about time we remove the logic board, secured tightly to the rear case enclosure by a fewscrews.
But before we finish, we're reminded to spudger away an antenna connector from the back of thelogic board.
iPhone 6 Plus Teardown
© iFixit — CC BY-NC-SA pt.iFixit.com Página 16 de 24
Passo 19
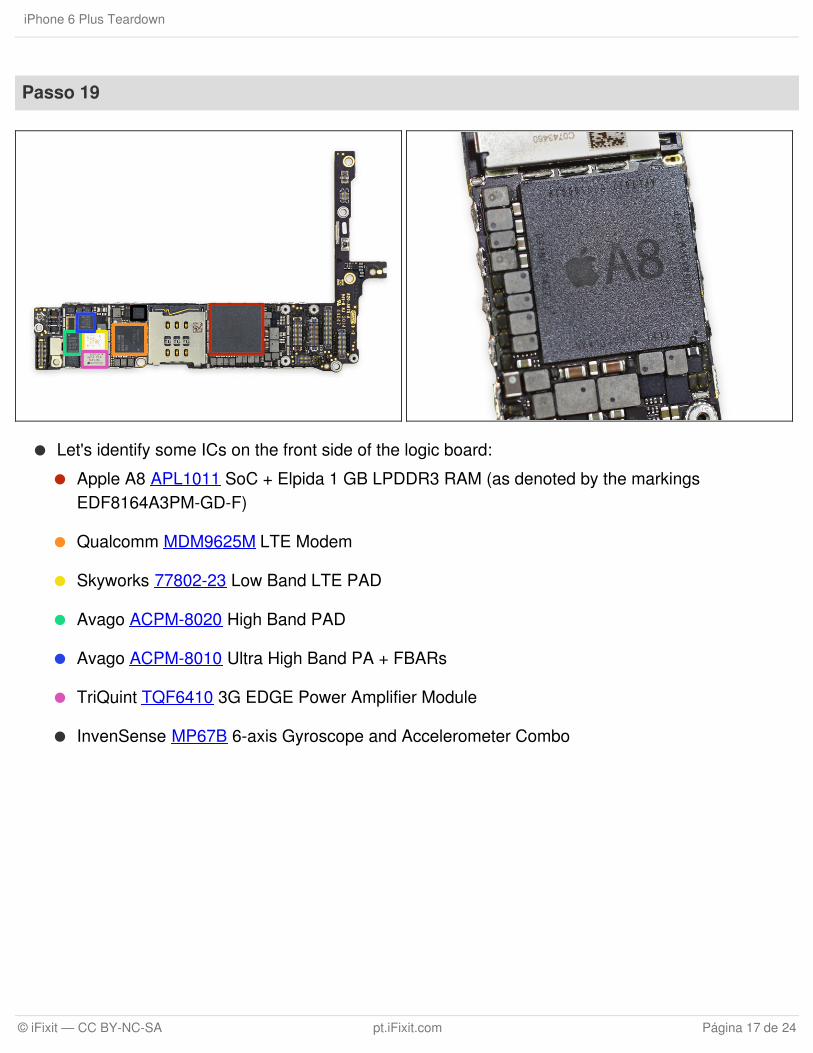
Let's identify some ICs on the front side of the logic board:
Apple A8 APL1011 SoC + Elpida 1 GB LPDDR3 RAM (as denoted by the markingsEDF8164A3PM-GD-F)
Qualcomm MDM9625M LTE Modem
Skyworks 77802-23 Low Band LTE PAD
Avago ACPM-8020 High Band PAD
Avago ACPM-8010 Ultra High Band PA + FBARs
TriQuint TQF6410 3G EDGE Power Amplifier Module
InvenSense MP67B 6-axis Gyroscope and Accelerometer Combo
iPhone 6 Plus Teardown
© iFixit — CC BY-NC-SA pt.iFixit.com Página 17 de 24
Passo 20
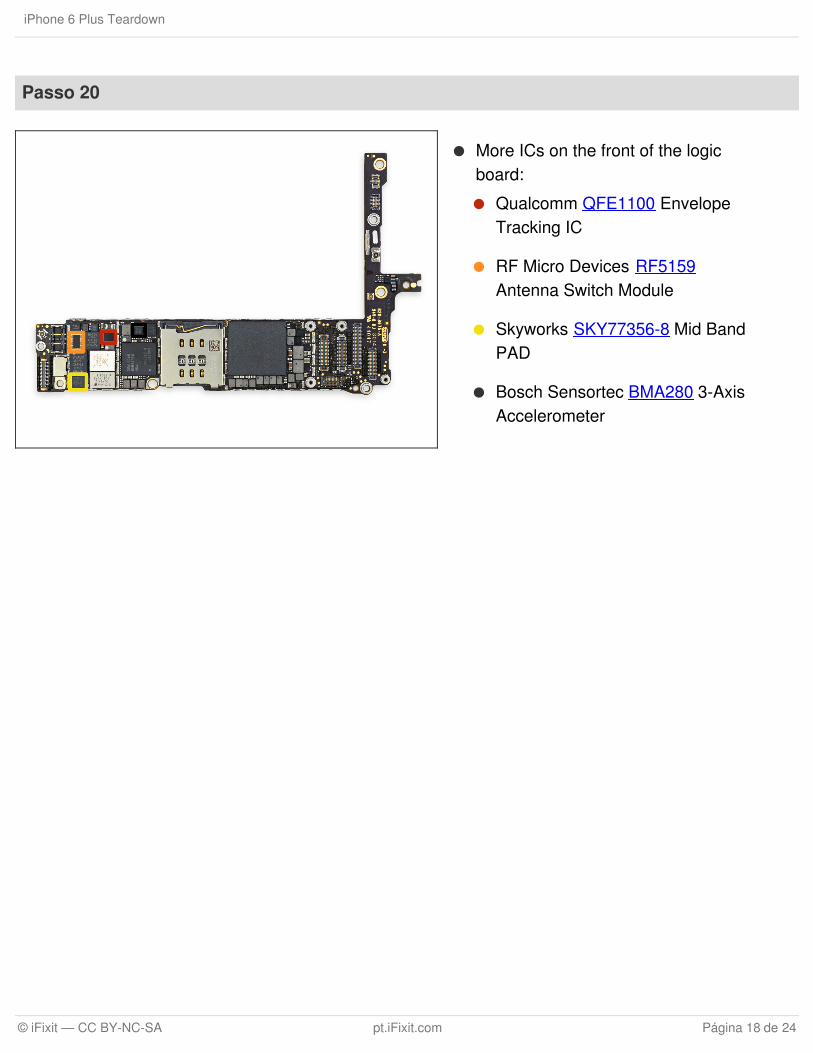
More ICs on the front of the logicboard:
Qualcomm QFE1100 EnvelopeTracking IC
RF Micro Devices RF5159Antenna Switch Module
Skyworks SKY77356-8 Mid BandPAD
Bosch Sensortec BMA280 3-AxisAccelerometer
iPhone 6 Plus Teardown
© iFixit — CC BY-NC-SA pt.iFixit.com Página 18 de 24
Passo 21
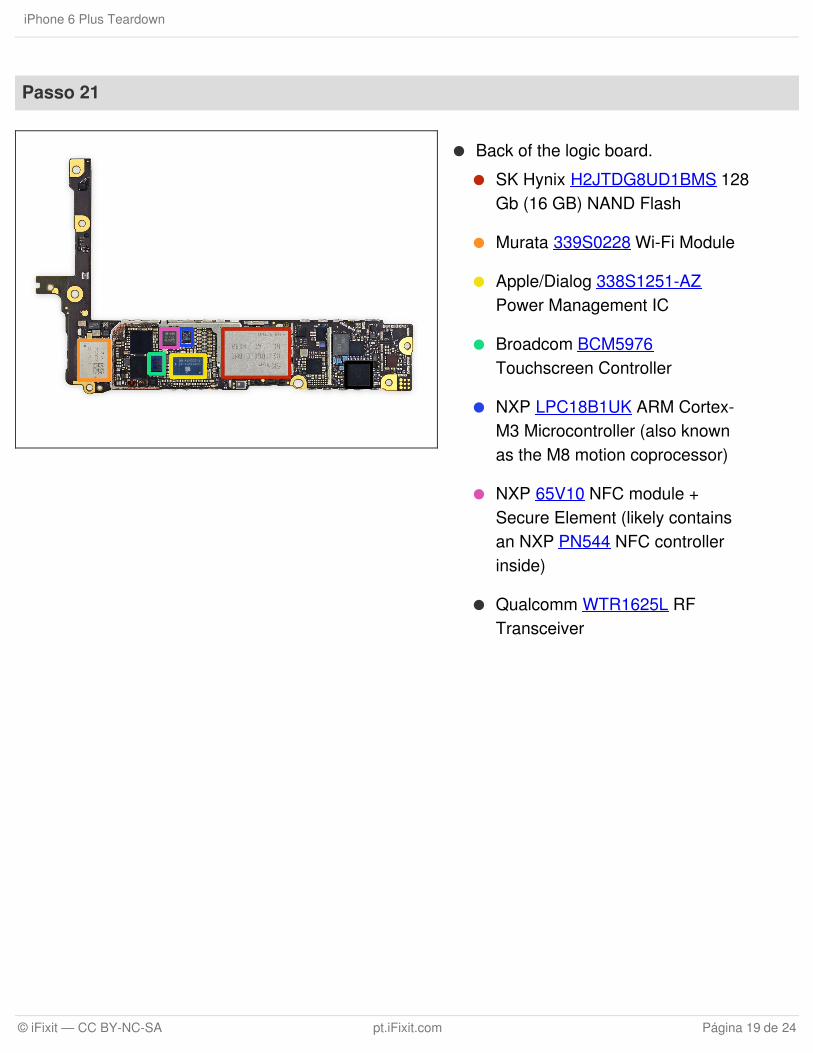
Back of the logic board.
SK Hynix H2JTDG8UD1BMS 128Gb (16 GB) NAND Flash
Murata 339S0228 Wi-Fi Module
Apple/Dialog 338S1251-AZPower Management IC
Broadcom BCM5976Touchscreen Controller
NXP LPC18B1UK ARM Cortex-M3 Microcontroller (also knownas the M8 motion coprocessor)
NXP 65V10 NFC module +Secure Element (likely containsan NXP PN544 NFC controllerinside)
Qualcomm WTR1625L RFTransceiver
iPhone 6 Plus Teardown
© iFixit — CC BY-NC-SA pt.iFixit.com Página 19 de 24

Passo 22
More ICs on the back of the logic board:
Qualcomm WFR1620 receive-only companion chip. Qualcomm states that the WFR1620 is"required for implementation of carrier aggregation with WTR1625L."
Qualcomm PM8019 Power Management IC
Texas Instruments 343S0694 Touch Transmitter
AMS AS3923 NFC Booster IC
Cirrus Logic 338S1201 Audio Codec
Bosch Sensortec BMP280
A big and hearty mega-thanks to our pals at Chipworks for helping us ID all of this tech. Wedefinitely couldn't have done it without them!
iPhone 6 Plus Teardown
© iFixit — CC BY-NC-SA pt.iFixit.com Página 20 de 24
Passo 23
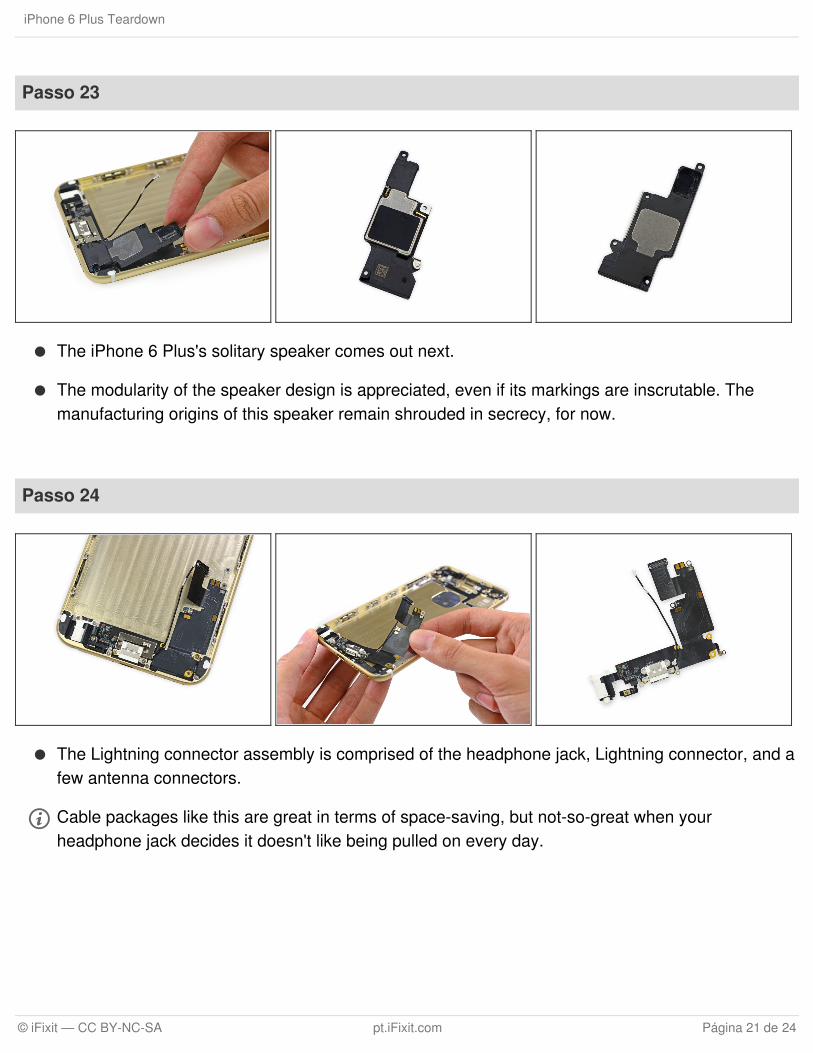
The iPhone 6 Plus's solitary speaker comes out next.
The modularity of the speaker design is appreciated, even if its markings are inscrutable. Themanufacturing origins of this speaker remain shrouded in secrecy, for now.
Passo 24
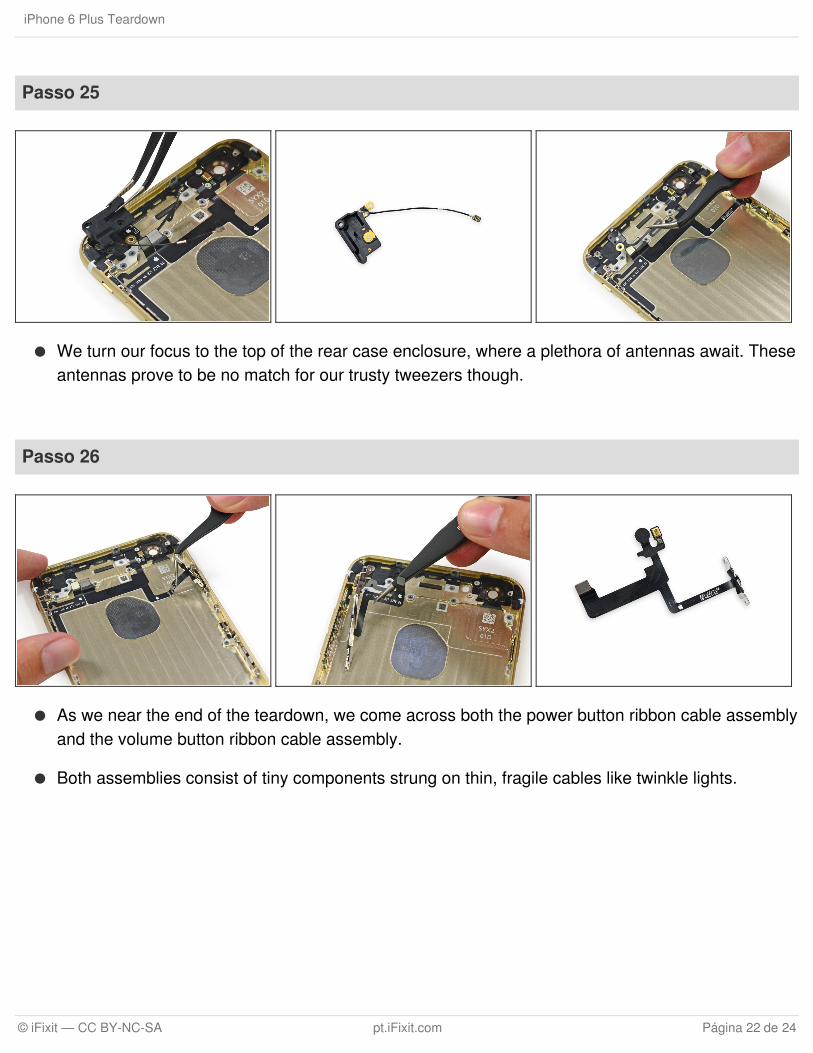
The Lightning connector assembly is comprised of the headphone jack, Lightning connector, and afew antenna connectors.
Cable packages like this are great in terms of space-saving, but not-so-great when yourheadphone jack decides it doesn't like being pulled on every day.
iPhone 6 Plus Teardown
© iFixit — CC BY-NC-SA pt.iFixit.com Página 21 de 24
Passo 25
We turn our focus to the top of the rear case enclosure, where a plethora of antennas await. Theseantennas prove to be no match for our trusty tweezers though.
Passo 26
As we near the end of the teardown, we come across both the power button ribbon cable assemblyand the volume button ribbon cable assembly.
Both assemblies consist of tiny components strung on thin, fragile cables like twinkle lights.
iPhone 6 Plus Teardown
© iFixit — CC BY-NC-SA pt.iFixit.com Página 22 de 24
Passo 27
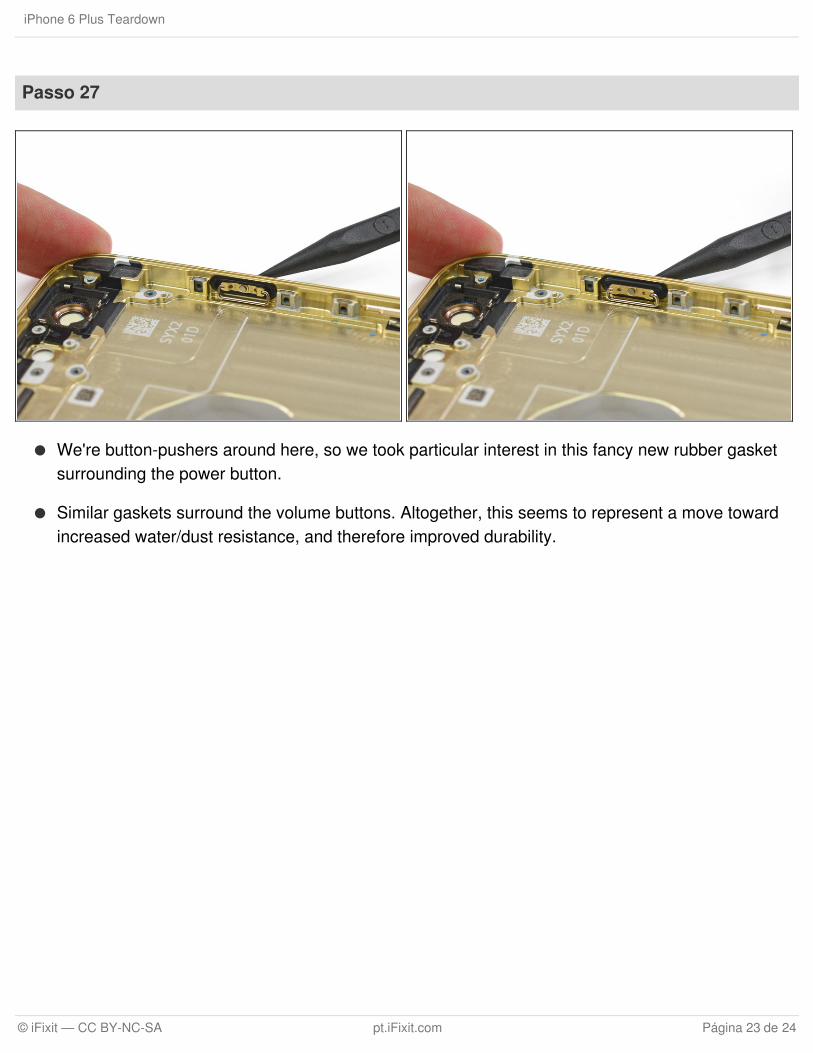
We're button-pushers around here, so we took particular interest in this fancy new rubber gasketsurrounding the power button.
Similar gaskets surround the volume buttons. Altogether, this seems to represent a move towardincreased water/dust resistance, and therefore improved durability.
iPhone 6 Plus Teardown
© iFixit — CC BY-NC-SA pt.iFixit.com Página 23 de 24

Este documento foi gerado pela última vez em 2018-06-14 05:40:14 PM.
Passo 28
We have slain the giant. The iPhone 6 Plus earned a respectable seven out of ten, animprovement over the iPhone 5s. Here's why:
Continuing the trend from the iPhone 5 series, the display assembly comes out of the phone first,simplifying screen repairs.
The battery is straightforward to access. Removing it requires a proprietary pentalobe screwdriverand knowledge of the adhesive removal technique, but is not difficult.
The fingerprint sensor cable has been re-routed, fixing a significant repairability issue with theiPhone 5s and making the phone much safer to open. (On the 5s, the cable is easily torn if a useris not careful while opening the phone.)
The iPhone 6 Plus still uses proprietary Pentalobe screws on the exterior, requiring a specialtyscrewdriver to remove.
Apple does not share repair information for the iPhone 6 Plus with independent repair shops orconsumers.
iPhone 6 Plus Teardown
© iFixit — CC BY-NC-SA pt.iFixit.com Página 24 de 24