
iPDU - Socomec unit has been provided with a realtime clock circuit. ... • Intelligently turns...
28
iPDU Advanced Power Distribution Unit Version 1.0 Installation and operating manual GB Manuel d’installation et d’utilisation FR Manuale di installazione e uso IT
-
Upload
hoangxuyen -
Category
Documents
-
view
219 -
download
3
Transcript of iPDU - Socomec unit has been provided with a realtime clock circuit. ... • Intelligently turns...

iPDUAdvanced Power Distribution Unit
Version 1.0
Installation and operating manual GB
Manuel d’installation et d’utilisation FR
Manuale di installazione e uso IT

2 iPDU - Ref.: IOMPDUXXXX02-GB 00
SOCOMEC UPS retains the full and exclusive ownership rights over this document. Only a personal right to utilize the document for the application indicated by SOCOMEC UPS is granted to the recipient of such document. All reproduction, modification, dissemi-nation of this document whether in part or whole and by any manner are expressly prohibited except upon Socomec’s express prior written consent.
This document is not a specification. SOCOMEC UPS reserves the right to make any changes to data without prior notice.
About this Manual
Congratulations on purchasing the iPDU. This user manual provides a detailed description of the hardware components and how to use the iPDU. Read this manual carefully and follow the instructions when using the iPDU.
Copyright Information
No part of this manual, including the products and software described in it, may be reproduced, transmitted, transcribed, stored in a retrieval system, or translated into any language in any form or by any means, except in documentation kept by purchasers for backup purposes, without the express written permission of the manufacturer.
Products and corporate names appearing in this manual may or may not be registered trademarks or copyrights of their respective companies, and are used only for identification or explanation and to the owners’ benefit, without intent to infringe. All trademarks are the property of their respective owners.
PREFACE

3iPDU - Ref.: IOMPDUXXXX02-GB 00
SUMMARY
EN
GL
ISH
1. SAFETY PRECAUTIONS . . . . . . . . . . . . . . . . . . . . . . . . . . . . . . . . . . . . . . . . . . . . . . . . . . . . 41.1. Safety Instructions . . . . . . . . . . . . . . . . . . . . . . . . . . . . . . . . . . . . . . . . . . . . . . 41.2. Safety Notices . . . . . . . . . . . . . . . . . . . . . . . . . . . . . . . . . . . . . . . . . . . . . . . . . . 4
2. INTRODUCING IPDU . . . . . . . . . . . . . . . . . . . . . . . . . . . . . . . . . . . . . . . . . . . . . . . . . . . . . . 52.1. Features . . . . . . . . . . . . . . . . . . . . . . . . . . . . . . . . . . . . . . . . . . . . . . . . . . . . . . 52.2. Package Contents . . . . . . . . . . . . . . . . . . . . . . . . . . . . . . . . . . . . . . . . . . . . . . 62.3. Hardware Components . . . . . . . . . . . . . . . . . . . . . . . . . . . . . . . . . . . . . . . . . . . 6
3. GETTING STARTED . . . . . . . . . . . . . . . . . . . . . . . . . . . . . . . . . . . . . . . . . . . . . . . . . . . . . . . 93.1. Attaching the feet . . . . . . . . . . . . . . . . . . . . . . . . . . . . . . . . . . . . . . . . . . . . . . . 93.2. Attaching the brackets . . . . . . . . . . . . . . . . . . . . . . . . . . . . . . . . . . . . . . . . . . . 93.3. Rack Mounting . . . . . . . . . . . . . . . . . . . . . . . . . . . . . . . . . . . . . . . . . . . . . . . . . 93.4. Making Connections . . . . . . . . . . . . . . . . . . . . . . . . . . . . . . . . . . . . . . . . . . . . 103.5. Connecting Input Power . . . . . . . . . . . . . . . . . . . . . . . . . . . . . . . . . . . . . . . . . 113.6. Connecting Output Devices . . . . . . . . . . . . . . . . . . . . . . . . . . . . . . . . . . . . . . 113.7. Connecting Digital Outputs . . . . . . . . . . . . . . . . . . . . . . . . . . . . . . . . . . . . . . . 113.8. Connecting EMD . . . . . . . . . . . . . . . . . . . . . . . . . . . . . . . . . . . . . . . . . . . . . . . 123.9. Connecting the Console . . . . . . . . . . . . . . . . . . . . . . . . . . . . . . . . . . . . . . . . . 133.10. Connecting to a LAN/WAN . . . . . . . . . . . . . . . . . . . . . . . . . . . . . . . . . . . . . . . 133.11. Daisy Chaining . . . . . . . . . . . . . . . . . . . . . . . . . . . . . . . . . . . . . . . . . . . . . . . . 14
4. USING THE CONSOLE MENU . . . . . . . . . . . . . . . . . . . . . . . . . . . . . . . . . . . . . . . . . . . . . . 174.1. Using HyperTerminal . . . . . . . . . . . . . . . . . . . . . . . . . . . . . . . . . . . . . . . . . . . . 174.2. Navigating through the Console Menu . . . . . . . . . . . . . . . . . . . . . . . . . . . . . . 184.3. Setting the IP Address . . . . . . . . . . . . . . . . . . . . . . . . . . . . . . . . . . . . . . . . . . 18
5. USING THE WEB INTERFACE . . . . . . . . . . . . . . . . . . . . . . . . . . . . . . . . . . . . . . . . . . . . . . 195.1. Overview . . . . . . . . . . . . . . . . . . . . . . . . . . . . . . . . . . . . . . . . . . . . . . . . . . . . . 195.2. Modifying the Basic Settings . . . . . . . . . . . . . . . . . . . . . . . . . . . . . . . . . . . . . 205.3. Modifying Application Settings . . . . . . . . . . . . . . . . . . . . . . . . . . . . . . . . . . . . 21
6. APPENDIX . . . . . . . . . . . . . . . . . . . . . . . . . . . . . . . . . . . . . . . . . . . . . . . . . . . . . . . . . . . . . . 246.1. Specifications . . . . . . . . . . . . . . . . . . . . . . . . . . . . . . . . . . . . . . . . . . . . . . . . . 246.2. Error codes . . . . . . . . . . . . . . . . . . . . . . . . . . . . . . . . . . . . . . . . . . . . . . . . . . . 256.3. Regulatory Information . . . . . . . . . . . . . . . . . . . . . . . . . . . . . . . . . . . . . . . . . . 26

4 iPDU - Ref.: IOMPDUXXXX02-GB 00
1.1. Safety Instructions
Follow these safety instructions to avoid personal injury and damage to the iPDU.
• To reduce the risk of fire or electric shock, install the unit in a temperature-controlled indoor area free from conductive contaminants. Do not place the unit near liquids or in an excessively damp environment.
• Do not allow liquids or foreign objects to enter the unit.
• The unit does not contain any user-serviceable parts. Do not open the unit.
• Servicing, maintenance, and repair of this equipment must be performed by qualified service personnel. Remove rings, watches and other jewellery before servicing the unit.
• Before maintenance, repair or shipment, the unit must be completely switched off and unplugged and all connections must be removed.
• Before plugging in the device power cable, make sure the power source rating matches the power rating of the iPDU.
• Use a standard power cable when connecting any device to the iPDU outlets.
• The digital output only can connect switches, indicators, or other output devices that are normally open or normally closed.
1.2. Safety Notices
CAUTION:This unit has been provided with a realtime clock circuit. There is a risk of explosion if the battery is incorrectly replaced. Replace only with a 3V Lithium cell (CR2032) or equivalent type. Discard used batteries according to the manufacturer’s instructions.
CAUTION:Rack-Mounted Equipment – The unit is intended to be rack-mounted; the Installation Instructions will include the following when the unit is mounted in a rack system.
A. The equipment is to be installed in an environment where the maximum ambient temperature must not exceed 50°C.”
B. The openings on the casing are for air convection to protect the equipment from overheating. DO NOT COVER THE OPENINGS.
C. Lay this equipment on a reliable surface when installed. A drop or fall could cause injury or damage.
D. The equipment shall be installed according to the manufacturer's specifications. Verify the voltage of the power source when connecting the equipment to the power outlet. Load currentand power outputmust not exceed specification values.
E. This equipment must be earthed before use.
1. SAFETY PRECAUTIONS

5iPDU - Ref.: IOMPDUXXXX02-GB 00
EN
GL
ISH
Congratulations on purchasing the iPDU, an intelligent power management system. The iPDU is designed to measure input and individual outlet current consumption, and sends an auto email history report to the supervisor for billing. The iPDU II also manages power for any combination of network equipment connected to it. Users can control the on/off power supply for any device connected to the iPDU remotely, using a console or Ethernet connections. The iPDU comes with twelve power outlets, each of which can be monitored and controlled through a console or web interfaces.
The iPDU is also equipped with a console port for connecting an EMD (Environmental Monitoring Device) to detect temperature and humidity along with two alarms that can be activated when either of the sensors shows unusual values. The iPDU is provided with two digital outputs which users can use for connecting status indicators or digital switches.
2. INTRODUCING iPDU
2-0
2.1. Features
• Power consumption calculation every hour and daily totals
• Detailed data logging for statistical analysis and diagnosis then auto email history report daily
• Daisy-chaining can cascade up to 6 iPDU II items
• Sequential power-up on outlets - Allows users to configure the sequence in which power is turned on or off for each outlet
• Intelligently turns on/off devices based on event occurrence or planned schedules
• Event notification via pop-up/sending trap or e-mail
• Twelve power outlets that can be turned on or off in multiple ways, with easy monitoring of current consumption
• Over-current monitoring for each outlet (threshold settings for over-current warnings and alerts)
• Versatile sensors supported through EMD (Environmental Monitoring Device) inputs
• Activates extended devices via digital outputs
• Comprehensive power management and flexible configuration through web browser, NMS, Telnet, SNMP, or HyperTerminal (console)
• Supports Secure Socket Layer V3 and Secure Shell V1 protocols
• Administrator and multiple users with password protection for double-layered security
• Address-specific IP security masks to prevent unauthorised access
• User-friendly interface to display input and output status
• Upgrade utility for easy firmware upgrade
• Available in 120V and 230V models

6 iPDU - Ref.: IOMPDUXXXX02-GB 00
2. INTRODUCING iPDU
2.2. Package Contents
Make sure the iPDU package has the following items. If any of the items is missing or damaged, contact your nearest service centre or retailer.
2.2-1
2.3-1 Front Panel of 2-inlet Model
2.3-2 Front Panel of 1-inlet Model
1. iPDU
2. Ears (x2)
3. U-type handles (x2)
4. U-type handle screws (x4)
5. Bracket screws (x6)
6. Feet screws (x4)
7. Software CD
8. Feet (x4)
9. Quick Install Guide
10. Power cable (x2) for 2-inlet model; Power cable (x1) for 1-inlet model
11. Serial cable
2.3. Hardware Components
Take a moment to familiarise yourself with the iPDU front and rear panels. The following sections provide descriptions of the front and rear panel components and how to use them.

7iPDU - Ref.: IOMPDUXXXX02-GB 00
EN
GL
ISH
2. INTRODUCING iPDU
Component Description
1. Input power status indicator 2-inlet Model: Displays power status for each input power G1 through G2
1-inlet Model: Displays power status for the input power G1
2. Output power status indicator (A ~ L)
Displays power status for each power outlet A to L
3. Status indicator Displays input current, voltage, frequency, error code and the number of daisy chains
4. Daisy-chaining mode DIP Switch (C-link DIP)
Set the daisy-chaining mode for iPDU.
Auto mode: For the master iPDU, set all the DIP switches of the C- link to ON by moving all the switches downwards; for all the other iPDU (slave iPDU IIs) in the daisy chain, set all the DIP switches of the C- link to OFF by moving all the switches upwards. After setting the DIP switches for all the iPDU s in the daisy chain, the daisy chain ID can be assigned for each iPDU automatically.
Manual mode: The daisy chain ID for all iPDUs is assigned by the user manually. Please refer to DIP Switch Setting Table on page 20.
5. Reset button Enables you to reset the iPDU if the system locks up.
6. Operation mode DIP switch
Set the mode of operation for the iPDU.
Default mode (S1 off, S2 off): Set the DIP switches S1 and S2 to OFF by moving the switches upwards for normal operations.
7. Serial (CONSOLE) PortEnables you to configure the iPDU using the serial port. Users can also connect an optional EMD to this port.
8. Digital output Connects to digital outputs that are normally open or normally closed.
9. Breaker Prevents excessive current flow to protect the system.
Status indicator Description
Input and Output power status indicator
Display status of each power input and outlet (A ~ L) as follows:
Input/Output power indicator: Displays the input / output power status.
• Grey: power off
• Green: power on
• Red: power fault
Input power status indicator
Displays input voltage (Volts), input current (Amps), frequency (Hz), and the number of daisy chains sequentially on the 7-segment switching display. This indicator also shows system errors in the form of an error code such E01, E02, E03 and so on.Refer to Error codes on page 36 under the appendix for a list of all error codes.
Status indicatorsThe front panel of the iPDU has several LED indicators that provide information about the input and output power status. The following table describes these status indicators.

8 iPDU - Ref.: IOMPDUXXXX02-GB 00
2. INTRODUCING iPDU
4 1 2
3
A B C D E F G H I J K L
A B C D E F G H I J K L
2.3-3 Rear Panel of 2-inlet Model
2.3-4 Rear Panel of 1-inlet Model
Component Description
1. Input power (G1 ~ G2)
Connects to a power outlet
2-inlet model:• G1 supplies power to outlet A to F• G2 supplies power to outlet G to L
1-inlet model:• G1 supplies power to outlet A to L
2. Power Outlet(A ~ L)
Connects a device to each power outlet to supply it with power.
Note: Three outlets group into one unit and the maximum load is 10 Amps for one unit or one outlet.
3. Daisy-chaining (C-link) port Enables users to cascade next iPDU II through an USB cable.
4. Ethernet (LAN) port Enables users to configure the iPDU through a LAN or WAN
9iPDU - Ref.: IOMPDUXXXX02-GB 00
EN
GL
ISH
3. GETTING STARTED
3.1-1
3.2-1
This section provides information about setting up the iPDU, connecting power, and connecting devices to it before users start using it for power management. Read this section carefully to learn how to connect various devices to the iPDU.
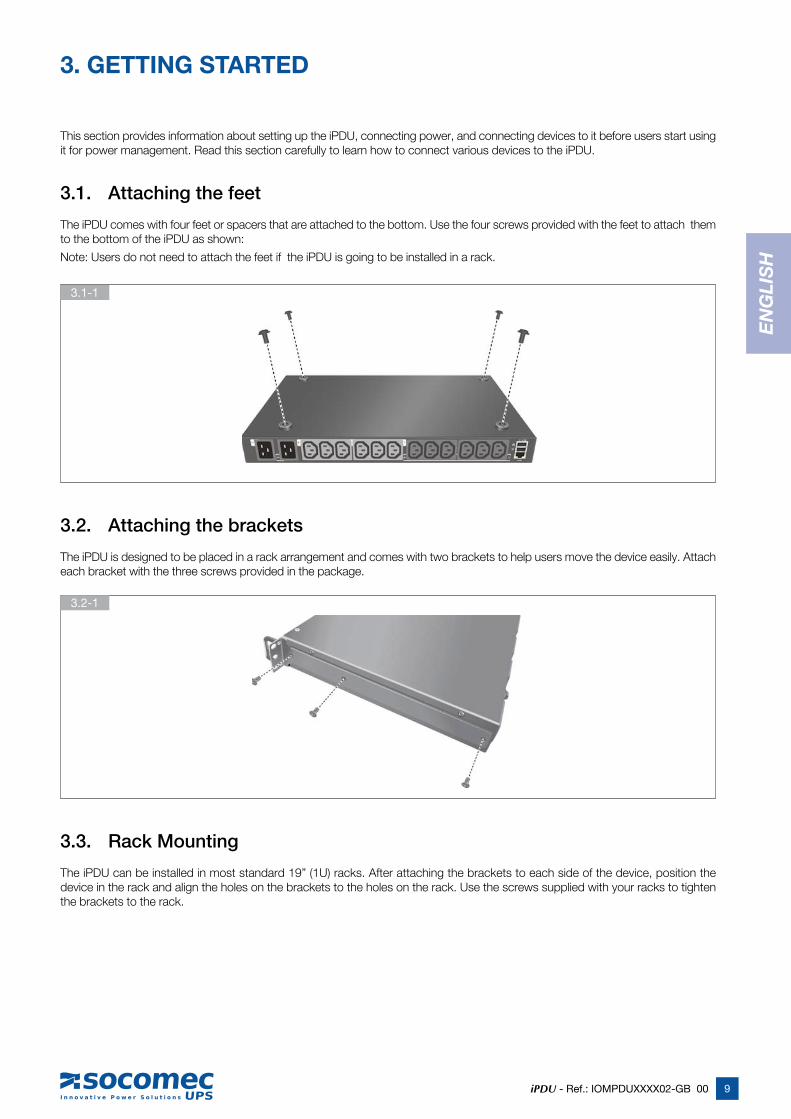
3.1. Attaching the feet
The iPDU comes with four feet or spacers that are attached to the bottom. Use the four screws provided with the feet to attach them to the bottom of the iPDU as shown:
Note: Users do not need to attach the feet if the iPDU is going to be installed in a rack.
3.2. Attaching the brackets
The iPDU is designed to be placed in a rack arrangement and comes with two brackets to help users move the device easily. Attach each bracket with the three screws provided in the package.
3.3. Rack Mounting
The iPDU can be installed in most standard 19” (1U) racks. After attaching the brackets to each side of the device, position the device in the rack and align the holes on the brackets to the holes on the rack. Use the screws supplied with your racks to tighten the brackets to the rack.

10 iPDU - Ref.: IOMPDUXXXX02-GB 00
3. GETTING STARTED
3.4-1
The following procedure describes the basic steps needed to set up the iPDU:
1. To set up the hardware, connect power to the power inlet and output devices to the power outlets. Connect devices with normally open or normally closed conditions to the digital output ports, and an EMD to the console port.
2. To configure the iPDU, users can use the console or LAN port. Connect the iPDU to a console and a LAN to enable its configura-tion via the console or browser menu.
3. After connecting to a console, use a console application such as Telnet or HyperTerminal to access the console menu. Select the System Group submenu under the iPDU Configuration to set up the IP address and the system date/time. This IP address will be used while accessing the web interface to configure the iPDU parameters.
4. After connecting to a LAN, open a browser from a PC on the network and use the iPDU’s IP address specified through the console menu to open the web interface for system configuration.
The following sections provide instructions on how to make various connections.
3.4. Making Connections
The iPDU is a versatile product that can be connected to several different types of input and output devices. This makes it a useful tool for connecting devices to it and controlling their power on/off status through its user interface.
The iPDU can be attached to twelve output devices whose power status can be controlled remotely. It also supports an EMD (Environmental Monitoring Device) connected with sensors for detecting environmental conditions as well as digital outputs to enable devices with normally open or normally closed conditions. Moreover, the iPDU supports a serial port (console) and Ethernet (LAN/WAN) connection that lets users control the iPDU outputs remotely.

11iPDU - Ref.: IOMPDUXXXX02-GB 00
EN
GL
ISH
3. GETTING STARTED
3.5. Connecting Input Power
The 2-inlet model of the iPDU has two IEC C20 power inlets for supplying and managing power for the output devices. The 1-inlet model has just one inlet for supplying power to all outlets. For each inlet, connect the power cable to the power inlet and plug the other end into a power outlet as shown:
3.5-1
3.6-1
3.6. Connecting Output Devices
The iPDU has twelve power outlets for connecting devices such as workstations, servers, and printers. Their power on/off status can be controlled remotely through the LAN and Console ports. Connect the power connectors of the devices to each of the power outlets A to L with the power cables supplied with the devices as shown:
3.7. Connecting Digital Outputs
The iPDU provides two digital outputs to which users can connect switches, indicators, or other output devices that are normally open or normally closed. Users can control the digital outputs remotely through the console or over the LAN/WAN.

12 iPDU - Ref.: IOMPDUXXXX02-GB 00
3. GETTING STARTED
3.8. Connecting EMD
An Environmental Monitoring Device (EMD) that is connected to sensors for detecting temperature, humidity, water leaks etc. can be connected to the iPDU with the console port. The EMD can also be connected to alarms or indicators and controlled through the iPDU. Connect the EMD to the console port as shown:
3.8-1
After connecting to EMD, open a browser from a PC on the network. The temperature and humidity status is automatically displayed on the iPDU II Status page.

13iPDU - Ref.: IOMPDUXXXX02-GB 00
EN
GL
ISH
3. GETTING STARTED
3.9. Connecting the Console
Users can control the output devices and manage the power status through a console or serial connection with a PC. Use the serial cable provided in the iPDU package to connect the COM port of the PC and the CONSOLE port of the iPDU as shown.
Refer to Using the Console Menu on page 17 to learn how to use the console with a console application such as HyperTerminal or Telnet.
3.9-1
3.10-1
3.10. Connecting to a LAN/WAN
The iPDU has an RJ-45 LAN connection that enables users to monitor and manage the power outlets and digital outputs over the network. The iPDU has a graphic user interface that allows users to control the device through a web browser. Connect the iPDU to a free port on the router using an Ethernet cable as shown. Users can then control the iPDU from a PC, laptop, mobile phone, or PDA which is connected to the router network. Refer to page 19 for details on how to control the iPDU and its output devices through the web.

14 iPDU - Ref.: IOMPDUXXXX02-GB 00
3. GETTING STARTED
3.11. Daisy Chaining
To manage more devices, up to 5 additional iPDUs can be daisy chained to the first unit. Follow instructions below to set up a daisy chain installation.
1. For each iPDU that you add to the chain, use USB cables to connect it to the parent iPDU’s C-Link Port. The upper C-Link port
( ) of child iPDU II is connected to lower C-Link port ( ) of its parent iPDU II and the lower C-Link port ( ) of the lowest
level iPDU II is connected to the highest level parent’s upper C-Link port ( ) to form a cyclic (ring) structure as illustrated in the following diagram
2. The daisy chain installation can operate in Auto mode or Manual mode. Use daisy-chaining mode DIP switch (C-link DIP) to set the operation mode.
Auto mode: For the master iPDU, set all the DIP switches of the C- link to ON by moving all the switches downwards; for all the other iPDUs (slave iPDU IIs) in the daisy chain, set all the DIP switches of the C- link to OFF by moving all the switches upwards. After setting the DIP switches for all the iPDUs in the daisy chain, the daisy chain ID can be assigned for each iPDU automatically.
3.11-1
DIP Switch Setting Table for Daisy Chain ID in Auto mode
DIP 1 DIP 2 DIP 3 DIP 4 Daisy Chain ID
OFF OFF OFF OFFSlave01 to Slave05, automatically assigned by iPDU
ON ON ON ON Master
Down: ON ; Up: OFF

15iPDU - Ref.: IOMPDUXXXX02-GB 00
EN
GL
ISH
3. GETTING STARTED
DIP Switch Setting Table for Daisy Chain ID in Manual mode
DIP 1 DIP 2 DIP 3 DIP 4 Daisy Chain ID
OFF OFF OFF OFF 15
OFF OFF OFF ON 14
OFF OFF ON OFF 13
OFF OFF ON ON 12
OFF ON OFF OFF 11
OFF ON OFF ON 10
OFF ON ON OFF 9
OFF ON ON ON 8
ON OFF OFF OFF 7
ON OFF OFF ON 6
ON OFF ON OFF 5
ON OFF ON ON 4
ON ON OFF OFF 3
ON ON OFF ON 2
ON ON ON OFF 1
ON ON ON ON 0
Down: ON ; Up: OFF
Manual mode: Use DIP switches on the front panel to set the (daisy chain) ID number for each iPDU that you add to the chain. You may set Daisy Chain ID for the first unit (Master) to 0 (DIP Switches: On, On, On, On) and the ID for the second unit (Slave 01) to 1(DIP Switches: On, On, On, OFF), etc. The DIP Switch Setting Table for Daisy Chain ID is described in the following table.
3. After all the iPDUs have been set up, power up all the iPDU IIs.
Note: The total length of all USB cables in the chain must not exceed 8 metres. The USB cable specification is illustrated in the following diagram.
3.11-2
16 iPDU - Ref.: IOMPDUXXXX02-GB 00
3. GETTING STARTED
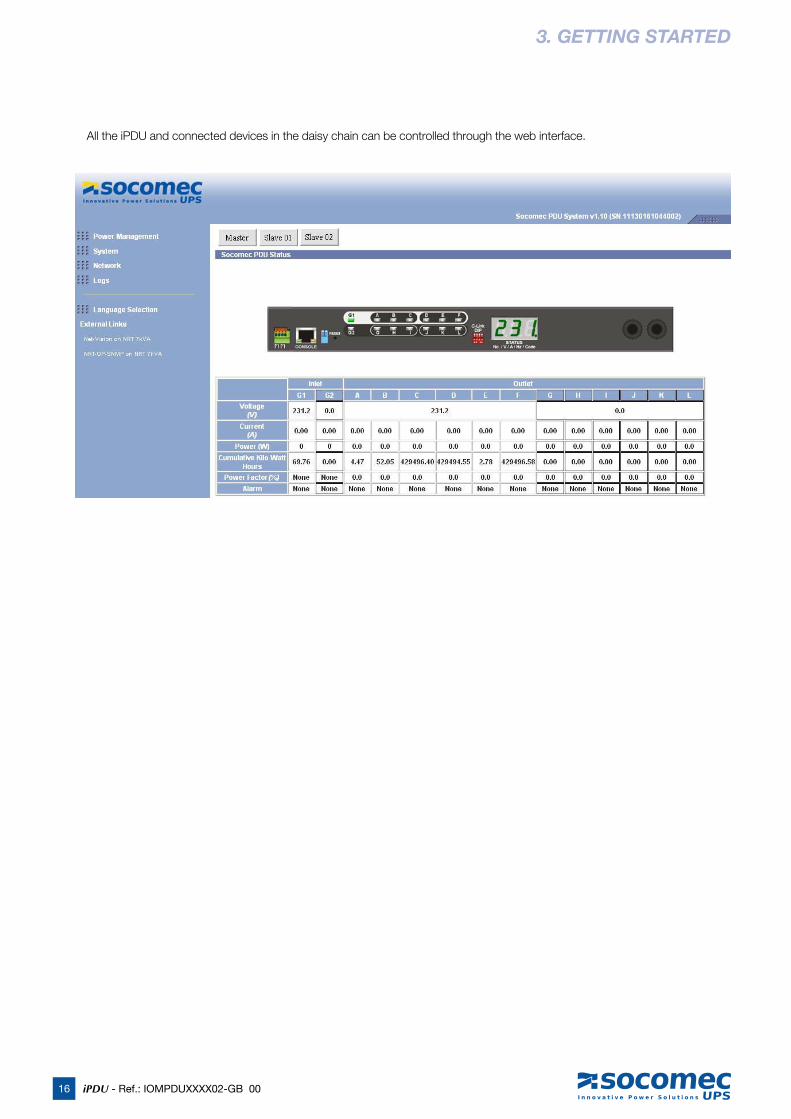
All the iPDU and connected devices in the daisy chain can be controlled through the web interface.

17iPDU - Ref.: IOMPDUXXXX02-GB 00
EN
GL
ISH
The iPDU is provided with a serial port that enables users to configure and control the system through the PC’s RS-232 serial (COM) port. Use the serial cable provided to connect the console port to the PC’s COM port as described in Connecting the Console on page 13. This section describes how to use a console application to control the iPDU and configure its settings such as the IP address, outlet control parameters, access control table, and trap receivers table.
4.1. Using HyperTerminal
HyperTerminal is a console application in Windows that enables users to configure or control a device through command line param-eters. Users can configure the iPDU parameters and its outlets through simple numerical commands from a PC keyboard. Users can also use Telnet or any other console application to control the device in a similar manner.
4. USING THE CONSOLE MENU
4. The Properties window will open. Click Restore Defaults to use the default settings. Make sure that the Bits per second = ”9600”, Data Bits = “8”, Parity = “None”, Stop bits = “1” and Flow Control = “None”. Click OK when completed.
Follow these steps to start HyperTerminal and communicate with the iPDU:
1. To start HyperTerminal click Start, Programs, Accessories, Communications, and HyperTerminal from the Windows Start button.
2. A New Connection opens. Type a name for the connection in the Name field and select an icon for the connection. Click OK when completed.
3. From the Connect using drop-down box, select the COM port that users have connected to the iPDU. Click OK when completed.
5. Press any key. The iPDU Configuration Utility Main menu will open and users will be prompted for a password. Type the default password (public) and press Enter to continue.
The main menu options are displayed iPDU Confi guration Utility Main menu
1. iPDU Confi guration2. Outlet Control3. Digital Output Control4. EMD Control5. Access Control Table6. Trap Receiver Table7. Reset Confi guration To Default8. Restart iPDU 0. Exit
Please Enter Your Choice
iPDU Confi guration Utility Main menu
Enter Password: *****

18 iPDU - Ref.: IOMPDUXXXX02-GB 00
4. USING THE CONSOLE MENU
4.2. Navigating through the Console Menu
Follow these steps to navigate through the console menu to modify settings:
• To select a submenu type the number corresponding to the submenu and press Enter. For example, to select the iPDU Configuration menu, type 1 and press Enter. Submenus may have further nested menus which can also be accessed by typing the appropriate number.
• To modify a menu option, select the option with its correspond-ing number and then type the new values for the option. For instance, to change the system date, first select the System Date option by typing 4 from the System Group and press Enter. Then type the date in the specified format (dd/mm/yyyy) and press Enter to save the changes.
• Type 0 (zero) to return to a previous or higher-level menu.
The console menu consists of the following submenus:
• iPDU Configuration: This is the primary menu consisting of various submenus such as the system submenu to sett the IP address, date, and time, the control submenu to set the administrator user name, password, and access protocols, the parameter submenu to set identification information, and the e-mail submenu to configure the e-mail settings. This menu also provides the option under the control group submenu to enable input phase detection which allows the iPDU to turn off outlet power if there is a phase mismatch.
• Outlet Control: Enables users to control all power outlets and configure each outlet’s name, location, and other parameters.
• Digital Outlet Control: Displays digital output status and enables users to control all digital outputs.
• EMD Control: Displays EMD temperature and humidity and enables users to configure other parameters.
• Access Control Table: Enables users to set up a list of users who can access and control the power outlets.
• Trap Receiver Table: Enables users to set up a list of users who will be alerted with a trap message if an unusual event is triggered on the iPDU system.
• Reset Configuration to Default: This option sets all system settings to their factory default values.
• Restart iPDU: Enables users to restart the iPDU.
4.3. Setting the IP Address
1. Use the steps described under Navigating through the Console Menu to navigate the System Group under the iPDU Configuration menu.
2. Select the IP Address item and set the IP address. This address lets users access the iPDU in a TCP/IP network (LAN/WAN). Contact the system administrator for assistance if users are not sure about which IP address to choose.
Once users have set the IP address they can use the web interface to modify all other settings. See page 19 for more infor-mation.
System Group Confi guration Menu
Version : iPDU System v1.00 (2M)(SN)Ethernet address : 00 E0 D8 00 7F 61
1. Ip Address : 10.0.34.512. Gateway Address : 10.0.32.13. Network Mask : 255.255.240.04. System Date (dd/mm/yyyy) : 09/01/20065. System Time (hh:mm:ss) : 08:02:570. Return to previous menu
Please Enter Your Choice

19iPDU - Ref.: IOMPDUXXXX02-GB 00
EN
GL
ISH
5. USING THE WEB INTERFACE
The iPDU provides a graphic user interface that can be viewed from a web browser such as Internet Explorer. This enables users to access and control the iPDU outlets and then its output devices remotely from users’ desktop, laptop, PDA, or even users’ mobile phone. This section provides instructions about how to use the web interface to configure and control the iPDU remotely.
5.1. Overview
Start a web browser such as Internet Explorer from the host PC or laptop and enter the IP address of the iPDU in the address bar. For details about setting the IP address of the system see Setting the IP Address on page 18. You will be prompted to enter a Username (admin) and Password (default password is public). Click Go and the main status page of the iPDU web interface will be displayed.
The main page shows a graphical representation of the iPDU outlets and inputs status as described below:
• The left pane shows the various menus and submenus for the iPDU. Click any menu to display the menu options, expand the menu items, and modify the menu options as required.
• The front panel displayed in the right pane shows the status of the outlets, input power, input current and Cumulative Kilo-Watt Hours. Click anywhere on the front panel to see detailed information about the iPDU input and output status.
Note:
• Each menu page provides online help to assist users in configuring the iPDU. Click the icon at the top of each page to view the help menu.

20 iPDU - Ref.: IOMPDUXXXX02-GB 00
5. USING THE WEB INTERFACE
5.2. Modifying the Basic Settings
The System menu enables users to configure the iPDU system parameters such as the administrator name, password, IP address, date, time etc.. Some of these settings have been described here for users’ reference.
5.2.1. Setting the Date and Time
Click Date & Time under System to view and modify the system date and time. This menu page displays the current iPDU date and time. Select one of the options to configure the date and time by setting it manually, synchronising with a computer’s time, or synchronising it with an NTP server.
Note: When users change the system date and time it affects various other system settings such as schedule, e-mail, traps, and logs.
5.2.2. Changing Event Alert Settings
The iPDU sends email or SNMP trap alerts to specified users when specific events occur. Use the following steps to set the alerts:
• Click Trap Receivers under System to set up a list of users or workstations who will be alerted with an SNMP trap message. Use this menu page to specify the IP addresses of up to 8 trap receivers, community information, type of trap, severity of trap, and description of the events that cause the traps.
• Click Email Notification under System to set up a list of up to 8 users who will be alerted with an email. Use this menu to specify the mail server, user account, DNS, and other informa-tion necessary to set up a mail server for sending mail alerts. Use the Email Receivers Table to add the Email addresses. (Note: Mail Server, DNS server, and User’s email must be entered correctly in order to receive email notification)

21iPDU - Ref.: IOMPDUXXXX02-GB 00
EN
GL
ISH
5. USING THE WEB INTERFACE
5.3. Modifying Application Settings
The following sections describe how to use the Power Management and Environment menus to control the system input and output ports, as well as view the status of the EMD.
5.3.1. Setting Control Options
Click Control under Power Management to display the control options for the power.
5.3.2. Setting up a Schedule
To use the Schedule utility the unit must be set as master (all dip swiches in the daisy chain configuration must be set to ON). Click Schedule under Power Management to see a list of schedules for turning power outlets on or off at a desired time. For instance, users may want to turn on all the servers and the administra-tor’s workstation every Monday morning. Users can setvup the schedule for a certain time of day or it can be scheduled weekly. The Schedule menu enables users to do this automatically by setting up an entry in the Schedule.
• Inlet: Specify what action is taken by the iPDU when the inlet voltage is not within limits. Users can set which power outlets and digital outputs are to be turned on or off when the inlet voltage is not acceptable value.
• Power Status of Outlet: Configure the parameters to identify the outlet, specify its power on/off delay, and output current threshold. Users can also manually turn the outlet on/off from this menu page.
• Digital Output Status: This menu page shows the status of both digital outputs and lets users specify which digital output is toggled when events occur. Users can also manually change the status of both digital outputs from this menu page.
Click Add New to add a new schedule. Specify the type of schedule, date, and time using the drop-down menus. Select the appropriate outlets that users want to control and specify if users want to turn the outlets on or off.

22 iPDU - Ref.: IOMPDUXXXX02-GB 00
5. USING THE WEB INTERFACE
5.3.3. Status
Click Status under Environment menu to see the status of the EMD connected to the iPDU. The menu page displays the temperature and humidity of the environment sensor, as well as the open/close conditions of the EMD alerts.
5.3.5. Alert
Click Alert under Environment menu to configure the EMD connected to the iPDU. This menu enables users to specify which EMD events andalert conditions cause which power outlets to be turned off.
5.3.4. Confi guration
Click Configuration under Environment menu to configure the EMD connected to the iPDU. This menu enables users to set up the sensor names, high and low set points, calibration offsets for the sensors, as well as alert names and normal conditions.

23iPDU - Ref.: IOMPDUXXXX02-GB 00
EN
GL
ISH
5. USING THE WEB INTERFACE
5.3.6. Confi gure the Power-On/Off Sequence
iPDU allows users to configure the sequence in which power is turned on or off for each outlet. To manage the Power-On Sequence, set appropriate delay time in Power On Delay field for each outlet in the Control webpage under Power Management as illustrated in the following figure. Similarly, to manage the Power-Off Sequence, set appropriate delay time in Power Off Delay field for each outlet in the same Control webpage.

24 iPDU - Ref.: IOMPDUXXXX02-GB 00
iPDU II-1202 (2-inlet models of the iPDU)
Model iPDU II -1202 -120V iPDU II -1202 -230V
Power Input
IEC320 C20 inlet * 2 pcs, 40 Amps (2 inlets share 40 Amps)
Inlet-G1: 100-125 VAC 50/60 Hz, 20 A
Inlet-G2: 100-125 VAC 50/60 Hz, 20 A
IEC320 C20 inlet * 2 pcs, 32 Amps (2 inlet share 32 Amps)
Inlet-G1: 200-240 VAC 50/60 Hz, 16 A
Inlet-G2: 200-240 VAC 50/60 Hz, 16 A
Breaker Type & Qty20 A2 pcs
16 A2 pcs
Power Output
Voltage: 100-125 VAC 50/60 Hz Voltage: 200-240 VAC 50/60 Hz
IEC320 C-13 * 12 pcs. Grouping 3 pcs outlet into 1 unit.Inlet-G1 support outlet A~FInlet-G2 support outlet G~L
Loading: Max. 10 Amp each outlet or Max. 10 Amp total for Outlet A~C. Same as D~F, G~I, J~L
Dimensions and Weight
Size1U rack: 436 (W) x 300 (D) x 44 (H) mm
17 (W) x 11.8 (D) x 1.7 (H) inches
Weight Approx: 4.2 kg or 9.26 lbs
Operating Environment
Temperature 0 °C ~ 50 °C
Input Frequency 10 ~ 80% non-condensed
Warranty
Two years
iPDU II-1201 (1-inlet models of the iPDU)
Model iPDU II -1201 -120V iPDU II -1201 -230V
Power InputIEC320 C20 inlet * 1 pcs, 20 Amps
Inlet-G1: 100-125 VAC 50/60 Hz, 20 A
IEC320 C20 inlet * 1 pcs, 16 Amps
Inlet-G1: 200-240 VAC 50/60 Hz, 16 A
Breaker Type & Qty20 A2 pcs
16 A2 pcs
Power Output
Voltage: 100-125 VAC 50/60 Hz Voltage: 200-240 VAC 50/60 Hz
IEC320 C-13 * 12 pcs. Grouping 3 pcs outlet into 1 unit.Loading: Max. 10 Amp each outlet or Max. 10 Amp total for Outlet A~C. Same as D~F, G~I, J~L
Dimensions and Weight
Size1U rack: 436 (W) x 300 (D) x 44 (H) mm
17 (W) x 11.8 (D) x 1.7 (H) inches
Weight Approx: 4.1 kg or 9.05 lbs
Operating Environment
Temperature 0 °C ~ 50 °C
Input Frequency 10 ~ 80% non-condensed
Warranty
Two years
6. APPENDIX
6.1. Specifi cations
The specifications for iPDU II-1202 (2-inlet models of the iPDU ) and iPDU II-1201 (1-inlet models of the iPDU) are listed as follows:

25iPDU - Ref.: IOMPDUXXXX02-GB 00
EN
GL
ISH
6. APPENDIX
6.2. Error codes
Description Error Code
Network Link Down E01
Parameters Checksum Error E02
Input G1Voltage Over Threshold High (Volt) E03
Input G1Voltage Over Threshold Low (Volt) E04
Input G2 Voltage Over Threshold High (Volt) E05
Input G2 Voltage Over Threshold Low (Volt) E06
Outlet A Current Over Threshold (Amp) E07
Outlet B Current Over Threshold (Amp) E08
Outlet C Current Over Threshold (Amp) E09
Outlet D Current Over Threshold (Amp) E10
Outlet E Current Over Threshold (Amp) E11
Outlet F Current Over Threshold (Amp) E12
Outlet G Current Over Threshold (Amp) E13
Outlet H Current Over Threshold (Amp) E14
Outlet I Current Over Threshold (Amp) E15
Outlet J Current Over Threshold (Amp) E16
Outlet K Current Over Threshold (Amp) E17
Outlet L Current Over Threshold (Amp) E18
Input Source Abnormal (Should be 120v Model) E19
Input Source Abnormal (Should be 230v Model) E20

26 iPDU - Ref.: IOMPDUXXXX02-GB 00
6. APPENDIX
6.3. Regulatory Information
6.3.1. FCC Statement
This device complies with Part 15 of the FCC rules. Operation is subject to the following conditions:
• This device may not cause harmful interference; and
• This device must tolerate any interference received, including interference that may cause undesired operation.
This equipment has been tested and found to comply with the limits for a class B digital device, pursuant to Part 15 of the Federal Communications Commission (FCC) rules. These limits are designed to provide reasonable protection against harmful interference in a residential installation. This equipment generates, uses, and can radiate radio frequency energy and, if not installed and used in accordance with the instructions, may cause harmful interference to radio communications. However, there is no guarantee that interference will not occur in a particular installation. If this equipment does cause harmful interference to radio or television recep-tion, which can be determined by turning the equipment off and on, the user is encouraged to try to correct the interference by one or more of the following measures:
• Turn or relocate the receiving antenna.
• Increase the separation between the equipment and receiver.
• Connect the equipment into an outlet on a different circuit from that to which the receiver is connected.
• Consult the dealer or an experienced radio/TV technician for assistance.
WARNING! The use of a shielded power cable is required in order to meet FCC emission limits and to prevent interference to the nearby radio and television reception. It is essential that only the supplied power cable is used. Use only shielded cables to connect I/O devices to this equipment. Users are advised that changes or modifications not expressly approved by regulatory bodies could invalidate authorisation to operate the equipment.
6.3.2. CE
This device complies with the EMC directive of the European Community and meets or exceeds the following technical standards:
• EN 55022 – Limits and Methods of Measurement of Radio interference Characteristics of Information Technology Equipment. This device complies with the CISPR Class B standard.
• EN 55024 – Electromagnetic compatibility – Generic immunity standard, Part 1: Residential and light industry.
6.3.3. CB and TUV
The product is accredited with IEC 60950-1 and EN 60950-1, for use in Information Technology Equipment, including Electric Business Equipment. The TUV Recognition or CB certification is remains throughout the product's lifetime.


*IOMPDUXXXX02-GB 00*IOMPDUXXXX02-GB 00 05.2012
VALID FOR FRANCE VALID FOR ITALY
ISO 9001FM 28237
ISO14001EMS 553476
www.socomec.com
YOUR DISTRIBUTOR
Non contractual document. © 2012, Socomec SA. All rights reserved.
HEAD OFFICE
SOCOMEC GROUP
S.A. SOCOMEC capital 11 149 200 € - R.C.S. Strasbourg B 548 500 149
B.P. 60010 - 1, rue de Westhouse - F-67235 Benfeld Cedex
SOCOMEC UPS Strasbourg
11, route de Strasbourg - B.P. 10050 - F-67235 Huttenheim Cedex- FRANCE
Tel. +33 (0)3 88 57 45 45 - Fax +33 (0)3 88 74 07 90
SOCOMEC UPS Isola Vicentina
Via Sila, 1/3 - I - 36033 Isola Vicentina (VI) - ITALY
Tel. +39 0444 598611 - Fax +39 0444 598622
SALES, MARKETING AND SERVICE MANAGEMENT
SOCOMEC UPS Paris
95, rue Pierre Grange
F-94132 Fontenay-sous-Bois Cedex - FRANCE
Tel. +33 (0)1 45 14 63 90 - Fax +33 (0)1 48 77 31 12
Socomec UPS worldwide
IN WESTERN EUROPE
BELGIUM
Schaatsstraat, 30 rue du Patinage
B - 1190 Bruxelles
Tel. +32 (0)2 340 02 34
FRANCE
95, rue Pierre Grange
F - 94132 Fontenay-sous-Bois Cedex
Tel. +33 (0)1 45 14 63 90
GERMANY
Heppenheimer Straße 57
D - 68309 Mannheim
Tel. +49 (0) 621 71 68 40
ITALY
Via Leone Tolstoi, 73 - Zivido
20098 San Giuliano Milanese (MI)
Tel. +39 02 98 242 942
PORTUGAL
Núcleo Empresarial de Mafra II
Av. Dr. Francisco Sá Carneiro, Fracção N
2640-486 Mafra
Tel. +351 261 812 599
SPAIN
C/Nord, 22 Pol. Ind. Buvisa
E - 08329 Teià (Barcelona)
Tel. +34 935 407 575
THE NETHERLANDS
Duwboot 13
NL - 3991 CD Houten
Tel. +31 (0)30 760 0911
UNITED KINGDOM
Units 7A-9A Lakeside Business Park
Broadway Lane - South Cerney
Cirencester - GL7 5XL
Tel. +44 (0)1285 863300
OTHER COUNTRIES
Tel. +34 935 407 575
IN EASTERN EUROPE, MIDDLE EAST, AFRICA
UNITED ARAB EMIRATES
LIU-E17 DAFZA
371355 Dubai airport free zone
Dubai (United Arab Emirates)
Tel.: +971 (0) 4 29 98 441
POLAND
ul. Mickiewicza 63
01-625 Warszawa
Tel. +48 22 825 73 60
ROMANIA
Heliade Intre Vii Street no.8, 2 District
023383 Bucharest
Tel. +40 21 319 36 88 ( 89, 81, 82)
RUSSIA
4th Street 8 Marta, 6A, 405
125167 - Moscow
Tel. +7 495 775 19 85
SLOVENIA
Savlje 89
SI - 1000 Ljubljana
Tel. +386 1 5807 860
TURKEY
Masuklar Yokusu No:57/2
34357 Besiktas
Istanbul
Tel. +90 212 2580810
OTHER COUNTRIES
Tel. +39 0444 598 611
IN ASIA PACIFIC
AUSTRALIA
Unit 3, 2 Eden Park Drive (Rydecorp)
Macquarie Park NSW 2113
Tel. +61 2 9325 3900
CHINA
Universal Business Park
B33, Floor 3, 10 Jiuxianqiao Lu,
Chaoyang, Beijing 100016 P.R., China
Tel. +86 10 59756108
INDIA
B1, IInd Floor, Thiru-Vi-Ka-Industrial Estate
Guindy
Chennai – 600 032
Tel. +91 44 3921 5400
MALAYSIA
31 Jalan SS 25/41- Mayang Industrial Park
47301 Petaling Jaya.- Selangor, Malaysia
Tel. +603 7804 1153
SINGAPORE
31 Ubi Road 1 #07-02 (Lobby B)
Aztech Building
Singapore 408694
Tel. +65 6506 7600
THAILAND
No.9 Soi Vibhavadirangsit 42
Vibhavadirangsit Rd, Ladyao
Chatujak Bangkok 10900
Tel. +66 2 941-1644-7
VIETNAM
539/23 Luy Ban Bich St.,
Phu Thanh Ward, Tan Phu Dist
Ho Chi Minh City
Tel. +84-839734.990
ASIA PACIFIC HEAD OFFICE
Tel. +65 6507 9770
IN AMERICA
LATIN AMERICAN COUNTRIES
Tel. +34 935 407 575


