IPCOM AVATAR GUIDE · form, the identified Avatar clinical forms used for the project, the Avatar...
58
Interprofessional Primary Care Outreach for Persons with Mental Illness 1 IPCOM AVATAR GUIDE
Transcript of IPCOM AVATAR GUIDE · form, the identified Avatar clinical forms used for the project, the Avatar...

Interprofessional Primary Care Outreach for Persons with Mental Illness
1
IPCOM AVATAR GUIDE
Interprofessional Primary Care Outreach for Persons with Mental Illness
2
Table of Contents
Introduction 3 Interprofessional Primary Care Outreach for Persons with Mental Illness (IPCOM) How to Sign on to Avatar 4 Sign-in Issues 8 Avatar Home View 11 Avatar Chart View 14 Navigation 9-18 Pre-Display Screens 18 Avatar Admission 19-25 Health and Review of Systems 26-29 Physical 30-33 Vitals Entry 34-35 Diagnosis 36-41 MD Progress Notes 42-44 Special Instructions for Notes Field of MD Progress Notes 45 Avatar Discharge 46-49 Reports 50-57 IPCOM Appointment Sheet 58
Interprofessional Primary Care Outreach for Persons with Mental Illness
3
INTRODUCTION
The purpose of this project is to develop a unique nurse-managed interprofessional (IP) collaborative practice model called Interprofessional Primary Care Outreach for Persons with Mental Illness (IPCOM). Currently, the School of Nursing (SON), University of California, San Francisco (UCSF) has a community-based nursing partnership with the Progress Foundation providing care to a medically underserved, predominately homeless client population in community-based mental health residential treatment facilities. Progress Foundation is a non-profit organization providing community-based residential treatment and supported housing programs as alternatives to institutional treatment for individuals with psychiatric disabilities. Progress Foundation provides a continuum of residential treatment programs (RTFs) situated in homes operated cooperatively by staff and clients. All programs are staffed 24 hours a day, 7 days a week by professional and non-licensed counselors. There are 3 Acute Diversion Units (ADUs), 10-12-bed crisis residential programs that serve as alternatives to hospitalization, with a typical length of stay of two weeks. Transitional programs offer the next level of care in the continuum. Clients stay between three months and one year. Several of the transitional programs have an identified specialty population focus: LGBT, Latino, African American, seniors and mentally ill mothers housed with their children. Initially the community-based nursing partnership with the Progress Foundation provided services focused on routine health screening and physical examinations to determine medical stability for residential placement. Currently services have expanded to include urgent care and chronic disease management in the context of mental illness; health promotion and education targeted to the risk profile of people with mental illness; and education for non-licensed Progress Foundation staff on medical conditions and health promotion in aggregate living. PCOM NPs and students make referrals for ongoing primary care although there are multiple constraints (time, lack of care management resources and lack of information technology) that complicate these referrals.
An electronic health record (EHR) called Avatar is used by staff counselors and psychiatrists although paper charts are also maintained for each client. PCOM NPs record the following services they provide in Avatar documents: Admission, Health and Review of Systems, Physical Exam, Diagnosis, Vital Signs, Primary Care Notes and Discharge. The Primary Care Notes also include documentation of any follow-up appointments that are scheduled with a primary care. A paper appointment reminder is given to clients and Progress staff include appointment information in the discharge summary whenever possible.
This Avatar Guide will walk you through the Avatar Sign-In process, how to complete the Avatar Admission form, the identified Avatar clinical forms used for the project, the Avatar Discharge form, how to print “Abstracts” of Avatar forms and the paper IPCOM Appointment form that will be provided to the client. In addition, there are examples of Avatar reports and how to access the Avatar report function.
Interprofessional Primary Care Outreach for Persons with Mental Illness
4
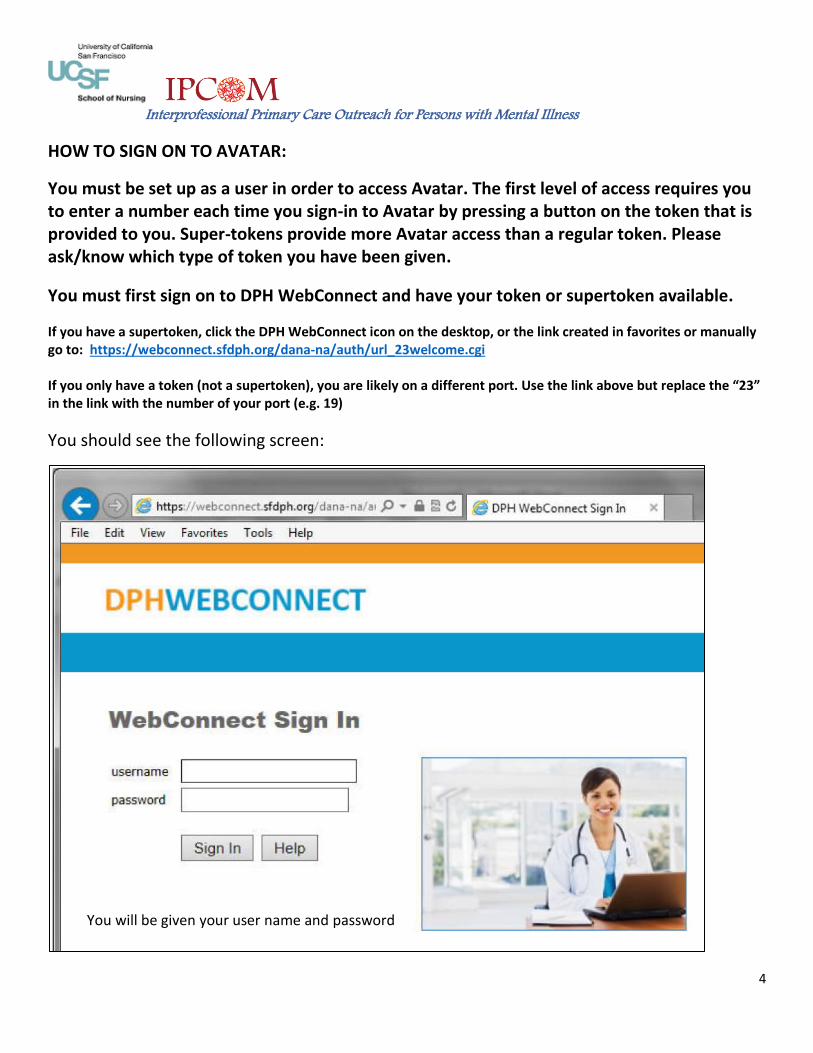
HOW TO SIGN ON TO AVATAR:
You must be set up as a user in order to access Avatar. The first level of access requires you to enter a number each time you sign-in to Avatar by pressing a button on the token that is provided to you. Super-tokens provide more Avatar access than a regular token. Please ask/know which type of token you have been given.
You must first sign on to DPH WebConnect and have your token or supertoken available.
If you have a supertoken, click the DPH WebConnect icon on the desktop, or the link created in favorites or manually go to: https://webconnect.sfdph.org/dana-na/auth/url_23welcome.cgi If you only have a token (not a supertoken), you are likely on a different port. Use the link above but replace the “23” in the link with the number of your port (e.g. 19)
You should see the following screen:
You will be given your user name and password
Interprofessional Primary Care Outreach for Persons with Mental Illness
5
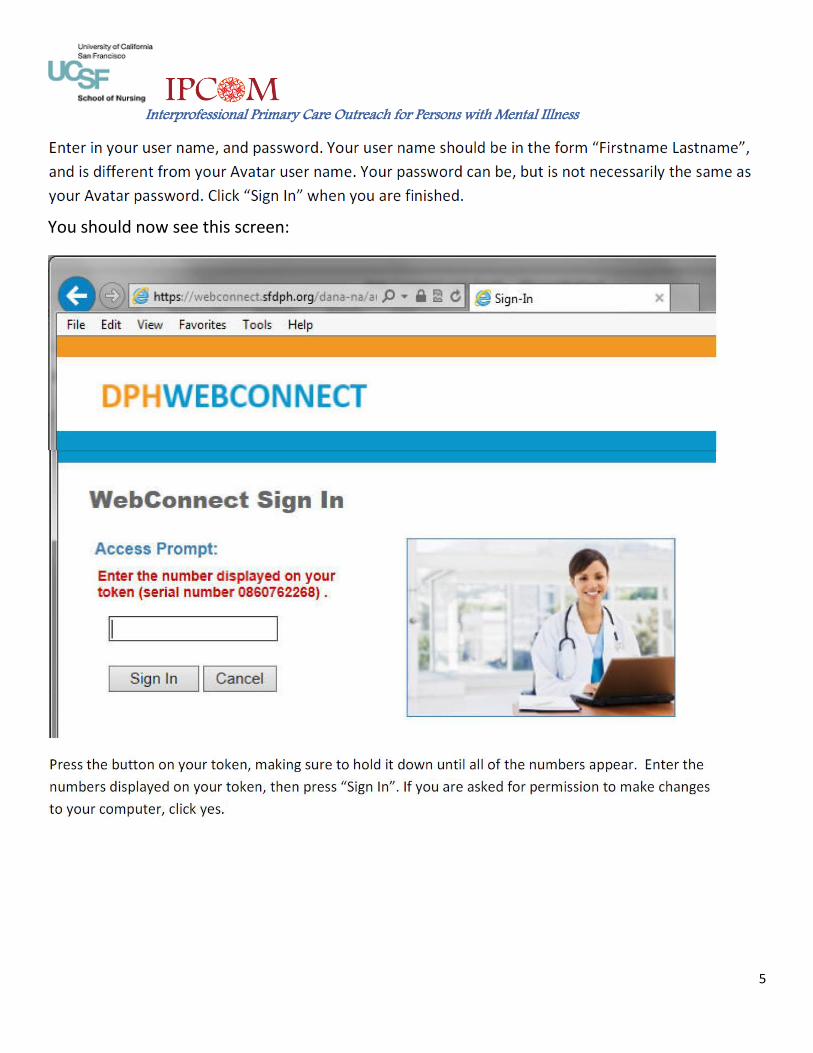
You should now see this screen:
Interprofessional Primary Care Outreach for Persons with Mental Illness
6
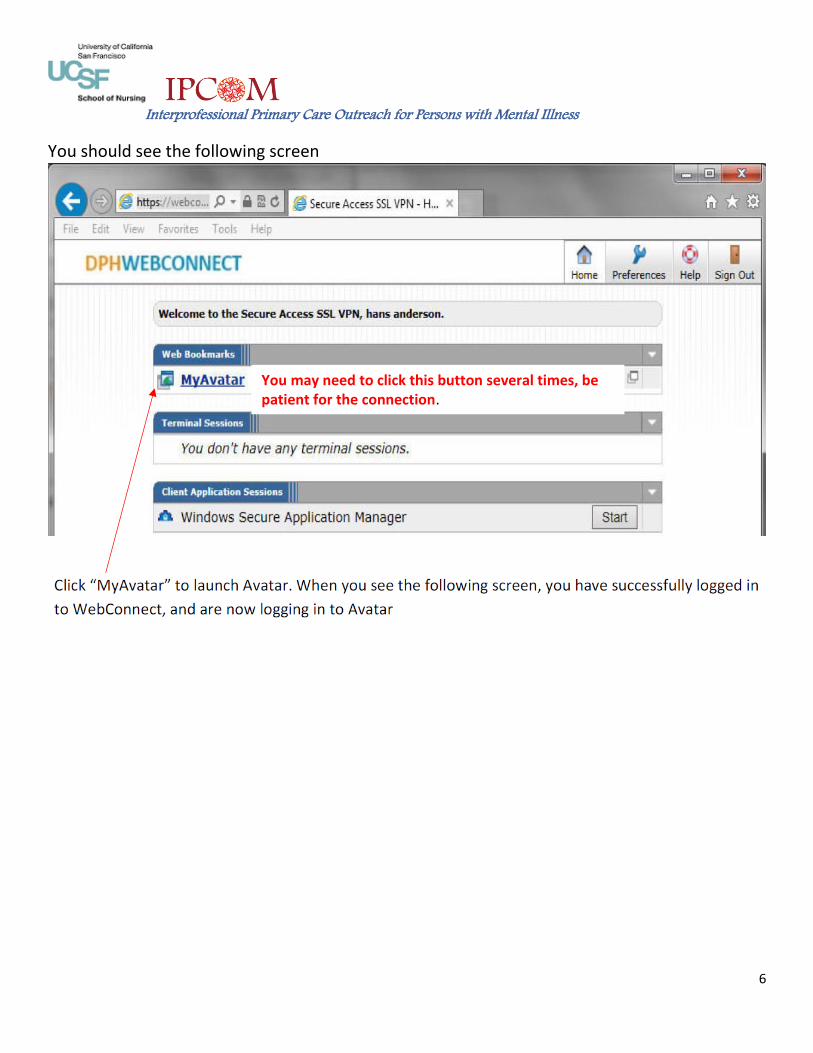
You should see the following screen
You may need to click this button several times, be patient for the connection.
Interprofessional Primary Care Outreach for Persons with Mental Illness
7
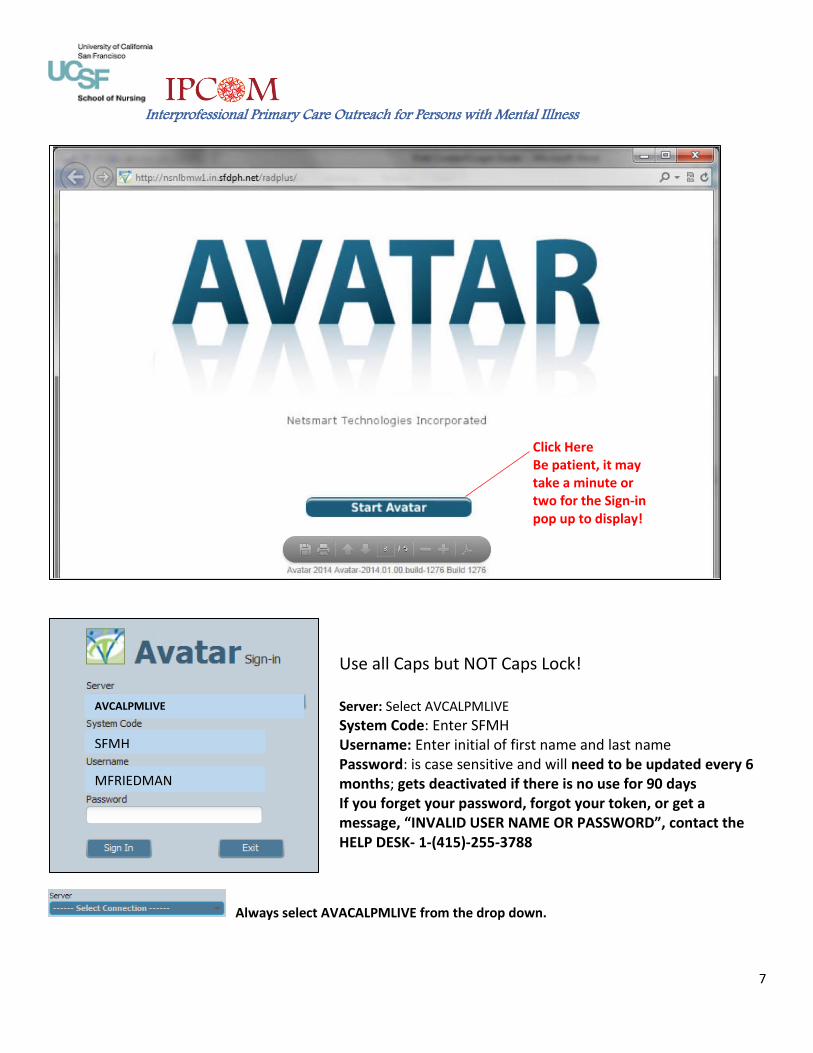
Always select AVACALPMLIVE from the drop down.
AVCALPMLIVE
Use all Caps but NOT Caps Lock! Server: Select AVCALPMLIVE
System Code: Enter SFMH Username: Enter initial of first name and last name Password: is case sensitive and will need to be updated every 6 months; gets deactivated if there is no use for 90 days If you forget your password, forgot your token, or get a message, “INVALID USER NAME OR PASSWORD”, contact the HELP DESK- 1-(415)-255-3788
SFMH
MFRIEDMAN
Click Here Be patient, it may take a minute or two for the Sign-in pop up to display!
Interprofessional Primary Care Outreach for Persons with Mental Illness
8
SIGN IN ISSUES
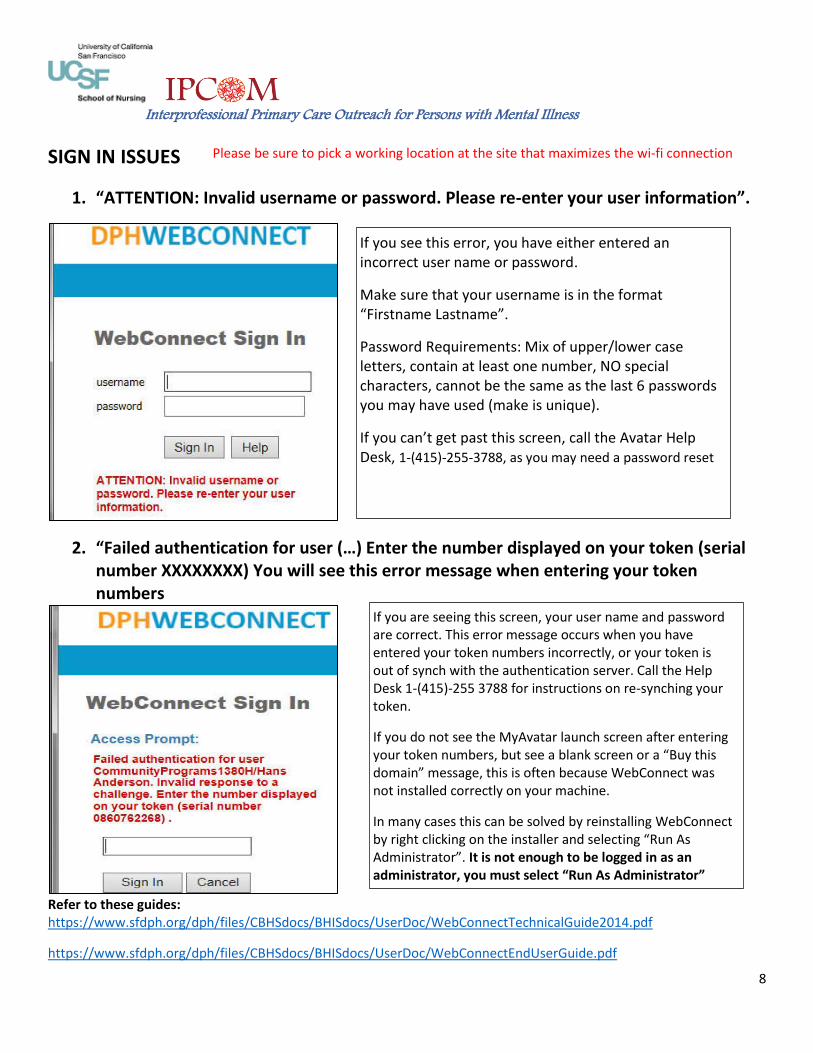
1. “ATTENTION: Invalid username or password. Please re-enter your user information”.
2. “Failed authentication for user (…) Enter the number displayed on your token (serial number XXXXXXXX) You will see this error message when entering your token numbers
Refer to these guides: https://www.sfdph.org/dph/files/CBHSdocs/BHISdocs/UserDoc/WebConnectTechnicalGuide2014.pdf
https://www.sfdph.org/dph/files/CBHSdocs/BHISdocs/UserDoc/WebConnectEndUserGuide.pdf
If you see this error, you have either entered an incorrect user name or password.
Make sure that your username is in the format “Firstname Lastname”.
Password Requirements: Mix of upper/lower case letters, contain at least one number, NO special characters, cannot be the same as the last 6 passwords you may have used (make is unique).
If you can’t get past this screen, call the Avatar Help Desk, 1-(415)-255-3788, as you may need a password reset
If you are seeing this screen, your user name and password are correct. This error message occurs when you have entered your token numbers incorrectly, or your token is out of synch with the authentication server. Call the Help Desk 1-(415)-255 3788 for instructions on re-synching your token.
If you do not see the MyAvatar launch screen after entering your token numbers, but see a blank screen or a “Buy this domain” message, this is often because WebConnect was not installed correctly on your machine.
In many cases this can be solved by reinstalling WebConnect by right clicking on the installer and selecting “Run As Administrator”. It is not enough to be logged in as an administrator, you must select “Run As Administrator”
Please be sure to pick a working location at the site that maximizes the wi-fi connection
Interprofessional Primary Care Outreach for Persons with Mental Illness
9
* Be aware, Avatar automatically locks you out after 30 minutes to 1 hour of no use- you may receive a
warning that time has elapsed since last use; you can cancel the warning and remain active or if you need, just log back in. Windows locks you out after 10 minutes of no use and you will need to re-enter your windows password.
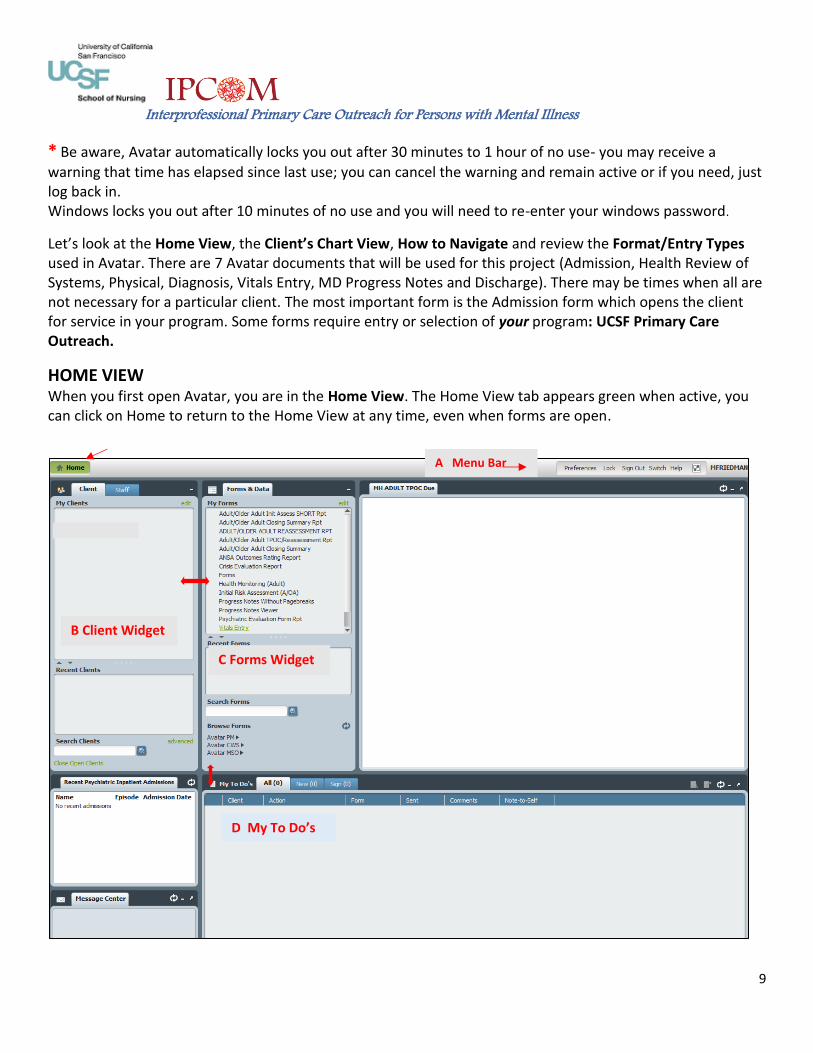
Let’s look at the Home View, the Client’s Chart View, How to Navigate and review the Format/Entry Types used in Avatar. There are 7 Avatar documents that will be used for this project (Admission, Health Review of Systems, Physical, Diagnosis, Vitals Entry, MD Progress Notes and Discharge). There may be times when all are not necessary for a particular client. The most important form is the Admission form which opens the client for service in your program. Some forms require entry or selection of your program: UCSF Primary Care Outreach.
HOME VIEW When you first open Avatar, you are in the Home View. The Home View tab appears green when active, you can click on Home to return to the Home View at any time, even when forms are open.
A Menu Bar
B Client Widget
C Forms Widget
D My To Do’s
Interprofessional Primary Care Outreach for Persons with Mental Illness
10
A. The Menu Bar is displayed at the top of the Home View window and always displays regardless of the Avatar forms that are open. The Menu Bar contains functions you need while you are working in Avatar.
LOCK- if you click LOCK, client information is protected and cannot be viewed if you leave your computer for a short time. Locking the application restricts unauthorized access. You will be required to enter your Avatar password to unlock when you return; however the screen will be at the exact state it was before it was locked.
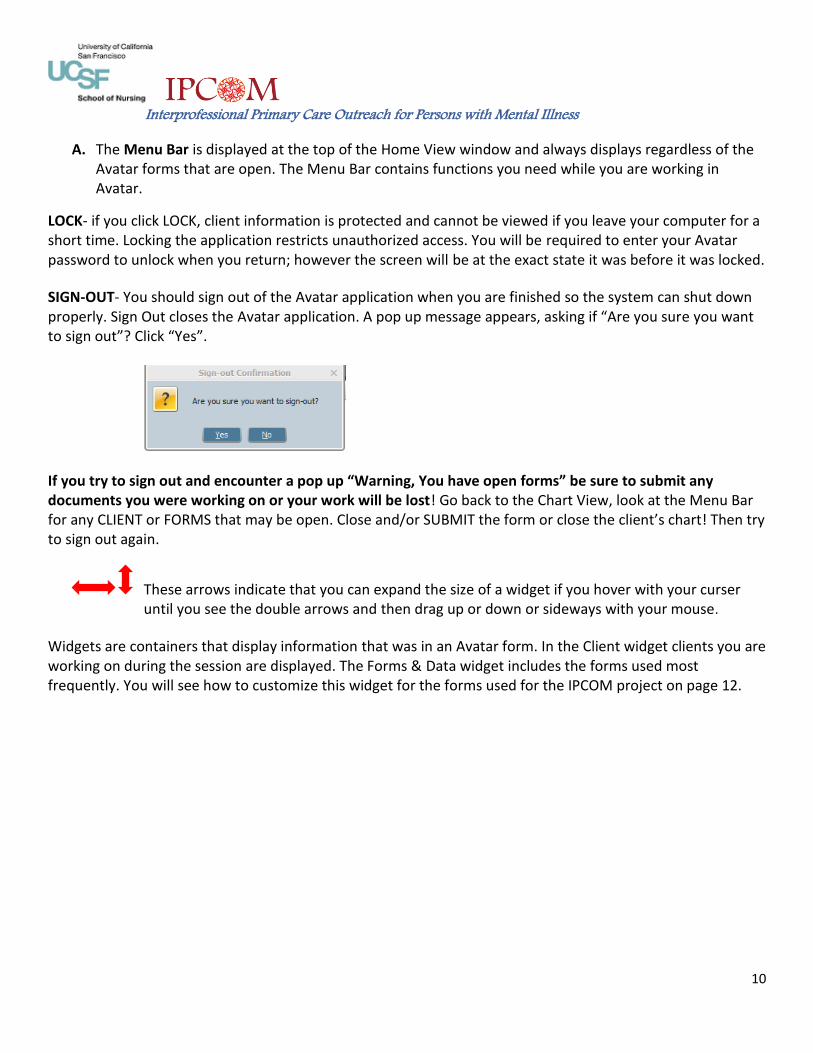
SIGN-OUT- You should sign out of the Avatar application when you are finished so the system can shut down properly. Sign Out closes the Avatar application. A pop up message appears, asking if “Are you sure you want to sign out”? Click “Yes”.
If you try to sign out and encounter a pop up “Warning, You have open forms” be sure to submit any documents you were working on or your work will be lost! Go back to the Chart View, look at the Menu Bar for any CLIENT or FORMS that may be open. Close and/or SUBMIT the form or close the client’s chart! Then try to sign out again.
These arrows indicate that you can expand the size of a widget if you hover with your curser until you see the double arrows and then drag up or down or sideways with your mouse.
Widgets are containers that display information that was in an Avatar form. In the Client widget clients you are working on during the session are displayed. The Forms & Data widget includes the forms used most frequently. You will see how to customize this widget for the forms used for the IPCOM project on page 12.
Interprofessional Primary Care Outreach for Persons with Mental Illness
11
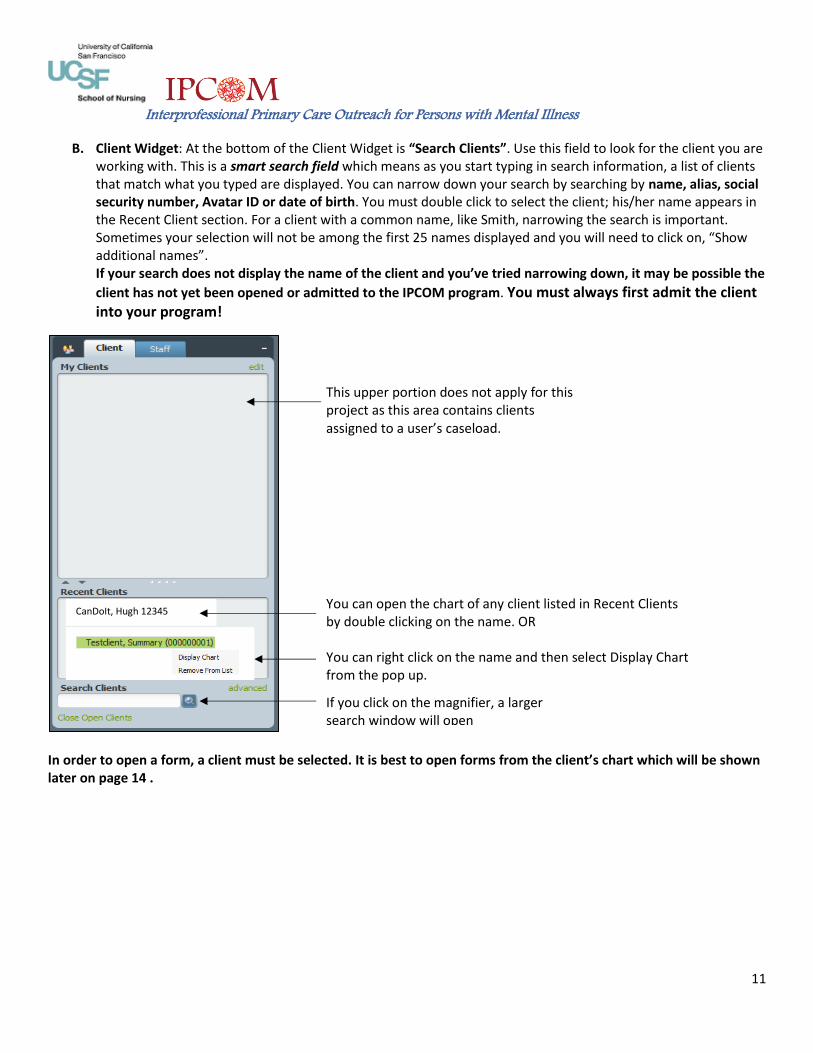
B. Client Widget: At the bottom of the Client Widget is “Search Clients”. Use this field to look for the client you are working with. This is a smart search field which means as you start typing in search information, a list of clients that match what you typed are displayed. You can narrow down your search by searching by name, alias, social security number, Avatar ID or date of birth. You must double click to select the client; his/her name appears in the Recent Client section. For a client with a common name, like Smith, narrowing the search is important. Sometimes your selection will not be among the first 25 names displayed and you will need to click on, “Show additional names”. If your search does not display the name of the client and you’ve tried narrowing down, it may be possible the
client has not yet been opened or admitted to the IPCOM program. You must always first admit the client into your program!
In order to open a form, a client must be selected. It is best to open forms from the client’s chart which will be shown later on page 14 .
This upper portion does not apply for this project as this area contains clients assigned to a user’s caseload.
CanDoIt, Hugh 12345
If you click on the magnifier, a larger search window will open
You can open the chart of any client listed in Recent Clients by double clicking on the name. OR You can right click on the name and then select Display Chart from the pop up.
Interprofessional Primary Care Outreach for Persons with Mental Illness
12
C. CREATING “FAVORITES” FOR YOUR FORMS & DATA widget
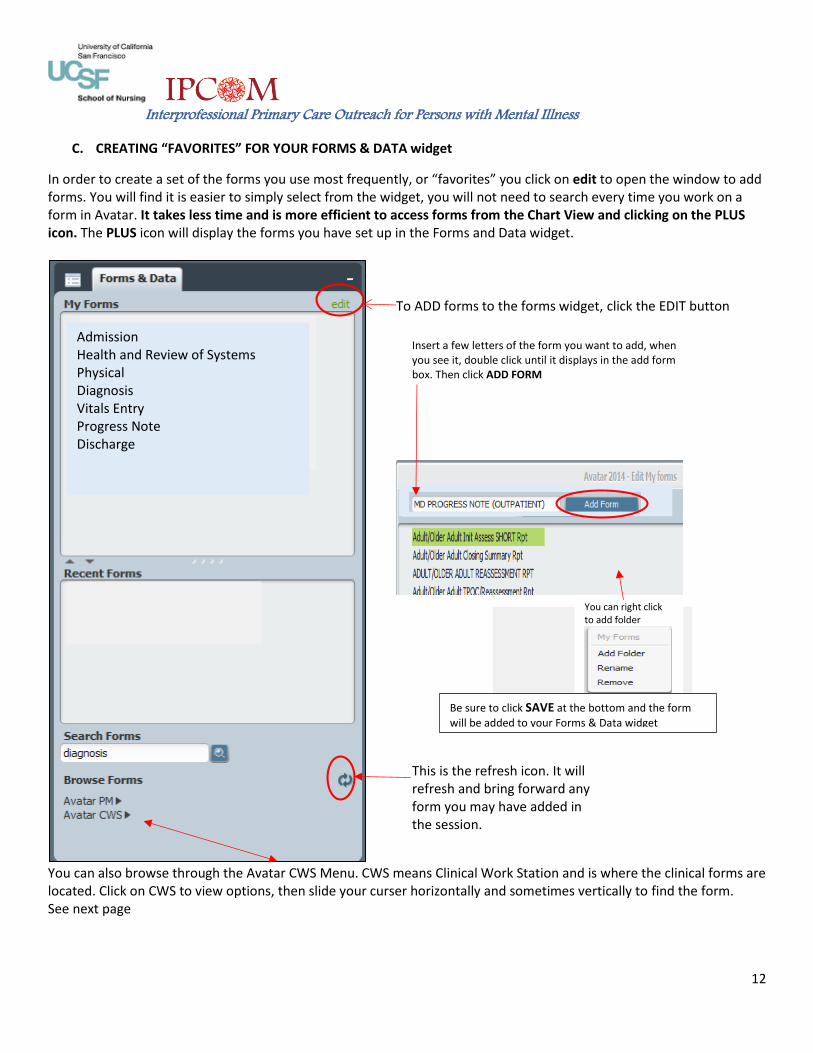
In order to create a set of the forms you use most frequently, or “favorites” you click on edit to open the window to add forms. You will find it is easier to simply select from the widget, you will not need to search every time you work on a form in Avatar. It takes less time and is more efficient to access forms from the Chart View and clicking on the PLUS icon. The PLUS icon will display the forms you have set up in the Forms and Data widget.
You can also browse through the Avatar CWS Menu. CWS means Clinical Work Station and is where the clinical forms are located. Click on CWS to view options, then slide your curser horizontally and sometimes vertically to find the form. See next page
kb
Admission Health and Review of Systems Physical Diagnosis Vitals Entry Progress Note Discharge
yh
To ADD forms to the forms widget, click the EDIT button
This is the refresh icon. It will refresh and bring forward any form you may have added in the session.
You can right click to add folder
Insert a few letters of the form you want to add, when you see it, double click until it displays in the add form box. Then click ADD FORM
Be sure to click SAVE at the bottom and the form
will be added to your Forms & Data widget
Interprofessional Primary Care Outreach for Persons with Mental Illness
13
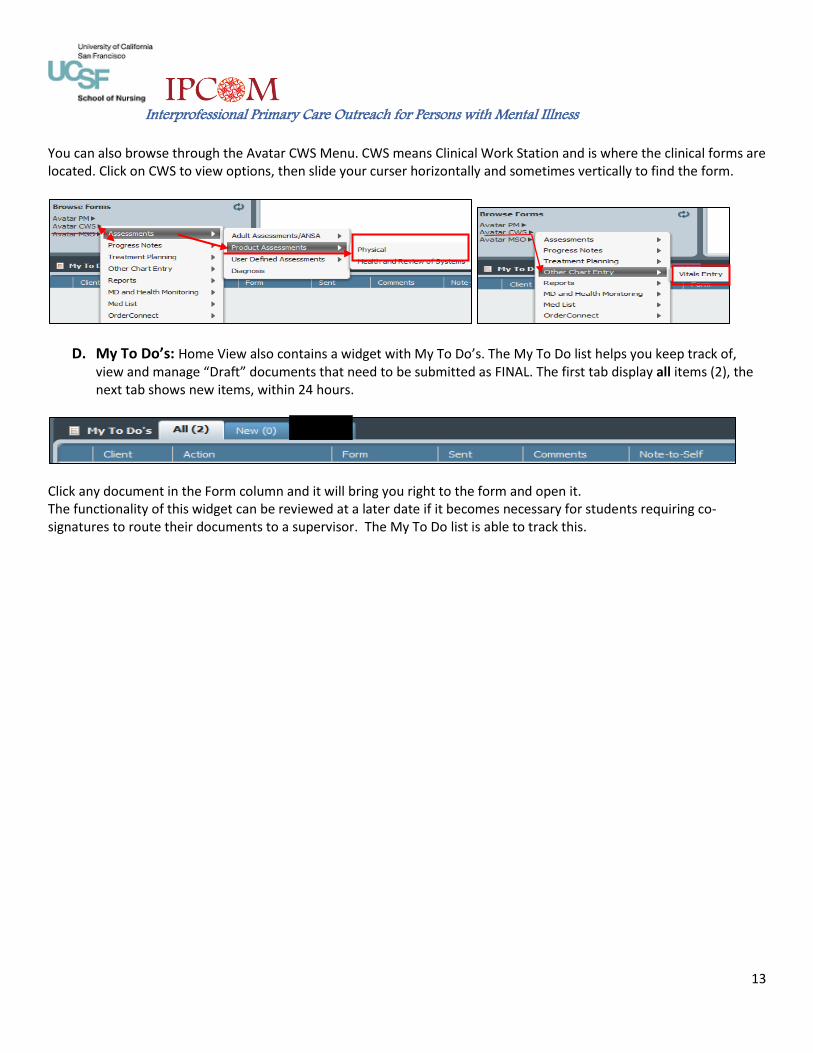
You can also browse through the Avatar CWS Menu. CWS means Clinical Work Station and is where the clinical forms are located. Click on CWS to view options, then slide your curser horizontally and sometimes vertically to find the form.
D. My To Do’s: Home View also contains a widget with My To Do’s. The My To Do list helps you keep track of, view and manage “Draft” documents that need to be submitted as FINAL. The first tab display all items (2), the next tab shows new items, within 24 hours.
Click any document in the Form column and it will bring you right to the form and open it. The functionality of this widget can be reviewed at a later date if it becomes necessary for students requiring co-signatures to route their documents to a supervisor. The My To Do list is able to track this.
Interprofessional Primary Care Outreach for Persons with Mental Illness
14
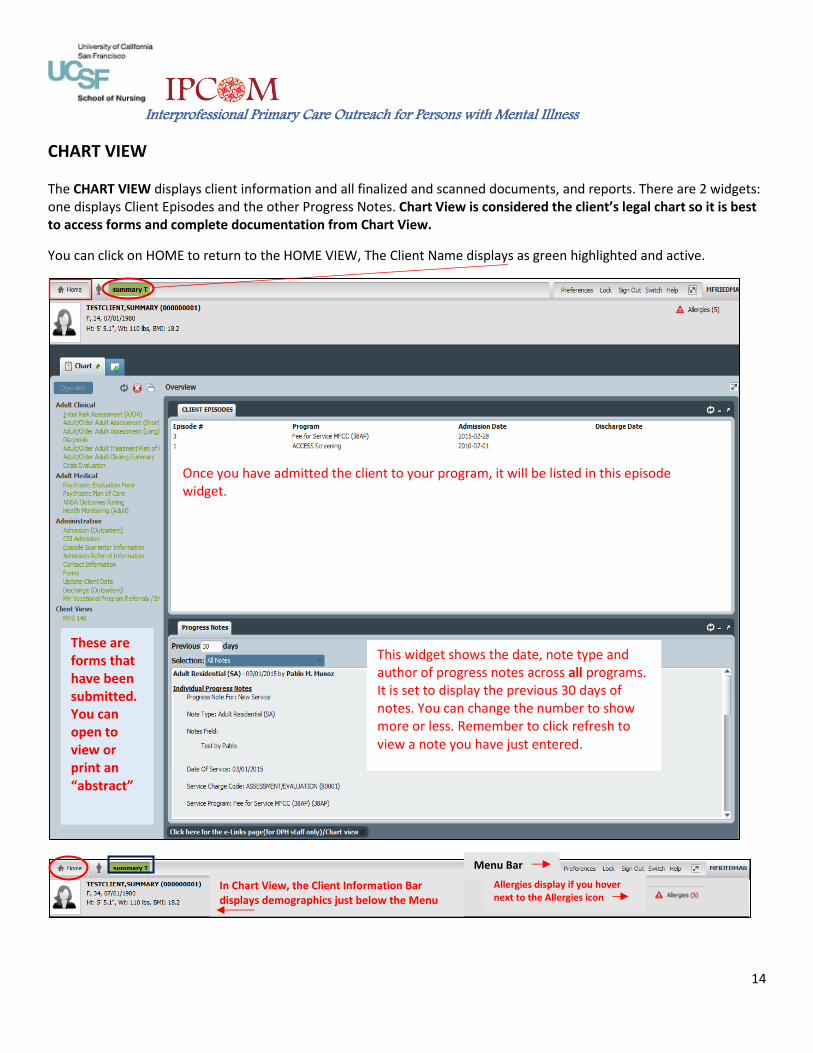
CHART VIEW The CHART VIEW displays client information and all finalized and scanned documents, and reports. There are 2 widgets: one displays Client Episodes and the other Progress Notes. Chart View is considered the client’s legal chart so it is best to access forms and complete documentation from Chart View.
You can click on HOME to return to the HOME VIEW, The Client Name displays as green highlighted and active.
In Chart View, the Client Information Bar displays demographics just below the Menu Bar
Allergies display if you hover next to the Allergies icon
Menu Bar
Once you have admitted the client to your program, it will be listed in this episode widget.
This widget shows the date, note type and author of progress notes across all programs. It is set to display the previous 30 days of notes. You can change the number to show more or less. Remember to click refresh to view a note you have just entered.
These are forms that have been submitted. You can open to view or print an “abstract”
Interprofessional Primary Care Outreach for Persons with Mental Illness
15
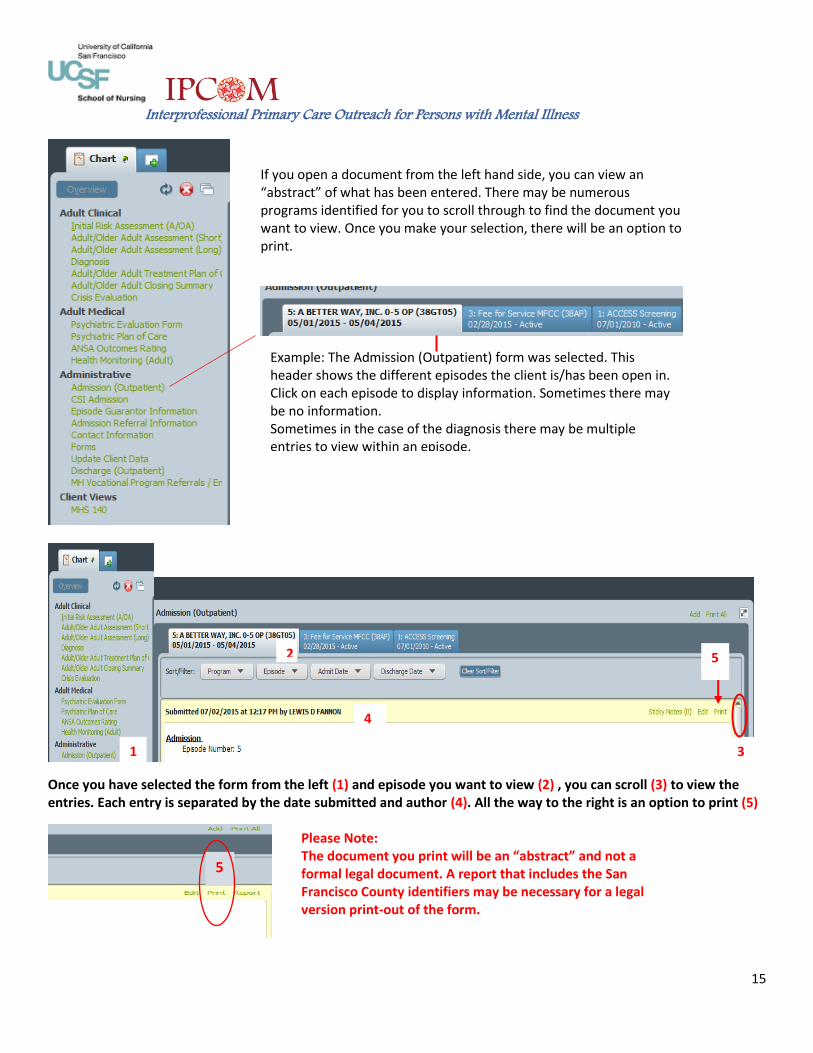
Once you have selected the form from the left (1) and episode you want to view (2) , you can scroll (3) to view the entries. Each entry is separated by the date submitted and author (4). All the way to the right is an option to print (5)
If you open a document from the left hand side, you can view an “abstract” of what has been entered. There may be numerous programs identified for you to scroll through to find the document you want to view. Once you make your selection, there will be an option to print.
Example: The Admission (Outpatient) form was selected. This header shows the different episodes the client is/has been open in. Click on each episode to display information. Sometimes there may be no information. Sometimes in the case of the diagnosis there may be multiple entries to view within an episode.
1
2
3
4
5
5
Please Note: The document you print will be an “abstract” and not a formal legal document. A report that includes the San Francisco County identifiers may be necessary for a legal version print-out of the form.
Interprofessional Primary Care Outreach for Persons with Mental Illness
16
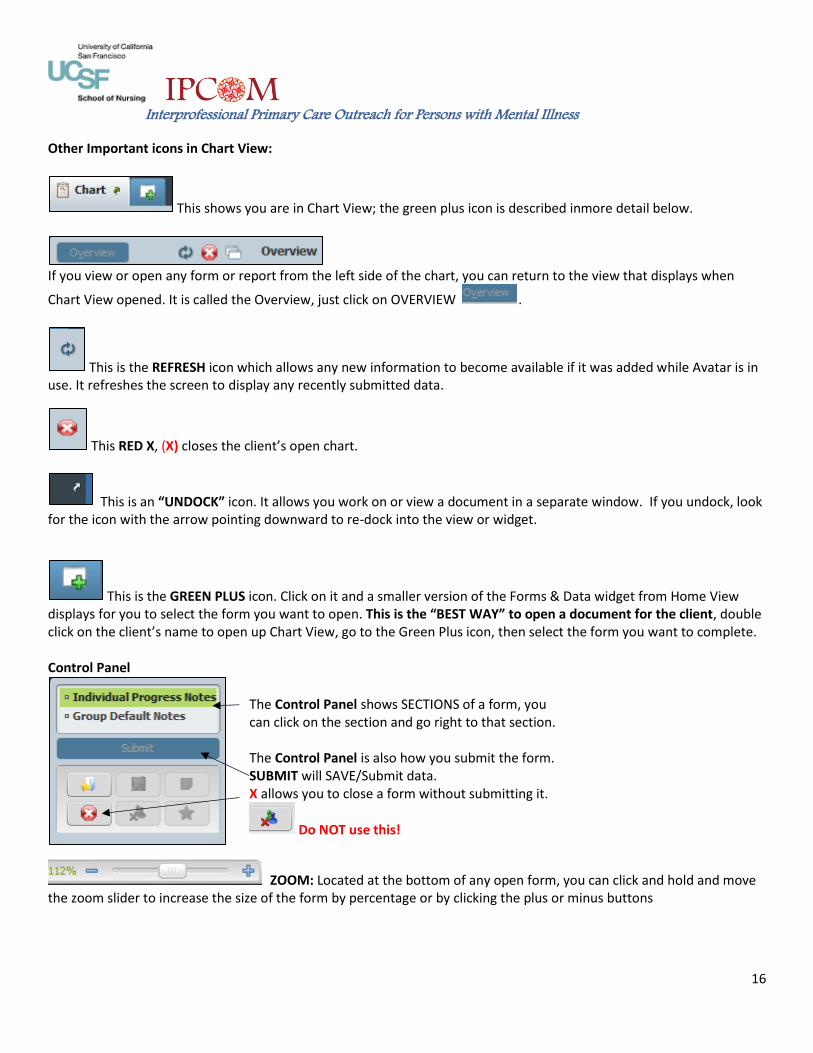
Other Important icons in Chart View:
This shows you are in Chart View; the green plus icon is described inmore detail below.
If you view or open any form or report from the left side of the chart, you can return to the view that displays when
Chart View opened. It is called the Overview, just click on OVERVIEW .
This is the REFRESH icon which allows any new information to become available if it was added while Avatar is in use. It refreshes the screen to display any recently submitted data.
This RED X, (X) closes the client’s open chart.
This is an “UNDOCK” icon. It allows you work on or view a document in a separate window. If you undock, look for the icon with the arrow pointing downward to re-dock into the view or widget.
This is the GREEN PLUS icon. Click on it and a smaller version of the Forms & Data widget from Home View displays for you to select the form you want to open. This is the “BEST WAY” to open a document for the client, double click on the client’s name to open up Chart View, go to the Green Plus icon, then select the form you want to complete. Control Panel
ZOOM: Located at the bottom of any open form, you can click and hold and move the zoom slider to increase the size of the form by percentage or by clicking the plus or minus buttons
The Control Panel shows SECTIONS of a form, you can click on the section and go right to that section. The Control Panel is also how you submit the form. SUBMIT will SAVE/Submit data. X allows you to close a form without submitting it.
Do NOT use this!
Interprofessional Primary Care Outreach for Persons with Mental Illness
17
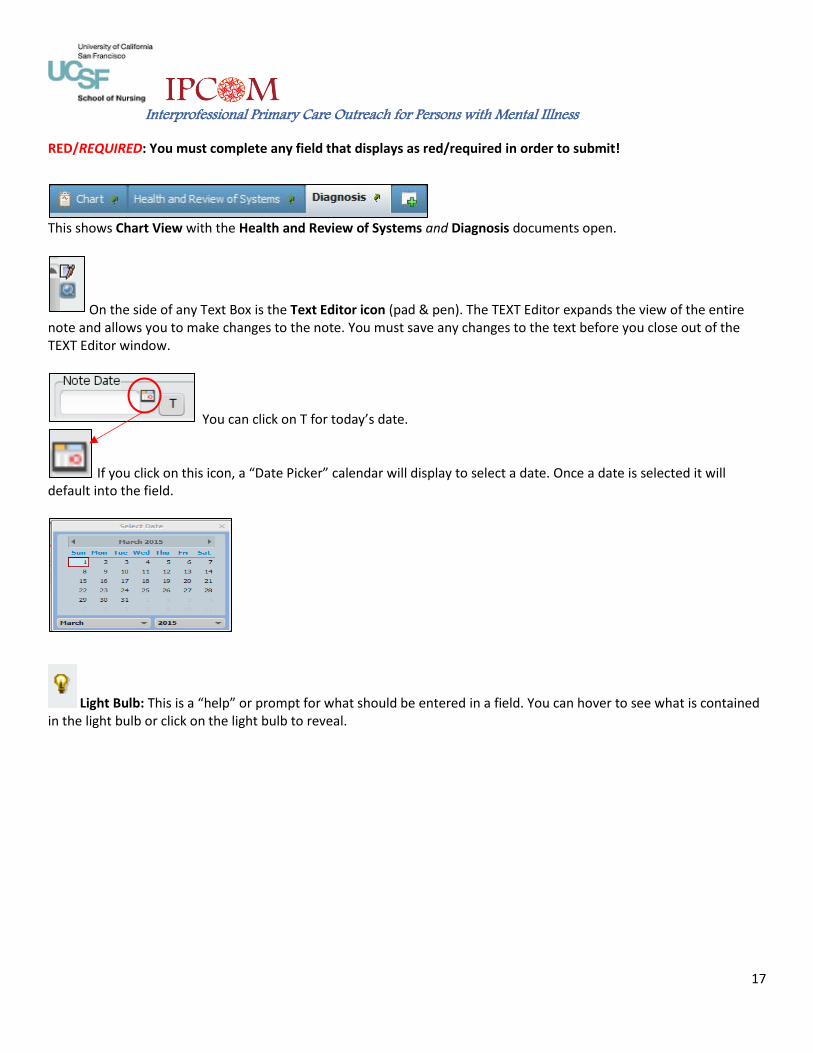
RED/REQUIRED: You must complete any field that displays as red/required in order to submit!
This shows Chart View with the Health and Review of Systems and Diagnosis documents open.
On the side of any Text Box is the Text Editor icon (pad & pen). The TEXT Editor expands the view of the entire note and allows you to make changes to the note. You must save any changes to the text before you close out of the TEXT Editor window.
You can click on T for today’s date.
If you click on this icon, a “Date Picker” calendar will display to select a date. Once a date is selected it will default into the field.
Light Bulb: This is a “help” or prompt for what should be entered in a field. You can hover to see what is contained in the light bulb or click on the light bulb to reveal.
Interprofessional Primary Care Outreach for Persons with Mental Illness
18
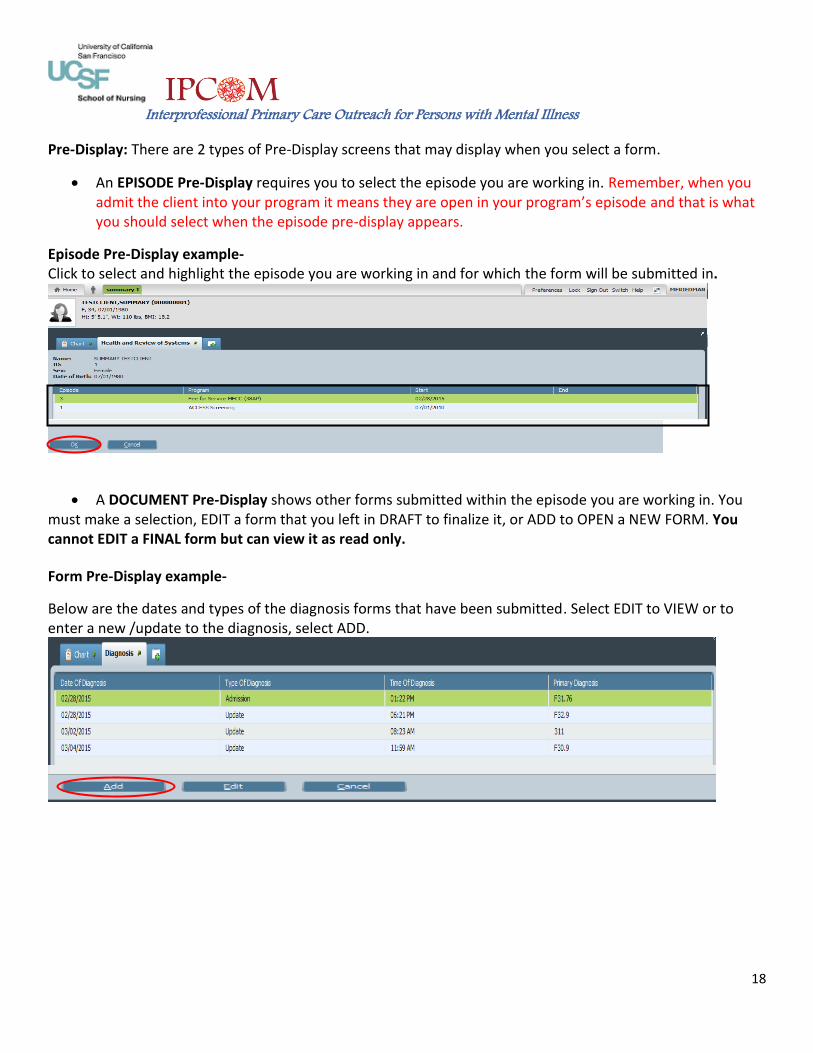
Pre-Display: There are 2 types of Pre-Display screens that may display when you select a form.
An EPISODE Pre-Display requires you to select the episode you are working in. Remember, when you admit the client into your program it means they are open in your program’s episode and that is what you should select when the episode pre-display appears.
Episode Pre-Display example- Click to select and highlight the episode you are working in and for which the form will be submitted in.
A DOCUMENT Pre-Display shows other forms submitted within the episode you are working in. You must make a selection, EDIT a form that you left in DRAFT to finalize it, or ADD to OPEN a NEW FORM. You cannot EDIT a FINAL form but can view it as read only.
Form Pre-Display example-
Below are the dates and types of the diagnosis forms that have been submitted. Select EDIT to VIEW or to enter a new /update to the diagnosis, select ADD.
Interprofessional Primary Care Outreach for Persons with Mental Illness
19
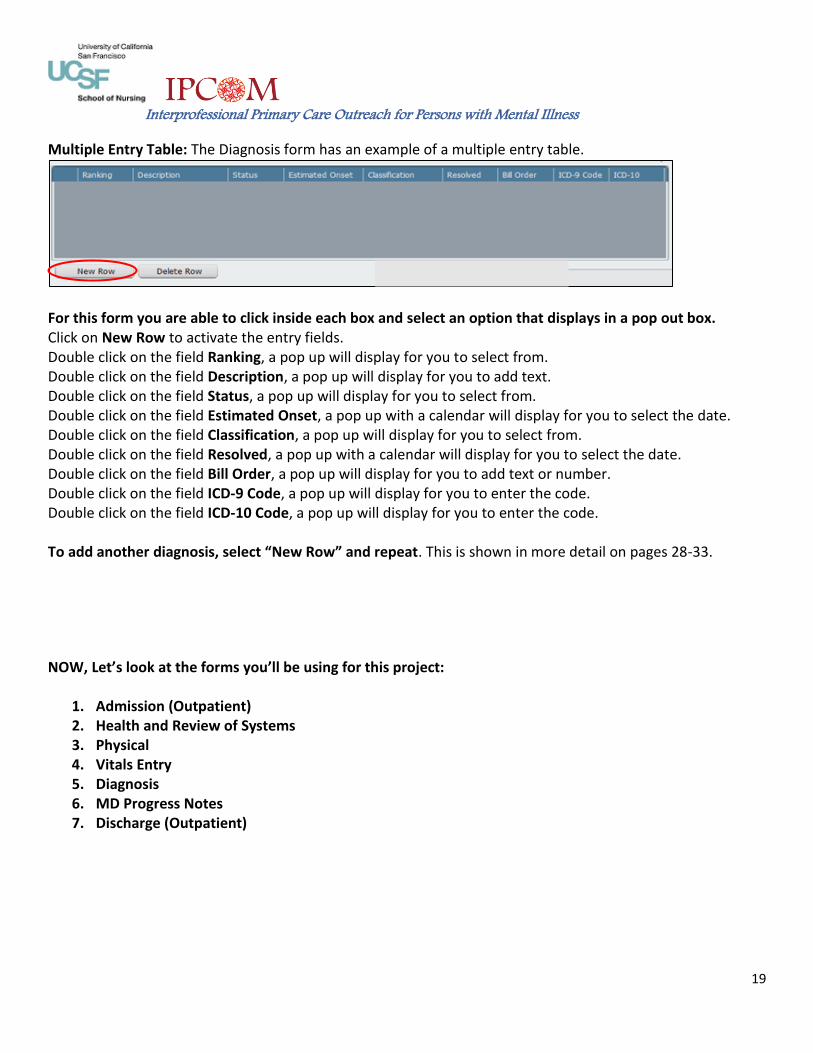
Multiple Entry Table: The Diagnosis form has an example of a multiple entry table.
For this form you are able to click inside each box and select an option that displays in a pop out box. Click on New Row to activate the entry fields. Double click on the field Ranking, a pop up will display for you to select from. Double click on the field Description, a pop up will display for you to add text. Double click on the field Status, a pop up will display for you to select from. Double click on the field Estimated Onset, a pop up with a calendar will display for you to select the date. Double click on the field Classification, a pop up will display for you to select from. Double click on the field Resolved, a pop up with a calendar will display for you to select the date. Double click on the field Bill Order, a pop up will display for you to add text or number. Double click on the field ICD-9 Code, a pop up will display for you to enter the code. Double click on the field ICD-10 Code, a pop up will display for you to enter the code. To add another diagnosis, select “New Row” and repeat. This is shown in more detail on pages 28-33.
NOW, Let’s look at the forms you’ll be using for this project:
1. Admission (Outpatient) 2. Health and Review of Systems 3. Physical 4. Vitals Entry 5. Diagnosis 6. MD Progress Notes 7. Discharge (Outpatient)

Interprofessional Primary Care Outreach for Persons with Mental Illness
20
1. Admission (Outpatient)
You must enter all clients you provide a service for into an IPCOM episode. You must admit the client to your program using the Avatar Admission (Outpatient) form. Highlight Client→ Forms & Data Search→ Admission (Outpatient). Double click to open the form.
Interprofessional Primary Care Outreach for Persons with Mental Illness
21
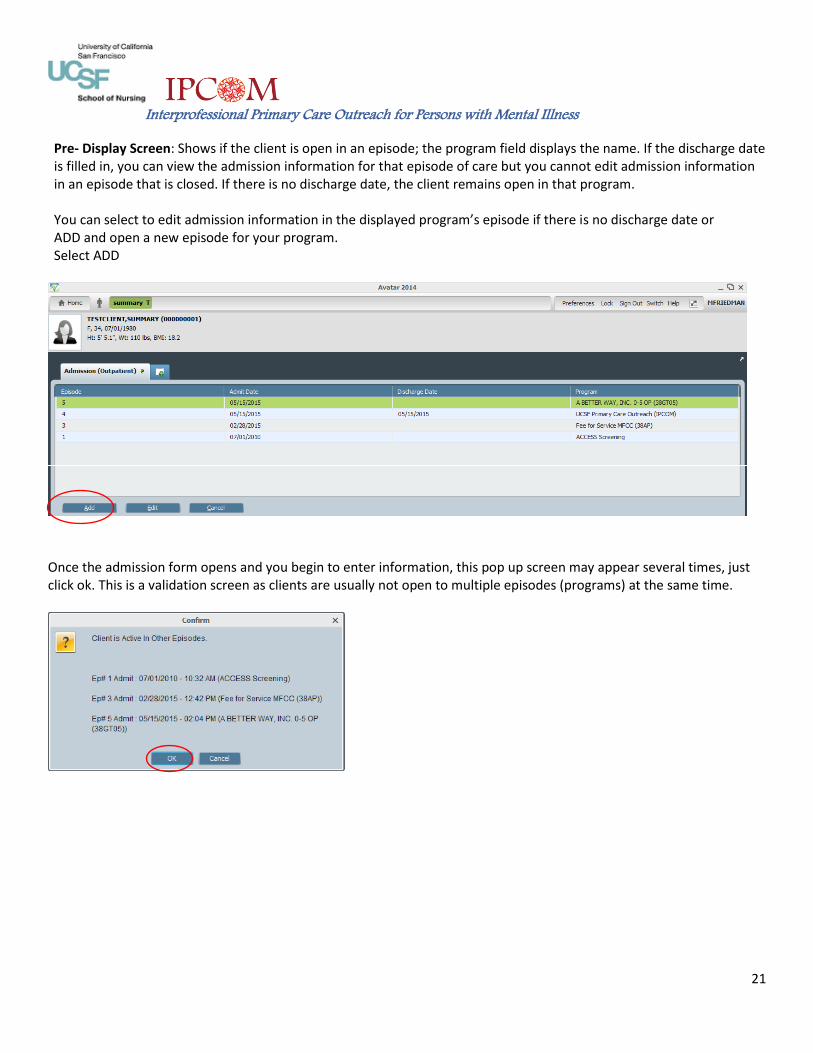
Pre- Display Screen: Shows if the client is open in an episode; the program field displays the name. If the discharge date is filled in, you can view the admission information for that episode of care but you cannot edit admission information in an episode that is closed. If there is no discharge date, the client remains open in that program.
You can select to edit admission information in the displayed program’s episode if there is no discharge date or ADD and open a new episode for your program. Select ADD
Once the admission form opens and you begin to enter information, this pop up screen may appear several times, just click ok. This is a validation screen as clients are usually not open to multiple episodes (programs) at the same time.
Interprofessional Primary Care Outreach for Persons with Mental Illness
22
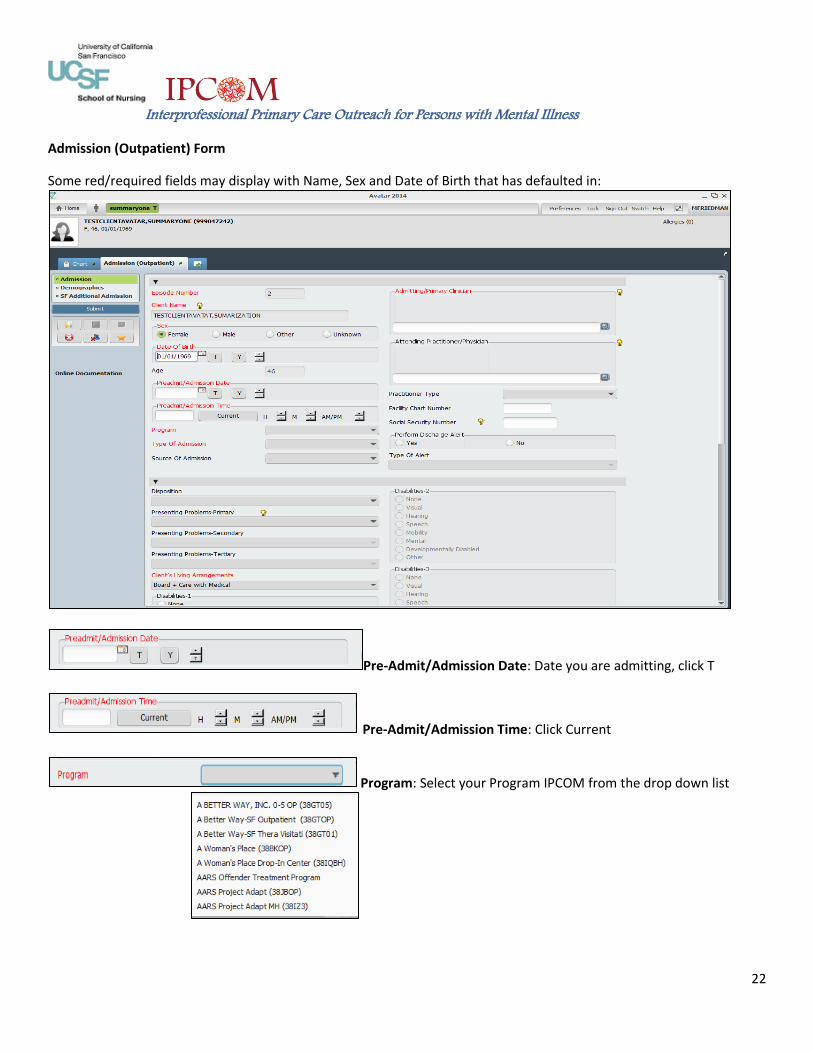
Admission (Outpatient) Form
Some red/required fields may display with Name, Sex and Date of Birth that has defaulted in:
Pre-Admit/Admission Date: Date you are admitting, click T
Pre-Admit/Admission Time: Click Current
Program: Select your Program IPCOM from the drop down list
Interprofessional Primary Care Outreach for Persons with Mental Illness
23
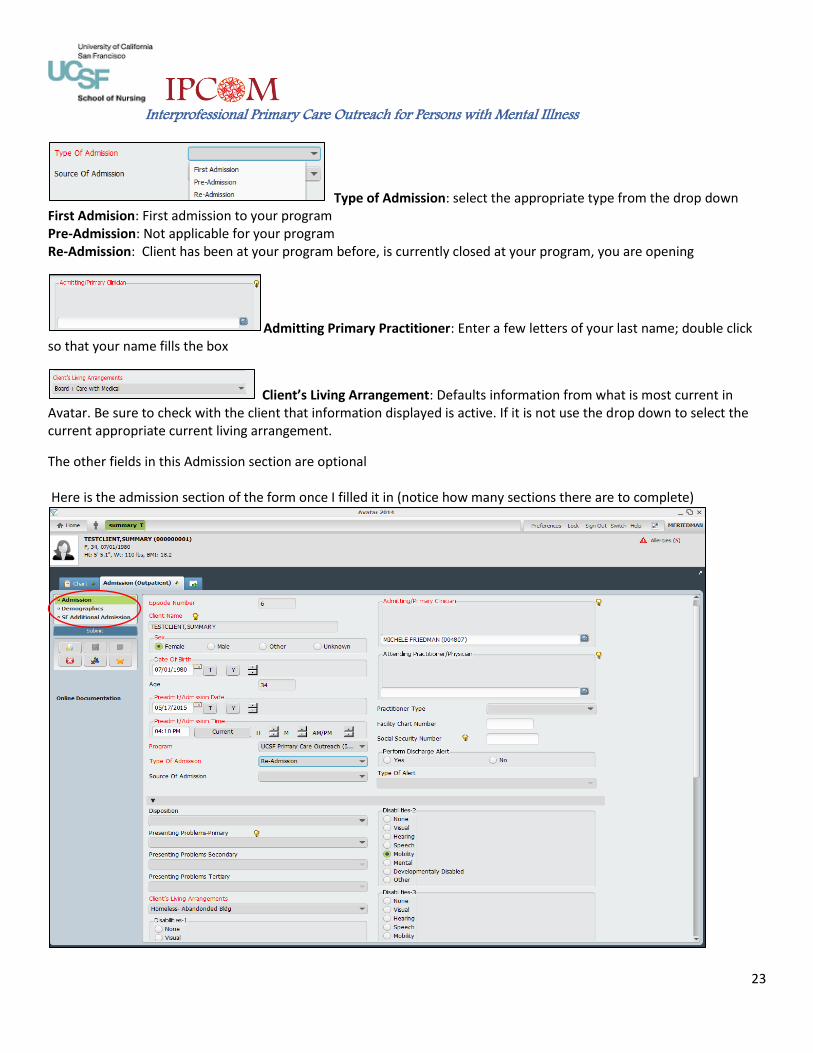
Type of Admission: select the appropriate type from the drop down First Admision: First admission to your program Pre-Admission: Not applicable for your program Re-Admission: Client has been at your program before, is currently closed at your program, you are opening
Admitting Primary Practitioner: Enter a few letters of your last name; double click so that your name fills the box
Client’s Living Arrangement: Defaults information from what is most current in Avatar. Be sure to check with the client that information displayed is active. If it is not use the drop down to select the current appropriate current living arrangement.
The other fields in this Admission section are optional Here is the admission section of the form once I filled it in (notice how many sections there are to complete)

Interprofessional Primary Care Outreach for Persons with Mental Illness
24
Next, click on the Demographics section…. Demographics section:
Many of the fields in this section are optional; go down to the red/required “Smoker” field.
Select the current Smoker status
D drop down selections
Interprofessional Primary Care Outreach for Persons with Mental Illness
25
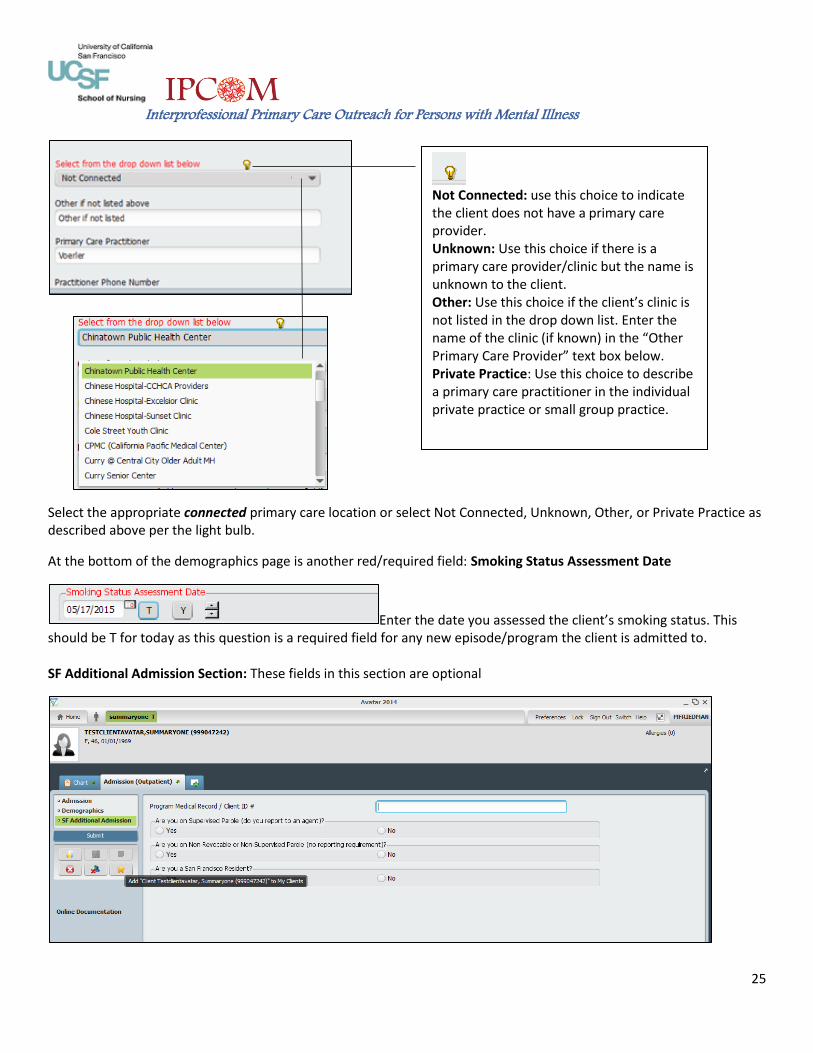
Select the appropriate connected primary care location or select Not Connected, Unknown, Other, or Private Practice as described above per the light bulb.
At the bottom of the demographics page is another red/required field: Smoking Status Assessment Date
Enter the date you assessed the client’s smoking status. This should be T for today as this question is a required field for any new episode/program the client is admitted to. SF Additional Admission Section: These fields in this section are optional
Not Connected: use this choice to indicate the client does not have a primary care provider. Unknown: Use this choice if there is a primary care provider/clinic but the name is unknown to the client. Other: Use this choice if the client’s clinic is not listed in the drop down list. Enter the name of the clinic (if known) in the “Other Primary Care Provider” text box below. Private Practice: Use this choice to describe a primary care practitioner in the individual private practice or small group practice.

Interprofessional Primary Care Outreach for Persons with Mental Illness
26
Always remember to Submit and then document in the MD progress notethat the client has been admitted into the IPCOM program!
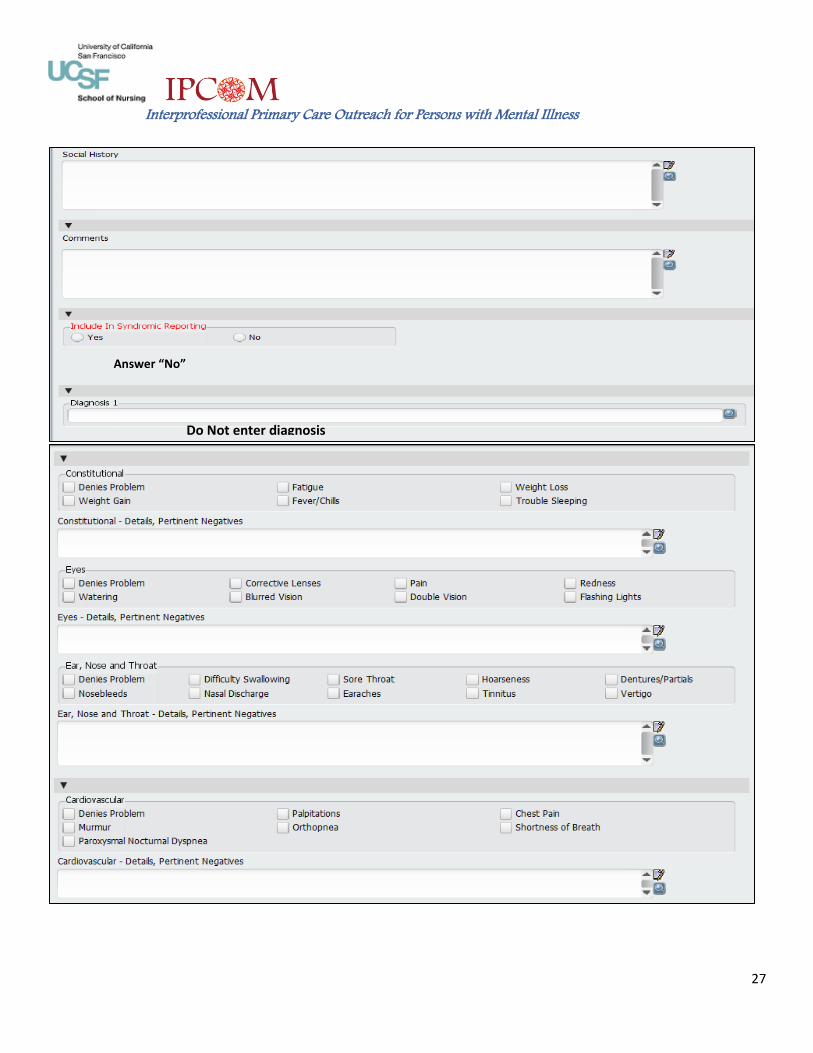
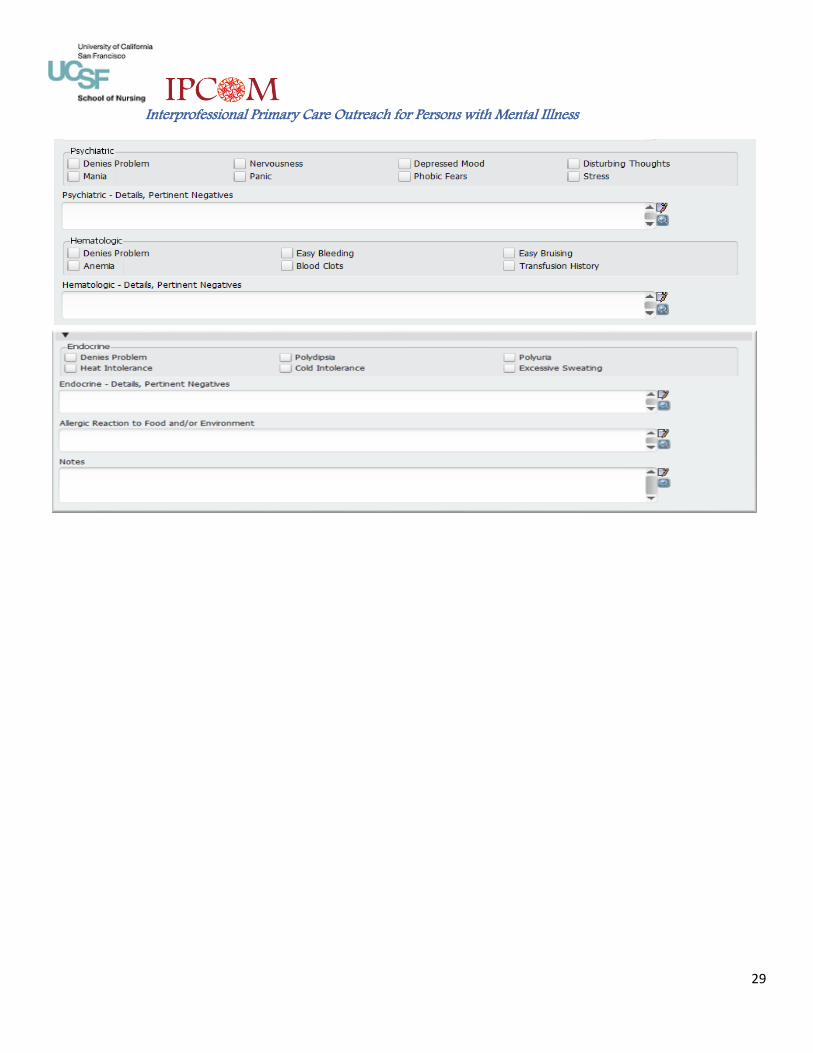
2. Health and Review of Systems
This shows the sections required to complete this document. You can skip ahead to another section.
You must document in the MD Progress Note (Outpatient) that you have finalized the Health and Review of Systems. The Progress Note must be completed within 24 hours of the service and is the bill for the service you provided.
Interprofessional Primary Care Outreach for Persons with Mental Illness
27
Answer “No”
Do Not enter diagnosis

Interprofessional Primary Care Outreach for Persons with Mental Illness
28
Interprofessional Primary Care Outreach for Persons with Mental Illness
29
Interprofessional Primary Care Outreach for Persons with Mental Illness
30
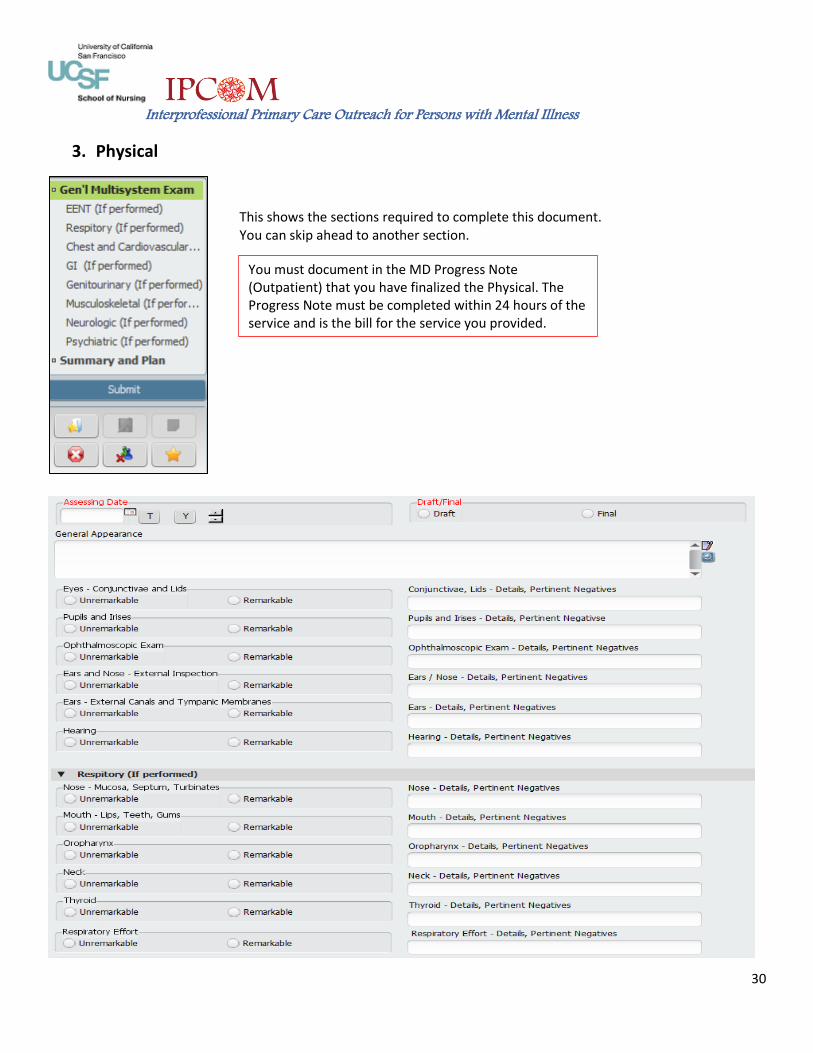
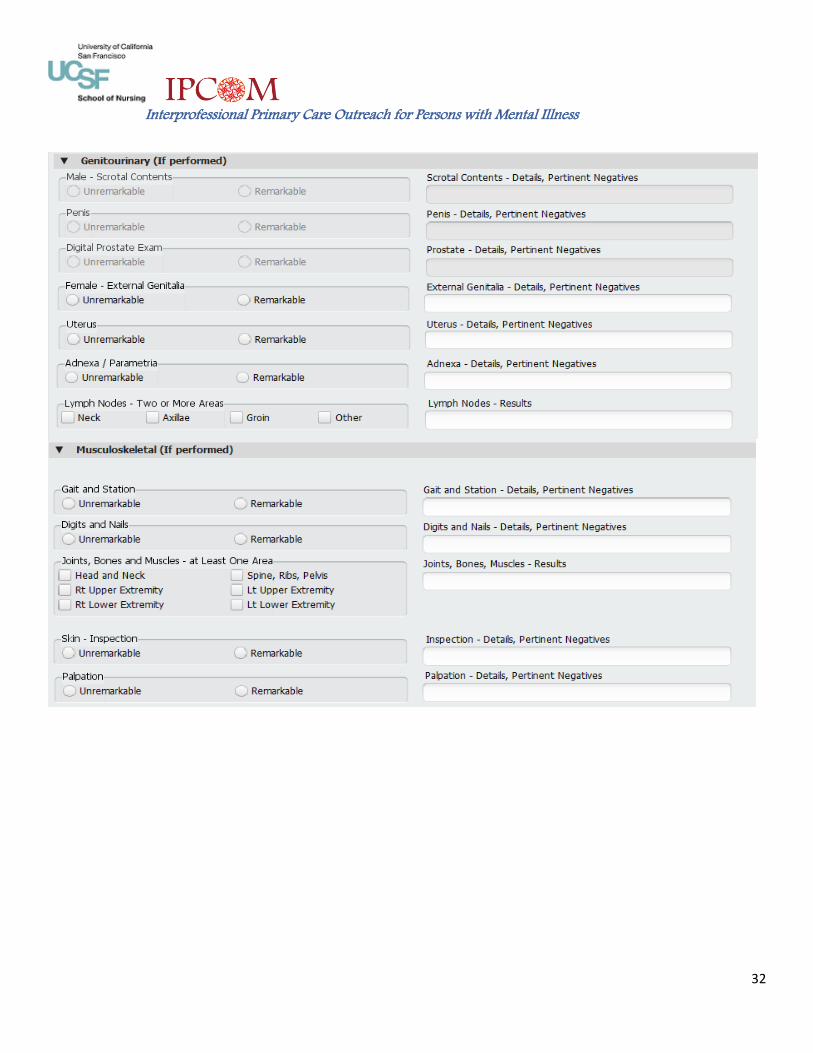
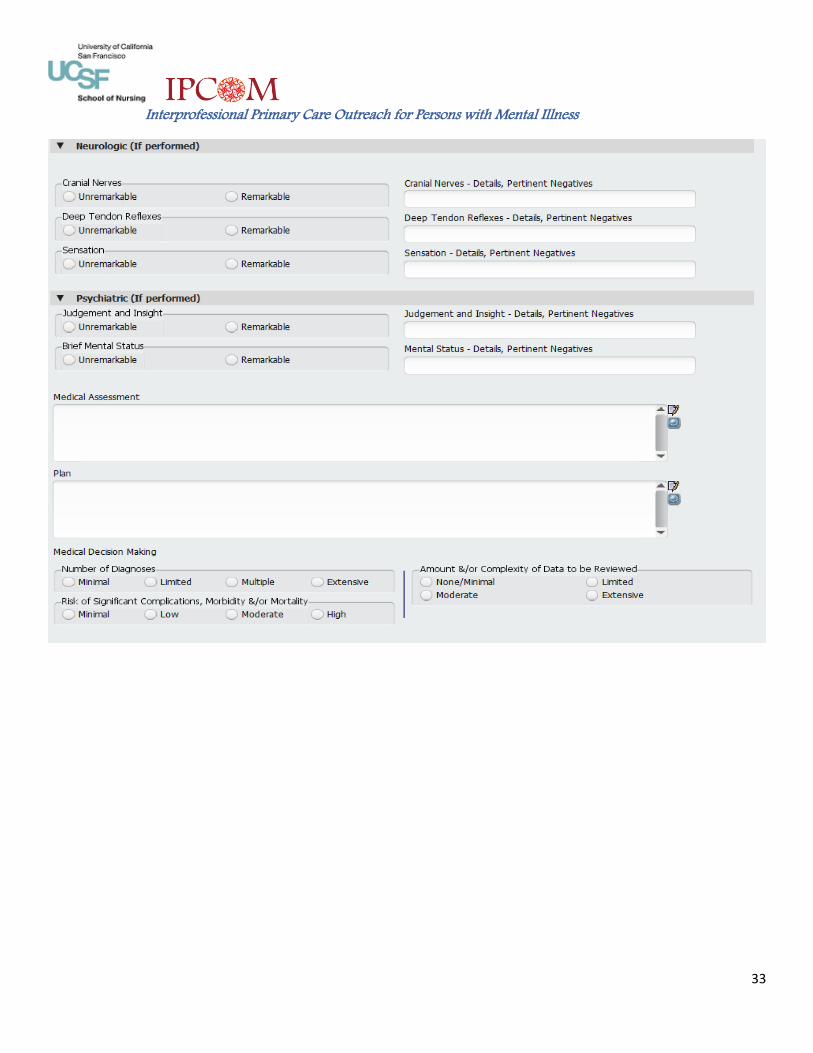
3. Physical
This shows the sections required to complete this document. You can skip ahead to another section.
You must document in the MD Progress Note (Outpatient) that you have finalized the Physical. The Progress Note must be completed within 24 hours of the service and is the bill for the service you provided.

Interprofessional Primary Care Outreach for Persons with Mental Illness
31
Interprofessional Primary Care Outreach for Persons with Mental Illness
32
Interprofessional Primary Care Outreach for Persons with Mental Illness
33
Interprofessional Primary Care Outreach for Persons with Mental Illness
34
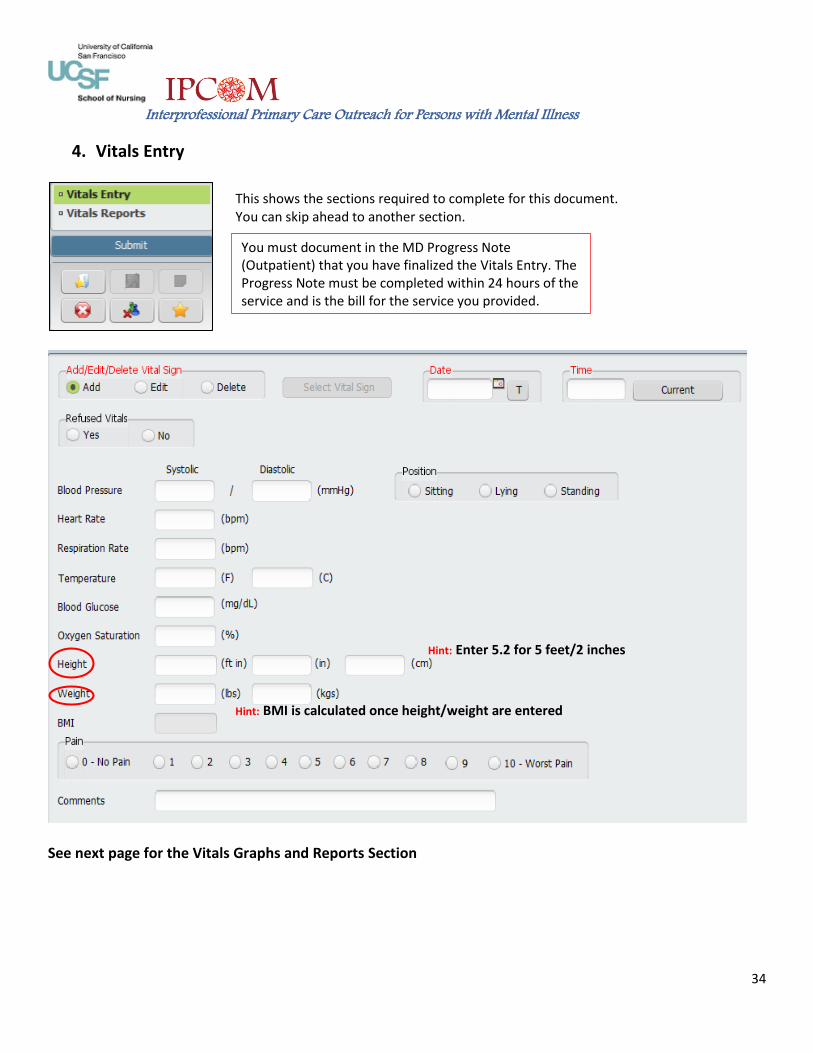
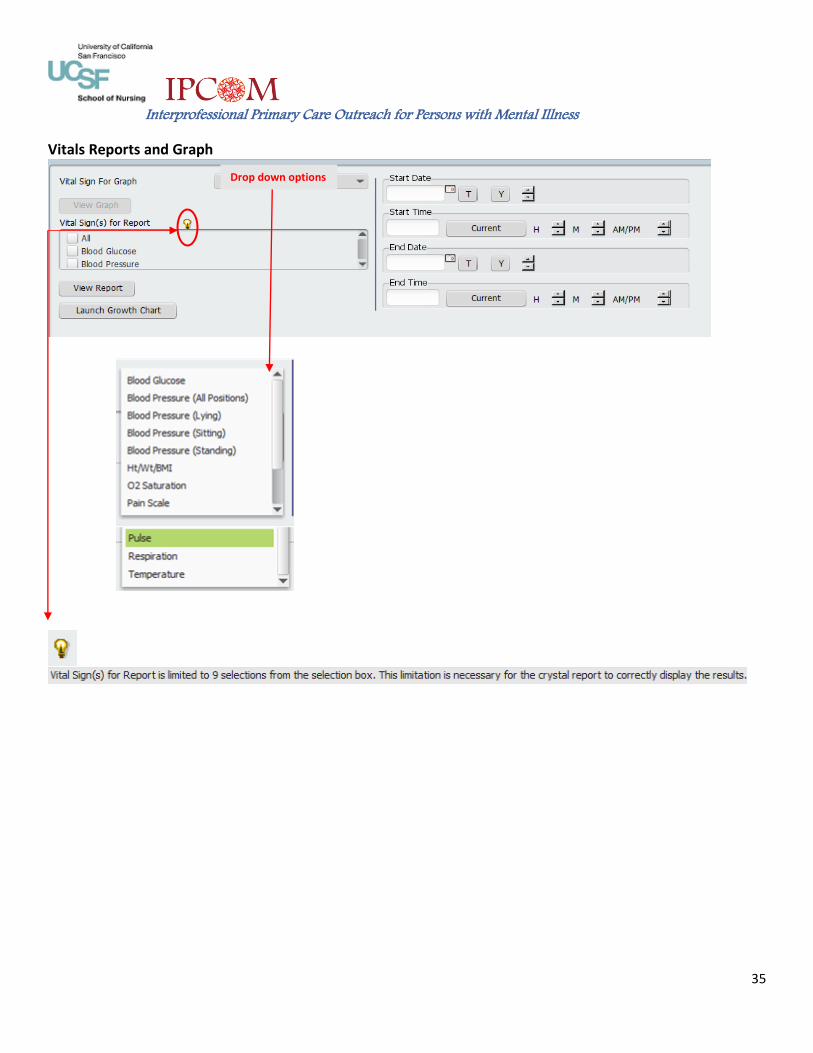
4. Vitals Entry
See next page for the Vitals Graphs and Reports Section
This shows the sections required to complete for this document. You can skip ahead to another section.
Hint: Enter 5.2 for 5 feet/2 inches
Hint: BMI is calculated once height/weight are entered
You must document in the MD Progress Note (Outpatient) that you have finalized the Vitals Entry. The Progress Note must be completed within 24 hours of the service and is the bill for the service you provided.
Interprofessional Primary Care Outreach for Persons with Mental Illness
35
Vitals Reports and Graph
Drop down options

Interprofessional Primary Care Outreach for Persons with Mental Illness
36
5. Diagnosis
Click on New Row to activate the entry fields.
Double click on the field Ranking, a pop up will display for you to select from.
This shows the sections required to complete this document. You can skip ahead to another section.
You must document in the MD Progress Note (Outpatient) that you have finalized the Diagnosis. The Progress Note must be completed within 24 hours of the service and is the bill for the service you provided.
Interprofessional Primary Care Outreach for Persons with Mental Illness
37
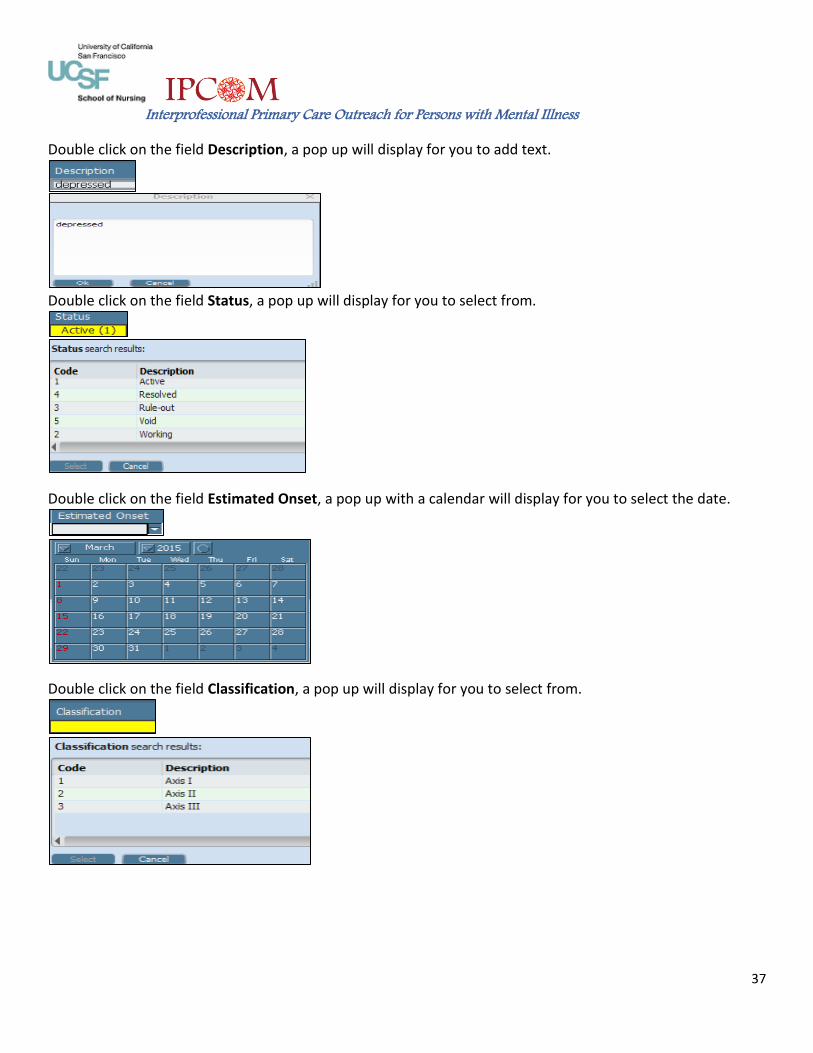
Double click on the field Description, a pop up will display for you to add text.
Double click on the field Status, a pop up will display for you to select from.
Double click on the field Estimated Onset, a pop up with a calendar will display for you to select the date.
Double click on the field Classification, a pop up will display for you to select from.
Interprofessional Primary Care Outreach for Persons with Mental Illness
38
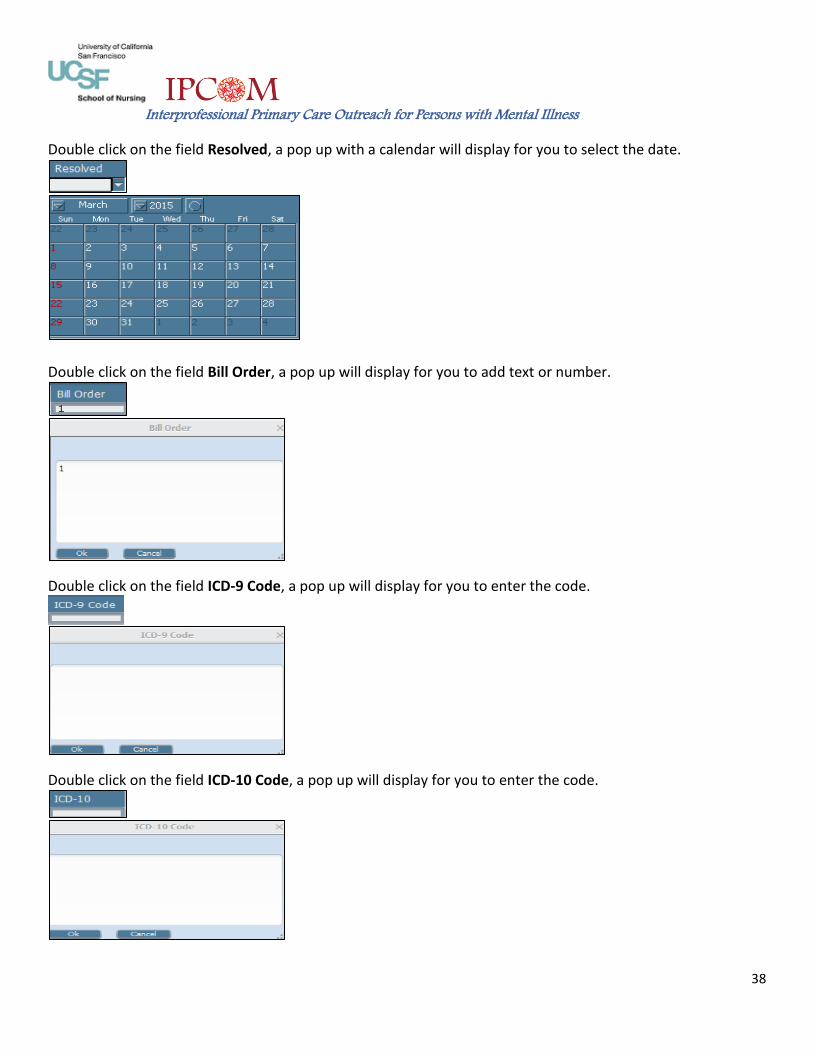
Double click on the field Resolved, a pop up with a calendar will display for you to select the date.
Double click on the field Bill Order, a pop up will display for you to add text or number.
Double click on the field ICD-9 Code, a pop up will display for you to enter the code.
Double click on the field ICD-10 Code, a pop up will display for you to enter the code.
Interprofessional Primary Care Outreach for Persons with Mental Illness
39
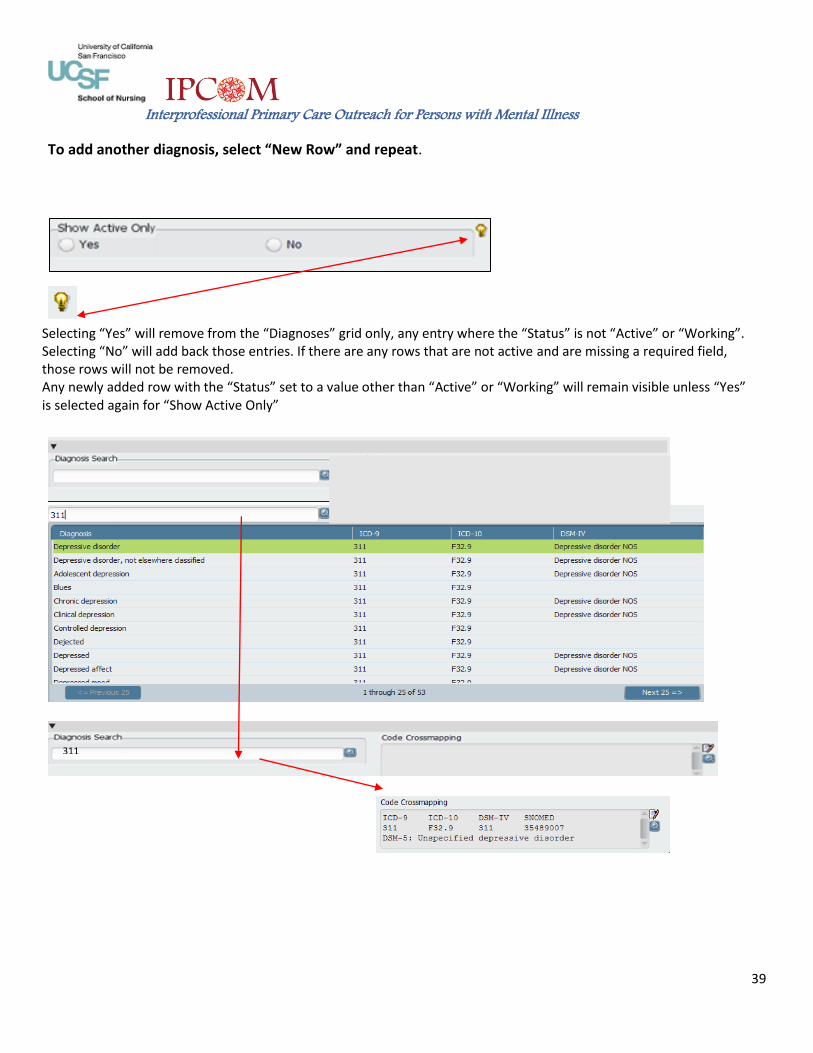
To add another diagnosis, select “New Row” and repeat.
311
Selecting “Yes” will remove from the “Diagnoses” grid only, any entry where the “Status” is not “Active” or “Working”. Selecting “No” will add back those entries. If there are any rows that are not active and are missing a required field, those rows will not be removed. Any newly added row with the “Status” set to a value other than “Active” or “Working” will remain visible unless “Yes” is selected again for “Show Active Only”
Interprofessional Primary Care Outreach for Persons with Mental Illness
40
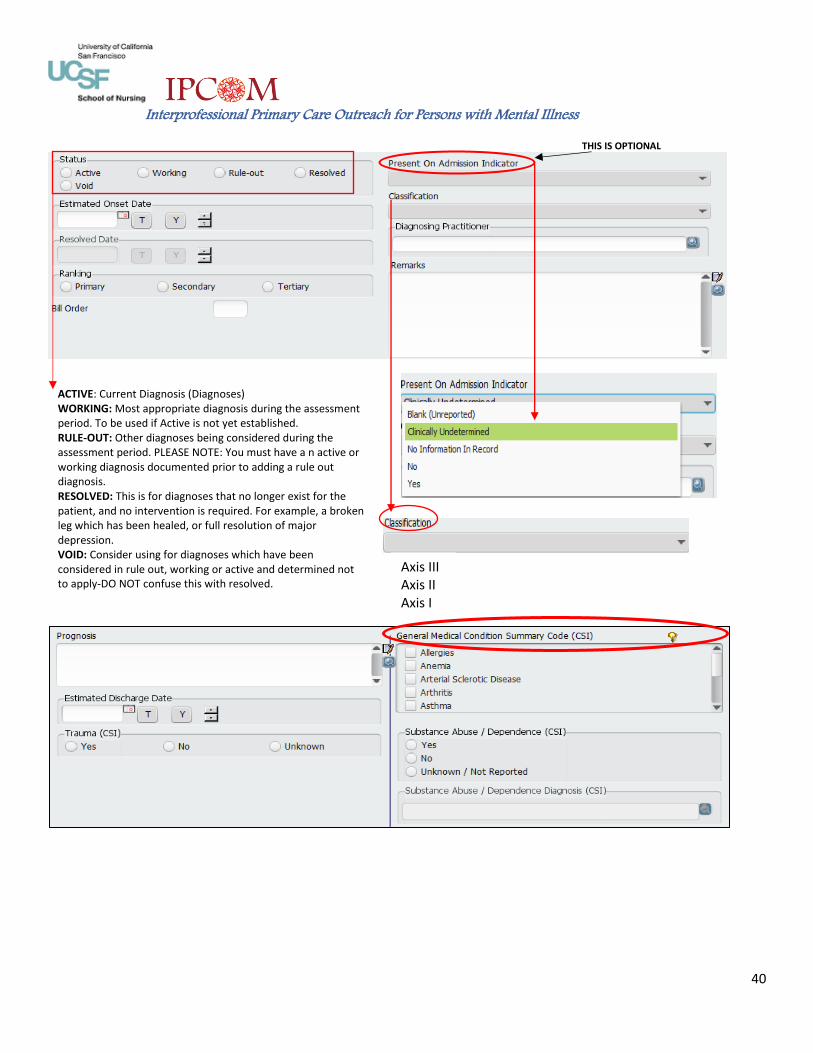
THIS IS OPTIONAL
Axis III Axis II Axis I
ACTIVE: Current Diagnosis (Diagnoses) WORKING: Most appropriate diagnosis during the assessment period. To be used if Active is not yet established. RULE-OUT: Other diagnoses being considered during the assessment period. PLEASE NOTE: You must have a n active or working diagnosis documented prior to adding a rule out diagnosis. RESOLVED: This is for diagnoses that no longer exist for the patient, and no intervention is required. For example, a broken leg which has been healed, or full resolution of major depression. VOID: Consider using for diagnoses which have been considered in rule out, working or active and determined not to apply-DO NOT confuse this with resolved.
Interprofessional Primary Care Outreach for Persons with Mental Illness
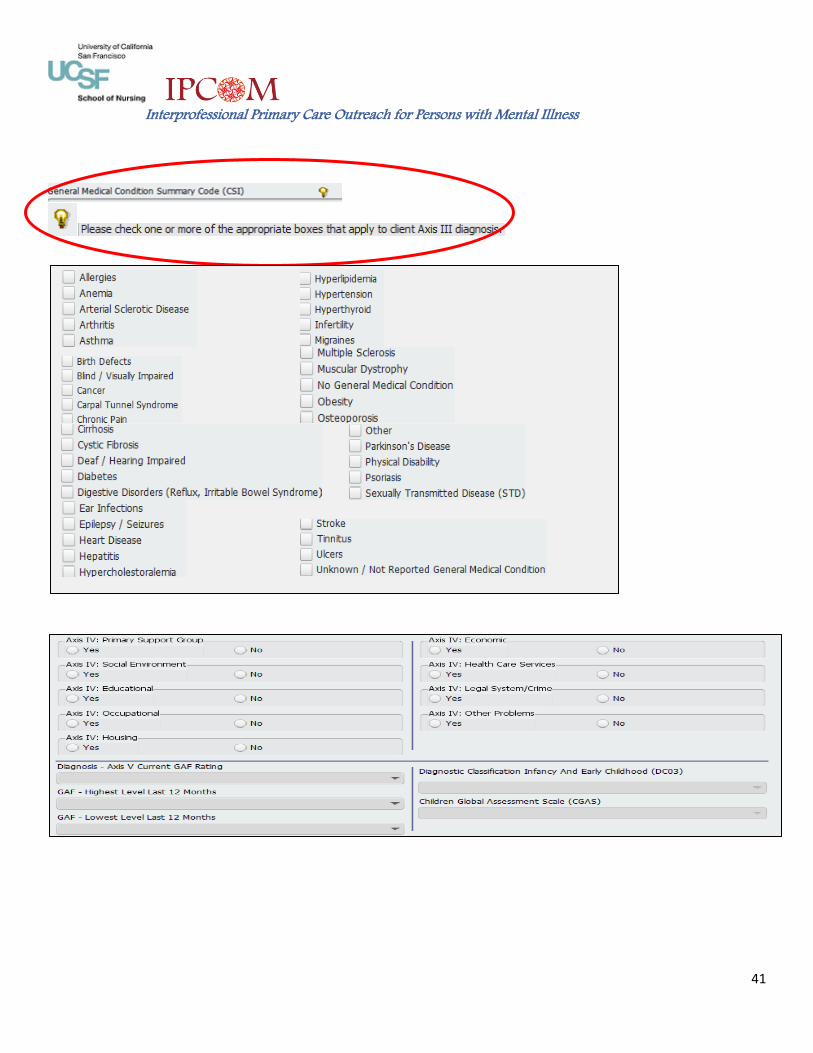
41
Interprofessional Primary Care Outreach for Persons with Mental Illness
42
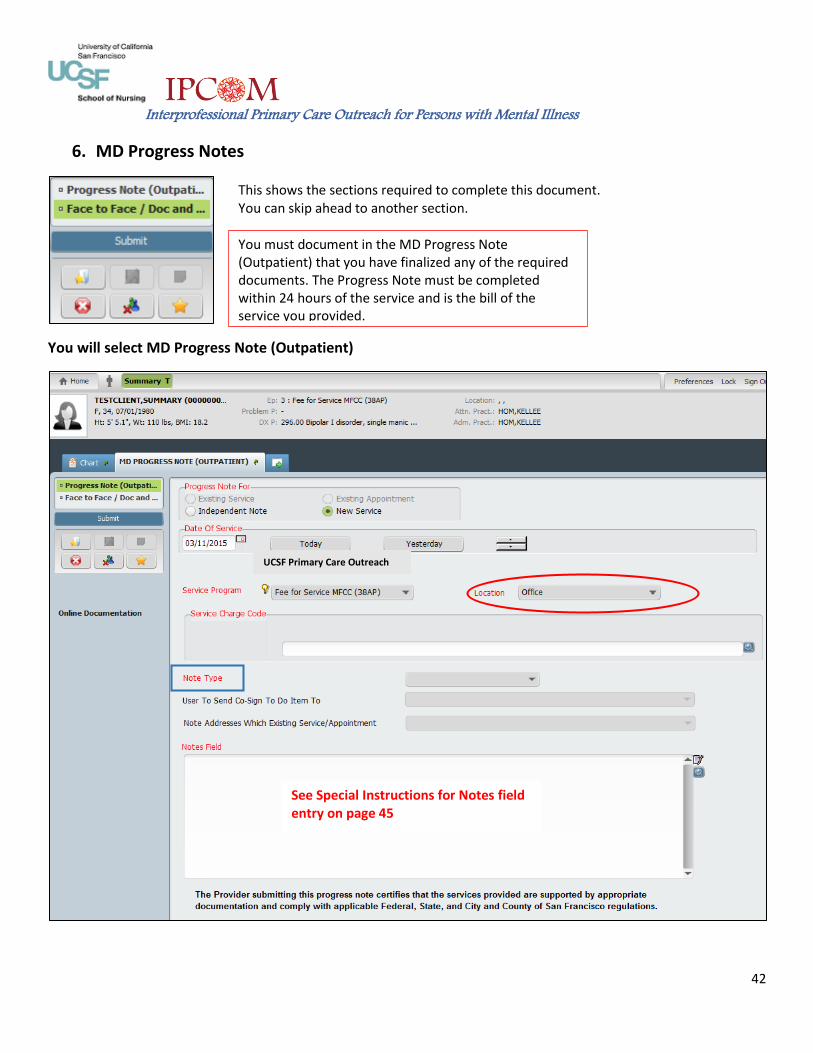
6. MD Progress Notes
You will select MD Progress Note (Outpatient)
This shows the sections required to complete this document. You can skip ahead to another section.
You must document in the MD Progress Note (Outpatient) that you have finalized any of the required documents. The Progress Note must be completed within 24 hours of the service and is the bill of the service you provided.
UCSF Primary Care Outreach
See Special Instructions for Notes field entry on page 45
Interprofessional Primary Care Outreach for Persons with Mental Illness
43
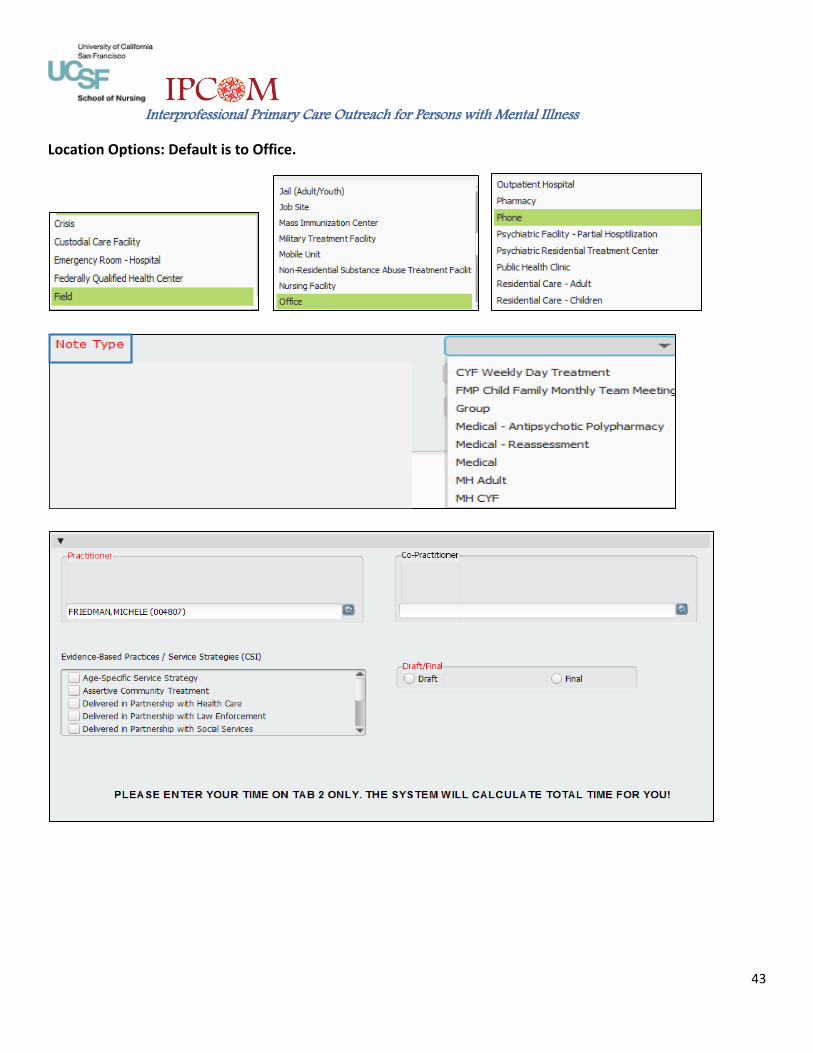
Location Options: Default is to Office.
Interprofessional Primary Care Outreach for Persons with Mental Illness
44
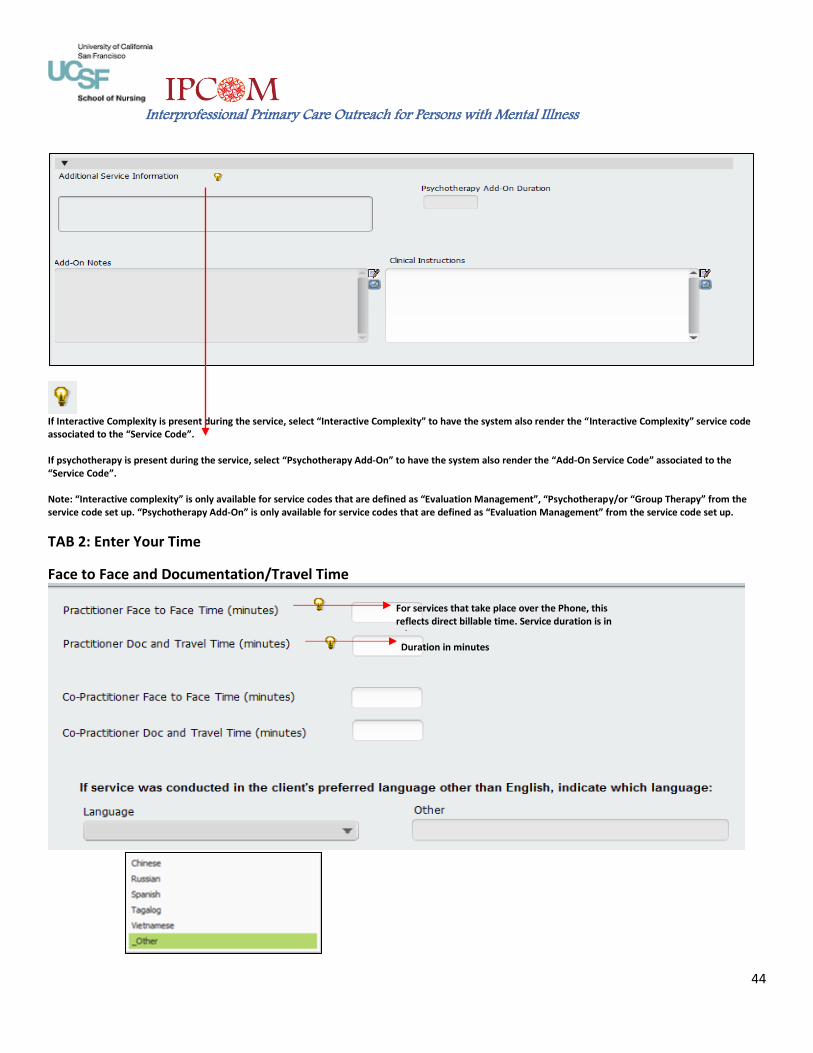
If Interactive Complexity is present during the service, select “Interactive Complexity” to have the system also render the “Interactive Complexity” service code associated to the “Service Code”. If psychotherapy is present during the service, select “Psychotherapy Add-On” to have the system also render the “Add-On Service Code” associated to the “Service Code”. Note: “Interactive complexity” is only available for service codes that are defined as “Evaluation Management”, “Psychotherapy/or “Group Therapy” from the service code set up. “Psychotherapy Add-On” is only available for service codes that are defined as “Evaluation Management” from the service code set up.
TAB 2: Enter Your Time
Face to Face and Documentation/Travel Time
For services that take place over the Phone, this reflects direct billable time. Service duration is in minutes
Duration in minutes
Interprofessional Primary Care Outreach for Persons with Mental Illness
45
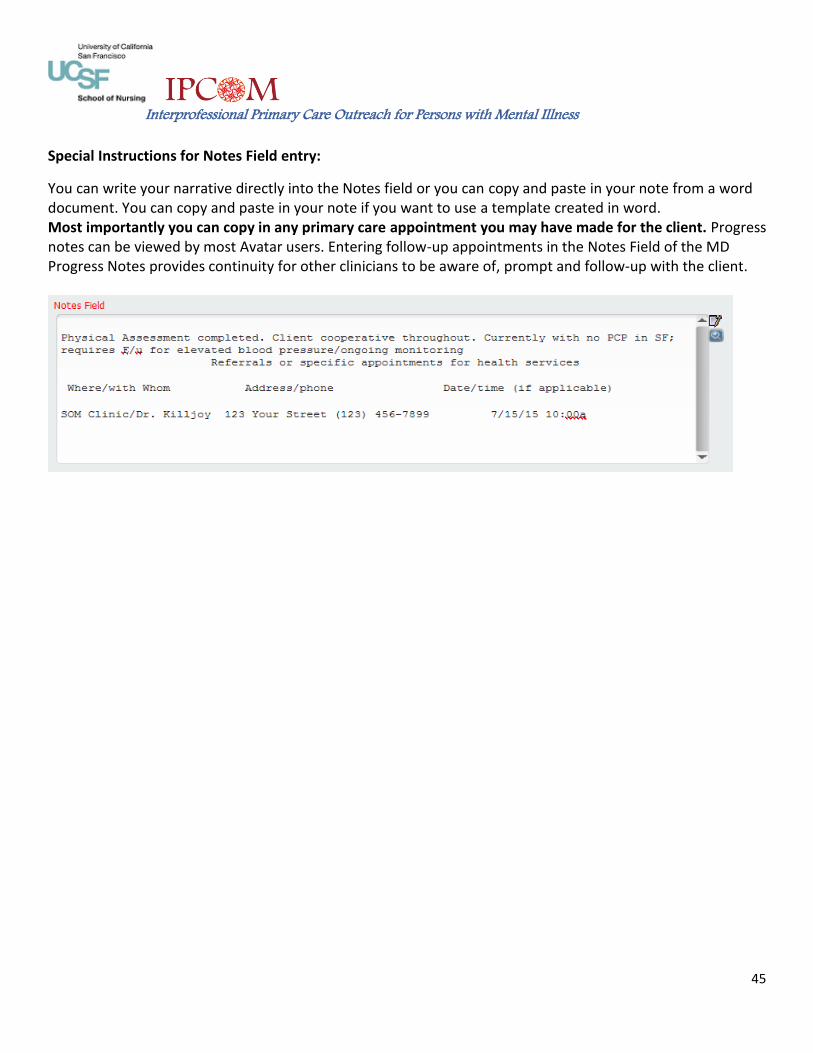
Special Instructions for Notes Field entry:
You can write your narrative directly into the Notes field or you can copy and paste in your note from a word document. You can copy and paste in your note if you want to use a template created in word. Most importantly you can copy in any primary care appointment you may have made for the client. Progress notes can be viewed by most Avatar users. Entering follow-up appointments in the Notes Field of the MD Progress Notes provides continuity for other clinicians to be aware of, prompt and follow-up with the client.
Interprofessional Primary Care Outreach for Persons with Mental Illness
46
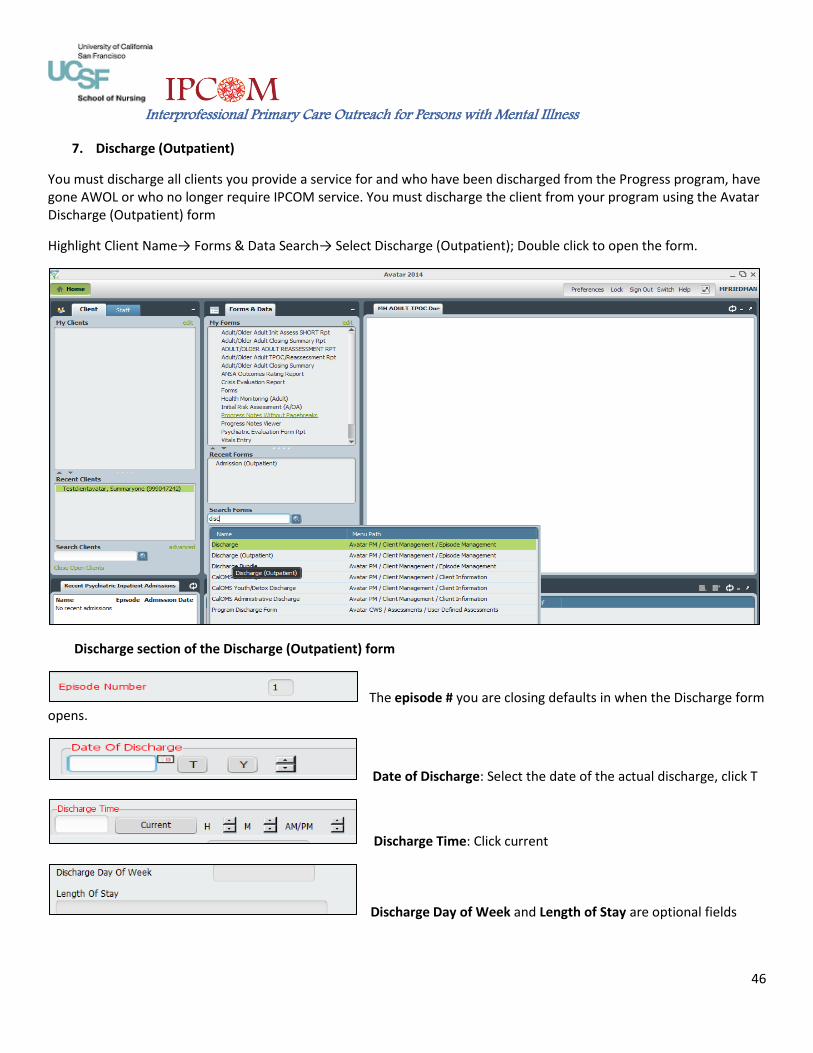
7. Discharge (Outpatient)
You must discharge all clients you provide a service for and who have been discharged from the Progress program, have gone AWOL or who no longer require IPCOM service. You must discharge the client from your program using the Avatar Discharge (Outpatient) form
Highlight Client Name→ Forms & Data Search→ Select Discharge (Outpatient); Double click to open the form.
Discharge section of the Discharge (Outpatient) form
The episode # you are closing defaults in when the Discharge form opens.
Date of Discharge: Select the date of the actual discharge, click T
Discharge Time: Click current
Discharge Day of Week and Length of Stay are optional fields
Interprofessional Primary Care Outreach for Persons with Mental Illness
47
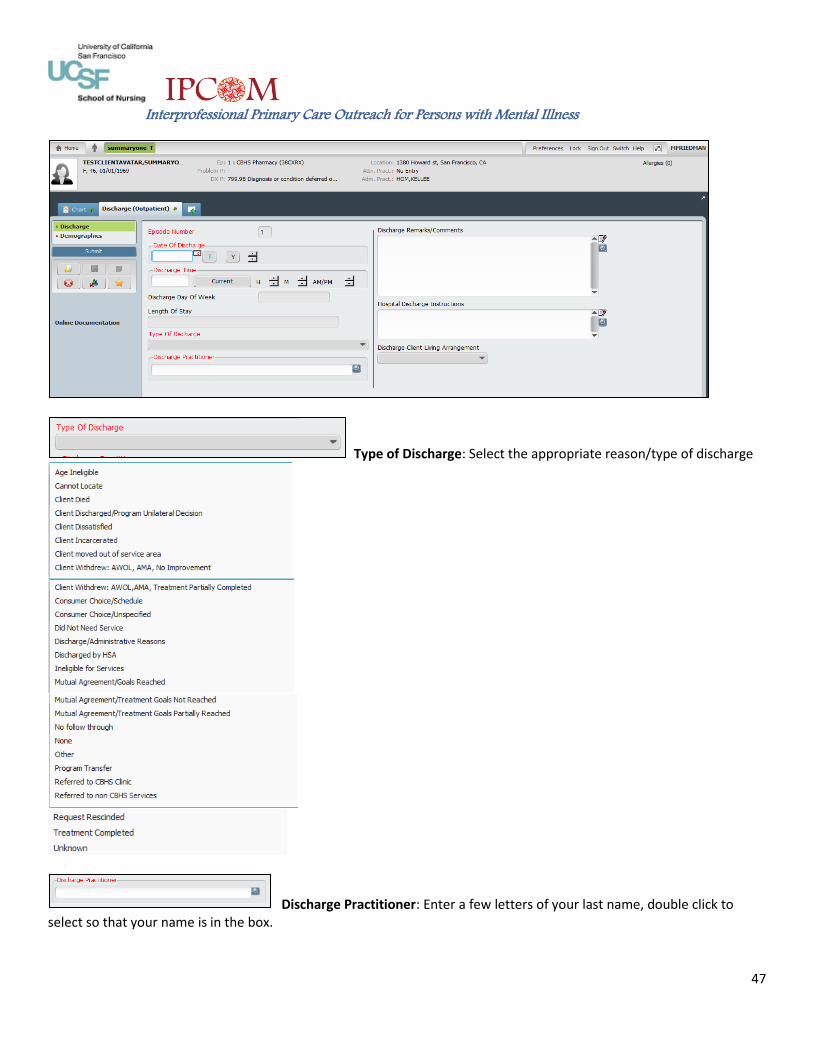
Type of Discharge: Select the appropriate reason/type of discharge
Discharge Practitioner: Enter a few letters of your last name, double click to select so that your name is in the box.
Interprofessional Primary Care Outreach for Persons with Mental Illness
48
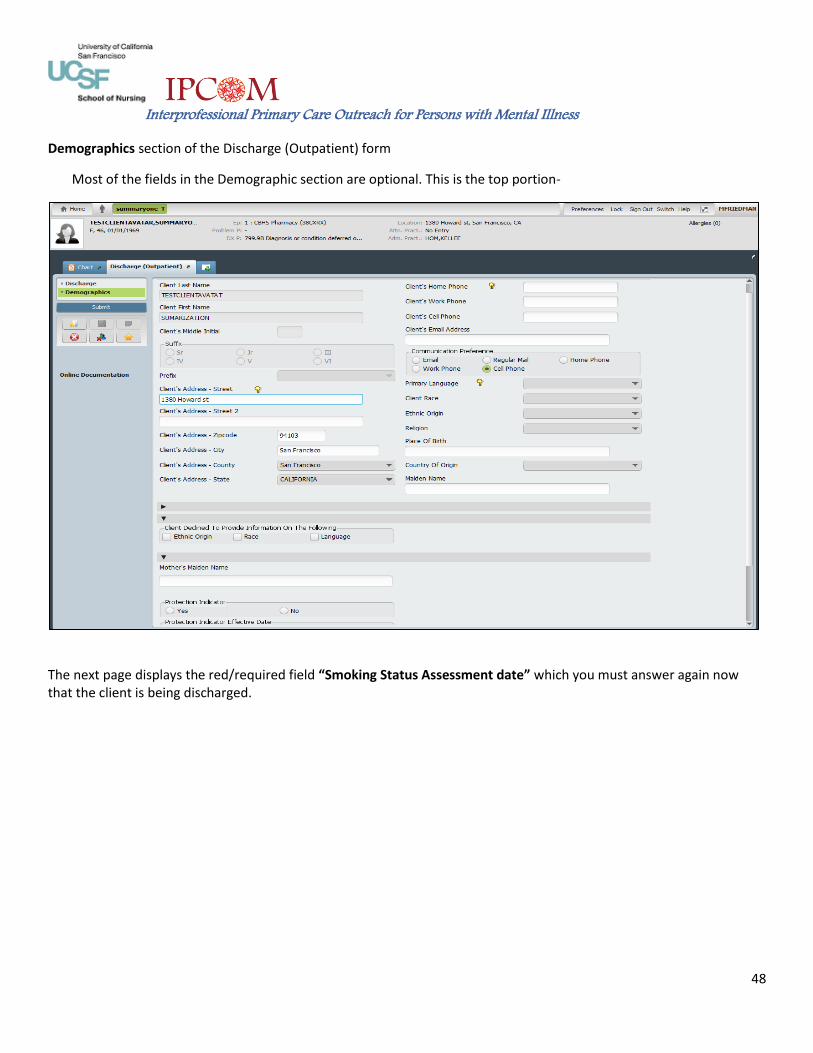
Demographics section of the Discharge (Outpatient) form
Most of the fields in the Demographic section are optional. This is the top portion-
The next page displays the red/required field “Smoking Status Assessment date” which you must answer again now that the client is being discharged.
Interprofessional Primary Care Outreach for Persons with Mental Illness
49
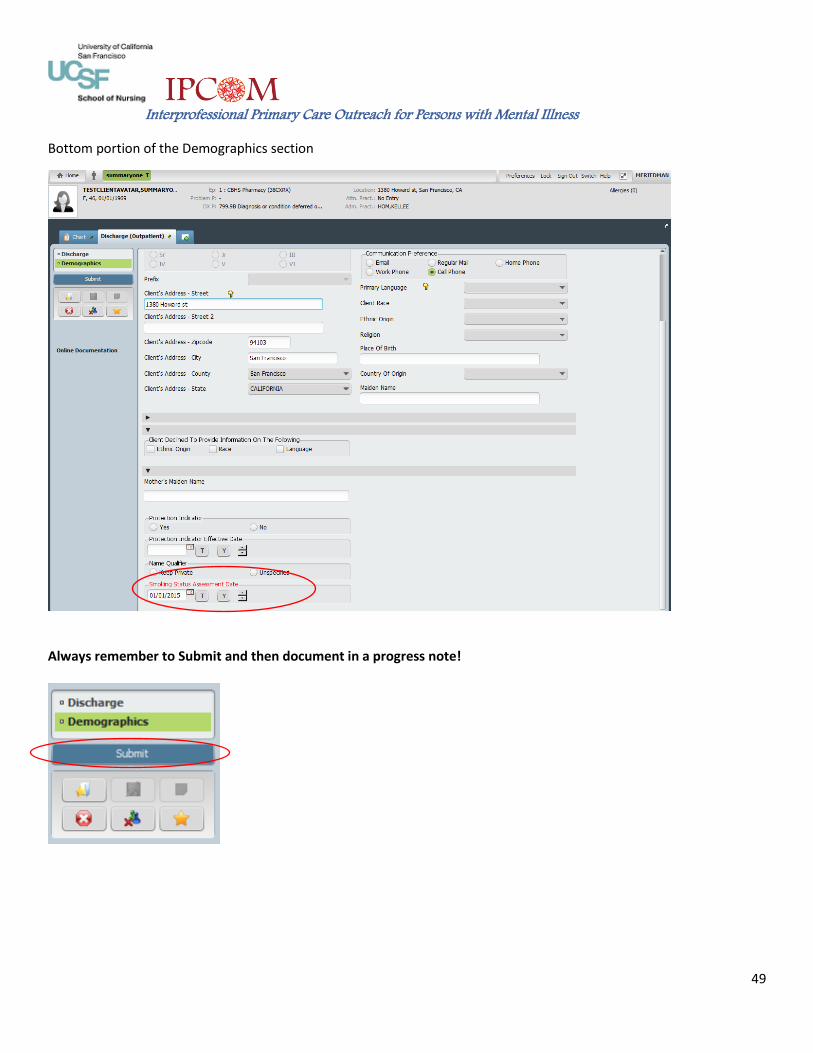
Bottom portion of the Demographics section
Always remember to Submit and then document in a progress note!
Interprofessional Primary Care Outreach for Persons with Mental Illness
50
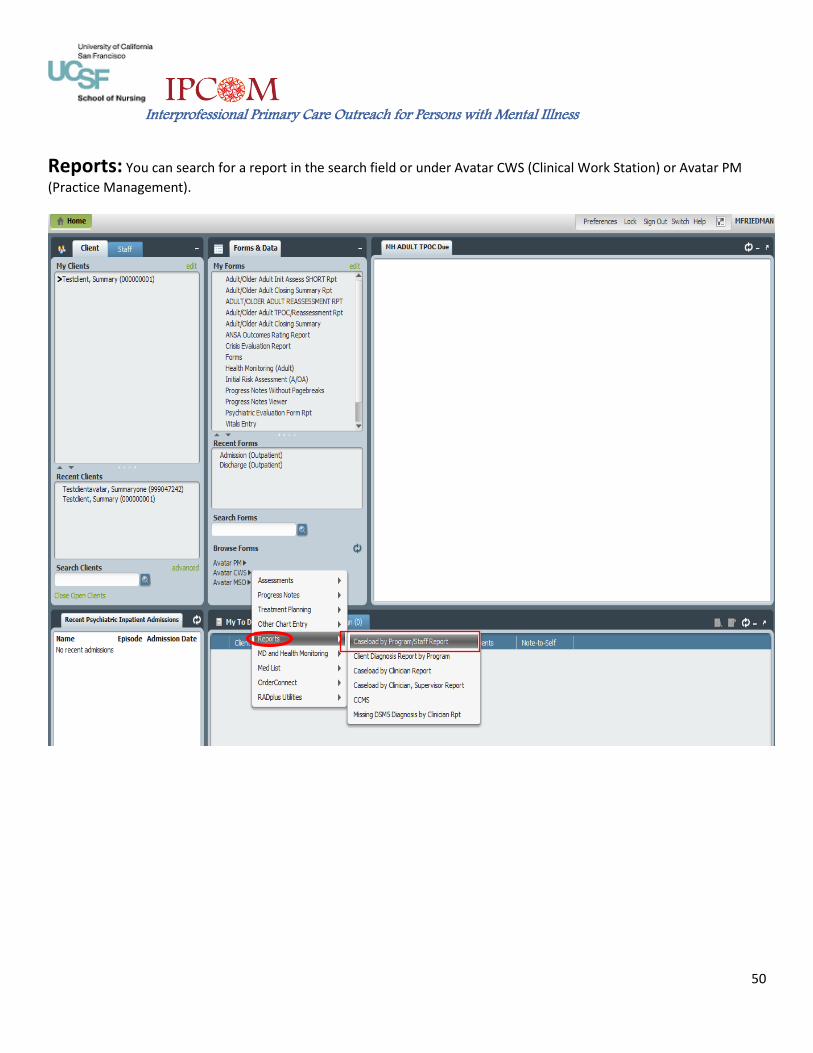
Reports: You can search for a report in the search field or under Avatar CWS (Clinical Work Station) or Avatar PM
(Practice Management).
Interprofessional Primary Care Outreach for Persons with Mental Illness
51
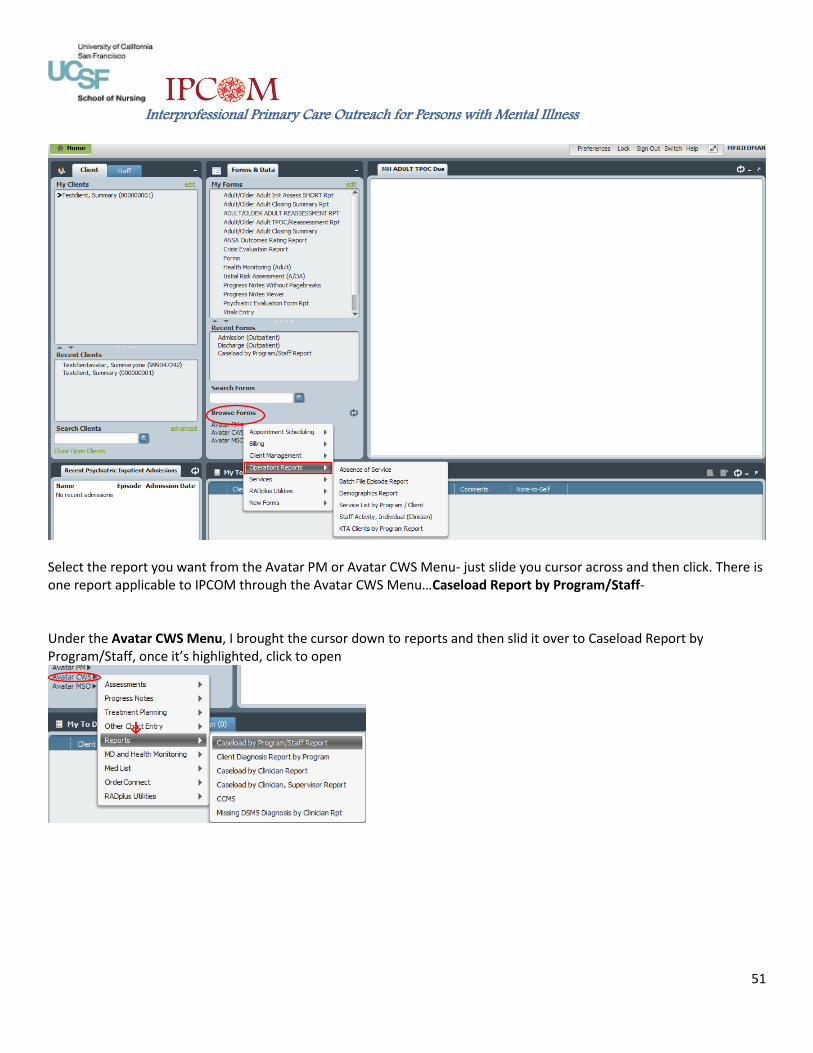
Select the report you want from the Avatar PM or Avatar CWS Menu- just slide you cursor across and then click. There is one report applicable to IPCOM through the Avatar CWS Menu…Caseload Report by Program/Staff- Under the Avatar CWS Menu, I brought the cursor down to reports and then slid it over to Caseload Report by Program/Staff, once it’s highlighted, click to open
↓↓

Interprofessional Primary Care Outreach for Persons with Mental Illness
52
This is the report screen to set parameters for the report. Select your program and caseload type from the drop down
The Control Panel looks the same for submitting documents, however, in place of submit, select Process for reports. There may be a pop up, Do you wish to return to form? It’s Ok to enter Yes or No. Be Patient! It make take a few minutes for the information to be gathered for the report.
At the top of every report is the Report Name and under the name, you can save the report to a disc, print, the arrows pointing left will bring you back a page or to the beginning page, the arrows pointing right will bring you forward a page or to the last page of the report. Information in the white box shows the current page number and the number after the slash outside of the box shows the total number of pages in the report, the binoculars allow you to search and the number per cent in the white box displays the magnification which you can increase or decrease.
Interprofessional Primary Care Outreach for Persons with Mental Illness
53
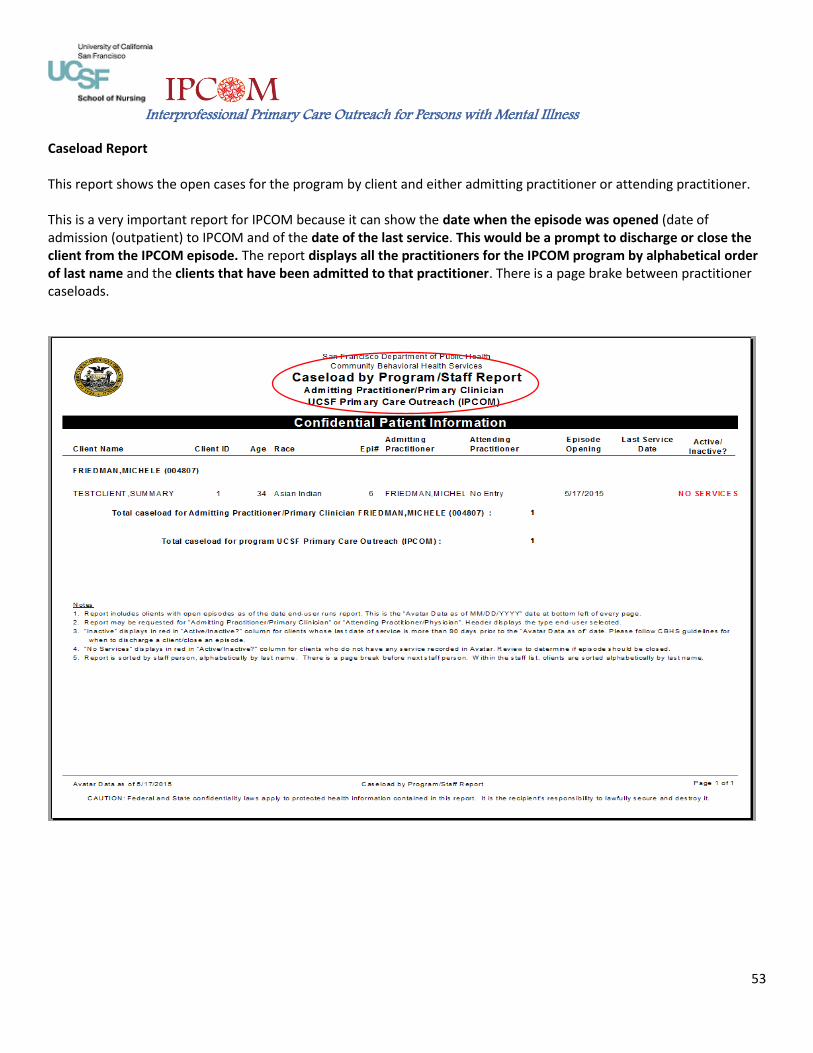
Caseload Report This report shows the open cases for the program by client and either admitting practitioner or attending practitioner.
This is a very important report for IPCOM because it can show the date when the episode was opened (date of admission (outpatient) to IPCOM and of the date of the last service. This would be a prompt to discharge or close the client from the IPCOM episode. The report displays all the practitioners for the IPCOM program by alphabetical order of last name and the clients that have been admitted to that practitioner. There is a page brake between practitioner caseloads.
Interprofessional Primary Care Outreach for Persons with Mental Illness
54
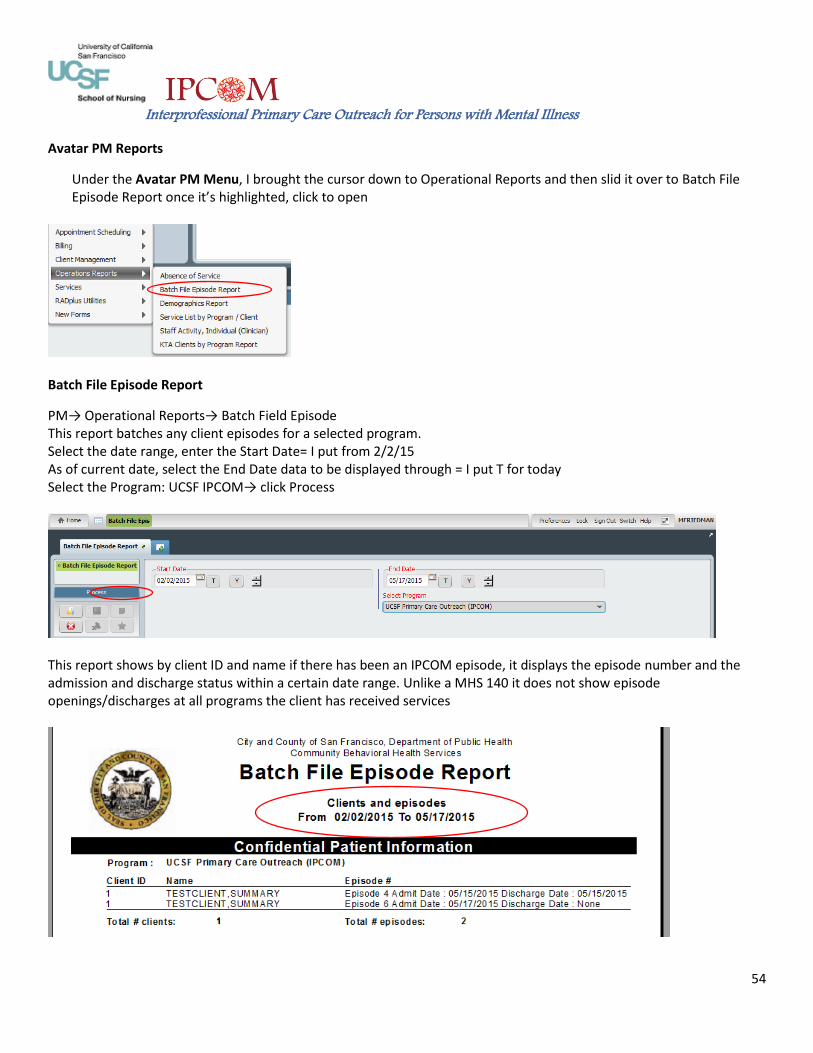
Avatar PM Reports
Under the Avatar PM Menu, I brought the cursor down to Operational Reports and then slid it over to Batch File Episode Report once it’s highlighted, click to open
Batch File Episode Report
PM→ Operational Reports→ Batch Field Episode This report batches any client episodes for a selected program. Select the date range, enter the Start Date= I put from 2/2/15 As of current date, select the End Date data to be displayed through = I put T for today Select the Program: UCSF IPCOM→ click Process
This report shows by client ID and name if there has been an IPCOM episode, it displays the episode number and the admission and discharge status within a certain date range. Unlike a MHS 140 it does not show episode openings/discharges at all programs the client has received services
Interprofessional Primary Care Outreach for Persons with Mental Illness
55
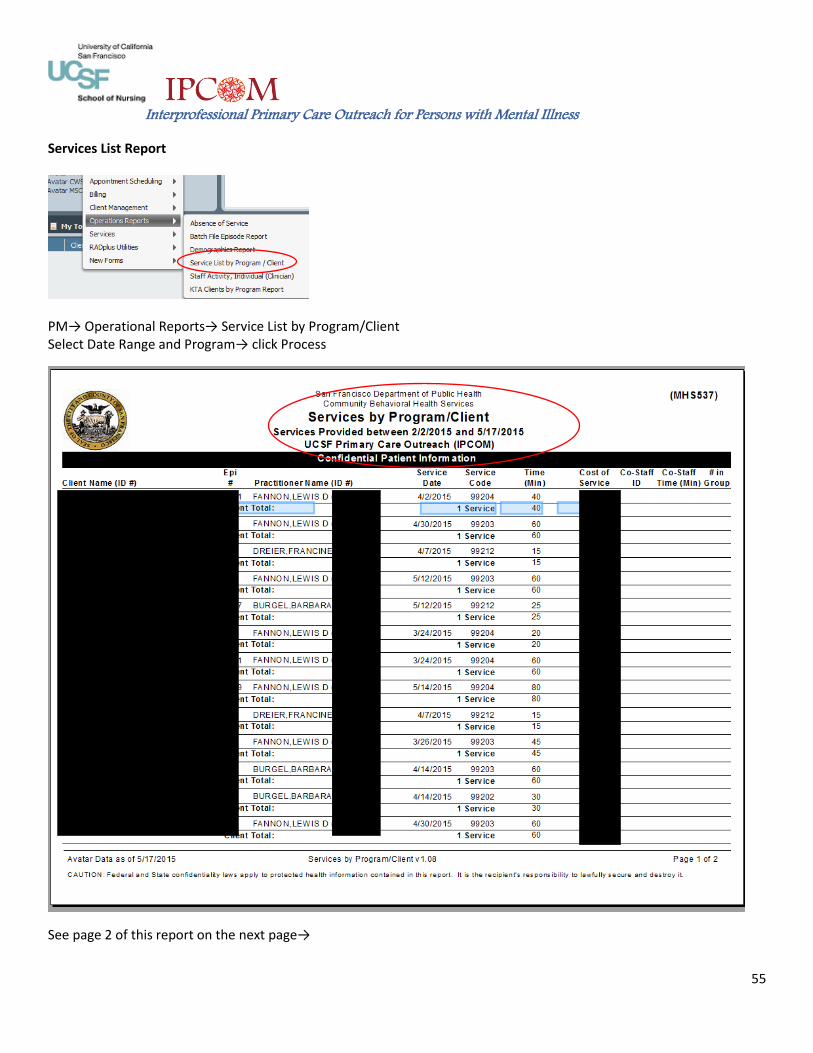
Services List Report
PM→ Operational Reports→ Service List by Program/Client Select Date Range and Program→ click Process
See page 2 of this report on the next page→
Interprofessional Primary Care Outreach for Persons with Mental Illness
56
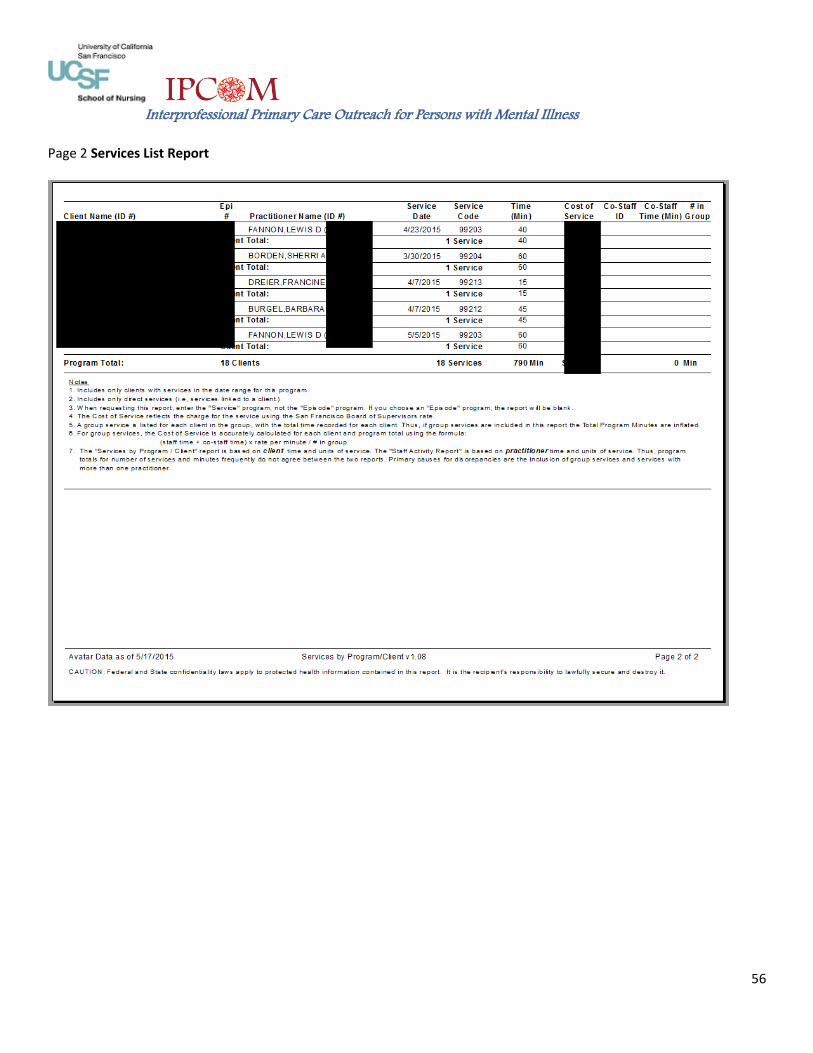
Page 2 Services List Report
Interprofessional Primary Care Outreach for Persons with Mental Illness
57
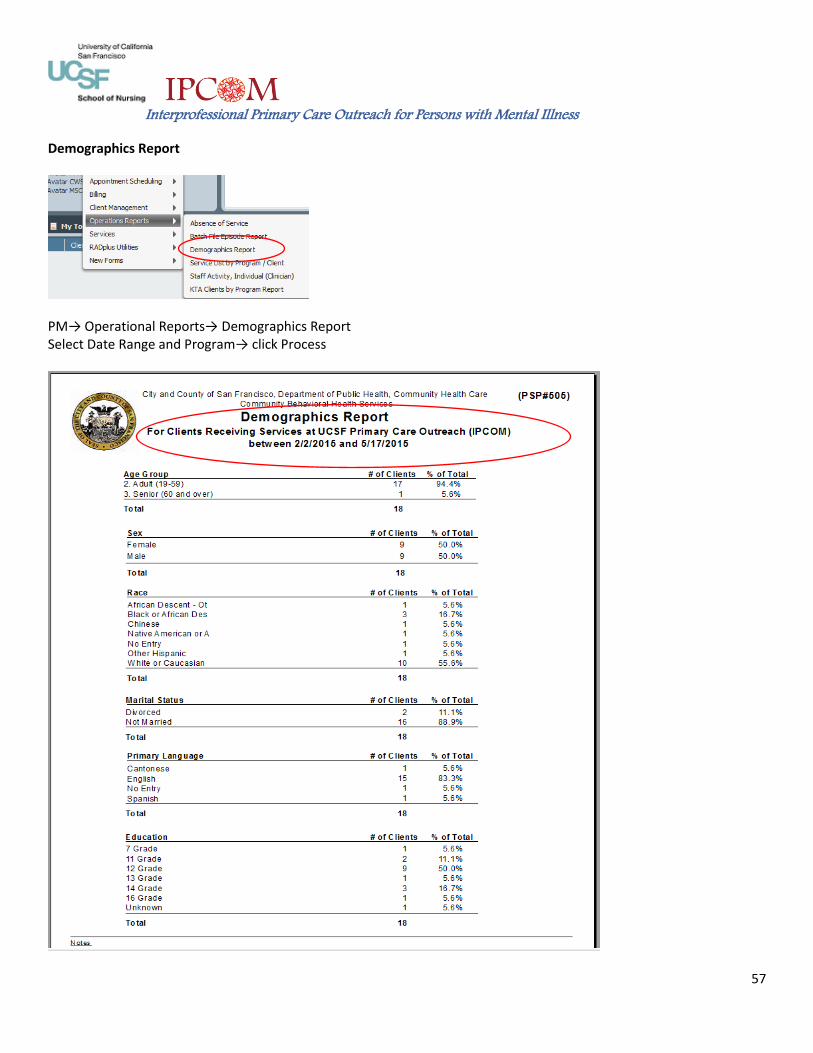
Demographics Report
PM→ Operational Reports→ Demographics Report Select Date Range and Program→ click Process
Interprofessional Primary Care Outreach for Persons with Mental Illness
58
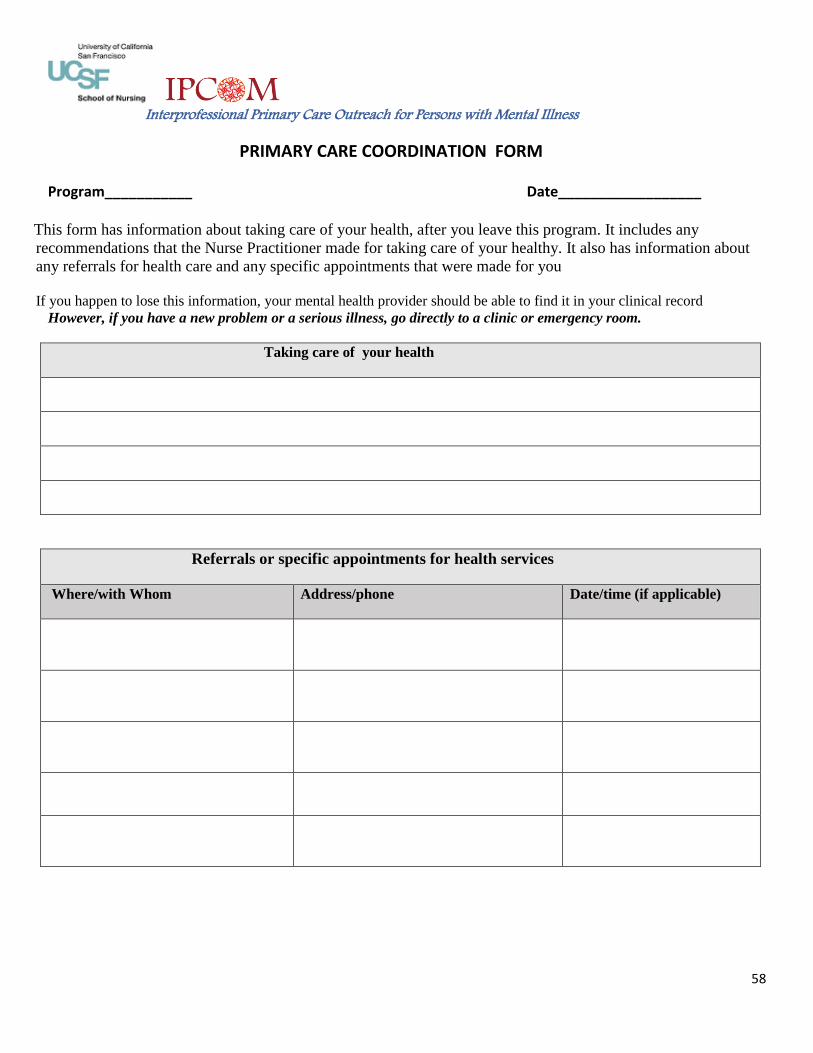
PRIMARY CARE COORDINATION FORM Program___________ Date__________________
This form has information about taking care of your health, after you leave this program. It includes any
recommendations that the Nurse Practitioner made for taking care of your healthy. It also has information about
any referrals for health care and any specific appointments that were made for you
If you happen to lose this information, your mental health provider should be able to find it in your clinical record
However, if you have a new problem or a serious illness, go directly to a clinic or emergency room.
Taking care of your health
Referrals or specific appointments for health services
Where/with Whom
Address/phone Date/time (if applicable)