IP Office™ Platform 10 - Avayamarketingtools.avaya.com/knowledgebase/user/ipoffice/merged... ·...
86
15-601016 Issue 22a - (Thursday, April 5, 2018) Using SoftConsole IP Office™ Platform 10.1
Transcript of IP Office™ Platform 10 - Avayamarketingtools.avaya.com/knowledgebase/user/ipoffice/merged... ·...

15-601016 Issue 22a - (Thursday, April 5, 2018)
Using SoftConsole
IP Office™ Platform 10.1

Using SoftConsole Page 215-601016 Issue 22a (Thursday, April 5, 2018)IP Office™ Platform 10.1
Comments on this document? [email protected]
© 2018 AVAYA All Rights Reserved.
NoticeWhile reasonable efforts have been made to ensure that the information in this document is complete and accurate at the time of printing, Avaya assumes no liability for anyerrors. Avaya reserves the right to make changes and corrections to the information in this document without the obligation to notify any person or organization of suchchanges.
Documentation disclaimer“Documentation” means information published by Avaya in varying mediums which may include product information, operating instructions and performance specificationsthat Avaya may generally make available to users of its products and Hosted Services. Documentation does not include marketing materials. Avaya shall not be responsiblefor any modifications, additions, or deletions to the original published version of documentation unless such modifications, additions, or deletions were performed by Avaya.End User agrees to indemnify and hold harmless Avaya, Avaya's agents, servants and employees against all claims, lawsuits, demands and judgments arising out of, or inconnection with, subsequent modifications, additions or deletions to this documentation, to the extent made by End User.
Link disclaimerAvaya is not responsible for the contents or reliability of any linked websites referenced within this site or documentation provided by Avaya. Avaya is not responsible for theaccuracy of any information, statement or content provided on these sites and does not necessarily endorse the products, services, or information described or offered withinthem. Avaya does not guarantee that these links will work all the time and has no control over the availability of the linked pages.
WarrantyAvaya provides a limited warranty on Avaya hardware and software. Refer to your sales agreement to establish the terms of the limited warranty. In addition, Avaya’sstandard warranty language, as well as information regarding support for this product while under warranty is available to Avaya customers and other parties through theAvaya Support website: https://support.avaya.com/helpcenter/getGenericDetails?detailId=C20091120112456651010 under the link “Warranty & Product Lifecycle” or suchsuccessor site as designated by Avaya. Please note that if You acquired the product(s) from an authorized Avaya Channel Partner outside of the United States and Canada,the warranty is provided to You by said Avaya Channel Partner and not by Avaya.
“Hosted Service” means a hosted service subscription that You acquire from either Avaya or an authorized Avaya Channel Partner (as applicable) and which is describedfurther in Hosted SAS or other service description documentation regarding the applicable hosted service. If You purchase a Hosted Service subscription, the foregoinglimited warranty may not apply but You may be entitled to support services in connection with the Hosted Service as described further in your service description documentsfor the applicable Hosted Service. Contact Avaya or Avaya Channel Partner (as applicable) for more information.
Hosted ServiceTHE FOLLOWING APPLIES IF YOU PURCHASE A HOSTED SERVICE SUBSCRIPTION FROM AVAYA OR AN AVAYA CHANNEL PARTNER (AS APPLICABLE), THETERMS OF USE FOR HOSTED SERVICES ARE AVAILABLE ON THE AVAYA WEBSITE, HTTPS://SUPPORT.AVAYA.COM/LICENSEINFO UNDER THE LINK “AvayaTerms of Use for Hosted Services” OR SUCH SUCCESSOR SITE AS DESIGNATED BY AVAYA, AND ARE APPLICABLE TO ANYONE WHO ACCESSES OR USES THEHOSTED SERVICE. BY ACCESSING OR USING THE HOSTED SERVICE, OR AUTHORIZING OTHERS TO DO SO, YOU, ON BEHALF OF YOURSELF AND THEENTITY FOR WHOM YOU ARE DOING SO (HEREINAFTER REFERRED TO INTERCHANGEABLY AS “YOU” AND “END USER”), AGREE TO THE TERMS OF USE. IFYOU ARE ACCEPTING THE TERMS OF USE ON BEHALF A COMPANY OR OTHER LEGAL ENTITY, YOU REPRESENT THAT YOU HAVE THE AUTHORITY TO BINDSUCH ENTITY TO THESE TERMS OF USE. IF YOU DO NOT HAVE SUCH AUTHORITY, OR IF YOU DO NOT WISH TO ACCEPT THESE TERMS OF USE, YOU MUSTNOT ACCESS OR USE THE HOSTED SERVICE OR AUTHORIZE ANYONE TO ACCESS OR USE THE HOSTED SERVICE. YOUR USE OF THE HOSTED SERVICESHALL BE LIMITED BY THE NUMBER AND TYPE OF LICENSES PURCHASED UNDER YOUR CONTRACT FOR THE HOSTED SERVICE, PROVIDED, HOWEVER,THAT FOR CERTAIN HOSTED SERVICES IF APPLICABLE, YOU MAY HAVE THE OPPORTUNITY TO USE FLEX LICENSES, WHICH WILL BE INVOICED ACCORDINGTO ACTUAL USAGE ABOVE THE CONTRACT LICENSE LEVEL. CONTACT AVAYA OR AVAYA’S CHANNEL PARTNER FOR MORE INFORMATION ABOUT THELICENSES FOR THE APPLICABLE HOSTED SERVICE, THE AVAILABILITY OF ANY FLEX LICENSES (IF APPLICABLE), PRICING AND BILLING INFORMATION, ANDOTHER IMPORTANT INFORMATION REGARDING THE HOSTED SERVICE.
LicensesTHE SOFTWARE LICENSE TERMS AVAILABLE ON THE AVAYA WEBSITE, HTTPS://SUPPORT.AVAYA.COM/LICENSEINFO, UNDER THE LINK “AVAYA SOFTWARELICENSE TERMS (Avaya Products)” OR SUCH SUCCESSOR SITE AS DESIGNATED BY AVAYA, ARE APPLICABLE TO ANYONE WHO DOWNLOADS, USES AND/ORINSTALLS AVAYA SOFTWARE, PURCHASED FROM AVAYA INC., ANY AVAYA AFFILIATE, OR AN AVAYA CHANNEL PARTNER (AS APPLICABLE) UNDER ACOMMERCIAL AGREEMENT WITH AVAYA OR AN AVAYA CHANNEL PARTNER. UNLESS OTHERWISE AGREED TO BY AVAYA IN WRITING, AVAYA DOES NOTEXTEND THIS LICENSE IF THE SOFTWARE WAS OBTAINED FROM ANYONE OTHER THAN AVAYA, AN AVAYA AFFILIATE OR AN AVAYA CHANNEL PARTNER;AVAYA RESERVES THE RIGHT TO TAKE LEGAL ACTION AGAINST YOU AND ANYONE ELSE USING OR SELLING THE SOFTWARE WITHOUT A LICENSE. BYINSTALLING, DOWNLOADING OR USING THE SOFTWARE, OR AUTHORIZING OTHERS TO DO SO, YOU, ON BEHALF OF YOURSELF AND THE ENTITY FORWHOM YOU ARE INSTALLING, DOWNLOADING OR USING THE SOFTWARE (HEREINAFTER REFERRED TO INTERCHANGEABLY AS “YOU” AND “END USER”),AGREE TO THESE TERMS AND CONDITIONS AND CREATE A BINDING CONTRACT BETWEEN YOU AND AVAYA INC. OR THE APPLICABLE AVAYA AFFILIATE(“AVAYA”).
Avaya grants You a license within the scope of the license types described below, with the exception of Heritage Nortel Software, for which the scope of the license is detailedbelow. Where the order documentation does not expressly identify a license type, the applicable license will be a Designated System License. The applicable number oflicenses and units of capacity for which the license is granted will be one (1), unless a different number of licenses or units of capacity is specified in the documentation orother materials available to You. “Software” means computer programs in object code, provided by Avaya or an Avaya Channel Partner, whether as stand-alone products,pre-installed on hardware products, and any upgrades, updates, patches, bug fixes, or modified versions thereto. “Designated Processor” means a single stand-alonecomputing device. “Server” means a Designated Processor that hosts a software application to be accessed by multiple users. “Instance” means a single copy of the Softwareexecuting at a particular time: (i) on one physical machine; or (ii) on one deployed software virtual machine (“VM”) or similar deployment.
License type(s)Designated System(s) License (DS). End User may install and use each copy or an Instance of the Software only on a number of Designated Processors up to the numberindicated in the order. Avaya may require the Designated Processor(s) to be identified in the order by type, serial number, feature key, Instance, location or other specificdesignation, or to be provided by End User to Avaya through electronic means established by Avaya specifically for this purpose.
Concurrent User License (CU). End User may install and use the Software on multiple Designated Processors or one or more Servers, so long as only the licensed number ofUnits are accessing and using the Software at any given time. A “Unit” means the unit on which Avaya, at its sole discretion, bases the pricing of its licenses and can be,without limitation, an agent, port or user, an e-mail or voice mail account in the name of a person or corporate function (e.g., webmaster or helpdesk), or a directory entry inthe administrative database utilized by the Software that permits one user to interface with the Software. Units may be linked to a specific, identified Server or an Instance ofthe Software.

Using SoftConsole Page 315-601016 Issue 22a (Thursday, April 5, 2018)IP Office™ Platform 10.1
Comments on this document? [email protected]
Database License (DL). End User may install and use each copy or an Instance of the Software on one Server or on multiple Servers providedthat each of the Servers on which the Software is installed communicates with no more than one Instance of the same database.
CPU License (CP). End User may install and use each copy or Instance of the Software on a number of Servers up to the number indicated inthe order provided that the performance capacity of the Server(s) does not exceed the performance capacity specified for the Software. EndUser may not re-install or operate the Software on Server(s) with a larger performance capacity without Avaya’s prior consent and payment ofan upgrade fee.
Named User License (NU). You may: (i) install and use each copy or Instance of the Software on a single Designated Processor or Server perauthorized Named User (defined below); or (ii) install and use each copy or Instance of the Software on a Server so long as only authorizedNamed Users access and use the Software. “Named User”, means a user or device that has been expressly authorized by Avaya to accessand use the Software. At Avaya’s sole discretion, a “Named User” may be, without limitation, designated by name, corporate function (e.g.,webmaster or helpdesk), an e-mail or voice mail account in the name of a person or corporate function, or a directory entry in theadministrative database utilized by the Software that permits one user to interface with the Software.
Shrinkwrap License (SR). You may install and use the Software in accordance with the terms and conditions of the applicable licenseagreements, such as “shrinkwrap” or “clickthrough” license accompanying or applicable to the Software (“Shrinkwrap License”).
Heritage Nortel Software“Heritage Nortel Software” means the software that was acquired by Avaya as part of its purchase of the Nortel Enterprise Solutions Businessin December 2009. The Heritage Nortel Software is the software contained within the list of Heritage Nortel Products located athttps://support.avaya.com/LicenseInfo under the link “Heritage Nortel Products” or such successor site as designated by Avaya. For HeritageNortel Software, Avaya grants Customer a license to use Heritage Nortel Software provided hereunder solely to the extent of the authorizedactivation or authorized usage level, solely for the purpose specified in the Documentation, and solely as embedded in, for execution on, or forcommunication with Avaya equipment. Charges for Heritage Nortel Software may be based on extent of activation or use authorized asspecified in an order or invoice.
CopyrightExcept where expressly stated otherwise, no use should be made of materials on this site, the Documentation, Software, Hosted Service, orhardware provided by Avaya. All content on this site, the documentation, Hosted Service, and the product provided by Avaya including theselection, arrangement and design of the content is owned either by Avaya or its licensors and is protected by copyright and other intellectualproperty laws including the sui generis rights relating to the protection of databases. You may not modify, copy, reproduce, republish, upload,post, transmit or distribute in any way any content, in whole or in part, including any code and software unless expressly authorized by Avaya.Unauthorized reproduction, transmission, dissemination, storage, and or use without the express written consent of Avaya can be a criminal,as well as a civil offense under the applicable law.
VirtualizationThe following applies if the product is deployed on a virtual machine. Each product has its own ordering code and license types. Note that eachInstance of a product must be separately licensed and ordered. For example, if the end user customer or Avaya Channel Partner would like toinstall two Instances of the same type of products, then two products of that type must be ordered.
Third Party Components“Third Party Components” mean certain software programs or portions thereof included in the Software or Hosted Service may containsoftware (including open source software) distributed under third party agreements (“Third Party Components”), which contain terms regardingthe rights to use certain portions of the Software (“Third Party Terms”). As required, information regarding distributed Linux OS source code(for those products that have distributed Linux OS source code) and identifying the copyright holders of the Third Party Components and theThird Party Terms that apply is available in the products, Documentation or on Avaya’s website at: https://support.avaya.com/Copyright orsuch successor site as designated by Avaya. The open source software license terms provided as Third Party Terms are consistent with thelicense rights granted in these Software License Terms, and may contain additional rights benefiting You, such as modification and distributionof the open source software. The Third Party Terms shall take precedence over these Software License Terms, solely with respect to theapplicable Third Party Components to the extent that these Software License Terms impose greater restrictions on You than the applicableThird Party Terms.
The following applies if the H.264 (AVC) codec is distributed with the product. THIS PRODUCT IS LICENSED UNDER THE AVC PATENTPORTFOLIO LICENSE FOR THE PERSONAL USE OF A CONSUMER OR OTHER USES IN WHICH IT DOES NOT RECEIVEREMUNERATION TO (i) ENCODE VIDEO IN COMPLIANCE WITH THE AVC STANDARD (“AVC VIDEO”) AND/OR (ii) DECODE AVCVIDEO THAT WAS ENCODED BY A CONSUMER ENGAGED IN A PERSONAL ACTIVITY AND/OR WAS OBTAINED FROM A VIDEOPROVIDER LICENSED TO PROVIDE AVC VIDEO. NO LICENSE IS GRANTED OR SHALL BE IMPLIED FOR ANY OTHER USE.ADDITIONAL INFORMATION MAY BE OBTAINED FROM MPEG LA, L.L.C. SEE HTTP://WWW.MPEGLA.COM.
Service ProviderTHE FOLLOWING APPLIES TO AVAYA CHANNEL PARTNER’S HOSTING OF AVAYA PRODUCTS OR SERVICES. THE PRODUCT ORHOSTED SERVICE MAY USE THIRD PARTY COMPONENTS SUBJECT TO THIRD PARTY TERMS AND REQUIRE A SERVICEPROVIDER TO BE INDEPENDENTLY LICENSED DIRECTLY FROM THE THIRD PARTY SUPPLIER. AN AVAYA CHANNEL PARTNER’SHOSTING OF AVAYA PRODUCTS MUST BE AUTHORIZED IN WRITING BY AVAYA AND IF THOSE HOSTED PRODUCTS USE OREMBED CERTAIN THIRD PARTY SOFTWARE, INCLUDING BUT NOT LIMITED TO MICROSOFT SOFTWARE OR CODECS, THE AVAYACHANNEL PARTNER IS REQUIRED TO INDEPENDENTLY OBTAIN ANY APPLICABLE LICENSE AGREEMENTS, AT THE AVAYACHANNEL PARTNER’S EXPENSE, DIRECTLY FROM THE APPLICABLE THIRD PARTY SUPPLIER.
WITH RESPECT TO CODECS, IF THE AVAYA CHANNEL PARTNER IS HOSTING ANY PRODUCTS THAT USE OR EMBED THE G.729CODEC, H.264 CODEC, OR H.265 CODEC, THE AVAYA CHANNEL PARTNER ACKNOWLEDGES AND AGREES THE AVAYA CHANNELPARTNER IS RESPONSIBLE FOR ANY AND ALL RELATED FEES AND/OR ROYALTIES. THE G.729 CODEC IS LICENSED BY SIPROLAB TELECOM INC. SEE WWW.SIPRO.COM/CONTACT.HTML. THE H.264 (AVC) CODEC IS LICENSED UNDER THE AVC PATENTPORTFOLIO LICENSE FOR THE PERSONAL USE OF A CONSUMER OR OTHER USES IN WHICH IT DOES NOT RECEIVEREMUNERATION TO: (I) ENCODE VIDEO IN COMPLIANCE WITH THE AVC STANDARD (“AVC VIDEO”) AND/OR (II) DECODE AVCVIDEO THAT WAS ENCODED BY A CONSUMER ENGAGED IN A PERSONAL ACTIVITY AND/OR WAS OBTAINED FROM A VIDEOPROVIDER LICENSED TO PROVIDE AVC VIDEO. NO LICENSE IS GRANTED OR SHALL BE IMPLIED FOR ANY OTHER USE.ADDITIONAL INFORMATION FOR H.264 (AVC) AND H.265 (HEVC) CODECS MAY BE OBTAINED FROM MPEG LA, L.L.C. SEEHTTP://WWW.MPEGLA.COM.

Using SoftConsole Page 415-601016 Issue 22a (Thursday, April 5, 2018)IP Office™ Platform 10.1
Comments on this document? [email protected]
Compliance with LawsCustomer acknowledges and agrees that it is responsible for complying with any applicable laws and regulations, including, but not limited tolaws and regulations related to call recording, data privacy, intellectual property, trade secret, fraud, and music performance rights, in thecountry or territory where the Avaya product is used.
Preventing Toll Fraud“Toll Fraud” is the unauthorized use of your telecommunications system by an unauthorized party (for example, a person who is not acorporate employee, agent, subcontractor, or is not working on your company's behalf). Be aware that there can be a risk of Toll Fraudassociated with your system and that, if Toll Fraud occurs, it can result in substantial additional charges for your telecommunications services.
Avaya Toll Fraud interventionIf You suspect that You are being victimized by Toll Fraud and You need technical assistance or support, call Technical Service Center TollFraud Intervention Hotline at +1-800-643-2353 for the United States and Canada. For additional support telephone numbers, see the AvayaSupport website: https://support.avaya.com or such successor site as designated by Avaya.
Security VulnerabilitiesInformation about Avaya’s security support policies can be found in the Security Policies and Support section ofhttps://support.avaya.com/security. Suspected Avaya product security vulnerabilities are handled per the Avaya Product Security Support Flow(https://support.avaya.com/css/P8/documents/100161515).
Downloading DocumentationFor the most current versions of Documentation, see the Avaya Support website: https://support.avaya.com, or such successor site asdesignated by Avaya.
Contact Avaya SupportSee the Avaya Support website: https://support.avaya.com for product or Hosted Service notices and articles, or to report a problem with yourAvaya product or Hosted Service. For a list of support telephone numbers and contact addresses, go to the Avaya Support website:https://support.avaya.com (or such successor site as designated by Avaya), scroll to the bottom of the page, and select Contact AvayaSupport.
Using SoftConsole Page 515-601016 Issue 22a (Thursday, April 5, 2018)IP Office™ Platform 10.1
Comments on this document? [email protected]
Contents
ContentsIP Office SoftConsole1.
..................................................................... 101.1 Logging In
..................................................................... 111.2 The Main Window
..................................................................... 121.3 Compact View
..................................................................... 131.4 Viewing the Call History
..................................................................... 141.5 BLF Panel
............................................................................ 151.5.1 Add Members to a BLF Group
..................................................................... 161.6 Call Details Panel
..................................................................... 171.7 The Status Bar
..................................................................... 171.8 The Main Menu Bar
..................................................................... 181.9 Change Language
..................................................................... 181.10 Multisite Network Features
Call Handling2...................................................................... 202.1 Answering a Call
..................................................................... 212.2 Making a Call
............................................................................ 212.2.1 Using the Make Call Menu
............................................................................ 222.2.2 Make a Call Using the Dial Pad
..................................................................... 232.3 Dialing DTMF Digits
..................................................................... 242.4 Transfering Calls
............................................................................ 242.4.1 Unsupervised Transfers
............................................................................ 242.4.2 Supervised Transfers
............................................................................ 242.4.3 Transfer a Call to Voicemail
............................................................................ 252.4.4 Wait for Transfer to a Busy Extension
..................................................................... 262.5 Using Hold
..................................................................... 272.6 Parking a Call
..................................................................... 272.7 Collecting a Parked Call
..................................................................... 272.8 Reclaiming a Call
..................................................................... 282.9 Monitoring Queues
............................................................................ 282.9.1 Answering a Queued Call
..................................................................... 292.10 Conferences
............................................................................ 302.10.1 Conferencing Held Calls
............................................................................ 302.10.2 Viewing Conferences
............................................................................ 302.10.3 Adding Users to a Conference
............................................................................ 312.10.4 Using the Conference Rooms
..................................................................... 332.11 Adding Call Tag Text
..................................................................... 332.12 Door Release
..................................................................... 332.13 Intrude
..................................................................... 342.14 Sending a Text Message
..................................................................... 352.15 Instant Messaging
..................................................................... 352.16 Recording a Call
..................................................................... 362.17 Using Page
..................................................................... 362.18 Send Email
..................................................................... 362.19 Collecting Your Voicemail Messages
Directory3...................................................................... 403.1 Editing Directory Entry Properties
............................................................................ 413.1.1 The Directory Entry Form
............................................................................ 423.1.2 The Group Service Status Form
............................................................................ 433.1.3 User Directory Properties
..................................................................... 483.2 The Local Directory
............................................................................ 493.2.1 Adding/Editng Local Entries
Configuring SoftConsole4...................................................................... 534.1 Appearance Tab
..................................................................... 544.2 BLF Groups Tab
............................................................................ 554.2.1 Configuring BLF Groups
..................................................................... 564.3 Conferencing Tab
..................................................................... 574.4 Directories Tab
..................................................................... 584.5 Door Release Tab
..................................................................... 594.6 Keyboard Actions Tab
..................................................................... 604.7 Keyboard Mapping Tab
..................................................................... 614.8 Park Slots Tab
............................................................................ 624.8.1 Configuring Park Slots
..................................................................... 634.9 Queue Mode Tab
............................................................................ 644.9.1 Configuring Queues
..................................................................... 654.10 SoftConsole Tab
..................................................................... 664.11 Instant Messaging
Templates/Profiles5...................................................................... 695.1 Administrator Mode
..................................................................... 705.2 Editing a Profile
..................................................................... 705.3 Using Templates
..................................................................... 715.4 Default Templates
Appendix6...................................................................... 746.1 Short Cut Keys
..................................................................... 776.2 Toolbar Buttons
..................................................................... 786.3 Trouble Shooting
Document History7................................................................................81Index

Using SoftConsole Page 615-601016 Issue 22a (Thursday, April 5, 2018)IP Office™ Platform 10.1
Comments on this document? [email protected]

Using SoftConsole Page 715-601016 Issue 22a (Thursday, April 5, 2018)IP Office™ Platform 10.1
Comments on this document? [email protected]
IP Office SoftConsole
Chapter 1.

Using SoftConsole Page 815-601016 Issue 22a (Thursday, April 5, 2018)IP Office™ Platform 10.1
Comments on this document? [email protected]

Using SoftConsole Page 915-601016 Issue 22a (Thursday, April 5, 2018)IP Office™ Platform 10.1
Comments on this document? [email protected]
IP Office SoftConsole:
1. IP Office SoftConsoleIP Office SoftConsole is an application intended for receptionists and operators who answer and distribute calls. Itprovides a range of call controls through the user's computer. It also allows the receptionist to see the status of otherusers and to adjust some basic telephony settings of other users such as forwarding numbers.
Additional RequirementsSound and media files can be associated with calls. If this feature is to be used then the PC requires a sound card andspeakers to be installed.
Telephone SupportYou still require an extension which is used to provide the speech path for calls.
· It is recommended that IP Office SoftConsole is only used with a telephone that support auto-answer. If used withphones that do not support auto-answer (analog phones and most SIP/DECT phones), when making a call whilethe phone is on-hook, the telephone system first calls you and only makes the outgoing call when you answer (gooff-hook).

Using SoftConsole Page 1015-601016 Issue 22a (Thursday, April 5, 2018)IP Office™ Platform 10.1
Comments on this document? [email protected]
1.1 Logging InYou must login to IP Office SoftConsole before you can use the application. The Login window contains details so that IPOffice SoftConsole can communicate with the telephone system. If you are unable to login, see your systemadministrator.
To start IP Office SoftConsole:
1. Select Start and click on the SoftConsole icon.
2. The login window appears if there are still licenses available.
a. User Name/Extn Enter your user name or extension number. The user name is case sensitive.
b. Password Enter your user password. This is given to you by your system administrator and is case sensitive.
c. IP Office/IP Address Enter the IP address of the telephone system.
d. Use secure communication Select this option to use encrypted communications between the console and the telephone system.
3. To login now, click OK. Alternately, you can click Expand to view additional options that can be set beforelogging in.
· Profile You can save your console settings as a profile . When logging in, select the profile here to reapply thatprofile's settings.
· Call Waiting When selected, the system provides a call waiting tone when you are on a call and another incoming callarrives. When you end the current call, the new call is immediately presented to you. This option is ignored ifyou have multiple call appearances on your telephone.
· Off-hook Station This feature is used by receptionists that use the hands free features of the telephone. Console controls theoperation of the telephone. Only clear this option if you have an analog telephone where you answer or endcalls using the handset.
· Show Templates Indicates whether the default console templates are included in the list of profiles. See Default Templates .
4. Click Compact to return to the normal logging in menu. Otherwise, click OK to login with the settings selected.
68
71

Using SoftConsole Page 1115-601016 Issue 22a (Thursday, April 5, 2018)IP Office™ Platform 10.1
Comments on this document? [email protected]
IP Office SoftConsole: Logging In
1.2 The Main WindowIn normal view mode, the console screen is divided into the possible areas below. The profile or template selected whenlogging in sets whether the held calls, BLF and park slots panels are shown. Profiles and templates can be edited, seeProfiles . The console can also be run in a compact mode, see Compact View .
· Title Bar The Title Bar contains the name of the person who has logged in. When the console is the active program, the titlebar is red. If the console is not the active program, the title bar grey.
· Menu Bar Commands and actions are available through menus. Some items are only accessible when the right conditionsoccur, for example, when a call is ringing.
· Toolbar The toolbar provides short cuts for options that are frequently used. The toolbar can be shown or hidden using theView menu option.
· Call Details Panel The panel contains a side-by-side display of current call information. The panel on the left contains details of thecurrent call. The panel on the right contains the directory and individual extension details. It can also contain ascript file or conferencing details .
· Queue Panel The Queue panel displays graphical information on the status of calls held in queues.
· Held Calls Panel Any calls that are being held are listed in this panel.
· BLF Panel (Busy Lamp Field Panel) The icons represent dialable numbers. If the icons represent internal users, the user's status is indicated.
· Call History Shows a list of recent incoming, outgoing and missed calls. When selected, the call history replaces the Held Callsand BLF Panels.
· Park Slot Panel The park slot panel can contain up to 16 park slot buttons.
· Status Bar The status bar confirms that you are connected to the telephone system and the profile that you are using. Thereis also an indication to the number of new messages and missed calls that you have had.
68 12
53
17
77
16
48 30
28
26
14
13
27
17
Using SoftConsole Page 1215-601016 Issue 22a (Thursday, April 5, 2018)IP Office™ Platform 10.1
Comments on this document? [email protected]
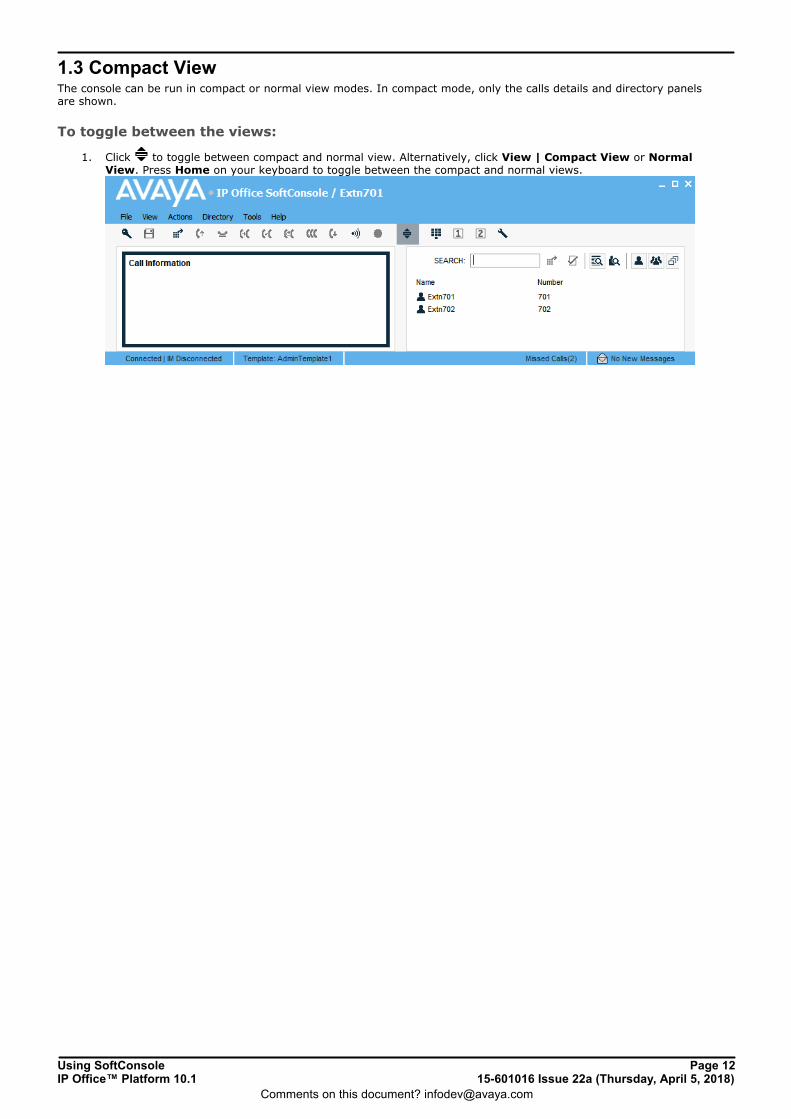
1.3 Compact ViewThe console can be run in compact or normal view modes. In compact mode, only the calls details and directory panelsare shown.
To toggle between the views:
1. Click to toggle between compact and normal view. Alternatively, click View | Compact View or NormalView. Press Home on your keyboard to toggle between the compact and normal views.

Using SoftConsole Page 1315-601016 Issue 22a (Thursday, April 5, 2018)IP Office™ Platform 10.1
Comments on this document? [email protected]
IP Office SoftConsole: Compact View
1.4 Viewing the Call HistoryThe Call History pane replaces the BLF and Held Calls panels. The Call History pane can not be viewed at the same timeas the BLF and Held Calls panels. If the profile loaded does not contain the BLF and Held Call panels, you can not view theCall History. For example, when the AdminTemplate3 default template is used you can not view the Call History panel.
· Note The call history shown by the console is stored on the same PC as the application. Its contents can differ from thecall history shown on your phone and in other call handling applications you may have. Actions such as deleting theconsole call history do not affect those other call histories and vice versa.
To view the call history:1. Click View | History. The Call History details replace the BLF and Held Calls panels.
The call history pane is divided into the following tabs. Each tab displays a maximum of 100 calls. When the maximumcapacity is reached, the oldest record is deleted to add a new record. The number in brackets shows the number of callslisted.
· In - Lists all calls received at your extension.
· Out - Lists all calls made from your extension.
· Missed - All the unanswered calls to your extension.
· All - Lists all the incoming, outgoing and missed calls.
Within each tab there are the following fields:
Field Description
Call StatusIcon
· Outgoing call: Indicates a call that was made from your extension.
· Incoming call: Indicates a call that was made to your extension.
· Missed call: Indicates a call that was not answered.
Number Either the incoming telephone number or the telephone number that was called.
From The name that is associated with the number in the directory on the main system or your local consoledirectory.
To The name that is associated with the called number in the directory on the main system or your localconsole directory.
Tag Text that was entered to identify the call. See Adding Call Tag Text .
Date & Time The date and time that the call happened.
To make a call:1. Double-click on the telephone number shown in the call history.
To clear the call history:1. Right-click on the call history.
· Select Clear to remove all the calls from the currently selected tab.
· Select Clear All Tabs to remove all calls from all the tabs.
To return to the Held Calls and BLF panels view:1. Click View | Call History again.
33
Using SoftConsole Page 1415-601016 Issue 22a (Thursday, April 5, 2018)IP Office™ Platform 10.1
Comments on this document? [email protected]
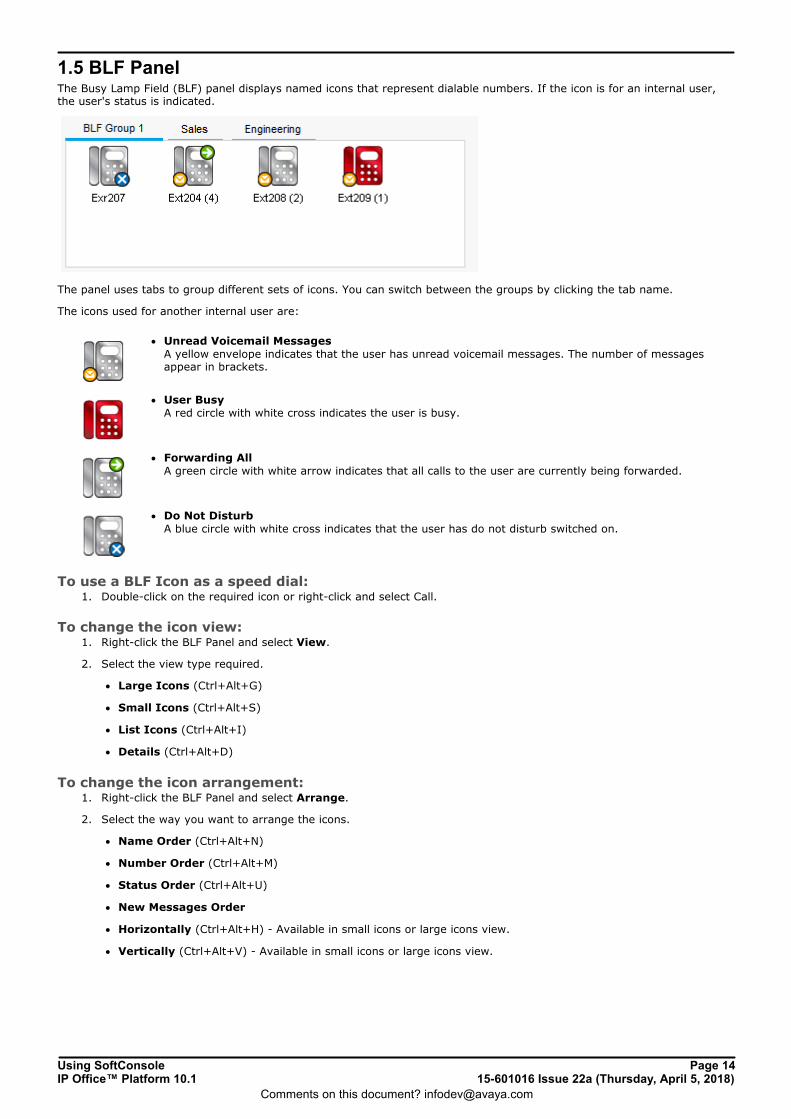
1.5 BLF PanelThe Busy Lamp Field (BLF) panel displays named icons that represent dialable numbers. If the icon is for an internal user,the user's status is indicated.
The panel uses tabs to group different sets of icons. You can switch between the groups by clicking the tab name.
The icons used for another internal user are:
· Unread Voicemail Messages A yellow envelope indicates that the user has unread voicemail messages. The number of messagesappear in brackets.
· User Busy A red circle with white cross indicates the user is busy.
· Forwarding All A green circle with white arrow indicates that all calls to the user are currently being forwarded.
· Do Not Disturb A blue circle with white cross indicates that the user has do not disturb switched on.
To use a BLF Icon as a speed dial:1. Double-click on the required icon or right-click and select Call.
To change the icon view:1. Right-click the BLF Panel and select View.
2. Select the view type required.
· Large Icons (Ctrl+Alt+G)
· Small Icons (Ctrl+Alt+S)
· List Icons (Ctrl+Alt+I)
· Details (Ctrl+Alt+D)
To change the icon arrangement:1. Right-click the BLF Panel and select Arrange.
2. Select the way you want to arrange the icons.
· Name Order (Ctrl+Alt+N)
· Number Order (Ctrl+Alt+M)
· Status Order (Ctrl+Alt+U)
· New Messages Order
· Horizontally (Ctrl+Alt+H) - Available in small icons or large icons view.
· Vertically (Ctrl+Alt+V) - Available in small icons or large icons view.
Using SoftConsole Page 1515-601016 Issue 22a (Thursday, April 5, 2018)IP Office™ Platform 10.1
Comments on this document? [email protected]
IP Office SoftConsole: BLF Panel
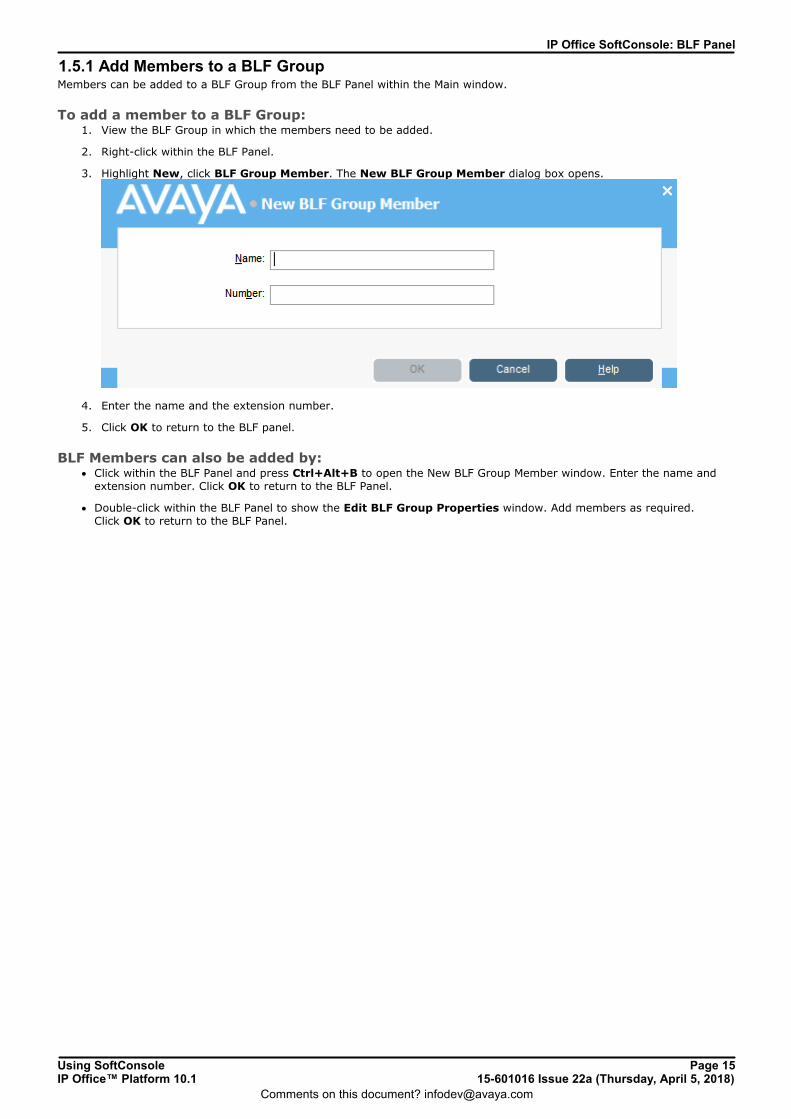
1.5.1 Add Members to a BLF GroupMembers can be added to a BLF Group from the BLF Panel within the Main window.
To add a member to a BLF Group:1. View the BLF Group in which the members need to be added.
2. Right-click within the BLF Panel.
3. Highlight New, click BLF Group Member. The New BLF Group Member dialog box opens.
4. Enter the name and the extension number.
5. Click OK to return to the BLF panel.
BLF Members can also be added by:· Click within the BLF Panel and press Ctrl+Alt+B to open the New BLF Group Member window. Enter the name and
extension number. Click OK to return to the BLF Panel.
· Double-click within the BLF Panel to show the Edit BLF Group Properties window. Add members as required.Click OK to return to the BLF Panel.

Using SoftConsole Page 1615-601016 Issue 22a (Thursday, April 5, 2018)IP Office™ Platform 10.1
Comments on this document? [email protected]
1.6 Call Details PanelThe Call Details panel contains a side-by-side display of current call information. A slider positioned between the twopanels allows you to adjust the size of the panels as required.
The panel on the left contains details about the current calls. When a single call is in progress, either ringing orconnected, it contains details of that call.
If you have multiple call appearances set, additional calls can be shown when they arrive. Clicking the separate calls hasthe same effect as pressing the matching call appearance buttons on the telephone, ie. it will answer the selected callwhilst putting any previously connected call on hold.
Details that can be shown for a single call are:
· Calling Name The name associated with the calling number. For external calls this can be a name obtained from a calling numbermatch with the telephone system directory.
· Calling Number The telephone number of the caller, if available.
· Called Name The name associated with the called number.
· Called Number The extension number the incoming call was routed to by the telephone system.
· Call Status States the progress of a call. The border around the Call Details Panel changes color to indicate the status of a call.See Appearance tab in the Configuration section.
· Red - Alerting incoming call or alerting outgoing call.
· Green - Connected call, or call still being dialed.
· Yellow - Returned call. For example, a held call that has timed out from hold.
· Black - Idle.
· Duration The length of time that the call is in its current state, for example ringing, connected, or held.
· Notes This area displays notes or information about the call. For example, when a call returns the reason for the return isshown. If annotation is attached to the call, the annotation is shown here. See Adding Text to a Call in theFeatures section.
53
33
Using SoftConsole Page 1715-601016 Issue 22a (Thursday, April 5, 2018)IP Office™ Platform 10.1
Comments on this document? [email protected]
IP Office SoftConsole: Call Details Panel
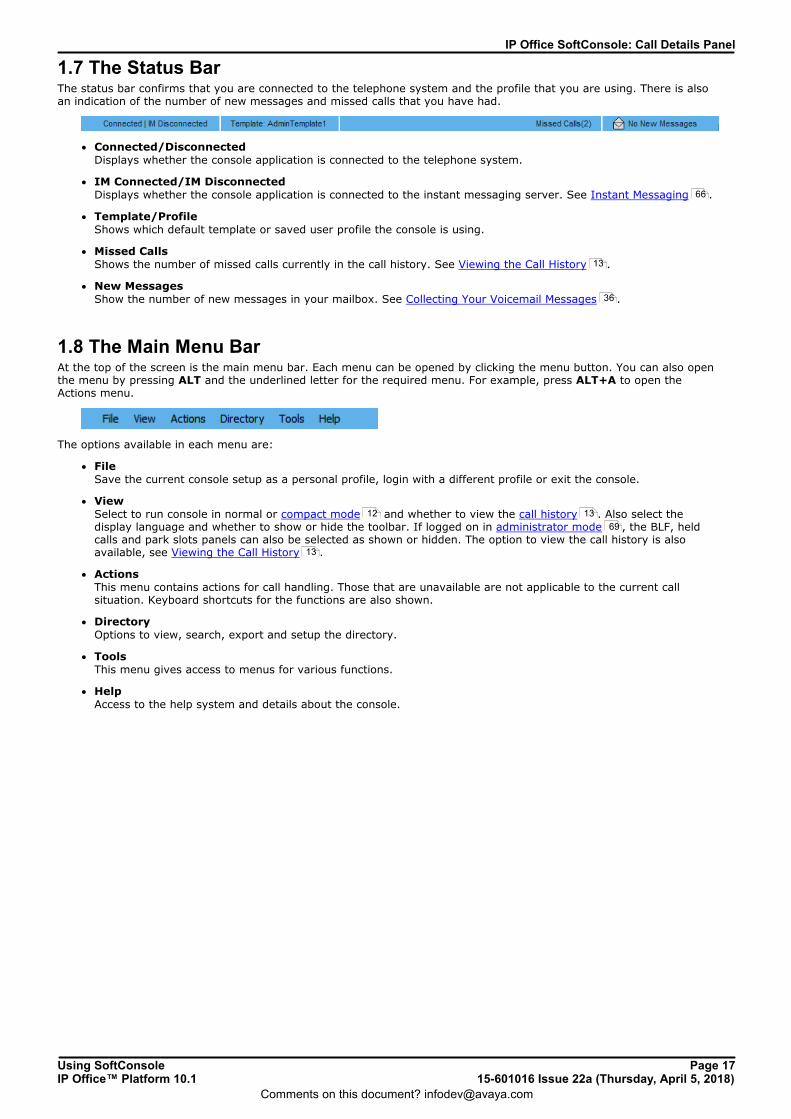
1.7 The Status BarThe status bar confirms that you are connected to the telephone system and the profile that you are using. There is alsoan indication of the number of new messages and missed calls that you have had.
· Connected/Disconnected Displays whether the console application is connected to the telephone system.
· IM Connected/IM Disconnected Displays whether the console application is connected to the instant messaging server. See Instant Messaging .
· Template/Profile Shows which default template or saved user profile the console is using.
· Missed Calls Shows the number of missed calls currently in the call history. See Viewing the Call History .
· New Messages Show the number of new messages in your mailbox. See Collecting Your Voicemail Messages .
1.8 The Main Menu BarAt the top of the screen is the main menu bar. Each menu can be opened by clicking the menu button. You can also openthe menu by pressing ALT and the underlined letter for the required menu. For example, press ALT+A to open theActions menu.
The options available in each menu are:
· File Save the current console setup as a personal profile, login with a different profile or exit the console.
· View Select to run console in normal or compact mode and whether to view the call history . Also select thedisplay language and whether to show or hide the toolbar. If logged on in administrator mode , the BLF, heldcalls and park slots panels can also be selected as shown or hidden. The option to view the call history is alsoavailable, see Viewing the Call History .
· Actions This menu contains actions for call handling. Those that are unavailable are not applicable to the current callsituation. Keyboard shortcuts for the functions are also shown.
· Directory Options to view, search, export and setup the directory.
· Tools This menu gives access to menus for various functions.
· Help Access to the help system and details about the console.
66
13
36
12 13
69
13

Using SoftConsole Page 1815-601016 Issue 22a (Thursday, April 5, 2018)IP Office™ Platform 10.1
Comments on this document? [email protected]
1.9 Change LanguageYou can select which language in which you want to run the console. The console supports the following languages:
· Chinese (Simplified), Danish, Dutch, English (UK), English (US), Finnish, French, German, Italian, Korean,Japanese, Latin Spanish, Norwegian, Portuguese, Portuguese (Brazilian),Russian, Spanish, Spanish (Latin) andSwedish.
To change the console language: 1. Click View and select Language.
2. Select the language required.
3. The console immediately changes to use the new language.
4. To save the change as part of your profile, click the icon.
1.10 Multisite Network FeaturesPreviously, some IP Office SoftConsole features were not supported for user, groups, etc. on other telephone systems in amultisite network. For Release 9.0 and higher, the information provided by the telephone system to the console has beenenhanced to allow those existing console features to now be used across a multisite network. Affected features are:
· Park slots .
· Hunt group queue monitoring and longest waiting call pickup .
· Park against a busy extension (Ctrl+B)
· Configuration of user forwarding, DND, etc .
· Setting hunt groups in or out of service .
· Call tagging .
27
28 28
24
43
42
33

Using SoftConsole Page 1915-601016 Issue 22a (Thursday, April 5, 2018)IP Office™ Platform 10.1
Comments on this document? [email protected]
Call Handling
Chapter 2.

Using SoftConsole Page 2015-601016 Issue 22a (Thursday, April 5, 2018)IP Office™ Platform 10.1
Comments on this document? [email protected]
2. Call Handling2.1 Answering a CallWhen an incoming call is received, the Call Details panel is outlined in red and displays information about the caller. If, inthe IP Office SoftConsole directory, a script file is associated with the incoming number, the script is shown in the rightcall panel.
To answer an incoming call: 1. Use any of the following methods:
· Press Enter.
· Click .
· Click Actions | Answer Call.
· Pick up the handset on your telephone or press the headset or speaker button.
· Double-click in the Call Details Panel.
2. When a call is answered the caller information is outlined in green. If a script is showing, to remove it, click theClose Script button or press Enter again.
Using SoftConsole Page 2115-601016 Issue 22a (Thursday, April 5, 2018)IP Office™ Platform 10.1
Comments on this document? [email protected]
Call Handling: Answering a Call
2.2 Making a CallThere are several ways to make a call from the console. Use one of the following methods:
· Dial from your telephone.
· Double-click on a specific BLF to speed dial the associated number.
· Locate and select a directory entry and then click or press F12.
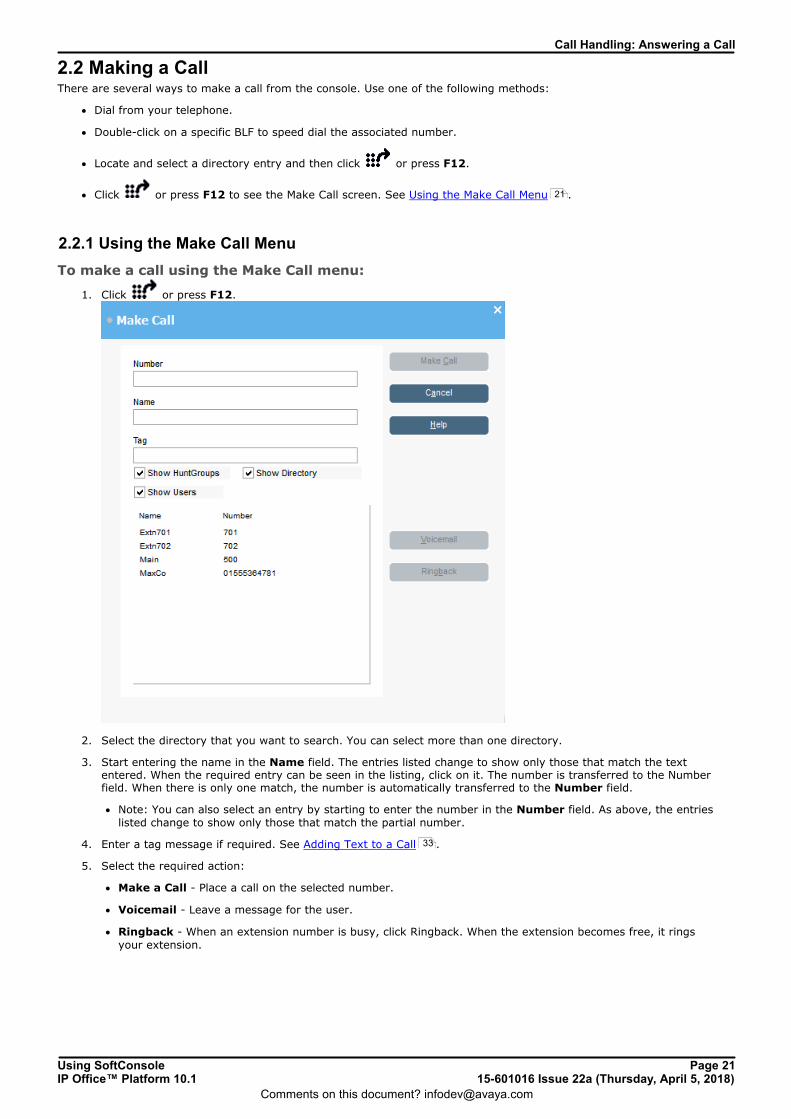
· Click or press F12 to see the Make Call screen. See Using the Make Call Menu .
2.2.1 Using the Make Call Menu
To make a call using the Make Call menu:
1. Click or press F12.
2. Select the directory that you want to search. You can select more than one directory.
3. Start entering the name in the Name field. The entries listed change to show only those that match the textentered. When the required entry can be seen in the listing, click on it. The number is transferred to the Numberfield. When there is only one match, the number is automatically transferred to the Number field.
· Note: You can also select an entry by starting to enter the number in the Number field. As above, the entrieslisted change to show only those that match the partial number.
4. Enter a tag message if required. See Adding Text to a Call .
5. Select the required action:
· Make a Call - Place a call on the selected number.
· Voicemail - Leave a message for the user.
· Ringback - When an extension number is busy, click Ringback. When the extension becomes free, it ringsyour extension.
21
33
Using SoftConsole Page 2215-601016 Issue 22a (Thursday, April 5, 2018)IP Office™ Platform 10.1
Comments on this document? [email protected]
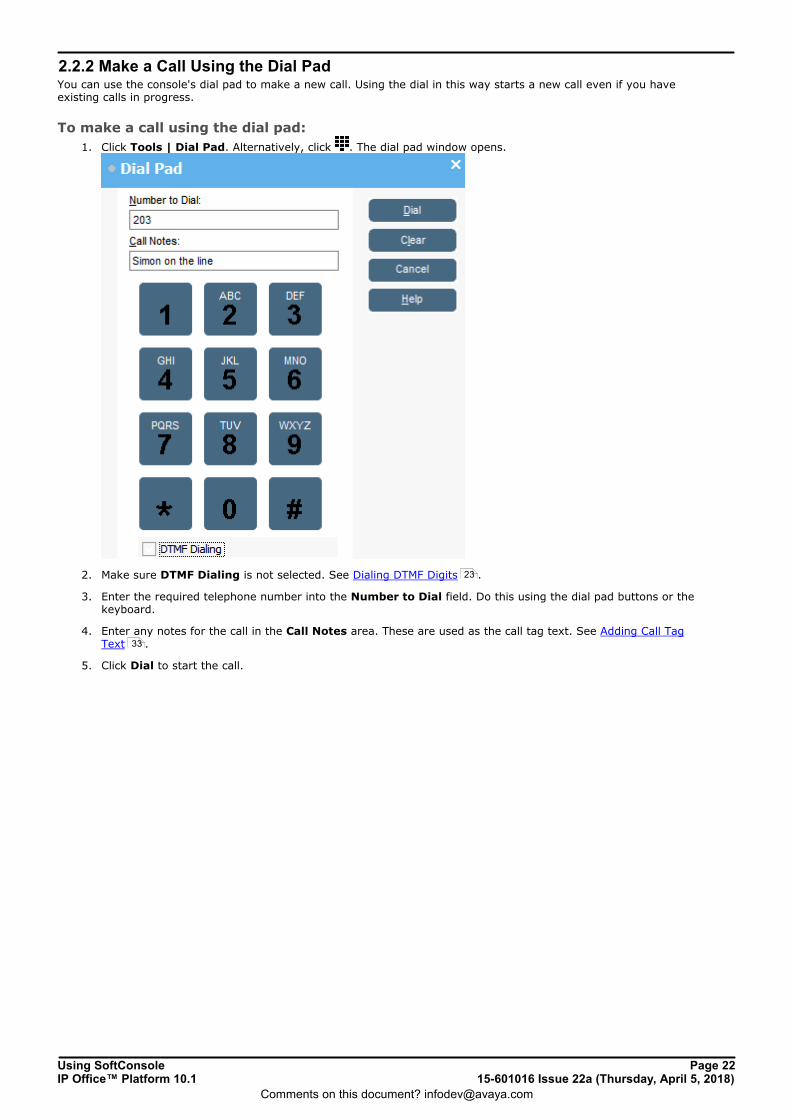
2.2.2 Make a Call Using the Dial PadYou can use the console's dial pad to make a new call. Using the dial in this way starts a new call even if you haveexisting calls in progress.
To make a call using the dial pad:
1. Click Tools | Dial Pad. Alternatively, click . The dial pad window opens.
2. Make sure DTMF Dialing is not selected. See Dialing DTMF Digits .
3. Enter the required telephone number into the Number to Dial field. Do this using the dial pad buttons or thekeyboard.
4. Enter any notes for the call in the Call Notes area. These are used as the call tag text. See Adding Call TagText .
5. Click Dial to start the call.
23
33
Using SoftConsole Page 2315-601016 Issue 22a (Thursday, April 5, 2018)IP Office™ Platform 10.1
Comments on this document? [email protected]
Call Handling: Making a Call
2.3 Dialing DTMF DigitsIn addition to be used to make calls , you can use the console's dial pad to dial DTMF digits during a call.
To dial DTMF digits during a call:
1. Click Tools | Dial Pad. Alternatively, click . The dial pad window opens.
2. Select DTMF Dialing.
3. Any digits you now dial on the dial pad are sent to your currently connected call as DTMF digits.
21

Using SoftConsole Page 2415-601016 Issue 22a (Thursday, April 5, 2018)IP Office™ Platform 10.1
Comments on this document? [email protected]
2.4 Transfering CallsThis section covers the different methods which can be used to transfer calls.
· Making an unsupervised transfer
· Making a supervised transfer
· Transfer direct to voicemail
· Wait for transfer to a busy extension
2.4.1 Unsupervised TransfersAn unsupervised transfer is one where you transfer the call without speaking to the the transfer destination or waiting tosee if they answer. Note that you system administrator can configure the system so that unanswered calls return to youWhen a call is returned, (NoAns) is shown in the Call Details panel.
To transfer a call that you have answered: 1. While talking to the caller, you can transfer a call by doing any of the following:
· Pressing F2. Select or enter the transfer destination and click Dial (Ctrl+D).
· Click Actions | Transfer Call. Select or enter the transfer destination and click Dial (Ctrl+D).
· Drag and drop the call on to the extension within the Directory panel.
· Drag and drop the call onto the required BLF.
To transfer a call without answering it: If you recognizes the calling name or number and know where they need to be transferred, you can transfer the incomingcall without answering it.
1. Enter the destination extension number in the SEARCH field.
2. Click on the match required and then click . Alternatively, when you are down to a single match just click .
3. The incoming call is transferred to the destination extension and cleared from the screen.
2.4.2 Supervised TransfersA supervised transfer is one where you consult with the transfer destination to check that they answer and that they willaccept the call before transferring the caller.
To make a consultation call:1. Enter the extension number or user name in the directory SEARCH field.
a. If the extension is free, either click in the directory panel or press F12. You can hear the progress ofthe outgoing call while the original caller is put on hold.
· If the incoming call is accepted for transfer, complete the transfer by clicking or pressing Ctrl+T.
· If the user does not want to receive the incoming call, finish the consultation call by clicking orpressing End. Return to the original caller by taking them off hold.
b. If the extension is busy, you can ask the caller if they want to wait. See Wait for Transfer to a BusyExtension .
2.4.3 Transfer a Call to VoicemailIf an incoming caller wants to leave a message for a user, the caller can be transferred directly to a user or hunt group'svoicemail mailbox.
To transfer a call to voicemail:1. Press F3. Alternatively, click Actions | Voicemail Transfer.
· Another way to transfer a call to voicemail is to select the extension number in the directory panel and thenpress F3.
24
24
24
25
25
Using SoftConsole Page 2515-601016 Issue 22a (Thursday, April 5, 2018)IP Office™ Platform 10.1
Comments on this document? [email protected]
Call Handling: Transfering Calls
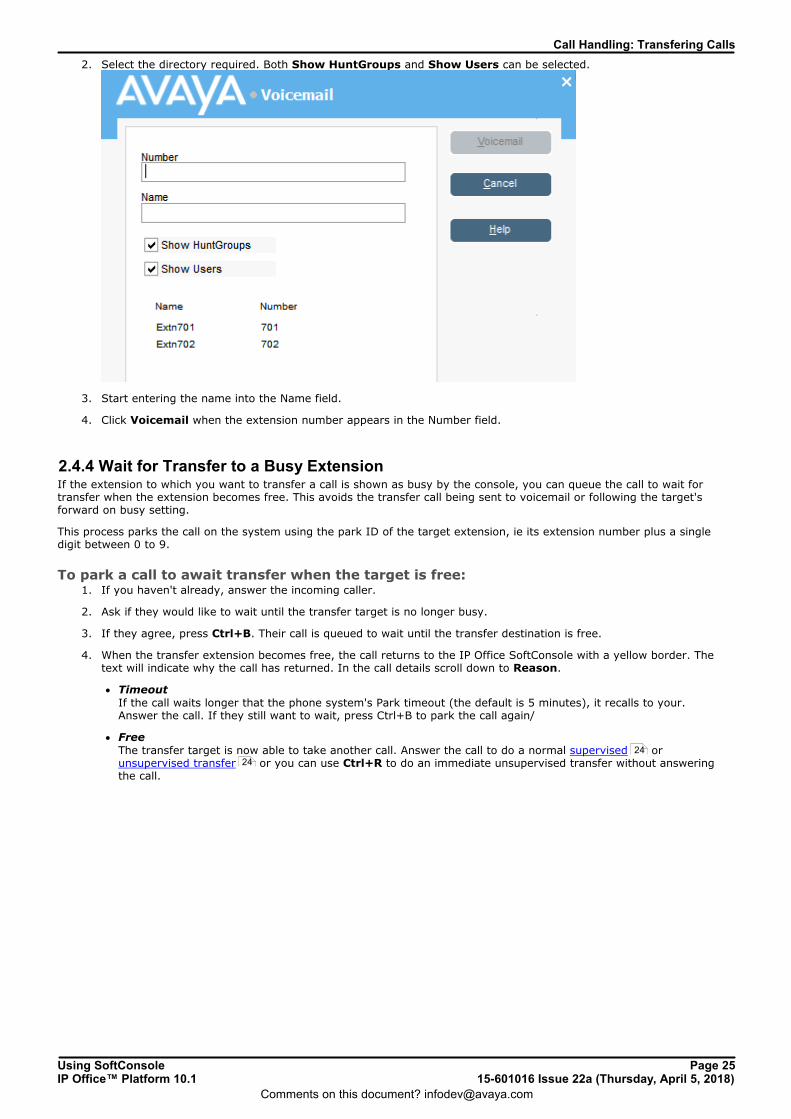
2. Select the directory required. Both Show HuntGroups and Show Users can be selected.
3. Start entering the name into the Name field.
4. Click Voicemail when the extension number appears in the Number field.
2.4.4 Wait for Transfer to a Busy ExtensionIf the extension to which you want to transfer a call is shown as busy by the console, you can queue the call to wait fortransfer when the extension becomes free. This avoids the transfer call being sent to voicemail or following the target'sforward on busy setting.
This process parks the call on the system using the park ID of the target extension, ie its extension number plus a singledigit between 0 to 9.
To park a call to await transfer when the target is free: 1. If you haven't already, answer the incoming caller.
2. Ask if they would like to wait until the transfer target is no longer busy.
3. If they agree, press Ctrl+B. Their call is queued to wait until the transfer destination is free.
4. When the transfer extension becomes free, the call returns to the IP Office SoftConsole with a yellow border. Thetext will indicate why the call has returned. In the call details scroll down to Reason.
· Timeout If the call waits longer that the phone system's Park timeout (the default is 5 minutes), it recalls to your.Answer the call. If they still want to wait, press Ctrl+B to park the call again/
· Free The transfer target is now able to take another call. Answer the call to do a normal supervised orunsupervised transfer or you can use Ctrl+R to do an immediate unsupervised transfer without answeringthe call.
24
24
Using SoftConsole Page 2615-601016 Issue 22a (Thursday, April 5, 2018)IP Office™ Platform 10.1
Comments on this document? [email protected]
2.5 Using HoldA call can be put on hold so that you can perform another task.
To place the current connected call on hold:
1. Click or press F4. To hold and answer the next call in one action, press F7.
2. The time a call remains on hold, if you are free, is controlled by the telephone system. The default is 15 seconds.See your system administrator.
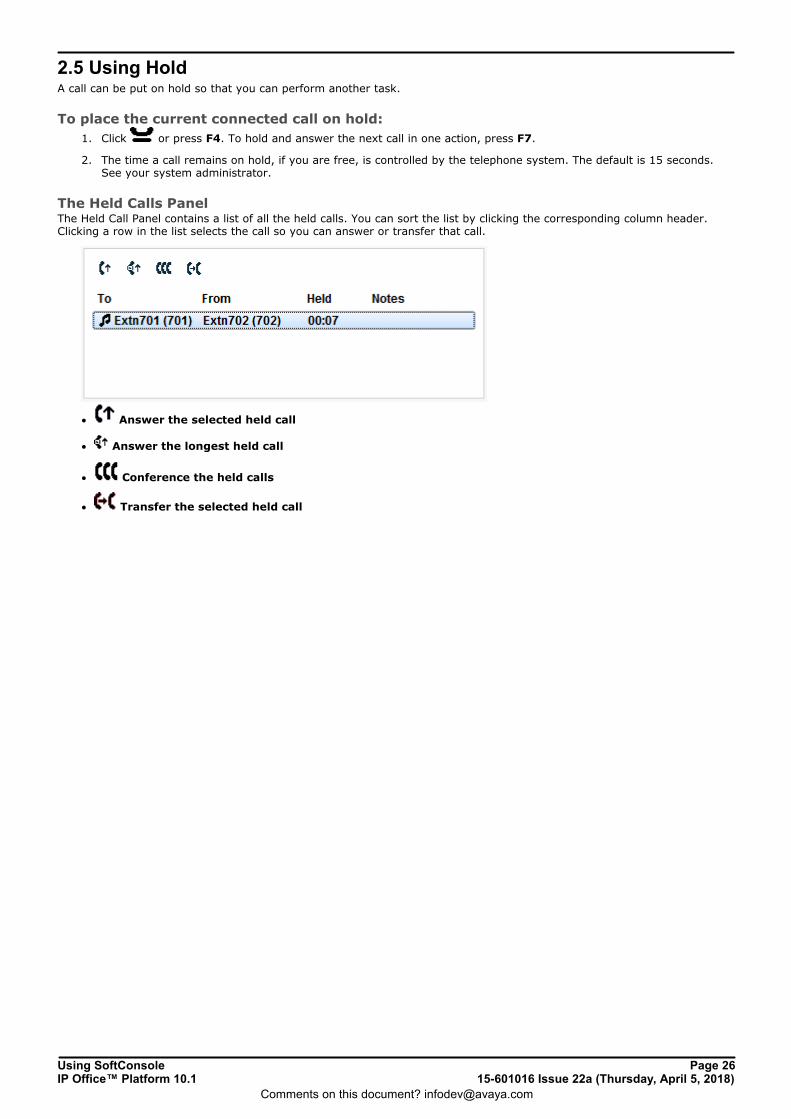
The Held Calls PanelThe Held Call Panel contains a list of all the held calls. You can sort the list by clicking the corresponding column header.Clicking a row in the list selects the call so you can answer or transfer that call.
· Answer the selected held call
· Answer the longest held call
· Conference the held calls
· Transfer the selected held call

Using SoftConsole Page 2715-601016 Issue 22a (Thursday, April 5, 2018)IP Office™ Platform 10.1
Comments on this document? [email protected]
Call Handling: Using Hold
2.6 Parking a CallYou might need to temporarily "park" a call to handle some other tasks. An example of parking is where an incomingcaller needs to speak to someone urgently but they can not be found. The call can be parked in slot "1", and the specificuser paged to pick up the call on "1". See Using Page .
Calls remain parked for a specific length of time before being returned to the operator. For more information on the parktime, see your system administrator.
IP Office SoftConsole provides parking slots for 16 calls, all with a specific park ID. See Configuring Park Slots .
When a call is parked in one of the park slots, the button label provides information about the call. When a park slot isvacant, the button label shows the park slot ID. All operators can see when the call is picked up or ended. Anyone cananswer a parked call. See Collecting a Parked Call .
To park a call:1. While connected to the call, click on a vacant park slot button to park the call in that slot.
2. The parked call displays information regarding the call, for example the source number of call.
To unpark a call:1. When a call is parked in a park slot, click the relevant Park Slot button to unpark the call.
The default keyboard shortcuts are Alt+F1 to F12 for buttons 1 to 12 and then Shift+F9 to F12 for buttons 13 to 16.
2.7 Collecting a Parked CallWhen you park a call, the call can be picked up by any other user who knows the park slot number. To pick up a parkedcall do one of the following:
· Dial the default short code, *38*N# replacing N with the park slot number.
· If console users have a park slot button set to the same park slot number, the button indicates the parked call.They can click the button to unpark the call.
· On Avaya telephones with programmable buttons, those buttons can be programmed to match particular park slotnumbers. The button indicates when a call is parked in that park slot and can be pressed to unpark the call.
2.8 Reclaiming a CallYou can attempt to reclaim the last incoming call presented to the console. This includes calls that rang but were thenanswered elsewhere. The reclaim feature is useful if you suspect a call was transferred to the wrong number or is stillringing unanswered.
· When working in a group of console users, the reclaim function may reclaim a call that was presented to you butthen answered by one of the other IP Office SoftConsole users.
To reclaim the last call handled:1. Press F6 or click Actions | Reclaim Call.
36
62
27

Using SoftConsole Page 2815-601016 Issue 22a (Thursday, April 5, 2018)IP Office™ Platform 10.1
Comments on this document? [email protected]
2.9 Monitoring QueuesHunt groups can be configured with queuing. When their are more calls waiting to be answered than agents available toanswer, the additional calls are queued. You can configure your console to monitor up to 8 hunt group queues. SeeConfiguring Queues .
The number of calls held in a queue is indicated by a bar graph. The total number of calls is shown at the end of the bargraph. Each call is shown as a white box, if the alarm threshold has not been exceeded. If the number of calls in thequeue exceeds the alarm threshold, the calls exceeding the threshold are shown as an amber box.
The longest length of time a call is in the queue is indicated in the text box at the end of the graph. The time is updatedwhenever a call is queued. The time is shown in white if the longest wait time alarm threshold has not been exceeded.The time changes to being amber if the longest wait time is exceeded.
When the mouse pointer is moved over an active Queue Call bar information is shown about the queue. The Queue Name,number of calls in the queue, number of Recall calls and the queue status either normal or alarmed is listed.
2.9.1 Answering a Queued CallAny console operator can answer queued calls. You do not have to be a member of the hunt group.
To answer a queued call:1. Click the Queue Name button. The first call in the queue is presented to you. Alternatively, press Shift+F1 to
Shift+F8.
2. Answer the call in the normal way.
Note· If you are a member of a hunt group, a queued call is automatically presented in the Current Call Information
panel. The name of the hunt group is shown in the Calling Name field. You can answer the call in the normal way.
63

Using SoftConsole Page 2915-601016 Issue 22a (Thursday, April 5, 2018)IP Office™ Platform 10.1
Comments on this document? [email protected]
Call Handling: Monitoring Queues
2.10 ConferencesA IP Office SoftConsole operator can create conferences. They can also add callers to a conference hosted by thetelephone system. This can be done is several ways:
· Conference Held Calls You can place several calls on hold and then start a conference between those calls.
· Use Conference Rooms Console has two conference rooms where conferences can be created. The indicated conference users can beinvited to join the conference. If Voicemail Pro is installed, the invitation to join a conference is automated.
· Viewing Existing Conferences and Add Users You can view all existing conferences and add a caller to any of those conferences.
30
31
30
Using SoftConsole Page 3015-601016 Issue 22a (Thursday, April 5, 2018)IP Office™ Platform 10.1
Comments on this document? [email protected]
2.10.1 Conferencing Held CallsUsing IP Office SoftConsole, multiple calls can be held and then a conference started between the held calls. This is thesimplest method for starting a small ad-hoc conference of three or four parties. For more information about creatinglarger conferences, see Using the Conference Rooms .
To conference held calls:1. Call and then place each user to be conferenced on hold.
2. Press the Conference button.
3. Click Hang Up to remove yourself from the conference call.
2.10.2 Viewing ConferencesYou can use the Directory Panel to view any current conferences on the telephone system. The conferences listed includesad-hoc conferences started by other users and any IP Office SoftConsole conferences.
To view a conference:
· Click in the Directory panel. The conference name and host is listed for IP Office SoftConsole conferences.For other conferences, just the conference number is shown.
2.10.3 Adding Users to a ConferenceYou can add a caller to any conference running on the telephone system.
To add a caller to conference:1. Answer or make a call to a user.
2. Click in the Directory panel to display the current conferences.
3. Click the required conference.
4. Click Actions | Add to Conference.
31
Using SoftConsole Page 3115-601016 Issue 22a (Thursday, April 5, 2018)IP Office™ Platform 10.1
Comments on this document? [email protected]
Call Handling: Conferences
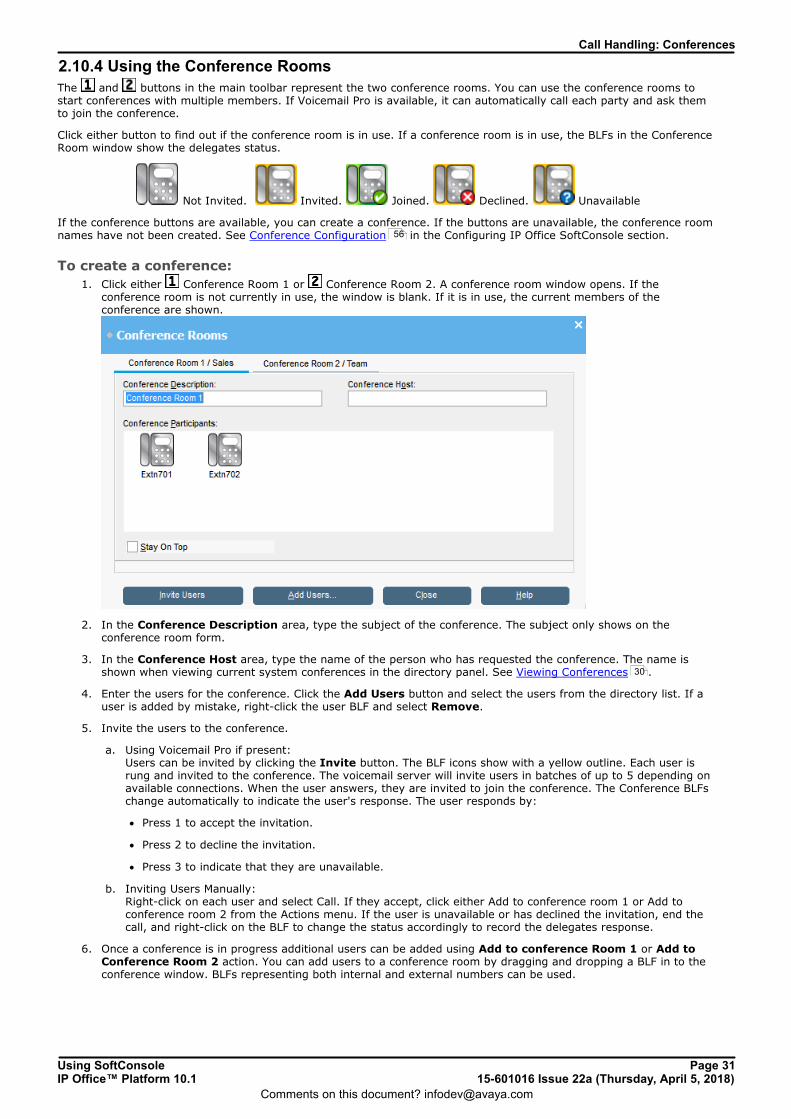
2.10.4 Using the Conference Rooms
The and buttons in the main toolbar represent the two conference rooms. You can use the conference rooms tostart conferences with multiple members. If Voicemail Pro is available, it can automatically call each party and ask themto join the conference.
Click either button to find out if the conference room is in use. If a conference room is in use, the BLFs in the ConferenceRoom window show the delegates status.
Not Invited. Invited. Joined. Declined. Unavailable
If the conference buttons are available, you can create a conference. If the buttons are unavailable, the conference roomnames have not been created. See Conference Configuration in the Configuring IP Office SoftConsole section.
To create a conference:
1. Click either Conference Room 1 or Conference Room 2. A conference room window opens. If theconference room is not currently in use, the window is blank. If it is in use, the current members of theconference are shown.
2. In the Conference Description area, type the subject of the conference. The subject only shows on theconference room form.
3. In the Conference Host area, type the name of the person who has requested the conference. The name isshown when viewing current system conferences in the directory panel. See Viewing Conferences .
4. Enter the users for the conference. Click the Add Users button and select the users from the directory list. If auser is added by mistake, right-click the user BLF and select Remove.
5. Invite the users to the conference.
a. Using Voicemail Pro if present: Users can be invited by clicking the Invite button. The BLF icons show with a yellow outline. Each user isrung and invited to the conference. The voicemail server will invite users in batches of up to 5 depending onavailable connections. When the user answers, they are invited to join the conference. The Conference BLFschange automatically to indicate the user's response. The user responds by:
· Press 1 to accept the invitation.
· Press 2 to decline the invitation.
· Press 3 to indicate that they are unavailable.
b. Inviting Users Manually: Right-click on each user and select Call. If they accept, click either Add to conference room 1 or Add toconference room 2 from the Actions menu. If the user is unavailable or has declined the invitation, end thecall, and right-click on the BLF to change the status accordingly to record the delegates response.
6. Once a conference is in progress additional users can be added using Add to conference Room 1 or Add toConference Room 2 action. You can add users to a conference room by dragging and dropping a BLF in to theconference window. BLFs representing both internal and external numbers can be used.
56
30

Using SoftConsole Page 3215-601016 Issue 22a (Thursday, April 5, 2018)IP Office™ Platform 10.1
Comments on this document? [email protected]
To change the conference room view:1. Right-click in the Conference Room Window.
2. Select View from the pop-up menu. The view types available are large icons, small icons, a list of icons or thedetails.
To change the way the icons are arranged:· Right-click in the Conference Room Window.
· Select Arrange from the pop-up menu. The ways you can arrange the icons are by name, number or by status.
To change the status of a user:1. Right-click on the user's BLF.
2. Select Change Status.
3. Select the status required. The status types are Not invited, Invited, Joined, Declined, or Unavailable.
Using SoftConsole Page 3315-601016 Issue 22a (Thursday, April 5, 2018)IP Office™ Platform 10.1
Comments on this document? [email protected]
Call Handling: Conferences
2.11 Adding Call Tag TextText can be associated with a call by the telephone system or by any user on the call. This feature is known as calltagging. The text remains with the call when it is transferred and is displayed on the telephones if internal. The text isalso recorded within the call history, see Viewing the Call History . For users with one-X Portal for IP Office, it appearsas the call subject.
You can add a call tag when making or transferring a call with the console. Alternatively, you can add a call tagwhile connected to the call using the process below.
By default, the length of a message is up to 16 characters. However, this can be changed, see Administrator ModeOverview .
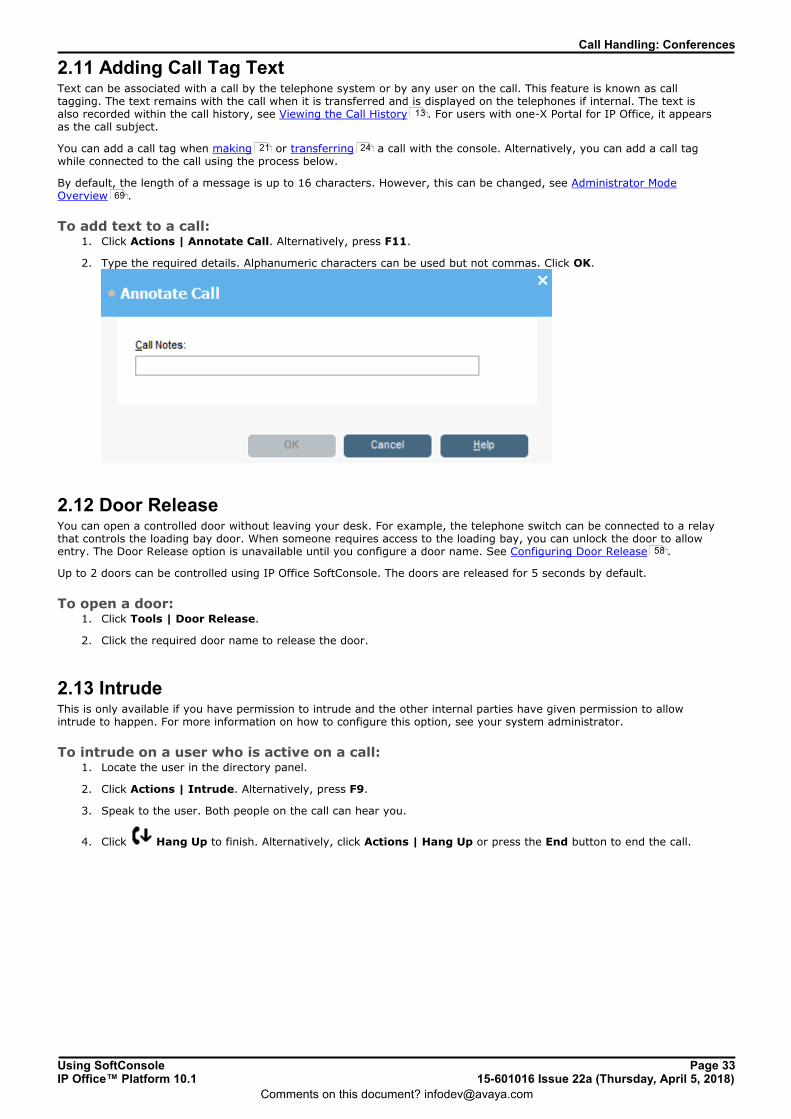
To add text to a call:1. Click Actions | Annotate Call. Alternatively, press F11.
2. Type the required details. Alphanumeric characters can be used but not commas. Click OK.
2.12 Door ReleaseYou can open a controlled door without leaving your desk. For example, the telephone switch can be connected to a relaythat controls the loading bay door. When someone requires access to the loading bay, you can unlock the door to allowentry. The Door Release option is unavailable until you configure a door name. See Configuring Door Release .
Up to 2 doors can be controlled using IP Office SoftConsole. The doors are released for 5 seconds by default.
To open a door:1. Click Tools | Door Release.
2. Click the required door name to release the door.
2.13 IntrudeThis is only available if you have permission to intrude and the other internal parties have given permission to allowintrude to happen. For more information on how to configure this option, see your system administrator.
To intrude on a user who is active on a call:1. Locate the user in the directory panel.
2. Click Actions | Intrude. Alternatively, press F9.
3. Speak to the user. Both people on the call can hear you.
4. Click Hang Up to finish. Alternatively, click Actions | Hang Up or press the End button to end the call.
13
21 24
69
58

Using SoftConsole Page 3415-601016 Issue 22a (Thursday, April 5, 2018)IP Office™ Platform 10.1
Comments on this document? [email protected]
2.14 Sending a Text MessageYou can send a short text message to a user phone. The message appears on the display of most Avaya telephones. Thisfeature is less disruptive then intruding on a call. The result depends on the user's telephone type and whether they areon a call or not.
· By default, the maximum length of a message is 16 characters. However, this can be altered, see AdministratorMode Overview .
· When a message is sent to an Avaya DS Port display telephone the message lights the telephone message lamp.This happens whether the telephone is free or on a call. If the telephone is free, the message text is shown. If on acall, the text is shown after the user completes the current call.
To send a text message:1. Locate the user in the directory.
2. Click Actions | Send Message. Alternatively, press Ctrl+M. The extension number field is automaticallycompleted from information showing in the directory.
3. Enter the message and press OK.
69
Using SoftConsole Page 3515-601016 Issue 22a (Thursday, April 5, 2018)IP Office™ Platform 10.1
Comments on this document? [email protected]
Call Handling: Sending a Text Message
2.15 Instant MessagingThe console can be configured to support instant messaging . When enabled, you can use the console directory toselect and send instant messages to a user.
The other user must be using an application that also supports instant messaging. That can be one-X Portal for IP Office,one of the one-X Portal for IP Office plug-ins, one-X Mobile Preferred for IP Office or one-X Communicator.
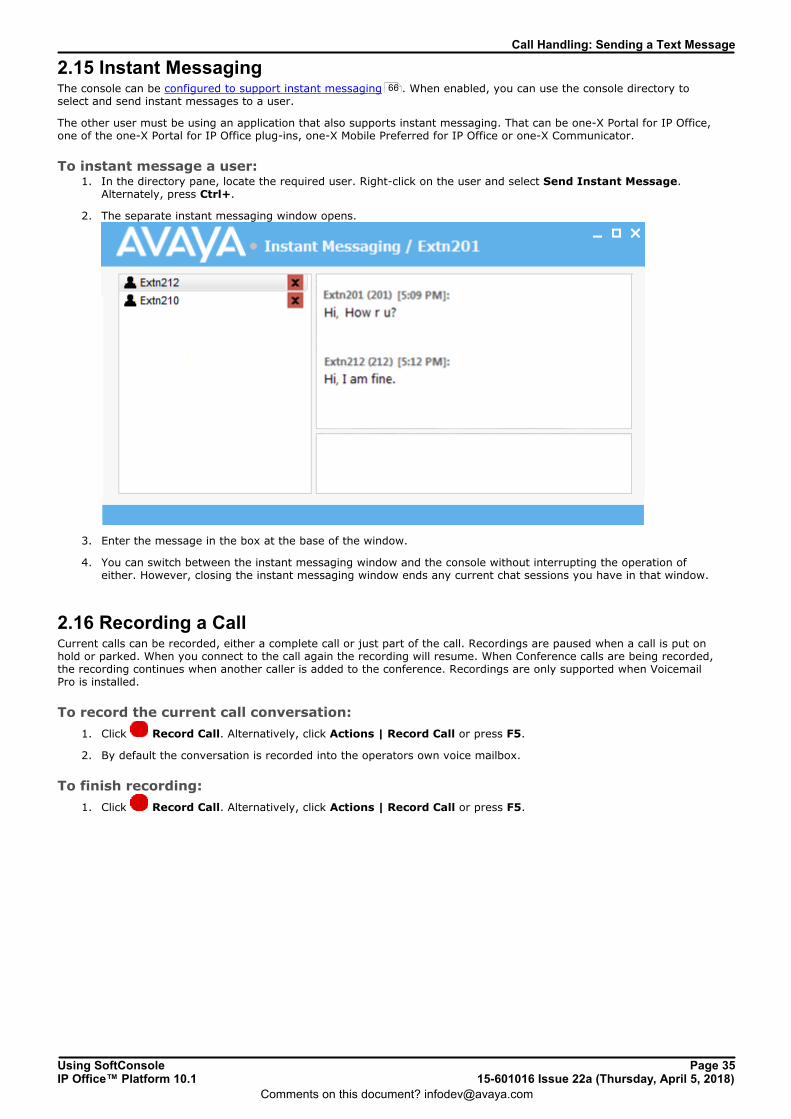
To instant message a user:1. In the directory pane, locate the required user. Right-click on the user and select Send Instant Message.
Alternately, press Ctrl+.
2. The separate instant messaging window opens.
3. Enter the message in the box at the base of the window.
4. You can switch between the instant messaging window and the console without interrupting the operation ofeither. However, closing the instant messaging window ends any current chat sessions you have in that window.
2.16 Recording a CallCurrent calls can be recorded, either a complete call or just part of the call. Recordings are paused when a call is put onhold or parked. When you connect to the call again the recording will resume. When Conference calls are being recorded,the recording continues when another caller is added to the conference. Recordings are only supported when VoicemailPro is installed.
To record the current call conversation:
1. Click Record Call. Alternatively, click Actions | Record Call or press F5.
2. By default the conversation is recorded into the operators own voice mailbox.
To finish recording:
1. Click Record Call. Alternatively, click Actions | Record Call or press F5.
66
Using SoftConsole Page 3615-601016 Issue 22a (Thursday, April 5, 2018)IP Office™ Platform 10.1
Comments on this document? [email protected]
2.17 Using PageYou can broadcast to a group of people. For example, an incoming caller needs to speak to someone urgently but theycan not be found. The call can be parked and then a message broadcast for the user to pick up the call. The page is heardat any telephone extension that has a hands free speaker and is not being used.
To broadcast a message:
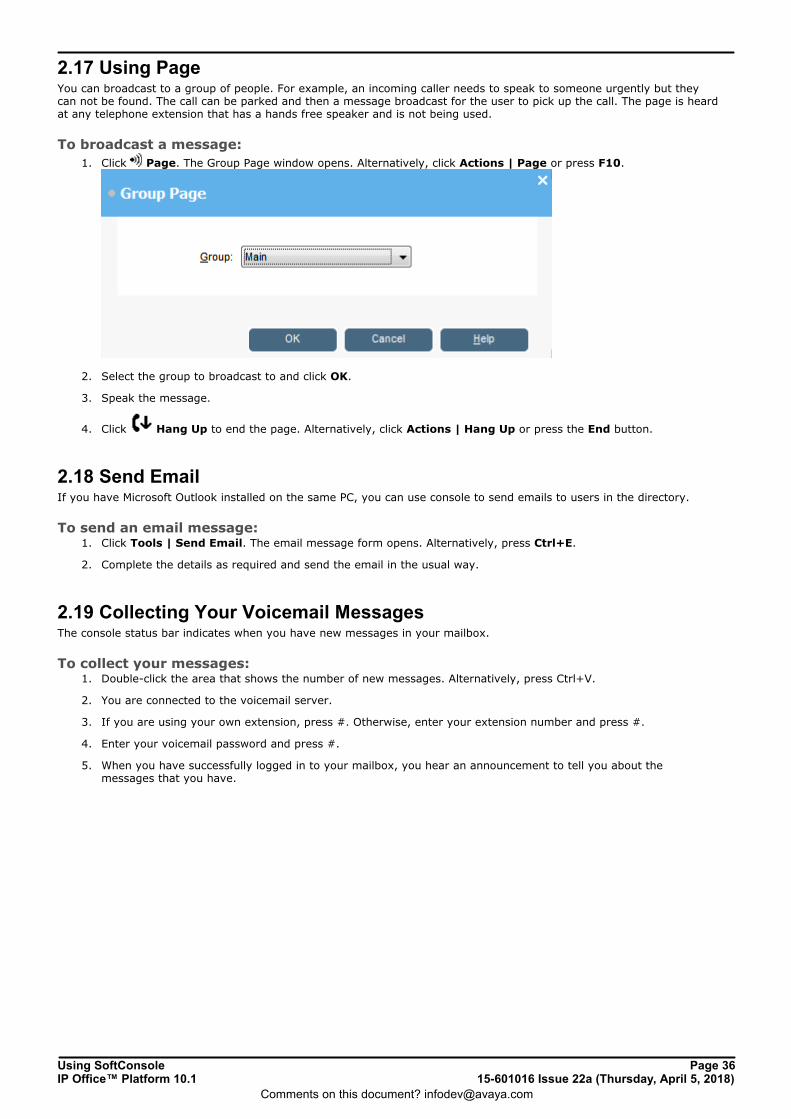
1. Click Page. The Group Page window opens. Alternatively, click Actions | Page or press F10.
2. Select the group to broadcast to and click OK.
3. Speak the message.
4. Click Hang Up to end the page. Alternatively, click Actions | Hang Up or press the End button.
2.18 Send EmailIf you have Microsoft Outlook installed on the same PC, you can use console to send emails to users in the directory.
To send an email message:1. Click Tools | Send Email. The email message form opens. Alternatively, press Ctrl+E.
2. Complete the details as required and send the email in the usual way.
2.19 Collecting Your Voicemail MessagesThe console status bar indicates when you have new messages in your mailbox.
To collect your messages:1. Double-click the area that shows the number of new messages. Alternatively, press Ctrl+V.
2. You are connected to the voicemail server.
3. If you are using your own extension, press #. Otherwise, enter your extension number and press #.
4. Enter your voicemail password and press #.
5. When you have successfully logged in to your mailbox, you hear an announcement to tell you about themessages that you have.

Using SoftConsole Page 3715-601016 Issue 22a (Thursday, April 5, 2018)IP Office™ Platform 10.1
Comments on this document? [email protected]
Directory
Chapter 3.

Using SoftConsole Page 3815-601016 Issue 22a (Thursday, April 5, 2018)IP Office™ Platform 10.1
Comments on this document? [email protected]
3. DirectoryThe console panel on the right usually displays the directory of telephone names and numbers. It can include thedirectory entries from the telephone system, the console's own local directory and contacts from Outlook.
Changes to the telephone system directory are updated automatically every 30 minutes. They are also updated whenmake a manual search using the directory (up to a maximum of every 5 minutes).
· Call the selected entry Make a call to the selected directory entry.
· Edit the selected entry Edit the properties of the selected directory entry. See Editing Directory Entry Properties .
· View Directory Items Use the directory panel to view directory entries.
· View Active Conferences Use the directory panel to view conferences being hosted by the telephone system.
· Show/Hide user entries Show or hide user telephone system users in the directory panel.
· Show/Hide group entries Show or hide telephone system hunt groups in the directory panel.
· Show/Hide directory entries Show or hide telephone numbers from the telephone system directory, local console directory and or Outlook.
· You can select which directories are included, see Directories Tab .
· You can edit the local console directory, see Incoming Calls Tab .
Directory IconsWhen viewing directory entries, the following icons are used for the different types of entry.
· User A user on the telephone system.
· Hunt Group A hunt group on the telephone system.
· Directory A directory entry from the telephone system directory or the local directory.
· Outlook Contact A contact from Outlook running on the same PC as the console.
40
57
48

Using SoftConsole Page 3915-601016 Issue 22a (Thursday, April 5, 2018)IP Office™ Platform 10.1
Comments on this document? [email protected]
Directory:
Directory Entry DetailsWhen the search has only one remaining match or when you double-click on a particular entry, the directory changes toshow details for that entry. The information to display can be configured through the console settings. See DirectoriesTab .
To return to the full directory listing, remove the text from the search box. Alternatively, select Directory | New Search(Ctrl+S).
57

Using SoftConsole Page 4015-601016 Issue 22a (Thursday, April 5, 2018)IP Office™ Platform 10.1
Comments on this document? [email protected]
3.1 Editing Directory Entry PropertiesYou can use the Directory Entry Properties window to edit the properties of the entry selected. All directory entrieshave an icon that indicates the entry type.
· User A user is indicated by the icon. See The User Directory Entry Form .
· Directory A directory entry is indicated by the icon. See The Directory Entry Form .
· Hunt Group A group is indicated by the icon. See The Group Service Status Form .
· Note: If the settings are updated by another method, for example using another application or through the usersphone, the values shown in the console are not automatically updated if already being displayed. The valuesdisplayed in the console directory are those current when the user/group was selected.
To open a Directory Entry Properties form:1. Click an entry in the directory.
2. Click . The Directory Entry Properties form is shown for the selected entry.
3. Double-click a directory entry to see the properties in the directory panel. Double-click on the properties to showthe details in a directory properties form
43
41
42

Using SoftConsole Page 4115-601016 Issue 22a (Thursday, April 5, 2018)IP Office™ Platform 10.1
Comments on this document? [email protected]
Directory: Editing Directory Entry Properties
3.1.1 The Directory Entry FormThe Directory Entry form that opens depends on whether the number is from the telephone system directory or fromthe local console directory.
To open a directory entry properties form:1. Click in the IP Office SoftConsole directory panel.
2. Select the directory entry and click . Alternatively, right-click on the entry and select Properties.
Telephone System Directory NumberThe telephone system with which IP Office SoftConsole is working includes a directory of names and numbers. These areused both for outward dialling and to match names to incoming caller numbers. Entries in the telephone system directoryare available to all users through directory functions on their telephones.
The only fields used for an telephone system directory number are the Name and Phone Number. These can not bechanged through the IP Office SoftConsole.
IP Office SoftConsole Directory NumberThe console has a local directory that can be used for outgoing dialling and to match a name to an incoming call. When aname match exists in both the telephone system directory and the console directory, the name in the console directory isused. See Adding/Editing Local Entries for details of the fields.49
Using SoftConsole Page 4215-601016 Issue 22a (Thursday, April 5, 2018)IP Office™ Platform 10.1
Comments on this document? [email protected]
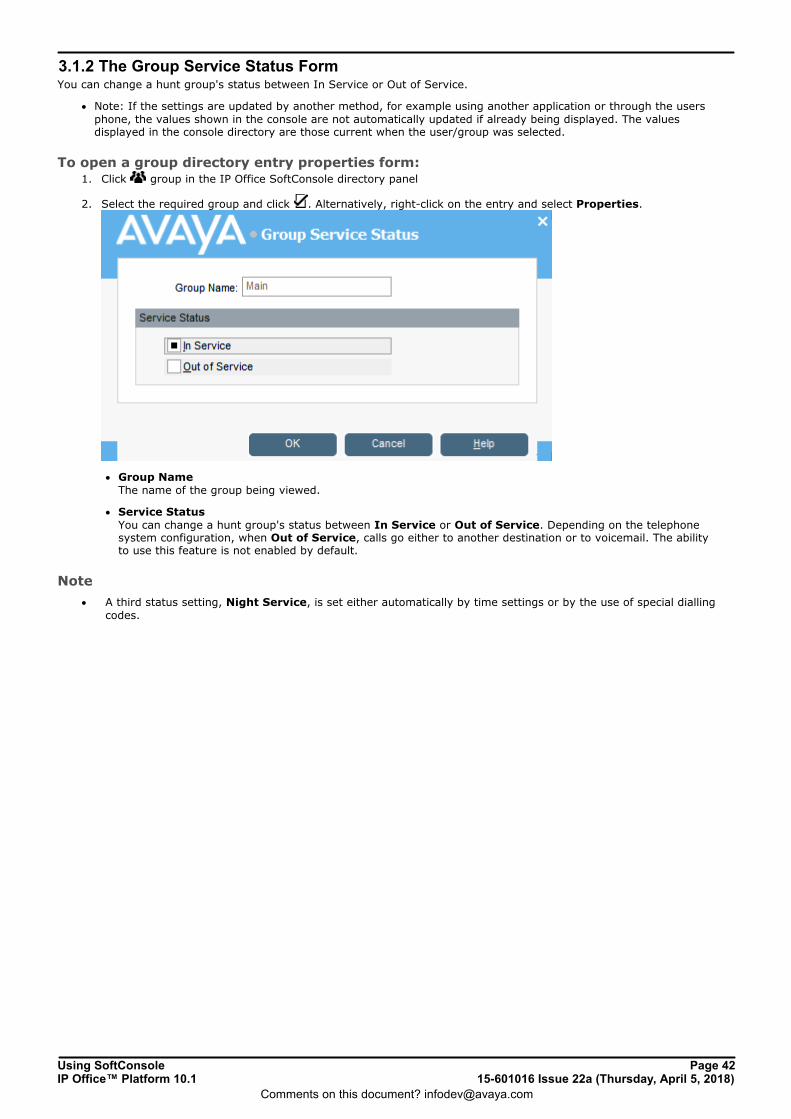
3.1.2 The Group Service Status FormYou can change a hunt group's status between In Service or Out of Service.
· Note: If the settings are updated by another method, for example using another application or through the usersphone, the values shown in the console are not automatically updated if already being displayed. The valuesdisplayed in the console directory are those current when the user/group was selected.
To open a group directory entry properties form:1. Click group in the IP Office SoftConsole directory panel
2. Select the required group and click . Alternatively, right-click on the entry and select Properties.
· Group Name The name of the group being viewed.
· Service Status You can change a hunt group's status between In Service or Out of Service. Depending on the telephonesystem configuration, when Out of Service, calls go either to another destination or to voicemail. The abilityto use this feature is not enabled by default.
Note
· A third status setting, Night Service, is set either automatically by time settings or by the use of special diallingcodes.

Using SoftConsole Page 4315-601016 Issue 22a (Thursday, April 5, 2018)IP Office™ Platform 10.1
Comments on this document? [email protected]
Directory: Editing Directory Entry Properties
3.1.3 User Directory PropertiesYou can change the Do Not Disturb status, bar the user from making outgoing calls, alter the group status for individualgroups and change the forwarding settings.
To open a Users directory entry properties form:1. Click in the IP Office SoftConsole directory panel.
2. Select the user and click . Alternatively, right-click on the entry and select Properties.
3. Some details are for information only and cannot be changed. Those are the User Name, Extension, FullName and Logged In.
4. You can change the following details.
· Do Not Disturb Shows whether the user is on do not disturb.
· Bar Outgoing Calls The IP Office SoftConsole operator can control whether a user can make outgoing calls.
· Forwarding Button Click this button to display the users forwarding settings. See The Forwarding Status Window .
· Group Status A list of the hunt groups that the user belongs. If the group is checked, the user is 'in group' (receiving callsfor that group).
44

Using SoftConsole Page 4415-601016 Issue 22a (Thursday, April 5, 2018)IP Office™ Platform 10.1
Comments on this document? [email protected]
3.1.3.1 Setting Follow Me and Forwarding
You can view and change the forwarding status of a user. Calls to an extension can be diverted to a different telephonenumber either internal or external. You can enter the destination telephone number and select whether all calls areredirected or only external calls. See Follow Me and Forwarding Behaviour . Mobile twinning can also be set in thiswindow. See Mobile Twinning .
· Note: If the settings are updated by another method, for example using another application or through the usersphone, the values shown in the console are not automatically updated if already being displayed. The valuesdisplayed in the console directory are those current when the user/group was selected.
To configure the forwarding options:1. Click the required user in the IP Office SoftConsole directory panel.
2. Click .
3. Click Forwarding. The Forwarding Status window opens.
4. Type the destination telephone numbers in to the appropriate fields. Available numbers can also be selected fromyour directory list.
· Right-click in a number field. The Forward Follow-me Number window opens.
· Select the telephone number required from the listing.
· Click Add.
5. Click OK to save your changes.
Notes· For call appearance users 'Forward On Busy' is only used when all their call appearance buttons are busy.
· Some forwarding options require configuration within the telephone system, for example a user might be barredfrom making outgoing calls. See your system administrator.
· You must enter an internal extension number as the Follow Me destination.
46
45

Using SoftConsole Page 4515-601016 Issue 22a (Thursday, April 5, 2018)IP Office™ Platform 10.1
Comments on this document? [email protected]
Directory: Editing Directory Entry Properties
3.1.3.2 Mobile Twinning
If twinning is enabled in the telephone system, any incoming calls ring the extension number and the external 'twinned'number. For example, a user's extension number rings as well as their mobile telephone. The call can be answered fromeither the extension or mobile telephone. See your system administrator.
Notes1. Mobile Twinning is a licensed feature.
2. If account codes are used, the user can not enter an account code when they answer a call at the externaltelephone.
3. If the feature Do Not Disturb (DND) is selected any callers to the internal extension will hear the busy tone. Theuser's external telephone will not ring. If a caller is entered in to the DND exception list only the internaltelephone rings. As a IP Office SoftConsole operator you can not add numbers to DND exception lists.
4. If any of the forward options are selected, both the external telephone and the extension where the calls areforwarded to will ring.
5. If the option Follow Me is selected, only the extension that the calls are forwarded to will ring. The externaltelephone number will not ring.
· Note: If the settings are updated by another method, for example using another application or through the usersphone, the values shown in the console are not automatically updated if already being displayed. The valuesdisplayed in the console directory are those current when the user/group was selected.
To set mobile twinning:1. Click the required user in the IP Office SoftConsole directory panel.
2. Click . Alternatively, right-click on the entry and select Properties.
3. Click Forwarding. The Forwarding window opens.
4. Select Mobile Twining.
5. In the Mobile Twinning field, enter the telephone number that you want to 'twin' to the user's extension.Telephone numbers must be entered with no spaces.
6. Click OK to save your changes.
Using SoftConsole Page 4615-601016 Issue 22a (Thursday, April 5, 2018)IP Office™ Platform 10.1
Comments on this document? [email protected]
3.1.3.3 Follow Me and Forwarding Behaviour
Calls to an extension can be diverted to a different telephone number either internal or external. You can enter thedestination telephone number and select whether all calls are redirected or only external calls.
The types of forwarding that can be selected are:
· Follow me .
· Forward unconditional .
· Forward on busy .
· Forward on no answer .
Follow MeWhen selected, ALL your calls are forwarded to the entered 'Follow Me' extension number. This is used for temporaryredirection when you are away from your own extension but are available on another extension. You must enter aninternal extension number as the Follow Me destination.
· Calls can be made from your original extension. The only calls that can be received at your original extension arecalls made from the Follow Me destination extension.
· Any Speed Dial associated with your original extension number does not indicate that the calls are being forwardedto another number.
· If the Follow Me destination extension is busy or there is no answer, the call is transferred to your voicemail.
· If you have set an absent message, the text is displayed to callers. If Absent text is active at the destinationextension it will not be displayed as your absent message has priority. See Setting an Absent Message.
If you have forwarding options selected, the Follow Me behaviour can change.
Forwarding OptionsSelected
Follow Me Behaviour
Forward Unconditional Setting is ignored when Follow Me is selected.
Forward on Busy If the Follow Me destination extension is busy, the call is forwarded to your Forward on Busydestination. If there is no answer at the Forward on busy extension then the call is transferredto your voicemail, if available.
Forward on No Answer. If there is no answer at the Follow Me destination extension the Forward on no answer setting isignored and the call is transferred to your voicemail, if available.
Note
· If an option is selected, but there is no destination entered, the option is ignored. For example, Anne Webb (ext206) diverts all her calls to extension 207 using Follow Me. There is an incoming call for Anne.
Scenario Forward on Busy/No Answer optionsselected
No Forward options selected
Extension 207 is busy. Caller is transferred to Anne’s Forward onBusy number specified.
Caller is transferred to Anne’s voicemail.
There is no answer atextension 207.
Caller is transferred to Anne’s voicemail. Caller is transferred to Anne’s voicemail.
46
47
47
47

Using SoftConsole Page 4715-601016 Issue 22a (Thursday, April 5, 2018)IP Office™ Platform 10.1
Comments on this document? [email protected]
Directory: Editing Directory Entry Properties
Forward UnconditionalIf Forward Unconditional is selected and a destination number entered, ALL your calls can be re-directed. The destinationcan be an extension number or if enabled an external number. See your system administrator.
· The Forward Unconditional option is ignored when the Follow Me option is selected.
· If the option Forward Hunt Group Calls is selected it only applies to hunt groups that are configured for sequentialor rotary ringing mode. See your system administrator. It includes internal calls to the hunt group regardless ofthe Forward Internal Calls setting.
· The options 'Forward on Busy' and 'Forward On No Answer' are unavailable.
· You can still make outgoing calls from your extension. The only calls that you can receive when all your calls areforwarded are calls made from the Forward unconditional destination number.
· If you have set an absent message, the text is displayed to callers. If Absent text is active at the destinationextension it will not be displayed as your absent message has priority. See Setting an Absent Message.
ForwardUncondition
al
ForwardHunt
GroupCalls
ForwardInternal
Calls
Call Behaviour
All calls are redirected to the Forward Unconditional destination number.
External calls and hunt group calls received by your extension are redirected tothe Forward Unconditional destination number. Internal calls are presented to yourextension.
External calls are redirected to the Forward Unconditional destination number.Internal calls, including any hunt group calls, are presented to your extension.
Forward on Busy / No AnswerWhen selected your calls are redirected to the number entered in the forward on Busy/No Answer field. The same numberis used for calls forwarded when your extension is busy or not answered.
· If either the Forward on Busy or Forward on No Answer options are selected and no forward number entered, thecalls are forwarded to the number set in the forward unconditional section.
· The first time Forward on No Answer is selected, the option Forward Internal Calls is automatically selected. IfForward Internal Calls and Forward On No Answer are de-selected, the next time Forward On No Answer isselected, the option Forward Internal Calls is not automatically selected.
· If you have set an absent message, the text is displayed to callers when the Forward on No Answer forwardingoption is selected. If Absent text is active at the destination extension it will not be displayed as your absent texthas priority. See Setting an Absent Message.
· If you have set an absent message, the text is displayed to callers when the Forward on Busy forwarding option isselected. If Absent text is active at the destination extension your absent text will not be shown. The destinationextension's absent text has priority. See Setting an Absent Message.
Forwardon Busy
Forwardon No
Answer
ForwardInternal
Calls
Call Behaviour
External calls are forwarded to the specified number when your extension is busy.Internal calls are transferred to your voicemail, if available.
All calls (internal and external) are forwarded to the specified number when yourextension is busy.
External calls are forwarded to the specified number when your extension is notanswered. Internal calls are transferred to your voicemail, if available.
All calls (internal and external) are forwarded to the specified number when yourextension is not answered.
External calls are forwarded to the specified number when your extension is notanswered or your extension is busy. Internal calls are transferred to your voicemail, ifavailable.
All calls (internal and external) are forwarded to the specified number when yourextension is not answered or is busy.

Using SoftConsole Page 4815-601016 Issue 22a (Thursday, April 5, 2018)IP Office™ Platform 10.1
Comments on this document? [email protected]
3.2 The Local DirectoryYou can setup directory names and numbers. These can then be shown in the directory panel as the console's localdirectory. The directory numbers can be used to make outgoing calls. They can also be used to provide a name matchagainst the calling number on incoming calls.
You can also associate a specific script to display and/or media file to be played when the console receives a call from amatching number.
To view the local directory:
1. Click Preferences and select the Incoming Calls tab. Alternatively, select Tools | Preferences-Configure| Incoming Calls.
2. The current console directory entries are listed. Select the action to perform using the available buttons:
· New Add a new directory entry. See Configuring Directory Lists .
· Edit Edit the selected entry. See Configuring Directory Lists .
· Delete Delete the selected entry.
· Open Directory File Change the file being used for storing the console's local directory entries. The entries in the selected file arethen listed and used.
· Default Call Handling You can set a default script and/or default sound file. These are used when the incoming call does not match aspecific number which has its own script or sound file defined.
· Script File The script can be a.TXT or .RTF file. The script is displayed in the directory panel when an incoming call isreceived and answered.
· Media File The file is a .WAV file. The sound is played by the console PC.
49
49

Using SoftConsole Page 4915-601016 Issue 22a (Thursday, April 5, 2018)IP Office™ Platform 10.1
Comments on this document? [email protected]
Directory: The Local Directory
3.2.1 Adding/Editng Local EntriesFrom the Incoming Calls tab , you can create new entries and edit the properties of existing entries.
To add or edit a local directory entry:
1. Click Preferences and select the Incoming Calls tab. Alternatively, select Tools | Preferences-Configure| Incoming Calls.
· To add a new entry, click Add.
· To edit an existing entry, select the entry and click Edit.
2. The local directory entry properties menu is displayed.
· Name The name that you want associated with the directory entry.
· Number The telephone number that is dialed when the directory entry is selected. This number is also used formatching against incoming calls.
· Script File A script can be associated with the directory entry. When an incoming call matches the directory number, thescript is displayed in the directory panel. The script can be a.TXT or .RTF file.
· Media File A sound file can be associated with the directory entry. When an incoming call matches the directory number,the file is played by the console PC. The file is a .WAV file.
3. Click OK.
48

Using SoftConsole Page 5015-601016 Issue 22a (Thursday, April 5, 2018)IP Office™ Platform 10.1
Comments on this document? [email protected]

Using SoftConsole Page 5115-601016 Issue 22a (Thursday, April 5, 2018)IP Office™ Platform 10.1
Comments on this document? [email protected]
Configuring SoftConsole
Chapter 4.

Using SoftConsole Page 5215-601016 Issue 22a (Thursday, April 5, 2018)IP Office™ Platform 10.1
Comments on this document? [email protected]
4. Configuring SoftConsoleThe console Preferences menus allow you to configure a range of console settings.
· Appearance Change the general appearance of the console. For example, the font used and the colors used to indicate callstatus.
· BLF Groups BLF Groups can be created, edited and deleted. The order that the groups are shown can also be rearranged.
· Conferencing Enter the names of the Conference rooms.
· Directories Specify what directory information can be included in the directory display and what information can be included inthe properties of individual entries.
· Door Release Enter a door name for the option to become active.
· Incoming Calls You can provide a name match against an incoming calls. A specific script or media file can be played on callsfrom a matching number.
· Keyboard Actions You can customize the default actions performed by the console when you start typing text or a number.
· Keyboard Mapping You can see and change the keyboard short cuts used for different console functions.
· Park Slots Specify the park slot buttons that are available and what park slot IDs are associated with those buttons.
· Queue Mode Configure and monitor up to eight hunt group queues.
· SoftConsole Configure how the console saves any changes that you make to the screen layout and behaviour when minimizedor closed.
· Instant Messaging Configure whether the console supports instant messaging and set the address details of the messaging server.
53
54
56
57
58
48
59
60
61
63
65
66
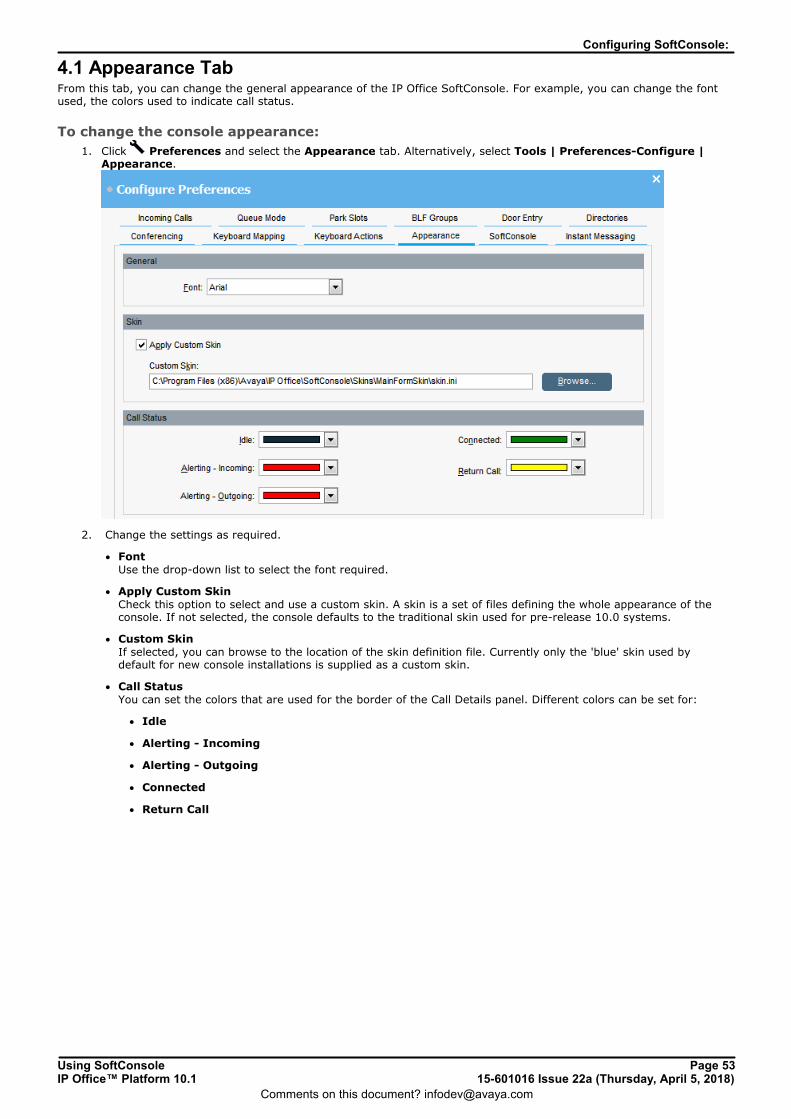
Using SoftConsole Page 5315-601016 Issue 22a (Thursday, April 5, 2018)IP Office™ Platform 10.1
Comments on this document? [email protected]
Configuring SoftConsole:
4.1 Appearance TabFrom this tab, you can change the general appearance of the IP Office SoftConsole. For example, you can change the fontused, the colors used to indicate call status.
To change the console appearance:
1. Click Preferences and select the Appearance tab. Alternatively, select Tools | Preferences-Configure |Appearance.
2. Change the settings as required.
· Font Use the drop-down list to select the font required.
· Apply Custom Skin Check this option to select and use a custom skin. A skin is a set of files defining the whole appearance of theconsole. If not selected, the console defaults to the traditional skin used for pre-release 10.0 systems.
· Custom Skin If selected, you can browse to the location of the skin definition file. Currently only the 'blue' skin used bydefault for new console installations is supplied as a custom skin.
· Call Status You can set the colors that are used for the border of the Call Details panel. Different colors can be set for:
· Idle
· Alerting - Incoming
· Alerting - Outgoing
· Connected
· Return Call
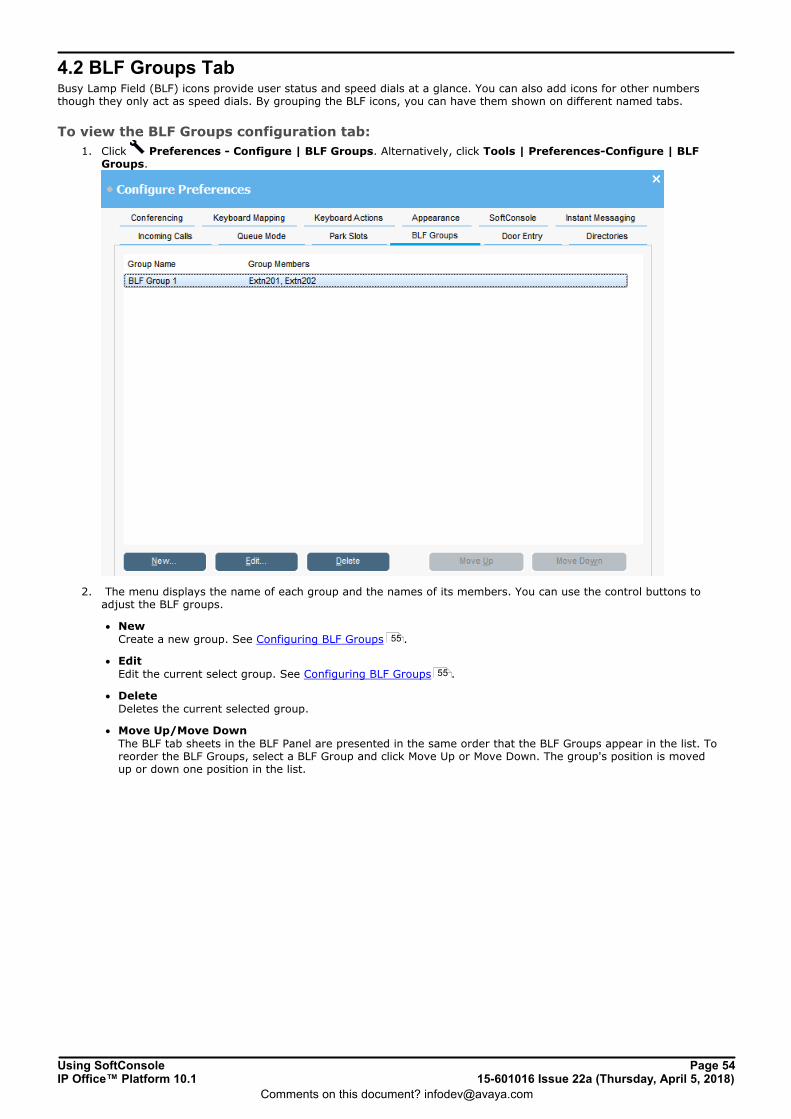
Using SoftConsole Page 5415-601016 Issue 22a (Thursday, April 5, 2018)IP Office™ Platform 10.1
Comments on this document? [email protected]
4.2 BLF Groups TabBusy Lamp Field (BLF) icons provide user status and speed dials at a glance. You can also add icons for other numbersthough they only act as speed dials. By grouping the BLF icons, you can have them shown on different named tabs.
To view the BLF Groups configuration tab:
1. Click Preferences - Configure | BLF Groups. Alternatively, click Tools | Preferences-Configure | BLFGroups.
2. The menu displays the name of each group and the names of its members. You can use the control buttons toadjust the BLF groups.
· New Create a new group. See Configuring BLF Groups .
· Edit Edit the current select group. See Configuring BLF Groups .
· Delete Deletes the current selected group.
· Move Up/Move Down The BLF tab sheets in the BLF Panel are presented in the same order that the BLF Groups appear in the list. Toreorder the BLF Groups, select a BLF Group and click Move Up or Move Down. The group's position is movedup or down one position in the list.
55
55

Using SoftConsole Page 5515-601016 Issue 22a (Thursday, April 5, 2018)IP Office™ Platform 10.1
Comments on this document? [email protected]
Configuring SoftConsole: BLF Groups Tab
4.2.1 Configuring BLF GroupsYou can group BLF icons so that similar icons are grouped together. For example, the regular extension numbers that youuse for the sales team are grouped together.
To create a new BLF Group:
1. Click Preferences - Configure | BLF Groups | New. Alternatively, click Tools | Preferences-Configure |BLF Groups | New.
2. Enter a unique BLF Group Name.
3. Select the required member from the 'Members not in BLF Group' list, and then click Add.
4. The details show in the 'BLF Group Members' list on the right side of the dialog box. To add more than onemember at a time, hold down the Ctrl key and click each member. When all members are selected, click the Addbutton.
5. Click OK when all members for a group are added. You are returned to the BLF Groups configuration form. Thenew BLF Group is added to the end of the list.
To open a new BLF group window from the main screen:1. Right-click in a blank area of the BLF Panel to display a pop-up menu.
2. Click New | BLF Group. The New BLF Group window opens.
To edit a BLF Group:
1. Click Preferences - Configure | BLF Groups. Alternatively, click Tools | Preferences-Configure | BLFGroups.
2. Select the BLF group you want to change.
3. Click Edit.
4. Add or remove group members.
5. Click OK to save the changes.
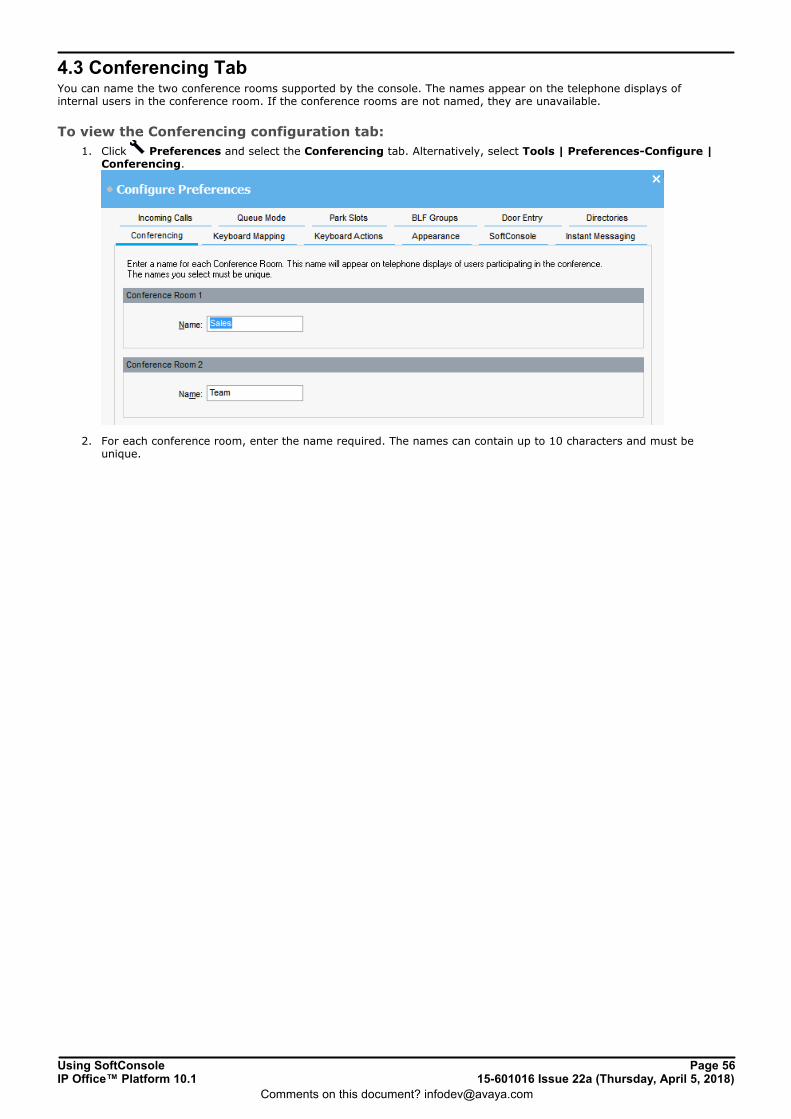
Using SoftConsole Page 5615-601016 Issue 22a (Thursday, April 5, 2018)IP Office™ Platform 10.1
Comments on this document? [email protected]
4.3 Conferencing TabYou can name the two conference rooms supported by the console. The names appear on the telephone displays ofinternal users in the conference room. If the conference rooms are not named, they are unavailable.
To view the Conferencing configuration tab:
1. Click Preferences and select the Conferencing tab. Alternatively, select Tools | Preferences-Configure |Conferencing.
2. For each conference room, enter the name required. The names can contain up to 10 characters and must beunique.

Using SoftConsole Page 5715-601016 Issue 22a (Thursday, April 5, 2018)IP Office™ Platform 10.1
Comments on this document? [email protected]
Configuring SoftConsole: Conferencing Tab
4.4 Directories TabYou can specify the directory information that is included in the directory display . You can also specify the informationthat is included in the properties of individual entries.
To view the Directories configuration tab:
1. Click Preferences and select the Directories tab. Alternatively, select Tools | Preferences-Configure |Directories.
2. Directory Access Section
When is pressed in the directory, it shows directory numbers other than users and groups. The DirectoryAccess options specify from where those other directory numbers are obtained.
· SoftConsole Local Directory These are directory numbers and associated names stored by the IP Office SoftConsole. See Incoming CallsTab .
· IP Directory These are directory numbers and associated names stored on the telephone system and shared by all users.
· Microsoft Outlook Contacts Folder This options allows address book entries from Outlook running on the same PC to be included in the directory.Note that this feature requires Outlook to be running with Administrator privileges.
3. Display Fields for Search Results Section When a directory search matches an individual directory entry, the directory panel display a range of informationabout entry. The Display Fields for Search Results options specify which information fields are shown.
38
48
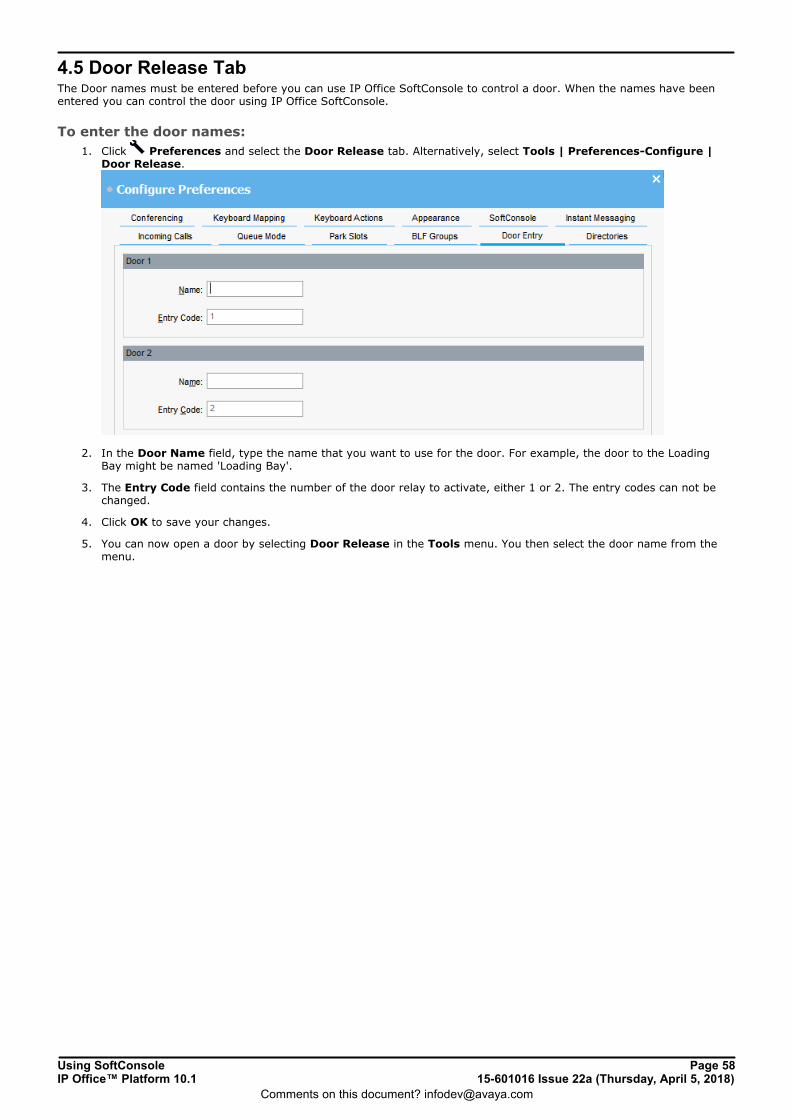
Using SoftConsole Page 5815-601016 Issue 22a (Thursday, April 5, 2018)IP Office™ Platform 10.1
Comments on this document? [email protected]
4.5 Door Release TabThe Door names must be entered before you can use IP Office SoftConsole to control a door. When the names have beenentered you can control the door using IP Office SoftConsole.
To enter the door names:
1. Click Preferences and select the Door Release tab. Alternatively, select Tools | Preferences-Configure |Door Release.
2. In the Door Name field, type the name that you want to use for the door. For example, the door to the LoadingBay might be named 'Loading Bay'.
3. The Entry Code field contains the number of the door relay to activate, either 1 or 2. The entry codes can not bechanged.
4. Click OK to save your changes.
5. You can now open a door by selecting Door Release in the Tools menu. You then select the door name from themenu.
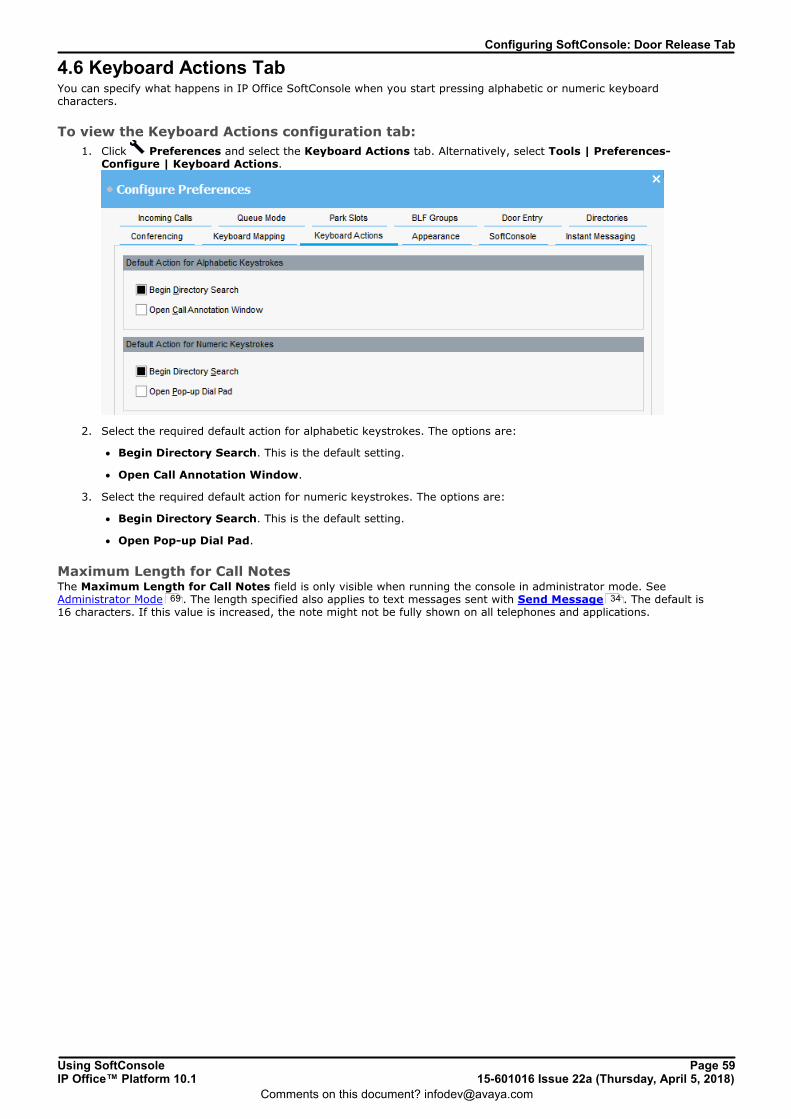
Using SoftConsole Page 5915-601016 Issue 22a (Thursday, April 5, 2018)IP Office™ Platform 10.1
Comments on this document? [email protected]
Configuring SoftConsole: Door Release Tab
4.6 Keyboard Actions TabYou can specify what happens in IP Office SoftConsole when you start pressing alphabetic or numeric keyboardcharacters.
To view the Keyboard Actions configuration tab:
1. Click Preferences and select the Keyboard Actions tab. Alternatively, select Tools | Preferences-Configure | Keyboard Actions.
2. Select the required default action for alphabetic keystrokes. The options are:
· Begin Directory Search. This is the default setting.
· Open Call Annotation Window.
3. Select the required default action for numeric keystrokes. The options are:
· Begin Directory Search. This is the default setting.
· Open Pop-up Dial Pad.
Maximum Length for Call NotesThe Maximum Length for Call Notes field is only visible when running the console in administrator mode. SeeAdministrator Mode . The length specified also applies to text messages sent with Send Message . The default is16 characters. If this value is increased, the note might not be fully shown on all telephones and applications.
69 34
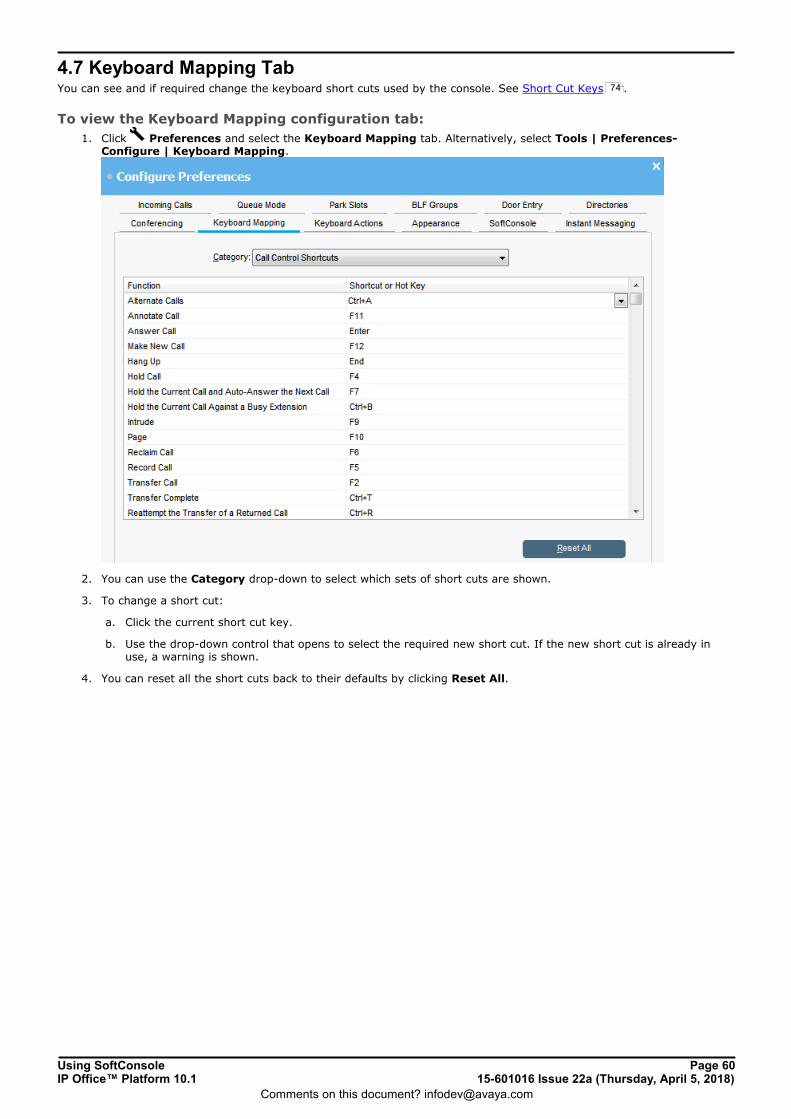
Using SoftConsole Page 6015-601016 Issue 22a (Thursday, April 5, 2018)IP Office™ Platform 10.1
Comments on this document? [email protected]
4.7 Keyboard Mapping TabYou can see and if required change the keyboard short cuts used by the console. See Short Cut Keys .
To view the Keyboard Mapping configuration tab:
1. Click Preferences and select the Keyboard Mapping tab. Alternatively, select Tools | Preferences-Configure | Keyboard Mapping.
2. You can use the Category drop-down to select which sets of short cuts are shown.
3. To change a short cut:
a. Click the current short cut key.
b. Use the drop-down control that opens to select the required new short cut. If the new short cut is already inuse, a warning is shown.
4. You can reset all the short cuts back to their defaults by clicking Reset All.
74
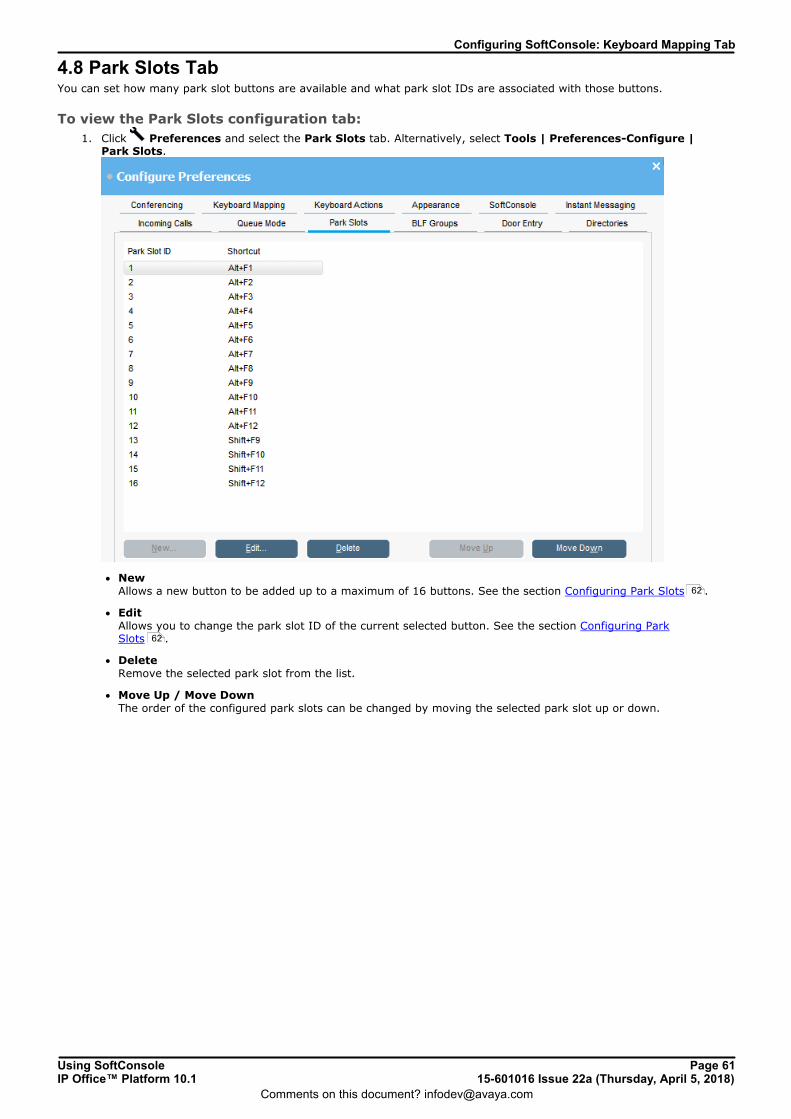
Using SoftConsole Page 6115-601016 Issue 22a (Thursday, April 5, 2018)IP Office™ Platform 10.1
Comments on this document? [email protected]
Configuring SoftConsole: Keyboard Mapping Tab
4.8 Park Slots TabYou can set how many park slot buttons are available and what park slot IDs are associated with those buttons.
To view the Park Slots configuration tab:
1. Click Preferences and select the Park Slots tab. Alternatively, select Tools | Preferences-Configure |Park Slots.
· New Allows a new button to be added up to a maximum of 16 buttons. See the section Configuring Park Slots .
· Edit Allows you to change the park slot ID of the current selected button. See the section Configuring ParkSlots .
· Delete Remove the selected park slot from the list.
· Move Up / Move Down The order of the configured park slots can be changed by moving the selected park slot up or down.
62
62
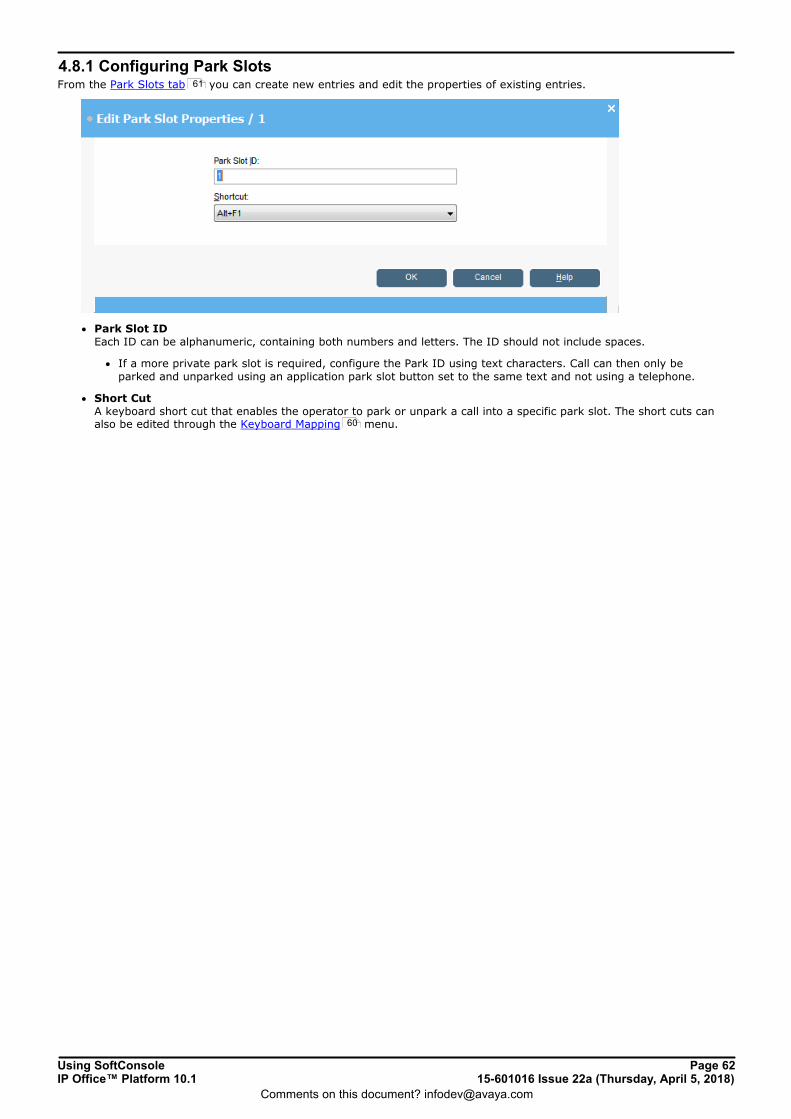
Using SoftConsole Page 6215-601016 Issue 22a (Thursday, April 5, 2018)IP Office™ Platform 10.1
Comments on this document? [email protected]
4.8.1 Configuring Park SlotsFrom the Park Slots tab you can create new entries and edit the properties of existing entries.
· Park Slot ID Each ID can be alphanumeric, containing both numbers and letters. The ID should not include spaces.
· If a more private park slot is required, configure the Park ID using text characters. Call can then only beparked and unparked using an application park slot button set to the same text and not using a telephone.
· Short Cut A keyboard short cut that enables the operator to park or unpark a call into a specific park slot. The short cuts canalso be edited through the Keyboard Mapping menu.
61
60
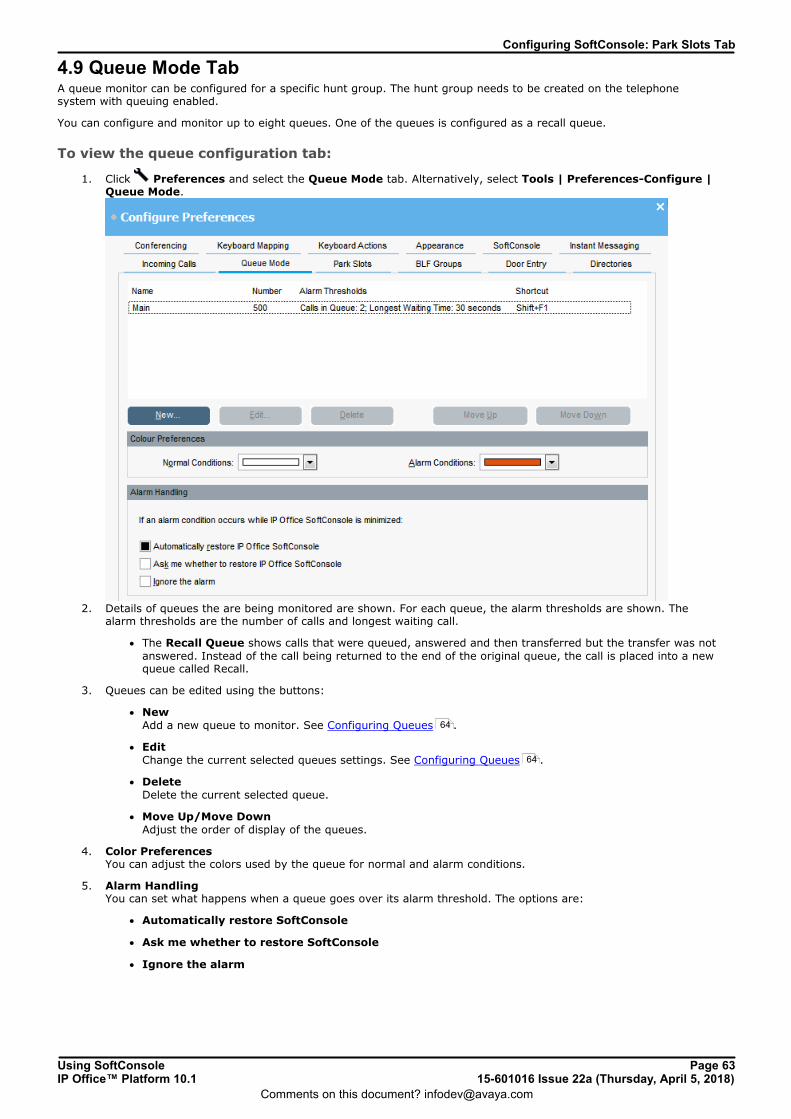
Using SoftConsole Page 6315-601016 Issue 22a (Thursday, April 5, 2018)IP Office™ Platform 10.1
Comments on this document? [email protected]
Configuring SoftConsole: Park Slots Tab
4.9 Queue Mode TabA queue monitor can be configured for a specific hunt group. The hunt group needs to be created on the telephonesystem with queuing enabled.
You can configure and monitor up to eight queues. One of the queues is configured as a recall queue.
To view the queue configuration tab:
1. Click Preferences and select the Queue Mode tab. Alternatively, select Tools | Preferences-Configure |Queue Mode.
2. Details of queues the are being monitored are shown. For each queue, the alarm thresholds are shown. Thealarm thresholds are the number of calls and longest waiting call.
· The Recall Queue shows calls that were queued, answered and then transferred but the transfer was notanswered. Instead of the call being returned to the end of the original queue, the call is placed into a newqueue called Recall.
3. Queues can be edited using the buttons:
· New Add a new queue to monitor. See Configuring Queues .
· Edit Change the current selected queues settings. See Configuring Queues .
· Delete Delete the current selected queue.
· Move Up/Move Down Adjust the order of display of the queues.
4. Color Preferences You can adjust the colors used by the queue for normal and alarm conditions.
5. Alarm Handling You can set what happens when a queue goes over its alarm threshold. The options are:
· Automatically restore SoftConsole
· Ask me whether to restore SoftConsole
· Ignore the alarm
64
64

Using SoftConsole Page 6415-601016 Issue 22a (Thursday, April 5, 2018)IP Office™ Platform 10.1
Comments on this document? [email protected]
4.9.1 Configuring QueuesWhen you select Edit or Create from the Queue Mode tab the Queue Properties screen opens. If you have selected anexisting queue, the details of the queue are entered in the form.
The fields show the queue details. Details that are amended are applied to the selected queue.
· Queue Name A list of available queues. Select the queue required.
· Shortcut Select the shortcut key combination required for the new queue.
· Alarm Settings
· Number of Calls in Queue This option can be turned on or off. This alarm occurs when the number of calls within a queue reaches thenumber specified in the calls box.
· Calls The number of calls within a queue before an alarm occurs.
· Longest Waiting Time This option can be turned on or off. If on an alarm occurs when the call wait time reaches the time specified inthe seconds box.
· Seconds The number of seconds a call waits within the queue before an alarm occurs.
· Play Media File When an alarm state is reached a specific sound can occur as an alarm. If a media file is to be associated withan alarm, click Browse for Media File and locate the file.
63

Using SoftConsole Page 6515-601016 Issue 22a (Thursday, April 5, 2018)IP Office™ Platform 10.1
Comments on this document? [email protected]
Configuring SoftConsole: Queue Mode Tab
4.10 SoftConsole TabYou can set how IP Office SoftConsole saves any changes that you make to the screen layout and behavior whenminimized or closed.
To view the console configuration tab:
1. Click Preferences and select the SoftConsole tab. Alternatively, select Tools | Preferences-Configure |SoftConsole.
2. Select the general options required:
· Pop SoftConsole If selected, when an incoming call is received, the console is brought to the front of any other applicationsthat are running.
· Hide on Close This option minimizes the console to the system tray in the Windows Taskbar when you close the application
rather than exiting the application. You can still close the console by clicking on the icon in the system trayand selecting Exit.
3. Select the save mode required for profile changes :
· Automatically Save Changes to My Profile In this mode, when you close the console, any profile changes are automatically saved to the current profile.
· Prompt me to Save Changes to My Profile In this mode, when you close the console, it prompts you whether to save or abandon any changes.
68

Using SoftConsole Page 6615-601016 Issue 22a (Thursday, April 5, 2018)IP Office™ Platform 10.1
Comments on this document? [email protected]
4.11 Instant MessagingYou can use the console to send instant messages to other users, see Instant Messaging . In order to do that, theconsole uses the one-X Portal for IP Office server if available.
To configure instant messaging:
1. Click Preferences and select the Instant Messaging tab. Alternatively, select Tools | Preferences-Configure | Instant Messaging.
· Enable Instant Messaging Select this option to enable console instant messaging. Until enabled IM Disconnected is displayed in theconsole's status bar.
2. Click OK.
35

Using SoftConsole Page 6715-601016 Issue 22a (Thursday, April 5, 2018)IP Office™ Platform 10.1
Comments on this document? [email protected]
Templates/Profiles
Chapter 5.
Using SoftConsole Page 6815-601016 Issue 22a (Thursday, April 5, 2018)IP Office™ Platform 10.1
Comments on this document? [email protected]
5. Templates/ProfilesWhen you first login, you select one of the default console templates. Whilst using the console, you can change varioussettings and also change the appearance of the screen. You can save those changes as a personal profile.
The current profile or template that you are using is shown in the console's status bar .
· If you want to change if the Held Calls and BLF panels to be hidden or shown, you need to be logged in to theconsole as the Administrator. See Administrator Mode .
To load a profile:1. When logging in , click Expand and select the profile required.
To manually save your current profile changes:1. Click File and select Save Profile.
To save your current changes as a new profile:1. Click File and select Save Profile As.
2. Enter a new file name.
3. Click OK. The new profile is saved and the console status bar shows the new profile name.
To automatically save profile changes: When exiting the console, it will normally prompt you whether to save you profile changes. You can configure the consoleto automatically save the changes every time.
1. Click Preferences - Configure | Soft Console. Alternatively, click Tools | Preferences-Configure | SoftConsole.
2. In the Save Options section, select Automatically Save Changes to My Profile.
3. Click OK.
17
69
10

Using SoftConsole Page 6915-601016 Issue 22a (Thursday, April 5, 2018)IP Office™ Platform 10.1
Comments on this document? [email protected]
Templates/Profiles:
5.1 Administrator ModeIP Office SoftConsole can be started in Administrator mode. When run in this mode, there is no access to the telephonyfunctions. In administrative mode you can:
· Create and edit user profiles.
· Amend the length of the call notes. See Keyboard Actions Tab .
· Create and edit templates.
· Remove or display the BLF, Held Calls and Park Slots panels.
To start the console in Administrator Mode:1. At the login screen enter Administrator and the administrator password.
2. IP Office SoftConsole starts in Administrator Mode. The status bar indicates that you are in Administrator modeand not connected to the telephone system.
To change the Administrator password:1. Start the console in Administrator mode as above.
2. Click File | Change Administrator Password. The Change Administrator Password screen opens.
3. Enter the old password. The password shows as asterisks.
4. Enter the new password. Make a note of the new password being careful regarding capitalization as the passwordis case sensitive. The new password shows as asterisks.
5. Enter the new password again to confirm.
6. Click OK.
59
Using SoftConsole Page 7015-601016 Issue 22a (Thursday, April 5, 2018)IP Office™ Platform 10.1
Comments on this document? [email protected]
5.2 Editing a ProfileYou can only edit a user's profile if you are in administrator mode.
To change a user's profile:1. During login, select the profile you want to edit.
2. Login as the administrator .
3. Make changes as required. In administrator mode, the View menu options for Busy Lamp Fields, HeldCalls and Park Slots are available to hide or show those panels in addition to the normal view options.
4. Click File | Save Profile to save the profile.
5.3 Using TemplatesYou can use templates to create a user's profile. There are three default templates installed. Templates can only becreated and edited if you are logged in in administrative mode .
To create a new template:1. Log in as an administrator. Make sure that you have loaded a template to base your new template on.
2. When you log in, click Expand. Select the required default profile: AdminTemplate1, AdminTemplate2 orAdminTemplate3.
3. Change the layout as required. The areas that can be changed are:
· The display size of the panels.
· The number of park slots.
· The panels that are visible.
4. Click File | Save Template to save the new template
5. Enter a name for the template and click OK.
69
17
71
69

Using SoftConsole Page 7115-601016 Issue 22a (Thursday, April 5, 2018)IP Office™ Platform 10.1
Comments on this document? [email protected]
Templates/Profiles: Using Templates
5.4 Default TemplatesThere are 3 default templates installed with the console:
AdminTemplate1 AdminTemplate2 AdminTemplate3
Menu bar
Tool bar
Call Details
Directory panel
Queue panel
Held calls panel –
BLF panel – –
Park slots panel –
If a profile is created using Admin Template 3 the user cannot see the Call History .13

Using SoftConsole Page 7215-601016 Issue 22a (Thursday, April 5, 2018)IP Office™ Platform 10.1
Comments on this document? [email protected]

Using SoftConsole Page 7315-601016 Issue 22a (Thursday, April 5, 2018)IP Office™ Platform 10.1
Comments on this document? [email protected]
Appendix
Chapter 6.
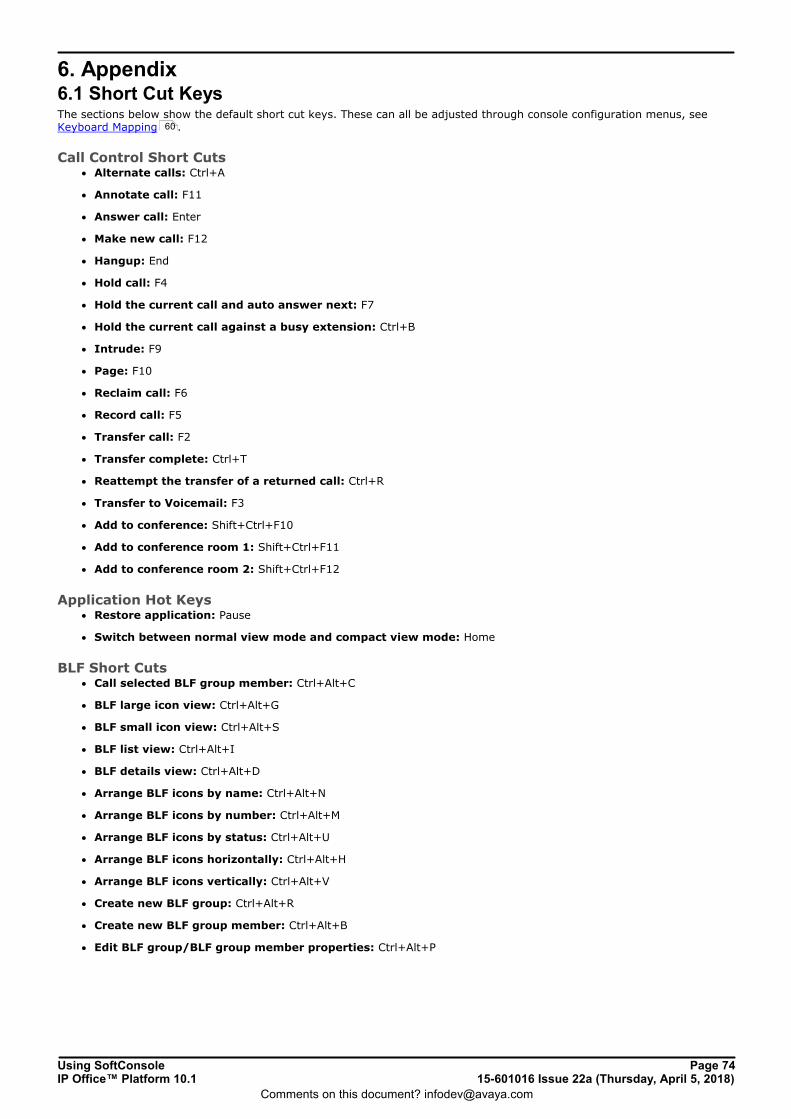
Using SoftConsole Page 7415-601016 Issue 22a (Thursday, April 5, 2018)IP Office™ Platform 10.1
Comments on this document? [email protected]
6. Appendix6.1 Short Cut KeysThe sections below show the default short cut keys. These can all be adjusted through console configuration menus, seeKeyboard Mapping .
Call Control Short Cuts· Alternate calls: Ctrl+A
· Annotate call: F11
· Answer call: Enter
· Make new call: F12
· Hangup: End
· Hold call: F4
· Hold the current call and auto answer next: F7
· Hold the current call against a busy extension: Ctrl+B
· Intrude: F9
· Page: F10
· Reclaim call: F6
· Record call: F5
· Transfer call: F2
· Transfer complete: Ctrl+T
· Reattempt the transfer of a returned call: Ctrl+R
· Transfer to Voicemail: F3
· Add to conference: Shift+Ctrl+F10
· Add to conference room 1: Shift+Ctrl+F11
· Add to conference room 2: Shift+Ctrl+F12
Application Hot Keys· Restore application: Pause
· Switch between normal view mode and compact view mode: Home
BLF Short Cuts· Call selected BLF group member: Ctrl+Alt+C
· BLF large icon view: Ctrl+Alt+G
· BLF small icon view: Ctrl+Alt+S
· BLF list view: Ctrl+Alt+I
· BLF details view: Ctrl+Alt+D
· Arrange BLF icons by name: Ctrl+Alt+N
· Arrange BLF icons by number: Ctrl+Alt+M
· Arrange BLF icons by status: Ctrl+Alt+U
· Arrange BLF icons horizontally: Ctrl+Alt+H
· Arrange BLF icons vertically: Ctrl+Alt+V
· Create new BLF group: Ctrl+Alt+R
· Create new BLF group member: Ctrl+Alt+B
· Edit BLF group/BLF group member properties: Ctrl+Alt+P
60
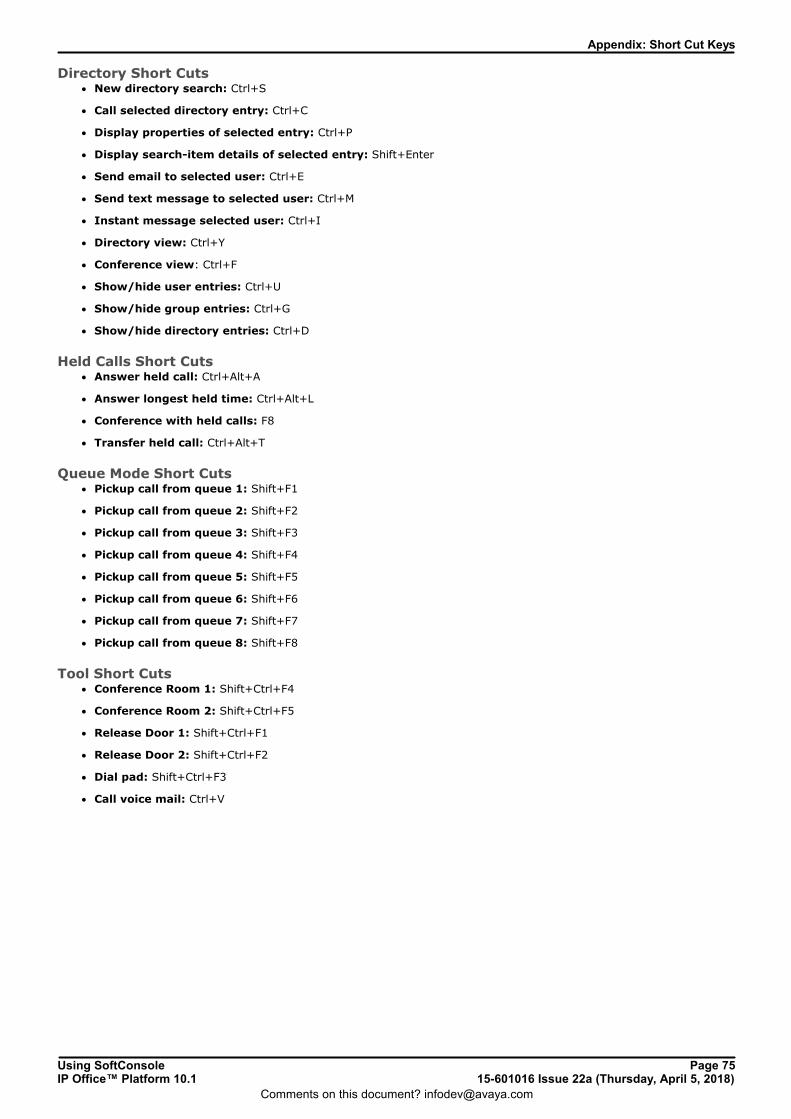
Using SoftConsole Page 7515-601016 Issue 22a (Thursday, April 5, 2018)IP Office™ Platform 10.1
Comments on this document? [email protected]
Appendix: Short Cut Keys
Directory Short Cuts· New directory search: Ctrl+S
· Call selected directory entry: Ctrl+C
· Display properties of selected entry: Ctrl+P
· Display search-item details of selected entry: Shift+Enter
· Send email to selected user: Ctrl+E
· Send text message to selected user: Ctrl+M
· Instant message selected user: Ctrl+I
· Directory view: Ctrl+Y
· Conference view: Ctrl+F
· Show/hide user entries: Ctrl+U
· Show/hide group entries: Ctrl+G
· Show/hide directory entries: Ctrl+D
Held Calls Short Cuts· Answer held call: Ctrl+Alt+A
· Answer longest held time: Ctrl+Alt+L
· Conference with held calls: F8
· Transfer held call: Ctrl+Alt+T
Queue Mode Short Cuts· Pickup call from queue 1: Shift+F1
· Pickup call from queue 2: Shift+F2
· Pickup call from queue 3: Shift+F3
· Pickup call from queue 4: Shift+F4
· Pickup call from queue 5: Shift+F5
· Pickup call from queue 6: Shift+F6
· Pickup call from queue 7: Shift+F7
· Pickup call from queue 8: Shift+F8
Tool Short Cuts· Conference Room 1: Shift+Ctrl+F4
· Conference Room 2: Shift+Ctrl+F5
· Release Door 1: Shift+Ctrl+F1
· Release Door 2: Shift+Ctrl+F2
· Dial pad: Shift+Ctrl+F3
· Call voice mail: Ctrl+V

Using SoftConsole Page 7615-601016 Issue 22a (Thursday, April 5, 2018)IP Office™ Platform 10.1
Comments on this document? [email protected]
Park Slot Short Cuts· Park/unpark call in park slot 1: Alt+F1
· Park/unpark call in park slot 2: Alt+F2
· Park/unpark call in park slot 3: Alt+F3
· Park/unpark call in park slot 4: Alt+F4
· Park/unpark call in park slot 5: Alt+F5
· Park/unpark call in park slot 6: Alt+F6
· Park/unpark call in park slot 7: Alt+F7
· Park/unpark call in park slot 8: Alt+F8
· Park/unpark call in park slot 9: Alt+F9
· Park/unpark call in park slot 10: Alt+F10
· Park/unpark call in park slot 11: Alt+F11
· Park/unpark call in park slot 12: Alt+F12
· Park/unpark call in park slot 13: Shift+F9
· Park/unpark call in park slot 14: Shift+F10
· Park/unpark call in park slot 15: Shift+F11
· Park/unpark call in park slot 16: Shift+F12
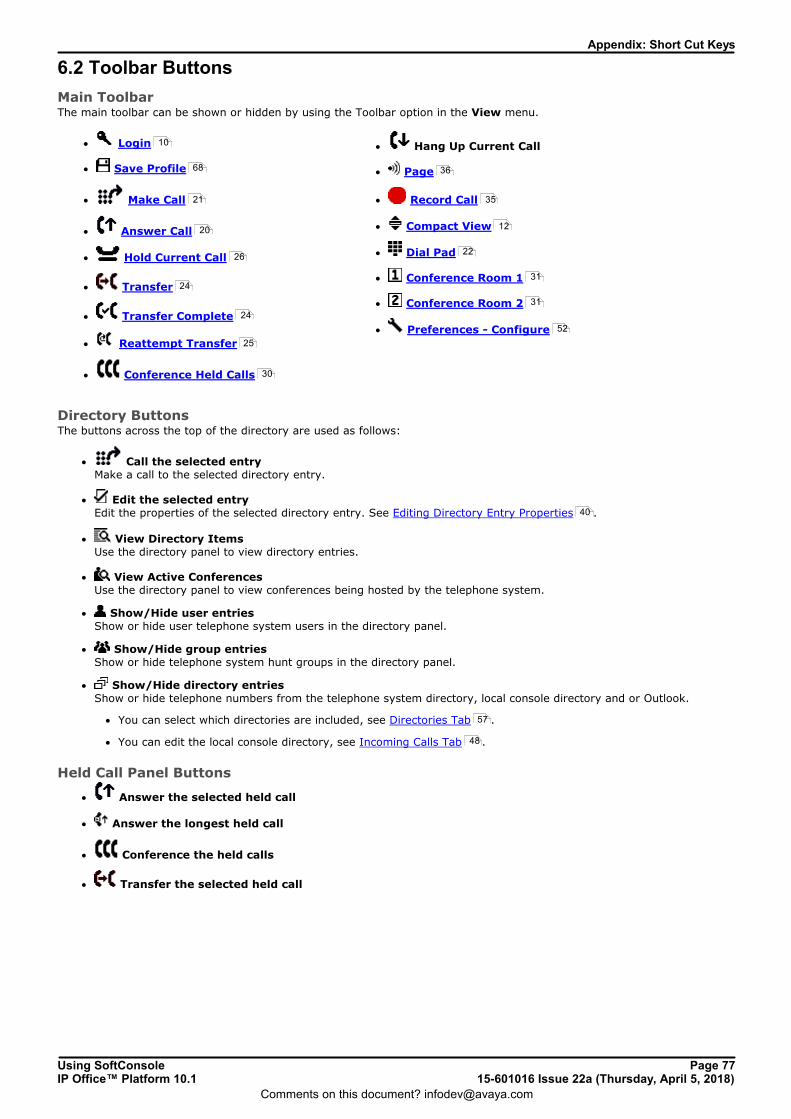
Using SoftConsole Page 7715-601016 Issue 22a (Thursday, April 5, 2018)IP Office™ Platform 10.1
Comments on this document? [email protected]
Appendix: Short Cut Keys
6.2 Toolbar Buttons
Main ToolbarThe main toolbar can be shown or hidden by using the Toolbar option in the View menu.
· Login
· Save Profile
· Make Call
· Answer Call
· Hold Current Call
· Transfer
· Transfer Complete
· Reattempt Transfer
· Conference Held Calls
· Hang Up Current Call
· Page
· Record Call
· Compact View
· Dial Pad
· Conference Room 1
· Conference Room 2
· Preferences - Configure
Directory ButtonsThe buttons across the top of the directory are used as follows:
· Call the selected entry Make a call to the selected directory entry.
· Edit the selected entry Edit the properties of the selected directory entry. See Editing Directory Entry Properties .
· View Directory Items Use the directory panel to view directory entries.
· View Active Conferences Use the directory panel to view conferences being hosted by the telephone system.
· Show/Hide user entries Show or hide user telephone system users in the directory panel.
· Show/Hide group entries Show or hide telephone system hunt groups in the directory panel.
· Show/Hide directory entries Show or hide telephone numbers from the telephone system directory, local console directory and or Outlook.
· You can select which directories are included, see Directories Tab .
· You can edit the local console directory, see Incoming Calls Tab .
Held Call Panel Buttons
· Answer the selected held call
· Answer the longest held call
· Conference the held calls
· Transfer the selected held call
10
68
21
20
26
24
24
25
30
36
35
12
22
31
31
52
40
57
48
Using SoftConsole Page 7815-601016 Issue 22a (Thursday, April 5, 2018)IP Office™ Platform 10.1
Comments on this document? [email protected]
6.3 Trouble Shooting
Cannot use the 'Force Extension Status' or 'Group Service Status' featuresThere is an interval of several seconds after IP Office SoftConsole has been started that the operator cannot use thesefeatures. During this interval, the Directory Entry Properties and Group Service Status forms will display a Closebutton, rather than the OK and Cancel buttons. Close the form, wait several seconds and then re-open the form to tryagain.
Unanswered Calls are Not Returned to the OperatorContact your system administrator. For calls to be returned to the operator when they are not answered, a TransferReturn Time must be set in the User | Telephony tab in the telephone system's configuration.
Microsoft Outlook Warning Screen opens at LoginIf directory access to Microsoft Outlook contacts folder has been selected in the Directories Tab , a Microsoft Outlookwarning screen might appear when an operator is opening IP Office SoftConsole or using the option 'Send Email'. If thewarning screen opens:
1. Select the Allow access for check box, and then click an amount of time in the list.
2. Click Yes. Yes must be selected to allow IP Office SoftConsole to retrieve Outlook contacts. For more information,refer to the Microsoft Support web site.
Directory Does Not Show Outlook ContactsThis feature requires Outlook to be running with Administrator privileges. Contact your PC support if necessary.
How Do I Delete a Profile?Profiles can be removed if they are no longer required.
To delete a profile:1. Click File | Save Profile as.
2. Select the profile to be deleted.
3. Press Delete button.
4. When all profiles to be deleted have been removed, click Cancel to return to the Main screen.
Cannot Restore Login Menu After Pressing Ctrl+D
If the console login menu is minimised using the Windows Ctrl+D shortcut, it cannot be restored. The only option is tostop the application using Task Manager and then restart the login process.
57

Using SoftConsole Page 7915-601016 Issue 22a (Thursday, April 5, 2018)IP Office™ Platform 10.1
Comments on this document? [email protected]
Document History
Chapter 7.

Using SoftConsole Page 8015-601016 Issue 22a (Thursday, April 5, 2018)IP Office™ Platform 10.1
Comments on this document? [email protected]
7. Document HistoryDate Issue Change Summary
4th April 2018 21a Conversion to new authoring tool.
Using SoftConsole Page 8115-601016 Issue 22a (Thursday, April 5, 2018)IP Office™ Platform 10.1
Comments on this document? [email protected]
Index
IndexAAdministrator Mode 69Alarms
Queue 64
All Directory Entry Forms 40
Annotate 33
Answer 20Appearance 53
Apply skin 53
BBLF
Group 54BLF Panel 14
Buttons 77
CCall
Annotate 33Answer 20
Bar outgoing calls 43
Follow me 44, 46Forward 44, 46
Hold 26
Intrude 33
Make 21
Make a call 13Mobile twinning 45
Page 36
Park 27Pop console 65
Reclaim 27
Record 35
Subject 33
Tag 33Transfer 24
Transfer to voicemail 24
Call Details Panel 16Call history 13
Call status
Colors 53
Call waiting 10
Color Call status 53
Queue 63
Compact view 12Conference
Add caller 30
Conference rooms 31
Held calls 30
Room name 56Conference Calls 29
Conferences
Viewing 30Configuration
Incoming calls 48
Configure
Instant messaging 66
Keyboad mapping 60Park slots 61
Queue mode 63, 64
SoftConsole 65Configuring
Door Release 58
Console
Directory 48, 57
Console directory
Add 49Edit 49
DDial pad 22, 59
Directory
Add a local entry 49Console 48, 57
Edit a local entry 49
Outlook 57System 57
User properties 43, 44, 45, 46
Do not disturb 43
Door Release 33
Configuring 58
EEdit
Profile 70
Template 70
Edit BLF Groups 55Email 36
FFile
Media 48
Media file 49, 64Script 48
Script file 49
Follow Me 44, 46Font 53
Forward 44, 46
GGetting
Started 9Group
Add group 64
BLF 54
Configure 63
Forward group calls 44Page 36
Queue 28
Queue answer 28User status 43
Group Service Status 42
HHide on close 65
Hold and answer next 26, 77
Call 26
Conference held calls 30
Hunt group
Add group 64Configure 63
Forward group calls 44
Page 36Queue 28
Queue answer 28
User status 43
IIncoming call
Pop console 65
Incoming calls 13
Instant message 35
Instant messaging 66

Using SoftConsole Page 8215-601016 Issue 22a (Thursday, April 5, 2018)IP Office™ Platform 10.1
Comments on this document? [email protected]
Internal calls
Forward 44
Interrupt 33Intrude 33
KKeyboard
Actions 59
Mapping 60, 74Short cuts 74
LLocal directory
Add 49
Edit 49Login 10
Longest held call 26, 77
MMake a call
Call details 13Make call 21
Media file 48, 64
Local directory entry 49Message 35
Text 34
Messaging 66
Minimize
Hide on close 65Pop console 65
Minimized
Automatically restore 63Missed calls 13
Mobile Twinning 45
Monitor
Queue 28
NNew BLF Group Member Form 15
Normal view 11
OOff-hook station 10
Outgoing calls 13Bar outgoing calls 43
Outlook
Directory 57
PPage 36Park 27
Slot configuration 61
Park Slots 62
Parked Calls 27
Password 10Administrator 69
Pop console 65
Profile 68Edit 70
Save automatically 65
Select 10
QQueue
Answer 28
Monitor 28
Queue Mode
Add group 64
Alarms 64Configure 63
RReattempt transfer 25
Reclaim call 27Record call 35
Relay 33
Retrieve 27
Return call 13
Room 31Name 56
RTF File 49
SScript file 48
Local directory entry 49Search
Begin 59
Search results 57Send Email 36
Send Message 34
Short cuts 74
Skin 53
Started Getting 9
Status Bar 17
Subject 33Supervised transfer 24
System
Directory 57
TTag 33Template
Default 71
Edit 70
Show templates 10
Text message 34Toolbars 77
Transfer
Held call 26, 77Reattempt 25
Reclaim 27
Supervised 24
To voicemail 24
Unsupervised 24Trouble Shooting 78
Twinning 45
TXT File 49
UUnhold 26, 77Unpark 27
Unsupervised transfer 24
User Bar outgoing calls 43
Do not disturb 43
Email 36
Follow me 44, 46
Forward 44, 46Instant message 35
Mobile twinning 45
User name 10
VView
Compact view 12
Normal view 11
Views Conferences 30

Using SoftConsole Page 8315-601016 Issue 22a (Thursday, April 5, 2018)IP Office™ Platform 10.1
Comments on this document? [email protected]
Index
Voicemail
Transfer to 24
WWAV File 49

Using SoftConsole Page 8415-601016 Issue 22a (Thursday, April 5, 2018)IP Office™ Platform 10.1
Comments on this document? [email protected]

Using SoftConsole Page 8515-601016 Issue 22a (Thursday, April 5, 2018)IP Office™ Platform 10.1
Comments on this document? [email protected]

Using SoftConsole Page 8615-601016 Issue 22a (Thursday, April 5, 2018)IP Office™ Platform 10.1
Comments on this document? [email protected]
© 2018 Avaya Inc. All rights reserved.
Template: 21st February 2018