IP Office - Job Aid Office Paging Guide (3rd Party).pdf · IP Office - Job Aid Attaching 3rd Party...
14
IP Office - Job Aid Attaching 3rd Party Paging Equipment Summary This document gives an overview of attaching 3 rd party paging equipment to the IP Office. It covers attachment of this equipment to either an analog trunk port, an analog extension port or an Avaya 20 Series digital telephone (2030, 2050 or 20CC). Whilst the details in this document should be typical for most 3 rd party paging equipment it does not imply support for all such equipment. Issue 1 (Draft F, 18th November 2002)
-
Upload
trinhkhuong -
Category
Documents
-
view
217 -
download
1
Transcript of IP Office - Job Aid Office Paging Guide (3rd Party).pdf · IP Office - Job Aid Attaching 3rd Party...
IP Office - Job Aid Attaching 3rd Party Paging Equipment
Summary This document gives an overview of attaching 3rd party paging equipment to the IP Office. It covers attachment of this equipment to either an analog trunk port, an analog extension port or an Avaya 20 Series digital telephone (2030, 2050 or 20CC). Whilst the details in this document should be typical for most 3rd party paging equipment it does not imply support for all such equipment.
Issue 1 (Draft F, 18th November 2002)
Attaching Paging Equipment Introduction
Attaching Paging Equipment Introduction
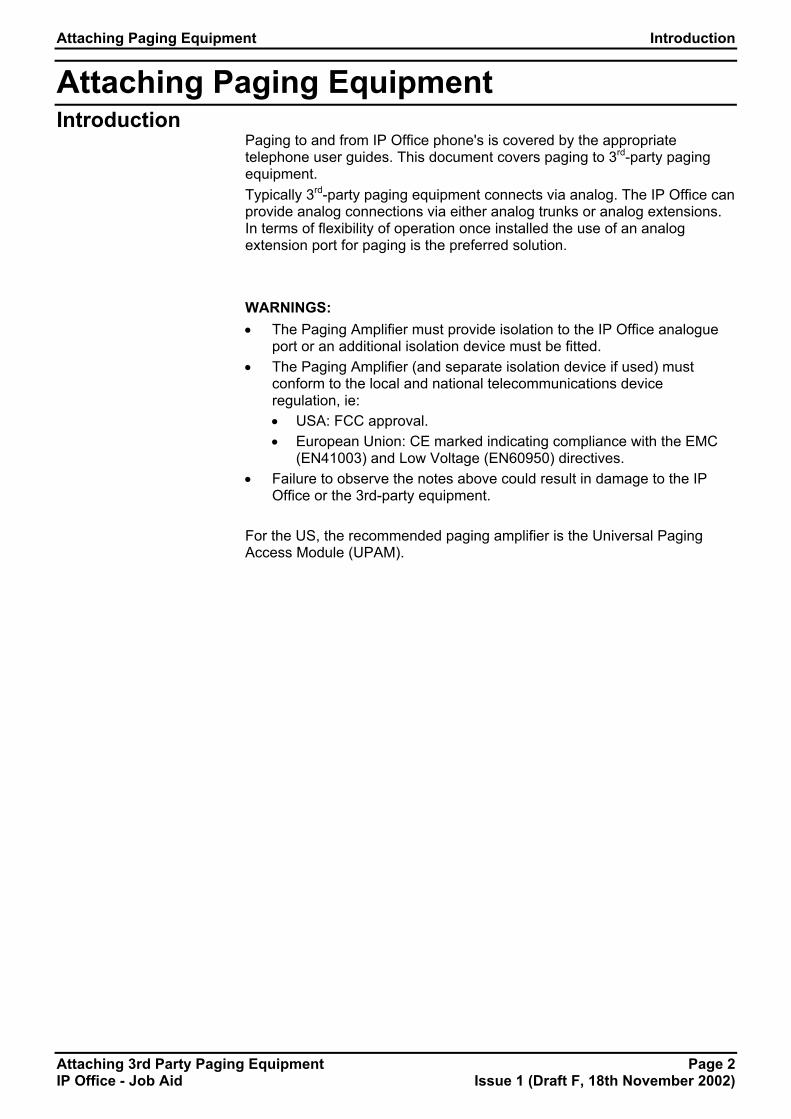
Paging to and from IP Office phone's is covered by the appropriate telephone user guides. This document covers paging to 3rd-party paging equipment. Typically 3rd-party paging equipment connects via analog. The IP Office can provide analog connections via either analog trunks or analog extensions. In terms of flexibility of operation once installed the use of an analog extension port for paging is the preferred solution. WARNINGS: • The Paging Amplifier must provide isolation to the IP Office analogue
port or an additional isolation device must be fitted. • The Paging Amplifier (and separate isolation device if used) must
conform to the local and national telecommunications device regulation, ie: • USA: FCC approval. • European Union: CE marked indicating compliance with the EMC
(EN41003) and Low Voltage (EN60950) directives. • Failure to observe the notes above could result in damage to the IP
Office or the 3rd-party equipment. For the US, the recommended paging amplifier is the Universal Paging Access Module (UPAM).
Attaching 3rd Party Paging Equipment Page 2 IP Office - Job Aid Issue 1 (Draft F, 18th November 2002)

Attaching Paging Equipment Paging via an Analog Extension Port (POT Port)
Paging via an Analog Extension Port (POT Port) IP Office analog extension ports are marked as POT. These can be used for the connect of third-party paging equipment. The IP Office 401 (not available in North America) and IP Office 403 Control Units have integral POT ports.
POT ports can also be installed by the addition of an IP Office Phone Module to the system.
• As previously stated the Paging Amplifier must provide isolation or an
additional isolation device should be fitted. • The Paging Amplifier (and separate isolation device if used) must
conform to the local and national telecommunications device regulation.
• If not done automatically, it may be necessary to set the Paging Amplifier to give priority to the VOX input
1. IP Office POT Port Wiring Connection Connections to POT ports should use a twin-pair cable wired as follows:
POT RJ45 Socket
Pin Number Description
1 and 3 Do not use. 2 Bell 4 A: Ring 5 B: Tip 6 Bell
7 and 8 Do not use. • Pins 2 and 6 are connect to pin 5 via a ringing capacitor.
The POT ports are rated as follows:
• Off-Hook Current = 25mA. • Ring Voltage = 40V rms. • REN = 2
Attaching 3rd Party Paging Equipment Page 3 IP Office - Job Aid Issue 1 (Draft F, 18th November 2002)

Attaching Paging Equipment Paging via an Analog Extension Port (POT Port)
2. Configure the Analog Extension 1. Start IP Office Manager and receive the configuration from the IP
Office. 2. Click on the Extension icon to display the list of extensions. 3. Double-click on the extension that will be used for the paging
equipment connection. 4. In the Extn tab set the following:
• Set the Equipment Classification to Paging Speaker. • Set Caller Display Type to Off.
5. Click on OK. 6. Note that the icon for the extension has changed from to . In this
mode the extension connects the speech path imeediately without any ringing.
3. Configure the Analog Extension User 1. Click on the User icon to display the list of users. 2. Double-click on the user currently associated with the extension above. 3. In the User tab set the following set the Name to Paging or similar to
indicate the function. 4. In the Voicemail tab untick Voicemail On. 5. Click on OK.
Attaching 3rd Party Paging Equipment Page 4 IP Office - Job Aid Issue 1 (Draft F, 18th November 2002)

Attaching Paging Equipment Paging via an Analog Extension Port (POT Port)
4. Create a Short Code for Paging the Extension This stage can be skipped. Since the connection is via a extension with an associated user, page calls can be made using the appropriate user name or number (see "Making Page Calls" on page 10). If you skip short code creation send the new configuration to the IP Office and reboot. 1. Click on the ShortCode icon to display the list of short codes. 2. Right-click on the list and select New. 3. Enter the settings for the short code that users should dial when to
make a paging call:
• Short Code: *78
The numbers users should dial to do a page. *78 is just an example.
• Telephone Number: 201 The analog extension connected to the paging equipment.
• Feature: DialPaging Note that DialPaging is used for an analogue extension connection. Dial is used for an analogue trunk connection. .
4. Click on OK. 5. Send the new configuration to the IP Office and reboot.
Attaching 3rd Party Paging Equipment Page 5 IP Office - Job Aid Issue 1 (Draft F, 18th November 2002)

Attaching Paging Equipment Paging via an Analog Trunk Port
Paging via an Analog Trunk Port You can use the analog trunk ports provided by the ATM4 or ATM16 modules. The ATM4 is an internal module installed into the IP Office Control Unit. Note that the ATM4 only provides Loop Start analog trunk ports.
The ATM16 is an external expansion module. It supports both Loop Start and Ground Start analog trunks.
• As previously stated the Paging Amplifier must provide isolation or an
additional isolation device should be fitted. • The Paging Amplifier (and separate isolation device if used) must
conform to the local and national telecommunications device regulation.
• The paging connection must provide power in order to be seen as a real trunk by the IP Office.
1. IP Office Analog Trunk Port Wiring Connection The analog trunk ports on IP Office modules are RJ45 sockets. Connections to these should use a single-pair cable wired cable as follows:
RJ45 Socket Pin Number Description 1 to 3 Do not use. 4 A: Ring 5 B: Tip
6 to 8 Do not use.
Attaching 3rd Party Paging Equipment Page 6 IP Office - Job Aid Issue 1 (Draft F, 18th November 2002)

Attaching Paging Equipment Paging via an Analog Trunk Port
2. Line Configuration 1. Receive the configuration from the IP Office. 2. Click on the Line icon to display the list of installed lines. 3. Analog lines appear as shown with icons. Double-click on the line
that will be used for paging. 4. In the Line tab set the following:
• In the Telephone Number field enter a note indicating that this is the line to the paging equipment, eg. Line to Paging.
• Set the Outgoing Group ID to a unique value, ie. one not used by any other line. This number will be used in a short code that routes page calls to this line.
5. In the Analog tab, set the following:
• Set the Trunk Type to Loop Start. Note: This is the only option with ATM4 trunks. With ATM16 trunks Ground Start can be used if required by the paging equipment.
• Leave the remaining values at their defaults unless the instructions
of the paging equipment manufacturer indicate that other values are required.
6. Click on OK.
Attaching 3rd Party Paging Equipment Page 7 IP Office - Job Aid Issue 1 (Draft F, 18th November 2002)

Attaching Paging Equipment Paging via an Analog Trunk Port
3. Create a Short Code for Paging the Trunk 1. Click on the ShortCode icon to display the list of system short codes. 2. Right-click on the list and select New. 3. Enter the settings for the short code that users should dial when to
make a paging call:
• Short Code: *88
This is the numbers users should dial to do a page. *88 is just an example.
• Telephone Number: . • Line Group ID: 20
This must match the Outgoing Group ID set for the analog trunk. • Feature: Dial
Note that Dial is used for an analogue trunk connection. DialPaging is used for an analogue extension connection.
4. Click on OK. 5. Send the new configuration to the IP Office and reboot.
Attaching 3rd Party Paging Equipment Page 8 IP Office - Job Aid Issue 1 (Draft F, 18th November 2002)

Attaching Paging Equipment Paging via an Avaya 20 Series Digital Telephone
Paging via an Avaya 20 Series Digital Telephone A page call to any 20 Series digital telephone (2030, 2050 or 20CC) where the handset is physically off-hook and the telephone is idle (not receiving dial tone) is directed to the handset speaker rather than the 20 Series loudspeaker. This option allows external paging systems to be connected to the 20 Series handset cord socket (marked as H/SET). Though this method of connection requires a 20 Series telephone and IP Office DT port, it allows the paging device to be part of a group with other extensions that can be paged simultaneously.
The external loudspeaker system must be CE marked to indicate compliance with the EMC (EN41003) and Low Voltage (EN60950) directives. • Loudspeaker Impedance:
The matching impedance of the external loundspeaker should be 150 ohms.
• Voltage Levels : The typical voltage levels on an Avaya 20 Series handset Rx output are: • Minimum volume: 55mV peak to peak. • Maximum volume: 555mV peak to peak.
• Wiring Connection: RJ11 using pins 2 and 3 (the inner pair).
Attaching 3rd Party Paging Equipment Page 9 IP Office - Job Aid Issue 1 (Draft F, 18th November 2002)

Attaching Paging Equipment Making Page Calls
Making Page Calls Having setup and tested the paging equipment, users can begin to use it. If the paging device has been connected via an analogue extension port, then the page call features provided for different phones can also be used to page the extension number. Refer to the appropriate phone user guide. Otherwise users can dial the short code setup for paging. The following methods can be used to make make page calls.
Paging via a DSS Key For extensions with DSS keys, paging can be assigned to one of those keys. 1. Start Manager and load the IP Office configuration. 2. Click on Users to display the list of Users. In the list double-click on
the user whose DSS keys you want to edit. 3. Select the Button Programming tab. 4. For the required DSS button, select Dial as the Action. For the
Telephone number enter the paging short code or the extension number or the extension name in quotes.
5. Click on OK. 6. Save the new configuration.
Paging from eBLF If the paging connection is via an analogue extension, then the associated user will appear in the eBLF button with their new name (eg. Paging). Simple lift your handset and click that button. If the paging connection is via an analogue trunk, you can add a new BLF button. Select Configure and then Add to Config. Enter a name for the button and enter the paging short code or extension number or extension name.
Paging from eConsole In addition to simply dialing the appropriate short code or extension number you can set the page feature under one of the eConsole's 10 speed dial buttons. Place your cursor over the required button and right-click. Enter a name and then enter the paging short code or extension number or extension name. Click on Okay.
Paging from Phone Manager You can add a speed dial to Phone Manager in order to make paging calls. 1. Within the users Phone Manager, select the Speed Dials tab. 2. Right-click on the tab area.
• If paging via a analogue extension port, select Add User and select the appropriate user.
• If paging via an analogue trunk port, select New. Enter a name and enter the paging short code as the number.
Attaching 3rd Party Paging Equipment Page 10 IP Office - Job Aid Issue 1 (Draft F, 18th November 2002)
Attaching Paging Equipment Making Page Calls
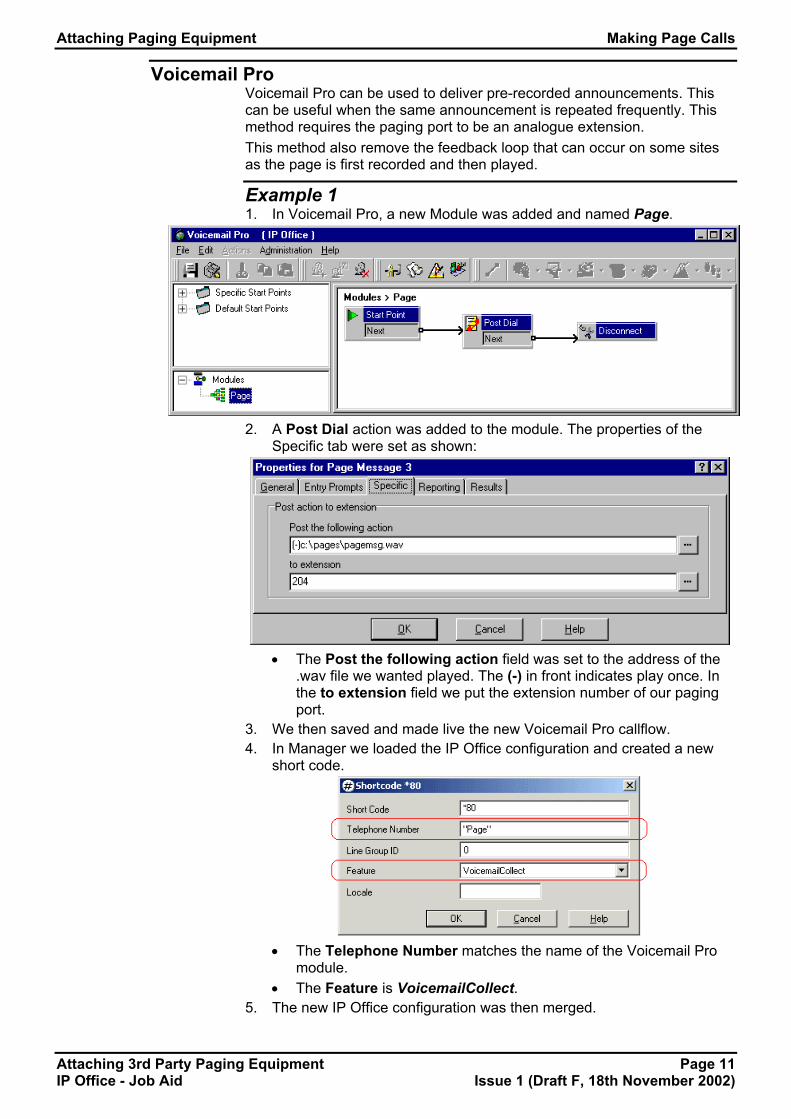
Voicemail Pro Voicemail Pro can be used to deliver pre-recorded announcements. This can be useful when the same announcement is repeated frequently. This method requires the paging port to be an analogue extension. This method also remove the feedback loop that can occur on some sites as the page is first recorded and then played.
Example 1 1. In Voicemail Pro, a new Module was added and named Page.
2. A Post Dial action was added to the module. The properties of the
Specific tab were set as shown:
• The Post the following action field was set to the address of the
.wav file we wanted played. The (-) in front indicates play once. In the to extension field we put the extension number of our paging port.
3. We then saved and made live the new Voicemail Pro callflow. 4. In Manager we loaded the IP Office configuration and created a new
short code.
• The Telephone Number matches the name of the Voicemail Pro
module. • The Feature is VoicemailCollect.
5. The new IP Office configuration was then merged.
Attaching 3rd Party Paging Equipment Page 11 IP Office - Job Aid Issue 1 (Draft F, 18th November 2002)
Attaching Paging Equipment Making Page Calls
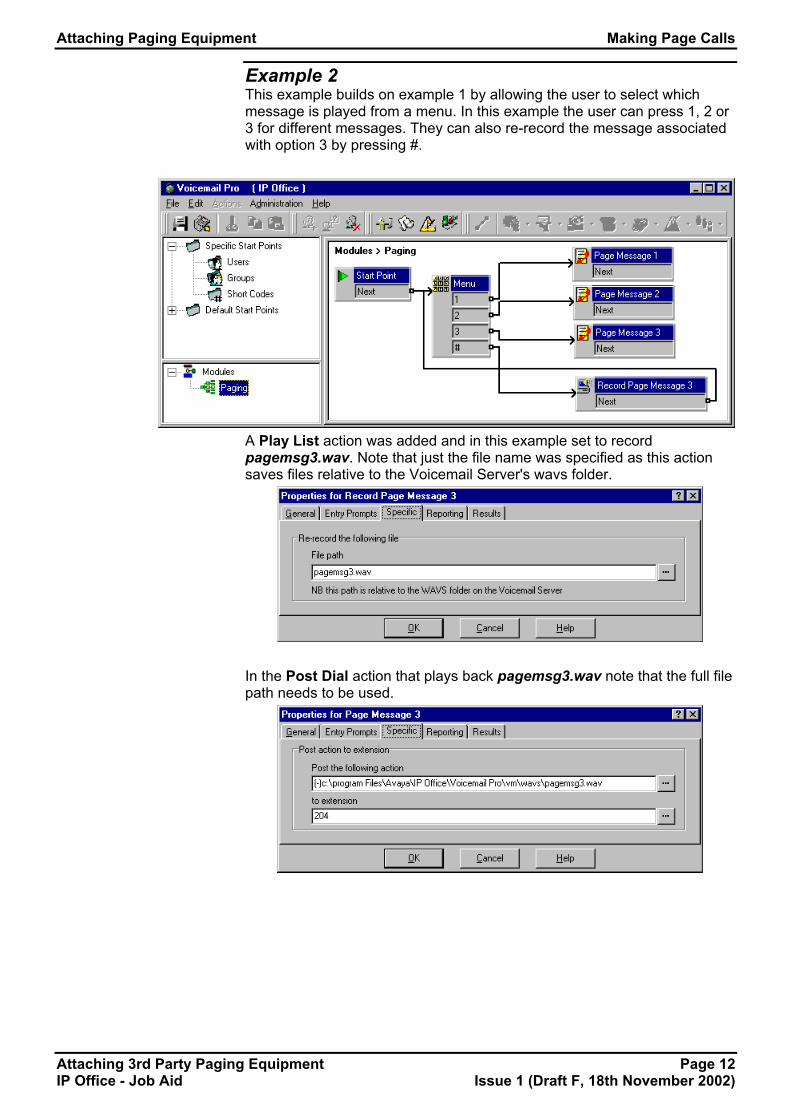
Example 2 This example builds on example 1 by allowing the user to select which message is played from a menu. In this example the user can press 1, 2 or 3 for different messages. They can also re-record the message associated with option 3 by pressing #.
A Play List action was added and in this example set to record pagemsg3.wav. Note that just the file name was specified as this action saves files relative to the Voicemail Server's wavs folder.
In the Post Dial action that plays back pagemsg3.wav note that the full file path needs to be used.
Attaching 3rd Party Paging Equipment Page 12 IP Office - Job Aid Issue 1 (Draft F, 18th November 2002)

Attaching Paging Equipment Making Page Calls
Blank Page
Attaching 3rd Party Paging Equipment Page 13 IP Office - Job Aid Issue 1 (Draft F, 18th November 2002)

Attaching Paging Equipment Making Page Calls
Performance figures and data quoted in this document are typical, and must be specifically confirmed in writing by Avaya before they become applicable to any particular order or contract. The company reserves the right to make alterations or amendments to the detailed specifications at its discretion. The publication of
information in this document does not imply freedom from patent or other protective rights of Avaya, or others.
Intellectual property related to this product (including trademarks) and registered to Lucent Technologies has been transferred or licensed to Avaya.
This confidential document is the property of Avaya and without its prior written consent may not be disclosed to a third party nor copied.
Any comments or suggestions regarding this document should be sent to "[email protected]".
© Copyright 2002 Avaya
Attaching 3rd Party Paging Equipment Page 14 IP Office - Job Aid Issue 1 (Draft F, 18th November 2002)