
IP Camera HW0036 Wanscam - ip-kamera.cz · 14.PTZ setting Through setting to set some PTZ function...
27
IP Camera HW0036 Wanscam Shenzhen Wanscam Technology Co., Ltd Downloaded from www.Manualslib.com manuals search engine
Transcript of IP Camera HW0036 Wanscam - ip-kamera.cz · 14.PTZ setting Through setting to set some PTZ function...

IP Camera
HW0036
Wanscam
Shenzhen Wanscam Technology Co., Ltd
Downloaded from www.Manualslib.com manuals search engine

Packaging list:
Note:Some camera models don’t have separate antenna(fixed)
Installation procedures:
Note:For the first time use IP Camera,please refer to the procedures
Connect Hardwares
Install the Search Tool
Login the IP Camera in Lan
Login the IP Camera On PC
Client
Access By Mobile
Wireless Settings
End
Begin
Downloaded from www.Manualslib.com manuals search engine

above
Connect the Camera with Internet cable and power accordingly as above
2.Install the Search Tool
Open the CD,Install the following software:
1. Open the File “JW & HW series”-”Browser View”:
Click “OCX setup”—“Next”—“Install”—“Finish”
Downloaded from www.Manualslib.com manuals search engine

2. Open the File “JW & HW series”-”Browser View”:
Copy “Search Tool ” to desktop and run it
3. E-View7 App Installation
APP Download
Please Download and install the E-view7 APP before you set up the
IP Camera. Search on Google Play store or APP Store for “E-view7”
One Key Setting Function (cell phone must be connected to the WiFi. )
Step1.Connect the camera with power adaptor (you do not need to connect
the Ethernet cable).
Step2.Launch the APP, tap on “+” to access the “Add Camera” function, then
click on “One Key Setting”, and the screen shown below will appear:
Downloaded from www.Manualslib.com manuals search engine

1
Step3.Enter the correct WiFi password, then click on “Start configuration”, like
shown in the screen below:
2 3
Step4. Wait for 60 seconds, then choose the respective device and enter the
password. If done, click on save to connect to the WiFi.
Three methods to add IP camera
Downloaded from www.Manualslib.com manuals search engine

Method 1:Input the P2P ID, User name, Password of your camera manually.
Then click “Save”
Method 2:Scan the QR code:Click the “Scan QR code” button,at the bottom of
the camera, there is a label of QR Code, then scan the QR code with your
smart phone,it will show the ID, input the user name and password, then click
“Save ”
Method 3:Click “Search”, then you will get the local camera list in your phone.
Choose the camera which you want to view, input the user name and
password, then click “Save”
Then the video will be showed,refer to picture 7
Click the “!” In the red circle,the camera settings are available,refer to picture 8
7 8
Open the WiFi settings,showed as Picture 9
choose the correct SSID,and input the password,like picture 10
Downloaded from www.Manualslib.com manuals search engine

9 10
After wifi connection, the camera will be rebooting,
You will find the camera online after 3-5 minutes
The video will be showed wirelessly,refer to Picture 11and 12
11 12
4. Login IP Camera In LAN
After hardwares connection properly, run the search tool, the Camera IP Address will
Downloaded from www.Manualslib.com manuals search engine

be showed automatically.(Before viewing camera on IE, you must set One Key
Setting)
Note:If the Search Tool shows subnet mask does not match,please click
Double click the camera IP address in the search tool.
A Sign-in interface will be showed on your default browser, like the below:
Note: username is “admin”;password is none
(Please change the account info for safety after login)
The login screen will be showed after the correct user name and password input
Downloaded from www.Manualslib.com manuals search engine

Note: If the OCX installed before,then login directly
A. Click “OCX” to download and Install it.
B. Refresh the webpage and login again,the camera video will be displayed as
below
Live video
.
5.Device imformation Setting
Downloaded from www.Manualslib.com manuals search engine

1).Click , access the “ Device imformation” settings
2)Checking the imformation of the ipcamera
6.Alias setting
The display name of the camera
Downloaded from www.Manualslib.com manuals search engine

7.Time Setting
1).Click , access the “time” setting
2)You can choose the NTP server you want,and click “Apply”
3)Choose the time zone you want,click “Apply”,you can get it
8.Record setting
1
Downloaded from www.Manualslib.com manuals search engine

Record & Capture Path: Where to store the files, video and photos. (If you can’t choose
this, pay attention to your PC OS and IE version, please use the IE browser.)
Record file length: At least 100MB
Record time length: At least 5 minutes.
Reserved disk space: If your pc disk space is less than 200MB, stop recording.
Record cover: Delete the old files when the disk capacity is almost depleted.
Note :If you can not change the recording path, please follow these steps:
First,please open search tool,Find the camera's ip address :
Then,Run IE browser as administrator :
Downloaded from www.Manualslib.com manuals search engine

Finally, Paste IP address of the camera in IE browser, Click “Enter” and find the below page
then you can modify the video path :
9.Record Schedule
This section explains the SD card recording settings. If the SD card has been inserted, the
capacity of the card will be displayed. But at first, you need to format it. It includes: Record
coverage, Record time, Timer recording. The settings are like follows:
Downloaded from www.Manualslib.com manuals search engine

Record coverage: Delete old files when the SD card is nearly full.
Record time: Create a video file every 10 minutes.
Timer recording: Set the time, select all, store recording to the SD card.
You can playback the video online with IE browser. Press the “Enter” button, choose the last
sign in code:
Downloaded from www.Manualslib.com manuals search engine

10.Mail Service Settings and Alarm Service Settings
1). The Mail service settings are a requirement for the alarm function. If your camera will
be activated it will send you an email with photos attached. For this, you must assure
that the mail service is configured correctly and successfully tested.
Here an example for Gmail.
It will send an email if the camera is activated.
Downloaded from www.Manualslib.com manuals search engine

You must enter the following information:
Sender: Enter your email address
Receiver: Enter your email address or a different email address
SMTP user: Enter the email username
SMTP password: Enter your email password
Note: This function only works if the IP camera is accessed via the network. If you use Gmail,
the port should be configured as 465, SSL should be TLS. The most important, make sure
that your Gmail has SMTP enabled.
After first test email,you will receive an email from google with an login attemt.
Option 2 :
Change your setting to allow less secure apps to access your account,follow these steps :
1.Go to the “Less secure apps ”section in my account.
2.Next to “Access for less secure apps”,select Turn on.(Note to Google Apps users :This
setting is hidden if your administrator has locked less secure app account access)
3.More details about allow less secure apps ,please refer to this link :
https://support.google.com/a/answer/6260879?hl=en.
It will send you a notification as soon the camera will be activated (depends on the model)
Alarm Service Settings, please use the same settings like in the screenshot below:
If you let the camera page (browser) on, if the come will be activated, 1 minute will be
recorded.
Downloaded from www.Manualslib.com manuals search engine
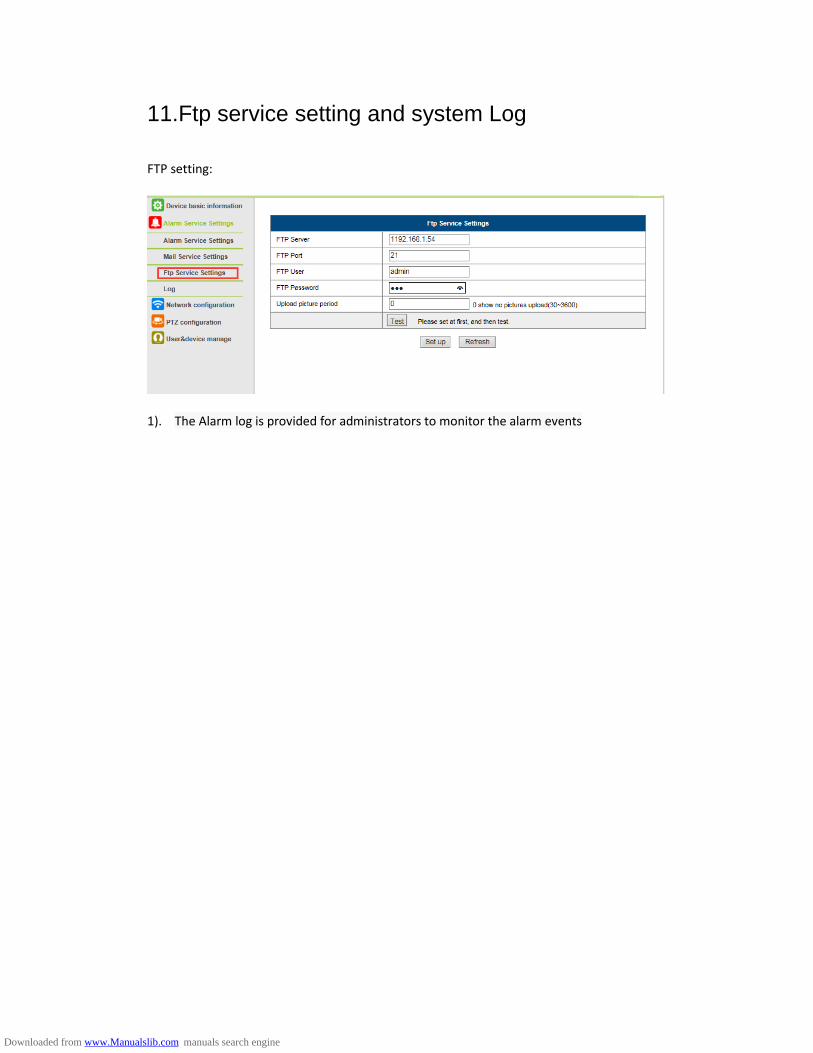
11.Ftp service setting and system Log
FTP setting:
1). The Alarm log is provided for administrators to monitor the alarm events
Downloaded from www.Manualslib.com manuals search engine

12.Basic Network Settings & wireless
1)You may modify the network Settings of IP address and gateway, and the port number
Downloaded from www.Manualslib.com manuals search engine

Wireless Setting
1).Click , access the “Wireless” settings
2).Search the WIFI signals and choose the SSID you want
3).Make sure all the parameters are the same as your router, input the WIFI network
key.
5).Click “check”, after 30seconds,one notification will show you if the WIFI settings
succeed
6)If succeed, just go back to select “Apply”, then disconnect the network cable
Note:If the camera IP Address can not be found on the search tool.please
connect the internet cable again to check the WIFI settings
Checking the WIFI signal connection situation
Downloaded from www.Manualslib.com manuals search engine

13.Rtsp&Onvif
1)Support onvif function and Rtsp function
14.PTZ setting
Through setting to set some PTZ function
Downloaded from www.Manualslib.com manuals search engine
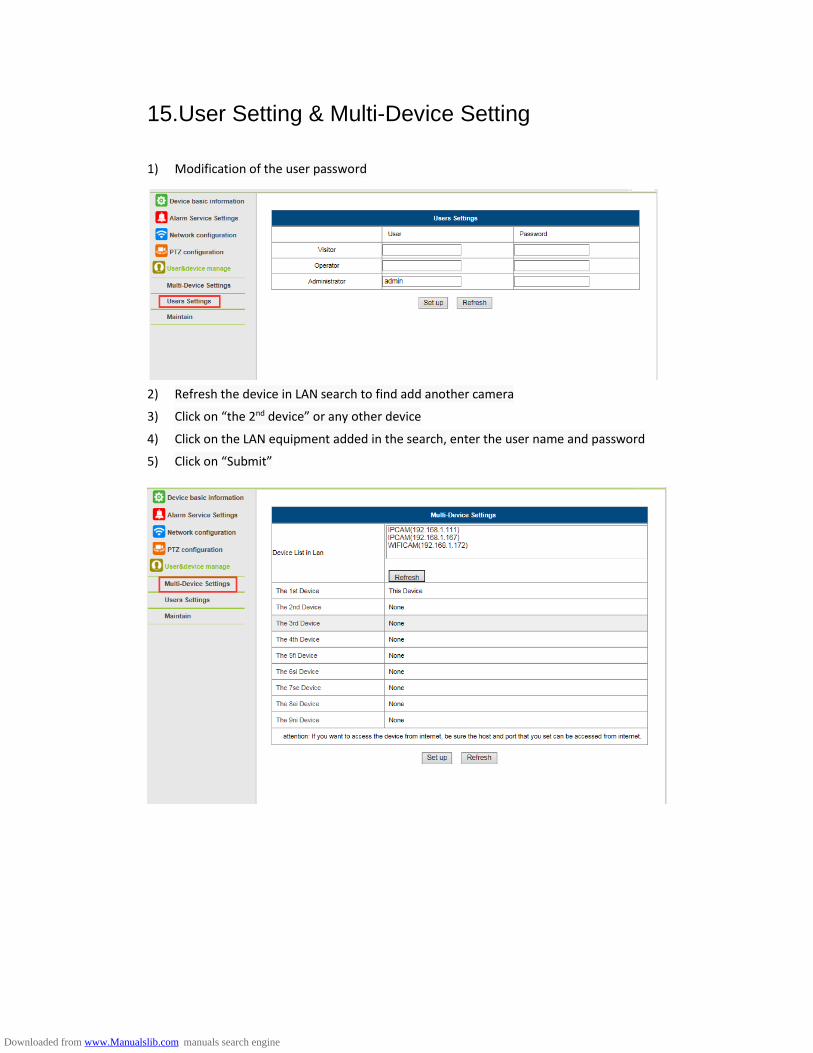
15.User Setting & Multi-Device Setting
1) Modification of the user password
2) Refresh the device in LAN search to find add another camera
3) Click on “the 2nd device” or any other device
4) Click on the LAN equipment added in the search, enter the user name and password
5) Click on “Submit”
Downloaded from www.Manualslib.com manuals search engine

16.Upgrade Device Firmware
2). With this option you may reboot the camera, restore it to the factory settings, and
upgrade the system.
17.Access By Mobile
E-View7 App Installation
A. For IOS (iPhone/iPad),download App “E-view7” in App Store;
For Android phones, download App “E-view7” in Google Play, our official website or
you can get it from CD Path:”JW & HW Series”-”Mobile App”.
B. Also support scan the App QR-code in the user manual to download directly.
Mobile View
A.Run the App ,please refer to picture 1
B.Add the Camera,please refer to picture 2
Downloaded from www.Manualslib.com manuals search engine

1. 2.
Three methods to add IP camera:
Method 1:Input the P2P ID, User name, Password of your camera manually. Then
click “Save”
Method 2:Scan the QR code:Click the “Scan QR code” button,at the bottom of the
camera, there is a label of QR Code, then scan the QR code with your smart phone,it
will show the ID, input the user name and password, then click “Save ”
Method 3:Click “Search”, then you will get the local camera list in your phone. Choose
the camera which you want to view, input the user name and password, then click
“Save”
Method 4:Click”One key setting”,enter the correct SSID and Password,Click”start
Configuration”
The operation interface:
A.Device List
Downloaded from www.Manualslib.com manuals search engine

B.Live video
7.FAQ :
A.Forget the password
1)Reset your camera, you should press the RESET button for 10 seconds when the
power is on(for indoor camera,it’s on the bottom of the camera, for outdoor camera ,
the white reset button is at the end of the power cable).
2)Finishing reset, the camera will restore to factory settings, the user name
is”admin”and password is none.
B.No video shown on browser only black screen
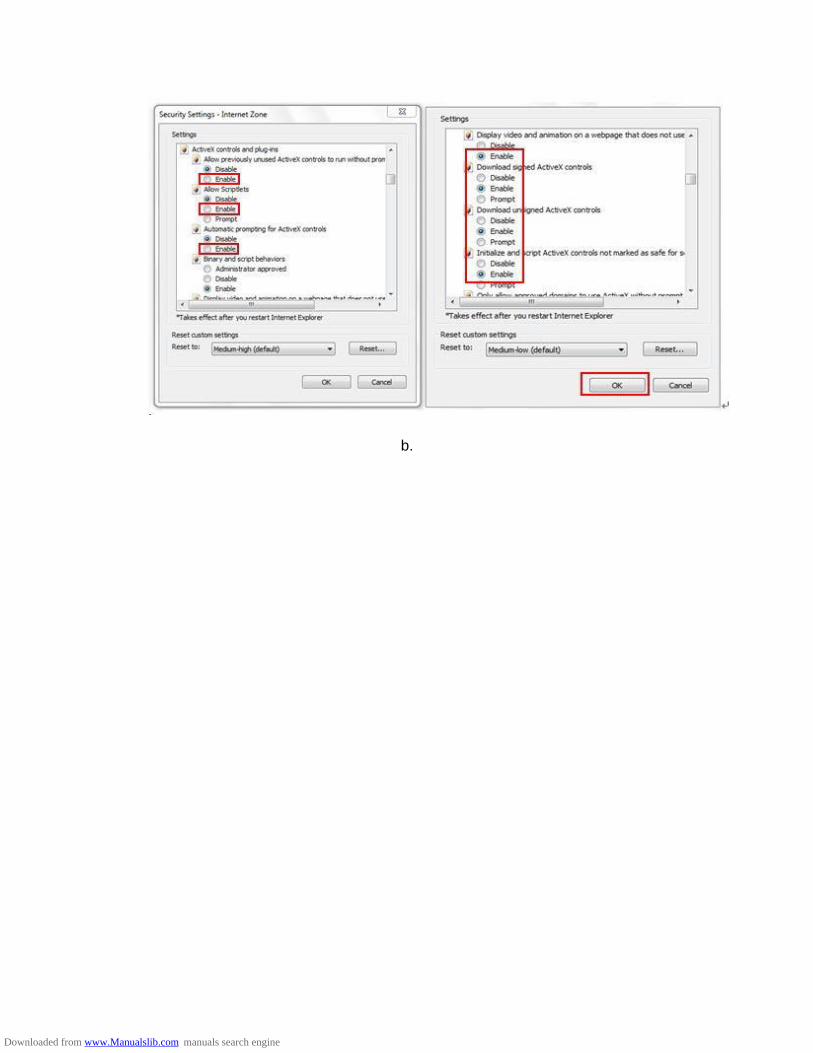
Note:If there is still no live video after run OCX ActiveX,please try to enable the
ActiveX options of IE security settings, please do the follow steps:
Downloaded from www.Manualslib.com manuals search engine

1.Close the firewall of your computer.
2.Change the ActiveX settings,“IE” browser > “Tool” > “Internet Options” > “Security”>
“Custom Level” > “ActiveX control and Plug-ins”,all the ActiveX options set to be
“Enable”:
Especially:
Enable:Download unsigned ActiveX controls
Enable:Initialize and script ActiveX controls not marked as safe
Enable:Run ActiveX controls and plug-ins
a.
Downloaded from www.Manualslib.com manuals search engine

FCC Warning:
This equipment has been tested and found to comply with the limits for a Class
B digital device, pursuant to part 15 of the FCC Rules. These limits are
designed to provide reasonable protection against harmful interference in a
residential installation. This equipment generates, uses and can radiate radio
frequency energy and, if not installed and used in accordance with the
instructions, may cause harmful interference to radio communications.
However, there is no guarantee that interference will not occur in a particular
installation. If this equipment does cause harmful interference to radio or
television reception, which can be determined by turning the equipment off and
on, the user is encouraged to try to correct the interference by one or more of
the following measures:
• Reorient or relocate the receiving antenna.
• Increase the separation between the equipment and receiver.
• Connect the equipment into an outlet on a circuit different from that to which
the receiver is connected.
• Consult the dealer or an experienced radio/TV technician for help.
Caution: Any changes or modifications to this device not explicitly approved by
manufacturer could void your authority to operate this equipment.
This device complies with part 15 of the FCC Rules. Operation is subject to the
following two conditions: (1) This device may not cause harmful interference,
and (2) this device must accept any interference received, including
interference that may cause undesired operation.
To comply with FCC RF exposure compliance requirements,this grant isapplicable to
only mobile configurations. The antennas used for this transmittermust be installed to
provide a separation distance of at least 20 cm from allpersons and must not be co-l
ocated or operating in conjunction with any otherantenna or transmitter.
Downloaded from www.Manualslib.com manuals search engine