IoTivity Programmer [s Guide Primitive Service · 3.4 Build IoTivity code for Android ... A first...
126
IoTivity Programmer’s Guide – Primitive Service
Transcript of IoTivity Programmer [s Guide Primitive Service · 3.4 Build IoTivity code for Android ... A first...

IoTivity Programmer’s Guide – Primitive Service

1 CONTENTS
2 Terminology .......................................................................................................................................... 4
3 Build Instructions .................................................................................................................................. 6
3.1 Cloning Iotivity Code....................................................................................................................... 6
3.1.1 Tools and Libraries .................................................................................................................. 6
3.1.2 Checking out the Source code ................................................................................................. 7
3.2 Build Iotivity code for linux platform .............................................................................................. 8
3.3 Build IoTivity code for Tizen Platform ............................................................................................ 9
3.4 Build IoTivity code for Android Platform ........................................................................................ 9
4 Resource Encapsulation ...................................................................................................................... 10
4.1 Overall Architecture ..................................................................................................................... 10
4.2 IoTivity Service Component .......................................................................................................... 11
4.3 Components of Resource Encapsulation Layer ............................................................................ 11
4.3.1 Resource Broker .................................................................................................................... 11
4.3.2 Resource Cache ..................................................................................................................... 12
4.3.3 Resource Client ..................................................................................................................... 13
4.3.4 Server Builder ........................................................................................................................ 13
4.3.5 Discovery Manager................................................................................................................ 13
4.4 Sample Application : Resource Client & Server Builder ............................................................... 14
4.4.1 Linux ...................................................................................................................................... 14
4.4.2 Tizen ...................................................................................................................................... 15
4.4.3 Android .................................................................................................................................. 18
5 Resource Container ............................................................................................................................. 20
5.1 Resource Bundle APIs and Project Templates .............................................................................. 23
5.1.1 C++ Bundle APIs and Project Template ................................................................................. 23
5.1.2 Java Bundle APIs and Project Template ................................................................................ 25
5.2 Sample application : Resource Container .................................................................................... 27
5.2.1 Linux ...................................................................................................................................... 27
5.2.2 Tizen ...................................................................................................................................... 28
5.2.3 Android .................................................................................................................................. 31
6 Things Manager................................................................................................................................... 35
6.1 Sample Application : Group Manager .......................................................................................... 37

6.1.1 Linux ...................................................................................................................................... 37
6.1.2 Tizen ...................................................................................................................................... 62
6.1.3 Android .................................................................................................................................. 83
7 Resource Hosting .............................................................................................................................. 104
7.1 Sample Application : Resource Hosting ...................................................................................... 105
7.1.1 Linux .................................................................................................................................... 105
7.1.2 Tizen .................................................................................................................................... 106
7.1.3 Android ................................................................................................................................ 112
8 MultiPhy - Easy Setup ...................................................................................................................... 120
8.1 Detailed Description ................................................................................................................... 120
8.1.1 Enrollee ............................................................................................................................... 120
8.1.2 Mediator .............................................................................................................................. 121
8.1.3 Enroller ................................................................................................................................ 121
8.2 EasySetup Steps .......................................................................................................................... 121
8.2.1 Negotiation .......................................................................................................................... 121
8.2.2 OnBoarding ......................................................................................................................... 121
8.2.3 Ownership Transfer ............................................................................................................. 121
8.2.4 Provisioning ......................................................................................................................... 121
8.3 EasySetup Resources .................................................................................................................. 122
8.3.1 Network Resource Representation ..................................................................................... 122
8.3.2 Provisioning Resource Representation ............................................................................... 122
8.4 Android Mediator API ................................................................................................................. 123
8.5 C SDK Enrollee API ...................................................................................................................... 123
8.5.1 Build instructions................................................................................................................. 124

2 TERMINOLOGY
Resource Encapsulation
It is an abstract layer which consists of common resource function modules.
Resource Broker
It is function module of Resource Encapsulation layer which monitors the presence status of the
Resource of Interest.
Resource Cache
It is the function module of Resource Encapsulation layer which manages the caching of Resource data.
Resource Client
It is the common API layer for the Resource Cache and Resource Broker module.
Server Builder
It is module which provides easy creation of resource with flexibility of handling the request either
internally by module itself or at application level.
Resource Container
It provides the APIs for integration of non-OIC resources into OIC ecosystem.
Resource Bundle
It contains the resource information of non-OIC devices, which is used to create OIC resources.
Things Manager
An abstracted service which comprises 2 sub services: Group management and Things
configuration/maintenance service.
Group
A set of devices in an IoTivity local network and remote networks for accomplishing the specific goal.
Using several kinds of criteria, devices can be a member of a specific group. However, basically those
member devices don’t have any information about the group. Only the device that creates this group
can have and maintain the information about this group.
Currently, resource type can be used as criteria for group formation and more criteria will be provided
later.
ActionSet
A set of action descriptions needed by remote devices as the member of a specific group. For a
particular group, multiple actions set can be assigned to this group. One action set can have multiple
actions and one action should be assigned to one specific member devices’ characteristic. Currently only
resource type can be used as device’s characteristic.

To create an action set, one may need to know the Delimiter serialization. With the Delimiter, one
specifies an action set as below.
movieTime*10 1*uri=coap://10.251.44.228:49858/a/light|power=on*
uri=coap://10.251.44.228:49858/a/light|power=on
A first segment before the first asterisk(*) is an action set name. The second segment indicates a time-
related information which is used for scheduled/recursive group action features. The first digit in the
segment is either delay or a step of time delay and the second digit is a type of group action, e.g., a
normal/scheduled/recursive group action. If the type indicates a normal group action, the first digit will
be ignored. If the type does a scheduled group action, the first digit will be utilized as a time delay such
as after 10 seconds. If the type does a recursive group action, the first digit will be utilized as a step of
time delay such as every 10 seconds.
The third segment goes before a next asterisk. In the above example,
“uri=coap://10.251.44.228:49858/a/light|power=on” is the segment. This can be also divided into two
sub segments by a vertical bar(|): URI and a pair of attribute key and value.
The remained string from the second asterisk is same as the third segment.
Group Manager
A software service which helps to shape a specific group and maintain that group. Group action feature -
creating, maintaining and executing group action related with this group also provided by Group
Manager.
Things Configuration
A Things Configuration class provides several APIs to access a Configuration resource’s value to
get/update a system parameter. The extent of what a Configuration resource covers could be all system-
specific parameters. In this release, a Configuration resource partially covers system parameters on a
device name, location, and currency information.
Things Maintenance
The purpose of a Things Maintenance is to request a system command (e.g., Factory Reset, Reboot) with
a maintenance purpose to a resource server by accessing a Maintenance resource’s value from a client
remote in distance.

3 BUILD INSTRUCTIONS
This section covers Cloning of Iotivity code and build instructions for Iotivity code.
3.1 CLONING IOTIVITY CODE
3.1.1 Tools and Libraries
The following tools and libraries are necessary to build IoTivity code in Linux machine for Linux platform.
The commands and instructions provided in this section are specifically for Ubuntu LTS 12.04. Open the
terminal window and follow instructions to install all the necessary tools and libraries to build an IoTivity
project.
Ubuntu LTS 12.04
Ubuntu LTS version 12.04 is the supported OS for building the IoTivity stack. The instructions may be
different for other versions of Ubuntu and Linux.
Git
Git is source code management software. Git is necessary to gain access to the IoTivitiy source code. Use
the following command to download and install git:
ssh
Secure Shell is required to connect to the git repository to check out the IoTivity source code. Secure
Shell is typically part of the base operating system and should be included. If for any reason it is not
available, it can be installed by running the following command in your terminal window:
SCons
SCons is build tool used for compiling IoTivity source code. It can be installed by running the following
command n your terminal window, otherwise you can refer to the following link to install SCons.
http://www.scons.org/doc/production/HTML/scons-user.html#chap-build-install
Doxygen
Doxygen is a documentation generation tool used to generate API documentation for the IoTivity
project. Download and install doxygen by running following command in your terminal window.
$ sudo apt-get install git-core
$ sudo apt-get install ssh
$ sudo apt-get install scons

3.1.2 Checking out the Source code
Gerrit is a web-based code review tool built on top of the git version control system. Gerrit’s main
features are side-by-side difference viewing and inline commenting, streamlining code review. Gerrit
allows authorized contributors to submit changes to the git repository after reviews are done.
Contributors can have code reviewed with little effort, and get their changes quickly through the system.
The following five steps describe how to check out the source code on the development machine.
Note: skip Step 1 to use existing ssh keys.
Step 1: Create ssh Key
On the terminal, type the following (replace “your name <your_email_address>” with your name and
email address):
For example: Jay Sharma with an email address [email protected] would type:
After pressing the Enter key at several prompts, an ssh key-pair will be created at ~/.ssh/id_rsa.pub.
Step 2: Upload and register an ssh public key
a. Log in to OIC Gerrit. b. Click on Settings on the top right side as shown here:
c. Click on SSH Public Keys and add key. d. Open ~/.ssh/id_rsa.pub, copy the content, and paste the content in the “Add SSH Public Key”
window. e. Click Add.
Step 3: Setting up ssh
a. Open ~/.ssh/config in a text editor. b. Add the following lines:
Host iotivity gerrit.iotivity.org
$ sudo apt-get install doxygen
$ ssh-keygen –t rsa –C “your name<your_email_address_here>”
$ ssh-keygen –t rsa –C “Jay Sharma [email protected]”

Hostname gerrit.iotivity.org IdentityFile ~/.ssh/id_rsa User [Insert_your_username_here] Port 29418
c. To connect behind the proxy, add the following line after IdentityFile ~/.ssh/id_rsa with the appropriate proxy address and port:
ProxyCommand nc –X5 –x <proxy-address>:<port> %h %p
Step 4: Verify your ssh connection
Execute the following command in the terminal window:
Upon successful connection, the following message should appear indicating proper ssh and
configuration connection.
**** Welcome to Gerrit Code Review ****
If the connection is not established, check for the proxy and use the proxy settings described in Step 3.
Step 5: Cloning the project source
To build the IoTivity resource stack:
a. Using your terminal window, browse to the directory where code will be checked out.
b. Execute the following command in the terminal window to clone the iotivity repository:
The above command clones the repository in your current working directory.
3.2 BUILD IOTIVITY CODE FOR LINUX PLATFORM To run the Linux Sample application of “Resource Encapsulation”, the Iotivity code should be built for
Linux platform.
To build the whole project, including the core, C SDK, C++ SDK, Resource Encapsulation samples:
Navigate to the root of the iotivity directory using the terminal.
Execute the scons command from the iotivity directory in the terminal:
If the build is successful you will see an out/linux folder in Iotivity directory.
$ ssh gerrit.iotivity.org
$ git clone ssh://gerrit.iotivity.org/iotivity
$ scons

3.3 BUILD IOTIVITY CODE FOR TIZEN PLATFORM To run the primitve services sample applications, the Iotivity code should be built for Tien platform.
To build the whole project, including the core, C SDK, C++ SDK, Primitive Services samples:
Navigate to the root of the iotivity directory using the terminal.
Execute the sh gbsbuild.sh command from the iotivity directory in the terminal:
If the build is successful you will see the following build success logs:
Here the RPM packages will be generated in the directory : RPM package path : /home/<username>/GBS-ROOT/local/repos/tizen/armv7l/RPMS Note: If you get failed logs, you can try the following commands:
1. dos2unix tools/tizen/iotivity.spec 2. dos2unix gbsbuild.sh
The required libraries can be found by extracting the rpm packages. The iotivity-0.9.2-0.armv7l.rpm package contains base stack libraries, where as iotivity-service-0.9.2-0.armv7l.rpm package contains the primitive service related libraries. Additional required libraries can be found at path: /home/<username>/GBS-ROOT/local/BUILD-ROOTS/scratch.armv7l.0/usr/lib.
3.4 BUILD IOTIVITY CODE FOR ANDROID PLATFORM To run the Android Sample applications of Primitive Services, the Iotivity code should be built for
Android platform.
To build the whole project, including the core, C SDK, C++ SDK, Primitive Services samples:
Navigate to the root of the iotivity directory using the terminal.
Execute the scons command from the iotivity directory in the terminal:
$ sh gbsbuild.sh
$ scons TARGET_OS=android TARGET_ARCH=armeabi TARGET_TRANSPORT=IP

Parameters of scons command depend on your requirements.
If the build is successful you will see an out/android folder in Iotivity directory.
4 RESOURCE ENCAPSULATION
Resource Encapsulation is an abstract layer which consists of common resource function modules. It
provides functionalities for both the client and server side to ease the work of developers.
For client side it provides Resource Cache and Broker functionalities (monitoring the presence of
resource in the network). For server side it provides the simple and direct way to create the resource
and to set the properties and attributes. For handling the request from client it provides flexibility to
developer either auto control of request by the layer itself or developer control the request in the
application. Namely, Resource Encapsulation provides the common function modules to make
developer’s life easy.
4.1 OVERALL ARCHITECTURE
This is an abstract view of the IoTivity architecture including the Resource Encapsulation layer of the
IoTivity service.
Figure 1 : IoTivity architecture depicting IoTivity services layer

4.2 IOTIVITY SERVICE COMPONENT
The IoTivity service layer consists of two sub layers:
Service:
This layer contains service modules which in-turn uses the functional modules of RE layer.
Resource Encapsulation (RE):
This layer consists of common functional modules as shown in Figure 2.
The difference between both these layers is that the service layer has resource(s) to represent their
features whereas RE layer do not have any resources.
Figure 2: Iotivity service architecture depicting service modules and function modules
Here the Resource Broker and Resource Cache are functional modules which provide the client side
functionalities for the IoTivity services. The Resource client is an API layer on these functional modules
to provide these functionalities to the developer in an abstract way. Server Builder is the functional
module which provides server side APIs for easy creation of Resource and handling of requests.
DiscoveryManager provides the resource discovery method which is responsible for monitoring late
creation and join of user interested resources.
4.3 COMPONENTS OF RESOURCE ENCAPSULATION LAYER
4.3.1 Resource Broker
This is a function module in the resource encapsulation layer. It monitors the presence status of the
resource of user interest. It guarantees the presence status of the remote server (resource) selected &
asked by application.

Figure 3: Resource Broker usage
4.3.2 Resource Cache
This is another function module in the resource client side. It caches the attribute data of the resource
of interest. It guarantees the delivery of the resource data selected & asked by application. It has
different methods of caching the resource data as per developer’s requirements. These methods are
specified in API section.
Figure 4: Resource Cache usage

4.3.3 Resource Client
Resource Client is a common API layer for the developer to use Resource Cache and Resource Broker
functionalities. It provides the APIs of “Resource Broker” and “Resource Cache” to the developers.
4.3.4 Server Builder
It is a functional module which handles the simplified creation of resources. In this module the developer does not need to deal with the details of CoAP communication, request and response handling. It provides APIs to ease the definition of resource types. The resources are defines based on the properties and developer has to provide the getter/setter methods. The developer does not have to worry about the request handling as it is taken care of internally in this module.
Figure 5: Server builder usage
4.3.5 Discovery Manager
It is a functional module which handles the discovery for advertising/non-advertising remote resources.
It means that, with this module, the resources could be discovered even though the resources do not
advertise its presence by themselves. It will discover resources periodically (interval time for discovery is
60 seconds) until cancel for the discovery is requested.

Figure 6: DiscoveryManager usage
4.4 SAMPLE APPLICATION : RESOURCE CLIENT & SERVER BUILDER This section describes about the sample applications using the Resource Client and Server Builder APIs.
4.4.1 Linux
4.4.1.1 Working Flow
This section describes the working flow of the SampleResourceClient and SampleResourceServer Linux
Applications. These sample applications show the functionalities provided by Resource Client (Common
API layer over Resource Broker and Resource Cache) and Serverbuilder to ease the life of developer.
We have two linux applications :
SampleResourceClient & SampleResourceServer (act as Temperature Sensor)
First run the SampleResourceServer:
Following logs will be shown:
Sample Application provides two options for presence.
~/iotivity/service/resource-encapsulation/examples/linux $ ./SampleResourceServer

To select an option, input the corresponding value for that option. For example if we select Presence On,
input 1. Sample Application now provides two options regarding creation of the resource.
If we select the first option, it will create the resource and handling of all requests from client will be
taken care internally by ResourceBuilder module.
If we select the second option, it will create the resource and handling of get and set request will be
done by the application.
Now we will run the SampleResourceClient:
Following logs will be shown:
It gives two options, either to discover a resource or to quit the application. If discoverResource option
is selected, application provides two more options as to what resource type is to be discovered.
Discovery for light resource or temperature sensor can be made. On selecting Temperature Resource
Discovery option, further options will be displayed to select the discovery type. This enquires the
developer if discovery is to be unicast or multicast. In case of unicast discovery, the address needs to be
input. In case of multicast discovery an empty string is passed by just passing a null string.
4.4.2 Tizen
4.4.2.1 Working Flow
This section describes the working flow of the RESampleClientApp and RESampleServerApp Tizen
Applications. These sample applications show the functionalities provided by Resource Client (Common
API layer over Resource Broker and Resource Cache) and Serverbuilder to ease the life of developer.
We have two tizen applications : RESampleClientApp & RESampleServerApp (act as Temperature
Sensor)
4.4.2.2 Build and Import Procedure
1. Import RESampleClientApp and RESampleServerApp applications from the given path : “service\resource-encapsulation\examples\tizen” to Tizen IDE.
To import projects in tizen IDE, Go to File -> Import -> Tizen -> Tizen Native Projects.
~/iotivity/service/resource-encapsulation/examples/linux $ ./SampleResourceClient

2. Create a lib folder in RESampleClientApp and RESampleServerApp projects (if not present) and copy the required libraries (mentioned below) extracted from the generated RPM package as shown in section Build IoTivity code for Tizen Platform.
Required libraries are “liboc.so, liboctbstack.so, libuuid.so, liboc_logger.so,
liboc_logger_core.so, libconnectivity_abstraction.so, librcs_client.so, librcs_common.so,
librcs_container.so, librcs_server.so, libboost_date_time, libboost_system and
libboost_thread”.
3. Specify the path of the unzipped boost libraries in RESampleClientApp and RESampleServerApp projects in the way given mentioned below. (Unzip the boost libraries if not done already)
Right click the project in IDE -> Properties -> expand C/C++ Build -> Settings -> Tool Settings ->
select includes option under C++ Compiler -> add the path of the unzipped boost libraries in the
include paths area -> Apply -> OK.
4. Clean and build RESampleClientApp and RESampleServerApp projects and launch the applications in Tizen 2.3 device.
4.4.2.3 Running Applications
In the case of sample applications both created as well as discovered resource is a temperature sensor
resource.
Sample Server Application provides two options for creation of a temperature resource.
a) Auto control : It creates a temperature resource and handling of all requests from client will be
taken care internally by ResourceBuilder module.
b) Developer control : It creates a temperature resource and handling of all get and set requests from
client will be taken care by the application(i.e. developer).
Sample Client Application provides a single option to discover the resource of interest. Only once the
resource has been discovered remaining options will be displayed for the found resource.
Home screen for both the sample applications are shown below :
Server Screen

4.4.2.4 Server with Auto Control
Run the RESampleServerApp: Select the only option provided to create a temperature resource. As this
resource is created with auto control option, the server set and get requests handling will be done
internally by ResourceBuilder module. Application will just create the resource, set the resource
properties and attributes(i.e. temperature value). The sample screen with logs is shown below.
Run the RESampleClientApp: Select the start discovery option. Wait until a found resource callback is
printed in the log box. If it is the desired resource you are looking for, press cancel discovery, else keep
the discovery running. The application looks for a temperature resource and on successful discovery
prints the resource URI and host name. The sample screen with logs is shown below.
Client Screen

4.4.3 Android
4.4.3.1 Working Flow
This section describes the working flow of the RESampleClientApp and RESampleServerApp Android
Applications.
These sample applications show the functionalities provided by Resource Client (Common API layer over
Resource Broker and Resource Cache) and Serverbuilder to ease the life of developer.
4.4.3.2 Build and Import Procedure
Import RESampleClientApp and RESampleServerApp applications from the given path :
“service\resource-encapsulation\examples\android” to Android Stuido.
1) Import RESampleClientApp and RESampleServerApp applications from the given path :
“service\resource-encapsulation\examples\android” to Android Stuido.
- To import projects in Android Studio, Go to File -> Open.

2) Create ‘libs’ folder in app folder each of RESampleClientApp and RESampleServerApp projects
(if not present) and copy the required libraries.
- iotivity-{TARGET_ARCH}-base-{MODE}.aar located in
android/android_api/base/build/outputs/aar
- iotivity-{TARGET_ARCH}-service-{MODE}.aar located in
service/resource-encapsulation/android/service/build/outputs/aar
where TARGET_ARCH is a build option for scons of iotivity and where MODE is release or debug.
3) Clean and build RESampleClientApp and RESampleServerApp projects and launch the
applications.
4.4.3.3 Running Applications
In the case of sample applications both created as well as discovered resource is a temperature sensor
resource.
Sample Server Application provides two options for creation of a temperature resource.
a) Simple Server : creates a temperature resource and handling of all requests from client will be taken
care internally by ResourceBuilder module.
b) Custom Server : creates a temperature resource and handling of all get and set requests from client
will be taken care by the application(i.e. developer).
Sample Client Application provides a single option to discover the resource of interest. Only once the
resource has been discovered remaining options will be displayed for the found resource.
Home screen for both the sample applications are shown below :
Run the RESampleServerApp: Select ‘SIMPLE SERVER’, press the ‘START’ button to start the server
resource. As this resource does not set any handlers, the server set and get requests handling will be
done internally by ServerBuilder module. Application will just create the resource, set the resource
properties and attributes(i.e. temperature value). The sample screen with logs is shown below.
Run the RESampleClientApp: Press the ‘DISCOVERY RESOURCE’ button. Wait until a found resource
callback is printed in the log box. The application looks for a temperature resource and on successful
discovery prints the resource URI and host name and control options will be shown. The sample screen
with logs is shown below.

Details are similar to Tizen sample applications.
5 RESOURCE CONTAINER
The main purpose of this functional module is to:
Provides APIs for integration of non-OIC resources into OIC ecosystem.
Dynamic loading of resources bundles. One resource bundle can contain multiple resources. Bundle is activated by the container and bundle registers its resources at the resource container re-using the features of the other Resource Encapsulation layer components.
Provides common resource templates and configuration mechanism for resource bundles. It deals with OIC specific communication features, and provides common functionalities in a generic way.
It provides APIs to activate and deactivate resource instance(s) dynamically on demand.

Figure 7: Resource Container Architecture
Figure 7 illustrates the architecture of the resource container. It offers a container API that can be used
to start the container. A common XML configuration file is used for all resource bundles. The
configuration contains parameters specific to the bundle but also to every resource instance. A resource
bundle contains an activator and bundle resources. A bundle resource can be the definition of a soft
sensor(= logical sensor, virtual sensor) resource that contains an algorithm to derive new knowledge
and offer it as a resource and protocol bridge resources which map other technologies to OIC resources.
The bundles only contain the mapping logic, whereas the actual creation of OIC resource servers
happens in the resource container. The bundle provider is agnostic of the base and resource
encapsulation layer APIs of IoTivity and only needs to adhere to the bundle API.
The resource container is a component used by many different stakeholders. The main stakeholders are
device manufacturers that provide a device bridge to other technologies, a bundle provider providing
bundles that map other technologies to IoTivity or offer software-defined resources (e.g. algorithms,
sensor fusioning), system integrator or end-user which configure the resource container and its bundles
for a concrete environment. For an application developer the resource container is transparent and the
developer has only to adhere to the OIC specified interfaces. A stakeholder overview is given in Figure 8,
and the interaction flow for the activation of a bundle is shown in Figure 9.

Figure 8: Resource container stakeholder overview
Figure 9: Resource container interaction flow
•Responsibility: Create bridge software (executable using the ResourceContainer)
•Benefits: ResourceContainer provides a modular environment. Software can be shipped with the bridge and does not need to be modified by the manufacturer if a new technology needs to be supported. Configuration is kept separate and depends on environment (network config, used devices)
Device Manufacturer
(Bridge)
•Responsibility: Integrates non-OIC technologies into the OIC ecosystem, by providing a mapping to OIC resources. A bundle contains the resource mappings for all devices/services of a technology
•Benefits: One bundle for a compete technology can be provided
Bundle Provider
•Responsibility: Create a solution for a concrete customer/environment. Install resource bundles. In the best case, the bridge and the bundles automatically configure themselves (e.g. for private customers) but in complex cases (e.g. commercial buildings) manual setup and configuration is required
•Benefits: Only the configuration needs to be changed, no software needs to be built. Bundles can be just copied
System Integrator/System administrator/End
user
•Responsibility: Create services based on the definition of OIC resources.
•Benefits: Resource bundles are transparent to the application developer. A common interface (OIC resources) is provided for all technologies.
Application developer

5.1 RESOURCE BUNDLE APIS AND PROJECT TEMPLATES The IoTivity resource container dynamically loads resource definitions from external libraries. The library
consists of multiple bundle resource classes which can represent either a software defined sensor or a
protocol bridge resource. A protocol bridge resources maps the interaction between OIC-based
communication and arbitrary protocols. Third-parties can use this mechanism to integrate their
technologies in the OIC eco-system. A so-called bundle combines multiple resource type definitions. A
bundle has to provide a bundle activator, which is responsible to create resource instances and to
register the resource instances at the resource container. The container offers an API to retrieve the
bundle and resource configuration and to register/unregister resources.
The resource container supports C++ and Java libraries. According APIs and project templates ease the
development of bundles. The resource container can also be used on the Android platform, but in the
current version only bundles of C++ native libraries can be loaded.
5.1.1 C++ Bundle APIs and Project Template
A C++ bundle is a shared object library (.so) which is dynamically loaded by the resource container. To
create a C++ bundle the header files located in the resource-container/bundle-api folder have to be
included by a bundle developer. A sample C++ template project is provided in resource-
container/examples/HueSampleBundle. To create a bundle the header files of the bundle API need to be
included. A bundle has then to provide a bundle activator and its resource definitions. A protocol bridge
bundle shall further provide a connector.
Bundle Configuration:
The common format for the XML configuration of a bundle is given below.
<container>
<bundle>
<id>oic.bundle.hueSample</id>
<path>libHueBundle.so</path>
<activator>huesample</activator>
<version>1.0.0</version>
<resources>
<resourceInfo>
<name>light</name>
<resourceType>oic.r.light</resourceType>
<address>http://192.168.0.2/api/newdeveloper/lights/1</address>
</resourceInfo>
</resources>
</bundle>
</container>>

The root element of the configuration is the container element which contains an arbitrary number of bundle elements specifying the configuration of bundles. For configuration of the bundle an id, path, activator ,version and resources need to be configured. The identifier should be a string uniquely identifying the bundle. A hierarchical naming scheme like a domain name is desirable but an arbitraty string can be chosen. The path references the local path of the bundle location relative to the executing application. The activator holds bundle specific information of the activation code that needs to be triggered if a bundle is started. For C++ bundles, this is a name prefix of a static activation function, for Java it is a class name.
The resources element encapsulates all resource specific information. A resource element covers
here the configuration of a single resource instance. The bundle contains resource type specific classes
that map the interaction for a specific protocol or soft sensor. The resource element provides all
instance specific configuration. A bundle can contain multiple resources, and each resource is described
with the resourceInfo element. Mandatory elements of the resource configuration are name and
resourceType and resourceUri. In addition to the mandatory fields, arbitrary technology specific
information for the resource can be included in the configuration file. A soft sensor resource could
further provide resource configuration for inputs. In this case the resource container can take care to
acquire the according data from the according input resources. Output attributes can either be listed in
the configuration or programmatically inside the soft sensor implementation.
5.1.1.1 Project template
A project template to create a C++ resource bundle is given in
“resource-container/examples/HueSampleBundle”
A resource bundle has to define an activator, a connector and resource classes.
<resources>
<resourceInfo>
<name>DiscomfortIndexSensor1</name>
<resourceType>oic.r.sensor</resourceType>
<outputs>
<output>
<name>discomfortIndex</name>
<type>int</type>
</output>
<output>
<name>humidity</name>
<type>double</type>
</output>
<output>
<name>temperature</name>

A resource bundle should implement the BundleActivator interface to define an activator. The following
external functions also need to be defined, and trigger the creation and the execution of the activator.
The prefix of the external functions should be the same as the activator described in the bundle
configuration file.
To define resource classes, the resource bundle should implement ProtocolBridgeResource and
SoftSensorResource interface to define resources for each protocol bridge and soft sensor bundle.
5.1.1.2 Build instructions
To build the bundle API and a C++ resource bundle, include the header files of the bundle-api into a new
project and provide the resource container library.
Scons can be used to create a resource library. The Sconscript of the resourceContainer shows how to
build a resource bundle.
5.1.2 Java Bundle APIs and Project Template
A Java bundle offers the capability to reuse existing Java-based communication libraries and integrate
your protocols. The Java bundle mechanism can also be used in an Android environment. A Java bundle
developer only needs to take care about the mapping between the OIC resource representation and the
integrated technology. The required interfaces to create a Java bundle can be found in the resource-
extern "C" void huesample_externalActivateBundle(ResourceContainerBundleAPI
*resourceContainer, std::string bundleId)
{
bundle = new HueSampleBundleActivator();
bundle->activateBundle(resourceContainer, bundleId);
}
extern "C" void huesample_externalDeactivateBundle()
{
bundle->deactivateBundle();
delete bundle;
}
extern "C" void huesample_externalCreateResource(resourceInfo resourceInfo)
{
bundle->createResource(resourceInfo);
}
extern "C" void huesample_externalDestroyResource(BundleResource::Ptr pBundleResource)
{
bundle->destroyResource(pBundleResource);
}

container/bundle-java-api directory. The API consists of a set of interfaces and abstract classes. Most
important is the BaseActivator class, which has to be extended by a bundle provider. It offers the
methods for retrieving configuration parameters and for resource registration. The second important
abstract class is the BundleResource. A developer has to extend this class for concrete resource types
and implement the mapping for reads and writes on the resource attributes.
5.1.2.1 Project Template
A Java example project template is provided in the folder examples/HueJavaSampleBundle/hue.
To create a new Java bundle, copy this folder and modify the Maven pom.xml. Source files can be put in
an arbitrary
5.1.2.2 Build instructions
For building the Java Bundle APIs and the bundle projects the Maven1 build system is used.
Note (using Maven behind firewall or proxy): If you are behind a firewall or proxy it might be required to ease the security settings. Provide the following parameters to your Maven commands if external
dependencies are downloaded.
-Dmaven.wagon.http.ssl.insecure=true
-Dmaven.wagon.http.ssl.allowall=true
-Dmaven.wagon.http.ssl.ignore.validity.dates=true
Bundle API
First step is to build the Java Bundle API.
This compiles the bundle api and installs it in the local maven repository. All bundle projects can use the
library then.
A project can include declare a dependency on the Java bundle API. An example pom.xml can be found
in the resource-container/examples/HueJavaSampleBundle folder.
Java resource bundle
To build a Java bundle all dependencies need to be included. In order to package all dependencies the
assembly plugin is used.
1maven.apache.org
resource-container/bundle-java-api> mvn compile
resource-container/bundle-java-api> mvn install

5.2 SAMPLE APPLICATION : RESOURCE CONTAINER
5.2.1 Linux
A sample application demonstrates the resource container. Example bundles and a configuration is
provided. The configuration can be found in the examples folder and a snippet of the XML file is shown
below. You can inspect the configuration to see how to configure bundles to be loaded by the resource
container.
First run the ContainerSample:
The resource container starts. Follow the instructions and press [ENTER] to see the demonstration of
how bundles get loaded, stopped, activated and the whole container gets stopped.
After the container is started you can execute in parallel the ContainerClientSample, which executes the
test requests against container provided resources.
To execute the ContainerSampleClient run:
…
<bundle>
<id>oic.bundle.hueSample</id>
<path>libHueBundle.so</path>
<activator>huesample</activator>
<version>1.0.0</version>
<resources>
<resourceInfo>
<name>light</name>
<resourceType>oic.r.light</resourceType>
<address>http://192.168.0.2/api/newdeveloper/lights/1</address>
</resourceInfo>
</resources>
</bundle>
…
~/[release-folder]/service/resource-container/ $ ./ContainerSample
~/[release-folder]/service/resource-container/ $ ./ContainerSampleClient

5.2.2 Tizen
This sections covers the Tizen Sample Applications of Resource Container module.
5.2.2.1 Working Flow
This section describes the working flow of the ContainerClientApp and ContainerServerApp Tizen
Applications.
ContainerServerApp show the functionalities provided by Resource Container module.
ContainerClientApp is to discover the resource created by ContainerServerApp.
5.2.2.2 Build and Import Procedure
Import ContainerServerApp and ContainerClientApp applications from the given path :
“service\resource-container\examples\tizen” to Tizen IDE.
To import projects in tizen IDE, Go to File -> Import -> Tizen -> Tizen Native Projects.
Create a lib folder in ContainerClientApp and ContainerServerApp projects (if not present) and copy the required libraries (mentioned below) extracted from the generated RPM package as shown in section 3.3
Required libraries for ContainerServerApp and ContainerClientApp are “liboc.so, liboctbstack.so, libuuid.so, liboc_logger.so, liboc_logger_core.so, libconnectivity_abstraction.so, librcs_client.so, librcs_common.so, librcs_container.so, librcs_server.so, libboost_date_time, libboost_system and libboost_thread”.
Additional libraries required for ContainerServerApp are : libHueBundle.so, libDISensorBundle.so and libBMISensorBundle.so. These libraries also should be added in the lib folder.
Specify the path of the unzipped boost libraries in ContainerServerApp and ContainerClientApp projects in the way given mentioned below. (Unzip the boost libraries if not done already)
Right click the project in IDE -> Properties -> expand C/C++ Build -> Settings -> Tool Settings -> select includes option under C++ Compiler -> add the path of the unzipped boost libraries in the include paths area -> Apply -> OK.
Clean and build ContainerServerApp and ContainerClientApp projects and launch the applications in Tizen 2.3 device.
5.2.2.2.1 Running Applications
Running the ContainerServerApp provides two options on the home screen :
Start Container
Stop Container
On selecting the start container options, it trigeers the container to start with default bundle provided in
the configuration file. Once the container has started successfully the remaining container option is
displayed to test the resource container APIs. The following images show the homescreen of the
application and screen for container APIs.
Note : In sample application we have the configuration file (.xml) with hue bundle.

The remaing container APIs can be tested now as the container has been successfully started. On
selecting the first option i.e. List Bundles, it displayes the list of all bundles in the container.
On selecting the option for List Hue resources, it displayes all resources added to the Hue bundle. Since
we have not added amy resources it displayes the resource bundle size as 0.
Using the Add HUE Bundle Resource option, light resources can be added to the HUE bundle. On
selecting this option a new resource is created and added. The following logs will be displayed :

The created resources that have been added to Hue bundle can be deleted using the Remove HUE
Bundle Resource. Multiple resources can be created and added and deleted.
Hue Bundle is added and started by default on starting the container. Addition bundles can also be
added to the container. These APIs can be tested using the add and start bundle options.
‘Add BMI bundle’ and ‘Start BMI bundle’ options in the applications add a BMISensorBundle to the
already started resource container. On selecting the ‘Add BMI bundle’ option first and then ‘Start BMI
bundle’ option, BMISensor bundle is added to the container. Following logs are shown :
We can verify the authenticity by checking the list of bundles of the container. This can be done using
the first option ‘List Bundles’. The following logs is displayed :
Here we can see the bundle list size has increased and BMISensor bundle has been added to the
container. Now similarly to stop and remove a bundle from the container, stop bundle and remove
bundle options can be used. The ‘Stop BMI Bundle’ and ‘Remove BMI Bundle’ options will stop and
remove the BMISensor bundle if added to the container . The following logs will be displayed :
The container can be stopped using the stop container button on the top right hand corner of the screen.
Selecting this button automatically removes all bundles added to the container and stops the container.
If the container is not yet started then this button has no effect what so ever.
ContainerClientApp provides the feature to discover the resource created by ContainerServiceApp.

Running the ContainerClientApp provides only one option to start the container client. On selecting the
start container client option new menu is shown. The homescreen is shown below.
If Resources have been created by the ContainerServiceApp, is can be discovered by this application. If a
light resource discovery is to be made, selet the ‘Start light resource Discovery’ option to begin the
discovery request. If the a light resource is running in the same network it will get a callback :
Once the desired resource has been found, the discovery request can be terminated by selecting the
‘Stop Discovery’ option. Once the discovery has been canceled, we will get a list of all the resources
discovered to select from for our use. Similarly discovery can be made for a soft sensor resource also.
5.2.3 Android
This sections covers the Android Sample Applications of Resource Container module.
<Experimental Support >
Resource container for Android platform is not supported officially. It is under development,
5.2.3.1 Working Flow
This section describes the working flow of the RCSampleClientApp and RCSampleServerApp Android
Applications.
RCSampleServerApp show the functionalities provided by Resource Container module.
RCSampleClientApp is to discover the resource created by RCSampleServerApp.
Client Home Screen

5.2.3.1.1 Build and Import Procedure
(a) Import RCSampleClientApp and RCSampleServerApp applications from the given path :
“,Iotivity_root- /service/resource-container/examples/android” to Android studio.
- To import projects in Android Studio, Go to File -> Open.
(b) Create ‘libs’ folder in app folder each of RCSampleClientApp and RCSampleServerApp projects (if
not present) and copy the required libraries.
- iotivity-{TARGET_ARCH}-base-{MODE}.aar located in
{Iotivity_root} /android/android_api/base/build/outputs/aar
- iotivity-{TARGET_ARCH}-service-{MODE}.aar located in
{Iotivity_root} /service/resource-encapsulation/android/service/build/outputs/aar
(c) copy the below libs to RCSampleServerApp
- iotivity-{TARGET_ARCH}-resource-container-{MODE}.aar located in
{Iotivity_root} /service/resource-container/android/service/build/outputs/aar
(d) In the app/src/main/assets/lib folder of RCSampleServerApp copy the following libs:
- libBMISensorBundle.so
- libDISensorBundle.so
From : {Iotivity_root}/out/android/{TARGET_ARCH}/{MODE}/
where TARGET_ARCH is a build option for scons of iotivity and where MODE is release or debug.
(d) Clean and build RCSampleClientApp and RCSampleServerApp projects and launch the applications.
5.2.3.1.2 Running Applications
First Run the RCSampleServerApp, and START CONTAINER will show the result below :

Note : In sample application we have the configuration file (.xml) with one bundle.
It will create a resource of type oic.sensor. To discover the resource press “DISCOVER RESOURCE”
button on RCSampleClientApp. The following logs will be shown on the Client app:
User can press the option 3,4,5 to List, add, remove resources from the bundle. Same as done for
Discomfort Index sensor.
When a resource is added to BMI bundle it can be discovered from the RCSampleClientApp by pressing
Discover Resource Button.
Press option 6 “Stop Bundle”to stop the Bundle. If user stops the bundle all the resources that are
added to bundle will be removed. Press option 7 “Remove Bundle” to remove the BMI bundle.


6 THINGS MANAGER
Things Manager is operated in the IoTivity Base messaging environment as shown in the Figure below.
Figure 10: Things Manager Context Diagram
There are two kind of usages in the Things Manager; SDK API and Raw API usage
For the first usage, Things Manager provides SDK API described in the previous section which hides the
details of IoTivity functions and protocols and provides a simple operation set in C++.
The raw API also can be used to use main function of group management (i.e. group action) and other
functionalities of group management can be emulated by using raw API. The raw API introduces
Resource based concept and matched with CoAP’s basic functionalities (i.e. GET/PUT/POST/DELETE).
This API now provided as a simple operation set in C language.
Things Manager comprises 3 components from the perspective of functionality: Group Manager and
Things Configuration/Maintenance.
- Group Manager APIs provide functions for application to find appropriate devices (i.e. things) in
network, create a group of the devices, check a presence of member devices in the group, and
actuate a group action in a more convenient way.
- Things Configuration APIs have two main usages: (1) On a server side, bootstrapping requisite
information (i.e. system configuration parameters) from a bootstrap server to access other IoT
services, (2) On a client side, getting/updating the system configuration parameters from/to
multiple remote things.
- Things Maintenance APIs have two functionalities: 1) FactoryReset to restore all configuration
parameters to default one, and (2) Reboot to request a system rebooting.

Resource models used for Things Configuration and Maintenance function are standardized in OIC
specification document and specified as follows:
Resource Name URI Resource Type
Configuration /oic/con oic.wk.con
Attribute Attribute Name(key)
Value Type
Access Modes
Description
Device Name n String R, W Human friendly name
e.g., “Bob’s Thermostat”
Location loc Json R, W Provides location information
Location Name locn String R, W Provides location information
Currency c String R, W Indicates the currency that is used for any monetary transactions
Region r String R, W Indicates the current region in which the device is located geographically
Resource Name URI Resource Type
Maintenance /oic/mnt oic.wk.mnt
Attribute Attribute Name(key)
Value Type
Access Modes
Description
Factory_Reset fr boolean R,W
0 – No action (Default)
1 – Start Factory Reset. After factory reset, this value shall be changed back to the default value
Reboot rb boolean R,W
0 – No action (Default)
1 – Start Reboot, After reboot, this value shall be changed back to the default value
StartStatCollection ssc boolean R,W 0 – No collection of statistics
1 – Start collection statistics. Toggles

between collecting and not collecting any device statistics depending on the value being 0 or 1.
6.1 SAMPLE APPLICATION : GROUP MANAGER
This section is to show the functionality of group management and group action. With example, it can
be understood how group can be made and how can we use it.
A Group can have homogeneous or heterogeneous member things. Multiple groups can be handled
simultaneously.
Group Action can be triggered by user’s action (i.e. switch control) or by registered action. User
application can subscribe this kind of action to particular group. Subscription function will be provided
by next release
6.1.1 Linux
6.1.1.1 Example Scenario : Group Formation & Group Action
Figure 11: Example Scenario for Testing Group Formation / Action Feature
- Scenario 1: Bulb Control Service

There are mainly two entities composing “Bulb Control System”: one mobile phone and two
bulbs. This scenario shows that users can easily manage their at-home light bulbs with their
mobile phone. One of convincing situations for the scenario is the moment that users leave
home for work; they may want to turn all bulbs at home off with their phone.
① At initial stage, we assume that two bulbs are already on.
② After an application to control the bulbs executed on the phone, , the phone discovers the bulbs around itself and sets them as “Group” for Bulb Control Service.
③ After “Group” made, user can see a switch to control.
④ Once clicking the switch to off, the bulbs are going to turning off.
- Scenario 2: Help Your Reading Service (using bookmark)
There are mainly three entities composing “Help Your Reading System”: One bookmark with
Arduino platform, two bulbs with Arduino platform. This scenario shows that when a specific
user is about to read a book, the bookmark put in the book detects users’ intention and
seamlessly the bulbs produce a comfortable mood for reading.
① At initial stage, we assume that the bulbs are already off and the bookmark is put in a book.
② The phone discovers the bookmark and bulbs. First, when all bulbs are found, “Group” can be made. And when the bookmark is found, the phone requests the bookmark to observe a book’s openness. After that, the bookmark will notice its status whenever it changes. (openclose, closeopen)
③ A book reader opens his/her book.
④ Then the bulbs are going to turn.
6.1.1.2 Working Flow

[Example Topology]
This section introduces an experimental example of the scenarios run on Ubuntu platform. This
section describes how Things (i.e. bulbs and bookmark) can make group communication and
what kind of features can be provided by Things Manager, specifically Group Manager.
① Run all light bulb applications and a bookmark application
First of all, users execute light bulb applications corresponding to actuators (called
resources from here). Create the Ubuntu device topology according to “Example Topology”
and run executables
To execute all bulb applications, enter as follows:
As seeing above, users can know details of the registration for the bulb resource including
resource URI, resource type.
~/deviceB/service/things-manager/build/linux/release$ ./lightserver
Resource URI : /a/light
Resource Type Name : core.light
Resource Interface : oc.mi.def
Resource creation is successful with resource handle : 0x1dd1de0
…
~/deviceC/service/things-manager/build/linux/release$ ./lightserver
…
Ubuntu(deviceA)
./tgmserver

Next, users execute a bookmark. To do, enter as follows:
② Run a groupserver application to control a group
Lastly, users execute a user application, called a “groupserver”. Once the application is
executed, it initially creates a group resource with a resource type, “a.collection”, and
attempts to discover all candidate resources in a network. In this example, the candidate
resource is a light bulb resource with a resource type “core.light”. After a few seconds (e.g.,
5 seconds), the application binds the found light bulb resource into the group resource,
which is a creation of the group. If the creation is successful, users can see a menu to ask
users’ input.
To run the application, enter as follows:
~/deviceD/service/things-manager/build/linux/release$ ./bookmark
Resource URI : /core/bookmark
Resource Type Name : core.bookmark
Resource Interface : oc.mi.def
Resource creation is successful with resource handle : 0xfd6da0
…

③ Find the group resource
In the step ②, “groupserver” application creates a group resource. Then, to request this
resource with GET or PUT, users need to find the group resource using findResource() function.
To do this, just enter a digit ‘9’ as follows:
~/deviceA/service/things-manager/build/linux/release $ ./groupserver
DISCOVERED Resource:
URI of the resource: /a/light
Host address of the resource: coap://10.251.42.143:45631
List of resource types:
core.light
core.brightlight
List of resource interfaces:
oc.mi.def
oc.mi.ll
(additional resources can be founded)
…
1 :: CREATE ACTIONSET
2 :: EXECUTE ACTIONSET(ALLBULBON)
3 :: EXECUTE ACTIONSET(ALLBULBOFF)
4 :: CREATE ACTIONSET(R_ALLBULBON)
41 :: EXECUTE ACTIONSET 42 :: CANCEL ACTIONSET
5 :: CREATE ACTIONSET(S_ALLBULBON)
51 :: EXECUTE ACTIONSET 52 :: CANCEL ACTIONSET
6 :: GET ACTIONSET
7 :: DELETE ACTIONSET
8 :: QUIT
9 :: FIND GROUP
0 :: FIND BOOKMARK TO OBSERVE
_(prompt)

④ Create group action sets, ”AllBulbsOn” and “AllBulbsOff”
The next step is to define group action sets for the group. In this example, there are two
predefined group action sets: “AllBulbsOn” and “AllBulbsOff”.
~/deviceA/service/things-manager/build/linux/release $ ./groupserver
1 :: CREATE ACTIONSET
2 :: EXECUTE ACTIONSET(ALLBULBON)
3 :: EXECUTE ACTIONSET(ALLBULBOFF)
4 :: CREATE ACTIONSET(R_ALLBULBON)
41 :: EXECUTE ACTIONSET 42 :: CANCEL ACTIONSET
5 :: CREATE ACTIONSET(S_ALLBULBON)
51 :: EXECUTE ACTIONSET 52 :: CANCEL ACTIONSET
6 :: GET ACTIONSET
7 :: DELETE ACTIONSET
8 :: QUIT
9 :: FIND GROUP
0 :: FIND BOOKMARK TO OBSERVE
9(prompt)

First, a name of group action set is specified in actionsetName variable of ActionSet instance.
Next, for each light bulb resource, users need to create an Action class instance and specify
the light bulb resource’s URI in target variable of Action instance. And another class instance,
called Capability, is needed to be created to specify an attribute key and value of the target
resource. The attribute key and value are written in capability and status variables of
Capability instance class, respectively. After filling the Capability instance, store it to
listOfCapability vector variable of Action instance and store the Action instance to
listOfAction vector variable of ActionSet instance.
On the ActionSet instance for “AllBulbsOff” is specified, users just use addActionSet()
function provided in ThingsManager class.
To execute two group action sets to turn off/on all bulbs, enter a digit ‘1’. If the creation is
successful, users can see the below log message:
~/deviceA/service/things-manager/sampleapp/linux/groupaction/groupserver.cpp …
void createActionSet_AllBulbOff()
{
ActionSet *allBulbOff = new ActionSet();
allBulbOff->actionsetName = "AllBulbOff";
for(auto iter = lights.begin(); iter != lights.end(); ++iter)
{
Action *action = new Action();
action->target = (*iter);
Capability *capa = new Capability();
capa->capability = "power";
capa->status = "off";
action->listOfCapability.push_back(capa);
allBulbOff->listOfAction.push_back(action);
}
if (g_resource)
{
thingsMgr->addActionSet(g_resource, allBulbOff, onPut);

⑤ Execute a group action
To execute a group action set, users just call a executeActionSet() function in ThingsManager
class as following:
To execute a group action set to turn off all bulbs, enter a digit ‘3’ as follows:
Then, users can notice that all light bulb applications have a “Off” event as follows:
In execution of “./groupserver” on deviceA
1 :: CREATE ACTIONSET
2 :: EXECUTE ACTIONSET(ALLBULBON)
3 :: EXECUTE ACTIONSET(ALLBULBOFF)
…
1(prompt)
onPut
Result is OK.(for “ALLBULBON”)
onPut
Result is OK. (for “ALLBULBOFF”)
~/deviceA/service/things-manager/sampleapp/linux/groupaction/groupserver.cpp
void allBulbOff()
{
g_ thingsMgr->executeActionSet(resource, “AllBulbOff”, callback)
}
In execution of “./groupserver” on deviceA
1 :: CREATE ACTIONSET
2 :: EXECUTE ACTIONSET(ALLBULBON)
3 :: EXECUTE ACTIONSET(ALLBULBOFF)
…
3(prompt)

⑥ Request an observe to a bookmark application
For the second scenario mentioned in Section 7.1, the groupserver application needs to
monitor how a bookmark’s status changes. To do this, the groupserver application utilizes an
observe option of CoAP specification.
To find the bookmark resource and request an observe to it, enter a digit “0” as follows:
If the bookmark resource is found and the request is successful, users can see a log message
like the above. At the same time, users can also notice that the bookmark application has a
new prompt to get users’ input as follows:
⑦ Change a status of bookmark resource
In execution of “./lightserver” on device and deviceC
…
In entity handler wrapper:
In Server CPP entity handler:
requestFlag : Request
requestType : PUT
power: off
In execution of “./groupserver” on deviceA
1 :: CREATE ACTIONSET
…
0 :: FIND BOOKMARK TO OBSERVE
0
FOUND RESOURCE
OBSERVE RESULT:
SequenceNumber: 0
level: 0
In execution of “./bookmark” on deviceD
Input a integer(0:opened, 5:close) :
…

If users want to change a status of the bookmark resource, simply put a digit “0” or “5” as
follows:
Once the status changes, the bookmark application sends the notification to the groupserver
application. If the notification informs that a book is opened, just execute an “AllBulbOn”
action set and send a request for light bulb resource to turn on.
After that, users can notice that all light bulb applications have a “On” event as follows:
⑧ Create a scheduled/recursive group action
Along with an ordinary group action, Group Manager provides time-related group actions like
scheduled and recursive group action. The scheduled group action can be utilized for an
execution of group action after a certain time delay. For example, it can be used where users
wants to execute a group action after 10 seconds. The other, recursive group action, can be
utilized for an repeated execution of group action every a certain time. For example, it can be
used where users wants to execute a group action at 1 PM every day.
For creating these group actions, users should specify a type of group action in creation. All
supported types for group action includes NONE, SCHEDULED, and RECURSIVE. And users
should also specify a time parameter of a time delay and an time interval used for scheduled
and recursive group action, respectively. The below is an example for creating recursive group
action. Creating a scheduled group action does not make much of difference with this.
In execution of “./bookmark” on deviceD
Input a integer(0:opened, 5:close) : 0
…
In execution of “./lightserver” on deviceB and deviceC
…
In entity handler wrapper:
In Server CPP entity handler:
requestFlag : Request
requestType : PUT
power: on

To create a recursive group action, please enter a digit ‘4’ as follows:
~/deviceA/service/things-manager/sampleapp/linux/groupaction/groupserver.cpp …
void createRecursiveActionSet_AllBulbOn()
{
string actionsetDesc;
ActionSet *allBulbOn = new ActionSet();
allBulbOn->actionsetName = "AllBulbOnRecursiveCall";
allBulbOn->type = OIC::ACTIONSET_TYPE::RECURSIVE;
allBulbOn->setDelay(5); //every 5 seconds
for (auto iter = lights.begin(); iter != lights.end(); ++iter)
{
Action *action = new Action();
action->target = (*iter);
Capability *capa = new Capability();
capa->capability = "power";
capa->status = "on";
action->listOfCapability.push_back(capa);
allBulbOn->listOfAction.push_back(action);
}
if (g_resource)
{
thingsMgr->addActionSet(g_resource, allBulbOn, onPut);
}

For a case of scheduled group action, just enter a digit ‘5’.
⑨ Execute a scheduled/recursive group action
When creating a scheduled/recursive group action, users would specify a time-related
parameter. For example, the above example, the “5 seconds” parameter was used for the
scheduled group action. Note that, this parameter will be valid right after calling of
executeActionSet() function not after calling of createActionSet().
If users want to execute the recursive(scheduled) group action as users specified, users just
calls an executeActionSet() function as follows:
To execute the recursive group action, please enter a digit ‘41’ as follows:
In execution of “./groupserver” on deviceA
1 :: CREATE ACTIONSET
2 :: EXECUTE ACTIONSET(ALLBULBON)
3 :: EXECUTE ACTIONSET(ALLBULBOFF)
4 :: CREATE ACTIONSET(R_ALLBULBON)
41 :: EXECUTE ACTIONSET 42 :: CANCEL ACTIONSET
5 :: CREATE ACTIONSET(S_ALLBULBON)
51 :: EXECUTE ACTIONSET 52 :: CANCEL ACTIONSET
…
4(prompt)
onPut
Result is OK. (for recursive group action)
~/deviceA/service/things-manager/sampleapp/linux/groupaction/groupserver.cpp
void Recursive_allBulbOn()
{
thingsMgr->executeActionSet(g_resource, "AllBulbOnRecursiveCall", &onPost);
}

Then, users can see the log message every 5 seconds as below
⑩ Cancel a scheduled/recursive group action
When users want to stop the recursive group action still running, just call a cancelActionSet()
function.
To cancel the recursive group action, please enter a digit ‘42’ as follows:
In execution of “./groupserver” on deviceA
1 :: CREATE ACTIONSET
2 :: EXECUTE ACTIONSET(ALLBULBON)
3 :: EXECUTE ACTIONSET(ALLBULBOFF)
4 :: CREATE ACTIONSET(R_ALLBULBON)
41 :: EXECUTE ACTIONSET 42 :: CANCEL ACTIONSET
5 :: CREATE ACTIONSET(S_ALLBULBON)
51 :: EXECUTE ACTIONSET 52 :: CANCEL ACTIONSET
…
41(prompt)
In execution of “./lightserver” on deviceB and deviceC
…
In entity handler wrapper:
In Server CPP entity handler:
requestFlag : Request
requestType : PUT
power: on
~/deviceA/service/things-manager/sampleapp/linux/groupaction/groupserver.cpp
void CancelRecursive_allBulbOn()
{
groupMgr->cancelActionSet(g_resource, "AllBulbOnRecursiveCall", &onPost);
}

Then, users can see no more log message at light resource applications.
6.1.1.3 Example Scenario : Things Configuration & Maintenance
- Scenario 1: Things Configuration (Get/Update)
We assume that there are two things(i.e. resource servers) to be managed by the
administrator(i.e. a resource client). Additionally, we also assume that a simple bootstrap server
is installed in purpose that things can fetch essential configuration parameters to access other
IoT service. This scenario shows a bootstrap procedure between things and a bootstrap server
and retrieval and update procedures between things and an administrator.
- Scenario 2: Things Maintenance (Factory Reset/Reboot)
In execution of “./groupserver” on deviceA
1 :: CREATE ACTIONSET
2 :: EXECUTE ACTIONSET(ALLBULBON)
3 :: EXECUTE ACTIONSET(ALLBULBOFF)
4 :: CREATE ACTIONSET(R_ALLBULBON)
41 :: EXECUTE ACTIONSET 42 :: CANCEL ACTIONSET
5 :: CREATE ACTIONSET(S_ALLBULBON)
51 :: EXECUTE ACTIONSET 52 :: CANCEL ACTIONSET
…
42(prompt)
This scenario shows two requests from an administrator to things: First is a factory reset and
second is a system reboot. A factory reset is to restore all system configuration parameters to
default one. And a system reboot is just to let the system reboot.
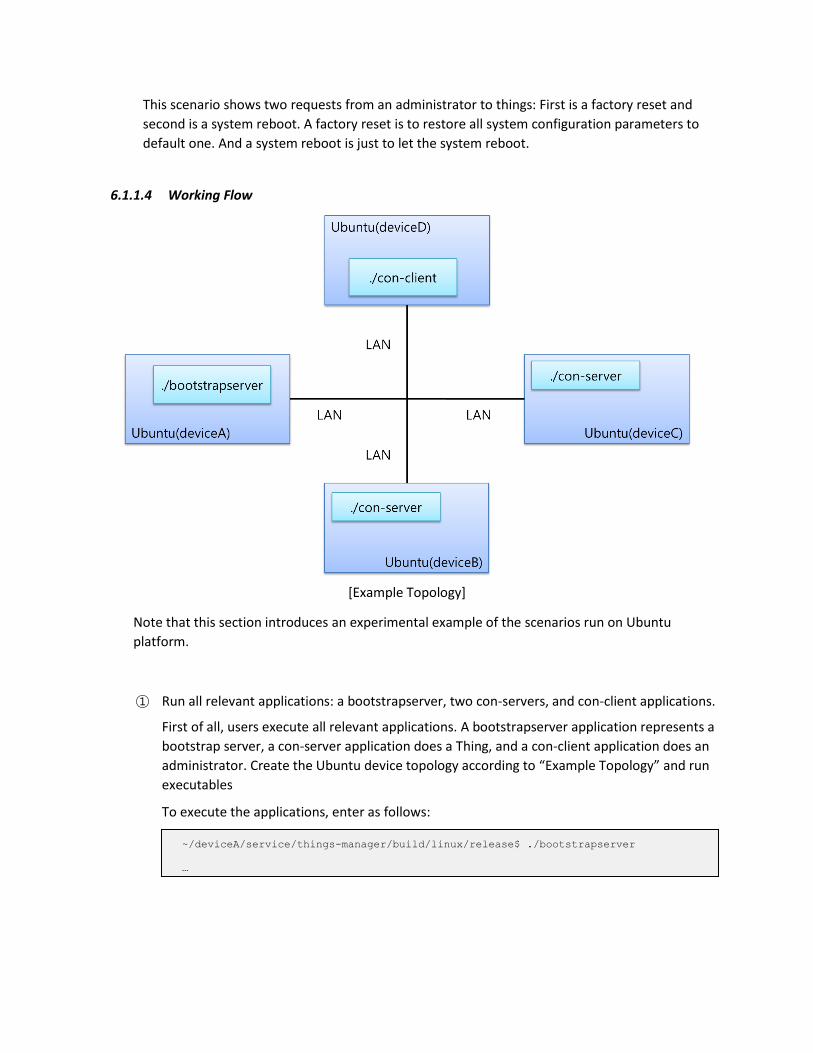
6.1.1.4 Working Flow
[Example Topology]
Note that this section introduces an experimental example of the scenarios run on Ubuntu
platform.
① Run all relevant applications: a bootstrapserver, two con-servers, and con-client applications.
First of all, users execute all relevant applications. A bootstrapserver application represents a
bootstrap server, a con-server application does a Thing, and a con-client application does an
administrator. Create the Ubuntu device topology according to “Example Topology” and run
executables
To execute the applications, enter as follows:
~/deviceA/service/things-manager/build/linux/release$ ./bootstrapserver
…

② Bootstrapping between things and a bootstrap server
First step for the con-server application is to bootstrap all system configuration parameters
from the bootstrapserver application. To do this, users simply use a doBootStrap() function
as following code:
After a successful bootstrapping, a callback function will be called. All configuration
parameters are carried as a pair of attribute key and value in a form of OCRepresentation
instance. So users need to use an attribute key to retrieve a corresponding attribute value. In
~/deviceB/service/things-manager/build/linux/release$ ./con-server
~/deviceC/service/things-manager/build/linux/release$ ./con-server
…
(0) Quit
(1) Bootstrap
(2) Create Configuration Resources
~/deviceD/service/things-manager/build/linux/release$ ./con-client
…
(0) Quit
(1) Find all resources(URI: /oic/con, /oic/mnt, /factoryset)
(2) Find all groups
(3) Get a Configuration resource
(4) Update a device name attribute value
(5) FactoryReset (for the group)
(6) Reboot (for the group)
(10) Show Configuration Units
~/deviceA/service/things-manager/sampleapp/linux/configuration/con-server.cpp
int main()
{
…
g_thingsmanager->doBootstrap(&onBootstrap);

this release, users should manually retrieve these configuration parameters. This process is
shown as following code:
~/deviceA/service/things-manager/sampleapp/linux/configuration/con-server.cpp
void onBootstrap(const HeaderOptions& headerOptions, const OCRepresentation& rep, const
int eCode)
{
if (eCode == SUCCESS_RESPONSE){
std::cout << "\n\nGET request was successful" << std::endl;
std::cout << "\tResource URI: " << rep.getUri() << std::endl;
defaultDeviceName = rep.getValue< std::string >("n");
defaultLocation = rep.getValue< std::string >("loc");
defaultLocationName = rep.getValue< std::string >("locn");
defaultRegion = rep.getValue< std::string >("r");
defaultCurrency = rep.getValue< std::string >("c");

Based on the codes, users can execute the con-server application to bootstrap by entering a
digit “1” as follows:
In execution of “./con-server” on deviceB and deviceC
…
(0) Quit
(1) Bootstrap
(2) Create Configuration/Maintenance Resources
1
Finding Bootstrap Server resource...
DISCOVERED Resource:
URI of the resource: /bootstrap
Host address of the resource: coap://10.251.42.143:33472
List of resource types:
bootstrap
List of resource interfaces:
oc.mi.def
Getting bootstrap server representation on: oc.mi.def
GET request was successful
Resource URI: /bootstrap
Device Name: Legacy Device
Location : 37.256616, 127.052806
LocationName: Living Room
Currency : Won
Region : Seoul, Korea

③ Create a Configuration resource and Maintenance resource
Next step for the con-server application is to create a Configuration resource and
Maintenance resource with the retrieved configuration parameters from a bootstrap server.
Please note that an implementation and management of the Configuration resource and
Maintenance resource is up to developers. For this example scenario, this guide provides
sample files (i.e., ConfigurationCollection.h/.cpp and MaintenanceCollection.h/.cpp) for the
resources so users can refer the files.
To create such resources, enter a digit “2” as follows:
The usage of Factoryset resource will be discussed in Step 7.
In execution of “./con-server” on deviceB and deviceC
…
(0) Quit
(1) Bootstrap
(2) Create Configuration/Maintenance Resources
2
Configuration Resource is Created!(URI: /oic/con)
Maintenance Resource is Created!
Factoryset Resource is Created!
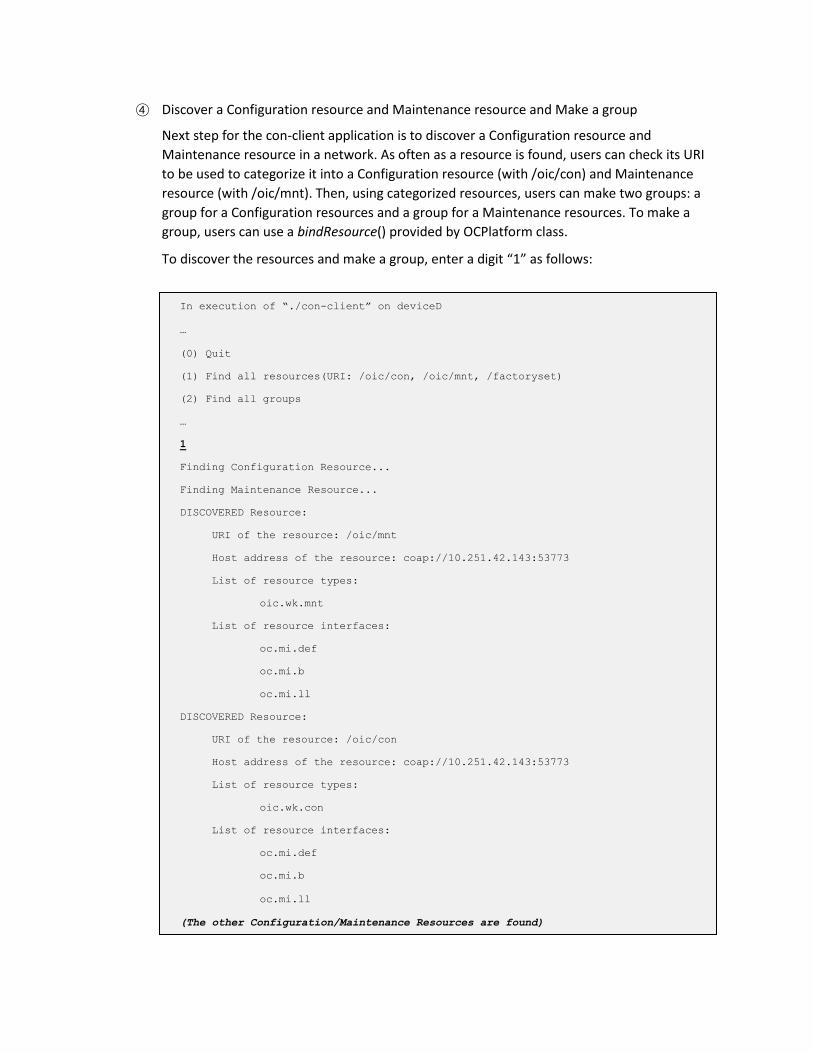
④ Discover a Configuration resource and Maintenance resource and Make a group
Next step for the con-client application is to discover a Configuration resource and
Maintenance resource in a network. As often as a resource is found, users can check its URI
to be used to categorize it into a Configuration resource (with /oic/con) and Maintenance
resource (with /oic/mnt). Then, using categorized resources, users can make two groups: a
group for a Configuration resources and a group for a Maintenance resources. To make a
group, users can use a bindResource() provided by OCPlatform class.
To discover the resources and make a group, enter a digit “1” as follows:
In execution of “./con-client” on deviceD
…
(0) Quit
(1) Find all resources(URI: /oic/con, /oic/mnt, /factoryset)
(2) Find all groups
…
1
Finding Configuration Resource...
Finding Maintenance Resource...
DISCOVERED Resource:
URI of the resource: /oic/mnt
Host address of the resource: coap://10.251.42.143:53773
List of resource types:
oic.wk.mnt
List of resource interfaces:
oc.mi.def
oc.mi.b
oc.mi.ll
DISCOVERED Resource:
URI of the resource: /oic/con
Host address of the resource: coap://10.251.42.143:53773
List of resource types:
oic.wk.con
List of resource interfaces:
oc.mi.def
oc.mi.b
oc.mi.ll
(The other Configuration/Maintenance Resources are found)

Note that a group can be represented to a collection resource. Thus, users need to find the
collection resources as to find groups. To do this, enter a digit “2” as follows:
In execution of “./con-client” on deviceD
…
(0) Quit
(1) Find all resources(URI: /oic/con, /oic/mnt, /factoryset)
(2) Find all groups
…
2
Finding Collection resource...
DISCOVERED Resource:
URI of the resource: /core/a/maintenance/resourceset
Host address of the resource: coap://10.251.42.143:39071
List of resource types:
core.maintenance.resourceset
List of resource interfaces:
oc.mi.b
oc.mi.c
oc.mi.def
DISCOVERED Resource:
URI of the resource: /core/a/configuration/resourceset
Host address of the resource: coap://10.251.42.143:39071
List of resource types:
core.configuration.resourceset
List of resource interfaces:
oc.mi.b
oc.mi.c
oc.mi.def

⑤ Update a Configuration resource
Next step for the con-client application is to update a specific value of a Configuration
resource. Here, a target attribute is a device name in Configuration resource.
First, users need to know a ConfigurationName indicating a target attribute. In this example,
the ConfigurationName used is “n” which refers to a device name. And users need to specify
a new value to be updated. After that, users store them in form of std::map structure and
then use a updateConfigurations() function. The code of this procedure is shown as follows:
Based on the above code, to update a value of Configuration resource, enter a digit “4” as
follows:
Then, users can notice that all con-server applications have received a request to update the
value as follows:
~/deviceA/service/things-manager/sampleapp/linux/configuration/con-client.cpp
ConfigurationName name = "n";
ConfigurationValue value = "OIC Device";
std::cout << "For example, change a device name" << std::endl;
std::map< ConfigurationName, ConfigurationValue > configurations;
configurations.insert(std::make_pair(name, value));
if (g_thingsmanager->updateConfigurations(g_configurationCollection,
configurations,&onUpdate) != OC_STACK_ERROR)
isWaiting = 1;
In execution of “./con-client” on deviceD
…
(0) Quit
(1) Find all resources(URI: /oic/con, /oic/mnt, /factoryset)
(2) Find all groups
(3) Get a Configuration resource
(4) Update a device name attribute value
…

⑥ Get a Configuration resource
Next step for the con-client application is to get a value of a Configuration resource. Here, a
target value is a value of Configuration resource which has 5 attributes such as a device name,
location, location name, currency, and region attributes. More details are described in
Section 5.2.
To get a value, users need to know a Configuration Name indicating the target attribute key,
which is introduced in Section 5.2. In this release, the Configuration Name is “all” because it
wants to retrieve all attributes in the configuration resource. An update value is not needed.
After that, users store them in form of std::vector structure and then use a
getConfigurations() function. The code of this procedure is shown as follows:
⑦ Factory Reset for maintenance
In execution of “./con-server” on deviceB and deviceC
…
In entity handler wrapper:
In Server CPP (entityHandlerForResource) entity handler:
In Server CPP prepareResponseForResource:
requestFlag : Request
requestType : PUT
value : OIC Device
~/deviceA/service/things-manager/sampleapp/linux/configuration/con-client.cpp
ConfigurationName name = "all";
std::cout << "For example, get configuration collection's value" << std::endl;
std::vector< ConfigurationName > configurations;
configurations.push_back(name);
if (g_thingsmanager->getConfigurations(g_configurationResource, configurations,
&onGet)!= OC_STACK_ERROR)
isWaiting = 1;

One functionality of Thing Maintenance is a factory reset to restore all system configuration
parameters to default one. As described in Section 5.2, all default parameters are stored in
Factoryset resource.
For a factory reset functionality, users need to just update a value of FactoryReset resource
to “true”. After the value is updated to “true”, the con-server application checks the value
and executes a factory reset by itself. The logic how to do a factor reset is not provided by
Things Maintenance. This con-server application just shows one of example to do a factory
reset using with Factoryset resource. Please refer to the con-server application for this.
To sum up, users need to just update a value of FactoryReset resource by using factoryReset()
function. The code of this procedure is shown as follows:
Based on the code, to request a factory reset to all con-server applications, enter a digit “5”
as follows:
~/deviceA/service/things-manager/sampleapp/linux/configuration/con-client.cpp
// factory reset
if (g_thingsmanager->factoryReset(g_maintenanceCollection, &onFactoryReset)
!= OC_STACK_ERROR)
isWaiting = 1;
In execution of “./con-client” on deviceD
…
(0) Quit
...
(5) FactoryReset (for the group)
(6) Reboot (for the group)
(10) Show Configuration Units
5

Then, users can notice that all con-server applications have received a request to do a factory
reset as follows:
⑧ System reboot for maintenance
One functionality of Thing Maintenance is a system reboot to let the system reboot. Like a
factory reset, all users need to do for the system reboot is to just update a value of Reboot
resource to “true”. The logic how to let the system reboot is not provided by Thing
Maintenance. This con-server application just shows one of example to reboot an Ubuntu
system. Please refer to the con-server application for this.
The code to request a reboot to the con-server applications is shown as follows:
In execution of “./con-server” on deviceB and deviceC
…
In entity handler wrapper:
In Server CPP (entityHandlerForResource) entity handler:
In Server CPP prepareResponseForResource:
requestFlag : Request
requestType : PUT
value: true
Factory Reset will be soon...
~/deviceA/service/things-manager/sampleapp/linux/configuration/con-client.cpp
// reboot
if (g_thingsmanager->reboot(g_maintenanceCollection, &onReboot) != OC_STACK_ERROR)
isWaiting = 1;

Based on the code, to update a value of Reboot resource, enter a digit “6” as follows:
Then, users can notice that all con-server applications have received a request to reboot a
system as follows:
Please note that an actual system reboot can happen when users run the application as a
super user.
6.1.2 Tizen
6.1.2.1 Example Scenario : Group Formation & Group Action
Example scenario for Tizen sample application group formation and group action is same as that of Linux.
Please refer to section Example Scenario : Group Formation & Group Action for more details.
In execution of “./con-client” on deviceD
…
(0) Quit
...
(5) FactoryReset (for the group)
(6) Reboot (for the group)
(10) Show Configuration Units
6
In execution of “./con-server” on deviceB and deviceC
…
In entity handler wrapper:
In Server CPP (entityHandlerForResource) entity handler:
In Server CPP prepareResponseForResource:
requestFlag : Request
requestType : PUT
value: true
Reboot will be soon...

6.1.2.2 Working Flow
This section introduces an experimental example of the scenarios where light bulbs and bookmark run
on Ubuntu platform and the TM sample app on Tizen Mobile. This section describes how Things (i.e.
bulbs and bookmark) can make group communication and what kind of features can be provided by
Things Manager, specifically Group Manager.
6.1.2.2.1 Run all light bulb applications
First of all, users execute light bulb applications (linux) corresponding to actuators (called resources from
here).
To execute the light bulb application, enter as follows:
As seeing above, users can know details of the registration for the light bulb resource including resource
URI, resource type, and resource interface.
Next, execute a bookmark application. To do, enter as follows:
6.1.2.2.2 Run the TM sample app to control a group
Now, users execute Tizen application, called a “TM sample app”. Once the application is executed, it
shows two options: GROUP APIS & CONFIGURATION APIS.
~/out/linux/<arch>/release/service/things-manager/SampleApp/linux $ ./lightserver
Resource URI : /a/light
Resource Type Name : core.light
Resource Interface : oc.mi.def
Resource creation is successful with resource handle : 0x1dd1de0
~/out/linux/<arch>/release/service/things-manager/SampleApp/linux $ ./bookmark
Resource URI : /core/bookmark
Resource Interface : oc.mi.def
Resource creation is successful with resource handle : 0xfd6da0
…

MAIN MENU SCREEN:
GROUPACTION APIS: For verifying Group Manager APIs.
CONFIGURATION APIS: For verifying Things Configuration and Maintenance APIs.
Once you select the first option the below screen will be shown:

If light resource (linux) is running, then resource information will be displayed as shown in the below
screenshot
GROUP APIS SCREEN:
Press Find Group button to find the group resource. It invokes findGroup API for the resource of the
type “b.collection”
Once we find the group resource, a list of actions will be displayed which can be performed using the
found group comprising the found light resources.

6.1.2.2.3 Create group actionset ”AllBulbsOn” and “AllBulbsOff”
The next step is to define group actionsets for the group. In this example, there are two predefined
group actionsets: “AllBulbsOn” and “AllBulbsOff”
To create action set “AllBulbsOn” & “ALLBULBOFF” click 1st option in the app
6.1.2.2.4 Execute a group action
To execute action set “AllBulbsOn”, click 2nd option in the App.

Now, users can notice that all light bulb applications have an “On” event as follows:
To execute action set “AllBulbsOff”, click 3rd option in the App.
Now, users can notice that all light bulb applications have an “Off” event as follows:
In execution of “./lightserver
…
In entity handler wrapper:
In Server CPP entity handler:
requestFlag : Request
requestType : PUT
power: on
In execution of “./lightserver”
…
In entity handler wrapper:
In Server CPP entity handler:
requestFlag : Request
requestType : PUT
power: off

6.1.2.2.5 Create, Execute and Cancel ActionSet (RECURSIVE_ALLBULBON)
User can create an action set that can be triggered recursively. In sample application we are giving time
duration of 5 seconds .
To create a recursive action set “ALLBULBON” click 4th option in the app.
To execute the recursive action set “ALLBULBON” click on th 4.1 option in the App.

Now, users can notice that all light bulb applications have an “On” event after each 5 seconds as follows:
(until user cancel it by clicking 4.2 option in the app)
To cancel the recursive action set “ALLBULBON” click on the 4.2 option in the App. It will stop the
recursive action set “ALLBULBON”.
In execution of “./lightserver
…
In entity handler wrapper:
In Server CPP entity handler:
requestFlag : Request
requestType : PUT
power: on

6.1.2.2.6 Create, Execute and Cancel ActionSet (SCHEDULED_ALLBULBOFF)
User can create an action set that can be triggered at the given date and time.
To create a scheduled action set “ALLBULBOFF” click on the 5th option in the app.
On clicking the 5th option the following pop-up will be shown:
After setting the date and time:

To execute scheduled action set “ALLBULBOFF” click on the 5.1 option in the App.
To cancel the scheduled action set “AllBulbsOFF” click on the 5.2 option in the App. It will cancel the scheduled action set that has been executed using 5.1 option.

6.1.2.2.7 GetActionSet (ALLBULBOFF)
To get an actionset “ALLBULBOFF” that we have created using 1st option of the UI.
6.1.2.2.8 DeleteActionSet (ALLBULBOFF)
To delete an action set “ALLBULBOFF” that we have created earlier using 1st option of the UI.

6.1.2.2.9 Request an observe to a bookmark application
For the second scenario the “TM sample app” needs to monitor how a bookmark’s status changes. To do
this, the “TM sample app” utilizes an observe option of CoAP specification.
To request an observe, click on the 8th option i.e. “Find Bookmark to Observe”. Then the “TM sample
app” discovers a bookmark resource in a network and then sends an observe request to the found
resource server.
If the observe request is successfully delivered to a bookmark resource server, users can see the below
prompt.
In execution of “./bookmark”
Input a integer(0:opened, 5:close) :
…

6.1.2.2.10 Change a status of bookmark resource
If users want to change a status of the bookmark resource, simply put a digit “0” or “5” as follows
Once the status changes, the bookmark application sends the notification to the groupserver application.
If the notification informs that a book is opened, just execute an “AllBulbOn” action set and send a
request for light bulb resource to turn on.
After that, users can notice that all light bulb applications have an “On” event as follows:
6.1.2.3 Example Scenario : Things Configuration & Maintenance
Example scenario for Tizen sample application for things configuration and maintenance is same as that
of Linux. Please refer to sectionExample Scenario : Things Configuration & Maintenance for more details.
6.1.2.4 Working Flow
This section introduces an experimental example of the scenarios run on Ubuntu platform & Tizen App.
6.1.2.4.1 Run all the relevant applications
bootstrapserver (Linux), con-server(Tizen) and TM sample(Tizen) app .
First of all, user executes all relevant applications. A bootstrapserver application represents a bootstrap
server, a con-server application does a Thing, and a TM sample application does an administrator.
To execute the bootstrap Linux App, enter as follows:
In execution of “./bookmark”
Input a integer(0:opened, 5:close) : 0
…
In execution of “./lightserver”
…
In entity handler wrapper:
In Server CPP entity handler:
requestFlag : Request
requestType : PUT
power: on
~/deviceA/service/things-manager/build/linux/release$ ./bootstrapserver

Now, run the con-server Tizen App
MAIN MENU SCREEN :
Two options are provided on the main menu :
doBootStrap
Create Configuration Resources
6.1.2.4.2 doBootStrap
This API is used by resource server, to receive configuration information from an available bootstrap
server to configure it to access other IoT services. We receive configuration information in
onBootStrapCallback, we are updating same information to UI as shown in the below figure.

6.1.2.4.3 Create Configuration Resources
Create configuration resources with the retrieved configuration parameters from a bootstrap server.
Configuration Resource
Maintenance Resource
Factoryset Resource
After successful creation of all the resources the UI will be updated as shown below:
we can test the Configuration APIs of Things Configuration and Maintenance class by running our TM
sample app that has con-client in it i.e. CONFIGURATION APIS.
Now, Run the TM sample app
MAIN MENU SCREEN:

CONFIGURATION APIS: Click on this menu to test Things configuration and Maintenance APIs.
CONFIGURATION APIS SCREEN:

6.1.2.4.4 Find All Groups
Search for the groups of the type core.configuration.resourceset, core.maintenance.resourceset and
core.factoryset.resourceset using API findCandidateResources.
6.1.2.4.5 Find All Resources
Search for the resources of the type oic.wk.con, oic.wk.mnt and factoryset using API
findCandidateResources.

6.1.2.4.6 Get a Configuration Resource
Get configuration table from “oic.wk.con” resource. We will get four attributes of configuration
resource : Location, System Time, Currency and Region as shown in below screenshot.
6.1.2.4.7 Update Attribute (region)
Set attribute “region” of oic.wk.con resource with new value(India).
Once user select Update attribute(region) option in the app the following dialog will be shown

For Example:
If user clicks Set then, the following screen will be shown

Now, if user clicks on the 3rd option “Get a Configuration Resource”, user will see the region attributes
has been set to the new value given by him.
6.1.2.4.8 Factory Reset
Invoke factoryReset on “oic.wk.mnt” resource to restore all system configuration parameters to default
one.

Note that now, If you press Get Configuration (region) option, you can see that it’s been reset to default
value:
6.1.2.4.9 Reboot
Invoke reboot on “oic.wk.mnt” resource to reboot the con-server.

6.1.2.4.10 Get Supported Configuration Units
Get supported configuration unit in JSon format.
6.1.3 Android
6.1.3.1 Example Scenario : Group Formation & Group Action
Example scenario for Android sample application group formation and group action is same as that of
Linux. Please refer to sectionExample Scenario : Group Formation & Group Action for more details.
6.1.3.2 Working Flow
This section introduces an experimental example of the scenarios where light bulbs and bookmark run
on Ubuntu platform and the TM sample app on Android. This section describes how Things (i.e. bulbs
and bookmark) can make group communication and what kind of features can be provided by Things
Manager, specifically Group Manager.
6.1.3.2.1 Run all light bulb applications
First of all, users execute light bulb applications (linux) corresponding to actuators (called resources from
here).
To execute all light bulb application, enter as follows:

As seeing above, users can know details of the registration for the light bulb resource including resource
URI, resource type, and resource interface.
Next, execute a bookmark application. To do, enter as follows:
6.1.3.2.2 Run the TM sample app to control a group
Now, users execute Android application, called a “TM sample app”. Once the application is executed, it
shows two options:
GROUP APIS
CONFIGURATION APIS.
~/out/linux/<arch>/release/service/things-manager/SampleApp/linux $ ./lightserver
Resource URI : /a/light
Resource Type Name : core.light
Resource Interface : oc.mi.def
Resource creation is successful with resource handle : 0x1dd1de0
~/out/linux/<arch>/release/service/things-manager/SampleApp/linux $ ./bookmark
Resource URI : /core/bookmark
Resource Interface : oc.mi.def
Resource creation is successful with resource handle : 0xfd6da0
…

MAIN MENU SCREEN:
GROUP APIS: For verifying Group Manager APIs.
CONFIGURATION APIS: For verifying Things Configuration and Maintenance APIs.
Once you select the first option the below screen will be shown:
If resource is running in background, then resource information will be displayed as shown in the
below screenshot

GROUP APIS SCREEN:
Find Group: Clicking Find Group button invokes findGroup API for the resource of the type
“b.collection”
After that, click Find Group button to find the group resource. Once we find the group resource, a
list of actions will be displayed which can be performed. Group comprising the found light
resources. Group information will be displayed as shown in the below screenshot
6.1.3.2.3 Create group action set,”AllBulbsOn” and “AllBulbsOff”
The next step is to define group action sets for the group. In this example, there are two
predefined group action sets: “AllBulbsOn” and “AllBulbsOff”. To create action set “AllBulbsOn” &
“ALLBULBOFF” click on the 1st option in the app

6.1.3.2.4 Execute a group action
To execute action set “AllBulbsOn”, click on the 2nd option in the App.
After that, users can notice that all light bulb applications have an “On” event as follows:
In execution of “./lightserver
…
In entity handler wrapper:
In Server CPP entity handler:
requestFlag : Request
requestType : PUT
power: on

To execute action set “AllBulbsOff”, click on the 3rd option in the App.
Then, users can notice that all light bulb applications have an “Off” event as follows:
6.1.3.2.5 Create, Execute and Cancel ActionSet (RECURSIVE_ALLBULBON)
User can create an action set that can be triggered recursively.In sample application we are giving
time duration of 5 seconds .
In execution of “./lightserver”
…
In entity handler wrapper:
In Server CPP entity handler:
requestFlag : Request
requestType : PUT
power: off

To create a recursive action set “ALLBULBON” click on the 4th option in the app.
To execute the recursive action set “ALLBULBON” click on the 4.1 option in the App.
Then users can notice that all light bulb applications have an “On” event after each 5 seconds as
follows: (until user cancel it by clicking 4.2 option in the app)

To cancel the recursive action set “ALLBULBON” click on the 4.2 option in the App. It will stop the
recursive action set “ALLBULBON”.
In execution of “./lightserver
…
In entity handler wrapper:
In Server CPP entity handler:
requestFlag : Request
requestType : PUT
power: on

6.1.3.2.6 Create, Execute and Cancel ActionSet (SCHEDULED_ALLBULBOFF)
User can create an action set that can be triggered at the given date and time. To create a
scheduled action set “ALLBULBOFF” click on the 5th option in the app.
On clicking the 5th option the following dialog will be shown:
To execute scheduled action set “ALLBULBOFF” click on the 5.1 option in the App.
To cancel the scheduled action set “AllBulbsOFF” click on the 5.2 option in the App. It will cancel the scheduled action set that has been executed using 5.1 option.

6.1.3.2.7 GetActionSet (ALLBULBOFF)
To get an actionset “ALLBULBOFF” that we have created using 1st option of the UI.

6.1.3.2.8 DeleteActionSet (ALLBULBOFF)
To delete an action set “ALLBULBOFF” that we have created earlier using 1st option of the UI.
6.1.3.2.9 Request an observe to a bookmark application
For the second scenario mentioned in Section7.1, the “TM sample app” needs to monitor how a
bookmark’s status changes. To do this, the “TM sample app” utilizes an observe option of CoAP
specification. To request an observe, click on the 8th option i.e. “Find Bookmark to Observe”.
Then the “TM sample app” discovers a bookmark resource in a network and then sends an
observe request to the found resource server.

If the observe request is successfully delivered to a bookmark resource server, users can see the
below prompt.
6.1.3.2.10 Change a status of bookmark resource
If users want to change a status of the bookmark resource, simply put a digit “0” or “5” as follows:
Once the status changes, the bookmark application sends the notification to the groupserver
application. If the notification informs that a book is opened, just execute an “AllBulbOn”
action set and send a request for light bulb resource to turn on.
After that, users can notice that all light bulb applications have an “On” event as follows:
6.1.3.3 Example Scenario : Things Configuration & Maintenance
Example scenario for Android sample application for things configuration and maintenance is same as
that of Linux. Please refer to section Example Scenario : Things Configuration & Maintenance for more
details.
6.1.3.4 Working Flow
This section introduces an experimental example of the scenarios run on Ubuntu platform & Android
App.
In execution of “./bookmark”
Input a integer(0:opened, 5:close) :
…
In execution of “./bookmark”
Input a integer(0:opened, 5:close) : 0
…
In execution of “./lightserver”
…
In entity handler wrapper:
In Server CPP entity handler:
requestFlag : Request
requestType : PUT
power: on

6.1.3.4.1 Run all relevant applications: a bootstrapserver (Linux), con-server(Android) and TM
sample(Android) app .
First of all, users execute all relevant applications. A bootstrapserver application represents a
bootstrap server, a con-server application does a Thing, and a TM sample application does an
administrator.
To execute the applications, enter as follows:
Now, run the con-server Android App
MAIN MENU SCREEN :
6.1.3.4.2 doBootStrap :
This API is used by resource server, to receive configuration information from an available
bootstrap server to configure it to access other IoT services. We receive configuration
information in onBootStrapCallback, we are updating same information to UI as shown in the
below figure.
~/deviceA/service/things-manager/build/linux/release$ ./bootstrapserver
…

6.1.3.4.3 Create Configuration resources:
Create configuration resources with the retrieved configuration parameters from a bootstrap
server.
Configuration resource
Maintenance resource
Factorysetresource
After successful creation of all the resources the UI will be updated as shown below
we can test the Configuration APIs of Things Configuration and Maintenance by running our
sample app that has con-client in it i.e. CONFIGURATION APIS. Now, Run the TM sample app
MAIN MENU SCREEN:

CONFIGURATION APIS: Click on this menu to test Things configuration and Maintenance APIs
CONFIGURATION APIS SCREEN:
Note that in the above snapshots, since in a single snapshot all options cannot be shown, two
snapshots are captured to show all the options.
6.1.3.4.4 Find All Groups
Search for the groups of the type core.configuration.resourceset, core.maintenance.resourceset
and core.factoryset.resourceset using API findCandidateResources.

6.1.3.4.5 Find All Resources
Search for the resources of the type oic.wk.con, oic.wk.mnt and factoryset using API
findCandidateResources.

6.1.3.4.6 Get a Configuration resource
Get configuration table from “oic.wk.con” resource. We will get four attributes of configuration
resource : Location, System Time, Currency and Region as shown in below screenshot.
6.1.3.4.7 Update Attribute (region)
Set attribute “region” of oic.wk.con resource with new value(India).
Once user select Update attribute(region) option in the app the following dialog will be shown

For example :
If user clicks ok then, the following screen will be shown

Now, if user clicks on the 3rd option “Get a Configuration resource”, user will see the region
attributes has been set to the new value given by him.
6.1.3.4.8 Factory Reset
Invoke factoryReset on “oic.wk.mnt” resource to restore all system configuration parameters to
default one.

Note that now, If you press Get Configuration (region) option, you can see that it’s been reset to
default value:
6.1.3.4.9 Reboot
Invoke reboot on “oic.wk.mnt” resource to reboot the con-server.

6.1.3.4.10 Get Supported Configuration Units
Get supported configuration unit in JSon format.

7 RESOURCE HOSTING
The goal of Resource Hosting is to off-load the request handling works from the resource server where
original resource is located.
Figure 12: Resource Hosting Functional Bolck Diagram
Resource Hosting has three functional blocks over the Resource Encapsulation Layer. Resource
Virtualization creates and registers the mirrored resources which reflects the status of the origin
resource server. The resources between origin server and mirrored resource are synchronized via
Resource Synchronization block and remote requests from resource clients are handled by the Remote
Request Handler.
Figure 13: Resource Hosting Deployment View
Figure 13 illustrates the Deployment View of the Resource Hosting. It provides Resource Hosting APIs
that can be used to start and stop “Hosting”. When origin server creates a resource which is needed to
be hosted, and Hosting service in network is available, Resource Hosting makes mirrored resource of
origin server. Mirrored resource maintains data synchronized with origin resource. If client get data or
discovery resource by information of origin resource, Mirrored resource will responds to client instead
of origin server. When data of origin resource updated, Data of mirrored resource is cloned from origin
resource and mirrored resource notify to clients.

7.1 SAMPLE APPLICATION : RESOURCE HOSTING This section describes about the sample applications across various platforms using the Resource
Hosting APIs.
7.1.1 Linux
This section describes the working flow of sampleprovider, sampleresourcehosting, sampleconsumer
on linux machine. Sampleprovider is origin server which is needed to be hosted, sampleresourcehosting
is hosting device, It will run “Resource Hosting”. and sampleconsumer is client. It want to know about
information of ogirin server.
First run the sampleprovider:
Following logs will be shown:
“sampleprovider” make origin server. It’s URI is “/a/TempHumSensor/hosting”.
It can choice two options, If option is selected, application update value of attribute named
“Temperature” and notify to observers.
And run the sampleresourcehosting:
Following logs will be shown:
Log of “Successfully” is shown, Resource Hosting feature is started successfully.
Resource Hosting make mirrored resource of origin server. It’s URI is “/a/TempHumSensor”
~/[release folder]/service/resource-hosting/SampleApp/linux $ ./sampleprovider
~/[release folder]/service/resource-hosting/SampleApp/linux $ ./sampleresourcehosting

Last, run the sampleconsumer:
Following logs will be shown:
Sampleconsumer find resource of Temperature. It can found mirrored resource(URI :
“/a/TempHumSensor”).
and It can request(Observe, Get, Put) to origin server through mirrored resource.
7.1.2 Tizen
Pre-requisite Run sampleprovider, Linux applications to test the Hosting APIS.
After launching the Tizen application (RHSampleApp), run sampleconsumer, Linux
applications for complete two way testing.
Runnig all the Sample Apps:
Steps to run sampleprovider(Linux) Export LD_LIBRARY_PATH to “<iotivity>/out/linux/<arch>/release”
Run the sampleprovider application as shown below
The following logs will be shown
~/[release folder]/service/resource-hosting/SampleApp/linux $ ./sampleconsumer
<iotivity>/out/linux/<arch>/release/service/notification-manager/SampleApp/linux
$./sampleprovider

Run the RHSampleApp(Tizen)
App description Above given is the home screen of the application. Platform configurations will be done
on the launch of the application by default.
On clicking the Find and Host button, the notification manager service will start
completely.
Stop button will terminate the notification manager service completely. Once the service
is terminated it can be restarted using the Find and Host button on the same screen.
Once user presses “Find and Host” button the corresponding logs can be seen on linux and tizen
Applications.
Sampleprovider (Linux)
RHSampleApp (Tizen)

Steps to run sampleconsumer (Linux) Export LD_LIBRARY_PATH to “<iotivity>/out/linux/<arch>/release”
Run the sampleconsumer application as shown below
NOTE: '<iotivity>' is the path to 'iotivity' project.
The following logs will be shown in sampleconsumer
The following logs will be shown in sampleprovider
<iotivity>/out/linux/<arch>/release/service/notification-manager/SampleApp/linux$./sampleconsumer

Now, if user enter 1 in sampleconsumer Application, it will send a observer request to RHSampleApp(as
it is hosting the resource);
Follwing logs will be updated on sampleconsumer Application:
If user enter 2 in sampleconsumer Application, it will send a get request to RHSampleApp(as it is
hosting the resource).
Follwing logs will be updated on sampleconsumer Application:

If user enter 3 in sampleconsumer Application, it will send a put request to RHSampleApp(as it is
hosting the resource).
Follwing logs will be updated on sampleProvider Application:

If user enter 4 in sampleconsumer Application, it will send a delete request to RHSampleApp(as it is
hosting the resource).
Follwing logs will be updated on sampleProvider Application:
Note : No direct communication will be there between sampleprovider and sampleconsumer as
RHSampleApp is hosting the resource.

7.1.3 Android
There are three Android applications which needs to be run to test the functionality of Hosting Manager.
a. SampleProviderApp
b. SampleResourceHosting
c. SampleConsumer
SampleProviderApp acts as TemperatureHumidity Sensor
ResourceHosing will host the SampleProviderApp.
SampleConsumer is the one that will perform operations (GET, PUT, DELETE) on the hosted resource.
Note: As ResourceHosting is hosting the resource all the requests from SampleConsumer App will come
to SampleResourceHosting App.
“Internet of Things” scenario:
We can consider SampleProviderApp as a thin device and SampleResourceHosting as a powerful device,
which can host the resource running in the thin device and can handle all the request on behalf of thin
device.
8.1.3.1 Working flow
First, run the SampleProviderApp application

Run the SampleResourceHosting application
Now press “startHosting” button in SampleResourceHosting app.
Once user presses “startHosting” button the following logs will be shown in the SampleResourceHosting
App

Following logs will be shown in SampleProviderApp:
Note: Logs in the SampleProviderApp may take some time to update. Just wait for few seconds.
Once logs updated you can start SampleConsumer to perform operation on the resource that is hosted
by SampleResourceHosting.
When user starts the SampleConsumer App the following window will be shown:

7.1.3.1.1 Get Request
If user presses “GET” button it will send request to SampleResoureHosting app to get current
temperature and humidity. Once it got the response the logs will be updated as shown below:
7.1.3.1.2 PUT Request
If user presses “PUT” button it will send request to SampleResoureHosting app to put specified value to
temperature and humidity. In sample we are sending temperature = 25 and humidity = 10
Following logs will be shown in SampleConsumer App:

Following logs will be shown in SampleProviderApp:
7.1.3.1.3 OBESERVE Request
If user presses “OBV” button in SampleConsumer app it will send an observe request to
SampleResourceHosting
Following logs will be shown on SampleConsumer App:

If user presses “UP” *Temperature+ button in SampleProviderApp it will increase the current
temperature by 1.
The following logs will be shown SampleProviderApp App
As SampleConsumer is already observing resource so any change on the resource, will notify the
SampleConsumer.
Following logs will be shown in SampleConsumer:

Similarly, if user presses “UP” *Humidity+ button in SampleProviderApp it will increase the current
Humidity by 1.
The following logs will be shown SampleProviderApp
As SampleConsumer is already observing the resource so any change on the resource, will notify the
SampleConsumer.
Following logs will be shown in SampleConsumer:

7.1.3.1.4 DEL Request
If user presses “DEL” button in the SampleProviderApp then it will delete the resource i.e.
TemperatureHumidity.
Following logs will be updated to SampleProviderApp:

8 MULTIPHY - EASY SETUP
Multi-PHY Easy Setup is a primitive service layer developed using platform OS APIs for OnBoarding and
IoTivity Base Layer for Security and Provisioing feature implementation as showin in the Figure 14.
MultiPHY Easysetup primitive service enables different sensor devices(with different connectivity
support) to be easily connected to the end user's IoTivity network seamlessly. Thus enabling Sensor
devices to be part of the IoTivity network in a user friendly manner.
Using MultiPHY Easy Setup functionalities and its offering SDK APIs, developers can easily make different
sensor devices supporting different connectivity technologies, for example, SoftAP to connect to the
Smart Device (OnBoarding step) after UnBoxing. Post unboxing and onboarding steps, sensor will be
provided with the WiFi provisioning information (Provisioning step) to enable sensor devices running on
different transport to easily connect to the home IP network.
Figure 14: MultiPHY EasySetup Architecture
Note : Security features like Device Ownership are not available in v1.0 implementation of IoTivity.
8.1 DETAILED DESCRIPTION There are three types of roles defined in MultiPHY EasySetup; Enrollee, Mediator and Enroller
8.1.1 Enrollee
All devices with limited CPU, memory, and power resources, so- called "constrained devices" often used
as sensors/actuators, smart objects, or smart devices) are termed as Enrollee devices.

All the constrained devices discussed above may or may not have the user interface to take user input
and connect to the user desired networks.
8.1.2 Mediator
The purpose of a Mediator in MultiPHY Easy Setup is to enable Enrollee devices running on different
transports to be easily connected to the target network.
Mediator having support for different transports acts as a controller device to enable target
connectivity to multiple Enrollee running on different transports
8.1.3 Enroller
Enroller is the target network entity to be connected by Enrollee. Mediator provides the target Enroller
information to the Enrollee. The Mediator may get the Enroller information either from the application
user or dynamically fetch from the Enroller depending on the deployment transport and scenario.
8.2 EASYSETUP STEPS
MultiPHY Easy Setup comprises of the following 4 steps
8.2.1 Negotiation
This phase involves negotiation of OnBoarding Modes supported by the Enroller and the Mediator.
Note : In the current implementation, negotiation phase is assumed to be completed. The OnBoardinig
Mode is choosen by default to be either SoftAP or BLE depending on the sample application settting.
8.2.2 OnBoarding
This phase involves starting the OnBoarding transport required for connecting the Mediator and
Enrollee devices. After the devices are connected, the devices are ready for communicating with each
other using standard IoTivity Resource Model.
8.2.3 Ownership Transfer
Ownership transfer phase is required for secure communication between Mediator and Enrollee devices.
Some usecases may not enforce usage of OwnerShip Transfer step. So usage of this step depends on
the information fetched during the negoatiation step.
Note : In the current implementation, the Ownership transfer is not implemented.
8.2.4 Provisioning
The provisioning phase involves handshaking communication process with the Enrollee device regarding
the network information provisioning state of the Enrollee.
If the device is not provisioned with the target network information, Mediator will be posting target
network information to the Enrollee.
If the device is already provisioned with the target network information, the application will be provided
with the chance to update the target network information.

8.3 EASYSETUP RESOURCES
8.3.1 Network Resource Representation
Provisioning phase involves finding the supported Networks by the Enrollee. Table 1 provides high level
view of the sequence and the network resource usage is also shown in the sequence.
Network Resource has several attributes as shown in the Table 2
Resource Name URI Resource Type
Network /oic/net oic.net
Attribute Attribute Name(key)
Value Type Access Modes
Description
Current Network
Type
cnt integer R Indicates the current network type
(1: WLAN, 2: BT, 3: BLE, 4: ZigBee,
5:Ethernet, …)
Available Network Type
ant Array of integers
R Indicate a list of available network
types
e.g., {1, 2} (WLAN and BT)
Table 1 : Network Resource Representation
8.3.2 Provisioning Resource Representation
Provisioning phase involves finding the provisioning status of the Enrollee by the Mediator and perform
the provisioning of network information based on the provisioning status. Provisioning Resource has
several attributes as shown in the Table 2
Resource Name URI Resource Type
Provisioning /oic/prov oic.prov
Attribute Attribute Name(key)
Value Type Access Modes
Description
Provisioning
Status
ps integer R Indicates the provisioning status of the
device
(1: Need to provision, 2: Connected to internet)
Target NetType tnt integer RW Indicates the target network type
(1: WLAN, 2: BT, 3: BLE, 4: ZigBee,
5:Ethernet, …)

Target NetName tnn string RW SSID for Wi-Fi, MAC address for BT
Credential cd string RW Credential information for connecting to the target network
Trigger tr E Trigger to connect to target network
Table 2 : Provisioning Resource Representation
8.4 ANDROID MEDIATOR API Mediator devices are smart devices with the capability to provide user input (for providing target
IoTivity network information) of user Enroller information. This information will be provided to the
Enrollee using IoTivity communication.
Mediator application can be built and deployed in Android device using the procedure mentioned the in
the file “service\easy-setup\Build_Instructions_Android_Arduino.txt”
As shown in theFigure 15 below, after the application is deployed in the device, user has to provide the
following information
- Ad-hoc network information for Enrollee to
- Target IoTivity network information
Figure 15: Mediator Application for EasySetup before/After OnBoarding and Provisioning
StartSetup will start the OnBoarding and Provisioning Process using the information provided by the
user in the UI. After the provisioning is succesful, the UI will be updated as shown in the
8.5 C SDK ENROLLEE API Enrollee devices are thin UI less devices which needs to be connected to the users home IoTivity
network. Connecting to the target IoTivity network enables these Enrollee devices to advertise services

hosted by the Enrollee device in the network and to be controlled by the user using different client
applications.
Figure 16: MultiPHY EasySetup SDK APIs and Application
8.5.1 Build instructions
The following sections helps in setting up Enrollee device in Arduino.
In the terminal navigate to the root of IoTivity directory.
Find the port to which serial pport Arduino is connected
Enable read/write persmission to the serial port
Execute the scons command from the IoTivity directory in the terminal:
8.5.1.1 Arduino hex file upload instructions
Arduino uses serial ports like ttyACM0 for installing the applications on the Arduino device. First identify
on which serial port the Arduino device is connected.
The following command is used for enabling read write persmissin on the serial port to which Arduino is
connected
8.5.1.2 Scons command
For Mega board
For Due board
$ sudo chmod a+rw /dev/ttyACM0
$ scons service TARGET_OS=arduino BOARD=mega TARGET_ARCH=avr SHIELD=IP UPLOAD=TRUE
$ scons service TARGET_OS=arduino BOARD=arduino_due_x_dbg TARGET_ARCH=arm SHIELD=IP
UPLOAD=TRUE

If the build is successful you will see enrollee.hex file generated in the following path
8.5.1.3 Executing Enrollee
Start the serial monitor in Arduino ide for executing the application.
SoftAP Connection
As show in theFigure 17, after starting the serial monitor, the following options will be shown to the user.
Select “S” or “s” to start the Enrollee EasySetup.
Figure 17: Enrollee Arduino Serial Monitor
After selecting “s”, enrollee will be connecting to the SoftAP provided by the sample application. If
connected successfully OnBoarding success log will be shown
Figure 18: Enrollee Onboarding Success log
If connected failed OnBoarding failure as shown in Figure 19 will be displayed
Figure 19: Enrollee Onboarding Failure
Provisioning of target network information
out/arduino/avr/debug/service/easy-setup/sampleapp/enrollee/arduino/enrollee.hex

Once OnBoarding is success, press “p” to start the provisioning of the Enrollee device. If the provisioning
resources are started successfully, log as shown in Figure 20 will be shown
Figure 20: Provisioning Resources started successfully
If provisioning of network information is successful, Enrollee will try conneting to the target network
provided by the Mediator. Arduino Enrollee will show the log as shown in the figure below
Figure 21: Enrollee log after mediator provisions the target network info.