
iOS Apps with REST APIs - Leanpubsamples.leanpub.com/iosappswithrest-sample.pdf ·...
41
Transcript of iOS Apps with REST APIs - Leanpubsamples.leanpub.com/iosappswithrest-sample.pdf ·...


iOS Apps with REST APIsBuilding Web-Driven Apps in Swift
Christina Moulton
This book is for sale at http://leanpub.com/iosappswithrest
This version was published on 2018-06-26
This is a Leanpub book. Leanpub empowers authors and publishers with the Lean Publishingprocess. Lean Publishing is the act of publishing an in-progress ebook using lightweight tools andmany iterations to get reader feedback, pivot until you have the right book and build traction onceyou do.
© 2015 - 2018 Teak Mobile Inc. All rights reserved. Except for the use in any review, thereproduction or utilization of this work in whole or in part in any form by any electronic,mechanical or other means is forbidden without the express permission of the author.

Tweet This Book!Please help Christina Moulton by spreading the word about this book on Twitter!
The suggested hashtag for this book is #SwiftRestAppsBook.
Find out what other people are saying about the book by clicking on this link to search for thishashtag on Twitter:
#SwiftRestAppsBook

Contents
1. From JSON API to Swift App 11.1 What Will You Be Able to Do? 11.2 Who Is This Book For? 21.3 Who Is This Book Not For? 21.4 Using This Book 21.5 What We Mean By Web Services / APIs / REST / CRUD 31.6 What about GraphQL? 31.7 JSON 41.8 Versions 41.9 Source Code 41.10 Disclaimer 51.11 Trademarks 5
2. Our App’s Requirements 62.1 Match Tasks to Endpoints 72.2 User Interface 92.3 API Requirements 102.4 Make a Plan 11
3. Swift JSON Parsing & Networking Calls 101 123.1 REST API Calls with URLSession 123.2 REST API Calls with Alamofire 25
A Brief Introduction to CocoaPods 31Adding a CocoaPod to a Project 31What Does the Podfile Mean? 33Dependencies 34CocoaPods Version Numbers 34Updating CocoaPods 34
Thanks for Reading 36

1. From JSON API to Swift AppYou need to build an iOS app around your team’s API or integrate a third party API. You need a quick,clear guide to demystify Xcode and Swift. No esoteric details about Core Anything or mathematicalanalysis of flatMap. Only the nitty gritty that you need to get real work done now: pulling data fromyour web services into an iOS app, without tossing your MacBook or Mac Mini through a window.
You just need the bare facts on how to get CRUD done on iOS. That’s what this book will do foryou.
1.1 What Will You Be Able to Do?
After reading this book you’ll be able to:
• Analyze a JSON response from a web service call and write Swift code to parse it into modelobjects either manually or using Codable
• Display those model objects in a table view so that when the user launches the app they havea nice list to scroll through
• Add authentication to use web service calls that require OAuth 2.0, a username/password or atoken
• Transition from the main table view to a detail view for each object, possibly making anotherweb service call to get more info about the object
• Let users add, modify and delete objects (as long as your web service supports it)• Hook into more web service calls to extend your app, like adding user profiles or letting userssubmit comments or attach photos to objects
To achieve those goals we’ll build out an app based on the GitHub API, focusing on gists. If you’renot familiar with gists, they’re basically just text snippets, often code written by a GitHub user.Here are mine: cmoulton gists¹. Your model objects might be bus routes, customers, chat messages,or whatever kind of object is core to your app. We’ll start by figuring out how to make calls to webAPIs in Swift and how to handle the data we get from them. Then we’ll start building out our appone feature at a time to make it more and more useful to users:
• Show a list of all public gists in a table view• Load more results when the user scrolls down• Let them pull to refresh to get the latest public gists• Load images from URLs into table view cells
¹https://gist.github.com/cmoulton/
1

From JSON API to Swift App 2
• Use OAuth 2.0 for authentication to get lists of private and starred gists• Have a detail view for each gist showing the text• Allow users to add new gists, star and unstar gists, and delete gists• Handle not having an internet connection with warnings to the user and saving the gists onthe device
1.2 Who Is This Book For?
• Software developers getting started with iOS but experienced in other languages• Relatively new Swift developers who are comfortable with basic concepts in the language likeoptionals
• Front-end devs looking to implement native UIs for iOS apps• Back-end devs tasked with getting the data into the user’s hands on iOS• Android,Windows Phone, Blackberry, Tizen, Symbian & PalmOS devs looking to expand theirweb service backed apps to iOS
• Anyone whose boss is standing over their shoulder asking why the API data isn’t showing upin the table view yet
1.3 Who Is This Book Not For?
• Complete newcomers to programming. You should have a decent grasp of at least one object-oriented programming language or have completed several introduction to iOS tutorials inSwift
• Designers, managers, UX pros, etc. It’s a programming book. All the monospace font insertswill probably drive you crazy
• Cross-platform developers committed to their tools (e.g., React Native ir Xamarin). This bookis all Swift & native UI
• Programmers building apps that have little or no web service interaction• Game developer, unless you’re tying in a REST-like API
1.4 Using This Book
This book is mostly written as a tutorial in implementing a gists demo app. Depending on howyou learn best and how urgently you need to implement your own app, there are two differentapproaches you might take:
1. Work through the tutorials as written, creating an app for GitHub Gists. You’ll understand howthat app works and later be able to apply it to your own apps.

From JSON API to Swift App 3
2. Read through the tutorials but implement them for your own app and API. Throughout thetext I’ll point out where you’ll need to analyze your own requirements and API to help youfigure out how to modify the example code to work with your API. Those tips will look likethis:
List the tasks or user stories for your app. Compare them to the list for the gists app, focusingon the number of different objects (like stars, users, and gists) and the types of action taken(like viewing a list, viewing an object’s details, adding, deleting, etc.).
We’ll start with that task in the next chapter. We’ll analyze our requirements and figure out just whatwe’re going to build. Then we’ll start building the gists app, right after an introduction to makingnetwork calls and parsing JSON in Swift.
1.5 What We Mean By Web Services / APIs / REST /CRUD
Like anything in tech, there are plenty of buzzwords around web services. For a while it was reallytrendy to say your web services were RESTful. If you want to read the theory behind it, head overto Wikipedia². For our purposes in this book, all I mean by “REST web service” or even when I say“web service” or “API” is that we can send an HTTP request and we get back some data in a formatthat’s easy to use in our app. Usually that format will be JSON³.
Web services are wonderful since they let you use existing web-based systems in your own apps.There’s always a bit of a learning curve when you’re using any web service for the first time. Everyone has its own quirks but most of the integration is similar enough that we can generalize how tointegrate them into our iOS apps.
If you want an argument about whether or not a web service is really RESTful you’re not going tofind it here. We’ve got work that just needs to get done.
1.6 What about GraphQL?
GraphQL⁴ is an alternative to REST for APIs. Instead of predetermined resources, GraphQL lets youquery your API to just get the data that you currently need. Most of the code in this book willwork just as well with a GraphQL API. You’ll have to do a little more work to figure out whatqueries you need to make instead of choosing from a list of REST endpoints. You’ll also need tothoroughly understand Codable and plan your model objects and queries to work with it, or use theolder JSONSerialization parsing that we’ll also cover.
²https://en.wikipedia.org/wiki/Representational_state_transfer³http://www.json.org/⁴http://graphql.org

From JSON API to Swift App 4
1.7 JSON
In this book we’re going to deal with web services that return JSON⁵. JSON is hugely common thesedays so it’s probably what you’ll be dealing with. Of course, there are other return types out theresuch as XML. This book won’t cover responses in anything but JSON but it will encapsulate theJSON parsing so that you can replace it with whatever you need to without having to touch a tonof code. If you are dealing with XML response you should look at NSXMLParser⁶.
1.8 Versions
This is version 1.4 of this book. It uses Swift 4, iOS 11 (with support back to iOS 10), and Xcode9. When we use libraries we’ll explicitly list the versions used. The most commonly used one isAlamofire 4.7.
If you need or want an older version of this book for Swift 3, Swift 2.2 or Swift 2.0, email me [email protected]⁷.
1.9 Source Code
All sample code is available on GitHub⁸ under the MIT license⁹. Links are provided throughout thetext. Each chapter has a tag allowing you to check out the code in progress up to the end of thatchapter.
Individuals are welcome to use the code for commercial and open-source projects. As a courtesy,please provide attribution to “Teak Mobile Inc.” or “Christina Moulton”. For more information,review the complete license agreement in the GitHub repo¹⁰.
Throughout the book, code that’s being added will be shown in bold:
func myExistingFunction() {
existingFunctionCall()
functionCallToAdd()
}
And code being removed will be struck out:
⁵http://www.json.org/⁶https://developer.apple.com/library/ios/documentation/Cocoa/Reference/Foundation/Classes/NSXMLParser_Class/⁷mailto:[email protected]⁸https://github.com/cmoulton/grokSwiftREST_v1.4/⁹https://opensource.org/licenses/MIT¹⁰https://github.com/cmoulton/grokSwiftREST_v1.4/blob/master/LICENSE

From JSON API to Swift App 5
func myExistingFunction() {
stuffToRemove()
stuffToKeep()
}
1.10 Disclaimer
The information provided within this eBook is for general informational purposes only. The authorhas made every effort to ensure the accuracy of the information within this book was correct attime of publication. Teak Mobile Inc. and/or Christina Moulton do not assume and hereby disclaimsany liability to any party for any loss, damage, or disruption caused by errors or omissions, whethersuch errors or omissions result from accident, negligence, or any other cause.
Teak Mobile Inc. and/or Christina Moulton shall in no event be liable for any loss of profit or anyother commercial damage, including but not limited to special, incidental, consequential, or otherdamages.
Any use of this information is at your own risk.
1.11 Trademarks
This book identifies product names and services known to be trademarks, registered trademarks, orservice marks of their respective holders. They are used throughout this book in an editorial fashiononly. In addition, terms suspected of being trademarks, registered trademarks, or service marks havebeen appropriately capitalized, although Teak Mobile Inc. and Christina Moulton cannot attest tothe accuracy of this information. Use of a term in this book should not be regarded as affecting thevalidity of any trademark, registered trademark, or service mark. Teak Mobile Inc. and/or ChristinaMoulton are not associated with any product or vendor mentioned in this book.
Apple, Xcode, App Store, Cocoa, Cocoa Touch, Interface Builder, iOS, iPad, iPhone, Mac, OS X, Swift,and Xcode are trademarks of Apple, Inc., registered in the United States and other countries.
GitHub is a trademark of GitHub, Inc. registered in the United States.
Mashape is a trademark of Mashape, Inc. registered in the United States.

2. Our App’s RequirementsIt’s always tempting to jump right into coding but it usually goes a lot smoother if we plan it out inadvance. At the least, we need some idea of what we’re building. Let’s lay that out for the gists appand you can modify it to suit your app.
The first thing to do is to figure out what our app needs to do. There are a few ways to do this taskbut I prefer to make a list of things that users will want to do with your app then design the screensto make those things easy.
So what do people do with gists? Gists are snippets of text, often bits of code that are easily shared.So people might:
1. Look at a list of public gists to see what’s new2. Search for interesting gists, maybe by programming language3. Star a gist so they can find it later4. Look at a list of gists they’ve starred5. Look at a list of their own gists to grab code they commonly use but don’t want to retype all
the time6. Look at details for a gist in a list (public, their own, or starred)7. Create a new gist8. Delete one of their gists
List the tasks or user stories for your app. Compare them to the list for the gists app, focusingon the number of different objects (like stars, users, and gists) and the types of action taken(like viewing a list, viewing an object’s details, adding, deleting, etc.).
Youmight end up with a really long list. Consider each item and whether it’s really necessary for thefirst version of your app. Maybe it can be part of the next release if the first one gets some traction?
Evaluate each task on your list. Decide which ones will form v1.0 of your app. You mighteven want to design v2.0 now so you’re not tempted to put everything in the first version.A good shipped app is far better than a perfect app that’s indefinitely delayed.
6

Our App’s Requirements 7
2.1 Match Tasks to Endpoints
Next look at each of those tasks and figure out how you can use the API to accomplish them or to getthe data you’ll need to display. We’ll check the documentation for the GitHub gists API¹ to find theendpoint for each task. We’ll make notes of anything special that we need to do, like authenticationor pagination.
2.1.1 List Public Gists
GET /gists/public
No authentication required. Will be paginated so we’ll have to load more results if they want to seemore than 20 or so.
2.1.2 Search Gists
Hmm, there isn’t an API for searching gists. Is our app still useful without search? I think so, so wedon’t need to abandon the project.
2.1.3 Star/Unstar a Gist
PUT /gists/:id/star
DELETE /gists/:id/star
Requires authentication.
2.1.4 List Starred Gists
GET /gists/starred
Requires authentication.
2.1.5 List my Gists
There are two ways to get a list of a user’s gists:
GET /users/:username/gists
Or, if authenticated we can get the current user’s gists:
¹https://developer.github.com/v3/gists/

Our App’s Requirements 8
GET /gists
2.1.6 View Gist Details
We’ll probably be able to pass the data from the list of gists to the detail view but if we can’t thenwe can get a single gist’s details:
GET /gists/:id
If we want to display whether a gist is starred then we can use:
GET /gists/:id/star
2.1.7 Create Gist
POST /gists
Requires authentication to create a gist owned by a user. Otherwise the gist is created anonymously.
The JSON to send to create a gist looks like:
{
"description": "the description for this gist",
"public": true,
"files": {
"file1.txt": {
"content": "String file content"
}
}
}
2.1.8 Delete Gists
DELETE /gists/:id
Requires authentication.
Those are the endpoints for our tasks. Other than not being able to build our search feature, weshouldn’t have any trouble building our demo app around this API.
Analyze each action and list the API endpoint or iOS feature that will be needed for it.Make sure that everything is possible using the API that’s available. If not, and the API isbeing built by your team, then request what you need now so there’s plenty of time to getit implemented. If you need features that aren’t available and you don’t have control overthe API then you’ll have to figure out how to work around those requirements.

Our App’s Requirements 9
2.2 User Interface
Now we have to figure out how we’re going to make the app usable by the users. Let’s look at eachtask and figure out how we’d like it to work. I’ve reordered the tasks below a bit to group togetherbits that will share parts of the interface.
2.2.1 Authentication Flow
Since there isn’t much they can do in the app without being logged in, we’ll check at launch if they’reauthenticated. If not, we’ll start the login process immediately.
If your API provides some functionality without authentication then you might want to delayrequiring the user to log in. If that’s the case you can add authentication checks before makingthe API calls that require authentication.
2.2.2 List Public Gists
On launch the user sees a list (table view) with the public gists.
2.2.3 List Starred Gists
From the public gists the user can switch to a similar list of my starred gists.
2.2.4 List My Gists
From the public or starred gists the user can switch to a similar list of their own gists.
Do display these three lists of gists, we’ll be able to use a single table view with have a selector sothe user can pick which set of gists they want to view.
2.2.5 View Gist Details
When they tap on a gist in one of the lists we’ll transition to a different view. That view will listdetails about the gist (description and filenames) and let them view the text of the files. It will alsoshow whether we’ve starred the gist.
2.2.6 Star/Unstar a Gist
Within a gist’s detail view we’ll show the starred status. They will be able to tap to star or unstar agist in that view.

Our App’s Requirements 10
2.2.7 Create Gist
On the list of My Gists we’ll have a + button in the upper right corner. Tapping on that button willdisplay a form where they can enter the info for the new gist:
• Description: text• Whether it’s a public or private gist: Boolean• Filename: text• File content: text
To keep it simple we’ll only allow a single file in gists created in the app in this initial version.
2.2.8 Delete Gists
We’ll allow swipe to delete on the list of My Gists.
Go through your tasks and figure out the user interface that people will use to accomplishthose tasks.
2.3 API Requirements
We’ll have some requirements to interact with the API that aren’t obvious when we consider theuser’s tasks. Reading through the documentation carefully can help us make a list.
2.3.1 Authentication
You can read public gists and create them for anonymous users without a token; however,to read or write gists on a user’s behalf the gist OAuth scope is required. GitHub GistsAPI docs²
We will need to set up authentication, preferably OAuth 2.0, including the gist scope. The API willwork with a username/password but then we’d have to worry about securing that data within theapp. With OAuth 2.0 we never see the username & password, only the token for our app.
We will store the OAuth token securely.
Check your APIs authentication requirements. In the auth chapters we’ll cover how toimplement OAuth 2.0, token-based authentication, and basic auth with username/password.
²https://developer.github.com/v3/gists/#authentication
Our App’s Requirements 11
2.3.2 Handle App Transport Security
In iOS 9, Apple introduced Apple’s App Transport Security³. ATS requires SSL to be used fortransferring data and it’s pretty picky about just how it’s implemented. Sadly this means that alot of servers out there don’t meet ATS’s requirements. GitHub’s gist API complies with the ATSrequirements so we won’t have to add an exception.
If you find that you get SSL errors when calling your API from iOS 9 then you’ll probablyneed to add an exception to ATS.
2.4 Make a Plan
Now that we know what we need to do we can figure out how we’re going to do it. We’ll build theapp up incrementally, feature by feature:
• Set up the app with a table view displaying the public gists• Add custom HTTP headers• Load images in table view cells• Load more gists when they scroll down• Add pull to refresh• Add authentication and let them switch to displaying My Gists and Starred Gists• Create a detail view for the gists• Add starring & unstarring gists in the detail view• Add deleting and creating gists• Handle not having an internet connection
Put your views and tasks in order to implement them. Try to match up roughly with theorder for the gists app. If you don’t have an API call to start with that doesn’t requireauthentication you might need to jump ahead to the auth chapters before starting on thetable view chapter. If your API requires custom headers to be sent with all requests thenyou’ll want to start with the headers chapter then come back to the table view chapter.
Now that we’ve sorted out the basic requirements for our app we know where to start. First, we’llspend a little time looking at how to make web requests and parse JSON in Swift so we don’t getbogged down with those details later.
³https://developer.apple.com/library/ios/documentation/General/Reference/InfoPlistKeyReference/Articles/CocoaKeys.html#//apple_ref/doc/uid/TP40009251-SW33

3. Swift JSON Parsing & NetworkingCalls 101
Nearly every app these days consumes or creates content through a web-based API. In this bookwe’ll mostly use Alamofire¹, a rich networking library, to interact with web services but you canalso use iOS’s URLSession to make REST calls.
3.1 REST API Calls with URLSession
The function to use to make an asynchronous URL request is part of URLSession:
func dataTask(with request: URLRequest, completionHandler:
@escaping (Data?, URLResponse?, Error?) -> Void) -> URLSessionDataTask
It takes a request which contains the URL. When that request is done or has an error to report itcalls the completion handler. The completion handler is where we can work with the results of thecall: error checking, saving the data locally, updating the UI, etc.
The simplest case is a GET request. To figure out how to do that we’ll need an API to hit. Fortunatelythere’s super handy JSONPlaceholder²:
“JSONPlaceholder is a fake online REST API for testing and prototyping. It’s like imageplaceholders but for web developers.”
JSONPlaceholder has a handful of resources similar to what you’ll find in a lot of apps: users, posts,photos, albums, … We’ll stick with todos.
You’ll need to create an Xcode project to run the demo code in this chapter. To do that, open Xcodeand select File -> New -> Project. Choose a Single ViewApplication. Give it a name (maybe Grok101),make sure it’s using Swift (not Objective-C), and choose where you want to save it.
First, let’s print out the title of the first todo (assuming that there are todos, which this dummy APIalready has). To get a single todo, we need to make a GET call to the todos endpoint with an IDnumber. Checking out https://jsonplaceholder.typicode.com/todos/³ we can see that the id for thefirst todo is 1. So let’s grab it.
¹https://github.com/Alamofire/Alamofire²https://jsonplaceholder.typicode.com³https://jsonplaceholder.typicode.com/todos/
12

Swift JSON Parsing & Networking Calls 101 13
3.1.1 Creating a URL Request
First, set up the URL request:
let todoEndpoint = "https://jsonplaceholder.typicode.com/todos/1"
guard let url = URL(string: todoEndpoint) else {
print("Error: cannot create URL")
return
}
let urlRequest = URLRequest(url: url)
Not sure where to put that code? If you created a test project at the start of this chapter, open theViewController.swift file. You can put the test code in viewDidLoad like this:
import UIKit
class ViewController: UIViewController {
override func viewDidLoad() {
super.viewDidLoad()
// test code goes here like this:
let todoEndpoint = "https://jsonplaceholder.typicode.com/todos/1"
guard let url = URL(string: todoEndpoint) else {
print("Error: cannot create URL")
return
}
let urlRequest = URLRequest(url: url)
// ... keep adding test code here
}
}
Now your code will be run when that view controller is shown, which happens right after your applaunches.
The guard statement lets us check that the URL we’ve provided is valid.
Then we need a URLSession to use to send the request. We can use the default shared session:
let session = URLSession.shared
Then create the data task:
let task = session.dataTask(with: urlRequest, completionHandler: { _, _, _ in })

Swift JSON Parsing & Networking Calls 101 14
{ _, _, _ in } looks funny but it’s just an empty completion handler. Since we just want to executeour request and not deal with the results yet, we can specify an empty completion handler here. Itneeds to have input arguments that match the type of completion handler that’s expected, hence the_, _, _ placeholders for those three arguments.
And finally send it (yes, this is an oddly named function):
task.resume()
All together it looks like this:
// set up url request
let todoEndpoint = "https://jsonplaceholder.typicode.com/todos/1"
guard let url = URL(string: todoEndpoint) else {
print("Error: cannot create URL")
return
}
let urlRequest = URLRequest(url: url)
// create and send task
let session = URLSession.shared
let task = session.dataTask(with: urlRequest, completionHandler: { _, _, _ in })
task.resume()
Calling this now will hit the URL (from the urlRequest) and obtain the results (using a GET requestsince that’s the default). To actually get the results to do anything useful we need to implement thecompletion handler.
3.1.2 Completion Handlers
Completion handlers can be a bit confusing the first time you run into them. On the one hand,they’re a variable or argument but, on the other hand, they’re a chunk of code. They can seem oddif you’re not used to that kind of thing which is called a closure:
“Closures are self-contained blocks of functionality that can be passed around and usedin your code.” - iOS Developer Documentation on Closures⁴
Completion handlers are useful when your app is doing something that might take a little while, likemaking an API call, and you need to do something when that task is done, like updating the userinterface to show the data that you just received. You’ll see completion handlers in Apple’s APIs likedataTask(with request: completionHandler:) and later on we’ll add some of our own completionhandlers when we’re writing functions to make our API calls.
In dataTask(with request: completionHandler:) the completion handler argument has a signa-ture like this:
⁴https://developer.apple.com/library/ios/documentation/Swift/Conceptual/Swift_Programming_Language/Closures.html

Swift JSON Parsing & Networking Calls 101 15
completionHandler: (Data?, URLResponse?, Error?) -> Void
The completion handler takes as input a chunk of code with three arguments: (Data?, URLRe-
sponse?, Error?) that returns nothing: Void.
To specify a completion handler we can write the closure inline like this:
let task = session.dataTask(with: urlRequest,
completionHandler: { data, response, error in
// this is where the completion handler code goes
})
task.resume()
The code for the completion handler is the bit between the curly brackets. Notice that the threearguments in the closure data, response, error match the arguments in the completion handlerdeclaration: Data?, URLResponse?, Error?. You can specify the types explicitly when you createyour closure but it’s not necessary because the compiler can figure it out:
let task = session.dataTask(with: urlRequest, completionHandler:{
(data: Data?, response: URLResponse?, error: Error?) in
// this is where the completion handler code goes
if let response = response {
print(response)
}
if let error = error {
print(error)
}
})
task.resume()
Somewhat confusingly, you can actually drop the completionHandler: bit and just tack the closureon at the end of the function call. It’s called trailing closure syntax⁵. This is totally equivalent to thecode above and far more commonly in Swift:
⁵https://developer.apple.com/library/content/documentation/Swift/Conceptual/Swift_Programming_Language/Closures.html#//apple_ref/doc/uid/TP40014097-CH11-ID102

Swift JSON Parsing & Networking Calls 101 16
let task = session.dataTask(with: urlRequest) { data, response, error in
// this is where the completion handler code goes
if let response = response {
print(response)
}
if let error = error {
print(error)
}
}
task.resume()
You can use a trailing closure whenever the last argument for a function is a closure. We’ll be usingtrailing closure syntax in the rest of our code.
If you want to ignore some arguments you can tell the compiler that you don’t want them byreplacing them with _ like we did earlier when we weren’t ready to implement the completionhandler yet. For example, if we only need the data and error arguments but not the response inour completion handler:
let task = session.dataTask(with: urlRequest) { data, _, error in
// can't do print(response) since we don't have response
if let error = error {
print(error)
}
}
task.resume()
We can also declare the closure as a variable then pass it in when we call session.dataTask(with:).That’s handy if we want to use the same completion handler for multiple tasks. We will use thistechnique when implementing an OAuth 2.0 login flow since it has lots of steps but we will want touse the same completion handler to handle failure at any step.
Here’s how you can use a variable for a completion handler:
// create completion handler
let myCompletionHandler: (Data?, URLResponse?, Error?) -> Void = {
(data, response, error) in
// this is where the completion handler code goes
if let response = response {
print(response)
}
if let error = error {
print(error)
}
}
let task = session.dataTask(with: urlRequest, completionHandler: myCompletionHandler)
task.resume()

Swift JSON Parsing & Networking Calls 101 17
So when we run that code what will happen to the closure that we pass in? You might be surprisedthat it won’t get called right away when we call dataTask(with request: completionHandler:).That’s a good thing, if it were called immediately then we wouldn’t have the results of the webservice call yet. Somewhere in Apple’s implementation of that function it will get called like this:
func dataTask(with request: URLRequest,
completionHandler: @escaping (Data?, URLResponse?, Error?) -> Void
) -> URLSessionDataTask {
// send the URL request
// wait for results
// check for errors and do other processing of the response
completionHandler(data, response, error)
// return the data task
}
You don’t need to write that in your own code, it’s already implemented in dataTask(with:
completionHandler:). In fact, there are probably a few calls to completionHandler for handlingsuccess and error cases. The completion handler will just sit around waiting to be called wheneverdataTask(with: completionHandler:) is done.
So what’s the point of completion handlers? Well, we can use them to take action when somethingis done. For example, here we could set up a completion handler to print out the results and anypotential errors so that we can make sure our API call worked. Let’s go back to our dataTask(withrequest: completionHandler:) example and implement a useful completion handler.
3.1.3 Handling the Response
Within the completion handler we have access to three arguments: the data returned by the request,the URL response, and an error (if one occurred). We’ll check for errors and figure out how to get atthe data that we want: the first todo’s title. We need to:
1. Check for any errors2. Make sure we got data3. Try to transform the data into JSON4. Access the todo object in the JSON and print out the title
Here’s how we’ll do all that:

Swift JSON Parsing & Networking Calls 101 18
let task = session.dataTask(with: urlRequest) {
(data, response, error) in
// check for any errors
guard error == nil else {
print("error calling GET on /todos/1")
print(error!)
return
}
// make sure we got data
guard let responseData = data else {
print("Error: did not receive data")
return
}
// parse the result as JSON, since that's what the API provides
do {
guard let todo = try JSONSerialization.jsonObject(with: responseData, options: [])
as? [String: Any] else {
print("error trying to convert data to JSON dictionary")
return
}
// now we have the todo
// let's just print it to prove we can access it
print("The todo is: " + todo.description)
// the todo object is a dictionary
// so we just access the title using the "title" key
// so check for a title and print it if we have one
guard let todoTitle = todo["title"] as? String else {
print("Could not get todo title from JSON")
return
}
print("The title is: " + todoTitle)
} catch {
print("error trying to convert data to JSON")
return
}
}
task.resume()
Which prints out:

Swift JSON Parsing & Networking Calls 101 19
The todo is: {
completed = 0;
id = 1;
title = "delectus aut autem";
userId = 1;
}
The title is: delectus aut autem
In the next section we’ll dig into how the JSON parsing works but let’s take a quick look at the errorchecking code first.
First, we check if we received an error using guard error == nil else { ... }. For nowwe’re justprinting errors and returning, in later chapters we’ll build in some error handling.
It’s usually best to avoid force unwrapping any optionals using ! since they will crash if the optionalis nil. But we’re choosing using one when handling an error:
guard error == nil else {
print("error calling POST on /todos/1")
print(error!)
return
}
print(error!) won’t cause a crash because we just checked that error isn’t nil.
We could do the same thing using if let to avoid the force unwrap:
if let error = error {
print("error calling POST on /todos/1")
print(error)
return
}
If we use if let then the compiler won’t check that we remembered to include return in that block.In other words, this will compile:
if let error = error {
print("error calling POST on /todos/1")
print(error)
}
If we use guard then the compiler will make sure that we won’t forget that return statement. Thiswon’t compile:

Swift JSON Parsing & Networking Calls 101 20
guard error == nil else {
print("error calling POST on /todos/1")
print(error!)
}
So we have a trade-off to make: we can either avoid force unwrapping or we can have the compilermake sure we include the return statement. Either choice is reasonable. I prefer to use guard withforce unwrapping because I would rather have a crash if I wrote code that isn’t right instead ofaccidentally proceeding to try to parse the JSON when there was an error.
After checking the error, we’re checking that we did receive data in the response using guard let
responseData = data else { ... }. If neither of those guard statements find an issue, we proceedto trying to parse the JSON.
3.1.4 Simple JSON Parsing
In this code we’re using JSONSerialization.jsonObject(with: options:) to convert the data toJSON. That’s the older way of converting data to JSON. In some cases, it’s quicker and easier thanusing the new way with Codable.
As of Swift 4, we can also use Codable to create objects or structs from the JSON in the response.We’ll look at handling JSON again when we create a struct to represent the todo items. Then in alater chapter, we’ll come back to it again to figure how to handle dates and more complex structures.
JSONSerialization is easier to use if you only want to pull out one or two items from the JSON. Aswell, sometimes it’s easier to work with JSONSerialization if the structure of the objects in yourapp isn’t very similar to the JSON that you receive, though you can work around that with Codable.Codable is still relatively new and, while it’s pretty powerful, there are situations where it can befrustrating to get it working with the JSON that you need to parse.
Here’s how we’re extracting the title of the todo item from the JSON:
do {
guard let todo = try JSONSerialization.jsonObject(with: responseData, options: [])
as? [String: Any] else {
print("error trying to convert data to JSON dictionary")
return
}
// now we have the todo
// let's just print it to prove we can access it
print("The todo is: " + todo.description)
// the todo object is a dictionary
// so we just access the title using the "title" key
// so check for a title and print it if we have one
guard let todoTitle = todo["title"] as? String else {

Swift JSON Parsing & Networking Calls 101 21
print("Could not get todo title from JSON")
return
}
print("The title is: " + todoTitle)
} catch {
print("error trying to convert data to JSON")
return
}
JSONSerialization.data(withJSONObject: options:) converts the data that we’ve received intoJSON represented as dictionaries and arrays.
At the top level, the JSON parsing is wrapped in a do-catch statement:
do {
// ...
} catch {
print("error trying to convert data to JSON")
return
}
That do-catch statementwith try inside it is necessary because JSONSerialization.data(withJSONObject:options:) can throw an error⁶.
The catch statement will catch anything that isn’t valid JSON. In other words, any time JSONSeri-alization.jsonObject(with: , options:) can’t convert the responseData into a valid Any. It usesAny instead of a more specific type because the top-level JSON could be either a dictionary or anarray.
Since the JSON parsing gives us an Any but we expect it to be a dictionary, we immediately try tocast it using as? [String: Any]. If that cast fails then we print an error message and return:
guard let todo = try JSONSerialization.jsonObject(with: responseData, options: [])
as? [String: Any] else {
print("error trying to convert data to JSON dictionary")
return
}
Then we can extract the title from the todo dictionary using the title key and cast that element toString:
⁶https://developer.apple.com/library/content/documentation/Swift/Conceptual/Swift_Programming_Language/ErrorHandling.html

Swift JSON Parsing & Networking Calls 101 22
guard let todoTitle = todo["title"] as? String else {
print("Could not get todo title from JSON")
return
}
print("The title is: " + todoTitle)
If you just need to access a few elements of the JSON then using JSONSerialization in this way canbe at least as simple as Codable. That code is a little verbose but if you just need a quick GET call toan API without authentication, that’ll do it.
3.1.5 Other HTTP Methods
If you need to use a HTTP method type other than GET then you can set the HTTP method in theURLRequest. You’ll have to do that after the URLRequest is created since it’s not part of the initializer,so declare the URLRequest with var, not let. Set the code you’ve been working on aside (you canjust comment it out) so we can create a POST request instead:
let todosEndpoint = "https://jsonplaceholder.typicode.com/todos"
guard let todosURL = URL(string: todosEndpoint) else {
print("Error: cannot create URL")
return
}
var todosUrlRequest = URLRequest(url: todosURL)
todosUrlRequest.httpMethod = "POST"
Similar to parsing the JSON in the response, we can use JSONSerialization to convert the newTododictionary to JSON represented as Data. Then we set that data as the request’s httpBody to includeit in the request. In this case, the function to use is JSONSerialization.data(withJSONObject:,
options:). Like parsing, it can throw an error so we call it using try and wrap it in a do-catch
statement:
let newTodo: [String: Any] = ["title": "My First todo", "completed": false, "userId": 1]
let jsonTodo: Data
do {
jsonTodo = try JSONSerialization.data(withJSONObject: newTodo, options: [])
todosUrlRequest.httpBody = jsonTodo
} catch {
print("Error: cannot create JSON from todo")
return
}
Later we’ll use urlRequest.httpBody again to send JSON that we’ve converted to Data usingCodable.
Now we can execute this POST request:

Swift JSON Parsing & Networking Calls 101 23
let session = URLSession.shared
let task = session.dataTask(with: todosUrlRequest) { _, _, _ in }
task.resume()
If it’s working correctly then we should get our todo back as a response along with the id numberassigned to it. Since it’s just for testing, JSONPlaceholder will let you do all sorts of REST requests(GET, POST, PUT, PATCH, DELETE and OPTIONS) but it won’t actually change the data based onyour requests. So when we send this POST request, we’ll get a response with an ID to confirm thatwe did it right but it won’t actually be kept in the database so we can’t access it on subsequent calls.We can use the same error checking and parsing that we used with our GET request to make surethe API call worked:
let todosEndpoint = "https://jsonplaceholder.typicode.com/todos"
guard let todosURL = URL(string: todosEndpoint) else {
print("Error: cannot create URL")
return
}
var todosUrlRequest = URLRequest(url: todosURL)
todosUrlRequest.httpMethod = "POST"
let newTodo: [String: Any] = ["title": "My First todo", "completed": false, "userId": 1]
let jsonTodo: Data
do {
jsonTodo = try JSONSerialization.data(withJSONObject: newTodo, options: [])
todosUrlRequest.httpBody = jsonTodo
} catch {
print("Error: cannot create JSON from todo")
return
}
let session = URLSession.shared
let task = session.dataTask(with: todosUrlRequest) {
(data, response, error) in
guard error == nil else {
print("error calling POST on /todos/1")
print(error!)
return
}
guard let responseData = data else {
print("Error: did not receive data")
return
}
// parse the result as JSON, since that's what the API provides
do {
guard let receivedTodo = try JSONSerialization.jsonObject(with: responseData,

Swift JSON Parsing & Networking Calls 101 24
options: []) as? [String: Any] else {
print("Could not get JSON from responseData as dictionary")
return
}
print("The todo is: " + receivedTodo.description)
guard let todoID = receivedTodo["id"] as? Int else {
print("Could not get todoID as int from JSON")
return
}
print("The ID is: \(todoID)")
} catch {
print("error parsing response from POST on /todos")
return
}
}
task.resume()
In this case we’re interested in the id property which is an integer so we can extract it from theJSON dictionary using receivedTodo["id"] as? Int.
Deleting is pretty similar, except we don’t need to set the httpBody using a new todo item. To seewhether the delete call succeeds, we can just check whether we get an error by using guard let _ =
data. That will check whether data has a value. It’s equivalent to guard data != nil:
let firstTodoEndpoint = "https://jsonplaceholder.typicode.com/todos/1"
var firstTodoUrlRequest = URLRequest(url: URL(string: firstTodoEndpoint)!)
firstTodoUrlRequest.httpMethod = "DELETE"
let session = URLSession.shared
let task = session.dataTask(with: firstTodoUrlRequest) {
(data, response, error) in
guard let _ = data else {
print("error calling DELETE on /todos/1")
return
}
print("DELETE ok")
}
task.resume()
That’s how to call a REST API from Swift using URLSession and URLRequest. The code to make thecalls themselves is fairly verbose and the level of abstraction is low: you’re thinking about todos buthaving to code in terms of HTTP requests and data tasks. Alamofire⁷ is a nice way to get rid of someof the verbosity and work at a higher level of abstraction:
⁷https://github.com/Alamofire/Alamofire
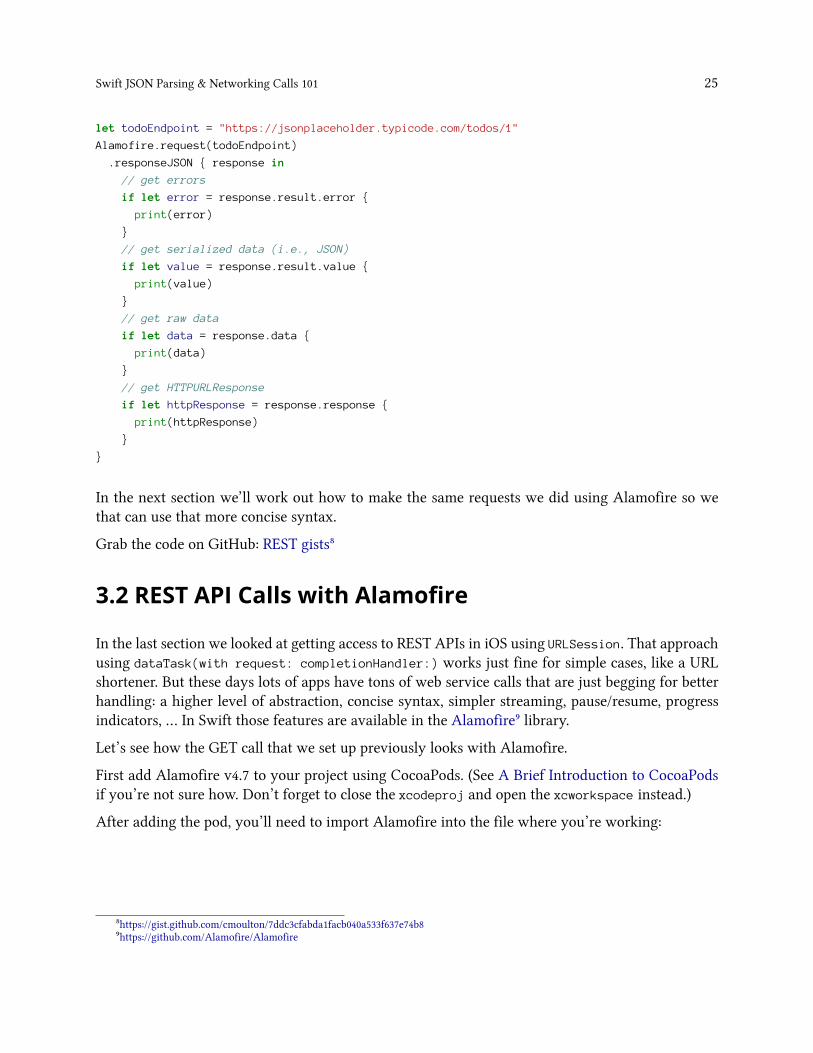
Swift JSON Parsing & Networking Calls 101 25
let todoEndpoint = "https://jsonplaceholder.typicode.com/todos/1"
Alamofire.request(todoEndpoint)
.responseJSON { response in
// get errors
if let error = response.result.error {
print(error)
}
// get serialized data (i.e., JSON)
if let value = response.result.value {
print(value)
}
// get raw data
if let data = response.data {
print(data)
}
// get HTTPURLResponse
if let httpResponse = response.response {
print(httpResponse)
}
}
In the next section we’ll work out how to make the same requests we did using Alamofire so wethat can use that more concise syntax.
Grab the code on GitHub: REST gists⁸
3.2 REST API Calls with Alamofire
In the last section we looked at getting access to REST APIs in iOS using URLSession. That approachusing dataTask(with request: completionHandler:) works just fine for simple cases, like a URLshortener. But these days lots of apps have tons of web service calls that are just begging for betterhandling: a higher level of abstraction, concise syntax, simpler streaming, pause/resume, progressindicators, … In Swift those features are available in the Alamofire⁹ library.
Let’s see how the GET call that we set up previously looks with Alamofire.
First add Alamofire v4.7 to your project using CocoaPods. (See A Brief Introduction to CocoaPodsif you’re not sure how. Don’t forget to close the xcodeproj and open the xcworkspace instead.)
After adding the pod, you’ll need to import Alamofire into the file where you’re working:
⁸https://gist.github.com/cmoulton/7ddc3cfabda1facb040a533f637e74b8⁹https://github.com/Alamofire/Alamofire

Swift JSON Parsing & Networking Calls 101 26
import UIKit
import Alamofire
class ViewController: UIViewController {
// ...
}
Now we can set up the request:
let todoEndpoint = "https://jsonplaceholder.typicode.com/todos/1"
Alamofire.request(todoEndpoint)
.responseJSON { response in
// ...
}
We’re telling Alamofire to set up & send an asynchronous request to todoEndpoint (without theugly call to URL to wrap up the string). We don’t have to explicitly say it’s a GET request since that’sthe default HTTP method. If we wanted to specify the HTTP method then we’d use a member ofAlamofire’s HTTPMethod enum, which includes .get, .post, .patch, .options, .delete, etc. We canadd the method when creating the request to make it explicit:
let todoEndpoint = "https://jsonplaceholder.typicode.com/todos/1"
Alamofire.request(todoEndpoint, method: .get)
.responseJSON { response in
// ...
}
After making the request, we get the data (asynchronously) as JSON in the .responseJSON. Wecould also use .response (for the HTTPURLResponse), .responseData, or .responseString. We caneven chain multiple .responseX methods, which is often handy for debugging:
let todoEndpoint = "https://jsonplaceholder.typicode.com/todos/1"
Alamofire.request(todoEndpoint)
.responseJSON { response in
// handle JSON
}
.responseString { response in
if let error = response.result.error {
print(error)
}
if let value = response.result.value {
print(value)
}
}

Swift JSON Parsing & Networking Calls 101 27
That’s neat but right now we just want to get the todo’s title from the JSON. We’ll make the requestthen handle it with .responseJSON. Like last time we need to do some error checking:
1. Check for an error returned by the API call2. If no API call error, see if we got any JSON results3. Check for an error in the JSON transformation4. If no JSON parsing error, access the todo object in the JSON and print out the title
.responseJSON takes care of some of the boilerplate we had to write earlier. It makes sure we gotresponse data then calls JSONSerialization.jsonObject for us. So we can just check that we gotthe JSON object that we expected. In this case, that’s a dictionary so we ‘ll use as? [String: Any]
in our guard statement.
When using the .responseX handlers in Alamofire, the value that you want (e.g., a string for.responseString) will be in response.result.value. If that value can’t be parsed or there’s aproblem with the call then you’ll get an error in response.result.error.
So to check for errors then get the JSON if there are no errors:
let todoEndpoint = "https://jsonplaceholder.typicode.com/todos/1"
Alamofire.request(todoEndpoint)
.responseJSON { response in
guard let json = response.result.value as? [String: Any] else {
print("didn't get todo object as JSON from API")
if let error = response.result.error {
print("Error: \(error)")
}
return
}
print(json)
}
You can use response.result.isSuccess if you just need to know whether the call succeeded orfailed:
let todoEndpoint = "https://jsonplaceholder.typicode.com/todos/1"
Alamofire.request(todoEndpoint)
.responseJSON { response in
guard response.result.isSuccess else {
// handle failure
return
}
// handle success
}

Swift JSON Parsing & Networking Calls 101 28
There’s another possibility that our current code doesn’t consider well: what if we didn’t get an errorbut we also didn’t get any JSON or the JSON isn’t a dictionary? SomeAPIs will return error messagesas JSON that’s a different format than what you requested. In those cases we need to differentiatebetween not getting anything and not getting the JSON that we expected. Let’s split up the code thatchecks that we got the JSONwe expected and the code that checks response.result.error into twoseparate guard statements:
let todoEndpoint = "https://jsonplaceholder.typicode.com/todos/1"
Alamofire.request(todoEndpoint)
.responseJSON { response in
// check for errors
guard response.result.error == nil else {
// got an error in getting the data, need to handle it
print("error calling GET on /todos/1")
print(response.result.error!)
return
}
// make sure we got some JSON since that's what we expect
guard let json = response.result.value as? [String: Any] else {
print("didn't get todo object as JSON from API")
if let error = response.result.error {
print("Error: \(error)")
}
return
}
print(json)
}
Finally, we can extract the title from the JSON dictionary just like we did in the previous section:
let todoEndpoint = "https://jsonplaceholder.typicode.com/todos/1"
Alamofire.request(todoEndpoint)
.responseJSON { response in
// check for errors
guard response.result.error == nil else {
// got an error in getting the data, need to handle it
print("error calling GET on /todos/1")
print(response.result.error!)
return
}
// make sure we got some JSON since that's what we expect
guard let json = response.result.value as? [String: Any] else {
print("didn't get todo object as JSON from API")

Swift JSON Parsing & Networking Calls 101 29
if let error = response.result.error {
print("Error: \(error)")
}
return
}
// get and print the title
guard let todoTitle = json["title"] as? String else {
print("Could not get todo title from JSON")
return
}
print("The title is: " + todoTitle)
}
To POST, we just need to change the HTTP method and provide the todo item as JSON in theparameters argument of Alamofire.request():
let todosEndpoint = "https://jsonplaceholder.typicode.com/todos"
let newTodo: [String: Any] = ["title": "My First Post", "completed": 0, "userId": 1]
Alamofire.request(todosEndpoint, method: .post, parameters: newTodo,
encoding: JSONEncoding.default)
.responseJSON { response in
guard response.result.error == nil else {
// got an error in getting the data, need to handle it
print("error calling POST on /todos/1")
print(response.result.error!)
return
}
// make sure we got some JSON since that's what we expect
guard let json = response.result.value as? [String: Any] else {
print("didn't get todo object as JSON from API")
if let error = response.result.error {
print("Error: \(error)")
}
return
}
guard let todoID = json["id"] as? Int else {
print("Could not get todoID as int from JSON")
return
}
print("The ID is: \(todoID)")
}
And DELETE is nice and compact:

Swift JSON Parsing & Networking Calls 101 30
let firstTodoEndpoint = "https://jsonplaceholder.typicode.com/todos/1"
Alamofire.request(firstTodoEndpoint, method: .delete)
.responseJSON { response in
guard response.result.error == nil else {
// got an error in getting the data, need to handle it
print("error calling DELETE on /todos/1")
print(response.result.error!)
return
}
print("DELETE ok")
}
Grab the example code on GitHub¹⁰.
So that’s one step better on our journey to nice, clean REST API calls. But we’re still interacting withuntyped JSON which can easily lead to errors. Next, we’ll take another step towards cleaner codeby using an Alamofire Router to create the URL requests for us. Then we’ll look at how Codable canmake it easier to convert JSON to objects or structs.
¹⁰https://gist.github.com/cmoulton/9591be2b10043e6811a845f6dcbe821a

A Brief Introduction to CocoaPodsIf you’re not familiar with CocoaPods, it’s worth taking a fewminutes to learn about this dependencymanager commonly used for iOS libraries today.
Cocoapods is great for adding libraries to your iOS projects, in Objective-C and Swift. In fact, it’seasy to use Objective-C code in iOS Swift projects. If you’re curious, check out Objective-C in SwiftProject¹¹.
We’ll just cover the simple basics that we’ll use throughout this book so that when I say “add theAlamofire v4.7 CocoaPod to your project” we don’t need to spend a few paragraphs detailing howto do that.
Adding a CocoaPod to a Project
Let’s say we’re going to add the Alamofire CocoaPod to an Xcode project. Here’s what we need todo:
Close Xcode
Open the terminal in the project top directory (the directorywith the .xcodeproj file for your project).
If you haven’t previously installed CocoaPods run:
sudo gem install cocoapods
If you need more info on installing CocoaPods, check out their Getting Started guide¹².
Once it’s done installing CocoaPods, you need to initialize Cocoapods for your project. So run:
pod init
That will create a new file called “Podfile” (to be honest, I think that’s all it does). Using a text editoropen the newly created Podfile and see what’s in there:
¹¹https://grokswift.com/objective-c-in-swift/¹²https://guides.cocoapods.org/using/getting-started.html
31

A Brief Introduction to CocoaPods 32
# Uncomment the next line to define a global platform for your project
# platform :ios, '10.0'
target 'GrokCocoapods' do
# Comment the next line if you're not using Swift and
# don't want to use dynamic frameworks
use_frameworks!
# Pods for GrokCocoapods
end
To add pods, put them under this line: # Pods for GrokCocoapods. The last part of that line is thename of the target in your project that you want to add the pods to, so it might be different for you.
The simplest way to add a pod is to just list it in that section in single-quotes with pod before it:
# Uncomment the next line to define a global platform for your project
# platform :ios, '10.0'
target 'GrokCocoapods' do
# Comment the next line if you're not using Swift and
# don't want to use dynamic frameworks
use_frameworks!
# Pods for GrokCocoapods
pod 'Alamofire'
end
Add that line to your Podfile and save it. Then switch back to Terminal and run:
pod install
That operation will download the pod and set up your project to use it. It’ll create an .xcworkspace
that contains your original project and any pods you’ve installed. Always use the .xcworkspace
instead of the .xcodeproj file now.
Open the .xcworkspace file in Xcode. Navigate back to whatever class you want to use Alamofirein and add import Alamofire at the top like this:

A Brief Introduction to CocoaPods 33
import Foundation
import Alamofire
class MyClass {
...
}
Now you can use Alamofire in that file.
What Does the Podfile Mean?
While it’s nice to just get instructions that work, it’s usually a good idea to know why they work.So let’s take a look at that Podfile:
# Uncomment the next line to define a global platform for your project
# platform :ios, '10.0'
target 'GrokCocoapods' do
# Comment the next line if you're not using Swift and
# don't want to use dynamic frameworks
use_frameworks!
# Pods for GrokCocoapods
pod 'Alamofire'
end
When you run pod install CocoaPods looks for a Podfile and tries to install the pods listed in it.Install in this case means “download and add to the Xcode project in the current directory”. A podis generally a library, really just a chunk of code that you want to use in your project.
Let’s go through it line by line:
platform :ios, '10.0'
If you uncomment this line then it specifies that we’re working on an app for iOS (not OS X) andwe’re building an app for the iOS 10.0 SDK. Including this info in a Podfile means that pods can havedifferent versions for iOS and OS X as well as for different versions of the iOS SDK. It’s commentedout by default but you can un-comment and update it to make sure Cocoapods pulls down theright version of the pod for your app. For example, Alamofire 4.7 requires at least iOS 9.0. So if youspecified platform :ios, '8.0' then you’d get an older version of Alamofire that supports iOS 8.0.
target 'GrokCocoapods' do
Projects can have multiple targets so we need to specify which target we’re adding the pods to.Examples of additional targets might be tests or a today extension¹³.
¹³https://developer.apple.com/library/content/documentation/General/Conceptual/ExtensibilityPG/ExtensionCreation.html

A Brief Introduction to CocoaPods 34
use_frameworks!
use_frameworks! tells CocoaPods how we want to integrate the code libraries with our project. InSwift we want it to wrap up the code in a framework then include the framework in our project.Since CocoaPods pre-dates Swift that’s not the default so we have to include this line. Want moredetails? See the release notes for CocoaPods v0.36¹⁴.
pod 'Alamofire'
And finally, we specify which pod (or pods) we want to install.
Dependencies
The real time saver in CocoaPods is that pods can specify dependencies. So if Alamofire requiredsome other library then CocoaPods would make sure we have it in our Pods before downloadingAlamofire and adding it to our project. It’ll also make sure that we have the correct compatibleversion. So we don’t need to hunt down and install a bunch of prerequisites before installing a pod.
CocoaPods Version Numbers
One option that we’ll use in CocoaPods is to specify which version of a pod we want. We can specifyan exact number or a less specific number. For example to use v4.0.1:
pod 'PodName', '4.0.1'
We could also say that we want to use v4.0.whatever to get small updates:
pod 'PodName', '~> 4.0.0'
Which would allow v4.0.0, 4.0.1, 4.0.2, … but not v4.1.
Or even v4.whatever:
pod 'PodName', '~> 4.0'
Which would allow v4.0, 4.1, … but not v5.0.
If we leave off the version number then CocoaPods will just install the latest version.
Updating CocoaPods
Unless you tell it to, CocoaPods won’t auto-update to newer versions. To tell CocoaPods that youdo want newer versions (if your version numbers will allow it) run:
¹⁴http://blog.cocoapods.org/CocoaPods-0.36/

A Brief Introduction to CocoaPods 35
pod update
You’ll see a message in the terminal showing you which pods were updated and to which versions.You’ll also need to run that command if you change the version numbers in the Podfile or add morepods to it.

Thanks for ReadingThanks for reading this free sample. I hope you’ve learned a bit about using APIs in iOS apps andfeel confident about continuing to develop your skills. Grab the latest edition of the book so thatyou can:
• Hook up a REST API to a table view• Load table view cell images from an API• Handle pagination and pull to refresh• Use basic, header-based, or OAuth 2.0 authentication• Build out your app so users can add, delete, and modify objects• Handle losing the network connection
Since you’ve already taken the time to work through the free chapters, I’m extending an exclusiveoffer to you: 10% off any version of iOS Apps with REST APIs¹⁵
The book was written using Swift 4.1, Alamofire 4.7, and iOS 11 (with support back to iOS 10). You’llget PDF, EPUB, and MOBI formats.
“I had to comment on how you progressed from simple NSURLSession calls to Alamofireserializers. I really like how you explained why you would choose to use one vs. the otherand also how using some libraries can dramatically simplify the code and reduce boilerplate. I wish I didn’t have work to do so I could finish reading it all in one sitting.” - MarkJohnson, Sr. Architect Apple Products at Proscape Technologies
The Expanded Edition: Get your app built faster
Along with the book, the expanded edition includes 2 extra guides to help you get started on yourapp right away and make it easier to keep adding features.
The 8 page TL;DR Edition will help guide you through the book to find the parts you need and getyour app started.
Then once you’re on your way, the Adding More API Checklist will help you through all of thenecessary steps each time you find yourself integrating yet another REST API call in your Swiftapp.
Get the Expanded Edition for $35.10 (usually $39)¹⁶
Just the Book
Get the book (and code) now for $26.10 (usually $29)¹⁷
¹⁵https://leanpub.com/iosappswithrest/c/tenpercent¹⁶https://leanpub.com/iosappswithrest/c/tenpercent¹⁷http://leanpub.com/iosappswithrest/c/tenpercent
36

Thanks for Reading 37
Your bookmademe a rockstar inmy company :) I can’t thank you enough! - Dave LaPorte,Senior Developer at Volm Companies Inc
iOS Apps with REST APIs now¹⁸ is the guide I wish I had on my first iOS contract when I wasstruggling to figure out how to get the API data showing up in the app I was building. Get the wholebook now: iOS Apps with REST APIs now - 10% off¹⁹.
¹⁸https://leanpub.com/iosappswithrest/c/tenpercent#packages¹⁹https://leanpub.com/iosappswithrest/c/tenpercent#packages


