InventorCAM 2014 SP2 / Autodesk Vault Basic Integration...
9
InventorCAM 2014 SP2 / Autodesk Vault Basic Integration Build 18.086.0 Presentation Guideline Create a new InventorCAM Part from a CAD model in vault Save a InventorCAM Part to Vault (without a Link to CAD model) Save a InventorCAM Part to Vault Open a InventorCAM Part from Vault Recorded Presentation Contact FAQ’s Preample: InventorCAM Vault Basic integration Supports two general workstyles how CAM users allowed to open the CAD models saved in Vault: Whether the CAD model is checked out or only “get” write protected from Vault. □ Start Showing the Server Folder structure at with the Vault Browser. Explain two modes of creating a new CAM Part: a) with CAD model which is checked out (modification possible) b) with CAD model in write protected mode (“get”) Note: If an InventorCAM part with linked CAD model will be open from Vault, and the CAD model was not checked out before, the CAD model will be “get” automatically from Vault, to do the synchronization.
Transcript of InventorCAM 2014 SP2 / Autodesk Vault Basic Integration...

InventorCAM 2014 SP2 / Autodesk Vault Basic Integration Build 18.086.0
Presentation Guideline
Create a new InventorCAM Part from a CAD model in vault
Save a InventorCAM Part to Vault (without a Link to CAD model)
Save a InventorCAM Part to Vault
Open a InventorCAM Part from Vault
Recorded Presentation
Contact
FAQ’s
Preample:
InventorCAM Vault Basic integration Supports two general workstyles how CAM users allowed to
open the CAD models saved in Vault: Whether the CAD model is checked out or only “get” write
protected from Vault.
□ Start Showing the Server Folder structure at with the Vault Browser.
Explain two modes of creating a new CAM Part:
a) with CAD model which is checked out (modification possible)
b) with CAD model in write protected mode (“get”)
Note: If an InventorCAM part with linked CAD model will be open from Vault, and the CAD
model was not checked out before, the CAD model will be “get” automatically from Vault, to
do the synchronization.

□ Open Inventor \ Projects and show the settings in the project File / Show an Exist *.ipt in
Vault
□ Open with Inventor a CAD model from Vault in write protected mode (“get”)
Choose Open and click to the Safe
Select the CAD model and choose option write protected
□ Starting with: Create a new InventorCAM Part with a CAD model from Vault
Using a CAD model from Vault and define a new InventorCAM Part.
Before Start: Open InventorCAM settings and set Work directory related to you Vault Project
Settings as default, for Example:

The InventorCAM New Part dialog will be shown:
Note: with the Vault browser you can check the existence of the CAD model in the Model name path.
□ After creating a new InventorCAM Part save it to Vault with InventorCAM Option: Save to PDM
Open dialog with Right Button Mouse click at CAM Manger Partname and choose save to PDM
□ At the first time you need to enter the Server Connection to the Vault

□ The Save to PDM dialog opens and shows the folder structure at the Vault server.
□ Browse to your CAM part folder and click: Save
□ After the location is chosen, the user has to link the CAD model in Vault, to the CAM part he
wants to add.
Browse to the folder of the CAD models in Vault and click to the model.
link to a model

□ User may add a comment and get some options what to do with the working part:
After clicking on OK, InventorCAM Part will be closed, saved to the server.
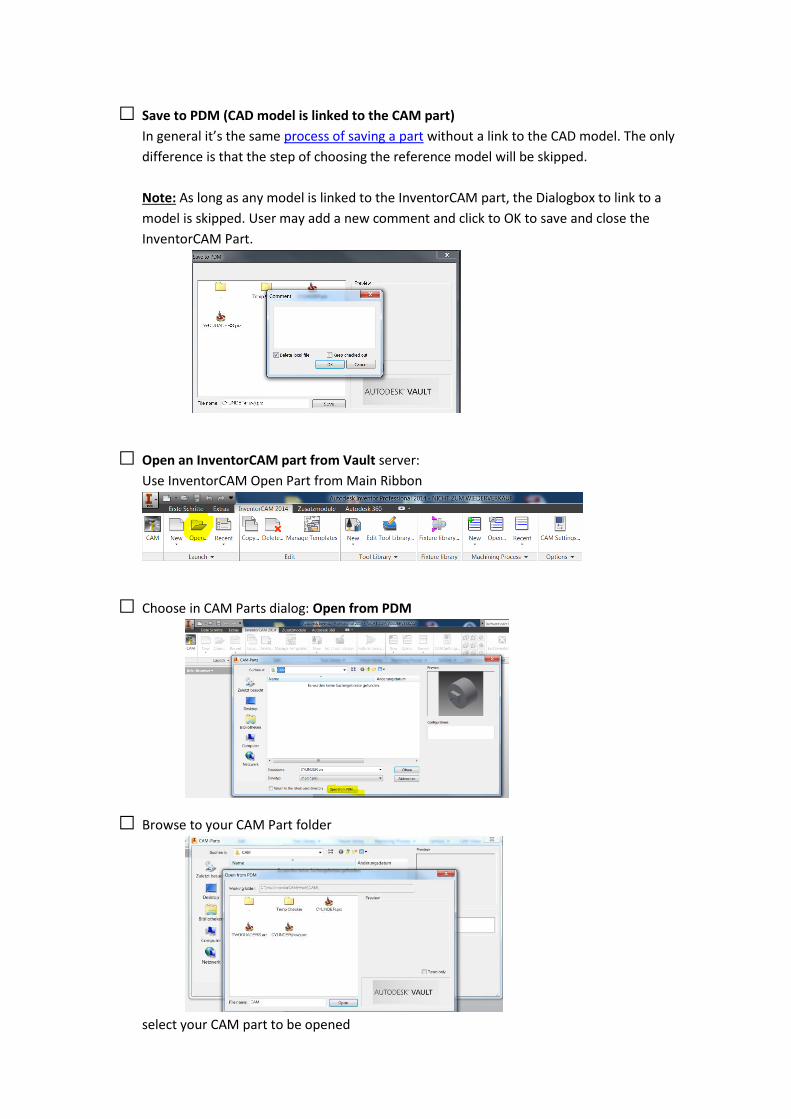
□ Save to PDM (CAD model is linked to the CAM part)
In general it’s the same process of saving a part without a link to the CAD model. The only
difference is that the step of choosing the reference model will be skipped.
Note: As long as any model is linked to the InventorCAM part, the Dialogbox to link to a
model is skipped. User may add a new comment and click to OK to save and close the
InventorCAM Part.
□ Open an InventorCAM part from Vault server:
Use InventorCAM Open Part from Main Ribbon
□ Choose in CAM Parts dialog: Open from PDM
□ Browse to your CAM Part folder
select your CAM part to be opened

□ Note: If the InventorCAM part has a link to the CAD model, it will be automatically
downloaded in “get” modus to the working directory of the client.
Status of the CAM part in the Vault Browser: checked out
Status of the CAD model: not checked out
A GotoMeeting in German Language was recorded and can be downloading from here
https://solidcam.box.com/s/z886u54takbol8t0st7o
A first Address for Questions will be FAQ’s sector here under
or
Harald Schumacher, [email protected], Tel. +49 6241 95409-0
April 2014
Harald Schumacher
SoidCAM GmbH
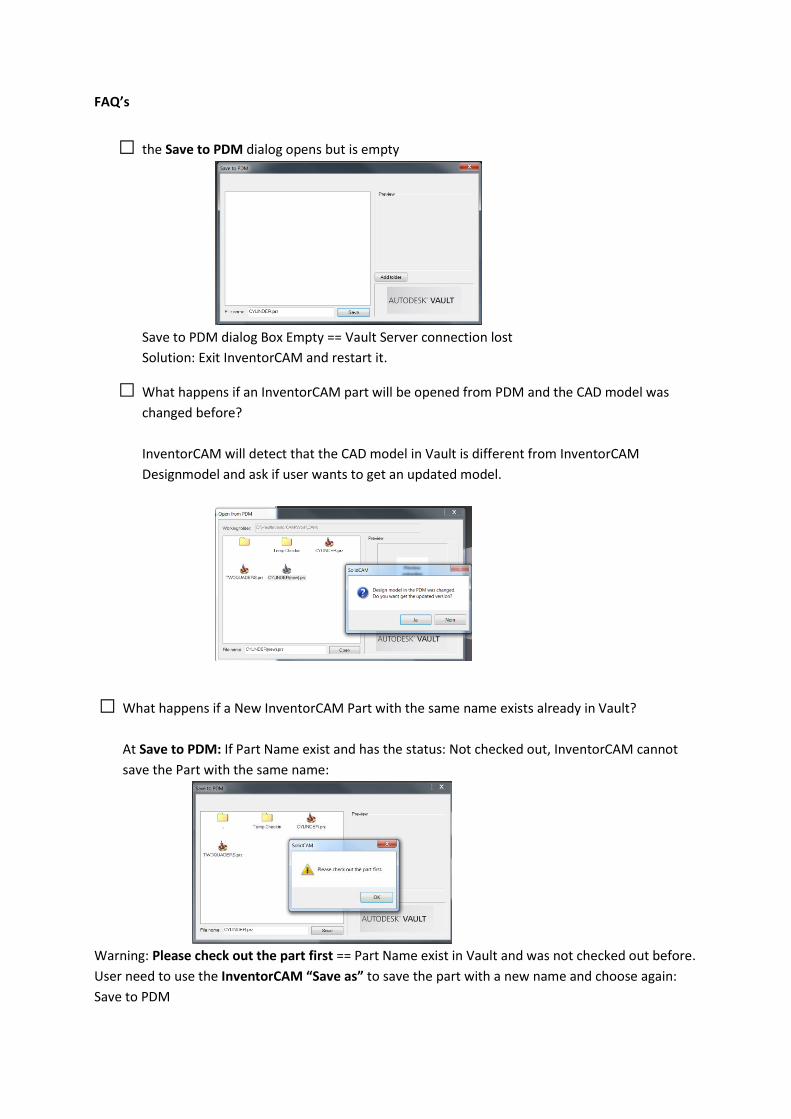
FAQ’s
□ the Save to PDM dialog opens but is empty
Save to PDM dialog Box Empty == Vault Server connection lost
Solution: Exit InventorCAM and restart it.
□ What happens if an InventorCAM part will be opened from PDM and the CAD model was
changed before?
InventorCAM will detect that the CAD model in Vault is different from InventorCAM
Designmodel and ask if user wants to get an updated model.
□ What happens if a New InventorCAM Part with the same name exists already in Vault?
At Save to PDM: If Part Name exist and has the status: Not checked out, InventorCAM cannot
save the Part with the same name:
Warning: Please check out the part first == Part Name exist in Vault and was not checked out before.
User need to use the InventorCAM “Save as” to save the part with a new name and choose again:
Save to PDM

Note: It’s not allowed to change the file name shown in the Save to PDM dialog
□ Can I save a InventorCAM part without to link it to a model?
Yes. Click at the Save to PDM Dialog at the “…select the referencemodel” stage to Cancel
confirm that you want to check-in the part without a model:
you will be asked to add a comment before OK will close and save the part to Vault: