Introduction to Windows Azureaz12722.vo.msecnd.net/.../Lab.docx · Web view, which contains...
94
Hands-On Lab Introduction to Windows Azure Lab version: 2.0.0 Last updated: 4/5/2022 Page | 1
Transcript of Introduction to Windows Azureaz12722.vo.msecnd.net/.../Lab.docx · Web view, which contains...

Hands-On LabIntroduction to Windows AzureLab version: 2.0.0
Last updated: 5/17/2023
Page | 1

CONTENTS
OVERVIEW................................................................................................................................................. 3
EXERCISE 1: BUILDING YOUR FIRST WINDOWS AZURE APPLICATION............................................5Task 1 – Creating the Visual Studio Project..........................................................................................5
Task 2 – Creating a Data Model for Entities in Table Storage............................................................11
Task 3 – Creating a Web Role to Display the Guest Book and Process User Input.............................25
Task 4 – Queuing Work Items for Background Processing.................................................................35
Verification........................................................................................................................................39
EXERCISE 2: BACKGROUND PROCESSING WITH WORKER ROLES AND QUEUES.......................46Task 1 – Creating a Worker Role to Process Images in the Background............................................46
Verification........................................................................................................................................56
EXERCISE 3: PUBLISHING A WINDOWS AZURE APPLICATION........................................................58Task 1 – Creating a Storage Account and a Hosted Service Component............................................58
Task 2 – Publishing the Application to the Windows Azure Management Portal..............................66
Task 3 – Configuring the Application to Increase the Number of Instances......................................73
Task 4 – Testing the Application in the Staging Environment............................................................76
Task 5 – Promoting the Application to Production............................................................................77
SUMMARY................................................................................................................................................ 80
Page | 2

Overview
A service hosted in Windows Azure consists of one or more web roles and worker roles. A web role is an ASP.NET Web application accessible via an HTTP or HTTPS endpoint and is commonly the front-end for an application. Worker roles are background-processing applications and are typically found in the back-end. Windows Azure services may be comprised of one or both types of roles and can run multiple instances of each type. Role instances can be added or removed based on demand and allow applications to quickly and economically scale-up or down when the need arises.
Windows Azure storage services provide storage in the cloud, which includes Blob services for storing text and binary data, Table services for structured storage that can be queried, and Queue services for reliable and persistent messaging between services.
In this hands-on lab, you will explore the basic elements of a Windows Azure service by creating a simple GuestBook application that demonstrates many features of Windows Azure, including web and worker roles, blob storage, table storage, and queues.
In the GuestBook application, a web role provides the front-end that allows users to view the contents of the guest book and submit new entries. Each entry contains a name, a message, and an associated picture. The application also contains a worker role that can generate thumbnails for the images that users submit.
When users post a new item, the web role uploads the picture to blob storage and creates an entry in table storage that contains the information entered by the user and a link to the blob with the picture. The web role renders this information to the browser so users can view the contents of the guest book.
After storing the image and creating the entry, the web role posts a work item to a queue to have the image processed. The worker role fetches the work item from the queue, retrieves the image from blob storage, and resizes it to create a thumbnail. Using queues to post work items is a common pattern in cloud applications and enables the separation of compute-bound tasks from the front-end. The advantage of this approach is that front and back ends can be scaled independently.
Objectives
In this hands-on lab, you will learn how to:
Create applications in Windows Azure using web roles and worker roles
Use Windows Azure storage services including blobs, queues and tables
Publish an application to Windows Azure
Page | 3
Prerequisites
The following is required to complete this hands-on lab:
IIS 7 (with ASP.NET, WCF HTTP Activation)
Microsoft Visual Studio 2010
Microsoft .NET Framework 4.0
Windows Azure Tools for Microsoft Visual Studio 1.6
SQL Server 2005 Express Edition (or later)
Setup
In order to execute the exercises in this hands-on lab you need to set up your environment.
1. Open a Windows Explorer window and browse to the lab’s Source folder.
2. Double-click the Setup.cmd file in this folder to launch the setup process that will configure your environment and install the Visual Studio code snippets for this lab.
3. If the User Account Control dialog is shown, confirm the action to proceed.
Note: Make sure you have checked all the dependencies for this lab before running the setup.
Using the Code Snippets
Throughout the lab document, you will be instructed to insert code blocks. For your convenience, most of that code is provided as Visual Studio Code Snippets, which you can use from within Visual Studio 2010 to avoid having to add it manually.
If you are not familiar with the Visual Studio Code Snippets, and want to learn how to use them, you can refer to the Setup.docx document in the Assets folder of the training kit, which contains a section describing how to use them.
Exercises
This hands-on lab includes the following exercises:
Building Your First Windows Azure Application
Background Processing with Worker Roles and Queues
Publishing a Windows Azure Application
Page | 4

Estimated time to complete this lab: 75 minutes.
Note: When you first start Visual Studio, you must select one of the predefined settings collections. Every predefined collection is designed to match a particular development style and determines window layouts, editor behavior, IntelliSense code snippets, and dialog box options. The procedures in this lab describe the actions necessary to accomplish a given task in Visual Studio when using the General Development Settings collection. If you choose a different settings collection for your development environment, there may be differences in these procedures that you need to take into account.
Exercise 1: Building Your First Windows Azure Application
In this exercise, you create a guest book application and execute it in the local development fabric. For this purpose, you will use the Windows Azure Tools for Microsoft Visual Studio to create the project using the Cloud Service project template. These tools extend Visual Studio to enable the creation, building and running of Windows Azure services. You will continue to work with this project throughout the remainder of the lab.
Note: To reduce typing, you can right-click where you want to insert source code, select Insert Snippet, select My Code Snippets and then select the entry matching the current exercise step.
Task 1 – Creating the Visual Studio Project
In this task, you create a new Cloud Service project in Visual Studio.
1. Open Visual Studio as administrator from Start | All Programs | Microsoft Visual Studio 2010 by right clicking the Microsoft Visual Studio 2010 shortcut and choosing Run as administrator.
2. If the User Account Control dialog appears, click Yes.
3. From the File menu, choose New and then Project.
4. In the New Project dialog, expand the language of your preference (Visual C# or Visual Basic) in the Installed Templates list and select Cloud. Choose the Windows Azure Project template, set the Name of the project to GuestBook, set the location to \Source\Ex1-
Page | 5

BuildingYourFirstWindowsAzureApp\[CS|VB], change the solution name to Begin, and ensure that Create directory for solution is checked. Click OK to create the project.
Figure 1Creating a new Windows Azure Cloud Service project (C#)
Figure 2Creating a new Windows Azure Cloud Service project (Visual Basic)
Page | 6

Note: Windows Azure supports the .NET Framework 4.0. If you use Visual Studio 2010 to create the project, you can select this version for the target framework and take advantage of its new features.
5. In the New Windows Azure Project dialog, inside the Roles panel, expand the tab for the language of your choice (Visual C# or Visual Basic), select ASP.NET Web Role from the list of available roles and click the arrow (>) to add an instance of this role to the solution. Before closing the dialog, select the new role in the right panel, click the pencil icon and rename the role as GuestBook_WebRole. Click OK to create the cloud service solution.
Figure 3Assigning roles to the cloud service project (C#)
Page | 7

Figure 4Assigning roles to the cloud service project (Visual Basic)
6. In Solution Explorer, review the structure of the created solution.
Page | 8

Figure 5Solution Explorer showing the GuestBook application (C#)
Page | 9

Figure 6Solution Explorer showing the GuestBook application (Visual Basic)
Note: The generated solution contains two separate projects. The first project, named GuestBook, holds the configuration for the web and worker roles that compose the cloud application. It includes the service definition file, ServiceDefinition.csdef, which contains metadata needed by the Windows Azure fabric to understand the requirements of your application, such as which roles are used, their trust level, the endpoints exposed by each role, the local storage requirements and the certificates used by the roles. The service definition also establishes configuration settings specific to the application. The service configuration files specify the number of instances to run for each role and sets the value of configuration settings defined in the service definition file. This separation between service definition and configuration allows you to update the settings of a running application by uploading a new service configuration file.You can create many configuration files, each one intended for a specific scenario such as production, development, or QA, and select which to use when publishing the application. By
Page | 10

default, Visual Studio creates two files ServiceConfiguration.Local.cscfg and ServiceConfiguration.Cloud.cscfg.
The Roles node in the cloud service project enables you to configure what roles the service includes (web, worker or both) as well as which projects to associate with these roles. Adding and configuring roles through the Roles node will update the ServiceDefinition.csdef and ServiceConfiguration.cscfg files.
The second project, named GuestBook_WebRole, is a standard ASP.NET Web Application project template modified for the Windows Azure environment. It contains an additional class that provides the entry point for the web role and contains methods to manage the initialization, starting, and stopping of the role.
Task 2 – Creating a Data Model for Entities in Table Storage
The application stores guest book entries in Windows Azure Table storage. The Table service offers semi-structured storage in the form of tables that contain collections of entities. Entities have a primary key and a set of properties, where a property is a name, typed-value pair.
In addition to the properties required by your model, every entity in Table Storage has two key properties: the PartitionKey and the RowKey. These properties together form the table's primary key and uniquely identify each entity in the table. Entities also have a Timestamp system property, which allows the service to keep track of when an entity was last modified. This field is intended for system use and should not be accessed by the application. The Table Storage client API provides a TableServiceEntity class that defines the necessary properties. Although you can use the TableServiceEntity class as the base class for your entities, this is not required.
The Table service API is compliant with the REST API provided by WCF Data Services (formerly ADO.NET Data Services Framework) allowing you to use the WCF Data Services Client Library (formerly .NET Client Library) to work with data in Table Storage using .NET objects.
The Table service does not enforce any schema for tables making it possible for two entities in the same table to have different sets of properties. Nevertheless, the GuestBook application uses a fixed schema to store its data.
In order to use the WCF Data Services Client Library to access data in table storage, you need to create a context class that derives from TableServiceContext, which itself derives from DataServiceContext in WCF Data Services. The Table Storage API allows applications to create the tables that they use from these context classes. For this to happen, the context class must expose each required table as a property of type IQueryable<SchemaClass>, where SchemaClass is the class that models the entities stored in the table.
In this task, you model the schema of the entities stored by the GuestBook application and create a context class to use WCF Data Services to access the information in table storage. To complete the task,
Page | 11

you create an object that can be data bound to data controls in ASP.NET and implements the basic data access operations: read, update, and delete.
1. Create a new project for the schema classes. To create the project, in the File menu, point to Add and then select New Project.
2. In the Add New Project dialog, expand the language of your choice under the Installed Templates tree view, select the Windows category, and then choose the Class Library project template. Set the name to GuestBook_Data, leave the proposed location inside the solution folder unchanged, and then click OK.
Figure 7Creating a class library for GuestBook entities (C#)
Page | 12
Figure 8Creating a class library for GuestBook entities (Visual Basic)
3. Delete the default class file generated by the class library template. To do this, right-click Class1.cs (for Visual C# Projects) or Class1.vb (for Visual Basic Projects) and choose Delete. Click OK in the confirmation dialog.
4. Add a reference to the .NET Client Library for WCF Data Services in the GuestBook_Data project. In Solution Explorer, right-click the GuestBook_Data project node, select Add Reference, click the .NET tab, select the System.Data.Services.Client component and click OK.
Page | 13

Figure 9Adding a reference to the System.Data.Service.Client component
5. Repeat the previous step to add a reference to the Windows Azure storage client API assembly, this time choosing the Microsoft.WindowsAzure.StorageClient component instead.
6. Before you can store an entity in a table, you must first define its schema. To do this, right-click GuestBook_Data in Solution Explorer, point to Add and select Class. In the Add New Item dialog, set the name to GuestBookEntry.cs (for Visual C# projects) or GuestBookEntry.vb (for Visual Basic projects) and click Add.
Page | 14
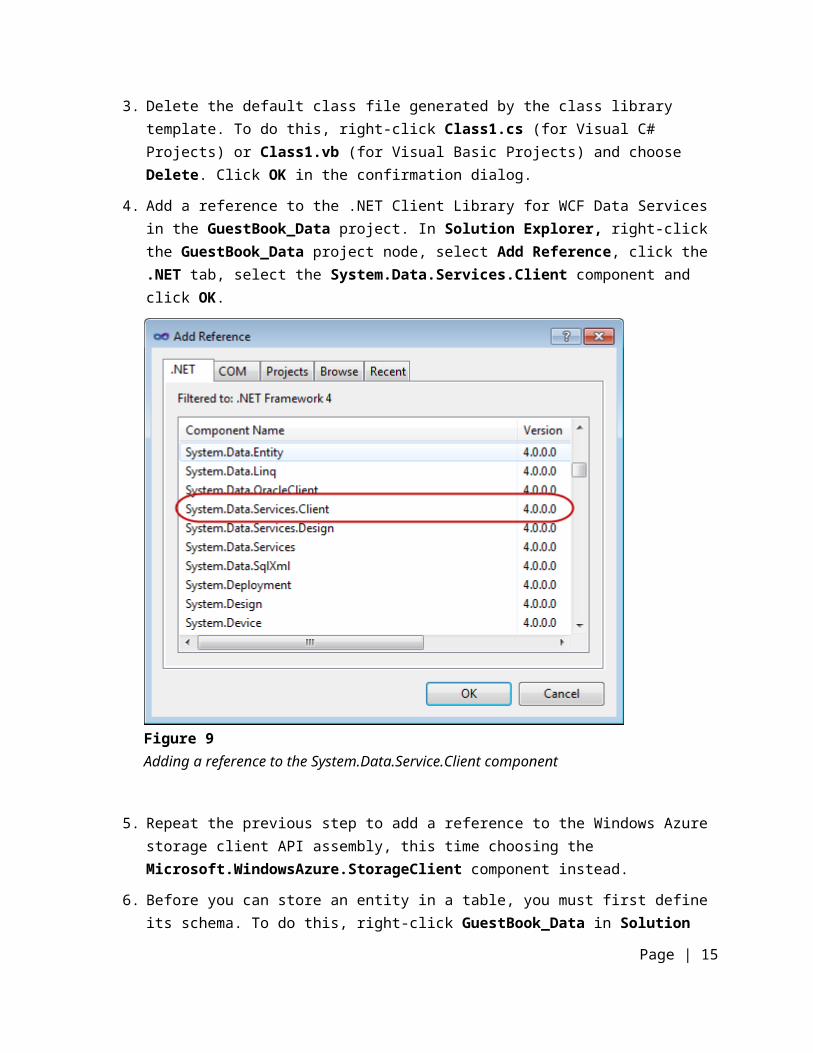
Figure 10Adding the GuestBookEntry class (C#)
Figure 11Adding the GuestBookEntry class (Visual Basic)
7. At the top of the file, insert the following namespace declaration to import the types contained in the Microsoft.WindowsAzure.StorageClient namespace.
Page | 15

C#
using Microsoft.WindowsAzure.StorageClient;
Visual Basic
Imports Microsoft.WindowsAzure.StorageClient
8. If not already opened, open the GuestBookEntry.cs file (for Visual C# projects) or GuestBookEntry.vb file (for Visual Basic projects) and then update the declaration of the GuestBookEntry class to make it public and derive from the TableServiceEntity class.
Note: In Visual Basic, the template for a new class already declares the class as Public.
C#
public class GuestBookEntry : Microsoft.WindowsAzure.StorageClient.TableServiceEntity{}
Visual Basic
Public Class GuestBookEntry Inherits Microsoft.WindowsAzure.StorageClient.TableServiceEntity
End Class
Note: TableServiceEntity is a class found in the Storage Client API. This class defines the PartititionKey, RowKey and TimeStamp system properties required by every entity stored in a Windows Azure table.
Together, the PartitionKey and RowKey define the DataServiceKey that uniquely identifies every entity within a table.
9. Add a default constructor to the GuestBookEntry class that initializes its PartitionKey and RowKey properties.
(Code Snippet – Introduction to Windows Azure - Ex1 GuestBookEntry constructor – CS)
C#
public GuestBookEntry(){
Page | 16

PartitionKey = DateTime.UtcNow.ToString("MMddyyyy");
// Row key allows sorting, so we make sure the rows come back in time order. RowKey = string.Format("{0:10}_{1}", DateTime.MaxValue.Ticks - DateTime.Now.Ticks, Guid.NewGuid());}
(Code Snippet – Introduction to Windows Azure - Ex1 GuestBookEntry constructor – VB)
Visual Basic
Public Sub New() PartitionKey = DateTime.UtcNow.ToString("MMddyyyy")
' Row key allows sorting, so we make sure the rows come back in time order. RowKey = String.Format("{0:10}_{1}", DateTime.MaxValue.Ticks - DateTime.Now.Ticks, Guid.NewGuid())End Sub
Note: To partition the data, the GuestBook application uses the date of the entry as the PartitionKey, which means that there will be a separate partition for each day of guest book entries. In general, you choose the value of the partition key to ensure load balancing of the data across storage nodes.
The RowKey is a reverse DateTime field with a GUID appended for uniqueness. Tables within partitions are sorted in RowKey order, so this will sort the tables into the correct order to be shown on the home page, with the newest entry shown at the top.
10. To complete the definition of the GuestBookEntry class, add properties for Message, GuestName, PhotoUrl, and ThumbnailUrl to hold information about the entry.
(Code Snippet – Introduction to Windows Azure - Ex1 Table Schema Properties – CS)
C#
public string Message { get; set; }public string GuestName { get; set; }public string PhotoUrl { get; set; }public string ThumbnailUrl { get; set; }
(Code Snippet – Introduction to Windows Azure - Ex1 Table Schema Properties – VB)
Visual Basic
Page | 17

Public Property Message As StringPublic Property GuestName As StringPublic Property PhotoUrl As StringPublic Property ThumbnailUrl As String
11. Save the GuestBookEntry.cs file (for Visual C# projects) or GuestBookEntry.vb file (for Visual Basic projects).
12. Next, you need to create the context class required to access the GuestBook table using WCF Data Services. To do this, in Solution Explorer, right-click the GuestBook_Data project, point to Add and select Class. In the Add New Item dialog, set the Name to GuestBookDataContext.cs (for Visual C# projects) or GuestBookDataContext.vb (for Visual Basic projects) and click Add.
13. In the new class file, update the declaration of the new class to make it public and inherit the TableServiceContext class.
Note: In Visual Basic, the template for a new class already declares the class as Public.
C#
public class GuestBookDataContext : Microsoft.WindowsAzure.StorageClient.TableServiceContext{}
Visual Basic
Public Class GuestBookDataContext Inherits Microsoft.WindowsAzure.StorageClient.TableServiceContextEnd Class
14. Now, add a default constructor to initialize the base class with storage account information.
(Code Snippet – Introduction to Windows Azure - Ex1 GuestBookDataContext Class – CS)
C#
public class GuestBookDataContext : Microsoft.WindowsAzure.StorageClient.TableServiceContext{ public GuestBookDataContext(string baseAddress, Microsoft.WindowsAzure.StorageCredentials credentials) : base(baseAddress, credentials) { }}
Page | 18
(Code Snippet – Introduction to Windows Azure - Ex1 GuestBookDataContext Class – VB)
Visual Basic
Public Class GuestBookDataContext Inherits Microsoft.WindowsAzure.StorageClient.TableServiceContext
Public Sub New(ByVal baseAddress As String, ByVal credentials As Microsoft.WindowsAzure.StorageCredentials) MyBase.New(baseAddress, credentials) End SubEnd Class
Note: You can find the TableServiceContext class in the storage client API. This class derives from DataServiceContext in WCF Data Services and manages the credentials required to access your storage account as well as providing support for a retry policy for its operations.
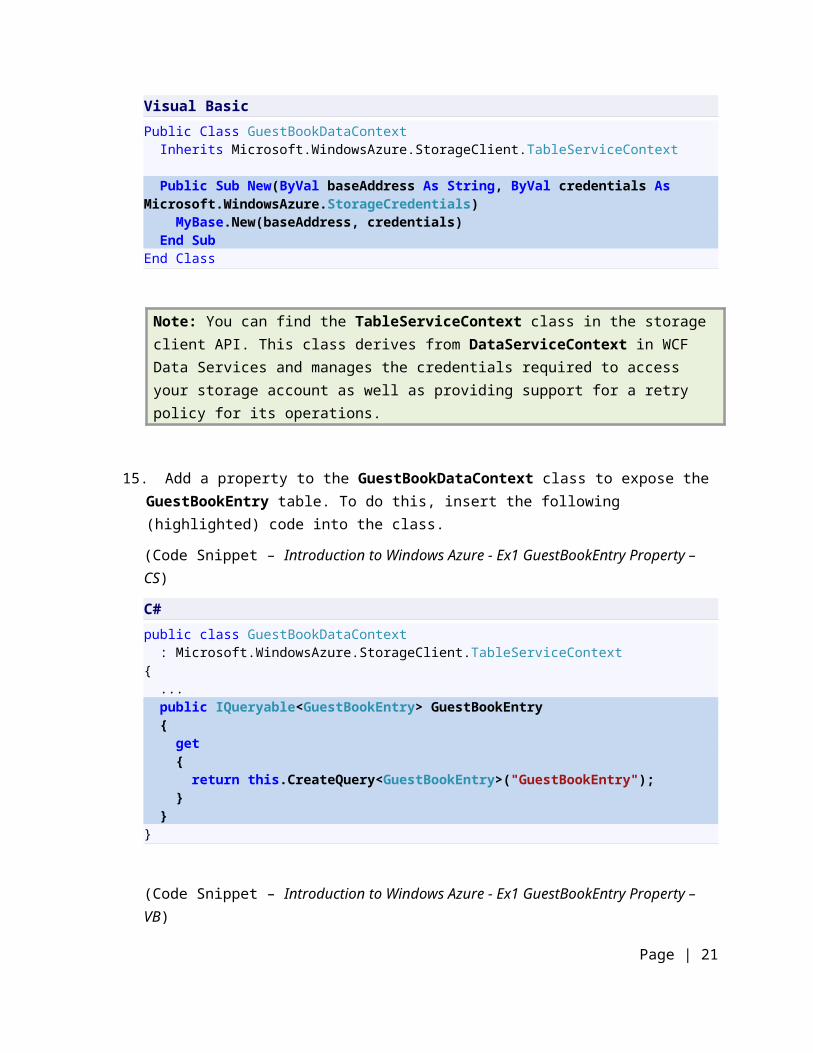
15. Add a property to the GuestBookDataContext class to expose the GuestBookEntry table. To do this, insert the following (highlighted) code into the class.
(Code Snippet – Introduction to Windows Azure - Ex1 GuestBookEntry Property – CS)
C#
public class GuestBookDataContext : Microsoft.WindowsAzure.StorageClient.TableServiceContext{ ... public IQueryable<GuestBookEntry> GuestBookEntry { get { return this.CreateQuery<GuestBookEntry>("GuestBookEntry"); } }}
(Code Snippet – Introduction to Windows Azure - Ex1 GuestBookEntry Property – VB)
Visual Basic
Public Class GuestBookDataContext Inherits Microsoft.WindowsAzure.StorageClient.TableServiceContext ... Public ReadOnly Property GuestBookEntry() As IQueryable(Of GuestBookEntry)
Page | 19

Get Return Me.CreateQuery(Of GuestBookEntry)("GuestBookEntry") End Get End PropertyEnd Class
Note: You can use the CreateTablesFromModel method in the CloudTableClient class to create the tables needed by the application. When you supply a DataServiceContext (or TableServiceContext) derived class to this method, it locates any properties that return an IQueryable<T>, where the generic parameter T identifies the class that models the table schema, and creates a table in storage named after the property.
16. Finally, you need to implement an object that can be bound to data controls in ASP.NET. In Solution Explorer, right-click GuestBook_Data, point to Add, and select Class. In the Add New Item dialog, set the name to GuestBookDataSource.cs (for Visual C# projects) or GuestBookDataSource.vb (for Visual Basic projects) and click Add.
17. In the new class file, add the following namespace declarations to import the types contained in the Microsoft.WindowsAzure and Microsoft.WindowsAzure.StorageClient namespaces.
C#
using Microsoft.WindowsAzure;using Microsoft.WindowsAzure.StorageClient;
Visual Basic
Imports Microsoft.WindowsAzureImports Microsoft.WindowsAzure.StorageClient
18. In the GuestBookDataSource class, make the class public and define member fields for the data context and the storage account information, as shown below.
Note: In Visual Basic, the template for a new class already declares the class as Public.
(Code Snippet – Introduction to Windows Azure - Ex1 GuestBookDataSource Fields – CS)
C#
public class GuestBookDataSource{ private static CloudStorageAccount storageAccount; private GuestBookDataContext context;
Page | 20
}
(Code Snippet – Introduction to Windows Azure - Ex1 GuestBookDataSource Fields – VB)
Visual Basic
Public Class GuestBookDataSource
Private Shared storageAccount As CloudStorageAccount Private context As GuestBookDataContextEnd Class
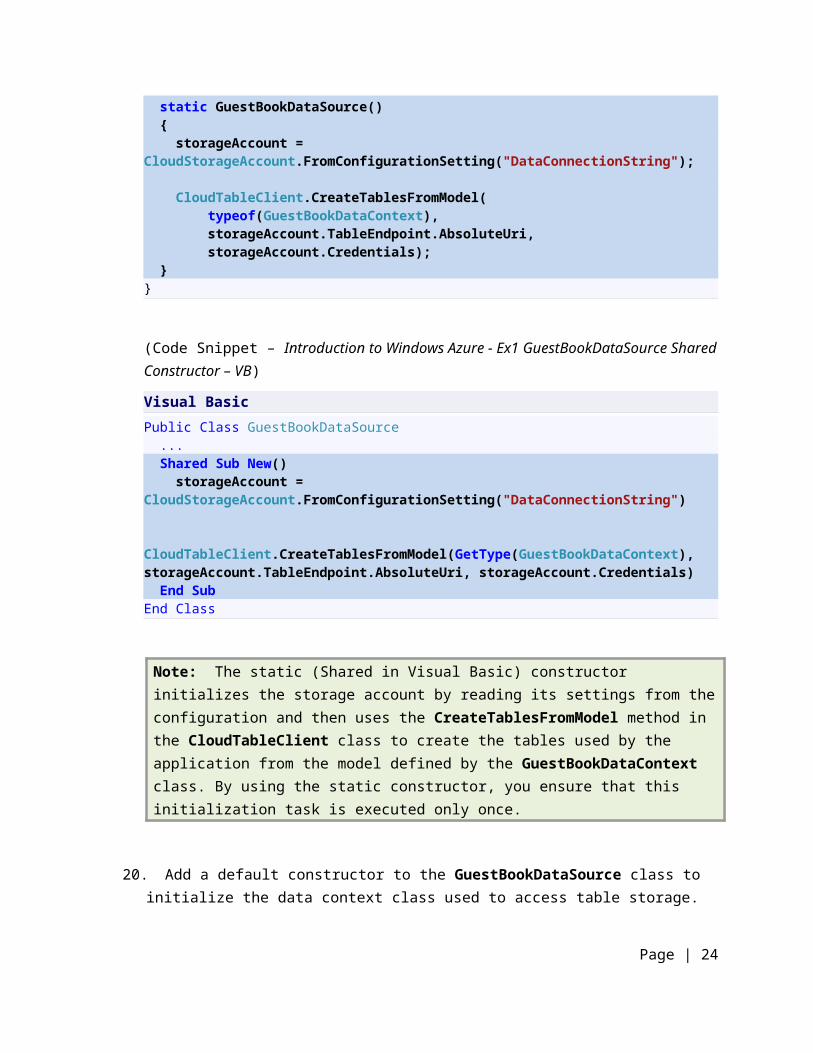
19. Now, add a static (Shared in Visual Basic) constructor to the data source class as shown in the following (highlighted) code. This code creates the tables from the GuestBookDataContext class.
(Code Snippet – Introduction to Windows Azure - Ex1 GuestBookDataSource Static Constructor – CS)
C#
public class GuestBookDataSource{ ... static GuestBookDataSource() { storageAccount = CloudStorageAccount.FromConfigurationSetting("DataConnectionString");
CloudTableClient.CreateTablesFromModel( typeof(GuestBookDataContext), storageAccount.TableEndpoint.AbsoluteUri, storageAccount.Credentials); }}
(Code Snippet – Introduction to Windows Azure - Ex1 GuestBookDataSource Shared Constructor – VB)
Visual Basic
Public Class GuestBookDataSource ... Shared Sub New() storageAccount = CloudStorageAccount.FromConfigurationSetting("DataConnectionString")
Page | 21

CloudTableClient.CreateTablesFromModel(GetType(GuestBookDataContext), storageAccount.TableEndpoint.AbsoluteUri, storageAccount.Credentials) End SubEnd Class
Note: The static (Shared in Visual Basic) constructor initializes the storage account by reading its settings from the configuration and then uses the CreateTablesFromModel method in the CloudTableClient class to create the tables used by the application from the model defined by the GuestBookDataContext class. By using the static constructor, you ensure that this initialization task is executed only once.
20. Add a default constructor to the GuestBookDataSource class to initialize the data context class used to access table storage.
(Code Snippet – Introduction to Windows Azure - Ex1 GuestBookDataSource Constructor – CS)
C#
public class GuestBookDataSource{ ... public GuestBookDataSource() { this.context = new GuestBookDataContext(storageAccount.TableEndpoint.AbsoluteUri, storageAccount.Credentials); this.context.RetryPolicy = RetryPolicies.Retry(3, TimeSpan.FromSeconds(1)); }}
(Code Snippet – Introduction to Windows Azure - Ex1 GuestBookDataSource Constructor – VB)
Visual Basic
Public Class GuestBookDataSource ... Public Sub New() Me.context = New GuestBookDataContext(storageAccount.TableEndpoint.AbsoluteUri, storageAccount.Credentials) Me.context.RetryPolicy = RetryPolicies.Retry(3, TimeSpan.FromSeconds(1)) End SubEnd Class
Page | 22

21. Next, insert the following method to return the contents of the GuestBookEntry table.
(Code Snippet – Introduction to Windows Azure - Ex1 GuestBookDataSource Select – CS)
C#
public class GuestBookDataSource{ ... public IEnumerable<GuestBookEntry> GetGuestBookEntries() { var results = from g in this.context.GuestBookEntry where g.PartitionKey == DateTime.UtcNow.ToString("MMddyyyy") select g; return results; }}
(Code Snippet – Introduction to Windows Azure - Ex1 GuestBookDataSource Select – VB)
Visual Basic
Public Class GuestBookDataSource ... Public Function GetGuestBookEntries() As IEnumerable(Of GuestBookEntry) Dim results = From g In Me.context.GuestBookEntry _ Where g.PartitionKey = DateTime.UtcNow.ToString("MMddyyyy") _ Select g Return results End FunctionEnd Class
Note: The GetGuestBookEntries method retrieves today's guest book entries by constructing a LINQ statement that filters the retrieved information using the current date as the partition key value. The web role uses this method to bind to a data grid and display the guest book.
22. Now, add the following method to insert new entries into the GuestBookEntry table.
(Code Snippet – Introduction to Windows Azure - Ex1 GuestBookDataSource AddGuestBookEntry – CS)
C#
Page | 23
public class GuestBookDataSource{ ... public void AddGuestBookEntry(GuestBookEntry newItem) { this.context.AddObject("GuestBookEntry", newItem); this.context.SaveChanges(); }}
(Code Snippet – Introduction to Windows Azure - Ex1 GuestBookDataSource AddGuestBookEntry – VB)
Visual Basic
Public Class GuestBookDataSource ... Public Sub AddGuestBookEntry(ByVal newItem As GuestBookEntry) Me.context.AddObject("GuestBookEntry", newItem) Me.context.SaveChanges() End SubEnd Class
Note: This method adds a new GuestBookEntry object to the data context and then calls SaveChanges to write the entity to storage.
23. Finally, add a method to the data source class to update the thumbnail URL property for an entry.
(Code Snippet – Introduction to Windows Azure - Ex1 GuestBookDataSource UpdateImageThumbnail – CS)
C#
public class GuestBookDataSource{ ... public void UpdateImageThumbnail(string partitionKey, string rowKey, string thumbUrl) { var results = from g in this.context.GuestBookEntry where g.PartitionKey == partitionKey && g.RowKey == rowKey select g;
var entry = results.FirstOrDefault<GuestBookEntry>();
Page | 24

entry.ThumbnailUrl = thumbUrl; this.context.UpdateObject(entry); this.context.SaveChanges(); }
}
(Code Snippet – Introduction to Windows Azure - Ex1 GuestBookDataSource UpdateImageThumbnail – VB)
Visual Basic
Public Class GuestBookDataSource ... Public Sub UpdateImageThumbnail(ByVal partitionKey As String, ByVal rowKey As String, ByVal thumbUrl As String) Dim results = From g In Me.context.GuestBookEntry _ Where g.PartitionKey = partitionKey AndAlso g.RowKey = rowKey _ Select g
Dim entry = results.FirstOrDefault() entry.ThumbnailUrl = thumbUrl Me.context.UpdateObject(entry) Me.context.SaveChanges() End SubEnd Class
Note: The UpdateImageThumbnail method locates an entry using its partition key and row key; it updates the thumbnail URL, notifies the data context of the update, and then saves the changes.
24. Save the GuestBookDataSource.cs file (for Visual C# projects) or GuestBookDataSource.vb file (for Visual Basic projects).
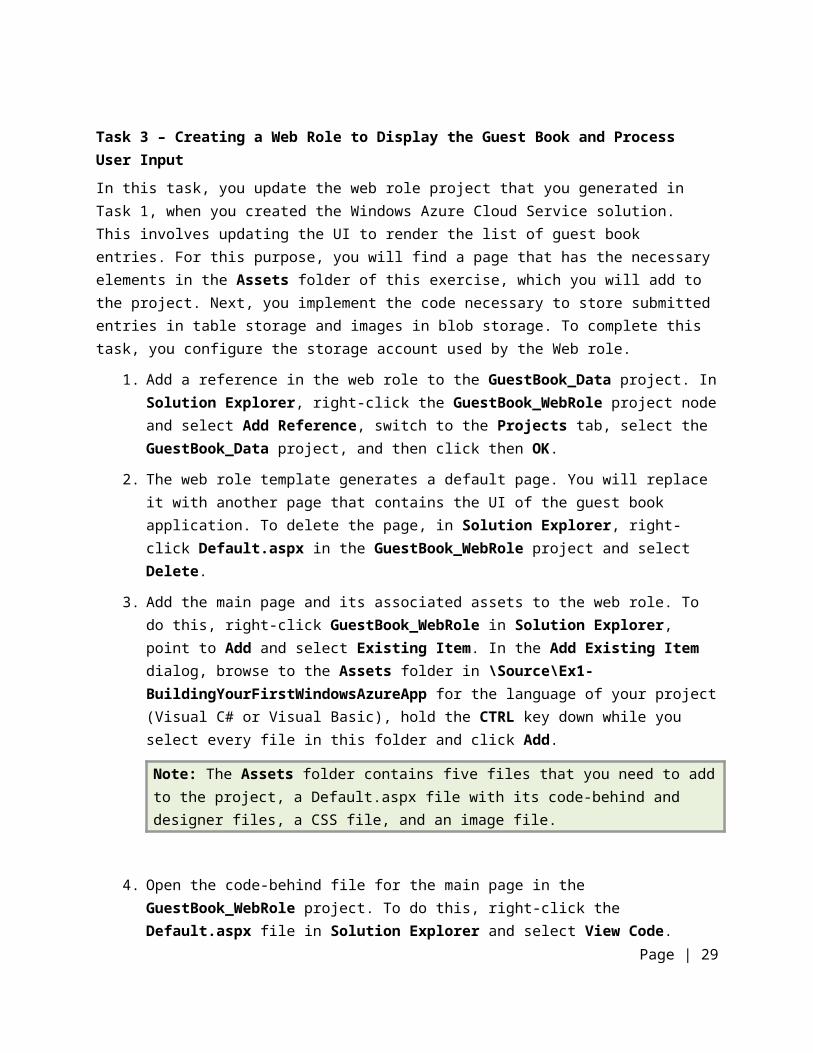
Task 3 – Creating a Web Role to Display the Guest Book and Process User Input
In this task, you update the web role project that you generated in Task 1, when you created the Windows Azure Cloud Service solution. This involves updating the UI to render the list of guest book entries. For this purpose, you will find a page that has the necessary elements in the Assets folder of this exercise, which you will add to the project. Next, you implement the code necessary to store submitted
Page | 25

entries in table storage and images in blob storage. To complete this task, you configure the storage account used by the Web role.
1. Add a reference in the web role to the GuestBook_Data project. In Solution Explorer, right-click the GuestBook_WebRole project node and select Add Reference, switch to the Projects tab, select the GuestBook_Data project, and then click then OK.
2. The web role template generates a default page. You will replace it with another page that contains the UI of the guest book application. To delete the page, in Solution Explorer, right-click Default.aspx in the GuestBook_WebRole project and select Delete.
3. Add the main page and its associated assets to the web role. To do this, right-click GuestBook_WebRole in Solution Explorer, point to Add and select Existing Item. In the Add Existing Item dialog, browse to the Assets folder in \Source\Ex1-BuildingYourFirstWindowsAzureApp for the language of your project (Visual C# or Visual Basic), hold the CTRL key down while you select every file in this folder and click Add.
Note: The Assets folder contains five files that you need to add to the project, a Default.aspx file with its code-behind and designer files, a CSS file, and an image file.
4. Open the code-behind file for the main page in the GuestBook_WebRole project. To do this, right-click the Default.aspx file in Solution Explorer and select View Code.
5. In the code-behind file, insert the following namespace declarations.
(Code Snippet – Introduction to Windows Azure - Ex1 Web Role Namespace Declarations – CS)
C#
using System.IO;using System.Net;using Microsoft.WindowsAzure;using Microsoft.WindowsAzure.ServiceRuntime;using Microsoft.WindowsAzure.StorageClient;using GuestBook_Data;
(Code Snippet – Introduction to Windows Azure - Ex1 Web Role Namespace Declarations – VB)
Visual Basic
Imports System.IOImports System.NetImports Microsoft.WindowsAzureImports Microsoft.WindowsAzure.ServiceRuntimeImports Microsoft.WindowsAzure.StorageClientImports GuestBook_Data
Page | 26

6. Declare the following member fields in the _Default class.
(Code Snippet – Introduction to Windows Azure - Ex1 Web Role Member Fields – CS)
C#
public partial class _Default : System.Web.UI.Page{ private static bool storageInitialized = false; private static object gate = new Object(); private static CloudBlobClient blobStorage; ...}
(Code Snippet – Introduction to Windows Azure - Ex1 Web Role Member Fields – VB)
Visual Basic
Partial Public Class _Default Inherits System.Web.UI.Page
Private Shared storageInitialized As Boolean = False Private Shared gate As New Object() Private Shared blobStorage As CloudBlobClient ...End Class
7. Locate the SignButton_Click event handler in the code-behind file and insert the following code.
(Code Snippet – Introduction to Windows Azure - Ex1 SignButton_Click – CS)
C#
public partial class _Default : System.Web.UI.Page{ ... protected void SignButton_Click(object sender, EventArgs e) { if (FileUpload1.HasFile) { InitializeStorage();
// upload the image to blob storage string uniqueBlobName = string.Format("guestbookpics/image_{0}{1}", Guid.NewGuid().ToString(), Path.GetExtension(FileUpload1.FileName)); CloudBlockBlob blob = blobStorage.GetBlockBlobReference(uniqueBlobName);
Page | 27

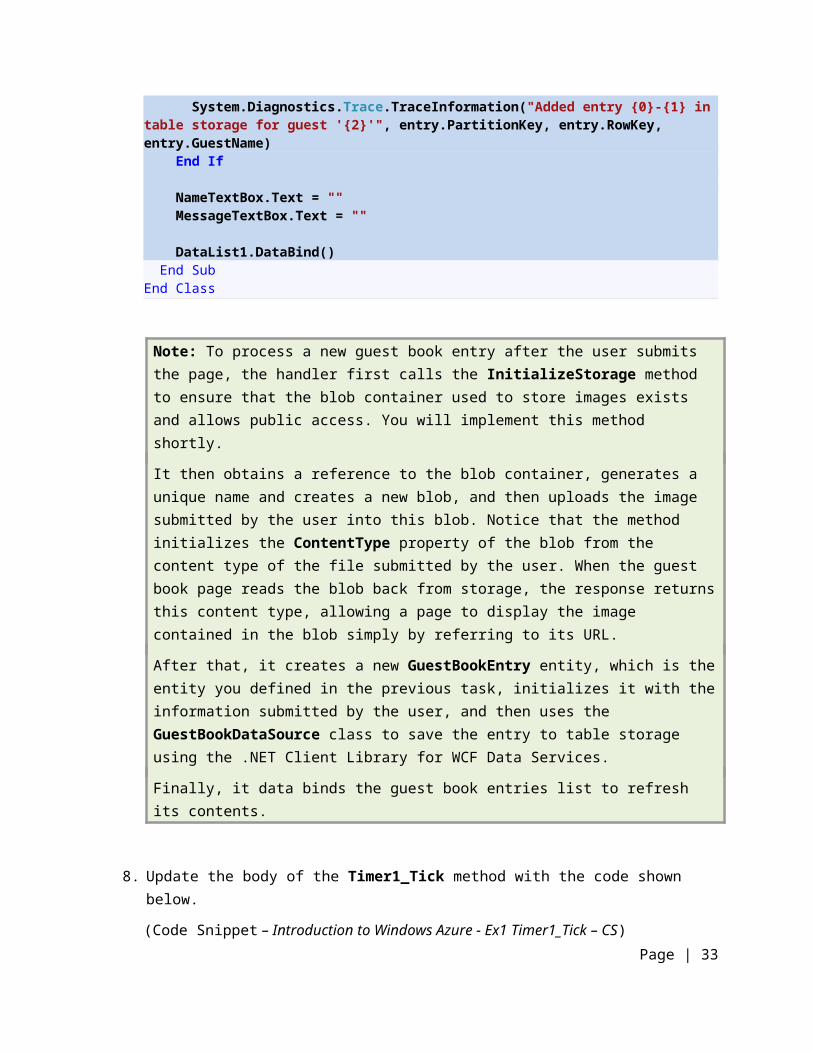
blob.Properties.ContentType = FileUpload1.PostedFile.ContentType; blob.UploadFromStream(FileUpload1.FileContent); System.Diagnostics.Trace.TraceInformation("Uploaded image '{0}' to blob storage as '{1}'", FileUpload1.FileName, uniqueBlobName);
// create a new entry in table storage GuestBookEntry entry = new GuestBookEntry() { GuestName = NameTextBox.Text, Message = MessageTextBox.Text, PhotoUrl = blob.Uri.ToString(), ThumbnailUrl = blob.Uri.ToString() }; GuestBookDataSource ds = new GuestBookDataSource(); ds.AddGuestBookEntry(entry); System.Diagnostics.Trace.TraceInformation("Added entry {0}-{1} in table storage for guest '{2}'", entry.PartitionKey, entry.RowKey, entry.GuestName); }
NameTextBox.Text = ""; MessageTextBox.Text = "";
DataList1.DataBind(); }}
(Code Snippet – Introduction to Windows Azure - Ex1 SignButton_Click – VB)
Visual Basic
Public Class _Default Inherits System.Web.UI.Page ... Protected Sub SignButton_Click(ByVal sender As Object, ByVal e As EventArgs) Handles SignButton.Click
If FileUpload1.HasFile Then InitializeStorage()
' upload the image to blob storage Dim uniqueBlobName As String = String.Format("guestbookpics/image_{0}{1}", Guid.NewGuid().ToString(), Path.GetExtension(FileUpload1.FileName)) Dim blob As CloudBlockBlob = blobStorage.GetBlockBlobReference(uniqueBlobName) blob.Properties.ContentType = FileUpload1.PostedFile.ContentType blob.UploadFromStream(FileUpload1.FileContent) System.Diagnostics.Trace.TraceInformation("Uploaded image '{0}' to blob storage as '{1}'", FileUpload1.FileName, uniqueBlobName)
' create a new entry in table storage
Page | 28
Dim entry As New GuestBookEntry() With {.GuestName = NameTextBox.Text, .Message = MessageTextBox.Text, .PhotoUrl = blob.Uri.ToString(), .ThumbnailUrl = blob.Uri.ToString()} Dim ds As New GuestBookDataSource() ds.AddGuestBookEntry(entry) System.Diagnostics.Trace.TraceInformation("Added entry {0}-{1} in table storage for guest '{2}'", entry.PartitionKey, entry.RowKey, entry.GuestName) End If
NameTextBox.Text = "" MessageTextBox.Text = ""
DataList1.DataBind() End SubEnd Class
Note: To process a new guest book entry after the user submits the page, the handler first calls the InitializeStorage method to ensure that the blob container used to store images exists and allows public access. You will implement this method shortly.
It then obtains a reference to the blob container, generates a unique name and creates a new blob, and then uploads the image submitted by the user into this blob. Notice that the method initializes the ContentType property of the blob from the content type of the file submitted by the user. When the guest book page reads the blob back from storage, the response returns this content type, allowing a page to display the image contained in the blob simply by referring to its URL.
After that, it creates a new GuestBookEntry entity, which is the entity you defined in the previous task, initializes it with the information submitted by the user, and then uses the GuestBookDataSource class to save the entry to table storage using the .NET Client Library for WCF Data Services.
Finally, it data binds the guest book entries list to refresh its contents.
8. Update the body of the Timer1_Tick method with the code shown below.
(Code Snippet – Introduction to Windows Azure - Ex1 Timer1_Tick – CS)
C#
public partial class _Default : System.Web.UI.Page{ ... protected void Timer1_Tick(object sender, EventArgs e) {
Page | 29

DataList1.DataBind(); }}
(Code Snippet – Introduction to Windows Azure - Ex1 Timer1_Tick – VB)
Visual Basic
Public Class _Default Inherits System.Web.UI.Page ... Protected Sub Timer1_Tick(ByVal sender As Object, ByVal e As EventArgs) Handles Timer1.Tick DataList1.DataBind() End SubEnd Class
Note: The timer periodically forces the page to refresh the contents of the guest book entries list.
9. Locate the Page_Load event handler and update its body with the following code to enable the page refresh timer.
(Code Snippet – Introduction to Windows Azure - Ex1 Page_Load – CS)
C#
public partial class _Default : System.Web.UI.Page{ ... protected void Page_Load(object sender, EventArgs e) { if (!Page.IsPostBack) { Timer1.Enabled = true; } }}
(Code Snippet – Introduction to Windows Azure - Ex1 Page_Load – VB)
Visual Basic
Public Class _Default Inherits System.Web.UI.Page ...
Page | 30

Protected Sub Page_Load(ByVal sender As Object, ByVal e As System.EventArgs) Handles Me.Load If Not (Page.IsPostBack) Then Timer1.Enabled = True End If End SubEnd Class
10. Implement the InitializeStorage method by replacing its body with the following (highlighted) code.
(Code Snippet – Introduction to Windows Azure - Ex1 InitializeStorage – CS)
C#
public partial class _Default : System.Web.UI.Page{ ... private void InitializeStorage() { if (storageInitialized) { return; }
lock (gate) { if (storageInitialized) { return; }
try { // read account configuration settings var storageAccount = CloudStorageAccount.FromConfigurationSetting("DataConnectionString");
// create blob container for images blobStorage = storageAccount.CreateCloudBlobClient(); CloudBlobContainer container = blobStorage.GetContainerReference("guestbookpics"); container.CreateIfNotExist();
// configure container for public access var permissions = container.GetPermissions(); permissions.PublicAccess = BlobContainerPublicAccessType.Container; container.SetPermissions(permissions);
Page | 31

} catch (WebException) { throw new WebException("Storage services initialization failure. " + "Check your storage account configuration settings. If running locally, " + "ensure that the Development Storage service is running."); }
storageInitialized = true; } }}
(Code Snippet – Introduction to Windows Azure - Ex1 InitializeStorage – VB)
Visual Basic
Public Class _Default Inherits System.Web.UI.Page ... Private Sub InitializeStorage() If storageInitialized Then Return End If SyncLock gate If storageInitialized Then Return End If
Try ' read account configuration settings Dim storageAccount = CloudStorageAccount.FromConfigurationSetting("DataConnectionString")
' create blob container for images blobStorage = storageAccount.CreateCloudBlobClient() Dim container As CloudBlobContainer = blobStorage.GetContainerReference("guestbookpics") container.CreateIfNotExist()
' configure container for public access Dim permissions = container.GetPermissions() permissions.PublicAccess = BlobContainerPublicAccessType.Container container.SetPermissions(permissions)
Page | 32
Catch e1 As WebException Throw New WebException("Storage services initialization failure. " _ & "Check your storage account configuration settings. If running locally, " _ & "ensure that the Development Storage service is running.") End Try
storageInitialized = True End SyncLock End SubEnd Class
Note: The InitializeStorage method first ensures that it executes only once. It reads the storage account settings from the Web role configuration, creates a blob container for the images uploaded with each guest book entry and configures it for public access.
11. Because the web role uses Windows Azure storage services, you need to provide your storage account settings. To create a new setting, in Solution Explorer, expand the Roles node in the GuestBook project, double-click GuestBook_WebRole to open the properties for this role and select the Settings tab. Click Add Setting, type “DataConnectionString” in the Name column, change the Type to ConnectionString, and then click the button labeled with an ellipsis.
Figure 12Configuring the storage account settings
12. In the Storage Account Connection String dialog, choose the option labeled Use the Windows Azure storage emulator and then click OK.
Page | 33

Figure 13Creating a connection string for the storage emulator
Note: A storage account is a unique endpoint for the Windows Azure Blob, Queue, and Table services. You must create a storage account in the Management Portal to use these services. In this exercise, you use Windows Azure storage emulator, which is included in the Windows Azure SDK development environment to simulate the Blob, Queue, and Table services available in the cloud. If you are building a hosted service that employs storage services or writing any external application that calls storage services, you can test locally against the Windows Azure storage emulator.
To use the storage emulator, you set the value of the UseDevelopmentStorage keyword in the connection string for the storage account to true. When you publish your application to Windows Azure, you need to update the connection string to specify storage account settings including your account name and shared key. For example,
<Setting name="DataConnectionString" value="DefaultEndpointsProtocol=https;AccountName=YourAccountName;AccountKey=YourAccountKey" />
where YourAccountName is the name of your Azure Storage account and YourAccountKey is your access key.
13. Press CTRL + S to save changes to the role configuration.Page | 34

14. Finally, you need to set up the environment for the configuration publisher. In the GuestBook_WebRole project, open the Global.asax.cs file (for Visual C# projects) or the Global.asax.vb file (for Visual Basic projects).
15. At the top of the file, insert the following namespace declaration to import the types contained in the Microsoft.WindowsAzure and Microsoft.WindowsAzure.ServiceRuntime namespaces.
C#
using Microsoft.WindowsAzure;using Microsoft.WindowsAzure.ServiceRuntime;
Visual Basic
Imports Microsoft.WindowsAzureImports Microsoft.WindowsAzure.ServiceRuntime
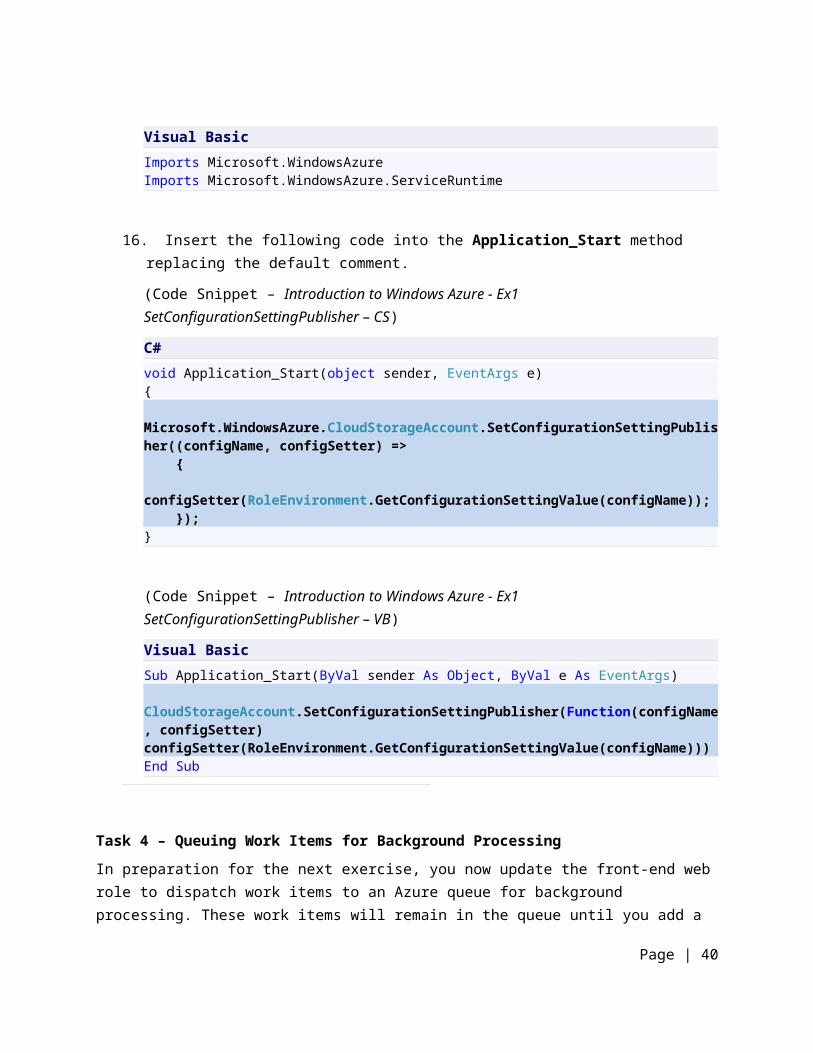
16. Insert the following code into the Application_Start method replacing the default comment.
(Code Snippet – Introduction to Windows Azure - Ex1 SetConfigurationSettingPublisher – CS)
C#
void Application_Start(object sender, EventArgs e){ Microsoft.WindowsAzure.CloudStorageAccount.SetConfigurationSettingPublisher((configName, configSetter) => { configSetter(RoleEnvironment.GetConfigurationSettingValue(configName)); });}
(Code Snippet – Introduction to Windows Azure - Ex1 SetConfigurationSettingPublisher – VB)
Visual Basic
Sub Application_Start(ByVal sender As Object, ByVal e As EventArgs) CloudStorageAccount.SetConfigurationSettingPublisher(Function(configName, configSetter) configSetter(RoleEnvironment.GetConfigurationSettingValue(configName)))End Sub
Task 4 – Queuing Work Items for Background ProcessingPage | 35

In preparation for the next exercise, you now update the front-end web role to dispatch work items to an Azure queue for background processing. These work items will remain in the queue until you add a worker role that picks items from the queue and generates thumbnails for each uploaded image.
1. Open the code-behind file for the main page of the web role project. To do this, right-click the Default.aspx file in Solution Explorer and select View Code.
2. Declare a queue client member by inserting the following (highlighted) declaration into the Default class.
(Code Snippet – Introduction to Windows Azure - Ex1 CloudQueueClient member – CS)
C#
public partial class _Default : System.Web.UI.Page{ private static bool storageInitialized = false; private static object gate = new Object(); private static CloudBlobClient blobStorage; private static CloudQueueClient queueStorage; ...}
(Code Snippet – Introduction to Windows Azure - Ex1 CloudQueueClient member – VB)
Visual Basic
Public Class _Default Inherits System.Web.UI.Page
Private Shared storageInitialized As Boolean = False Private Shared gate As New Object() Private Shared blobStorage As CloudBlobClient Private Shared queueStorage As CloudQueueClient ...End Class
3. Now, update the storage initialization code to create the queue, if it does not exist, and then initialize the queue reference created in the previous step. To do this, locate the InitializeStorage method and insert the following (highlighted) code into this method immediately after the code that configures the blob container for public access.
(Code Snippet – Introduction to Windows Azure - Ex1 Create Queue – CS)
C#
public partial class _Default : System.Web.UI.Page{ ...
Page | 36

private void InitializeStorage() { ... try { ... // configure container for public access var permissions = container.GetPermissions(); permissions.PublicAccess = BlobContainerPublicAccessType.Container; container.SetPermissions(permissions);
// create queue to communicate with worker role queueStorage = storageAccount.CreateCloudQueueClient(); CloudQueue queue = queueStorage.GetQueueReference("guestthumbs"); queue.CreateIfNotExist(); } catch (WebException) { ...}
(Code Snippet – Introduction to Windows Azure - Ex1 Create Queue – VB)
Visual Basic
Partial Public Class _Default Inherits System.Web.UI.Page ... Private Sub InitializeStorage() ... Try ... ' configure container for public access Dim permissions = container.GetPermissions() permissions.PublicAccess = BlobContainerPublicAccessType.Container container.SetPermissions(permissions)
' create queue to communicate with worker role queueStorage = storageAccount.CreateCloudQueueClient() Dim queue As CloudQueue = queueStorage.GetQueueReference("guestthumbs") queue.CreateIfNotExist() Catch e1 As WebException ...End Class
Page | 37

Note: The updated code creates a queue that the web role uses to submit new jobs to the worker role.
4. Finally, add code to post a work item to the queue. To do this, locate the SignButton_Click event handler and insert the following (highlighted) code immediately after the lines that create a new entry in table storage.
(Code Snippet – Introduction to Windows Azure - Ex1 Queueing work items – CS)
C#
protected void SignButton_Click(object sender, EventArgs e){ if (FileUpload1.HasFile) { ...
// create a new entry in table storage GuestBookEntry entry = new GuestBookEntry() { GuestName = NameTextBox.Text, Message = MessageTextBox.Text, PhotoUrl = blob.Uri.ToString(), ThumbnailUrl = blob.Uri.ToString() }; GuestBookDataSource ds = new GuestBookDataSource(); ds.AddGuestBookEntry(entry); System.Diagnostics.Trace.TraceInformation("Added entry {0}-{1} in table storage for guest '{2}'", entry.PartitionKey, entry.RowKey, entry.GuestName);
// queue a message to process the image var queue = queueStorage.GetQueueReference("guestthumbs"); var message = new CloudQueueMessage(String.Format("{0},{1},{2}", blob.Uri.ToString(), entry.PartitionKey, entry.RowKey)); queue.AddMessage(message); System.Diagnostics.Trace.TraceInformation("Queued message to process blob '{0}'", uniqueBlobName); }
NameTextBox.Text = ""; MessageTextBox.Text = "";
DataList1.DataBind();}
(Code Snippet – Introduction to Windows Azure - Ex1 Queueing work items – VB)
Visual Basic
Page | 38

Protected Sub SignButton_Click(ByVal sender As Object, ByVal e As EventArgs) Handles SignButton.Click
If FileUpload1.HasFile Then ...
' create a new entry in table storage Dim entry As New GuestBookEntry() With {.GuestName = NameTextBox.Text, .Message = MessageTextBox.Text, .PhotoUrl = blob.Uri.ToString(), .ThumbnailUrl = blob.Uri.ToString()} Dim ds As New GuestBookDataSource() ds.AddGuestBookEntry(entry) System.Diagnostics.Trace.TraceInformation("Added entry {0}-{1} in table storage for guest '{2}'", entry.PartitionKey, entry.RowKey, entry.GuestName)
' queue a message to process the image Dim queue = queueStorage.GetQueueReference("guestthumbs") Dim message = New CloudQueueMessage(String.Format("{0},{1},{2}", blob.Uri.ToString(), entry.PartitionKey, entry.RowKey)) queue.AddMessage(message) System.Diagnostics.Trace.TraceInformation("Queued message to process blob '{0}'", uniqueBlobName) End If
NameTextBox.Text = "" MessageTextBox.Text = ""
DataList1.DataBind()End Sub
Note: The updated code obtains a reference to the “guestthumbs” queue. It constructs a new message that consists of a comma-separated string with the name of the blob that contains the image, the partition key, and the row key of the entity that was added. The worker role can easily parse messages with this format. The method then submits the message to the queue.
Verification
The Windows Azure compute emulator, formerly Development Fabric or devfabric, is a simulated environment for developing and testing Windows Azure applications in your machine. In this task, you launch the GuestBook application in the emulator and create one or more guest book entries.
Among the features available in the Windows Azure Tools for Microsoft Visual Studio is a Windows Azure Storage browser that allows you to connect to a storage account and browse the blobs and tables
Page | 39
it contains. If you are using this version of Visual Studio, you will use it during this task to examine the storage resources created by the application.
1. Press F5 to execute the service. The service builds and then launches the local Windows Azure compute emulator. To show the Compute Emulator UI, right-click its icon located in the system tray and select Show Compute Emulator UI.
Figure 14Showing the Compute Emulator UI
Note: If it is the first time you run the Windows Azure Emulator, the System will show a Windows Security Alert dialog indicating the Firewall has blocked some features. Click Allow Access to continue.
Page | 40

Note: When you use the storage emulator for the first time, it needs to execute a one-time initialization procedure to create the necessary database and tables. If this is the case, wait for the procedure to complete and examine the Development Storage Initialization dialog to ensure that it completes successfully.
Figure 15Storage emulator initialization process
2. Switch to Internet Explorer to view the GuestBook application.
3. Add a new entry to the guest book. To do this, type your name and a message, choose an image to upload from the Pictures\Sample Pictures library, and then click the pencil icon to submit the entry.
Page | 41

Figure 16Windows Azure GuestBook home page
Note: It is a good idea to choose a large hi-resolution image because, once the application is complete, the guestbook service will resize uploaded images.
Once you submit an entry, the web role creates a new entity in the guest book table and uploads the photo to blob storage. The page contains a timer that triggers a page refresh every 5 seconds, so the new entry should appear on the page after a brief interval. Initially, the new entry contains a link to the blob that contains the uploaded image so it will appear with the same size as the original image.
Page | 42
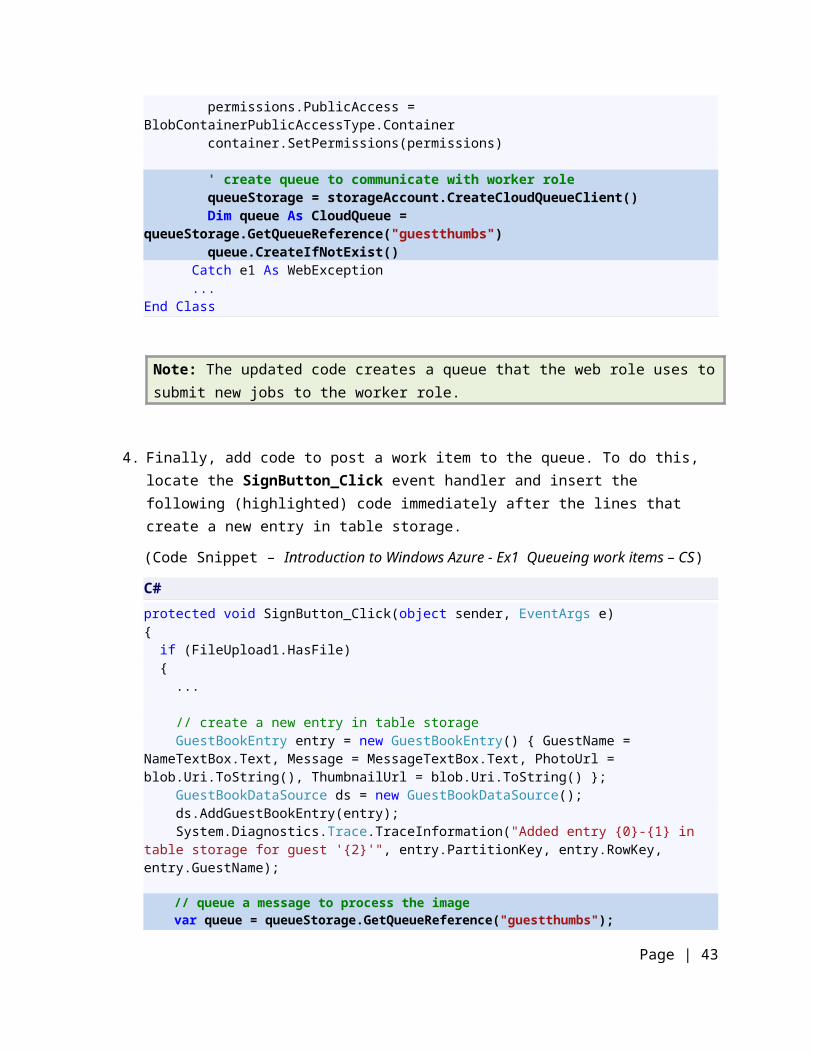
Figure 17GuestBook application showing an uploaded image in its original size
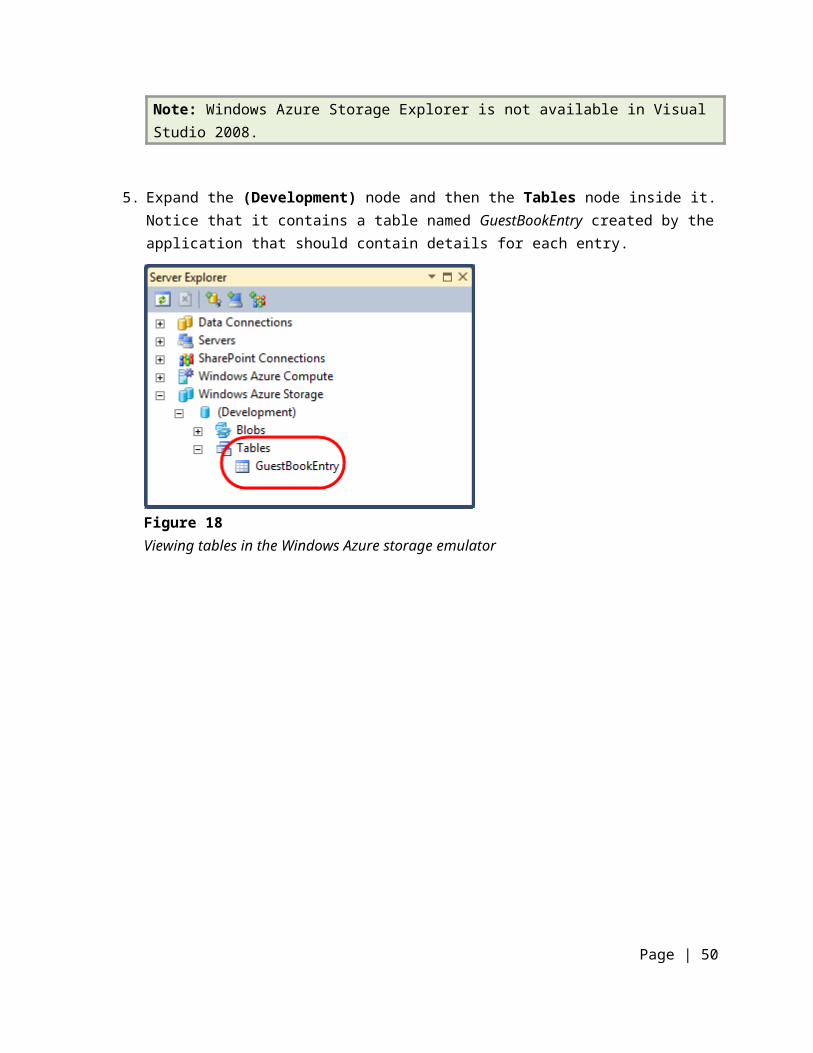
If you are using Visual Studio 2010, you can use the Windows Azure Storage Explorer to view storage resources directly from Visual Studio. This functionality is not available in Visual Studio 2008.
4. To open the Storage Explorer in Visual Studio 2010, open the View menu, select Server Explorer, and then expand the Windows Azure Storage node.
The Windows Azure Storage node lists the storage accounts that you have currently registered and, by default, includes an entry for the storage emulator account labeled as (Development).
Note: Windows Azure Storage Explorer is not available in Visual Studio 2008.
Page | 43

5. Expand the (Development) node and then the Tables node inside it. Notice that it contains a table named GuestBookEntry created by the application that should contain details for each entry.
Figure 18Viewing tables in the Windows Azure storage emulator
6. Double-click the GuestBookEntry node in the Windows Azure Storage explorer to show the contents of this table. The GuestBookEntry table contains information for the entry that you created earlier in this task, including its GuestName, Message, PhotoUrl, and ThumbnailUrl properties, as well as the PartitionKey, RowKey, and Timestamp properties common to all table storage entities. Notice that the PhotoUrl and ThumbnailUrl properties are currently the same. In the next exercise, you will modify the application to generate image thumbnails and to update the corresponding URL.
Figure 19Viewing tables using the Windows Azure Tools for Visual Studio
Page | 44

7. Now, expand the Blobs node in the Windows Azure Storage explorer. Inside this node, you will find an entry for a container named guestbookpics that contains blobs with raw data for the images uploaded by the application.
Figure 20Viewing blobs using the Windows Azure Tools for Visual Studio
8. Double-click the node for the guestbookpics container to list the blobs it contains. It should include an entry for the image that you uploaded earlier.
Figure 21Viewing the contents of a blob container in Visual Studio
9. Each blob in blob storage has an associated content type that Visual Studio uses to select a suitable viewer for the blob. To display the contents of the blob, double-click the corresponding entry in the container listing to display the image.
Page | 45

Figure 22Viewing blob contents in Visual Studio
10. Press SHIFT + F5 to stop the debugger and shut down the deployment in the development fabric.
Exercise 2: Background Processing with Worker Roles and Queues
A worker role runs in the background to provide services or execute time related tasks like a service process.
In this exercise, you create a worker role to read work items posted to a queue by the web role front-end. To process the work item, the worker role extracts information about a guest book entry from the message and then retrieves the corresponding entity from table storage. It then fetches the associated image from blob storage and creates its thumbnail, which it also stores as a blob. Finally, to complete the processing, it updates the URL of the generated thumbnail blob in the guest book entry.
Task 1 – Creating a Worker Role to Process Images in the Background
Page | 46

In this task, you add a worker role project to the solution and update it so that it reads items posted by the front-end from the queue and processes them.
1. If not already open, launch Visual Studio as administrator from Start | All Programs | Microsoft Visual Studio 2010 by right clicking the Microsoft Visual Studio 2010 shortcut and choosing Run as administrator.
2. In the File menu, choose Open and then Project/Solution. In the Open Project dialog, browse to \Source\Ex2-UsingWorkerRolesAndQueues\Begin, select Begin.sln in the folder for the language of your preference (Visual C# or Visual Basic) and click Open. Alternatively, you may continue with the solution that you obtained after completing the previous exercise.
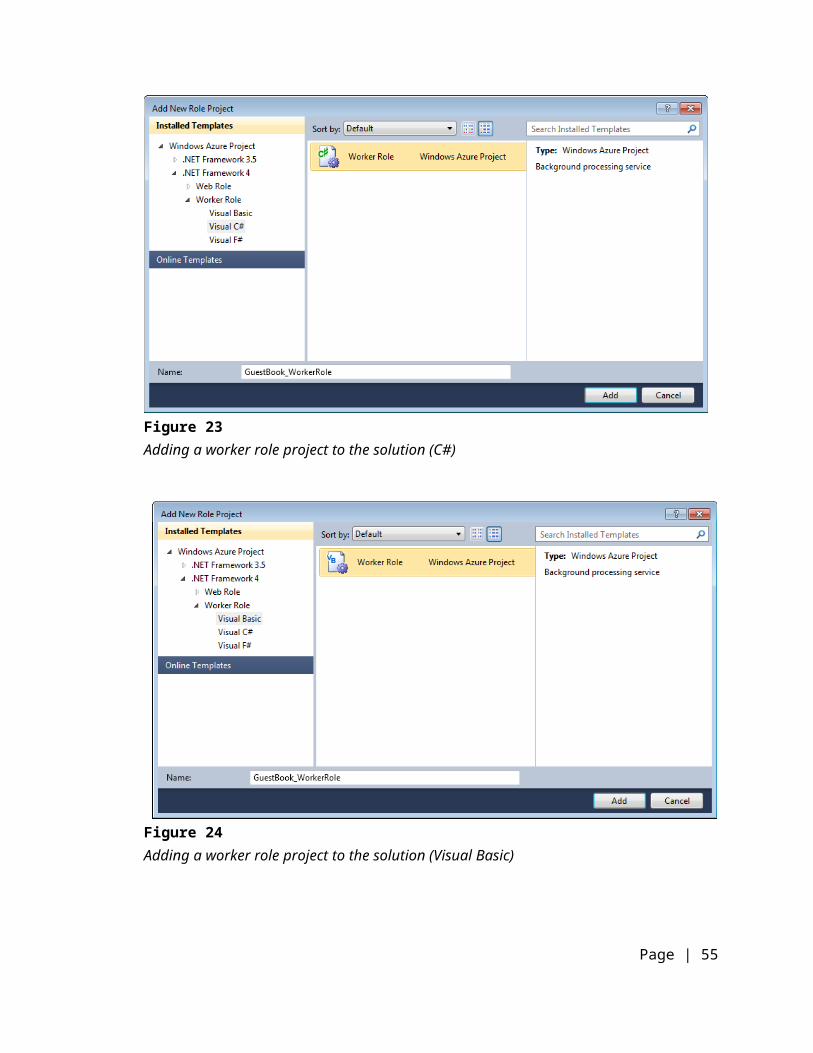
3. In Solution Explorer, right-click the Roles node in the GuestBook project, point to Add and then select New Worker Role Project.
4. In the Add New Role Project dialog, select the Worker Role category and choose the Worker Role template for the language of your choice (Visual C# or Visual Basic). Set the name of the worker role to GuestBook_WorkerRole and click Add.
Figure 23Adding a worker role project to the solution (C#)
Page | 47

Figure 24Adding a worker role project to the solution (Visual Basic)
5. In the new worker role project, add a reference to the data model project. In Solution Explorer, right-click the GuestBook_WorkerRole project and select Add Reference, switch to the Projects tab, select GuestBook_Data and then click OK.
6. Next, add a reference to the System.Drawing assembly, only this time, in the Add Reference dialog, switch to the .NET tab instead, select the System.Drawing component and then click OK.
7. Now, open the WorkerRole.cs file (for Visual C# projects) or WorkerRole.vb file (for Visual Basic projects) of the GuestBook_WorkerRole project and insert the followings namespace declarations.
(Code Snippet – Introduction to Windows Azure - Ex2 WorkerRole Namespaces – CS)
C#
using System.Drawing;using System.Drawing.Drawing2D;using System.Drawing.Imaging;using System.IO;using GuestBook_Data;
(Code Snippet – Introduction to Windows Azure - Ex2 WorkerRole Namespaces – VB)
Visual Basic
Imports System.DrawingImports System.Drawing.Drawing2D
Page | 48

Imports System.Drawing.ImagingImports System.IOImports GuestBook_Data
8. Add member fields to the WorkerRole class for the blob container and the queue, as shown below.
(Code Snippet – Introduction to Windows Azure - Ex2 WorkerRole Fields – CS)
C#
public class WorkerRole : RoleEntryPoint{ private CloudQueue queue; private CloudBlobContainer container; ...}
(Code Snippet – Introduction to Windows Azure - Ex2 WorkerRole Fields – VB)
Visual Basic
Public Class WorkerRole Inherits RoleEntryPoint
Private queue As CloudQueue Private container As CloudBlobContainer ...End Class
9. Insert the following code into the body of the OnStart method immediately after the line that subscribes the RoleEnvironmentChanging event and before the call to the OnStart method in the base class.
(Code Snippet – Introduction to Windows Azure - Ex2 WorkerRole OnStart – CS)
C#
public class WorkerRole : RoleEntryPoint{ ... public override bool OnStart() { // Set the maximum number of concurrent connections ServicePointManager.DefaultConnectionLimit = 12;
// read storage account configuration settings
Page | 49
CloudStorageAccount.SetConfigurationSettingPublisher((configName, configSetter) => { configSetter(RoleEnvironment.GetConfigurationSettingValue(configName)); }); var storageAccount = CloudStorageAccount.FromConfigurationSetting("DataConnectionString");
// initialize blob storage CloudBlobClient blobStorage = storageAccount.CreateCloudBlobClient(); container = blobStorage.GetContainerReference("guestbookpics");
// initialize queue storage CloudQueueClient queueStorage = storageAccount.CreateCloudQueueClient(); queue = queueStorage.GetQueueReference("guestthumbs");
Trace.TraceInformation("Creating container and queue...");
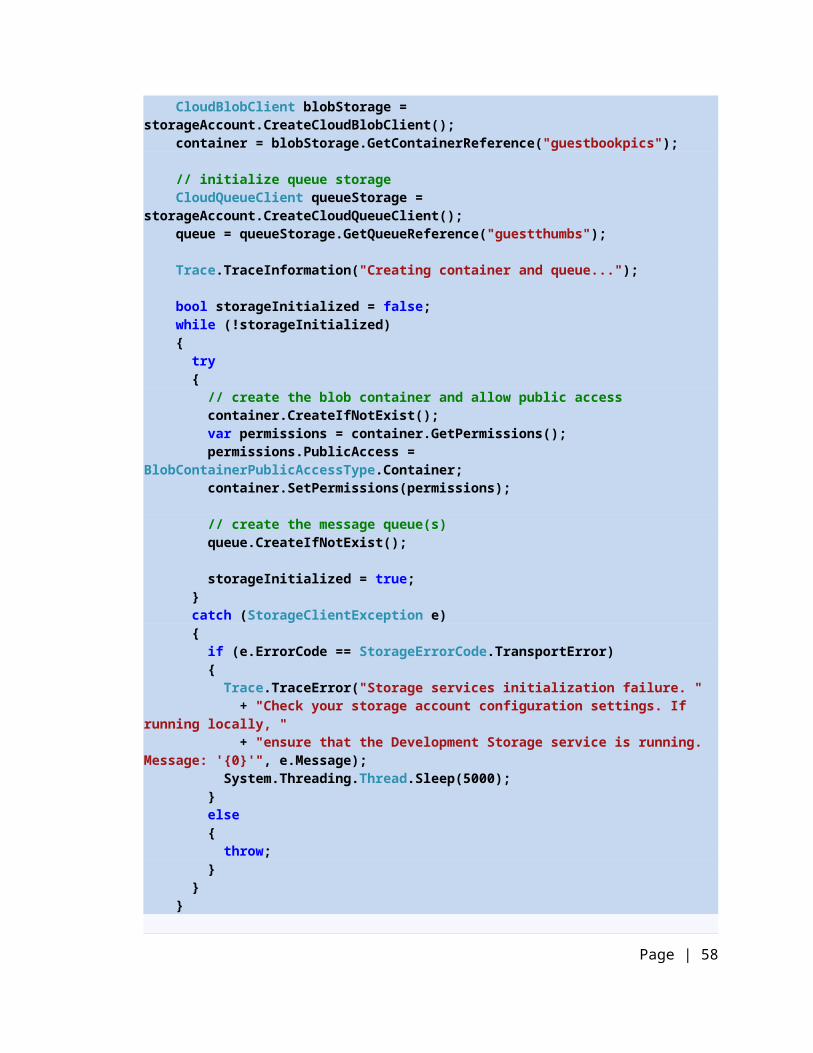
bool storageInitialized = false; while (!storageInitialized) { try { // create the blob container and allow public access container.CreateIfNotExist(); var permissions = container.GetPermissions(); permissions.PublicAccess = BlobContainerPublicAccessType.Container; container.SetPermissions(permissions);
// create the message queue(s) queue.CreateIfNotExist();
storageInitialized = true; } catch (StorageClientException e) { if (e.ErrorCode == StorageErrorCode.TransportError) { Trace.TraceError("Storage services initialization failure. " + "Check your storage account configuration settings. If running locally, " + "ensure that the Development Storage service is running. Message: '{0}'", e.Message); System.Threading.Thread.Sleep(5000); }
Page | 50

else { throw; } } }
return base.OnStart(); } ...}
(Code Snippet – Introduction to Windows Azure - Ex2 WorkerRole OnStart – VB)
Visual Basic
Public Class WorkerRole Inherits RoleEntryPoint ... Public Overrides Function OnStart() As Boolean
' Set the maximum number of concurrent connections ServicePointManager.DefaultConnectionLimit = 12
' read storage account configuration settings CloudStorageAccount.SetConfigurationSettingPublisher(Function(configName, configSetter) configSetter(RoleEnvironment.GetConfigurationSettingValue(configName))) Dim storageAccount = CloudStorageAccount.FromConfigurationSetting("DataConnectionString")
' initialize blob storage Dim blobStorage = storageAccount.CreateCloudBlobClient() container = blobStorage.GetContainerReference("guestbookpics")
' initialize queue storage Dim queueStorage = storageAccount.CreateCloudQueueClient() queue = queueStorage.GetQueueReference("guestthumbs")
Trace.TraceInformation("Creating container and queue...")
Dim storageInitialized = False Do While (Not storageInitialized) Try ' create the blob container and allow public access container.CreateIfNotExist() Dim permissions = container.GetPermissions()
Page | 51

permissions.PublicAccess = BlobContainerPublicAccessType.Container container.SetPermissions(permissions)
' create the message queue(s) queue.CreateIfNotExist()
storageInitialized = True Catch e As StorageClientException If (e.ErrorCode = StorageErrorCode.TransportError) Then Trace.TraceError("Storage services initialization failure. " _ & "Check your storage account configuration settings. If running locally, " _ & "ensure that the Development Storage service is running. Message: '{0}'", e.Message) System.Threading.Thread.Sleep(5000) Else Throw End If End Try Loop
Return MyBase.OnStart()
End Function ...End Class
10. Replace the body of the Run method with the code shown below.
(Code Snippet – Introduction to Windows Azure - Ex2 WorkerRole Run – CS)
C#
public class WorkerRole : RoleEntryPoint{ ... public override void Run() { Trace.TraceInformation("Listening for queue messages...");
while (true) { try { // retrieve a new message from the queue CloudQueueMessage msg = queue.GetMessage(); if (msg != null)
Page | 52

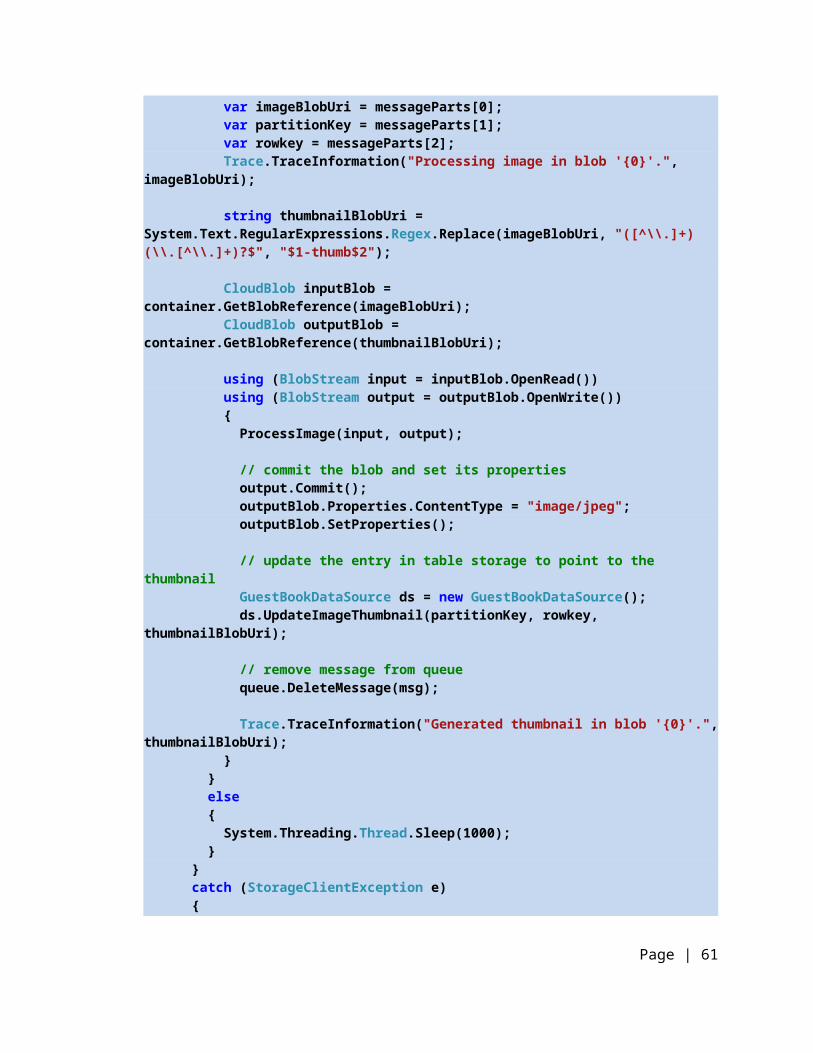
{ // parse message retrieved from queue var messageParts = msg.AsString.Split(new char[] { ',' }); var imageBlobUri = messageParts[0]; var partitionKey = messageParts[1]; var rowkey = messageParts[2]; Trace.TraceInformation("Processing image in blob '{0}'.", imageBlobUri);
string thumbnailBlobUri = System.Text.RegularExpressions.Regex.Replace(imageBlobUri, "([^\\.]+)(\\.[^\\.]+)?$", "$1-thumb$2");
CloudBlob inputBlob = container.GetBlobReference(imageBlobUri); CloudBlob outputBlob = container.GetBlobReference(thumbnailBlobUri);
using (BlobStream input = inputBlob.OpenRead()) using (BlobStream output = outputBlob.OpenWrite()) { ProcessImage(input, output);
// commit the blob and set its properties output.Commit(); outputBlob.Properties.ContentType = "image/jpeg"; outputBlob.SetProperties();
// update the entry in table storage to point to the thumbnail GuestBookDataSource ds = new GuestBookDataSource(); ds.UpdateImageThumbnail(partitionKey, rowkey, thumbnailBlobUri);
// remove message from queue queue.DeleteMessage(msg);
Trace.TraceInformation("Generated thumbnail in blob '{0}'.", thumbnailBlobUri); } } else { System.Threading.Thread.Sleep(1000); } } catch (StorageClientException e) {
Page | 53

Trace.TraceError("Exception when processing queue item. Message: '{0}'", e.Message); System.Threading.Thread.Sleep(5000); } } } ...}
(Code Snippet – Introduction to Windows Azure - Ex2 WorkerRole Run – VB)
Visual Basic
Public Class WorkerRole Inherits RoleEntryPoint ... Public Overrides Sub Run()
Trace.TraceInformation("Listening for queue messages...") Do Try ' retrieve a new message from the queue Dim msg As CloudQueueMessage = queue.GetMessage() If msg IsNot Nothing Then ' parse message retrieved from queue Dim messageParts = msg.AsString.Split(New Char() {","c}) Dim imageBlobUri = messageParts(0) Dim partitionKey = messageParts(1) Dim rowKey = messageParts(2) Trace.TraceInformation("Processing image in blob '{0}'.", imageBlobUri)
Dim thumbnailBlobUri As String = System.Text.RegularExpressions.Regex.Replace(imageBlobUri, "([^\\.]+)(\\.[^\\.]+)?$", "$1-thumb$2")
' download original image from blob storage Dim inputBlob As CloudBlockBlob = container.GetBlockBlobReference(imageBlobUri) Dim outputBlob As CloudBlockBlob = container.GetBlockBlobReference(thumbnailBlobUri) Using input As BlobStream = inputBlob.OpenRead() Using output As BlobStream = outputBlob.OpenWrite() ProcessImage(input, output)
' commit the blob and set its properties output.Commit() outputBlob.Properties.ContentType = "image/jpeg"
Page | 54
outputBlob.SetProperties()
' update the entry in table storage to point to the thumbnail Dim ds = New GuestBookDataSource() ds.UpdateImageThumbnail(partitionKey, rowKey, thumbnailBlobUri)
' remove message from queue queue.DeleteMessage(msg)
Trace.TraceInformation("Generated thumbnail in blob '{0}'.", thumbnailBlobUri) End Using End Using Else System.Threading.Thread.Sleep(1000) End If Catch e As StorageClientException Trace.TraceError("Exception when processing queue item. Message: '{0}'", e.Message) System.Threading.Thread.Sleep(5000) End Try Loop
End Sub ...End Class
11. Finally, add the following method to the WorkerRole class to create thumbnails from a given image.
(Code Snippet – Introduction to Windows Azure - Ex2 ProcessImage – CS)
C#
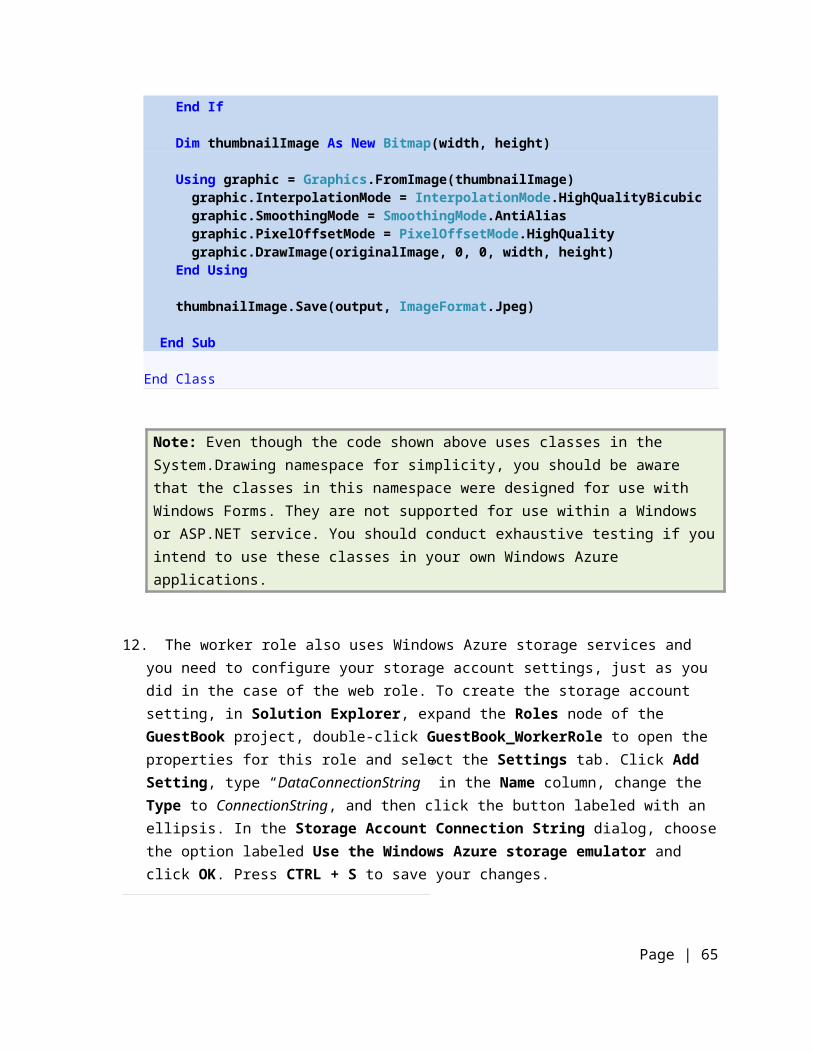
public class WorkerRole : RoleEntryPoint{ ... public void ProcessImage(Stream input, Stream output) { int width; int height; var originalImage = new Bitmap(input);
if (originalImage.Width > originalImage.Height) { width = 128; height = 128 * originalImage.Height / originalImage.Width;
Page | 55

} else { height = 128; width = 128 * originalImage.Width / originalImage.Height; }
var thumbnailImage = new Bitmap(width, height);
using (Graphics graphics = Graphics.FromImage(thumbnailImage)) { graphics.InterpolationMode = InterpolationMode.HighQualityBicubic; graphics.SmoothingMode = SmoothingMode.AntiAlias; graphics.PixelOffsetMode = PixelOffsetMode.HighQuality; graphics.DrawImage(originalImage, 0, 0, width, height); }
thumbnailImage.Save(output, ImageFormat.Jpeg); }}
(Code Snippet – Introduction to Windows Azure - Ex2 ProcessImage – VB)
Visual Basic
Public Class WorkerRole Inherits RoleEntryPoint ... Private Sub ProcessImage(ByVal input As Stream, ByVal output As Stream)
Dim width As Integer Dim height As Integer Dim originalImage As New Bitmap(input)
If originalImage.Width > originalImage.Height Then width = 128 height = 128 * originalImage.Height / originalImage.Width Else height = 128 width = 128 * originalImage.Width / originalImage.Height End If
Dim thumbnailImage As New Bitmap(width, height)
Using graphic = Graphics.FromImage(thumbnailImage) graphic.InterpolationMode = InterpolationMode.HighQualityBicubic
Page | 56

graphic.SmoothingMode = SmoothingMode.AntiAlias graphic.PixelOffsetMode = PixelOffsetMode.HighQuality graphic.DrawImage(originalImage, 0, 0, width, height) End Using
thumbnailImage.Save(output, ImageFormat.Jpeg)
End Sub
End Class
Note: Even though the code shown above uses classes in the System.Drawing namespace for simplicity, you should be aware that the classes in this namespace were designed for use with Windows Forms. They are not supported for use within a Windows or ASP.NET service. You should conduct exhaustive testing if you intend to use these classes in your own Windows Azure applications.
12. The worker role also uses Windows Azure storage services and you need to configure your storage account settings, just as you did in the case of the web role. To create the storage account setting, in Solution Explorer, expand the Roles node of the GuestBook project, double-click GuestBook_WorkerRole to open the properties for this role and select the Settings tab. Click Add Setting, type “DataConnectionString” in the Name column, change the Type to ConnectionString, and then click the button labeled with an ellipsis. In the Storage Account Connection String dialog, choose the option labeled Use the Windows Azure storage emulator and click OK. Press CTRL + S to save your changes.
Verification
You now launch the updated application in the Windows Azure compute emulator to verify that the worker role can retrieve queued work items and generate the corresponding thumbnails.
1. Press F5 to launch the service in the local compute emulator.
2. Switch to Internet Explorer to view the application. Provided you completed the verification section of the previous exercise successfully, you will see the guest book entry that you entered, including the uploaded image displayed in its original size. If you recall, during the last task of that exercise, you updated the web role code to post a work item to a queue for each new entry submitted. These messages remain in the queue even though the web role was subsequently recycled.
3. Wait a few seconds until the worker role picks up the queued message and processes the image that you are viewing. Once that occurs, it generates a thumbnail for this image and updates the
Page | 57
corresponding URL property for the entry in table storage. Eventually, because the page refreshes every few seconds, it will show the thumbnail image instead.
Figure 25Home page showing the thumbnail generated by the worker role
4. If you are using Visual Studio 2010, in Server Explorer, expand the Blobs node in the Windows Azure Storage node, and then double-click the guestbookpics container. Notice that it now contains an additional blob for the generated thumbnail image.
Figure 26Blob container showing the blob for the generated thumbnail
5. Add some more guest book entries. Notice that the images update after a few seconds once the worker role processes the thumbnails.
Page | 58

6. Press SHIFT + F5 to stop the debugger and shut down the deployment in the compute emulator.
Exercise 3: Publishing a Windows Azure Application
In this exercise, you publish the application created in the previous exercise to Windows Azure using the Management Portal. First, you provision the required service components, upload the application package to the staging area and configure it. You then execute the application in the staging area to verify its operation. Finally, you promote the application to production.
Note: In order to complete this exercise, you need to sign up for a Windows Azure account and purchase a subscription.
For a description of the provisioning process, see Provisioning Windows Azure.
Task 1 – Creating a Storage Account and a Hosted Service Component
The application you publish in this exercise requires both compute and storage services. In this task, you create a new Windows Azure storage account to allow the application to persist its data. In addition, you define a hosted service component to execute application code.
1. Navigate to http://windows.azure.com using a Web browser and sign in using the Windows Live ID associated with your Windows Azure account.
Page | 59

Figure 27Signing in to the Windows Azure Management Portal
2. First, you create the storage account that the application will use to store its data. In the Windows Azure ribbon, click New Storage Account.
Figure 28Creating a new storage account
Page | 60
3. In the Create a New Storage Account dialog, pick your subscription in the drop down list labeled Choose a subscription.
Figure 29Choosing a subscription to host the storage account
4. In the textbox labeled Enter a URL, enter the name for your storage account, for example, <yourname>guestbook, where <yourname> is a unique name. Windows Azure uses this value to generate the endpoint URLs for the storage account services.
Figure 30Choosing the URL of the new storage account
Note: The portal ensures that the name is valid by verifying that the name complies with the naming rules and is currently available. A validation error will be shown if you enter a name that does not satisfy the rules.
Page | 61

5. Select the option labeled Create or choose an affinity group and then pick Create a new affinity group from the drop down list.
Figure 31Creating a new affinity group
Note: The reason that you are creating a new affinity group is to deploy both the hosted service and storage account to the same location, thus ensuring high bandwidth and low latency between the application and the data it depends on.
6. In the Create a New Affinity Group dialog, enter an Affinity Group Name, select its Location in the drop down list, and then click OK.
Figure 32Creating a new affinity group
Page | 62

7. Back in the Create a New Storage Account dialog, click OK to register your new storage account. Wait until the account provisioning process completes and updates the Storage Accounts tree view. Notice that the Properties pane shows the URL assigned to each service in the storage account. Record the public storage account name—this is the first segment of the URL assigned to your endpoints.
Figure 33Storage account successfully created
8. Now, click the View button next to Primary access key in the Properties pane. In the View Storage Access Keys dialog, click Copy to Clipboard next to the Primary Access Key. You will use this value later on to configure the application.
Page | 63

Figure 34Retrieving the storage access keys
Note: The Primary Access Key and Secondary Access Key both provide a shared secret that you can use to access storage. The secondary key gives the same access as the primary key and is used for backup purposes. You can regenerate each key independently in case either one is compromised.
9. Next, create the compute component that executes the application code. Click Hosted Services on the left pane. Click on New Hosted Service button on the ribbon.
Figure 35Creating a new hosted service
Page | 64
10. In the Create a new Hosted Service dialog, select the subscription where you wish to create the service from the drop down list labeled Choose a subscription.
Figure 36Choosing your subscription
11. Enter a service name in the textbox labeled Enter a name for your service and choose its URL by entering a prefix in the textbox labeled Enter a URL prefix for your service, for example, <yourname>guestbook, where <yourname> is a unique name. Windows Azure uses this value to generate the endpoint URLs for the hosted service.
Page | 65

Figure 37Choosing a service name and URL
Note: If possible, choose the same name for both the storage account and hosted service. However, you may need to choose a different name if the one you select is unavailable.
Note: The portal ensures that the name is valid by verifying that the name complies with the naming rules and is currently available. A validation error will be shown if you enter name that does not satisfy the rules.
12. Select the option labeled Create or choose an affinity group and then pick the guestbook affinity group from the drop down list—this is the same affinity group that you defined earlier, when you created the storage account.
Figure 38Choosing an affinity group
Page | 66

Note: By choosing guestbook as the affinity group, you ensure that the hosted service is deployed to the same location as the storage account that you provisioned earlier.
13. Select the option labeled Do not Deploy.
Note: While you can create and deploy your service to Windows Azure in a single operation by completing the Deployment Options section, for this hands-on lab, you will defer the deployment step until the next task.
14. Click OK to create the hosted service and then wait until the provisioning process completes.
Figure 39Hosted service successfully created
15. Do not close the browser window. You will use the portal for the next task.
Task 2 – Publishing the Application to the Windows Azure Management Portal
There are several alternatives for publishing applications to Windows Azure. The Windows Azure Tools for Visual Studio allow you to both create and publish the service package to the Windows Azure environment directly from Visual Studio. Another deployment option is the Windows Azure Service Management PowerShell Cmdlets that enable a scripted deployment of your application. Lastly, the Windows Azure Management Portal provides the means to publish and manage your service using only your browser. For more information about publishing applications, see the Windows Azure Deployment lab in this training kit.
Page | 67
In this task, you publish the application to the staging environment using the Management Portal but first, you generate the service package using Visual Studio.
1. If it is not already open, launch Visual Studio as administrator from Start | All Programs | Microsoft Visual Studio 2010 by right clicking the Microsoft Visual Studio 2010 shortcut and choosing Run as administrator.
2. If the User Account Control dialog appears, click Continue.
3. In the File menu, choose Open and then Project/Solution. In the Open Project dialog, browse to \Source\Ex3-WindowsAzureDeployment and choose the folder for the language of your preference (Visual C# or Visual Basic). Select Begin.sln in the Begin folder and click Open. Alternatively, you may continue with the solution that you obtained after completing the previous exercise.
4. To configure the storage before publishing the service, open the ServiceConfiguration.cscfg file you will use to publish the project (e.g. ServiceConfiguration.Cloud.cscfg), which is located in GuestBook service. Replace the placeholder labeled [YOUR_ACCOUNT_NAME] with the Storage Account Name that you chose when you configured the storage account in Task 1. If you followed the recommendation, the name should follow the pattern <yourname>guestbook, where <yourname> is a unique name. Make sure to replace both instances of the placeholder, one for the DataConnectionString and the second one for the Microsoft.WindowsAzure.Plugins.Diagnostics.ConnectionString.
Note: If you continued working with the solution obtained in the previous exercise, you need to change the DataConnectionString and Microsoft.WindowsAzure.Plugins.Diagnostics.ConnectionString values.Replace their value with the following:
DefaultEndpointsProtocol=https;AccountName=[YOUR_ACCOUNT_NAME];AccountKey=[YOUR_ACCOUNT_KEY]
Then replace the placeholders with your Storage Account Name and Primary Access Key.
5. Next, replace the placeholder labeled [YOUR_ACCOUNT_KEY] with the Primary Access Key value that you recorded earlier, when you created the storage account in Task 1. Again, replace both instances of the placeholder, one for each connection string.
Page | 68

Figure 40Configuring the storage account connection strings
6. Generate the package to publish to the cloud. To do this, right-click the GuestBook cloud
project and select Package. In the Package Windows Azure Application dialog, select the Service Configuration and the Build Configuration you will use from the dropdowns and then click Package.
After Visual Studio builds the project and generates the service package, Windows Explorer opens with the current folder set to the location where the generated package is stored.
Page | 69

Figure 41Creating a service package in Visual Studio
Note: Although the procedure is not shown here, you can use the Publish Cloud Service feature in the Windows Azure Tools to publish your service package directly from Visual Studio. To use this feature, you need to configure a set of credentials that you use to authenticate access to the management service using a self-issued certificate that you upload to the Management Portal.
7. Now, switch back to the browser window and the Management Portal.
8. At the portal, select the hosted service that you created in the previous step and then click New Staging Deployment on the ribbon.
Note: A hosted service is a service that runs your code in the Windows Azure environment. It has two separate deployment slots: staging and production. The staging deployment slot allows you to test your service in the Windows Azure environment before you deploy it to production.
Page | 70

Figure 42Hosted service summary page
9. In the Create a new Deployment dialog, to select a Package location, click Browse Locally, navigate to the folder where Visual Studio generated the package in Step 4 and then select GuestBook.cspkg.
10. Now, to choose the Configuration File, click Browse Locally and select ServiceConfiguration.cscfg in the same folder that you used in the previous step.
Note: The .cscfg file contains configuration settings for the application, including the instance count that you will update later in the exercise.
11. Finally, for the Deployment name, enter a label to identify the deployment; for example, use v1.0.
Note: The portal displays the label in its user interface for staging and production, allowing you to identify the version currently deployed in each environment.
Page | 71

Figure 43Configuring the service package deployment
12. Click OK to start the deployment. Notice that the portal displays a warning message when you do this. Click See more details to review and understand the message.
Figure 44Reviewing the warnings
Page | 72

Note: In this particular case, the warning indicates that only a single instance is being deployed for at least one of the roles. This is not recommended because it does not guarantee the service’s availability. In the next task, you will increase the number of instances to overcome this issue.
13. Click Yes to override and submit the deployment request. Notice that the package begins to upload and that the portal shows the status of the deployment to indicate its progress.
Figure 45Uploading a service package to the Windows Azure Management Portal
Page | 73
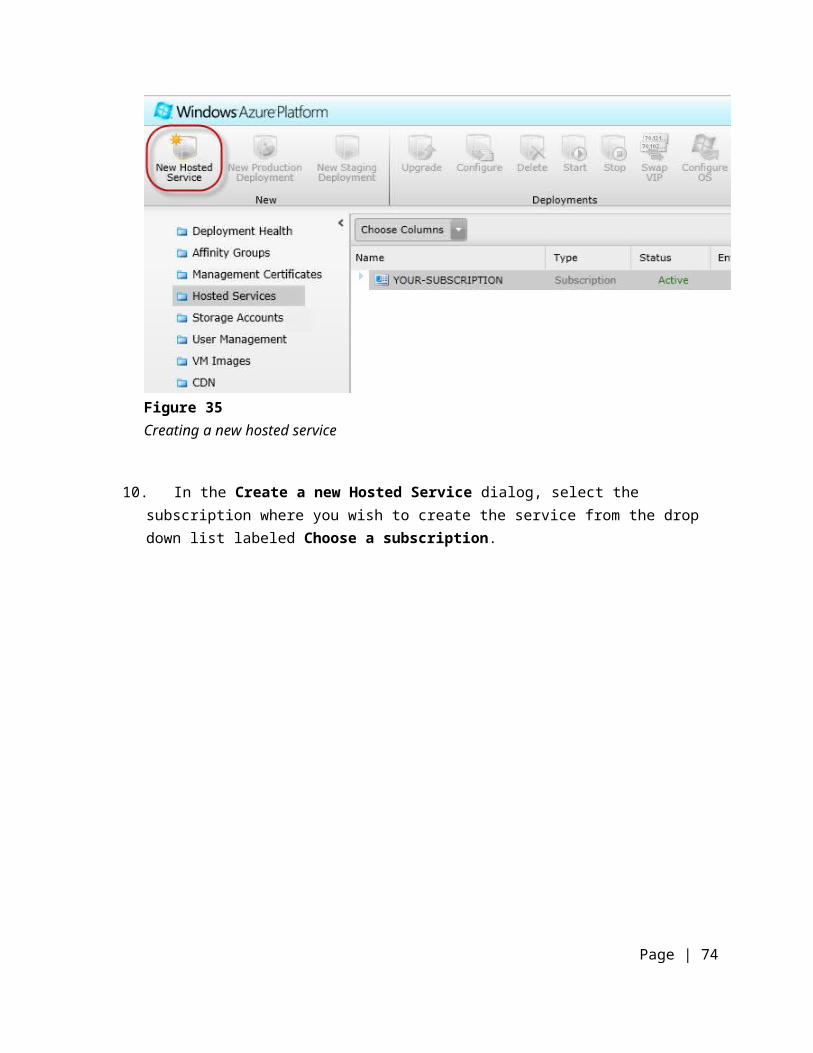
14. Wait until the deployment process finishes, which may take several minutes. At this point, you have already uploaded the package and it is in a Ready state. Notice that the portal assigned a DNS name to the deployment that includes a unique identifier. Shortly, you will access this URL to test the application and determine whether it operates correctly in the Windows Azure environment, but first you need to configure it.
Note: During deployment, Windows Azure analyzes the configuration file and copies the service to the correct number of machines, and starts all the instances. Load balancers, network devices and monitoring are also configured during this time.
Figure 46Package successfully deployed and ready
Task 3 – Configuring the Application to Increase the Number of Instances
Before you can test the deployed application, you need to configure it. In this task, you define the storage account settings for the application.
1. In Hosted Services, select your GuestBook service and click Configure on the ribbon.
Page | 74

Figure 47Configuring application settings
2. In the Configure Deployment dialog, select the option labeled Edit current configuration, locate the Instances element inside the GuestBook_WebRole configuration and change its count attribute to 2. Do the same for the GuestBook_WorkerRole configuration to also increase its instance count to 2.
Page | 75

Figure 48Configuring the Instances count
Note: The configuration is simply an XML document that contains the value of the settings declared in the service definition file. Its initial content is determined by the ServiceConfiguration.cscfg file that you uploaded earlier, when you deployed the package in Task 2.
Note: The Instances setting controls the number of roles that Windows Azure starts and is used to scale the service. For a token-based subscription—currently only available in countries that are not provisioned for billing—this number is limited to a maximum of two instances. However, in the commercial offering, you can change it to any number that you are willing to pay for.
3. Click OK to update the configuration and wait for the hosted service to apply the new settings.
Page | 76

Figure 49Updating the number of role instances
Note: The portal displays a legend "Updating deployment..." while the settings are applied.
Task 4 – Testing the Application in the Staging Environment
In this task, you run the application in the staging environment and access its public endpoint to test that it operates correctly.
1. In Hosted Services, select your GuestBook service and then click the link located in the right pane under DNS name.
Figure 50
Page | 77

Running the application in the staging environment
Note: The link shown for DNS name has the form <guid>.cloudapp.net, where <guid> is some random identifier. This is different from the address where the application will run once it is in production. Although the application executes in a staging area that is separate from the production environment, there is no actual physical difference between staging and production – it is simply a matter of where the load balancer is connected.
2. If you wish, you may test the application by signing the guest book and uploading an image.
Figure 51Application running in the staging environment
Task 5 – Promoting the Application to Production
Now that you have verified that the service is working correctly in the staging environment, you are ready to promote it to final production. When you deploy the application to production, Windows Azure reconfigures its load balancers so that the application is available at its production URL.
1. In Hosted Services, select your GuestBook service and then click Swap VIP on the ribbon.
Page | 78

Figure 52Promoting the application to the production slot
2. On the Swap VIPs dialog, click OK to swap the deployments between staging and production.
Page | 79

Figure 53Promoting the application to the production deployment
3. Wait for the promotion process to complete, which typically takes a few seconds.
Figure 54Application successfully deployed to production
4. Click the DNS name link to open the production site in a browser window and notice the URL in the address bar.
Page | 80

Figure 55Application running in the production environment
Note: If you visit the production site shortly after its promotion, the DNS name might not be ready. If you encounter a DNS error (404), wait a few minutes and try again. Keep in mind that Windows Azure creates DNS name entries dynamically and that the changes might take few minutes to propagate.
5. Even when a deployment is in a suspended state, Windows Azure still needs to allocate a virtual machine (VM) for each instance and charge you for it. Once you have completed testing the application, you need to remove the deployment from Windows Azure to avoid an unnecessary expense. To remove a running deployment, go to Hosted Services, select the deployment slot where the service is currently hosted, staging or production, and then click Stop on the ribbon. Once the service has stopped, click Delete on the ribbon to remove it.
SummaryPage | 81

By completing this hands-on lab, you have reviewed the basic elements of Windows Azure applications. You have seen that services consist of one or more web roles and worker roles. You have learned about Windows Azure storage services and in particular, Blob, Table and Queue services. Finally, you have explored a basic architectural pattern for cloud applications that allows front-end processes to communicate with back-end processes using queues.
Page | 82