Introduction to Unitybyuksel/affectivecomputing/presentations/IntroUnity.pdfScript Components We are...
44
Introduction to Unity Beste F. Yuksel Some figures taken from Unity’s award winning tutorials - rest of my own making :)
Transcript of Introduction to Unitybyuksel/affectivecomputing/presentations/IntroUnity.pdfScript Components We are...

Introduction to UnityBeste F. YukselSome figures taken from Unity’s award winning tutorials - rest of my own making :)

What is UnityUnity is a 2D and 3D game engine that can be applied to a variety of platforms including phones and VR/AR (XR) devices.
A game engine is a framework that allows you to import art and assets (2D and 3D) from other software such as Maya, assemble those assets into scenes, add lighting, audio, physics, animation, interactivity, and logic.
The scripting language that we will be using with Unity is C# (very similar to Java) but JavaScript and Boo can also be used.
Unity has fantastic tutorials and documentation which I strongly recommend you peruse.

Create a new project in Unity called SampleProject (3D)

Let’s import a plane GameObject

If you click on the Plane object in the Hierarchy on the left, you can view its components on the right.

You can always reset a GameObject’s position in the same to 0,0,0 by going to the toggle next to Transform and Reset
GameObjectsGame objects are the items that make up your Unity scenes.
Everything within a scene is considered a game object and these objects are made
up of a number of components.
Each has a necessary transform component that contains the position, rotation
and scale of the game object.
You can view each game object’s components by clicking on it in the Hierarchy.
The Hierarchy is a list of all the game objects in the scene.
GameObject in Unity docs

Unity’s 3D coordinate system
Z axis represents depth
X and Z axes make up the horizontal plane
Y axis points up
Unity works on a left-handed coordinate system.


Back to resetting - if you reset a GameObject’s Transform.position you will set it to 0,0,0 (also called the origin)

TransformTransform is a class in the UnityEngine that is the position, rotation, and scale of an object.
See this reference for the Transform class in Unity docs
The Transform class has a property called position

Transform.positionThis is the X,Y,Z position of an object in the scene.
Transform.position in Unity docs
It is represented as a Vector3 object.
You can alter the Transform.position to move a GameObject or get this value to locate the GameObject in the 3D world space.

Vector3Vector3 is a structure (similar to a class) that represents 3D vectors and points.
It includes the properties x, y, and z.
Vector3 in Unity docs

VectorsA vector is often defined as a geometric object that has both magnitude (length) and direction.
It is represented as an arrow between 2 points with a certain length (and direction, hence arrow).
Here is an example of a 2D Vector.
2D vectors are made of the x and y
components.
Vector2 objects represent 2D vectors
in Unity.

We can also have 3D vectors as we saw before as represented by a Vector3 object in Unity.
Thus, going back to our Transform. position property, that is a Vector3 object and is made up of the x, y, and z components.

Let’s return to our plane that we have created with a Transform.position of (0,0,0)

Let’s rename our plane object to ‘Ground’
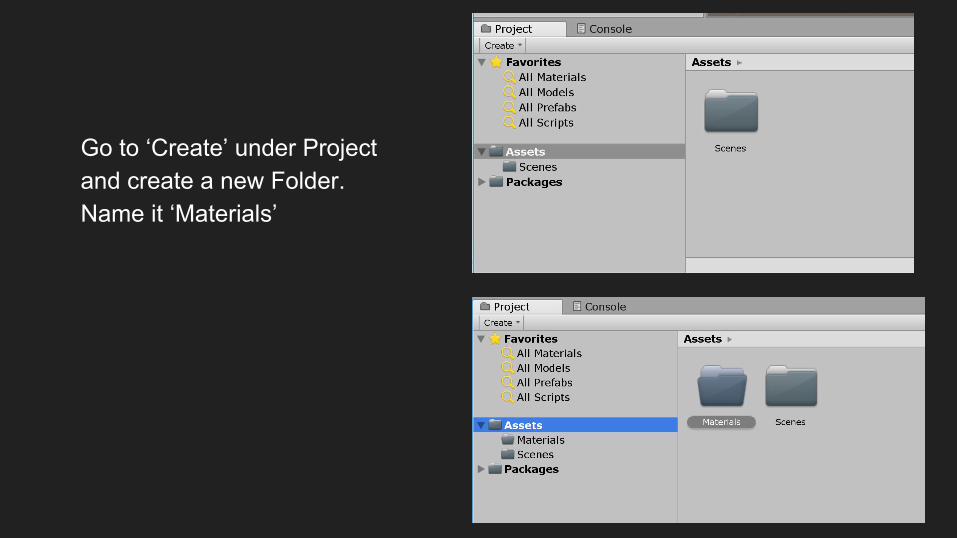
Go to ‘Create’ under Project and create a new Folder. Name it ‘Materials’

Go into the ‘Materials’ folder and go to ‘Create’ again and this time create ‘Material’ and name it ‘Background’.

Go to ‘Albedo’ under Background and click on the color selector and choose a dark green. Then drag and drop the material onto the plane.

Zoom into the scene with your mouse.
Try adjusting the position, rotation and scale of the plane using the Transform component and the buttons here:
Here is some documentation on Scene View navigation
Here are some keyboard Unity shortcuts

Save your scene and project as you go!
Let’s add a 3D Cube to the scene. Once you’ve added the cube, reset its position so it’s at (0,0,0).
Give it a red color by creating a new material called ‘Cube1’.
You will see that it sits cut half-way by the ground object.

This is because in Unity all primitive objects, cubes, spheres, etc. have a standard size: they are either 1 by 1 by 1 or 1 by 2 by 1 Unity units.
Therefore, we can lift the object up by half a unit in the Y axis to lay it on top of the plane.

Script ComponentsWe are now ready to add a script component to the Cube GameObject.
Scripts can be considered as behavior components in Unity as they control the behavior of the GameObject they are added to.
Let’s create a Scripts folder in the project panel under Assets.
Scripts can be attached to Objects by
dragging and dropping them to the inspector
panel or by adding a component in the
Inspector panel.

Go into your scripts folder and create a C# script.
Call it ‘ObjectMovement’

You will see a preview of the script if you select it but this is not editable.
First, let’s add this script to the Cube by dragging and dropping it to the Cube’s Inspector. Make sure the Cube object is selected in the Hierarchy!

Let’s open the script using the cog wheel next to the script component and select ‘Edit script’

using System.Collections;
using System.Collections.Generic;
using UnityEngine;
public class ObjectMovement : MonoBehaviour {
// Use this for initialization
void Start () {
}
// Update is called once per frame
void Update () {
}
}

The method Update() is important. It is called before rendering each frame.
We will now add some code to move the cube each frame inside this method.
Let’s start with:
transform.Translate(Vector3.up * Time.deltaTime);
transform.Translate will translate the position of the object.
Vector3.up moves the object up. It is shorthand for writing Vector3(0,1,0)
Press Play!
Time.deltaTime allows you to move the object a n units per second rather than per frame (i.e. it slows it down - try the code without it and see)

using System.Collections;
using System.Collections.Generic;
using UnityEngine;
public class ObjectMovement : MonoBehaviour {
// Update is called once per frame
void Update () {
transform.Translate(Vector3.up * Time.deltaTime);
}
}

We can also control the speed using a public variable that we can then edit in the Inspector.
You can also just say:
public float moveSpeed;
(without setting the value)

using System.Collections;
using System.Collections.Generic;
using UnityEngine;
public class ObjectMovement : MonoBehaviour {
public float moveSpeed = 5;
// Update is called once per frame
void Update () {
transform.Translate(Vector3.up * movespeed * Time.deltaTime);
}
}

Now go back to your Inspector and you will see that the variable move speed has appeared.
Try running it again.
Change the value in the inspector and watch the speed of the cube change.
Does it change the value of the variable in the script?

Now let’s have the cube move forward along the z axis.
transform.Translate(Vector3.forward * moveSpeed * Time.deltaTime);
You will actually see the cube move away from you because the camera is positioned back along the z axis.
You can have the cube move backward along the z axis with this piece of code:
transform.Translate(-Vector3.forward * moveSpeed * Time.deltaTime);

using System.Collections;
using System.Collections.Generic;
using UnityEngine;
public class ObjectMovement : MonoBehaviour {
public float moveSpeed = 5;
// Update is called once per frame
void Update () {
transform.Translate(Vector3.forward * movespeed * Time.deltaTime);
}
}

Object RotationNow let’s have the cube rotate. transform.Rotate will rotate the object around the X, Y, and Z axes, measured in degrees.
transform.Rotate(Vector3.up, turnSpeed * Time.deltaTime);
The variable turnSpeed is also public (see next slide) and you can control the speed at which the object rotates.
You can rotate in the other direction by negating the turnSpeed like this:
transform.Rotate(Vector3.up, -turnSpeed * Time.deltaTime);

using System.Collections;
using System.Collections.Generic;
using UnityEngine;
public class ObjectMovement : MonoBehaviour {
public float moveSpeed = 5;
public float turnSpeed = 50;
// Update is called once per frame
void Update () {
transform.Rotate(Vector3.up, turnSpeed* Time.deltaTime);
}
}

Physics - RigidBodyIf we want our GameObjects to behave like real world objects such as coming back to earth with gravity or colliding with other objects, this requires physics.
To use physics the GameObject needs a Rigid Body component attached.
Let’s create a new Cube called ‘CubeRigidBody’ to see the differences.
Create your new Cube and give it a yellow color. Put it near your first cube.

With your CubeRigidBody selected, go to ‘Component’ -> Physics -> Rigidbody.
You will see this new component in the Inspector with ‘Use Gravity’ checked.

Now, let’s edit our script back to the object moving backward along the z axis:
transform.Translate(-Vector3.forward * moveSpeed * Time.deltaTime);
Now drag and drop the script so that it is also added
to the CubeRigidBody components.

Set the speed of both cubes to 2.
Now Play!
Watch what happens!
Due to the laws of the physics, when the rigidbody cube falls of the plane it drops over the edge!
Now change the code so that the cubes move upward and see what happens! Change the speeds and play it again.

To Explore On Your Own1. You can learn about the RigidBody class and how to apply force to the RigidBody (RigidBody.AddForce) in the Roll A Ball tutorial, specifically on ‘Moving the Player’
Try applying the code in that tutorial to move a GameObject. (It’s a great tutorial!)
2. Have a look at moving the camera position here ‘Moving the Camera’. This will also give you another way of moving an object. (Another great tutorial!)
Please familiarize yourself with Unity a bit as the Lab 2 won’t be identical to what we did, but this prep does introduce you to the concepts.