Introduction to the Student Center - UNT...
22
Introduction to the Student Center Updated June 8, 2014 1 The EIS Student Center is a “one-stop-shop” for many student view and update functions. The student center allows the student to view grades, GPAs, schedules, programs and plans, student finances, transfer information, basic demographic data, the schedule of classes, and allows the student to register for classes. Log on to my.unt.edu. When you first log into myUNT, you may see the following screen: Per the Texas Education Code, all new students, including transfer students, must meet immunization requirements. • Read the provided information before clicking Confirm. For more complete information about immunization requirements, please visit the Health Center Immunization Information page.
-
Upload
truongdang -
Category
Documents
-
view
223 -
download
0
Transcript of Introduction to the Student Center - UNT...

Introduction to the Student Center
Updated June 8, 2014 1
The EIS Student Center is a “one-stop-shop” for many student view and update functions. The student center allows the student to view grades, GPAs, schedules, programs and plans, student finances, transfer information, basic demographic data, the schedule of classes, and allows the student to register for classes.
Log on to my.unt.edu.
When you first log into myUNT, you may see the following screen:
Per the Texas Education Code, all new students, including transfer students, must meet immunization requirements.
• Read the provided information before clicking Confirm. For more complete information about immunization requirements, please visit the Health Center Immunization Information page.

Introduction to the Student Center
Updated June 8, 2014 2
After logging into myUNT, click on the Student Center link.
STUDENT CENTER: The student center page displays a student’s schedule, allows the student to search and register for classes, inquire about account summaries, view holds and review and update demographic information.
The page also has invaluable links to a student’s grades, excess hours, TSI and repeated courses.
Introduction to the Student Center
Updated June 8, 2014 3
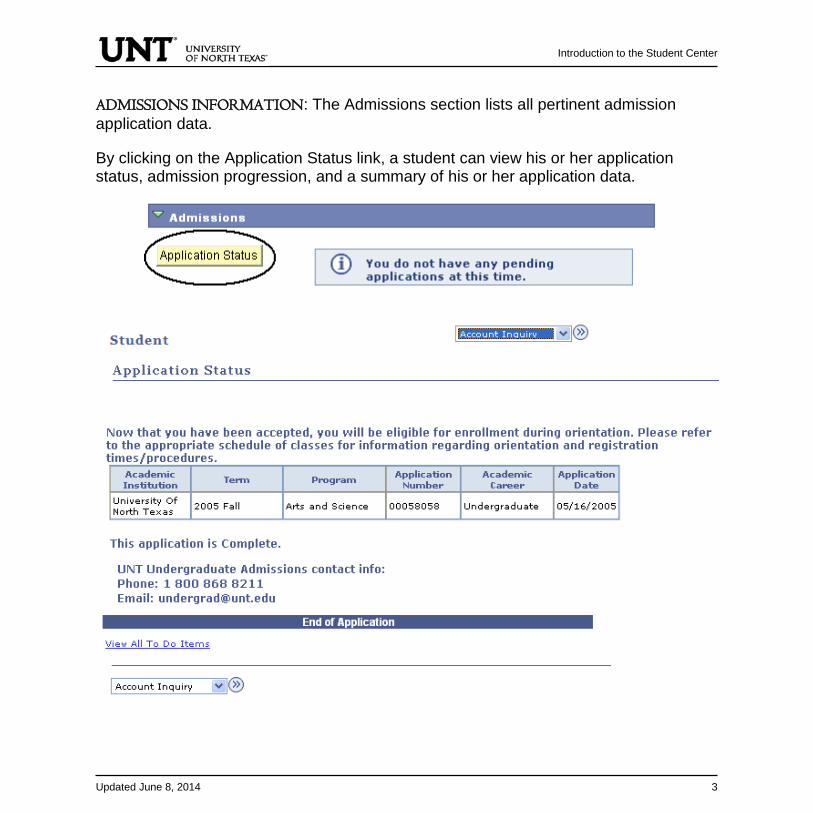
ADMISSIONS INFORMATION: The Admissions section lists all pertinent admission application data.
By clicking on the Application Status link, a student can view his or her application status, admission progression, and a summary of his or her application data.

Introduction to the Student Center
Updated June 8, 2014 4
HOLDS INFORMATION: This section of the student center lists active holds on a student’s account. Some holds you can clear yourself, such as the Student Financial Obligation block, while others, such as Advising Required, require you to take action as detailed in the hold itself. Some holds will block a student’s ability to register for classes, so it is important to visit this section before attempting registration in classes.
When you first log into myUNT, you may be notified that you have one or more holds on your account. You may click the notification to access more details about your holds.
From the Student Center, your holds are listed in their own module. By clicking on , you can access more details about your holds.
From the holds list, you can click on each hold for detailed information about that hold, including how it can be removed, if applicable.

Introduction to the Student Center
Updated June 8, 2014 5
To Clear the Student Financial Obligation Hold
• Find the holds module on the Student Center page. Depending on your computer screen resolution, you may need to scroll over to the right. Your holds will be listed in the Holds module. Click on for more information.
• Clicking on the hold will display the following instructions: Student must read and confirm the Student Financial Obligation prior to registration. In order to read and accept the Student Financial Obligation (and remove the hold) you must click "Remove Hold".
• Click to get back to the Holds list, then click “remove hold” to navigate to the Student Financial Obligation document.
• Click once you have finished reading the statement, and the hold will be removed.

Introduction to the Student Center
Updated June 8, 2014 6
ACADEMICS INFORMATION: Academics information lists student class schedules and grades. Students may also manage class enrollment, order an unofficial transcript, and view his or her transfer credit report in the Academics section.
To manage class enrollment click on the Enroll/Add/Drop a Class link.
• From this screen, you can select any of the three enrollment functions (add, drop, or swap) to continue.

Introduction to the Student Center
Updated June 8, 2014 7
To add classes, make sure “add” is the active tab, then choose the semester you wish to modify and click .
If you know the class number (a numerical identifying code different than the course subject and course number), you may add a class to your shopping cart by entering the class number. Otherwise, you may use the class search to find the classes to add.
Class numbers are listed in the schedule of classes, or you may also use the Visual Schedule Builder for another method of finding class numbers and planning your class schedule.
Introduction to the Student Center
Updated June 8, 2014 8
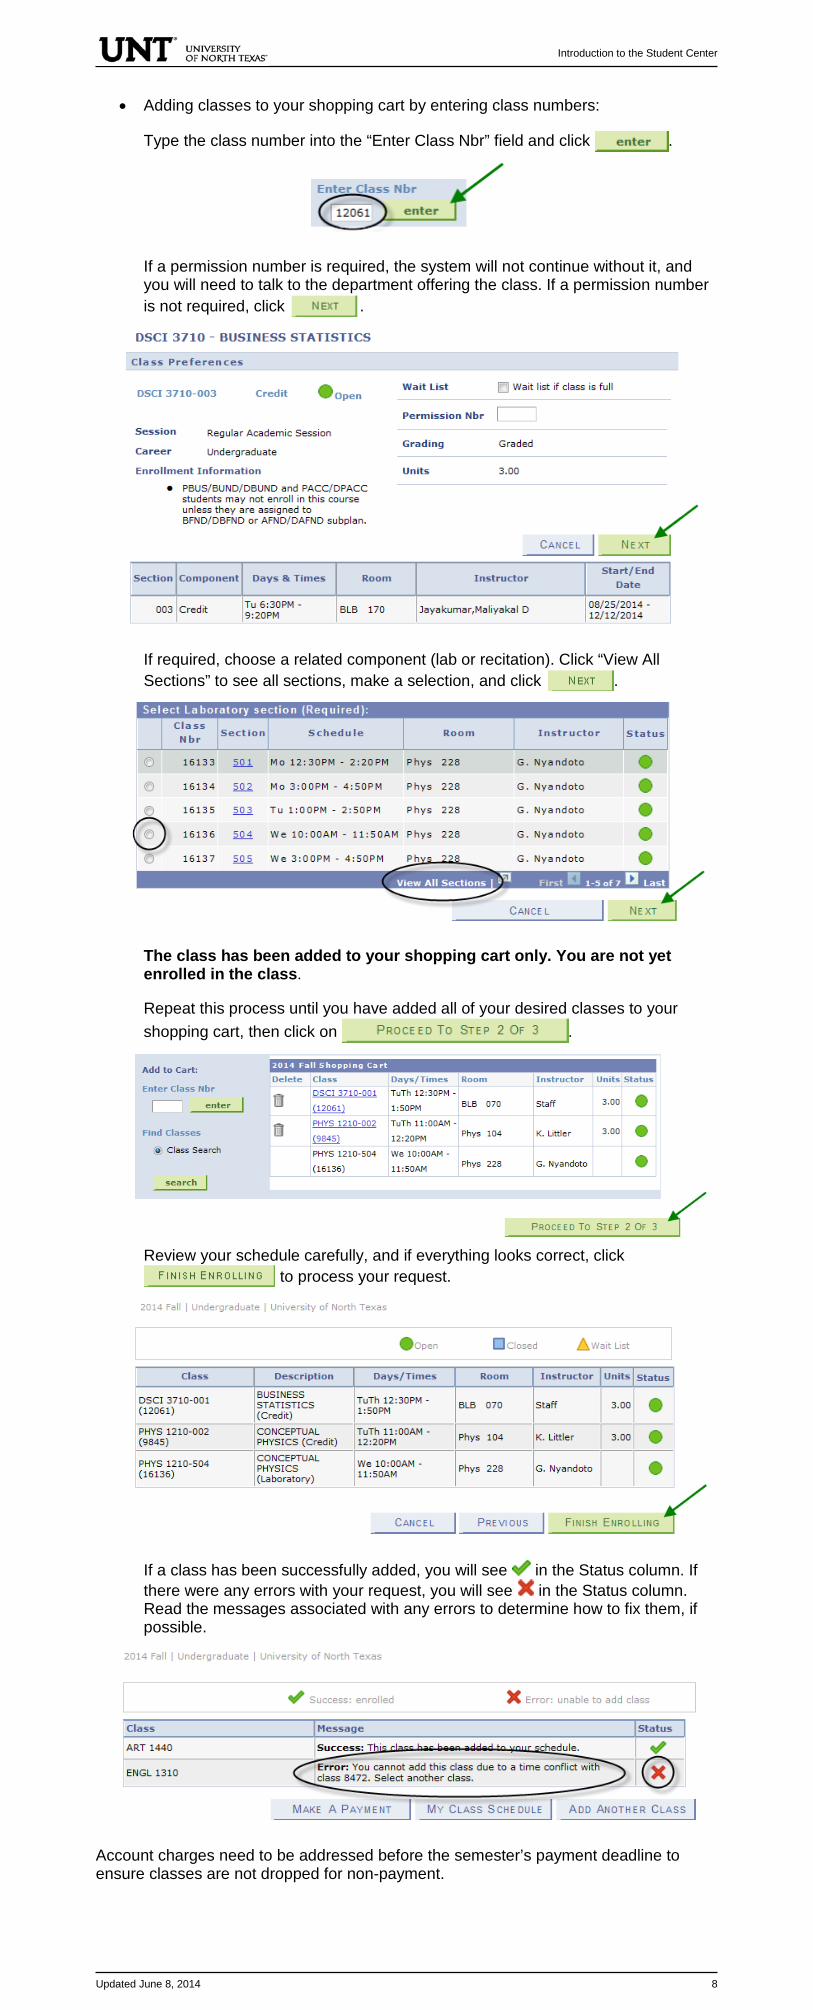
• Adding classes to your shopping cart by entering class numbers:
Type the class number into the “Enter Class Nbr” field and click .
If a permission number is required, the system will not continue without it, and you will need to talk to the department offering the class. If a permission number is not required, click .
If required, choose a related component (lab or recitation). Click “View All Sections” to see all sections, make a selection, and click .
The class has been added to your shopping cart only. You are not yet enrolled in the class.
Repeat this process until you have added all of your desired classes to your shopping cart, then click on .
Review your schedule carefully, and if everything looks correct, click to process your request.
If a class has been successfully added, you will see in the Status column. If there were any errors with your request, you will see in the Status column. Read the messages associated with any errors to determine how to fix them, if possible.
Account charges need to be addressed before the semester’s payment deadline to ensure classes are not dropped for non-payment.

Introduction to the Student Center
Updated June 8, 2014 9
• Adding to your shopping cart by using the class search:
Click on to begin. On the next screen, enter your search criteria, and click again.
If the class is being offered in the selected semester, your search will return one or more available sections. Click “View All Sections” to see all sections. When you find the class you want, click to add that section to your shopping cart.
If a permission number is required, the system will not continue without it, and you will need to talk to the department offering the class. If a permission number is not required, click .
Continued on next page.

Introduction to the Student Center
Updated June 8, 2014 10
If required, choose a related component (lab or recitation). Click “View All Sections” to see all sections, make a selection, and click .
The class has been added to your shopping cart only. You are not yet enrolled in the class.
Repeat this process until you have added all of your desired classes to your shopping cart, then click on .
Review your schedule carefully, and if everything looks correct, click to process your request.
If a class has been successfully added, you will see in the Status column. If there were any errors with your request, you will see in the Status column. Read the messages associated with any errors to determine how to fix them, if possible.
Account charges need to be addressed before the semester’s payment deadline to ensure classes are not dropped for non-payment.

Introduction to the Student Center
Updated June 8, 2014 11
To drop classes, make sure “drop” is the active tab, then choose the semester you wish to modify and click . If you intend to drop an undesired class and add a different class, please see the following section on swapping classes instead.
A student may not drop the last class from a session without contacting an office on campus. If classes have not yet started, contact the Registrar’s Office. If classes have already started, contact the Dean of Students.
Note: In the summer semesters, each term (such as 3 week, 5 week 1, 5 week 2, etc.) is considered its own session for class drop purposes. So if a student is enrolled in several summer classes, they still may not drop a class using myUNT if it is the only class within a single session.
• Choose the class or classes to be dropped and click .
• Review your selection. Confirm your drop request by clicking .
• If a class has been successfully dropped, you will see in the Status column. If there were any errors with your request, you will see in the Status column. Read the messages associated with any errors to determine how to fix them, if possible.

Introduction to the Student Center
Updated June 8, 2014 12
Swapping classes is essentially dropping one class and adding one class simultaneously. To swap classes, make sure “swap” is the active tab, then choose the semester you wish to modify and click .
Note: Classes need to be within the same session in order to be eligible for the swap function. In the summer semesters, each term (such as 3 week, 5 week 1, 5 week 2, etc.) is considered its own session for class swap purposes.
• Select the class you wish to drop using the drop-down box. Select the class you wish to add using either the class search or by entering the class number. Refer to the earlier section about how to add classes for further instruction on this step.
• When you have made your selections, you have the opportunity to review your choices. Confirm your selections by clicking to submit your swap request.
• If a class has been successfully swapped, you will see in the Status column. If there were any errors with your request, you will see in the Status column. Read the messages associated with any errors to determine how to fix them, if possible.

Introduction to the Student Center
Updated June 8, 2014 13
The waitlist feature allows students to place themselves on a wait list for a class section that is full and be given a position number. As seats open up in the class, the waitlist process will run to auto-enroll students according to their position number.
Class numbers are listed in the schedule of classes, or you may also use the Visual Schedule Builder for another method of finding class numbers and planning your class schedule.
Refer to the earlier section about how to add classes for further instruction on entering class numbers and using Class Search.
If using Class Search, uncheck the “Show Open Classes Only” box in order to view all courses (will display all open, closed, and waitlisted classes).
Click View All to see all sections.
Courses offering a Wait List, will reflect a Status of in the class search. Once you find a course you want, you can “Select class” to put it in your shopping cart.
To be put on the Wait List for a class, you must select the “Wait list if class is full” option illustrated below. Then select “Next”.

Introduction to the Student Center
Updated June 8, 2014 14
You will receive confirmation that the course has been added to your shopping cart. You will need click on “Proceed to Step 2 of 3” where you will be asked to confirm.
Confirm your class by selecting “Finish Enrolling”. This will then add you to the Wait List as selected.
View Results to check whether your request was successful or not. If successfully enrolled on the Wait List you will receive a message indicating your position on the waitlist and the Status will reflect a to indicate success.
To view courses you have added to Wait List, click on view “My Class Schedule”.
Be sure to check the “Show Waitlisted Classes” and select . This will show you the results you have requested. The status for Wait List course will have Status “Waiting” and will indicate what position you are on the Wait List (i.e. Position #1).

Introduction to the Student Center
Updated June 8, 2014 15
To Drop from Waitlist for a Class:
Click on the Enroll/Add/Drop Class link in Student Center.
Click on the Drop Tab and choose the semester and click continue.
Choose the class to be dropped and submit “Dropped Selected Classes”.
Confirm the dropped class by reviewing schedule and clicking.
Verify the Waitlisted course has successfully been dropped from your schedule.

Introduction to the Student Center
Updated June 8, 2014 16
Swapping and Waitlisting:
Swapping onto a Wait List is a feature for students who are already enrolled in a course, but would like to “wait” to see if they can get into a different one (maybe the same course, but a different section). When using the swap, the process will automatically drop the “enrolled course” and enroll you in the “waitlisted” course you have selected, if a seat becomes available, and your position on the waitlist qualifies you to be able to be enrolled in the class.
Sample Scenario:
You are already enrolled in for HIST 2610.001, however you prefer to take PSCI 2300.003. PSCI 2300.003 is currently closed, but offers a Wait List. You could us the Swap feature to get on the wait list for PSCI 2300.003. If a seat opens up and you are next on the Wait List for PSCI 2300.003, then you will automatically be registered in the PSCI 2300.003 course and dropped from the HIST 2610.001 course.
Click on the Enroll/Add/Drop Class link in Student Center.
Choose Swap tab and then select the course you would want to swap out of. **You can only swap out of a course you are enrolled in.
To complete the swap for Wait List, select a course you want to swap into the Wait List. You can use the same options to select the course as used when Adding to Waitlist.
Confirm your selections and finish by selecting “Finish Swapping”.
You can review results by selecting “My Class Schedule” and including “Show Waitlisted Classes”.

Introduction to the Student Center
Updated June 8, 2014 17
TRANSCRIPT INFORMATION: A student can access/print their unofficial UNT transcript by using the drop-down box under Academics. Choose Unofficial Transcript and click the >> option.
The Academic Institution is University of North Texas and the Report Type is UNT Unofficial EIS Transcript. Click Go.
Your unofficial UNT transcript will generate and you may click File then Print from your toolbar.
Introduction to the Student Center
Updated June 8, 2014 18
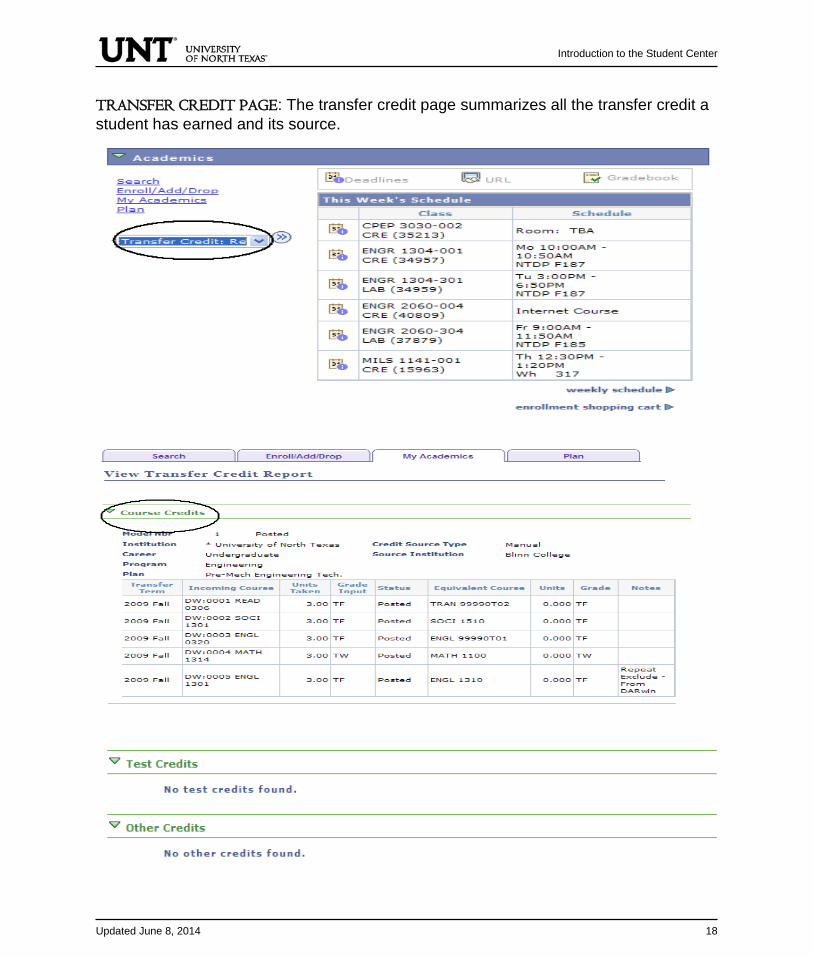
TRANSFER CREDIT PAGE: The transfer credit page summarizes all the transfer credit a student has earned and its source.

Introduction to the Student Center
Updated June 8, 2014 19
FINANCES PAGE: The Finance page displays all financial data related to tuition and fees.
Click on the Account Inquiry to view your account summary, due charges, completed payments, pending financial aid or to complete a payment.

Introduction to the Student Center
Updated June 8, 2014 20
To Complete a Payment:
Click on Pay Bill.
Click on Make Payment.
Enter Payment Amount, Select Payment Method and click Continue.

Introduction to the Student Center
Updated June 8, 2014 21
PERSONAL INFORMATION: The personal information page allows the student to view and update various student data.
By clicking on the Demographic Data link, a variety of information can be viewed: Student ID number, Date of Birth, Social Security number.
A student can update their address information by clicking on the Addresses link.
• Click on the button next to the address to change.
• Update the information and click
• Click .
• You will receive a confirmation that your update was successful. Click to return to your address screen.
Introduction to the Student Center
Updated June 8, 2014 22
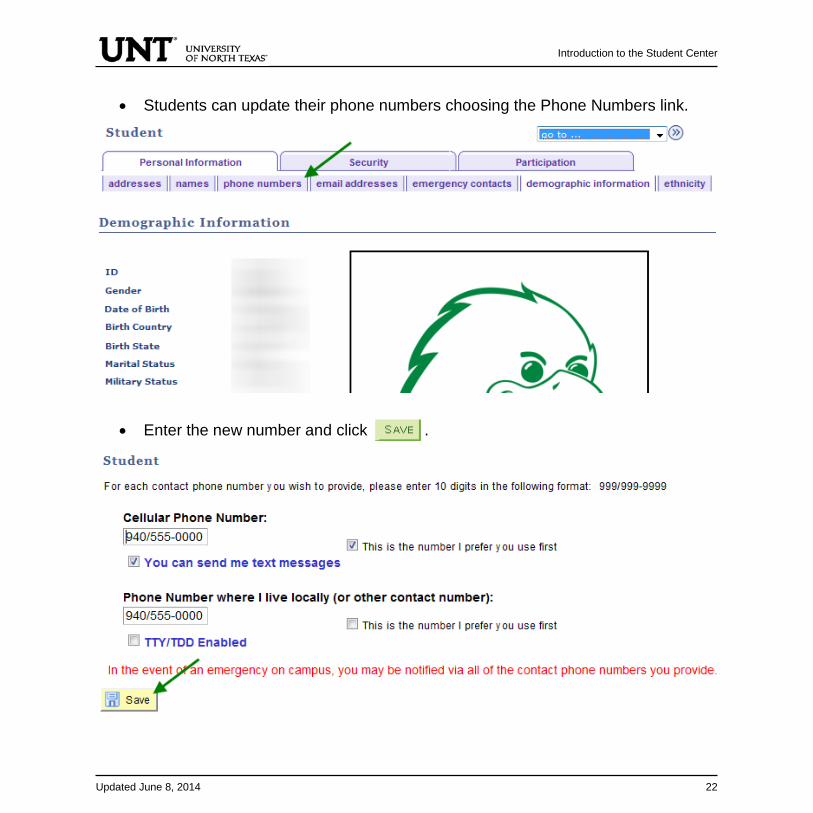
• Students can update their phone numbers choosing the Phone Numbers link.
• Enter the new number and click .