Introduction to Quality Center. Course Contents Quality Center Definition and Architecture Overview...
34
Introduction to Quality Center
-
Upload
christal-nash -
Category
Documents
-
view
219 -
download
0
Transcript of Introduction to Quality Center. Course Contents Quality Center Definition and Architecture Overview...

Introduction to Quality Center

Course Contents Quality Center Definition and Architecture Overview
Test Management and Quality Center
Features of Quality Center
Getting Started
Quality Center Window
Organizing and managing the testing process using different modules in Quality Center:
Requirements
Test Plan
Test Lab
Defects
Other important features
Traceability Alerts
Generating Reports & Graphs

Quality Center Definition and Architecture
Quality Center – Quality Center is a Mercury’s Web-based test management tool. Quality Center is used to manage the application testing process with respect to testing requirements, planning tests, executing tests, and tracking defects.
Users can access QC from anywhere irrespective of their geographical locations.
QC Client is the actual desktop from where request to the QC servers for processing the data is made.
The Quality Center servers processes the request with the help of an application server. Data is read or written on the DB based on the nature of the request.
QC Server
DNB INTRANETDNB INTRANET
QC Client QC Client QC Client
DB ServerApplication
Server

Test Management and Quality Center…
Test Case Development
Defect Reporting
and Tracking
Test Requirements
Gathering
Test Case ExecutionDefects
Module
Requirements
Module
Test Lab Module
Test PlanModule
Rich Reportsand
Graphs generation
features in QC helps
in better Test Management
Test Management and Requirements Traceability
…Test Management and Quality Center
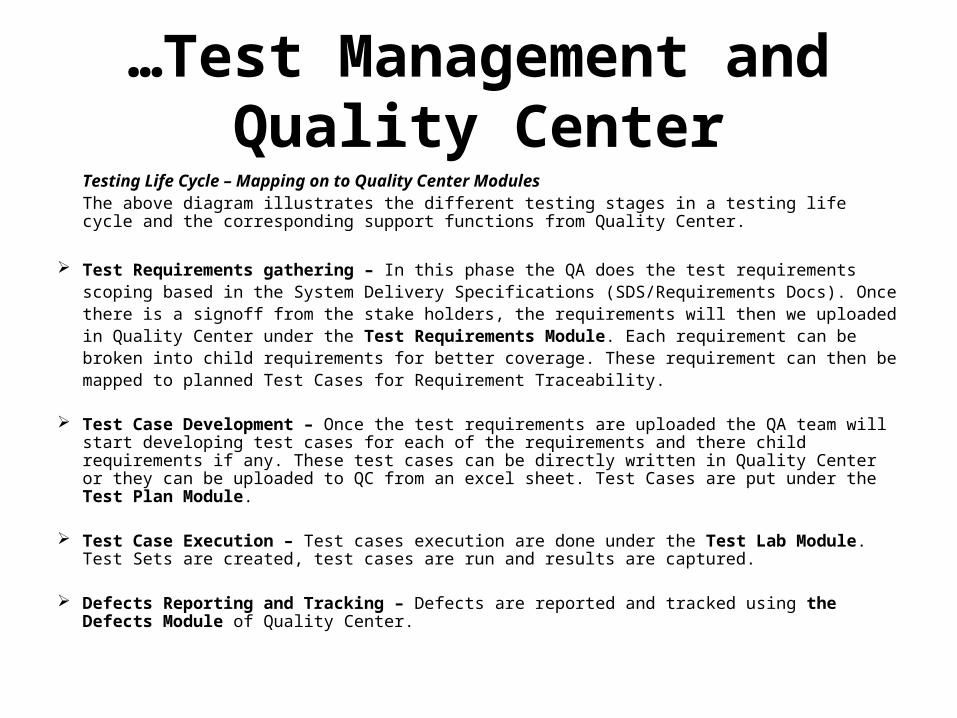
Testing Life Cycle – Mapping on to Quality Center ModulesThe above diagram illustrates the different testing stages in a testing life cycle and the corresponding support functions from Quality Center.
Test Requirements gathering – In this phase the QA does the test requirements scoping based in the System Delivery Specifications (SDS/Requirements Docs). Once there is a signoff from the stake holders, the requirements will then we uploaded in Quality Center under the Test Requirements Module. Each requirement can be broken into child requirements for better coverage. These requirement can then be mapped to planned Test Cases for Requirement Traceability.
Test Case Development – Once the test requirements are uploaded the QA team will start developing test cases for each of the requirements and there child requirements if any. These test cases can be directly written in Quality Center or they can be uploaded to QC from an excel sheet. Test Cases are put under the Test Plan Module.
Test Case Execution – Test cases execution are done under the Test Lab Module. Test Sets are created, test cases are run and results are captured.
Defects Reporting and Tracking – Defects are reported and tracked using the Defects Module of Quality Center.

Key Features of Quality Center
QC is a standard Web-based Test Management tool which helps in managing QA activities better.
Quality Center has enhanced usability features with easy accessibility.
It provides a central repository for all the test artifacts that can be used across Geographies.
It provides better Traceability with help of mapping functionality.
It provides email notification as and when there is a change in any test artifact which requires immediate
attention for modifications to be followed.
Integrated Defect reporting and Tracking which will avoid undue defects slippage to production.
It can be integrated with automation tools which are compatible with Quality Center.
It provides rich report generation features which helps in test results analysis and status reporting.

Getting Started
Log on to URL (Dummy): http://<Mercury
Quality Center server
name>/qcbin/default.htm
Open or click Quality Center to go to the login
page
Key in the Domain, Project and a valid User ID
and Password.
This data would be provided to you by the QC
Admin
As soon as you login in, you can see the
Quality Center Modules - Requirements, Test
Plan, Test Lab and Defects buttons on the
sidebar.

The Quality Center toolbar is located directly above the project name. The common Quality Center toolbar is accessible from all Quality Center modules and contains standard buttons like Spell Check, Back, Froward, Add Defects etc.
The menu bar, located directly below the Quality Center project name, displays the names of menus from which you select commands.
The module toolbar, located below the menu bar, contains buttons for frequently-used commands in the current Quality Center module.
Quality Center Modules
Quality Center Window

Requirements Module – Managing and Organizing Test Requirements
Requirements Module
is used for:
Defining Requirements
Viewing Requirements
Modifying Requirements
Converting Requirements Defining a New Requirement: Select Requirements View as
Document View Click the New Requirement button. The
New Requirement dialog box opens or click the New Child Requirement button to add a requirement below Parent Requirements, at a lower hierarchical level.
Enter the Requirements details and click OK.
Requirements descriptions and attachments can be added using the tools in the module toolbar.

…Requirements ModuleViewing Requirements
Go to the Requirements Module
Click the Zoom In button on the
toolbar to display only the child
requirements
To reverse the zoom in action and
display the entire requirements
tree, click the Zoom In arrow and
choose Zoom Out To Root.
Display numeration in the
requirements tree choose View >
Numeration.
Modifying Requirements
•Select the Requirement and the action you want to do –
Cut, Copy or Paste
•To Delete - Select Requirement -> Click the Delete button -
> Click Yes to confirm.
•To Rename - Right Click -> select Rename -> edit the
name and press enter

…Requirements ModuleConverting Requirements We can use the Convert to
Tests wizard to design our test plan tree.
Select the Requirements -> Tools -> Convert to Tests -> Select Convert.
Choose an automatic conversion method.
Click Next to begin converting the requirements.
When the conversion process is complete, the results are displayed in the Step 2 dialog box.
Click on Next and choose the destination Subject Path (Subject folder where you want to store the designed tests) and Click on Finish.

Test Plan Module…
Test Plan Module contains the following key elements: Test Plan menu bar, with drop-down menus of Test Plan module commands. Test Plan toolbar, with buttons of commands commonly used when creating and modifying the test plan tree. Test Plan Tree, a graphical representation of your test plan. Details tab, description of the subject folder or test currently selected on the test plan tree. Design Steps tab, details of test steps Test Script tab, shows test script for the test currently selected on the test plan tree Attachments tab, shows the attachments that provide additional information Reqs Coverage tab, shows requirements that the test currently selected on the test plan tree meets.
Test Plan Module is where we plan our tests as per the requirements with detailed design steps and description
Add Subject by selecting the Subject Folder and clicking on the Add Folder icon

…Test Plan ModuleDeveloping a Test Plan Tree:
After subjects are defined in the tree, you decide which tests to create for each subject and add them to the tree -> Select the Subject -> Right Click -> Add Test
OR Click the New Test button, or choose Planning -> New Test. The Create New Test dialog box opens.
Specify the Test Name and Test Type
Define basic information about the test, such as its name, status, and the designer.
Attach application snapshot or system information to illustrate a test.
Afterwards, you define the test steps. Test steps contain detailed instructions on how to execute a test and evaluate the results.
During the testing process, need may arise to modify test plan. The test plan tree can be updated at any time.
Subjects
Different Logical levels of Subjects
Tests under a Particular Subject

…Test Plan ModuleDesigning Tests:
For the selected Test in the Test Plan Tree add description under the details tab. Fill in other details such as Designer, Creation Date and Status
Go to Design Steps Tab -> Click on Add Step to open Design Step Editor
Give Description of what that Step has to do and give the expected results
Click on Attachment tool icon to add attachment for that particular step.
Add another step as per your test case and save.
Standard editing options are available like Cut, Copy, Paste, Font editing etc.
A Sample Test Case
Standard editing options, to delete, copy re-order the test steps

Requirements Coverage…
Linking Requirements to a
Test
Go to Test Plan Module
Select the Test -> Go to
the Reqs Coverage Tab
Click on Select Reqs to
show the Requirements
Click the Add to Coverage
(Include Children) button.
Requirements Coverage Requirements Coverage ensures tests in test plan comply with the testing requirements. In the Test Plan module, requirements coverage is done by selecting requirements and linking it to a
test. Alternatively, in the Requirements module, tests coverage is achieved by selecting tests and linking it
to a requirement. A test can cover more than one requirement, and a requirement can be covered by more than one
test.

…Requirements CoverageLinking Tests to a Requirement
Go to the Requirements module and select the Coverage View
Select the Requirement which has to be linked to the test case
Click on Select Tests
Add Test to the selected requirements
Change the View to Coverage Analysis View to analyze the breakdown of child requirementsaccording to tests coverage
Filter and Search Options are available to point to the exact test easily

Test Lab Module… Test Lab Module is where we create test sets and run the tests to capture the results.
Creating test sets and choosing which tests to include in each set.
A test set is a group of tests in a Quality Center project designed to achieve specific testing goals.
Execute the tests manually or automatically.
In Manual execution we execute the test steps we defined in test planning. Pass or fail each step, depending on whether the actual results match the expected output.
When we run a test automatically, Quality Center opens the selected testing tool, runs the test, and exports the test results to Quality Center.
Defining New Test Sets:
Click the New Test Set button -> The New Test Set dialog box opens -> Give the Test Set name and description
Go to Test Lab -> select the Root folder -> Click the New Folder button -> Give the folder name

…Test Lab ModuleAdding Tests to a Test Set: Go to the Test Lab Module and Select the Execution Grid. Click the Select Tests button -> The right pane displays the test plan tree. Select Individual Tests under a folder, or entire folder or user filters to select the test ->
Click on click the Add Tests to Test Set button to move tests to the Test Set.
Run – Select Run (if running the test for the first time or Continue Run (If you had stopped it in the middle in earlier run)

…Test Lab ModuleRunning Tests: Go to the Test Lab Module In the test sets tree, select the test. Click the Run button. The Manual Runner
dialog box opens. Click on Begin Run after filling in the required
information.
Execute the steps one by one and capture the actual results against the expected.
Capture the screen shots using the Camera option in the attachment dialogue box to strengthen your findings.
Update the status of the each step to Pass, Fail, Not-Complete etc depending on the situation.
Save and Exit

Defects Module…Quality Center Defects Lifecycle: Initially defects reported to the Quality
Center project by QA Testers is assigned the status New, by default.
A QA Lead reviews the defect and determines whether or not to consider the defect for repair. If the defect is refused, it is assigned the status Rejected.
If the defect is accepted, the QA Lead determines a repair priority, changes its status to Open, and assigns it to the development team or a Dev Lead.
A developer repairs the defect and assigns it the status Fixed.
QA retest the application, making sure that the defect does not recur. If the defect recurs, the QA lead assigns it the status Reopened.
If the defect is actually repaired, the QA Lead assigns it the status Closed.

…Defects ModuleDefects Module Window: The Defects module contains the following key elements: Defects menu bar, with drop-down menus of Defects module commands. Defects toolbar, with buttons commonly used when adding, managing, and tracking defects. Grid filter, displays the filter that is currently applied to a column. Defects Grid, displays defect data in a grid. Description tab, displays a defect’s description. Choose View > Description Page for this pane. History tab, displays a defect’s history. Choose View > History Page for this pane. Comments pane, enables you to view and add comments for a defect.

…Defects ModuleAdding Defects:
Go to the Defect Module and click on the Add Defect button.
Add Defect dialog box opens.
Fill in other fields such as Category, Detected by, etc.
Describe the defect – give the exact steps to recreate the defect.
Add attachments or screenshots as proof of defects.
Click on Submit once done Close the window.
Note: When a test fails and defect is raised having that test in context, Defect gets automatically associated with Test Case. Defects raised can also be associated with a Test later by using the Associate Defects option in Test Plan module (Select Test -> Right Click Select Associate Defect -> Give the Defect ID)

…Defects Module
Matching Defects:
Matching defects enables you
to eliminate duplicate or similar
defects in the project.
Go to the Defects Module and
select the Defect ID for which
you want to find similar defects.
Click on Similar Defects button.
The results are stored in the
Similar Defects dialog box,
sorted by the percentage of
detected similarity.

…Defects ModuleUpdating Defects:
Tracking the defects to closure in a project requires periodical updates. It can be done directly in the Defects Grid or in the Defect Details dialog box.
Ability to update some defect fields depends on your permission settings.
Updates may be regarding defect information, assigning the defect to the responsible person, changing the severity of the defect and adding a comment.
Click the Defect Details button. The Defect Details dialog box opens.
Update the Defect.
Click OK to exit the dialog box and save your changes.

…Defects Module
Mailing Defects:
This feature is used to send an e-mail
about a defect to another user. This
enables us to routinely inform
development and quality assurance
personnel about defect repair activity.
Quality Center includes a Go To Defect
link in the e-mail, which enables the
recipient to go directly to the defect.
To Mail a Defect Go to the Defect
Module -> click the Mail Defects button.
The Send Mail dialog box opens.
Fill in the details and check what all you
want to be included in the mail.
Give additional Comment if required and
Send.

Traceability AlertQuality Center can generate traceability alerts for these changes:
When a requirement changes (excluding change of status), the designers of the associated tests are notified.
When a requirement changes and it has associated tests, all project users are notified.
When the status of a defect changes to “Fixed”, the responsible tester of the associated test instance is notified.
When a test runs successfully, the users assigned to the associated defects are notified.
Viewing the Traceability Alert:
OR click the Trace All Changes button. The Trace All Changes dialog box opens and displays a list of all traceability changes in your Quality Center project.
Log on to QC -> Go to Test Plan Modules -> Look for a test which has a trace changes flag, indicating that a change was made to an associated requirement.
Note: Traceability Notification and Email notification rules will be set up the QC Administrator at the time of project customization. However Quality Center enables users to add your own alerts to remind them to follow up on outstanding issues using follow up flags.

Generating Reports and Graphs To assess the progress of test requirements gathering, test plan, test runs, and defect tracking
you can generate reports and graphs. They can be generated at any time during the testing process from each Quality Center module.
Example: In Requirements Module – Go to Analysis > Reports > Standard Requirements Report.

…Generating Reports and Graphs
We can use default settings or do our customization. When customizing a report or graph, you can apply filters and sort conditions, and display information according to your specifications.
Click the Configure Report and Sub-Reports button. The Report Customization page opens with the default options selected. Do the settings and Click on Apply to generate a new Report.

…Generating Reports and Graphs
Generating Graphs:• To analyze the relationships between different types of data in a project we can generate graphs.• Each Quality Center module contains various graph options. • After you generate a graph, you can customize graph properties to display information according to your
specifications (Similar to Report Generation Customization)
Example: Go to Defects Module - Analysis -> Graphs -> Summary ->Group by ‘Status’. The Defects - Summary Graph opens. By default, the graph is grouped by Status.
To Customize – set the filter conditions and click on Refresh to generate a fresh graph as required.

Using MS Excel Add-In Install the Microsoft Excel Add-in from Quality Center Add-In page. Define requirements, tests, or defects in Microsoft Excel. Export them to Quality Center. This feature lets you design your test artifact in excel sheets, have them properly reviewed
and upload it in Quality Center.
Designing in Excel Sheets: Write the Test Cases (Requirements or Defects) in excel sheets. Make sure that every
new test cases begins in a new row. Fill in all the mandatory fields. Make sure you give the correct Subject (hierarchical path)
where you want the test cases to be stored. Test Name should not contain – “\ / : " ? < > | * %” characters. Requirement Name should
not contain – “\ ^ *”. Upload the Test Cases (Requirements or Defects) in Quality Center.
QC Upload

…Using MS Excel Add-InUploading Data to Quality Center: Go to Tools > Export to Quality Center in MS Excel. The Quality Center Export Wizard - Step
1 of 8 dialog box opens. Complete the Steps 1 through 8 to upload the Test Cases in Quality Center. Give the QC Server name -> Next -> Enter Domain and Project you want to connect -> Next

…Using MS Excel Add-InGive the User Name and Password -> Next
Select the type of Data for upload
Select Map (if existing) or create a New Map (Excel column names which maps to QC field names)
After Selecting Map or creating a New Map, choose the QC fields names and specify the Excel sheet column name -> Next -> Upload starts

References Mercury Quality Center User Guide Microsoft Excel Add-in Guide Snapshots – Courtesy Mercury Quality Center User Guide Snapshots – Courtesy Microsoft Excel Add-in Guide

Thank You


![Definition of Quality of Service parameters and their ... · PDF fileLTE Long Term Evolution ... Definition of Quality of Service parameters and their computation ". [3] ... (QoS)](https://static.fdocuments.in/doc/165x107/5a8589f17f8b9ad30c8c73d3/definition-of-quality-of-service-parameters-and-their-long-term-evolution-.jpg)