Introduction to pilates · Pilates exercises are best done in a calm and quiet environment to...
18
Produced by Becky Scott, Kim Burnett, Tracey Paul Senior Physiotherapists 1 INTRODUCTION TO PILATES/ CORE STABILITY The goal of Pilates in to improve the strength of the muscles surrounding your spine that are involved in your “core stability.” These muscles provide stability to your spine to support your discs and joints helping to prevent injury. If you imagine what a coke can looks like then it helps to imagine how these muscles work to provide stability; 1) Your pelvic floor is the bottom of the coke can. 2) Your diaphragm is the top of the coke can. 3) Your Transversus sits at the front of the coke can. 4) And the Multifidus muscles sit at the back of the coke can. The muscles work in conjunction with connective tissue (fascia) by acting as a natural corset. In people with back pain these muscles still work but the timing is not as good as it should be. This booklet and a Pilates trained physiotherapist will teach you how to recruit these muscles, make you more aware of good posture and empower you to be able to follow Pilates exercises at home. Pilates involves five key principles: 1) Breathing – You should feel the lower ribs expand sideways as you breathe in. 2) Centering - Learning how to find the spine neutral position and how to engage the appropriate muscles (see below) 3) Ribcage placement – Not allowing the ribcage to lift up during the exercises. 4) Shoulder blade placement - keeping shoulder blades down and back. 5) Head and neck position – Avoiding poking the chin by lengthening the back of the neck. Guiding principles: Pilates exercises are best done in a calm and quiet environment to enable the body and mind to focus. Throughout the exercises you should focus on maintaining neutral spine with slow and controlled quality of movement. These exercises should not provoke your symptoms, if they do re-review your 5 key principles. If this still persists please discuss with your Pilates Physiotherapist. Diaphragm (top) Pelvic Floor (bottom) Tranversus (front) Multifidus (back)
Transcript of Introduction to pilates · Pilates exercises are best done in a calm and quiet environment to...

Produced by Becky Scott, Kim Burnett, Tracey Paul Senior Physiotherapists
1
INTRODUCTION TO PILATES/ CORE STABILITY
The goal of Pilates in to improve the strength of the muscles surrounding your spine
that are involved in your “core stability.” These muscles provide stability to your
spine to support your discs and joints helping to prevent injury.
If you imagine what a coke can looks like then it helps to imagine how these muscles
work to provide stability;
1) Your pelvic floor is the bottom of the coke can.
2) Your diaphragm is the top of the coke can.
3) Your Transversus sits at the front of the coke can.
4) And the Multifidus muscles sit at the back of the coke can.
The muscles work in conjunction with connective tissue (fascia) by acting as a natural
corset. In people with back pain these muscles still work but the timing is not as good
as it should be.
This booklet and a Pilates trained physiotherapist will teach you how to recruit these
muscles, make you more aware of good posture and empower you to be able to follow
Pilates exercises at home.
Pilates involves five key principles:
1) Breathing – You should feel the lower ribs expand sideways as you breathe in.
2) Centering - Learning how to find the spine neutral position and how to engage
the appropriate muscles (see below)
3) Ribcage placement – Not allowing the ribcage to lift up during the exercises.
4) Shoulder blade placement - keeping shoulder blades down and back.
5) Head and neck position – Avoiding poking the chin by lengthening the back of
the neck.
Guiding principles:
Pilates exercises are best done in a calm and quiet environment to enable the body and
mind to focus. Throughout the exercises you should focus on maintaining neutral
spine with slow and controlled quality of movement.
These exercises should not provoke your symptoms, if they do re-review your 5 key
principles. If this still persists please discuss with your Pilates Physiotherapist.
Diaphragm (top)
Pelvic Floor (bottom)
Tranversus (front) Multifidus (back)

Produced by Becky Scott, Kim Burnett, Tracey Paul Senior Physiotherapists
2
Finding spine neutral
Lying on your back with bent knees, feet hip width apart with arms by your side
Imagine you have a saucer of milk sitting on your tummy, tip the milk towards your
nose and flatten your back into the mat. Then tip the milk towards your toes and arch
your back. Repeat, and stop when the milk in the saucer would be level. You should
just be able to place your fingers between the floor and the small of your back.
“Neutral”
Setting your “Centre” with your abdominal muscles.
Lie in the neutral spine (see above). Place your fingers on the bony points of your
hips. Move your fingers across and down 4cm. This is the area of the muscles to be
worked. Breathe in and breathe out fully. As you breathe out slowly and gently pull
in the muscles below your belly button, as if you were tightening a belt or your
trousers. You should feel gentle tension under your fingertips. Hold this position and
breathe normally.
Setting your “Centre” with your pelvic floor muscles.
Lie in the neutral spine (see above). Place your fingers on the bony points of your
hips. Move your fingers across and down 4cm. This is the area of the muscles to be
worked. Breathe in and breathe out fully. As you breathe out imagine that you are
trying to stop yourself going to the toilet to pass urine. You may feel gentle tension
under your fingertips. Hold this position and breathe normally.
Produced by Becky Scott, Kim Burnett, Tracey Paul Senior Physiotherapists
3
EXERCISES
Always start with level 1, when ready progress slowly to level 2.
These exercises should be performed daily to achieve maximum benefit.

Produced by Becky Scott, Kim Burnett, Tracey Paul Senior Physiotherapists
4
SINGLE LEG STRETCH
Level 1
Find spine neutral.
Set your centre.
Breathe in to prepare.
Breathe out and slide one heel along the
floor away from your bottom.
Breathe in and slide the along the floor
towards your bottom.
Repeat 10 times alternating legs.
Level 2
Find spine neutral.
Set your centre.
Breathe in to prepare.
Breathe out and lift 1 leg up so that
your hip and knee is at 90°.
Straighten your leg as much as you can.
Bring the knee back to 90°, then lower
to the floor.
Repeat 10 times alternating legs.
Watch Points
Make sure the spine does not arch or
flatten during the exercise (maintain
your neutral spine).
Make sure your upper body stays
relaxed.
Produced by Becky Scott, Kim Burnett, Tracey Paul Senior Physiotherapists
5
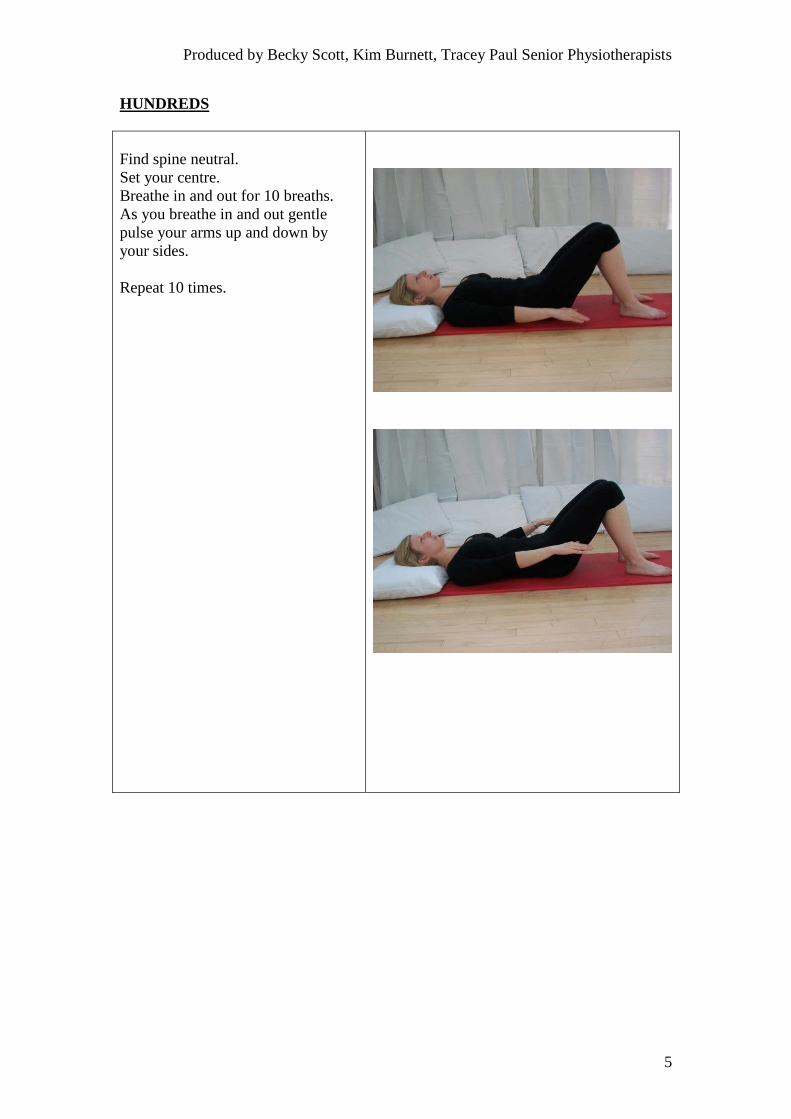
HUNDREDS
Find spine neutral.
Set your centre.
Breathe in and out for 10 breaths.
As you breathe in and out gentle
pulse your arms up and down by
your sides.
Repeat 10 times.

Produced by Becky Scott, Kim Burnett, Tracey Paul Senior Physiotherapists
6
HIP TWIST
Level 1
Find spine neutral.
Set your centre.
Breathe in to prepare.
Breathe out and slowly let 1 knee
drop out to the side.
Breathe in and draw the knee back to
the middle.
Repeat 10 times alternating legs.
Level 2
Find spine neutral.
Bring your knees together.
Set your centre.
Breathe in to prepare.
Breathe out and roll both knees to
the right.
Let the pelvis and low back gently
roll with it.
At the same time let your head
gently roll to the left.
Breathe in.
Breathe out and roll your legs and
head back to the middle.
Repeat 10 times alternating sides.
Watch Points
Make sure the back and pelvis stay
still and your other leg doesn’t move.

Produced by Becky Scott, Kim Burnett, Tracey Paul Senior Physiotherapists
7
SHOULDER BRIDGE Level 1
Find spine neutral.
Walk your heels a small distance
towards your bottom.
Set your centre.
Breathe in to prepare.
Breathe out and gently roll the
bottom of your back into the floor.
Squeeze your bottom muscles as you
lift it off of the floor.
Gently roll the rest of your back up
bone by bone until you are resting on
your shoulder blades or to where you
can manage.
Breathe in and hold the position.
Breathe out and gently roll down
bone by bone, starting with the top
of your spine.
Repeat 10 times.
Watch Points
Make sure your hamstrings (muscle
at back of thigh) are not over
working.
Stop the movement before any
weight is put through the neck or
head.

Produced by Becky Scott, Kim Burnett, Tracey Paul Senior Physiotherapists
8
SHOULDER BRIDGE Level 2
Level 2
Find spine neutral.
Walk your heels a small distance
towards your bottom.
Set your centre.
Breathe in to prepare.
Breathe out and gently roll the
bottom of your back into the floor.
Squeeze your bottom muscles as you
lift it off of the floor.
Gently roll the rest of your back up
bone by bone until you are resting on
your shoulder blades or to where you
can manage.
Breathe in and hold the position.
In this position lift 1 heel up off the
floor, then lower.
Repeat on other side.
Breathe out and gently roll down
bone by bone, starting with the top
of your spine.
Level 3
Find spine neutral.
Walk your heels a small distance

Produced by Becky Scott, Kim Burnett, Tracey Paul Senior Physiotherapists
9
towards your bottom.
Set your centre.
Breathe in to prepare.
Breathe out and gently roll the
bottom of your back into the floor.
Squeeze your bottom muscles as you
lift it off of the floor.
Gently roll the rest of your back up
bone by bone until you are resting on
your shoulder blades or to where you
can manage.
Breathe in and hold the position.
In this position lift 1 leg up and
stretch it away from you, then lower
back to the floor.
Repeat on other side.
Breathe out and gently roll down
bone by bone, starting with the top
of your spine.
Repeat 10 times.
Watch Points
Make sure your hamstrings (muscle
at back of thigh) are not over
working.
Stop the movement before any
weight is put through the neck or
head.
DOUBLE LEG STRETCH

Produced by Becky Scott, Kim Burnett, Tracey Paul Senior Physiotherapists
10
Find spine neutral.
Set your centre.
Breathe in to prepare.
Breathe out and lift both arms up to
90°.
Breathe in
Breathe out and slowly lower your
arms above your head.
At the same time slide one heel
along the floor away from your
bottom.
Breathe in and circle your arms out
to the side finishing with them above
you.
At the same time slide your heel
back to your bottom.
Repeat 10 times alternating legs.
Watch Points
Do not allow your back to arch.
Do not overwork the muscles around
your neck.
CLAM

Produced by Becky Scott, Kim Burnett, Tracey Paul Senior Physiotherapists
11
Level 1
Lie on your side.
Have your underneath arm stretched
out under your head.
Hips bent to 45° and knees bent to
90°. Shoulders and hips should feel
stacked on each other.
Gently point your top hip towards
your toes to give a small gap at your
waist.
Centre yourself.
Breathe in to prepare.
Breathe out and lift your top knee up
whilst keeping your heels together.
Breathe in and lower your top leg.
Repeat 10 times
Level 2
Lie on your side.
Have your underneath arm stretched
out under your head.
Hips bent to 45° and knees bent to
90°. Shoulders and hips should feel
stacked on each other.
Gently point your top hip towards
your toes to give a small gap at your
waist.
Centre yourself.
Lift both feet in the air a small
distance, ensure the rest of you
posture stays the same.
Breathe in to prepare.
Breathe out and lift your top knee up
whilst keeping your heels together.
Breathe in and lower your top leg.
Repeat 10 times
Watch Points
You should only feel the movement
coming from your hip.
Do not allow yourself to roll
backwards.
SIDE KICK

Produced by Becky Scott, Kim Burnett, Tracey Paul Senior Physiotherapists
12
Lie on your side.
Have your underneath arm stretched
out under your head.
Hips bent to 45° and knees bent to
90°. Shoulders and hips should feel
stacked on each other.
Gently point your top hip towards
your toes to give a small gap at your
waist.
Centre yourself.
Breathe in to prepare.
Breathe out and lift your top leg up
to hip height.
Smoothly move the leg forward from
the hip joint, keeping the bent.
Breathe in and smoothly move the
leg backwards then lower down to
the start position.
Repeat 10 times
Watch Points
You should only feel the movement
coming from your hip.
Do not allow yourself to roll
backwards.
Do not tense the muscles around you
neck and shoulders.

Produced by Becky Scott, Kim Burnett, Tracey Paul Senior Physiotherapists
13
ARM OPENING
Lie on your side.
Have both your arms stretched out in
front of you.
Hips bent to 45° and knees bent to
90°. Shoulders and hips should feel
stacked on each other.
Gently point your top hip towards
your toes to give a small gap at your
waist.
Centre yourself.
Breathe in to prepare.
Breathe out and lift your top arm up
to the ceiling.
Let your upper body twist so that
you feel your chest opening.
Allow your head to follow the
movement.
Breathe in and hold the position.
Breathe out and bring your upper
body and arm back to the start
position.
Repeat 10 times.
Watch Points
Do not allow your pelvis to roll
backwards.
Do not lift your head off the floor.
SWAN DIVE

Produced by Becky Scott, Kim Burnett, Tracey Paul Senior Physiotherapists
14
Lie on your stomach with legs out
straight and hip width apart.
Bend your arms up to the side of
your shoulders.
Rest your forehead on a small
cushion or folded towel.
Imagine making a small double chin
and keep the back of your neck long.
Centre yourself.
Breathe in to prepare.
Breathe out and gently lift your
breastbone off of the floor.
Breathe in and hold the position.
Breathe out and gently lower
yourself down.
Repeat 10 times.
Watch Points
Make sure you keep your neck still
throughout the movement.
Do not over work the muscles
around the tops of your shoulders.
BREAST STROKE

Produced by Becky Scott, Kim Burnett, Tracey Paul Senior Physiotherapists
15
Lie on your stomach with legs out
straight and hip width apart.
Place your arms by your sides.
Rest your forehead on a small
cushion or folded towel.
Imagine making a small double
chin and keep the back of your
neck long.
Centre yourself.
Breathe in to prepare.
Breathe out and glide your
shoulder blades back and down.
At the same time gently hover your
arms off the floor.
Breathe in and hold the position.
Breathe out and gently lower your
arms and shoulder blades down.
Repeat 10 times.
Watch Points
Make sure you keep your neck still
throughout the movement.
Do not over work the muscles
around the tops of your shoulders.
Do not arch your lower back.
SPINE TWIST

Produced by Becky Scott, Kim Burnett, Tracey Paul Senior Physiotherapists
16
Sit up tall.
Find spine neutral.
Fold your arms across your chest.
Set your centre.
Breathe in to prepare.
Breathe out and twist your upper body to
the left.
Breathe in and hold the stretch.
Breathe out and twist back to the start
position.
Repeat to the right side.
Repeat 10 times.
Watch Points
Do not slump down in this position.
ROLL UP

Produced by Becky Scott, Kim Burnett, Tracey Paul Senior Physiotherapists
17
Sit up tall on top of your sitting bones on
a chair or a cushion.
Find spine neutral.
Place 1 thumb in your belly button and
the other thumb on the bottom of your
breast bone.
Set your centre.
Breathe in to prepare.
Breathe out and roll backwards off the
sitting bones. You will gently curve the
bottom of your back.
The distance between the 2 thumbs
should stay the same.
Breathe in and roll forwards back to the
start position.
Repeat 10 times.
Watch Points
Only the bottom of the spine should
move – your mid back and neck should
stay long.
ONE LEG CIRCLE

Produced by Becky Scott, Kim Burnett, Tracey Paul Senior Physiotherapists
18
Find spine neutral.
Set your centre.
Breathe in to prepare.
Breathe out and lift 1 leg, bending
the hip and knee to 90°.
With your foot draw a small circle in
a clockwise direction.
Repeat 8 -10 times.
Breathe out and lower the leg down
to the start position.
Repeat 8 -10 times in an anti
clockwise direction.
Repeat with the opposite leg.
Watch Points
Make sure you keep your neutral
spine and do not allow your pelvis or
back to move.