Introduction to Map, Compass, and GPS Basics Part 2 of 3 Compass Basics Passaic County Sheriff’s...
34
Introduction to Map, Compass, and GPS Basics Part 2 of 3 Compass Basics Passaic County Sheriff’s Department CERT Team Training Bob Smith Revision 1.05 Copyright 1/3/2010 Robert J. Smith
-
Upload
candace-thornton -
Category
Documents
-
view
220 -
download
3
Transcript of Introduction to Map, Compass, and GPS Basics Part 2 of 3 Compass Basics Passaic County Sheriff’s...

Introduction to Map, Compass, and GPS BasicsPart 2 of 3 Compass Basics
Passaic County Sheriff’s Department
CERT Team TrainingBob Smith
Revision 1.05 Copyright 1/3/2010 Robert J. Smith
To introduce the basics of Compasses.
What you will learn
A basic introduction to:
* Using a compass.
* Using a compass with a map for navigation.
The Purpose of this Presentation

Compasses are Region Specific
Buy Your Compass for the Right Area: As well as the magnetic deviation east or west, compasses also show a vertical "dip" up and down. This dip varies in different parts of the world and compasses are specially calibrated for that dip. So you can't take a compass made for North America and use it in South America and get accurate readings.
A compass is balanced for the zone it is used in. There are 5 compass zones in the world. Different parts of the world have more or less dip to the magnetic field and the card needs to be balanced to match the zone. A compass balanced for a given zone will work well in one zone above and one below the zone it was balanced for. Select the zone for the compass so it will work for the entire trip.
Military compasses are constructed such they they can be used throughout the world.
Compass Facts

Compass Zone Chart
Almost all of the standard compasses sold in North America are balanced for zone 1.
The manufacturer Suunto has developed a patented Global Needle that will perform perfectly with needle tilts of up to 20 degrees. This allows a single compass to be used effectively in all 5 of the earth's zones. So when we hear that a compass is outfitted with a Global Needle for true world-wide performance, now you know what we mean.
More Compass Facts
One thing to remember is that a compass does NOT really point to TRUE NORTH, except by coincidence in some areas. This is an IMPORTANT point!
It aligns with the magnetic field in which it is placed which aligns it to the MAGNETIC NORTH pole. This difference between True & Magnetic north is call DECLINATION.
The compass needle is attracted by magnetic force, which varies in different parts of the world and is constantly changing.
When you read NORTH on a compass, you're really reading the direction of the magnetic north pole.
A Word of Caution!!!
Compass readings are also affected by the presence of iron and steel objects and magnetic fields.
Be sure to look out for—and stay away from—
pocket knives, belt buckles, railroad tracks, vehicles, electrical lines and powered on cell phones.
For High Tension lines, allow a Minimum of 50 yards!

•The compass consists of a magnetized metal needle that floats on a pivot point. The needle orients to the magnetic field lines of the earth. The basic orienteering compass is composed of the following parts:Base plateStraight edge and rulerDirection of travel arrowCompass housing with 360 degree markingsNorth labelIndex lineOrienting arrowMagnetic needle-NORTH end is ALWAYS red)
The Basic Compass Features
NOTE! There are many different types of compasses and some are very specific for certain tasks. One that has declination adjustment, called an Orienteering compass, is very useful.
TWO WAYS to use a compass will be covered.
#1 Using a compass WITHOUT a map to follow a heading.
#2 Using a Compass WITH a map to follow a heading.
Let’s have TWO quick examples!
How Do You Use a Compass?

Using a Compass WITHOUT a Map
Then you turn the compass housing so that northwest on the housing comes exactly there where the large direction of travel-arrow meets the housing.
Lets go Northwest
Locate Northwest on the compass housing
Compass housing
Now turn yourself, your hand, the entire compass, just make sure the compass housing doesn't turn, and turn it until the RED part of the compass needle is aligned with the lines inside the compass housing.
Hold the compass in your hand and make sure it is flat, so that the compass needle can turn.
Be careful! It is extremely important that the red, north part of the compass needle points at north in the compass housing. If south points at north, you would walk off in the exact opposite direction.
This is a very common mistake with beginners.

When do you use this technique?
If you are out in the field without a map, and you don't know where you are, but you know that there is a road, trail, stream, river or something long and big you can't miss if you go in the right direction.
And you know in what direction you must go to get there, at least approximately what direction.
Why isn't this navigation technique really good?
It is not very accurate. You are going in the right direction at least you won't go around in circles, but you're very lucky if you hit a small spot this way.
If you are taking a long hike in unfamiliar terrain, you should always carry a GOOD TOPO MAP that covers the terrain. Especially if you are leaving the trail.
It is in this interaction between the map and a compass, that the compass becomes really valuable.

Here is our compass again.
Using a Compass WITH a map
The technique we will use here is the same as the one we covered above but this time, we will using a map to tell us which way is correct instead of using intuition or guessing.

The first rule of any navigation method is to know where you are located.
Take out your map and precisely locate where you are on the map.
In our example you are located at point A. Your destination is B.
Now use your compass like a ruler.
Place the edge of your compass on the map so that the same edge is aligned with point A & point B.
Be careful here!
The direction of travel arrow, must point from A to B!
If you do this wrong, you'll walk off in the exact opposite direction of what you want.
Basic Land Navigation with a Map & Compass
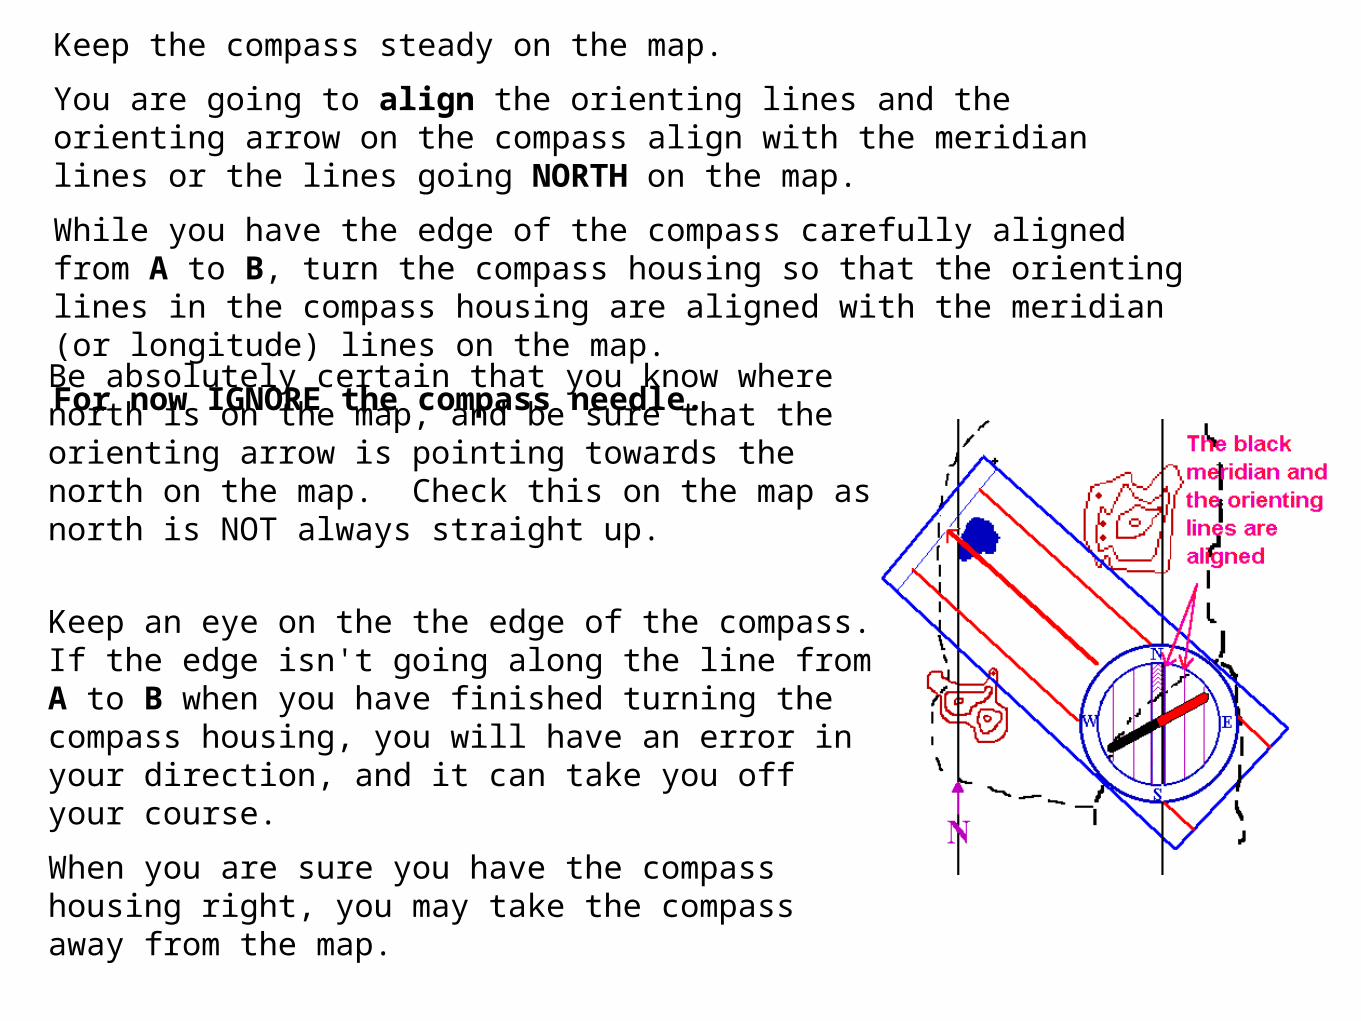
Keep the compass steady on the map.
You are going to align the orienting lines and the orienting arrow on the compass align with the meridian lines or the lines going NORTH on the map.
While you have the edge of the compass carefully aligned from A to B, turn the compass housing so that the orienting lines in the compass housing are aligned with the meridian (or longitude) lines on the map.
For now IGNORE the compass needle.
Be absolutely certain that you know where north is on the map, and be sure that the orienting arrow is pointing towards the north on the map. Check this on the map as north is NOT always straight up.
Keep an eye on the the edge of the compass. If the edge isn't going along the line from A to B when you have finished turning the compass housing, you will have an error in your direction, and it can take you off your course.
When you are sure you have the compass housing right, you may take the compass away from the map.
Be sure that the housing doesn't turn, before you reach your target B!
Only one more step to go.

The Final Step
Hold the compass in your hand.
Make sure that the compass is flat so that the compass needle can turn.
Now turn yourself, your hand, the entire compass, just make sure the compass housing doesn't turn, and turn it until the compass needle is aligned with the lines inside the compass housing.
That it!
Now just keep the red north needle “boxed”and follow the RED direction of travel arrow.

Magnetic Declination
Unfortunately, the above example is not always this simple.
In the real world it is more complicated.
There is something called magnetic declination.
Your compass will ALWAYS point to the magnetic north pole.
Your map aligns and points towards the geographic north pole.
This is usually NOT the same physical place.
To add to these 2 norths there is a 3rd north.
It is called GRID (or UTM) North

What is Declination?
Declination values represent the error between magnetic North and True North, for a specific location.
Declination degree values can be either expressed as Easterly and Westerly, or as positive and negative values.
Easterly declinations are represented as positive (+) values.
Westerly declinations are represented as negative (-) values.
For example, your current location could be represented as a Westerly declination of 15 degrees, or as a declination value of -15 degrees.
Declination chart from 1990, showing the worldwide declination situation in 1990. The current declination values for today will be close.

A map represents the real world.
By orienting a compass & map, and using declination you are positioning it so its North is actually pointing True North while the
compass needle points to magnetic north.
Now, the map is oriented to the real world.
When you orient a map and know where you are on the map, you can look in a certain direction and see a real landmark and find it on the
map.
If you know where you are on the map, you should be able to look in any direction and see the objects represented on the map in the same
direction.
If you know where you are on your map, you can also orient your map by distant features.
If you can see a known mountain in one direction and a lake off another way, then just lay the map out and turn it so the
corresponding marks on the map align with the distant features.
Direction of Travel Arrow
Orienting Lines (aligned w/True North)
Orienting ArrowSet for Declination
Magnetic Needle pointing to MN
True North (or Meridian Line, Latitude)
The Reasons you Orientate a Map using Declination

Which North to Use?
We have learned that we have three NORTHs (TRUE, GRID & MAGNETIC) to use to navigate our course or position.
When you look at your Topo map, it is drawn in relation to TRUE NORTH, when you look at your compass, it points to MAGNETIC NORTH (GRID NORTH will be used with GPS).
IMPORTANT! To make the MAP and COMPASS work together you must decide on one of these Norths as your point of reference and base all your calculations on this reference NORTH.
To do this you need to use DECLINATION.
Failure to take this declination into account WILL put you way off your target destination.

To Answer the question of which NORTH to use:
The answer is use MAGNETIC NORTH to remove the Declination error and now the compass will match the map as well!
A quick way to see how far you will be off course if you DID NOT use declination:
For EVERY 1 degree you off you will have an ERROR of 1/60 of the distance traveled.
Example: If you walk 3 000 Feet and you are 15 degrees off (you did NOT apply declination!) will result in:
3 000 feet/60 = 50 feet (this is the error for ONE degree).
Now multiply 50 feet by 15 degrees (the declination error) = a 750 foot ERROR!
If you are in deep woods and you walked 3 000 feet you will miss your destination or meeting point by 750 FEET and you are now lost.

You now need to get the MAGNETIC DECLINATION for your map.
From your map you will see a diagram like the one below in the map’s legend:
MN is the symbol for Magnetic Northand is the one we will use.
Note that the Declination for THIS mapis 13.5 degrees EAST.
The MILS number is used by the Military 1 mil = 1/6400 of a circle.
True North Symbol
Grid or UTM North Symbol
NOTE! Declination is from the CENTER of the map! Remember DISTORTION!
Depending where you are the declination can be EAST or WEST.How do you know how to apply declination to your compass?

Use the LARS Rule
If Declination is:
To the Left Add itto your total headingreading!
If Declination is:
To the Right Subtract itfrom your total headingreading!
LARS = Left Add Right Subtract

Temporary Declination Method (Used with a Compass with NO declination adjustment)
You must redo this procedure every time you set a new heading.
Find the amount of declination in their area and whether it is easterly or westerly.
This information is on topographic maps of the area.Take your bearing from the map and observe the degree readingat the index pointer.
Turn the dial to increase or decrease that reading according to the declination. Easterly, decrease the dial reading and westerly, increase the reading.
For example, if your bearing from the map is l00º and the declination is 10º East, DECREASE the reading 10º by turning the dial to 90º. If the declination is 10º West, INCREASE the reading of l00º to read 110º.

How to use declination - Examples
You know your current declination value is -12 degrees (or 12 degrees West) and you want to be traveling in a true 72 degree path.
In order to actually travel 72 degrees from True North you will have to add 12 degrees to your planned bearing, and set your compass to 84 degrees. (LEFT ADD RULE)
Now traveling at a bearing 84 degrees from magnetic north, you are actually traveling 72 degrees from True North.

If you have a declination value of 20 degrees West and your compass indicates your bearing is 90 degrees:
You are actually bearing at 70 degrees.
If you really want a bearing of 90 degrees, you will have to add the 20 degrees of declination to the bearing of 90 degrees for a total of 110 degrees, to compensate for your local error.
How to use declination – More examples
There are many types of compasses.
Most, like the Military compass must have declination applied each time.
The Orienteering compass allow you set the declination angle once.
Once it is set you can forget about adjusting for declination.
This is the preferred compass to use as it removes all errors applying declination.
*As long as the set declination always matches the map you are using.
How to PERMANENTLY* adjust for declination

Permanent MethodUsing an Orienteering Compass to Adjust Declination on
Your Compass
Orienteering compasses allow you to adjust the declination by twisting a ring, using a screw, or some other method of changing where the orienting arrow sits
in relation to the ring.
The Orienting Arrow is allowed to move independently of the compass baseplate and Compass housing. You adjust the Orienting Arrow to the correct
Declination for our area (13.3 Degrees WEST) This is set only once.
NOTE! If you move to another area that has a different declination you must perform this step again.
By adjusting the compass to match the declination on our map, the orienting arrow now appears to be off-center from North, when the compass is pointing
True North, which is how it should be.
Whenever you use the compass you will use the Orienting Lines to align the compass on the map’s TRUE NORTH.
And when you align the Magnetic Needle inside Orienting Arrow, the North indicated at the Direction of travel Arrow is true north and matches your
map.
You can continue to check your location and chart your course correctly. Whenever you stop and check your heading or take a bearing on a distant object,
the degrees read on the dial will be the actual true degrees.
The only thing that looks a bit odd is that the north end of the compass needle does not point directly at the N when you are heading due North.

REMEMBER!The only thing that looks a bit odd is that the north end of the compass needle (when aligned in the Orienting Arrow) does not point directly at True North.
Orienting Arrow set to:13.3 Degree WEST Declination(Setting for our area!)
Adjusting screw used to move Direction of Travel Arrow
Note! Orienting Lines now do NOT Align with Orienting Arrow.
Direction of Travel
NOTE! For Clarity, the Magnetic Needle is NOT aligned with Orienting Arrow
Remember! Orienting Lines are used to line up on True North
An Orienteering Compass Set for Declination.

Using a Orienteering Compass with a map to follow a heading.Draw a straight line on the map passing through your location and your destination and extending across any one of the map borders. Or you can just lay the compass on the map.
Useful map hints:
Never use a pen to write on a map.
Use a pencil or keep the map in aplastic map case and use a grease pen.
Try to buy maps which are printed on plastic or Tyvekas they will resist the weather better.
Try to roll maps if possible it prevents “fold” damage.

Adjusting your Orienteering Compass
Momentarily ignore the Compass Magnetic Needle.
Center the compass base plate on your drawn line and rotate the compass housing degree dial to align the compass Orienting Lines with True North (i.e. the map border, a meridian or Longitude line).
Be careful to get the bearing in the correct sense because a straight line will have two values 180 degrees apart. Remember North is 0 degrees, East is 90 degrees, and so on.
Very Important! To use this bearing you must have compensated for magnetic declination.
Before you use your Orienteering compass you need to set the declination with the orienting arrow.
To make this declination adjustment - rotate the orienting arrow to match the magnetic declination. If the compass you have does NOT have an adjustable orienting arrow you need to remember this declination EACH time you take a heading.
One more step…

The Final Step - Just like before
Hold the compass in your hand.
Make sure that the compass is flat so that the compass needle can turn.
Now turn yourself, your hand, the entire compass, just make sure the compass housing doesn't turn, and turn it until the compass needle is aligned with the lines inside the compass housing.
That it!
Now just keep the red north needle “boxed”and follow the RED direction of travel arrow.

Taking 2 Bearings to locate your position
Using the technique described above you can locate where you are on a map.
Note: the Magnetic needle is aligned and over the orienting arrow.
Now you just follow the “Direction of Travel” arrow
Some tips on maps & compasses
1. You can also VERY carefully draw NEW N/S lines on your map which are adjusted for declination. Then you can just use the map & compass and forget about adjusting the compass for declination as the map has been compensate for it.
2. Buy a compass which allows you to set the declination and this will compensate for declination and you can just use the map and forget about declination as it has been compensated for by the compass.
3. Purchase a map on which the N/S lines have been already printed with the correct declination angle.
#2 is the BEST solution. It is the easiest solution to use and allows you the flexibility to always adjust for declination.

Uncertainty using a compassYou can't always expect to hit exactly what you are looking for. In fact, you must expect to get a little off course.
How much you get off course depends very often on the things around you. How dense the forest is, fog or visibility. And of course, it depends on how accurate you are. You can do this by being careful when you lay out a course, and it is important to aim as far ahead as you can see*.
In normal forest conditions we say that as a rule of thumb, the uncertainty is one tenth of the distance traveled. So if you go 200 meters, it is possible that you can end up a little off course, 20 meters or so. If you're looking for something smaller than 20 meters across, there is a chance you'll miss it. If you want to hit that rock in our example you'll need to keep your eyes open!
*Use reasonable far objects, features, or land marks for your actual course.

A Few more Important Land Navigation Points!
Check Your Position RegularlyCheck your map and compass frequently.
Keep track of your starting time, rest breaks, lunch stops, and general hiking.
Pace beads can be used to estimate distance traveled (see next slide).
Use the TERRAIN to your Advantage
If you can avoid STEEP slopes, wet lands or swamps do so. Navigate around them.
Take care crossing streams and rivers. Look for bridges. If you have no option but to cross a stream or a river exercise EXTREME care. KNEE deep water is VERY hard to cross especially with slippery rocks in streams. You can easily be swept away (especially with a backpack) and drown.
And NEVER, NEVER Navigate at NIGHT unless ABSOLUTELY NECESSARY!

Pace Beads Pace or counting beads are similar to an abacus. They are made of tightly fitted beads on a cord.
Usually 9 beads on the bottom separated by a knot from 4 beads on the top.
As you take a fixed amount of steps you move a bead down on the bottom. When you have moved all 9 beads on the bottom for the tenth bead you move down one of the top 4 beads, more the bottom beads up and start again moving the bottom ones.
To match distance on a UTM map you count how many steps you take to cover 100 meters,
Do NOT just walk a few 100 meters on level ground and use this as your pace count. This is a common error made by most.
You need to take step measurements over various times and terrains. When you start out when you are fresh, when you return when you are tired. With a pack, up and down hills and then average these numbers.
This average will be close to your true and accurate step count.

End of Compass Basics
Questions?