A Qadeer Negahban Cardiologist Barnsley Hospital United Kingdom.

Introduction to C#
Introduction to C#:
The structure of a C# program Let us start by looking at a simple C# program. Open a file with any basic text editor and type the following: using System; public class FirstCSProgram { public static void Main() { for( int i=0; i<10; i++) { Console.Write("This is loop: "+i.ToString()+"\n"); } } } Save this as a file "CSFirstProgram.cs." Next we have to compile this program. The C# compiler “csc.exe” will compile this code into Intermediate Language (IL), which then will be executed by the Common Language Runtime (CLR). The IL is an optimized platform independent intermediate language, needing a platform dependent CLR to actually run the program on a specific machine. This two step process allows all computer languages that compile to IL to be able to share functionality so that, for example, you can use your Fortran or C++ functions in C# without having to rewrite them. To compile this C# program we will use the “csc.exe” compiler. Open a DOS shell (A command prompt) and go to the directory you saved “CSFirstProgram.cs” into. Run the C# compiler on this file by typing csc CSFirstProgram.cs at the command prompt followed by pressing enter. If there are no compilation errors, the compiler should generate the program “CSFirstProgram.exe” in the same directory. You can run this program now by typing “CSFirstProgram.exe” at the command prompt followed by pressing return. You should see the following output in the DOS shell This is loop: 0 This is loop: 1 This is loop: 2 This is loop: 3 This is loop: 4 This is loop: 5 This is loop: 6
1

Introduction to C#
This is loop: 7 This is loop: 8 This is loop: 9 As you can see, the program goes through ten loops each time writing one line to the DOS shell. Let us look at each line to understand how the program works: “using System;”: In here "using" is a command telling the program to use the namespace "System." A namespace is grouping of a number of programming elements together. The namespace "System" is a special namespace that contains the core elements needed to implement this program. “public class FirstCSProgram”: This line declares a class FirstCSProgram that is "public" so that it can be accessed by all. “public static void Main()”: This line declares a method in the class "FirstCSProgram" that is called "Main." The method Main is a special method in C# that all C# programs must have since it defines the entry point to the program. As can be seen, Main declared to be a public method so that it can be accessed from outside the class FirstCSProgram. Main is also declared as static, which we will look at later, and is also declared as "void", which means it will not return anything back after it is called. The "()" is telling us that main takes no arguments, but if it did, they would be listed inside parentheses. “for( int i=0; i<10; i++)”: This declares the start of a "for" loop inside the method Main. This loop uses an integer index "i" that starts at "i=0" and increments by one each time the loop is completed, until the condition "i<10" is satisfied, after which it stops and returns control to the next element in Main. “Console.Write("This is loop: "+i.ToString()+"\n");”: This line tells the system to write "This is loop: " followed by "i" in "string" format and start a new line on the "Console" every time the for loop is executed. Now let us pay a little attention to the syntax. You might have noticed a couple of things:
1. To tell the compiler that the command was complete we needed to used a ";" at the end of the first line “using System;” and also at the end of the line “Console.Write("This is loop: "+i.ToString()+"\n");”
2. To define what is the content of our class FirstCSProgram and our method Main and the for loop, we have contained the content of each in a pair of curly brackets ("{}"). To improve the ease of reading the program, we have also indented the content of each to element.
Using Visual Studio to make a Console Application
2

Introduction to C#
We can do what we did in the last section using Visual Studio too. Since Visual Studio provides both editing tools and compiling tools, this is probably the desirable method of proceeding. These are the steps you need to complete to get this first application made by using Visual Studio:
1. Start Visual Studio and create a new C# Console Application by selecting from the File menu, New and then Project.
2. In the window select from the C# folder, the Console Application. Change the name to FirsCSProgram and press okay.
3. Visual Studio will open you a window that has most of what we did in the last section. You simply need to add the missing lines for( int i=0; i<10; i++)
{ Console.Write("This is loop: "+i.ToString()+"\n"); }
4. You can both compile and run the application by selecting Start Without Debugging from the Debug menu at the top of the Visual Studio Window. You should see the same output as before.
5. Visual Studio will put the compiled program in “bin/debug” directory.
Classes and Objects C# is a modern object oriented programming language. The “class” is a central idea in C# used to define an object
Class
Hidden Public variables
Public methods
Private variables Properties
Private methods
3

Introduction to C#
A class normally contains some variables and some methods, even though it might contain other elements. The current value of the variables defines the current state of the class. The methods of a class are programs that do things like calculations. Not all of a class is necessarily accessible from outside the class. Normally part of the variables and methods of a class are hidden to the outside. Classes can be instantiated, which means that one can produce difference instances of the same class. The class itself is only a template. For example, let us defined a class named “Ladder” that contains two variables “material” and “height”, and one method “Steps” to calculate the number of steps for this ladder. We can now instantiate three instances of this ladder and name them StanleyLadder, ACELadder, and TrueValueLadder, each having their own values for material and height, and access to the method Step to calculate the number of steps.
StanleyLadder TrueValueLadder ACELadder material = Wood material = Wood material = Aluminum height = 6 ft height = 7 ft height = 10 ft
Steps Number of steps = height*12/8
Properties Public variable and methods are one way of accessing the contents and functionality of a class, properties are another. Frequently properties are used to provide controlled (protected) access to the hidden part of the class.
Methods Methods are small programs that can access and manipulate the variables of a class, can initiate actions, can call other methods and also can get information from the caller of the method and return results to the caller of the method.
Inheritance Inheritance is a process which one class to inherit the variables and methods of another class. For example, consider HardwareItem class that contains the twp variables partNumber and price, and the a method Tax to calculate the tax. If we have our Ladder class inherit from HardwareItem, without any additional declarations or code, the
4

Introduction to C#
instances of the Ladder class would each have a partNumber and a price variable and access to the Tax method.
Ladder inherits from HardwareItem
Ladder HardwareItem material partNumber height price Steps Tax
StanleyLadder TrueValueLadder ACELadder material = Wood material = Wood material = Aluminum height = 6 ft height = 7 ft height = 10 ft partNumber = 1 partNumber = 3 partNumber = 2
price = $25 price = $20 price = $30
Steps Number of steps = height*12/8
Tax tax = price * 0.067
Events An event is when an action is taken, for example a button is pressed, a mouse is moved, or a menu is opened. Events need not be initiated by a user, they may be raised by the program itself. If an event handler is attached to an event, every time the event occurs the method associated with the handler will be run.
Using Visual Studio.NET The task of writing C# programs and making Windows application becomes much easier when you use a development platform such as Visual Studio.NET. In a lot of cases these development tools insert much of the details, giving you the freedom to focus on the specifics of your program. Let us start Visual Studio and make our first windows application. This will be a simple application that in response to pressing a button will change the background color of the window. Open Visual Studio and follow these steps:
1. Open the File menu
5

Introduction to C#
2. Select New 3. Select New Project
Applications folder
kColorApplication and open by pressing OK
ou should now have a new application set up for you to work on looking something like
4. Open the Visual C# 5. Select Windows Application 6. Name the application CSBBac
Ythis
f you don’t have the toolbax on the left or the solution explorer on the right, open the
n IView at the top and select them. Your application window is the small square window ithe middle that says Form1 at its top. Click and drag a button from the toolbox onto your application window. Your application window should now look like this
6

Introduction to C#
The program automatically named this instance of button as button1. Double click on button1. This should directly take you to the method that handles the Click event of button1. Type “this.” and you should see a menu pop up.
At this point “this” refers to the current form (i.e., Form1), and menu lists all the properties, public variables and methods, and events of this. Select BackColor. As shown, set this equal to Color.Agua
7

Introduction to C#
End the command by putting a semicolon “;” at the end of the line to get
The program is complete. We now need to “Build” the application. From the Build menu at the top select Build CSBackColorApplication. If you now go in the directory “bin\debug” you will find the program “CSBackColorApplication.exe.” double click on this, your application should open. Press on button1, the background color should change to aqua. Yes, with Visual Studio doing most of the work, this program only took a few minutes to develop. You can see all that Visual Studio did by viewing the content of Form1.cs with notepad. This is what you will see: using System; using System.Drawing; using System.Collections; using System.ComponentModel; using System.Windows.Forms; using System.Data; namespace CSChangeBackColorApplicatrion { /// <summary> /// Summary description for Form1. /// </summary> public class Form1 : System.Windows.Forms.Form { private System.Windows.Forms.Button button1; /// <summary> /// Required designer variable. /// </summary> private System.ComponentModel.Container components = null; public Form1() {
8

Introduction to C# // // Required for Windows Form Designer support // InitializeComponent(); // // TODO: Add any constructor code after InitializeComponent call // } /// <summary> /// Clean up any resources being used. /// </summary> protected override void Dispose( bool disposing ) { if( disposing ) { if (components != null) { components.Dispose(); } } base.Dispose( disposing ); } #region Windows Form Designer generated code /// <summary> /// Required method for Designer support - do not modify /// the contents of this method with the code editor. /// </summary> private void InitializeComponent() { this.button1 = new System.Windows.Forms.Button(); this.SuspendLayout(); // // button1 // this.button1.Location = new System.Drawing.Point(104, 80); this.button1.Name = "button1"; this.button1.TabIndex = 0; this.button1.Text = "button1"; this.button1.Click += new System.EventHandler(this.button1_Click); // // Form1 // this.AutoScaleBaseSize = new System.Drawing.Size(5, 13); this.ClientSize = new System.Drawing.Size(292, 266); this.Controls.Add(this.button1); this.Name = "Form1"; this.Text = "Form1"; this.ResumeLayout(false); } #endregion /// <summary> /// The main entry point for the application. /// </summary> [STAThread] static void Main() { Application.Run(new Form1());
9

Introduction to C# } private void button1_Click(object sender, System.EventArgs e) { this.BackColor = Color.AntiqueWhite; } } } At the top it has included several namespaces that it needs to set up the windows form. Then it has put all the code in its own namespace using “namespace CSChangeBackColorApplicatrion” with a “{“ starting the namespace and “}” closing it. Next Visual Studio has declared a class Form1 that inherits from System.Windows.Forms.Form . This is done using the command: public class Form1 : System.Windows.Forms.Form Next, inside Form1 it has declared the variable button1. This was done when we dragged and dropped the button onto the form. The command for this is private System.Windows.Forms.Button button1; As can be seen button1 is declared as private so it can only be seen by the components inside Form1. Next its put some required stuff, followed by a method named Form1. The command for this is public Form1() This method is required and is used to instantiate the form. Inside it is some instructions to initialize the form by running a method InitializeComponent(). Inside InitializeComponent() some more information about our button is provided, such as its size and location, and that it has an event handler attached to it. Also in there is a method to deal with disposing resources. Finally at the end there is our Main() method that is the starting point of our program. Note, the main method simply instructs the system to run Form1(). Yes, Visual Studio did a lot of the work.
The Console and MessageBox
10

Introduction to C#
We have already seen the console in use with our FirstProgram. Messages written to the Console are actually written to the DOS shell that the C# program is executing in. The
Notation and indentation The common notation for public variables and for methods is to capitalize the first letter of every word that is in the name. So that, for example, we would have variables or functions named, for example: MyProgramOne, InverseMatrix, CubicSpline. Local and private variables are normally written the same except that they first letter of the name is left lower case so, for example, we would have myVariableOne, inverseMatrix, and cubicSpline as our local variable names. Since C# is case sensitive, myVariableOne and MyVariableOne are considered as different. The argument of any class, method, loop, …, that spans more than one line is contained in “{}” and the content is indented to the right to set it visually apart from the rest of the program. The curly brackets are mandatory, but the indentation is not mandatory. If you use Visual Studio, you will see that the indentation is done for you automatically, if you don’t use Visual Studio, it is highly recommended that you still include indentations. If you have ever tired to read a program that is not indented, you will know why it is highly recommended to use indentation.
Comments You can comment out a line or part of it by including “//” at any point on the line. This will end the line so the compiler will not compile anything to the right of “//.” If a number of lines is to be commented off, this can be done by putting the material you what the compiler to ignore into “/*” and “*/.” // First start by including the namespace System using System; // Next declare a public class FirstCSProgram public class FirstCSProgram { /* * Any C# program need to have a Main method * that functions as the entrance point to the program * The main method must be public and static */ public static void Main() { // Include a for loop in Main to write ten lines to // the Console for( int i=0; i<10; i++) // i is an integer { // Have each line write "This is loop: i"
11
Introduction to C#
// where i changes each time // The \n at the end starts a new line Console.Write("This is loop: "+i.ToString()+"\n"); } } }
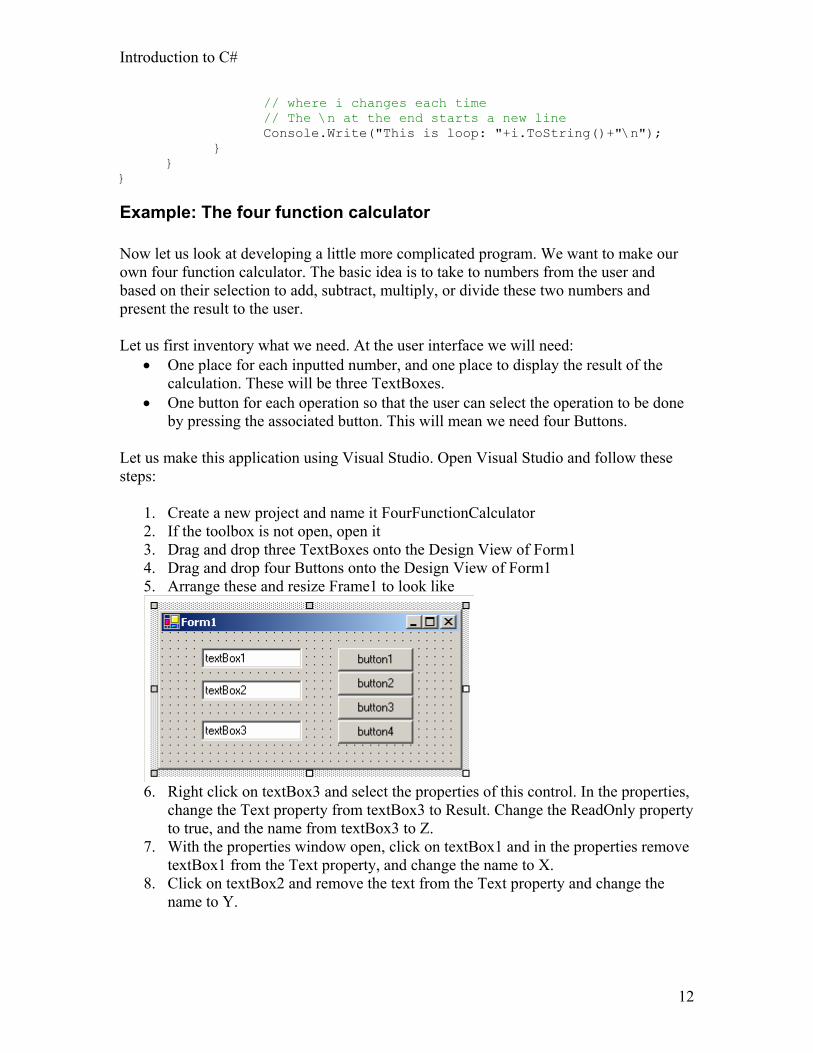
Example: The four function calculator Now let us look at developing a little more complicated program. We want to make our own four function calculator. The basic idea is to take to numbers from the user and based on their selection to add, subtract, multiply, or divide these two numbers and present the result to the user. Let us first inventory what we need. At the user interface we will need:
• One place for each inputted number, and one place to display the result of the calculation. These will be three TextBoxes.
• One button for each operation so that the user can select the operation to be done by pressing the associated button. This will mean we need four Buttons.
Let us make this application using Visual Studio. Open Visual Studio and follow these steps:
1. Create a new project and name it FourFunctionCalculator 2. If the toolbox is not open, open it 3. Drag and drop three TextBoxes onto the Design View of Form1 4. Drag and drop four Buttons onto the Design View of Form1 5. Arrange these and resize Frame1 to look like
6. Right click on textBox3 and select the properties of this control. In the properties,
change the Text property from textBox3 to Result. Change the ReadOnly property to true, and the name from textBox3 to Z.
7. With the properties window open, click on textBox1 and in the properties remove textBox1 from the Text property, and change the name to X.
8. Click on textBox2 and remove the text from the Text property and change the name to Y.
12

Introduction to C#
9. For button1 to buton4 change the Text property respectively to +, -, x, /, and the name to AddButton, SubtractButton, MultiplyButton, and DivideButton. Also, change the Font Size to 14. The form should now look like this
10. Double click on the AddButton to create an event handler for it and go to the
method that will be run on the event. Add the one line shown below: private void AddButton_Click(object sender, System.EventArgs e) { Z.Text = Convert.ToString(Convert.ToDouble(X.Text)+Convert.ToDouble(Y.Text)); }
11. Go back to the Design View and do the same for each of the other three buttons,
changing the “+” to the appropriate operator. 12. Now build the application.
You can run the application by going into the bin/Debug directory and double clicking on FourFunctionCalculator.exe. As you can see, this application will conduct the operation you select on the numbers in the two first fields and write the result in the last field. As you can see, it was not too difficult to make this application. You can take a look at all the code that Visual Studio created to make this possible by looking at the file FourFunctionCalculator.cs with notepad. You can do this from within Visual Studio too by going to the View menu at the top and selecting Code, but since visual studio hides parts of the file, you will have to double click on the “Windows Form Designer generated code” to have it expand it for viewing. Other than some long lines that did not fit on the page and were written on more than one line, the code in the file FourFunctionCalculator.cs pretty much looks as follows. As homework, read through the file and write what you think is being done in each part.
using System; using System.Drawing; using System.Collections; using System.ComponentModel; using System.Windows.Forms; using System.Data; namespace FourFunctionCalculator { /// <summary> /// Summary description for Form1. /// </summary>
13

Introduction to C#
public class Form1 : System.Windows.Forms.Form { private System.Windows.Forms.TextBox X; private System.Windows.Forms.TextBox Y; private System.Windows.Forms.TextBox Z; private System.Windows.Forms.Button AddButton; private System.Windows.Forms.Button SubtractButton; private System.Windows.Forms.Button MultiplyButton; private System.Windows.Forms.Button DivideButton; /// <summary> /// Required designer variable. /// </summary> private System.ComponentModel.Container components = null; public Form1() { // // Required for Windows Form Designer support // InitializeComponent(); // // TODO: Add any constructor code after InitializeComponent call // } /// <summary> /// Clean up any resources being used. /// </summary> protected override void Dispose( bool disposing ) { if( disposing ) { if (components != null) { components.Dispose(); } } base.Dispose( disposing ); } #region Windows Form Designer generated code /// <summary> /// Required method for Designer support - do not modify /// the contents of this method with the code editor. /// </summary> private void InitializeComponent() { this.X = new System.Windows.Forms.TextBox(); this.Y = new System.Windows.Forms.TextBox(); this.Z = new System.Windows.Forms.TextBox(); this.AddButton = new System.Windows.Forms.Button(); this.SubtractButton = new System.Windows.Forms.Button(); this.MultiplyButton = new System.Windows.Forms.Button(); this.DivideButton = new System.Windows.Forms.Button(); this.SuspendLayout(); // // X // this.X.Location = new System.Drawing.Point(40, 16); this.X.Name = "X"; this.X.TabIndex = 0; this.X.Text = ""; // // Y // this.Y.Location = new System.Drawing.Point(40, 48); this.Y.Name = "Y"; this.Y.TabIndex = 1; this.Y.Text = ""; //
14

Introduction to C#
// Z // this.Z.Location = new System.Drawing.Point(40, 88); this.Z.Name = "Z"; this.Z.ReadOnly = true; this.Z.TabIndex = 2; this.Z.Text = "Result"; // // AddButton // this.AddButton.Font = new System.Drawing.Font("Microsoft Sans Serif", 14F, System.Drawing.FontStyle.Regular, System.Drawing.GraphicsUnit.Point, ((System.Byte)(0))); this.AddButton.Location = new System.Drawing.Point(176, 16); this.AddButton.Name = "AddButton"; this.AddButton.TabIndex = 3; this.AddButton.Text = "+"; this.AddButton.Click += new System.EventHandler(this.AddButton_Click); // // SubtractButton // this.SubtractButton.Font = new System.Drawing.Font("Microsoft Sans Serif", 14F, System.Drawing.FontStyle.Regular, System.Drawing.GraphicsUnit.Point, ((System.Byte)(0))); this.SubtractButton.Location = new System.Drawing.Point(176, 40); this.SubtractButton.Name = "SubtractButton"; this.SubtractButton.TabIndex = 4; this.SubtractButton.Text = "-"; this.SubtractButton.Click += new System.EventHandler(this.SubtractButton_Click); // // MultiplyButton // this.MultiplyButton.Font = new System.Drawing.Font("Microsoft Sans Serif", 14F, System.Drawing.FontStyle.Regular, System.Drawing.GraphicsUnit.Point, ((System.Byte)(0))); this.MultiplyButton.Location = new System.Drawing.Point(176, 64); this.MultiplyButton.Name = "MultiplyButton"; this.MultiplyButton.TabIndex = 5; this.MultiplyButton.Text = "x"; this.MultiplyButton.Click += new System.EventHandler(this.MultiplyButton_Click); // // DivideButton // this.DivideButton.Font = new System.Drawing.Font("Microsoft Sans Serif", 14F, System.Drawing.FontStyle.Regular, System.Drawing.GraphicsUnit.Point, ((System.Byte)(0))); this.DivideButton.Location = new System.Drawing.Point(176, 88); this.DivideButton.Name = "DivideButton"; this.DivideButton.TabIndex = 6; this.DivideButton.Text = "/"; this.DivideButton.Click += new System.EventHandler(this.DivideButton_Click); // // Form1 // this.AutoScaleBaseSize = new System.Drawing.Size(5, 13); this.ClientSize = new System.Drawing.Size(296, 133); this.Controls.Add(this.DivideButton); this.Controls.Add(this.MultiplyButton); this.Controls.Add(this.SubtractButton); this.Controls.Add(this.AddButton); this.Controls.Add(this.Z); this.Controls.Add(this.Y); this.Controls.Add(this.X); this.Name = "Form1"; this.Text = "Form1"; this.ResumeLayout(false); } #endregion /// <summary> /// The main entry point for the application. /// </summary> [STAThread] static void Main()
15

Introduction to C#
16
{ Application.Run(new Form1()); } private void AddButton_Click(object sender, System.EventArgs e) { Z.Text = Convert.ToString(Convert.ToDouble(X.Text)+Convert.ToDouble(Y.Text)); } private void SubtractButton_Click(object sender, System.EventArgs e) { Z.Text = Convert.ToString(Convert.ToDouble(X.Text)-Convert.ToDouble(Y.Text)); } private void MultiplyButton_Click(object sender, System.EventArgs e) { Z.Text = Convert.ToString(Convert.ToDouble(X.Text)*Convert.ToDouble(Y.Text)); } private void DivideButton_Click(object sender, System.EventArgs e) { Z.Text = Convert.ToString(Convert.ToDouble(X.Text)/Convert.ToDouble(Y.Text)); } } }