Introduction - par.nsf.gov
12
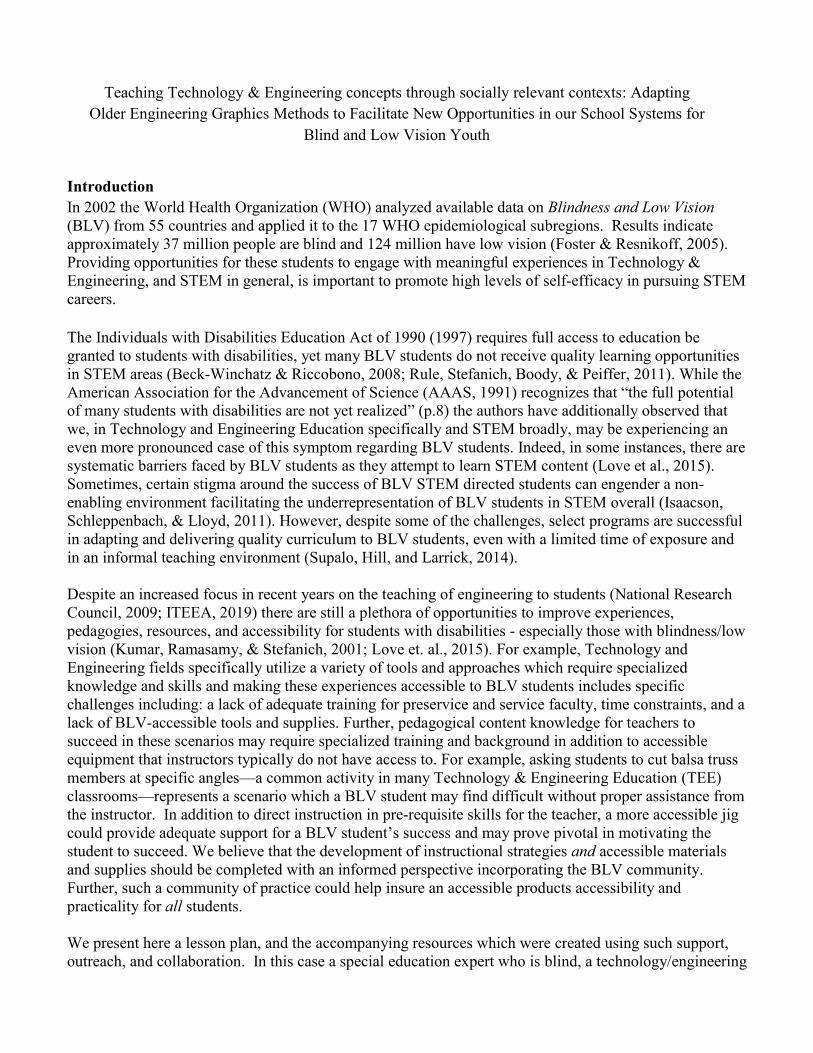
Teaching Technology & Engineering concepts through socially relevant contexts: Adapting Older Engineering Graphics Methods to Facilitate New Opportunities in our School Systems for Blind and Low Vision Youth Introduction In 2002 the World Health Organization (WHO) analyzed available data on Blindness and Low Vision (BLV) from 55 countries and applied it to the 17 WHO epidemiological subregions. Results indicate approximately 37 million people are blind and 124 million have low vision (Foster & Resnikoff, 2005). Providing opportunities for these students to engage with meaningful experiences in Technology & Engineering, and STEM in general, is important to promote high levels of self-efficacy in pursuing STEM careers. The Individuals with Disabilities Education Act of 1990 (1997) requires full access to education be granted to students with disabilities, yet many BLV students do not receive quality learning opportunities in STEM areas (Beck-Winchatz & Riccobono, 2008; Rule, Stefanich, Boody, & Peiffer, 2011). While the American Association for the Advancement of Science (AAAS, 1991) recognizes that “the full potential of many students with disabilities are not yet realized” (p.8) the authors have additionally observed that we, in Technology and Engineering Education specifically and STEM broadly, may be experiencing an even more pronounced case of this symptom regarding BLV students. Indeed, in some instances, there are systematic barriers faced by BLV students as they attempt to learn STEM content (Love et al., 2015). Sometimes, certain stigma around the success of BLV STEM directed students can engender a non- enabling environment facilitating the underrepresentation of BLV students in STEM overall (Isaacson, Schleppenbach, & Lloyd, 2011). However, despite some of the challenges, select programs are successful in adapting and delivering quality curriculum to BLV students, even with a limited time of exposure and in an informal teaching environment (Supalo, Hill, and Larrick, 2014). Despite an increased focus in recent years on the teaching of engineering to students (National Research Council, 2009; ITEEA, 2019) there are still a plethora of opportunities to improve experiences, pedagogies, resources, and accessibility for students with disabilities - especially those with blindness/low vision (Kumar, Ramasamy, & Stefanich, 2001; Love et. al., 2015). For example, Technology and Engineering fields specifically utilize a variety of tools and approaches which require specialized knowledge and skills and making these experiences accessible to BLV students includes specific challenges including: a lack of adequate training for preservice and service faculty, time constraints, and a lack of BLV-accessible tools and supplies. Further, pedagogical content knowledge for teachers to succeed in these scenarios may require specialized training and background in addition to accessible equipment that instructors typically do not have access to. For example, asking students to cut balsa truss members at specific angles—a common activity in many Technology & Engineering Education (TEE) classrooms—represents a scenario which a BLV student may find difficult without proper assistance from the instructor. In addition to direct instruction in pre-requisite skills for the teacher, a more accessible jig could provide adequate support for a BLV student’s success and may prove pivotal in motivating the student to succeed. We believe that the development of instructional strategies and accessible materials and supplies should be completed with an informed perspective incorporating the BLV community. Further, such a community of practice could help insure an accessible products accessibility and practicality for all students. We present here a lesson plan, and the accompanying resources which were created using such support, outreach, and collaboration. In this case a special education expert who is blind, a technology/engineering
Transcript of Introduction - par.nsf.gov
Teaching Technology & Engineering concepts through socially relevant contexts: Adapting
Older Engineering Graphics Methods to Facilitate New Opportunities in our School Systems for
Blind and Low Vision Youth
Introduction
In 2002 the World Health Organization (WHO) analyzed available data on Blindness and Low Vision
(BLV) from 55 countries and applied it to the 17 WHO epidemiological subregions. Results indicate
approximately 37 million people are blind and 124 million have low vision (Foster & Resnikoff, 2005).
Providing opportunities for these students to engage with meaningful experiences in Technology &
Engineering, and STEM in general, is important to promote high levels of self-efficacy in pursuing STEM
careers.
The Individuals with Disabilities Education Act of 1990 (1997) requires full access to education be
granted to students with disabilities, yet many BLV students do not receive quality learning opportunities
in STEM areas (Beck-Winchatz & Riccobono, 2008; Rule, Stefanich, Boody, & Peiffer, 2011). While the
American Association for the Advancement of Science (AAAS, 1991) recognizes that “the full potential
of many students with disabilities are not yet realized” (p.8) the authors have additionally observed that
we, in Technology and Engineering Education specifically and STEM broadly, may be experiencing an
even more pronounced case of this symptom regarding BLV students. Indeed, in some instances, there are
systematic barriers faced by BLV students as they attempt to learn STEM content (Love et al., 2015).
Sometimes, certain stigma around the success of BLV STEM directed students can engender a non-
enabling environment facilitating the underrepresentation of BLV students in STEM overall (Isaacson,
Schleppenbach, & Lloyd, 2011). However, despite some of the challenges, select programs are successful
in adapting and delivering quality curriculum to BLV students, even with a limited time of exposure and
in an informal teaching environment (Supalo, Hill, and Larrick, 2014).
Despite an increased focus in recent years on the teaching of engineering to students (National Research
Council, 2009; ITEEA, 2019) there are still a plethora of opportunities to improve experiences,
pedagogies, resources, and accessibility for students with disabilities - especially those with blindness/low
vision (Kumar, Ramasamy, & Stefanich, 2001; Love et. al., 2015). For example, Technology and
Engineering fields specifically utilize a variety of tools and approaches which require specialized
knowledge and skills and making these experiences accessible to BLV students includes specific
challenges including: a lack of adequate training for preservice and service faculty, time constraints, and a
lack of BLV-accessible tools and supplies. Further, pedagogical content knowledge for teachers to
succeed in these scenarios may require specialized training and background in addition to accessible
equipment that instructors typically do not have access to. For example, asking students to cut balsa truss
members at specific angles—a common activity in many Technology & Engineering Education (TEE)
classrooms—represents a scenario which a BLV student may find difficult without proper assistance from
the instructor. In addition to direct instruction in pre-requisite skills for the teacher, a more accessible jig
could provide adequate support for a BLV student’s success and may prove pivotal in motivating the
student to succeed. We believe that the development of instructional strategies and accessible materials
and supplies should be completed with an informed perspective incorporating the BLV community.
Further, such a community of practice could help insure an accessible products accessibility and
practicality for all students.
We present here a lesson plan, and the accompanying resources which were created using such support,
outreach, and collaboration. In this case a special education expert who is blind, a technology/engineering

teacher, and blind participant helped in the creation of the lesson plan, and the accompanying resources
(i.e. jig) which we believe increases the likelihood of success, adoption, and positive impact.
Design, modelling, measuring, and drafting
Architectural and Engineering graphics have traditionally been delivered as part of many middle school or
high school TEE curricula. Ault (2002) points out the value of such experiences, especially in preparation
for future experiences in engineering. These experiences with drafting, measuring, orthographic/isometric
understanding, and modelling help educate students towards a graphical understanding and common
language required of those involved with the design, production, or engineering of a variety of artifacts
important to our world and society.
In the specific context of preparing BLV students to succeed in these courses, modelling techniques of
multi-view drawing development for BLV students have been developed as part of a National Science
Foundation funded project. These methods were intentionally adapted from older hand-drafting
techniques that lend themselves much more easily than CAD to tactile interpretation for BLV students.
The impetus behind this effort was to create a platform for initial support to TEE professionals who may
have a BLV student in their courses. Specific examples, instructions, and applications for many of the
commonly-used tools and techniques are included here as part of this overall effort to teach TEE concepts
through socially relevant contexts by adapting older methods to facilitate new opportunities in our school
systems for BLV youth.
The Board and Drawing Utensil: In teaching isometric and multi-view drawing to BLV
students, the instructors of a National Federation of the Blind summer engineering program utilized a
special parallel-edged drafting board with a rubber surface that allows a drawing utensil to indent the
paper for tactile interpretation (Figure 1). Further, recommendations for improving this lesson for BLV-
students suggest that the drawing be conducted with a ball point pen which will leave a tactile ridge in the
paper for BLV students to interpret with their fingers. Fine and medium point pens could also be used to
create lines of different line weight.

Figure 1. Drawing Board

The Triangles: A typical 45 /90 and 30/60/90 triangle with edges notched at 1 inch or even ½
inch intervals can be used in the drawing process. The notches allow students to tactually interpret a
length to draw their linework to. It is important to cut notches with a small cutting device so it does not
become a significant obstruction to the pen being able to move along the edge when drawing. A
photographic example of the triangles can be seen in Figure 1.
Tactile 3D Objects: Drafting models, commonly used to teach orthographic and isometric views,
can be used as a valuable tactile model for BLV students to interpret while developing their drawings (see
Figure 2). The models, which should be relatively small, lightweight, and easily manipulated, become
powerful learning opportunities for BLV students accustomed to learning through tactile senses.
Figure 2. Tactile Ortho Cube Surrounding 3D Object
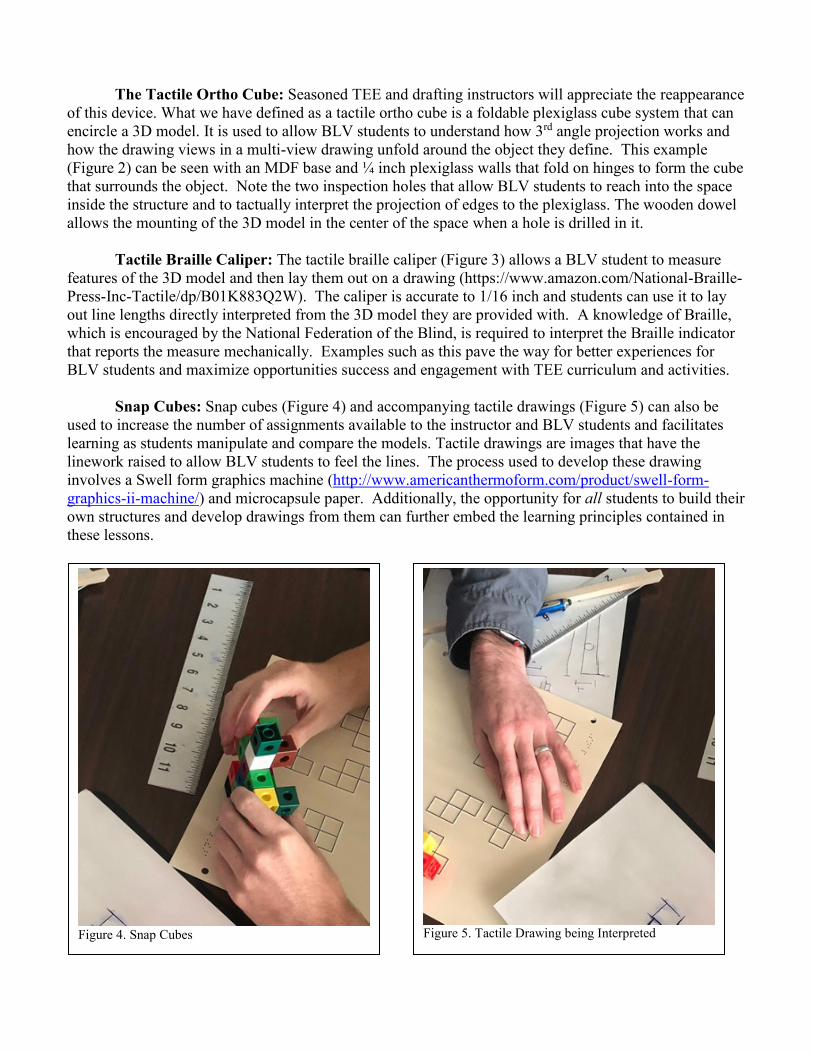
The Tactile Ortho Cube: Seasoned TEE and drafting instructors will appreciate the reappearance
of this device. What we have defined as a tactile ortho cube is a foldable plexiglass cube system that can
encircle a 3D model. It is used to allow BLV students to understand how 3rd angle projection works and
how the drawing views in a multi-view drawing unfold around the object they define. This example
(Figure 2) can be seen with an MDF base and ¼ inch plexiglass walls that fold on hinges to form the cube
that surrounds the object. Note the two inspection holes that allow BLV students to reach into the space
inside the structure and to tactually interpret the projection of edges to the plexiglass. The wooden dowel
allows the mounting of the 3D model in the center of the space when a hole is drilled in it.
Tactile Braille Caliper: The tactile braille caliper (Figure 3) allows a BLV student to measure
features of the 3D model and then lay them out on a drawing (https://www.amazon.com/National-Braille-
Press-Inc-Tactile/dp/B01K883Q2W). The caliper is accurate to 1/16 inch and students can use it to lay
out line lengths directly interpreted from the 3D model they are provided with. A knowledge of Braille,
which is encouraged by the National Federation of the Blind, is required to interpret the Braille indicator
that reports the measure mechanically. Examples such as this pave the way for better experiences for
BLV students and maximize opportunities success and engagement with TEE curriculum and activities.
Snap Cubes: Snap cubes (Figure 4) and accompanying tactile drawings (Figure 5) can also be
used to increase the number of assignments available to the instructor and BLV students and facilitates
learning as students manipulate and compare the models. Tactile drawings are images that have the
linework raised to allow BLV students to feel the lines. The process used to develop these drawing
involves a Swell form graphics machine (http://www.americanthermoform.com/product/swell-form-
graphics-ii-machine/) and microcapsule paper. Additionally, the opportunity for all students to build their
own structures and develop drawings from them can further embed the learning principles contained in
these lessons.
Figure 4. Snap Cubes
Figure 5. Tactile Drawing being Interpreted
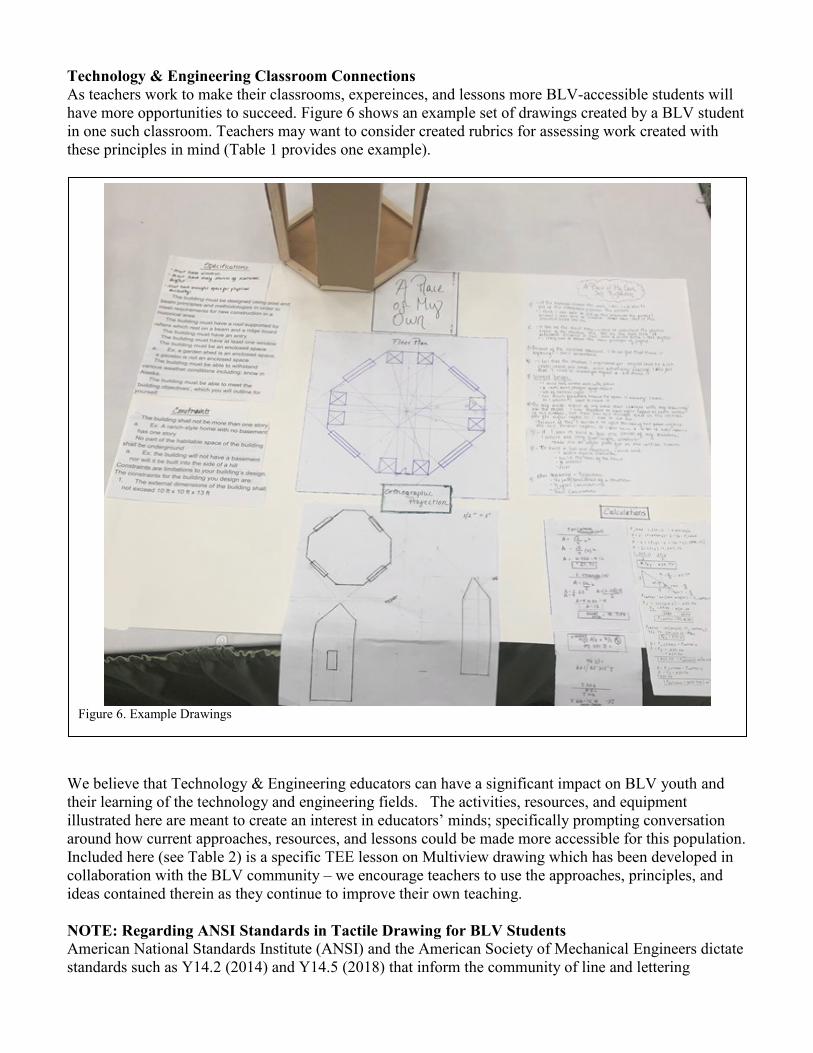
Technology & Engineering Classroom Connections
As teachers work to make their classrooms, expereinces, and lessons more BLV-accessible students will
have more opportunities to succeed. Figure 6 shows an example set of drawings created by a BLV student
in one such classroom. Teachers may want to consider created rubrics for assessing work created with
these principles in mind (Table 1 provides one example).
We believe that Technology & Engineering educators can have a significant impact on BLV youth and
their learning of the technology and engineering fields. The activities, resources, and equipment
illustrated here are meant to create an interest in educators’ minds; specifically prompting conversation
around how current approaches, resources, and lessons could be made more accessible for this population.
Included here (see Table 2) is a specific TEE lesson on Multiview drawing which has been developed in
collaboration with the BLV community – we encourage teachers to use the approaches, principles, and
ideas contained therein as they continue to improve their own teaching.
NOTE: Regarding ANSI Standards in Tactile Drawing for BLV Students
American National Standards Institute (ANSI) and the American Society of Mechanical Engineers dictate
standards such as Y14.2 (2014) and Y14.5 (2018) that inform the community of line and lettering
Figure 6. Example Drawings

conventions as well as dimensioning and tolerancing, respectively. Some of these standards do not
conform to tactile graphic standards set by the Braille Authority of North America and are thus difficult
for BLV students to tactually interpret. While this NSF funded project is still investigating and developing
line type and line weight standards to recommend to TEE professionals for their BLV students, teachers
are reminded that close adherence to the ANSI/ASME standards can be difficult for this population due to
the differences in visual and tactile perception. It is felt that a focus on creating a drawing conveying
drafting basics which uses typical drafting convention may be a more reasonable focus until more
research can be conducted partnering with BLV students to understand tactile interpretation limits.
Acknowledgements
This material is based upon work supported by the National Science Foundation under grant number
712887. Any opinions, findings, and conclusions or recommendations expressed are those of the authors
and do not necessarily reflect the views of the NSF.
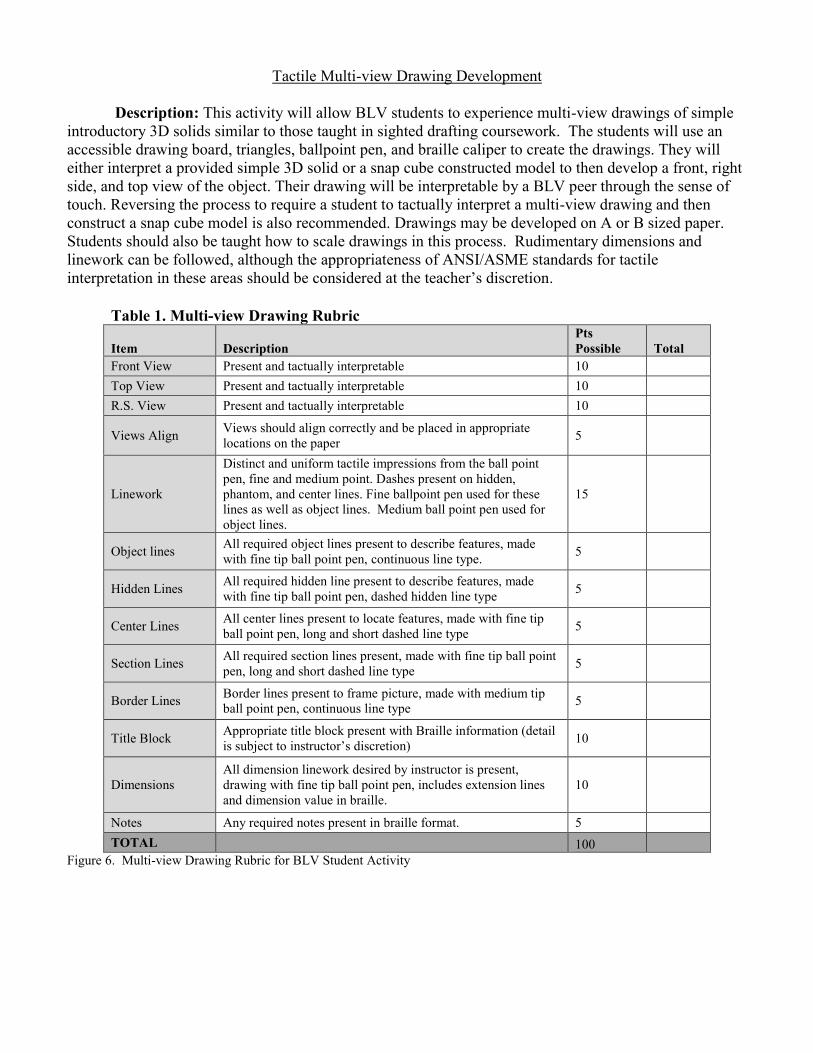
Tactile Multi-view Drawing Development
Description: This activity will allow BLV students to experience multi-view drawings of simple
introductory 3D solids similar to those taught in sighted drafting coursework. The students will use an
accessible drawing board, triangles, ballpoint pen, and braille caliper to create the drawings. They will
either interpret a provided simple 3D solid or a snap cube constructed model to then develop a front, right
side, and top view of the object. Their drawing will be interpretable by a BLV peer through the sense of
touch. Reversing the process to require a student to tactually interpret a multi-view drawing and then
construct a snap cube model is also recommended. Drawings may be developed on A or B sized paper.
Students should also be taught how to scale drawings in this process. Rudimentary dimensions and
linework can be followed, although the appropriateness of ANSI/ASME standards for tactile
interpretation in these areas should be considered at the teacher’s discretion.
Table 1. Multi-view Drawing Rubric
Item Description
Pts
Possible Total
Front View Present and tactually interpretable 10
Top View Present and tactually interpretable 10
R.S. View Present and tactually interpretable 10
Views Align
Views should align correctly and be placed in appropriate
locations on the paper 5
Linework
Distinct and uniform tactile impressions from the ball point
pen, fine and medium point. Dashes present on hidden,
phantom, and center lines. Fine ballpoint pen used for these
lines as well as object lines. Medium ball point pen used for
object lines.
15
Object lines
All required object lines present to describe features, made
with fine tip ball point pen, continuous line type. 5
Hidden Lines
All required hidden line present to describe features, made
with fine tip ball point pen, dashed hidden line type 5
Center Lines
All center lines present to locate features, made with fine tip
ball point pen, long and short dashed line type 5
Section Lines
All required section lines present, made with fine tip ball point
pen, long and short dashed line type 5
Border Lines
Border lines present to frame picture, made with medium tip
ball point pen, continuous line type 5
Title Block
Appropriate title block present with Braille information (detail
is subject to instructor’s discretion) 10
Dimensions
All dimension linework desired by instructor is present,
drawing with fine tip ball point pen, includes extension lines
and dimension value in braille.
10
Notes Any required notes present in braille format. 5
TOTAL
100
Figure 6. Multi-view Drawing Rubric for BLV Student Activity

Table 2. BLV Multi-view Drawing Activity
Lesson Purpose:
In the lesson, BLV students are engaged in learning to develop tactile multi-view drawings requiring an understanding in 3rd
angle projection, drawing layout, dimensioning, line weight and line type, and the mastery of tactile drawing instruments.
While adherence to strict ANSI/ASME drawing standards for spacing in dashes and offsets in dimensioning is not
necessarily recommended, the instructor can certainly begin to introduce them. We believe this lesson provides an
opportunity for BLV students to engage in a drawing process that can inform them of the ways that engineers, designers,
and technologist communicate.
Lesson Duration: 1 week (Five 45-minute class periods)
Engineering Core Concepts & Sub-Concepts:
Engineering Design – Engineering Graphics
o Engineering Drawing
Measurement & Precision (See Table 4)
o Measurement Instrumentation
o Accurate Layout & Precision Measurement
Manufacturing (Possible on Instructors Discretion)
o Design for Manufacture
Global or Local Issue:
Accessibility in STEM education is a priority for all educators and their students. Additionally, as students need to become
proficient in typical communication mediums used in TEE, this lesson attempts to address the issue of an instructor with a
blind or low vision (BLV) student who is desirous of having opportunities to learn the fundamentals of engineering
graphics.
Connected STEM Standards:
Standards for Technological Literacy
Standard 9: Students will develop an understanding of engineering design.
o K. A prototype is a working model used to test a design concept by making actual observations and
necessary adjustments.
o I. Established design principles are used to evaluate existing designs, to collect data, and to
guide the design process.
Mathematics
Practice Standards
o PS.4: Model with mathematics.
o PS.5: Use appropriate tools strategically
o PS. 6: Attend to precision
Learning Objectives:
I can create a multi-view drawing following 3rd angle projection techniques that will describe a simple 3D solid.
I can demonstrate my knowledge of line type and line weight to begin to develop methods that will allow me to
tactually communicate design to peers.
Enduring Understanding(s):
Rules and principles of graphical communication are used to convey attributes of solid objects
Driving Question(s):
Why is it important to communicate designs?
What is the purpose of a multi-view drawing? What is the advantages to conveying information using a multi-
view drawing over a pictorial drawing?
Why are the views laid out on paper the way they are in a multi-view drawing?
Career Connections:
There is a wide variety of careers and professions associated with multi-view drawings and engineering graphics.

Knowledge to be able to communicate designs capable of spanning a BLV and sighted medium can be important in opening
venues to jobs in architecture, civil, mechanical, aerospace, biological, environmental engineering, drafting, and
manufacturing. It is important to realize that blind and low vision individuals hold jobs in the engineering and architecture
fields and methods that help them communicate can have reaching impacts.
Required Student Prior Knowledge & Skills: Integration of students’ prior knowledge is critical in any successful lesson. In order to successfully build upon their
knowledge, the following concepts are expected to be understood prior to beginning this lesson:
Mathematics
Produce and analyze diagrams
Draw and identify lines and angles
Ability to convert between units of measurement
Ability to scale
Engineering/Technology
Ability to choose correct tools for given task
Proper use of rulers and other measurement tools
Tools / Materials / Equipment
The following is a list of materials and equipment necessary for successful delivery of this lesson plan:
Drafting table with rubber surface and parallel edge
30/60/90 notched triangle – notched by instructor
45/90 notched triangle – notched by instructor
Fine and Medium tipped ball point pens – purchased at nearby Walmart
3D Drawing Objects – create by instructor
Tactile Ortho Cube – Created by instructor
Snap Cubes – purchased on Amazon
Braille Caliper – purchased from the National Braille Press
Day to Day Plan (Times are can be variable based on the prior knowledge and adaptive skills of the
student)
Day 1: Familiarization with the Tools
1. Familiarize BLV students with using Braille caliper to measure an object and let them measure some objects. (10 min)
2. Familiarize the BLV student with the tactile drawing board, parallel rule (edge), and triangles. (12 min)
3. Familiarize the BLV student with drawing a line so it indents upon the paper. (3 min)
4. Introduce the hidden, object, and centerline line types and have student practice them (10 min)
5. Familiarize the BLV student with some simple objects they will draw. Let them feel the objects and interpret them. (5
min)
6. Familiarize the BLV student with feeling the line they have drawn. (1 min)
7. Let the BLV student experiment drawing more lines and ask them where they need help (4min)
Day 2:
1. Ask the BLV student to draw two parallel lines. (2 min)
2. Ask the BLV student to draw a centerline, object line, and hidden line across the page 5 times for each. (10 min)
3. Ask the BLV student to draw a square (any size). (5 min)
4. Ask the student to draw a rectangle measuring 5 inches on its base and 3 inches on its height. (8 min)
5. Ask the BLV student to draw a 1 inch by 1-inch square inside the rectangle and at its center. (10 min)
6. Ask the BLV student to draw a 6 inch by 4 inch right triangle. (8 min)
7. Ask the BLV student to reflect on their work today and assess it. (2 min)
Day 3:
1. Introduce BLV students to the Tactile Ortho Cube made of plexiglass that surrounds some 3d solid mounted on the
dowel in the middle. Use the Tactile Ortho Cube to let students feel how views of a certain feature of the object
project to its surfaces. Pay particular attention to projecting features to the Top, R-Side, and Front of the cube. (15
min)

2. Unfold the cube on its hinge points to show the BLV student how the multi-view projections drawings are developed
from a 3rd angle projection technique. (5 min)
3. Replace the Tactile Ortho Cube, place a new simple 3D solid inside, and have the student identify if that solid matches
a previously prepared tactile graphic that the instructor created. (5 min)
4. Place a new 3d solid with a hole in it within the Tactile Ortho Cube and ask students to locate linework on appropriate
views describing the hidden features of the holes. (5 min)
5. Hand out a multi-view drawing of an object along with the 3D model and ask BLV student to reproduce it. Coach
them on using the instruments to do so. You will develop techniques with them that are highly individualized so think
about how to help them locate the start of a line or its end and how to bring the instrument to that point to begin to
develop a new line from it. (13 min)
6. Ask the BLV student to reflect on their work today and assess it. (2 min)
Day 4:
1. With the BLV student develop 1 simple snap cube model (at least 4 pieces) and have them draw a multi-view drawing
of the object. (10 min)
2. Discuss with the BLV student how to choose a most characteristic side to set as the front view. (2 min)
3. Ask the BLV student to make two more snap cube models requiring at least 6 pieces in their construction. (10 min)
4. Ask the BLV student to draw both of these models as a multi-view drawing. (21 min)
5. Ask the BLV student to reflect on their work today and assess it. (2 min)
Day 5:
1. Discuss the concept of scale with the BLV student. (3 min)
2. Hand the BLV student a simple model of an object and have them draw it at full scale. (10 min)
3. Have the BLV student repeat the multi-view drawing of the object at ½ scale. (10 min)
4. Hand the BLV student a 3d Object and have them use the braille caliper to measure features and tell you what they
should draw their size as in a ½ scale drawing. (10 min)
5. Have the BLV student draw a multi-view drawing of a snap cube object that they can then build themselves. (10 min)
6. Ask the BLV student to reflect on their work today and assess it. (2 min)
References American Association for the Advancement of Science. (1991). Laboratories and classrooms in science and engineering.
AAAS.
American Society for Mechanical Engineers (2014). Lines Conventions and Lettering (Y14.2) https://www.asme.org/codes-
standards/find-codes-standards/y14-2-line-conventions-lettering
American Society for Mechanical Engineers (2018). Lines Conventions and Lettering (Y14.5) https://www.asme.org/codes-
standards/find-codes-standards/y14-5-dimensioning-tolerancing
Ault, H. K. (2009). Engineering design graphics as a communications tool for mechanical design: A broader view. Engineering
Design Graphics Journal, 66(3).
Beck-Winchatz, B., & Riccobono, M. A. (2008). Advancing participation of blind students in science, technology, engineering,
and math. Advances in Space Research, 42(11), 1855-1858.
Foster, A., & Resnikoff, S. (2005). The impact of Vision 2020 on global blindness. Eye, 19(10), 1133.
Individuals with Disability Education Act of 1990, 20 U. S. C. § 1400 (1997).
Isaacson, M. D., Schleppenbach, D., & Lloyd, L. (2010). Increasing STEM accessibility in students with print disabilities
through MathSpeak. Journal of Science Education for Students with Disabilities, 14(1), 3
ITEEA (2019). Resources. Retrieved on September 9, 2019 from https://www.iteea.org/Resources1507.aspx
Kumar, D., Ramasamy, R., & Stefanich, G. P. (2001). Science for students with visual impairments: Teaching suggestions and
policy implications for secondary educators. Electronic journal of science education, 5(3).
National Research Council. (2009). Engineering in K-12 education: Understanding the status and improving the prospects.
National Academies Press.
Love, T. S., Kreiser, N., Camargo, E., Grubbs, M. E., Kim, E. J., Burge, P. L., & Culver, S. M. (2014). STEM Faculty
experiences with students with disabilities at a Land Grant Institution. Journal of Education and Training
Studies, 3(1), 27-38.
Rule, A. C., Stefanich, G. P., Boody, R. M., & Peiffer, B. (2011). Impact of adaptive materials on teachers and their students
with visual impairments in secondary science and mathematics classes. International Journal of Science Education,
33(6), 865-887.
Supalo, C. A., Hill, A. A., & Larrick, C. G. (2014). Summer enrichment programs to foster interest in STEM education for
students with blindness or low vision. Journal of Chemical Education, 91(8), 1257-1260.