Introduction - Kal · PDF fileto hear someone say that ... There are 5 positions of the...
33
Transcript of Introduction - Kal · PDF fileto hear someone say that ... There are 5 positions of the...


2
IntroductionI have been very fortunate to have had the chance to travel the world playing music and it is always rewarding to hear someone say that something I played influenced them. My years of experience on the road and in the recording studio have taught me many things about playing and I am eager to pass them on just as they were passed on to me by some of the greats of all time. When I speak to guitarists all around the world, almost all of them ask about three things: how can I learn to play faster, how can I have more confidence on stage and how can I learn to improvise. I have put together this series to help guitarists accomplish all three and have a good time doing it.
These lessons will expand your “comfort zone.” When a challenge comes up that is just outside the zone, you must stretch the boundaries of your comfort zone to include the new challenge. I will challenge you by giving you things outside your “zone” to help you stretch your boundaries and thereby expand your knowledge. I will have exercises for you to study, but I have the antidote for the grind of doing exercises and playing scales. The simple antidote is in the form of songs. Just when you get tired of the exercises, I’ll give you a song to play. I’ll show you some new chord forms so that when you play the songs you will expand and grow. This series is meant to improve players on all levels and does not depend on how long you have been playing, or even if you are already playing professionally. I have included some basic information which may seem redun-dant to some advanced players. So if you already know some of the included material, just check it out briefly and move on.
While I read music, there is no reading of music notation in this course. You will be able to read chord charts and “Nashville charts” that are used for many recording sessions. If you already are a good reader, good! This series will still help, because I have built in practical uses for all the scales and exercises I’ll show you to aid in your improv skills. This will improve your confidence and you will soon have the facility to play faster. I think you will find that by the end of the last lesson you will be amazed by all you have learned and that you’ve had a great time. You will also hear from the musicians that you play with regularly, that your chops are getting better.
The best part of having this course on video is that you can go back over and over and review what you have learned and absorb more with each time you play it. I hope that you will. Let me be your coach–I’ll guide you through these lessons and you can always refer to a particular lesson to help you any time. And don’t ever feel overloaded. The time allowed is the rest of your life.
OK-It’s time to begin. Let’s have a good time!
Kal David
If you have a question, please visit the Master Class Forum on my website, KalDavid.com

3
Introduction
Lesson 1 > Tools of the Trade Strings Intonation Picks Amp Settings Other things to bring to the show Practice Assignment - Warm Up Exercises
Lesson 2 > Pentatonics and T-Bone Pentatonic scale - position 1 T-Bone Walker Stormy Monday Blues Assignment
Lesson 3 > Jamming Etiquette Background passages Me and Bo Diddley Taking Fours Assignment: Nothin’ New
Lesson 4 > Major Scales and Dynamics Major scales and exercises My favorite chord forms Chord exercise Dynamics Assignment: Johnny B. Goode
Lesson 5 > More Scales and Playing By Ear Pentatonic scale - 2nd position Love On My Mind Ear training Nashville charts Major scale exercise - 2nd position Assignment: Practice!
Lesson 6 > Scales and Some Theory Pentatonic scale - position 3 Pentatonic scale - position 4 Pentatonic scale - position 5 Transposing Major and minor pentatonics The Cycle of 5ths Major scale exercises - position 3 Major scale exercises - position 4 Major scale exercises - position 5 Assignment
Lesson 7 > Playing with Vibrato Parallel Vibrato Perpendicular Vibrato Bending for Vibrato Assignment
Lesson 8 > How I Get My Sound Tone and attack Picking Another Blue Monday A Few Licks Guitars Amps Effects Assignment - Dynamics
Lesson 9 > Chord Exercises You Can Use Exercise 1 - Four Note Chords Exercise 2 - Leading Bass Note Exercise 3 - A Diminished Exercise Exercise 4 - Minor Chord Exercise Assignment: Some licks & Things to do
Lesson 10 > Tying It All Together Hard Times Improvising Hard Times 12 bar blues Farewell
Lesson List

4
Lesson #1 > Assignment > Warm Up Exercise
This exercise can be done before beginning your regular practice session. I warn you... this is not a very musical sounding exercise... so, do it privately because otherwise your family will start to hate you! Work on it until “muscle memory” takes over.
Start with a down stroke and alternate your picking. Work your way up to the 12th fret and back down. Practice this a while and get good at it. It will become your basis for this whole series of lessons. Start off slowly, and make sure you can hear every note ring, then you can speed up. Don’t forget to tap your foot!

5
Lesson #2 > Pentatonic > Basics
The pentatonic scale has 5 notes.
There are 5 positions of the pentatonic scale for every key on the guitar, and once mastered, you’ll be able to play a solo in any position you find yourself on the guitar.
G Pentatonic Position 1 Pattern
G Pentatonic Scale - 1st Position

6
Lesson #2 > Pentatonic Scale ExerciseThis page shows the G pentatonic scale exercise in the first position at the 3rd fret. Practice a lot, and don’t forget to use all four fingers. Count to yourself, and tap your foot.
I’ll show you how to play the exercise on the dvd – once you’ve got it down in G, it’s easy to transpose up and down the neck – which means you’ll be able to solo in any key!
G Pentatonic Scale - Position 1
G Pentatonic Exercise

7
Lesson #2 > Stormy Monday Blues
The great bluesman T-Bone Walker was the first to ever record blues on the electric guitar. His licks and chords form the basics of all electric blues that followed. This version of Stormy Monday Blues is a 9th Chord exercise, using the 9th chord in different positions, and should become simple to play. Watch me on the DVD – I’ll show you how to play it.
Assignment: Use the C Pentatonic scale, 1st position at 8th fret to solo over Stormy Monday Blues
8
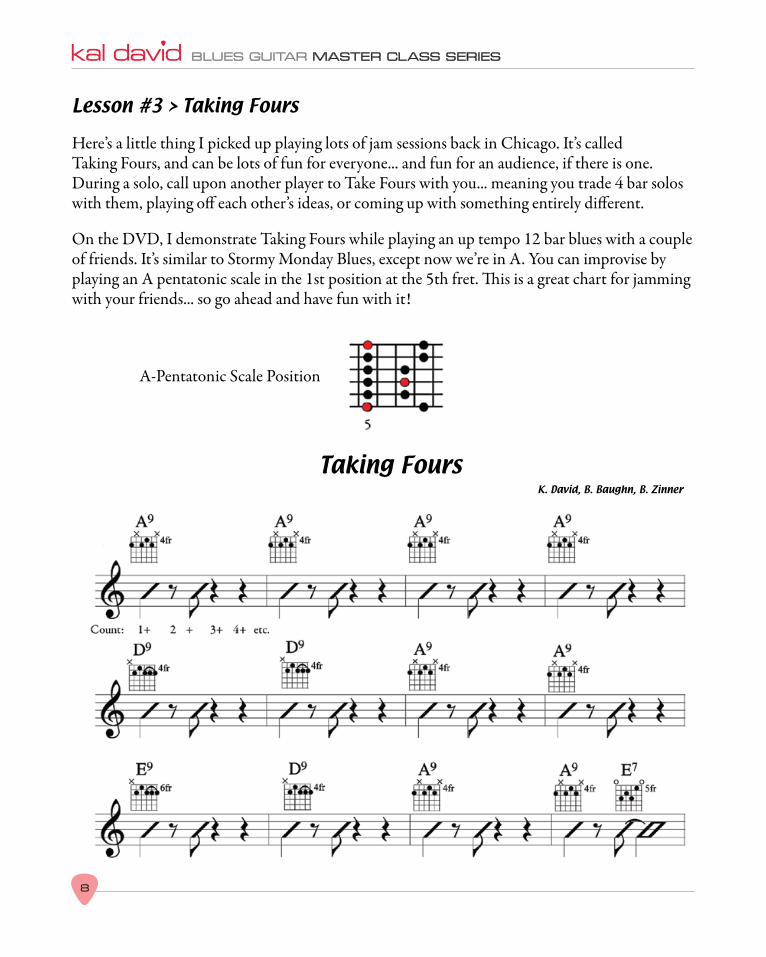
Lesson #3 > Taking Fours
Here’s a little thing I picked up playing lots of jam sessions back in Chicago. It’s called Taking Fours, and can be lots of fun for everyone... and fun for an audience, if there is one. During a solo, call upon another player to Take Fours with you... meaning you trade 4 bar solos with them, playing off each other’s ideas, or coming up with something entirely different.
On the DVD, I demonstrate Taking Fours while playing an up tempo 12 bar blues with a couple of friends. It’s similar to Stormy Monday Blues, except now we’re in A. You can improvise by playing an A pentatonic scale in the 1st position at the 5th fret. This is a great chart for jamming with your friends... so go ahead and have fun with it!
Taking FoursK. David, B. Baughn, B. Zinner
A-Pentatonic Scale Position

9
Lesson #3 > Assignment: Nothin’ New
I wrote this song some time ago... and, at the time, a lot of bar bands learned to play it. It’s a little tricky at first, but since it repeats over and over, it becomes simple to play. I recommend record-ing yourself playing the song for at least four choruses, then play along with the recording using the C Pentatonic scale. It’s a great song to jam on!

10
Lesson #4 > Major Scale Pattern & Positions
It’s time to begin a study of the major scales. These scales are important in improvising, and are the basic building blocks of music theory. The exercises I have for you to learn will make playing scales easy, and will also improve your speed while you learn them.
There are five positions of the major scale for each key on the guitar. Once you know them, and can play them, you’ll have an easy time finding a major scale wherever you are on the guitar neck.
G Major Scale - Position 1
Pos. 1 Pos. 2 Pos. 3 Pos. 4 Pos. 5
G Major Scale - 5 Positions
G Major Scale

11
Lesson #4 > G Major Scale Exercise - 1st Position
This exercise is similar in structure to the pentatonic exercise – we’ll play a group of four notes – then play the next group starting on the 2nd note of the first group and so on... continuing up 2 octaves and then back down again. Learn the scale from the tab... then follow the arrows in the neck diagrams for the exercise. I show you how to do it step by step on the DVD, so check it out!
G Major Scale - 1st Position
G Major Scale Exercise - 1st Position
left hand fingering
() indicates starting finger(2)
(2) 3
3 (2)

12
Lesson #4 > My Favorite Chord Forms + Exercises
My favorite 7th chord form contains only 4 notes... it’s a great substitution for any dominant 7th, with the Root played on the bottom string with your first finger – so it’s very moveable and easy to locate in any key. From this very useful chord, you can easily change to the G7+5, Gmaj7 and G6.
Watch the DVD chapter on dynamics where I discuss how to make these exercises more musical.
Get it down pat... then work it up the neck.

13
Lesson #4 > Assignment > Johnny B. Goode

14
Lesson #5 > Pentatonic Scale Exercise > Position 2
We played the Pentatonic Scale Exercise for Position 1 in Lesson 2. If you don’t have the first exercise down cold – don’t go on! Go back to lesson 2 and work on it some more.
G Pentatonic Scale - Position 2
G Pentatonic Scale Exercise - Position 2
Addendum: On DVD, sound track incorrectly names exercise notes from top down instead of from bottom up.

15
Lesson #5 > Love On My Mind

16
Lesson #5 > Nashville Charts
Nashville charts use Roman numerals and chord symbols based on scale steps, and are easy to transpose into any key:

17
Lesson #5 > G Major Scale Exercise > 2nd Position
This is the second position exercise of the G major scale. You will need to shift your hand posi-tion slightly as you play through this. The number in parentheses indicate which finger to use, 1 being your index finger, 4 is the pinky. Watch the DVD – my demo will make this easy.
G Major Scale Exercise - 2nd Position
G Major Scale - 2nd Position
Arrows indicate starting note in each direction. () indicates finger.
left hand fingering
(1)

18
Lesson #6 > Pentatonic Scale Exercise > Position 3
Pentatonic Scale - Position 3
Pentatonic Scale Exercise - Position 3
The 3rd pentatonic position has a move in it similar to the one in the major scale we worked on earlier. There’s a slight shift of your hand position as indicated between the G and B strings. In the key of G, the 3rd position starts at the 8th fret. Watch the DVD for precise directions.
Arrows show direction, numbers indicates fret, () indicates fingering.

19
Lesson #6 > Pentatonic Scale Exercise > Positions 4 & 5
Pentatonic Scale - Position 4
Pentatonic Scale Exercise - Position 4
Pentatonic Scale Exercise - Position 5
Arrows show direction, numbers indicates fret, (2) indicates fingering.
Pentatonic Scale - Position 5

20
Lesson #6 > Pentatonic > Transposing Position Patterns
G Pentatonic – lowest position is Position 1, starting with Root on 3rd fret.
A Pentatonic – lowest position is Position 5, starting with 7th scale note on 3rd fret.
G Pentatonic Lowest full pattern Position 1
A Pentatonic Lowest full pattern Position 5
C Pentatonic Lowest full pattern Position 4 - 3rd fret
Bb Pentatonic Lowest full pattern Position 4 - 1st fret
D Pentatonic Lowest full pattern Position 3
E Pentatonic Lowest full pattern Position 2

21
Lesson #6 > Major & Minor Pentatonics
Improvise with the C pentatonic scale - position 1 at the 8th fret – over these charts.
C Pentatonic Scale - Position 1
C 7th Jam
C minor Jam

22
Lesson #6 > Major & Minor Pentatonics > Using the Relative Minor
You can see that the patterns are the same... you just move down the neck 3 frets to be playing in the minor position. Play both patterns against this C major progression. It will sound more bluesy played at the 8th fret. Moving down to the 5th fret will completly change the color of your solo... it might remind you a bit of the solos and fills used by The Eagles.
C Minor Pentatonic Position 1 Played in C at 8th Fret.
C Major Pentatonic Position 1 Played in A at 5th Fret.
C major Jam

23
Lesson #6 > The Cycle of 5ths

24
Lesson #6 > G Major Scale Exercise - 3rd Position
Arrows indicate starting note in each direction. () indicates finger.
G Major Scale - 3rd Position
G Major Scale Exercise - 3rd Position
The 3rd position of the G major scale starts on the 7th fret. Learn to play the G scale at this position, then practice the 4 note exercise.
left hand fingering

25
Lesson #6 > G Major Scale Exercise - 4th Position
G Major Scale - 4th Position
G Major Scale Exercise - 4th Position
Arrows indicate starting note in each direction. () indicates finger.

26
Lesson #6 > G Major Scale Exercise - 5th Position
G Major Scale - 5th Position
G Major Scale Exercise - 5th Position
Arrows indicate starting note in each direction. () indicates finger.
left hand fingering

27
Lesson #8 > Picking – Another Blue Monday
Jerry Reed called this picking style “Claw!” It’s not pure finger picking because you use a flat pick plus your 3rd, 4th and 5th fingers to pick out the ringing notes on the high strings.

28
Lesson #9 > Exercise 1 - Four Note Chords
Four Note Chord Exercise
continue, up neck and back.

29
Lesson #9 > Exercise 2 - Leading Bass Notes
Leading Bass Note Exercise
continue, up neck and back.

30
Lesson #9 > Exercise 3 > Diminished Chords
The diminished chord has only 4 notes, and can be named for any of the notes in the chord. The degree symbol (o) can be used to designate a diminished, and a degree symbol with a slash (ø) can represent a 1/2 dim. chord. Chords can be referred to by more then one name, for example Dm7b5 can also be called D 1/2 diminished, written Dø
You can play a diminished scale up and down the neck when improvising over a diminished chord. There’s a two fret jump when you go from the 4th string to the 5th... watch my demo on the dvd.
F#/Gb dim C dim A dim D#/Eb dim
G#/Ab dim D dim B dim F dim
A dim D#/Eb dim C dim F#/Gb dim
G dim C#/Db dim A#/Bb dim E dim

31
Lesson #9 > Exercise 4 > Minor Chords
Minor Chord Exercise
continue, up neck and back.

32
Lesson #10 > Hard Times

33
Thanks...Franklin Odel – I asked Franklin (and his group including Robin Teraoka and Damian Arciniega) at OverSight Design to work on my booklet; give it a design element to go with the lessons. I gave him the various pieces to be included and he created a better booklet; one that he says, “I would have killed for when I was in my 20s.” His vision made this project better.
Charles Sappington – He is known as a photographic artist and a man of many talents. Charles’ company, Onalimb Productions, took on my DVD project and immediately elevated my envisioned production values to new heights. Working very closely with Charles, I was able to put on video all that I had written for this series. His help along the way, his logic and genius problem solving, and sense of humor, made the produc-tion of this DVD series a pleasure.
Bob Zinner – Thanks for your friendship and for your musical contribution to this video. As always in the past, playing with you is a really good time.
Barry Baughn – As my former student, if anything I showed you inspired you and set you on a path to your musical destiny, then my dream is realized. Thanks for your help on this. Your playing improves every time I hear you.
Kim Scharnberg – I didn’t realize that when I asked for your help transcribing that I’d get some music les-sons myself. Thanks for your help, your advice and your musical expertise.
Mike Ellis – It was you, my friend, who encouraged me to teach, and I discovered that when I teach, I learn. Thanks for all I have learned about what I know, and sometimes take for granted.
Jack Forchette – As my manager you kicked my butt to get this done, and as my friend, you kicked it harder. Thanks. I did it.
Lauri Bono – You are my partner in all my ventures and adventures. You helped me every step of the way in the creation of this instructional video. From the beginning, when I started my Master Classes in night clubs, which was your idea, to your encouraging me to teach my methods at the National Guitar Workshop, you have been helping me. You helped me with the editing of my text and with the look of the video. You were there to help me at the shoot which was long and difficult. For all your unselfish loving care and understand-ing, and the encouragement you always give, I dedicate this Blues Guitar Master Class Series to you.
Thank you all –
If you have a question, please visit the Master Class Forum on my website, KalDavid.com
Kal David