intro virtual infrastructure - VMware. Release Date Description Release x.x Month Day, Year PDF,...
106
Using VMware VirtualCenter and ESX Server Introduction to Virtual Infrastructure
-
Upload
truongnguyet -
Category
Documents
-
view
228 -
download
0
Transcript of intro virtual infrastructure - VMware. Release Date Description Release x.x Month Day, Year PDF,...
Using VMware VirtualCenter and ESX Server
Introduction toVirtual Infrastructure

VMware, Inc.
3145 Porter DrivePalo Alto, CA 94304www.vmware.com
Please note that you can always find the most up-to-date technical documen-tation on our Web site at http://www.vmware.com/support/.
The VMware Web site also provides the latest product updates.
© 1998–2006 VMware, Inc. All rights reserved. Protected by one or more of U.S. Patent Nos. 6,397,242, 6,496,847, 6,704,925, 6,711,672, 6,725,289, 6,735,601, 6,785,886, 6,789,156, 6,795,966, 6,880,022 6,961,941, 6,961,806 and 6,944,699; patents pending. VMware, the VMware "boxes" logo and design, Virtual SMP and VMotion are registered trademarks or trademarks of VMware, Inc. in the United States and/or other jurisdictions. All other marks and names mentioned herein may be trademarks of their respective companies.
Revision: 2006.01.31 Item: XXX-ENG-QNNN-NNN
Preface
This preface describes the contents of this manual, lists related documentation, describes document conventions, and provides references for support. This preface contains the following topics:
• Intended Audience on page 4
• Related Documentation on page 5
• Conventions on page 6
• Technical Support Resources on page 7
3
Preface
Intended AudienceThis guide is for users, VirtualCenter administrators, and virtual machine administrators.
Document HistoryThis is the Introduction to Virtual Infrastructure document, Revision xxxxxxxx, Item No. xx-xxx-xxxx-xxx.
Release Date Description
Release x.x Month Day, Year PDF, HTML on Web
www.vmware.com4
Preface
Related DocumentationESX Server 3.0 and VirtualCenter 2.0 documentation consists of the following publications:
• Documentation Roadmap
• Introduction to Virtual Infrastructure
• Installation and Upgrade Guide
• Server Configuration Guide
• Virtual Machine Backup Guide
• Web Access Administrator’s Guide
• SAN Configuration Guide
• Resource Management Guide
• Setup for Microsoft Cluster Service
• Online help
• Hardware compatibility guides
• I/O Compatibility Guide
• SAN Compatibility Guide
• Systems Compatibility Guide
• Backup Software Compatibility Guide
• Release Notes
5
Preface
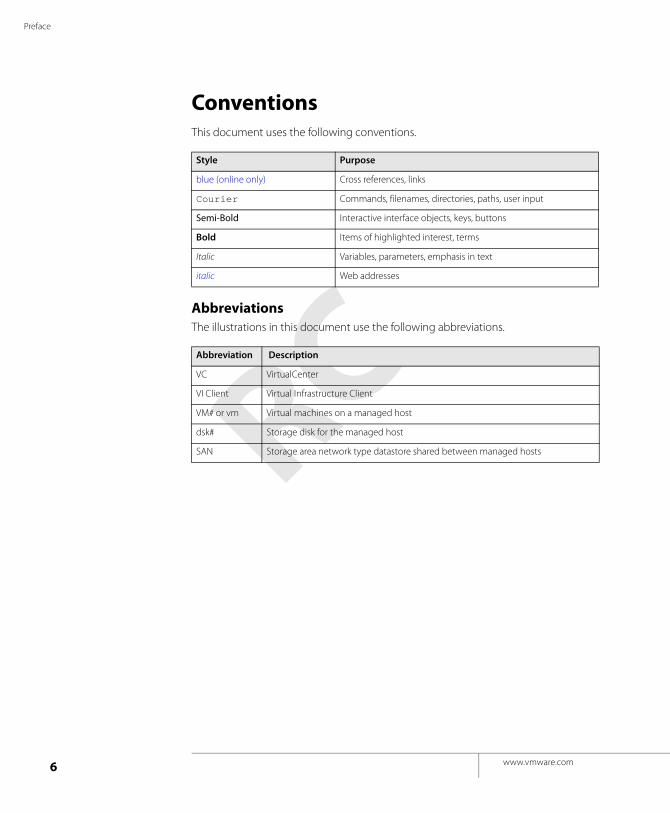
ConventionsThis document uses the following conventions.
AbbreviationsThe illustrations in this document use the following abbreviations.
Style Purpose
blue (online only) Cross references, links
Courier Commands, filenames, directories, paths, user input
Semi-Bold Interactive interface objects, keys, buttons
Bold Items of highlighted interest, terms
Italic Variables, parameters, emphasis in text
italic Web addresses
Abbreviation Description
VC VirtualCenter
VI Client Virtual Infrastructure Client
VM# or vm Virtual machines on a managed host
dsk# Storage disk for the managed host
SAN Storage area network type datastore shared between managed hosts
www.vmware.com6
Preface
Technical Support ResourcesThe following sections describe various technical support resources available to you.
• Self-Service Support
• Online and Telephone Support
• Support Offerings
Self-Service SupportUse the VMware technology network for self-help tools and technical information:
• Product Information — www.vmware.com/support/resources
• Technology Information — www.vmware.com/vcommunity/technology
• Documentation — www.vmware.com/support/pubs
• Knowledge Base — www.vmware.com/support/kb
• Discussion Forums — www.vmware.com/community
• User Groups — www.vmware.com/vcommunity/usergroups.html
For more information about the VMware Technology Network, go to www.vmtn.net.
Online and Telephone SupportUse online support to submit technical support requests, view your product and contract information, and register your products. Go to www.vmware.com/support.
Customers with appropriate support contracts should use phone support for the fastest response on priority 1 issues. Go to www.vmware.com/support/phone_support.html.
Support OfferingsFind out how VMware's support offerings can help you meet your business needs. Go to www.vmware.com/support/services.
7

Preface
www.vmware.com8
Table of Contents
1. Preface ______________________________________________________________________3Intended Audience _______________________________________________________________4
Document History _____________________________________________________________4Related Documentation ___________________________________________________________5Conventions ____________________________________________________________________6
Abbreviations _________________________________________________________________6Technical Support Resources _______________________________________________________7
Self-Service Support ___________________________________________________________7Online and Telephone Support ___________________________________________________7Support Offerings _____________________________________________________________7
1. Introduction to Virtual Infrastructure __________________________________________ 13What Is Virtual Infrastructure? ______________________________________________________14
Benefits of Virtual Infrastructure __________________________________________________14Features of VirtualCenter 2 and ESX Server 3 __________________________________________15
Virtual Machines _____________________________________________________________15Storage ____________________________________________________________________16Security ____________________________________________________________________16Resource Management ________________________________________________________17
Virtual Infrastructure Architecture ___________________________________________________18VirtualCenter Server ___________________________________________________________19ESX Server Hosts _____________________________________________________________19Host States __________________________________________________________________20Virtual Machines _____________________________________________________________20User Interface ________________________________________________________________21License Server _______________________________________________________________21
ESX Server Architecture __________________________________________________________22VMkernel ___________________________________________________________________22VMkernel Resource Manager ____________________________________________________22VMkernel Hardware Interface Layer _______________________________________________23Virtual Machine Monitor _______________________________________________________23
2. Getting Started with the VI Client ______________________________________________ 25VI Client Introduction ____________________________________________________________26
VI Client __________________________________________________________________26VI Web Access _____________________________________________________________26
9
10
Service Console ____________________________________________________________26VI Client Window _______________________________________________________________26
Virtual Machine Console _______________________________________________________29Inventory Objects ____________________________________________________________29
Exploring Hosts and Resources _____________________________________________________31Inventory Panel ____________________________________________________________32Information Panel __________________________________________________________33
VirtualCenter Administration ______________________________________________________34Active Sessions _______________________________________________________________34Starting and Stopping Virtual Infrastructure Components _____________________________35Establishing Connections Using the VI Client _______________________________________38
3. Planning Permissions ________________________________________________________ 39Users, Groups, Permissions, and Roles ________________________________________________40
Understanding Users __________________________________________________________40Understanding Groups ________________________________________________________42Understanding Permissions _____________________________________________________43Understanding Roles __________________________________________________________57
Planning Access Permission _______________________________________________________58
4. Working with Virtual Machines ________________________________________________ 59Creating and Working With Virtual Machines __________________________________________60Creating New Virtual Machines _____________________________________________________61
Migration Issues ______________________________________________________________64Virtual Machine Compatibility _________________________________________________64
Mapping a SAN LUN __________________________________________________________64Power State Exceptions ________________________________________________________65NIC Morphing _______________________________________________________________65
VMware Tools __________________________________________________________________65Installing or Upgrading VMware Tools _____________________________________________66Mass VMware Tools Upgrade ____________________________________________________67
Requirements______________________________________________________________67Doing a Mass Upgrade of Tools and Virtual Hardware on Multiple Virtual Machines________68
VMware Tools Properties _______________________________________________________68Requirements______________________________________________________________68Options Tab _______________________________________________________________69Devices Tab _______________________________________________________________70Scripts Tab ________________________________________________________________70About Tab ________________________________________________________________72
www.vmware.com
Datastores _____________________________________________________________________72Templates _____________________________________________________________________75
Template Registry ____________________________________________________________77Virtual Machine Properties Editor ___________________________________________________77
Changing the Audio Configuration _______________________________________________77Migration with VMotion __________________________________________________________78
Understanding the Migration Options _____________________________________________78Migration with VMotion ________________________________________________________79Migration ___________________________________________________________________80
Customizing Guest Operating Systems ______________________________________________80Preparing for Guest Customization _______________________________________________81Installing the Microsoft Sysprep Tools _____________________________________________81
5. Performing Administrative Tasks ______________________________________________ 85Monitoring ____________________________________________________________________86Performance Charts _____________________________________________________________88
Statistics Level _______________________________________________________________88Configuring the Statistics Level ________________________________________________89
Performance Chart Measurements _______________________________________________89Maps _________________________________________________________________________92SNMP ________________________________________________________________________93
Using MIBs with Your SNMP Traps ________________________________________________93SNMP Trap and Variable Definitions _______________________________________________93Using SNMP to Monitor the Computer Running ESX Server ____________________________96
Information about the Physical Computer________________________________________96Information about the Virtual Machines _________________________________________97SNMP Traps _______________________________________________________________97
Setting Up ESX Server SNMP ____________________________________________________97Installing the ESX Server SNMP Module __________________________________________98Installing the ESX Server MIB Module____________________________________________98Configuring the ESX Server Agent from the Service Console__________________________98
Configuring SNMP Trap Destinations ______________________________________________99Configuring SNMP Management Client Software ____________________________________99Configuring SNMP Security _____________________________________________________99Using SNMP with Guest Operating Systems _______________________________________100
11
12
6. Best Practices _____________________________________________________________ 101Setup and General Issues ________________________________________________________102Sizing for Optimal Resource Consumption ___________________________________________102Virtual SMP Best Practices ________________________________________________________103Storage Best Practices ___________________________________________________________104Related Publications ____________________________________________________________105
www.vmware.com
C H A P T E R 1
Introduction to Virtual InfrastructureThis chapter provides an introduction to Virtual Infrastructure as implemented with the VMware VirtualCenter 2 and ESX Server 3 product combination.
The chapter first briefly defines Virtual Infrastructure and lists benefits of using Virtual Infrastructure. Then it describes features and architecture of the VirtualCenter 2/ESX Server 3 system. Finally, it offers some easy steps and short procedures to get you started using the Virtual Infrastructure Client (VI Client).
• What Is Virtual Infrastructure? on page 14
• Benefits of Virtual Infrastructure on page 14
• Features of VirtualCenter 2 and ESX Server 3 on page 15
• Virtual Infrastructure Architecture on page 18
• ESX Server Architecture on page 22
13
Introduction to Virtual Infrastructure
What Is Virtual Infrastructure?The VMware Virtual Infrastructure approach to IT management creates virtual services out of the physical IT infrastructure, enabling administrators to allocate these virtual resources quickly to the business units that need them most.
This document discusses Virtual Infrastructure as implemented by the combination of VMware VirtualCenter 2 and ESX Server 3. The two products together allow you to significantly simplify IT so your company can leverage its storage, network, and computing resources to control costs and respond faster to business and customer needs.
Benefits of Virtual InfrastructureVirtual Infrastructure separates your information systems from hardware, providing benefits such as:
• Dramatic Cost Savings — Save money spent on hosting, development, and test machines. Consolidate servers. Decrease your datacenter’s operating costs: Fewer servers means smaller demand for electrical power, temperature control, and physical security.
• Scalable IT Infrastructure — React rapidly to growing business needs and to meet demand for new applications. Use enterprise-wide CPU resources more efficiently. CPU utilization can average 50–70 percent on VMware ESX Server hosts, compared to 6 to 8 percent on most other servers.
• Optimized Server Management — Use the VirtualCenter Server, a Windows service to manage and serve ESX Server hosts, to view a unified dashboard showing enterprise-wide server statistics. VirtualCenter Server allows you to use one console to manage resource use and workloads across multiple systems and reallocate virtual machines to different physical servers without downtime to give users appropriate access during real-time demand changes. VirtualCenter also reduces deployment time substantially. Customers report one day provisioning rather than the six to eight weeks that had been required previously.
• Better Customer Service — Respond more quickly to technology needs. Immediately implement solutions requested by business groups or customers, without a delay for hardware procurement.
• Testing and Development — Accelerate software development and testing operations with easily provisioned and managed server-based virtual machines. VMware Virtual Infrastructure allows you to restore a machine’s previous state
www.vmware.com14
C H A P T E R 1 Introduction to Virtual Infrastructure
with a single command, so that you don’t waste time reinstalling an operating system or application suite.
• Standardized Platforms — Take advantage of a new software platform more rapidly than in the past. You can deploy new operating systems and business applications into production environments, adopting new technologies rapidly while decreasing effort and risk.
Features of VirtualCenter 2 and ESX
Server 3This section looks at some of the features of VirtualCenter 2 and ESX Server 3 in the following sections:
• Virtual Machines
• Storage
• Security
• Resource Management
Note: For some of the features discussed below, you need additional licenses.
Virtual MachinesVirtual machines are at the heart of your Virtual Infrastructure. Here are some features of particular interest:
• Multiple processors on one virtual machine (VSMP) — ESX Server 3 allows you to have up to 4 virtual processors per virtual machine.
• Virtual Machine Templates — Templates allow you to designate specific virtual machines as the golden images from which you can deploy new virtual machines. You can periodically power on virtual machine templates to keep them updated with the most recent operating systems and application patches.
• Remote CD/Floppy — Using either the Virtual Infrastructure Client or Virtual Infrastructure Web Access, you can give a virtual machine access to a CD or floppy device from the client's machine. This means, for example, that you could install a program in a virtual machine running on a remote ESX Server by putting a CD in a drive on a desktop or laptop machine.
• Snapshots — Snapshots are manageable using the VI Client and capture the entire virtual machine state (all disks, plus memory, processor, and other virtual machine states). Snapshots are configured on an entire virtual machine and are
15
Introduction to Virtual Infrastructure
no longer per disk. Per-disk behavior can be achieved by using an independent disk configuration option for each virtual machine.
• Performance Charts — In the VI Client, you can create customized performance charts and view detailed data. You can actually create performance charts at each level of the inventory hierarchy and associate the appropriate performance metrics associated with them. The information can then be selected/deselected for viewing in real-time or across a specified time-interval. Charts to display information at a 20 second sampling rate.
StorageESX Server 3 supports different storage devices and using different protocols. Most of this information is discussed in the Server Configuration Guide.
• NAS and iSCSI Support — NAS and iSCSI support lower-cost, more easily managed shared storage. Guest virtual machines see the same virtual hardware under all types of storage and are, therefore, reusable across storage environments.
• Raw Device Mappings (RDMs) — You can use of raw device mappings when booting from SAN; possible to cluster applications (for example, Microsoft Cluster Server, or MSCS) in combination with using RDMs.
• Support for Fibre Channel SANs — ESX Server supports a large number of Fibre Channel SANs from different vendors. You can connect to the SAN using a Qlogic and Emulex HBA. ESX Server supports automatic failover if multipathing has been set up. You can boot from SAN if that makes sense in your environment. See the SAN Configuration Guide for more information.
• Virtual Machine File System — Your virtual machine is associated with a virtual machine file system (VMFS-3). The files can be stored locally or remotely. ESX Server creates a directory for each virtual machine and all its component files.
Security• ESX Server Security — ESX Server 3 enables you to leverage built-in security
features to ensure a protected environment for your virtual machine configuration. Features include restricted access to the VMkernel, virtual machine isolation, tightened security for the service console, the ability to protect virtual machines and the service console through virtual switch configuration and VLANs, CHAP authentication for iSCSI, and user permission model enforcement.
www.vmware.com16
C H A P T E R 1 Introduction to Virtual Infrastructure
• Virtual Machine Security — ESX Server now offers NX/XD CPU security features. With the appropriate server hardware, the more recent guest operating systems will be able to leverage AMD's No eXecute (NX) or Intel's eXecute Disable (XD) technologies. Both variants (available in most of the recent CPUs from Intel and AMD) improve security by marking memory pages as data only to prevent malicious software exploits and buffer overflow attacks.
• Permissions and Authentication — VirtualCenter 2 and ESX Server introduce support for fine-grained permissions and user-defined roles. There is an extensive set of capabilities that can be added or subtracted from pre-defined roles and/or custom-defined roles. Users can be assigned to specific roles in order to restrict access to the inventory and to capabilities on that inventory. In addition, VirtualCenter maintains an audit trail of all significant configuration changes so that you can easily review changes and determine who made the changes.
Resource ManagementAll virtual machines share the resources of their host. In addition, multiple hosts can be combined into clusters. This allows you to provide fine-grained resource management as needed. See the Resource Management Guide for more information.
• Resource Pools— Resource pools allow you to subdivide the resources of a stand-alone host or a cluster. A resource pool is configured with a set of CPU and memory resources that are shared by the virtual machines that run in the resource pool. A typical use of resource pools is to delegate control over a precisely specified set of resources to a group or individual without giving access to the underlying physical environment.
• VMotion— Migration with VMotion allows you to migrate virtual machines to different hosts manually. You can migrate a running virtual machine to a different physical server connected to the same SAN without service interruption. Administration tasks include:
• Performing zero-downtime maintenance by moving virtual machines around so the underlying hardware and storage can be serviced without disrupting user sessions.
• Continuously balancing workloads across the datacenter to most effectively utilize resources in response to changing business demands.
• Clustering — You can create clusters to manage a collection of hosts, to a certain extent, as a single entity. In particular, the resources from all the hosts in a cluster are aggregated into a single pool. Thus, from the resource management
17
Introduction to Virtual Infrastructure
perspective, a cluster looks like a standalone host, but it would typically have a lot more resources available.
Some of the key new technologies that make clusters powerful are: DRS, resource pools, and distributed availability services. These are described below.
• VMware DRS (DRS) —DRS helps improves resource allocation across all hosts and resource pools. DRS collects resource usage information for all hosts and virtual machines in the cluster and gives recommendations (or migrates virtual machines) in one of two situations:
• Initial placement — When you first power on a virtual machine in the cluster, DRS either places the virtual machine or makes a recommendation.
• Load balancing — DRS tries to improve resource utilization across the cluster by either performing automatic migrations of virtual machines (VMotion), or by providing recommendation for virtual machine migrations.
VMware HA (HA) — HA Allows administrators to organize virtual machines into failover groups. When a host fails, all its virtual machines are immediately started on different hosts. HA requires SAN storage. The virtual machine loses its memory state but its disk state is exactly as it was when the host failed (crash-consistent failover).
Refer to the Resource Management Guide for comprehensive information on using Virtual Infrastructure Client clusters.
Virtual Infrastructure ArchitectureThe new Virtual Infrastructure architecture consists of a VirtualCenter Server, one or more hosts, and the virtual machines running on the hosts. Client interfaces allow administrators to monitor and manage Virtual Infrastructure. An optional License Server stores and allocates licenses.
This section gives an overview of Virtual Infrastructure architecture; the next section, ESX Server Architecture on page 22, gives a more in-depth view of ESX Server.
www.vmware.com18
C H A P T E R 1 Introduction to Virtual Infrastructure
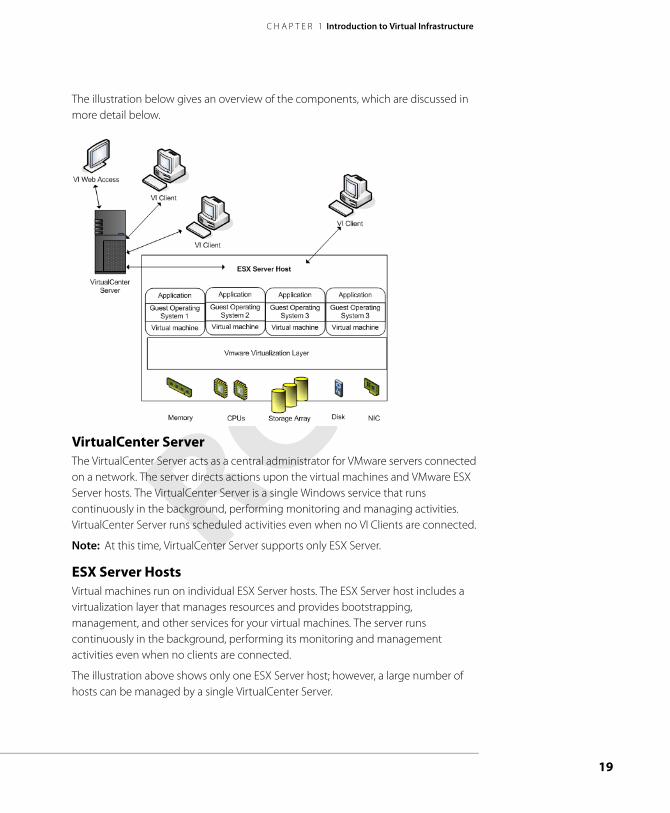
The illustration below gives an overview of the components, which are discussed in more detail below.
VirtualCenter ServerThe VirtualCenter Server acts as a central administrator for VMware servers connected on a network. The server directs actions upon the virtual machines and VMware ESX Server hosts. The VirtualCenter Server is a single Windows service that runs continuously in the background, performing monitoring and managing activities. VirtualCenter Server runs scheduled activities even when no VI Clients are connected.
Note: At this time, VirtualCenter Server supports only ESX Server.
ESX Server HostsVirtual machines run on individual ESX Server hosts. The ESX Server host includes a virtualization layer that manages resources and provides bootstrapping, management, and other services for your virtual machines. The server runs continuously in the background, performing its monitoring and management activities even when no clients are connected.
The illustration above shows only one ESX Server host; however, a large number of hosts can be managed by a single VirtualCenter Server.
19
Introduction to Virtual Infrastructure
A VirtualCenter managed host is an ESX Server host that is registered with VirtualCenter. The task of managing a host is accomplished through the Virtual Infrastructure Client (VI Client). This VI Client can be connected either directly to an ESX Server host or indirectly to ESX Server hosts through a connection to a VirtualCenter Server. ESX Servers not in clusters are referred to as stand-alone hosts. Managed hosts are hierarchically placed in datacenters, folders, or clusters under the root node folder.
Host StatesActions taken on a managed host require that the managed host be in a specific state. Whenever an operation is performed on a managed host, the host state changes. While the state is in transition, the state field displays a term that describes the transition.
Disconnecting a managed host is different from removing the managed host from the VirtualCenter Server. Disconnecting a managed host does not remove it from the VirtualCenter Server; it only temporarily suspends all VirtualCenter Server monitoring activities. The managed host and its associated virtual machines remain in the VirtualCenter Server inventory. Removing a managed host removes the managed host and all its associated virtual machines from the VirtualCenter Server inventory.
Virtual MachinesThe core of Virtual Infrastructure is the virtual machine. In many ways, a virtual machine is set up just like a physical machine and includes:
• Operating system, software programs, and documents
• Configuration information, such as email server, default printers, and desktop pattern
However, a virtual machine is managed by Virtual Infrastructure. From the Virtual Infrastructure standpoint, the virtual machine includes:
• User access privileges and other security definitions
• Entitlement for CPU processing power, network bandwidth, disk allotment, and RAM
• The state of the machine. You can suspend and resume a virtual machine just as you would a laptop.
You create and manage virtual machines using the VI Client. The illustration above shows four virtual machines, each with its own operating system called a guest operating system.
www.vmware.com20
C H A P T E R 1 Introduction to Virtual Infrastructure
User InterfaceAdministrators can view and manage Virtual Infrastructure components in several ways:
• A Virtual Infrastructure Client (VI Client) can connect directly to the ESX Server host. This is especially appropriate if there’s only one host in your environment.
• A VI Client can also connect to a VirtualCenter Server and interact with all ESX Server hosts managed by that VirtualCenter Server.
• VI Web Access allows you to perform many of the management tasks you perform through the VI Client but though a browser-based interface.
Note: With ESX Server 3 and VirtualCenter 2, you can perform almost all operations using the VI Client. For scripted interactions, you can use the Virtual Infrastructure SDK.
In the illustration above, two VI Clients and one VI Web Access Client access the VirtualCenter Server. They may be monitoring or creating virtual machines, adding or removing datastores, establishing network connections, or even adding more hosts to the VirtualCenter Server. Another VI Client is connected directly to the ESX Server host. This client has similar functionality but cannot do some things specific to VirtualCenter, such as creating clusters and adding hosts, or viewing performance or task information for multiple hosts at the same time.
As a rule, we recommend that you use the VirtualCenter Server to manage multiple hosts. Consider using a VI Client direct connection to ESX Server primarily in a single-host environment.
License ServerVMware offers two models for licensing software.
• Hosted Licensing— Maintains a separate license key file on each host and each server.
• Served Licensing— Maintains one license key file on a License Server. The VMware License Server is based on FlexNet® licensing technology.
If you are using a License Server, a Windows service authorizes operations based on purchased entitlement stored in a license pool. If a license is no longer in use — for example, because you disabled a feature — the license is automatically returned to the license pool. Using served licensing therefore guarantees optimal use of your licenses and is recommended.
21
Introduction to Virtual Infrastructure
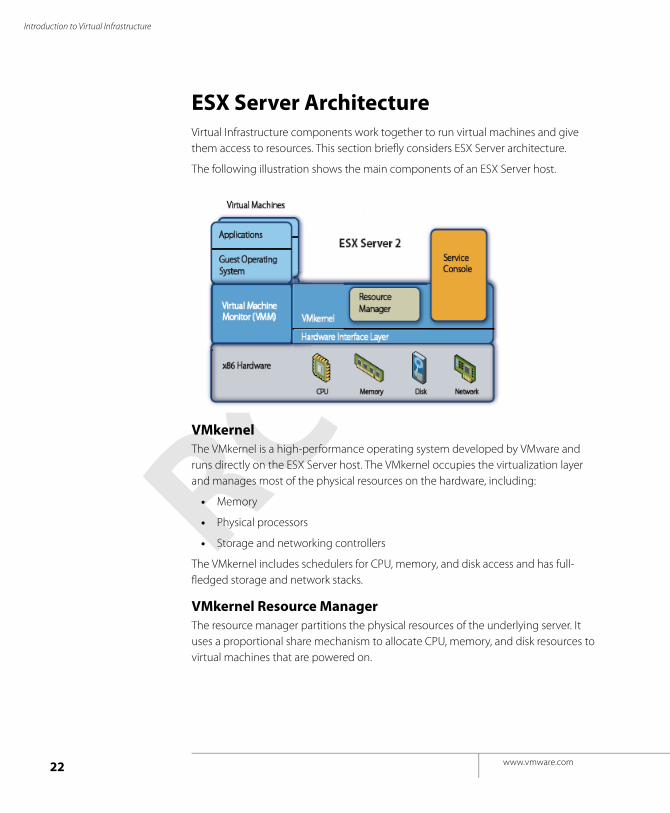
ESX Server Architecture Virtual Infrastructure components work together to run virtual machines and give them access to resources. This section briefly considers ESX Server architecture.
The following illustration shows the main components of an ESX Server host.
VMkernelThe VMkernel is a high-performance operating system developed by VMware and runs directly on the ESX Server host. The VMkernel occupies the virtualization layer and manages most of the physical resources on the hardware, including:
• Memory
• Physical processors
• Storage and networking controllers
The VMkernel includes schedulers for CPU, memory, and disk access and has full-fledged storage and network stacks.
VMkernel Resource ManagerThe resource manager partitions the physical resources of the underlying server. It uses a proportional share mechanism to allocate CPU, memory, and disk resources to virtual machines that are powered on.
www.vmware.com22
C H A P T E R 1 Introduction to Virtual Infrastructure
Users can specify CPU reservations, limits, and shares for each virtual machine. The resource manager takes this information into account when it allocates CPU and memory to each virtual machine.
VMkernel Hardware Interface LayerThe hardware interface hides hardware differences from ESX Server and virtual machine users. It enables hardware-specific service delivery and includes:
• Device drivers
• Virtual Machine File System (VMFS) — A distributed file system optimized for large files like virtual machine disks and swap files.
VMFS-3 read-only locking code allows a maximum of eight hosts to open the same file in read-only mode. There can be any number of virtual machines on each host, but there can be at most eight hosts. Any additional host that tries to open the host will get a busy message.
Note: Device drivers and VMFS are discussed in the Server Configuration Guide.
Virtual Machine MonitorThe virtual machine monitor (VMM) is responsible for virtualizing the CPUs. When a virtual machine starts running, control transfers to the VMM, which begins executing instructions from the virtual machine. In part, the transfer of control to the VMM involves setting the system state so that the VMM runs directly on the hardware.
The Virtual Infrastructure architecture allows administrators to allocate hardware resources to multiple workloads in fully isolated environments called virtual machines.
23

Introduction to Virtual Infrastructure
www.vmware.com24
C H A P T E R 2
Getting Started with the VI ClientThis chapter gives an overview of the VI Client.
• VI Client Introduction on page 26
• VI Client Window on page 26
• Exploring Hosts and Resources on page 31
• VirtualCenter Administration on page 34
25

Introduction to Virtual Infrastructure
VI Client IntroductionYou can monitor and manage your Virtual Infrastructure in several ways.
VI ClientThe VI Client is the primary interface for creating, managing, and monitoring virtual machines, their resources, and their hosts.
VI Client is installed on a Windows machine separately from your ESX Server host or your VirtualCenter Server installation. While all VirtualCenter activities are performed by the VirtualCenter Server, you use the VI Client to monitor, manage, and control the server. A single VirtualCenter Server can support multiple, simultaneously connected clients.
VI Web AccessVI Web Access is the Web interface through which you can manage your virtual machines directly. VI Web Access is installed automatically when you install ESX Server. Functionality of VI Web Access is a subset of VI Client.
Service ConsoleThe service console was used as the primary interface to ESX Server hosts. Starting with ESX Server 3, many of the commands are deprecated and service console is typically used only in conjunction with a VMware technical support representative.
The VMware Virtual Infrastructure SDK is used for scripted manipulation of your Virtual Infrastructure instead.
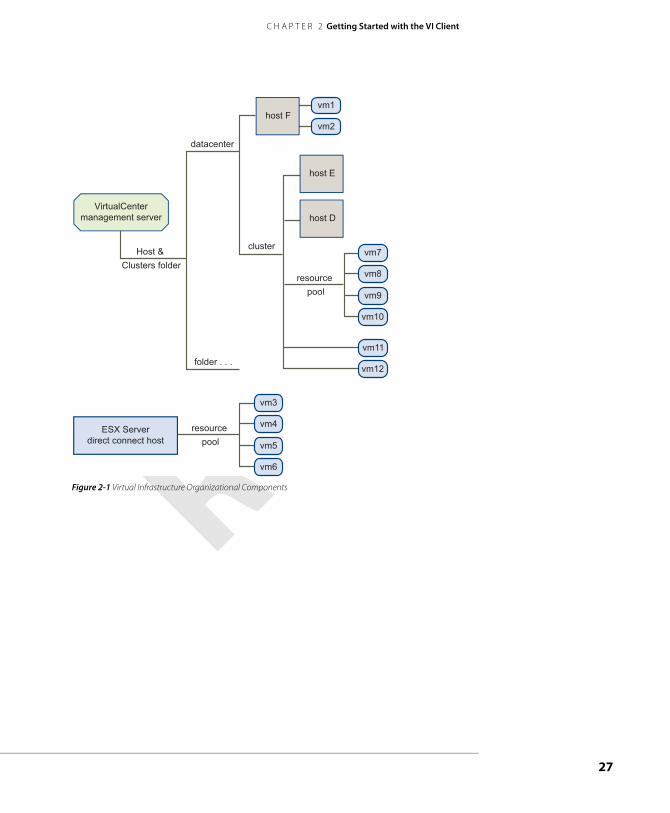
VI Client WindowWhen the VI Client is connected to a VirtualCenter Server, the VI Client displays the options available to the Virtual Infrastructure environment based on the licensing you have configured. When the VI Client is connected to an ESX Server, only the options appropriate to single host management appear. Each server supports multiple VI Client sessions.
All the VI Client components—the hosts, the virtual machines, and the organizational groupings of datacenters: folders, resource pools, and clusters —are contained within the Virtual Infrastructure environment.
www.vmware.com26
C H A P T E R 2 Getting Started with the VI Client
Figure 2-1 Virtual Infrastructure Organizational Components
VirtualCentermanagement server
Host & Clusters folder
folder . . .
resource pool
datacenter
cluster
host F
host E
host D
vm1
vm2
vm7
vm8
vm9
vm10
vm11
vm12
resource pool
vm3
vm4
vm5
vm6
ESX Serverdirect connect host
27
Introduction to Virtual Infrastructure
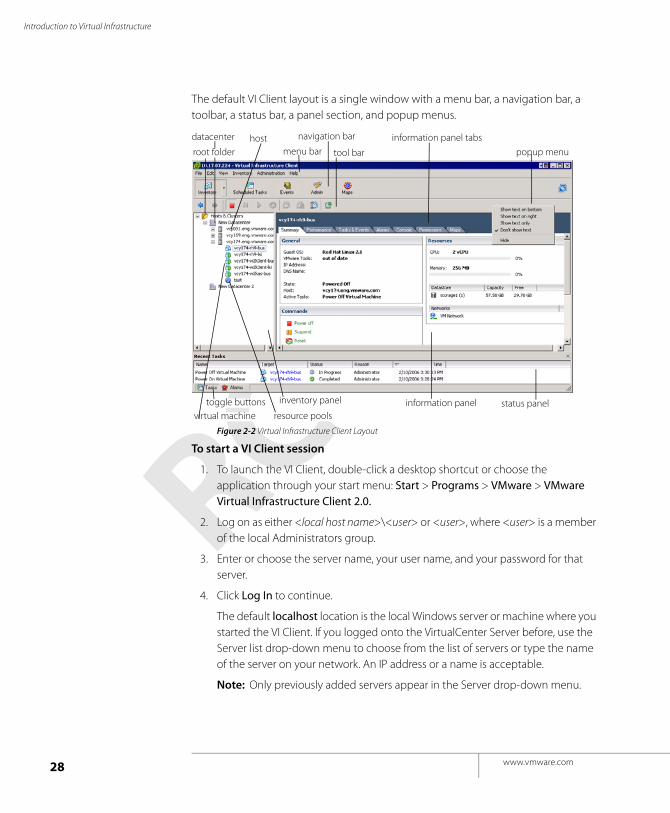
The default VI Client layout is a single window with a menu bar, a navigation bar, a toolbar, a status bar, a panel section, and popup menus.
Figure 2-2 Virtual Infrastructure Client Layout
To start a VI Client session
1. To launch the VI Client, double-click a desktop shortcut or choose the application through your start menu: Start > Programs > VMware > VMware Virtual Infrastructure Client 2.0.
2. Log on as either <local host name>\<user> or <user>, where <user> is a member of the local Administrators group.
3. Enter or choose the server name, your user name, and your password for that server.
4. Click Log In to continue.
The default localhost location is the local Windows server or machine where you started the VI Client. If you logged onto the VirtualCenter Server before, use the Server list drop-down menu to choose from the list of servers or type the name of the server on your network. An IP address or a name is acceptable.
Note: Only previously added servers appear in the Server drop-down menu.
datacenter
inventory panel
host
virtual machinestatus panel
information panel tabs
tool barmenu bar
navigation bar
popup menu
information panelresource pools
root folder
toggle buttons
www.vmware.com28
C H A P T E R 2 Getting Started with the VI Client
The first time you log onto the VirtualCenter Server, an empty Inventory screen appears. Add a datacenter and host to begin monitoring and managing your virtual machines through the Virtual Infrastructure Client.
To stop a VI Client session:
1. Close the VI Client window.
The VI Client shuts down. The VI Client is logged out from the server. The server continues to run all its normal activities in the background. Any scheduled tasks are saved and performed by the VirtualCenter Server.
Note: Closing a VI Client does not stop the server.
Virtual Machine ConsoleThe console of a virtual machine is available through a connected server. You can view the virtual machine console through the VI Client.
To view the virtual machine embedded console
1. Click the Inventory Navigation list selector.
2. Select Hosts & Clusters or VMs & Templates view.
3. Click a powered-on virtual machine in the Inventory panel.
4. Click the Console tab in the Information panel.
The embedded console appears.
To display the virtual machine console independent of the VI Client
1. Click the Launch VM Console icon in the navigation bar.
A copy of the Console window separates from the VI Client. Additional menu options are available from the pop-out Console window.
The pop-out virtual machine Console has the following menu items. The embedded Console has similar menu items but does not include all the external Console menu items.
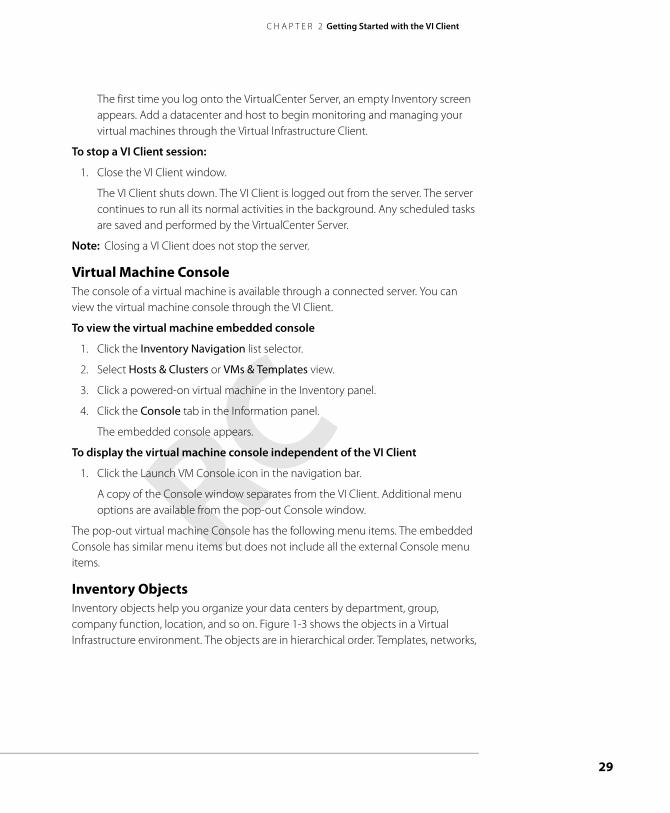
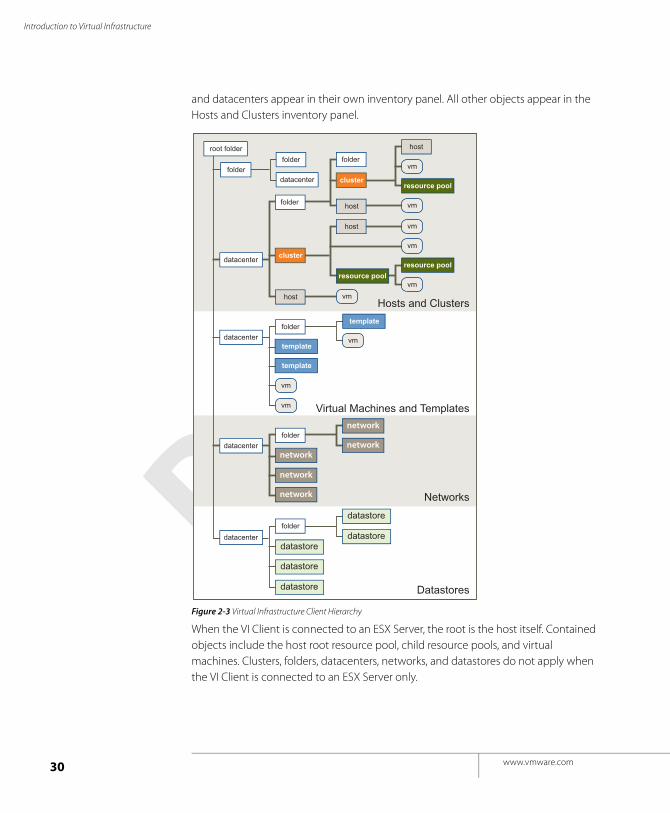
Inventory ObjectsInventory objects help you organize your data centers by department, group, company function, location, and so on. Figure 1-3 shows the objects in a Virtual Infrastructure environment. The objects are in hierarchical order. Templates, networks,
29
Introduction to Virtual Infrastructure
and datacenters appear in their own inventory panel. All other objects appear in the Hosts and Clusters inventory panel.
Figure 2-3 Virtual Infrastructure Client Hierarchy
When the VI Client is connected to an ESX Server, the root is the host itself. Contained objects include the host root resource pool, child resource pools, and virtual machines. Clusters, folders, datacenters, networks, and datastores do not apply when the VI Client is connected to an ESX Server only.
Hosts and Clusters
root folder
folderfolder
datacenter
folder
host
datacenter cluster
folder
host
cluster
host
resource poolresource pool
host
vmvm
vm
vm
vm
resource pool
vm
Virtual Machines and Templates
folderdatacenter vm
vm
template
vm
template
template
folderdatacenter
network
network
network
network
network
Networks
Datastores
folderdatacenter
datastore
datastore
datastore
datastore
datastore
www.vmware.com30
C H A P T E R 2 Getting Started with the VI Client
A datacenter is a structure for the VirtualCenter Server only. It can contain folders, clusters, and hosts on the Inventory Hosts and Clusters view. In the Networks, VMs & Templates, or Datastores view, the datacenters contain the virtual machines, templates, networks, and datastores associated with the managed hosts.
Inventory objects are restricted to their own datacenters. Networks and datastores are only unique within a datacenter. Use datacenters sparingly. VMotion does not work across datacenters. To use an object in another datacenter, for example, a template, register the template in multiple datacenters and then clone it.
Exploring Hosts and ResourcesIn this section, assume that you’ve installed the VI Client, added two ESX Server hosts to your VirtualCenter Server, and added some virtual machines. Now you are ready to explore hosts and resources.
To explore hosts and resources:
1. Double-click the VI Client to launch it, then log in.
You must have permissions to log into the VI Client. An administrator user can use the VI Client to give other users access.
2. In the VI Client, notice the main elements.
31
Introduction to Virtual Infrastructure
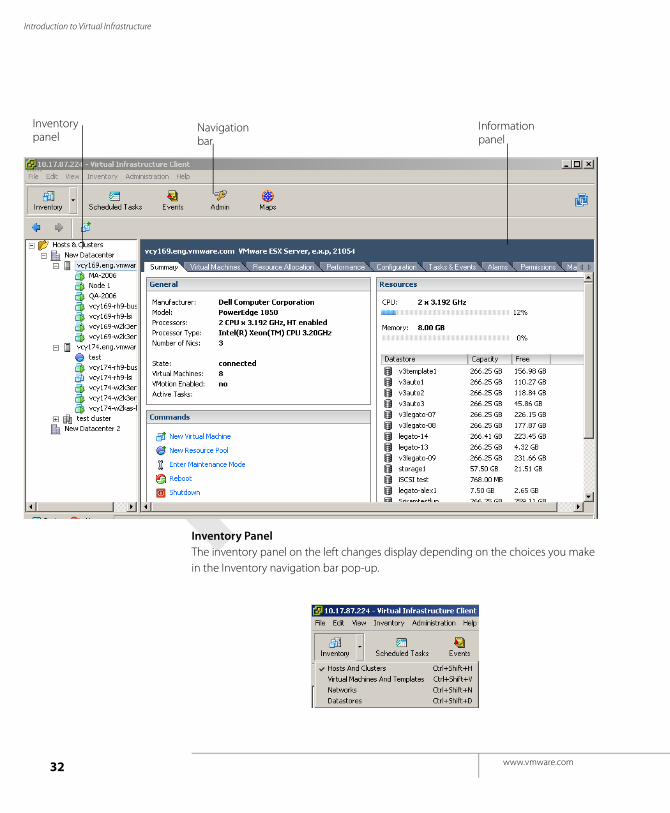
Inventory PanelThe inventory panel on the left changes display depending on the choices you make in the Inventory navigation bar pop-up.
Inventorypanel
Information panel
Navigationbar
www.vmware.com32
C H A P T E R 2 Getting Started with the VI Client
In the current display, you see datacenters, hosts, virtual machines, and one cluster.
• Datacenters can be used to group hosts and virtual machines.
• Hosts run the virtual machines.
• Clusters allow you to manage resources for multiple hosts jointly and turn on DRS, HA, or both.
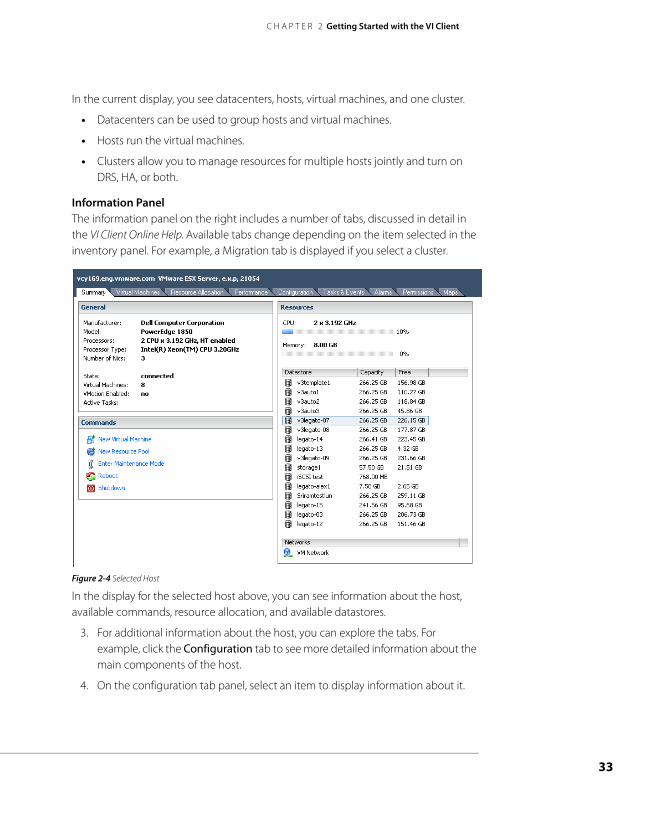
Information PanelThe information panel on the right includes a number of tabs, discussed in detail in the VI Client Online Help. Available tabs change depending on the item selected in the inventory panel. For example, a Migration tab is displayed if you select a cluster.
Figure 2-4 Selected Host
In the display for the selected host above, you can see information about the host, available commands, resource allocation, and available datastores.
3. For additional information about the host, you can explore the tabs. For example, click the Configuration tab to see more detailed information about the main components of the host.
4. On the configuration tab panel, select an item to display information about it.
33
Introduction to Virtual Infrastructure
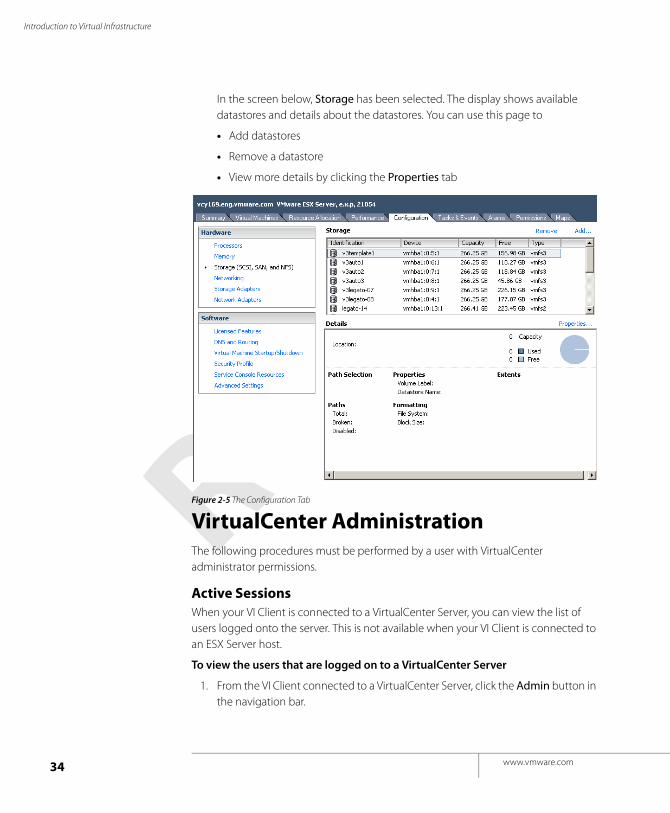
In the screen below, Storage has been selected. The display shows available datastores and details about the datastores. You can use this page to
• Add datastores
• Remove a datastore
• View more details by clicking the Properties tab
Figure 2-5 The Configuration Tab
VirtualCenter AdministrationThe following procedures must be performed by a user with VirtualCenter administrator permissions.
Active SessionsWhen your VI Client is connected to a VirtualCenter Server, you can view the list of users logged onto the server. This is not available when your VI Client is connected to an ESX Server host.
To view the users that are logged on to a VirtualCenter Server
1. From the VI Client connected to a VirtualCenter Server, click the Admin button in the navigation bar.
www.vmware.com34
C H A P T E R 2 Getting Started with the VI Client
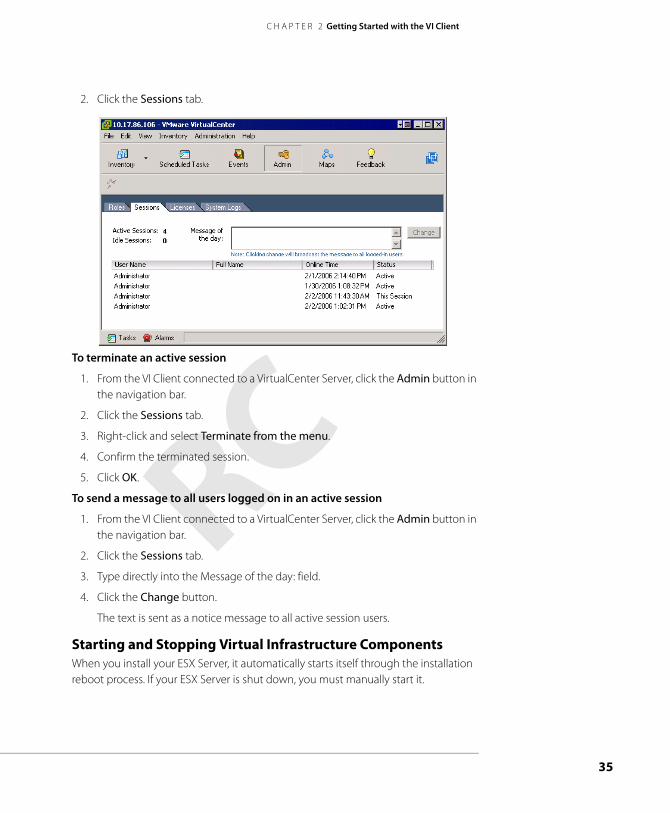
2. Click the Sessions tab.
To terminate an active session
1. From the VI Client connected to a VirtualCenter Server, click the Admin button in the navigation bar.
2. Click the Sessions tab.
3. Right-click and select Terminate from the menu.
4. Confirm the terminated session.
5. Click OK.
To send a message to all users logged on in an active session
1. From the VI Client connected to a VirtualCenter Server, click the Admin button in the navigation bar.
2. Click the Sessions tab.
3. Type directly into the Message of the day: field.
4. Click the Change button.
The text is sent as a notice message to all active session users.
Starting and Stopping Virtual Infrastructure ComponentsWhen you install your ESX Server, it automatically starts itself through the installation reboot process. If your ESX Server is shut down, you must manually start it.
35
Introduction to Virtual Infrastructure
To start your ESX Server
1. On the physical machine where the ESX Server is installed, press the power button until the power up sequence begins.
The ESX Server boots, discovers its virtual machines, and proceeds with its normal ESX Server functions.
You have the option to power down (shut down) or restart (reboot) any ESX Server host managed by VirtualCenter. Powering down a managed host disconnects it from the VirtualCenter Serve, but it does not remove it from the inventory.
To reboot your ESX Server
1. Start a Virtual Infrastructure Client.
2. Display the inventory panel and the ESX Server.
3. If you are connected to a VirtualCenter Server, display the inventory: Hosts & Clusters panel and choose the appropriate root folder (labeled Hosts & Clusters) or subfolder.
4. Select the appropriate ESX Server in the inventory panel.
5. From the Inventory > Host main or right-click pop-up menu, choose Reboot.
The ESX Server shuts down and reboots.
To shut down your ESX Server
1. Start a Virtual Infrastructure Client.
2. Display the inventory panel and the ESX Server.
3. If you are connected to a VirtualCenter Server, display the inventory: Hosts & Clusters panel and choose the appropriate root folder (labeled Hosts & Clusters) or subfolder.
4. Select the appropriate ESX Server in the inventory panel.
5. From the Inventory > Host main or right-click pop-up menu, choose Shut Down.
The ESX Server shuts down. You must manually power the system back on.
To manually stop your ESX Server
1. Log on to your ESX Server service console.
2. Execute the shutdown command. For example:
#shutdown -h now
ESX Server gracefully shuts down. When it is finished, a message appears, indicating that it is safe to power off your system.
www.vmware.com36
C H A P T E R 2 Getting Started with the VI Client
3. Press the power button until the machine powers down.
To verify that the VirtualCenter Server is running, check your Windows Services
1. Depending on your Windows version, go to the Services display.
For example, in Windows 2000, select Control Panel > Administrative Tools > Services > VMware VirtualCenter Server.
The Status column indicates whether or not the service is started.
2. Right-click the VMware VirtualCenter Server and choose Properties.
3. In the VMware VirtualCenter Services Properties dialog box, click the General tab and view the service status.
To start the VirtualCenter Server through your Windows Services
1. Depending on your Windows version, go to the Control Panel > Administrative Tools > Services > VMware VirtualCenter Server.
2. Right-click VMware VirtualCenter Server, choose Start, and wait for startup to complete.
3. If the VMware Web Service is installed, right-click VMware Virtual Infrastructure Client Web Service and choose Start.
Wait for it to complete.
The Web service depends on VirtualCenter and is stopped whenever the VirtualCenter Server stops.
4. Close the dialog box.
To stop the VirtualCenter Server
1. Display the Windows Services dialog box.
For example, in Windows 2000, choose Start > Control Panel > Administrative Tools > Services > VMware VirtualCenter Server.
2. Right-click the VMware VirtualCenter Server, choose Stop, and wait for it to stop.
If dependent VMware services are installed, the Stop Other Services dialog appears.
3. To stop a service, click Yes.
The Web service must be stopped whenever the VirtualCenter Server stops.
4. Click the X at the top of the dialog box to close it.
37
Introduction to Virtual Infrastructure
You should not have to stop the VirtualCenter Server. It is best for the VirtualCenter Server to run continuously. Continuous operation ensures that all monitoring and task activities are performed as expected.
Establishing Connections Using the VI ClientBy default, the VirtualCenter Server or ESX Server receives data transmissions from the VI Client on port 902. If a firewall is preventing the VI Client from connecting to the server, you can reconfigure your firewall to allow the VI Client to communicate with port 902 on the VirtualCenter Server. Refer to the instructions for your firewall.
Alternately, you can use some port other than 902 and, if necessary, configure your firewall to open this other port. You need to configure the server to use the desired port.
Note: Refer to the Server Configuration Guide for complete information on security and communication with an ESX Server directly.
www.vmware.com38

C H A P T E R 3
Planning PermissionsThis chapter describes users, groups, roles, and permissions.
This chapter contains the following sections:
• Users, Groups, Permissions, and Roles on page 40
• Planning Access Permission on page 58
39
Introduction to Virtual Infrastructure
Users, Groups, Permissions, and RolesVirtualCenter and ESX Server hosts determine the level of access for the user based on the permissions assigned to the user. The combination of user name, password, and permissions is the mechanism by which VirtualCenter and ESX Server hosts authenticate a user for access and authorize the user to perform activities. The VirtualCenter and ESX Server host maintains lists of authorized users, their passwords, and the permissions assigned to each user.
ESX Server and VirtualCenter use sets of privileges or roles to control which individual users or groups can access particular ESX Server objects and VirtualCenter objects. ESX Server and VirtualCenter provide a set of pre-established roles. You can also create new roles.
Note: You must be in Admin view for the Admin > Roles to be enabled.
You can manage users more easily by assigning them to groups. If you create groups, you can apply a role to the group, and this role is inherited by all the users in the group.
Understanding Users A user is an individual authorized to log on to either an ESX Server host or to VirtualCenter. ESX Server users fall into two categories: those who can access the ESX Server host through VirtualCenter and those who can access the ESX Server host by directly logging on to the host from the VI Client, VI Web Access, a third-party client, or a command shell. These two categories draw users from different sources.
• VirtualCenter users — Authorized users for VirtualCenter are those included in the Windows domain list referenced by VirtualCenter or are local Windows users on the VirtualCenter host.
You cannot use VirtualCenter to manually create, remove, or otherwise change users. If you need to manipulate the user list or change user passwords, you must do so through the tools you normally use to manage your Windows domain.
Any changes you make to the Windows domain are reflected in VirtualCenter. Because you cannot directly manage users in VirtualCenter, the user interface doesn’t provide a user list for you to review. You see these changes only when you select users to configure permissions.
• Direct access users — Users authorized to work directly on an ESX Server host are those added to the internal user list by default when ESX Server is installed or by a system administrator after installation.
www.vmware.com40
C H A P T E R 3 Planning Permissions
If you log on to the host as an administrator, you can perform a variety of management activities for these users, such as changing passwords, group memberships, permissions, and so forth. You can also add and remove users.
Even if the lists maintained by an ESX Server host and VirtualCenter appear to have common users (for instance, a user called devuser), these users should be treated as separate users who have the same name. The attributes of devuser in VirtualCenter, including permissions, passwords, and so forth, are separate from the attributes of devuser on the ESX Server host. If you log on to VirtualCenter as devuser, you might have permission to view and delete files from a datastore. If you log on to an ESX Server host as devuser, you might not.
Users and groups in the Virtual Infrastructure environment are created using two methods:
• When the VI Client is connected to a VirtualCenter Server, users and groups are defined through the standard methods for Windows domains or Active Directory. You do not create users and groups for access to the VirtualCenter Server through the VI Client.
• When the VI Client is connected to an ESX Server, users and groups are defined through the Users and Groups tab.
Users and groups defined when connected to an ESX Server are applicable to that ESX Server only. They are not in the list of available users for a VirtualCenter Server connection even if the ESX Server is registered with the VirtualCenter Server.
Each ESX Server has two default users:
• The root user has full administrative privileges. Administrators use this logon and its associated password to log on to an ESX Server through the VI Client. Root users have a complete range of control activities on the specific ESX Server host that they are logged on to, including manipulating permissions, creating groups and users, working with events, and so forth.
• The vpxuser user is a VirtualCenter entity with root rights on the ESX Server host, allowing it to manage activities for that host. The vpxuser is created at the time that an ESX Server host is attached to VirtualCenter. It is not present on the ESX Server host unless the host is being managed through VirtualCenter.
Caution: Do not change vpxuser and do not change its permissions. If you do so, you might experience problems working with the ESX Server host through VirtualCenter.
For information on creating users and groups for use with your VirtualCenter Server, refer to your Microsoft documentation.
41
Introduction to Virtual Infrastructure
For information about creating users and group for use with your ESX Server refer to the Security section of the Server Configuration Guide.
Understanding Groups You can efficiently manage some user attributes by creating groups. A group is a set of users that you want to manage through a common set of rules and permissions. When you assign permissions to a group, they are inherited by all users in the group. Using groups can significantly reduce the time it takes to set up your permissions model.
The group lists in VirtualCenter and an ESX Server host are drawn from the same sources as the user lists. If you are working through VirtualCenter, the group list is called from the Windows domain. If you are logged on to an ESX Server host directly, the group list is called from a table maintained by the host.
The VirtualCenter Server grants access to each inventory object by assigning a role with defined privileges and a user or group to each object. Roles are a defined set of access privileges.
Individual permissions are assigned through the VirtualCenter Server or the ESX Server by pairing a user and a role and assigning this pair to an inventory object. Users and groups are created for the VirtualCenter Server through the Windows domain or Active Directory database. Users and groups are created for the ESX Server through the Users and Groups tab.
Table 3-1 lists the default roles that can be paired with a user and assigned to an object. System-level roles are permanent and cannot be changed.
Table 3-1 Default Roles
Role Role Type Description
No Access User
system role Users cannot view or change the object. With a No Access role for a particular object, users can select the VI Client tabs associated with the no-access object, but the tab displays no content. The No Access role is the default. The root user and vpxuser are the only users not assigned the No Access role by default. They are assigned the Administrator role. Do not change the role for these users.
Read Only User
system role Users can view the state of the object and details about the object. Users can view all the tab panels in the VI Client except the console tab. All actions through the menus and toolbars are disallowed.
Administrator system role Users can change privileges for an object. They can add, remove, and set access rights and privileges for all the VirtualCenter users and all the virtual objects in the Virtual Infrastructure environment.
www.vmware.com42
C H A P T E R 3 Planning Permissions
Understanding PermissionsFor ESX Server and VirtualCenter, a permission is defined as an access role that consists of a user and the user’s assigned role for an object, such as a virtual machine or ESX Server host. Permissions grant users the right to perform specific activities and manage specific objects on an ESX Server host or, if users are working from VirtualCenter, all VirtualCenter-managed objects. For example, to configure memory for an ESX Server host, you must have host configuration permissions.
Most VirtualCenter and ESX Server users have limited ability to manipulate the objects associated with the host. However, ESX Server provides full access rights and permissions on all virtual objects, such as datastores, hosts, virtual machines, and resource pools, to two users: root and vpxuser.
• As root, you can grant permissions on an ESX Server host to individual users or groups that have been added to the ESX Server user list and group list by default when ESX Server was installed or because they were manually added to the host after installation.
• As vpxuser though VirtualCenter, you can grant permissions to any user or group included in the Windows domain list referenced by VirtualCenter.
Virtual Machine Administrator
sample role Users can perform actions on the following levels: global, folder, datacenter, datastore, host, virtual machine, resource, alarm management, scheduled task, and sessions.
Datacenter Administrator
sample role Users can perform actions on the following levels: global, folder, datacenter, datastore, host, virtual machine, resource, alarm management, and scheduled task.
Virtual Machine Provider
sample role Users can perform actions on the following levels: folder, virtual machine, and resource.
Virtual Machine Power User
sample role Users can perform actions on the following levels: virtual machine, resource, and scheduled task.
Virtual Machine User
sample role Users can perform actions on the following levels: virtual machine only.
Resource Administrator
sample role Users can perform actions on the following levels: datastore, host, virtual machine, resource, alarm management, and scheduled task. This role provides resource delegation.
Role Role Type Description
43
Introduction to Virtual Infrastructure
Note: VirtualCenter registers any selected Windows domain user or group through the process of assigning permissions. By default, all users who are members of the Windows Administrators group on the VirtualCenter Server are granted the same access rights as any user assigned to the Administrator role. Users who are members of the Administrators group can log on as individuals and have full access.
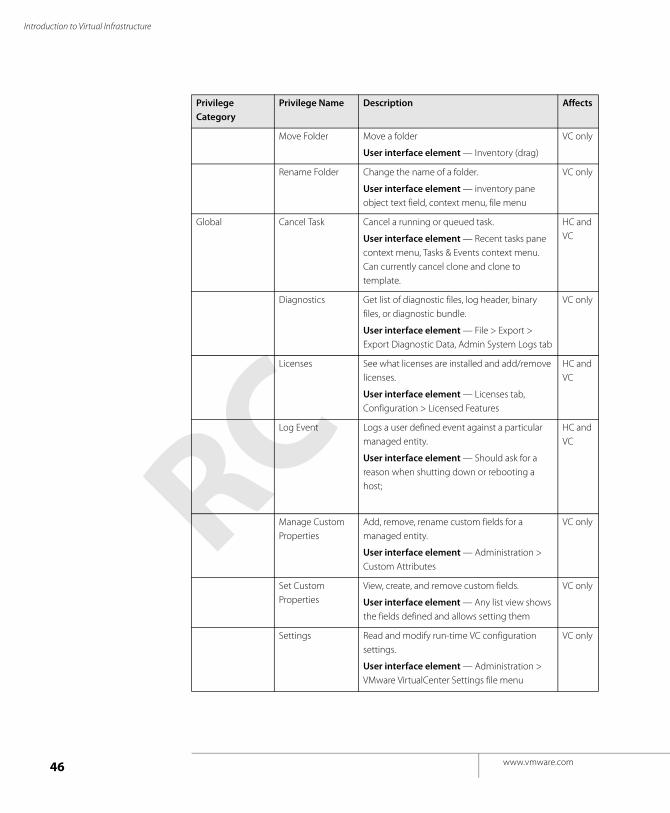
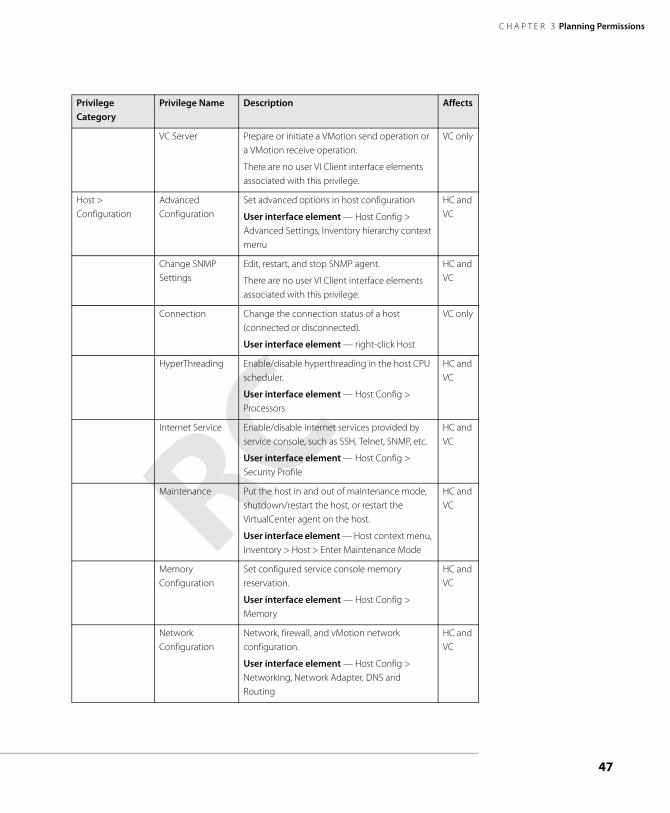
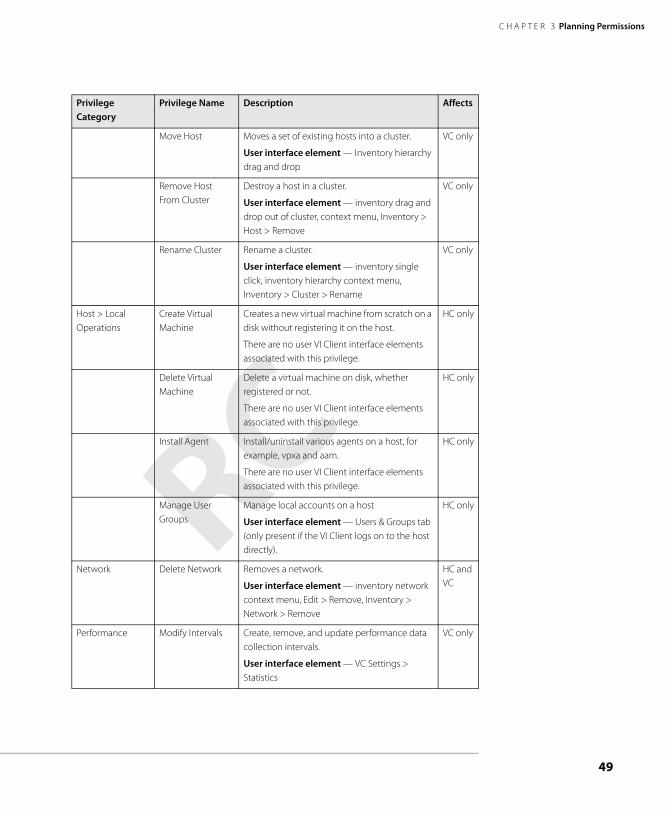
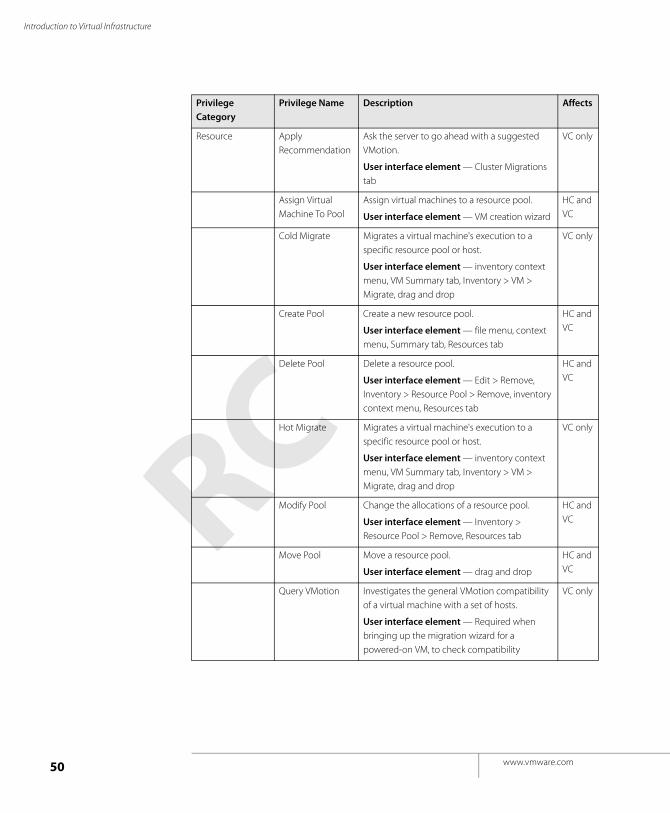
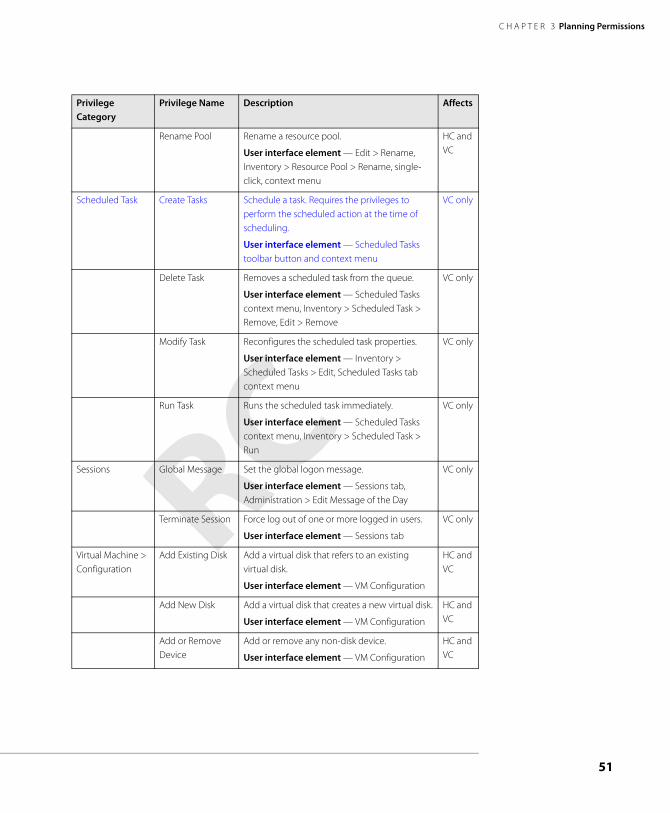
The method you use to configure permissions directly on an ESX Server host is identical to the method you use to configure permissions in VirtualCenter. The list of privileges is the same for both ESX Server and VirtualCenter. The abbreviations used in Table 3-2 are VC-VirtualCenter Server, HC-Host Client/ESX Server.
Table 3-2 Table of Permissions and Roles
Privilege Category
Privilege Name Description Affects
Alarm Management
Create Alarm Create a new alarm.
User interface element — alarm tab context menu, file menu
VC only
Delete Alarm Delete an existing alarm.
User interface element — alarm tab context menu, file menu
VC only
Modify Alarm Change the properties of an existing alarm.
User interface element — alarm tab context menu, file menu
VC only
Permissions Modify Permission Define one or more permission rules on an entity, or updates rules if already present for the given user or group on the entity.
User interface element — all items in permissions tab context menu, all items in Inventory > Permissions file menu
HC and VC
Modify Role Updates a role's name and/or the privileges.
User interface element — roles tab context menu, toolbar button, file menu
HC and VC
Reassign Role Permissions
Reassigns all permissions of a role to another role.
User interface element — Delete Role dialog box radio button and associated menu
HC and VC
www.vmware.com44

C H A P T E R 3 Planning Permissions
Datacenter Create Datacenter Create a new datacenter.
User interface element — inventory context menu, toolbar button, and File > New Datacenter
VC only
Delete Datacenter Removes a datastore.
User interface element — inventory context menu, Inventory > Datacenter > Remove, Edit > Remove
VC only
Move Datacenter Move a datacenter
User interface element — Inventory drag and drop
VC only
Rename Datacenter
Change the name of a datacenter.
User interface element — inventory object, inventory context menu, Edit > Rename, Inventory > Datacenter > Rename
VC only
Datastore Browse Datastore Browse files on a datastore
User interface element — Add existing disk, browse for CD-ROM or Floppy media, serial or parallel port files
HC and VC
Delete Datatore Removes a datastore.
User interface element — inventory datastore context menu, Edit > Remove, Inventory > Datastore > Remove
HC and VC
Delete Datastore File
Delete a file in the datastore
User interface element — Datastore Browser toolbar button and context menu
HC and VC
Rename Datastore Renames a datastore.
User interface element — <datastore> Properties dialog Change button, host summary tab context menu
HC and VC
Folder Create Folder Create a new folder.
User interface element — taskbar button, file menu, context menu
VC only
Delete Folder Delete a folder.
User interface element — file menu, context menu
VC only
Privilege Category
Privilege Name Description Affects
45
Introduction to Virtual Infrastructure
Move Folder Move a folder
User interface element — Inventory (drag)
VC only
Rename Folder Change the name of a folder.
User interface element — inventory pane object text field, context menu, file menu
VC only
Global Cancel Task Cancel a running or queued task.
User interface element — Recent tasks pane context menu, Tasks & Events context menu. Can currently cancel clone and clone to template.
HC and VC
Diagnostics Get list of diagnostic files, log header, binary files, or diagnostic bundle.
User interface element — File > Export > Export Diagnostic Data, Admin System Logs tab
VC only
Licenses See what licenses are installed and add/remove licenses.
User interface element — Licenses tab, Configuration > Licensed Features
HC and VC
Log Event Logs a user defined event against a particular managed entity.
User interface element — Should ask for a reason when shutting down or rebooting a host;
HC and VC
Manage Custom Properties
Add, remove, rename custom fields for a managed entity.
User interface element — Administration > Custom Attributes
VC only
Set Custom Properties
View, create, and remove custom fields.
User interface element — Any list view shows the fields defined and allows setting them
VC only
Settings Read and modify run-time VC configuration settings.
User interface element — Administration > VMware VirtualCenter Settings file menu
VC only
Privilege Category
Privilege Name Description Affects
www.vmware.com46
C H A P T E R 3 Planning Permissions
VC Server Prepare or initiate a VMotion send operation or a VMotion receive operation.
There are no user VI Client interface elements associated with this privilege.
VC only
Host > Configuration
Advanced Configuration
Set advanced options in host configuration
User interface element — Host Config > Advanced Settings, Inventory hierarchy context menu
HC and VC
Change SNMP Settings
Edit, restart, and stop SNMP agent.
There are no user VI Client interface elements associated with this privilege.
HC and VC
Connection Change the connection status of a host (connected or disconnected).
User interface element — right-click Host
VC only
HyperThreading Enable/disable hyperthreading in the host CPU scheduler.
User interface element — Host Config > Processors
HC and VC
Internet Service Enable/disable internet services provided by service console, such as SSH, Telnet, SNMP, etc.
User interface element — Host Config > Security Profile
HC and VC
Maintenance Put the host in and out of maintenance mode, shutdown/restart the host, or restart the VirtualCenter agent on the host.
User interface element — Host context menu, Inventory > Host > Enter Maintenance Mode
HC and VC
Memory Configuration
Set configured service console memory reservation.
User interface element — Host Config > Memory
HC and VC
Network Configuration
Network, firewall, and vMotion network configuration.
User interface element — Host Config > Networking, Network Adapter, DNS and Routing
HC and VC
Privilege Category
Privilege Name Description Affects
47

Introduction to Virtual Infrastructure
Storage Partition Configuration
Manage VMFS datastore and diagnostic partitions. Scan for new storage devices. Manage iSCSI.
User interface element — Host Config > Storage, Storage Adapters, Host Configuration tab datastore context menu
HC and VC
System Resource Settings
Update the configuration of the system resource hierarchy.
User interface element — Host Config > System Resource Allocation
HC and VC
Virtual Machine Auto-start Configuration
Change auto-start and auto-stop order of virtual machines on a single host.
User interface element — Host Config > Virtual Machine Startup/Shutdown
HC and VC
Host > Inventory Add Host To Cluster
Add a host to an existing cluster.
User interface element — inventory context menu
VC only
Add stand-alone Host
Add a stand-alone host.
User interface element — toolbar button, inventory context menu, Inventory > Datacenter > Add Host, File > New > Add Host, host tab context menu
VC only
Create Cluster Create a new cluster.
User interface element — toolbar button, inventory context menu, Inventory > Datacenter > New Cluster, File > New > Cluster
VC only
Delete Cluster Delete a cluster or stand-alone host.
User interface element — inventory context menu, Edit > Remove, Inventory > Cluster > Remove
VC only
Modify Cluster Change the properties of a cluster.
User interface element — inventory context menu, Inventory > Cluster > Edit Settings, Summary tab
VC only
Move Cluster Move a cluster between folders
User interface element — inventory hierarchy
VC only
Privilege Category
Privilege Name Description Affects
www.vmware.com48
C H A P T E R 3 Planning Permissions
Move Host Moves a set of existing hosts into a cluster.
User interface element — Inventory hierarchy drag and drop
VC only
Remove Host From Cluster
Destroy a host in a cluster.
User interface element — inventory drag and drop out of cluster, context menu, Inventory > Host > Remove
VC only
Rename Cluster Rename a cluster.
User interface element — inventory single click, inventory hierarchy context menu, Inventory > Cluster > Rename
VC only
Host > Local Operations
Create Virtual Machine
Creates a new virtual machine from scratch on a disk without registering it on the host.
There are no user VI Client interface elements associated with this privilege.
HC only
Delete Virtual Machine
Delete a virtual machine on disk, whether registered or not.
There are no user VI Client interface elements associated with this privilege.
HC only
Install Agent Install/uninstall various agents on a host, for example, vpxa and aam.
There are no user VI Client interface elements associated with this privilege.
HC only
Manage User Groups
Manage local accounts on a host
User interface element — Users & Groups tab (only present if the VI Client logs on to the host directly).
HC only
Network Delete Network Removes a network.
User interface element — inventory network context menu, Edit > Remove, Inventory > Network > Remove
HC and VC
Performance Modify Intervals Create, remove, and update performance data collection intervals.
User interface element — VC Settings > Statistics
VC only
Privilege Category
Privilege Name Description Affects
49
Introduction to Virtual Infrastructure
Resource Apply Recommendation
Ask the server to go ahead with a suggested VMotion.
User interface element — Cluster Migrations tab
VC only
Assign Virtual Machine To Pool
Assign virtual machines to a resource pool.
User interface element — VM creation wizard
HC and VC
Cold Migrate Migrates a virtual machine's execution to a specific resource pool or host.
User interface element — inventory context menu, VM Summary tab, Inventory > VM > Migrate, drag and drop
VC only
Create Pool Create a new resource pool.
User interface element — file menu, context menu, Summary tab, Resources tab
HC and VC
Delete Pool Delete a resource pool.
User interface element — Edit > Remove, Inventory > Resource Pool > Remove, inventory context menu, Resources tab
HC and VC
Hot Migrate Migrates a virtual machine's execution to a specific resource pool or host.
User interface element — inventory context menu, VM Summary tab, Inventory > VM > Migrate, drag and drop
VC only
Modify Pool Change the allocations of a resource pool.
User interface element — Inventory > Resource Pool > Remove, Resources tab
HC and VC
Move Pool Move a resource pool.
User interface element — drag and drop
HC and VC
Query VMotion Investigates the general VMotion compatibility of a virtual machine with a set of hosts.
User interface element — Required when bringing up the migration wizard for a powered-on VM, to check compatibility
VC only
Privilege Category
Privilege Name Description Affects
www.vmware.com50
C H A P T E R 3 Planning Permissions
Rename Pool Rename a resource pool.
User interface element — Edit > Rename, Inventory > Resource Pool > Rename, single-click, context menu
HC and VC
Scheduled Task Create Tasks Schedule a task. Requires the privileges to perform the scheduled action at the time of scheduling.
User interface element — Scheduled Tasks toolbar button and context menu
VC only
Delete Task Removes a scheduled task from the queue.
User interface element — Scheduled Tasks context menu, Inventory > Scheduled Task > Remove, Edit > Remove
VC only
Modify Task Reconfigures the scheduled task properties.
User interface element — Inventory > Scheduled Tasks > Edit, Scheduled Tasks tab context menu
VC only
Run Task Runs the scheduled task immediately.
User interface element — Scheduled Tasks context menu, Inventory > Scheduled Task > Run
VC only
Sessions Global Message Set the global logon message.
User interface element — Sessions tab, Administration > Edit Message of the Day
VC only
Terminate Session Force log out of one or more logged in users.
User interface element — Sessions tab
VC only
Virtual Machine > Configuration
Add Existing Disk Add a virtual disk that refers to an existing virtual disk.
User interface element — VM Configuration
HC and VC
Add New Disk Add a virtual disk that creates a new virtual disk.
User interface element — VM Configuration
HC and VC
Add or Remove Device
Add or remove any non-disk device.
User interface element — VM Configuration
HC and VC
Privilege Category
Privilege Name Description Affects
51
Introduction to Virtual Infrastructure
Advanced Change values in extraConfig - basically any VMX file lines that are not modelled in ConfigInfo.java
User interface element — VM Configuration Wizard > Options tab > Advanced - look for Configuration Parameters button
HC and VC
Change CPU Count
Change the number of virtual CPUs.
User interface element — VM Configuration
HC and VC
Change Resource Changes resource configuration of a set of VM nodes in a given resource pool.
User interface element — VM Configuration > Resources tab
HC and VC
Disk Lease Lease disks for Disk Manager
There are no user VI Client interface elements associated with this privilege.
HC and VC
Memory Change the amount of memory allocated to the VM.
User interface element — VM Configuration > Memory
HC and VC
Modify Device Settings
Change the properties of an existing device.
User interface element — VM Configuration - SCSI/IDE node selection
HC and VC
Raw Device Add or remove a raw disk mapping or SCSI passthrough device.
User interface element — VM Configuration > Add/Remove raw disk mapping
HC and VC
Remove Disk Remove a virtual disk device.
User interface element — VM Configuration > Hard Disk (but not a raw disk mapping)
HC and VC
Rename Rename a virtual machine.
User interface element — VM Configuration, inventory, inventory context menu, file menu, inventory menu
HC and VC
Reset Guest Information
Clears guestinfo variables
There are no user VI Client interface elements associated with this privilege.
HC and VC
Privilege Category
Privilege Name Description Affects
www.vmware.com52
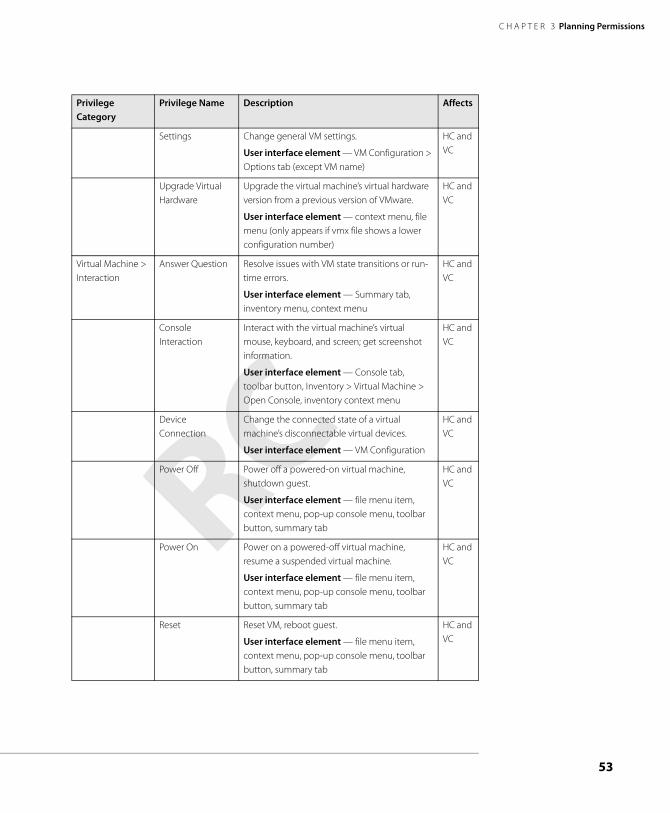
C H A P T E R 3 Planning Permissions
Settings Change general VM settings.
User interface element — VM Configuration > Options tab (except VM name)
HC and VC
Upgrade Virtual Hardware
Upgrade the virtual machine’s virtual hardware version from a previous version of VMware.
User interface element — context menu, file menu (only appears if vmx file shows a lower configuration number)
HC and VC
Virtual Machine > Interaction
Answer Question Resolve issues with VM state transitions or run-time errors.
User interface element — Summary tab, inventory menu, context menu
HC and VC
Console Interaction
Interact with the virtual machine’s virtual mouse, keyboard, and screen; get screenshot information.
User interface element — Console tab, toolbar button, Inventory > Virtual Machine > Open Console, inventory context menu
HC and VC
Device Connection
Change the connected state of a virtual machine’s disconnectable virtual devices.
User interface element — VM Configuration
HC and VC
Power Off Power off a powered-on virtual machine, shutdown guest.
User interface element — file menu item, context menu, pop-up console menu, toolbar button, summary tab
HC and VC
Power On Power on a powered-off virtual machine, resume a suspended virtual machine.
User interface element — file menu item, context menu, pop-up console menu, toolbar button, summary tab
HC and VC
Reset Reset VM, reboot guest.
User interface element — file menu item, context menu, pop-up console menu, toolbar button, summary tab
HC and VC
Privilege Category
Privilege Name Description Affects
53
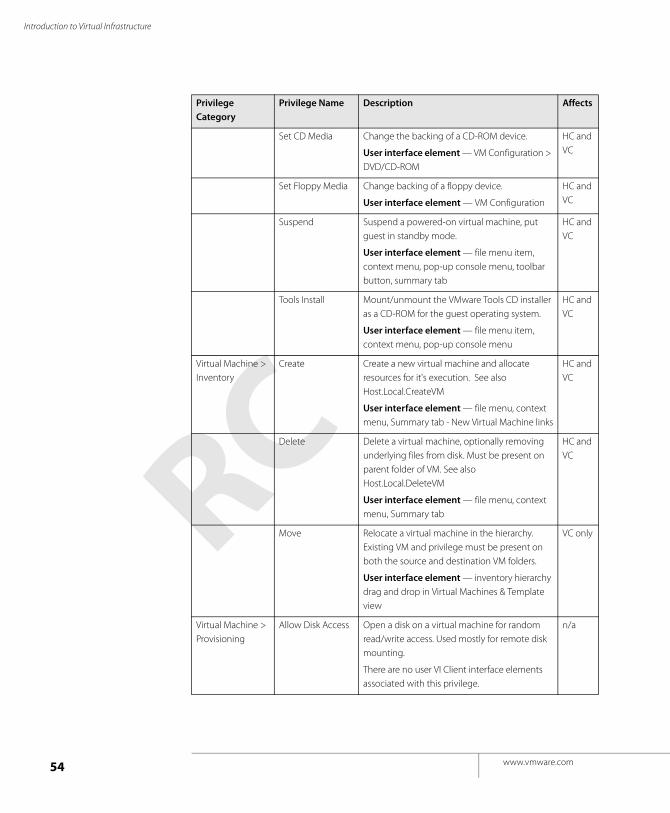
Introduction to Virtual Infrastructure
Set CD Media Change the backing of a CD-ROM device.
User interface element — VM Configuration > DVD/CD-ROM
HC and VC
Set Floppy Media Change backing of a floppy device.
User interface element — VM Configuration
HC and VC
Suspend Suspend a powered-on virtual machine, put guest in standby mode.
User interface element — file menu item, context menu, pop-up console menu, toolbar button, summary tab
HC and VC
Tools Install Mount/unmount the VMware Tools CD installer as a CD-ROM for the guest operating system.
User interface element — file menu item, context menu, pop-up console menu
HC and VC
Virtual Machine > Inventory
Create Create a new virtual machine and allocate resources for it's execution. See also Host.Local.CreateVM
User interface element — file menu, context menu, Summary tab - New Virtual Machine links
HC and VC
Delete Delete a virtual machine, optionally removing underlying files from disk. Must be present on parent folder of VM. See also Host.Local.DeleteVM
User interface element — file menu, context menu, Summary tab
HC and VC
Move Relocate a virtual machine in the hierarchy. Existing VM and privilege must be present on both the source and destination VM folders.
User interface element — inventory hierarchy drag and drop in Virtual Machines & Template view
VC only
Virtual Machine > Provisioning
Allow Disk Access Open a disk on a virtual machine for random read/write access. Used mostly for remote disk mounting.
There are no user VI Client interface elements associated with this privilege.
n/a
Privilege Category
Privilege Name Description Affects
www.vmware.com54
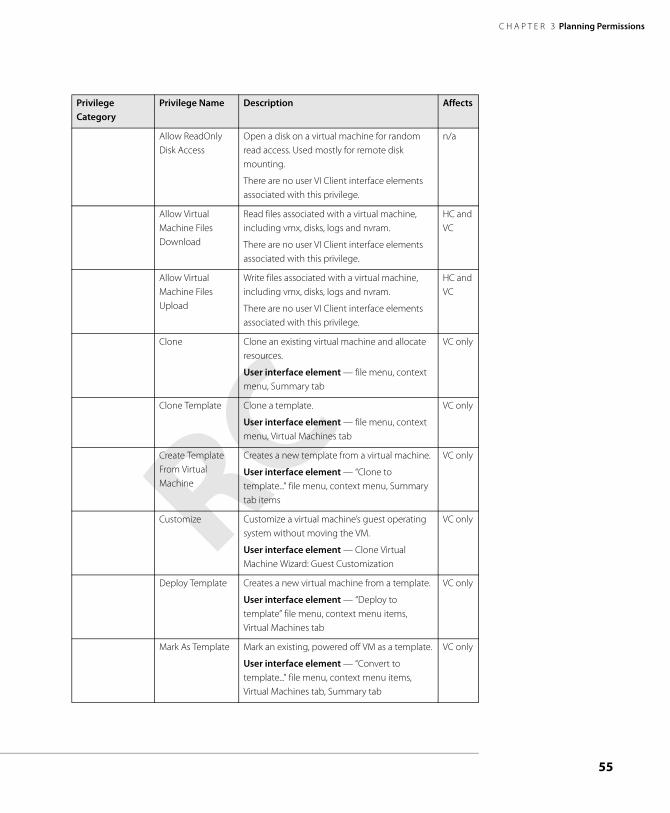
C H A P T E R 3 Planning Permissions
Allow ReadOnly Disk Access
Open a disk on a virtual machine for random read access. Used mostly for remote disk mounting.
There are no user VI Client interface elements associated with this privilege.
n/a
Allow Virtual Machine Files Download
Read files associated with a virtual machine, including vmx, disks, logs and nvram.
There are no user VI Client interface elements associated with this privilege.
HC and VC
Allow Virtual Machine Files Upload
Write files associated with a virtual machine, including vmx, disks, logs and nvram.
There are no user VI Client interface elements associated with this privilege.
HC and VC
Clone Clone an existing virtual machine and allocate resources.
User interface element — file menu, context menu, Summary tab
VC only
Clone Template Clone a template.
User interface element — file menu, context menu, Virtual Machines tab
VC only
Create Template From Virtual Machine
Creates a new template from a virtual machine.
User interface element — “Clone to template...” file menu, context menu, Summary tab items
VC only
Customize Customize a virtual machine’s guest operating system without moving the VM.
User interface element — Clone Virtual Machine Wizard: Guest Customization
VC only
Deploy Template Creates a new virtual machine from a template.
User interface element — “Deploy to template” file menu, context menu items, Virtual Machines tab
VC only
Mark As Template Mark an existing, powered off VM as a template.
User interface element — “Convert to template...” file menu, context menu items, Virtual Machines tab, Summary tab
VC only
Privilege Category
Privilege Name Description Affects
55
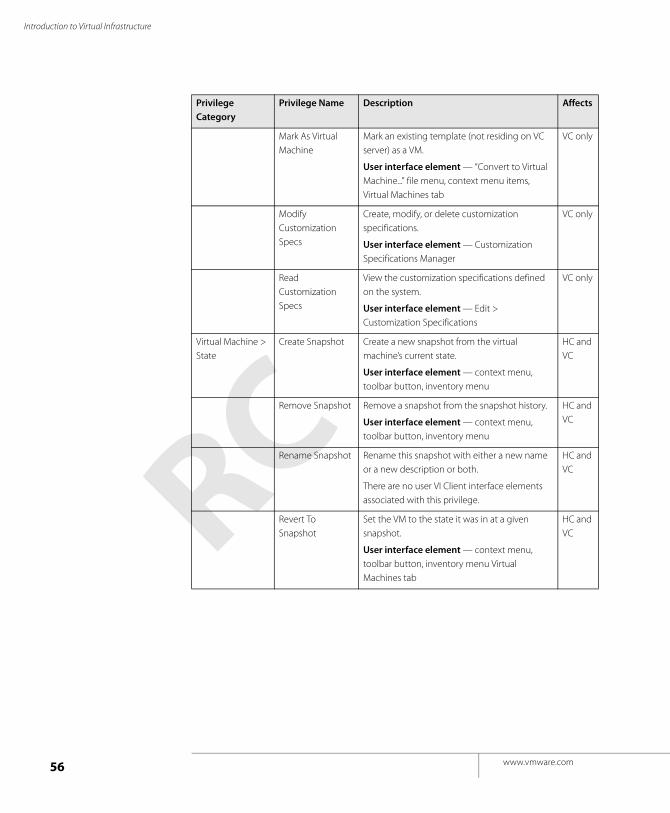
Introduction to Virtual Infrastructure
Mark As Virtual Machine
Mark an existing template (not residing on VC server) as a VM.
User interface element — “Convert to Virtual Machine...” file menu, context menu items, Virtual Machines tab
VC only
Modify Customization Specs
Create, modify, or delete customization specifications.
User interface element — Customization Specifications Manager
VC only
Read Customization Specs
View the customization specifications defined on the system.
User interface element — Edit > Customization Specifications
VC only
Virtual Machine > State
Create Snapshot Create a new snapshot from the virtual machine’s current state.
User interface element — context menu, toolbar button, inventory menu
HC and VC
Remove Snapshot Remove a snapshot from the snapshot history.
User interface element — context menu, toolbar button, inventory menu
HC and VC
Rename Snapshot Rename this snapshot with either a new name or a new description or both.
There are no user VI Client interface elements associated with this privilege.
HC and VC
Revert To Snapshot
Set the VM to the state it was in at a given snapshot.
User interface element — context menu, toolbar button, inventory menu Virtual Machines tab
HC and VC
Privilege Category
Privilege Name Description Affects
www.vmware.com56
C H A P T E R 3 Planning Permissions
Understanding RolesVirtualCenter and ESX Server grant access to objects only to users who have been assigned permissions for the object. When you assign a user or group permissions for the object, you do so by pairing the user or group with a role. A role is a predefined set of privileges.
ESX Server hosts provide three default roles, and you cannot change the privileges associated with these roles. Each subsequent role includes the privileges of the previous role.
• No Access User — Users assigned this role for an object cannot view or change the object. For example, a user who has a No Access role for a particular virtual machine cannot see the virtual machine in the VI Client inventory when he or she logs on to the ESX Server host. With a No Access role for a particular object, a user can select the VI Client tabs associated with the no-access object, but the tab displays no content. For example, if the user doesn’t have access to any virtual machines, he or she can select the Virtual Machines tab but won’t see a virtual machine listing on the tab or any status information. The table is blank.
The No Access role is the default assigned to any user or group you create on an ESX Server host. You can elevate or lower a newly created user’s or group’s role on an object-by-object basis.
• Read Only User — Users assigned this role for an object are allowed to view the state of the object and details about the object.
This user can view virtual machine, host, and resource pool attributes, that is, all the tab panels in the VI Client except the Console tab. The user cannot view the remote console for a host. All actions through the menus and toolbars are disallowed.
• Administrator — Users assigned this role for an object are allowed to view and perform all actions on the object.
Create new roles using the role-editing facilities in the VI Client to create privilege sets that match your user needs. If you use the VI Client connected to VirtualCenter to manage your ESX Server hosts, you have additional roles to choose from VirtualCenter. The roles you create directly on an ESX Server host are not accessible within VirtualCenter. You can work with these roles only if you log on to the host directly from the VI Client.
57
Introduction to Virtual Infrastructure
Planning Access PermissionFor each object in the Virtual Infrastructure hierarchy, determine the permissions for each Virtual Infrastructure user and group.
Typically, lower level permission roles are assigned at higher level locations in the hierarchy. As you move down into the branches of the hierarchy, users and groups permissions start to differentiate: some users and groups require higher permission roles in some branches, while other users and groups require higher permission roles in other branches.
Note: Several users may access the VirtualCenter Server from different Virtual Infrastructure Clients at the same time. Virtual Infrastructure does not explicitly restrict users with the same login and password from accessing and taking action within the VIrtual Infrastructure environment.
Remove users from the Windows Domain Controller or Active Directory, and they lose permissions to all objects in the Virtual Infrastructure system on their next attempts at login. Users that are currently logged in and are removed from the Windows databases retain their Virtual Infrastructure permissions as long as they remain logged in. After they log out, they can no longer access the Virtual Infrastructure system. Individual permissions, or those granted as part of inclusion in another group, are not affected.
Change a user's name in the Windows Domain Controller or Active Directory, and the existing user name becomes invalid in the Virtual Infrastructure system. The same methodology applies to groups, but this applies to a group only after VirtualCenter Server has been restarted.
For more information, see the online help files.
www.vmware.com58
C H A P T E R 4
Working with Virtual MachinesThis chapter contains the following information about creating and working with templates.
• Creating and Working With Virtual Machines on page 60
• Creating New Virtual Machines on page 61
• VMware Tools on page 65
• Datastores on page 72
• Templates on page 75
• Virtual Machine Properties Editor on page 77
59
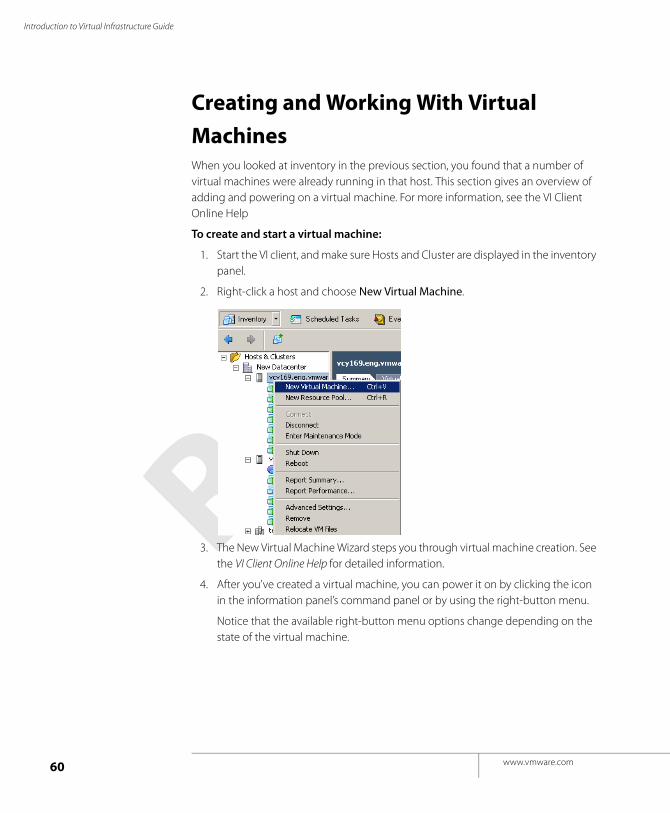
Introduction to Virtual Infrastructure Guide
Creating and Working With Virtual
MachinesWhen you looked at inventory in the previous section, you found that a number of virtual machines were already running in that host. This section gives an overview of adding and powering on a virtual machine. For more information, see the VI Client Online Help
To create and start a virtual machine:
1. Start the VI client, and make sure Hosts and Cluster are displayed in the inventory panel.
2. Right-click a host and choose New Virtual Machine.
3. The New Virtual Machine Wizard steps you through virtual machine creation. See the VI Client Online Help for detailed information.
4. After you’ve created a virtual machine, you can power it on by clicking the icon in the information panel’s command panel or by using the right-button menu.
Notice that the available right-button menu options change depending on the state of the virtual machine.
www.vmware.com60
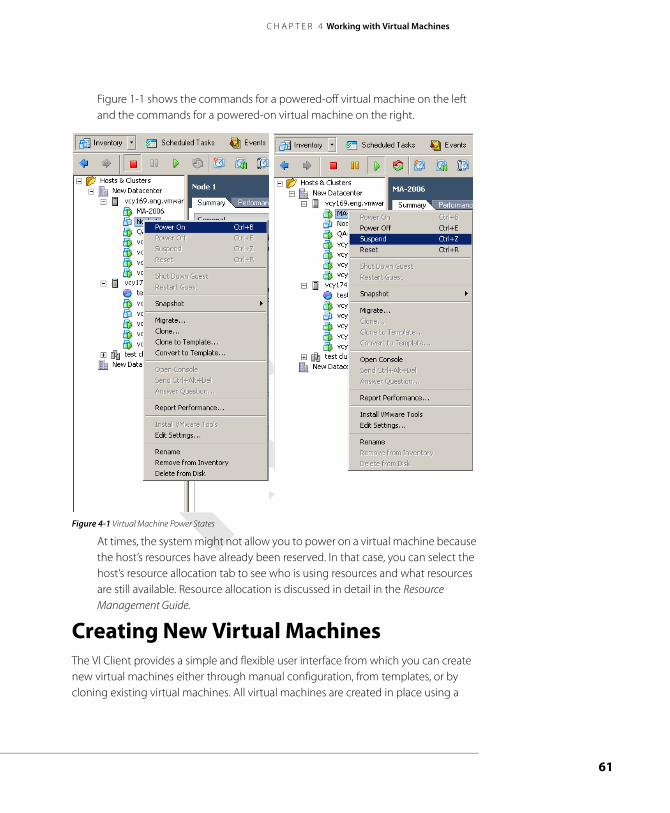
C H A P T E R 4 Working with Virtual Machines
Figure 1-1 shows the commands for a powered-off virtual machine on the left and the commands for a powered-on virtual machine on the right.
Figure 4-1 Virtual Machine Power States
At times, the system might not allow you to power on a virtual machine because the host’s resources have already been reserved. In that case, you can select the host’s resource allocation tab to see who is using resources and what resources are still available. Resource allocation is discussed in detail in the Resource Management Guide.
Creating New Virtual MachinesThe VI Client provides a simple and flexible user interface from which you can create new virtual machines either through manual configuration, from templates, or by cloning existing virtual machines. All virtual machines are created in place using a
61
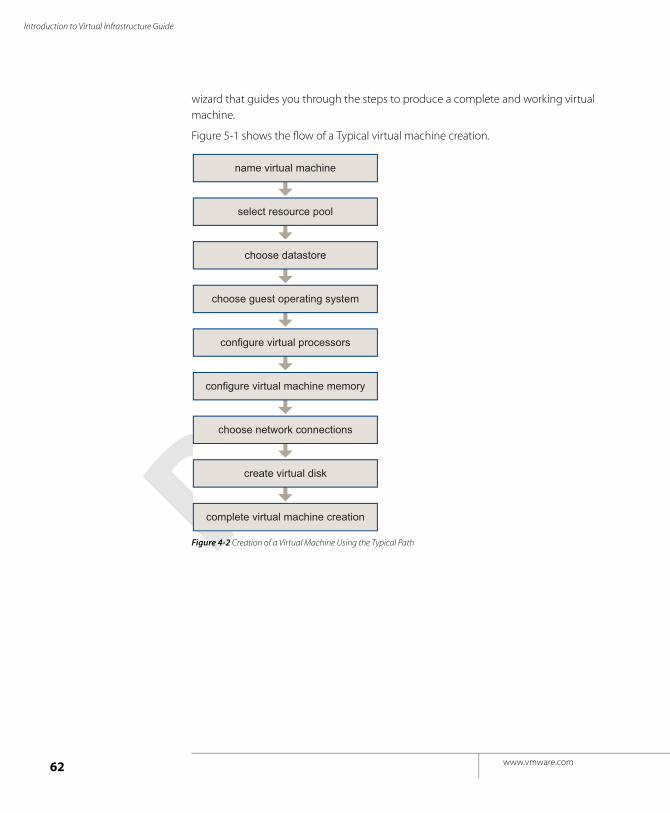
Introduction to Virtual Infrastructure Guide
wizard that guides you through the steps to produce a complete and working virtual machine.
Figure 5-1 shows the flow of a Typical virtual machine creation.
Figure 4-2 Creation of a Virtual Machine Using the Typical Path
name virtual machine
select resource pool
choose datastore
choose guest operating system
configure virtual processors
configure virtual machine memory
choose network connections
create virtual disk
complete virtual machine creation
www.vmware.com62
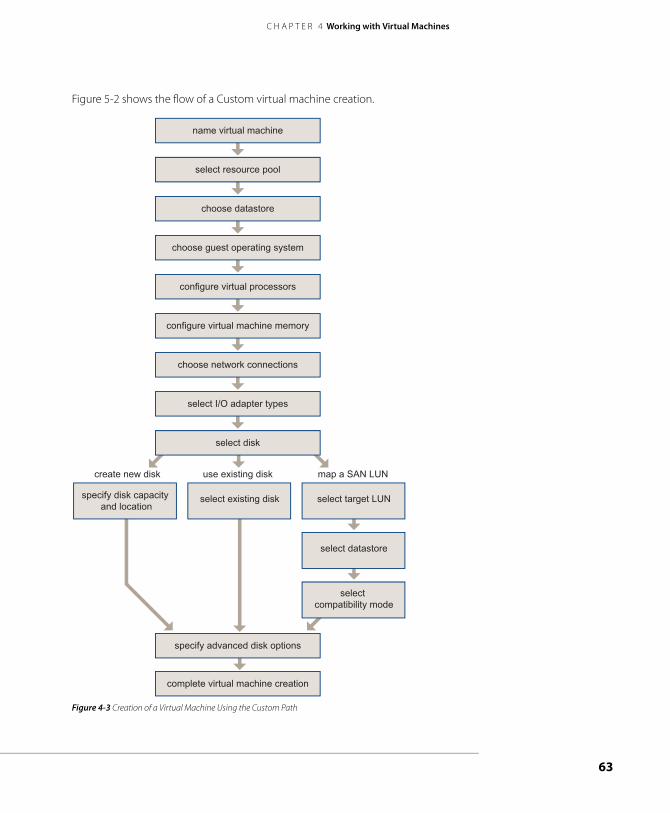
C H A P T E R 4 Working with Virtual Machines
Figure 5-2 shows the flow of a Custom virtual machine creation.
Figure 4-3 Creation of a Virtual Machine Using the Custom Path
name virtual machine
specify disk capacity and location
select target LUN
select datastore
select compatibility mode
select existing disk
create new disk use existing disk map a SAN LUN
select resource pool
choose datastore
choose guest operating system
configure virtual processors
configure virtual machine memory
choose network connections
select I/O adapter types
specify advanced disk options
complete virtual machine creation
select disk
63
Introduction to Virtual Infrastructure Guide
The process of creating a virtual machine includes selecting the specific type of virtual machine creation that you want from either the main or object context menus. Depending on the selection, you see a slightly different set of screens tailored for the particular process you chose. Any choices that are not applicable are disabled. For example, Clone is disabled if there are no virtual machines in your inventory. In all cases, the widest range of choices is available for optimal flexibility. See the online help files for information on creating virtual machines using the Create New Virtual Machine Wizard.
Migration Issues
Virtual Machine Compatibility
Migrating a Linux virtual machine from ESX Server 3 to ESX Server 2.x prevents the virtual machine from running until the old CMOS is replaced with a new one. The following message is displayed: “The CMOS of this virtual machine is incompatible with the current version of VMware ESX server. A new CMOS with default values will be used instead.”
Mapping a SAN LUNWhen you create a virtual machine, one of the options is to map a SAN LUN. Instead of storing virtual machine data in a virtual disk file, you can store the data directly on a SAN LUN. This is useful if you are running applications in your virtual machines that need visibility to the physical characteristics of the storage device.
When you map a LUN to a VMFS volume, VI Client creates a mapping file that points to the raw LUN. Encapsulating disk information in a file allows VI Client to lock the LUN so that only one virtual machine can write to it.
This mapping file has a .vmdk extension, but the file contains only disk information describing the mapping to the LUN on the ESX Server system. The actual data is stored on the LUN.
Note: Using VI Client, you cannot deploy a virtual machine from a template and store its data on a LUN. When you deploy a virtual machine from a template, you can store its data in a virtual disk file.
A compatibility mode is either physical or virtual.
• Physical compatibility mode allows the guest operating system to access the hardware directly. Physical compatibility is useful if you are using SAN-aware applications in the virtual machine.
www.vmware.com64
C H A P T E R 4 Working with Virtual Machines
• Virtual compatibility mode allows the virtual machine to use VMware snapshots and other advanced functionality. Virtual compatibility allows the LUN to behave as if it were a virtual disk, so you can use features like disk modes. However, a LUN configured for physical compatibility cannot be cloned, made into a template, or migrated if the migration involves copying the disk.
When you clone the disk, make a template out of it, or migrate it (if the migration involves copying the disk). The contents of the LUN are copied into a virtual disk (.vmdk) file.
Power State ExceptionsIf the physical machine on which your virtual machines reside crashes or loses power while saving a checkpoint, that checkpoint file might be corrupted. If you try to resume the virtual machine from that checkpoint file, the vmx will crash while trying to load it. You must delete the checkpoint file before trying to power on the virtual machine again. Remove the .vmss file and restart the virtual machine.
NIC MorphingIn ESX Server 3, the virtual vlance hardware is NIC morphing hardware. It looks like a vlance device to a regular pcnet32 driver but looks like a vmxnet device to a vmxnet driver. The vmxnet NIC appears as a vlance device but morphs on the fly to vmxnet. This is for ease of use and driver signing.
To install the vmxnet driver
1. Uninstall the pcnet32 driver so that the hardware resources are free for the vmxnet driver.
2. Install the vmxnet driver.
Previously, a device was either vmxnet or vmlance. A virtual machine was created with vlance, and then the tools were installed. The tools did not recognize the vmxnet driver, so the driver was not loaded.
3. Power off the virtual machine.
4. Add a vmxnet device.
5. Power on the virtual machine.
6. Run tools-config again to pickup the vmxnet driver.
VMware ToolsVMware Tools is a suite of utilities that enhances the performance of the virtual machine’s guest operating system and improves management of the virtual machine.
65

Introduction to Virtual Infrastructure Guide
For more information about installing a guest operating system in your virtual machine, see the Guest Operating System Customization Guide.
Note: It is important that you install VMware Tools in the guest operating system. Although the guest operating system can run without VMware Tools, you lose important functionality and convenience mentioned in the list below.
When you install VMware Tools, you install:
• VMware Tools service (or vmware-guestd on Linux guests).
• Set of VMware device drivers, including the following:
• SVGA display driver
• vmxnet networking driver for some guest operating systems
• BusLogic SCSI driver for some guest operating systems
• Memory control driver for efficient memory allocation between virtual machines
• Sync driver to quiesce I/O for Consolidated Backup
• VMware mouse driver
• VMware Tools control panel that lets you modify settings, shrink virtual disks, and connect and disconnect virtual devices.
• Scripts that help you to automate guest operating system operations. The scripts run when the virtual machine’s power state changes.
• Component that supports copying and pasting text between the guest and managed host operating systems in Microsoft Windows guest operating systems. The copy and paste option is not supported in Linux guest operating systems.
Configure the guest operating system before installing or reinstalling VMware Tools. This enables VMware tools to determine the correct mouse configuration and module configuration.
Caution: If the guest operating system is installed but not correctly configured when you install VMware Tools, the VMware Tools installation does not work correctly. This can cause the guest operating system to crash.
Installing or Upgrading VMware ToolsThe installers for VMware Tools for Windows, Linux, and NetWare guest operating systems are built into ESX Server as ISO image files.
www.vmware.com66
C H A P T E R 4 Working with Virtual Machines
Note: If you do not have VMware Tools installed in your virtual machine, you cannot use the shutdown or restart options. You can only use the Power options. To shut down the guest operating system, do it from within the virtual machine console before you power down the virtual machine.
To install or upgrade VMware Tools
1. From the VI Client, power on the virtual machine.
2. When the guest operating system starts, select Virtual Machines > Install VMware Tools.
3. From inside the virtual machine, click Yes to launch the InstallShield Wizard.
If you have autorun enabled in your guest operating system (the default setting for Windows operating systems), a dialog box appears.
If autorun is not enabled, run the VMware Tools installer. Click Start > Run and enter D:\setup.exe where D: is your first virtual CD-ROM drive.
4. Follow the onscreen instructions.
• On Windows Server 2003, the SVGA driver is installed automatically, and the guest operating system uses it after it reboots.
• After you install VMware Tools, reboot Windows 2000 and Windows XP guest operating systems to use the new driver.
Mass VMware Tools UpgradeIn ESX Server 3, you can upgrade VMware Tools and virtual hardware for multiple virtual machines without interacting with the virtual machine from the virtual machine console. This feature allows you to upgrade VMware Tools and virtual hardware for one or more virtual machine from earlier releases.
RequirementsThe following are VMware Tools requirements:
• Only virtual machines managed by VirtualCenter 2 can be upgraded.
• Mass upgrades are only available for Microsoft Windows 2000 and above.
• Windows NT and Linux are not supported.
• The virtual disk must be on a VMFS-3 volume.
• Virtual machines must be powered off.
• Because the mass upgrades command-line tool is installed as part of the VirtualCenter 2 server installation and run on VirtualCenter Server, the upgrader runs on Microsoft Windows only.
67
Introduction to Virtual Infrastructure Guide
Doing a Mass Upgrade of Tools and Virtual Hardware on Multiple Virtual MachinesThe upgrade tool, available from the VirtualCenter installation directory, can be used only from the command line with the following options.
Command:
vmware-vmupgrade.exe -u user [-p password] [-n vmname] [-h host] [-m maxpowerons] [-s] [-q]
Table 4-1 describes the options available with the upgrade command.
Table 4-1 Options
VMware Tools PropertiesWhen VMware Tools is installed in your virtual machine, a VMware Tools icon is displayed in the virtual machine’s system tray.
RequirementsThe following are VMware Tools requirements:
Option Description
-u user Specifies a user with sufficient privileges on the target virtual machine, including VirtualMachine.Config.*, VirtualMachine.Interact.*, and VirtualMachine.Provisioning.*
-p password Specifies a password on the command line. If omitted, the tool prompts for a password.
-n vmname The name of the virtual machine to upgrade. This name corresponds to the display name of a virtual machine. Specify multiple virtual machines using multiple -n parameters. The -n option is ignored if -h is specified.
-h host Attempts to upgrade all the virtual machines on a particular host. Fails if the specified host is not version ESX 3.0 or greater.
-m maxpowerons On a particular host, only power-on maxpowerons virtual machines at a time.
-t maxpowerontime After the tools upgrade is scheduled on a virtual machine, the virtual machine is powered on and allowed to run through the tools installation process. In most cases, the guest powers down the machine automatically when the process completes. This parameter allows a user to set the maximum amount of time for a virtual machine to be powered on in case the guest is unable to shut down the machine.
-s Skips the tools and does only the virtual hardware upgrade.
-q Works quietly. Doesn’t produce status or completion messages on stdout.
www.vmware.com68
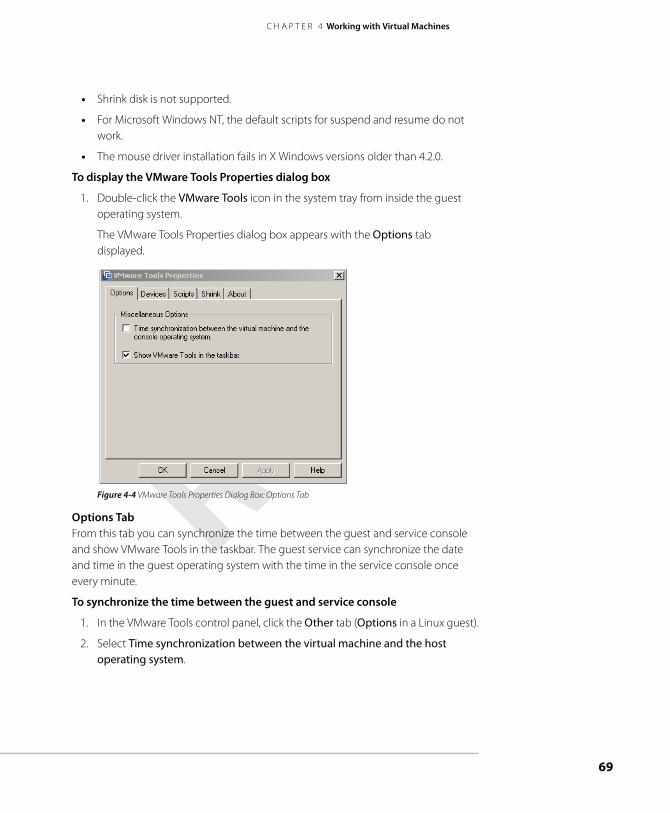
C H A P T E R 4 Working with Virtual Machines
• Shrink disk is not supported.
• For Microsoft Windows NT, the default scripts for suspend and resume do not work.
• The mouse driver installation fails in X Windows versions older than 4.2.0.
To display the VMware Tools Properties dialog box
1. Double-click the VMware Tools icon in the system tray from inside the guest operating system.
The VMware Tools Properties dialog box appears with the Options tab displayed.
Figure 4-4 VMware Tools Properties Dialog Box: Options Tab
Options TabFrom this tab you can synchronize the time between the guest and service console and show VMware Tools in the taskbar. The guest service can synchronize the date and time in the guest operating system with the time in the service console once every minute.
To synchronize the time between the guest and service console
1. In the VMware Tools control panel, click the Other tab (Options in a Linux guest).
2. Select Time synchronization between the virtual machine and the host operating system.
69
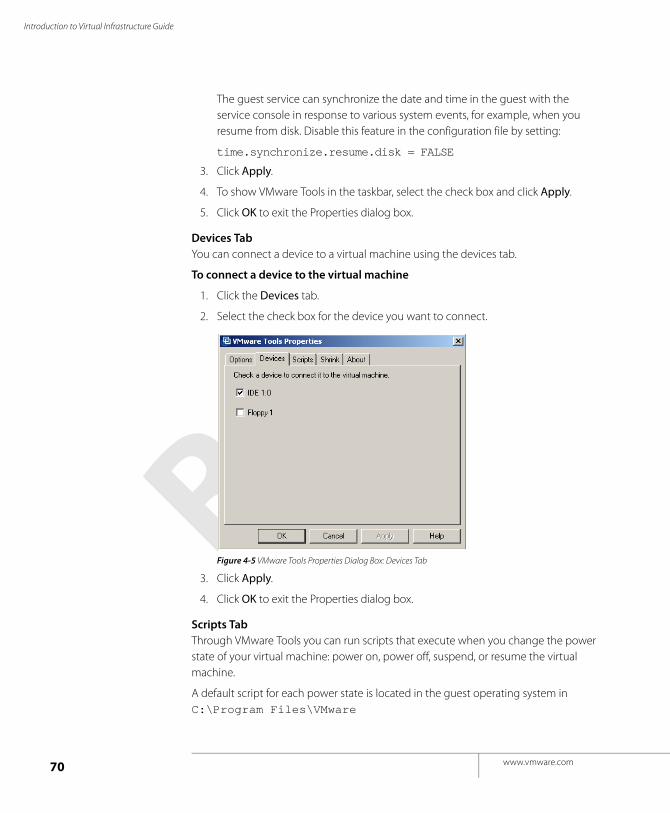
Introduction to Virtual Infrastructure Guide
The guest service can synchronize the date and time in the guest with the service console in response to various system events, for example, when you resume from disk. Disable this feature in the configuration file by setting:
time.synchronize.resume.disk = FALSE
3. Click Apply.
4. To show VMware Tools in the taskbar, select the check box and click Apply.
5. Click OK to exit the Properties dialog box.
Devices TabYou can connect a device to a virtual machine using the devices tab.
To connect a device to the virtual machine
1. Click the Devices tab.
2. Select the check box for the device you want to connect.
Figure 4-5 VMware Tools Properties Dialog Box: Devices Tab
3. Click Apply.
4. Click OK to exit the Properties dialog box.
Scripts TabThrough VMware Tools you can run scripts that execute when you change the power state of your virtual machine: power on, power off, suspend, or resume the virtual machine.
A default script for each power state is located in the guest operating system in C:\Program Files\VMware
www.vmware.com70
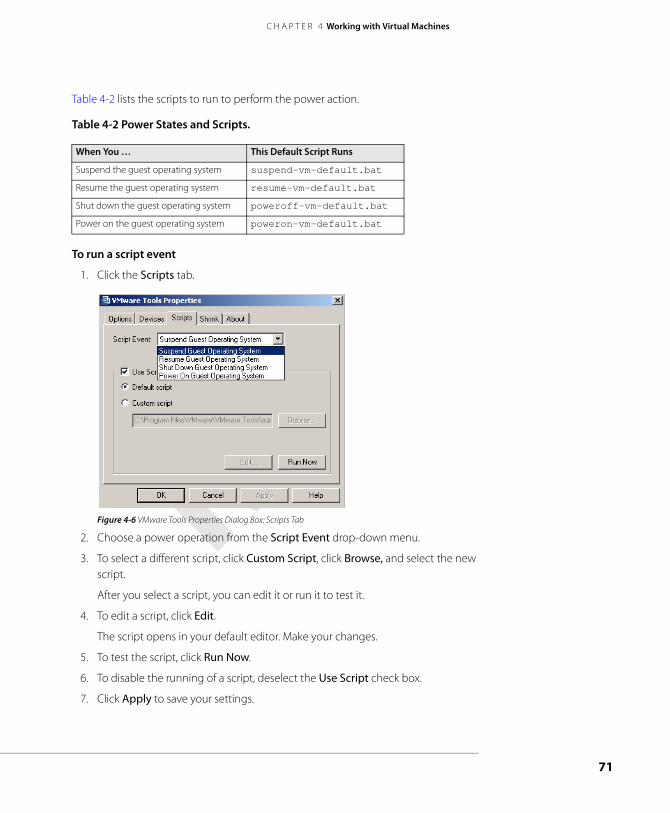
C H A P T E R 4 Working with Virtual Machines
Table 4-2 lists the scripts to run to perform the power action.
Table 4-2 Power States and Scripts.
To run a script event
1. Click the Scripts tab.
Figure 4-6 VMware Tools Properties Dialog Box: Scripts Tab
2. Choose a power operation from the Script Event drop-down menu.
3. To select a different script, click Custom Script, click Browse, and select the new script.
After you select a script, you can edit it or run it to test it.
4. To edit a script, click Edit.
The script opens in your default editor. Make your changes.
5. To test the script, click Run Now.
6. To disable the running of a script, deselect the Use Script check box.
7. Click Apply to save your settings.
When You … This Default Script Runs
Suspend the guest operating system suspend-vm-default.bat
Resume the guest operating system resume-vm-default.bat
Shut down the guest operating system poweroff-vm-default.bat
Power on the guest operating system poweron-vm-default.bat
71

Introduction to Virtual Infrastructure Guide
8. Click OK to exit the properties dialog box.
About TabThe About tab contains information about VMware Tools, such as the build number.
DatastoresA datastore is a new global object type that is managed within the Inventory list in VirtualCenter and the VI Client. A datastore provides storage for a managed host and is the location for stored virtual machines.
This option in the Inventory navigation button menu displays the list of available datastores. This option is available only when connected to a VirtualCenter Server. The datastore activities include:
• Browse the datastore
• Remove the datastore
Note: If you rename a datastore on a host client that is managed by VirtualCenter and then attempt to create a virtual machine in that datastore using VirtualCenter, the name of the datastore automatically reverts to the original name. You can change the name only through VirtualCenter.
www.vmware.com72
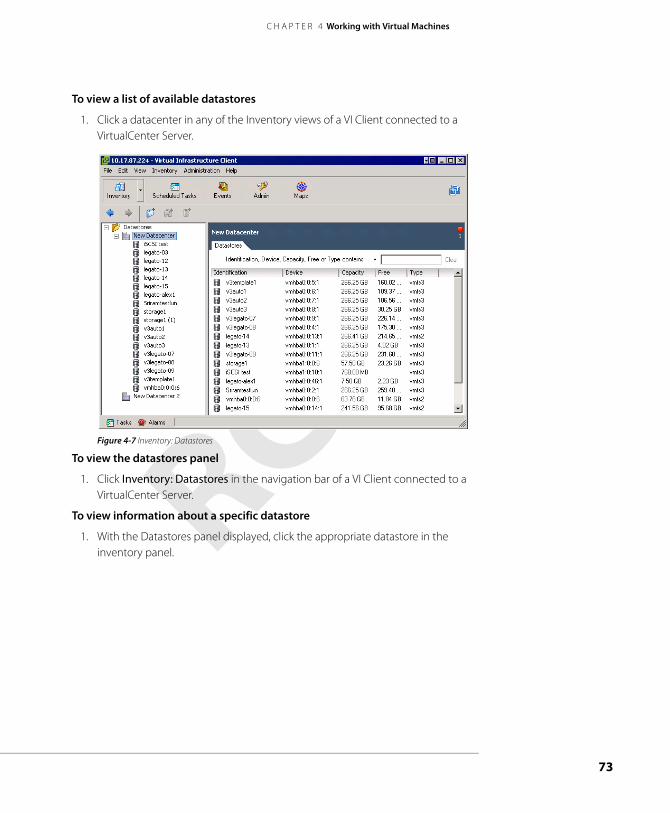
C H A P T E R 4 Working with Virtual Machines
To view a list of available datastores
1. Click a datacenter in any of the Inventory views of a VI Client connected to a VirtualCenter Server.
Figure 4-7 Inventory: Datastores
To view the datastores panel
1. Click Inventory: Datastores in the navigation bar of a VI Client connected to a VirtualCenter Server.
To view information about a specific datastore
1. With the Datastores panel displayed, click the appropriate datastore in the inventory panel.
73
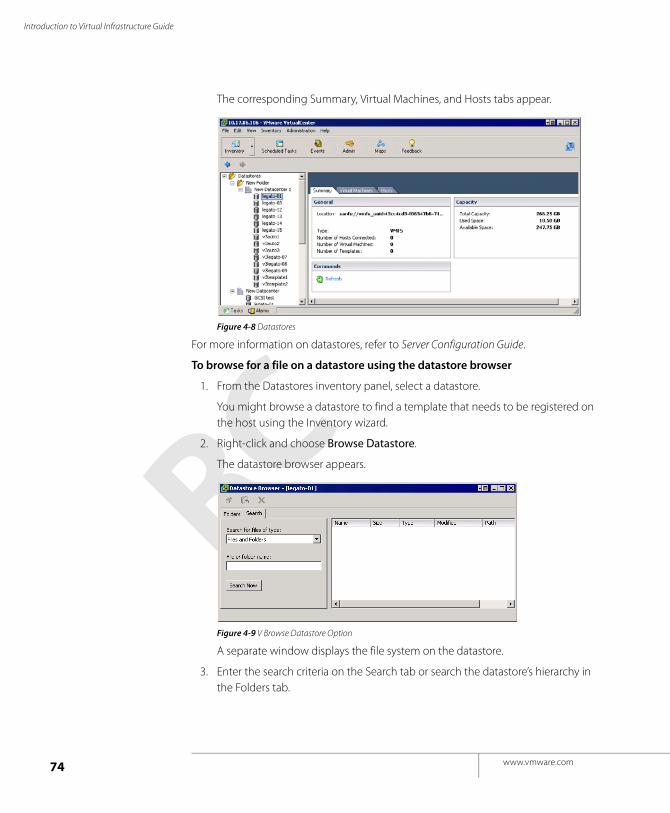
Introduction to Virtual Infrastructure Guide
The corresponding Summary, Virtual Machines, and Hosts tabs appear.
Figure 4-8 Datastores
For more information on datastores, refer to Server Configuration Guide.
To browse for a file on a datastore using the datastore browser
1. From the Datastores inventory panel, select a datastore.
You might browse a datastore to find a template that needs to be registered on the host using the Inventory wizard.
2. Right-click and choose Browse Datastore.
The datastore browser appears.
Figure 4-9 V Browse Datastore Option
A separate window displays the file system on the datastore.
3. Enter the search criteria on the Search tab or search the datastore’s hierarchy in the Folders tab.
www.vmware.com74
C H A P T E R 4 Working with Virtual Machines
TemplatesA template is a golden image of a virtual machine. This image typically includes a specified operating system and configuration, which provides virtual counterparts to hardware components, and a set of applications. Using templates allows you to capture a master copy of a virtual machine from which you can make copies without having to create and configure each one separately.
Virtual machines and templates are included within a single domain and can be managed together. You can order collections of virtual machines and templates into arbitrary folders and apply a variety of permissions to both virtual machines and templates. Virtual machines can be transformed into templates without requiring a full copy of the virtual machine files and the creation of a new object.
You can use templates to create new virtual machines by cloning the template as a virtual machine. When complete, the deployed virtual machine is added to the inventory panel datacenter where the host resides.
Templates are created from existing virtual machines. After a template is created, if it is residing on a VMFS volume or a datastore, it can be deployed to only managed hosts that have direct access to that datastore. On ESX Server hosts, the datastores are the VMFS, local, or NAS volumes that you configured for your ESX Server.
To edit or update the virtual machine properties, for example, to apply a patch or install an application, you would convert the template to a virtual machine, perform the action, and then make the virtual machine a template again. If there are no changes to be made, you would simply deploy a new instance. See the VI Client Online Help for more information.
75
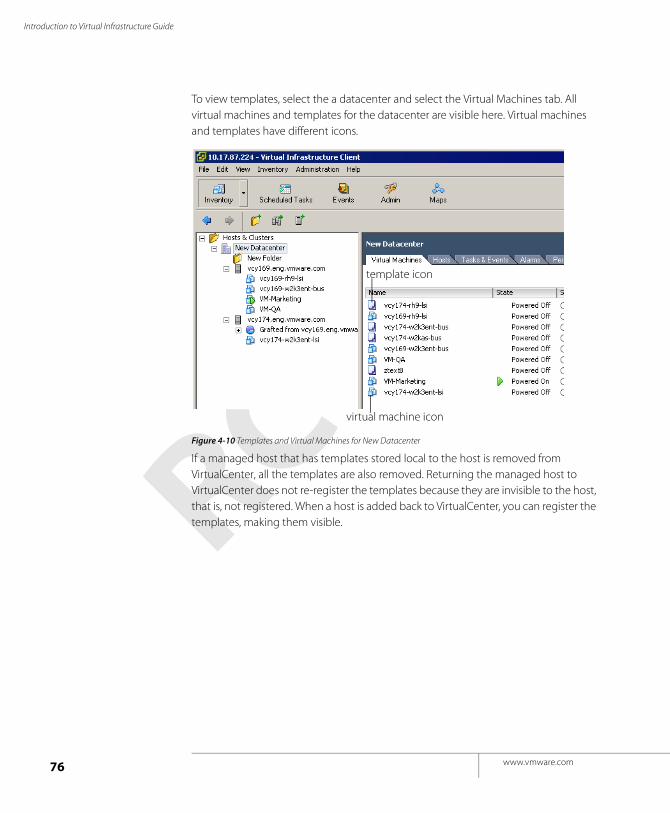
Introduction to Virtual Infrastructure Guide
To view templates, select the a datacenter and select the Virtual Machines tab. All virtual machines and templates for the datacenter are visible here. Virtual machines and templates have different icons.
Figure 4-10 Templates and Virtual Machines for New Datacenter
If a managed host that has templates stored local to the host is removed from VirtualCenter, all the templates are also removed. Returning the managed host to VirtualCenter does not re-register the templates because they are invisible to the host, that is, not registered. When a host is added back to VirtualCenter, you can register the templates, making them visible.
template icon
virtual machine icon
www.vmware.com76
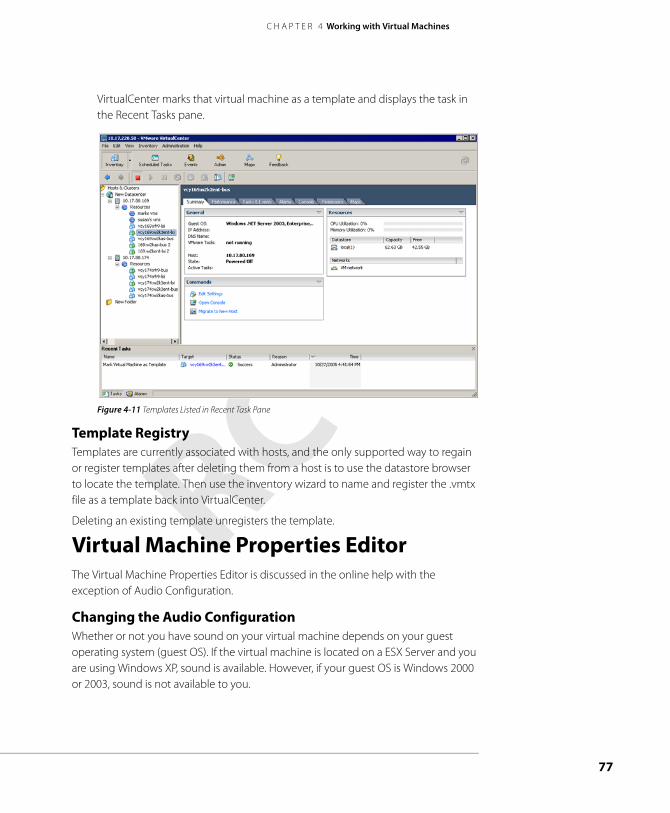
C H A P T E R 4 Working with Virtual Machines
VirtualCenter marks that virtual machine as a template and displays the task in the Recent Tasks pane.
Figure 4-11 Templates Listed in Recent Task Pane
Template RegistryTemplates are currently associated with hosts, and the only supported way to regain or register templates after deleting them from a host is to use the datastore browser to locate the template. Then use the inventory wizard to name and register the .vmtx file as a template back into VirtualCenter.
Deleting an existing template unregisters the template.
Virtual Machine Properties EditorThe Virtual Machine Properties Editor is discussed in the online help with the exception of Audio Configuration.
Changing the Audio ConfigurationWhether or not you have sound on your virtual machine depends on your guest operating system (guest OS). If the virtual machine is located on a ESX Server and you are using Windows XP, sound is available. However, if your guest OS is Windows 2000 or 2003, sound is not available to you.
77
Introduction to Virtual Infrastructure Guide
To change the audio configuration
1. From the VirtualCenter client, click Inventory in the navigation bar.
2. Expand the inventory as needed and click the appropriate virtual machine.
3. To display the Virtual Machine Properties dialog box, in the Summary tab, click Edit Properties or choose Edit > Properties.
4. Click the Hardware tab.
5. Click Audio in the Device list.
6. Under Device status, the default setting is Connect at power on.
Deselect the check box if you do not want the sound adapter to be connected when the virtual machine powers on.
7. Select Use default host sound adapter to use the default host sound adapter or select Specify host sound adapter and select a specific adapter from the list.
8. Click OK to save your changes.
The Virtual Machine Properties dialog box closes.
Migration with VMotionThis section describes migrating or moving a virtual machine from one host to another. Migrating a powered-off virtual machine is called migration. Migrating a powered-on virtual machine is called migration with VMotion. Migration with VMotion, designed to be used between highly compatible systems, allows you to migrate virtual machines with no downtime but requires VMotion licensing and specific configuration. In this release, you can migrate a virtual machine in a suspended state using the migration API.
Note: Copying a virtual machine is creating a new virtual machine. It is not a form of migration.
Understanding the Migration OptionsIn VirtualCenter 1.x, you had two options:
• Migration—Moving a powered-off virtual machine (configuration files and disk files).
• Migration with VMotion—Moving a virtual machine between hosts while the virtual machine is powered on and performing transactions (memory and configuration files only). This functionality has specific requirements, including the activation of VMotion on both the source and target host. When a migration
www.vmware.com78
C H A P T E R 4 Working with Virtual Machines
with VMotion is performed, the operations of the virtual machine can continue without interruption.
In VirtualCenter 2.0, you have two migration options and one relocation option:
• Migration
• Migration—Moving a powered-off virtual machine (configuration files but no disk movement).
When a virtual machine is suspended, migration moves only configuration files with no disk movement.
Note: Virtual machines must be available in a SAN.
• Migration with VMotion—Moving a virtual machine that is powered on.
• Relocation
• Migration moves configuration and disk files to their destination when a virtual machine is powered off or suspended.
Note: Virtual machines do not need to be available in SAN.
For virtual machines on VMFS3 that are migrated from one ESX Server host to another, the virtual machine's configuration file is already on the SAN and does not need to be moved by migration or migration with VMotion.
Virtual machines can be moved between hosts within the same datacenter. Virtual machines cannot be moved between datacenters.
Note: You cannot migrate virtual machines with raw disks. You cannot migrate with VMotion virtual machines with raw or clustered disks.
Migration with VMotionVMotion allows working processes to continue throughout a migration with VMotion. The entire state of the virtual machine as well as its configuration file, if necessary, are moved to the new host even while the data storage remains in the same location on the SAN. The associated virtual disk remains in the same location on the SAN storage that is shared between the two hosts. Once the configuration file is migrated to the alternate host, the virtual machine runs on the new host.
The state information includes the current memory content and all the information that defines and identifies the virtual machine. The memory content includes transaction data and whatever bits of the operating system and applications are in the memory. The defining and identification information stored in the state includes all the data that maps to the virtual machine hardware elements, such as BIOS, devices, CPU, MAC addresses for the Ethernet cards, chip set states, registers, and so forth.
79
Introduction to Virtual Infrastructure Guide
Migration with VMotion happens in three stages:
1. When the migration with VMotion is requested, VirtualCenter verifies that the existing virtual machine is in a stable state with its current host.
2. The virtual machine state information, that is, memory, registers, and network connections, is copied to the target host.
3. The virtual machine resumes its activities on the new host.
If any error occurs during migration, the virtual machines revert to their original states and locations.
You can move virtual machines manually or set up a scheduled task to perform the migration. Refer to the Virtual Infrastructure Users Guide for information on scheduling tasks.
MigrationMigration requires that the virtual machine being migrated is powered off or suspended prior to beginning the migration process. With a migration, you also have the option of moving the associated disks from one host to another. A migration consists of the following steps:
1. The configuration files, including the NVRAM file (BIOS settings), log files, and the suspend file for suspended virtual machines, and the disks of the virtual machine are moved from the source host to the destination host’s associated storage area.
2. The virtual machine is associated (registered) with the new host.
3. After the migration is completed, the old version of the virtual machine is deleted from the source host.
If any error occurs during migration, the virtual machines revert to their original states and locations.
You can move virtual machines manually or set up a scheduled task to perform the migration. Refer to the Virtual Infrastructure Users Guide for information on scheduling tasks.
Customizing Guest Operating SystemsNow that you have created and configured a virtual machine, you have the option to customize the identity and network settings of your virtual machine’s guest operating system so that it is ready to begin work immediately in your target environment.
www.vmware.com80
C H A P T E R 4 Working with Virtual Machines
You can save your virtual machine settings in a specification that you can recall later and reuse. You do this using the customization wizard. This specification is a text file that can be exported from the Customization Specification Manager, edited, and imported back into the manager.
There are two ways to access the customization wizard: using the customization specification manager, which lets you create specifications and store them in the database for later use, and using the wizard when you’re cloning a new virtual machine. See the VI Client Online Help for more information. To install a guest operating system, see the Guest Operating System Installation Guide.
Preparing for Guest CustomizationWhen you create a template or clone an existing virtual machine, you have the opportunity to customize the new guest operating system. The Guest Customization Wizard guides you through the configuration options. See the VI Client Online Help fo rmore information.
Before you run the Guest Customization Wizard, if you intend to perform a Guest Customization, do the following:
• Verify that your system meets the guest customization requirements.
• Install the required components on the Windows machine where the VirtualCenter server is installed.
Note: After deploying and customizing non-volume-licensed versions of Windows XP or Windows 2003, you might need to reactivate your Microsoft operating system on the new virtual machine.
Installing the Microsoft Sysprep ToolsIf you plan to customize a Windows guest operating system, you must first install the Microsoft Sysprep tools on your VirtualCenter server machine.
Microsoft includes the Sysprep tool set on the installation CD-ROMs for Windows 2000, Windows XP, and Windows 2003. It also distributes Sysprep 1.1 from the Microsoft Web site. In order to perform a Windows customization, you must install the Sysprep tools either from your installation CD-ROM or from the 1.1 download package.
During customization, VirtualCenter searches for the Sysprep package corresponding to your guest operating system. If the Sysprep tools are not found under the corresponding provided operating system directory, VirtualCenter searches in the provided \1.1 directory. If VirtualCenter does not find any Sysprep tools, the Windows virtual machine customization does not proceed.
81

Introduction to Virtual Infrastructure Guide
To install the Microsoft Sysprep tools from a Microsoft Web site download:
4. Download the Sysprep package from:
www.microsoft.com/windows2000/downloads/tools/sysprep/default.asp
Although the Sysprep version indicates Windows 2000, it works with both Windows XP Professional and Windows Server 2003.
5. Click Next to continue.
6. Click I agree to accept the terms and conditions.
7. Click Download.
8. Save the file to your local disk.
9. Run the Microsoft installer:
Q257813_w2k_spl_x86_en.exe
10. Extract the files to the provided directory.
The following Sysprep support directories were created during VirtualCenter installation:
C:\<ALLUSERSPROFILE>\Application Data\Vmware\VMware VirtualCenter\sysprep
...\sysprep\1.1\
...\sysprep\2k\
...\sysprep\xp\
...\sysprep\svr2003\
where <ALLUSERSPROFILE> is usually \Documents And Settings\All Users\. This is where vpxd.cfg is also located.
Select the 1.1 subdirectory.
11. Click OK to expand the files.
After you have extracted the files from Q257813_w2k_spl_x86_en.exe to the \1.1 directory, you should see:
...\sysprep\1.1\docs\
...\sysprep\1.1\samples\
...\sysprep\1.1\tools\
...\sysprep\1.1\contents.txt
To install the Microsoft Sysprep tools from the Windows operating system CD
1. Insert the Windows operating system CD into the CD-ROM, for example, D: drive.
www.vmware.com82

C H A P T E R 4 Working with Virtual Machines
2. Locate the DEPLOY.CAB file in the CD directory, \Support\Tools.
3. Open and expand the DEPLOY.CAB file, using a tool such as Winzip.exe or another tool capable of reading Microsoft CAB files.
4. Extract the files to the provided directory appropriate to your Sysprep guest operating system.
The following Sysprep support directories were created during VirtualCenter installation:
C:\<ALLUSERSPROFILE>\Application Data\Vmware\VMware VirtualCenter\sysprep
...\sysprep\1.1\
...\sysprep\2k\
...\sysprep\xp\
...\sysprep\svr2003\
where <ALLUSERSPROFILE> is usually \Documents And Settings\All Users\. This is where vpxd.cfg is also located.
Select the subdirectory that corresponds to your operating system.
5. Click OK to expand the files.
After you have extracted the files from DEPLOY.CAB, you should see:
...\sysprep\<guest>\deptool.chm
...\sysprep\<guest>\readme.txt
...\sysprep\<guest>\setupcl.exe
...\sysprep\<guest>\setupmgr.exe
...\sysprep\<guest>\setupmgx.dll
...\sysprep\<guest>\sysprep.exe
...\sysprep\<guest>\unattend.doc
where <guest> is either 2k, xp, or svr2003.
6. Repeat this procedure to extract Sysprep files for each of the Windows guest operating system (Windows 2000, Windows XP, or Windows 2003) you plan to customize using Virtual Center.
You are now ready to customize a new virtual machine with a supported Windows guest operating system when you clone an existing virtual machine.
83

Introduction to Virtual Infrastructure Guide
www.vmware.com84
C H A P T E R 5
Performing Administrative TasksThis chapter gives an overview of VI Client.
• Monitoring on page 86
• Performance Charts on page 88
• Maps on page 92
• SNMP on page 93
85
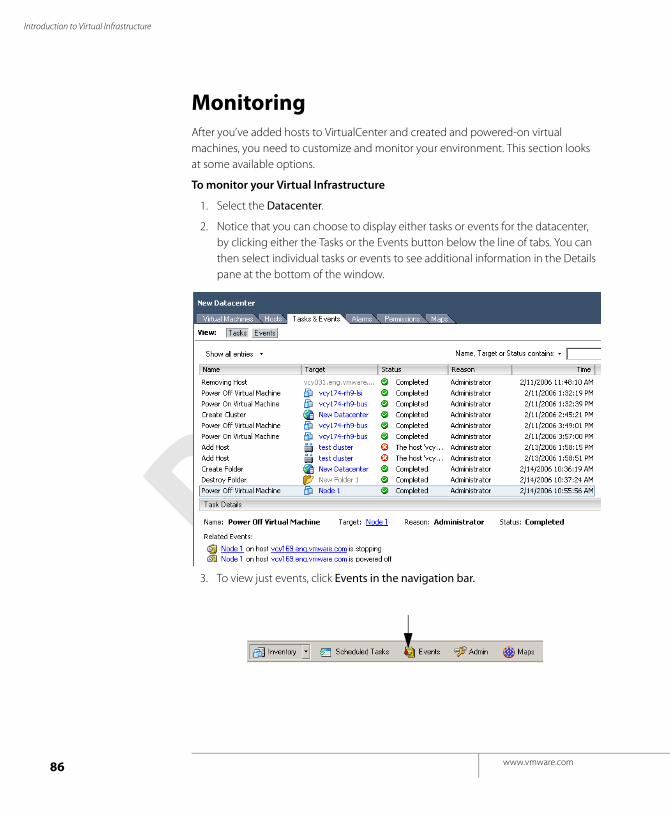
Introduction to Virtual Infrastructure
MonitoringAfter you’ve added hosts to VirtualCenter and created and powered-on virtual machines, you need to customize and monitor your environment. This section looks at some available options.
To monitor your Virtual Infrastructure
1. Select the Datacenter.
2. Notice that you can choose to display either tasks or events for the datacenter, by clicking either the Tasks or the Events button below the line of tabs. You can then select individual tasks or events to see additional information in the Details pane at the bottom of the window.
3. To view just events, click Events in the navigation bar.
www.vmware.com86
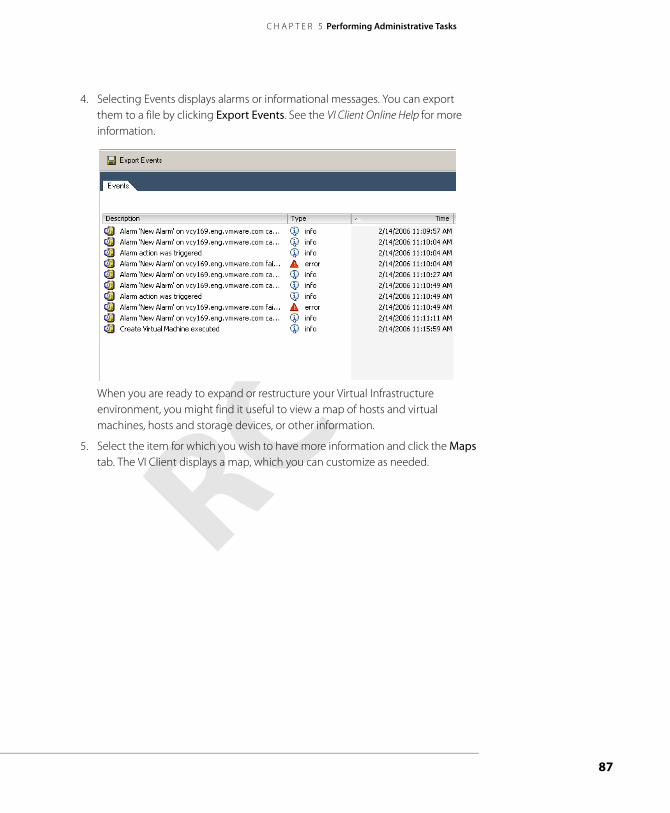
C H A P T E R 5 Performing Administrative Tasks
4. Selecting Events displays alarms or informational messages. You can export them to a file by clicking Export Events. See the VI Client Online Help for more information.
When you are ready to expand or restructure your Virtual Infrastructure environment, you might find it useful to view a map of hosts and virtual machines, hosts and storage devices, or other information.
5. Select the item for which you wish to have more information and click the Maps tab. The VI Client displays a map, which you can customize as needed.
87
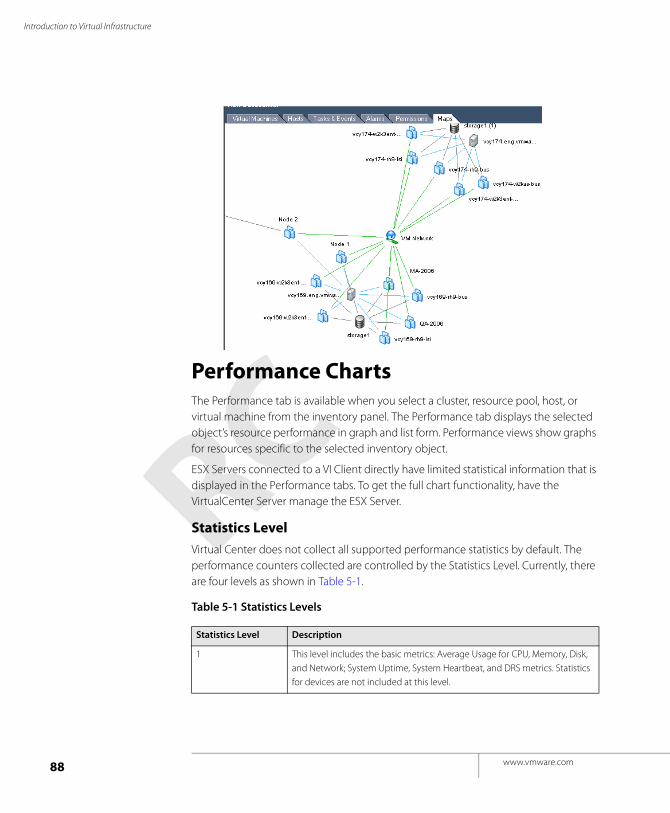
Introduction to Virtual Infrastructure
Performance ChartsThe Performance tab is available when you select a cluster, resource pool, host, or virtual machine from the inventory panel. The Performance tab displays the selected object’s resource performance in graph and list form. Performance views show graphs for resources specific to the selected inventory object.
ESX Servers connected to a VI Client directly have limited statistical information that is displayed in the Performance tabs. To get the full chart functionality, have the VirtualCenter Server manage the ESX Server.
Statistics LevelVirtual Center does not collect all supported performance statistics by default. The performance counters collected are controlled by the Statistics Level. Currently, there are four levels as shown in Table 5-1.
Table 5-1 Statistics Levels
Statistics Level Description
1 This level includes the basic metrics: Average Usage for CPU, Memory, Disk, and Network; System Uptime, System Heartbeat, and DRS metrics. Statistics for devices are not included at this level.
www.vmware.com88
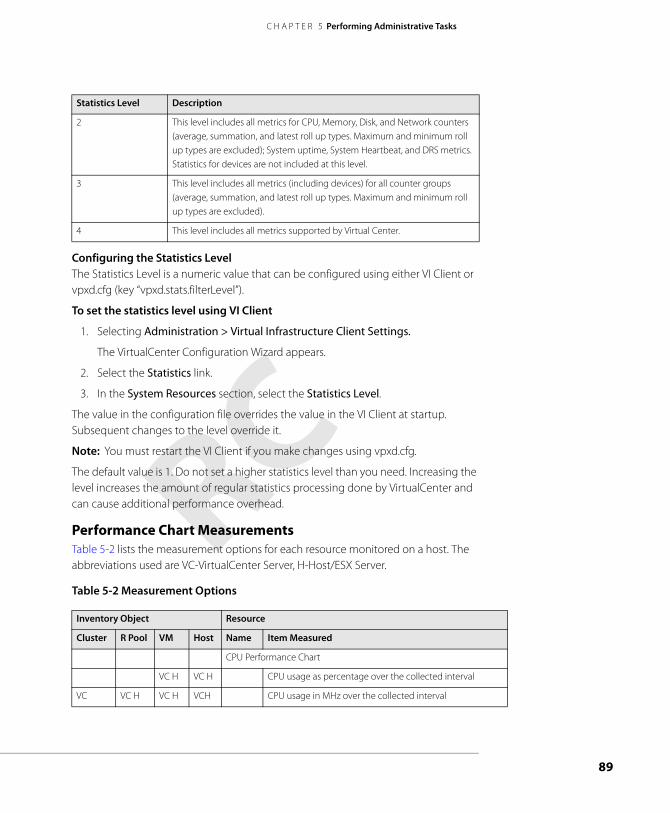
C H A P T E R 5 Performing Administrative Tasks
Configuring the Statistics LevelThe Statistics Level is a numeric value that can be configured using either VI Client or vpxd.cfg (key “vpxd.stats.filterLevel”).
To set the statistics level using VI Client
1. Selecting Administration > Virtual Infrastructure Client Settings.
The VirtualCenter Configuration Wizard appears.
2. Select the Statistics link.
3. In the System Resources section, select the Statistics Level.
The value in the configuration file overrides the value in the VI Client at startup. Subsequent changes to the level override it.
Note: You must restart the VI Client if you make changes using vpxd.cfg.
The default value is 1. Do not set a higher statistics level than you need. Increasing the level increases the amount of regular statistics processing done by VirtualCenter and can cause additional performance overhead.
Performance Chart MeasurementsTable 5-2 lists the measurement options for each resource monitored on a host. The abbreviations used are VC-VirtualCenter Server, H-Host/ESX Server.
Table 5-2 Measurement Options
2 This level includes all metrics for CPU, Memory, Disk, and Network counters (average, summation, and latest roll up types. Maximum and minimum roll up types are excluded); System uptime, System Heartbeat, and DRS metrics. Statistics for devices are not included at this level.
3 This level includes all metrics (including devices) for all counter groups (average, summation, and latest roll up types. Maximum and minimum roll up types are excluded).
4 This level includes all metrics supported by Virtual Center.
Statistics Level Description
Inventory Object Resource
Cluster R Pool VM Host Name Item Measured
CPU Performance Chart
VC H VC H CPU usage as percentage over the collected interval
VC VC H VC H VCH CPU usage in MHz over the collected interval
89
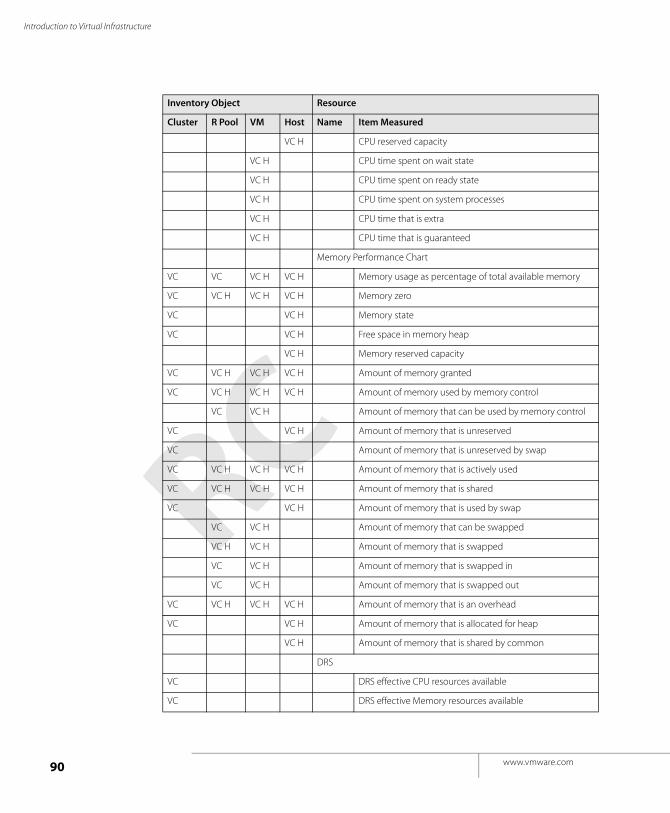
Introduction to Virtual Infrastructure
VC H CPU reserved capacity
VC H CPU time spent on wait state
VC H CPU time spent on ready state
VC H CPU time spent on system processes
VC H CPU time that is extra
VC H CPU time that is guaranteed
Memory Performance Chart
VC VC VC H VC H Memory usage as percentage of total available memory
VC VC H VC H VC H Memory zero
VC VC H Memory state
VC VC H Free space in memory heap
VC H Memory reserved capacity
VC VC H VC H VC H Amount of memory granted
VC VC H VC H VC H Amount of memory used by memory control
VC VC H Amount of memory that can be used by memory control
VC VC H Amount of memory that is unreserved
VC Amount of memory that is unreserved by swap
VC VC H VC H VC H Amount of memory that is actively used
VC VC H VC H VC H Amount of memory that is shared
VC VC H Amount of memory that is used by swap
VC VC H Amount of memory that can be swapped
VC H VC H Amount of memory that is swapped
VC VC H Amount of memory that is swapped in
VC VC H Amount of memory that is swapped out
VC VC H VC H VC H Amount of memory that is an overhead
VC VC H Amount of memory that is allocated for heap
VC H Amount of memory that is shared by common
DRS
VC DRS effective CPU resources available
VC DRS effective Memory resources available
Inventory Object Resource
Cluster R Pool VM Host Name Item Measured
www.vmware.com90
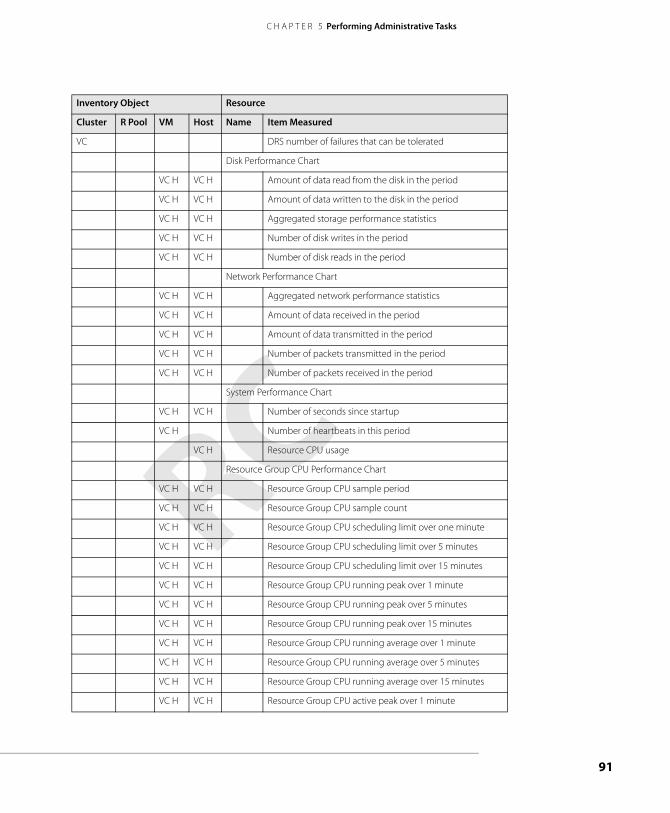
C H A P T E R 5 Performing Administrative Tasks
VC DRS number of failures that can be tolerated
Disk Performance Chart
VC H VC H Amount of data read from the disk in the period
VC H VC H Amount of data written to the disk in the period
VC H VC H Aggregated storage performance statistics
VC H VC H Number of disk writes in the period
VC H VC H Number of disk reads in the period
Network Performance Chart
VC H VC H Aggregated network performance statistics
VC H VC H Amount of data received in the period
VC H VC H Amount of data transmitted in the period
VC H VC H Number of packets transmitted in the period
VC H VC H Number of packets received in the period
System Performance Chart
VC H VC H Number of seconds since startup
VC H Number of heartbeats in this period
VC H Resource CPU usage
Resource Group CPU Performance Chart
VC H VC H Resource Group CPU sample period
VC H VC H Resource Group CPU sample count
VC H VC H Resource Group CPU scheduling limit over one minute
VC H VC H Resource Group CPU scheduling limit over 5 minutes
VC H VC H Resource Group CPU scheduling limit over 15 minutes
VC H VC H Resource Group CPU running peak over 1 minute
VC H VC H Resource Group CPU running peak over 5 minutes
VC H VC H Resource Group CPU running peak over 15 minutes
VC H VC H Resource Group CPU running average over 1 minute
VC H VC H Resource Group CPU running average over 5 minutes
VC H VC H Resource Group CPU running average over 15 minutes
VC H VC H Resource Group CPU active peak over 1 minute
Inventory Object Resource
Cluster R Pool VM Host Name Item Measured
91
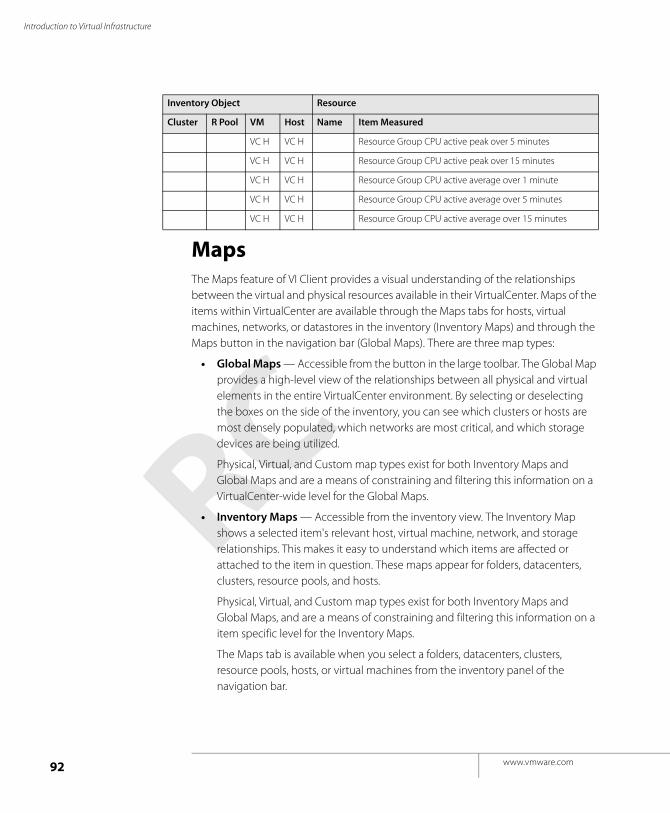
Introduction to Virtual Infrastructure
MapsThe Maps feature of VI Client provides a visual understanding of the relationships between the virtual and physical resources available in their VirtualCenter. Maps of the items within VirtualCenter are available through the Maps tabs for hosts, virtual machines, networks, or datastores in the inventory (Inventory Maps) and through the Maps button in the navigation bar (Global Maps). There are three map types:
• Global Maps — Accessible from the button in the large toolbar. The Global Map provides a high-level view of the relationships between all physical and virtual elements in the entire VirtualCenter environment. By selecting or deselecting the boxes on the side of the inventory, you can see which clusters or hosts are most densely populated, which networks are most critical, and which storage devices are being utilized.
Physical, Virtual, and Custom map types exist for both Inventory Maps and Global Maps and are a means of constraining and filtering this information on a VirtualCenter-wide level for the Global Maps.
• Inventory Maps — Accessible from the inventory view. The Inventory Map shows a selected item's relevant host, virtual machine, network, and storage relationships. This makes it easy to understand which items are affected or attached to the item in question. These maps appear for folders, datacenters, clusters, resource pools, and hosts.
Physical, Virtual, and Custom map types exist for both Inventory Maps and Global Maps, and are a means of constraining and filtering this information on a item specific level for the Inventory Maps.
The Maps tab is available when you select a folders, datacenters, clusters, resource pools, hosts, or virtual machines from the inventory panel of the navigation bar.
VC H VC H Resource Group CPU active peak over 5 minutes
VC H VC H Resource Group CPU active peak over 15 minutes
VC H VC H Resource Group CPU active average over 1 minute
VC H VC H Resource Group CPU active average over 5 minutes
VC H VC H Resource Group CPU active average over 15 minutes
Inventory Object Resource
Cluster R Pool VM Host Name Item Measured
www.vmware.com92
C H A P T E R 5 Performing Administrative Tasks
• VMotion Resource Maps — Appears only in the tabs for virtual machines selected in the inventory. In addition to visual representations of the resources (hosts, datastores, and networks) associated with a virtual machine, the VMotion Resource Maps display which hosts in a virtual machine’s cluster or datacenter are candidate hosts to which a virtual machine can migrate. The VMotion map provides information about which hosts are heavily loaded, which are connected to all the same resources that the target virtual machine is connected to, and which hosts have compatible CPU and software with the target virtual machine.
SNMPThe SNMP agent controls a database called the SNMP Management Information Base (MIB), a standard set of statistical and control values.
Using MIBs with Your SNMP TrapsVirtualCenter allows you to configure SNMP version 1 traps for alarm notification of events occurring in VirtualCenter; however, continue to use your ESX Server MIBs for host-related alarms.
The traps defined here are sent typically to other management programs. These management programs need to know how to interpret the SNMP traps sent by VirtualCenter.
To configure your management program to interpret VirtualCenter SNMP traps
1. Download the management information base (MIB) definitions.
• VMWARE-ROOT-MIB.mib
• VMWARE-TRAPS-MIB.mib
The MIB definition files can be found at C:\Program Files\VMware\VMware VirtualCenter\MIBS when the default installation directory is used.
2. Modify your management program to include and interpret the VMware MIBs.
Refer to your management program documentation for information on adding MIB definitions to your program.
A technical note describing the MIB definitions can be found at www.vmware.com/pdf/vc_dbviews_11.pdf.
SNMP Trap and Variable DefinitionsYou can download two groups of SNMP MIB definitions.
93
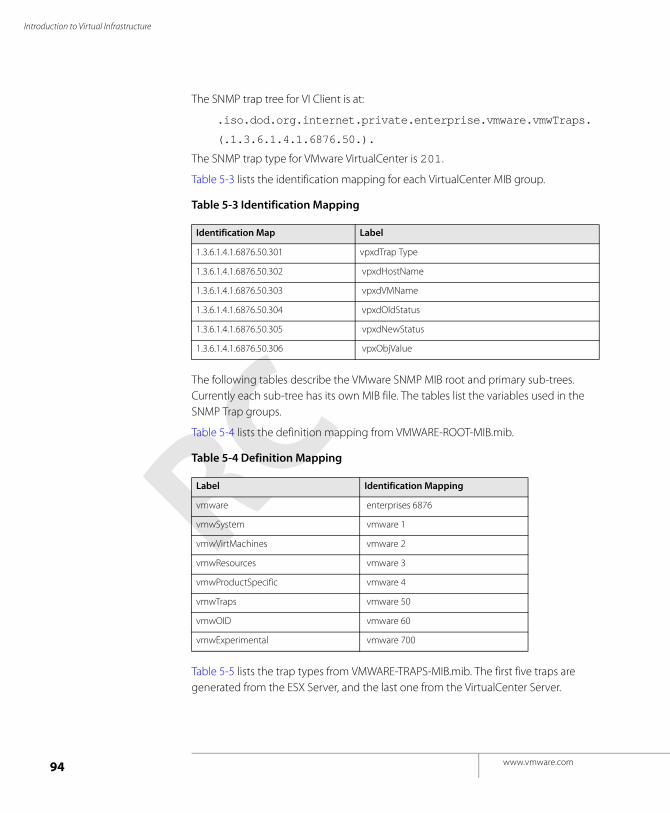
Introduction to Virtual Infrastructure
The SNMP trap tree for VI Client is at:
.iso.dod.org.internet.private.enterprise.vmware.vmwTraps.
(.1.3.6.1.4.1.6876.50.).
The SNMP trap type for VMware VirtualCenter is 201.
Table 5-3 lists the identification mapping for each VirtualCenter MIB group.
Table 5-3 Identification Mapping
The following tables describe the VMware SNMP MIB root and primary sub-trees. Currently each sub-tree has its own MIB file. The tables list the variables used in the SNMP Trap groups.
Table 5-4 lists the definition mapping from VMWARE-ROOT-MIB.mib.
Table 5-4 Definition Mapping
Table 5-5 lists the trap types from VMWARE-TRAPS-MIB.mib. The first five traps are generated from the ESX Server, and the last one from the VirtualCenter Server.
Identification Map Label
1.3.6.1.4.1.6876.50.301 vpxdTrap Type
1.3.6.1.4.1.6876.50.302 vpxdHostName
1.3.6.1.4.1.6876.50.303 vpxdVMName
1.3.6.1.4.1.6876.50.304 vpxdOldStatus
1.3.6.1.4.1.6876.50.305 vpxdNewStatus
1.3.6.1.4.1.6876.50.306 vpxObjValue
Label Identification Mapping
vmware enterprises 6876
vmwSystem vmware 1
vmwVirtMachines vmware 2
vmwResources vmware 3
vmwProductSpecific vmware 4
vmwTraps vmware 50
vmwOID vmware 60
vmwExperimental vmware 700
www.vmware.com94
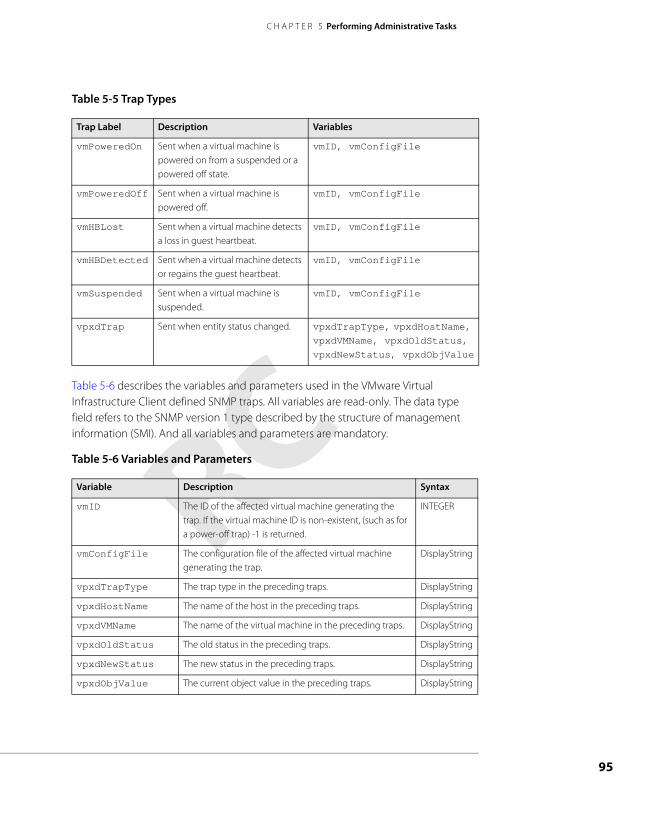
C H A P T E R 5 Performing Administrative Tasks
Table 5-5 Trap Types
Table 5-6 describes the variables and parameters used in the VMware Virtual Infrastructure Client defined SNMP traps. All variables are read-only. The data type field refers to the SNMP version 1 type described by the structure of management information (SMI). And all variables and parameters are mandatory.
Table 5-6 Variables and Parameters
Trap Label Description Variables
vmPoweredOn Sent when a virtual machine is powered on from a suspended or a powered off state.
vmID, vmConfigFile
vmPoweredOff Sent when a virtual machine is powered off.
vmID, vmConfigFile
vmHBLost Sent when a virtual machine detects a loss in guest heartbeat.
vmID, vmConfigFile
vmHBDetected Sent when a virtual machine detects or regains the guest heartbeat.
vmID, vmConfigFile
vmSuspended Sent when a virtual machine is suspended.
vmID, vmConfigFile
vpxdTrap Sent when entity status changed. vpxdTrapType, vpxdHostName, vpxdVMName, vpxdOldStatus, vpxdNewStatus, vpxdObjValue
Variable Description Syntax
vmID The ID of the affected virtual machine generating the trap. If the virtual machine ID is non-existent, (such as for a power-off trap) -1 is returned.
INTEGER
vmConfigFile The configuration file of the affected virtual machine generating the trap.
DisplayString
vpxdTrapType The trap type in the preceding traps. DisplayString
vpxdHostName The name of the host in the preceding traps. DisplayString
vpxdVMName The name of the virtual machine in the preceding traps. DisplayString
vpxdOldStatus The old status in the preceding traps. DisplayString
vpxdNewStatus The new status in the preceding traps. DisplayString
vpxdObjValue The current object value in the preceding traps. DisplayString
95
Introduction to Virtual Infrastructure
Using SNMP to Monitor the Computer Running ESX ServerESX Server ships with an SNMP agent that allows you to monitor the health of the physical machine where ESX Server is running and of virtual machines running on it. This agent is based on Net-SNMP with enhancements to support data specific to ESX Server. Background information on Net-SNMP is available at net-snmp.sourceforge.net.
The ESX Server SNMP agent can be used with any management software that can load and compile a management information base (MIB) in SMIv1 format and can understand SNMPv1 trap messages.
The location of the VMware sub-tree in the SNMP hierarchy is:
.iso.org.dod.internet.private.enterprises.vmware (.1.3.6.1.4.1.6876).
You can choose to use SNMP with or without any ESX Server MIB items.
Information about the Physical ComputerSNMP get variables allow you to monitor a wide variety of items about the physical computer and how virtual machines are using its resources. Some of the key types of information available are:
• Number of CPUs on the physical computer
• CPU resources on the physical computer being used by particular virtual machines
• Amount of RAM installed on the physical computer
• Physical memory used by the service console
• Physical memory used by particular virtual machines
• Physical memory that is not being used
• Usage data for disks on the physical computer, including number of reads and writes and amount of data read and written
• Usage data on the physical computer’s network adapters, including packets sent and received and kilobytes sent and received
• State of the VMkernel (loaded or not loaded)
Note: If the variable showing whether the VMkernel is loaded says no, any values reported for any other variable should be regarded as invalid.
www.vmware.com96
C H A P T E R 5 Performing Administrative Tasks
Information about the Virtual MachinesSNMP get variables allow you to monitor a number of items about particular virtual machines running on the computer. Some of the key types of information available are:
• Path to the virtual machine’s configuration file
• Guest operating system running on the virtual machine
• Amount of memory the virtual machine is configured to use
• State of the virtual machine’s power switch: on or off
• State of the guest operating system: on or off (running or not running)
• Disk adapters seen by the virtual machine
• Network adapters seen by the virtual machine
• Floppy disk drives seen by the virtual machine
• State of the floppy drive: connected or disconnected
• CD-ROM drives seen by the virtual machine
• State of the CD-ROM drive: connected or disconnected
SNMP TrapsFive SNMP traps notify you of critical events in particular virtual machines. The affected virtual machine is identified by ID number and configuration file path. The traps notify you:
• When a virtual machine is powered on or resumed from a suspended state.
• When a virtual machine is powered off.
• When the virtual machine detects a loss of heartbeat in the guest operating system.
• When a virtual machine is suspended.
• When the virtual machine detects that the guest operating system’s heartbeat has started or resumed.
Note: VMware Tools must be installed in the guest operating system to support the traps that detect loss and resumption of the guest’s heartbeat.
Setting Up ESX Server SNMPESX Server SNMP support is a module you can load into a daemon based on the net-snmp package. It is compiled for version 5.0.9.2.30E.19 of that package. That version of net-snmp is installed in the Service Console by default.
97
Introduction to Virtual Infrastructure
Installing the ESX Server SNMP ModuleThe VMware-specific SNMP modules are automatically installed when you install ESX Server. By default on a fresh install, ESX Server components are enabled in SNMP, and VMware traps are always on.
Installing the ESX Server MIB Module
You must make manual changes after upgrading ESX server because the MIB module is not be present in upgrades, only fresh installs. You might also have to make changes after installing third-party management agents because the state of the configuration is unknown.
Configuring the ESX Server Agent from the Service ConsoleThe following procedures must be performed after installing or upgrading third-party management applications.
To enable or disable ESX Server MIB
1. Log into the service console as the root user.
2. Edit the /etc/snmp/snmpd.conf configuration file.
3. Add or remove the following line to enable or disable VMware MIB items:
dlmod SNMPESX /usr/lib/vmware/snmp/libSNMPESX.so
To start the SNMP agents automatically
You can set the SNMP daemon to start automatically whenever ESX Server boots by logging in as the root user in the service console and running the chkconfig command:
chkconfig snmpd on
To start the SNMP agents manually
If you need to start the SNMP agent manually, log in as root in the service console and run the following command:
/etc/rc.d/init.d/snmpd start
By default, the agent starts and runs as background processes.
To enable and disable traps
1. Edit the config.xml file.
The configuration parameter snmp/generateTraps in the /etc/vmware/host/config.xml file determines whether or not to generate a trap. By default, a trap is generated.
2. Restart vmware_hostd for the change to take effect.
www.vmware.com98
C H A P T E R 5 Performing Administrative Tasks
Configuring SNMP Trap DestinationsVMware traps are generated to the destinations specified in the configuration file.
To configure traps
1. Log into the service console as the root user.
2. Modify the /etc/snmp/snmpd.conf file.
3. Using a text editor, add the following line, replacing mercury.solar.com with the name of the host on your network that will receive traps.
trapsink mercury.solar.com
Repeat this line to specify more than one destination.
4. Add the following line, replacing public with a community name of your choice.
Only one instance of this line is allowed:
trapcommunity public
5. Save your changes.
Configuring SNMP Management Client SoftwareTo use your SNMP management software with the ESX Server agent, take the steps needed to accomplish the following:
• In your management software, specify the ESX Server machine as an SNMP-based managed device.
• Set up appropriate community names in the management software. These must correspond to the values set in the master SNMP agent’s configuration file, for example, rocommunity, trapcommunity, and trapsink.
• Load the ESX Server MIBs into the management software so you can view the symbolic names for the ESX Server variables. You can find the MIB files on ESX Server, in the /usr/lib/vmware/snmp/mibs directory.
Configuring SNMP SecurityThe ESX Server SNMP package takes the simplest approach to SNMP security in the default configuration. It sets up a single community with read-only access. This is denoted by the rocommunity configuration parameter in the configuration file for the snmpd daemon, snmpd.conf. You should change this file.
Other enhancements to the SNMP security mechanism allow an administrator to set up a more elaborate permissions scheme. See the snmpd.conf(5) man page for details.
99
Introduction to Virtual Infrastructure
Using SNMP with Guest Operating SystemsTo use SNMP to monitor guest operating systems or applications running in virtual machines, install the SNMP agents you normally would use for that purpose in the guest operating systems. No special configuration is required on ESX Server.
The virtual machine uses its own virtual hardware devices. You should not install agents intended to monitor hardware on the physical computer in the virtual machine.
www.vmware.com100
C H A P T E R 6
Best PracticesThis chapter contains best practices for several different parts of the Virtual Infrastructure. The following sections are included:
• Setup and General Issues on page 102
• Sizing for Optimal Resource Consumption on page 102
• Virtual SMP Best Practices on page 103
• Storage Best Practices on page 104
• Related Publications on page 105
101
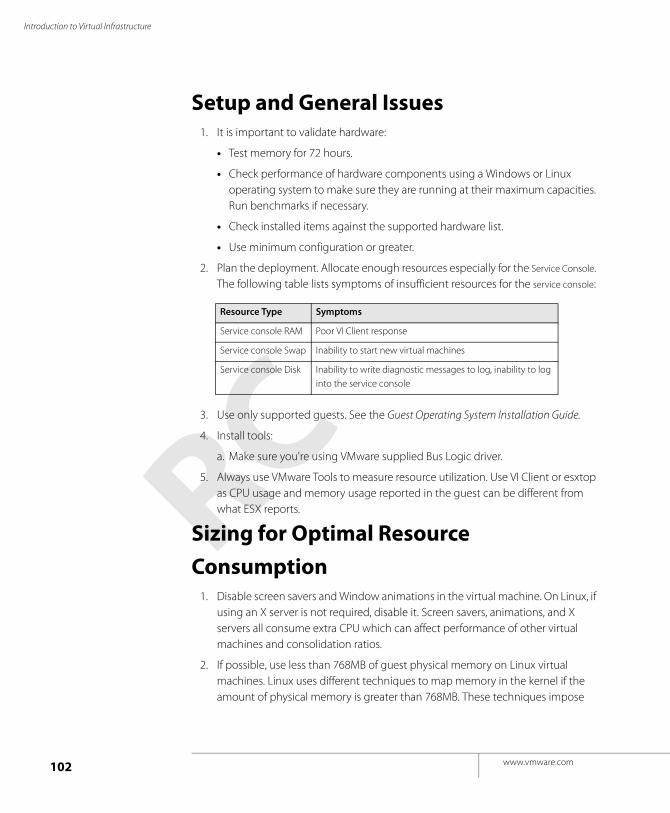
Introduction to Virtual Infrastructure
Setup and General Issues1. It is important to validate hardware:
• Test memory for 72 hours.
• Check performance of hardware components using a Windows or Linux operating system to make sure they are running at their maximum capacities. Run benchmarks if necessary.
• Check installed items against the supported hardware list.
• Use minimum configuration or greater.
2. Plan the deployment. Allocate enough resources especially for the Service Console. The following table lists symptoms of insufficient resources for the service console:
3. Use only supported guests. See the Guest Operating System Installation Guide.
4. Install tools:
a. Make sure you're using VMware supplied Bus Logic driver.
5. Always use VMware Tools to measure resource utilization. Use VI Client or esxtop as CPU usage and memory usage reported in the guest can be different from what ESX reports.
Sizing for Optimal Resource
Consumption1. Disable screen savers and Window animations in the virtual machine. On Linux, if
using an X server is not required, disable it. Screen savers, animations, and X servers all consume extra CPU which can affect performance of other virtual machines and consolidation ratios.
2. If possible, use less than 768MB of guest physical memory on Linux virtual machines. Linux uses different techniques to map memory in the kernel if the amount of physical memory is greater than 768MB. These techniques impose
Resource Type Symptoms
Service console RAM Poor VI Client response
Service console Swap Inability to start new virtual machines
Service console Disk Inability to write diagnostic messages to log, inability to log into the service console
www.vmware.com102
C H A P T E R 6 Best Practices
additional overhead on the virtual machine monitor and can result in degraded performance.
3. Disconnect unused, unnecessary devices:
• COM ports
• LPT ports
• Floppy drives
• CD-ROM drives
• USB adapters
Disabling these devices frees IRQ resources and eliminates IRQ sharing conflicts within the guest operating system that can cause performance problems. Some devices, such as USB, also consume extra CPU because they operate on a polling scheme.
4. Service console programs. Avoid running programs in the service console that consume excessive amounts of CPU or memory. This can adversely affect performance of the virtual machines and VirtualCenter. It's a good idea to periodically monitor service console memory and CPU usage using esxtop.
5. If ESX is overcommitted on memory, virtual machine performance is greatly affected (make sure ESX is not swapping). Due to page sharing and other techniques, ESX server can be overcommitted on memory but not swap. However, if the over-commitment is large and ESX is swapping, performance in the virtual machines is significantly reduced.
6. Schedule backups and anti-virus programs in the virtual machines to run at off-peak hours. In general, it's a good idea to distribute CPU consumption evenly not just across CPUs but also across time. For workloads, such as backups and antivirus where the load is predictable, this is easily achieved by scheduling the jobs appropriately.
Virtual SMP Best Practices1. Use as few virtual CPUs (VCPU) as possible. Don't run single threaded
applications in an SMP virtual machine, for example. Having virtual machines configured with virtual CPUs that are not used still imposes resource requirements on the ESX Servers. The unused virtual CPU still consumes timer interrupts and executes the idle loop of the guest operating system which translates to real CPU consumption from the point of view of the ESX Server. Also, in ESX we try to co-schedule the multiple VCPUs of an SMP virtual machine;
103
Introduction to Virtual Infrastructure
that is, we try to run them together in parallel as much as possible. Having unused VCPUs imposes scheduling constraint on the VCPU that is actually being used and might degrade its performance.
2. If you are running multi-threaded or multi-process applications in an SMP guest, sometimes it may help to pin guest threads or processes to VCPUs. When processes in the guest migrate from one VCPU to another, they incur small virtual overheads. If the migration is very frequent, it may help to pin the process in the guest to a particular VCPU.
Note: Performance for this scenario has been improved in ESX Server 3.
3. Monitor idle loop spin parameter. Certain guest operating systems do not actually halt the virtual CPU when they idle. Since the virtual CPU is not halted, ESX will continue to run and schedule this virtual CPU as if it were still doing useful work. To prevent such unneeded CPU consumption, ESX detects that a guest VCPU is attempting to idle and deschedules it. The detection heuristic is controlled by the idle loop spin parameter and can sometimes affect performance. See Related Publications on page 105.
Storage Best Practices1. Backend storage configuration greatly affects performance:
• See ESX SAN best practices
• See to NFS SAN best practices
• See to iSCSI SAN best practices
Lots of workloads are very sensitive to the latency of I/O operations; therefore, it's very important to have the storage device configured correctly. This is a vast area that depends on workload, hardware, vendor, RAID levels, cache sizes, stripe sizes, and so on. Consult the appropriate documentation from VMware as well as the storage vendor.
2. Make sure I/O is not queueing up in the vmkernel by checking the number of queued commands reported by esxtop. If queueing, then try to adjust queue depths. See Related Publications on page 105.
www.vmware.com104
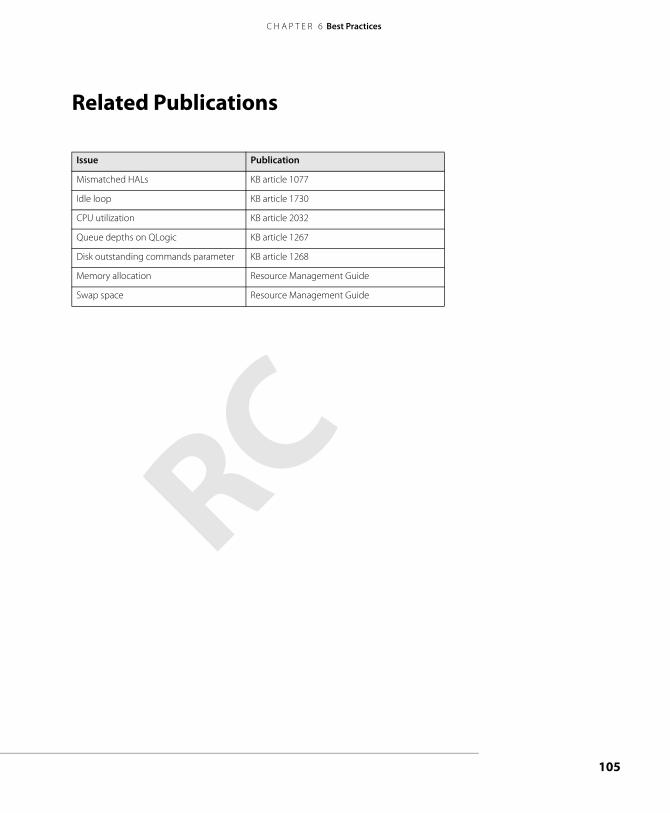
C H A P T E R 6 Best Practices
Related Publications
Issue Publication
Mismatched HALs KB article 1077
Idle loop KB article 1730
CPU utilization KB article 2032
Queue depths on QLogic KB article 1267
Disk outstanding commands parameter KB article 1268
Memory allocation Resource Management Guide
Swap space Resource Management Guide
105

Introduction to Virtual Infrastructure
www.vmware.com106